
Are you getting interested to remove or uninstall Android Studio On PC ( Windows 7, 8, 10, and Mac )? but how to, after it still having files in C: drive? With this article, you will able to delete or kick out all of those files also after uninstalling Android Studio.
Are you bored, or tired of using Android Studio? Now, wanna kick-off this software from your PC ( Windows 7, 8, 10, and Mac )? There is no condition to follow up before installing, so, you can remove it without getting any confusion about it.
There are 10 methods that users can adapt if they want to uninstall Android Studio:
Method #1
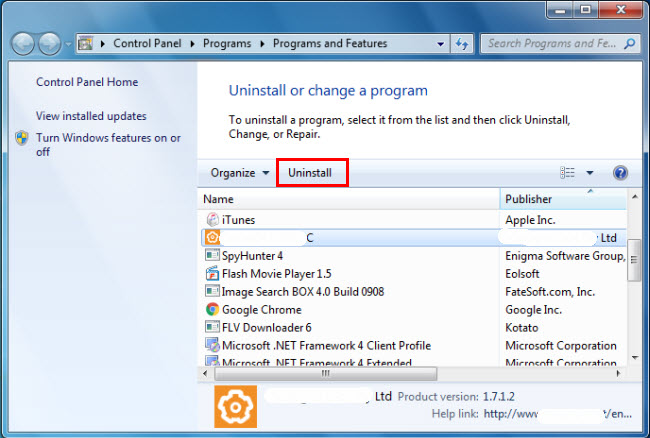
- Go to Start Menu, then click on the Control Panel.
- In Control Panel, under programs, go through the list of the ones that are installed on your computer
- Right-click on Android Studio, and then click on uninstall a program
- Follow the prompt on the screen, and you will get to see a progress bar that will take you to remove the Android Studio from the computer.


Method #2
The second method involves uninstaller.exe, through which Android Studio can be uninstalled. Just follow the instructions below to execute this step:
- Go to the installation folder of Android Studio.
- Find a file that is named as uninstall.exe or unins000.exe
- Double click on the file, and then follow the wizard’s instructions that appear on the screen.


Method #3
The third method involves System Restore. For those who don’t know, System Restore is a utility, which helps the user restore their system to its previous state. System Restore removes all those programs, which interfere with the operation and performance of the computer.


If you have created a system restore point before you installed Android Studio, then you can use this software to restore the system, and remove such unwanted programs. However, before you do so, make sure that you save all the important data.
Follow the steps below to know more from this method:
- Close all the files and programs, which are currently running on your PC
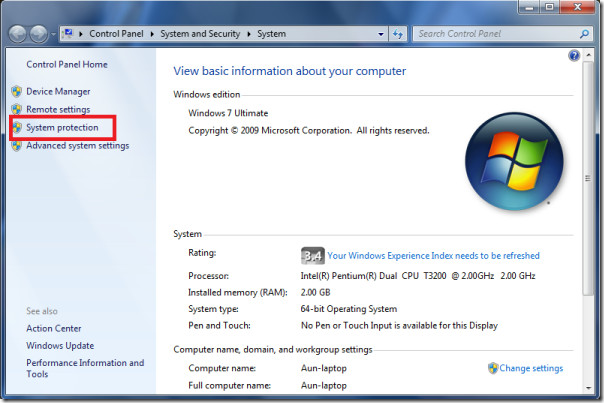
- Open Computer from the desktop, and then select Properties
- System Window will open
- On the left side and click to System Protection
- System Properties will open.
- Then do click on the option of System Restore, and a new window will again open.
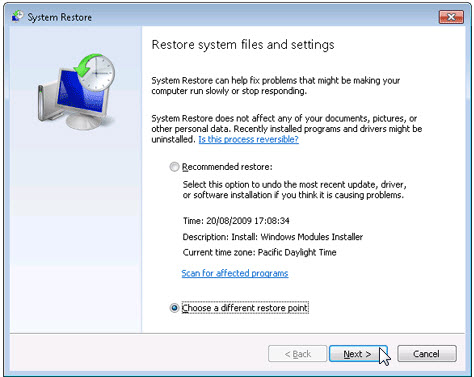
- Now, choose the ‘different restore point’ option, and click on Next.
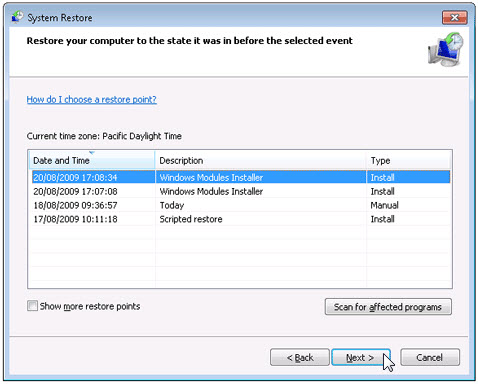
- You have to select a date and time from the given options; when you select a date, the drivers that you installed after the chosen date won’t work.
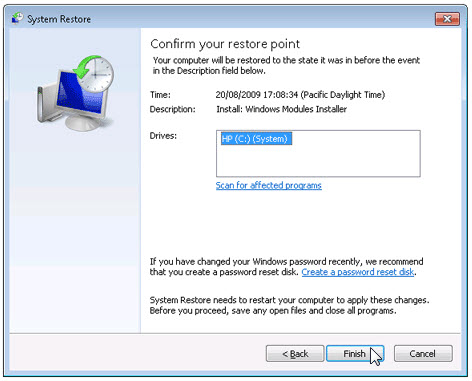
- Click on Finish and then Confirm the ‘Restore Point’ on the screen.
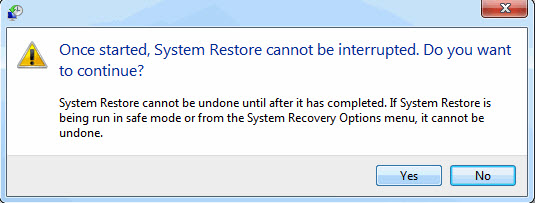
- When you click Yes to confirm, the Android Studio would be uninstalled.
Method #4
If you have an antivirus, then you can use it to uninstall Android Studio.
There is much malware or Android Studio software in the computer applications that we download nowadays. They have become very difficult to remove from the system, like Trojan and spyware.
If you cannot remove Android Studio with the above methods.
It means that there is malware or Android Studio in it, and only a good antivirus can be used for removing it.
You can either download Norton Antivirus or AVG antivirus, as these are reputable software and will surely remove the malware, Android Studio on the system.

If the files that are required for uninstalling the software are corrupted, then it is best to reinstall Android Studio.
- Once you have reinstalled the program, then you will get access to non-corrupted files, and it will become very easy to uninstall it.
- Simply go to Control Panel once Android Studio is installed, and then remove it from there.
Method #6
If you want to uninstall Android Studio, then you can do so using Command Displayed in the Registry. A registry is a place where all the settings of Windows, along with information, are stored. This also includes the command to uninstall a software or program. You can try this method with Android Studio as well, but it is a very risky method. If you make any mistake and delete the wrong information, then the system is most likely to crash. It would become difficult for you to bring it back from deletion.

To execute this method, To follow the steps given below:
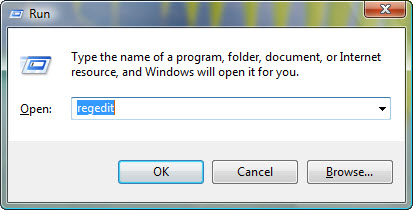
- Hold Windows + R together, and then Run command
- When the command box opens, type Regedit in the box and then click on OK
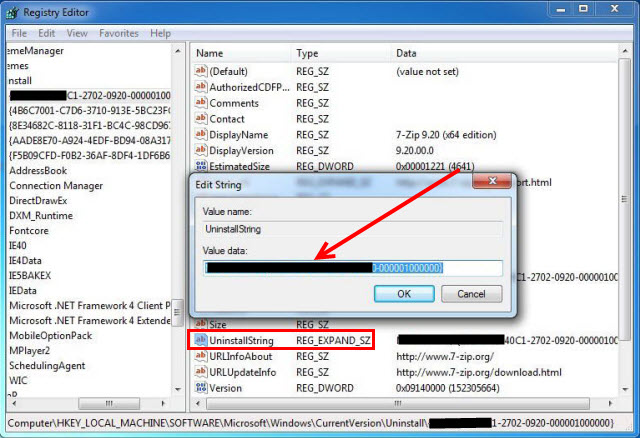
- You have to navigate and find the registry key for the Android Studio
- You will see an uninstall string on the next window; double click on it, and also copy ‘Value Data’
- Again hold Windows + R keys, and run the Command; paste the value data that you just copy and click on OK
Follow the wizard that comes on screen and then uninstall Android Studio.
Method #7
The seventh method is to uninstall the Android Studio using a third-party uninstaller.
At times, those who don’t have any knowledge of computer language, won’t be able to manually uninstall the software fully.
There are many files that occupy the hard disk of the computer, so it is best to use third-party software to uninstall them.

Method #8
There are some codes that users can type into the command prompt, and they would be able to uninstall the Android Studio. For example, if they want to remove the package, then just type
sudo apt-get remove Android Studio
If you want to uninstall the Android Studio and its dependencies as well, then type:
sudo apt-get remove –auto-remove Android Studio
For those who don’t know, some of the dependencies of Android Studio are GCC-5, libc6, libgcc1, Android Studio–dev, and gc++-5.

Method #9
If the user wants to remove the configuration and data files of Android Studio, then they need to run the following code on the Command Prompt:
sudo apt-get purge Android Studio

Method # 10
It depends on you that are you willing to kick-out the data or you want to remove the configuration data or data files, along with the dependencies, then the following code is most likely to work for you:
sudo apt-get auto remove -purge Android Studio

To uninstall Android Studio on mac because anytime we need space or only want to remove from pc due to some viruses and also many problems which are need to remove or uninstall from pc. so I will show you some steps of uninstalling Android Studio on mac so follow my this step or method if you have still confusion so you may contact with us for uninstall of Android Studio on pc or mac.
How to Uninstall Android Studio on Mac?
For uninstalling Android Studio on mac so as I told you that there is a simple method to uninstall apps on mac. As there are installed some apps on your Mac and now you want to remove or uninstall from your pc successfully and want to install some other apps on my mac so follow my these steps to uninstall Android Studio on mac.
Method #1
In the method 1, you have to open mac on your pc as I’m showing in image follow the images to uninstall Android Studio on you mac.

In the image there is Android Studio app on your mac dashboard and now we have to uninstall it from our mac now we will uninstall this app and will remove it in of mac now double-click-on-app showing in image.

- Now you double-clicked on app mac will ask that are you sure to uninstall Android Studio click on Delete button so go to Trash of mac to uninstall completely from mac.
- Showing in image trash bin click on trash bin and go inside there will be Android Studio which we had delete before so have to uninstall completely from mac.

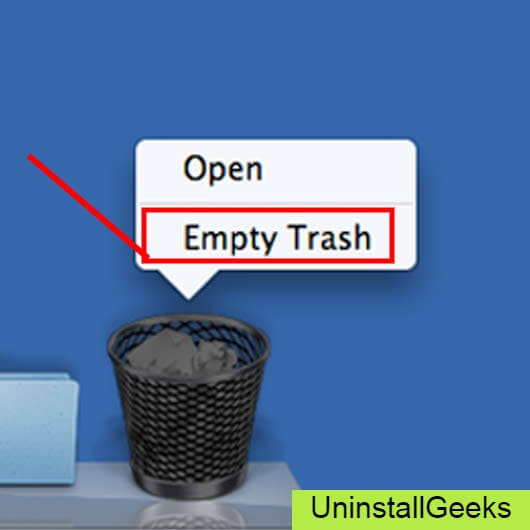
- Not right-click on trash to remove all data or app which we had uninstalled before see in image. Click on Empty Trash the whole data which is in trash will auto remove successfully.
- Now we uninstalled Android Studio on mac so as you see that how to uninstall or remove any app on mac so tif you liked this so share once.
This method don’t required any antivirus or uninstaller software from them we are to uninstall. I described only simple one method of uninstalling Android Studio on mac.
This method more people are using but some people take it is too hard uninstalling in mac but in this step anyone can understand this simple method.
How To Install?
For those who don’t know much about Android Studio, they might lean more towards uninstalling it. These Android Studio create an environment, where users can create a high GPU-accelerated application. If you want to install this Android Studio, then make sure that your system is compatible with it.
- Firstly, verify that the system you are using has an Android Studio capable GPU, and then download the Android Studio.
- Install it, and then test that the software runs smoothly on the system.
If it doesn’t run smoothly, then it could be because its communication with the hardware is corrupted.


Recommended Softwares To Uninstall:
- How To Uninstall Chromium In PC
- How To Uninstall Microsoft Edge In PC
- How To Uninstall Nvidia Cuda Toolkit In PC
- How To Uninstall Avast In PC
- How To Uninstall Google Chrome In PC
- How To Uninstall Python In PC
- How To Uninstall Internet Explorer In PC
- How To Uninstall Adobe Creative Cloud In PC
- How To Uninstall Skype for Business
- How To Uninstall Discord In PC
- How To Uninstall Avast Premium Security In PC
- How To Uninstall Skype On PC
Conclusion
There are other methods of uninstalling the Android Studio as well as in pc or windows, but these could be difficult for those, who don’t have much technical expertise.
Execute these methods, and they will surely work. These methods don’t require the user to have much knowledge of the technical side of an operating system. They can follow simple steps and uninstall Android Studio.
To remove Android Studio from Windows, you must follow these steps: Right-click on Start and then click “All Programs”, and then select “Uninstall”. Next, double-click on the app, and then follow the instructions to uninstall. Afterward, restart your computer. Locate the remaining files of Android Studio and delete them. To do so, locate and delete the following keys: HKEY_CURRENT_USERSoftware, HKEY_LOCAL_MACHAVE, and HKEY_CURRENT_USERSSoftware.
Run PowerMyMac’s Uninstaller. This application has been developed to easily and thoroughly uninstall Android Studio, including its associated files. PowerMyMac’s uninstaller is the most popular way to remove apps. It is also faster, convenient, and more effective than other methods. When using the uninstaller, it is important to remove all files associated with the app, as leaving them on your computer could lead to a slowdown of your PC.
You can also choose to uninstall Android Studio by using the command displayed in the Windows registry. Windows registry stores information and settings, including software uninstall commands. However, this method is risky and can result in a system crash. You can uninstall Android Studio by using the registry, but this is a risky option. It’s important to back up your system before performing this method, as it can lead to a complete system crash. You can also use a third-party uninstaller if you’re not confident with the registry.
How Do I Completely Remove Android SDK?
Once you have uninstalled the Android SDK, you may wonder how to completely remove the files that it leaves behind. These components are usually located in /System/Library/Extensions or in hidden files in your home folder. Fortunately, these files are usually small and easy to delete. However, if you find one of these files, you can manually delete it from your computer. To do this, you must first open the folder in question and then run a Terminal command.
Next, you should find the Android SDK application in the Applications folder in Finder. Type its name in the search bar to find it. Once you find it, click on its icon and drag it to the Trash. Alternatively, you can also press Cmd + Del to move the icon to the Trash. You can also select the folder itself and choose Move to Trash from the File menu. Afterward, move the Android SDK folder to the Trash by clicking on it and choosing “Move to Trash”.
Where is Uninstall EXE Android Studio?
First, let’s see how to uninstall Android Studio. This program has several files on your computer and requires that you use libc6, GCC-5, or gc++-5 to run. If you want to uninstall it, you can use third-party software. To uninstall Android Studio, follow the steps below. Note: Before attempting to uninstall Android Studio, it is recommended to backup your important data.
Locate the app in the Start Menu > Applications >> Programs and Features>Software. Double-click on the application to open it. Choose ‘Software and Updates’. Then, select Android studio from the list and click on the remove and authenticate box. After that, you can uninstall it. Make sure to reboot your computer after removing the program. You can also run ‘killall wingpanel’ in the terminal to clear out the program from your computer.
Next, you’ll have to uninstall the remaining files created by Android Studio. To find the rest of these files, run Funter on your Mac. This app can find system hidden files in any location. Select the Android Studio app and click ‘Uninstall’ to uninstall the remaining files. Once all these files have been removed, you’ll be able to uninstall Android Studio. If you don’t know how to do this, consult a professional.
Can Not Find Android Studio Uninstall EXE?
If you can’t find Android Studio’s uninstaller, you can try a few things. First, restart your computer. You will need to replace the username with your Windows account. C:Users will list all users on your system. Next, double-click UninstallString and copy the Value Data. After that, click OK to close the box. Follow the wizard to uninstall Android Studio.
To remove Android Studio, open the Settings > Programs and Features menu. In the Default folder, type “android studio” to clear all settings. You’ll have to change the Path property to the correct location. You will also need to change the ‘ADB’ path. If this step does not fix the problem, reboot your computer. If you have administrator privileges, run the EMDK installer.
How Do I Reinstall Android Studio?
To reinstall Android Studio, you first need to stop using it and restart your computer. You will also need to replace the user name with your Windows account. To find this user name, open C:Users and then choose your Windows account. You can then click on the “Application Data” tab to see all the files that were created with Android Studio. After logging in to your Windows account, select the “Android Studio” folder and then click on “Remove” to remove it.
After deleting the Android Studio app from the Applications folder, open the app’s file manager and click on “Remove”. Then, select the app and click “Remove.” You can also check whether Android Studio has left behind any service files or cookies. Once you remove these, simply click “Delete” to delete the files. If you’ve accidentally removed the app, don’t worry. You can also reinstall it directly from the app.
How Do I Uninstall an Exe File?
If you’ve recently installed Android Studio, you may be wondering how to remove the.exe file from your system. The good news is that there’s a simple way to do so. By installing the Android Studio Uninstaller, you can remove the program without any hassle. However, if you’re using Windows, you can also choose to uninstall a program manually. To uninstall an application, select it and click ‘uninstall’. It is important to remember that uninstalling an app from your system is not the same as deleting it. By uninstalling an app, you are removing it completely from your device, while deleting it removes its data from your system.
Manually uninstalling the Android Studio application requires patience and thoroughness, but you can still do it. However, manual uninstalling cannot guarantee that the program will completely uninstall itself. Incomplete uninstallation may leave invalid items in your computer’s registry, and this will decrease the speed of your computer. Furthermore, removing a program from your computer’s hard drive can result in many useless files that will occupy your hard disk and reduce PC speed. Therefore, it’s a better idea to use a third-party uninstaller to scan your system for Android Studio files and remove them for good.
How Do I Force Uninstall a Program on Windows 10?
If you are unsure how to force uninstall Android Studio on Windows 10, you can use System Restore. This will let you restore your system to a previous time before any programs were installed. To force uninstall Android Studio, you must first perform a full system restore. Next, you must choose a different restore point to force the application to be removed. Click the “Choose a different restore point” button and confirm.
First, select the program you’d like to uninstall from the list and then click on “Run as administrator.” Then, select “Uninstall Programs and Features.” Once this is complete, you can restart your computer and scan for any remaining files. Once you’ve scanned the system, click on the green Scan Leftover button to remove any unwanted files. If you still don’t see any files, try reinstalling the program.
After selecting the date and time you want to restore your system, open System Restore. Click on “Choose a restore point” and choose a different one. This may not work if you installed the program after the date and time you selected. Afterwards, you’ll have to reinstall the app. It may take some time, so be patient. The process can take several minutes.
Why Android Studio is Not Opening?
If you’re wondering why Android Studio is not opening properly, you may be experiencing some problem with JDK 11 and the signing of your keys. If this is the case, the first step to take is to uncheck the “Android-SDK Platform-Tools” check box. This will prevent the studio from opening. It will also try to sanitize your previous.vmoptions file, which may have caused the problem.
Another problem that may cause Android Studio to not open is that your computer does not have the Java SDK installed. The SDK is provided by Oracle, so reinstalling Java may fix the problem. Third-party applications may need administrative permission to run, so running them in compatibility mode may fix the problem. Once you’ve done this, reopen Android Studio and test it. If all these steps don’t work, try reinstalling Android Studio.
Another common cause of Android Studio to not open is when it detects that a dependency is missing. If you’re using the Hilt plugin to unit test an app, you may be experiencing this issue. Hilt fails to instrument app classes and is unable to handle dependency injection. AGP 7.1.1 has a fix for this problem. This may take some time to fix, but it’s worth a try!
Learn More Here:
1.) Android Help Center
2.) Android – Wikipedia
3.) Android Versions
4.) Android Guides
In this article, we will learn how to uninstall Android Studio from Windows. This article is the right method to completely uninstall Android Studio without any problems. Android Studio provides a lot of superb features that enhance productivity when building Android apps.
Uninstall Android Studio using uninstaller.exe
Most computer applications have uninstall.exe in their installation folders. You need to complete these files in Ornament to start the uninstallation process.
Open the installation directory of Android Studio. It is in C:\Programs files or C:\Program files(x86).
Locate uninstall.exe
Double-click on this file to start the uninstallation process.

Android Studio uninstalls the wizard, and it will ask for confirmation.
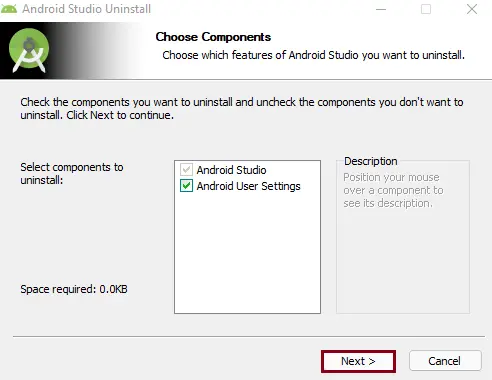
Here, you need to select what you need to uninstall. Android Studio is by default selected, and the second is Android User Settings, which is basically a directory that encompasses your saved Android Virtual Devices, Android SDK caches, and potentially application signing key stores. Select Next
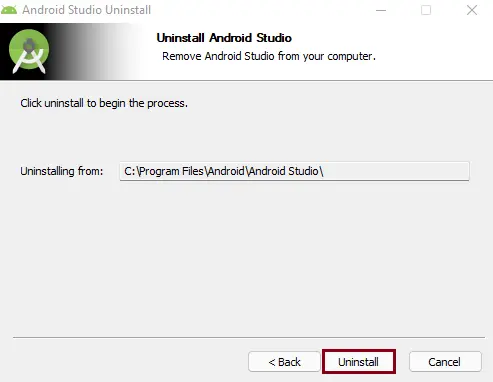
Uninstall Android Studio; just select the Uninstall button to start the process and wait for the uninstallation to complete.
This will remove the Android Studio folder from program files; click yes.
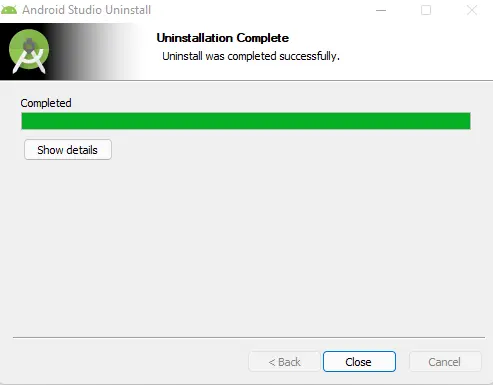
Uninstall was completed successfully.
Uninstall Android Studio using Apps & features
Click on the Windows search button, and then type apps & features.
Open apps & features.
Look for Android Studio in the list, and then click on it. Select the Uninstall button twice so you can initiate the uninstallation.
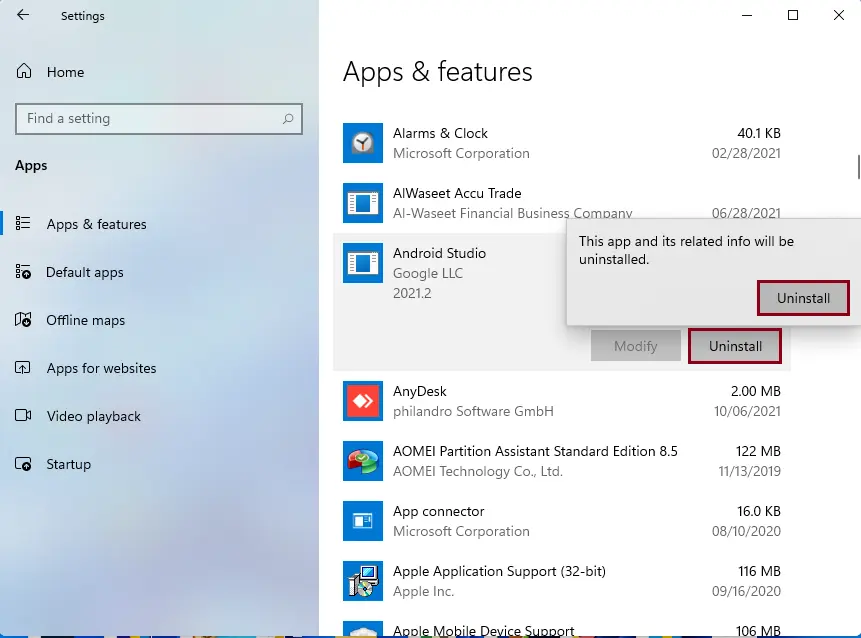
Follow the steps to uninstall android studio
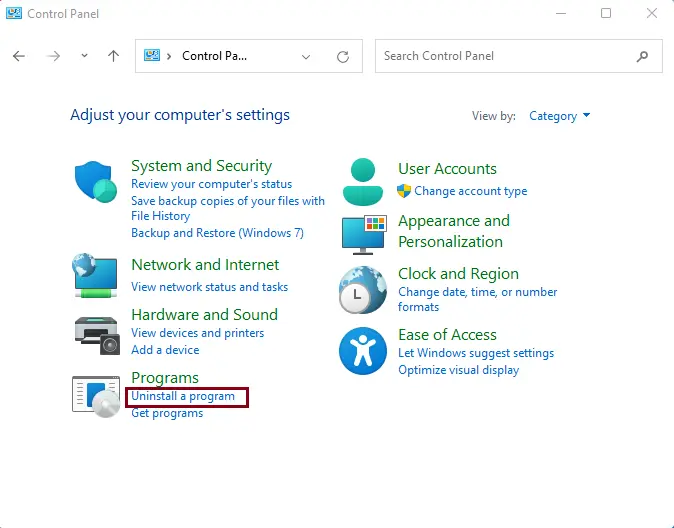
Uninstalling Android Studio via Control Panel
Type Control panel in the window run box, and then hit enter. Control Panel will appear.
Click on the Uninstall a Program link.
Find the Android Studio form program and features. Click on Android Studio here, and then click on uninstall.
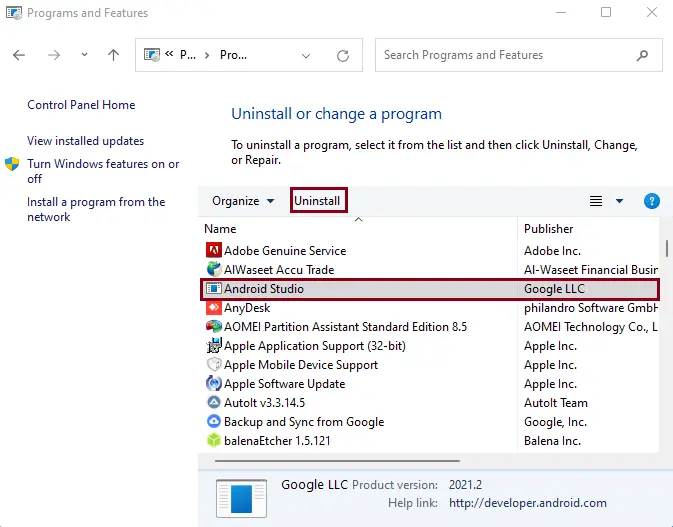
Follow the steps to remove Android Studio So we have completely removed Android Studio from the PC. Now, if you need to, you can do a clean installation. You may refer to the article.
Follow my other article on how to Uninstall Nox Player
Jamilhttp://jamiltech.com
A Professional Technology Blog Writer | An energetic professional with more than 20+ years of rich experience in Technology, Planning, Designing, Installation, and Networking.
Are you in need of uninstalling Android Studio to fix some problems? Are you looking for an effective solution to completely uninstall it and thoroughly delete all of its files out of your PC? No worry! This page provides detailed instructions on how to completely uninstall Android Studio.
Possible problems when you uninstall Android Studio
* Android Studio is not listed in Programs and Features.
* You do not have sufficient access to uninstall Android Studio.
* A file required for this uninstallation to complete could not be run.
* An error has occurred. Not all of the files were successfully uninstalled.
* Another process that is using the file stops Android Studio being uninstalled.
* Files and folders of Android Studio can be found in the hard disk after the uninstallation.
Android Studio cannot be uninstalled due to many other problems. An incomplete uninstallation of Android Studio may also cause many problems. So, it’s really important to completely uninstall Android Studio and remove all of its files.
How to Uninstall Android Studio Completley?
Method 1: Uninstall Android Studio via Programs and Features.
When a new piece of program is installed on your system, that program is added to the list in Programs and Features. When you want to uninstall the program, you can go to the Programs and Features to uninstall it. So when you want to uninstall Android Studio, the first solution is to uninstall it via Programs and Features.
Steps:
a. Open Programs and Features.
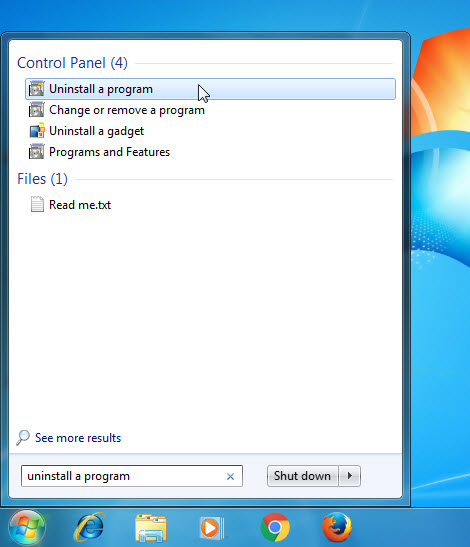
Windows Vista and Windows 7
Click Start, type uninstall a program in the Search programs and files box and then click the result.
Windows 8, Windows 8.1 and Windows 10
Open WinX menu by holding Windows and X keys together, and then click Programs and Features.
b. Look for Android Studio in the list, click on it and then click Uninstall to initiate the uninstallation.
Method 2: Uninstall Android Studio with its uninstaller.exe.
Most of computer programs have an executable file named uninst000.exe or uninstall.exe or something along these lines. You can find this files in the installation folder of Android Studio.
Steps:
a. Go to the installation folder of Android Studio.
b. Find uninstall.exe or unins000.exe.
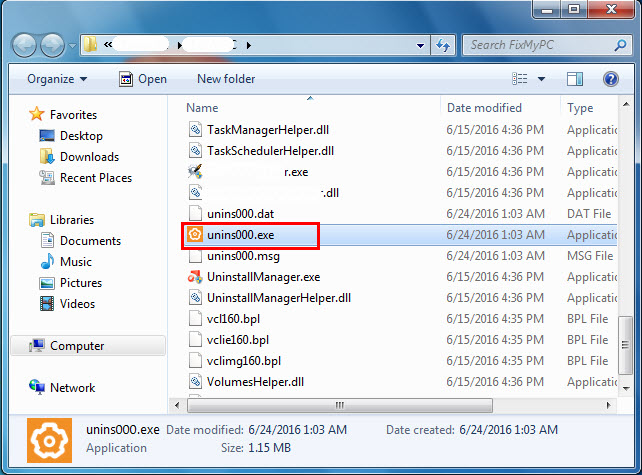
c. Double click on its uninstaller and follow the wizard to uninstall Android Studio.
Method 3: Uninstall Android Studio via System Restore.
System Restore is a utility which comes with Windows operating systems and helps computer users restore the system to a previous state and remove programs interfering with the operation of the computer. If you have created a system restore point prior to installing a program, then you can use System Restore to restore your system and completely eradicate the unwanted programs like Android Studio. You should backup your personal files and data before doing a System Restore.
Steps:
a. Close all files and programs that are open.
b. On the desktop, right click Computer and select Properties. The system window will display.
c. On the left side of the System window, click System protection. The System Properties window will display.
d. Click System Restore and the System Restore window will display.
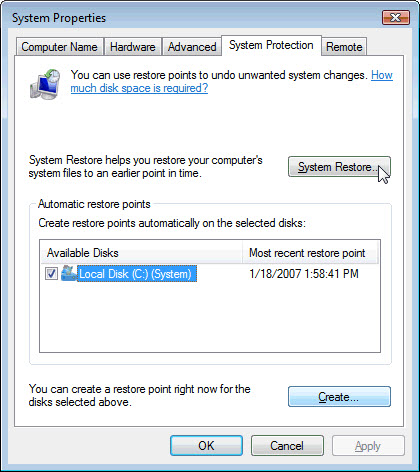
e. Select Choose a different restore point and click Next.
f. Select a date and time from the list and then click Next. You should know that all programs and drivers installed after the selected date and time may not work properly and may need to be re-installed.
g. Click Finish when the «Confirm your restore point» window appears.
h. Click Yes to confirm again.
Method 4: Uninstall Android Studio with Antivirus.
Nowadays, computer malware appear like common computer applications but they are much more difficult to remove from the computer. Such malware get into the computer with the help of Trojans and spyware. Other computer malware like adware programs or potentially unwanted programs are also very difficult to remove. They usually get installed on your system by bundling with freeware software like video recording, games or PDF convertors. They can easily bypass the detection of the antivirus programs on your system. If you cannot remove Android Studio like other programs, then it’s worth checking whether it’s a malware or not.
Method 5: Reinstall Android Studio to Uninstall.
When the file required to uninstall Android Studio is corrupted or missing, it will not be able to uninstall the program. In such circumstance, reinstalling Android Studio may do the trick. Run the installer either in the original disk or the download file to reinstall the program again. Sometimes, the installer may allow you to repair or uninstall the program as well.
Method 6: Use the Uninstall Command Displayed in the Registry.
When a program is installed on the computer, Windows will save its settings and information in the registry, including the uninstall command to uninstall the program. You can try this method to uninstall Android Studio. Please carefully edit the registry, because any mistake there may make your system crash.
Steps:
a. Hold Windows and R keys to open the Run command, type in regedit in the box and click OK.
b. Navigate the following registry key and find the one of Android Studio:
HKEY_LOCAL_MACHINE\SOFTWARE\Microsoft\Windows\CurrentVersion\Uninstall
c. Double click on the UninstallString value, and copy its Value Data.
d. Hold Windows and R keys to open the Run command, paste the Value Data in the box and click OK.
e. Follow the wizard to uninstall Android Studio.
Method 7: Uninstall Android Studio with Third-party Uninstaller.
The manual uninstallation of Android Studio requires computer know-how and patience to accomplish. And no one can promise the manual uninstallation will completely uninstall Android Studio and remove all of its files. And an incomplete uninstallation will many useless and invalid items in the registry and affect your computer performance in a bad way. Too many useless files also occupy the free space of your hard disk and slow down your PC speed. So, it’s recommended that you uninstall Android Studio with a trusted third-party uninstaller which can scan your system, identify all files of Android Studio and completely remove them. Download this powerful third-party uninstaller below.
Как полностью удалить Android Studio из Windows (v10)?
Я уже видел этот вопрос. Но это для Mac OS. Я использую окна. Каждый раз, когда я создаю новый проект или пытаюсь build/rebuild проект замерзает! Я установил последнюю версию (9/10/2016). Но все ухудшается. Я хочу полностью удалить его и установить, как если бы я впервые установил его. Любая помощь должна быть оценена.
zerobyzero 10 окт. 2016, в 10:40
Поделиться
используйте IOBit Uninstaller, затем Uninstall, а затем Powerfull scan и удалите все
Nikunj Paradva 10 окт. 2016, в 07:51
@NikunjParadva Могу ли я быть уверен, что это не нанесет (отредактирует) вред другим программным системам?
log0 10 окт. 2016, в 07:54
@AmirHasan ты видел мой ответ ниже ??
Ironman 10 окт. 2016, в 08:17
Показать ещё 1 комментарий
Поделиться:
android-studio
2 ответа
Лучший ответ
Полностью удалить Android Studio из Windows:
Шаг 1. Запустите деинсталлятор Android Studio
Первым шагом является запуск деинсталлятора. Откройте Панель управления и в разделе Программы выберите Удалить программу. После этого нажмите «Android Studio» и нажмите Удалить. Если у вас несколько версий, удалите их также.
Шаг 2: Удалите файлы Android Studio
Чтобы удалить все остатки файлов настроек Android Studio в Проводнике файлов, перейдите в свою папку пользователя ( %USERPROFILE% ) и удалите .android , .AndroidStudio и любые аналогичные каталоги с версиями на конце, то есть .AndroidStudio1.2 , а также .gradle и .m2 , если они существуют.
Затем перейдите к %APPDATA% и удалите каталог JetBrains .
Наконец, перейдите в C:\Program Files и удалите каталог Android .
Шаг 3: Удалите SDK
Чтобы удалить остатки SDK, перейдите к %LOCALAPPDATA% и удалите каталог Android .
Шаг 4: Удалите проекты Android Studio
Android Studio создает проекты в папке %USERPROFILE%\AndroidStudioProjects , которую вы можете удалить.
Как полностью удалить Android Studio из Windows (v10)?
Android Studio — это специализированная интегрированная среда разработки (IDE) для создания приложений под платформу Android. Однако, иногда возникает необходимость удалить Android Studio полностью из Windows 10. В этой статье мы рассмотрим пошаговую инструкцию по удалению Android Studio из операционной системы Windows 10.
Шаг 1: Закрыть Android Studio и эмуляторы
Прежде чем удалить Android Studio с компьютера, необходимо убедиться, что все экземпляры Android Studio, эмуляторы и связанные процессы полностью завершены. Закройте все открытые проекты и окна эмулятора Android.
Шаг 2: Удалить Android Studio
- Откройте «Панель управления» в Windows 10.
- Выберите раздел «Программы и компоненты» или «Установка и удаление программ».
- Найдите «Android Studio» в списке установленного программного обеспечения.
- Щелкните правой кнопкой мыши на «Android Studio» и выберите «Удалить» или «Изменить/Удалить».
- Следуйте инструкциям на экране для завершения процесса удаления.
Шаг 3: Удалить дополнительные компоненты
После удаления Android Studio появляется необходимость удалить оставшиеся компоненты, которые могли быть установлены в процессе использования Android Studio.
- Откройте проводник Windows и перейдите в папку «Users» (Пользователи).
- Найдите и удалите папку «.android», которая содержит настройки эмулятора Android.
- Найдите и удалите папку «.AndroidStudioX.X» (где «X.X» представляет собой версию Android Studio), которая содержит настройки самой среды разработки.
- Перейдите в папку «C:\Users\ваше_имя_пользователя\AppData\Local» и удалите папку «Android».
- Перейдите в папку «C:\Users\ваше_имя_пользователя\AppData\Roaming» и удалите папку «Google» и «JetBrains».
Шаг 4: Удалить Android Virtual Devices (AVD)
Если вы использовали эмуляторы Android Studio, вам также следует удалить Android Virtual Devices (AVD) вручную.
- Откройте Android Studio AVD Manager.
- Выберите AVD, которые вы хотите удалить.
- Щелкните правой кнопкой мыши на выбранные AVD и выберите «Удалить».
- Подтвердите удаление.
Шаг 5: Очистить системный путь
Android Studio может добавить несколько путей к системному пути операционной системы Windows. Не все эти пути удаляются автоматически при удалении Android Studio. Для полной очистки системного пути выполните следующее:
- Нажмите правой кнопкой мыши на значок «Пуск» и выберите «Свойства».
- Нажмите на «Дополнительные параметры системы».
- В окне «Свойства системы» выберите вкладку «Дополнительно».
- Нажмите на кнопку «Переменные среды».
- В разделе «Пользовательские переменные» найдите переменную «Path».
- Выберите эту переменную и нажмите на кнопку «Изменить».
- Удалите все пути, связанные с Android Studio, из значения переменной «Path».
- Нажмите на кнопку «ОК» во всех открытых окнах для сохранения изменений.
Вывод
Полное удаление Android Studio с компьютера включает удаление самой программы, очистку оставшихся компонентов и очистку системного пути. Следуя этой пошаговой инструкции, вы удалите Android Studio полностью из операционной системы Windows 10.
Как полностью удалить Android Studio в Windows?
Android Studio — это официальная IDE (интегрированная среда разработки) для разработки приложений для Android, основанная на программном обеспечении IntelliJ IDEA от JetBrains . Android Studio предоставляет множество отличных функций, повышающих производительность при создании приложений для Android. Возможно, вы столкнулись с некоторыми проблемами или ошибками при использовании Android Studio, так что не бойтесь, в этой статье мы узнаем, как полностью удалить Android Studio в Windows.
Пошаговая реализация
Шаг 1. Удаление через панель управления
Найдите Панель управления в окне «Пуск», появится Панель управления, затем нажмите на нее.
Откроется окно панели управления, затем нажмите « Удалить программу».
После нажатия на нее будут перечислены все программы, установленные в нашей системе. Найдите здесь студию Android и дважды щелкните по ней.
Затем он запросит подтверждение, нажмите «Да». Появится новое диалоговое окно.
Здесь, под таблицей, вы можете выбрать то, что хотите удалить. Android Studio по умолчанию отмечен, а во-вторых, это пользовательские настройки Android , которые в основном представляют собой папку, содержащую ваши сохраненные виртуальные устройства Android (AVD), кэши Android SDK и, возможно, хранилища ключей для подписи приложений. Здесь мы выполняем полное удаление, поэтому мы проверим оба и затем нажмем « Далее». Затем снова откроется новое диалоговое окно, просто нажмите «Удалить», чтобы начать процесс, и дождитесь завершения удаления.
Шаг 2. Удалите файлы Android Studio
Чтобы удалить все файлы настроек Android Studio, перейдите в папку пользователя в файловом менеджере C:UsersYour_UserName или вы можете просто выполнить поиск %USERPROFILE% в начале окна и нажать Enter , чтобы добраться туда.
В этом каталоге удалите .android, .AndroidStudio и любые аналогичные каталоги с версиями на конце, т.е. AndroidStudio1.2 , а также .gradle и .m2 , если они есть. Затем перейдите в %APPDATA% и удалите папку JetBrains .
После удаления всех этих папок перейдите в C:Program Files и удалите папку Android .
Мы удалили все файлы Android Studio, чтобы удалить все остатки SDK, перейдите в %LOCALAPPDATA% и удалите папку Android .
Итак, мы полностью удалили Android Studio из нашей системы. Теперь, если вы хотите, вы можете сделать чистую установку. Для этого вы можете обратиться к Руководству по установке и настройке Android Studio.
Слетела винда, в папке которая создает студия 2.2 AndroidStudioProjects есть важный проект. Если выбирать восстановить Винду без удаления личных файлов и он удалит android studio, то эта папка с проектами тоже удалиться?
Отслеживать
задан 15 янв 2017 в 12:15
721 6 6 серебряных знаков 19 19 бронзовых знаков
Врядли, но лучше скопируйте этот проект в надежное место. Раз он важный так он давно должен быть в облаках.
15 янв 2017 в 12:18
@pavel, ну вот как то тупанул