
Follow these instructions to easily show folder sizes in Windows 11, 10, 8, or 7. Display folder sizes in File Explorer and locate missing disk space easily. View the sizes of all directories and sort them by size.
List of top 5 ways to show folder sizes in Windows:
- Show Folder Sizes in File Explorer
- View Folder Size From Folder Properties
- Show Folder Size From the Command Line
- Display Folder Sizes Using PowerShell
- Show All Folder Sizes Using a Free Disk Analysis App
- Conclusion
- Show Folder Size Windows FAQ
Why isn’t the folder size visible in File Explorer? Can I display folder size in Windows File Explorer? You can utilize the 5 methods listed below to view folder sizes in Windows.
Show Folder Sizes in File Explorer
Displaying folder size information in File Explorer folder tips is a valuable feature that enhances user productivity by providing quick insights into the storage space usage of folders without the need to open properties or third-party software. Here’s a detailed guide on how to show folder sizes tooltips.
Enable Folder Size Information:
-
- Open Windows File Explorer.
- Navigate to the “View” tab on the ribbon menu.
- Click on “Options” located on the right side of the ribbon.
- In the Folder Options dialog box, switch to the “View” tab.
- Scroll down and locate the checkbox labeled “Display file size information in folder tips.“
- Check the box to enable this feature and then click “Apply” and “OK” to save the changes.
Show Folder Sizes Tooltip
View Folder Size Information:
-
- Once enabled, navigate to a folder in File Explorer.
- Hover your mouse cursor over the folder icon, and after a moment, a tooltip will appear.
- The tooltip will display information about the folder, including its size.
- The folder size information provided in the tooltip is typically displayed in bytes, kilobytes, megabytes, or gigabytes, depending on the folder’s size.
Advantages
-
- Instant Insight: Displaying folder size information in folder tips provides instant insights into the storage space usage of folders, allowing users to quickly identify large or space-consuming folders.
- Efficient Workflow: With this feature enabled, users can assess folder sizes without interrupting their workflow by avoiding the need to open properties or launch third-party applications.
- No Additional Software: Unlike some other methods that require the use of third-party software or scripts, displaying folder size information in folder tips is a built-in feature of Windows File Explorer, eliminating the need for additional software installations.
Disadvantages
-
- Limited Customization: While folder tips provide basic folder size information, they may lack customization options and detailed breakdowns available in third-party software or scripts.
- Tooltip Clutter: Depending on your folder structure and browsing habits, the constant display of tooltips may clutter the interface, especially if you frequently hover over folders while navigating File Explorer.
- Tooltip Delay: In some cases, there may be a slight delay before the tooltip appears when hovering over a folder, which could affect workflow efficiency for some users.
Conclusion
In conclusion, enabling folder size information in File Explorer folder tips is a convenient way to quickly assess the storage space usage of folders without the need for additional software or complex procedures. By leveraging this feature, users can streamline their workflow and make more informed decisions when managing disk space in Windows File Explorer.
View Folder Size From Folder Properties
Steps to view folder sizes from File Explorer properties menu:
- Right-click on the folder you want to inspect.
- Select “Properties” from the context menu.
- In the Properties dialog box, navigate to the “General” tab.
- The size of the folder, including its contents, will be displayed.
The screenshot below lists the size of the “MISC DOCS” folder that I have right-clicked and have chosen “Properties”.
Show Folder Size From Properties
Advantages:
- Simple and Quick: Accessing folder properties is straightforward and can be done with just a few clicks.
- Detailed Information: The Properties dialog box provides additional information about the folder, such as its location, creation date, and attributes.
- No Third-party Software Required: Unlike some other methods, such as using third-party software or command-line tools, accessing folder properties is built into Windows and does not require any additional software installations.
Disadvantages:
- Limited Customization: While you can view basic information about the folder, such as its size, the Properties dialog box does not offer advanced customization options or detailed breakdowns of the contents.
- Manual Process: Viewing folder properties for multiple folders or monitoring changes over time can be time-consuming as it requires manual intervention for each folder.
- Limited Compatibility: While this method works well for folders on local drives, it may not provide accurate information for network or cloud-based folders, depending on the configuration.
Show Folder Size From the Command Line
Using Command Prompt to check the size of a folder and its contents offers a flexible and powerful method for users who prefer command-line interfaces or need to automate tasks. Here’s a detailed explanation of how to do it, along with some examples:
To show folder sizes from Command Prompt:
- Open Command Prompt:
- Press the Windows key + R to open the Run dialog.
- Type “cmd” and press Enter, or search for “Command Prompt” in the Start menu and click on it to open.
- Navigate to the Directory:
- Use the cd command followed by the path of the directory containing the folder whose size you want to check.
- For example, if the folder is located in the “Documents” directory on your C drive, you would type:
cd C:\Users\YourUsername\Documents - Replace “YourUsername” with your actual username.
- Use the dir /s Command:
- Once you’ve navigated to the correct directory, type the following command:
dir /s FolderName - Replace “FolderName” with the name of the folder you want to check.
- Once you’ve navigated to the correct directory, type the following command:
- View the Folder Size:
- After pressing Enter, Command Prompt will list all the files and subdirectories within the specified folder, along with their sizes.
- At the end of the output, Command Prompt will display the total size of the folder and its contents.
Show Folder Sizes From Command Line Example
Suppose you want to check the size of a folder named “Photos” located in the “Pictures” directory of your user profile. Here’s how you would do it:
- Open Command Prompt.
- Navigate to the “Pictures” directory using the cd command:
cd C:\Users\YourUsername\Pictures - Type the following command to check the size of the “Photos” folder:
dir /s Photos
Command Prompt will then display a detailed list of files and subdirectories within the “Photos” folder, along with their respective sizes. Finally, it will provide the total size of the “Photos” folder and its contents.
Advantages:
- Powerful and Scriptable: Command Prompt offers powerful scripting capabilities, allowing users to automate tasks and perform advanced operations on files and directories.
- Quick Access: Users familiar with the command-line interface can quickly check folder sizes without the need for graphical user interfaces or third-party software.
- Detailed Information: The dir /s command provides detailed information about the folder’s contents, including file sizes, modification dates, and attributes.
Disadvantages:
- Steep Learning Curve: Command Prompt commands may be unfamiliar to users who are not comfortable with the command-line interface, requiring a learning curve to master.
- Limited Graphical Representation: Unlike graphical file explorers, Command Prompt does not provide visual representations of folder sizes, which may make it less intuitive for some users.
- Risk of Mistakes: Due to the nature of command-line interfaces, there is a risk of accidentally executing commands that can modify or delete files if not used carefully.
In summary, using Command Prompt to check folder sizes offers a versatile and efficient method for users who prefer command-line interfaces or need to automate tasks. While it may require some familiarity with command-line syntax, it provides detailed information and can be a valuable tool in a user’s toolkit for managing files and directories.
Display Folder Sizes Using PowerShell
Displaying folder sizes using PowerShell provides a robust and flexible approach for users who prefer command-line environments or need to perform bulk operations efficiently. PowerShell, with its scripting capabilities and integration with Windows systems, offers powerful tools for managing files and folders. Here’s a detailed guide on how to display folder sizes using PowerShell, along with its advantages and disadvantages:
1. Open PowerShell:
- Press the Windows key + X and select “Windows PowerShell” from the menu, or search for “PowerShell” in the Start menu and click on it to open.
2. Navigate to the Directory:
- Use the cd (Change Directory) command followed by the path of the directory containing the folder whose size you want to check.
- For example, if the folder is located in the “Documents” directory on your C drive, you would type:
cd C:\Users\YourUsername\Documents - Replace “YourUsername” with your actual username.
3. Use the Get-ChildItem Cmdlet:
- Once you’re in the correct directory, you can use the Get-ChildItem cmdlet to retrieve information about the folder and its contents.
- Type the following command:
Get-ChildItem -Directory -Recurse | Measure-Object -Property Length -Sum
4. View the Folder Size:
- PowerShell will calculate the total size of the folder and its contents and display it in bytes.
- You can format the output to display the size in a more readable format, such as kilobytes (KB), megabytes (MB), or gigabytes (GB).
How to Show Folder Sizes in PowerShell Example
Suppose you want to check the size of a folder named “Photos” located in the “Pictures” directory of your user profile. Here’s how you would do it in PowerShell:
-
- Open PowerShell.
- Navigate to the “Pictures” directory:
cd C:\Users\YourUsername\Pictures - Type the following command to check the size of the “Photos” folder:
Get-ChildItem -Directory -Recurse | Measure-Object -Property Length -Sum
PowerShell will then calculate the total size of the “Photos” folder and its contents and display it in bytes.
Advantages:
- Scripting Capabilities: PowerShell offers powerful scripting capabilities, allowing users to automate tasks and perform complex operations on files and folders.
- Integration with Windows: PowerShell is tightly integrated with Windows systems, making it a convenient tool for managing files and folders in a Windows environment.
- Detailed Information: The Get-ChildItem cmdlet provides detailed information about the folder’s contents, including file sizes, modification dates, and attributes.
- Flexibility: PowerShell allows users to customize and format the output according to their preferences, providing flexibility in displaying folder sizes.
Disadvantages:
- Learning Curve: PowerShell commands may be unfamiliar to users who are not comfortable with command-line interfaces, requiring a learning curve to master.
- Potential for Mistakes: Due to its scripting capabilities, there is a risk of accidentally executing commands that can modify or delete files if not used carefully.
- Less Intuitive: For users accustomed to graphical file explorers, PowerShell’s command-line interface may be less intuitive and require more effort to navigate.
In summary, using PowerShell to display folder sizes offers a powerful and flexible method for managing files and folders in a Windows environment. While it may require some familiarity with PowerShell commands, it provides detailed information and can be a valuable tool for users who prefer command-line interfaces or need to perform bulk operations efficiently.
Show All Folder Sizes Using a Free Disk Analysis App
Show folder sizes and locate missing disk space easily. Find the largest files and largest folders. Sort folders and files by size. Delete large unused files and folders and free up disk space. Visualize disk space distribution using pie or bar charts to easily spot space hogs. Print folders and file lists and print folder tree.
Your favorite Folder Size tool just got better. You could already show folder sizes and delete files and folders. This major update provides all the flexibility that you have in Windows Explorer. It adds the complete Windows Explorer context menu to Folder Size.
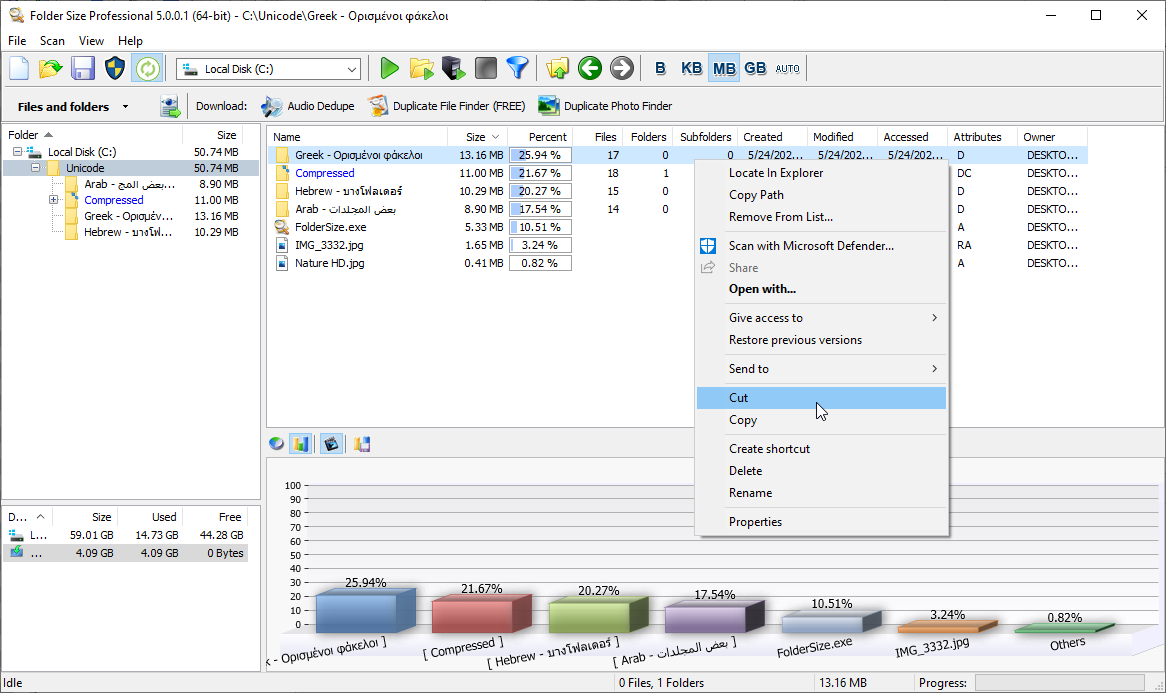
Show Folder Sizes
Folder Sizes – Copy, Cut, Paste, Delete, and Rename
In past releases of Folder Size, you could only delete files and folders. While this was sufficient to free up space, having Copy, Cut, Paste, and Rename features make it easier to reorganize files and folders. You can now use all those new features to rearrange folders and files.
Having Copy, Cut, and Paste options is great, but we have taken those features a step further. You can now Copy, Cut, and Paste from and to Windows Explorer. This means that you can now go to Windows Explorer and use the context menu to Copy an item and then go to Folder Size and use the context menu to paste it there. This is so flexible and convenient that, using Folder Size is like having a Windows Explorer with folder sizes.
Shell Context Menu in Folder Size
The shell context menu is the menu that is displayed when you right-click an item or empty space in Windows Explorer. We have integrated the entire Windows Explorer context menu in the latest version of Folder Size. You can easily understand that this will let you use all the features that you have inside Windows Explorer in Folder Size.
For example, you can use the shell context menu to create new folders and then copy or move items in them. You can use the third-party applications that have entries in it to manipulate files and folders. Such tools can extract or create archives, scan files and folders for viruses, play, view, or edit files, etc. Now you have all the flexibility of Windows Explorer inside Folder Size.
Monitor File System Changes and Update Folder Sizes Automatically
Another great new feature of Folder Size is the ability to monitor the file system changes. It will update the scan results automatically. This means that if you copy, cut, rename, delete, or move files using Windows Explorer the changes will be applied to the Folder Size results immediately. You no longer have to rescan the folders if you have modified the file system outside of the application.
While this is a great feature there are certain cases in which you wouldn’t want such changes to be applied automatically. For example, if you have loaded a project file that you have saved earlier you may not want its contents to be altered. That is why we have made this feature optional. Loading a saved project will automatically disable the feature. If you want to use it on a saved project, you can simply press the toolbar button to enable it.
Disabling the option for monitoring the file system changes, disables also the shell context menu. This is just a precaution as the loaded project may contain drives, folders, and files that do not exist on the local computer at all. Invoking the context menu on such missing items may cause issues. Nevertheless, if you load a project that you have saved from the local computer, you can simply use the toolbar button to enable the shell menu.
Show Folder Sizes Instantly – Without Rescan
The new feature for monitoring the file system changes has another great benefit. If you scan your drives and keep the application running, all the changes to the file system will be updated in Folder Size automatically. This means that you have up-to-date information about all folders and file sizes at any point in your work. All you need to do is to switch to the Folder Size application and take a look at the items that you are interested in.
The best part is that this has a ZERO impact on the performance of your system. Unlike other tools that install services or shell hooks, Folder Size uses native Windows features to detect modifications to the file system.
Folder Size Does Not Install Services
A service is an application that has no user interface and starts when Windows is started and works in the background to do tasks. Tools that use services are slowing down your system even if you are not using them. That is because the service that they have installed is working regardless if you are using the tool or not. The service is gathering information on files and folders at all times and the application that uses the service just requests that data when started.
Folder Size Does Not Install Shell Hooks
A shell hook can have an even worse performance impact on a system. A shell hook is similar to a service, but every file operation calls a function from the application that has installed the hook. If the hook is not developed properly it may cause huge performance issues. Another potential issue is that it may leak memory – use memory without freeing it properly. As such a hook is called for every file operation, even the smallest memory leak may deplete all the memory of the system in a short time.
Folder Size does not install services or shell hooks and you will never run into such issues.
Excessively Long File Path and Names Support
Many users are not aware of the fact that Windows has a limit of 260 characters for folder paths. This is the maximum count of characters for the folder plus the file name. Nevertheless, Windows Explorer does allow you to create longer paths. Unfortunately, they cause issues when accessed both in applications and in Windows itself.
Microsoft lifted this limit in newer Windows versions. They have not officially announced and enabled it yet though. In Windows 10 and later you can manually enable support for long paths. Nevertheless, we do not recommend using excessively long paths and file names. Folder Size supports long paths, but you may experience issues in many applications including Windows itself.
Conclusion
We have listed the top 5 ways to show folder sizes in Windows. In conclusion, when it comes to displaying folder sizes in Windows, the Folder Size app emerges as your top choice. It has intuitive interface, extensive features, and seamless integration with Windows Explorer. Therefore, that makes it the ideal tool for managing disk space and optimizing storage usage. Whether you’re a casual user seeking to free up space on your hard drive or a power user handling large volumes of data, Folder Size offers the perfect balance of functionality and ease of use. Best of all, it’s available as a free download, enabling you to take control of your storage space effortlessly. Say goodbye to the hassle of manually calculating folder sizes or navigating complex command-line interfaces. Download Folder Size today and start managing your storage space more efficiently.
Show Folder Size Windows FAQ
Q: How can I view the size of a folder in Windows File Explorer?
A: You can view the size of a folder in Windows File Explorer by right-clicking on the folder. Then select “Properties” from the context menu, and navigating to the “General” tab. As a result, the size of the folder, including its contents, will be displayed.
Q: Is there a way to quickly view folder sizes without opening Properties in File Explorer?
A: Yes, you can hover your mouse over the target folder in File Explorer. As a result, the folder size will be displayed in a tooltip.
Q: Can I use Command Prompt to check the size of a folder?
A: Yes, you can use Command Prompt to check the size of a folder. First open Command Prompt. Then navigate to the directory containing the folder using the “cd” command. Finally, type “dir /s” followed by the folder name to display the total size of the folder and its contents.
Q: Is PowerShell another option for displaying folder sizes?
A: Yes, PowerShell can also be used to display folder sizes. You can open PowerShell and navigate to the directory containing the folder. Then use commands such as “Get-ChildItem” to retrieve folder size information.
Q: Are there any third-party applications available for showing folder sizes in Windows?
A: Yes, there are several third-party applications available for displaying folder sizes in Windows. These applications often provide additional features and customization options beyond what is available through built-in Windows tools.
Please share this article with your friends – they will thank you!
3 Ways to Show/View Folder Size in Windows 10
There are 3 ways discussed in this article that focus on show folder size Windows 10. The main motive of each of these three ways is to resolve the issue of how to show folder size in Windows 10.
- Part 1. How to Show Folder Size in Windows Explorer?
- Part 2. How to View Folder Size in Windows 10 from Properties?
- Part 3. How to Show Folder Size in Windows 10 Using Apps?
Part 1. How to Show Folder Size in Windows Explorer?
Follow these steps for using Windows explorer to show folder size method:
• Go to File Explorer Options.
• Click on «View» tab.
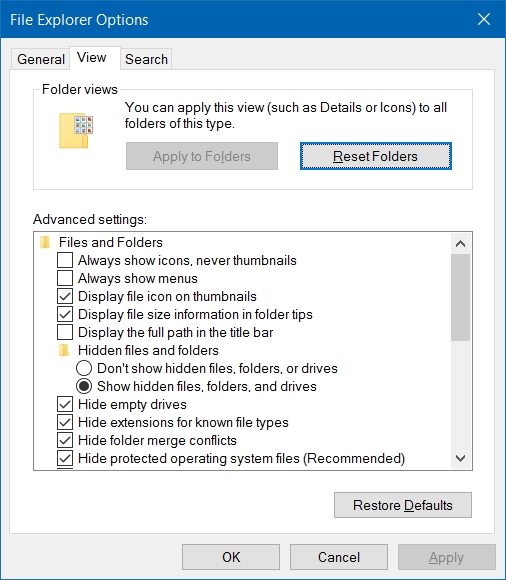
• Tick the box beside the option «Display file size information in folder tips» in the advanced settings dialog box.
• Click on «OK» to save the changes.
• By following these steps folder size explorer Windows 10 can be used to see the folder size in Windows 10.
Part 2. How to View Folder Size in Windows 10 from Properties?
Another way to view folder size Windows 10 is to check it from properties. The size of files is well shown in the Windows File Explorer, but usually, the size of the folder is not shown up in it. Follow the steps mentioned to see the folder size using properties:
• Locate the file in Windows File Explorer.
• Make a right click on it and click on the option «Properties» in the drop-down menu.
• A window named as «[foldername] Properties» will pop up showing the folder size in «Size» and space occupied on the disk at «Size on disk» boxes respectively.
Part 3. How to Show Folder Size in Windows 10 Using Apps?
There are a few apps that can help in the process of viewing the folder size in Windows 10 PC. 5 of the most popular software are listed here for the said purpose:
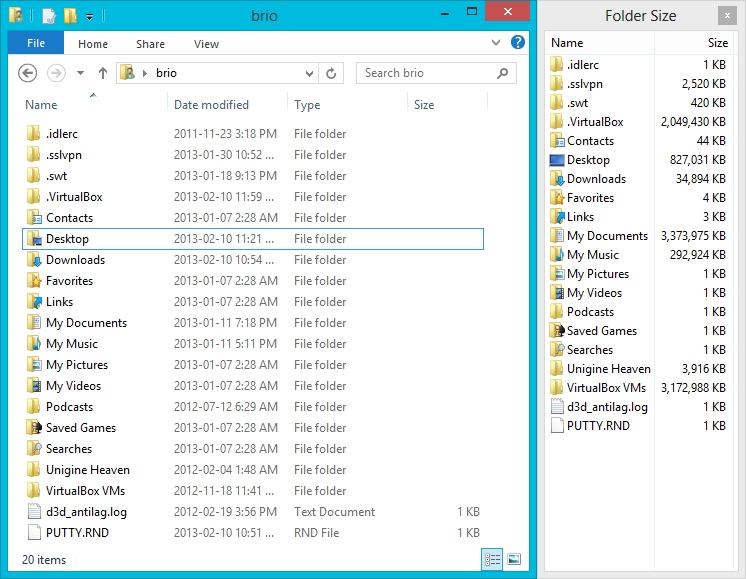
1. Folder Size:
Folder Size software is free of cost and easily downloadable. After getting installed in the PC Folder Size add on a new column in the Windows File Explorer. This column shows the size of each file and folder. People like folder Size due to the facts that:
• It updates the size of the folders automatically when a change in folder occurs.
• No other application or program is required to be used for getting the information of the size of the folder.
• The size of the folder is shown only on opening the Windows Explorer. No need to scan each time the PC is turned on.
• If the folder is large, then it will be scanned in the background while allowing the user to perform other tasks.
Here is the download link of the same: http://foldersize.sourceforge.net/
2. TreeSize:
TreeSize is also a program that lets the user know about the size of the folder. Its main feature is to inform the user which folder is occupying more space on the disk, so that he or she can free up space. Just like Folder Size, TreeSize is also free. Download the .exe file from the following link and install it. After installation click on «scan» in the menu and select the folder to see the size of it. The user can also select an entire drive to see the size of all the folders within it. Sorting of the later can be done too by TreeSize. TreeSize is capable of showing the size of subfolders within the folders too by expanding the later.
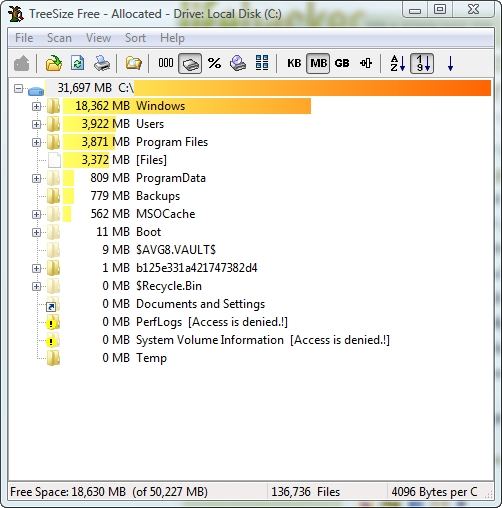
Here is the download link for TreeSize: http://treesize-free.en.lo4d.com/
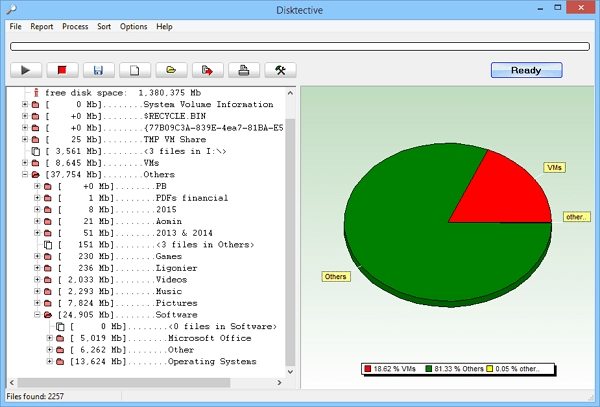
3. Disktective:
Disktective is a software platform to find out the size of the PC’s folders. The most preferred part of this software product is its user-friendly interface, which makes it easy to use and its portability. After installing the software from the link provided, the application will ask the user to choose the drive to scan. After selecting the drive, a quick scan will be done and the size of all the folders in the selected drive. A pie chart of the sizes will also be shown to the user for easier grasp of the space occupied by the folders. This software product also enables the user watch the size of external drives, i.e., CD/DVD or USB too.
Here is the download link: http://www.disktective.com/download/
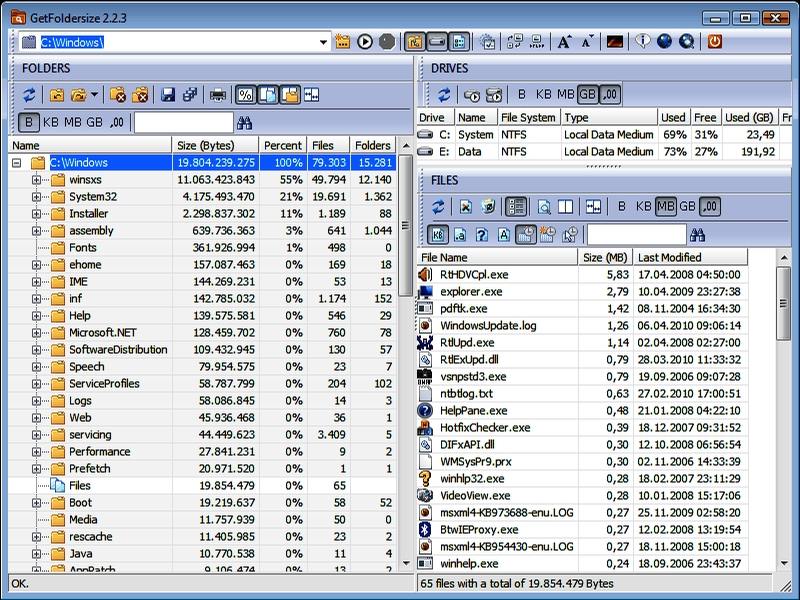
4. Getfoldersize:
Getfoldersize is another application to judge the size of folders in the PC. It shows the size of all the folders in the whole PC in shape of a folder tree sorted by folder size. This categorisation helps the user to locate the trash files or empty folders no longer needed. The user can free up space simply by deleting the said. The most liked features of this application are:
• Its visual interface, which systematically shows the folders and sub-folders; this makes it easier to choose which file to remove and which folder/file to keep.
• All the ghost folders, i.e., unused or empty folders can be tracked down easily through this.
• The software can scan computers connected through the same network.
Here is the link to download the software: https://getfoldersize.en.uptodown.com/windows
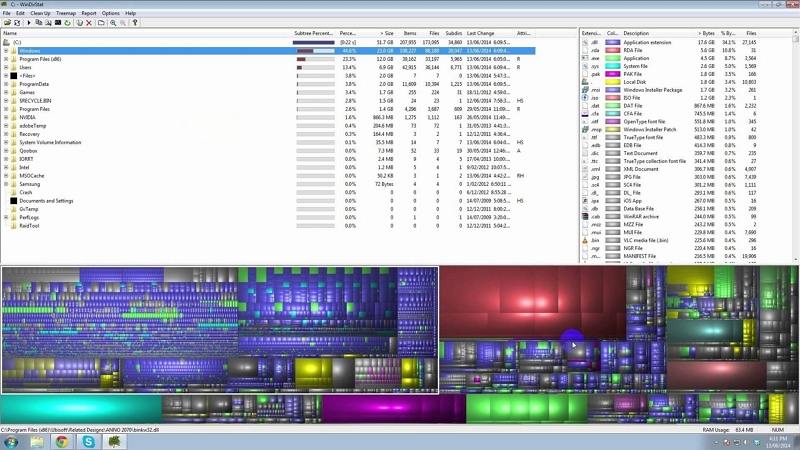
5. WinDirStat
WinDirStat can show the disk usage statistics view and clean up the spaces for various editions of Microsoft Windows. WinDirSat scans the whole directory of the PC and then projects the results in three functional ways viz.
• Tree view of the directory list just like the Windows Explorer but more arranged according to the size of the file
• Treemap, this feature shows the entire subjects of the directory in the form of a tree.
• Extension list which depicts the statistics of the files and their types.
Here is the download link: https://windirstat.net
That’s all about how to show folder size in Windows 10. In addition, losing the account’s password can make people suffer a lot. But with the use of a simple tool named 4WinKey, one can easily deal with such problems. This simple software product can come in real handy for the problems related to a lost password of Windows 10 PC.
Free Download Buy Now($19.95)
- Related Articles
- How to Disable Windows 10 Lock Screen
- The Top 3 Methods to Back Up Windows 10 PC
- How to Project Your Windows 10 Screen to Other TV or Projector
comments powered by
Все способы:
- Подключение и настройка двух мониторов в Виндовс 10
- Шаг 1: Подготовка
- Шаг 2: Приоритеты
- Шаг 3: Подключение
- Шаг 4: Настройка
- Дополнительно: Быстрое переключение между режимами отображения
- Заключение
- Вопросы и ответы: 2
Несмотря на высокое разрешение и большую диагональ современных мониторов, для решения многих задач, особенно, если они касаются работы с мультимедийным контентом, может потребоваться дополнительное рабочее пространство – второй экран. Если и вы хотите подключить к своему компьютеру или ноутбуку, работающему под управлением Виндовс 10, еще один монитор, но не знаете, как это сделать, просто ознакомьтесь с нашей сегодняшней статьей.
Примечание: Отметим, что далее речь пойдет именно о физическом подключении оборудования и его последующей настройке. Если под фразой «сделать два экрана», которая вас сюда привела, вы подразумеваете два (виртуальных) рабочих стола, рекомендуем ознакомиться с представленной по ссылке ниже статьей.
Читайте также: Создание и настройка виртуальных рабочих столов в Windows 10
Подключение и настройка двух мониторов в Виндовс 10
Возможность подключения второго дисплея есть практически всегда, независимо от того, пользуетесь ли вы стационарным или портативным компьютером (ноутбуком). В целом же процедура протекает в несколько этапов, к подробному рассмотрению которых мы и приступим.
Шаг 1: Подготовка
Для решения нашей сегодняшней задачи необходимо соблюдение нескольких важных условий.
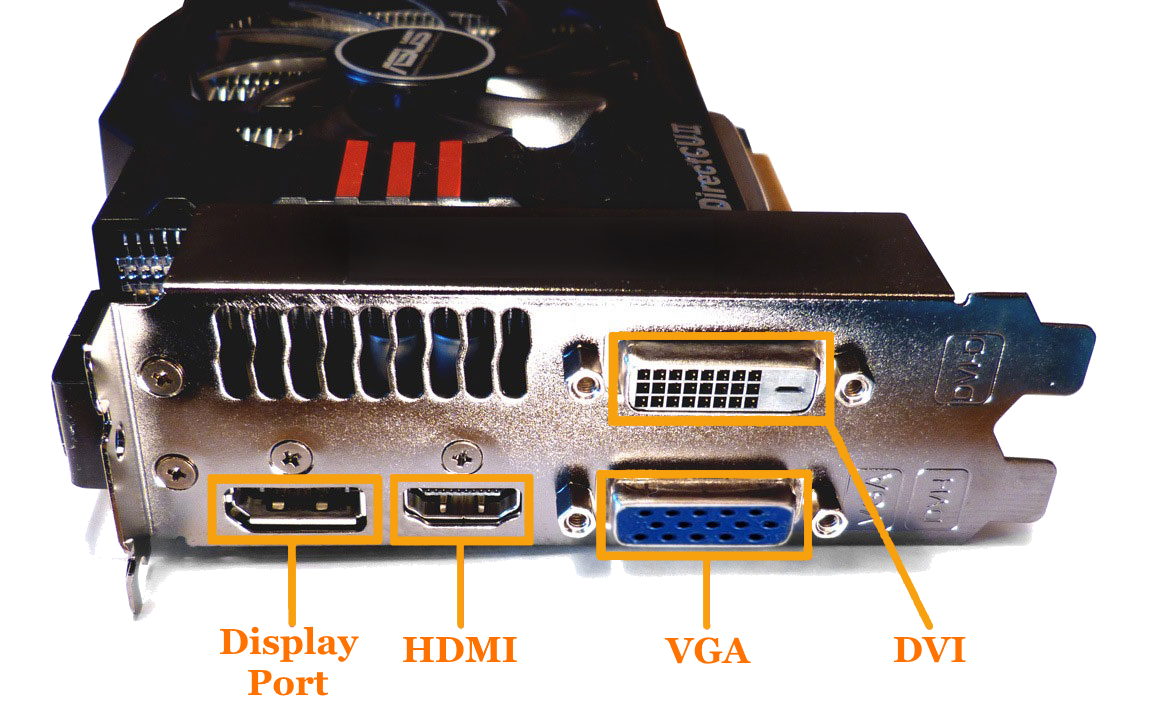
- Наличие дополнительного (свободного) разъема на видеокарте (встроенной или дискретной, то есть той, которая сейчас используется). Это может быть VGA, DVI, HDMI или DisplayPort. Аналогичный разъем должен быть и на втором мониторе (желательно, но не обязательно, и дальше расскажем, почему).

Примечание: Озвученные нами выше и ниже условия (в рамках конкретно этого шага) не имеет отношения к современным устройствам (как ПК или ноутбукам, так и мониторам) с наличием портов USB Type C. Все что потребуется для подключения в таком случае — наличие соответствующих портов на каждом из участников «связки» и непосредственно кабеля.
- Кабель, соответствующий выбранному для подключения интерфейсу. Чаще всего он идет в комплекте с монитором, но если таковой отсутствует, придется его приобрести.
- Стандартный провод питания (для второго монитора). Тоже идет в комплекте.
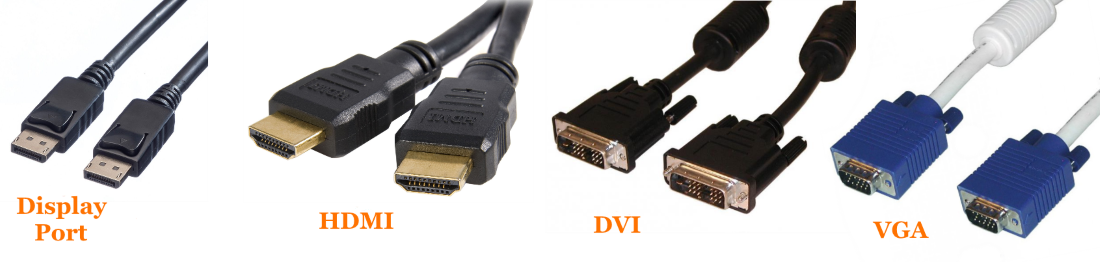
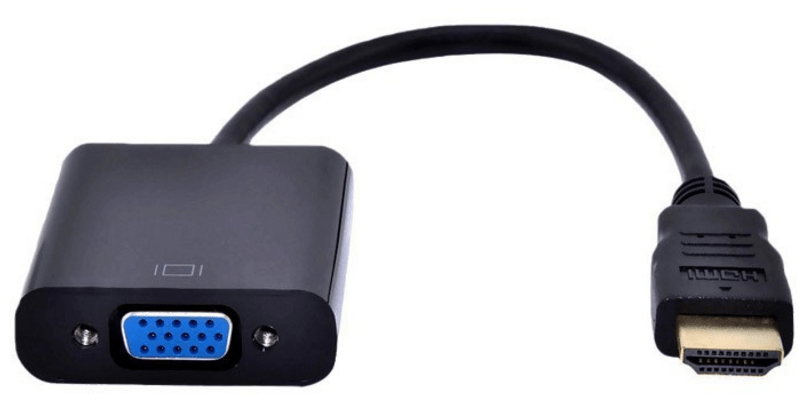
Если на видеокарте у вас свободен разъем одного типа (например, DVI), а на подключаемом мониторе есть только устаревший VGA или, наоборот, современный HDMI, либо же если просто нет возможности подключения оборудования к одинаковыми разъемам, дополнительно потребуется обзавестись соответствующим переходником.
Примечание: На ноутбуках чаще всего отсутствует порт DVI, поэтому «достигать консенсуса» придется с любым другим доступным к использованию стандартом или, опять же, путем использования переходника.
Шаг 2: Приоритеты
Убедившись в наличии соответствующих разъемов и необходимых для «связки» оборудования аксессуаров, следует правильно расставить приоритеты, по крайней мере, если используете мониторы разного класса. Определите, по какому из доступных интерфейсов будет подключаться каждое устройство, ведь в большинстве случаев разъемы на видеокарте будут не одинаковыми, при этом каждый из четырех обозначенных выше типов характеризуется разным качеством изображения (а иногда и поддержкой передачи аудио или отсутствием таковой).
Примечание: Относительно современные видеокарты могут быть оснащены несколькими DisplayPort или HDMI. Если у вас есть возможность использования их для подключения (мониторы оснащены аналогичными разъемами), можете сразу переходить к Шагу 3 данной статьи.
Так, если у вас есть «хороший» и «обычный» по качеству монитор (в первую очередь, типу матрицы и диагонали экрана), разъемы нужно задействовать в соответствии с этим их качеством – «хороший» для первого, «обычный» для второго. Рейтинг интерфейсов выглядит следующим образом (от лучшего к худшему):
- DisplayPort
- HDMI
- DVI
- VGA
Монитор, который будет для вас основным, должен быть подключен к компьютеру посредством более высокого стандарта. Дополнительный – по следующему в списке или любому другому доступному для использования. Для более точного понимания того, какой из интерфейсов что из себя представляет, рекомендуем ознакомиться со следующими материалами на нашем сайте:
Подробнее:
Сравнение интерфейсов DVI и HDMI
Шаг 3: Подключение
Итак, имея на руках (а точнее, на рабочем столе) необходимое оборудование и соответствующие ему аксессуары, определившись с приоритетами, можно смело переходить к подключению второго экрана к компьютеру.
- Совсем не обязательно, но все же рекомендуем для обеспечения дополнительной безопасности сначала выключить ПК через меню «Пуск», а затем и отключить его от сети.
- Возьмите кабель от основного дисплея и подключите его к тому разъему на видеокарте или ноутбуке, который для себя вы определили как основной. Аналогичное проделаете и со вторым монитором, его проводом и вторым по значимости разъемом.
Примечание: Если кабель используется вместе с переходником, его нужно подсоединить заранее. Если используете кабели VGA-VGA или DVI-DVI, не забывайте плотно закручивать фиксирующие винтики.
- Подключите провод питания к «новому» дисплею и воткните его в розетку, если ранее он был отключен. Включите устройство, а вместе с ним и компьютер или ноутбук.
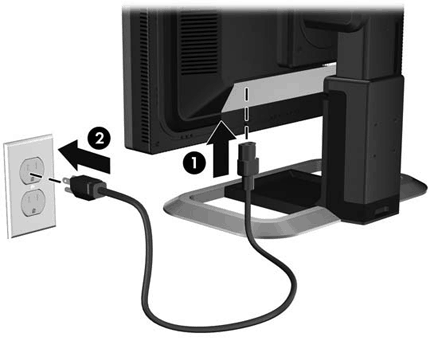
Дождавшись запуска операционной системы, можно переходить к следующему этапу.
Читайте также: Подключение монитора к компьютеру
Шаг 4: Настройка
После правильного и успешного подключения второго монитора к компьютеру нам с вами потребуется выполнить ряд манипуляций в «Параметрах» Windows 10. Это необходимо, несмотря на автоматическое обнаружение нового оборудования в системе и ощущение того, что оно уже готово к работе.
Примечание: «Десятка» практически никогда не требует драйверов для обеспечения корректной работы монитора. Но если вы столкнулись с необходимостью их установки (например, второй дисплей отображается в «Диспетчере устройств» как неизвестное оборудование, а изображение на нем отсутствует), ознакомьтесь с представленной по ссылке ниже статьей, выполните предложенные в ней действия, и только потом переходите к следующим шагам.
Подробнее: Установка драйвера для монитора
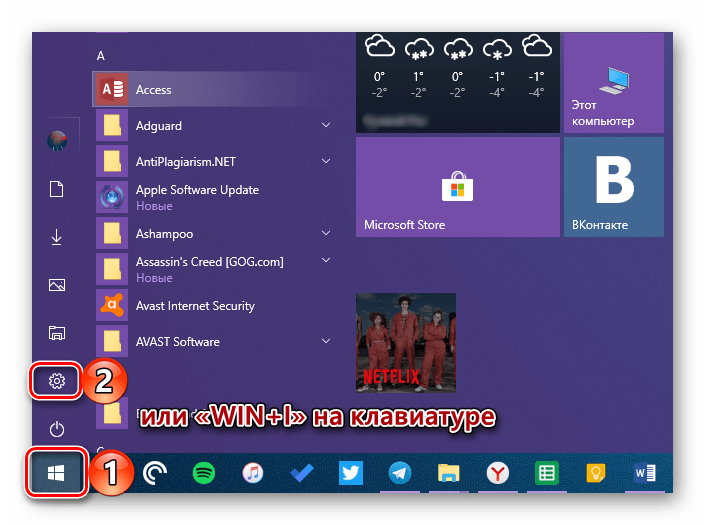
- Перейдите в «Параметры» Виндовс, воспользовавшись его значком в меню «Пуск» или клавишами «WINDOWS+I» на клавиатуре.
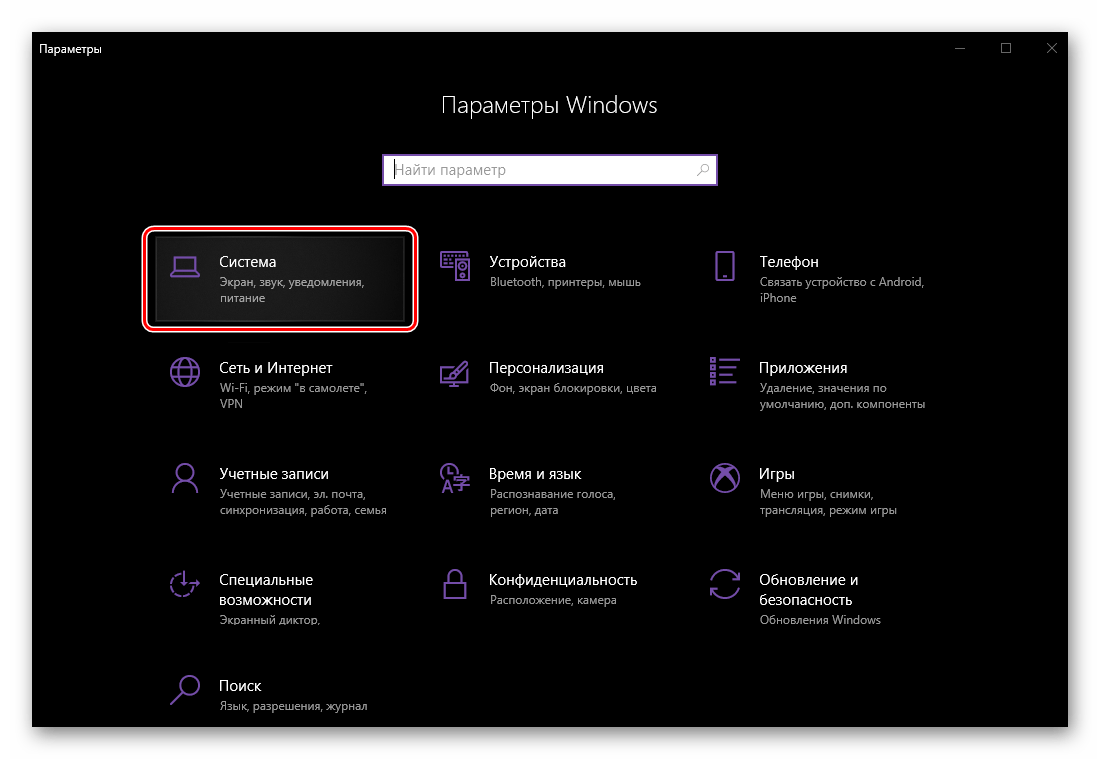
- Откройте раздел «Система», нажав по соответствующему блоку левой кнопкой мышки (ЛКМ).
- Вы окажетесь во вкладке «Дисплей», где и можно настроить работу с двумя экранами и адаптировать их «поведение» под себя.
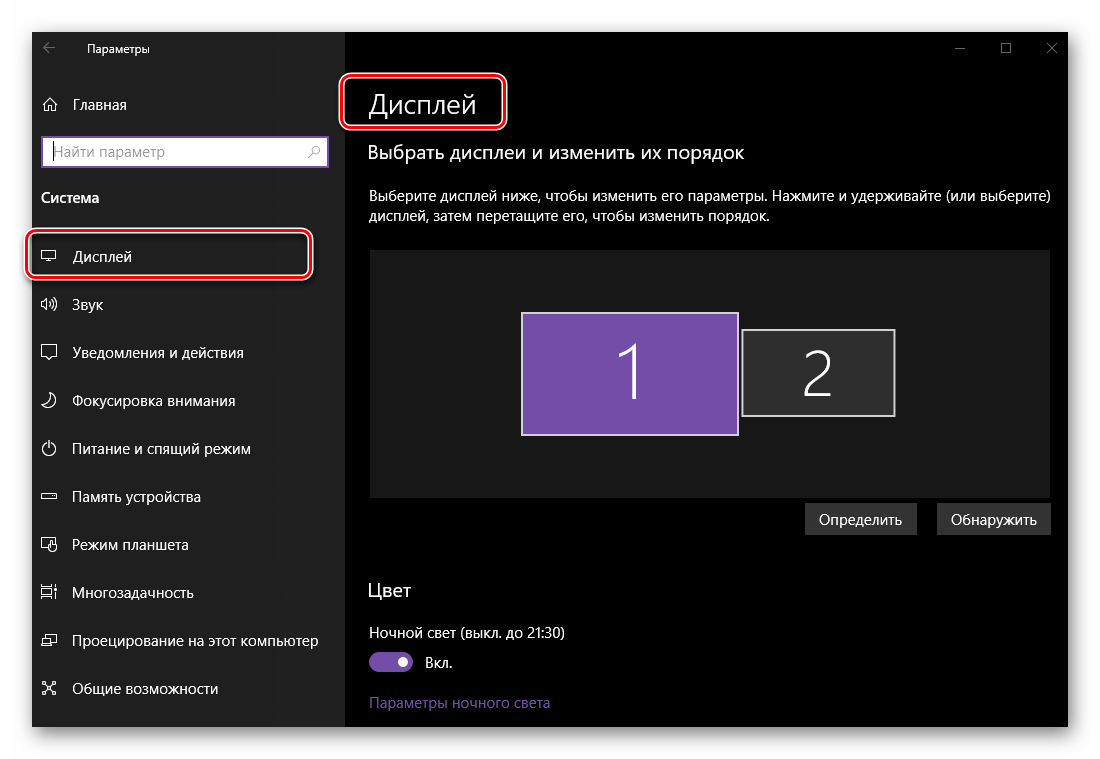
Далее мы рассмотрим только те параметры, которые имеют отношения к нескольким, в нашем случае двум, мониторам.
Примечание: Для настройки всех представленных в разделе «Дисплей» опций, кроме расположения и цвета, сначала нужно выделить в области предпросмотра (миниатюра с изображением экранов) конкретный монитор, и только потом вносить изменения.
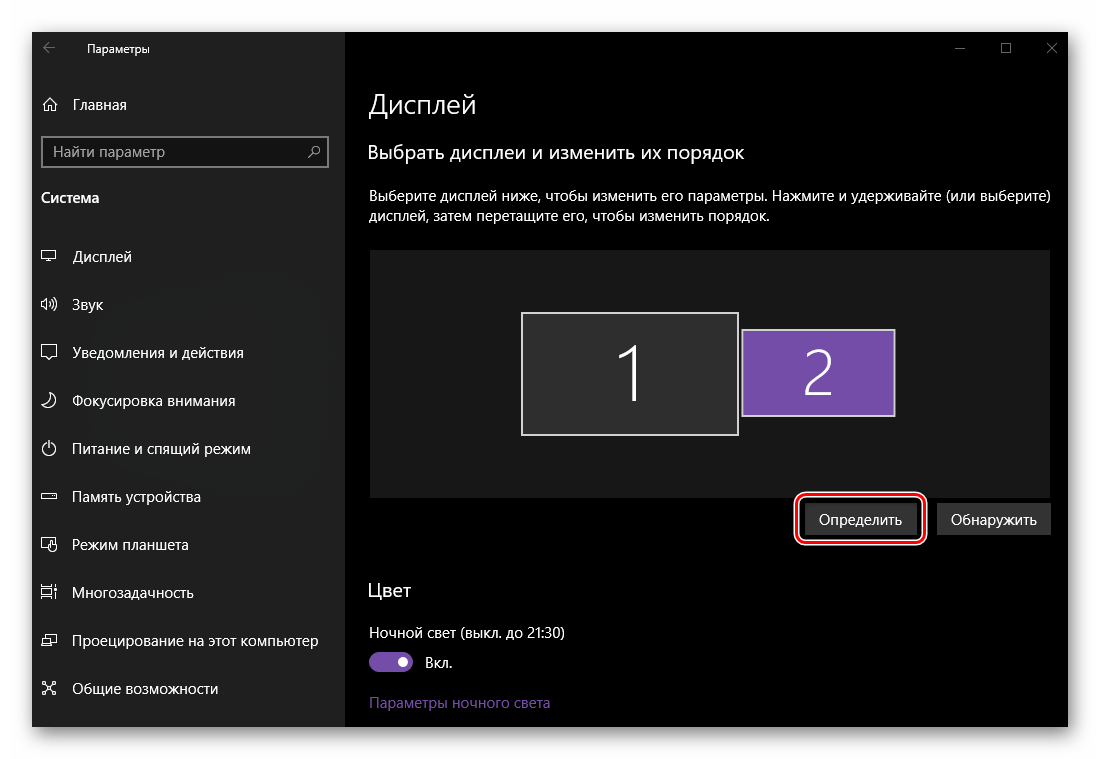
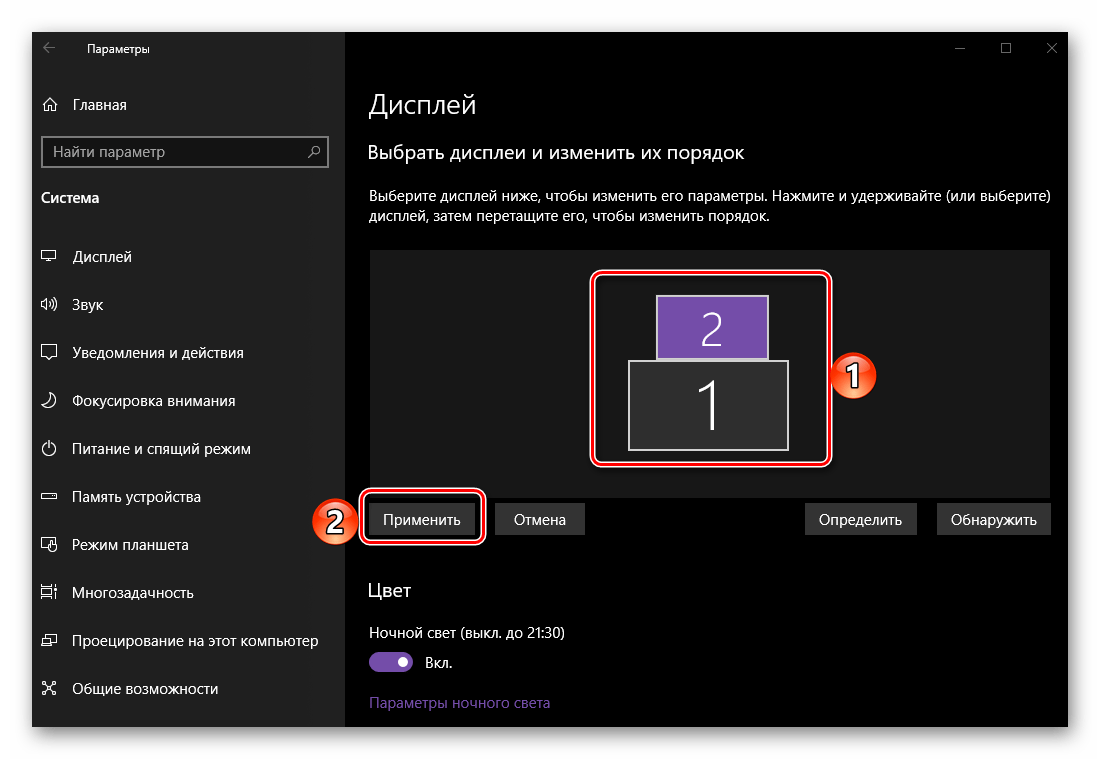
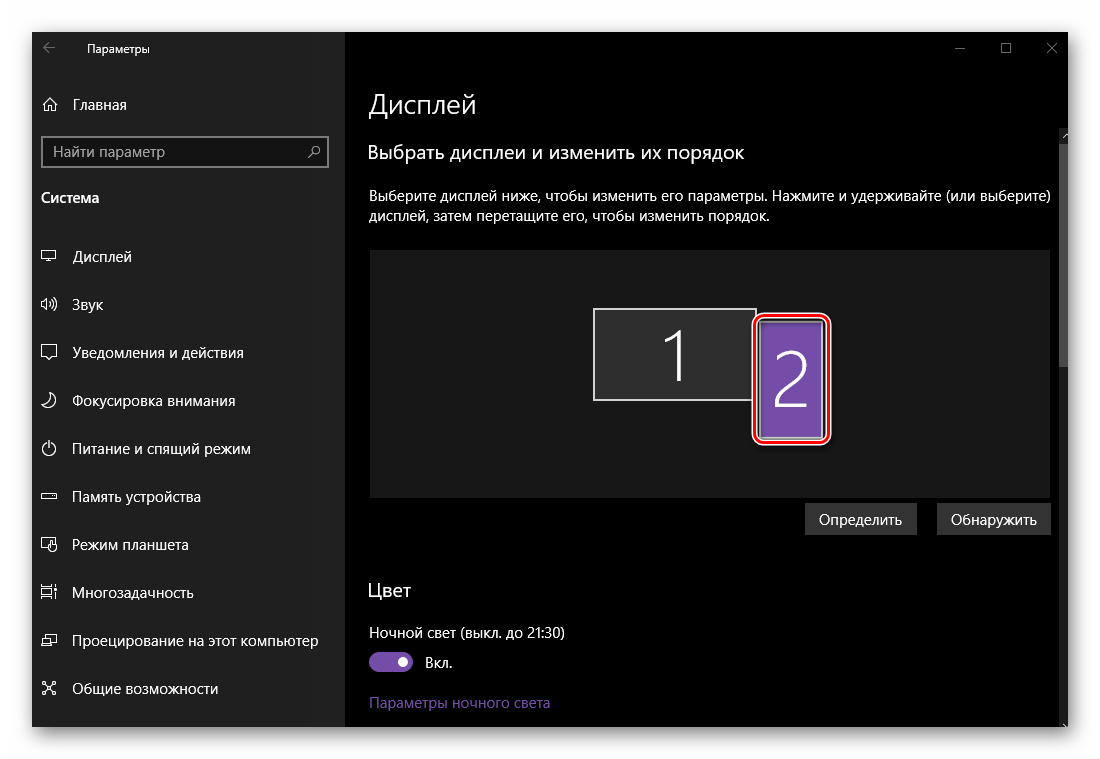
- Расположение. Первое, что можно и нужно сделать в настройках, это понять, какой номер принадлежит каждому из мониторов.

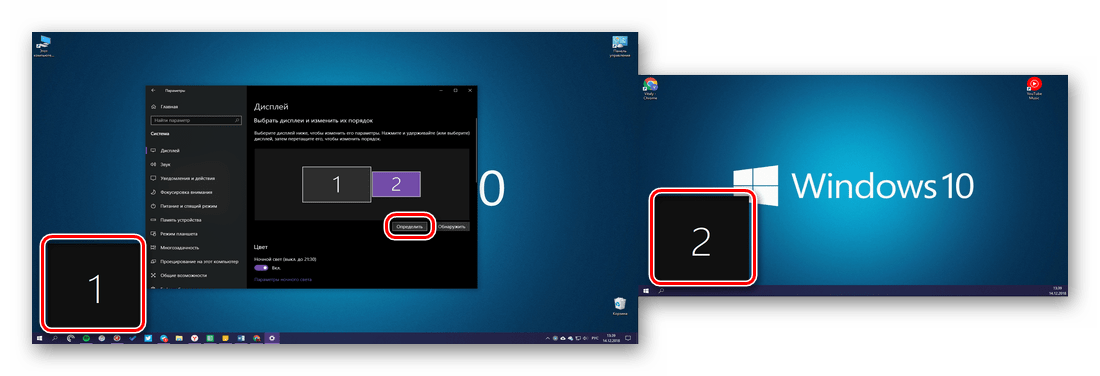
Для этого нажмите расположенную под областью предпросмотра кнопку «Определить» и смотрите на цифры, которые ненадолго появятся в левом нижнем углу каждого из экранов.

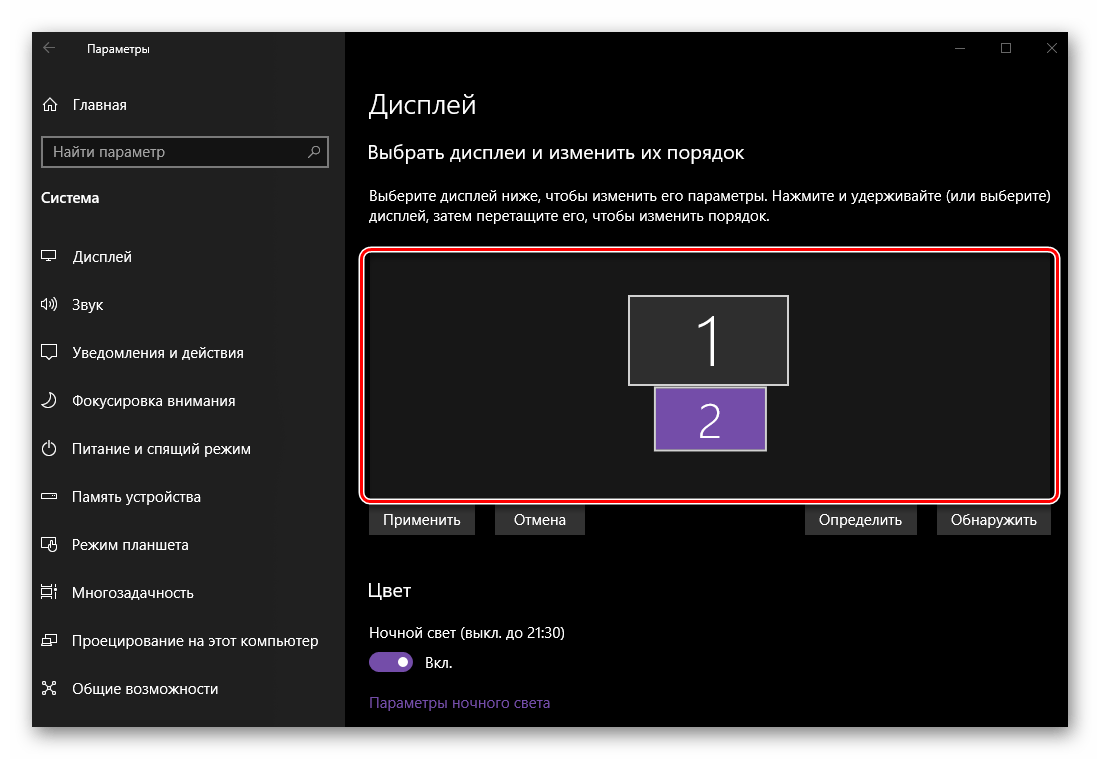
Далее следует указать реальное расположение оборудования или то, которое вам будет удобно. Логично предположить, что дисплей под номером 1 – основной, 2 – дополнительный, хотя по факту роль каждого из них вы определили самостоятельно еще на этапе подключения. Поэтому просто разместите представленные в окне предварительного просмотра миниатюры экранов так, как они установлены у вас на столе или как посчитаете нужным, после чего нажмите на кнопку «Применить».
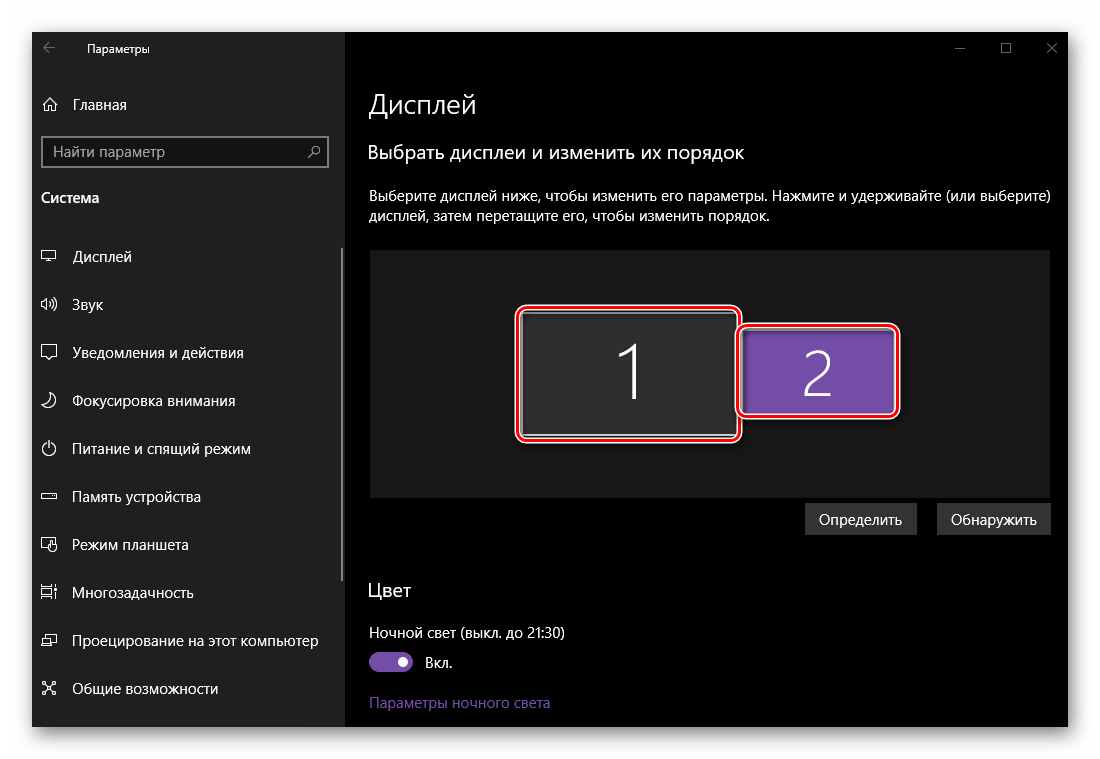
Примечание: Дисплеи можно расположить только впритык друг к другу, даже если по факту они установлены на расстоянии.
К примеру, если один монитор находится прямо напротив вас, а второй – правее от него, можно разместить их так, как это показано на скриншоте ниже.
Примечание: Размеры экранов, изображенных в параметрах «Дисплея», зависят от их реального разрешения (не диагонали). В нашем примере первый монитор – это Full HD, второй – HD.
- «Цвет» и «Ночной свет». Этот параметр применяется в целом к системе, а не к конкретному дисплею, ранее мы уже рассматривали данную тему.
Подробнее: Включение и настройка ночного режима в Виндовс 10
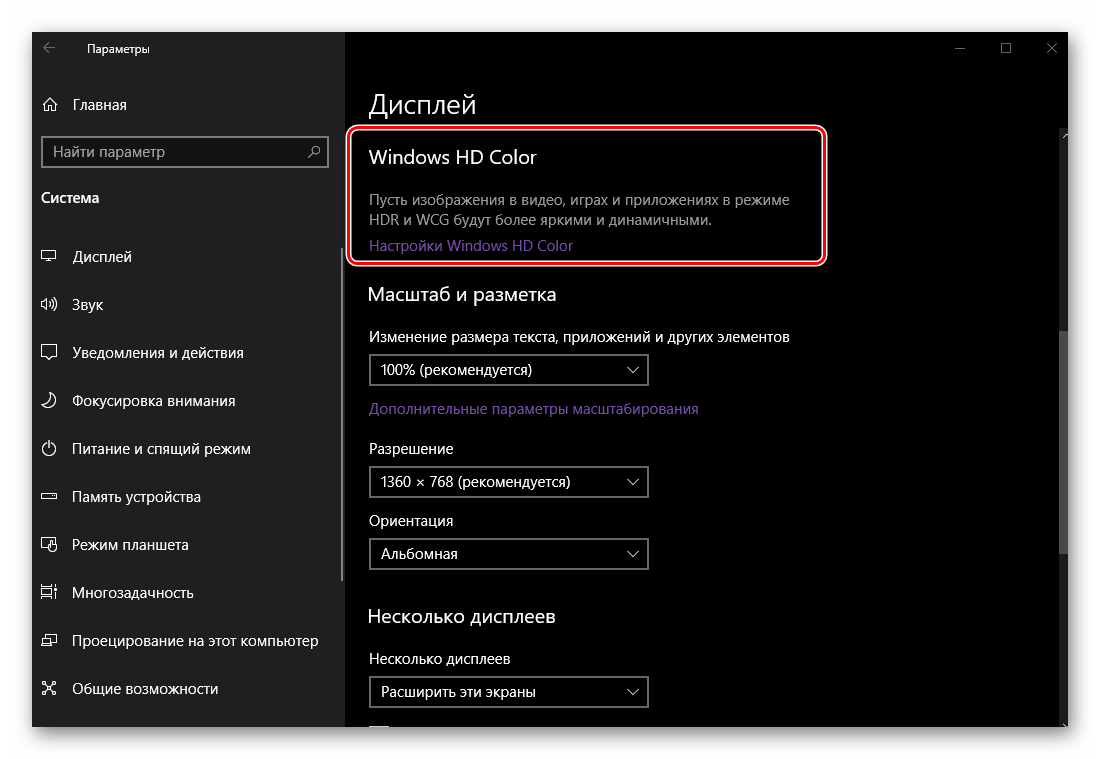
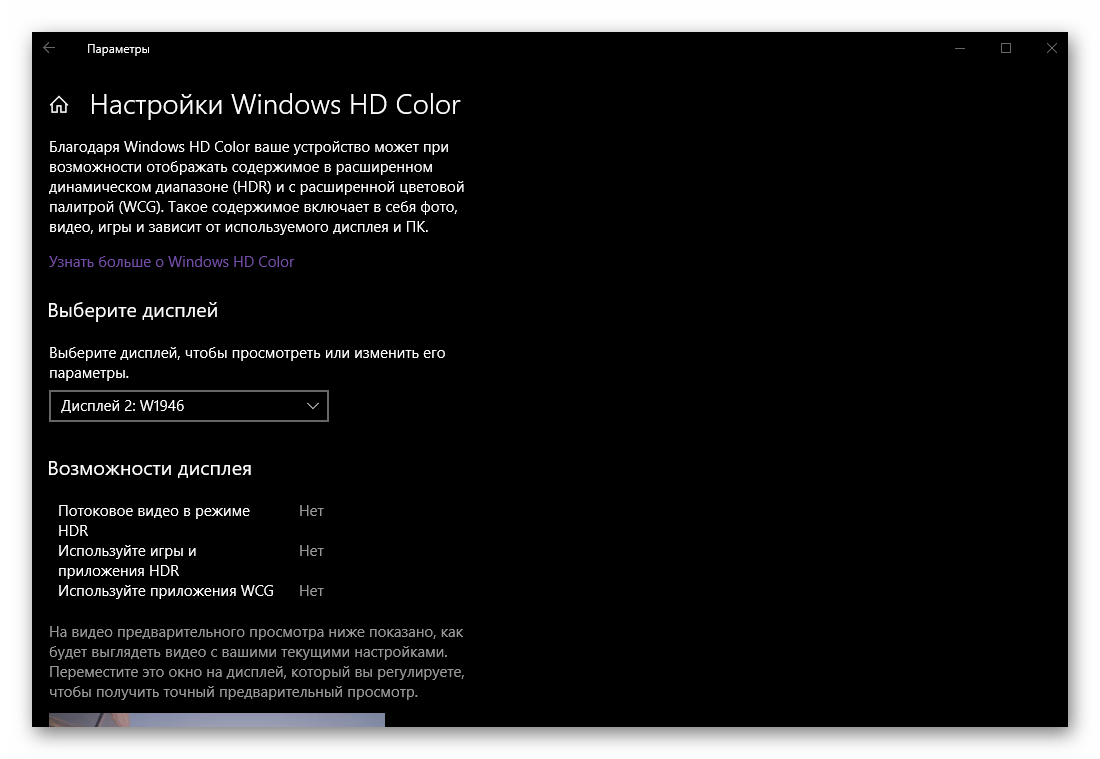
- «Настройки Windows HD Color». Этот параметр позволяет настроить качество изображения на мониторах с поддержкой HDR. Используемое в нашем примере оборудование таковым не является, поэтому показать на реальном примере, как происходит настройка цвета, у нас нет возможности.
Кроме того, конкретно к теме двух экранов прямого отношения это не имеет, но при желании вы можете ознакомиться с подробным описанием работы функции с правкой от Microsoft, представленной в соответствующем разделе.
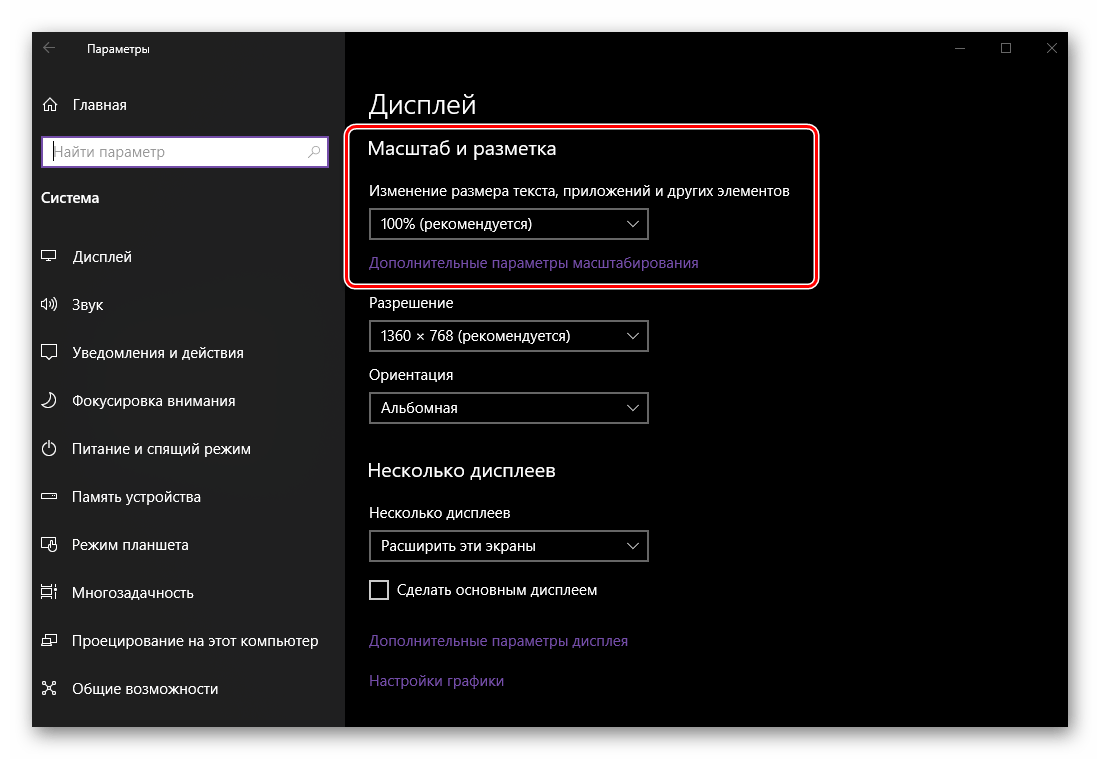
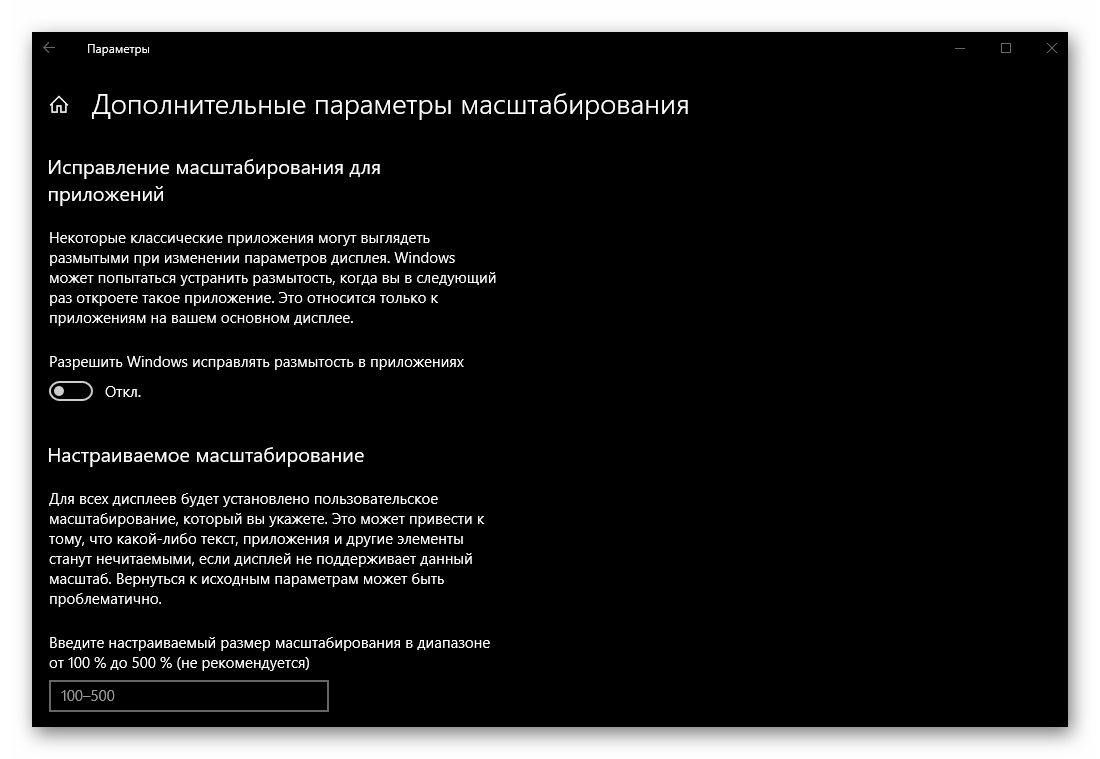
- «Масштаб и разметка». Данный параметр определяется для каждого из дисплеев отдельно, хотя в большинстве случаев его изменение не требуется (если разрешение монитора не превышает 1920 х 1080).
И все же, если вы хотите увеличить или уменьшить изображение на экране, рекомендуем ознакомиться с представленной по ссылке ниже статьей.
Подробнее: Изменение масштаба экрана в Windows 10
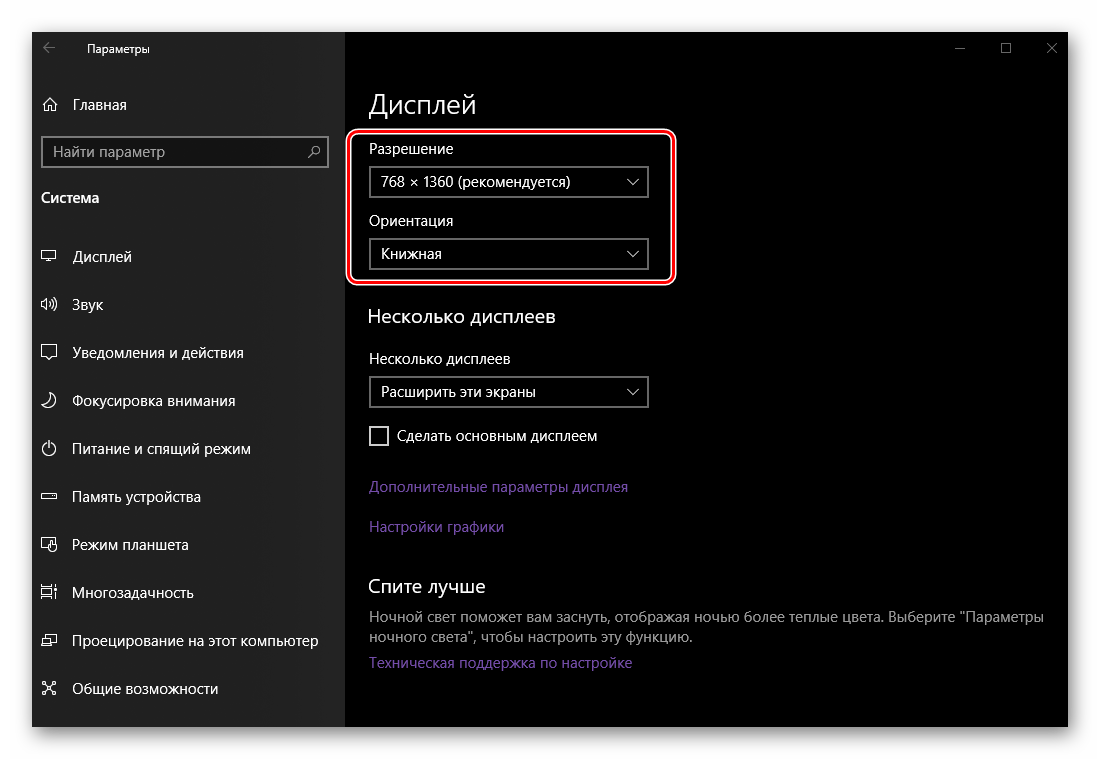
- «Разрешение» и «Ориентация». Как и в случае с масштабированием, эти параметры настраиваются отдельно для каждого из дисплеев.
Разрешение лучше оставить неизменным, отдав предпочтение установленному по умолчанию значению.
Менять ориентацию с «Альбомной» на «Книжную» следует только в том случае, если один из мониторов у вас установлен не горизонтально, а вертикально. Кроме того, для каждого варианта доступно «перевернутое» значение, то есть, отражение по горизонтали или вертикали соответственно.
Читайте также: Изменение разрешения экрана в Виндовс 10
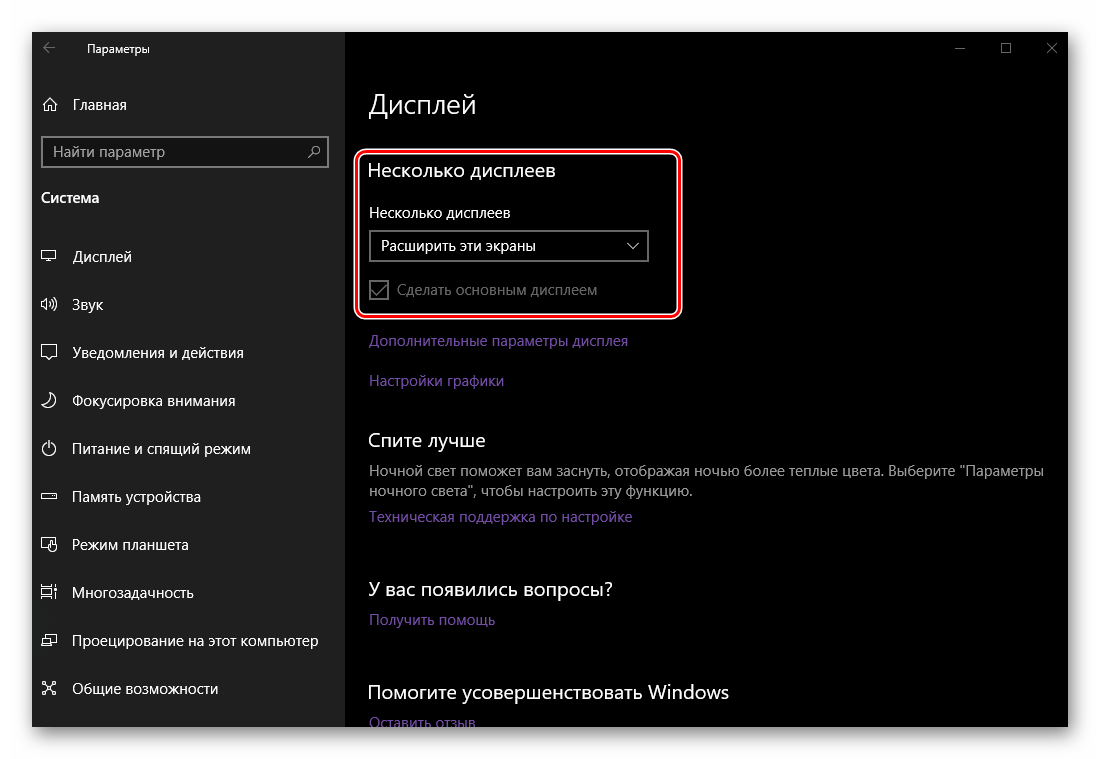
- «Несколько дисплеев». Это самый главный параметр при работе с двумя экранами, так как именно он позволяет определить то, как вы будете с ними взаимодействовать.
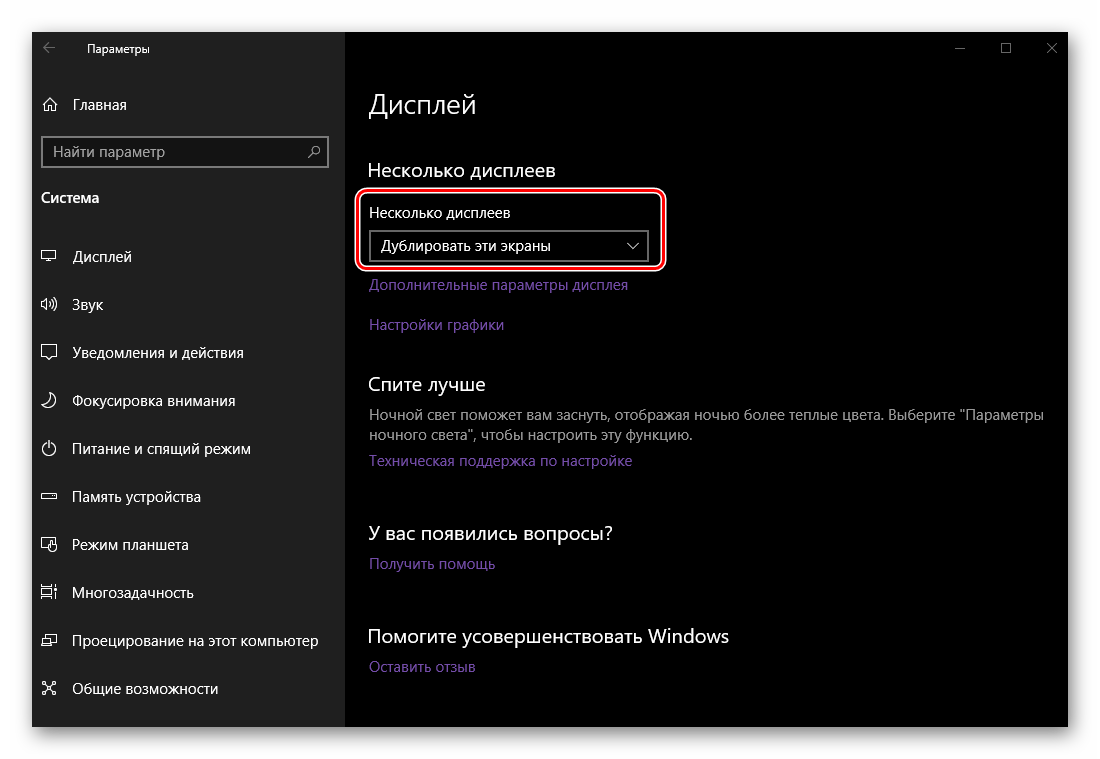
Выберите, хотите ли вы расширить дисплеи, то есть сделать второй продолжением первого (для этого и нужно было их правильно расположить на самом первом шаге из данной части статьи), или, наоборот, желаете дублировать изображение – видеть на каждом из мониторов одно и то же.
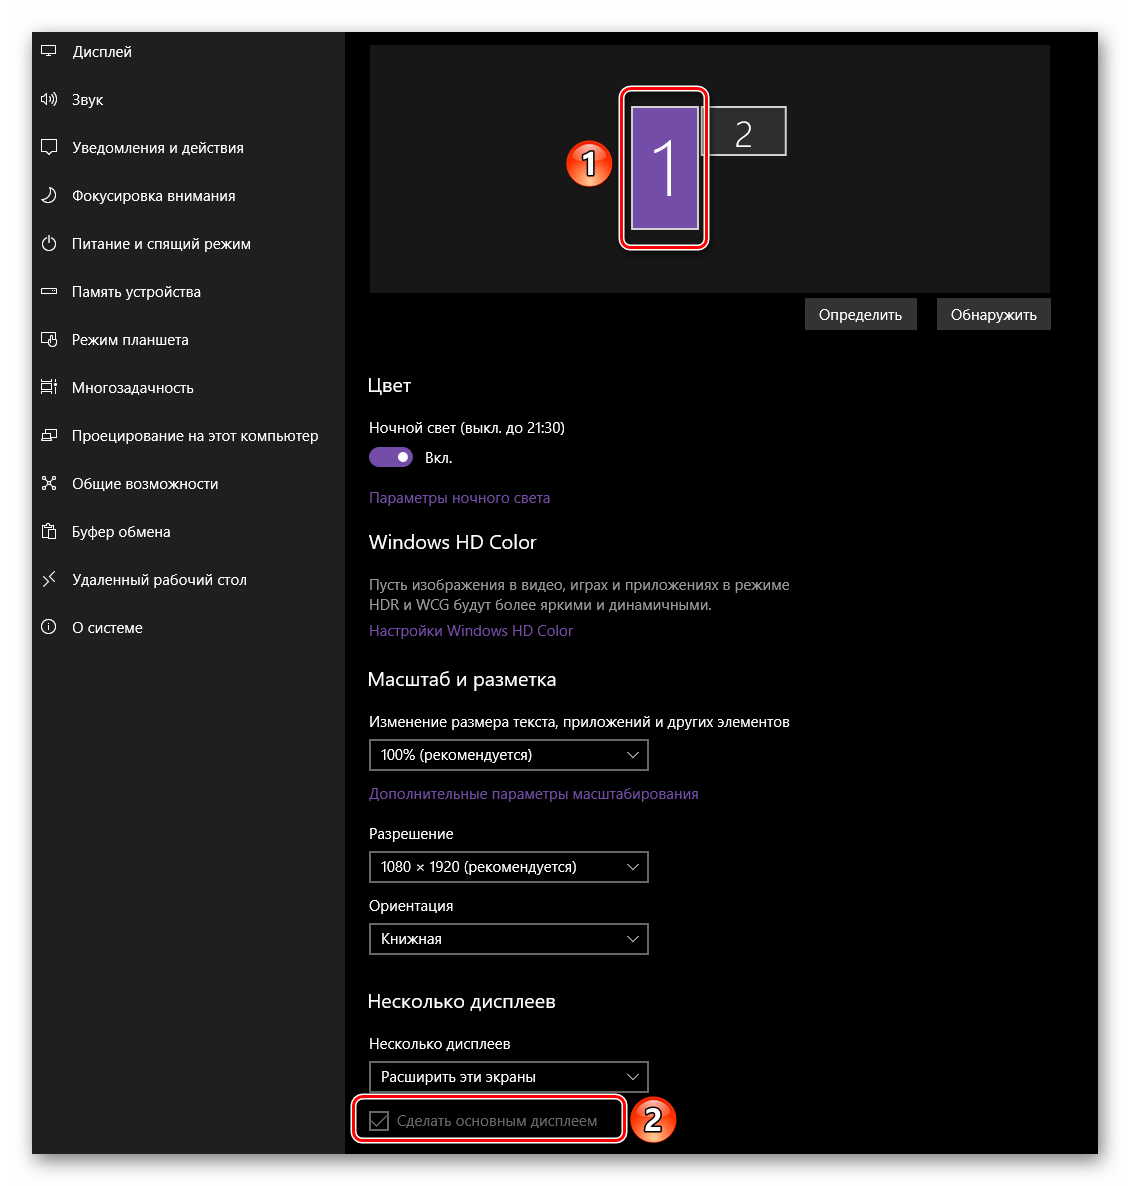
Дополнительно: Если то, как система определила основной и дополнительный дисплей не соответствует вашему пожеланию, выделите в области предпросмотра тот из них, который считаете главным, а затем установите галочку напротив пункта «Сделать дисплей основным».
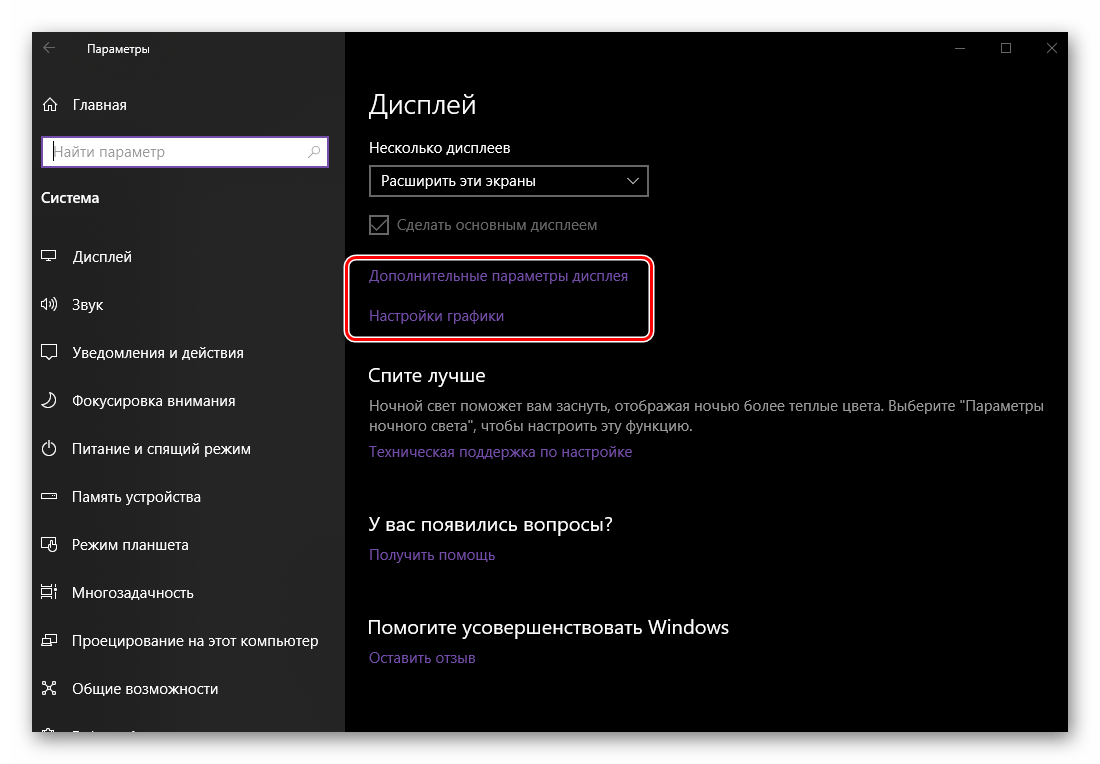
- «Дополнительные параметры дисплея» и «Настройки графики», как и упомянутые ранее параметры «Цвета» и «Ночного света», мы тоже пропустим – это относится к графике в целом, а не конкретно к теме нашей сегодняшней статьи.


В настройке двух экранов, а точнее, передаваемого ими изображения, нет ничего сложного. Главное, не только учесть технические характеристики, диагональ, разрешение и положение на столе каждого из мониторов, но и действовать, по большей части, на свое личное усмотрение, иногда пробуя разные варианты из списка доступных. В любом случае, даже если вы ошиблись на каком-то из этапов, все всегда можно изменить в разделе «Дисплей», находящемся в «Параметрах» операционной системы.
Дополнительно: Быстрое переключение между режимами отображения
Если при работе с двумя дисплеями вам приходится часто переключаться между режимами отображения, отнюдь не обязательно каждый раз обращаться к рассмотренному выше разделу «Параметров» операционной системы. Это можно сделать куда более быстрым и простым способом.
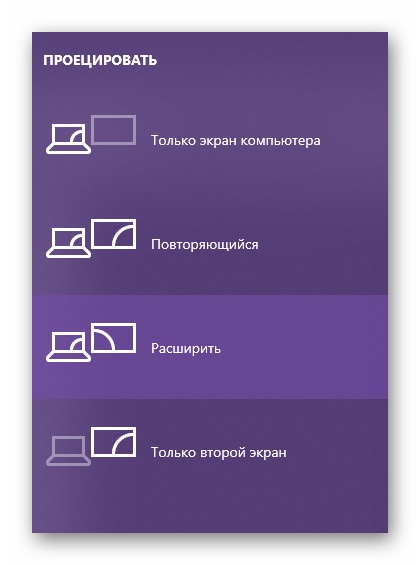
Нажмите на клавиатуре клавиши «WIN+P» и выберите в открывшемся меню «Проецировать» подходящий режим из четырех доступных:
- Только экран компьютера (основной монитор);
- Повторяющийся (дублирование изображения);
- Расширить (продолжение картинки на втором дисплее);
- Только второй экран (отключение основного монитора с трансляцией изображения на дополнительный).
Непосредственно для выбора необходимого значения можно использовать как мышку, так и обозначенную выше комбинацию клавиш – «WIN+P». Одно нажатие – один шаг в списке.
Заключение
Теперь вы знаете, как подключить к компьютеру или ноутбуку дополнительный монитор, а затем и обеспечить его работу, адаптировав под свои нужды и/или потребности параметры передаваемого на экран изображения. Надеемся, данный материал был полезен для вас, мы же на этом закончим.
Наша группа в TelegramПолезные советы и помощь
После подключения компьютера с Windows 11 к внешним дисплеям вы можете настроить параметры для каждого из них.
Перед началом работы
Перед изменением параметров внешних мониторов обеспечьте правильное подключение. Вот что можно сделать:
-
Правильно подключите кабели к компьютеру или док-станции.
-
Проверьте наличие обновлений Windows. Чтобы проверить наличие обновлений, выберите Пуск , затем найдите параметры. Выберите Параметры > Центр обновления Windows > Проверить наличие обновлений.
Совет: Если вы используете адаптер беспроводного дисплея, подключите адаптер к порту HDMI на новых телевизорах, а затем подключите к нему компьютер по беспроводной сети. После подключения адаптера беспроводного дисплея к телевизору перейдите на Windows 11 компьютер, нажмите клавишу с логотипом Windows+ K, чтобы открыть приведение, а затем выберите адаптер беспроводного дисплея.
Изменение порядка мониторов
Этот параметр отображается, если Windows обнаруживает несколько мониторов. Каждый монитор будет пронумерован для упрощения идентификации.
Идентификация монитора
Чтобы узнать, какой номер соответствует дисплею, выберите Пуск , а затем найдите параметры. Выберите Параметры > Система > Дисплей > Идентифицировать. На экране монитора появится номер, который ему назначен.
Обнаружение монитора
Если вы подключили другой дисплей и он не отображается в настройках, выберите Пуск > Параметры > Система > Дисплей > Несколько дисплеев > Обнаружить.
Подключение беспроводного дисплея
Если вы подключили беспроводной дисплей и он не отображается в разделе Параметры, выберите Пуск > Параметры > Система > Дисплей > Несколько дисплеев > Подключиться.
Упорядочение мониторов
Если у вас несколько мониторов, вы можете изменить их порядок. Это удобно, если вы хотите, чтобы ваши мониторы соответствовали их настройке у вас дома или в офисе. В разделе параметров «Дисплей» выберите и перетащите монитор, куда хотите. Проделайте это для всех мониторов, которые нужно переместить. После получения нужного расположения нажмите Применить. Протестируйте свое новое расположение, перемещая указатель мыши на разных мониторах, чтобы убедиться в их правильной работе.
Совет: Используйте параметр Определить при упорядочении дисплеев, чтобы увидеть номер дисплея на экране.
Несколько параметров отображения
При отстыковке компьютера окна на внешнем мониторе сворачиваться. При повторной закреплении компьютера к монитору Windows помещает все точно так же, как раньше.
Чтобы настроить это поведение, выполните следующие действия:
-
Выберите Пуск > Параметры > Отображение системных >.
-
Прокрутите вниз и выберите Несколько дисплеев , чтобы развернуть этот раздел.
-
Установите флажки в соответствии со своими предпочтениями:
-
Запоминать расположения окон на основе подключения монитора
-
Свертывание окон при отключении монитора.
-
Изменение параметров мониторов
-
Изменение яркости и цвета дисплея
-
Изменение разрешения, масштабирования и макета дисплея
-
Изменение частоты обновления отображения
Выбор варианта отображения
Чтобы изменить то, что отображается на дисплеях, нажмите клавишу с логотипом Windows+ P. Вот параметры, которые можно выбрать.
|
Если необходимо: |
Выберите |
|
Просматривать элементы только на одном мониторе. |
Только экран компьютера |
|
Просматривать одинаковые элементы на всех мониторах. |
Повторяющийся |
|
Просматривать рабочий стол на нескольких экранах. При расширении мониторов вы можете перемещать элементы между двумя экранами. |
Расширить |
|
Просматривать все только на втором мониторе. |
Только второй экран |
- Home
- Windows Tips
- Folder size windows 10
Keeping files organized and your drive storage optimized means you have to get rid of files you don’t need. Hard drives have gotten big; you can easily find systems with 1TB drives, but users who are now moving to an SSD have to make do with less storage space if they do not have a hard drive to go with it.
Regardless of your storage situation, you should still keep unnecessary folders off your desktop. It’s a good idea to start with large folders and move them to external storage.
Start off from the root of a drive and check the size of the folders there.
To show folder size in Windows 10, try these methods
1. Mouse tool-tip
- Open File Explorer.
- Select the folder that you want to view the size for.
- Wait a second or two, and a tool-tip will appear.
- The tool-tip will show you the size of the folder.
2. Folder properties
- Open File Explorer and navigate to the folder that you want to view the size of.
- Right-click it, and select Properties from the context menu.
- On the General tab, check the Size field to view folder size.
3. Settings Storage
If you need a more holistic view of how storage is being used on your Windows 10 PC, the Settings app has an excellent tool that lets you visualize how storage is used.
- Open the Settings app.
- Go to the System group of settings.
- Select the Storage tab.
- Allow the tab to load the storage usage.
- Once loaded, click the Show more categories.
- You will get a list of how storage is used on the drive. Select a category to view folders under it.
- For non-Windows drive, scroll a little further down and select ‘View storage on other drives.’
4. TreeSize Free
There are lots of third-party tools that you can use to view the folder size on Windows 10. It’s an area where the OS generally lacks, so plenty of tools have been developed to fill the gap.
- Install a free app called TreeSize Free from the Microsoft Store.
- Run the app, and click the Select Directory button.
- Pick a folder or a drive to scan for folders.
- The app will show you each folder and its size. You can sort the results by folder size.
- Expand each folder, and you can see the size of the folders nested under it.
5. Folder size in File Explorer search
You can use File Explorer to search for files and folders, and the results can be sorted by size.
- Open File Explorer and navigate to the folder you want to search in.
- Click inside the search bar, and enter a search term. Tap Enter.
- When the Search completes, go to the Search Tools tab.
- Open the Size dropdown, and select one of the size presets to narrow the results down.
- Alternatively, you can use the size: search modifier to enter a custom size e.g. size:1MB. Add it at the end of the search term.
Folder size in File Explorer
If you set the folder view of a particular folder to ‘Details,’ File Explorer adds a Size column to it. Unfortunately, this column remains empty for any and all folders. Windows 10 and its many predecessors do not show the folder size in File Explorer, and it doesn’t plan on doing so in the future even though users have been asking for the feature.
The reason the feature doesn’t extend to folders is that it can take time to calculate folder size, and that would slow File Explorer down. It’s not a big deal for smaller folders that do not have a complex folder structure but for large folders with many files and many nested folders under it, it can become a problem that Windows would like to avoid.
Deleting unnecessary folders
It’s a good idea to keep junk files and folders off your system. Here are a few ways to do that;
- Clean/empty the Recycle Bin often.
- Enable Storage Sense from the Settings app under System>Storage.
- Remove junk files and delete Windows update files. You can do this by right-clicking the Windows drive, and selecting properties. Click ‘Disk Cleanup’ and delete anything that isn’t needed.
- If you take a lot of screenshots, make sure you delete the ones you don’t need because the folder can get quite big over time.
- Check folders like those created by Apple and remove anything you don’t need e.g., multiple backups for a device.
Conclusion
Folders, especially those generated by apps, can get out of hand. Users may be aware of how big a folder they’ve personally created has gotten, but those created by an app like iTunes can get quite big without warning. Before you know it, your drive has turned red, and your OS is lagging. That’s why it’s a good idea to check in on them from time to time.

Fatima Wahab
Fatima has been writing for AddictiveTips for six years. She began as a junior writer and has been working as the Editor in Chief since 2014.
Fatima gets an adrenaline rush from figuring out how technology works, and how to manipulate it. A well-designed app, something that solves a common everyday problem and looks