

Установка IIS
На самом деле это даже не установка, как таковая, а включение службы, потому что в Windows 10 этот компонент есть сразу, но он просто выключен.
Первым делом нам нужно нажать комбинацию клавиш Win + R, и после того как появится окно “Выполнить”, нам нужно набрать “appwiz.cpl” и нажать OK. Либо мы просто можем пойти в Панель управления и там выбрать пункт Программы – Программы и компоненты – Установка и удаление программ.

Тут нам нужно выбрать пункт “Включение или отключение компонентов Windows”.

Тут находим пункт “Службы IIS”, ставим на против него галочку и нажимаем ОК, после чего служба будет включена.

Если вам, как разработчику, нужны дополнительные параметры, то мы можете раскрыть этот пункт, нажав на плюсик, и включить или отключить те функции, которые вам необходимы.

После того как все сделано можно запустить браузер, и вбить в адресной строке localhost, чтобы убедиться, что все работает. Также в меню Пуск и в папке «Средства администрирования» появится пункт «Диспетчер служб IIS». Также туда можно попасть снова нажав Win + R и набрав inetMgr.

Setting up a web server on Windows 10 can seem intimidating, but it’s actually a straightforward process. By installing software like IIS or XAMPP, you can have a functioning web server up and running in no time. Follow the steps below and you’ll be ready to serve websites from your own machine.
Setting up a web server on Windows 10 will allow you to host websites and manage web applications from your personal computer. The steps below guide you through the installation and configuration of IIS (Internet Information Services) or XAMPP, two popular choices for web servers on Windows.
Step 1: Install IIS
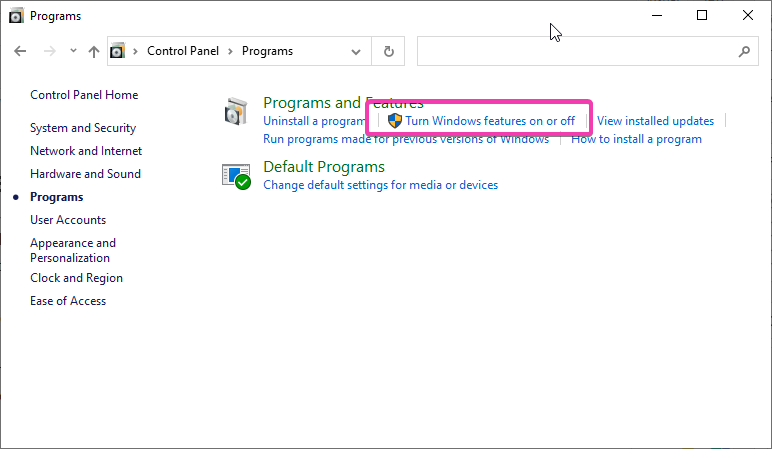
To install IIS, open the Control Panel and navigate to «Programs and Features,» then click «Turn Windows features on or off.»
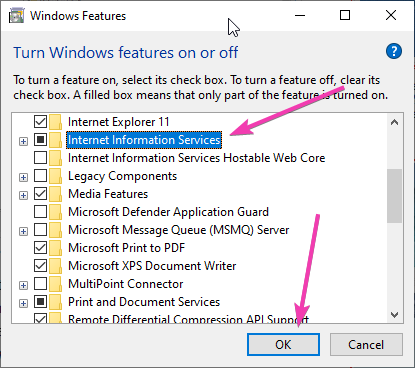
In the Windows Features dialog, check the box for Internet Information Services (IIS) and click OK. Windows will then install the necessary components.
Step 2: Open IIS Manager
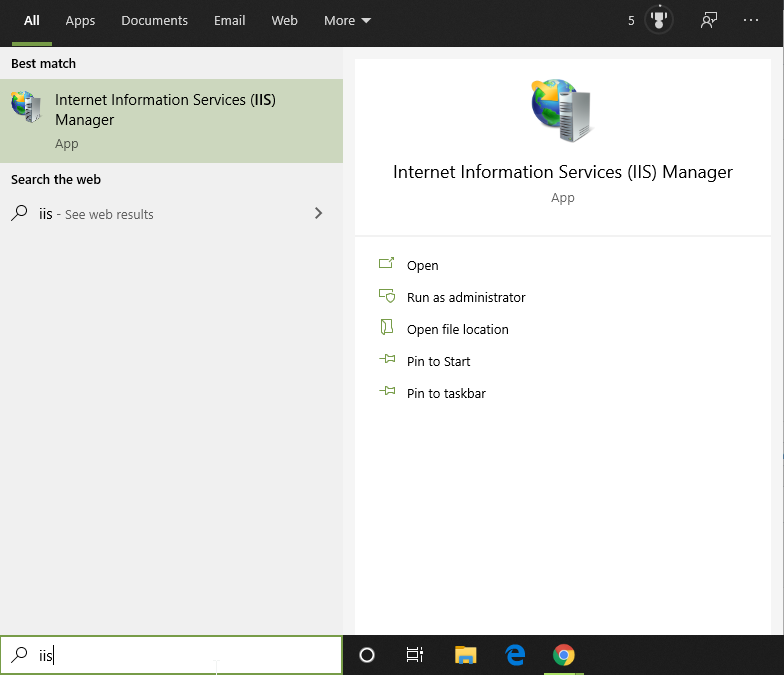
After installing IIS, open IIS Manager by typing «IIS» in the Windows search bar and selecting «Internet Information Services (IIS) Manager» from the results.
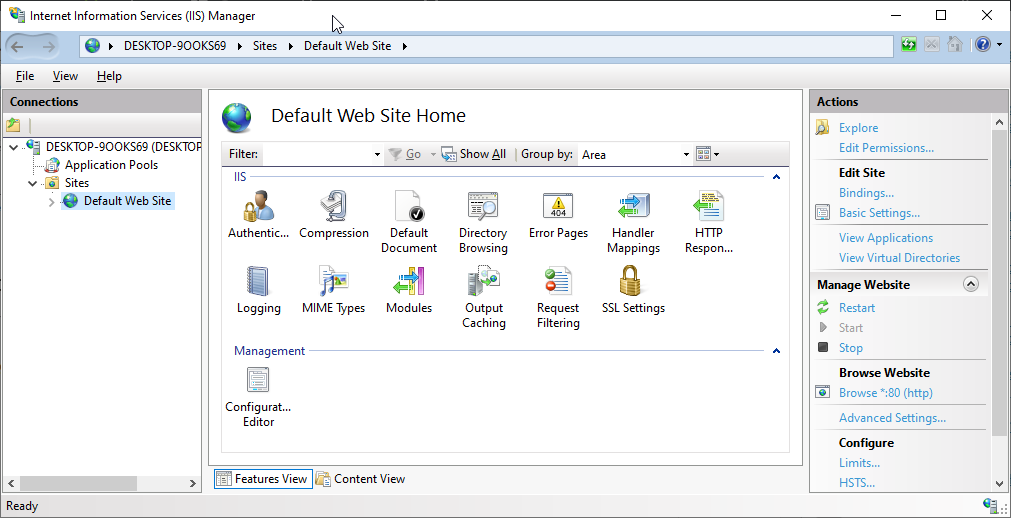
IIS Manager is the interface where you can manage your websites and web applications. It’s here that you’ll configure settings and manage your server.
Step 3: Install XAMPP (Alternative to IIS)
If you prefer XAMPP, download it from the official Apache Friends website and run the installer.
During installation, select the components you need. For a basic web server, you’ll want Apache and MySQL. Follow the prompts to complete the installation.
Step 4: Start Apache in XAMPP
Once installed, open the XAMPP Control Panel and click «Start» next to Apache to start your web server.
The XAMPP Control Panel allows you to manage different aspects of your server including starting and stopping services like Apache and MySQL.
Step 5: Test Your Setup
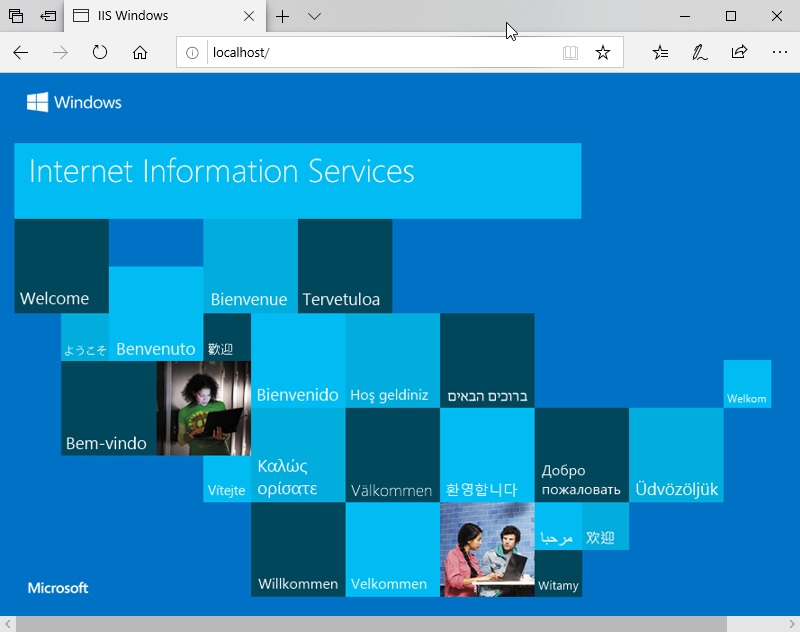
Open a web browser and type «localhost» in the address bar. You should see the IIS or XAMPP welcome page, indicating your web server is running.
Testing with «localhost» helps confirm that your server is correctly installed and operational. If you see the welcome page, you’re good to go.
Once everything is set up, your web server will be ready to host websites, allowing you to develop and test web applications locally.
Tips for Setting Up a Web Server on Windows 10
- Ensure Windows Firewall is configured to allow incoming traffic on the ports your web server uses (usually port 80 for HTTP and port 443 for HTTPS).
- Regularly update your web server software to protect against vulnerabilities.
- Use strong passwords for any administration interfaces to protect your server from unauthorized access.
- Backup your server settings and website data regularly.
- Test your server’s performance and security using tools like ApacheBench or LoadImpact.
Frequently Asked Questions
What is IIS?
IIS (Internet Information Services) is a flexible, secure, and manageable web server for hosting websites, services, and applications.
What is XAMPP?
XAMPP is a free and open-source cross-platform web server solution stack package developed by Apache Friends, consisting mainly of the Apache HTTP Server, MariaDB database, and interpreters for scripts written in the PHP and Perl programming languages.
Can I run both IIS and XAMPP on the same machine?
Yes, but you need to configure them to use different ports to avoid conflicts.
How do I install PHP on IIS?
To install PHP on IIS, download the PHP installer from the official PHP website, run the installer, and configure IIS to use PHP.
How do I secure my web server?
To secure your web server, use strong passwords, keep your software updated, use firewalls, and consider installing security modules or extensions.
Summary
- Install IIS.
- Open IIS Manager.
- Install XAMPP (alternative to IIS).
- Start Apache in XAMPP.
- Test your setup.
Conclusion
Setting up a web server on Windows 10 allows you to host and manage websites directly from your computer. Whether you choose IIS or XAMPP, the process is relatively simple and can be completed in just a few steps. By following this guide, you’ll be well on your way to having a functional web server.
Remember to keep your server secure by using strong passwords and keeping your software up to date. Once your web server is set up, you can explore more advanced configurations and optimizations to improve performance and security. Happy hosting!
Kermit Matthews is a freelance writer based in Philadelphia, Pennsylvania with more than a decade of experience writing technology guides. He has a Bachelor’s and Master’s degree in Computer Science and has spent much of his professional career in IT management.
He specializes in writing content about iPhones, Android devices, Microsoft Office, and many other popular applications and devices.
Read his full bio here.
IIS (internet information services manager) on Windows 10/7 Desktop or server is basically a flexible and secure Web server provided by Microsoft on its desktop and server operating systems. Just like Apache and Nginx in Linux Distros on WIndows we have IIS.
Install and configure the webserver (IIS) in Windows 10Step 1: Enable Internet Information Services -IIS on Windows 10 Step 2: Start Internet information service (IIS) ManagerStep 3: Test IIS WebserverStep 4: Configure and install WordPress with IIS ManagerHow to Disable IIS web server on Windows 10
Install and configure the webserver (IIS) in Windows 10
Microsoft didn’t integrate only the desktop version of Windows with IIS- Internet Information Services instead with this even Windows 10 Home can be turned in to a web server with the help of this feature.
However, as compared free and open-source server such as Apache, the configuration and the dealing with IIS web server could be a little complex, yet if you are a Windows Desktop or server user, the usage of IIS would be best because of better integration into the system.
The IIS, which also contain an FTP server, is not intended on the client to provide company websites or heavily used web applications. The Windows 10 desktop IIS is mainly for developing or for the demonstration of web applications.
So, if you want to set up and run some application on Windows 10 PC using IIS, for example, WordPress, then here is the step by step guide to install and configure this web server.
Step 1: Enable Internet Information Services -IIS on Windows 10
So, to install the Windows 10 web server feature, we don’t have to download some special packages, it is already in our system and just we need to activate.
Go to Control panel-> Select Program-> Turn Windows features on and off.
Now, scroll down and select “Internet Information Services” and press OK button to get it installed. Later restart the PC to make changes into effect.
The installation of it is very easy, by default when we select the IIS management console the Web Management Tools and Word Wide services along with HTTP features, performance features, security, system status and diagnostics are automatically going to be install. If you want FTP server as well then click on the + icon given in front of Internet information services and select FTP server option too.
Step 2: Start Internet information service (IIS) Manager
Go to Windows 10 Search box and simply type IIS and you will get installed webserver Manager application, click on it to start.
Finally, you will see the IIS manager with so many options to operate and handle different Web server application tasks.
Step 3: Test IIS Webserver
After the installation of IIS, Windows will automatically start the webserver services on default port number 80. Thus, to check whether it is functioning properly or not, open your system browser and type http://localhost to see.
By default, the IIS shows the local HTML page to show everything is working fine. In case not then check whether the HTTP server (localhost) is listening on port 80. Run the following command in command prompt.
netstat -a -p tcp -n
However, for newly installed IIS webserver such problem would not appear.
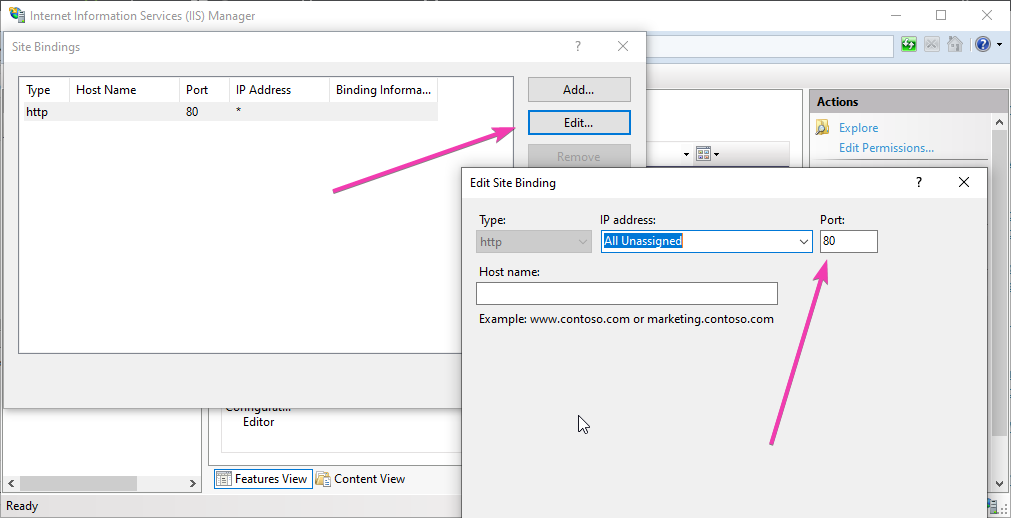
In case, your port 80 is already bound to some other application then you can change the default website or Http listening port on IIS.
Right-click on Default web site option given under the Sites and select Edit Bindings.
Now Click on Edit button and change the port number to one which you want to use. You can also specify any particular IP-address you want to use that port number.
Step 4: Configure and install WordPress with IIS Manager
So, to give you an idea of how to host an HTML website or web application like WordPress on IIS, we are going to configure it.
However, hosting a website on IIS, the steps will be the same for both WordPress or just a simple HTML one. Yet being a web application WordPress needs PHP support too.
Right-click on the default website and select Explore.
The root directory at %SystemDrive% \inetpub\wwwroot will open. Now simply extract all your WordPress file there. If it asks for permission give it.
Now, Select your newly created website and click on the restart option given in the right-side panel.

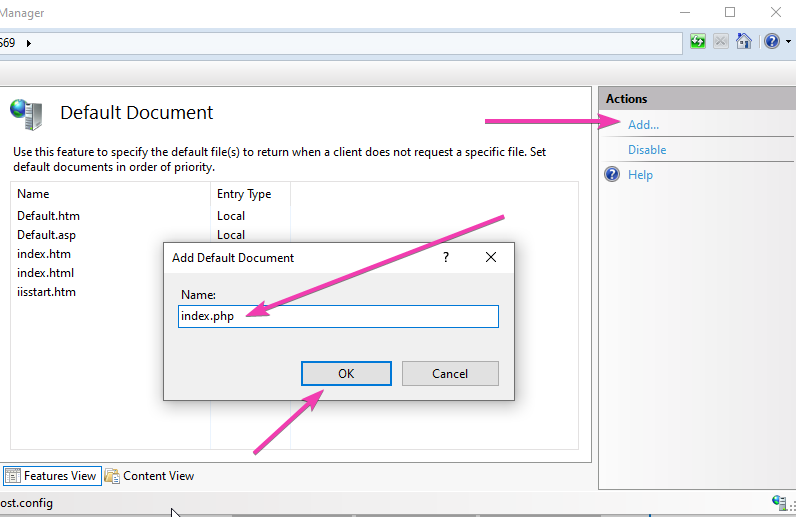
Add index.php to the Default Document.
Select Default website and double click on Default Document icon then Add link given on the right-side panel. Type index.php and save it.
Open the browser and point it to http://localhost, this time it will show the hosted website. However, in case of WordPress, it gives an error because we haven’t yet configured its Wp-config file.
Again right-click on the Default website ->Explore and then rename wp-config-sample.php to wp-config.php.
Now edit the wp-config.php file and change the following things given in red colour… In short, add the database details.
// ** MySQL settings - You can get this info from your web host ** //
/** The name of the database for WordPress */
define( 'DB_NAME', 'database_name_here' );

/** MySQL database username */
define( 'DB_USER', 'username_here' );

/** MySQL database password */
define( 'DB_PASSWORD', 'password_here' );

/** MySQL hostname */
define( 'DB_HOST', 'localhost' );
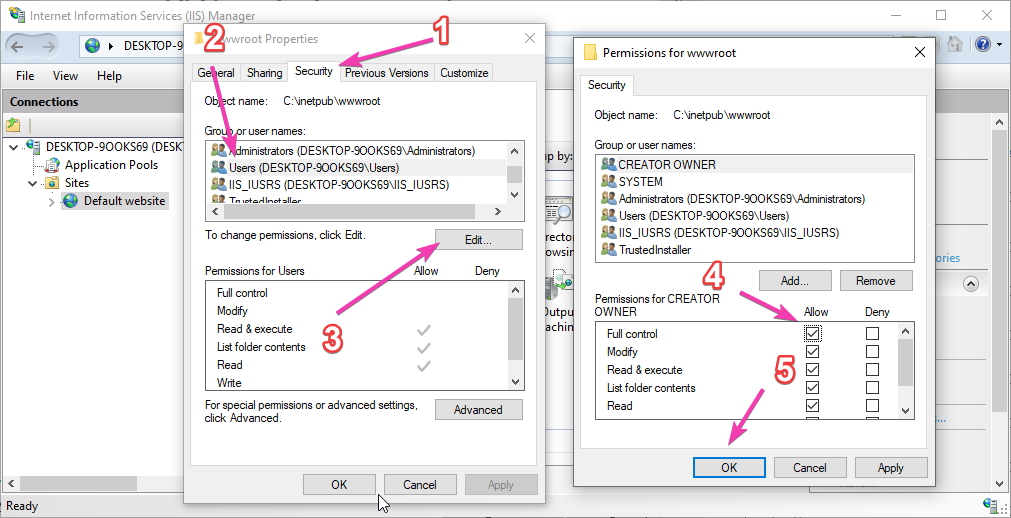
In case, it will say you don’t have permission to write a wp-config file, then simply right click on the Default website in IIS manager and select Edit Permissions.
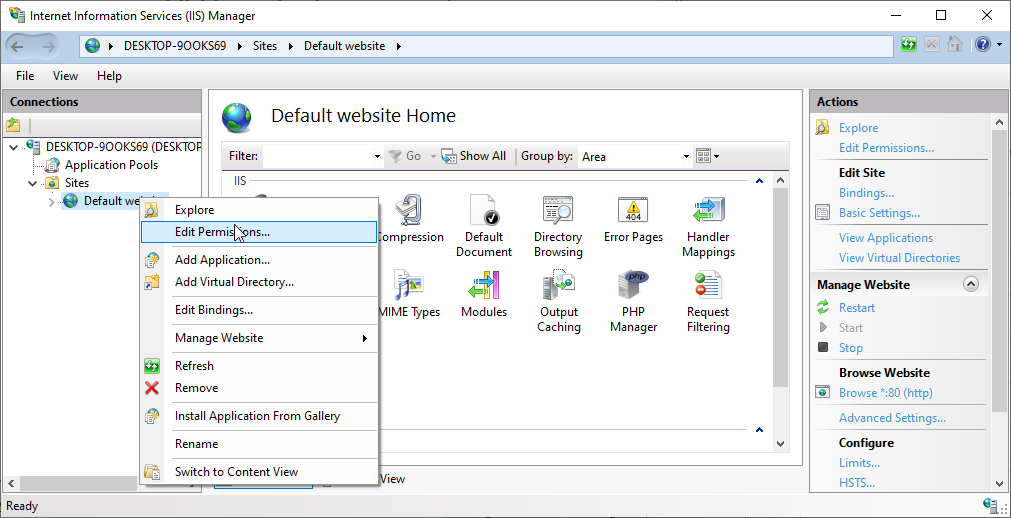
Go to Security Tab and select your Windows system user. Then Edit button-> Give all permissions to it and then press OK button.
Now, type http://localhost/index.php and you would be able to access your WordPress installation.
In the same way, if you have hosted some HTML based website file for development in the root directory of Default website you will get to see that.
How to Disable IIS web server on Windows 10
In case you don’t require IIS Manager and want to disable it. Again open “Turn Windows feature On or OFF” and unselect the option “Internet Information Services“. This will remove the IIS web server from your Windows 10 or Windows 7 PC, laptop or server.
Other Articles:
- How to install Kali Linux with GUI on WSL Windows 10
- How to install Apache web server on CentOS 8 or Stream
- Install Apache Cassandra on Windows 10/8/7 without datastax
- How to install Apache, MySQL, PHP & PhpmyAdmin on Windows 10 WSL
Все способы:
- Шаг 1: Загрузка и распаковка файлов
- Шаг 2: Редактирование конфигурационного файла
- Шаг 3: Проверка работы локального сервера
- Вопросы и ответы: 7
Важно! Разработчики Apache постоянно обновляют свое программное обеспечение, потому эта инструкция может потерять свою актуальность со временем. Но стоит отметить, что кардинально ничего не изменится, отличия будут заключаться только в параметрах, прописанных в конфигурационном файле. В любом случае при надобности рекомендуется обратиться к официальной документации от разработчиков.
Шаг 1: Загрузка и распаковка файлов
Первостепенно для установки веб-сервера Apache необходимо скачать на компьютер архив со всеми его файлами. Делать это следует только на официальном сайте, в противном случае есть вероятность занести в свою операционную систему вирус. Воспользуйтесь кнопкой ниже, чтобы перейти на страницу загрузки Apache.
Скачать Apache с официального сайта
Находясь на странице загрузки архива с файлами Apache, выполните следующие действия, чтобы начать процесс скачивания:
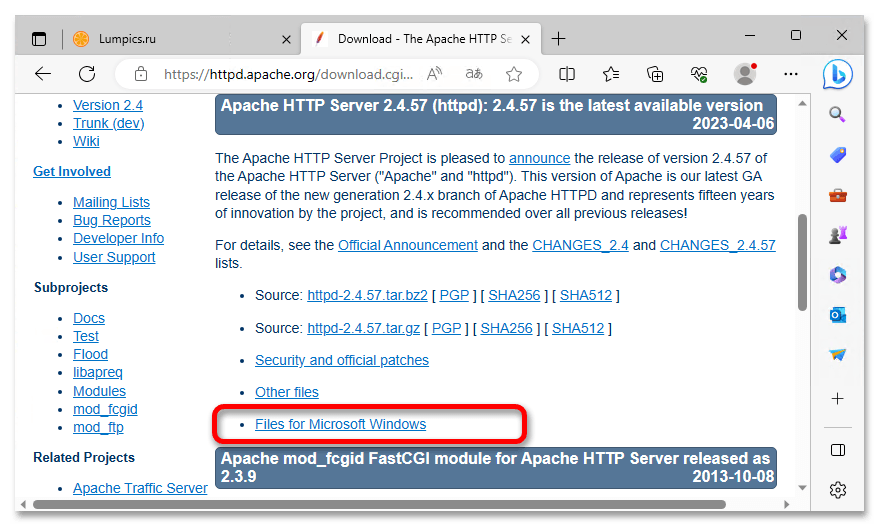
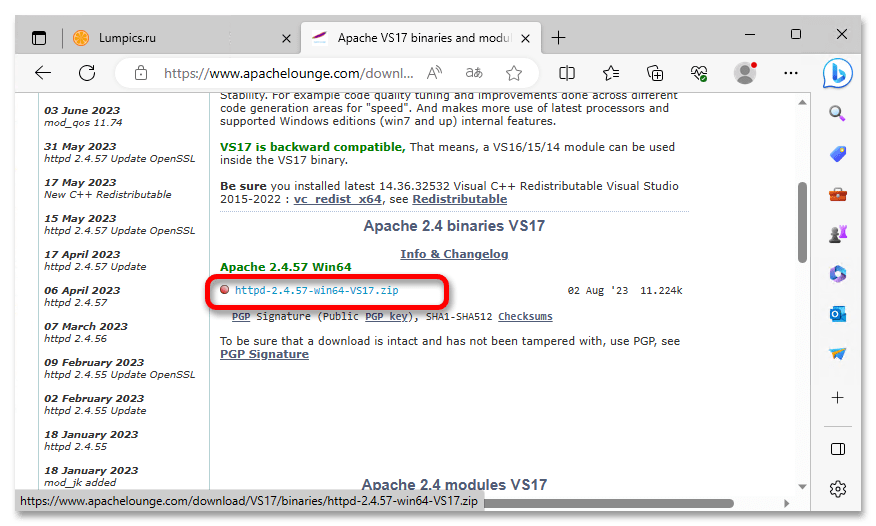
- Спуститесь до блока «Downloading the Apache HTTP Server» и кликните по ссылке, расположенной под строкой «Stable Release — Latest Version». Обычно она имеет название, соответствующее текущей версии приложения, в данном случае это «2.4.57».
- После этого вас перекинет до блока «Apache HTTP Server 2.4.57 (httpd): 2.4.57 is the latest available version», в котором нажмите по ссылке с названием «Files for Microsoft Windows».
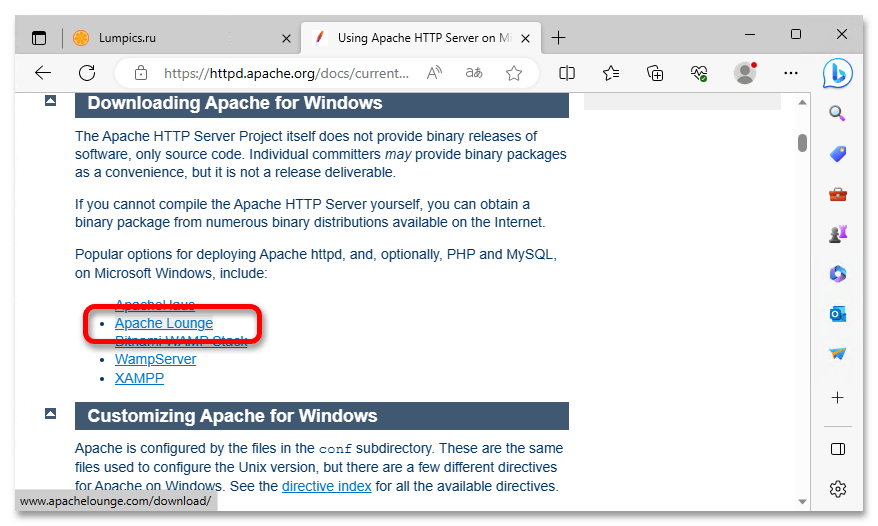
- Перейдя на новую страницу и находясь в блоке «Downloading Apache for Windows», щелкните по строке «Apache Lounge».
- Спуститесь чуть ниже до блока «Apache 2.4 binaries VS17», где щелкните по ссылке, рядом с которой расположен красный кружок. Обычно она имеет в своем названии версию программы и приписку «win64» (для 64-разрядных систем) или «win 32» (для 32-разрядных систем).
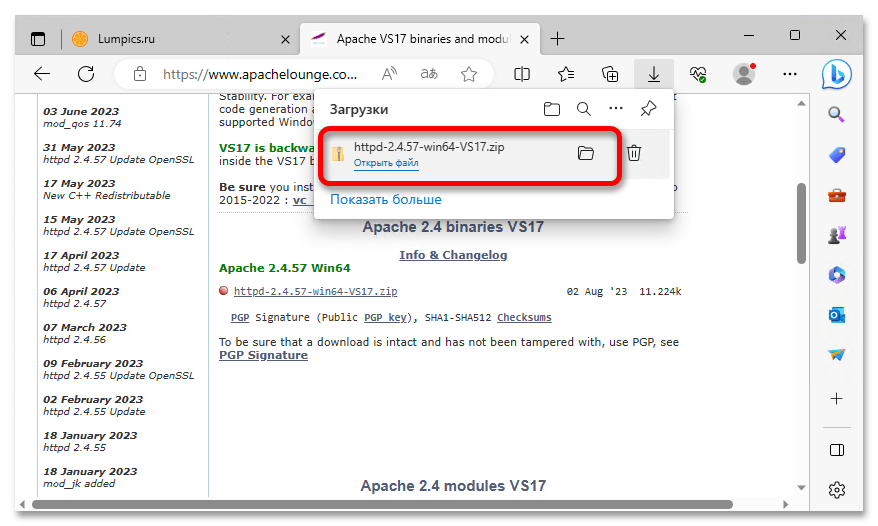
- После этого начнется загрузка архива с файлами программы на компьютер. Дождитесь ее завершения, после чего перейдите в директорию, куда был скачан файл. Для этого можете кликнуть по кнопке в виде папки, расположенной в интерфейсе браузера.
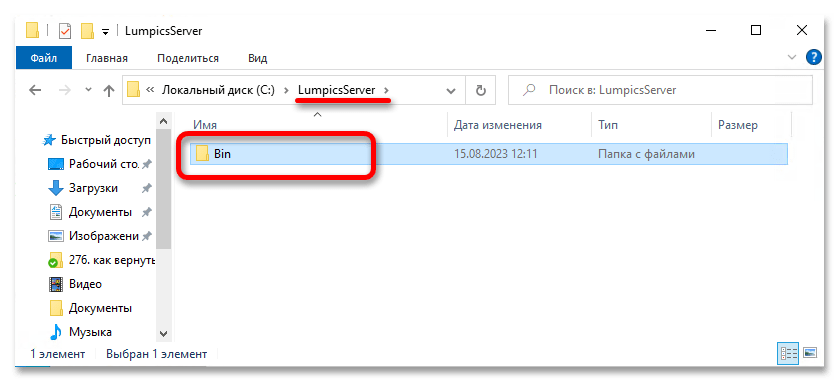
- Откройте окно «Проводника» и перейдите к системному диску. Создайте в корневом каталоге (то есть прямо внутри «С:») раздела папку с любым названием — именно в ней будут находиться файлы веб-сервера. В данном примере будет создана папка с названием «LumpicsServer». После этого перейдите в нее и создайте еще одну папку, которую назовите «Bin».
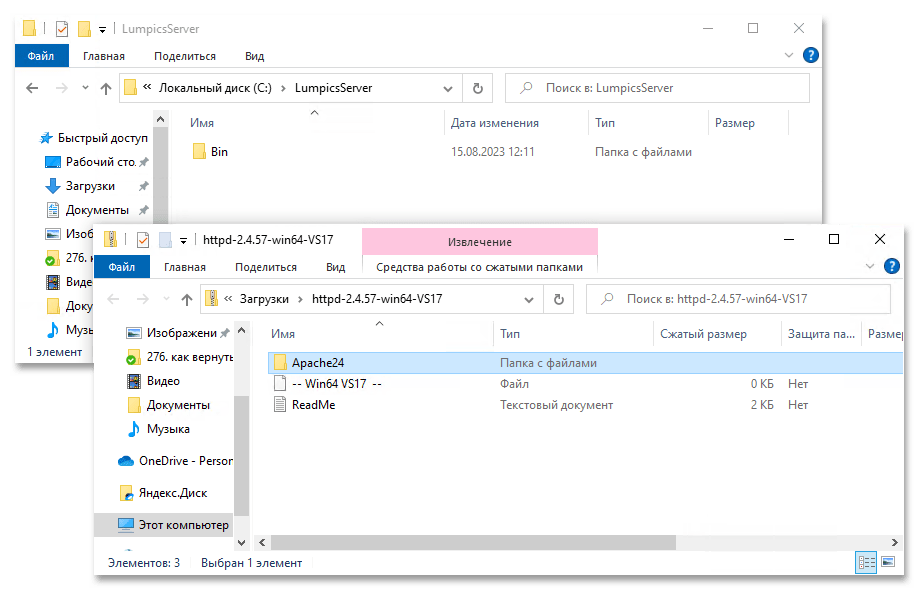
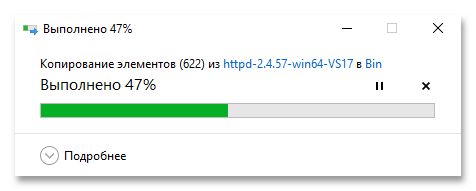
- Распакуйте файлы, содержащиеся в архиве скачанного сервера, и поместите их в папку «Bin», созданную на предыдущем этапе. Для этого вы можете просто перетащить папку «Apache24» из одного окна в другое, как это показано на изображении ниже.
- Дождитесь завершения распаковки данных. За ходом выполнения этой процедуры вы можете следить в появившемся диалоговом окне.

Шаг 2: Редактирование конфигурационного файла
После извлечения файлов программы из архива понадобится выполнить настройку Apache. Делается это путем редактирования конфигурационного файла. Для использования базовых функций сервера проделайте следующие действия:
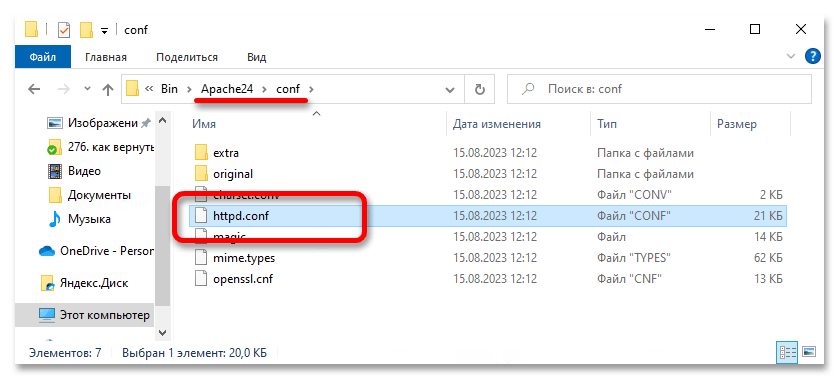
- Перейдите в извлеченную из архива папку «Apache24», а затем проследуйте в каталог «conf», в котором откройте конфигурационный файл с названием «httpd.conf». Для этого достаточно будет нажать по его названию дважды левой кнопкой мыши.

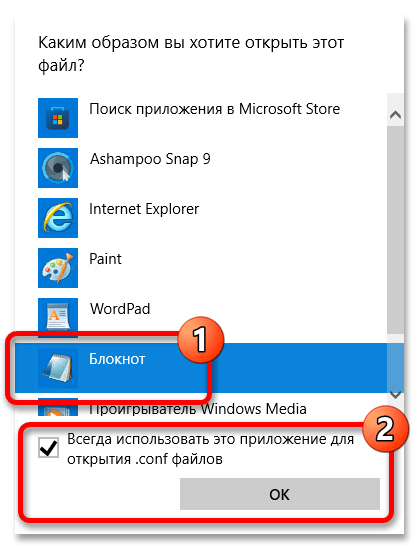
Если на экране появится диалоговое окно с надписью «Каким образом вы хотите открыть этот файл?», выберите в списке приложение «Блокнот» и щелкните по кнопке «ОК». Чтобы в будущем это меню не отображалось, поставьте отметку напротив пункта «Всегда использовать это приложение для открытия .conf файлов».
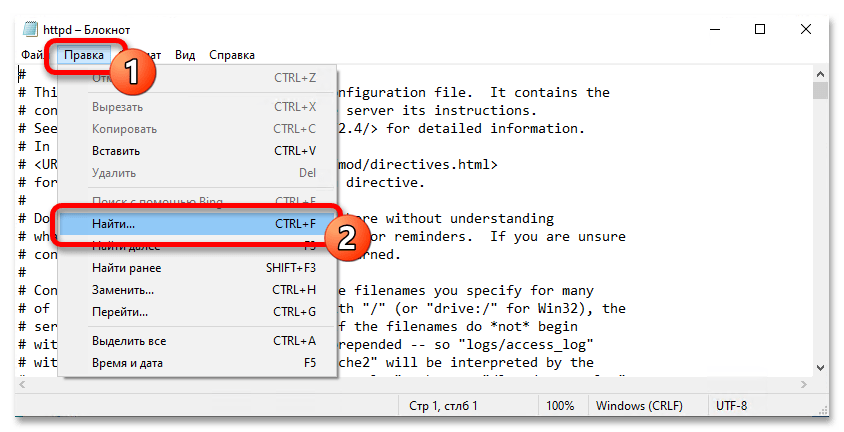
- В появившемся окне текстового редактора вам необходимо будет искать определенные строки для редактирования. Чтобы ускорить этот процесс, воспользуйтесь встроенной функцией поиска. Для ее вызова нажмите на клавиатуре комбинацию клавиш Ctrl + F или выберите из меню «Правка» пункт «Найти».

После этого в появившемся окне вставьте в поле «Что» искомую строку, которая приведена ниже:
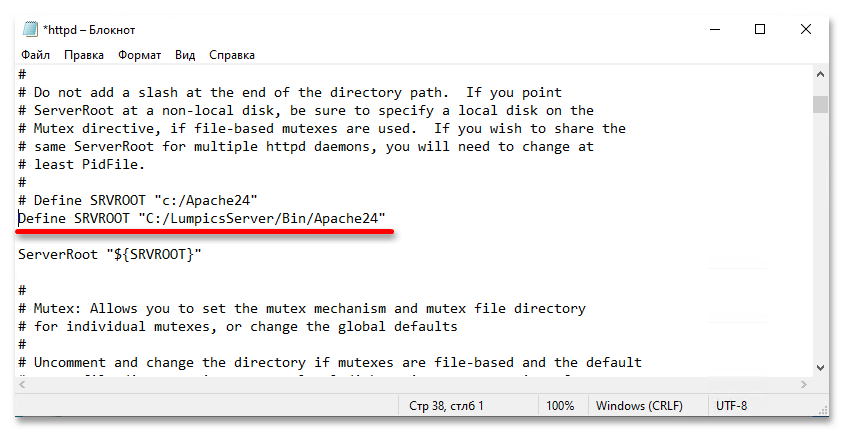
Define SRVROOT "c:/Apache24"Нажмите по кнопке «Найти далее», чтобы программа выполнила поиск по заданным критериям. Если на экране появится диалоговое окно, в котором сообщается о том, что искомой строки не было найдено, тогда установите переключатель в блоке «Направление» в положение «Вверх» и снова нажмите по кнопке «Найти далее».
- После того как искомая строка будет найдена, измените ее на приведенную ниже. Также, вместо удаления, вы можете ее просто закомментировать, поставив в самом начале символ решетки («#»). Для примера будет использован именно этот способ.
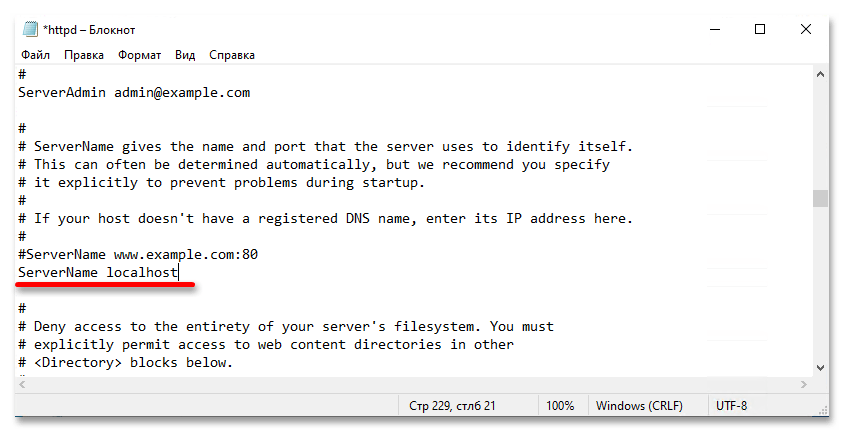
Define SRVROOT "C:/LumpicsServer/Bin/Apache24" - Вернитесь в меню поиска и отыщите строку
#ServerName www.example.com:80. Оставьте ее закомментированной, а снизу вставьте следующее значение:ServerName localhostЭтот параметр настроит точку подключения к вашему веб-серверу, установив в качестве него локальный адрес компьютера.
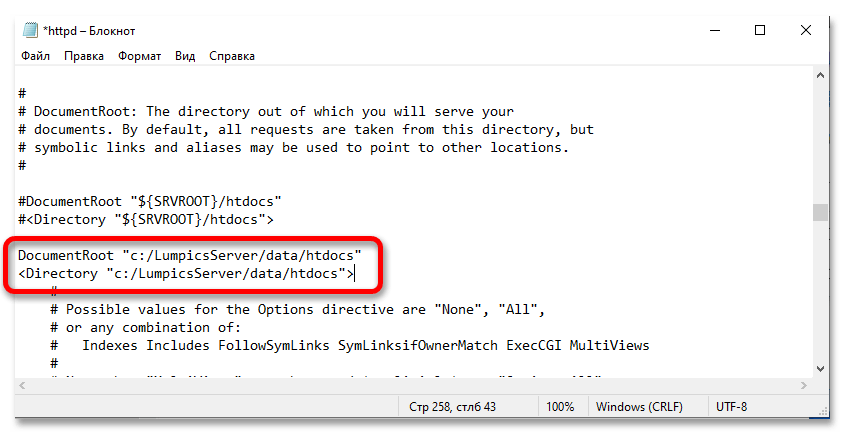
- Найдите в документе показанные ниже строки так же через меню поиска. В качестве запроса используйте одну из приведенных строк.
DocumentRoot "${SRVROOT}/htdocs"
<Directory "${SRVROOT}/htdocs">Закомментируйте искомые параметры, а снизу после них вставьте такие же, только с указанием корневой папки для хранения документации:
DocumentRoot "c:/LumpicsServer/data/htdocs"
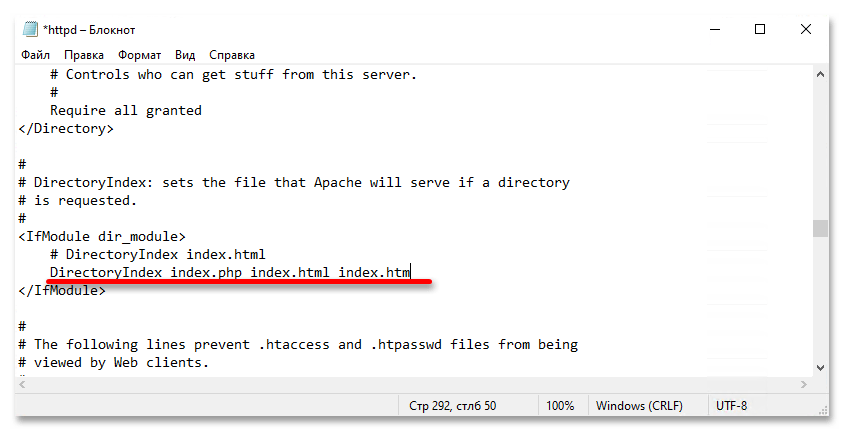
<Directory "c:/LumpicsServer/data/htdocs"> - С помощью поиска по документу найдите строку
DirectoryIndex index.html. После этого закомментируйте ее, а ниже вставьте видоизмененный параметр:DirectoryIndex index.php index.html index.htm - Следующим найдите параметр под названием
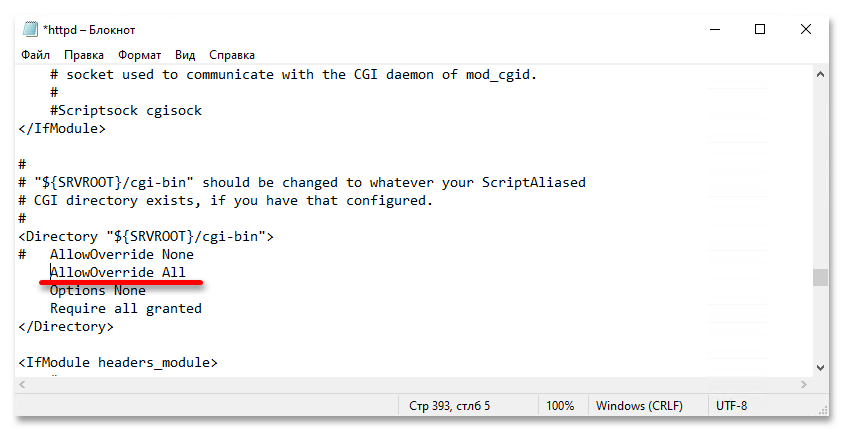
AllowOverride, по умолчанию он будет иметь значение «None». Его вам необходимо заменить на «All». Для этого закомментируйте исходную строку, а ниже нее вставьте уже измененную:AllowOverride All - Останется активировать еще один параметр в этом файле. Воспользовавшись поиском, найдите строку
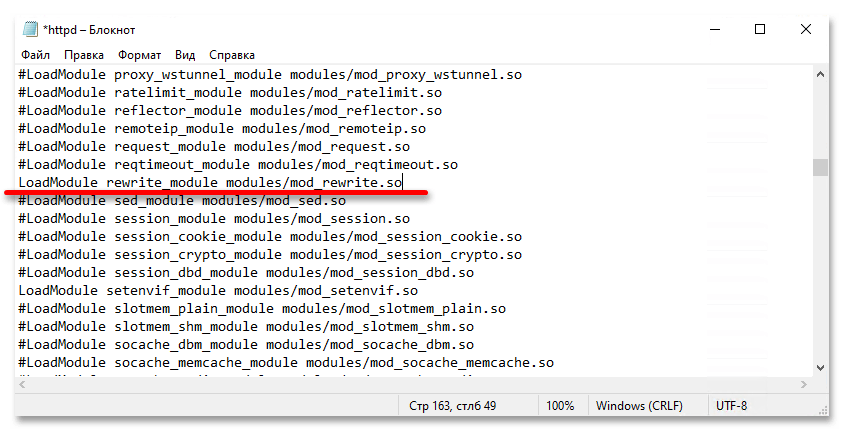
#LoadModule rewrite_module modules/mod_rewrite.soи раскомментируйте ее. Для этого просто удалите символ решетки («#»). По итогу строка у вас должна иметь следующий вид:LoadModule rewrite_module modules/mod_rewrite.so - На этом редактирование конфигурационного файла можно считать оконченным. Не забудьте сохранить внесенные изменения сочетанием клавиш Ctrl + S или кликнув по пункту «Сохранить», находящемуся в меню «Файл».

Шаг 3: Проверка работы локального сервера
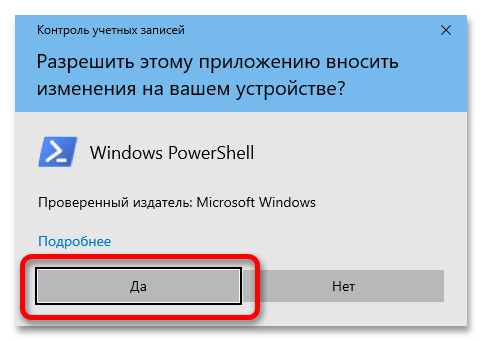
После того как конфигурационный файл был отредактирован, веб-сервер Apache готов к использованию. Необходимо проверить его работу, осуществив тестовый запуск. Производится он посредством ввода специальных команд в консоль. Поэтому предварительно запустите оболочку «Windows PowerShell» с правами администратора. Сделать это можно несколькими способами, например, вызвав контекстное меню «Пуска». Щелкните по ней правой кнопкой мыши, а затем выберите пункт «Windows PowerShell (администратор)».
Читайте также: Как открыть Windows PowerShell в Windows 10
Подтвердите инициализацию оболочки с повышенными привилегиями. Для этого в диалоговом окне контроля учетных записей кликните по кнопке «Да».
Находясь в окне консоли, вставьте в нее приведенную ниже команду. Чтобы не вводить строку вручную, используйте правую кнопку мыши, предварительно поместив команду в буфер обмена. Стандартная комбинация клавиш Ctrl + V в «PowerShell» не работает. Для выполнения команды не забудьте нажать Enter.
c:\LumpicsServer\bin\Apache24\Bin\httpd.exe -k install
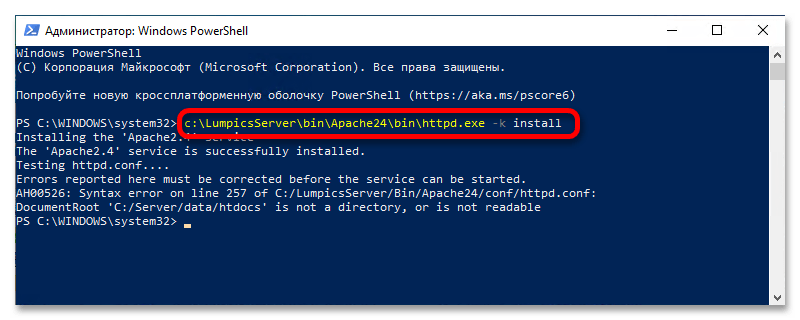
Если все пройдет успешно, в результате вы увидите надпись «The ‘Apache2.4’ service is successfully installed».Теперь можно выполнить попытку непосредственно запуска сервера. Для этого вставьте в консоль приведенную ниже команду и нажмите по клавише Enter.
c:\LumpicsServer\bin\Apache24\Bin\httpd.exe -k start
Если в ответ вы увидите ошибку, в которой будет содержаться строка «AH00526: Syntax error …», тогда для ее исправления потребуется выполнить еще некоторые манипуляции в файловом менеджере.
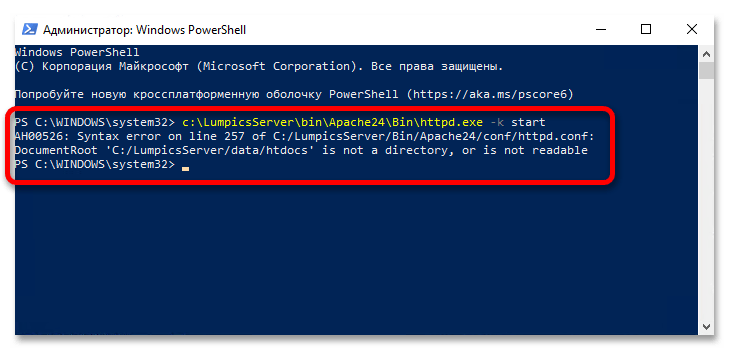
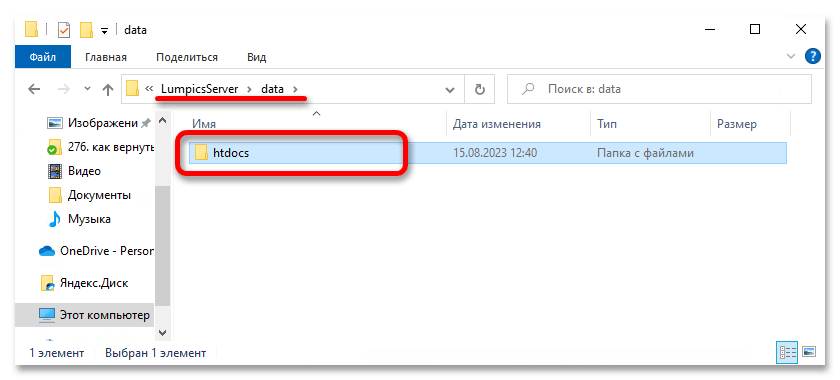
Перейдите в созданную еще на первом шаге папку, расположенную в корне диска «C:». В данном случае это «LumpicsServer». После этого создайте там еще одну папку под названием «data». Откройте ее и создайте папку «htdocs». В конечном итоге у вас должен получиться следующий адрес:
C:\LumpicsServer\data\htdocs
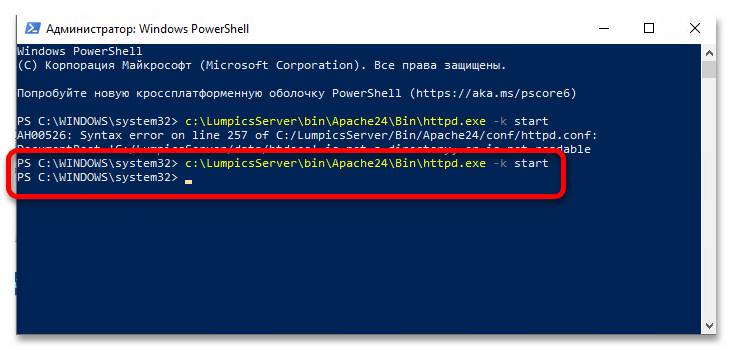
Когда все директории будут созданы, вернитесь в окно «Windows PowerShell» и снова выполните команду c:\LumpicsServer\bin\Apache24\Bin\httpd.exe -k start. На этот раз ошибки не должно быть.
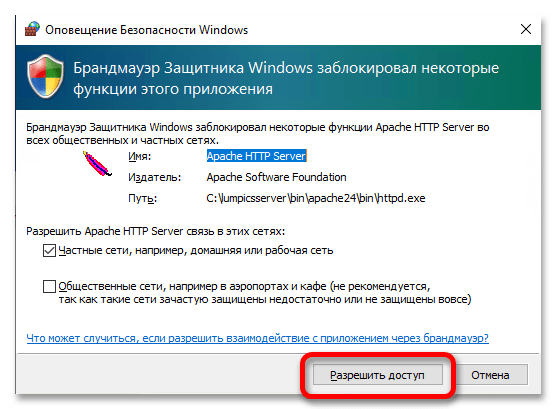
Об успешном запуске собственного веб-сервера будет свидетельствовать появившееся окно брандмауэра. В нем вам необходимо нажать по кнопке «Разрешить доступ».
Чтобы проверить работу сервера, попробуйте подключиться к нему. Для этого можно воспользоваться любым браузером — откройте его и перейдите по приведенному ниже адресу:
http://localhost
В результате вы должны увидеть страницу сайта, на которой будет написана всего одна строка — «Index of /». Если у вас так же, как показано на скриншоте ниже, значит, сервер установлен правильно.

Наша группа в TelegramПолезные советы и помощь
This article is part of series of articles on Apache. Here is the list:
- Introduction to Apache Web Server.
- Difference between Apache http and Apache Tomcat.
- How to Install and Run Apache Web Server on Ubuntu Linux.
- How to Install and Run Apache Web Server on Windows 10.(this one)
Original Article:
So, crack those knuckles and follow along.
Step 1.
Apache is a software, so we have to download it, visit the site
https://httpd.apache.org/download.cgi

Click on the latest stable release
Step 2.
You want the binaries, click on it.

Step 3.
Now go to ‘win32’ and click on it.
Step 4.
Scroll down to see ‘ApacheHaus’ , open it.

Step 5.
You should have something like this.

Scroll down to see the version of Apache in two variations 32 bit and 64 bit (x64) (blue boxes).
Click on download on whichever one you want (red circles).

Step 6.
Open up the downloaded file, then open up the folder with Apache24 on it.
Copy all the files and folder in it.

Step 7.
Make a new folder in any drive and paste the files in a folder named ‘Apache24’.

Just make sure the address is not much complicated.
Step 8.
Open System Properties, by right clicking on ‘This PC’, then properties.

Step 9.
Open Advanced System Settings.

Step 10.
Click on Environment Variables…

Double Click on ‘Path’

Step 11.
Now click on ‘Browse’
Find the folder you created and select

bin from it and click ok.
After you’ve done that it should look like this.

Now click ok, and the windows will keep closing.
This has to be done because the Web Server’s daemon runs as a Service on windows.
Step 12.
Press win+R, or open Run.
Write
services.msc
Find the ‘Apache’ service, right click on it and press start.

Step 13.
Open Command Prompt as Admin, and write
httpd –k install
When the window pops “Allow Access”
Check:
Open up any browser and write “localhost”, the window below should appear.

You are done!!
You can test all the above on our Windows VPS with a 20% lifetime discount. Use the coupon code WIN20OFF at checkout.