
Протокол TFTP (Trivial File Transfer Protocol) упрощенный протокол передачи файлов, обеспечивающей простую возможность скачивания и загрузки. Обычно протокол TFTP используется для загрузки по PXE (сетевая загрузка, бездисковые рабочие станции, установка ОС по сети, и пр.), загрузки/обновления конфигурации/прошивок сетевого оборудования и ряда других специфичных задач. В проколе отсутствуют средства защиты, аутентификации и управления. Основное его преимущество – простота реализации клиентской части и высокая производительность при передаче файлов большого объема. Протокол работает по порту 69 UDP.
Содержание:
- Запуск TFTP сервера в Windows
- Установка клиента TFTP в Windows
- Установка встроенного TFTP сервера в Windows Server
Запуск TFTP сервера в Windows
Чаще всего для быстрого запуска TFTP сервера в Windows используют бесплатный opensource Tftpd64 (tftpd32). Вы можете скачать portable или установочный пакет tftpd64 здесь.
- Запустите исполняемый файл tftpd64.exe;
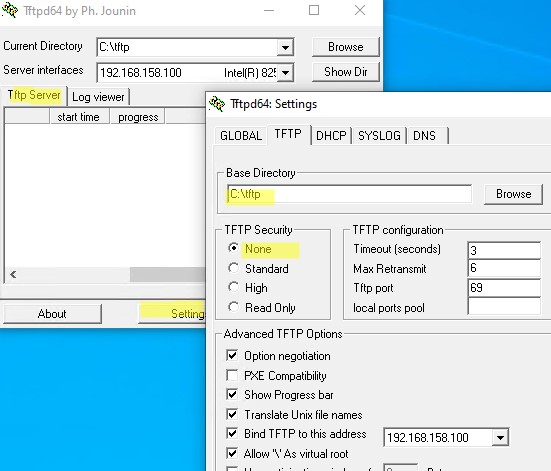
- Интерфейс tftpd64 состоит из нескольких вкладок. На вкладке Tftp Server нажмите кнопку Settings и выберите каталог, который вы хотите опубликовать;

- Выберите TFTP Security = None
- После того, как вы изменили настройки TFTP, нужно перезапустить программу.
- Откройте в Windows Firewall порт 69/UDP для входящего TFTP трафика. Можно создать разрешающее правило в файерволе Windows с помощью PowerShell: N
ew-NetFirewallRule -DisplayName 'TFTP-UDP-In' -Direction Inbound -Action Allow -Protocol UDP -LocalPort 69 - Теперь вы можете подключиться к tftp, чтобы получить или загрузить файл.
Программу tftpd64 можно использовать в качестве TFTP клиента. Перейдите на вкладку Tftp Client, укажите IP адрес TFTP сервера и порт подключения (69 по умолчанию).
Теперь вы можете скачать (Get) или загрузить (Put) файлы на указанный tftp сервер.
На вкладке Log viewer можно посмотреть логи подключений к TFTP.
Установка клиента TFTP в Windows
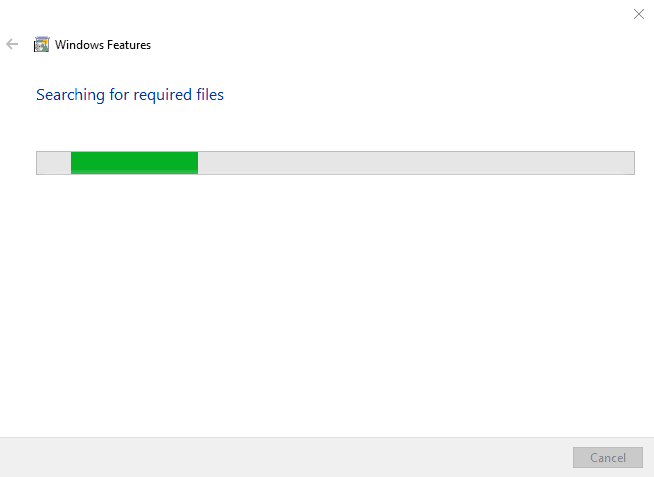
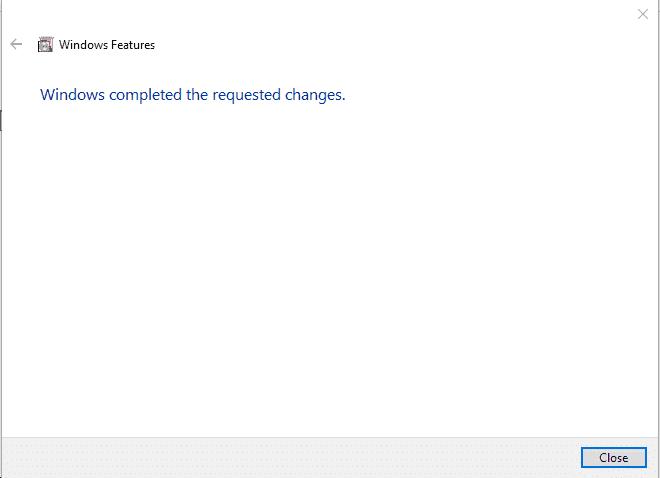
По умолчанию в Windows не установлен клиент TFTP. Вы можете установить в Windows 10/11 его командой:
Enable-WindowsOptionalFeature –FeatureName TFTP -Online
В Windows Server для установки клиента TFTP используется другая команда:
Install-WindowsFeature TFTP-Client
Теперь вы можете использовать утилиту tftp.exe для скачки и загрузки файлов по TFTP.
- Передать файл на TFTP сервер:
tftp 192.168.1.100 PUT имя_файла.txt - Скачать файл с TFTP:
tftp 168.1.100 GET имя_файла.txt
Установка встроенного TFTP сервера в Windows Server
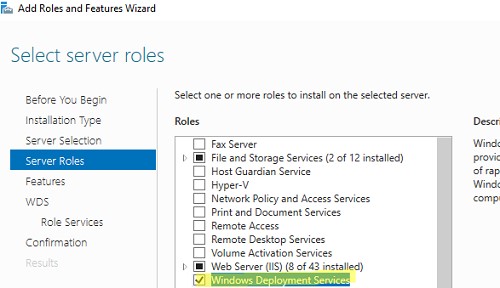
В Windows Server доступен встроенный TFTP сервер, который входит в состав роли WDS и используется для PXE загрузки и установки Windows по сети. Чтобы установить службу TFTP, откройте консоль Server Manager -> Add Roles and Features Wizard -> выберите роль Windows Deployment Services (Службы развертывания Windows).
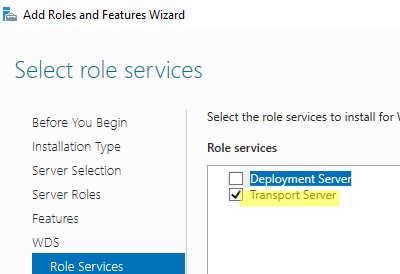
В компонентах роли WDS выберите только Transport Server (Транспортный сервер).
После завершения установки создайте каталог, который будет корневым каталогом для TFTP сервера. Например, C:\tftp.
Укажите путь к корневому каталогу TFTP в строковом REG_SZ параметре RootFolder в разделе реестра HKLM\SYSTEM\CurrentControlSet\services\WDSServer\Providers\WDSTFTP
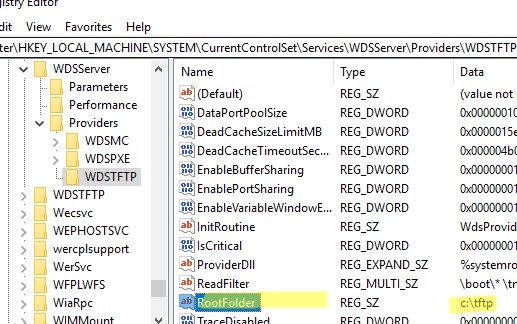
В параметре ReadFilter указан список каталогов, из которых разрешена загрузка файлов. По умолчанию загрузка возможна только из каталогов
\boot\
и
\tmp\
. Если вы используете другую структуру каталогов, нужно добавить разрешенные каталоги в параметр ReadFilter или указать тут
\*
.
Запустите службу WDSServer:
Get-Service WDSServer| Start-Service
Включить автоматический запуск службы с помощью Set-Service:
set-service WDSServer -StartupType Automatic
Проверьте, что служба запущена и ее процесс ожидает подключения на порту UDP 69:
Get-Process -Id (Get-NetUDPEndpoint -LocalPort 69).OwningProcess
В Windows Firewall доступ к UDP порту 69 отрывает правило “Windows Deployment Services (UDP-In)”. Проверьте, что правило брандмауэра включено:
(Get-NetFirewallRule -displayname 'Windows Deployment Services (UDP-In)').enabled
Попробуйте скачать файл с TFTP сервера с помощью встроенного клиента tftp.exe:
tftp -i 192.168.158.10 get test.zip
Основной недостаток встроенного TFTP сервера в Windows Server – он не позволяет открыть папку для записи. Это означает, что клиенты могут только скачивать файлы с такого TFTP сервера, но не загружать.
When transferring files across a network then TFTP is a good solution due to its ease of use and easy configuration.
TFTP, or Trivial File Transport Protocol, is a way of sending and receiving files over the internet. It is especially useful in situations where the remote computer that is receiving the file is unmanned.
This makes sending files very easy and does not require human intervention on the other end if configured correctly. The downside is that the protocol is not secure. (If security is a concern then you should look at transfer methods that use encryption.)
If you do a lot of file transfers over your home or business network, then TFTP is a good way to go.
In order to demonstrate this method of file copying and transferring, we will be using a free TFTP tool provided by SolarWinds TFTP. It is a quick and easy way to get the job done, so we will be downloading it from here.
Best of all is that this app is free, so using it will certainly not break the bank. Let’s get started.
After you download, install the package on your PC and lets get started with the configure.
Before We Begin:
There are a couple of things that we need to do before we can get started. This is all very easy to do so don’t let these steps scare you off. The whole process should only take a few minutes and is very simple to get done. You will therefore need:
- Access to the Administrator account:
This is easy to do. If you are the only person using your computer then the chances that you are the administrator of your account is pretty high. - Download and Install SolarWinds TFTP Server:
In order to use the SolarWinds TFTP Server we will obviously need to download and install it to the computer. The download link can be found above in the intro section. - You will need Port Forwarding for External Connections:
If you are planning on using remote connections with your TFTP server then you will need to use port forwarding. UDP Port 69 is the port type and port number that you will need to use. It will need to point to the IP address of your server on your network from your router in order to allow users from outside of the network. If you only need internal connections, then don’t worry about this step as it is not needed.
Now we can get started with the rest of the setup!
What Kind of Connection Do You Need to Configure?
For external connections you will need to ensure that you configure the security settings appropriately in the application. You can select which IP addresses can send and receive files to help specify which valid hosts can transfer and receive.
Basic TFTP Server Setup
These steps will guide you through the setup process of SolarWinds TFTP Server. This will help you get the ball rolling and allow you to eventually make transfers across multiple networks possible.
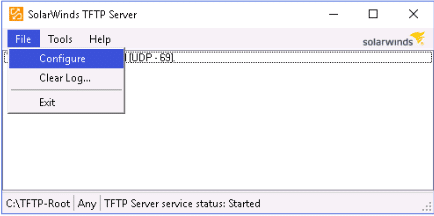
- Open the SolarWinds TFTP application
- Next, click file -> configure.
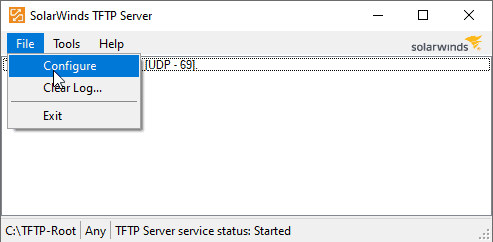
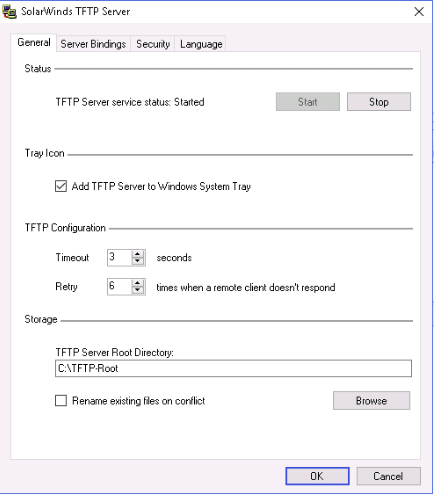
- Choose the correct settings as highlighted in the following screen capture labelled 1, 2 and 3.
- 1 Shows the status of the TFTP service, 2 allows you to set the icon to appear in the taskbar and 3 is where the files will be stored by default. You can choose a different location if you want. We will be leaving ours as the default location but feel free to make any changes if you need to. A popular choice for example is the Downloads folder.

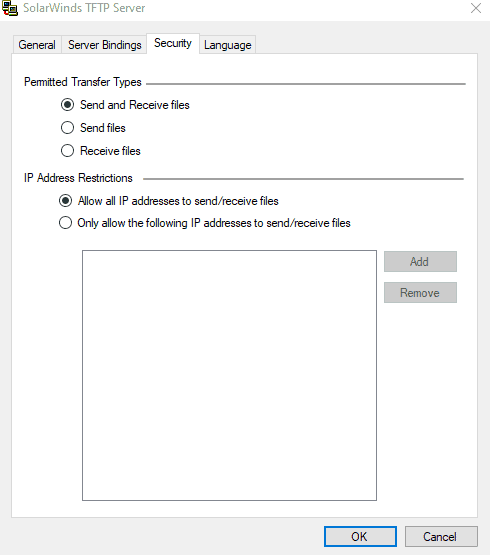
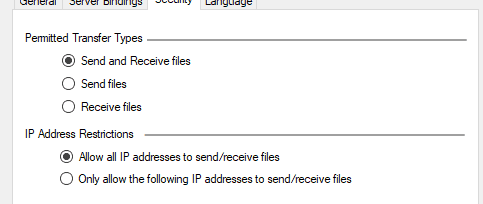
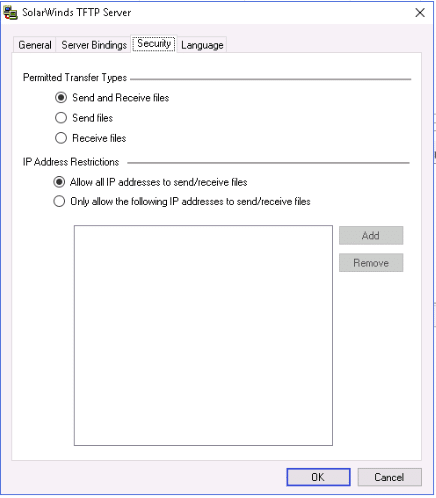
- The next step is locking down some security items. To do that, we need to go to the, you guessed it, security tab within the SolarWinds TFTP Server.
- This part is pretty self explanatory, but definitely worth looking into. We need to set the actions that we want this computer to be able to complete. If you are setting up permissions for a file server, then you might not want everyone to have access to send files to it, and instead you might only want it to server files and have them downloadable. If that is the case then you will want to choose send files. If you want to do both then select Send and Receive files.
- You can further lock down the security of your TFTP server by specifying which IP addresses are allowed to transfer files. You can do this by selecting a range of both IPv4 and IPv6 IP addresses. Our example uses IPv4 and allows 10 IP addresses to send and receive files across the network.
- We enter the range and then set the changes by clicking the OK button. Easy.
We have now configured our TFTP server in just a few simple clicks.
The Fun Part: Actually Utilizing Our New TFTP Server
The setup was pretty straight forward, and using the application is just as easy. Let’s go through the steps to make using our TFTP server a reality.
Port Forwarding Steps
This part is optional because you might not want to access your files from outside the network. This is understandable, especially because TFTP is not designed to be a secure protocol, just a convenient one. However, you can add mappings to port 69 in your router by either finding the NAT or Port Forwarding sections of your router. Each manufacturer is different, so be sure to consult your user manual when attempting to make changes to your router. If in doubt then contact your manufacturer’s support and see if they can assist you with the changes.
For everyone else, lets carry on with our tutorial!
Installing a suitable TFTP Client for Windows
The easiest way to continue is to use the default Windows TFTP that comes with the Operating System. To access it and install it onto our computer we need to do the following:
- Open the start menu and search for the control panel.
- Find Programs and Features and then click on Turn Windows features on or off.
- Find the TFTP client and click on the tick box so that the tick is visible.

- Next, Click on OK to install the client.

- Once finished, you have installed the client.

Important to note that this is the computer without the TFTP server application running, also known as the client PC.
Allow TFTP with a Firewall Configuration Change
There are 2 approaches to getting this right. The first and easiest way is to disable your Windows Firewall. This might be OK in a home setup where you trust all of your devices on the network, or in a corporate environment where management is conducted by the IT department. If you are not willing to do this, then we can create specific rules in our Windows firewall to allow traffic through.
- Click on the start menu and type in Control Panel, then click on that icon when it appears.
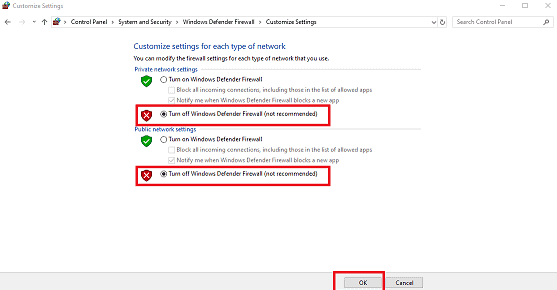
- Click on Windows Defender Firewall.
- Next, click on Turn Windows Defender on or off.
- Tick the boxes as seen below and then click ok

- You have now turned off you firewall.
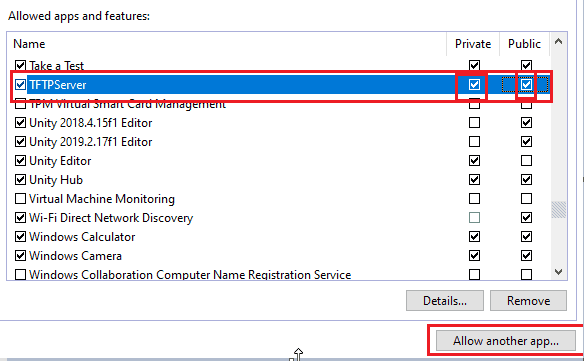
- If you don’t feel comfortable turning off Windows Firewall we create an exception instead. To do this, we must click on Allow an app or feature through Windows Defender Firewall’ in the Windows Firewall settings.
- Click on the Change settings button to add a program.
- Next you must click on Allow another appand then hit Browse.
- Select exein the Windows system32 directory and also TFTPServer in the SolarWinds folder inside Program Files x86.
- Click open and it has been added.
- Tick the boxes called Privateand To finish, click ok.

Transferring Files using TFTP
Let us now do some local tests with the following commands.
- Press the windows key or click on the start menu
- Type cmd and press enter
- You will see a black cmd terminal in front of you. This is where we will type in our commands.
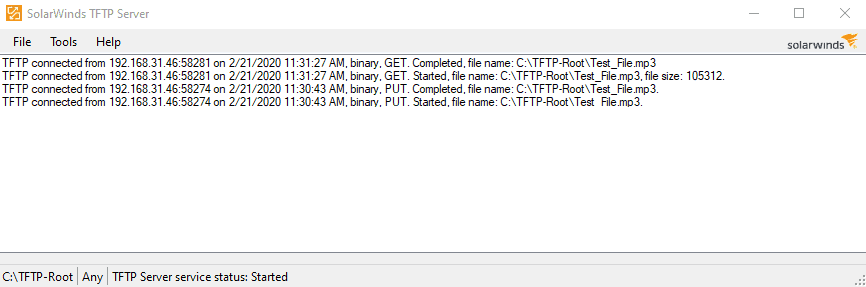
- Change directories to the path where your files are stored for sending and receiving. Let us now send a file. To do this, we use the ‘put’ command.
tftp -i 192.168.31.46 put “Test_File”.mp3
- If you want to receive a file, then the command we will use is called ‘get’.
tftp -i 192.168.31.46 get “Test_File”.mp3
We can look at our TFTP Server logs that display when we open our server app and we are greeted with the following records:
Conclusion
Transferring files by using TFTP is easy, fun and free. By leveraging the free TFTP server from SolarWinds, we can turn any ordinary PC into a file server with remote access capabilities.
This is useful for many reasons, and we hope that the tutorial will help you to get the correct access levels set for your own specific needs. Be sure to download the app from above so that you can follow along with this tutorial.
Better yet, check out SolarWinds and look at the multitude of monitoring, troubleshooting and control software that they have on offer. You are bound to find the right tool for the job, regardless of what you are trying to achieve!
Happy file transferring, and we’ll see you next time.
TFTP Server FAQs
What is difference between FTP and TFTP?
FTP is the File Transfer Protocol – the original file transfer system for the internet. TFTP is the Trivial File Transfer Protocol. This is a lightweight service that is usually used on private networks for moving small files to devices. Both systems can be used to either send or fetch a file and neither system includes security features, such as data encryption. As such, neither of these systems should be used to send files to remote devices outside a private network – user SFTP or FTPS instead.
Why do we use TFTP?
The Trivial File Transfer Protocol (TFTP) is fast and feature-free. It does not include authentication procedures, which means it can be integrated into task automation scripts without the need to store passwords but that also means that it shouldn’t e used to move sensitive data. The access security of private networks provides sufficient protection to make TFTP safe to use. However, even in this location, the protocol isn’t a good option for data movements. TFTP is good for moving configuration files to devices and for gathering log files from endpoints on a network to a central location.
Does TFTP use UDP or TCP?
The Trivial File Transfer Protocol (TFTP) is a lightweight file transfer system and as such, can be considered to be a stripped-down version of the File Transfer Protocol (FTP). The lack of features in TFTP makes it quick and also easy to deploy from a script. TFTP lacks authentication and session features, which are hallmarks of UDP. TFTP connections are initially made to port 69. However, continued communication for a transfer is switched to a random ephemeral port – some TFTP implementations choose to use the same ephemeral port number for all of their transactions.
In this article, we will examine how to install a TFTP server using SolarWinds TFTP Server to transfer files on a Windows PC.
How to Configure TFTP Server on a PC
TFTP (Trivial File Transfer Protocol) performs the file/data transfer operation. However, we can say that it is a non-secure protocol when compared with the FTP protocol.
In our previous article, we gave information about TFTP. In this article, we’ll build a TFTP server for PCs with SolarWinds.
As you know, the TFTP protocol structure is divided into two parts: Server and client. You can run a server by installing the 3rd software on a laptop or desktop computer that you are using.
You do not need a physical server for the server. You can install SolarWinds software on a simple computer and create a file server.
What is a TFTP Server?
It listens to the UDP 69 port on the network and provides file-based services to clients. Typically, it is used to install software on Cisco or any branded Router. It is not recommended to use the TFTP in an environment where your security is more important.
FTP or another protocol can be used instead of TFTP. You can also test this protocol by temporarily setting up a server on the local network to understand it better.
How to Setup SolarWinds TFTP Server
First, download the SolarWinds Server by clicking the button below. Then, please create a new virtual machine using the VMware or VirtualBox virtualization program and install a clean Windows 10 on it.
After you have completed the necessary steps, follow the steps below to set up the file server.
SolarWinds Download
Step 1
Configure the network settings for the VMware virtual machine as Bridged.
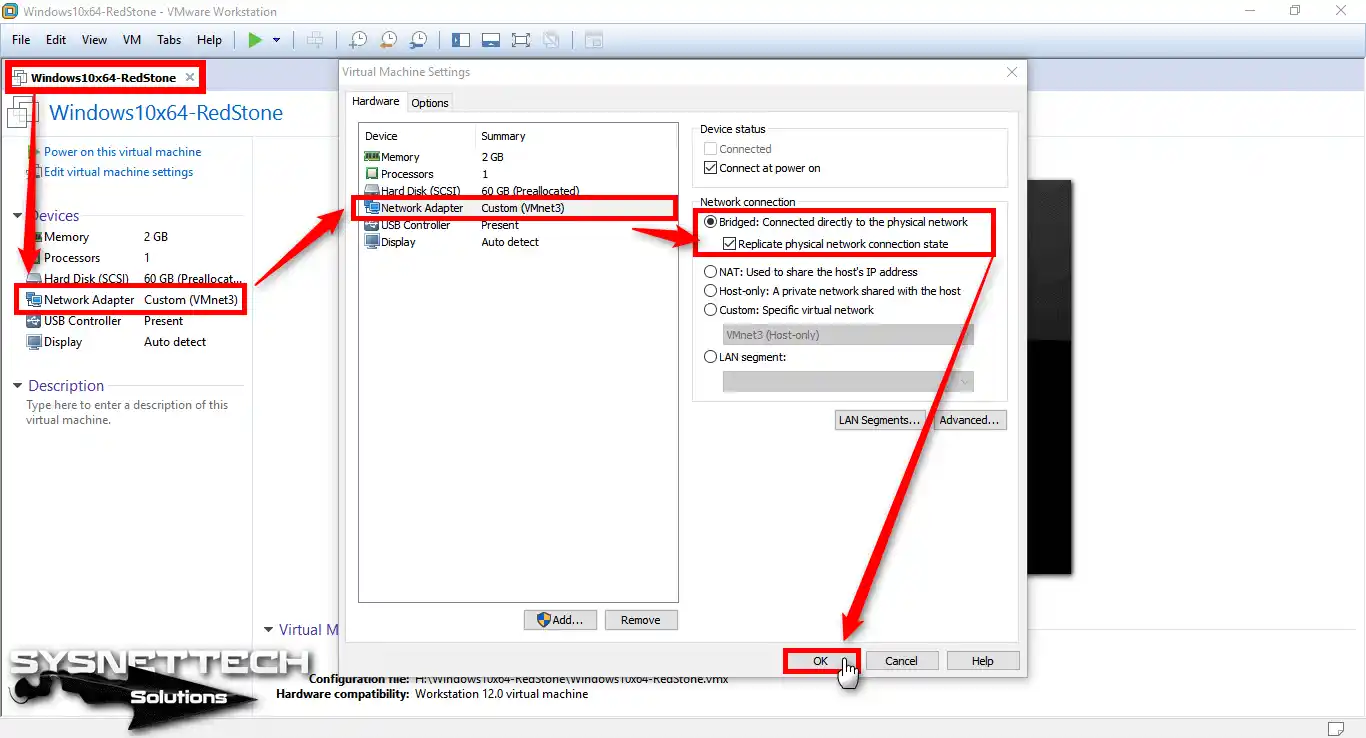
Step 2
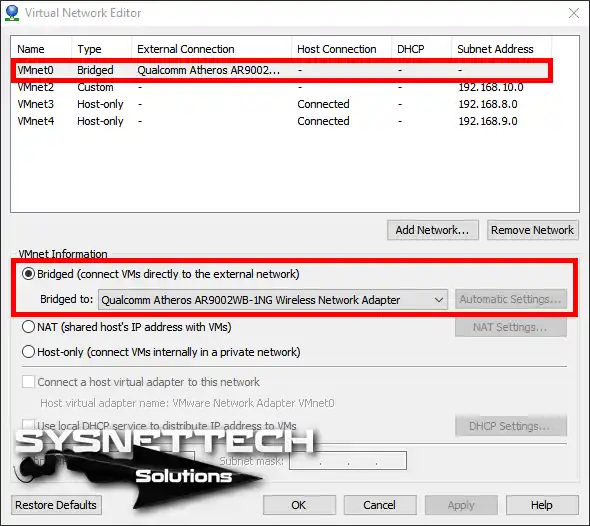
You can also configure VMnet0 as a bridge in VMware Virtual Network Editor.
Step 3
Run the Windows 10 virtual machine.

Step 4
Copy the SolarWinds TFTP Server program that you downloaded on your computer to the Win10 virtual machine and run the installation file as an administrator.

Step 5
In the SolarWinds setup window, click the Next button.
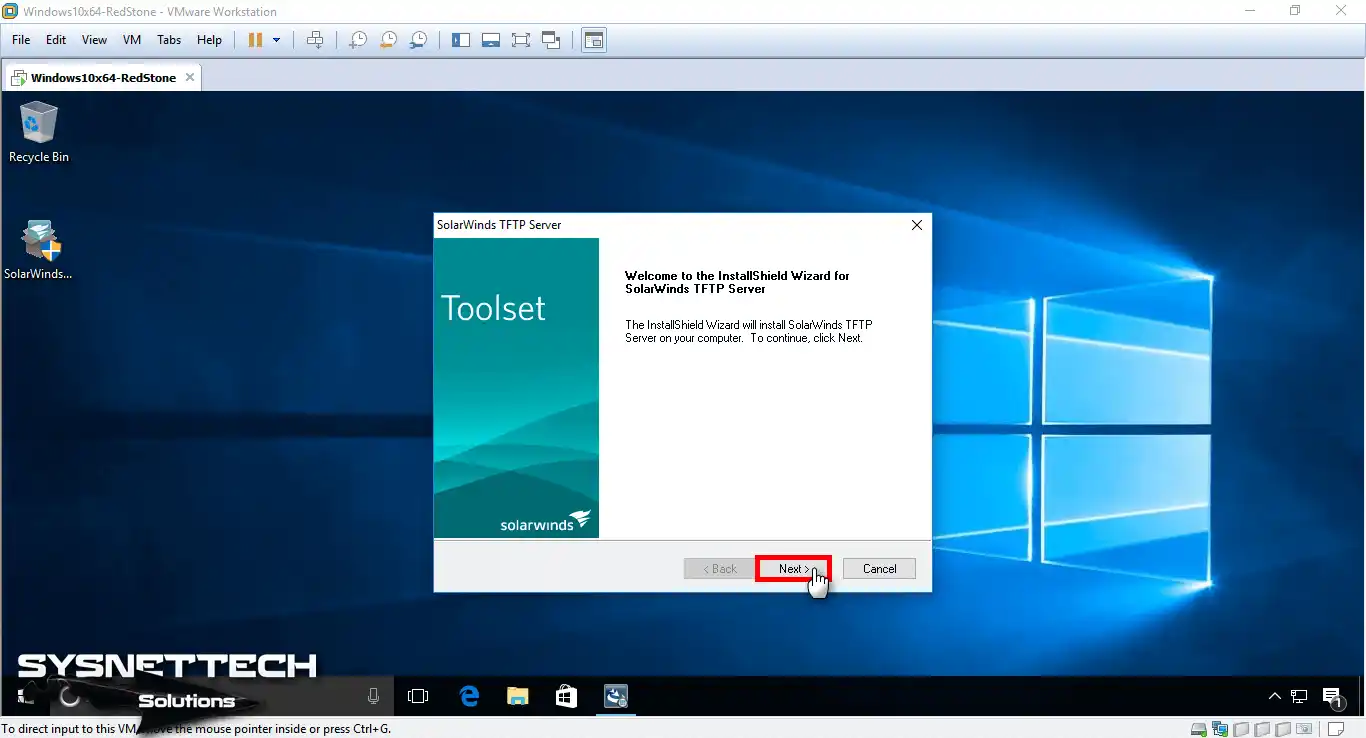
Step 6
Accept the SolarWinds license agreement and click on the Next button.

Step 7
Click on the Next button again.

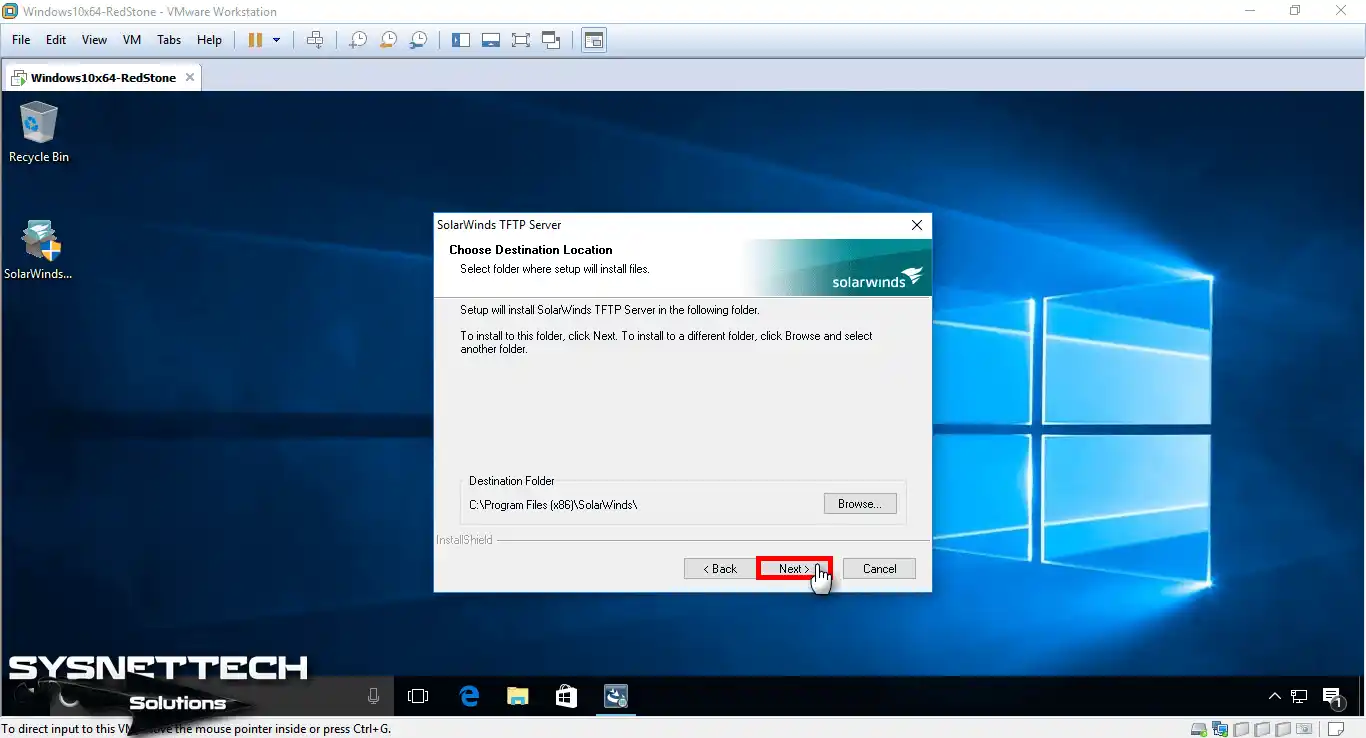
Step 8
Leave the destination location as default and click on Next.
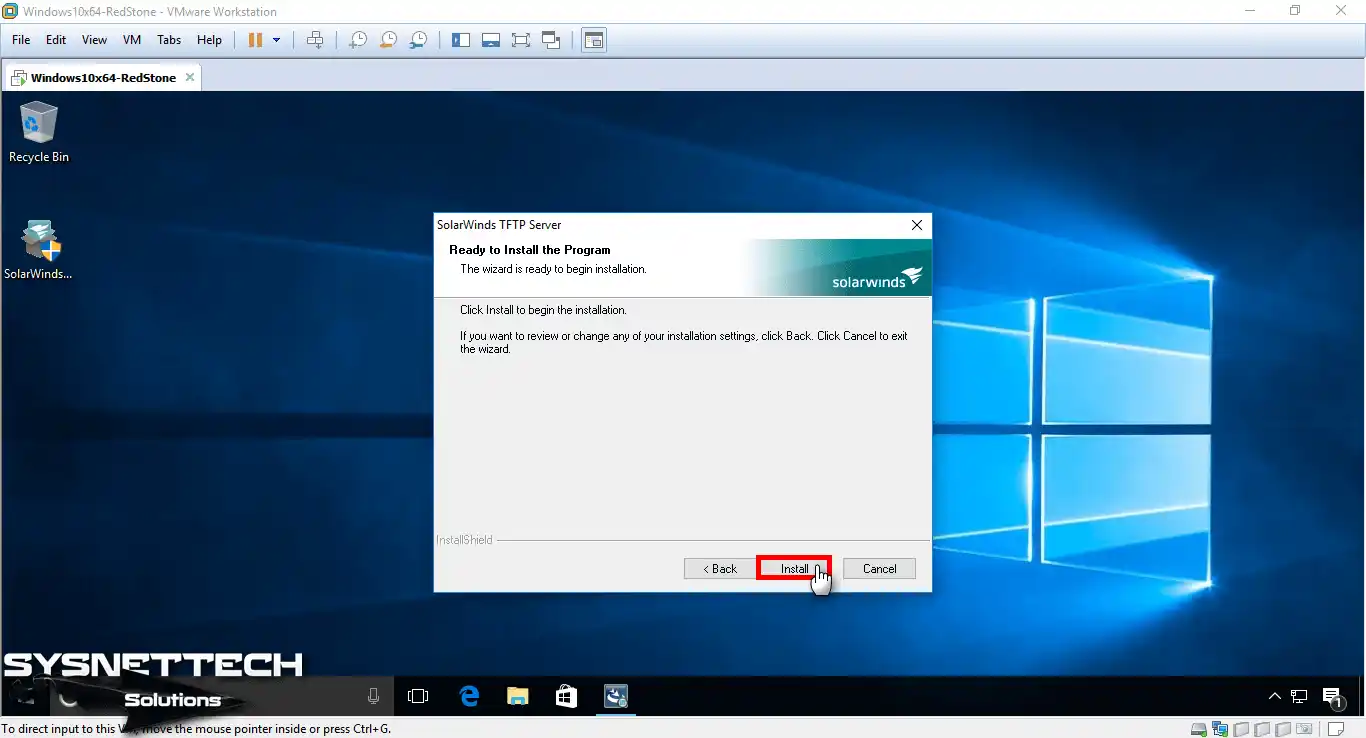
Step 9
Click the Install button to install SolarWinds software.
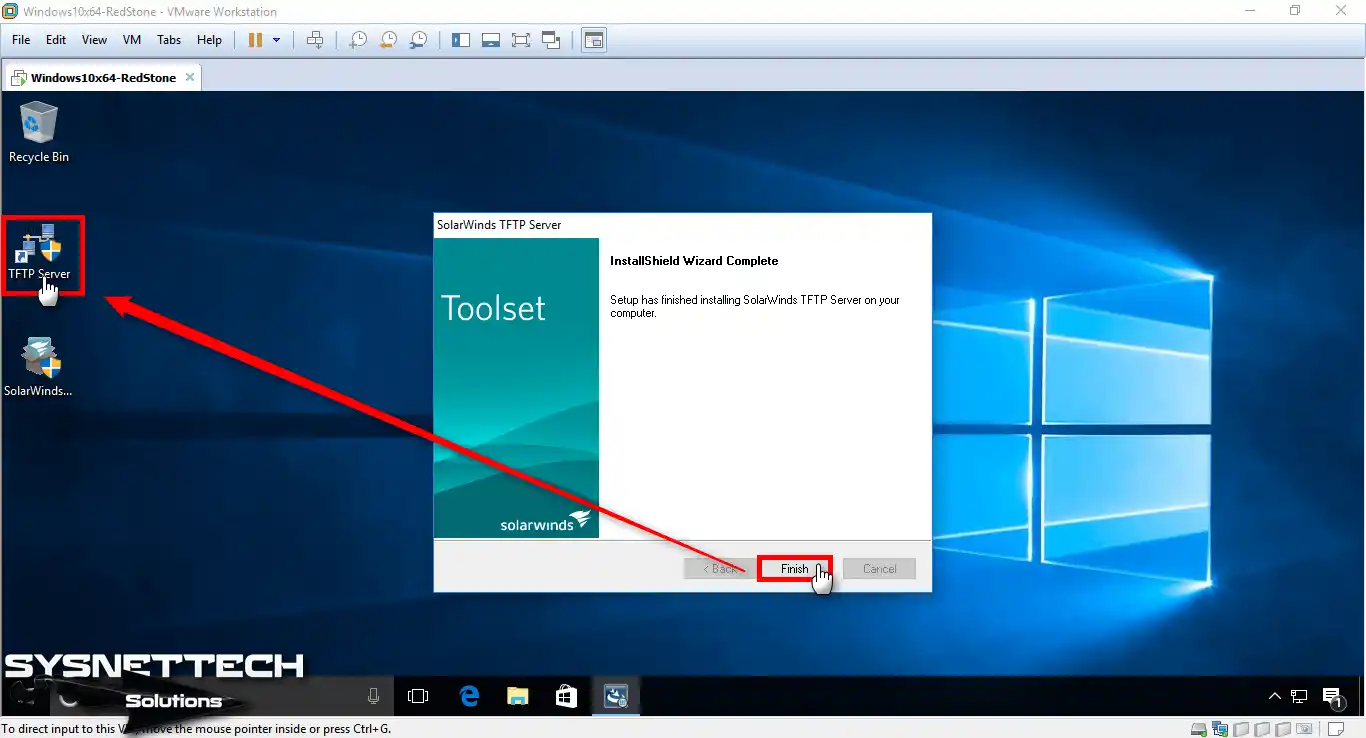
Step 10
Click on the Finish button in the InstallShield window.
Step 11
Open the SolarWinds program, and then click on the File menu.
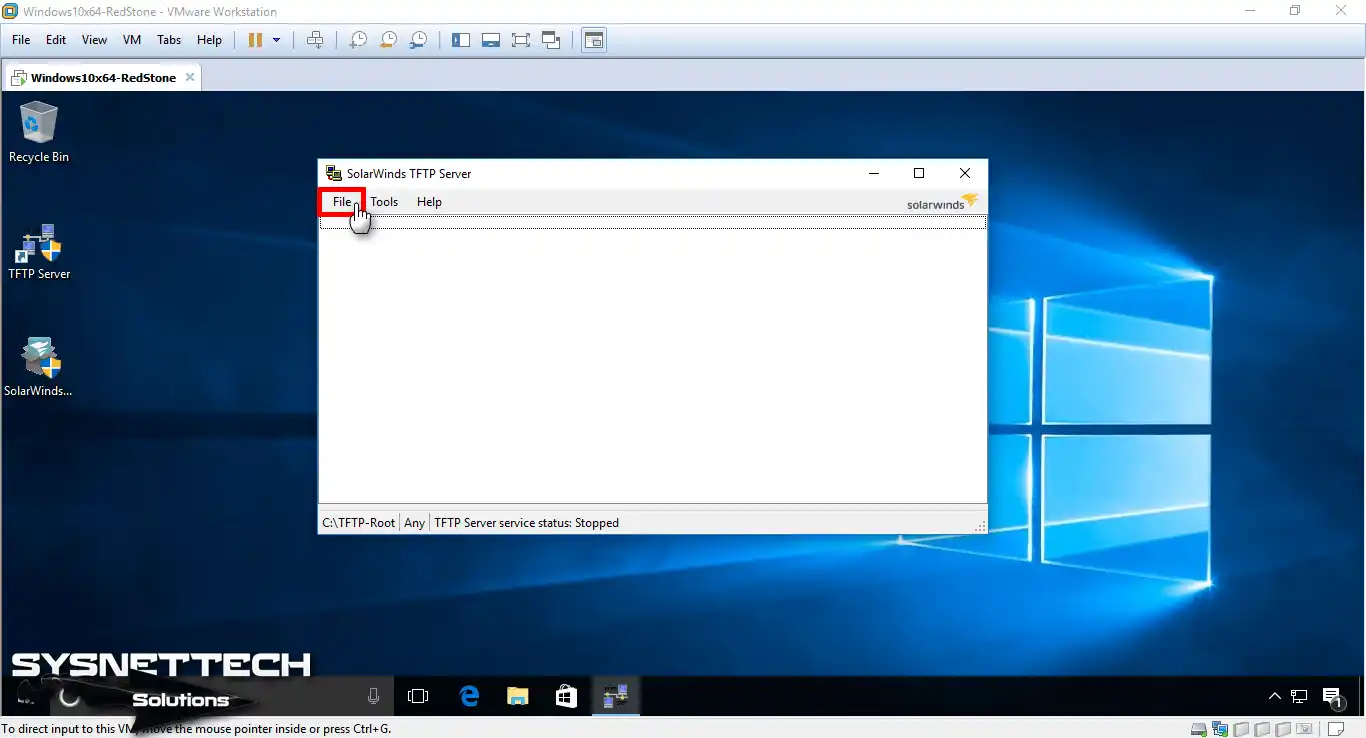
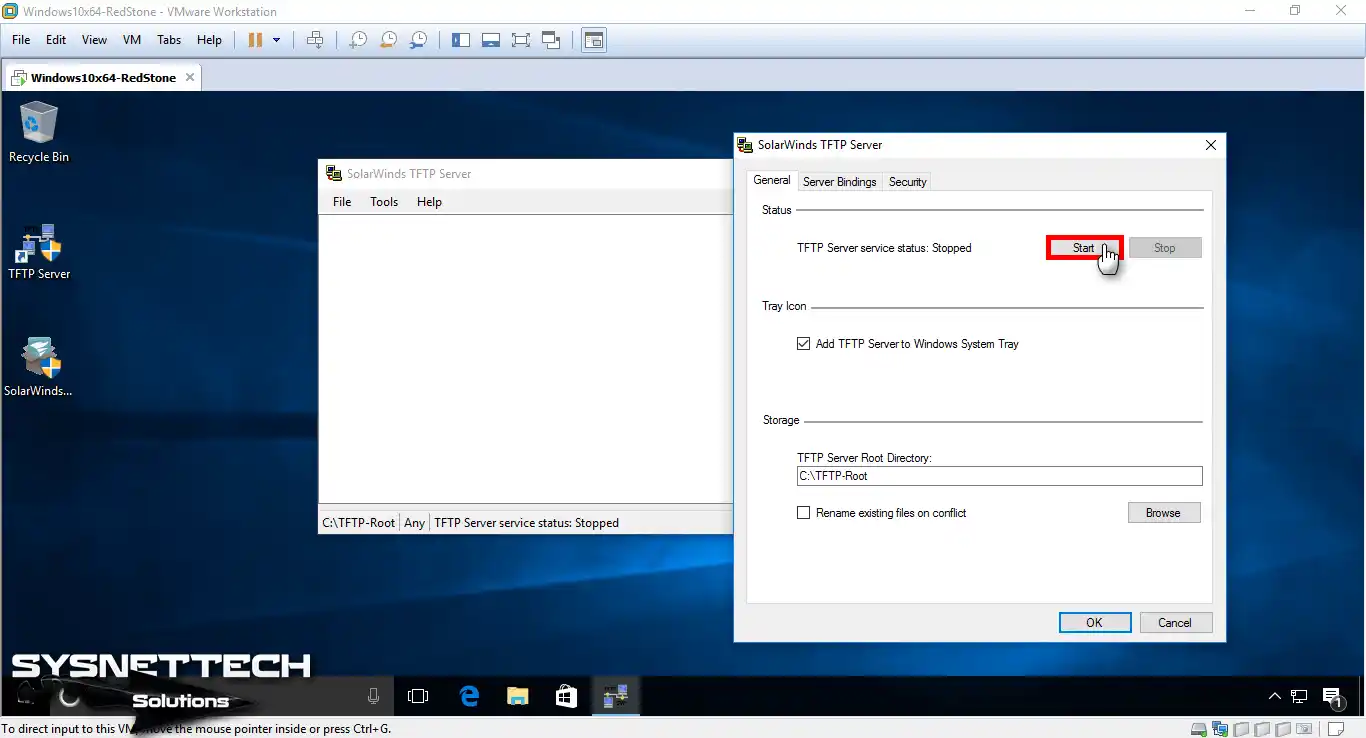
Step 12
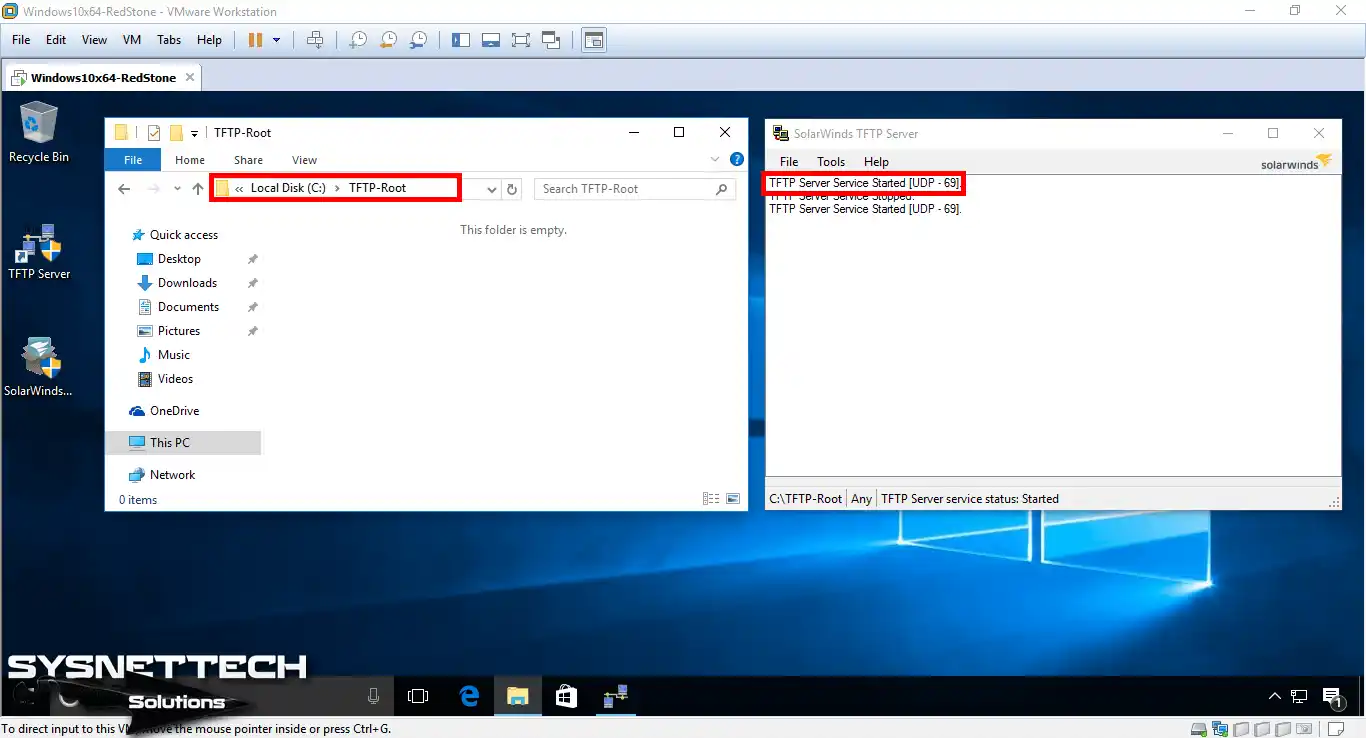
As you can see, the service is not working right now. Click the Start button to start the TFTP service.
Step 13
You can change the server’s storage location.

Step 14
After you start the service, the TFTP-Root folder is created on the C:\ drive.
Step 15
Create two text documents in the TFTP-Root folder.

Step 16
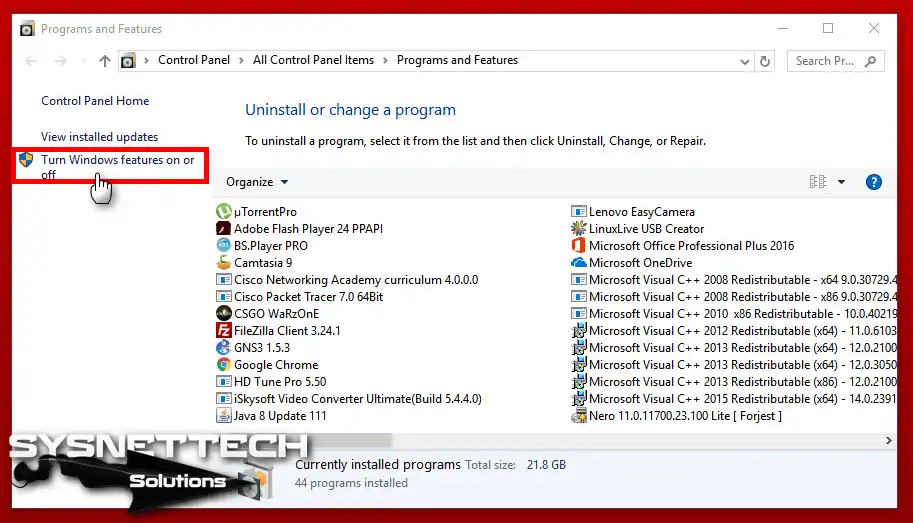
After installing the TFTP Server, you must configure your Host machine as a Client.
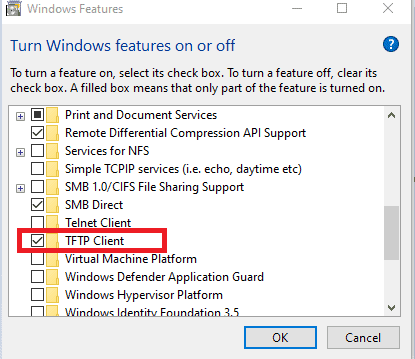
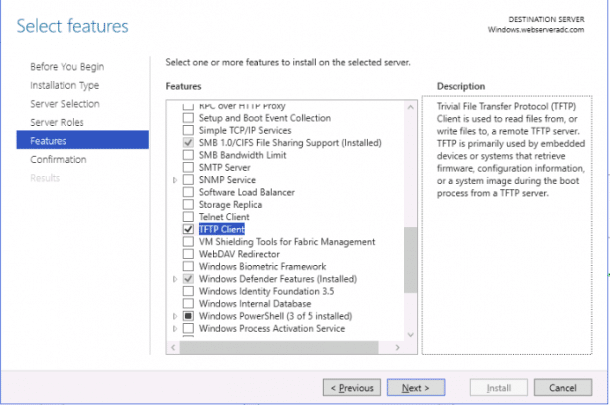
To enable TFTP Client, go to Control Panel / All Control Panel and click “Turn on Windows Features on or off” in the Programs and Features window.
Step 17
There is more than one service in the window that opens. When you scroll down, you will see the TFTP Client service. After activating the TFTP Client service, click OK.

Step 18
Click the Close button in the Windows Features.

Step 19
After you press Windows Key + R on your Host, the Run window will open. In the Windows Run window, type CMD and press the Enter key.
At the CMD command prompt, execute the “TFTP” command. You can review whether the TFTP Client service is running.

Step 20
In this step, use the command “tftp -i 192.168.1.102 get 1.txt” at the CMD command prompt to transfer the text document that you created on the TFTP Server to the desktop location of the Host.
tftp -i 192.168.1.102 get 1.txt

Step 21
You have successfully copied 1.txt from the server!

Step 22
Open the 1.txt text document you transferred, write something inside, and save the file. If the text document is Read-Only, you can change it from the file properties.

Step 23
To send the text document that you have edited on your host computer to the server, follow the command “tftp -i 192.168.1.102 put 1.txt” at the CMD command prompt.
tftp -i 192.168.1.102 put 1.txt

Step 24
The file transfer was completed successfully.

Step 25
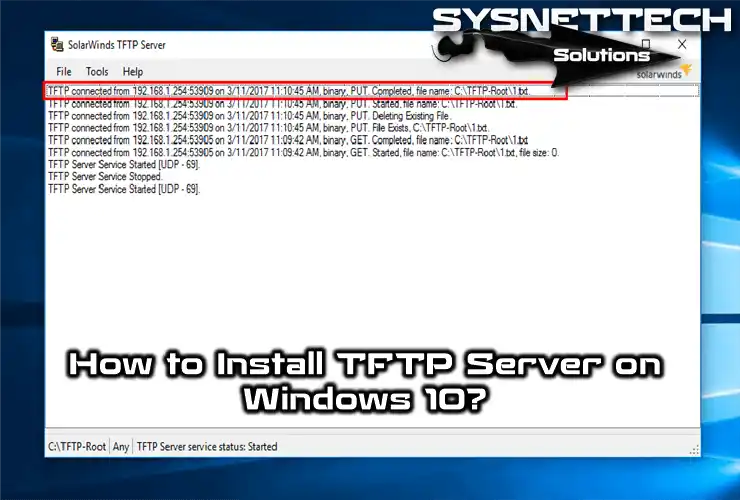
Open the file 1.txt in the TFTP-Root folder and check the change.

Step 26
After you have successfully configured the software, you can review the log files of the file transfer you made.

Video
Conclusion
In this article, we have installed and configured SolarWinds software, the best program to use TFTP Server in a network structure. Finally, we’ve reviewed how to transfer a file to the server after installing the TFTP Client on the Host computer. Thanks for following us!
Для некоторых айтишных задач требуется поднять tftp-сервер, который обычно предназначен только для простой передачи файлов между устройствами. TFTP изначально так и разрабатывался, чтобы быть простым. Прочитать о его работе можно на Wikipedia.
Мне понадобился сервер tftp для того, чтобы слить настройки с уже настроенного коммутатора Cisco и при необходимости залить его обратно.
Для справки: tftp – это протокол передачи данных, который работает на транспортном протоколе UDP на порту 69. Особой безопасности не предоставляет. Используется для загрузки бездисковых систем (нужен для загрузки первоначального загрузчика) и для обновления прошивок аппаратных sip-телефонов Cisco.
Этот протокол чувствителен к фрагментации сетевого пакета. Если фрагментация есть, то файл может передаваться не до конца. Чтобы проверить делятся пакеты или нет, нужно выставить правильное MTU. На Windows это можно сделать программой TCP Optimizer. Подробнее о программе и настройке MTU здесь.
Есть две версии приложения:
tftpd32— для 32-битной системы windows;tftpd64— для 32-битной системы соответственно.
Данный tftp-сервер можно установить как для старой Windows XP, так и для современной Windows 10. На серверные ОС (Windows 2012 r2, Windows 2016 и др.), tftpd64 и tftpd32 встают тоже без проблем.
Порт tftp сервера по умолчанию — 69/UDP. Если подключение проходит через маршрутизатор, не забываем открыть 69 порт UDP протокола.
Установка tftpd32 сервера на Windows
Для таких простых целей я выбрал замечательное приложение tftpd32/tftpd64. Найти его можно здесь.
Для того, чтобы развернуть tftp-сервер на своем рабочем месте необходимо:
- Загрузить нужный дистрибутив отсюда. Стоит обратить внимание, что дистрибутивы различаются по типу запуска: как службу (service edition) и как приложение (standard edition) и также по битности ОС. Для себя я выбрал пакет tftpd64 service edition (installer)
- После загрузки, устанавливаем загруженный дистрибутив, не изменяя абсолютно никаких параметров.
- Если Вы загрузили, как и я, дистрибутив с запуском в качестве службы, то стоит вручную запустить службу или просто перезапустить компьютер.
- Дальнейшей настройки этот сервер не требует, но для подстраховки все настройки должны выглядеть так как изображено на скрине:

Всё! Теперь можно подключаться к tftp и копировать файлы. У операционной системы Windows XP tftp-клиент установлен по умолчанию, а у Windows 7/8/10 его необходимо доставить через компоненты системы.
Как проверить работу сервера tftpd32?
Для того, чтобы передать файл необходимо открыть cmd.exe и выполнить команду:
tftp 192.168.1.10 GET имя_файла.txtДля того, чтобы получить файл с tftp-сервера, есть команда:
tftp 192.168.1.10 PUT имя_файла.txtИспользовать tftpd32/tftpd64 для каких-то постоянных задач не рекомендуется, так как у него практически нет никакой защиты от несанкционированного подключений к серверу. Да, можно ограничить доступ к нему только определенным IP-адресам, но та легкость, с которой можно подменить IP-адрес, позволяет сказать, что это не относится к сетевой безопасности вообще.
Включать сервер tftp с таким «уровнем безопасности» можно только на короткое время, для выполнения каких-то сервисных работ, а лучше вообще делать это в изолированной сети.
Теги: cisco
и сеть
Комментарии
TFTP stands for “Trivial File Transfer Protocol” is a simple and lightweight protocol for transferring files over the network.
TFTP runs on UDP port 69 and does not use any security during the file transfer, thus its really only good for transferring files within your LAN. It is commonly used in the place where security is not important and it has limited features compared to other file transfer protocols (FTP/FTPS/SCP).
Generally, TFTP is used to boot operating systems over the network. CISCO devices also use the TFTP protocol to store configuration files and images and move them to and from switches, routers and firewalls.
It is very useful for electronics circuit boards and microprocessors to download firmware into the chipset and its also used for transferring boot files and updating NVRAM. It does not provide authentication and no command structure like FTP, SFTP and SCP.
TFTP cannot list directory and there is no error recovery like TCP and nor does it allow you to delete or rename files.
TFTP is used for its simplicity as it is specifically designed to read and write files without establishing a connection between the client and the server.
It is very useful for thin clients, terminals and disk-less workstations with no room to install their own operating systems.
TFTP protocol also allows the network clients to automatically obtain the IP address of the TFTP server thus making TFTP not only easy to implement but also provide a better way for file transfers.
However, sending or receiving sensitive files via the TFTP without authentication or encryption is very risky.
In this tutorial, we’ll learn how to setup a TFTP server and a TFTP Client on Windows a system and also learn how to configure your Firewall to allow file transfer between the TFTP server and the TFTP client.
Install TFTP Server Windows
First, you will need to download the SolarWinds TFTP server.
Download: https://www.solarwinds.com/free-tools/free-tftp-server/registration
Once downloaded, extract the downloaded file and double click on the installer to start the installation, you should see the following screen:
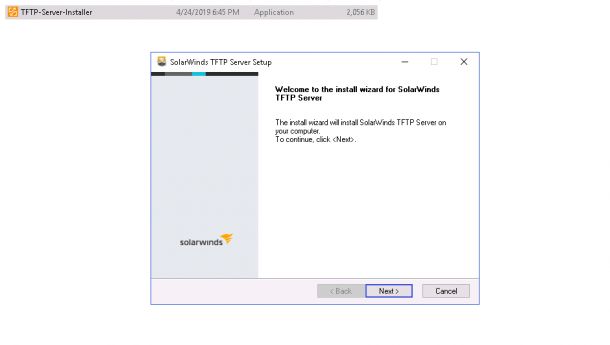
Click on the Next button.
You will be redirected to the License agreement page as shown below:
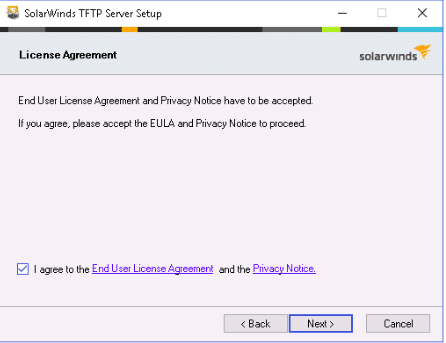
Accept the License agreement and click on the Next button.
You will be asked to provide the location of the TFTP server as shown below:
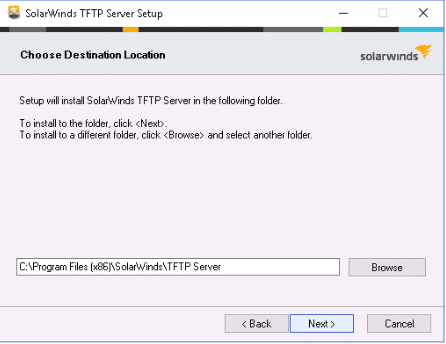
Click on the Next button to continue with the default location.
You should see the following page:
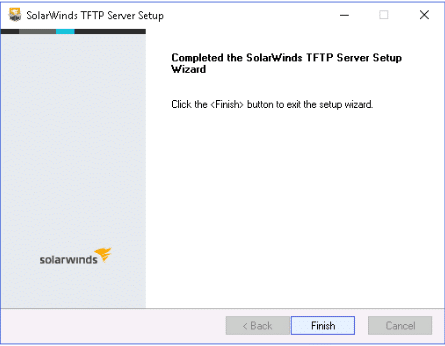
Click on the Finish button to complete the installation.
After installing the TFTP server, you will need to configure it.
You can follow the below steps to configure the TFTP server:
Configure TFTP Server
1. Open the TFTP Server from the Start Menu as shown below:
2. Click on the File => Configure button as seen in the above Screenshot.
You should see the following screen:
3. As seen in the screenshot above, Select the TFTP Server Root Directory field and provide the TFTP root directory, then click on the Security tab.
You should see the following screen:
4. In the Permitted Transfer Types section, check the box “Send and Receive files” and “Allow All IP address to send/receive Files” and click on the OK button to finish the configuration.
Once you are finished, you can proceed to the next step.
Install TFTP Client
At this point, the TFTP server is installed and configured.
Now, you will need to install a TFTP Client on the Client computer.
You can install the TFTP Client on the client computer by following the below steps:
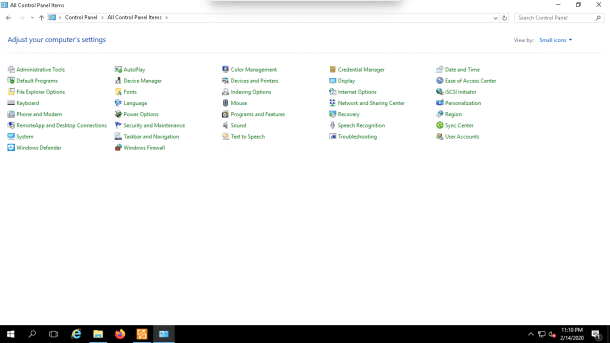
1. Click on the Start Menu and click on Control Panel.
2. Click on the Programs and Features => Turn Windows features on or off. This will open the Windows Features dialog box.
3. Scroll down until you see the TFTP Client check box and CHECK it as shown below:
4. Click on the OK button to start the installation process of the TFTP client.
This process will take some time to finish the installation. Once you are finished, you can proceed to the next step.
Configuring Firewall to Allow TFTP
Before using the TFTP client, you will need to turn off the Windows Firewall or configure the Firewall to allow the inbound/outbound transfer of files using the TFTP client.
You can follow the below steps to add an exception for the TFTP connections:
1. Go to the Start Menu and open the Control Panel as shown below:
2. Click on the Windows Firewall to open the firewall as shown below:
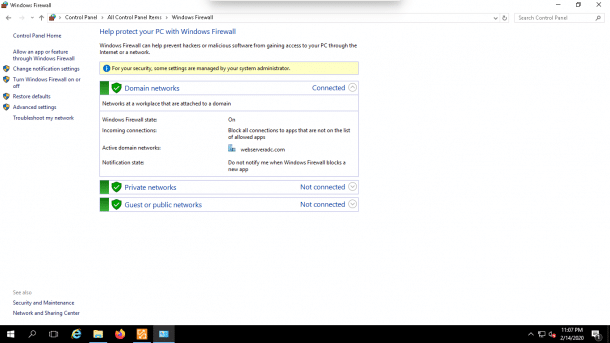
3. In the left-pane, click on the “Allow an app or feature through Windows Firewall“.
You should see the following page:
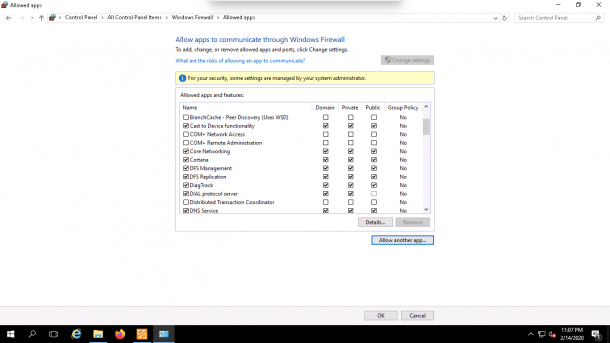
4. Click on the Allow an app or feature through Windows Firewall at the bottom. You should see the following page:
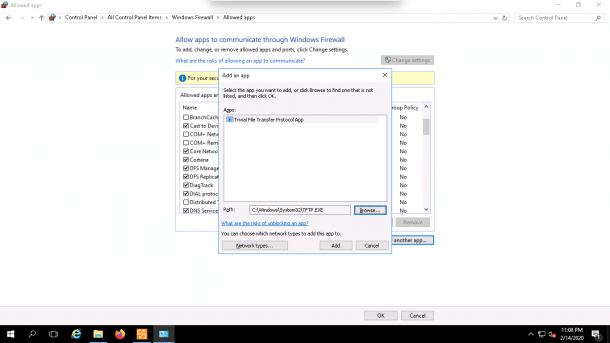
5. Click on the Browse button and specify the TFTP.EXE path and click on the Add button.
You should see the following page:
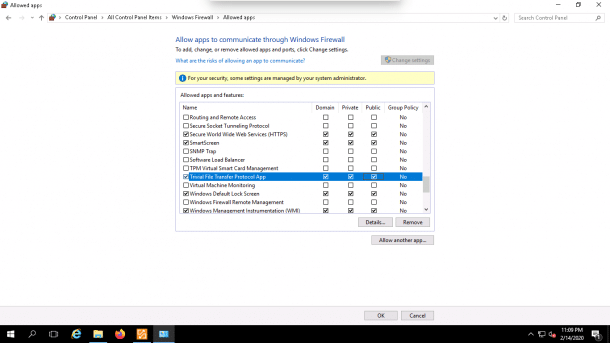
6. You should see that the Trivial File Transfer Protocol App should be highlighted.
7. Now, click on the OK button to finish the process.
At this point, your client computer is configured to allow PUT and GET command against your TFTP server.
Transfer File with TFTP Client
You are now ready to transfer file using the TFTP client.
Go to the TFTP client computer, open the command line interface and run the following command:
tftp
You should see all the options available with tftp command in the following page:
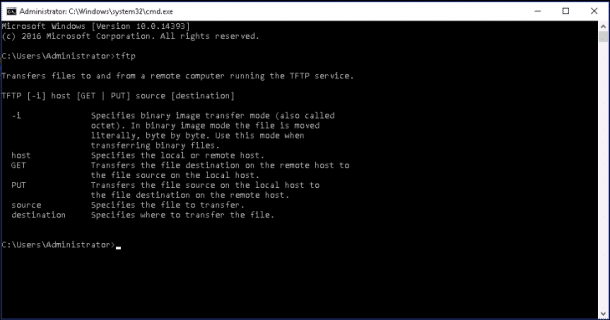
If you want to send a file to the TFTP server, use the following syntax:
tftp your-tftpserver-ip put location-of-the-file
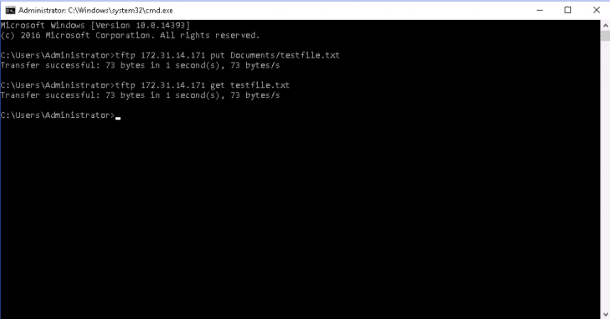
For example, to send the file named testfile.txt located in Documents directory to the TFTP server run the following command:
tftp 172.31.14.171 put Documents/testfile.txt
Once the file transfers successfully, you should see the following output:
Transfer successful: 73 bytes in 1 second(s), 73 bytes/s
If you want to transfer file from the TFTP server to your local computer, use the following syntax:
tftp your-tftpserver-ip get location-of-the-file
For example, transfer the file named testfile.txt from the TFTP server to your local computer run the following command:
tftp 172.31.14.171 get testfile.txt
Once the file transfers successfully, you should see the following output:
Transfer successful: 73 bytes in 1 second(s), 73 bytes/s
Example Screen:
You can also transfer the files over the internet using the Public IP address of the TFTP server – Please remember, there is not encryption or any security when sending over the Internet!
Conclusion
In the above guide, we’ve learned how to install and configure the TFTP server and Client on Windows system.
You can now easily transfer files to and from your TFTP server for FREE.
Please Feel free to ask us any questions below in the comments, we’ll try to answer them immediately!