
FTP-Сервер обеспечивает возможность передачи файлов между клиентом и сервером с помощью протокола FTP. Здесь будет рассказано как запустить FTP-сервер в Windows Server 2008 R2.
0. Оглавление
- Добавление службы FTP-сервер
- Добавление FTP-сайта
- Детальная настройка уровня доступа для FTP-сайта
1. Добавление службы FTP-сервер
FTP-Сервер является службой роли «Веб-сервер (IIS)» , поэтому для начала нужно установить данную роль. Для этого заходим в диспетчер сервера («Пуск» — «Администрирование» — «Диспетчер сервера»). Раскрываем вкладку «Роли» и нажимаем «Добавить роли» . Если веб-сервер уже был установлен раннее, то необходимо кликнуть правой кнопкой мыши на названии роли в диспетчере сервера и выбрать «Добавить службы ролей» .

В запустившемся мастере нажимаем «Далее» , выбираем роль «Веб-сервер (IIS)» и 2 раза жмем «Далее» .

Теперь надо выбрать службы для данной роли. По умолчанию уже отмечены службы, необходимые для работы web-сервера. Листаем вниз и отмечаем службу «FTP-Сервер» . Затем жмем «Далее» , «Установить» и дожидаемся сообщения об успешной установке роли.

2. Добавление FTP-сайта
Теперь в диспетчере сервера, раскрыв вкладку «Роли» мы видим добавленную только что роль «Веб-сервер (IIS)» . Кликаем по ней 2 раза и заходим в «Диспетчер служб IIS» (доступен также через «Пуск» — «Администрирование» — «Диспетчер служб IIS» ).

В диспетчере служб IIS мы видим, что у нас уже добавлен сайт по умолчанию «Default Web Site» (Чтобы его просмотреть можно набрать в строке браузера http://localhost/ ) , нам же надо добавить новый ftp-сайт. Для этого кликаем правой кнопкой мыши в окне «Подключения» и выбираем «Добавить FTP-сайт» .

Запустится мастер добавления FTP-сайта. Придумываем имя FTP-сайта (только для нас), указываем расположения каталогов для сайта и жмем «Далее» .

На следующей странице, в меню «Привязки» оставляем «Все свободные» и можно поменять порт по умолчанию, если вам это надо. Далее, если у вас есть доменное имя, и вы хотите чтобы по нему был доступен FTP-сайт, записываем его в поле «Виртуальный узел» (О доменном имени и привязке его к IP адресу можно прочитать здесь). У меня это ftp.tavalik.ru, в противном случае НЕ включаем опцию «Разрешить имена виртуальных узлов» . Оставляем галочку «Запускать FTP-сайт автоматически» (чтобы сайт запускался автоматически при запуске компьютера), выбираем пункт «Без SSL» (в этой статье я не буду рассматривать данный протокол) и жмем «Далее» .

Теперь настраиваем уровень доступа к FTP-сайту. Устанавливаем проверку подлинности «Анонимный» , только если хотим оставить анонимный доступ к сайту и выбираем «Обычная» для обычной проверки доступа. Далее необходимо выбрать для каких пользователей будет доступен наш FTP-сайт. Можно выбрать группы пользователей или перечислить имена пользователей через запятую. Я же выбираю «Все пользователи» , устанавливаем флаги «Чтение» и «Запись» и жмем «Готово» .

Все, на этом наш FTP-сайт готов. Для проверки можно набрать в браузере ftp://<%вашдомен%>, если Вы делали привязку к доменному имени, или ftp://localhost в противном случае.

Если вы настраивали все так же, как описано у меня, то FTP-сайт доступен для всех пользователей, имеющихся в системе (о том как добавить пользователя я писал здесь). Кроме того, все параметры вводимые при добавлении FTP-сайта можно изменить в любое время в меню управления сайтом, а также в меню «Действия» , выделив его в диспетчере служб IIS.

3. Детальная настройка уровня доступа для FTP-сайта
Наш FTP-сайт настроен и работает, теперь надо настроить уровень доступа пользователей на FTP. Сделать это можно, например, выбрав пункт «Правила авторизации FTP» в меню управления сайтом. На скриншоте ниже, настройки установлены таким образом, что группе «Администраторы» позволены запись и чтение на сайте, а группе «Пользователи» только чтение:

Более детально, уровень доступа можно настроить управляя параметрами безопасности для каталогов и файлов в директории, где находится FTP-сервер. В моем случае это C:\my_ftp\ . Заходим в свойства папки, выбираем вкладу «Безопасность» затем нажимаем «Изменить» и выбираем уровень доступа для пользователей и групп пользователей. Аналогично настраивается безопасность для вложенных папок и отдельных файлов.

Прочитано: 9 380
Итак задача:
- Поднять FTP сервер на Server 2008 R2 SP1 (Enterprise)
- Авторизация на FTP ресурсе посредством IIS учетных записей, а не Windows.
- Посредством FSRM настроить наблюдение и квоту
- Настроить проброс порта для доступа из вне на эту систему.
Ниже я приведу все шаги посредством которых поставленная задача была выполнена и если ее нужно будет повторить, то это уже не составит ни какого труда.
Нужно установить роль File Services (компонент File Server Resource Manager) и Web Server (IIS) (компоненты FTP Server):
Start – Control Panel – Administrative Tools – Server Manager – Add Roles
или же через консоль командной строки:
C:\Users\Administrator>dism /online /enable-feature /featurename:CoreFileServer
C:\Users\Administrator>dism /online /enable-feature /featurename:FSRM-Management
C:\Users\Administrator>start /wait dism /online /enable-feature /featurename:IIS
-WebServerRole
C:\Users\Administrator>start /wait dism /online /enable-feature /featurename:IIS
-FTPServer /featurename:IIS-FTPSvc /featurename:IIS-FTPExtensibility
Важно замечание: установленный IIS имеет версию (Version 7.5.7600.16385)
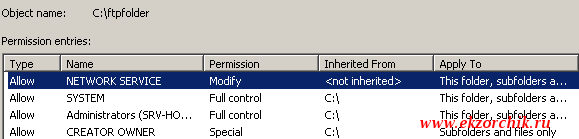
Затем на логическом диске, пусть это будет тот на котором стоит система создаем каталог, отключаем наследование прав и оставляем доступ к нему только для Администраторов текущей системы: c:\ftpfolder
После запускаем оснастку управления IIS Web сервером:
Start – Control Panels – Administrative Tools – Internet Information Services (IIS) Manager и создаем новый FTP Site:
Start Page – SRV-HOST1 (SRV-HOST1\Administrator) – Sites и через правый клик вызываем мастер Add FTP Site…
FTP site name: srv-host1
Physical path: указываем путь до c:\ftpfolder
и нажимаем кнопку Next, теперь нужно указать на каком сетевом интерфейсе ожидать подключения, порт взаимодействия, запускать ли FTP сайт автоматические и поддерживает ли наш ftp сайт SSL сертификат:
- IP Address: 192.168.1.162 (Я выбираю текущий IP адрес)
- Port: 21 (дефолтный)
- Start FTP site automatically: отмечаю галочкой
- SSL: No SSL
и нажимаю кнопку Next, далее момент когда нужно определить каким образом будет происходить авторизация на FTP сервисе:
Authentication: Basic
Authorization – Allow access to – Specified users (выбираю что только указанным учетным записям будет разрешен вход)
Ниже указываю их: ftpuser1,ftpuser2
Permissions: Write
и нажимаю кнопку Finish.
Вот и появился мой добавленный в IIS ресурс для обслуживания через FTP сервис:
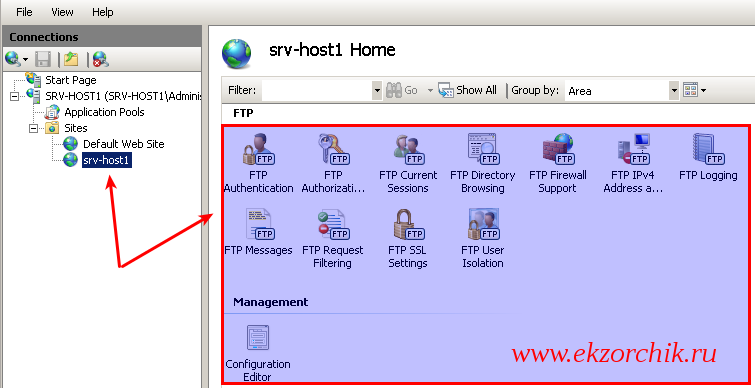
Слева в оснастке Internet Information Services (IIS) Manager представлены имеющиеся сайты, выделив который справа отобразятся апплеты настройки и управления возможностями.
Хоть я и посредством мастера создал пользователя и тип доступ, его можно посредством апплетов и видоизменить.
Важным было бы это определить как производить логирование взаимодействия с FTP сервисом: FTP Logging – Select W3C Fields… – отмечаем все пункты которые представляют из себя колонки заполняемой информации в формируемом лог файле при взаимодействии с FTP сервисом, уже потом поработав какое-то время можно будет исключить не представляющую из себя логируемую информацию и нажимаем кнопку OK окна Information To Log. Каталог по умолчанию для логов:
- Directory:
c:\inetpub\logs\LogFiles - Select a method that FTP uses to create a new log file: Schedule: Daily
- Use local time for file naming and rollover: Отмечаю галочкой
Чтобы внесенные изменения сохранились в правом углу нужно будет нажать кнопку Apply, когда изменения сохранены в правом углу появится надпись: The changes have been successfully saved.
Теперь нужно создать и назначить пароли для пользователей FTP–ресурса, для этого в оснастке IIS должны быть специальные апплеты, что я имею в виде, если перейти:
Start – Control Panels – Administrative Tools – Internet Information Services (IIS) Manager – Start Page – SRV-HOST1 (SRV-HOST1\Administrator) – и в правой части в подменю Management должна быть оснастка: IIS Manager Users если ее нет, как у меня к примеру:
То чтобы она появилась действия следующие:
Start – Control panel – Administrative Tools – Server Manager – Server Manager – Roles – Web Server (IIS) – Add Role Services
и отмечаем галочками:
- IIS Managemenet Console
- IIS Management Scripts and Tools
- Managemenet Service
- IIS 6 Managemenet Compatibility
- IIS 6 Metabase Compatibility
- IIS 6 Scripting Tools
- IIS 6 Management Console
и нажимаю кнопку Next – Install – Close
После нужно закрыть консоль управления IIS и заново открыть и необходимый апплет появится. Заходим в апплет → IIS Manager Users и создаю необходимых пользователей: Add User
- User name: ftpuser1
- Password: Aa1234567
- Confirm password: Aa1234567
и нажимаю OK, по аналогии создаю другого пользователя ftpuser2
Далее нужно определить что доступ к FTP ресурсу будет осуществлен с использованием созданных учетных записей IIS, а не учетных записей системы:
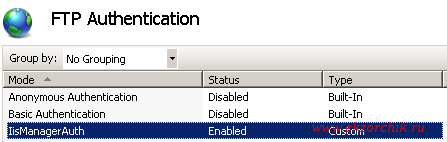
Start – Control Panels – Administrative Tools – Internet Information Services (IIS) Manager – Start Page – SRV-HOST1(SRV-HOST1\Administrator) – Sites – srv-host1 – FTP Authentication – через правый клик мышью вызываю мастер: Custom Providers… и регистрирую провайдера IisManagerAuth.
У Вас должно быть точно также как у меня на представленном скриншоте ниже:
- Anonymous Authentication: Disabled
- Basic Authentication: Disables
- IisManagerAuth: Enable
После меняем тип аутентификации на всем сервисе, по умолчанию стоит Windows credentials only, а я изменяю на:
Start – Control Panels – Administrative Tools – Internet Information Services (IIS) Manager – Start Page – SRV-HOST1 (SRV-HOST1\Administrator) – Management Service: Windows credentials or IIS Manager credentials и не забываем нажать Apply.
C:\Users\Administrator>CACLS "%SystemDrive%\Windows\System32\inetsrv\config" /G "Network Service":R /E
C:\Users\Administrator>CACLS "%SystemDrive%\Windows\System32\inetsrv\config\administration.config" /G "Network Service":R /E
C:\Users\Administrator>CACLS "%SystemDrive%\Windows\System32\inetsrv\config\redirection.config" /G "Network Service":R /E
C:\Users\Administrator>cacls "c:\ftpfolder" /G "Network Service":C /T /E
C:\Users\Administrator>iisreset /stop
Attempting stop…
Internet services successfully stopped
C:\Users\Administrator>iisreset /start
Attempting start…
Internet services successfully started
C:\Users\Administrator>iisreset /status
Status for IIS Admin Service ( IISADMIN ) : Running
Status for Windows Process Activation Service ( WAS ) : Running
Status for World Wide Web Publishing Service ( W3SVC ) : Running
или же находясь в то же окне где изменяли поведение авторизации справа нажать Start.
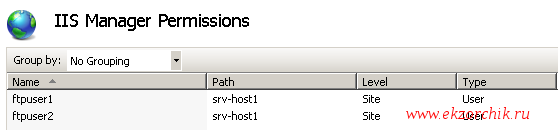
Затем добавляю к своему FTP–ресурсу в разрешения IIS учетные записи на основе которых и будет происходить авторизация, а не Windows создаваемые учетные записи:
Start – Control Panels – Administrative Tools – Internet Information Services (IIS) Manager – Start Page – SRV-HOST1(SRV-HOST1\Administrator) – Sites – srv-host1 – IIS Manager Permissions – Allow User… –
теперь параметр IIS Manager доступен для выбора (ранее он был затемнен, т.е. деактивирован) и через Select… указываю созданный ранее двух пользователей: ftpuser1, ftpuser2 и нажимаю OK.
После нужно дать данным пользователям полный доступ к FTP ресурсу, а не права только чтения, но и запись иначе да они смогут создавать каталоги,файлы,переименовывать, но получить список файлов не смогут:
Start – Control Panels – Administrative Tools – Internet Information Services (IIS) Manager – Start Page – SRV-HOST1(SRV-HOST1\Administrator) – Sites – srv-host1 –
FTP Authorization Rules –
- Specified users: ftpuser1,ftpuser2
- Permissions: Read и Write отмечаем галочками как на представленном ниже скриншоте.
Теперь когда все настройки по организации FTP сервиса настроены нужно по заметке если нужно настроить квоту на FTP-каталог и определить какие файлы разрешено на нем размещаться, останавливаться как это сделать не буду лишь укажу ссылки на FSRM с помощью которого все это делается.
Ладно это все вспомогательная часть которую можно и опустить, но я этого не рекомендую.
Теперь нужно на встроенный брандмауэер системы добавить правила на доступ:
C:\Users\Administrator>netsh advfirewall firewall add rule name=FTP action=allow protocol=tcp localport=21 dir=in profile=any
C:\Users\Administrator>netsh advfirewall set global statefulftp enable
После проверяю, что могу с другой системы в локальной сети подключиться, к примеру это будет моя рабочая система Ubuntu 12.04.5 Desktop amd64 (Gnome Classic):
ekzorchik@navy:~$ nmap -v 192.168.1.162 -p 21 | grep ftp
21/tcp open ftp
Теперь пробую подключиться с организованному FTP ресурсу:
ekzorchik@navy:~$ ftp 192.168.1.162
Connected to 192.168.1.162.
220 Microsoft FTP Service
Name (192.168.1.162:ekzorchik): ftpuser1
331 Password required for ftpuser1.
Password:Aa1234567
230 User logged in.
Remote system type is Windows_NT.
ftp> pwd
257 “/” is current directory.
ftp> mkdir 1
257 “1” directory created.
ftp> rename 1 2
350 Requested file action pending further information.
250 RNTO command successful.
ftp> quit
421 Service not available, remote server has closed connection
Справку по командам FTP ресурсам смотреть: ftp> help
Итого я получил решение своей задумки по организации FTP ресурса на Windows Server 2008 R2 без создания аутентификационных данных в Windows, только IIS аутентификация. Теперь же я смогу выполнить поставленную задачу от руководитель отдела запасных частей:
Есть необходимость в FTP.
Суть вопроса в следующем:
Поставщик шин готов предоставить нам выгрузку остатков шин (обновления будут происходить каждые 5 минут). Возможные варианты, которые реализованы с их стороны – выгрузка на FTP.
С нашей стороны необходимо предоставить / Хост[:Порт / Логин: / Пароль:
В дальнейшем данные файлы будут использоваться для загрузки на наш интернет-магазин, так же в автоматическом режиме.
Прошу предоставить ответ сегодня о возможности использования данного алгоритма.
Но это я сделал если FTP ресурс будет в пределах локальной сети, а тут как я погляжу из задания требуется доступ снаружи для поставщика, что ж и это можно.
У меня вся сетевая инфраструктура организована посредством оборудования Mikrotik (вот к примеру действия на моем: v6.37 on RB2011UiAS-2HnD), а значит я могу просто сделать проброс порта из вне:
winbox – IP&DNS – user&pass – IP – Firewall – NAT – Add –
вкладка: General
- Chain: dstnat
- Dst. Address: <уникальный_идентификатор>.sn.mynetname.net&IP-Addresss (Если статический)
- Protocol: 6 (tcp)
- Dst. Port: 33644 (выбирается произвольно главное чтобы был не занят)
вкладка: Action
- Action: dst-nat
- To Addresses: 192.168.1.162
- To Ports: 21
После не забываем сохранить изменения: Apply – Ok. Вот и все, проверяю со своего хостинга:
ekzorchik@ekzorchik:~$ ftp <уникальный_идентификатор>.sn.mynetname.net 33644
Connected to <уникальный_идентификатор>.sn.mynetname.net.
220 Microsoft FTP Service
Name (<уникальный_идентификатор>.sn.mynetname.net:ekzorchik): ftpuser1
331 Password required for ftpuser1.
Password:Aa1234567
230 User logged in.
Remote system type is Windows_NT.
ftp> quit
221 Goodbye.
Ну конечно же работает как могло быть иначе, ведь после того как сделал и перепроверил все работает как и было задумано. Вот теперь я могу отписать руководителю поставленной задачи – что задача выполнена и прислать ему необходимые данные для поставщика и организации задачи. На этом я прощаюсь и до новых встреч на моем блоге практических задач с которыми мне как системному администратору приходится сталкиваться, с уважением автор блога – Олло Александр.
Обычно по запросу «Настройка FTP в Windows Server 2008 или 2012» выскакивают подробные руководства, как развернуть этот сервер с использованием IIS (Internet Information Services – многофункциональный Web-сервер на базе Windows и встроенный в него). Однако, бывают частные случаи, когда поднимать IIS из-за одной фишки не совсем логично.
В моём случае на сервере уже был установлен apache и подняты определённые фишки, использующие apache и возникла необходимость настройки простенького FTP-сервера для обмена данными. Поднимать ради этой одной фичи IIS, чтобы потом отключать все сервисы и освобождать порты во избежание конфликта с apache – смысла большого не увидел. Поэтому было принято решение поднять FTP, который не грузит систему, и прекрасно знает своё дело – FileZilla Server.
Прошу вас сразу не пугаться его англоязычности. В настройках он довольно прост, а если вы всё будете делать по изложенной ниже инструкции, то тем более никаких проблем у вас не возникнет.
Устанавливаем FileZilla Server
Скачиваем дистрибутив с сайта производителя, либо с нашего сайта. Запускаем и идём по порядку:

Соглашаемся с лицензией, нажимаем I Agree

Здесь можно оставить всё, как есть. Source Code может быть интересен вам только, если вы программист. Если вы программист, то вряд ли вам требуется настоящая статья, так что не мудрствуя лукаво нажимаем Next и переходим к следующему этапу.

Выбираем путь для установки через нажатие кнопки Browse, либо оставляем всё, как есть и идём дальше – Next.

Здесь мы задаём режим работы нашего сервера и порт, по которому мы будем цепляться, чтобы администрировать сервер. Если это сервер, который будет использоваться постоянно, рекомендую здесь оставить всё, как есть. Если изредка, то можно выбрать второй вариант, но тогда придётся службу запускать вручную, а в третьем случае – обязательно заходить консольно, иначе работать не будет.
Нажимаем Next.

Здесь предлагаются следующие варианты:
Запуск административного интерфейса при входе в Windows под любым пользователем
Запуск административного интерфейса при входе только текущим пользователем (из под которого ведётся установка)
Запуск вручную
Можете выбрать по своему усмотрению. Мне его морду при каждом запуске видеть не интересно, поэтому я выбираю третий вариант.
Нажимаем Next.

Пошёл процесс установки.

Нажимаем Close.
Далее запускается окно логина.
Если в процессе установки вы не меняли порт для входа в административный модуль, то всё оставляем, как есть и нажимаем Connect.
Вот он рассказывает, кто он такой и предупреждает красным, что сервер находится за маршрутизатором, поэтому необходимо сконфигурировать Passive Mode и сделать проброс портов на маршрутизаторе.
Ещё он говорит, что зашифрованное соединение невозможно до тех пор, пока мы не активируем FTP over TLS. Это, чтобы никто трафик не мог перехватить. Активировать эту функцию или нет, выбирайте по своему усмотрению. Для домашнего сервера особой нужды не вижу.
Нажимаем на иконку Settings (третья по счёту) и начинаем настройки.

Раздел General settings – здесь можно оставить всё, как есть.
Если интересно, поясню, что здесь что обозначает:
Listen on these ports: 21 – какой порт будет слушать ftp-сервер. По умолчанию, это 21 порт. Можно его таким и оставить, если это единственный ftp-сервер на данном компьютере. Если уже какой-то есть, то лучше поменять порт.
Max. number of users: 0 – количество пользователей, которые одновременно могут подключиться к серверу. 0 – это неограниченное количество пользователей, иначе то количество, которое вы укажете.
Number of threads: 2 – максимальное количество потоков, которое позволено использовать серверу. По умолчанию – это количество ядер/потоков процессора. Если вы по каким-то причинам хотите ограничить использование процессора, вы можете уменьшить эту величину.
Timeout settings – в этом разделе определяем таймауты для соединения, для скачки и сколько времени пользователь будет залогинен. Менять смысла не вижу.

В Passive mode settings оставляем всё, как есть. Можете при необходимости задать внешний IP в разделе Use the following IP, но без проброса портов на маршрутизаторе ничего работать не будет.

Admin Interface settings – здесь вы можете задать белый список IP-адресов, с которых разрешено подключаться к административному интерфейсу, а так же определить, какие IP-адреса слушает сервер для подключения (при наличии нескольких сетевых адаптеров).
Самая важная установка здесь – это флажок Change admin password. Пользователь Admin не является клиентом FTP-сервера, так что если вы оставите его без пароля, под ним никто к FTP не подключится. Но если есть сомнения, лучше задать этот пароль. Это именно тот пароль, который надо будет вводить при входе в административный интерфейс. Пользователей мы настраиваем совсем в другом диалоге.

Здесь вы можете задать возможность ведения Логов – журнала, который отслеживает работу сервера. Это может быть полезно, в работе сервера возникают какие-то сбои.

Если планируется, что сервером будет пользоваться большое количество народу, то есть смысл добавить ограничения скорости на один поток скачивания, чтобы не было такого, что один кто-то займёт весь канал, а остальные будут ждать и надеяться. Это можно сделать в разделе Speed Limits. Верхнее окно – скорость скачивания, нижнее – скорость закачки.

Раздел FTP over TLS settings – это как раз тот раздел, в котором можно включить безопасное подключение к серверу и указать в настройках существующий файл, либо сгенерировать сертификат. Это по желанию.

Autoban – это очень полезный раздел, который оберегает ваш сервер от брутфорсеров.Если установить флажок Enable automatic bans, то через определённое количество попыток (по умолчанию 10), перебирающий пароли пользователь будет заблокирован на определённое количество часов (по умолчанию 1, можно выставить до 999 часов)
Рекомендую включить эту функцию.
Нажимаем ОК и переходим к настройке пользователей, папок и прав доступа.
Нажимаем на четвёртую по счёту иконку.

Здесь мы нажимаем Add и видим следующее окно:
Набираем, например, User и нажимаем OK.

Здесь можно проставить флажки Enable account, чтобы допустить пользователя на сервер и Password, чтобы задать пользователю пароль. Иначе пользователь сможет подключаться, как аноним без пароля.

Здесь задаём перечень папок, к которым этот пользователь может иметь доступ, а так же определяем, что конкретно он с этими папками и файлами, находящимися в них, может делать.
Нажимаем Add и добавляем папки. Затем проставляем флажки, что пользователь может с этими папками сделать.
Для тех, кто в английском совсем не силён, перевожу:
Files (файлы):
Read – чтение
Write – запись
Delete – удаление
Append – изменение
Directories (папки):
Create – создание
Delete – удаление
List – просмотр списка папок
+ Subdirs – имеет право просматривать вложенные папки

Я выбрал папку и поставил полные права на всё для пользователя User.

Лимиты можно задавать для каждого конкретного пользователя. Привилегированным мы не ставим ограничений, всем остальным можем индивидуально ставить разрешения.

Здесь тоже ничего не меняем, но можем задать белый список IP-адресов (верхний текст-бокс), с которых определённый пользователь может зайти. Либо чёрный список адресов (нижний текст-бокс), откуда нельзя пускать этих пользователей.
Нажимаем ОК и приступаем к испытаниям!
Только одна маленькая деталь. Если у вас включен встроенный брандмауэр Windows, то скорей всего порт 21 закрыт в целях безопасности. FileZilla не открывает этот порт автоматически, так что идём в Пуск>Панель управления>Брандмауэр

Нажимаем Создать правило…

Выбираем Настраиваемые и нажимаем Далее

Нажимаем Обзор и выбираем расположение сервера. В моём случае это “C:\Program Files\FileZilla Server\FileZilla Server.exe”.

Нажимаем Далее.

Здесь выбираем Тип протокола: TCP, остальное без изменений, нажимаем Далее

Нажимаем Далее

Выбираем Разрешить подключения и нажимаем Далее

Здесь можно ничего не менять, нажимаем Далее

Здесь вписываем в пункт Имя: какое-то имя, например, как у меня – FTP-TCP и нажимаем Готово.
Теперь проделываем всё тоже самое, только в пункте, где нужно выбрать протокол, выбираем UDP.

Имя выбираем любое, например, FTP-UDP.

Всё, нажимаем Готово.
Всё, Брандмауэру мы объяснили, что следует пропускать пакеты, теперь осталось пробросить 21 порт, а на клиенте выставить пассивный режим.
Теги:
сетевые технологии,
устанавливаем ftp-сервер
Внимание! Все вопросы по статье прошу писать в комментариях, расположенных ниже, чтобы получить бесплатный ответ.
На вопросы, написанные «в личку», отвечаю только за деньги.
Мат и оскорбления — удаляются, а их автор отправляется в бан навсегда.
Другие статьи в разделе:
Или как настроить повторитель
Или сеть своими руками – это просто
FTP (File Transfer Protocol) is a popular way to transfer files between computers over a network. It allows for easy sharing and transfer of files, making it an essential tool for many businesses and individuals. In this tutorial, we will guide you through the steps to create an FTP server on Windows Server 2008.
Step 1: Install FTP Server Role
To begin, you need to install the FTP server role on your Windows Server 2008. Here’s how:
1. Click on the Start button and open the Server Manager.
2. In the Server Manager, click on Roles and then select Add Roles.
3. The Add Roles Wizard will open. Click Next to proceed.
4. Select the Web Server (IIS) role and click Next.
5. On the Role Services screen, check the FTP Server box and click Next.
6. Click Install to begin the installation process.
Step 2: Configure FTP Server
Once the FTP server role is installed, you need to configure it. Follow these steps:
1. Open the Server Manager and go to Roles > Web Server (IIS) > Internet Information Services (IIS) Manager.
2. In the IIS Manager, click on the server name in the Connections pane.
3. Double-click on FTP Firewall Support.
4. In the Data Channel Port Range section, specify the range of ports to be used for data connections (optional).
5. Click Apply to save the changes.
Step 3: Create FTP Site
After configuring the FTP server, you can create an FTP site. Here’s how:
1. In the IIS Manager, right-click on the Sites folder and select Add FTP Site.
2. The Add FTP Site Wizard will open. Enter a name for your FTP site and choose a physical path where the files will be stored.
3. Select an IP address for the FTP site and choose an SSL certificate if required.
4. On the Authentication and Authorization Information screen, select the desired options for user authentication.
5. Set the permissions for your FTP site by choosing the appropriate settings.
6. Click Finish to create the FTP site.
Step 4: Test the FTP Server
To ensure that your FTP server is working correctly, you can perform a quick test. Here’s what you can do:
1. Open an FTP client such as FileZilla or Windows File Explorer.
2. Enter the FTP server’s IP address, username, and password.
3. Click Connect or press Enter to establish the connection.
4. Once connected, you can upload, download, and manage files using the FTP client.
| Pros | Cons |
|---|---|
| 1. Easy and straightforward setup process. | 1. Requires administrative access to the Windows Server. |
| 2. Allows for secure file transfer with SSL support. | 2. Requires manual configuration of firewall settings. |
| 3. Can be accessed using various FTP client applications. | 3. May require additional configuration for advanced features and security. |
Setting up an FTP server on Windows Server 2008 provides a convenient way to transfer files within a network or over the internet. With the ability to configure user permissions and SSL support, you can ensure secure file transfer. By following the steps outlined in this tutorial, you can create an FTP server and start sharing files efficiently.
Video Tutorial:How do I make a Windows server an FTP Server?
How do I create an FTP server file?
To create an FTP server and start sharing files, follow these steps:
1. Choose an FTP server software: There are several FTP server software options available such as FileZilla Server, FileCOPA, and Cerberus FTP Server. Research and select one that aligns with your operating system and requirements.
2. Install the FTP server software: Download and install the chosen FTP server software on your computer or server. Follow the installation instructions provided by the software’s developer.
3. Configure the FTP server: Once installed, open the FTP server software and configure its settings. Make sure to set the appropriate permissions, user access controls, and directory settings to secure your file transfers.
4. Create users and assign permissions: Create user accounts on the FTP server software and assign appropriate permissions for each user. This step allows you to control who can access and modify the files on your server.
5. Set up port forwarding (if necessary): If you are hosting the FTP server behind a router or firewall, you may need to configure port forwarding to allow external clients to connect to your FTP server. Consult your router or firewall documentation for instructions on setting up port forwarding.
6. Customize the server settings (optional): Depending on your requirements, you may want to customize additional server settings like maximum file upload size, timeout values, and logging options. Explore the FTP server software’s documentation for more details.
7. Test the FTP server: To ensure everything is working correctly, test the FTP server by connecting to it using an FTP client software or a web browser. Attempt to upload and download files to verify that the server is configured properly.
Remember to ensure the security of your FTP server by using strong passwords, enabling encryption if supported, and regularly updating the server software. Additionally, keep in mind any specific requirements or restrictions of your operating system.
Note: The steps provided here for setting up an FTP server are generic and may differ slightly based on the FTP server software you choose. Follow the specific instructions provided by the software’s developer for the best results.
Can I create my own FTP Server?
Certainly! As a tech blogger, I can provide you with a professional perspective on creating your own FTP (File Transfer Protocol) server. Here’s a step-by-step guide:
1. Determine your requirements: Before setting up an FTP server, analyze your needs. Understand the purpose, expected number of users, file size limits, and security measures you want to implement.
2. Choose the right server software: There are numerous FTP server software options available, both open-source and commercial. Popular choices include FileZilla Server, ProFTPD, vsftpd, and Pure-FTPd. Research and select the one that best suits your needs, keeping factors like ease of use, documentation, and community support in mind.
3. Set up a server environment: Prepare the server environment by installing the necessary tools. Ensure that you have a stable and secure network connection, and allocate sufficient storage space to store files.
4. Configure the server software: Each FTP server software has its own configuration settings. Before users can connect to your server, you’ll need to configure parameters like listening port, access permissions, encryption options, and user authentication methods. Refer to the documentation of your chosen software for detailed instructions.
5. Configure your network and firewall: If you’re using a home network or behind a firewall, you may need to open the FTP port (default 21) and configure port-forwarding rules to allow external connections. This step may vary depending on your network setup and hardware. Consult your network administrator or router documentation for assistance.
6. Test and fine-tune your setup: Once the initial configuration is complete, test your FTP server setup. Attempt to connect to the server using FTP client software from both local and external devices. Ensure that file transfers occur smoothly, and that permissions and security measures are functioning as intended. Make any necessary adjustments based on the results.
7. Implement security measures: FTP by itself lacks strong encryption, so consider enabling SSL/TLS encryption for secure connections. This can be done by obtaining an SSL certificate and configuring your server software accordingly. Additionally, enforce strong passwords and user restrictions to protect against unauthorized access.
8. Maintain and monitor your server: Regularly update your FTP server software and operating system to address security vulnerabilities. Set up system monitoring tools to keep an eye on server performance, disk space utilization, and security logs. Address any issues promptly to ensure a smooth and secure experience for users.
Remember, setting up an FTP server requires technical knowledge and comes with responsibilities for security and privacy. It’s crucial to stay up to date with best practices and security measures and to continuously monitor and maintain your server to provide a secure and reliable file transfer service.
How to set up SFTP server?
Setting up an SFTP (Secure File Transfer Protocol) server allows you to securely transfer files over the internet. Here’s a step-by-step guide on how to set up an SFTP server:
1. Choose a suitable operating system: Decide on the operating system you want to use for your SFTP server. Popular options include Linux distributions like Ubuntu, CentOS, or Debian.
2. Set up a server: Install the chosen operating system on a dedicated machine or a virtual private server (VPS). Ensure that the server is connected to a reliable internet connection.
3. Configure SSH (Secure Shell): SFTP runs over SSH, so make sure SSH is installed and properly configured on your server. This involves setting up SSH keys, enabling SSH access, and properly securing the SSH configuration to prevent unauthorized access.
4. Install an SFTP server software: Next, you’ll need to install an SFTP server software. OpenSSH is a common and secure option that’s widely available on most Linux distributions. Install OpenSSH server on your server using your operating system’s package manager.
5. Configure the SFTP server: Once OpenSSH is installed, you’ll need to configure the SFTP server. The configuration file is typically located at `/etc/ssh/sshd_config`. Modify this file to specify the SFTP-only access, set the desired root directory for the SFTP users, enable or disable specific features, and adjust other options as needed. Ensure that the SFTP subsystem is enabled in the SSH configuration.
6. Create SFTP accounts: To allow users to connect to your SFTP server, you need to create SFTP accounts. These accounts are separate from the regular system user accounts and are dedicated for secure file transfers. Use the appropriate command or tool to create SFTP accounts on your chosen operating system. Be sure to set their home directories, enforce password policies, or configure key-based authentication according to your specific requirements.
7. Set permissions and restrictions: It’s essential to properly manage permissions and restrictions to enhance the security and usability of your SFTP server. Assign correct ownership and permissions on files and directories, take precautions against unauthorized access, apply network-level firewall rules, and consider implementing additional security measures like limiting concurrent connections or using IP whitelisting.
8. Test and troubleshoot: After setting up the SFTP server, thoroughly test the configuration to ensure it’s functioning correctly. Connect to the server using an SFTP client, transfer a few files, verify permissions, and perform necessary checks. If you encounter any issues, consult the server logs and relevant documentation to troubleshoot and resolve them.
Remember, this is a general guide, and the specific steps can vary depending on your chosen operating system and distribution. Always refer to official documentation and best practices to ensure a secure and properly configured SFTP server.
How do I create an FTP Server user?
Creating an FTP server user involves a few steps, which I’ll outline below:
1. Install an FTP server software: Before creating a user, you need to have an FTP server software installed on your system. There are several options available, such as FileZilla Server, VSFTPD, and ProFTPD. Choose the one that suits your requirements.
2. Configure the FTP server software: Once the software is installed, you’ll need to configure it according to your preferences. This involves specifying the port number, enabling encryption if desired, and setting up other necessary server parameters. Refer to the documentation of the FTP server software you have chosen for specific instructions on configuration.
3. Create a new user account: After the FTP server software is set up, you can proceed with creating a user account. Most FTP server software provides a user management interface or a command-line tool to achieve this.
– In FileZilla Server, open the «Edit» menu, click on «Users,» and then select «Add.» Provide a username and password for the new user and choose the appropriate settings for access permissions and directories.
– For VSFTPD, you can edit the configuration file (usually located at «/etc/vsftpd.conf«) and specify a new user using the «userlist_file» option. You’ll also need to create the user account on your system separately.
– ProFTPD follows a similar approach, allowing you to create a new user by adding an entry in the configuration file (typically «/etc/proftpd/proftpd.conf«) and setting up the user’s home directory.
4. Set user permissions: Depending on your requirements, you may want to restrict or grant specific access permissions to the FTP server user. This can involve configuring read and write restrictions, defining the user’s home directory, or setting upload/download file size limits. The method to set these permissions may vary depending on the FTP server software you’re using. Refer to the software’s documentation for detailed instructions.
Once you have completed these steps, the FTP server user should be set up and ready to use. Users can now connect to your FTP server using an FTP client, providing the username and password you assigned to them during user creation. Remember to inform them of the necessary connection details, including the server IP address, port number, and any encryption settings if enabled.
How to enable SFTP in Windows Server 2008 R2?
To enable SFTP (SSH File Transfer Protocol) in Windows Server 2008 R2, you can follow these steps:
1. Install an SFTP server software: Start by installing an SFTP server software on your Windows Server 2008 R2. There are various options available, such as OpenSSH, Bitvise SSH Server, or WinSCP.
2. Configure the SFTP server software: Once the software is installed, you’ll need to configure it to enable SFTP. The specific steps may vary depending on the chosen software, but generally, you need to specify the SFTP settings, such as the port to use (default is usually port 22) and the user authentication method.
3. Configure firewall settings: After configuring the SFTP server software, you need to ensure that the necessary firewall settings are in place to allow SFTP connections. You’ll typically need to open the port used for SFTP (e.g., port 22) in the Windows Firewall or any other firewall software being used.
4. Create user accounts: Next, create user accounts on the server for those who will be accessing the SFTP service. Assign appropriate permissions to these accounts, allowing them to access the necessary files and directories.
5. Test the SFTP connection: Finally, test the SFTP connection from a client machine to ensure it is working as expected. You can use an SFTP client software, such as FileZilla or WinSCP, to connect to the SFTP server using the provided IP address, username, and password. Once connected, try transferring files to verify successful SFTP functionality.
Remember that security is essential when enabling SFTP, so make sure to set strong passwords, consider using public-key authentication, and regularly update your server software and operating system to protect against vulnerabilities.
How to add FTP user in Windows Server 2008?
Adding an FTP user in Windows Server 2008 is a relatively straightforward process. Here’s a step-by-step guide to help you accomplish that:
1. Open the Server Manager: Click on the «Start» button, select «Administrative Tools,» and then click on «Server Manager.«
2. Navigate to Roles: In the Server Manager window, locate the «Roles» section, and click on «Web Server (IIS).«
3. Add FTP Server Role: On the «Web Server (IIS)» page, click on the «Add Role Services» link.
4. Select FTP Server: In the «Add Role Services» window, scroll down the list and select «FTP Server.» Click on «Next» to proceed.
5. Choose FTP Service Role: In the subsequent window, leave the default selection as «FTP Server» and click on «Next.«
6. Select FTP Extensibility: On the «FTP Server Role Services» page, choose the desired FTP server extensions and click on «Next.«
7. Configure FTP Publishing: Now, you need to configure the FTP publishing options. Leave the default selection as «No SSL» unless you specifically require Secure Sockets Layer (SSL) for FTP connections. Click on «Next» to continue.
8. Specify FTP User Isolation: In the «FTP User Isolation» window, select the preferred user isolation mode based on your requirements:
a. «Do not isolate users«: This option allows all users to have access to the same server folder.
b. «Isolate users«: With this option, each FTP user is restricted to their own directory.
c. «Isolate users using Active Directory«: Choose this option if you want to utilize Active Directory for FTP user isolation.
Select the appropriate mode, and click on «Next.«
9. Choose Authentication: On the «Authentication and Authorization Information» page, select the authentication method you want to use for FTP users. You can opt for «Basic Authentication» or «Anonymous Authentication.» Make your selection and click on «Next.«
10. Finish the Wizard: Finally, review the summary of your selections, and click on the «Install» button to begin the installation process. Wait for the installation to complete.
11. Restart IIS: Once the installation is finished, click on «Close,» and then restart the IIS by clicking on the «Restart IIS» button.
12. Create FTP User: To add an FTP user, open the IIS Manager by clicking on the «Start» button, selecting «Administrative Tools,» and then clicking on «Internet Information Services (IIS) Manager.» In the IIS Manager, expand the server node, right-click on «Sites,» and select «Add FTP Site.» Follow the on-screen instructions to create a new FTP site and specify the necessary FTP user credentials during the process.
That’s it! You have successfully added an FTP user in Windows Server 2008. Make sure to test the FTP connection to validate the functionality and accessibility of the newly created user.
FTP (File Transfer Protocol) allow clients to transfer/download/upload their files using File Transfer Protocol. FTP is very useful for Shared Hosting Service providers, Internet Service providers etc. to allow their clients to upload/download/transfer files through FTP. In Windows Server 2008 R2 Microsoft FTP 7.5 is available as Role Service for Web Server (IIS 7.5). FTP 7.5 is tightly integrated with Web Server (IIS 7.5). Before installing FTP make sure Web Server (IIS) is installed, refer Install IIS on Windows Server 2008. In this article we are going to see how to setup a shared FTP Server for allowing clients of a Shared Web Server to transfer contents of their websites.
Install FTP for IIS 7.5 on Windows Server 2008 R2
Click Start >> Administrative Tools >> Server Manager. In the Server Manager hierarchy pane expand Roles and then click on Web Server (IIS).

Click on Add Role Services which will launch Select Role Services window as shown below. Select FTP Service and FTP Extensibility services from the list. Click Next.

On Confirm Installation Selections page click Install.

On Installation Results page click Close to exit the Add Role Services wizard.

Check Firewall Rules to Allow inbound FTP Traffic
After installation of FTP Server make sure that there are Inbound firewall rules in place to allow inbound FTP traffic. To check this follow below steps:
Click Start >> Administrative Tools >> Windows Firewall with Advanced Security and then click on Inbound Rules and check if three inbound firewall rules exists as highlighted in below snapshot.
- FTP Server (FTP Traffic-In): This rule allows inbound traffic on TCP port 21 for FTP Service.
- FTP Server Passive (FTP Passive Traffic-In): This rule allows inbound traffic on TCP ports greater than 1023 for FTP Service. This is required for FTP Service to work in passive mode.
- FTP Server Secure (FTP SSL Traffic-In): This rule allows inbound traffic on TCP port 990 for FTP Service over SSL.
If these rules doesn’t exists then create them.

Create a FTP Site using the FTP Site Wizard
We installed FTP for IIS 7.5 and also checked/created firewall rules to allow inbound traffic necessary for serving FTP services. However without creating a FTP Site, the FTP Server doesn’t listen on port 21 and you can not connect to the FTP Server. Now we will create a Default FTP Site.
Click Start >> Administrative Tools >> Internet Information Services (IIS) Manager.
Expand the Server from server hierarchy pane and then expand sites.
Right click on Sites and then click on Add FTP Site…

Add FTP Site: FTP Site Information
- FTP site name: Enter the name of this FTP Site.
- Physical path: Select the physical folder from where contents to FTP Users will be served. This is called root of the FTP Server. I choose %systemdrive%\inetpub\ftproot.
- Click Next.

Add FTP Site: FTP Binding and SSL Settings
- IP Address: Select IP address from the drop down list on which FTP Server will work. Select All Unassigned to allow it to work on all IP addresses.
- Port: Enter TCP port number on which this FTP Server will listen on. Default FTP port is 21.
- Enable Virtual Host Names: To bind a host name with this FTP site enable this option and then specify host name e.g. ftp.gopalthorve.com.
- Start FTP site automatically: Select this option to start this FTP site automatically.
- SSL: Select No SSL option. We will implement SSL feature some time later.
- Click Next.

Add FTP Site: Authentication and Authorization Information
- Authentication: Select Basic because we want to use Windows built-in authentication method that requires users to provide valid Windows username and password to gain access to contents. Later we will configure FTP User isolation to restrict users to their respected folders.
- Allow access to: Select Specified roles or user groups from the drop down list and then enter the name of group which holds all FTP Users (as we discussed in Local Users, local group and local security policies on Windows Server 2008). In my case the group is FTPUsers.
- Permissions: Select both Read and Write.
- Click Finish to add the FTP Site.

Planning directory structure for FTP Server
The FTP Server we setup above allows all clients to logon to the FTP Server and all FTPUsers are granted access of the ftproot folder (i.e. %systemdrive%\inetpub\ftproot). As we are going to configure a shared FTP Server to allow customers of a Shared Web server to manage contents of their websites and accounts, the directory structure must be planned accordingly. Directories must be organized in such a way so that we can easily manage and allow clients to access their respective directories only. I have designed a directory structure as given below for my shared FTP Server.

Parent Directory (%systemdrive%\HostingSpaces)
The parent directory which will contain sub-folders for each customer. I created %systemdrive%\HostingSpaces directory which will hold a sub-directories in it for each of client.
NTFS Permissions for this directory:
- Remove inheritable permissions from parent on %systemdrive%\HostingSpaces directory.
- Grant permissions to SYSTEM, Administrators on this object.
Client’s Home Directory (client1, client2 etc.)
Each shared hosting customer will have it’s own directory created under the parent directory and each directory must be named after Windows Local User account name created for that particular customer. Initially I have two customers respectively client1 and client2 and hence I created two directories client1 and client2 in parent directory (%systemdrive%\HostingSpaces), also create two Windows Local User account client1 and client2 and add them to FTPUsers group as discussed in Local Users, local group and local security policies on Windows Server 2008. Each client’s home directory must be given read/write permissions to that specific customer user account e.g. client1’s home folder is client1 and it must be given read/write permissions to user client1.
NTFS Permissions for these directories:
- It must inherit permissions from it’s parent i.e. %systemdrive%\HostingSpaces
- Each client must be granted access to its directory i.e. client1 user account must have Modify, Read & Execute, List folder contents, Read, Write permissions on its home directory client1.
Content Directories
Client can upload anything to this directory. By default it contains client’s hosted domains here i.e. client1domain1.com, client1domain2.com etc., which will further hold website contents in wwwroot directory, data in data directory and logs in logs directory.
FTP User Isolation
The FTP Site we recently created (Default FTP Site) allows each client session to start in the root directory of FTP Site i.e. %systemdrive%\inetpub\ftproot, because there is not FTP User Isolation configured on this FTP Site so far. By default FTP Site is configured to “Do not isolate users. Start users in: FTP root directory” which allows every ftp session to start in ftp root directory of the FTP Site.
We want to configure FTP Site such that each customer account must have access to it’s own folder only and each customer’s FTP session must start in it’s own home (root) folder named after it’s username. Microsoft FTP support one such FTP User Isolation mode called “Isolate users. Restrict users to the following directory: User name directory (disable global virtual directories)“. This mode requires us to create a folder named LocalUser under root of the FTP Site (%systemdrive%\inetpub\ftproot\LocalUser) which will further contain customer’s home folder (i.e. client1, client2 etc.). However I don’t want to put customers folder in %systemdrive%\inetpub\ftproot\LocalUser folder instead I want to put all those folders in %systemdrive%\HostingSpaces folder. To accomplish this we will need to create a Virtual Directory called LocalUser under recently created FTP Site which will point to physical folder %systemdrive%\HostingSpaces folder. To create Virtual Directory follow below steps:
Create Virtual Directory
- Start Internet Information Services (IIS) Manager. (Start >> Administrative Tools >> Internet Information Services (IIS) Manager)
- Expand Sites
- Right click on Default FTP Site we created recently and then click Add Virtual Directory…
- Alias: Enter LocalUser in this text box, remember to type with exact case it must be LocalUser with capital L and U.
- Physical path: Select physical path where this virtual directory will point to i.e. (%systemdrive%\HostingSpaces).
- Click OK to create Virtual Directory.
Finally configuring FTP User Isolation
- Start Internet Information Services (IIS) Manager. (Start >> Administrative Tools >> Internet Information Services (IIS) Manager)
- Expand Sites
- Click on Default FTP Site we recently created.
- Double click FTP User Isolation in feature view window in the middle.
- In “Isolate users. Restrict users to the following directory:” section select “User name directory (disable global directories)” option.
- Click Apply button to save changes.

Testing FTP Server
We have successfully setup FTP Server and now it’s time to check if everything is working fine. We can check FTP Server connectivity either using ftp command or using any FTP Client like FileZilla Client.
Testing FTP Server using ftp command:
- Open Command Prompt
- Type ftp at command prompt.
- Type “o 192.168.0.98” on the ftp prompt. Use IP address on which your FTP Server is configured to listen on. If “All Unassigned” is used you can use any IP address of your system as well as you can also use localhost.
- Type FTP User name e.g. client1.
- Type Password for the FTP User e.g. password for user client1.
- If everything works fine then you will get the response “230 User logged in.”
- Type “dir” command and you will get directory listing of client1 home folder.
- Type “cd client1domain1.com” command and current working directory (CWD) changes to client1domain1.com
- Type “pwd” command to know the current working directory.
- Type “put” command to upload local file to FTP Server. When prompted for local file name enter entire file name along with path. When prompted for remote file simply press enter to upload file with same name or enter new name for file on FTP Server.
- Type “recv” command to download file from FTP Server. When prompted for remote file name enter name of the file to download and when prompted for Local file enter path where you want to download the file.
- Type “dele file_name” command to delete file from FTP Server, replace file_name with name of the file to be deleted.
- I have pasted a sample command session with my recently configured FTP Server.
C:\>ftp
ftp> o 192.168.0.98
Connected to 192.168.0.98.
220 Microsoft FTP Service
User (192.168.0.98:(none)): client1
331 Password required for client1.
Password:
230 User logged in.
ftp> dir
200 PORT command successful.
125 Data connection already open; Transfer starting.
06-06-12  07:37PM       <DIR>          client1domain1.com
06-06-12  07:37PM       <DIR>          client1domain2.com
226 Transfer complete.
ftp: 118 bytes received in 0.00Seconds 118000.00Kbytes/sec.
ftp> cd client1domain1.com
250 CWD command successful.
ftp> put
Local file c:\help.txt
Remote file
200 PORT command successful.
125 Data connection already open; Transfer starting.
226 Transfer complete.
ftp: 5866 bytes sent in 0.02Seconds 244.42Kbytes/sec.
ftp> recv
Remote file help.txt
Local file d:\help.txt
200 PORT command successful.
125 Data connection already open; Transfer starting.
226 Transfer complete.
ftp: 5866 bytes received in 0.00Seconds 5866000.00Kbytes/sec.
ftp> dele help.txt
250 DELE command successful.
Checking FTP Server using FileZilla FTP Client
We can also check FTP Server by using GUI based FTP client like FileZilla Client. Simply download the FileZilla Client and then install, after installation launch FileZilla.
- Host: Enter IP address on which your FTP Server is listening on.
- Username: Enter FTP Username e.g. client1
- Password: Enter password for FTP User
- Port: Enter FTP Port default is 21.
- Click Quickconnect button.
- Once connected you can download/upload/delete contents simply drag and drop functionalities.

So that’s it for FTP Server for now. As far as more FTP Server settings are concerned I will be putting it under comments area of this article. Later we will see how to create website in IIS 7.5.