
Для активации всех ядер необходимо изменить параметры загрузки ОС Windows 11 в разделе «Конфигурация системы». Делается это следующим образом:
Читайте также:
Как посмотреть комплектующие компьютера с Виндовс 11
Как узнать характеристики железа компьютера с Виндовс 11
- Вызовите системную оснастку «Выполнить». Для этого можете воспользоваться контекстным меню кнопки «Пуск» (вызывается нажатием правой кнопки мышки (ПКМ) по соответствующему элементу) либо сочетанием клавиш «Win+R».
- Введите указанную ниже команду и нажмите «ОК» или «Enter».
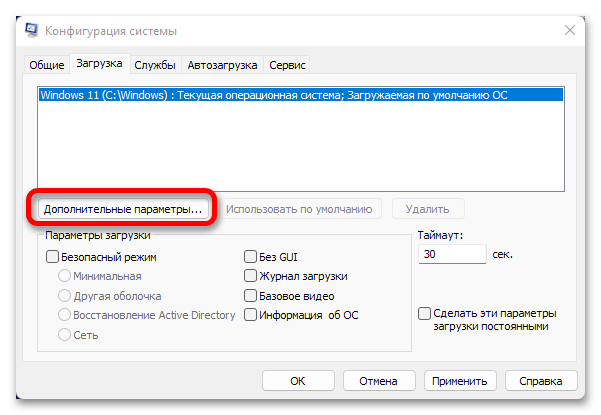
msconfig - В появившемся окне «Конфигурация системы» перейдите на вкладку «Загрузка».
- Нажмите на кнопку «Дополнительные параметры».
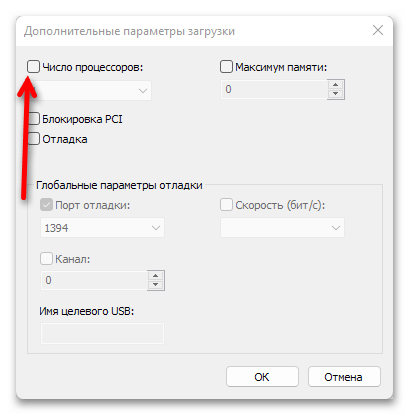
- Установите отметку напротив опции «Число процессоров»,

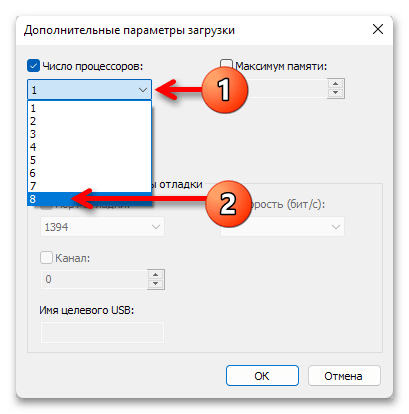
после чего разверните выпадающий список с количеством ядер и выберите наибольшее из доступных значений.
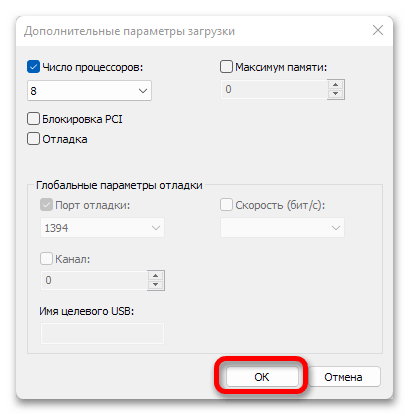
- Для сохранения внесенных изменений нажмите «ОК».
- Затем последовательно воспользуйтесь кнопками «Применить» и «ОК».

Система предложит выполнить «Перезагрузку». Как только вы это сделаете, запуск Windows будет осуществляться с задействованием всех доступных ядер процессора.


Читайте также: Как узнать характеристики материнской платы в Виндовс 11
Наша группа в TelegramПолезные советы и помощь
Почти на всех современные процессоры являются многоядерными. Все современные версии Windows поддерживают мультипроцессорные CPU и все ядра на них по умолчанию активны.
Содержание:
- Сколько процессоров и ядер доступно в Windows?
- Как включить все ядра процессора в Windows?
- Как запускать программу в Windows только на определенных ядрах?
- Включить все ядра Windows при загрузке
В Windows есть ограничение на максимальное поддерживаемое количество физических CPU и ядер (логических процессоров) в зависимости от версии и редакции:
- Windows 10 x86 (Enterprise Pro, Home) – до 2 CPU и 32 логических процессоров (учитываются как физические ядра, так и виртуальные ядра Hyper-Threading)
- Windows 10/11 x64 – до 2 CPU и 256 логических процессоров
- Windows Server 2019/2016/2012R2 – 640 логических процессоров
- Windows Server 2008 R2 – 256 логических ядер
Сколько процессоров и ядер доступно в Windows?
Проще всего проверить, сколько физических CPU, ядер и логических процессоров доступно в Windows с помощью Task Manager.
- Запустите
taskmgr.exe
и перейдите на вкладку Performance; - Выберите CPU;
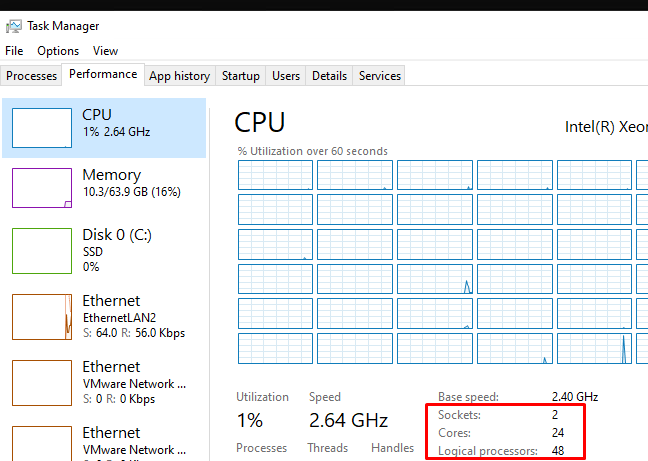
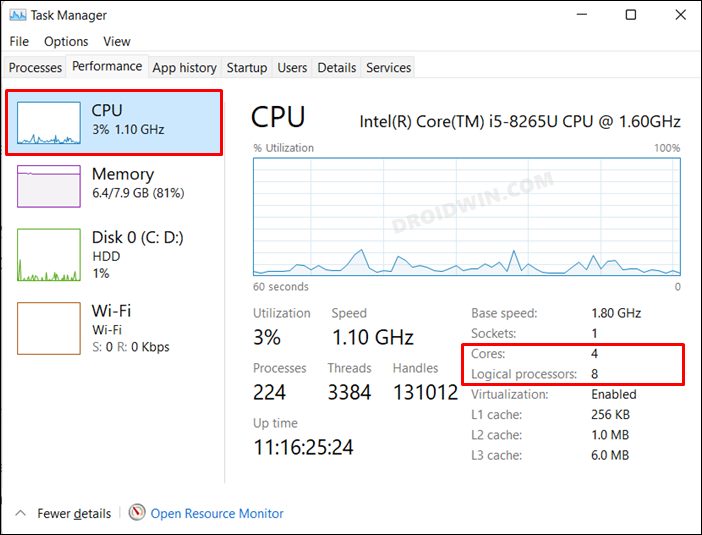
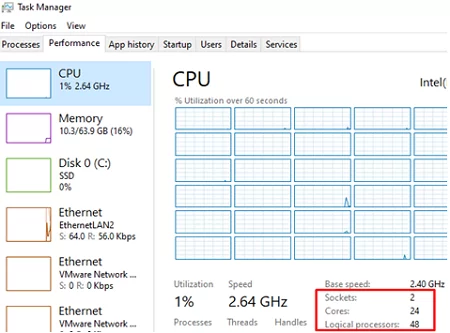
- В правом окне указано количество доступных процессоров (sockets), физических ядер (24 cores) и логических процессоров (logical processors).
Логические процессоры показывают число доступных ядер с учетом того, что на компьютере включен HyperThreading.
В диспетчере устройств (
devmgmt.msc
) также отображается количество доступных логических ядер.
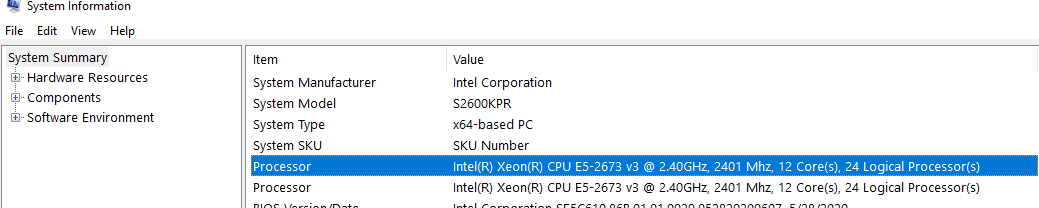
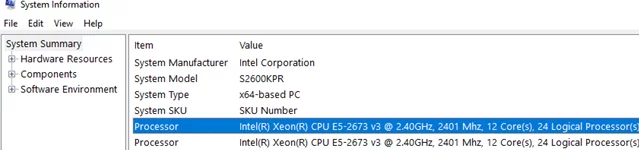
Также информация о физических CPU и количестве ядер на них отображается в разделе Processor утилиты msinfo32.exe
Processor Intel(R) Xeon(R) CPU E5-2673 v3 @ 2.40GHz, 2394 Mhz, 12 Core(s), 24 Logical Processor(s)
Processor Intel(R) Xeon(R) CPU E5-2673 v3 @ 2.40GHz, 2394 Mhz, 12 Core(s), 24 Logical Processor(s)
Вы можете получить информацию о количестве ядер и логических процессорах с помощью PowerShell:
Get-WmiObject -class Win32_processor | ft NumberOfCores,NumberOfLogicalProcessors
NumberOfCores NumberOfLogicalProcessors
------------- -------------------------
12 24
12 24

В переменной окружения Windows также есть информация о количестве логических процессоров в Windows:
echo %NUMBER_OF_PROCESSORS%
Как включить все ядра процессора в Windows?
Если в Windows недоступны все ядра CPU, проверьте включены ли они в настройках BIOS/UEFI. Здесь могут быть два параметра:
- HyperThreading – возможность использовать оба логических процессора ядра CPU
- Active Processor Cores – разрешено ли использовать все ядра процессора
Перезагрузите Windows и войдите в настройки BIOS (обычно для этого используются клавиши
F2
,
Del
,
F10
или
F1
.
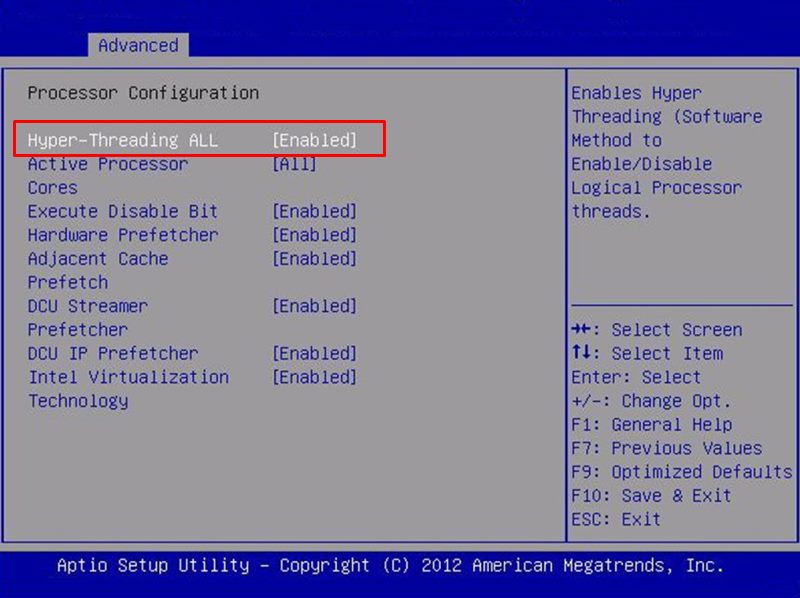
Конкретные названия пунктов и их наличие зависит от версии BIOS и модели процессора. В моем случае все ядра и логические процессоры включены в разделе Processor Configuration:
- Hyper-Threading ALL:
Enabled - Active Processor Cores:
All
Эти настройки могут находится в разделах Advanced, Extreme Tweaker и называться Processor Options, AMD Core Select, Processor Core, Active Processor Cores, Core Multi-Processing, CPU Cores и т.д.
Как запускать программу в Windows только на определенных ядрах?
В Windows вы можете разрешить программе выполняться только на одном или нескольких ядрах. По-умолчанию запущенное приложение Windows может выполняться на любом ядре.
Если вам нужно привязать программу к определенным ядрам, можно воспользоваться функцией Processor Affinity. Это может понадобится, если вы хотите ограничить использование CPU программой, или запускать программу только на одном ядре (это бывает нужно для запуска старых приложений, которые некорректно работают на многоядерных компьютерах.
Вы можете изменить привязку запущенного приложения к ядрам с помощью Task Manager:
- Перейдите на вкладку Details;
- Щелкните правой кнопкой по процессу и выберите Set affinity;
- Отметьте физические ядра, на которых разрешено выполнять инструкции приложения.
Если нужно сразу запустить приложение на одном ядре, например, CPU0. Воспользуйтесь командой:
cmd.exe /c start "Acrobat DC" /affinity 1 "C:\Program Files\MyApp\yourappname.exe"
Включить все ядра Windows при загрузке
В Windows при загрузке компьютера всегда используется одно ядро. Вы можете разрешить использовать все ядра при загрузке Windows через System Configuration:
- Запустите утилиту
msconfig
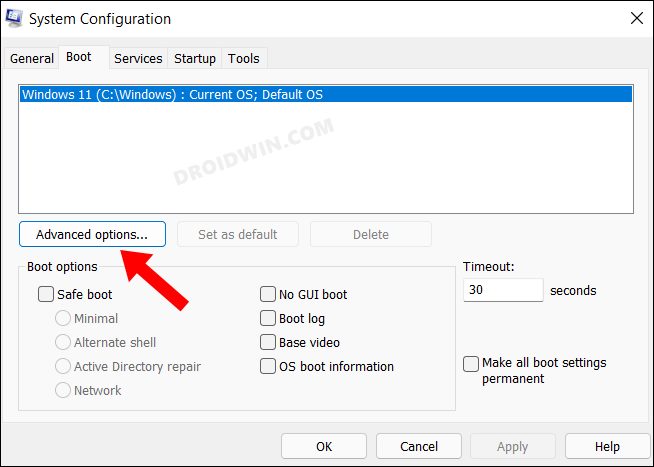
; - Перейдите на вкладку Boot и выберите загрузочную запись вашей Windows;
- Нажмите Advanced options;
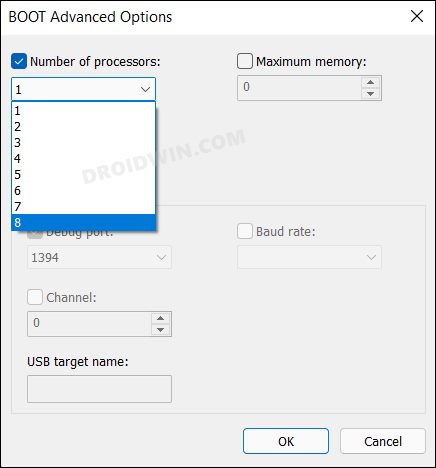
- Включите опцию Number of processors в окне BOOT Advanced Options;
- Выберите количество логических процессоров (потоков), которые можно использовать при загрузке .
Вы не заметите существенного ускорения загрузки Windows, если увеличите число доступных процессоров. Кроме того, в некоторых случаях эта опция может вызвать проблемы с загрузкой Windows, особенно при включении опции PCI lock (ошибка загрузки BAD SYSTEM CONFIG INFO). Поэтому в большинстве случаев не рекомендуется включать и настраивать эту опцию.
Most modern central processing units (CPUs) are now equipped with multiple cores. Each core is an independent processor that your system can use to perform tasks. These multiple cores can then work together to perform different tasks simultaneously, increasing speed and performance.
By default, both Windows 11 and Windows 10 support multi-core processors and activate all cores by default. However, these can be disabled manually, primarily through the system BIOS and within Windows.
This post discusses how you can enable all CPU cores supported by your CPU and operating system (if disabled), as well as its repercussions.
Table of Contents
Why Enable All CPU Cores
By default, Windows itself manages the available CPU cores. They are only used when required to speed up the tasks. However, you can manually enable some or all of them.
If you think that your computer is performing slow and can do better, you can manually enable all cores so the workload between them is divided, resulting in faster performance. However, doing so will have consequences.
Enable All CPU Cores In Windows 11/10
To manage CPU cores from within Windows, you must first ensure that the respective capabilities are enabled in BIOS. There are 2 main functionalities that need to be managed from BIOS:
- Multi Core Support
- HyperThreading
Enable All Physical CPU Cores from BIOS
First things first: configure your System BIOS to use all physical cores in the processor. To do this, you need to look for Multi Core Support (or relevant) settings in your BIOS and select All.
Restart your computer and access BIOS settings. From there, navigate to Multi Core Support and select the All option, as in the image below:

Do not exit BIOS yet. Rather, perform the next steps given below.
Enable HyperThreading
HyperThreading is Intel proprietary function that splits a physical core on a CPU into virtual cores (or logical processors), where each acts as an independent processor.
This means even more tasks can be executed simultaneously, further increasing the performance of the processor. For example, having 4 physical cores with HyperThreading enabled would split each core into 2, making 8 logical cores/processors.
This feature also needs to be enabled through System BIOS. Look for HyperThreading settings in BIOS, and then select the Enabled option.

Now that it is enabled, you can save the settings and exit BIOS.
Enable All Logical CPU Cores
Once you are done with BIOS, boot into Windows and perform the following steps to manually enable all CPU cores:
- Type msconfig in Run to open System Configuration.
- Switch to the Boot tab and click Advanced options.

- Now check the box next to “Number of processors” and then select the highest number available from the drop-down menu below it. Click Ok when done.
- Back in the System Configuration window, click Apply and OK.
- Now restart your computer for the changes to take place by clicking Restart on the dialog box.


Once the computer restarts, you can check that all cores are up and running through the method given in the next step.
How to Check Number of Cores in Windows
You can also know the number of physical cores and the logical cores in Windows. To know this information, launch the Task Manager by using the CTRL + Shift + Esc shortcut keys.
Now switch to the Performance tab, click CPU on the left of the window, and there you will find Cores, which is the actual number of physical cores on your processor, and Logical processors, which is the total number of processors (after HyperThreading) your system currently has.

How to Show All CPU Cores in Task Manager
Another useful piece of information you can benefit from is the performance of each CPU core. This way, you can identify whether you need to enable all CPU cores in the first place.
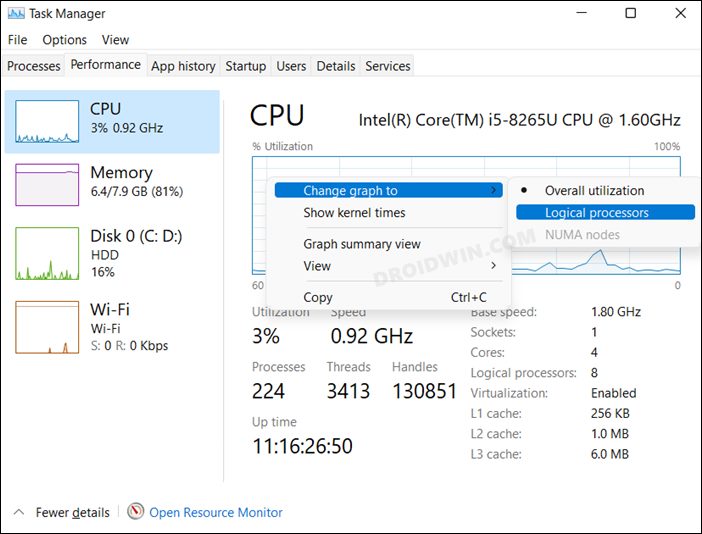
To view performance graphs on all CPU cores, open the Task Manager using the CTRL + Shift + Esc shortcut keys, and then switch to the Performance tab. From there, click on CPU from the left of the window. Now right-click on the CPU graph, expand Change graph to, and then click Logical processors.

Your graphical view within the Task Manager will now switch to smaller, individual graphs for all CPU cores.

Take Away
We think that meddling with CPU cores is not the wisest decision. If you are already Windows 10 or 11, we recommend leaving it to default and letting Windows manage the cores for you.
If you think your system can perform better, then you may want to try changing the process affinity. This way, you can free up some CPU cores for more critical tasks.
In this guide, we will you the steps to enable all the CPU cores on your Windows 11 PC. Nowadays, most CPUs support multi-cores, and the same is respected by the OS as well. In this regard, it is the sole responsibility of the OS to determine the number of cores it needs to enable at a particular point in time. It does so by looking at the task that you are currently performing, if it is a resource-intensive one, then it will automatically enable a higher number of cores and vice versa.
However, in some instances, the actual requirement of the cores might not be in sync with what the OS thinks is the right number. As a result of which, the task that you currently executing might be slow and laggy. Fortunately, we do have the option to manually enable the required number of cores when a particular task is in progress. When you do so, the workload will now be divided among more cores, and this should translate to a better and improved CPU performance. So with that in mind, this guide will show you how to enable all the CPU cores on your Windows 11 PC. Follow along.
Table of Contents

The first three steps are the prerequisites, so make sure to checkmark them off the list. After that, you may start off with the instructions to enable all the corers, which are given in STEP 4.
STEP 1: Boot Windows 11 to BIOS
- To begin with, power off your PC. Then turn it back on.
- As soon as it is booting up, continuously press the Esc key.
- This shall bring up the Start menu.
- Now just press the key that corresponds to BIOS (which is usually F10) and your PC shall boot to the BIOS screen.
STEP 2: Enable Multi-Core Support in BIOS
Next up, you will have to instruct your BIOS to use all the logical cores present in the CPU. So from the BIOS screen, go to the Multi-Core Support option and select All.

STEP 3: Enable HyperThreading
Intel’s Hyper-Threading Technology allows more than one thread to run on each core. More threads would translate to the ability to do more work in parallel. This means that one physical core now works like two “logical cores” that can handle different software threads. So from the BIOS menu, look for the HyperThreading settings and then choose Enable.
STEP 4: Enable All CPU Cores
Now that we are done with the prerequisites, it’s time to enable all the cores on your Windows 11 PC. So refer to the below instruction steps:
- Bring up the Run dialog box via Windows +R shortcut keys.
- Then type in the below command and hit Enter to open System Configuration:
msconfig
- Now go to the Boot section and click on Advanced Options.

- After that, checkmark the Number of Processors box and select the maximum one from the list.

- Finally, click OK to save the changes. You will be instructed to reboot your PC, so click on the Restart button.
- Once your Windows 11 PC boots up, all the cores stand enabled.
How to Check Number of Enabled Cores in Windows 11
You could easily check the total number of cores that are currently enabled as well as the utilization graph of each of these cores from the Task Manager. Here’s how
- Bring up the Task Manager using Ctrl+Shift+esc shortcut keys.
- Then go to the Performance tab and select CPU from the left-hand side.
- You could now see the total number of cores including the logical ones that are enabled.

- To check the utilization of individual cores, right-click on the activity graph and select Change Graph to > Logical Processor.

That’s it. These were the steps to enable all the CPU cores on your Windows 11 PC. Likewise, we have also listed out the steps to check the total number of logical cores enabled at a particular point in time as well as their utilization stats. If you have any queries concerning the aforementioned steps, do let us know in the comments. We will get back to you with a solution at the earliest.
- How to Reset BIOS in Windows 11
- How to Fix Windows 11 High CPU and Disk Usage
- Desktop Window Manager dwm.exe Consumes High CPU/Memory [Fixed]
- Antimalware Service Executable High CPU/Memory Usage: How to Fix
Almost all modern CPUs are multicore. Modern versions of Windows have support for multiprocessor CPUs and all cores on them are active by default.
Contents:
- Find the Number of Available CPUs and Cores on Windows
- How to Enable All Cores on Windows
- How to Restrict App to Specific Cores on Windows (CPU Affinity)
- Change the Number of Cores Used at Windows Boot
Windows has a strict limit on the maximum number of physical CPUs and cores (logical processors) supported, depending on the version and edition:
- Windows 10 x86 (Enterprise Pro, Home) — up to 2 CPUs and 32 logical processors (both physical and Hyper-Threading virtual cores are considered)
- Windows 10/11 x64 — up to 2 CPUs and 256 logical processors
- Windows Server 2022/2019/2016/2012R2 – up to 64 physical processors with 640 logical cores
- Windows Server 2008 R2 – 256 logical cores
Find the Number of Available CPUs and Cores on Windows
You can check the number of physical CPUs, cores, and logical processors available in Windows by using Task Manager.
- Run
taskmgr.exeand go to the Performance tab. - Select the CPU tab;
- You will see the number of available CPUs (sockets), physical cores (24 cores), and logical processors.
Logical processors show the number of logical cores available when HyperThreading is enabled on a computer.
The Device Manager (devmgmt.msc) also shows the number of logical processors available.
You can also find the information about physical CPUs and the number of cores on them in the Processor section of msinfo32.exe tool:
Processor Intel(R) Xeon(R) CPU E5-2673 v3 @ 2.40GHz, 2394 Mhz, 12 Core(s), 24 Logical Processor(s)
Processor Intel(R) Xeon(R) CPU E5-2673 v3 @ 2.40GHz, 2394 Mhz, 12 Core(s), 24 Logical Processor(s)
You can use PowerShell to see how many cores and logical processors are available:
Get-WmiObject -class Win32_processor | ft NumberOfCores,NumberOfLogicalProcessors
NumberOfCores NumberOfLogicalProcessors
------------- -------------------------
12 24
Special Windows environment variable also contains logical processor number information:
echo %NUMBER_OF_PROCESSORS%
How to Enable All Cores on Windows
If not all CPU cores are available in Windows, check that they are enabled in the BIOS/UEFI settings. There can be two options here:
- HyperThreading – enables the use of both logical processors of the physical CPU core
- Active Processor Cores – option to enable or disable the number of cores.
Restart Windows and enter BIOS settings (usually with the F2, Del, F10, or F1 keys).
Specific option names and availability vary depending on your BIOS version and CPU model. In my case, all the CPU options are in the Processor Configuration section:
- Hyper-Threading ALL:
Enabled - Active Processor Cores:
All
These settings may be located in Advanced or Extreme Tweaker sections and called Processor Options, AMD Core Select, Processor Core, Active Processor Cores, Core Multi-Processing, CPU Cores, etc.
How to Restrict App to Specific Cores on Windows (CPU Affinity)
In Windows, you can configure an application to only run on one or specific CPU cores. By default, a Windows app can run on any core.
You can use the Processor Affinity feature to bind a program to specific cores. This may be necessary if you want to restrict the program’s CPU usage or run it on a single core (this may be necessary to run legacy apps that do not work properly on multi-core computers).
You can change the core affinity of a running app in the Task Manager:
- Open the Details tab;
- Find and right-click your app process. Select Set affinity;
- Mark the physical cores that are allowed to execute the app instructions.
It is only possible to run an application on a single core using the command prompt. In this example, I will restrict the app to CPU0.
cmd.exe /c start /affinity 1 "C:\MyApp\myappname.exe"
Change the Number of Cores Used at Windows Boot
Windows always uses only one core to boot. You may allow to use all cores when booting Windows using the System Configuration:
- Open
msconfig; - Click the Boot tab and select your entry;
- Click Advanced options;
- Select the Number of processors option in the BOOT Advanced Options;
- Select the number of logical processors (threads) that can be used during the boot process. .
Your Windows will not boot faster if you increase the number of processors available at startup. Also, this option may result in Windows boot problems in some cases, especially if the PCI lock option is enabled (BAD SYSTEM CONFIG INFO boot error). So, typically it is not recommended to enable and configure this option.