
Last Updated :
09 Sep, 2024
Screen mirroring your Android device to a Windows 11 PC can be incredibly useful for presentations, gaming, or sharing media. Whether you need a larger display or simply want to control your phone from your computer, Windows 11 offers built-in features and third-party apps that make it easy to mirror your Android screen. In this guide, we’ll walk you through how to mirror your Android screen to Windows 11, covering both wireless and cable-based methods for a seamless connection.
How to Mirror Android Screen to Windows 11?
In this article, we will discuss how you can perform screen mirroring in Windows 11 using your mobile. But before you connect these two devices, you need to configure some things. They include:
Enabling Wireless Display
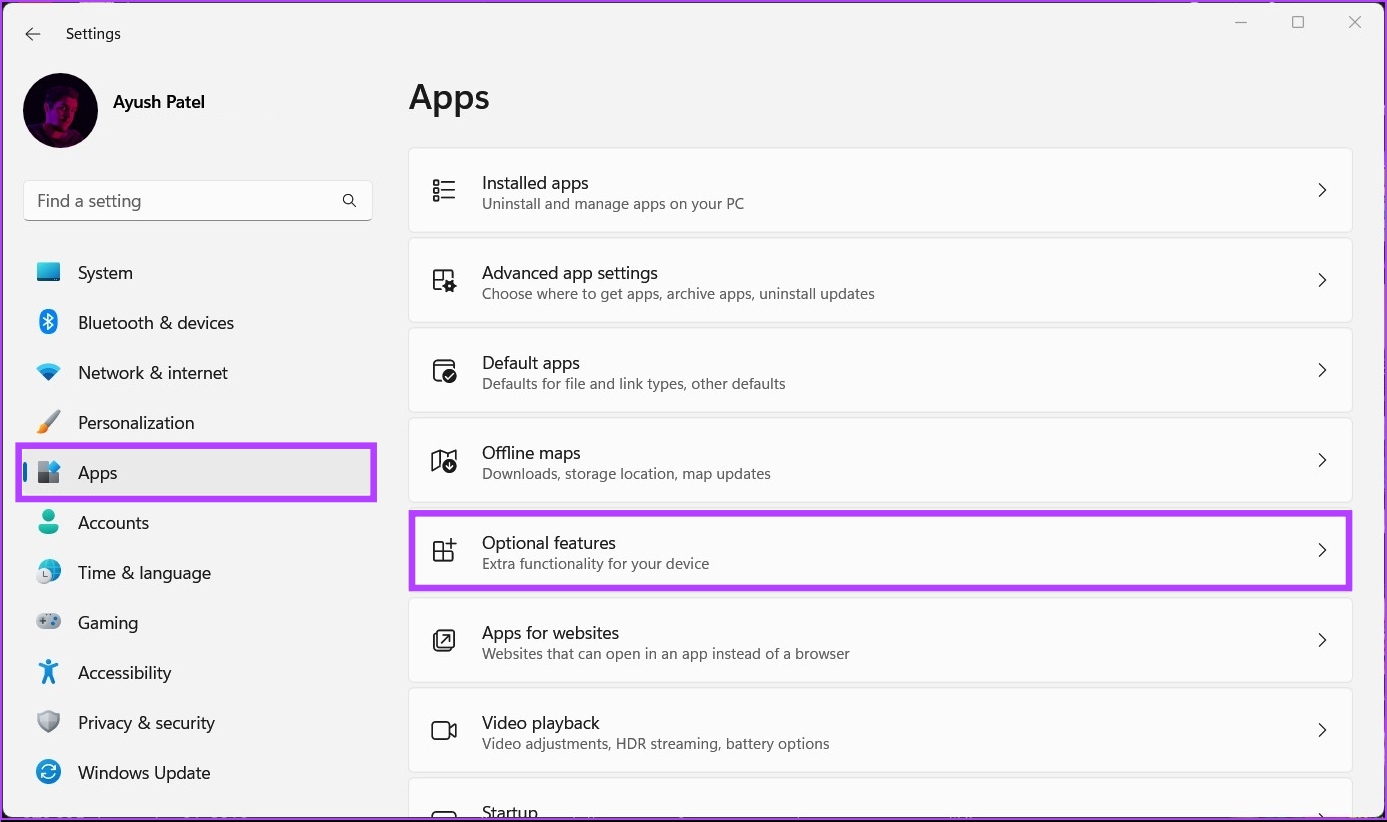
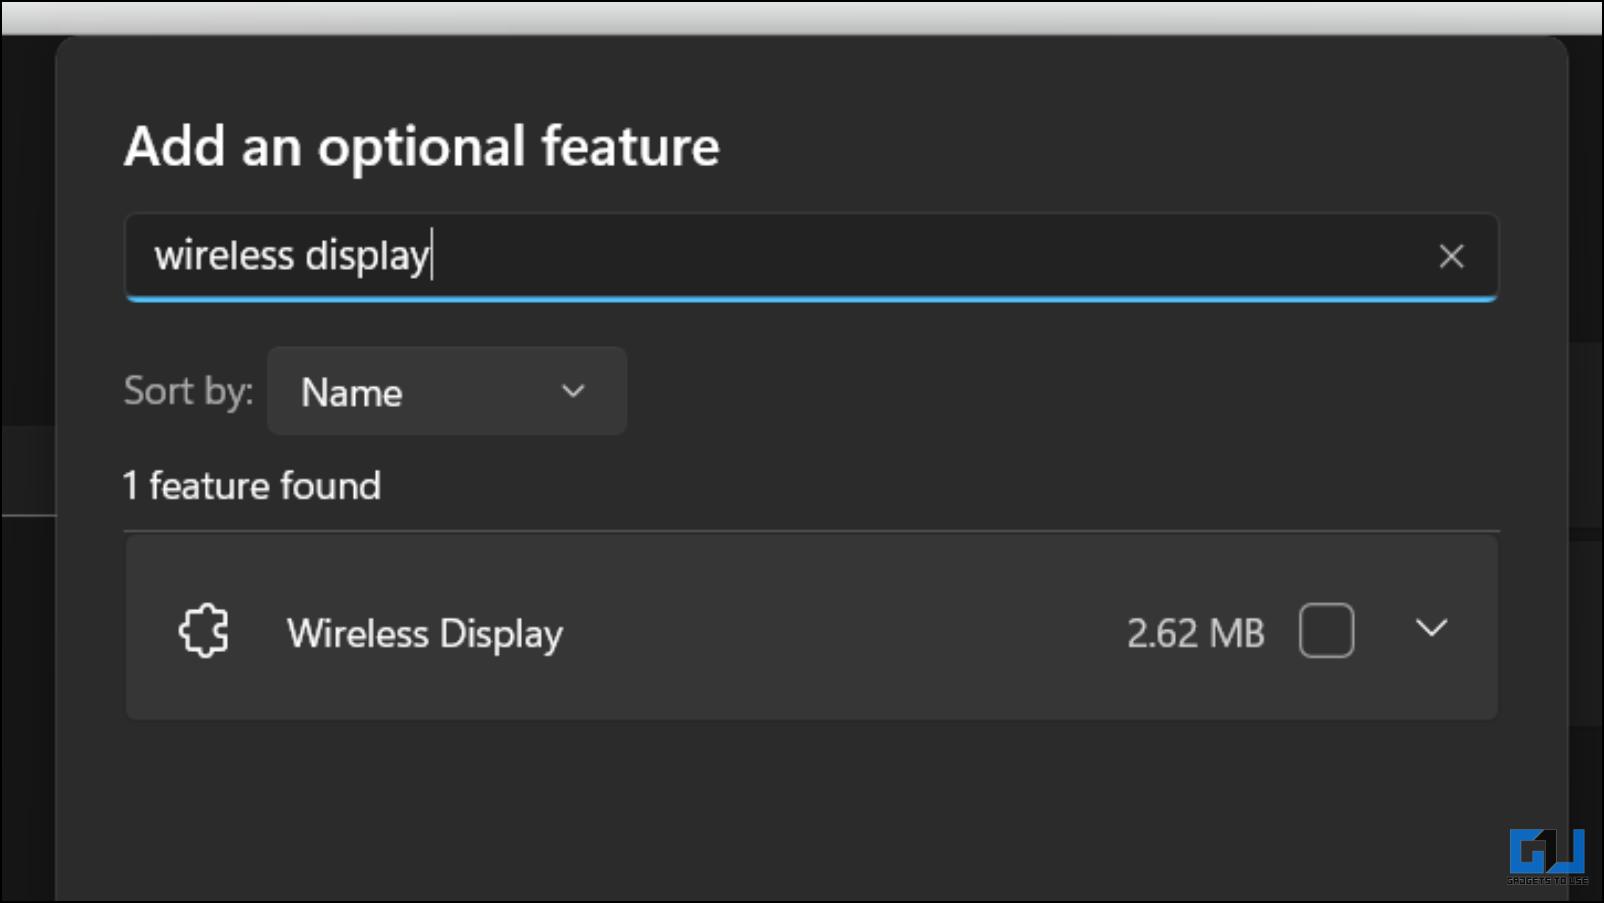
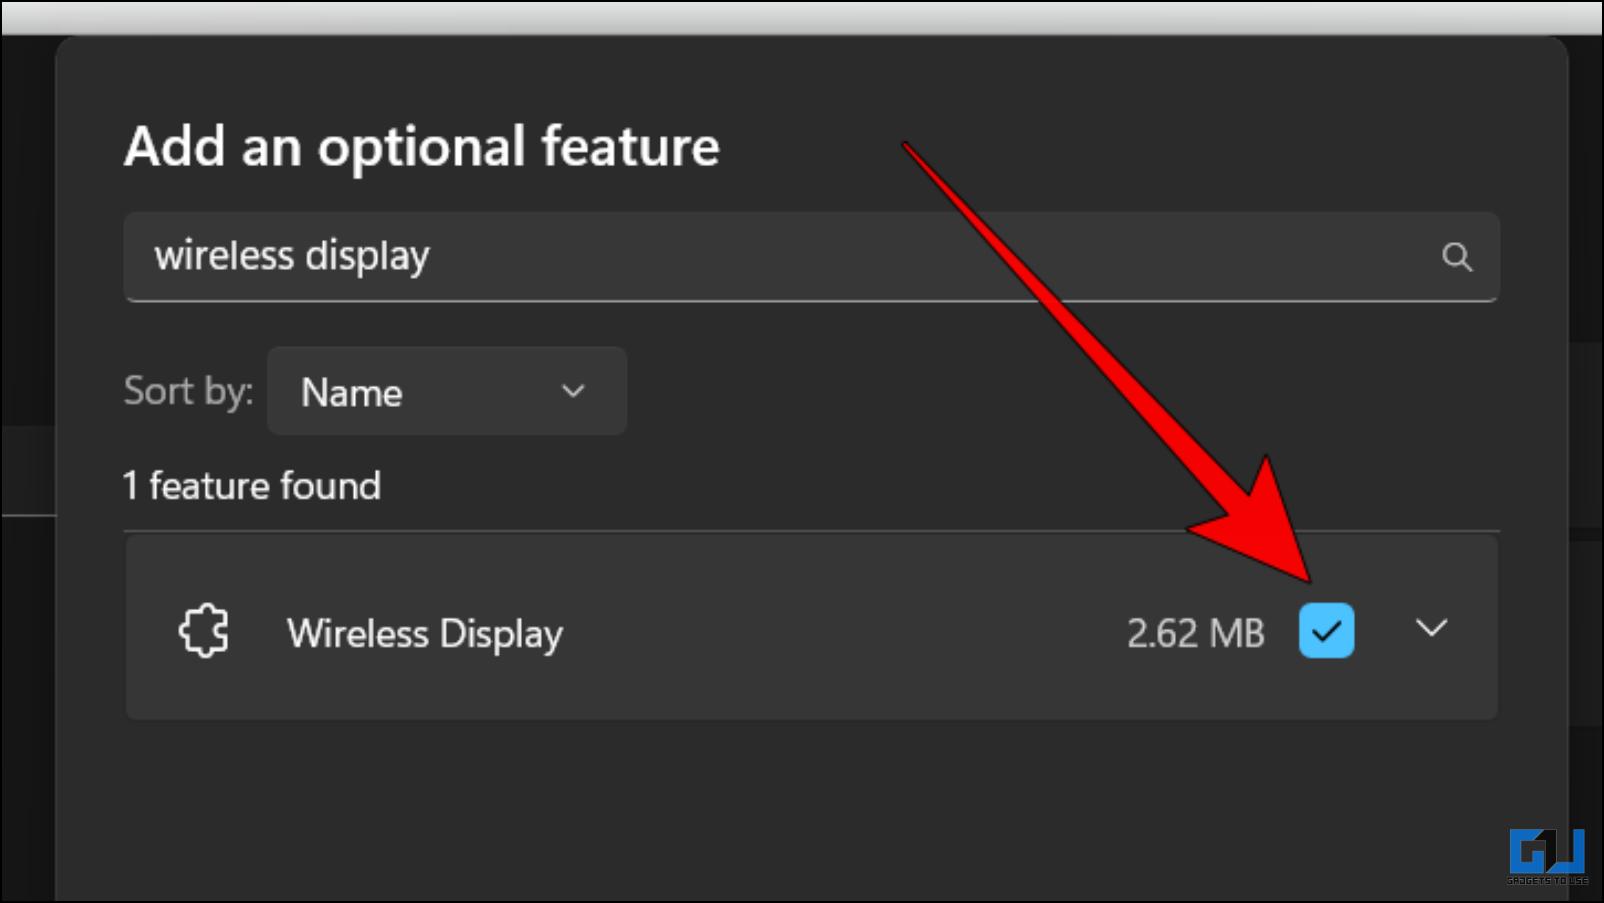
Step 1: Navigate to Settings > Apps. You will see a section named Optional Features. Click on it to proceed.
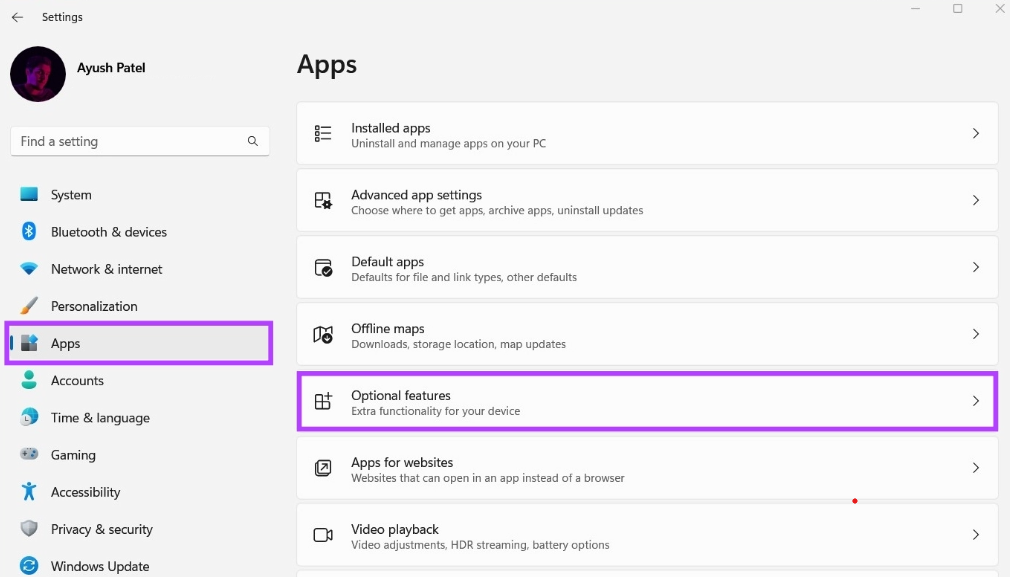
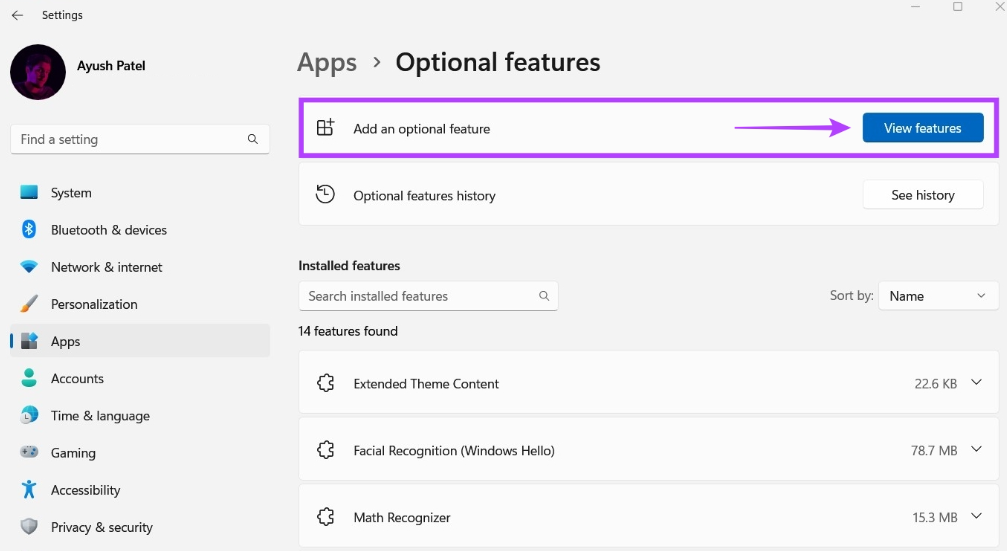
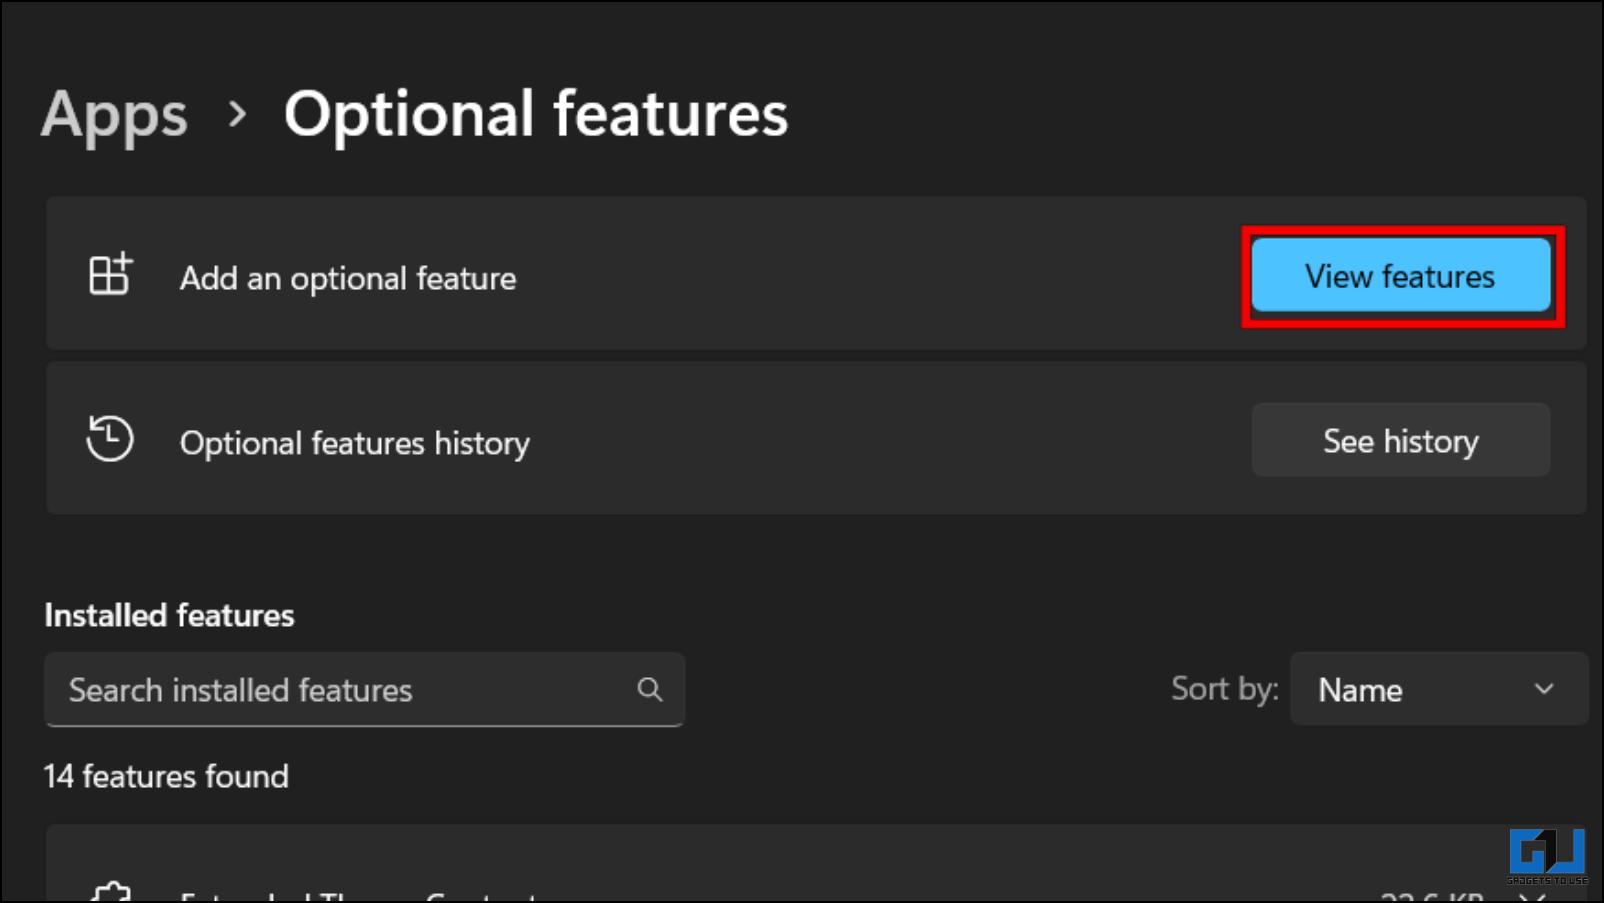
Step 2: Notice a section named Add an optional feature. Click on the View Features button to initiate the installation process.
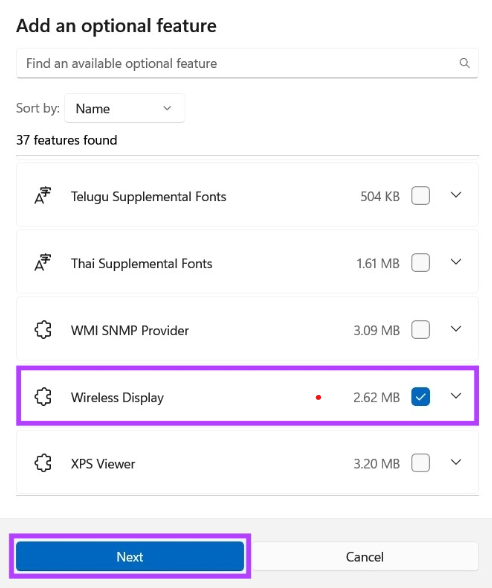
Step 3: The below list will appear. Find the Wireless Display feature in it and check the box you see at the end of the row. Then, click on Next.
Step 4: Click on Install.
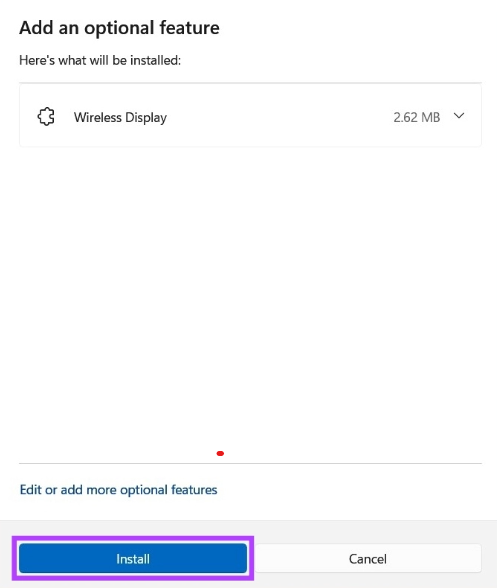
Now, the Wireless Display feature will be installed and enabled automatically.
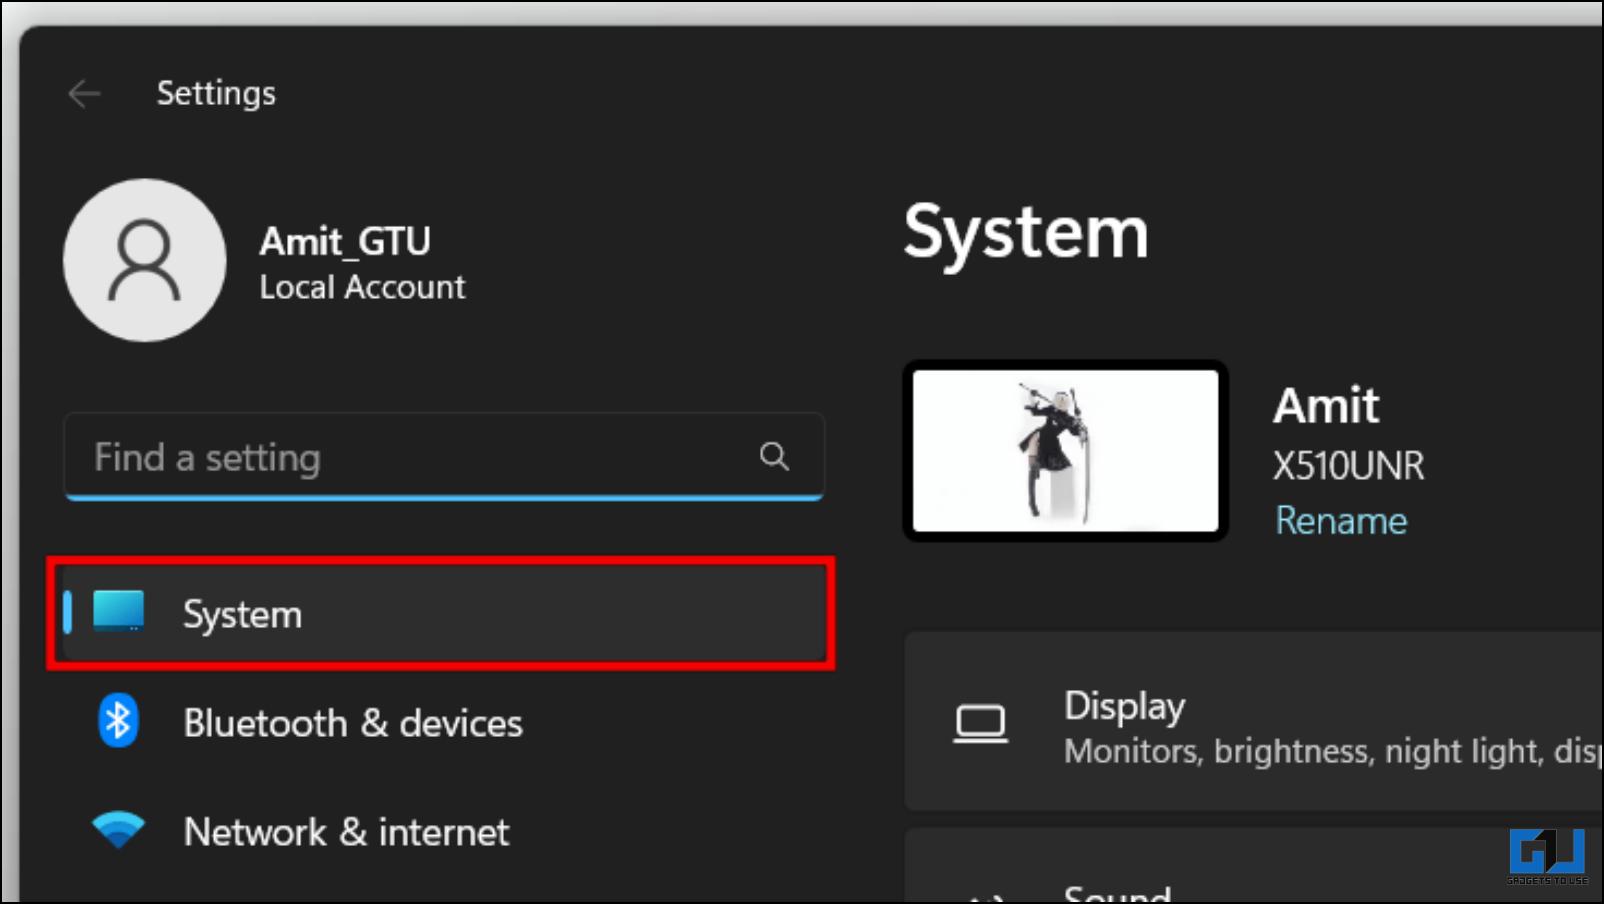
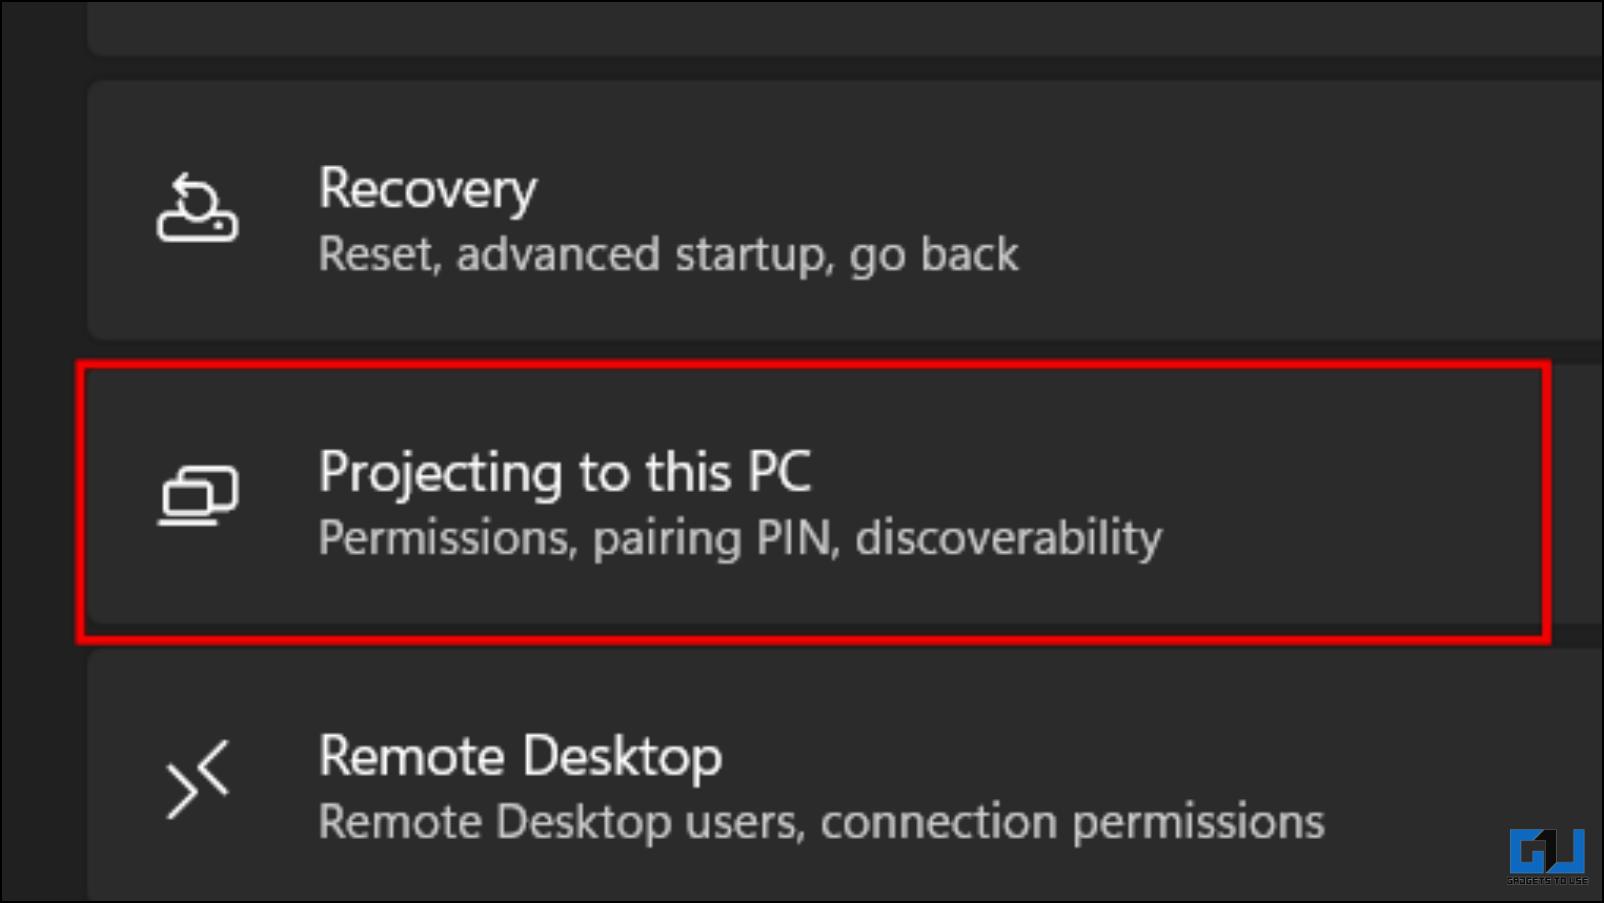
Configuring Windows 11
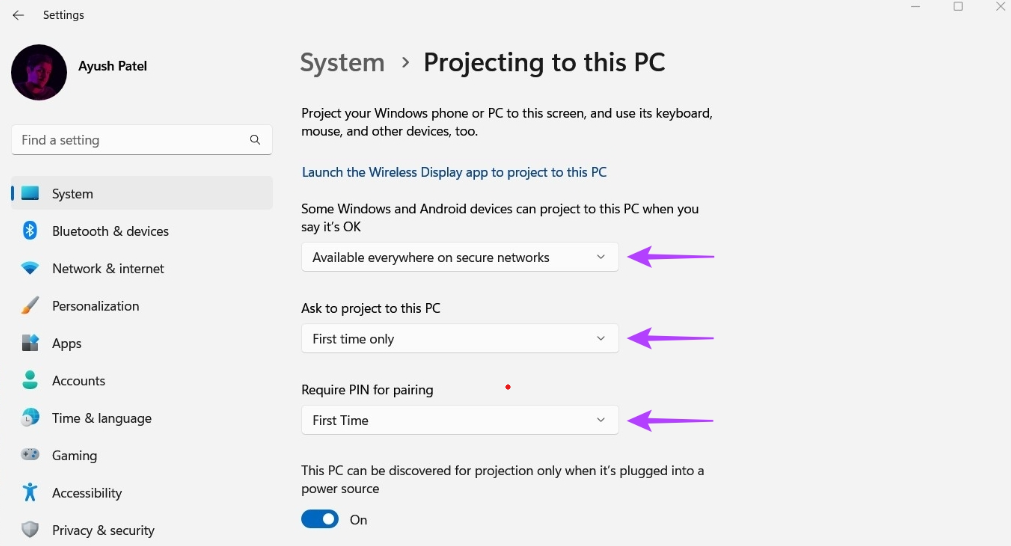
Step 1: Navigate to Settings > System. You will see a section named Projecting to this PC. Click on it to proceed.

The below page will appear. You will see three dropdown menus. Follow the steps below to configure these options:
Step 2.1: In the first dropdown menu, choose Available Everywhere on secure networks.
Step 2.2: In the second dropdown menu, choose First time only.
Step 2.3: In the first dropdown menu, choose the First Time.
Configuring the Android Device
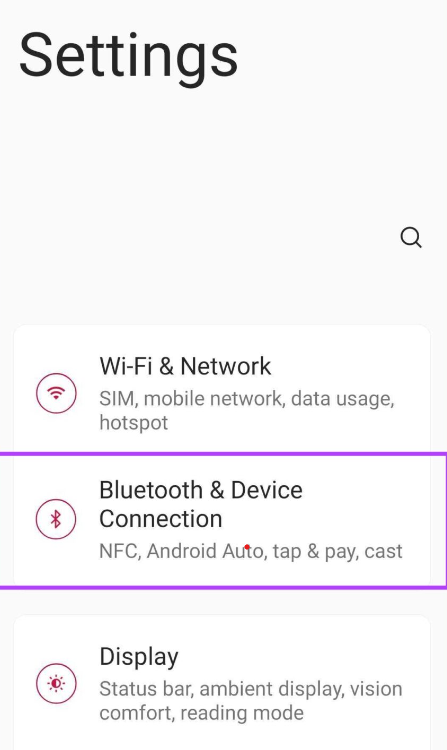
Step 1: Navigate to Settings.
Step 2: Click on Bluetooth & Device Connection.
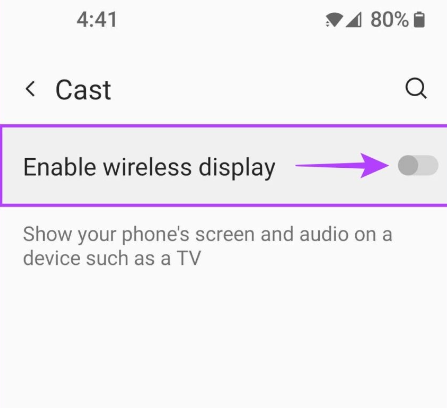
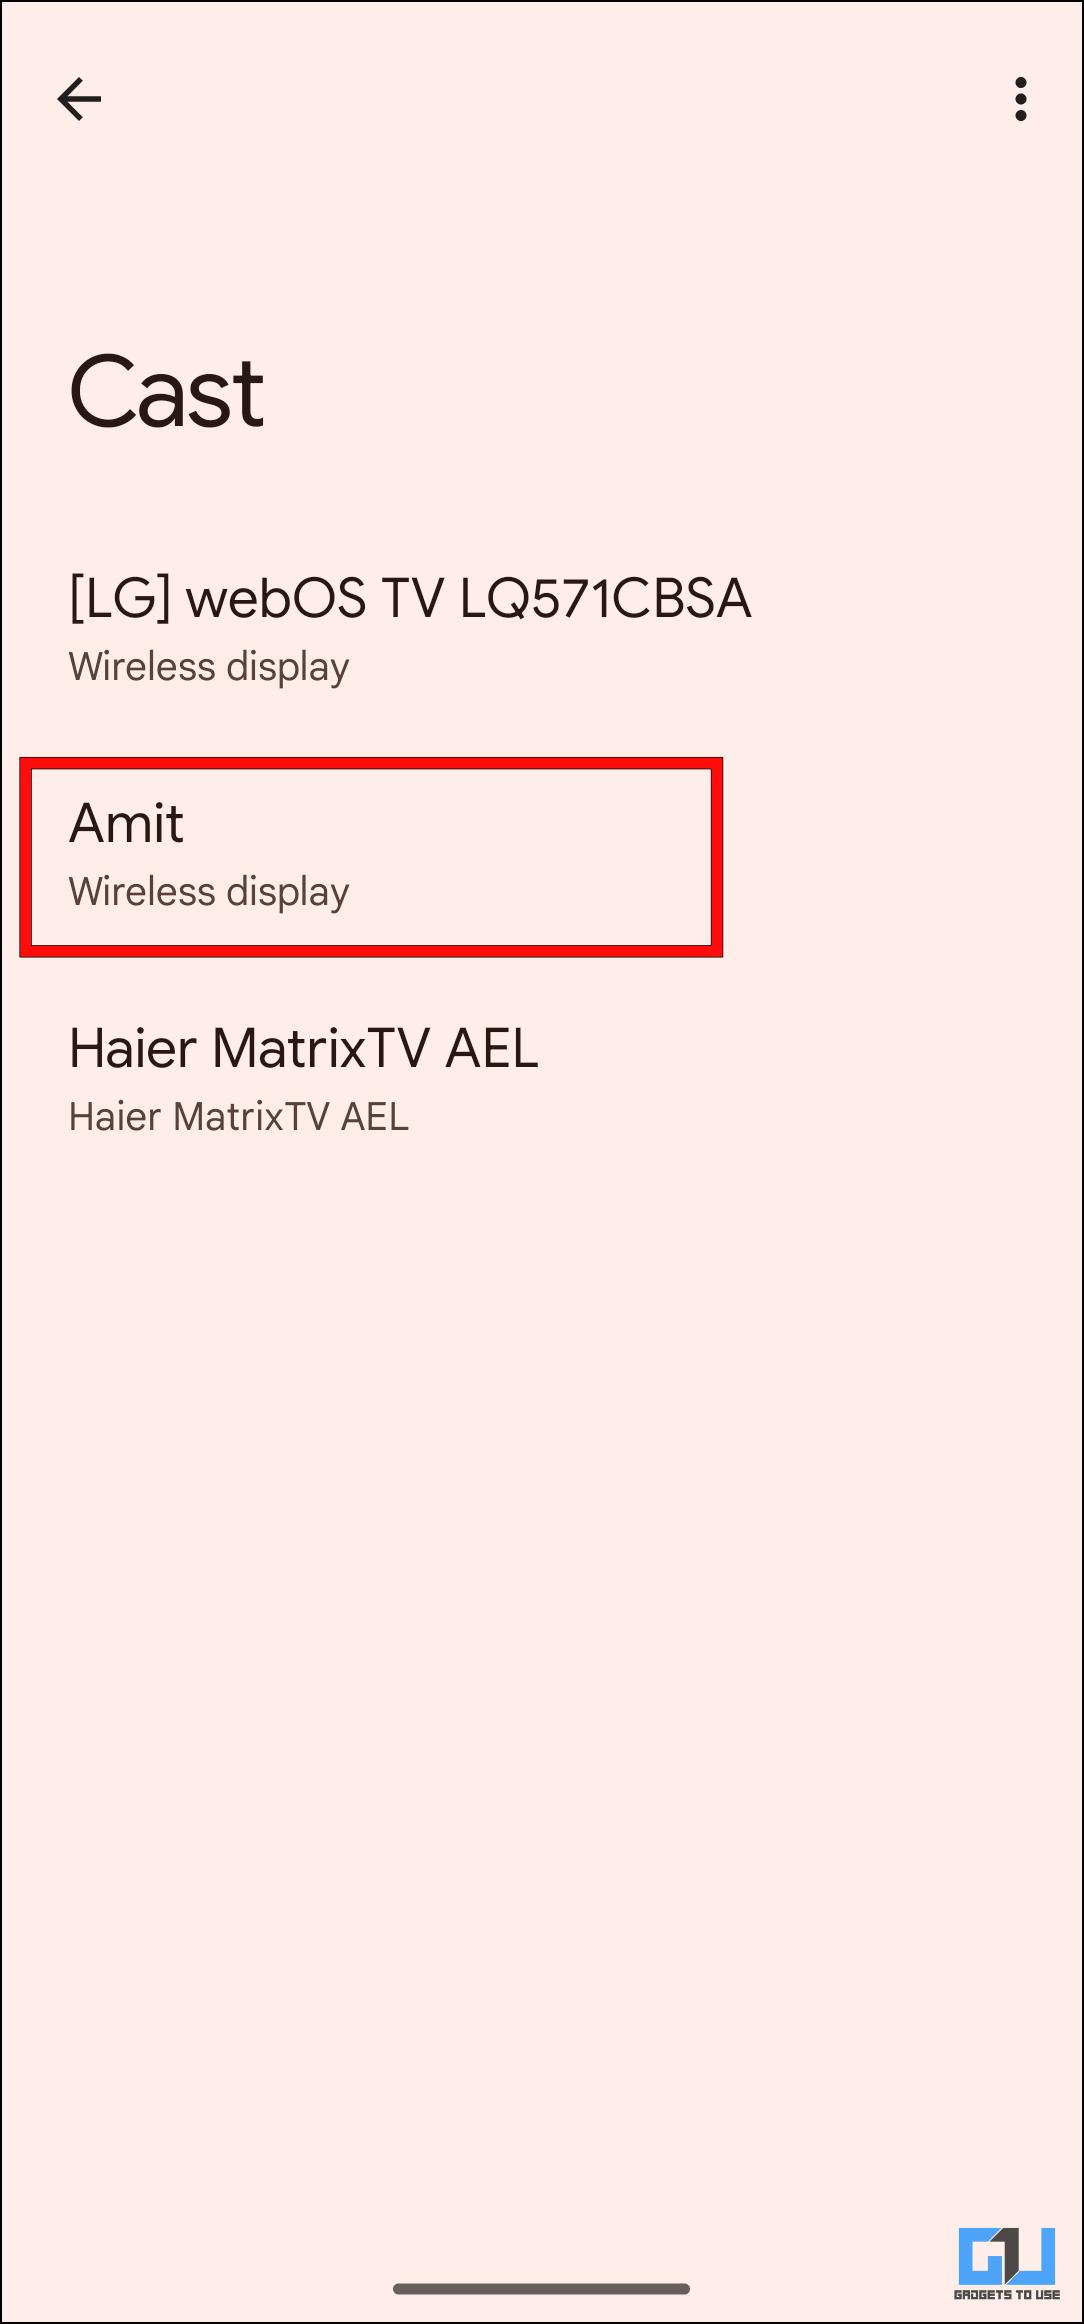
Step 3: Click on Cast.
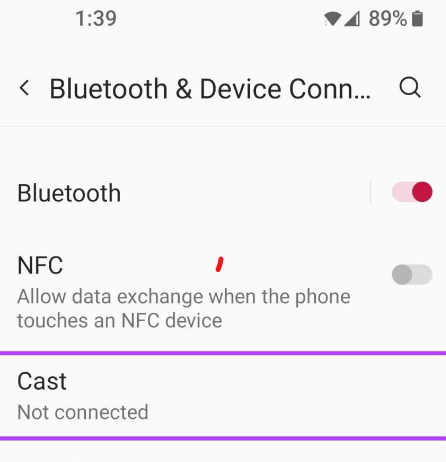
Step 4: Turn on the toggle button that says Enable wireless display.
Connecting Windows 11 to Android
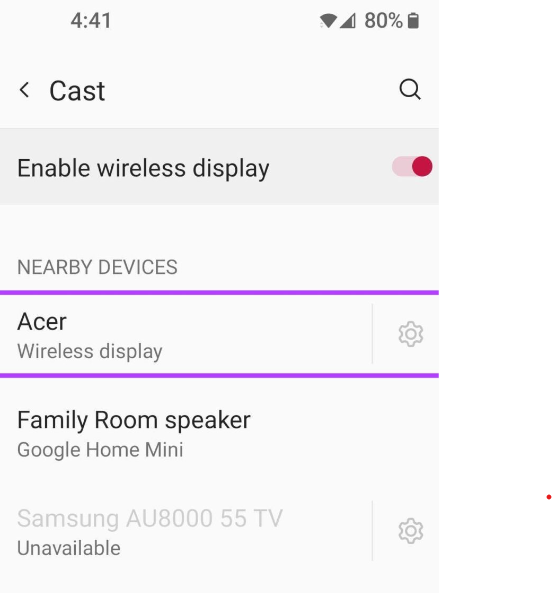
Step 1: On your Android device, you will notice that there is a new device added to the Nearby Devices list, which is essentially your Windows device. Click on it to proceed.
Step 2: Upon clicking, the Wireless Display application will open up on your Windows device. Notice that there is a PIN on your screen. In our case, the PIN is 86489362.
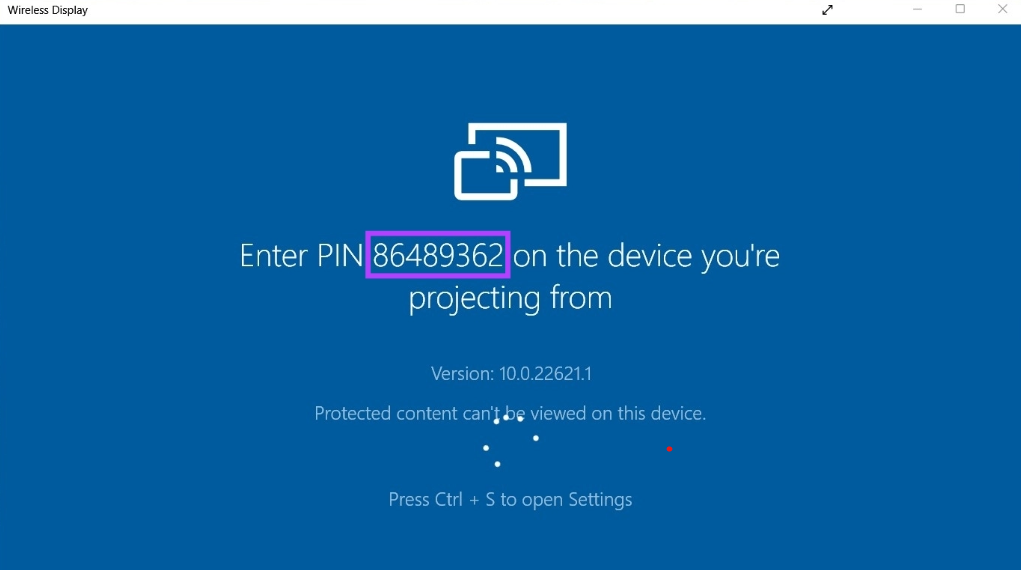
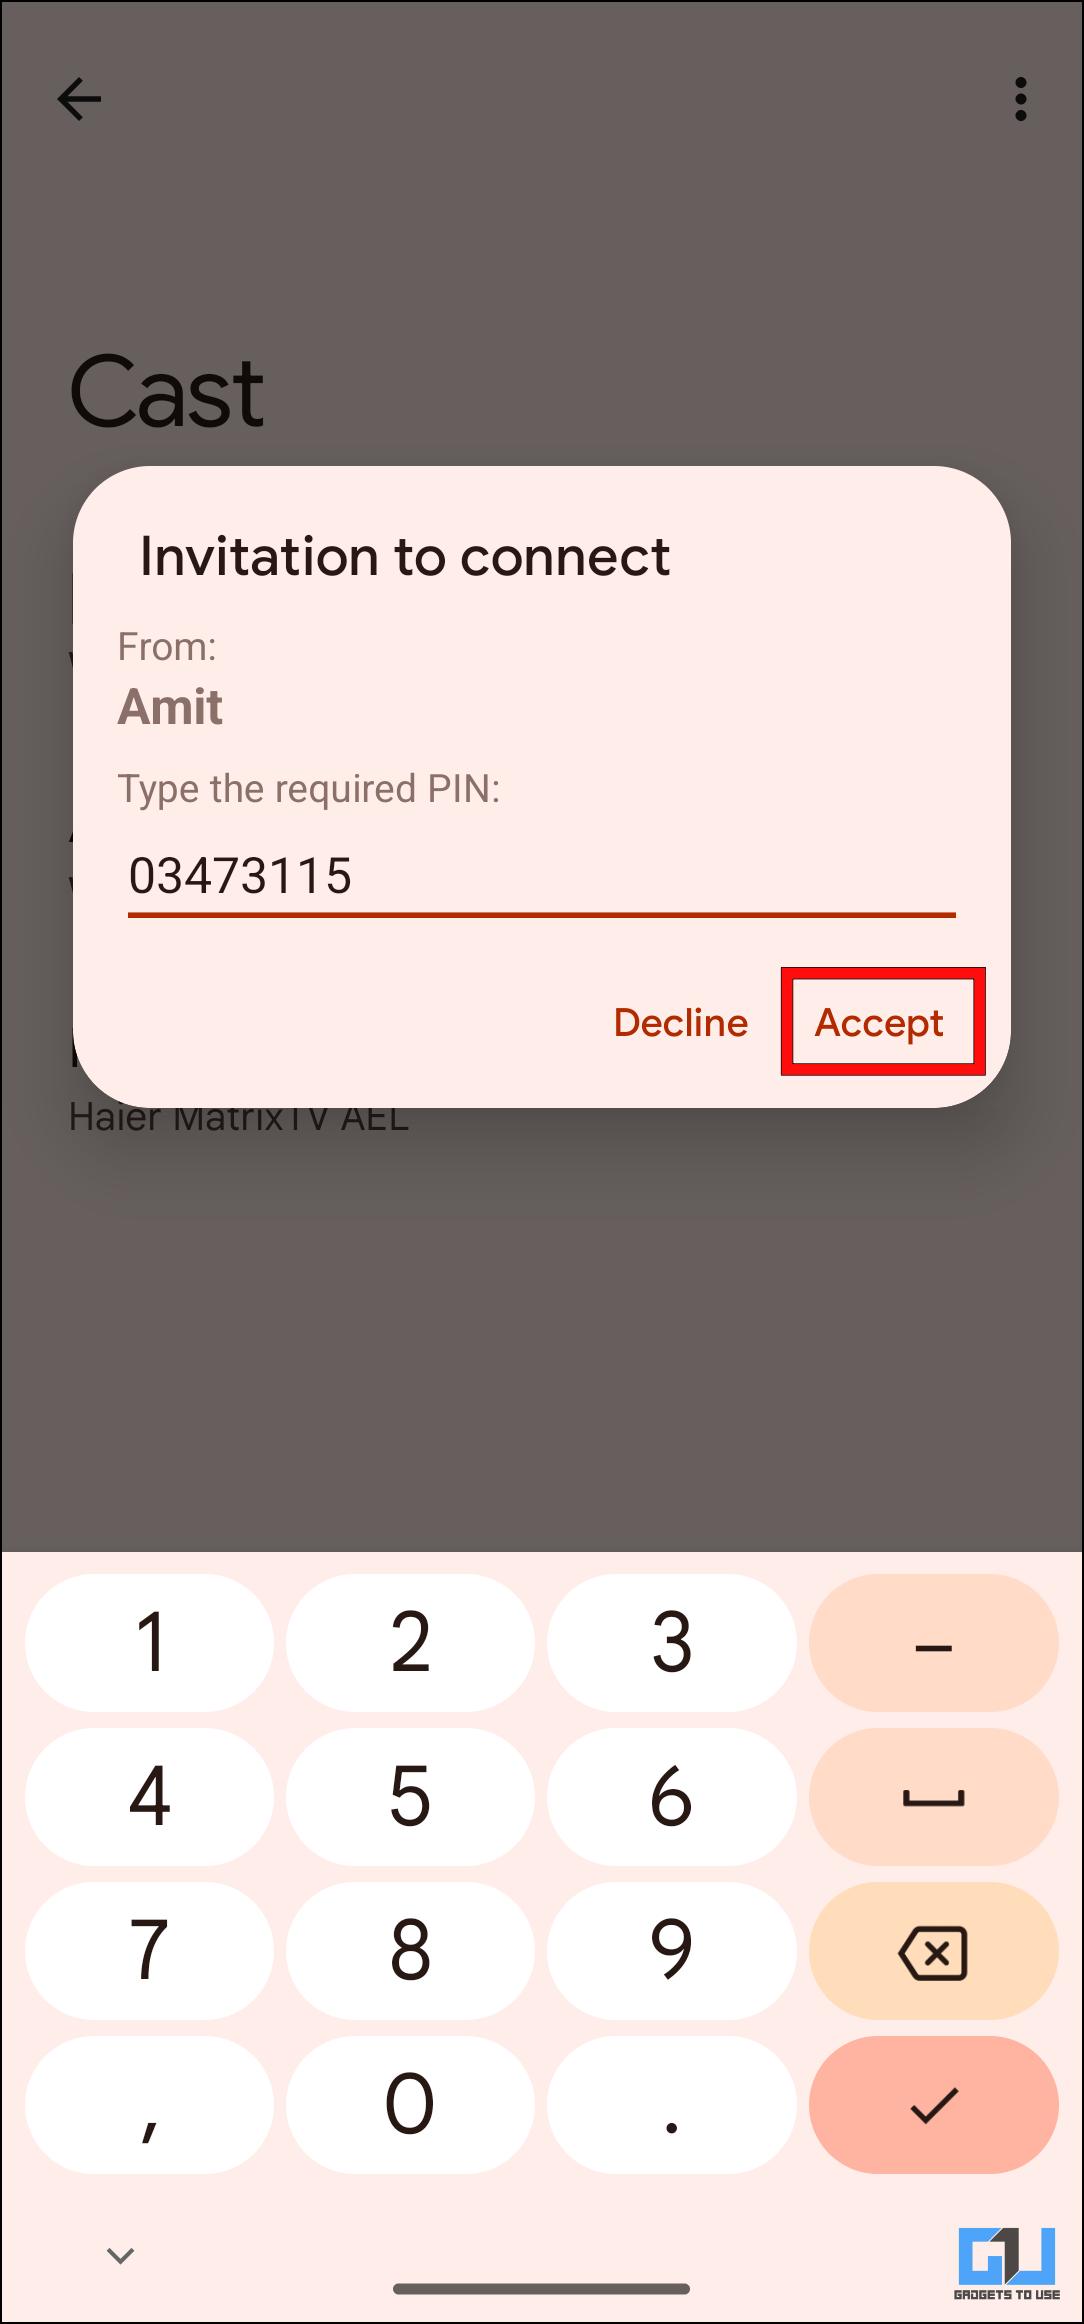
Step 3: Simultaneously, a box will pop up on your Android device. Type the PIN you got from your Windows device in the text field that says Type the required PIN. Then, click on Accept.
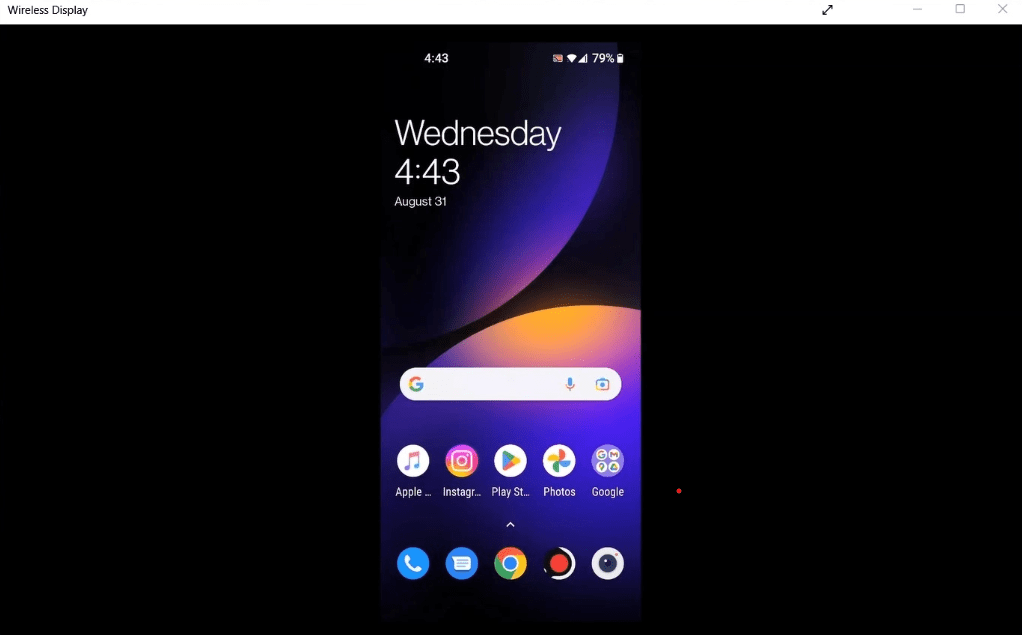
Upon clicking, you will be able to see your mobile screen on your Windows device as these two devices are successfully sharing the screen. Now, anything you do on your mobile will be displayed on your Windows device.
Conclusion
Mirroring your Android screen to Windows 11 is a simple process with multiple methods to suit your needs. Whether you’re using built-in Windows tools or third-party apps, you can quickly and efficiently cast your Android screen to your PC. By following the steps outlined in this guide, you’ll be able to enjoy content from your phone on a larger screen and even control your Android device directly from your computer. Explore these methods and pick the one that works best for you!
Не все знают, но ваш планшет или смартфон на Android можно использовать как полноценный второй монитор для компьютера или ноутбука. Причем речь идет не об удаленном доступе с Android к компьютеру, а именно о втором мониторе: который отображается в параметрах экрана и на который можно выводить отдельное от основного монитора изображение.
В этой инструкции — 5 способов подключения Android в качестве второго монитора по Wi-Fi или USB, о необходимых действиях и возможных настройках, а также о некоторых дополнительных нюансах, которые могут оказаться полезными. Внимание: на планшете Galaxy Tab S7 есть встроенная функция использования в качестве второго монитора.
SpaceDesk
SpaceDesk — бесплатное решение для использования Android и iOS устройств в качестве второго монитора в Windows 10, 8.1 и 7 с подключением по Wi-Fi (компьютер может быть подключен кабелем, но должен находиться в той же сети). Поддерживаются почти все современные и не очень версии Android.
- Скачайте и установите на телефон бесплатное приложение SpaceDesk, доступное в Play Маркет — https://play.google.com/store/apps/details?id=ph.spacedesk.beta (на настоящий момент приложение в Бета-версии, но всё работает)
- С официального сайта программы скачайте драйвер виртуального монитора для Windows и установите его на компьютере или ноутбуке — https://www.spacedesk.net/ (раздел Download — Driver Software).
- Запустите приложение на Android устройстве, подключенном к той же сети, что и компьютер. В списке будут отображены компьютеры, на которых установлен драйвер дисплея SpaceDesk. Нажмите по ссылке «Connection» с указанием локального IP-адреса. На компьютере может потребоваться разрешить драйверу SpaceDesk доступ к сети.
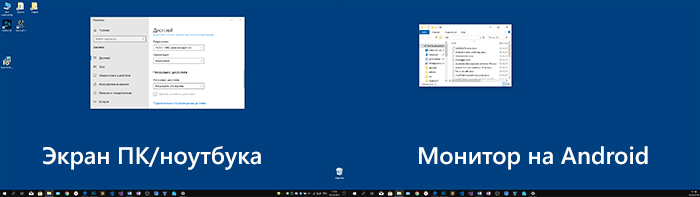
- Готово: на экране планшета или телефона отобразится экран Windows в режиме «Дублирование экрана» (при условии, что ранее вы не настраивали режим расширения рабочего стола или отображения только на одном экране).


Можно приступать к работе: у меня всё работало на удивление быстро. Сенсорный ввод с экрана Android поддерживается и работает исправно. При необходимости, открыв параметры экрана Windows, вы можете настроить то, как именно будет использоваться второй экран: для дублирования или же для расширения рабочего стола (об этом — в упоминавшейся в начале инструкции про подключение двух мониторов к компьютеру, здесь всё то же самое). Например, в Windows 10 эта опция находится в параметрах экрана, внизу.

Дополнительно, в приложении SpaceDesk на Android в разделе «Settings» (зайти туда можно до выполнения подключения) вы можете настроить следующие параметры:
- Quality/Performance — здесь можно задать качество изображения (чем качественнее тем медленнее), глубину цвета (чем меньше — тем быстрее) и желаемую частоту кадров.
- Resolution — разрешение монитора на Android. В идеале установить реальное разрешение, используемое на экране, если это не ведет к значительным задержкам отображения. Также, в моем тесте, по умолчанию было установлено разрешение меньшее, чем поддерживает устройство по факту.
- Touchscreen — здесь можно включить или отключить управление с помощью сенсорного экрана Android, а также изменить режим работы сенсора: Absolute touch означает, что нажатие будет срабатывать именно в том месте экрана, куда вы нажали, Touchpad — нажатия будут работать как если бы экран устройства был тачпадом.
- Rotation — настройка того, будет ли поворачиваться экран на компьютере так же, как поворачивается на мобильном устройстве. У меня эта функция ни на что не влияла, поворота не происходило в любом случае.
- Connection — параметры соединения. Например, автоматическое подключение при обнаружении сервера (т.е. компьютера) в приложении.
На компьютере драйвер SpaceDesk показывает значок в области уведомлений, по нажатию на который можно открыть список подключенных Android устройств, изменить разрешение, а также отключить возможность подключения.

В целом мое впечатление о SpaceDesk исключительно положительное. Кстати, с помощью этой утилиты можно превратить во второй монитор не только Android или iOS устройство, но и, например, другой компьютер с Windows.
К сожалению, SpaceDesk — единственный полностью бесплатный метод для подключения Android в качестве монитора, оставшиеся 3 требуют оплаты для использования (за исключением Splashtop Wired X Display Free, которым можно пользоваться в течение 10 минут бесплатно).
GlideX
GlideX — фирменное приложение от ASUS (работает и на других устройствах), позволяющее использовать планшет или смартфон с Android или iOS в качестве второго монитора, все базовые функции доступны бесплатно, поддерживается сенсорный ввод с экрана мобильного устройства.
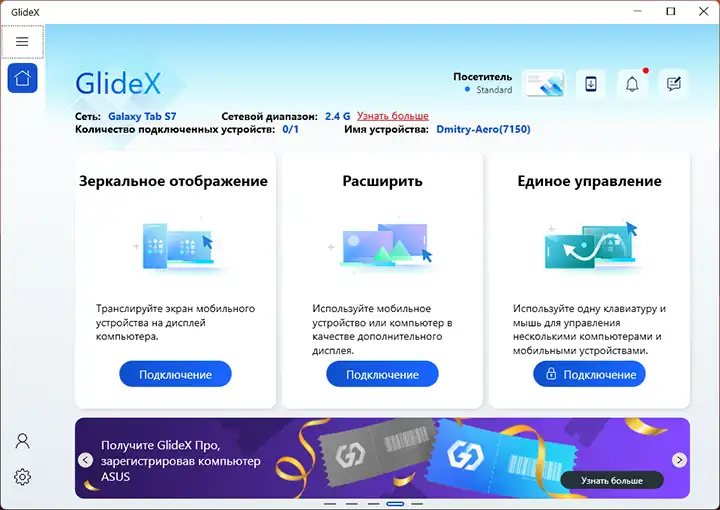
Отличительные особенности приложения:
- Русский язык интерфейса
- Простота использования даже для начинающего пользователя
- Подключение по Wi-Fi
- Дополнительные функции, в частности — отображение экрана мобильного устройства на компьютере
Инструкция по использованию и загрузке доступна в отдельном материале GlideX — использование смартфона или планшета в качестве второго монитора и другие возможности.
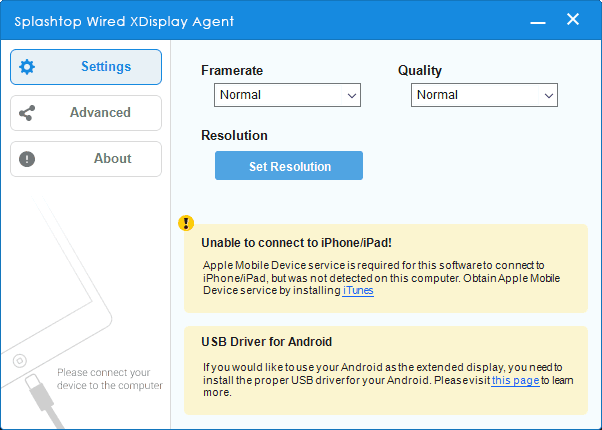
Splashtop Wired XDisplay
Приложение Splashtop Wired XDisplay доступно как в бесплатной (Free), так и в платной версиях. Бесплатная работает исправно, но ограничено время использования — 10 минут, по сути, она предназначена для того, чтобы принять решение о покупке. Поддерживаются Windows 7-10, Mac OS, Android и iOS.
В отличие от предыдущего варианта, подключение Android в роли монитора выполняется по USB кабелю, а порядок действий выглядит следующим образом (пример для Free версии):
- Скачайте и установите Wired XDisplay Free из Play Маркет — https://play.google.com/store/apps/details?id=com.splashtop.xdisplay.wired.free
- Установите программу XDisplay Agent для компьютера с Windows 10, 8.1 или Windows 7 (Mac тоже поддерживается), скачав её с официального сайта https://www.splashtop.com/wiredxdisplay
- Включите отладку по USB на Android устройстве. А затем подключите его USB-кабелем к компьютеру, на котором запущен XDisplay Agent и разрешите отладку с этого компьютера. Внимание: может потребоваться скачать ADB драйвер вашего устройства с официального сайта производителя планшета или телефона.
- Если всё прошло успешно, то после того, как вы разрешите подключение на Android, на нем автоматически отобразится экран компьютера. Само Android устройство будет видно, как обычный монитор в Windows, с которым можно выполнять все привычные действия, как и в предыдущем случае.


В программе Wired XDisplay на компьютере вы можете настроить следующие параметры:
- На вкладке Settings — разрешение монитора (Resolution), частоту кадров (Framerate) и качество (Quality).

- На вкладке Advanced можно включить или отключить автоматический запуск программы на компьютере, а также удалить драйвер виртуального монитора при необходимости.
Мои впечатления: работает, хорошо, но по ощущениям — слегка медленнее, чем SpaceDesk, несмотря на кабельное подключение. Также предвижу проблемы с подключением для некоторых начинающих пользователей в связи с необходимостью включения отладки по USB и установки драйвера.
Примечание: если вы будете пробовать эту программу, а затем удалять с компьютера, обратите внимание, что помимо Splashtop XDisplay Agent в списке установленных программ окажется Splashtop Software Updater — удаляйте и его тоже, сам он этого не сделает.
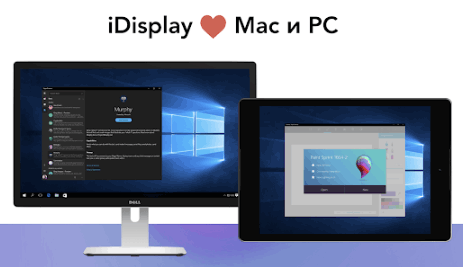
iDisplay и Twomon USB
iDisplay и Twomon USB — ещё два приложения, позволяющие выполнить подключение Android как монитора. Первое работает по Wi-Fi и совместимо с самыми разными версиями Windows (начиная с XP) и Mac, поддерживает почти все версии Android и было одним из первых приложений такого рода, второе — по кабелю и работает только для Windows 10 и Android, начиная с 6-й версии.
Ни то ни другое приложение я не попробовал лично — уж очень они платные. Есть опыт использования? Поделитесь в комментариях. Отзывы в Play Маркет, в свою очередь, разнонаправленные: от «Это лучшая программа для второго монитора на Android», до «Не работает» и «Роняет систему».
Надеюсь, материал был полезен. О схожих возможностях можно прочитать здесь: Лучшие программы для удаленного доступа к компьютеру (многие работают на Android), Управление Android с компьютера, Трансляция изображения с Android на Windows 10.
Quick Tips
- Enable Wireless Display: Go to Settings > Apps > Optional Features on your PC, and install the Wireless Display feature.
- Configure Windows: Set up your PC for projection under Projecting to this PC in Settings.
- Prepare Android Device: Access the Cast feature in your phone’s settings and connect to your PC.
Installing and Enabling the Wireless Display Feature
Step 1: Use the Windows + I shortcut to open the Settings app.
Step 2: Inside the Settings app, click on the Apps and click on Optional features.
Step 3: Click on the View features next to Add an optional feature section.

Step 4: Check the box next to Wireless Display and click the Next button.

Step 5: On the following screen, click the Install button.

After that, Windows 11 will automatically download and install the necessary files to enable the Wireless Display feature on your computer.
After installing and enabling Wireless Display on your Windows 11, you may set up screen mirroring from your Android phone.
Also Read: Fixes when Wireless Display feature is not working on Windows 11
Mirroring Android Devices to Windows 11
To mirror an Android smartphone to your PC, you must ensure that both devices are appropriately configured and connected to the same Wi-Fi network.
Configuring Your Windows 11 PC
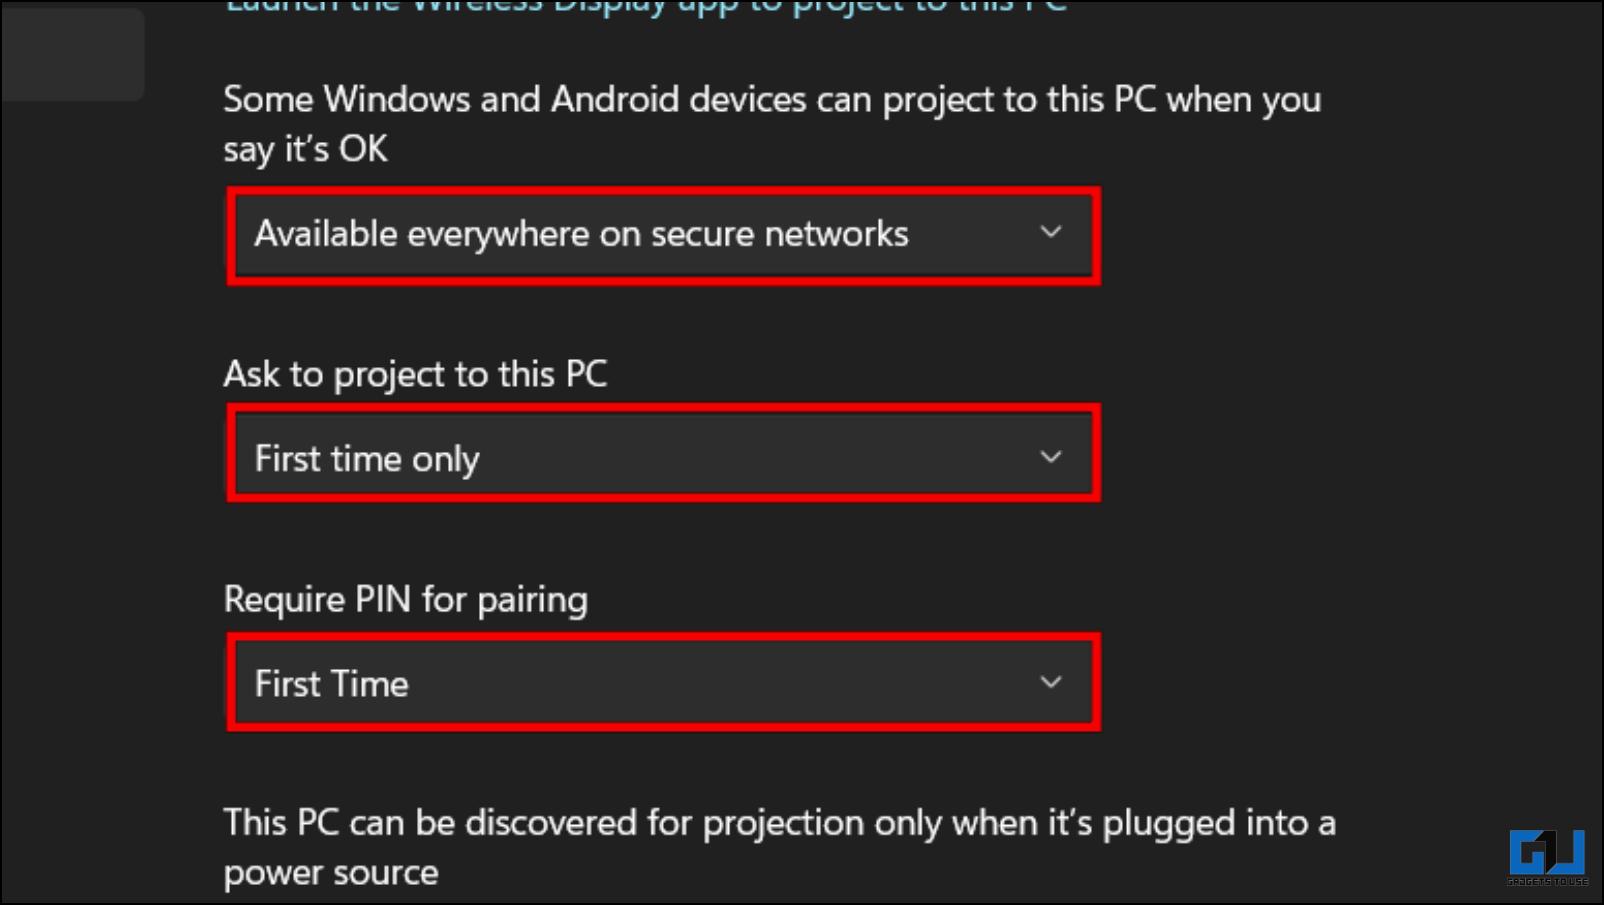
Step 1: Open the Windows Settings app. Then, scroll down and click on Projecting to this PC.

Step 2: Now, click on one drop-down at a time and ensure that you select all the options that are selected in the screenshot below:

Step 3: Click on the Launch the Wireless Display app to project to this PC option.
Note: If you’re trying to use the Wireless Display feature on a laptop, you must turn off the This PC can be discovered for projection only when it’s plugged into a power source toggle.

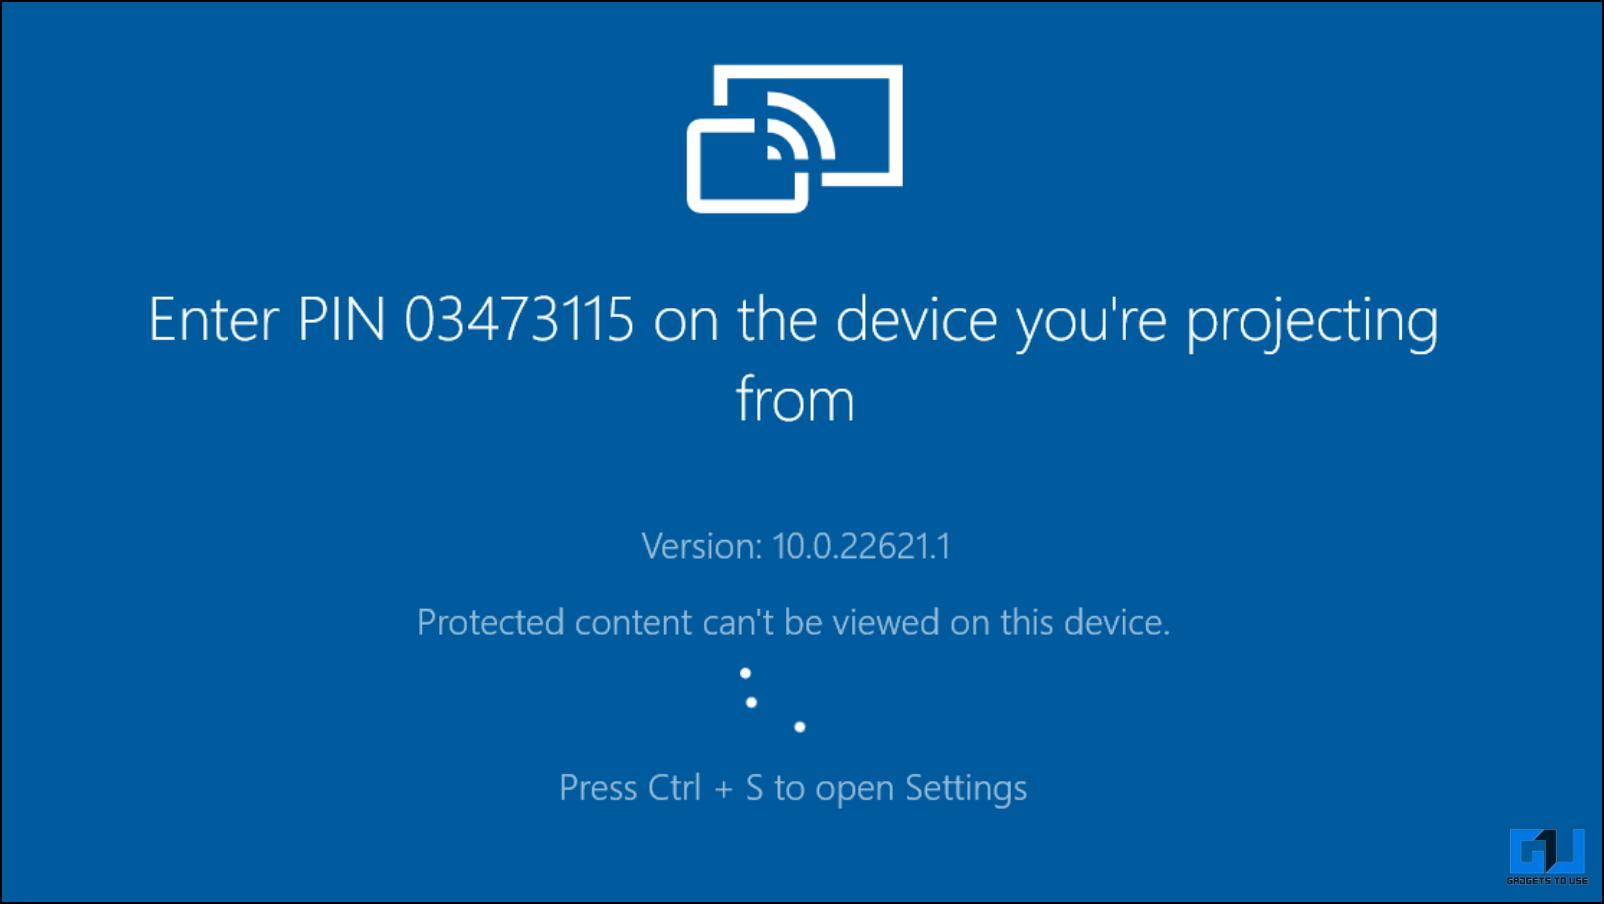
After that, you’ll see a blue Wireless Display window on your screen with the message, Your PC’s Name is ready for you to connect wirelessly.

After you’ve configured and confirmed that Wireless Display works on your Windows 11 PC, let’s move to the Android phone to get things ready.
Configuring Your Android Device
Almost all Android phones have a Cast feature built inside, regardless of the phone maker. So, it is pretty easy to configure your Android device for screen mirroring.
Step 1: Open the Settings app on your Android device. Then, tap on Bluetooth & Device Connection.
Note: The Settings app may look different on your Android phone depending on its make and Android version.
Step 3: Under Bluetooth & Device Connection, tap the Cast option.
Step 4: Under Cast, tap on the Enable wireless display toggle to turn it on.


Step 5: Now, tap on your PC’s name. This will open an Invitation to connect dialog, and you’ll need to enter the 8-digit PIN that you can find on your Windows 11 PC.


Your Windows 11 PC will display an 8-digit security PIN, which you’ll need for the next step.

Step 6: Enter the 8-digit PIN from your PC’s screen, then tap Accept.

When you tap Accept, your Android phone’s interface should appear on your PC’s screen.

This way, you can mirror an Android smartphone onto your Windows 11 PC. However, if you can’t, ensure all devices are connected to the same wireless network.
Was this helpful?
Thanks for your feedback!
The article above may contain affiliate links which help support Guiding Tech. The content remains unbiased and authentic and will never affect our editorial integrity.
Quick Answer
- Sharing the display of your Android smartphone to your Windows PC can come in quite helpful, especially to view your nostalgic photos and videos or present a document stored on your phone.
- Given it is a wireless connection, there is a bit of a delay while performing specific actions.
- Scrcpy is a free app that allows screen mirroring from Android to Windows or Mac over a wired connection.
Sharing the display of your Android smartphone to your Windows PC can come in quite helpful, especially to view your nostalgic photos and videos or present a document stored on your phone. Given the options to mirror your phone’s screen with or without an app, we discussed both ways in this article. Let us look at how you can mirror your Android phone’s display on Windows 10/11. Meanwhile, you can also learn to mirror your phone to LG WebOS TV.
How to Mirror Android Phone Display on Windows 10/11?
There are several ways to mirror your Android phone’s screen on your Windows PC’s monitor. However, for this article, we will keep it simple and discuss three ways to do the same. This includes wired and wireless methods that might or might not require using a third-party app.
Method 1 – Cast Android Phone Display to Windows
The older Windows version did not support Miracast, missing out on wireless mirroring. But that changed with the release of Windows 8, as it came with Miracast support. So, that means you can easily share the screen from your phone to your desktop computer without requiring any third-party app. The process is relatively seamless and does not require any wires.
Step 1: Configure Window for Wireless Display
Before we look at the steps to cast, we must install the Wireless Display plugin in our system. This allows us to cast or mirror other devices to the Windows PC. Here are the steps to install Wireless Display on Windows 10/11.
1. Open Windows Settings using the Windows key + I keyboard shortcut.
2. Go to the Apps section using the sidebar menu.
3. Click on the Optional Features.

4. Here, click on View Features next to Add an optional feature.
5. Using the search bar above, look for Wireless Display.
7. Tick the box next to the Wireless Display option, followed by Next.
This will start installing the plugin on your system. Once installed, restart your computer.
Step 2: Enable Project This PC on Windows
After installing Wireless Display, let’s move on to the next step, i.e., enabling the Project on this PC. We need to make some minor adjustments mentioned below before we start mirroring.
1. On Windows Settings, go to the System section.
2. Scroll down and click on Projecting this PC.
3. Here, change the following settings as shown below.
4. Next, click on Launch the Wireless Display app to project to this PC.
You should now see a blue screen stating your device is ready for wireless connection. Now, we can move on to connecting the Android smartphone.
Step 3: Setup and Connect Your Android Smartphone
We must set up our Android devices for the next step to ensure they connect with the Windows system properly. Here are the steps to do so.
1. Go to the Settings app on your phone.
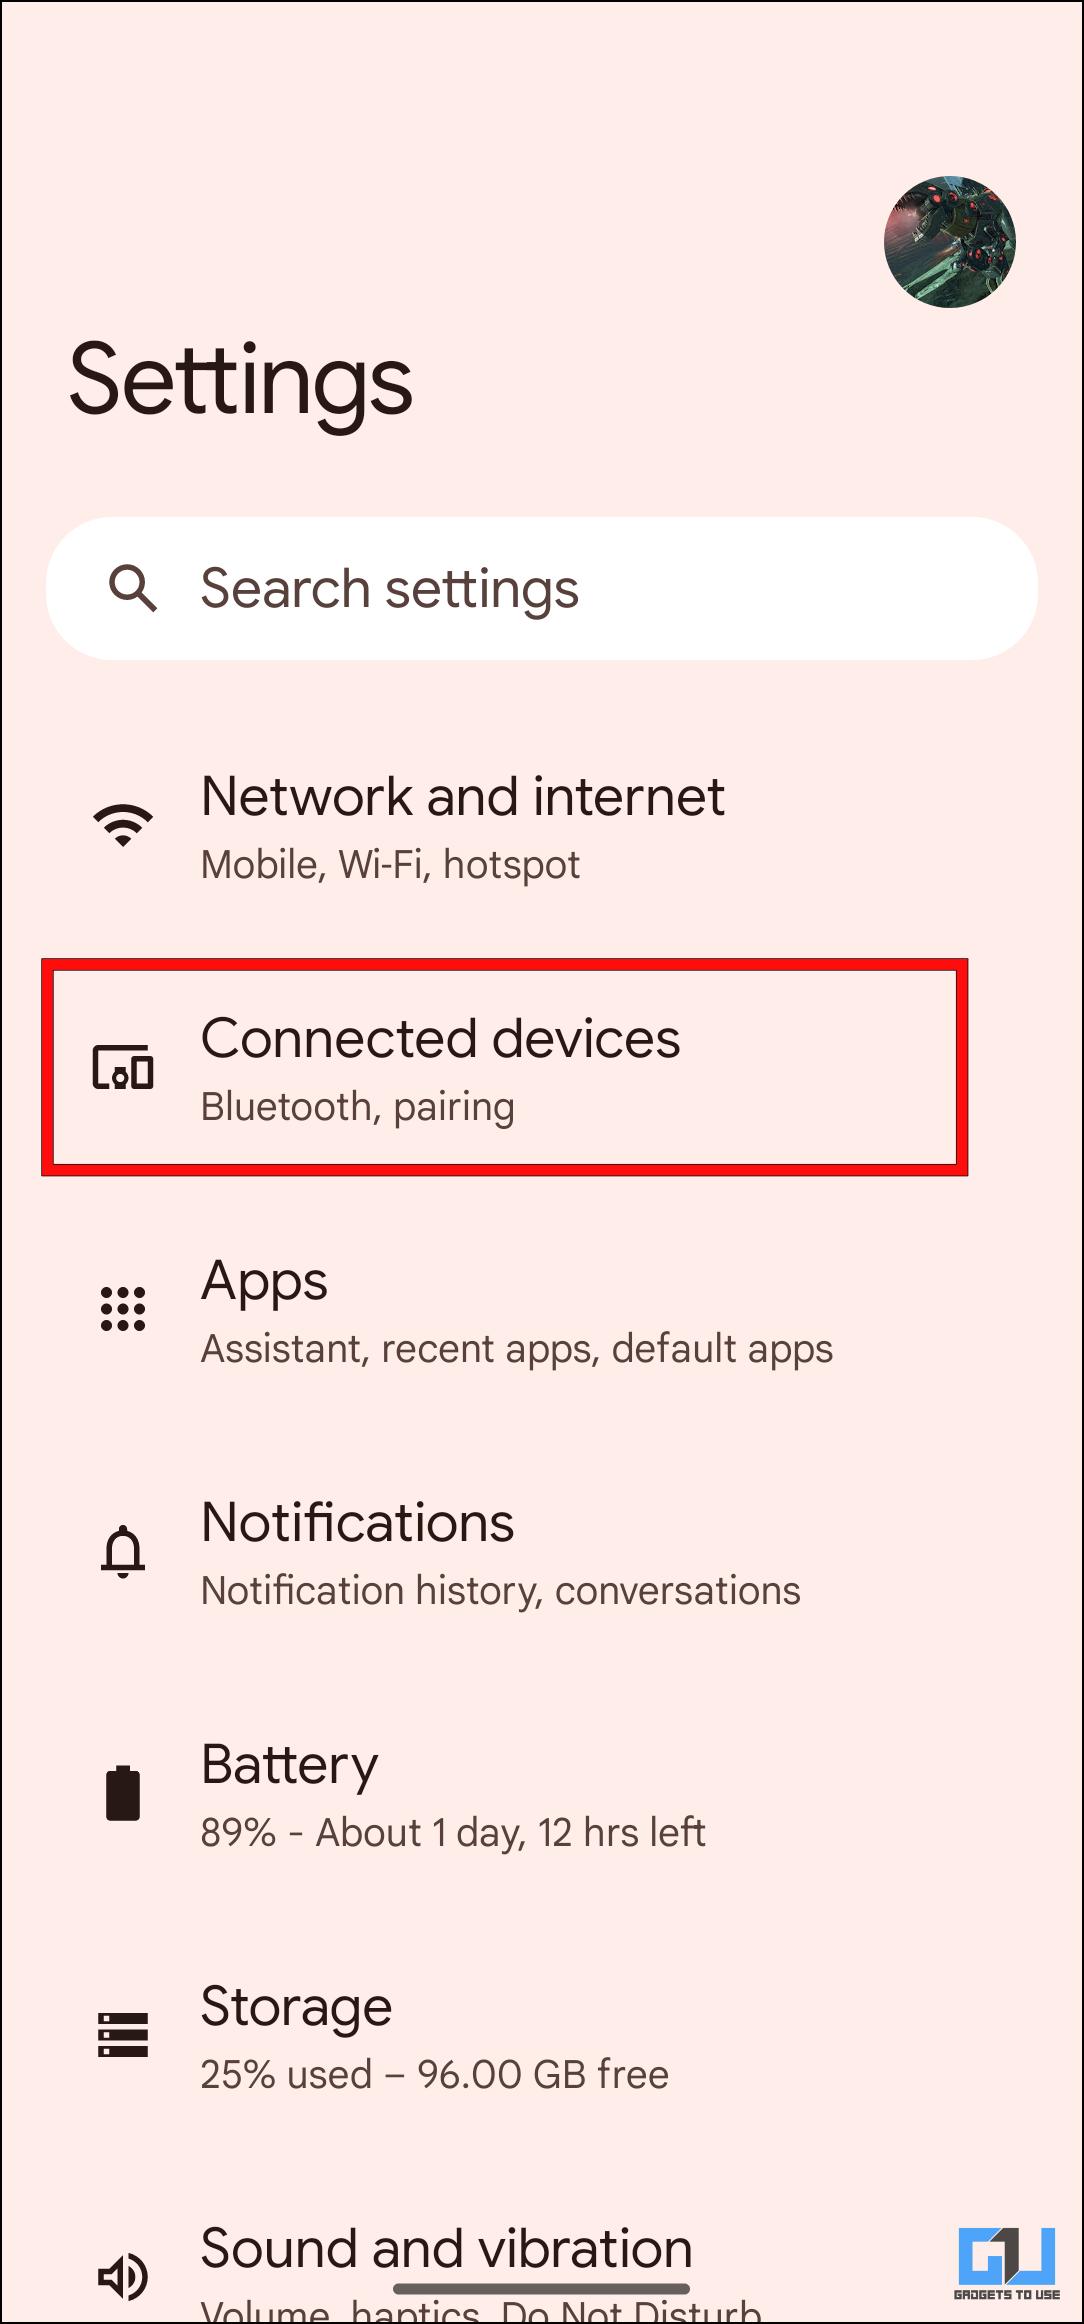
2. Tap on Connected Devices.
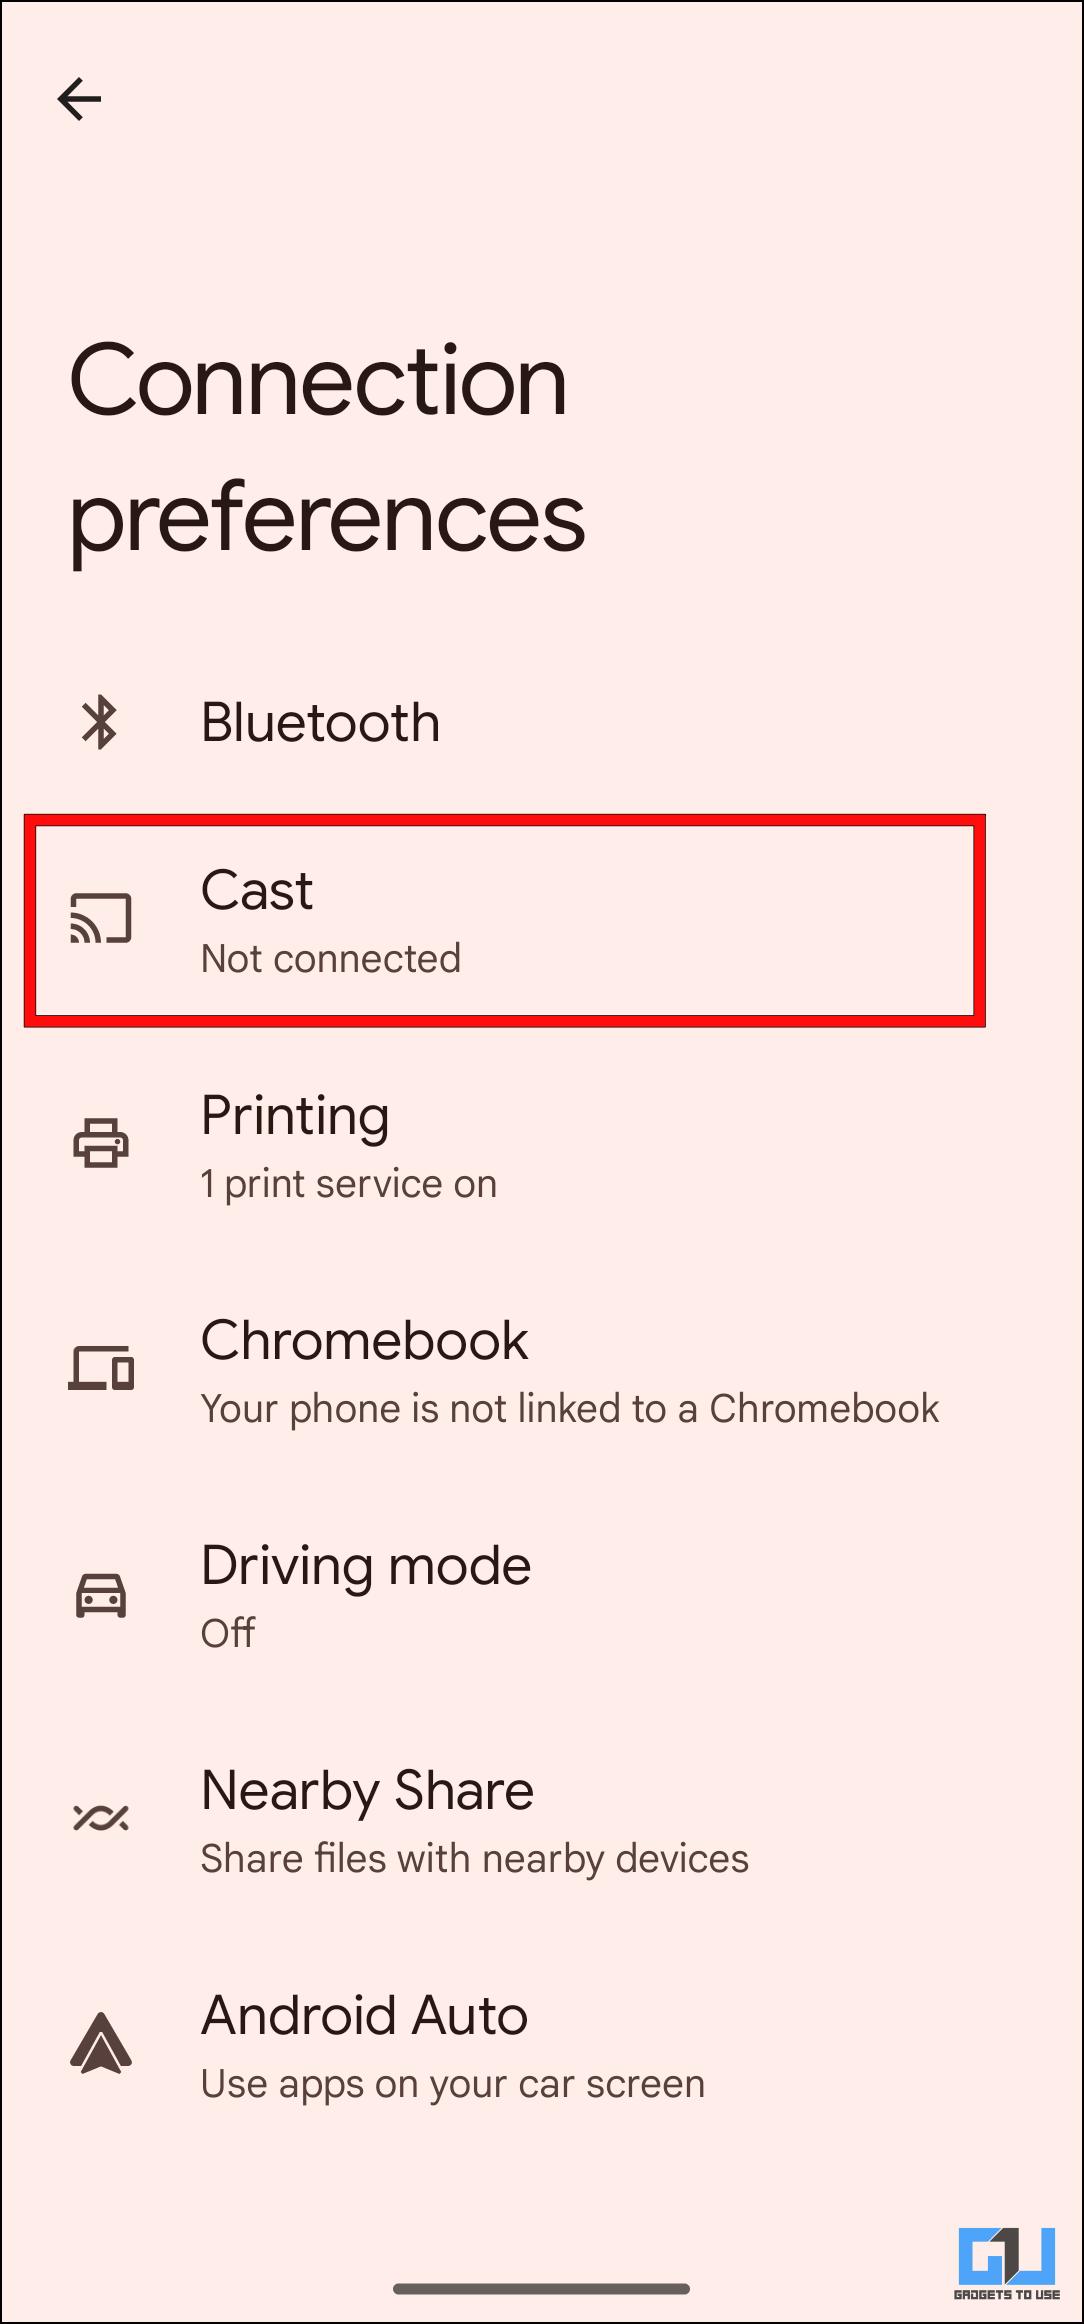
3. Then click on Connection preferences.
4. Click on the Cast option.
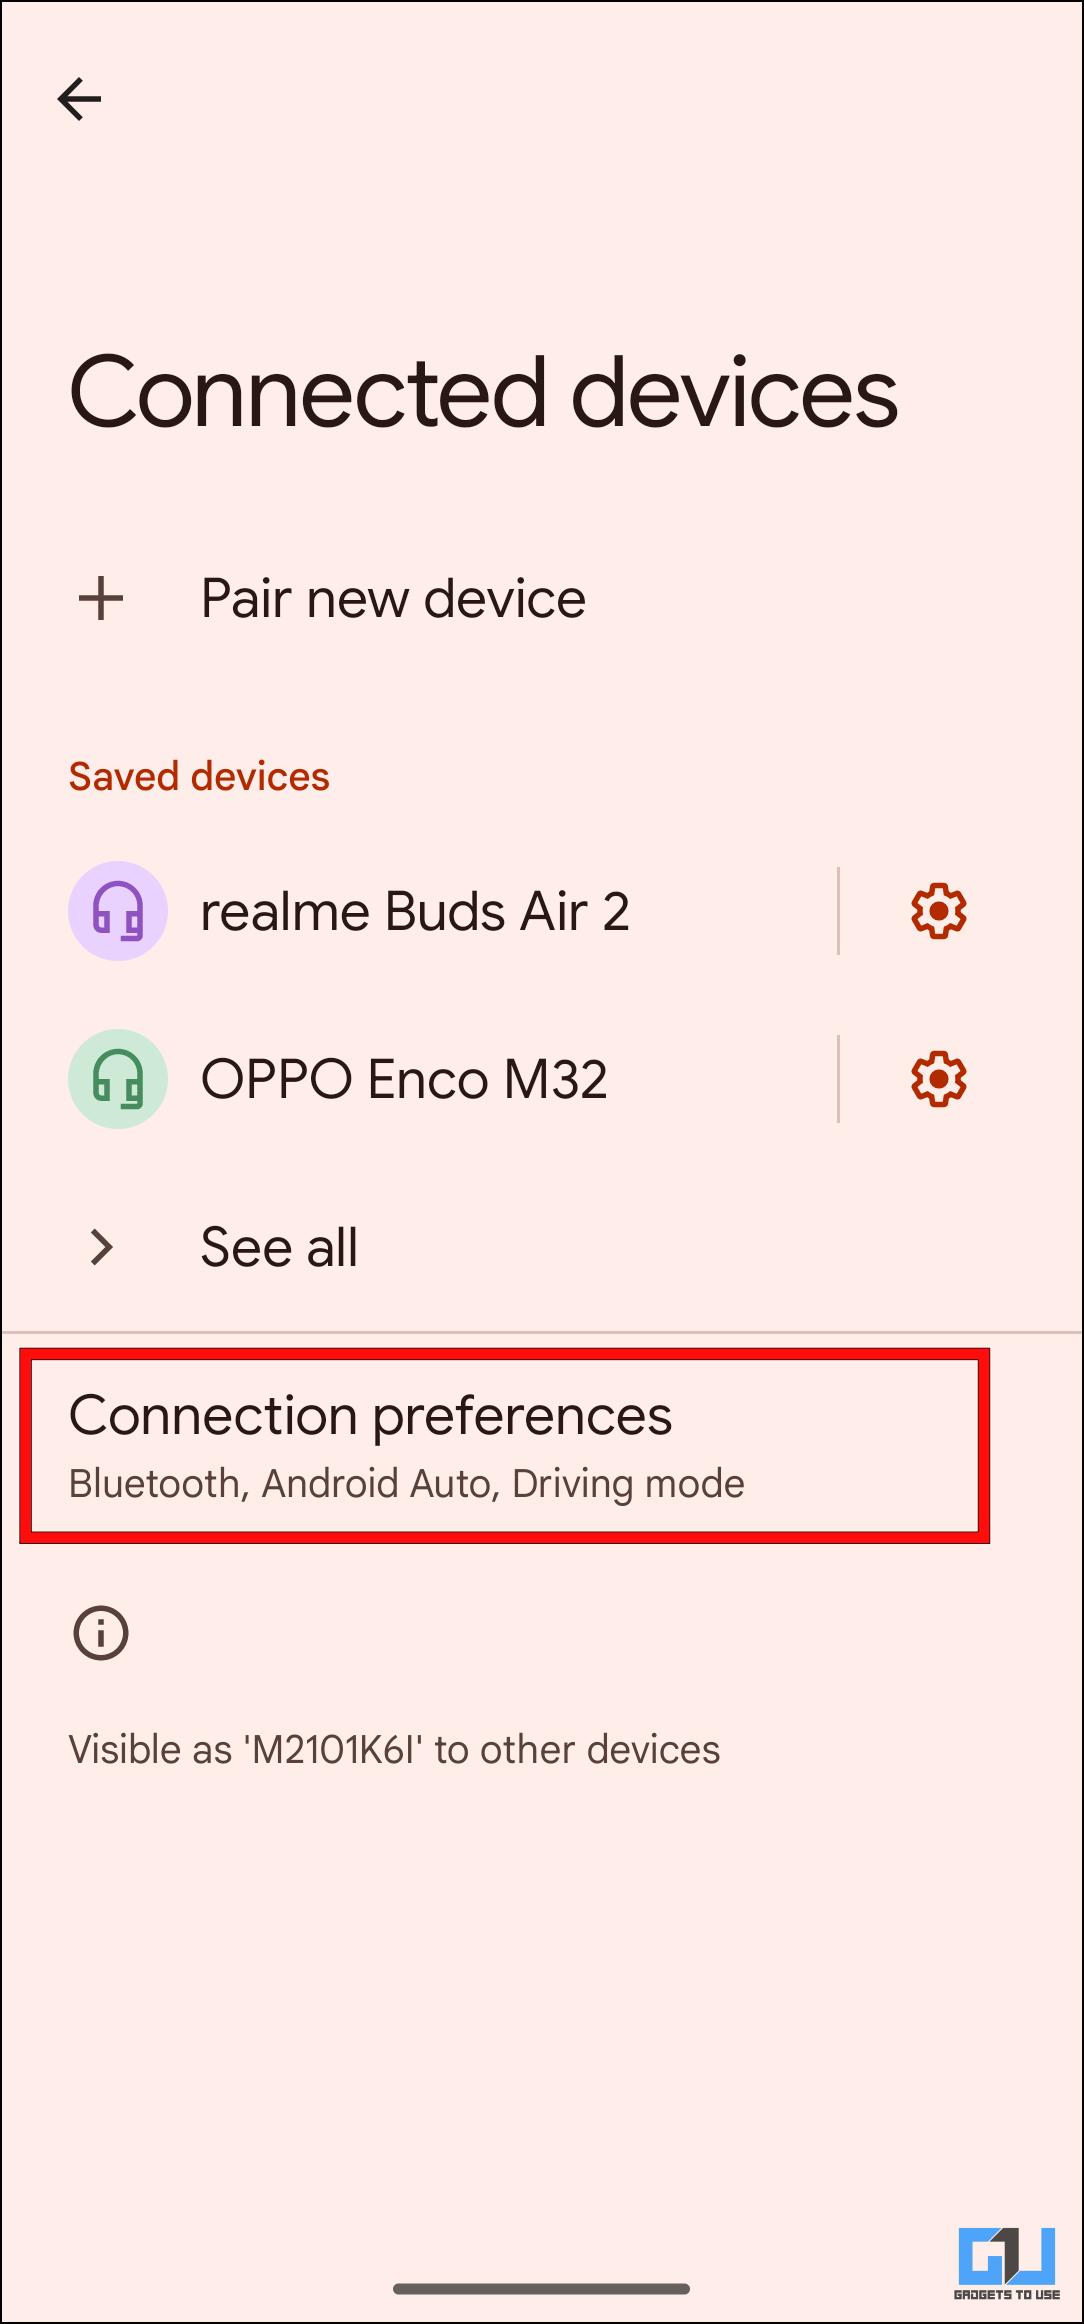
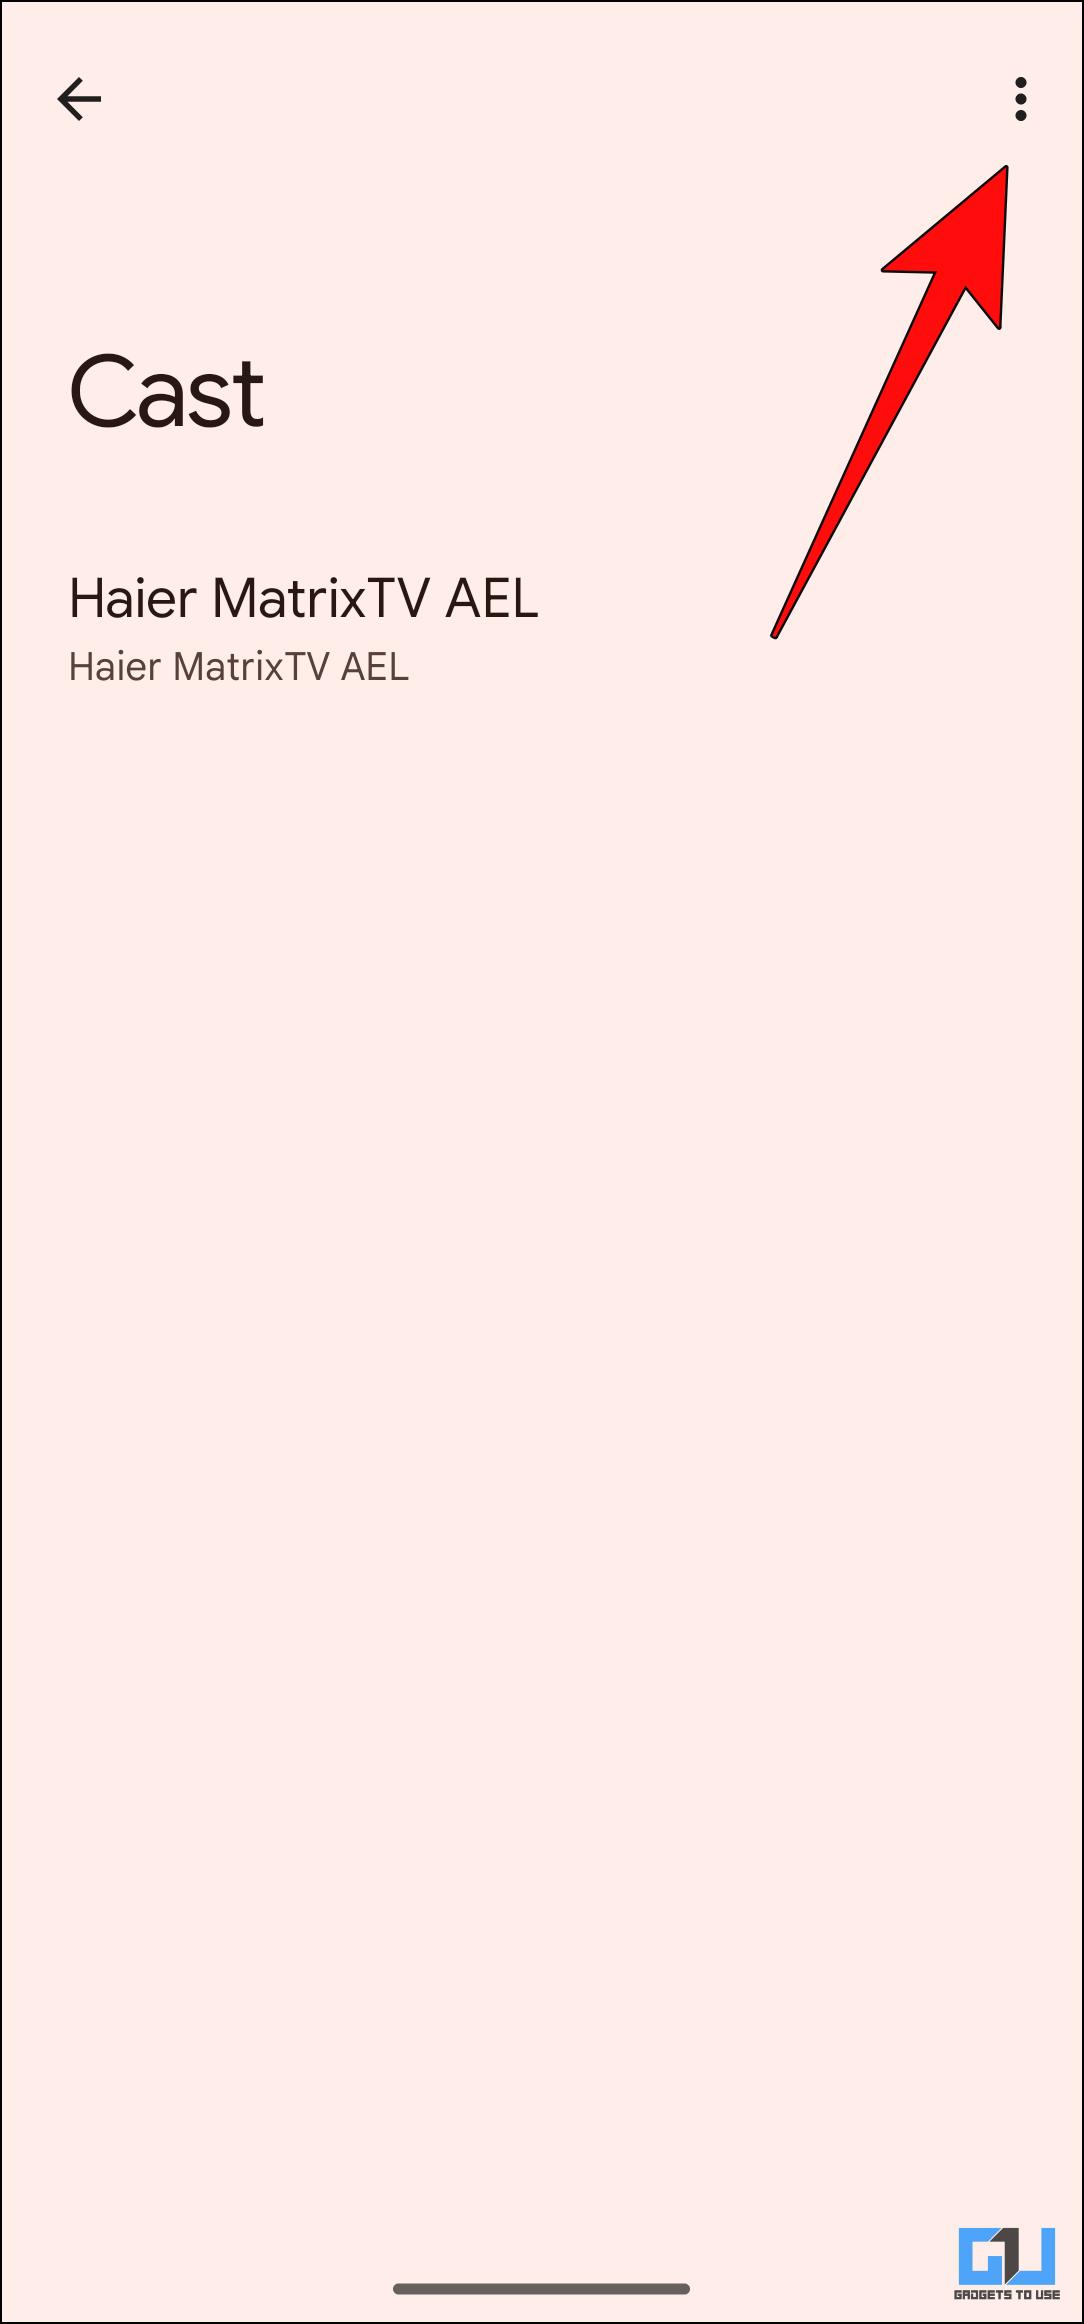
5. Tap on the three-dot menu in the top right corner.
6. Tick the box next to Enable wireless display. Your device should now display available devices to cast.
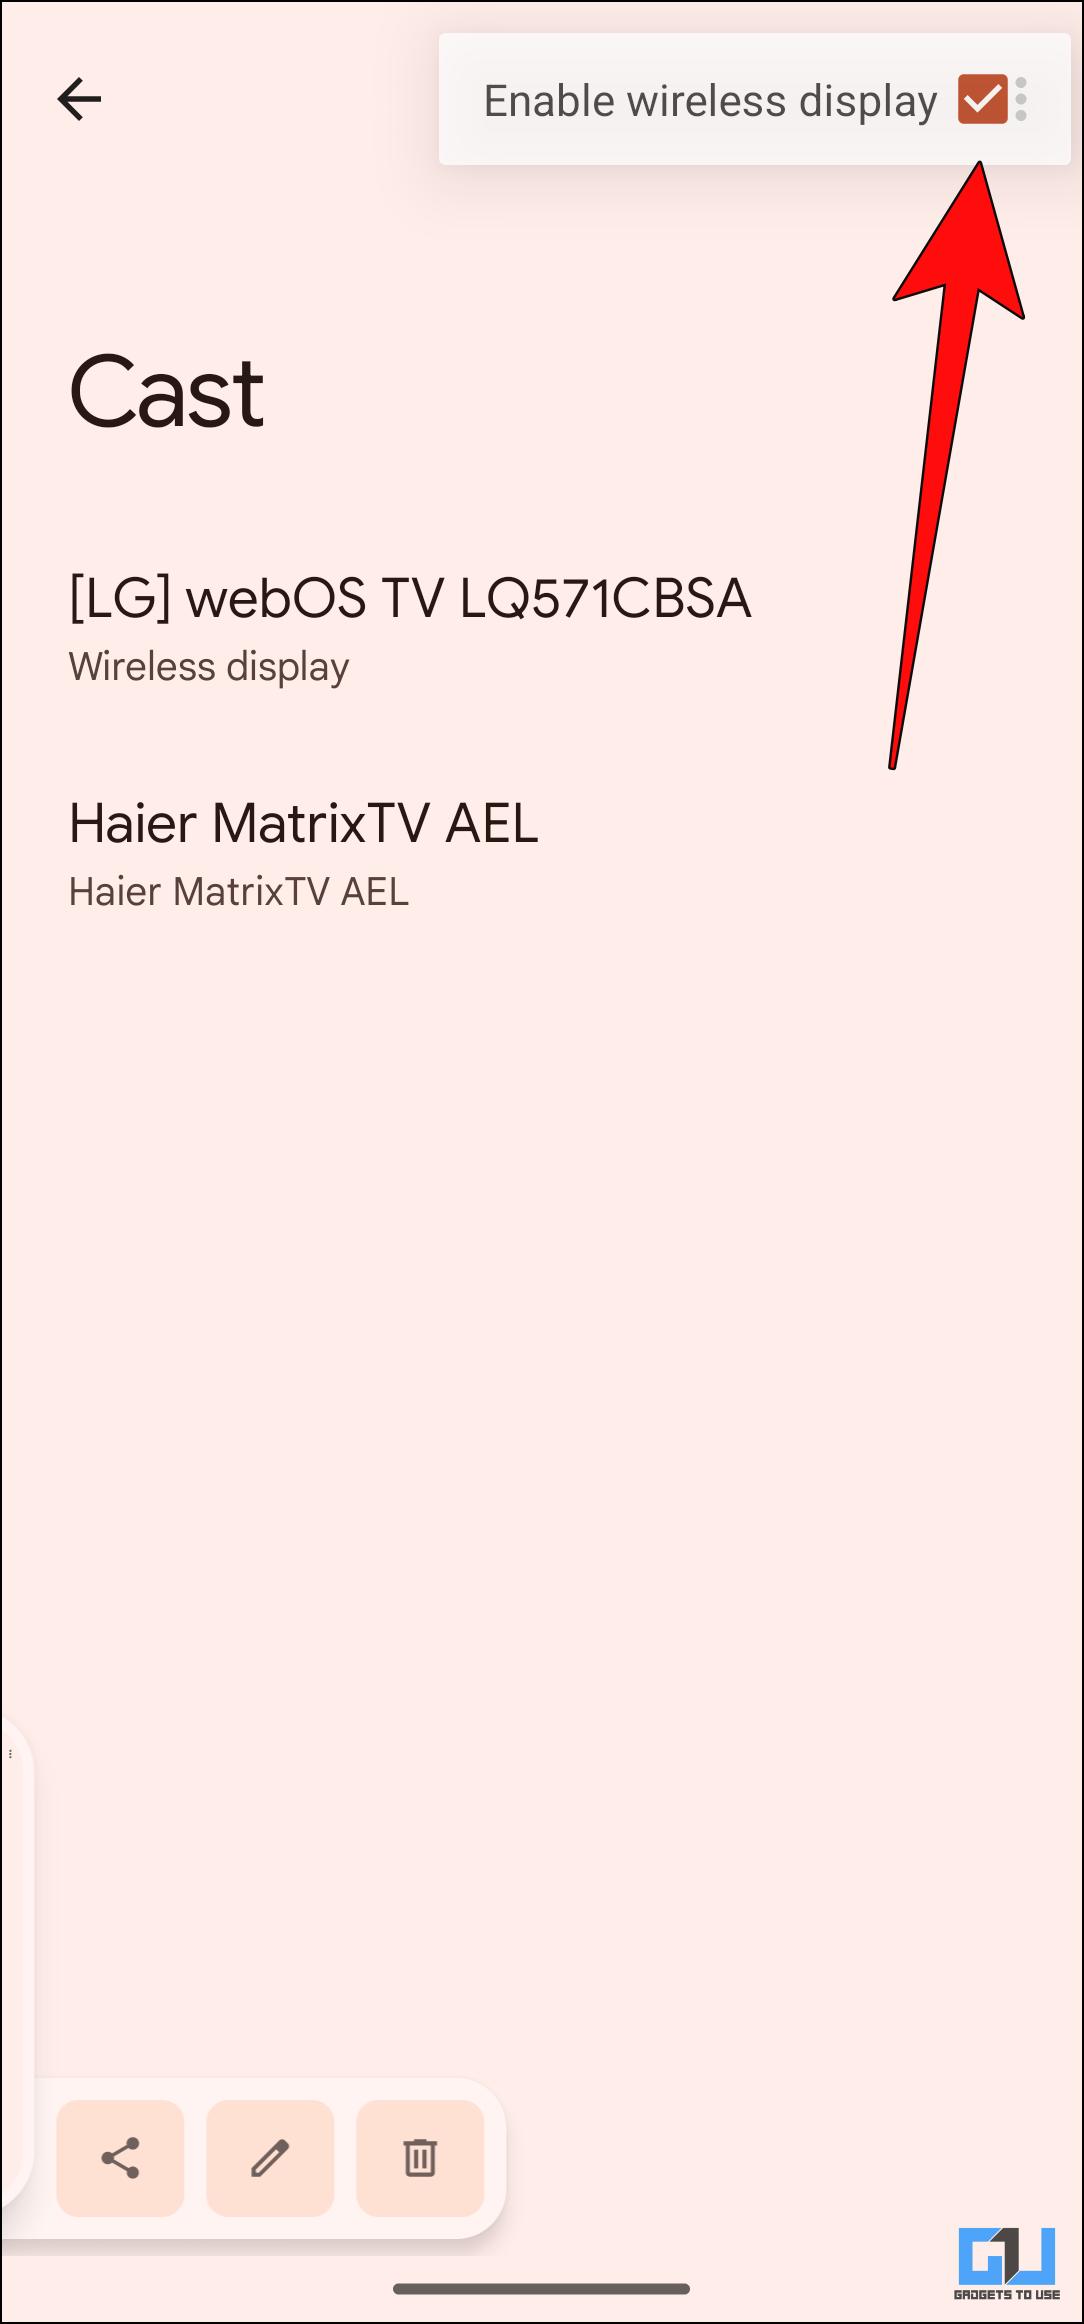
7. Select your Windows PC from the list.
Your smartphone will now ask for an eight-digit PIN.
8. Enter the code displayed on your Windows computer and click on Accept.
Your phone’s display should be mirrored on your computer’s large display. Given it is a wireless connection, there is a bit of a delay while performing specific actions. But it is a good official way to mirror the display of your Android smartphone.
Method 2 – Download Scrcpy to Mirror Android on Windows (Wired)
Scrcpy is a free app that allows screen mirroring from Android to Windows or Mac over a wired connection. It works by utilizing a TCP/IP protocol over a USB connection. The best part about this method is that there is less latency than the wireless option. Though this method is a bit involved, we have broken it down into simple steps to help you.
Step 1: Enable USB Debugging on Android
To use Scrcpy, you must first enable USB debugging on your Android smartphone. To do this, follow these steps.
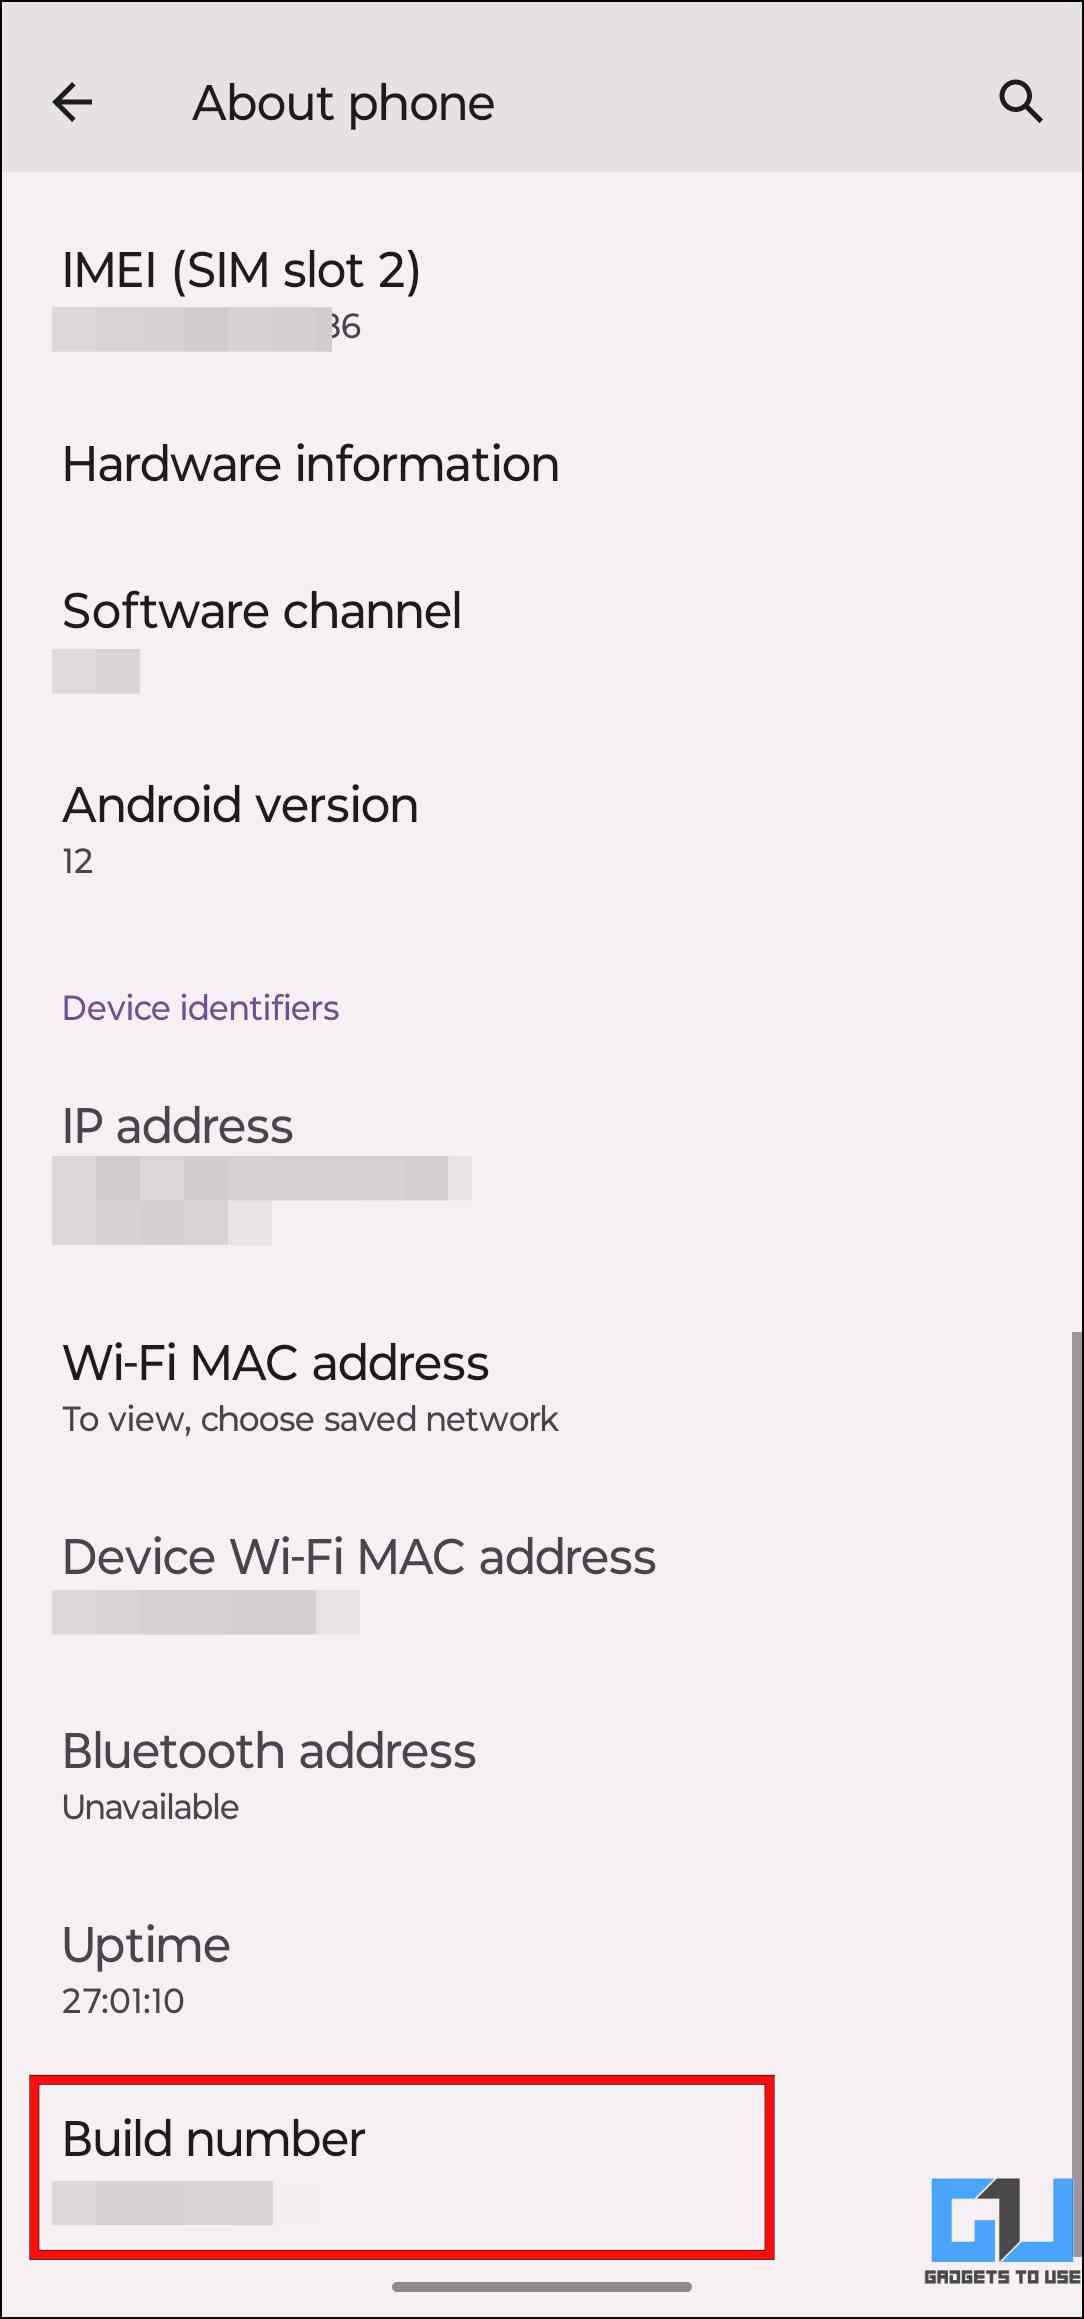
1. Open Settings and scroll down to About phone.
2. Here, tap on the Build number seven times.

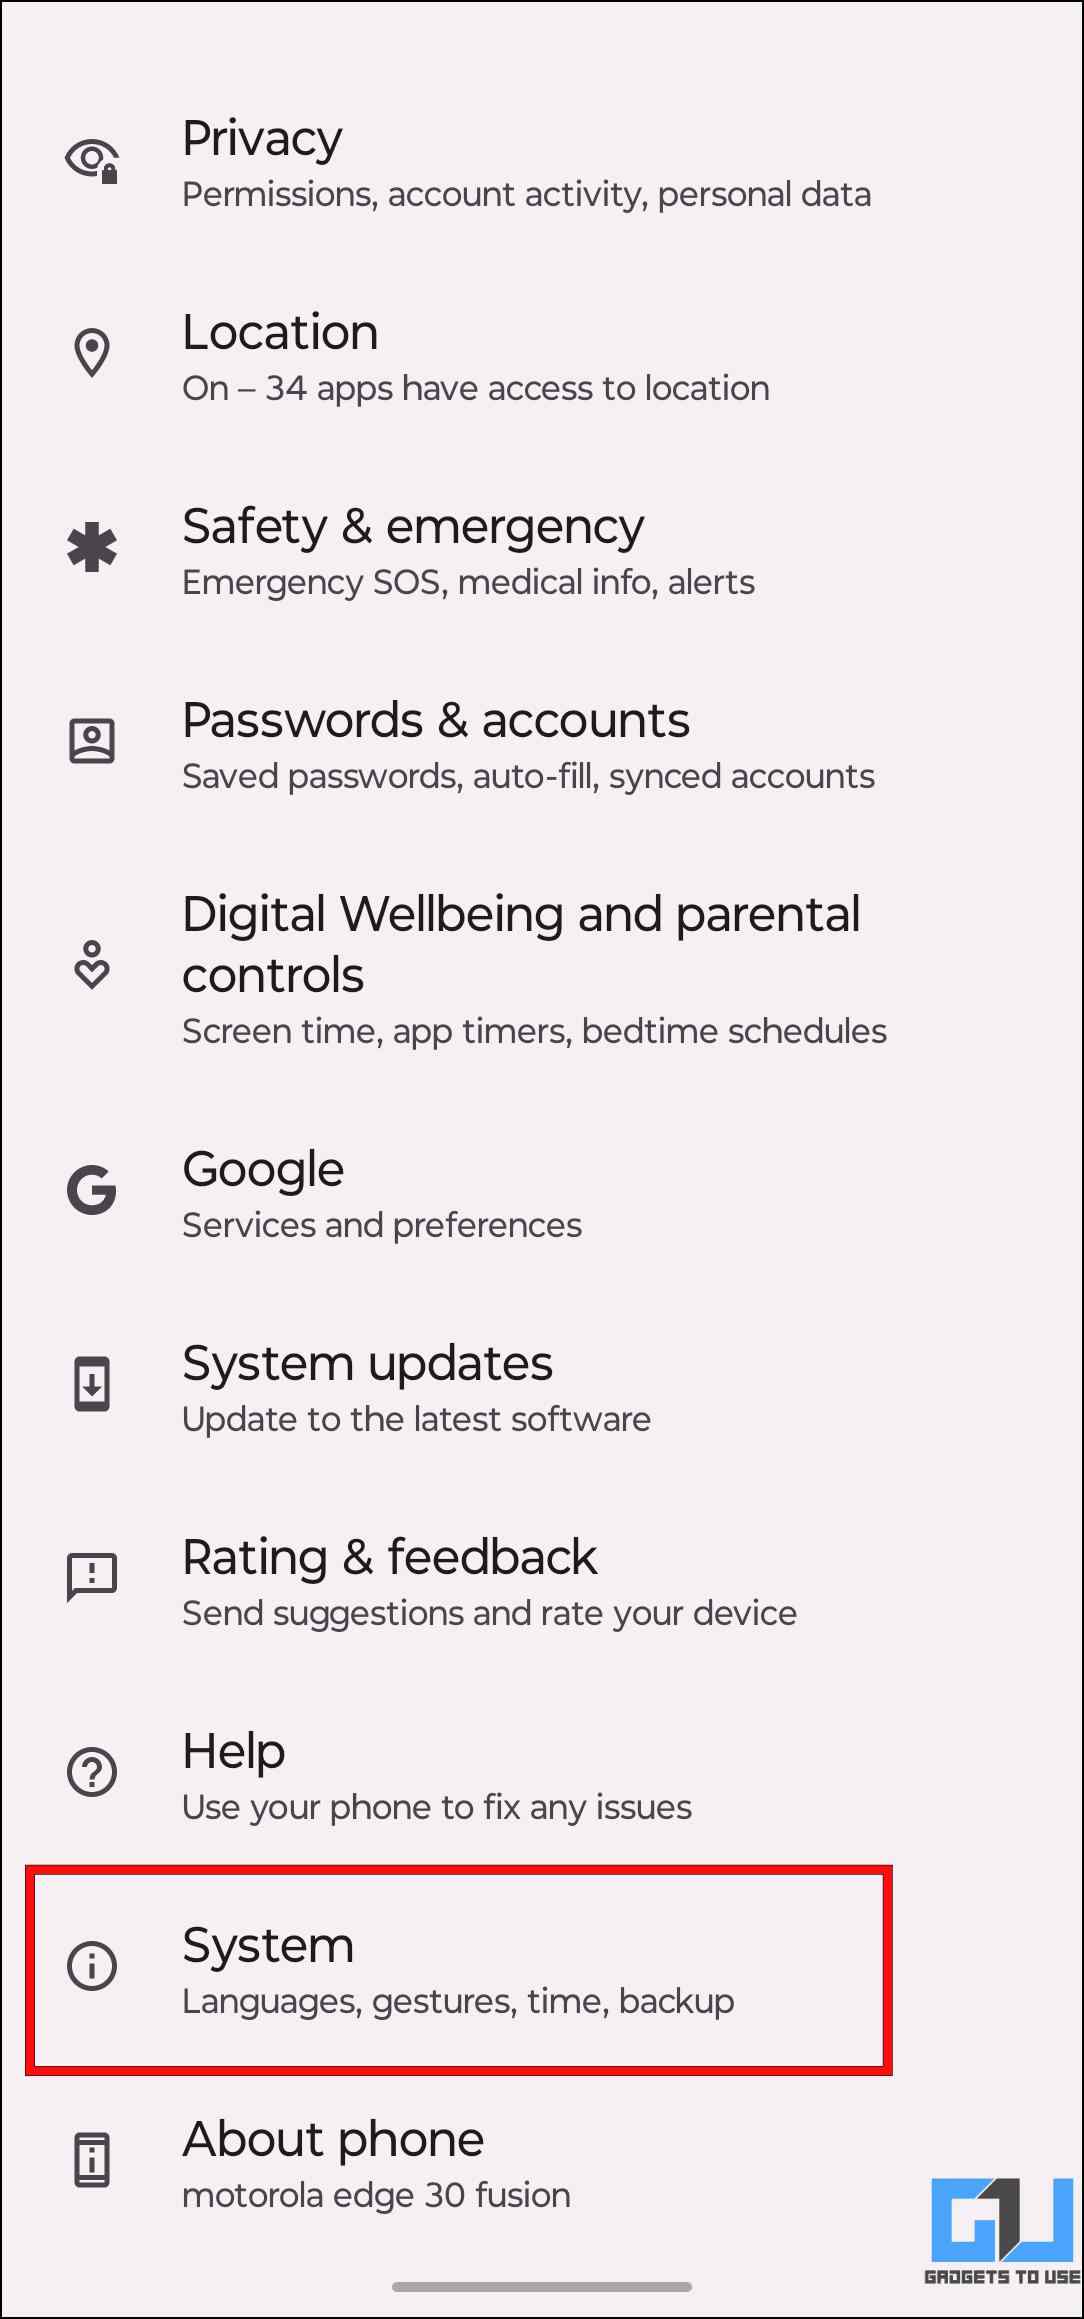
3. Now head back to Settings and go to System.
4. Tap on the Developer options.
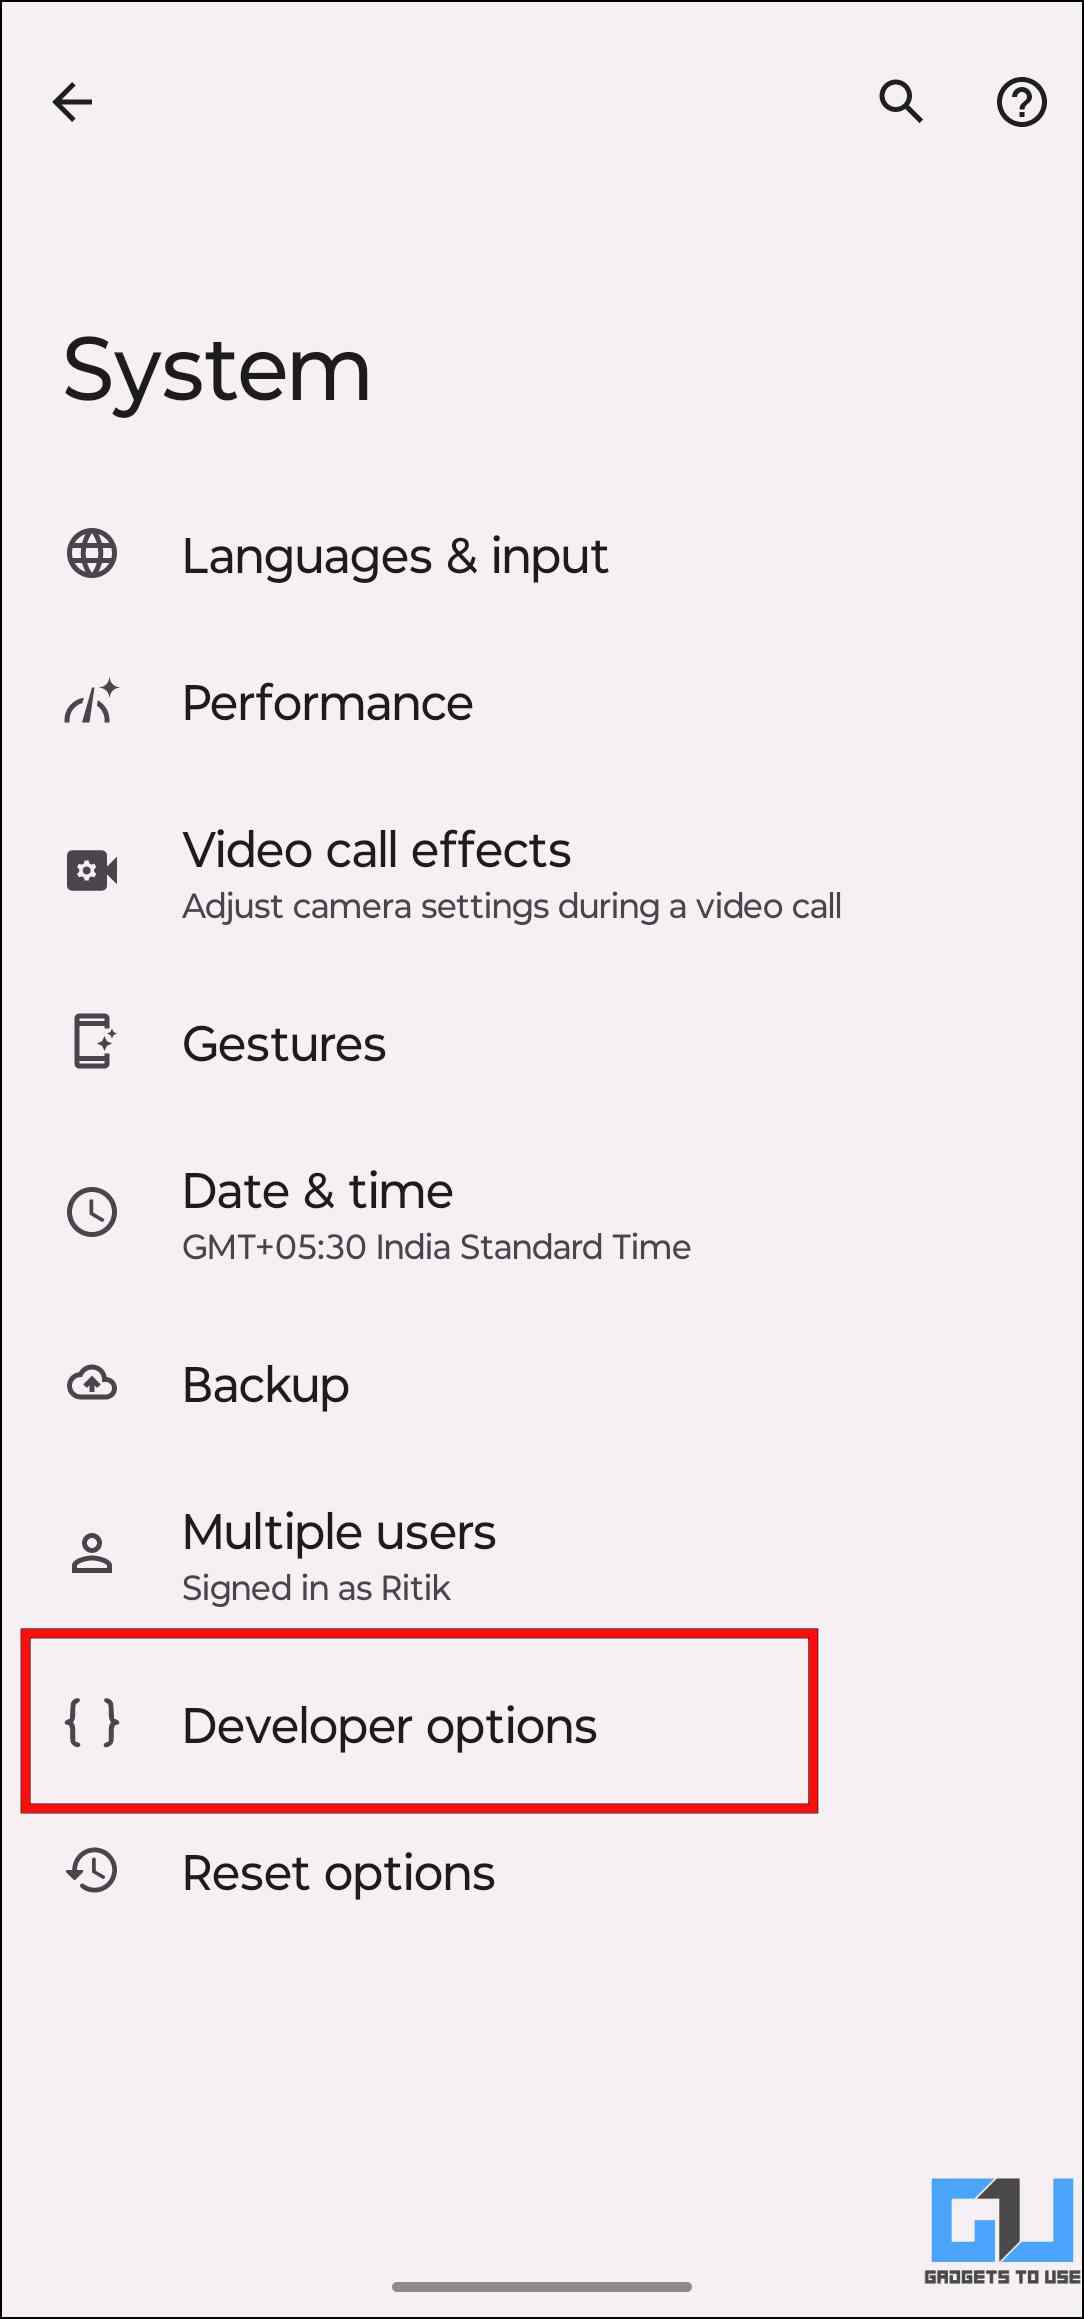
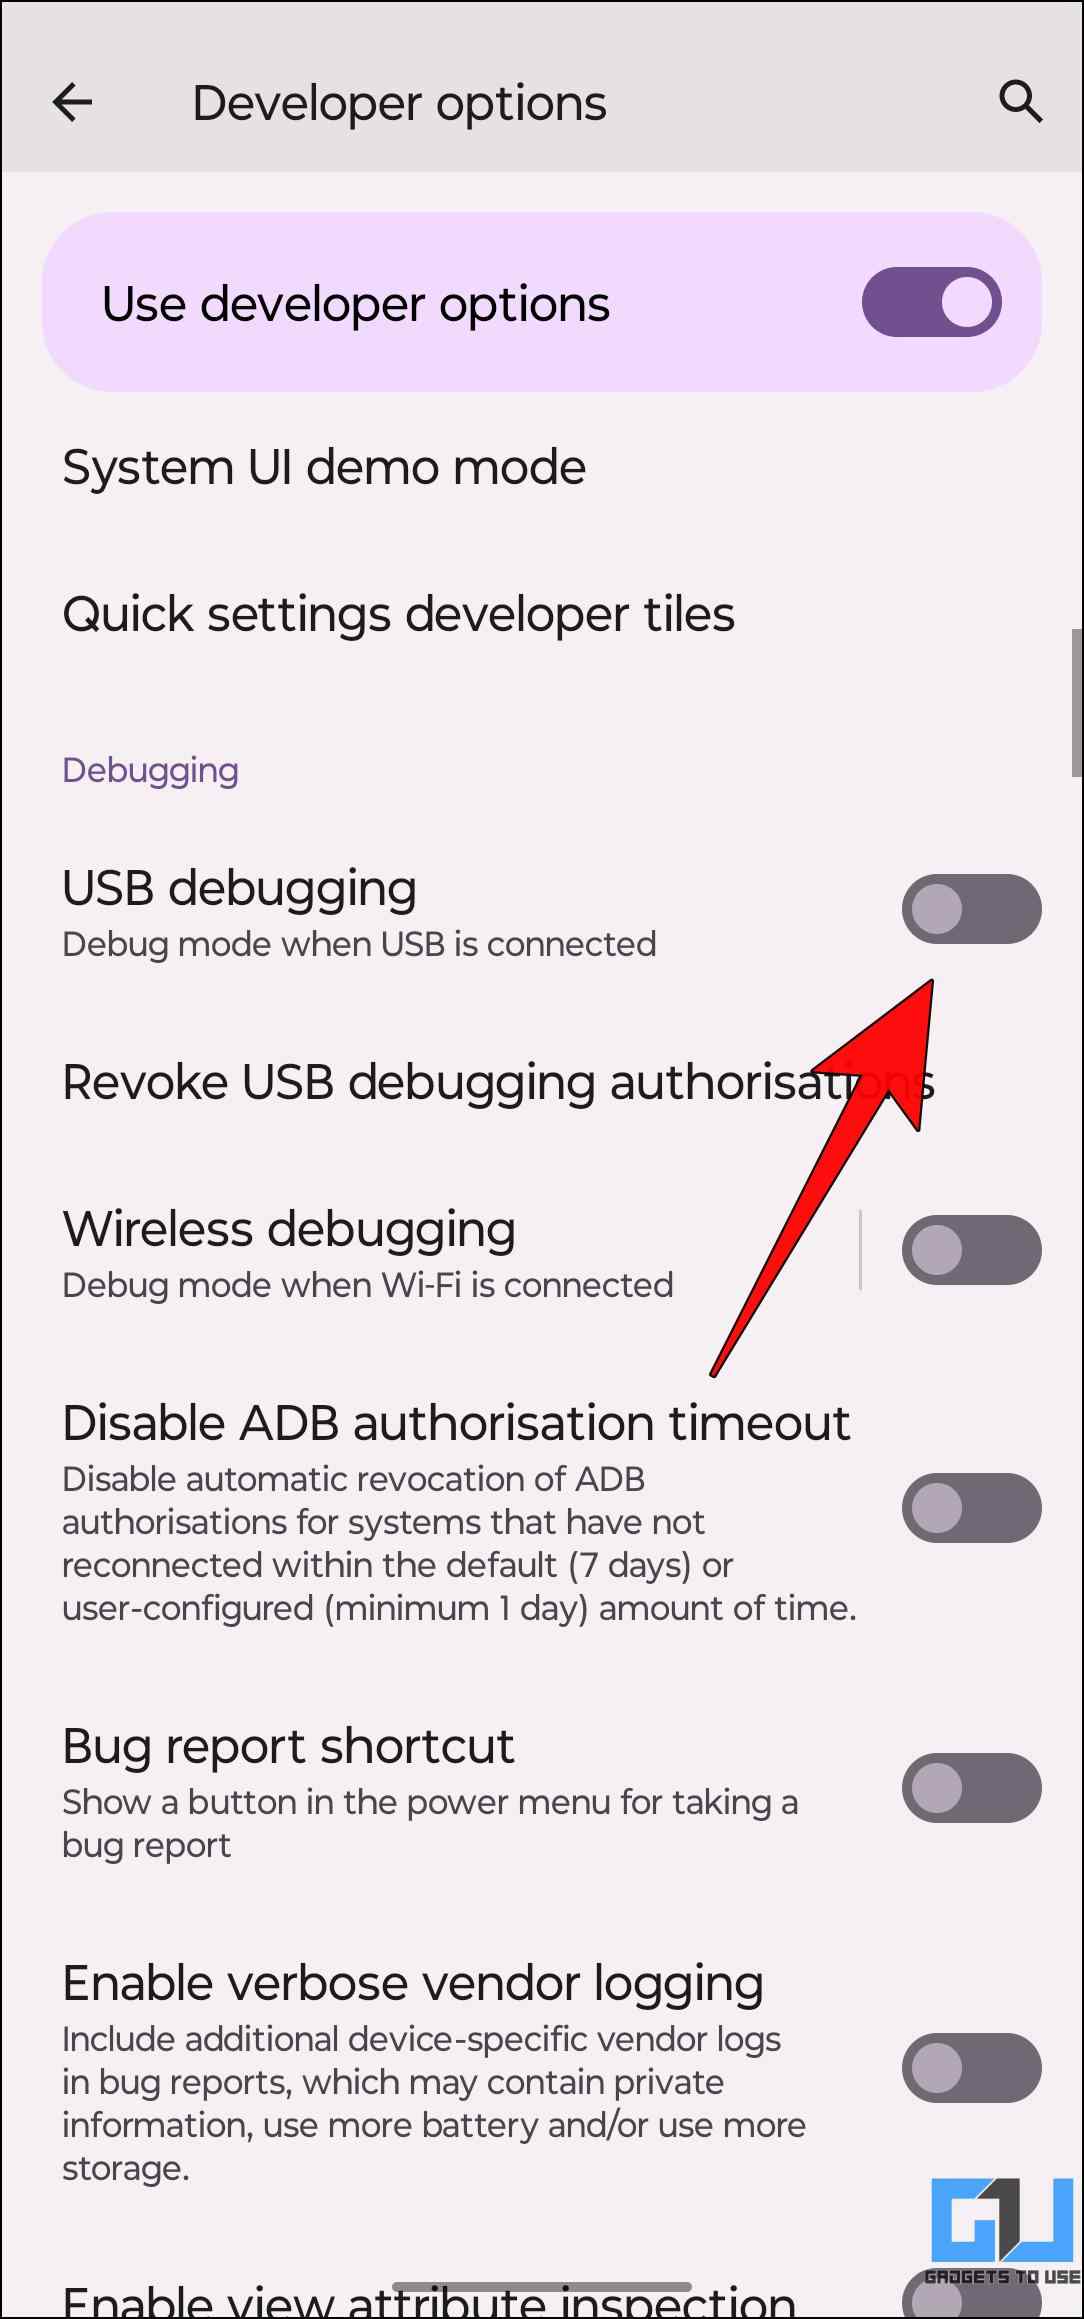
5. Under the Developer options, turn on the toggle for USB debugging.
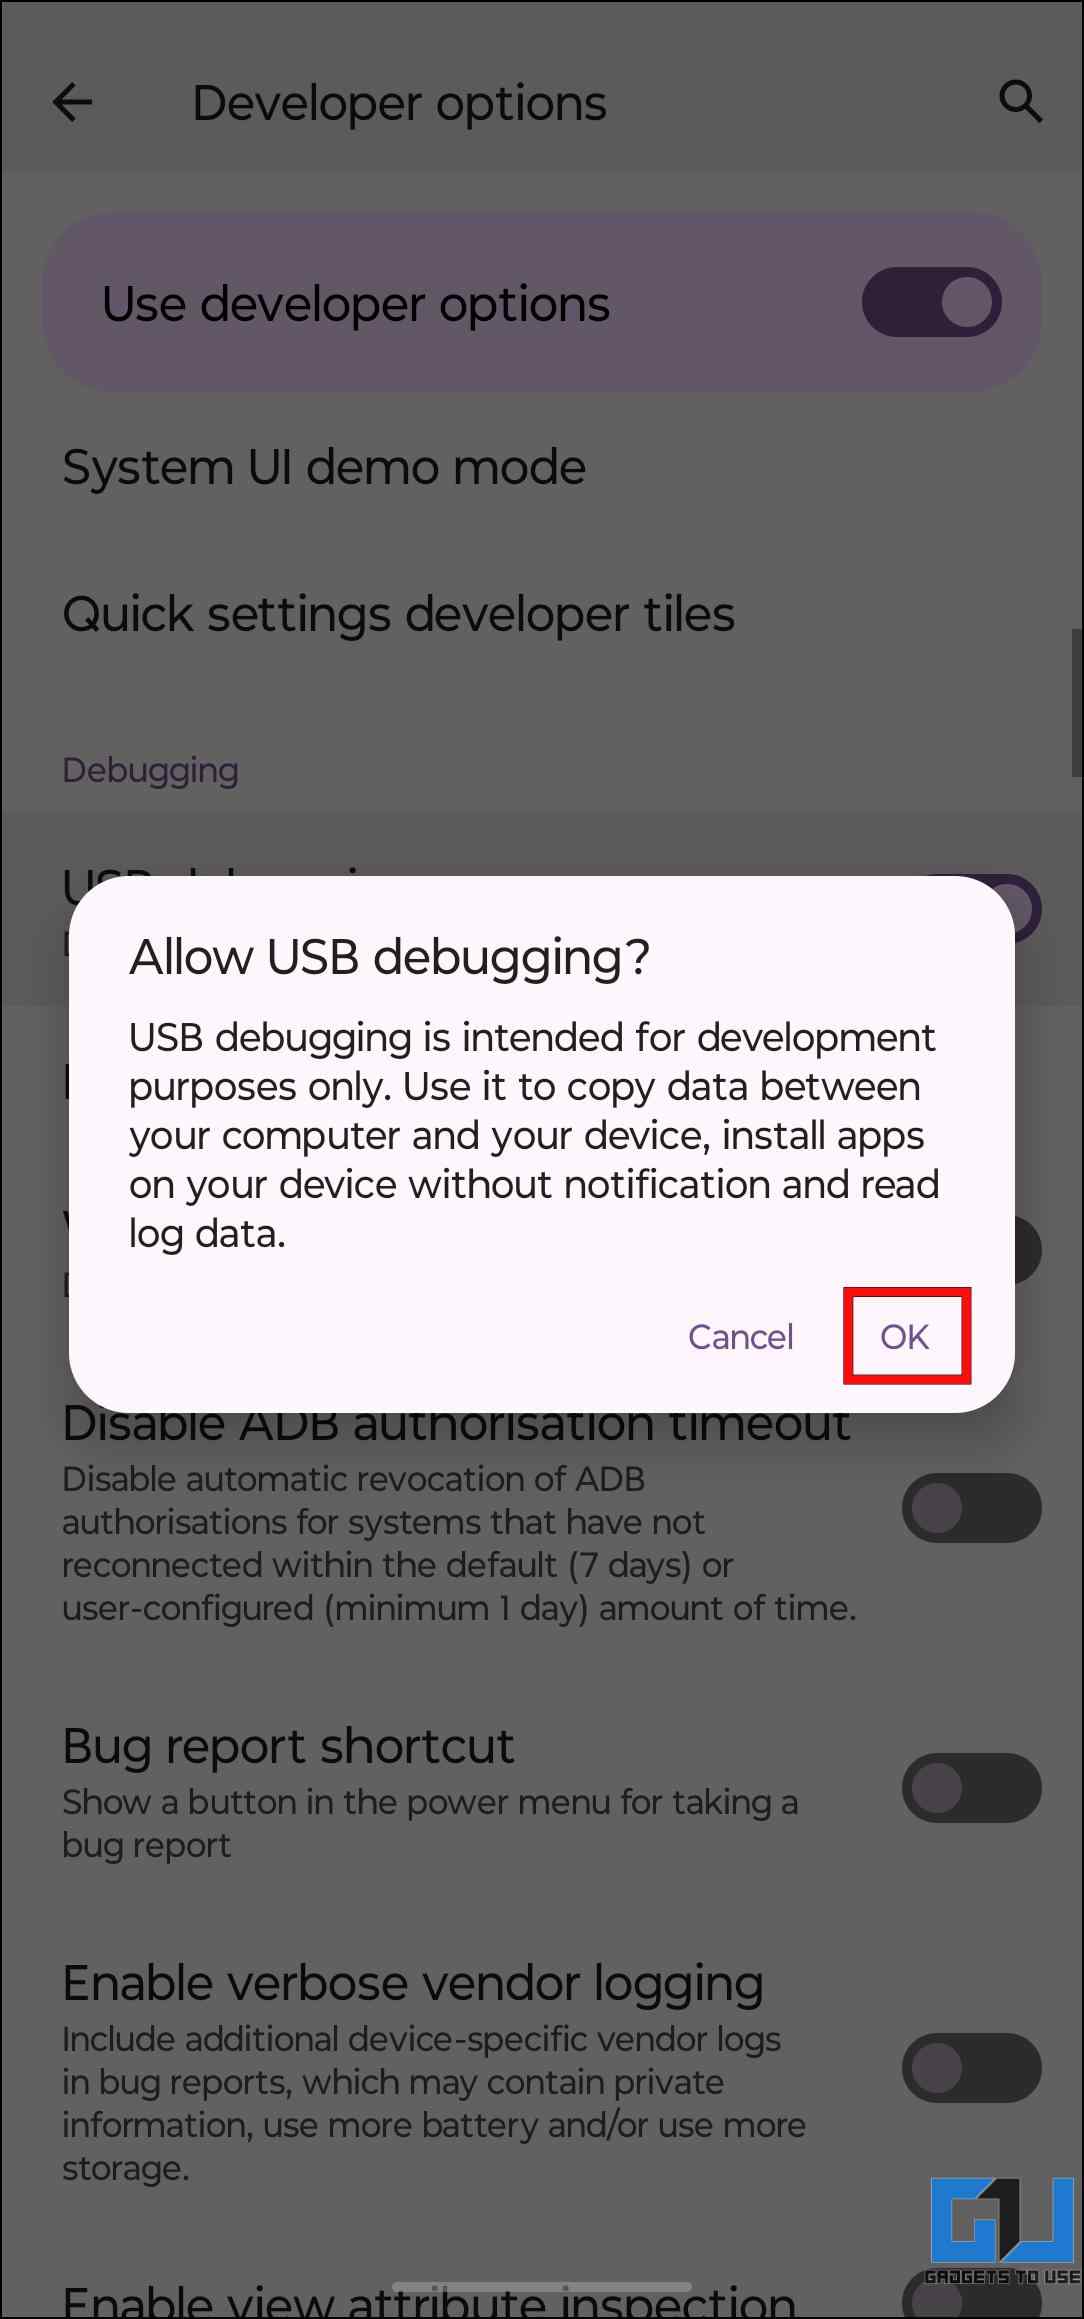
6. Tap OK on the confirmation prompt to enable USB debugging on your Android phone.
Step 2: Configure Scrcpy on Windows PC
We now have to set up the Scrcpy service on our Windows desktop. Let us look at the steps to install Scrcpy on Windows.
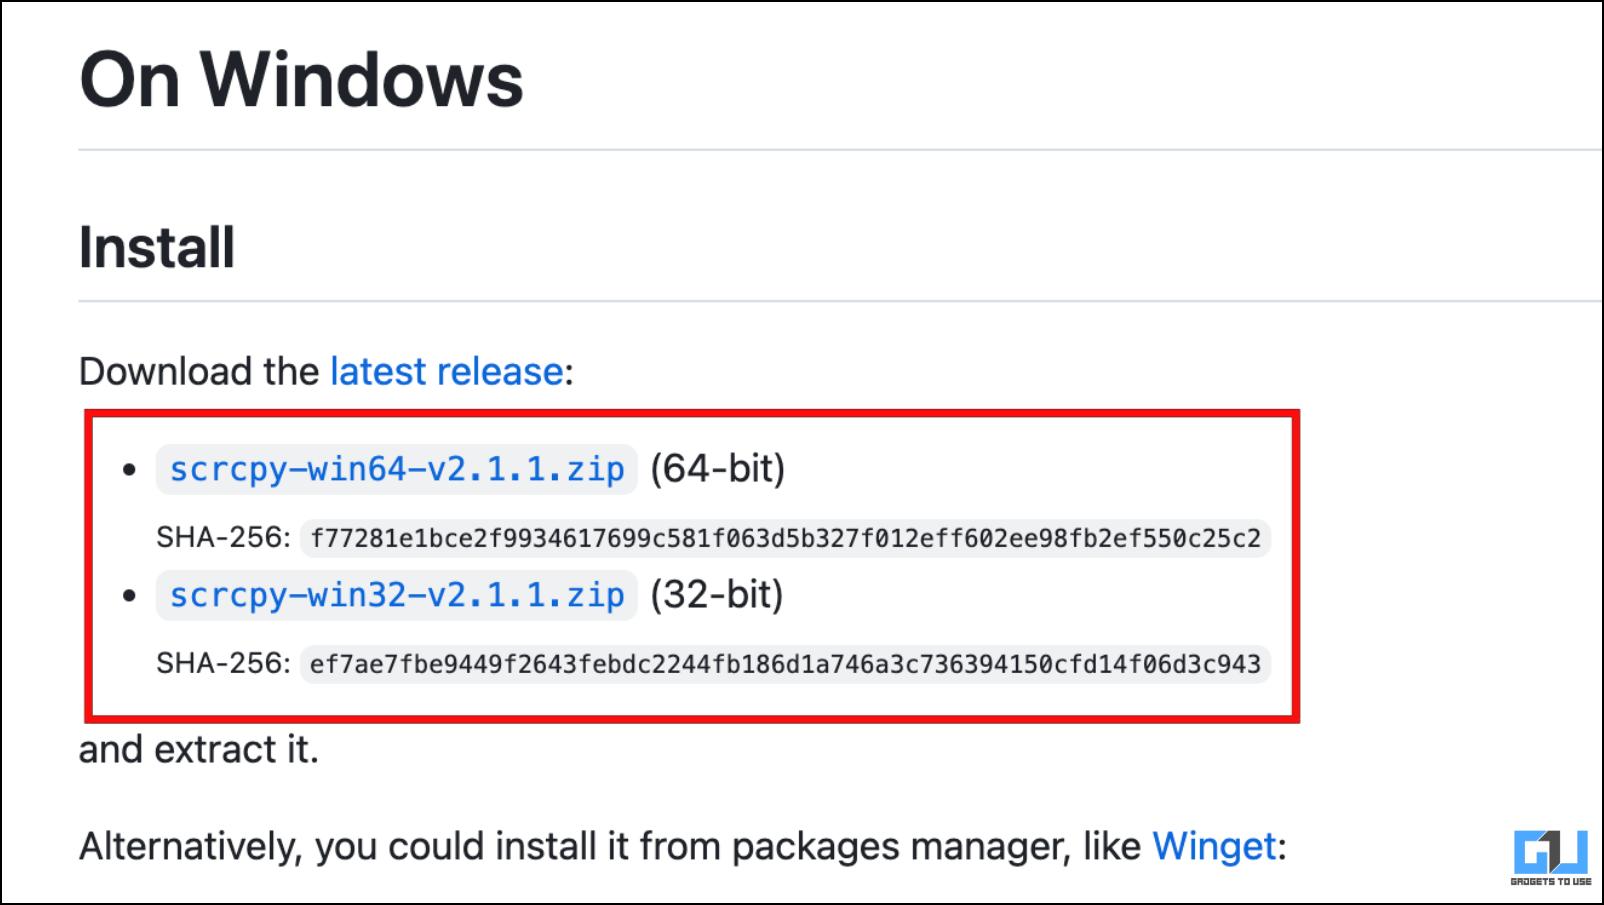
1. Head over to the Scrcpy GitHub page.
2. Click on Windows under the option, Get the App.
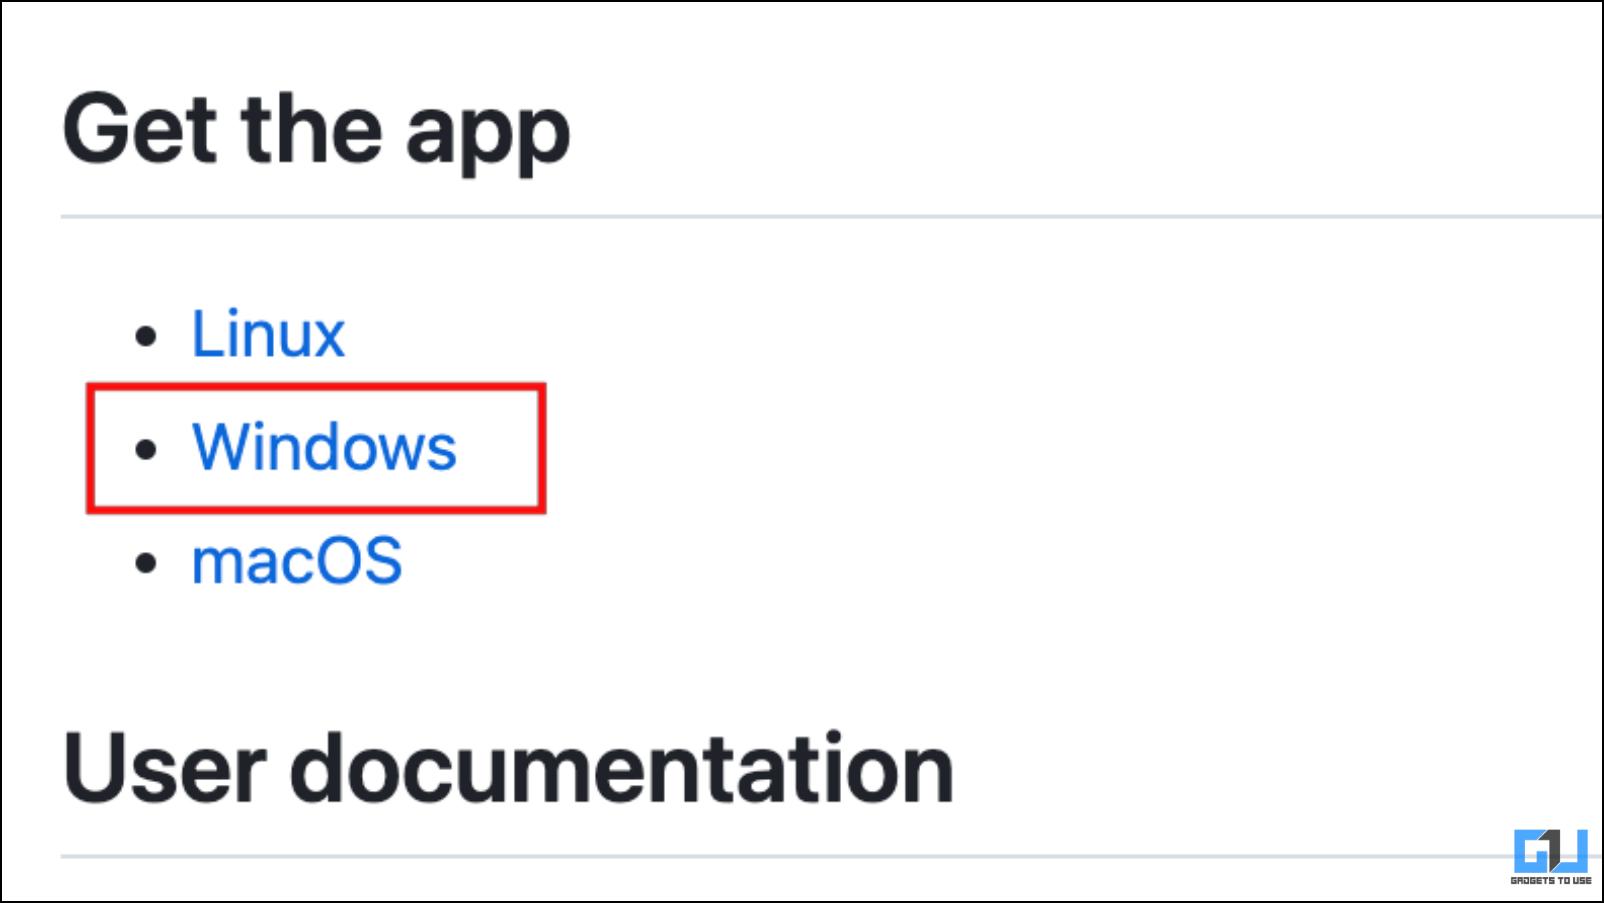
3. Here, select the latest version for your PC and click on it to begin the download.
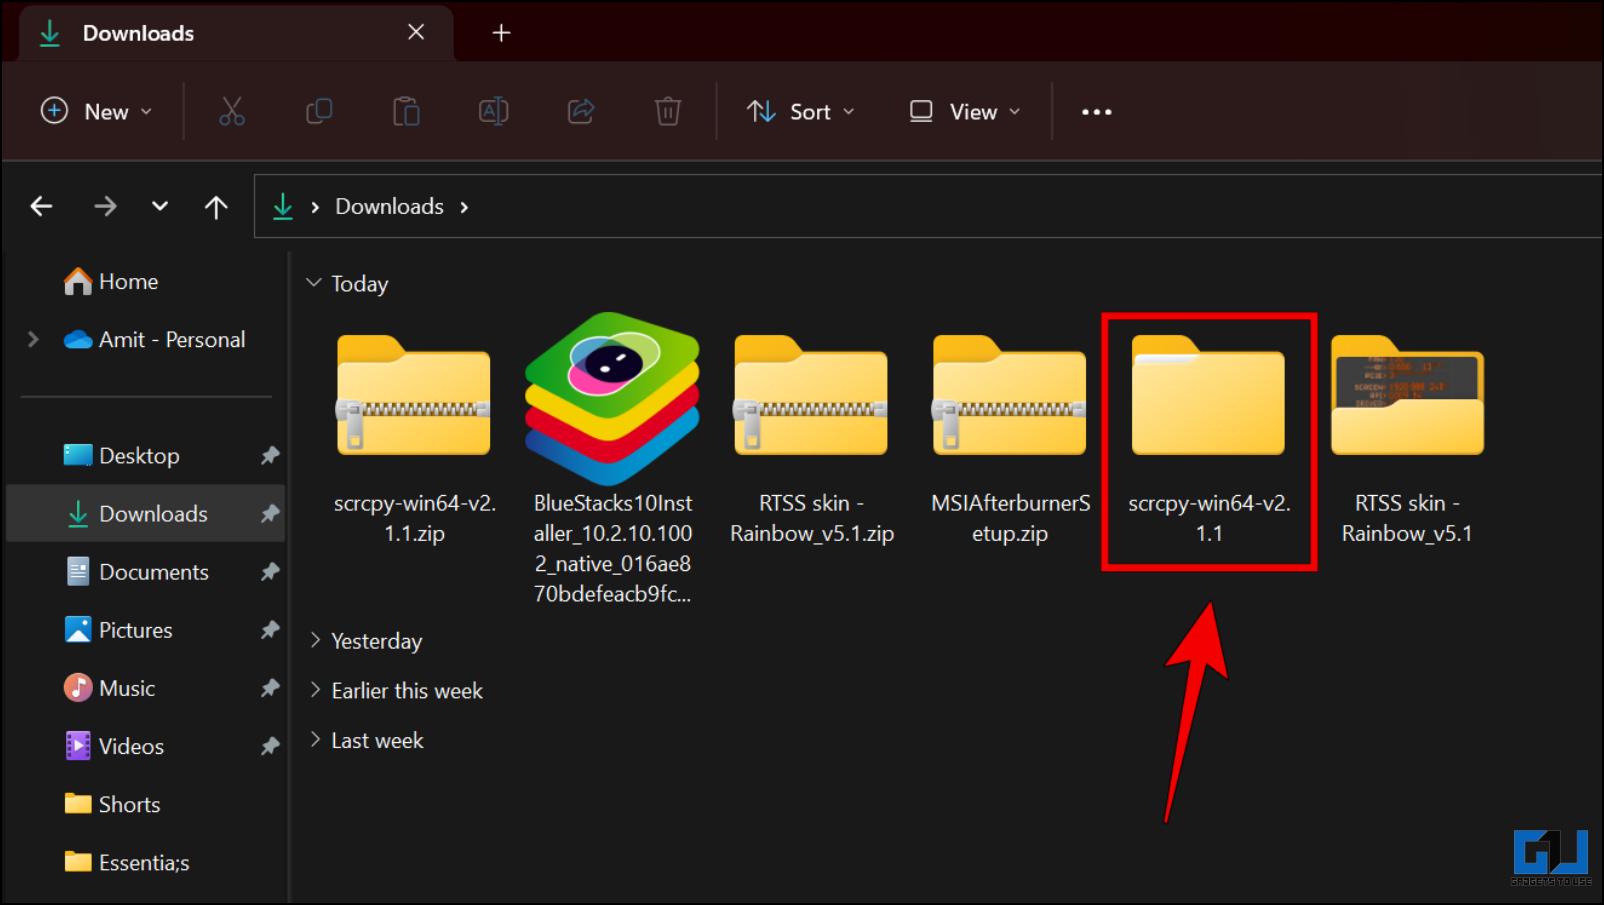
The downloaded file will be available under the Downloads folder in Windows File Manager.
4. Extract the contents of the downloaded .zip file.
5. Go to the extracted file and double-click on open_terminal_window-here.bat.
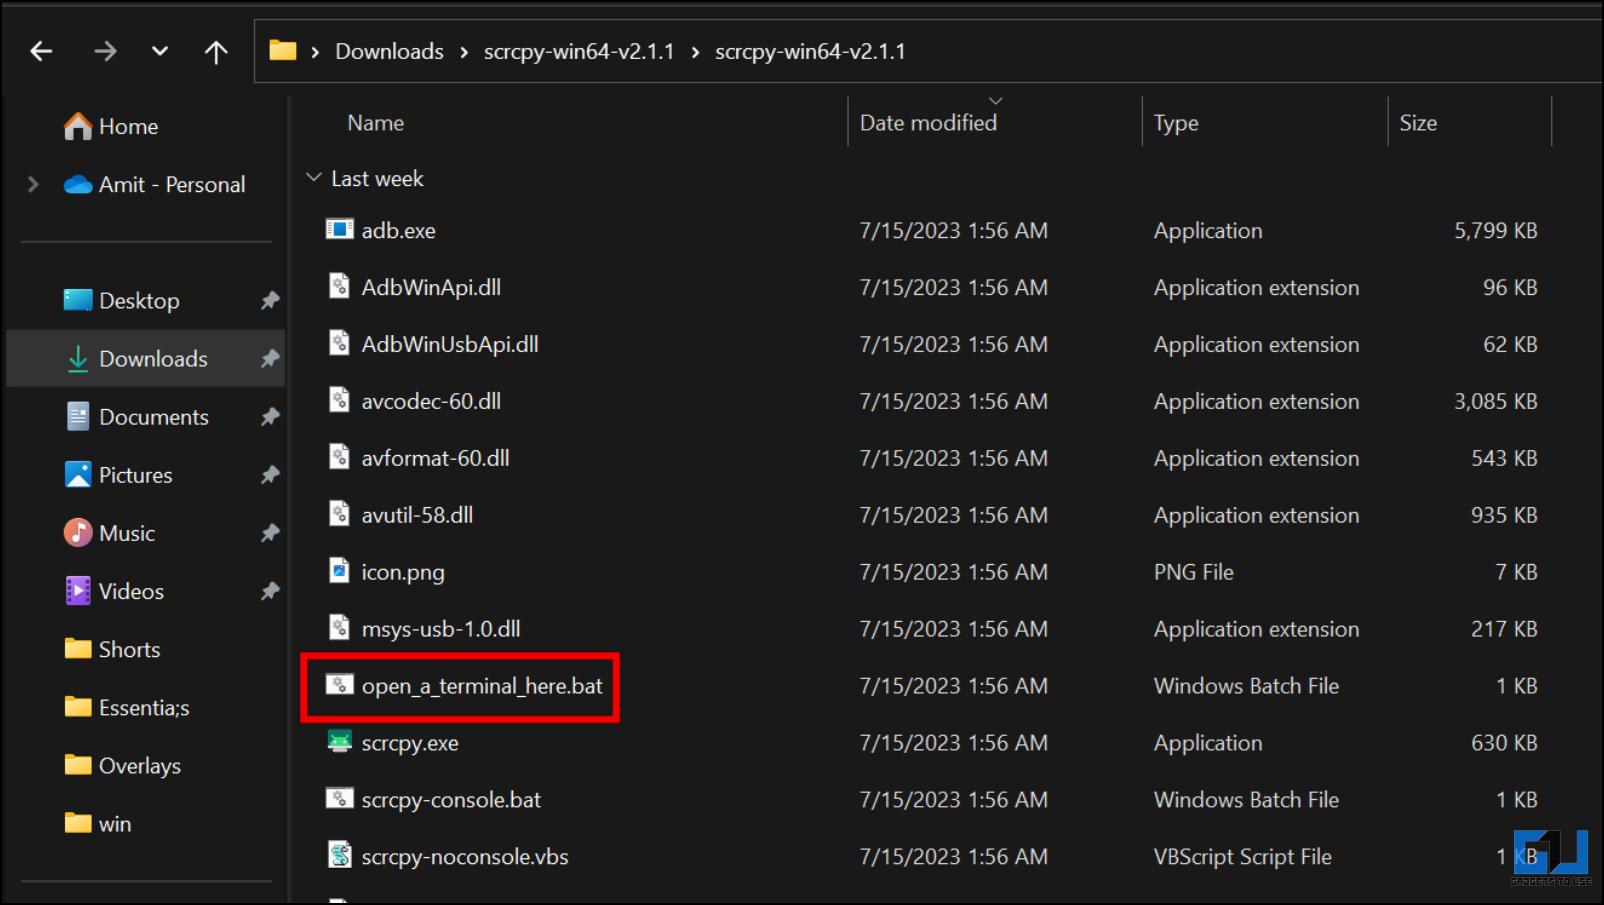
This will open a Terminal window within this folder. Keep it running, as we will require it later.
Step 3: Connect Android Phone with Windows
Finally, connect both devices over a USB to mirror the phone’s contents to the Windows PC.
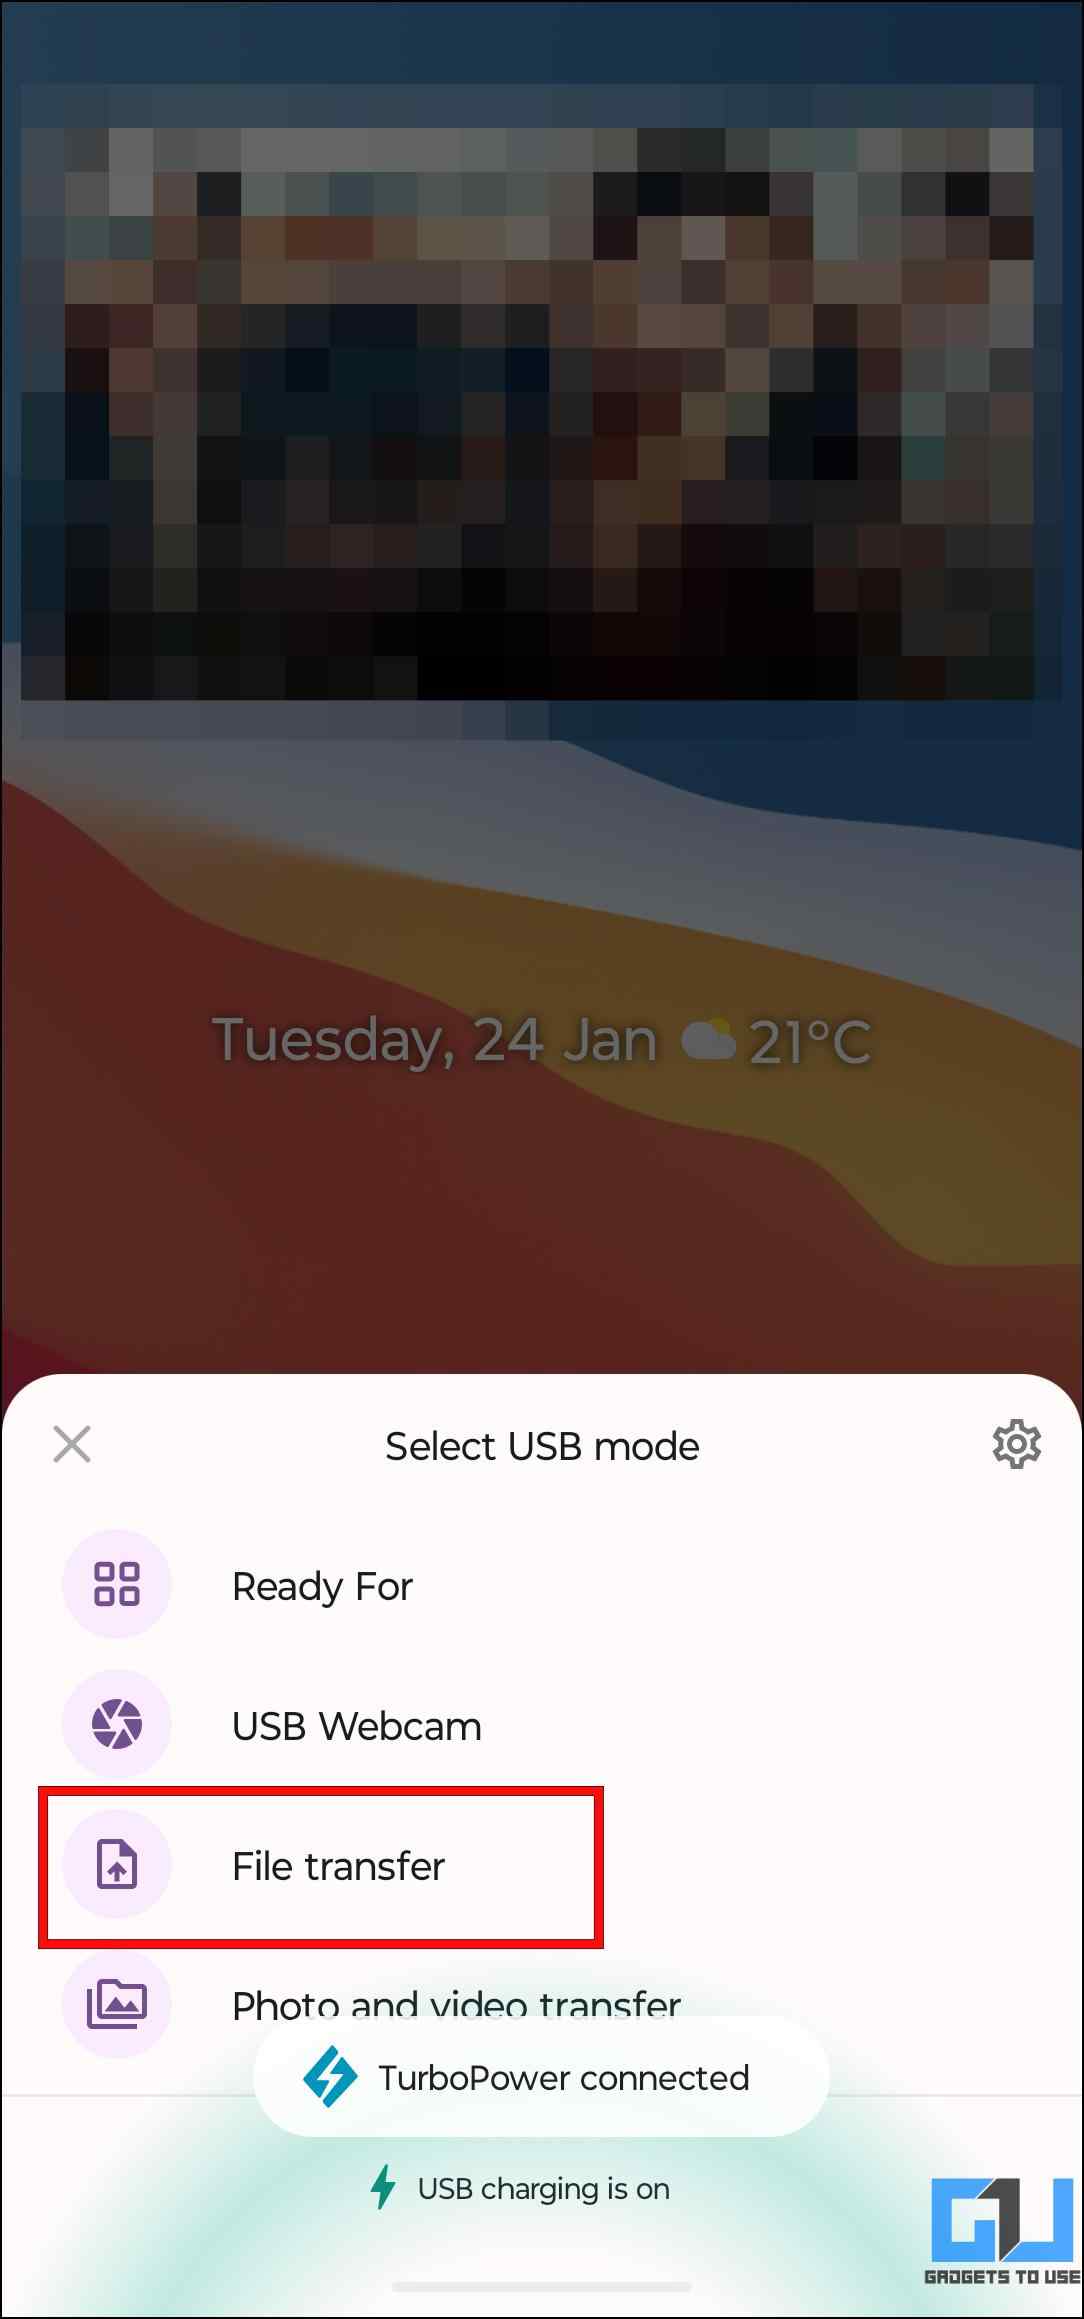
1. Plug your Android smartphone into your PC with a USB cable.
2. Change the connection mode to File Transfer whenever prompted.
3. Select Allow USB Debugging on the next prompt once plugged in.
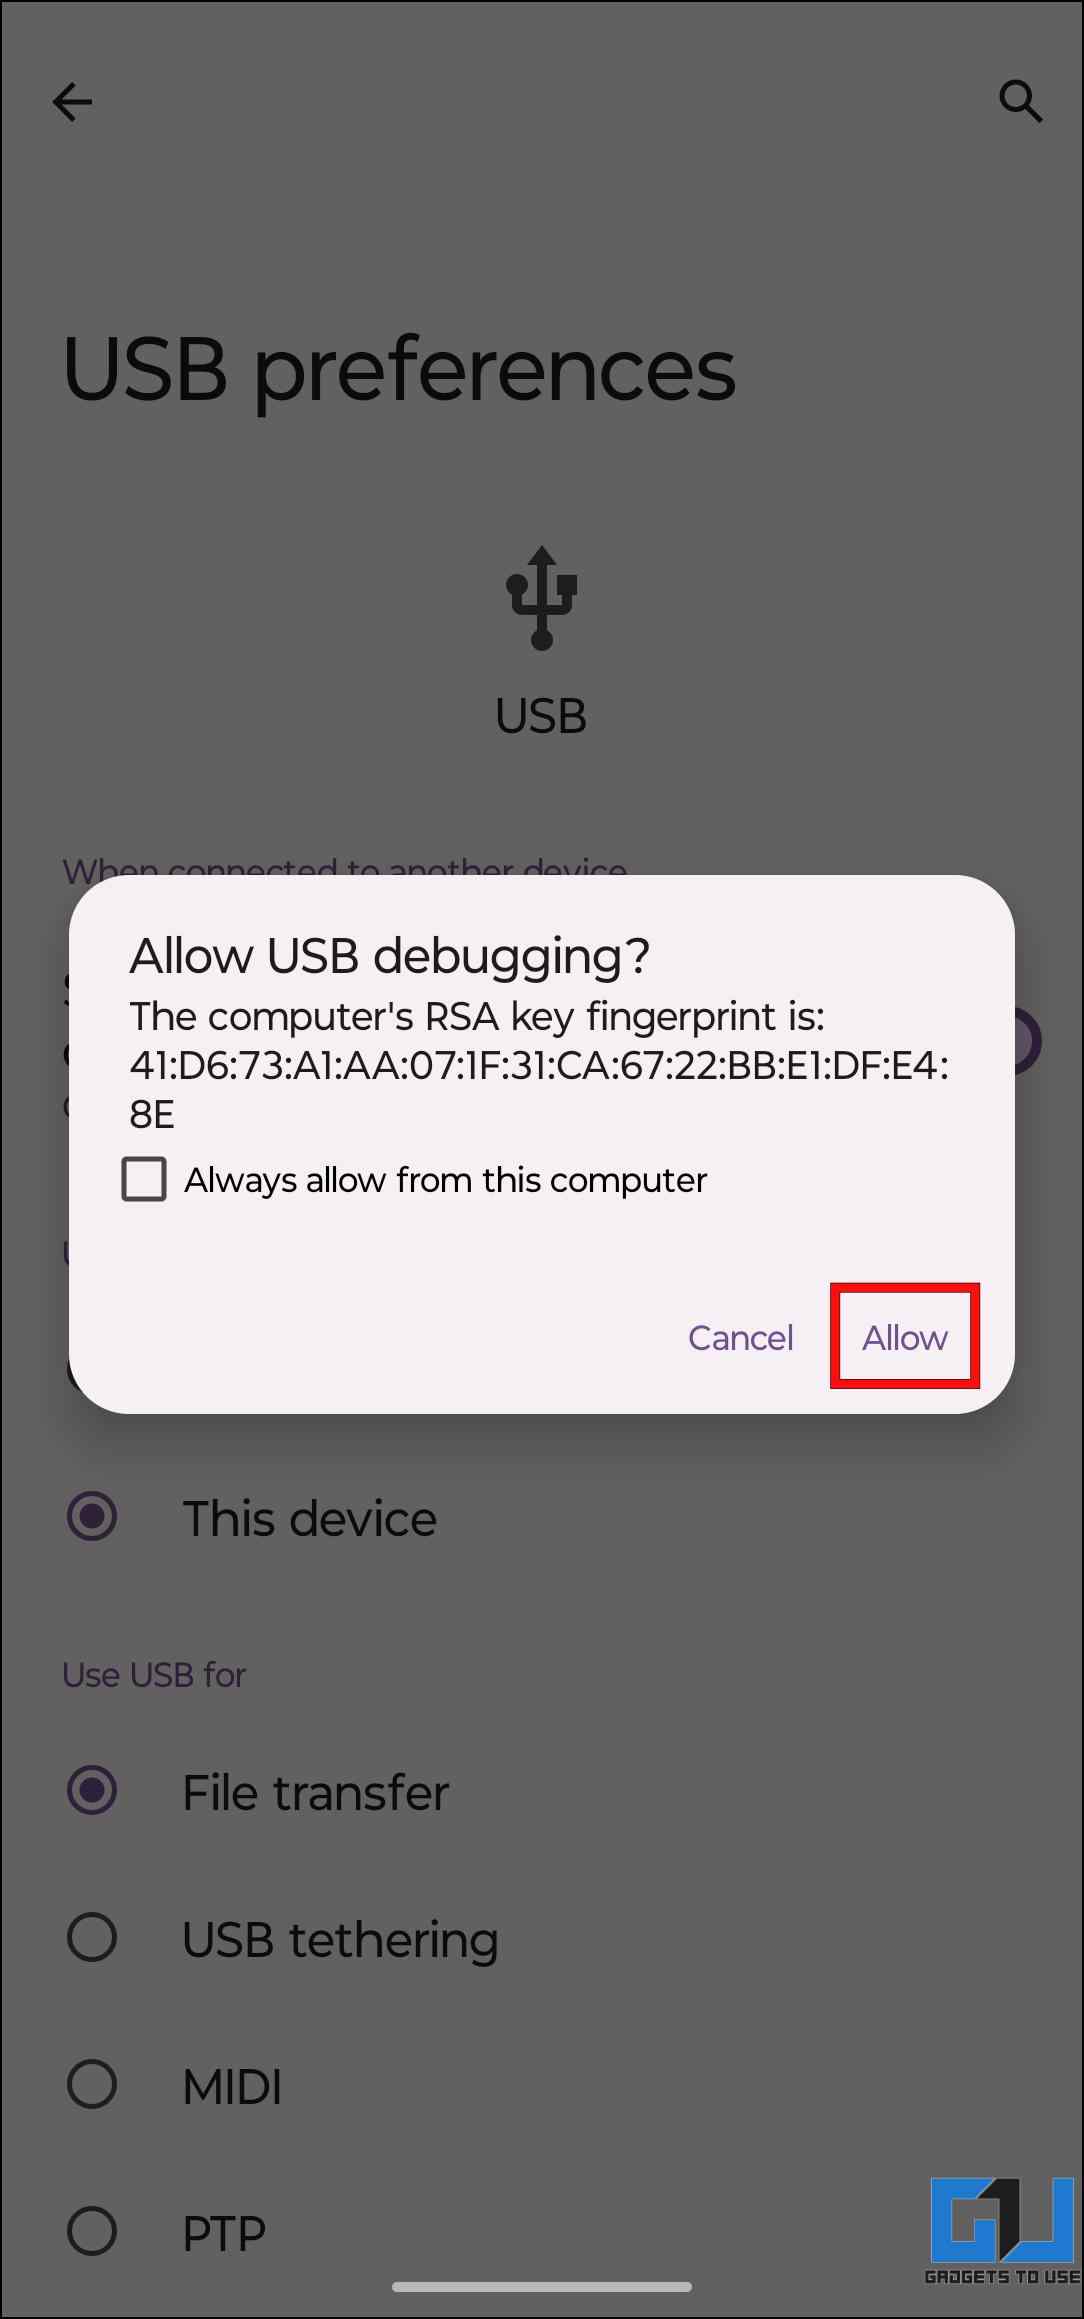
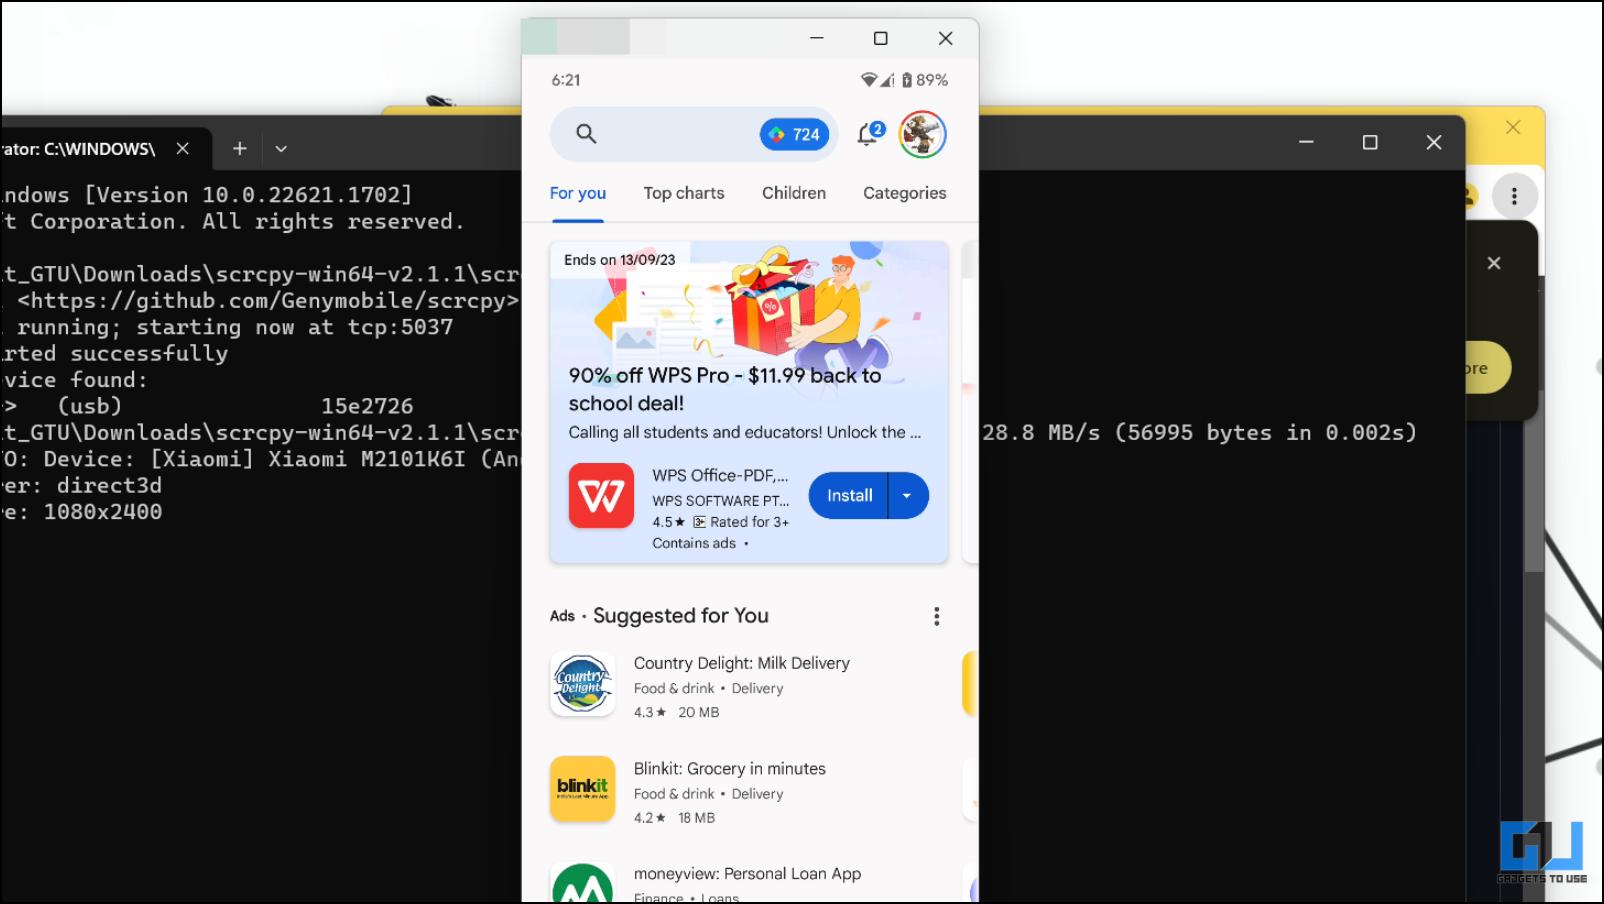
4. Return to the Terminal window opened earlier within the Scrcpy folder. In this window, type the following command.
type: scrcpy and press Enter
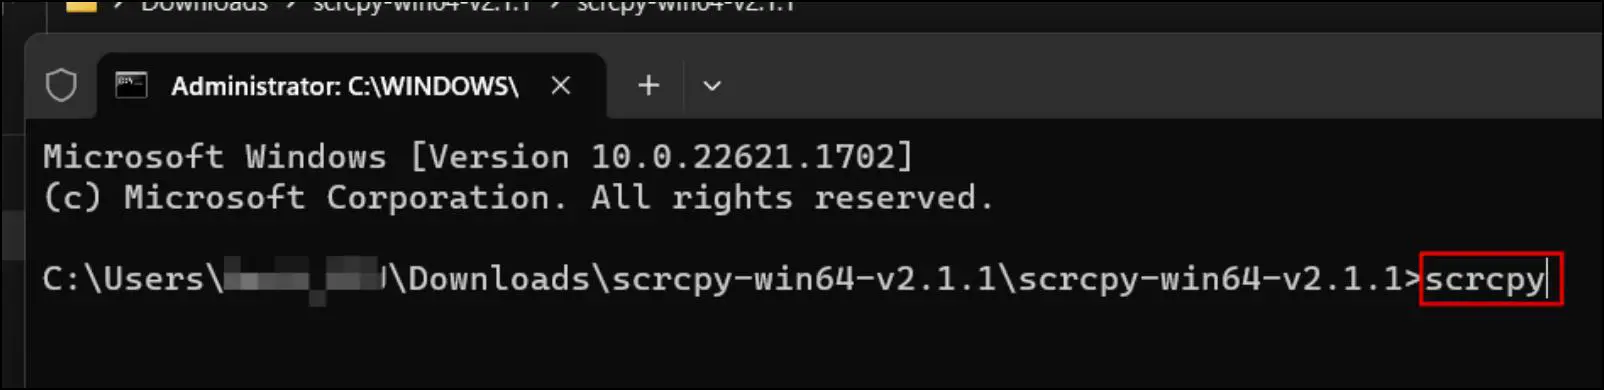
Running this command should start mirroring your phone’s current display to your computer.
Method 3 – Use the Link to Windows on Samsung Smartphones
Windows and Samsung have partnered to allow Samsung user to seamlessly cast their screens on a Windows 10 or 11 system. This is possible with the Link to Windows app pre-installed on every Samsung phone. So, let us look at how you can mirror the screen of your Samsung Android smartphone on your computer.
Step 1: Configure Phone Link App On Windows
You must first configure the Phone Link app to mirror your phone on your Windows desktop. Here’s how it can be done.
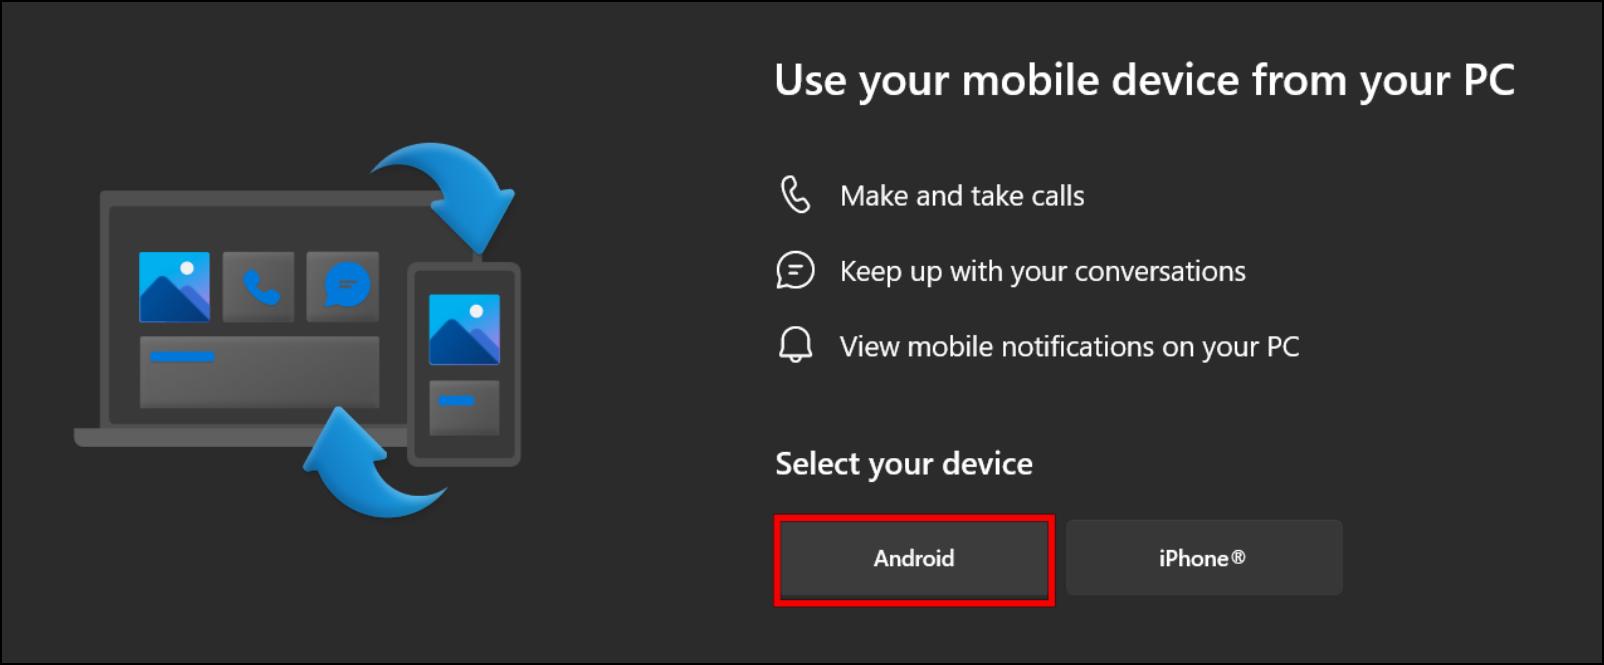
1. Open the Phone Link app using the Start menu.
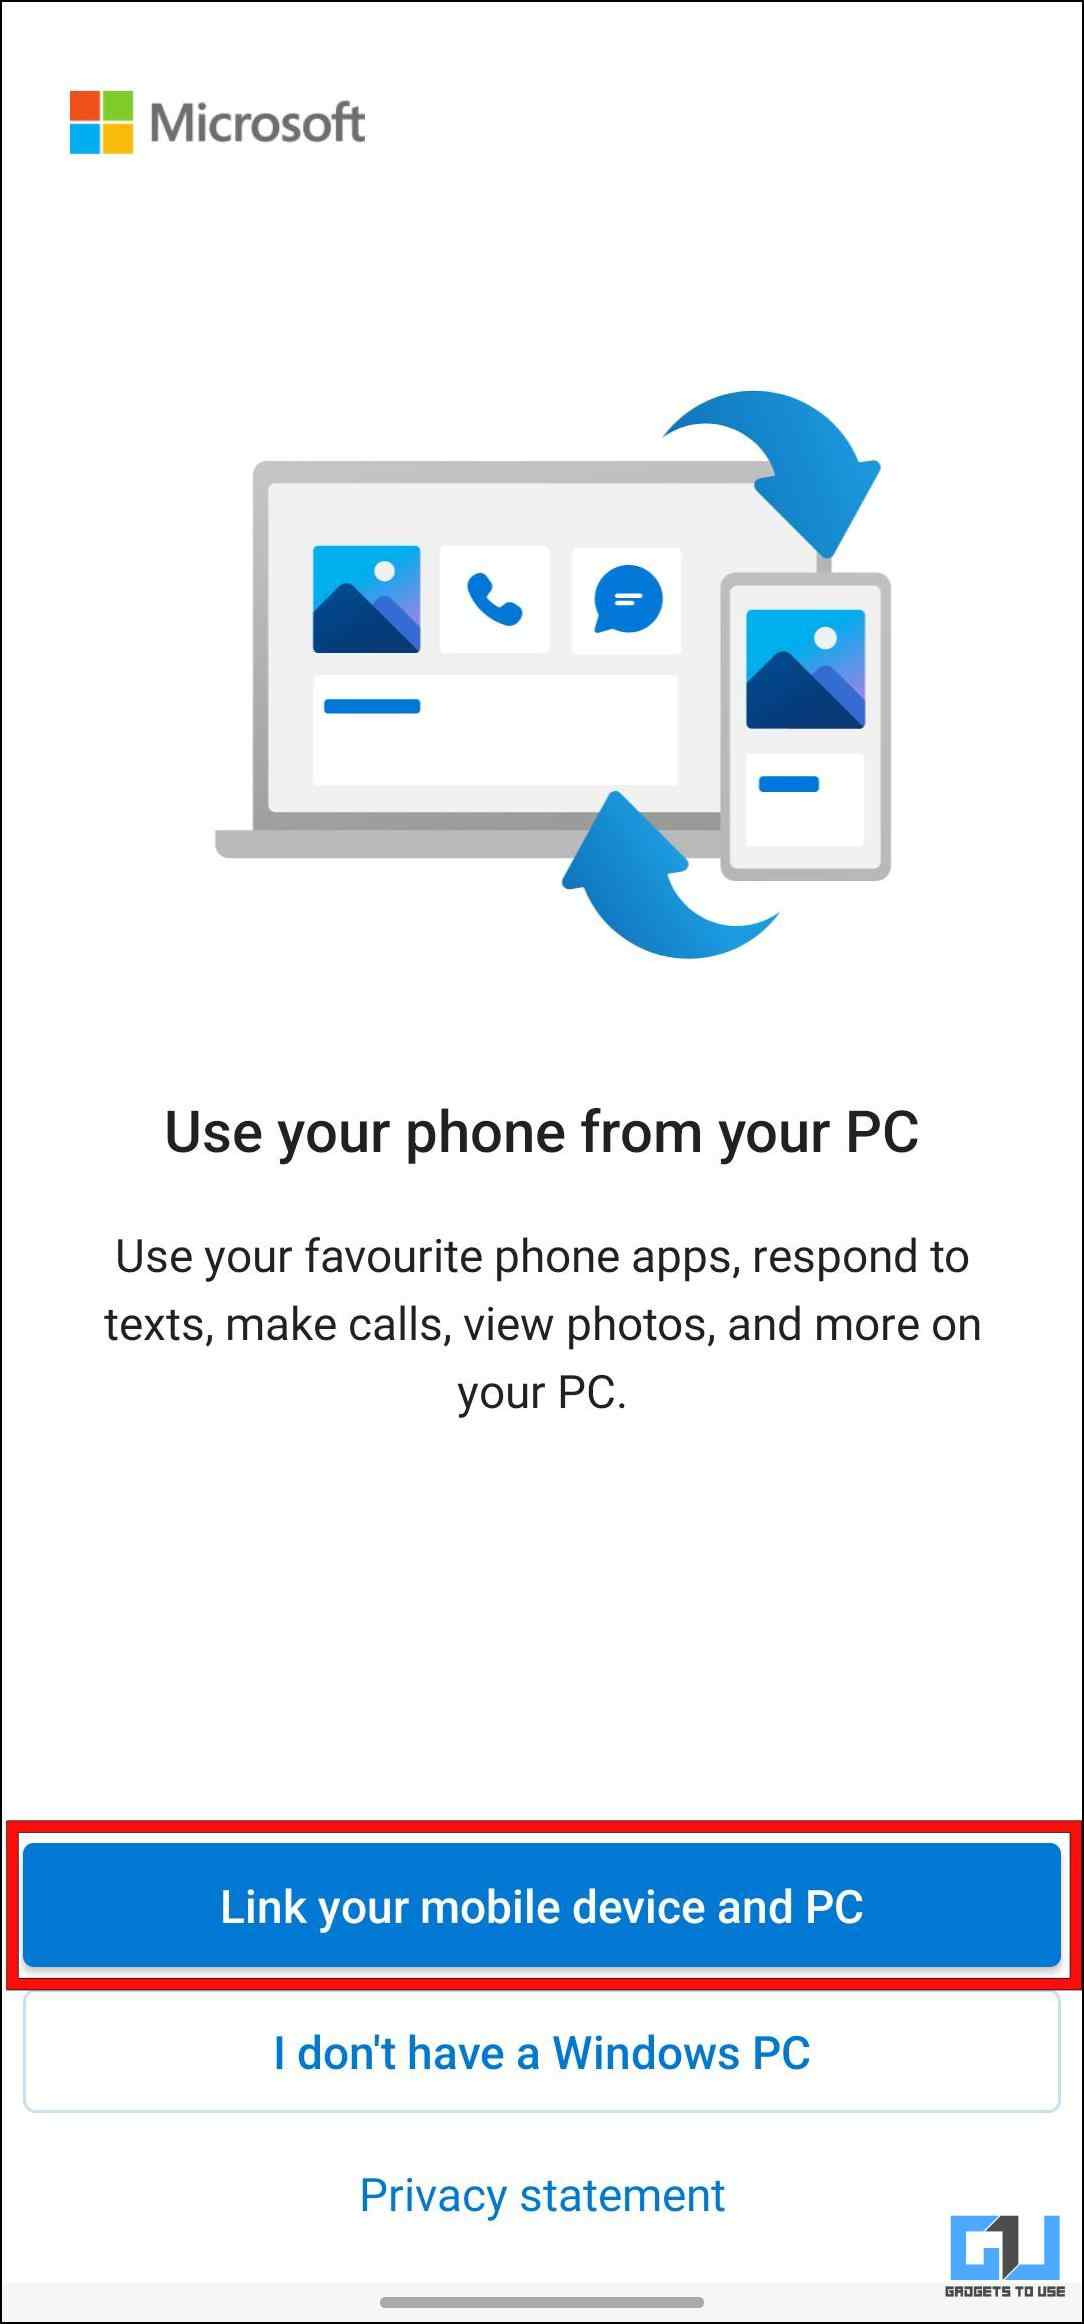
If it is not installed on your system, you can download it from the Microsoft Store.
2. Select Android under the “Use your mobile device from your PC” option.
3. Next, sign in with your Microsoft account.

4. Once you are signed in. Scan the QR code displayed on the app to proceed further.
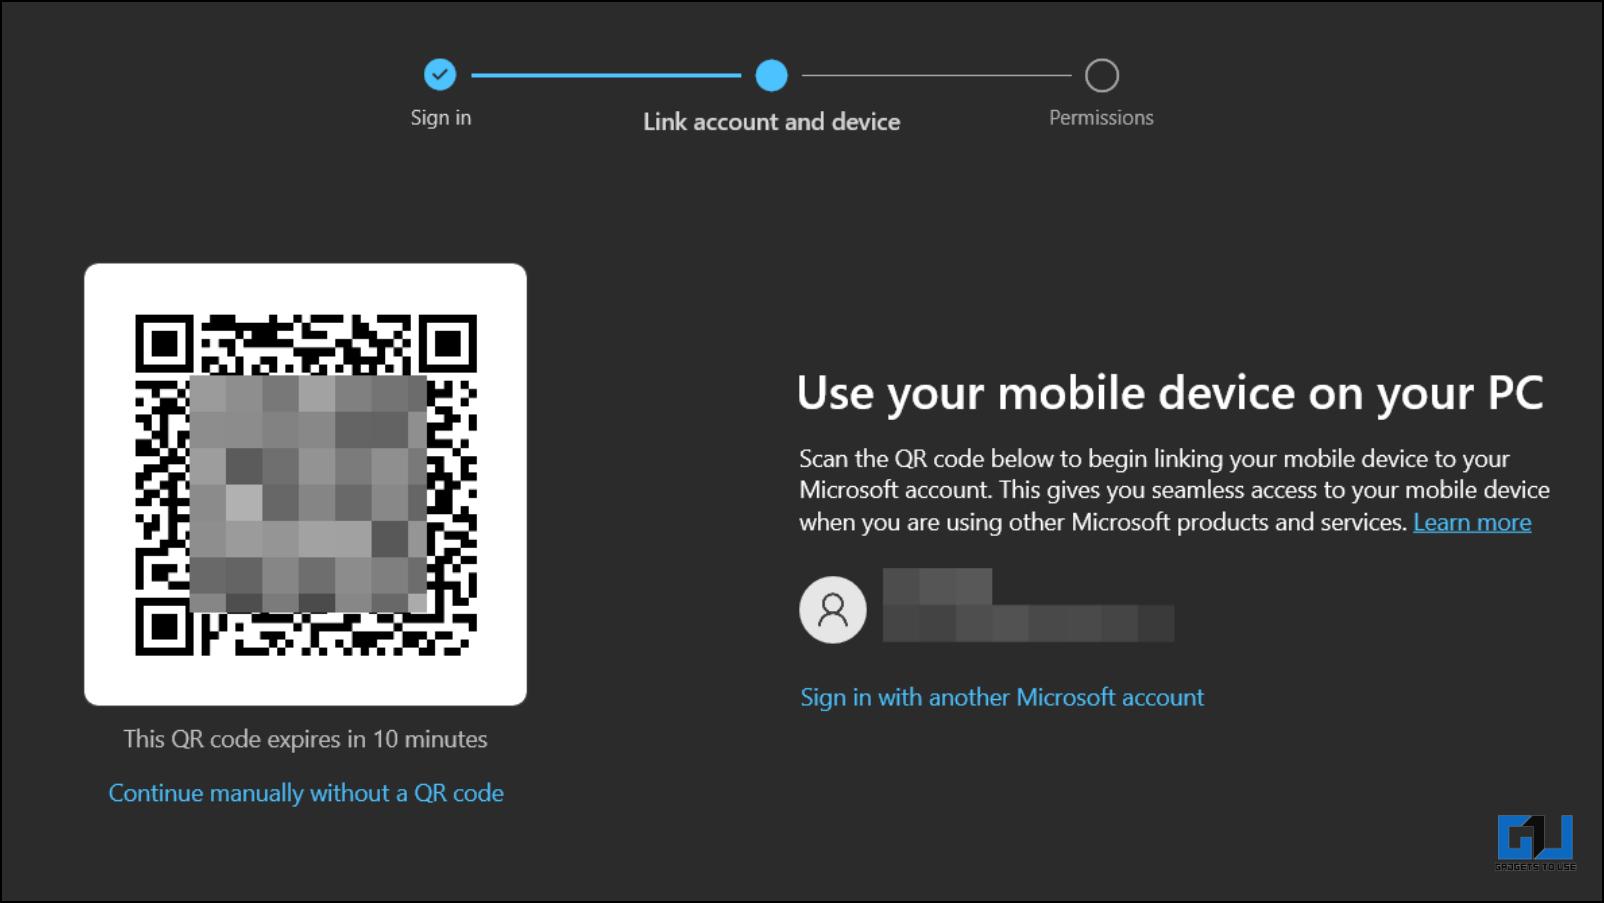
Step 2: Setup Link to Windows on Samsung Android Phone
For the next step, you must set up the Link to Windows on your Samsung smartphone. You can find the service within settings.
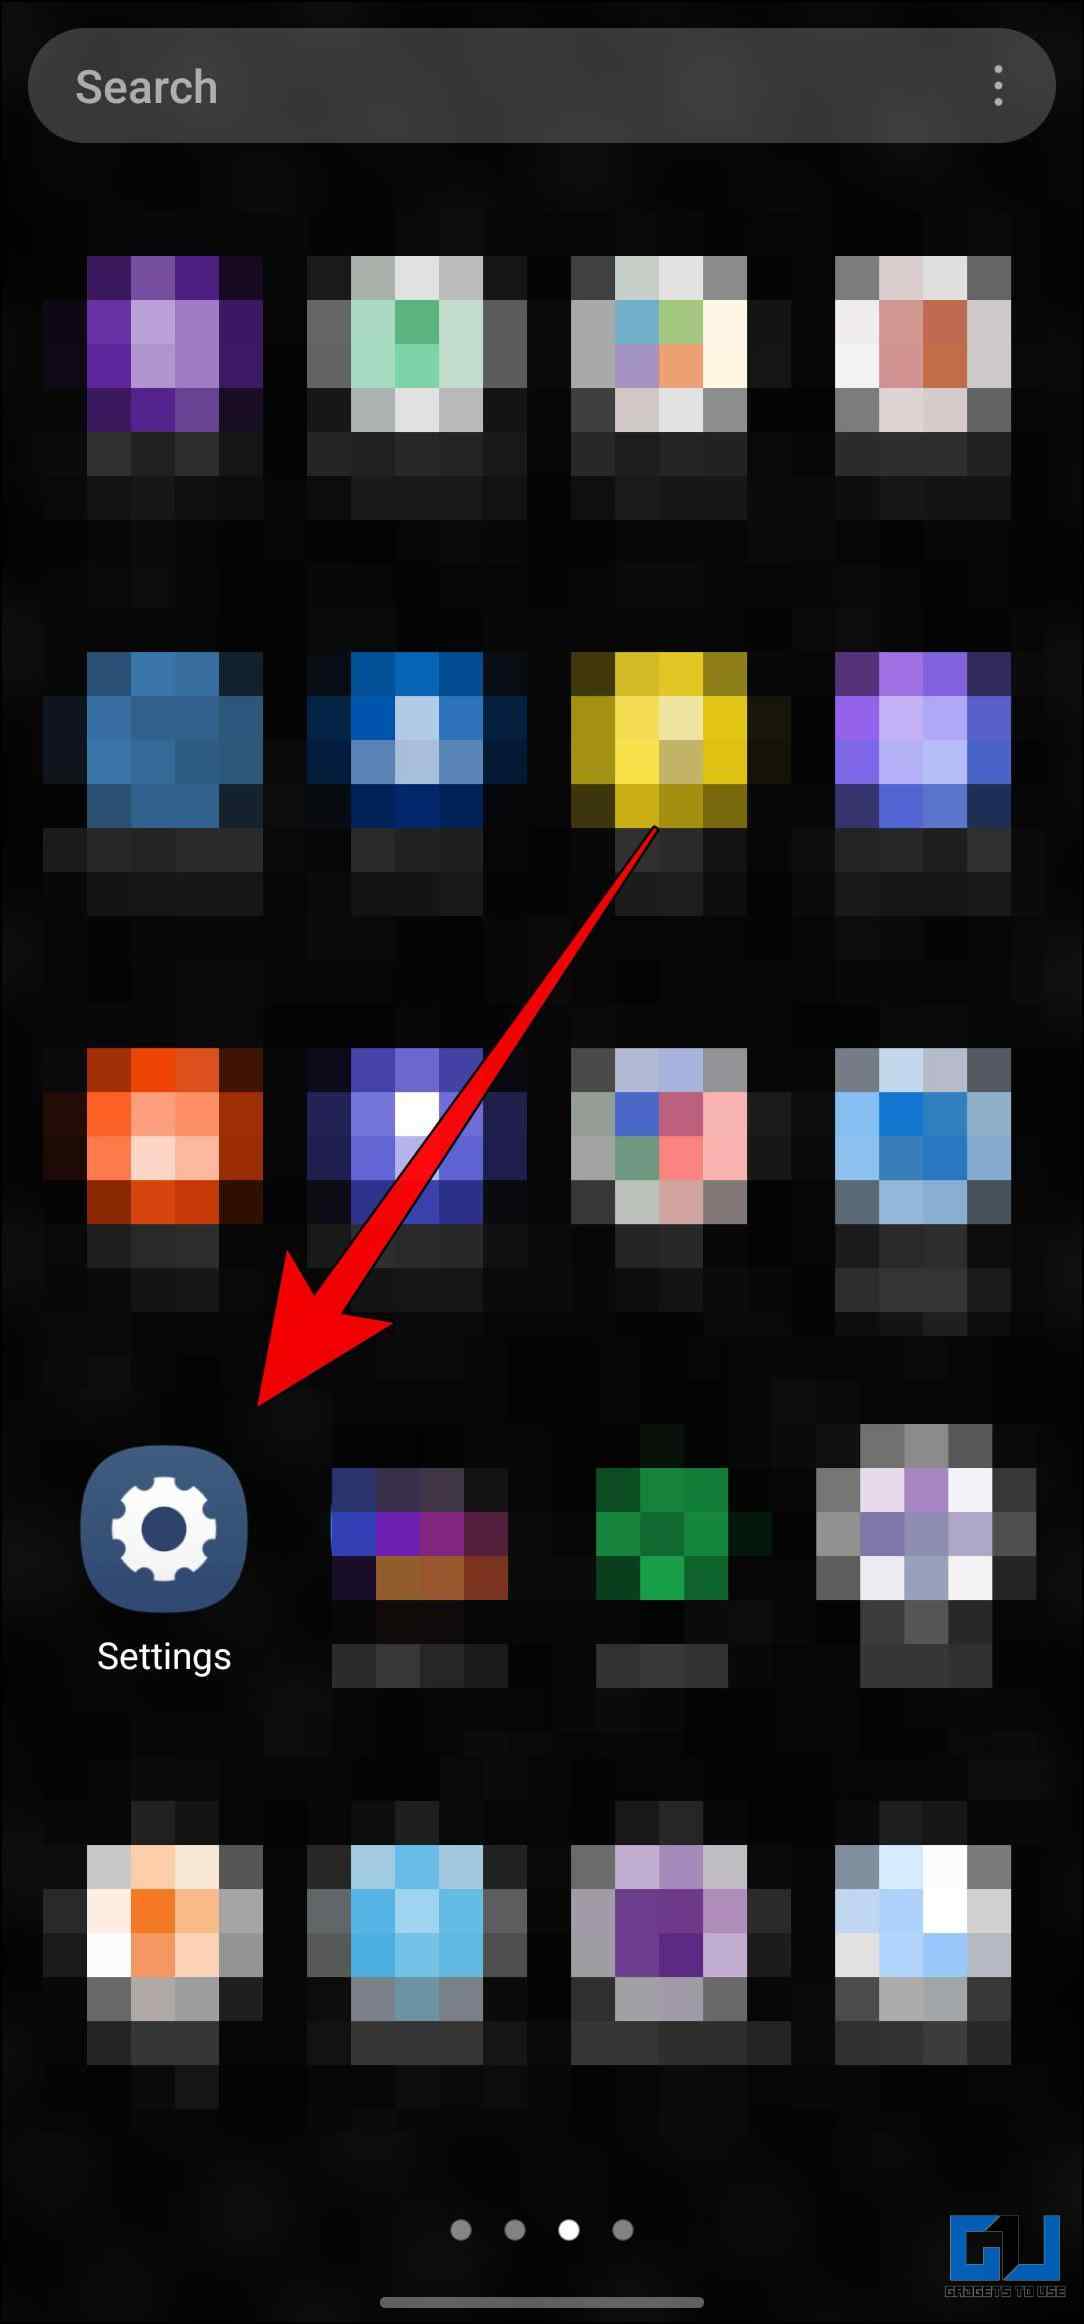
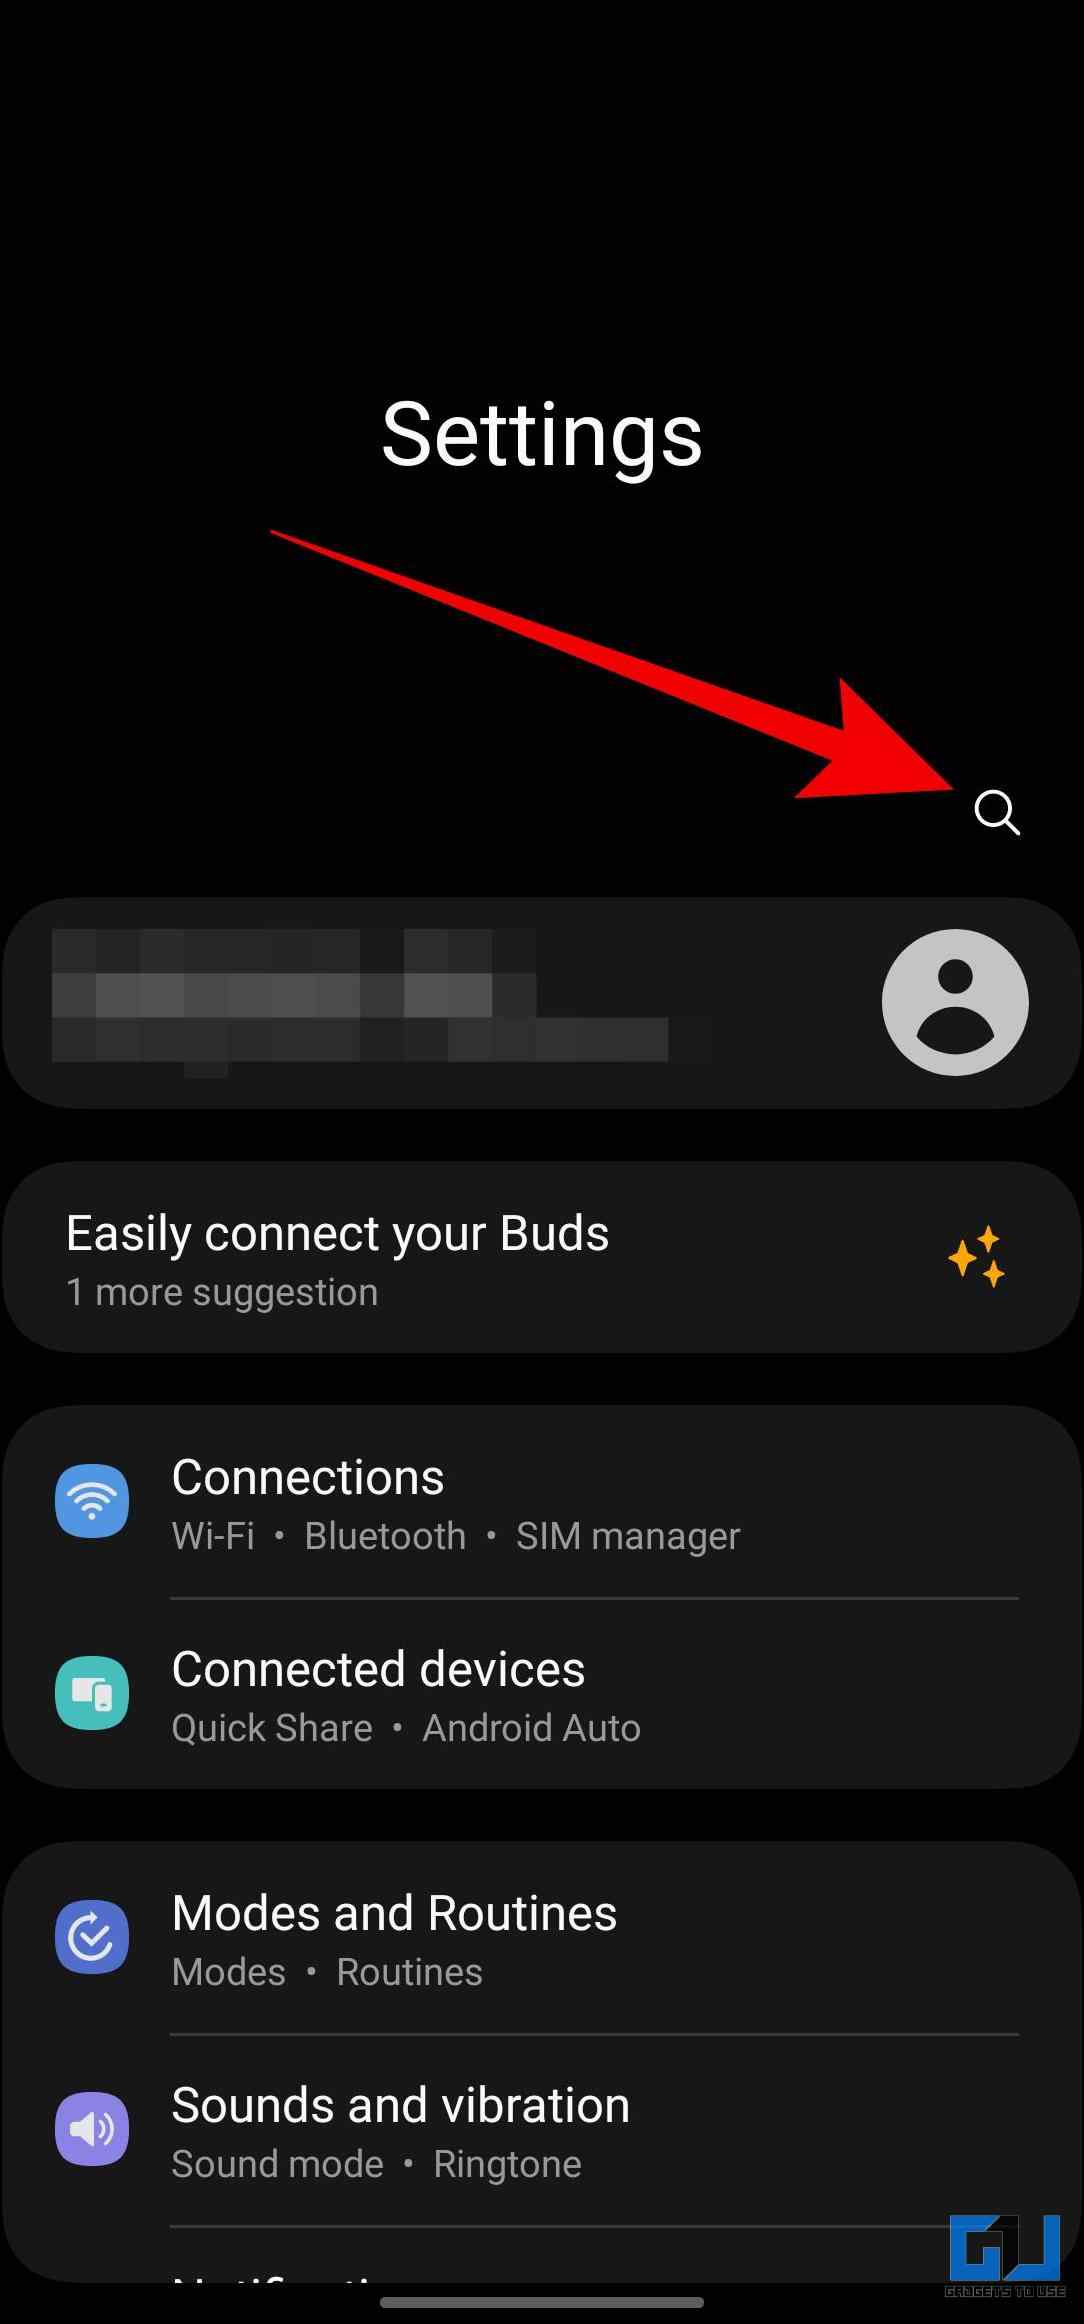
1. Open your phone’s Settings app, then tap the search icon.
2. Search for the Link to Windows and tap on the first result.
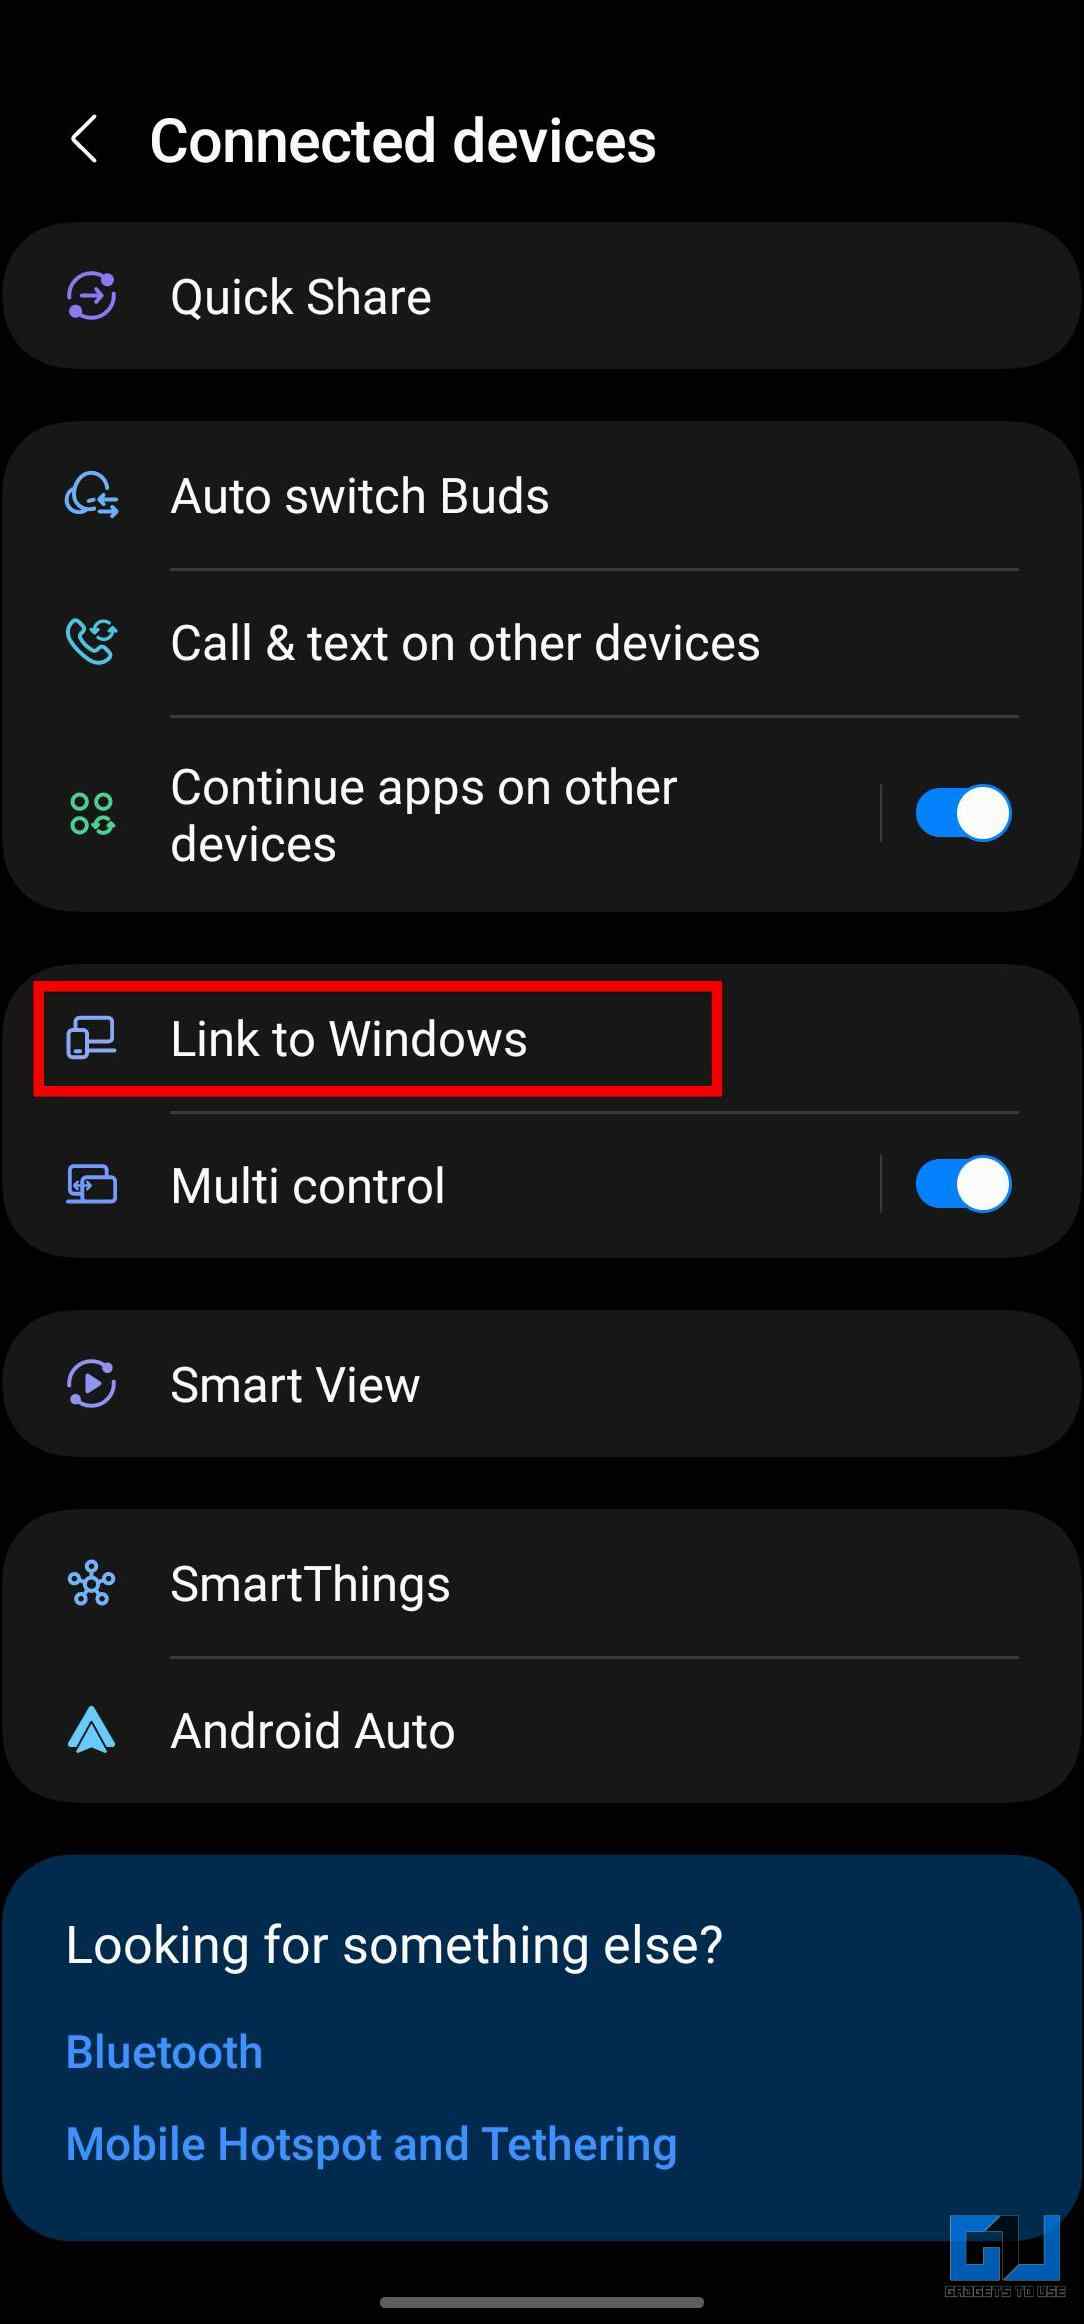
3. Under Connected Devices, tap on Link to Windows.

4. Tap the “Link your mobile device and PC” option to use this service.
5. Tap Continue on the next screen.
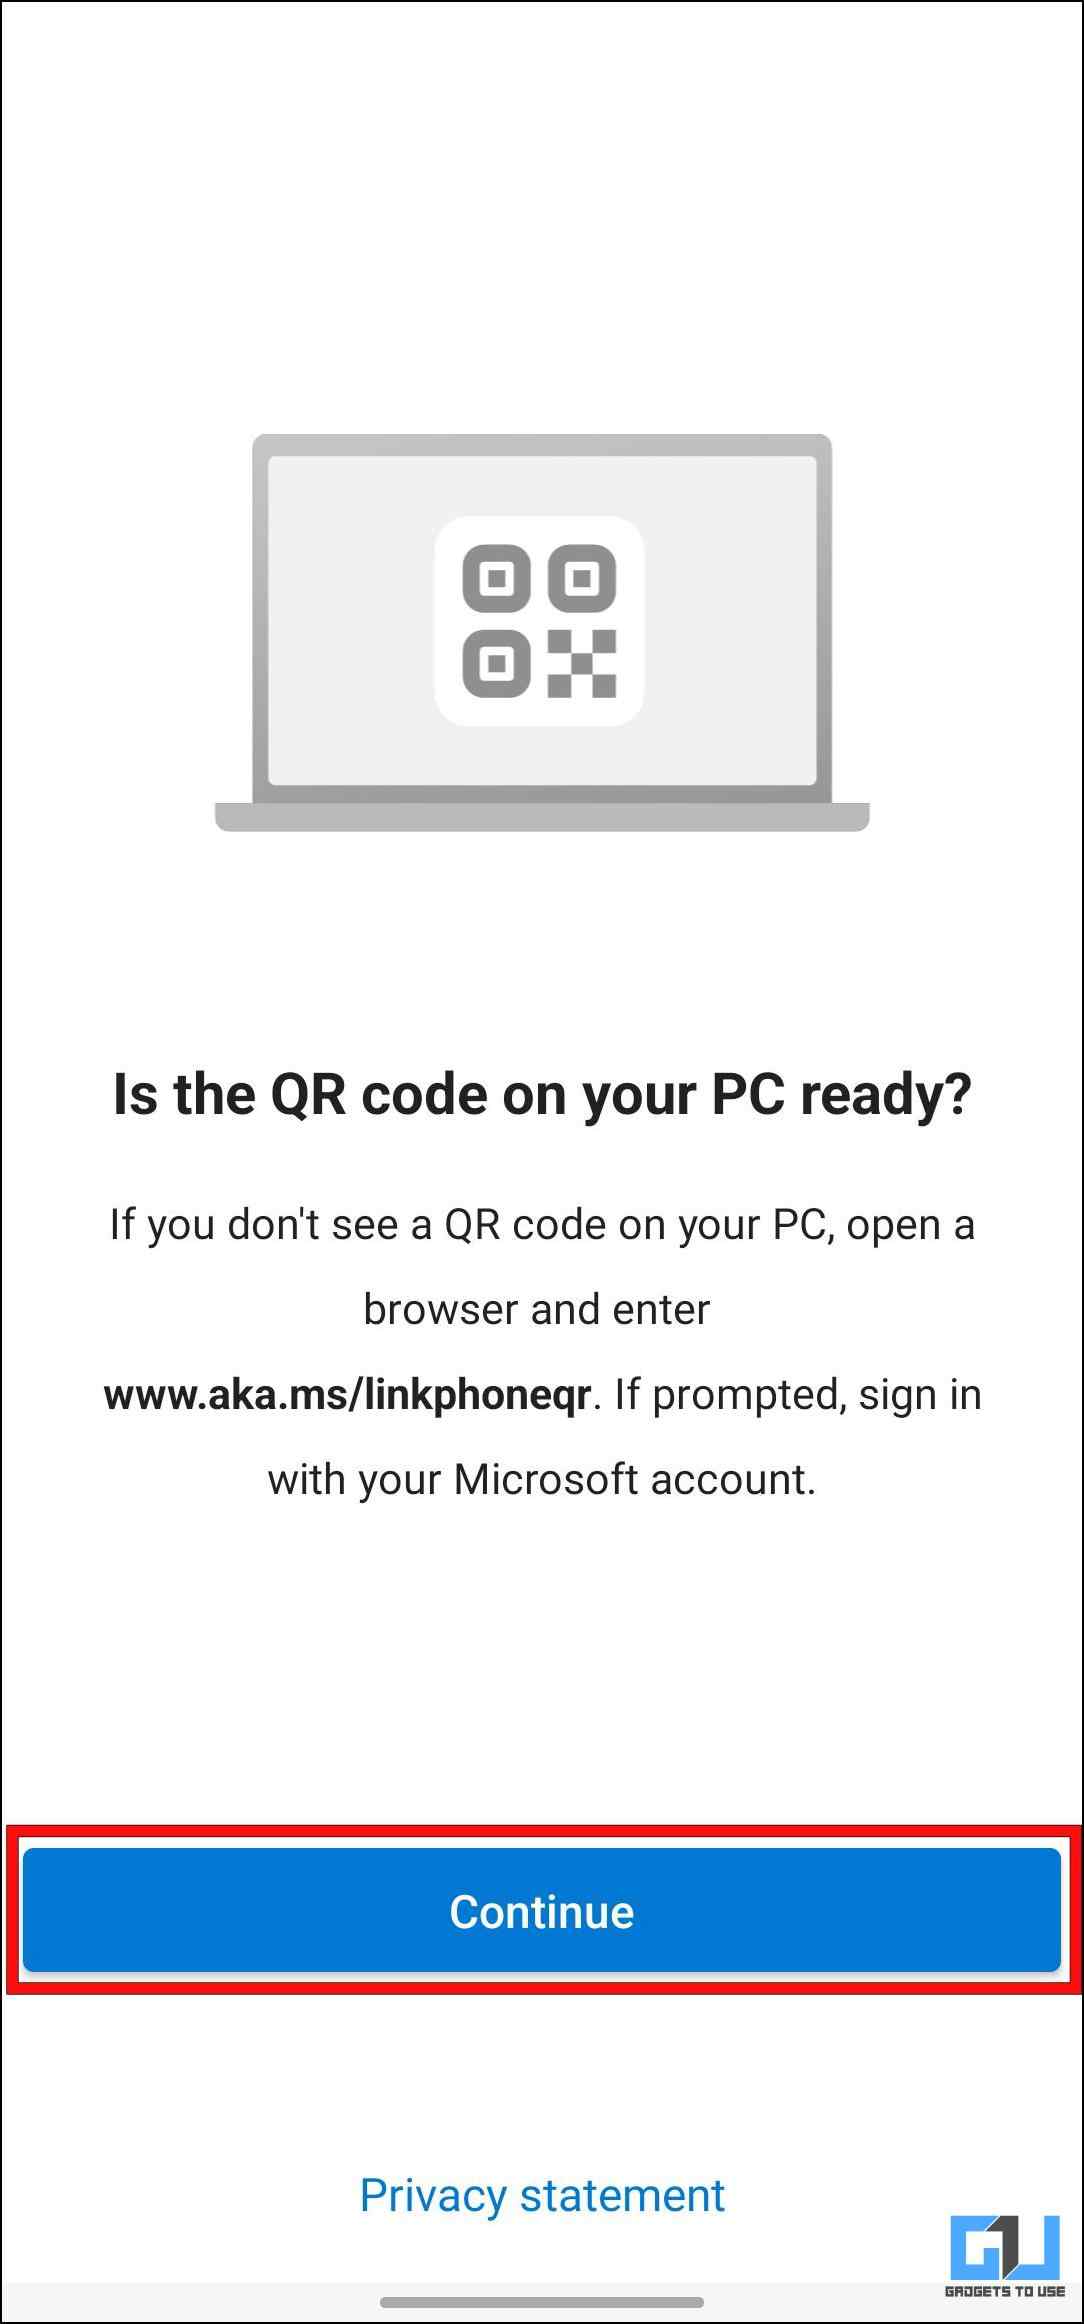
Allow necessary Camera permissions when prompted.
6. Now scan the QR code displayed on your computer.
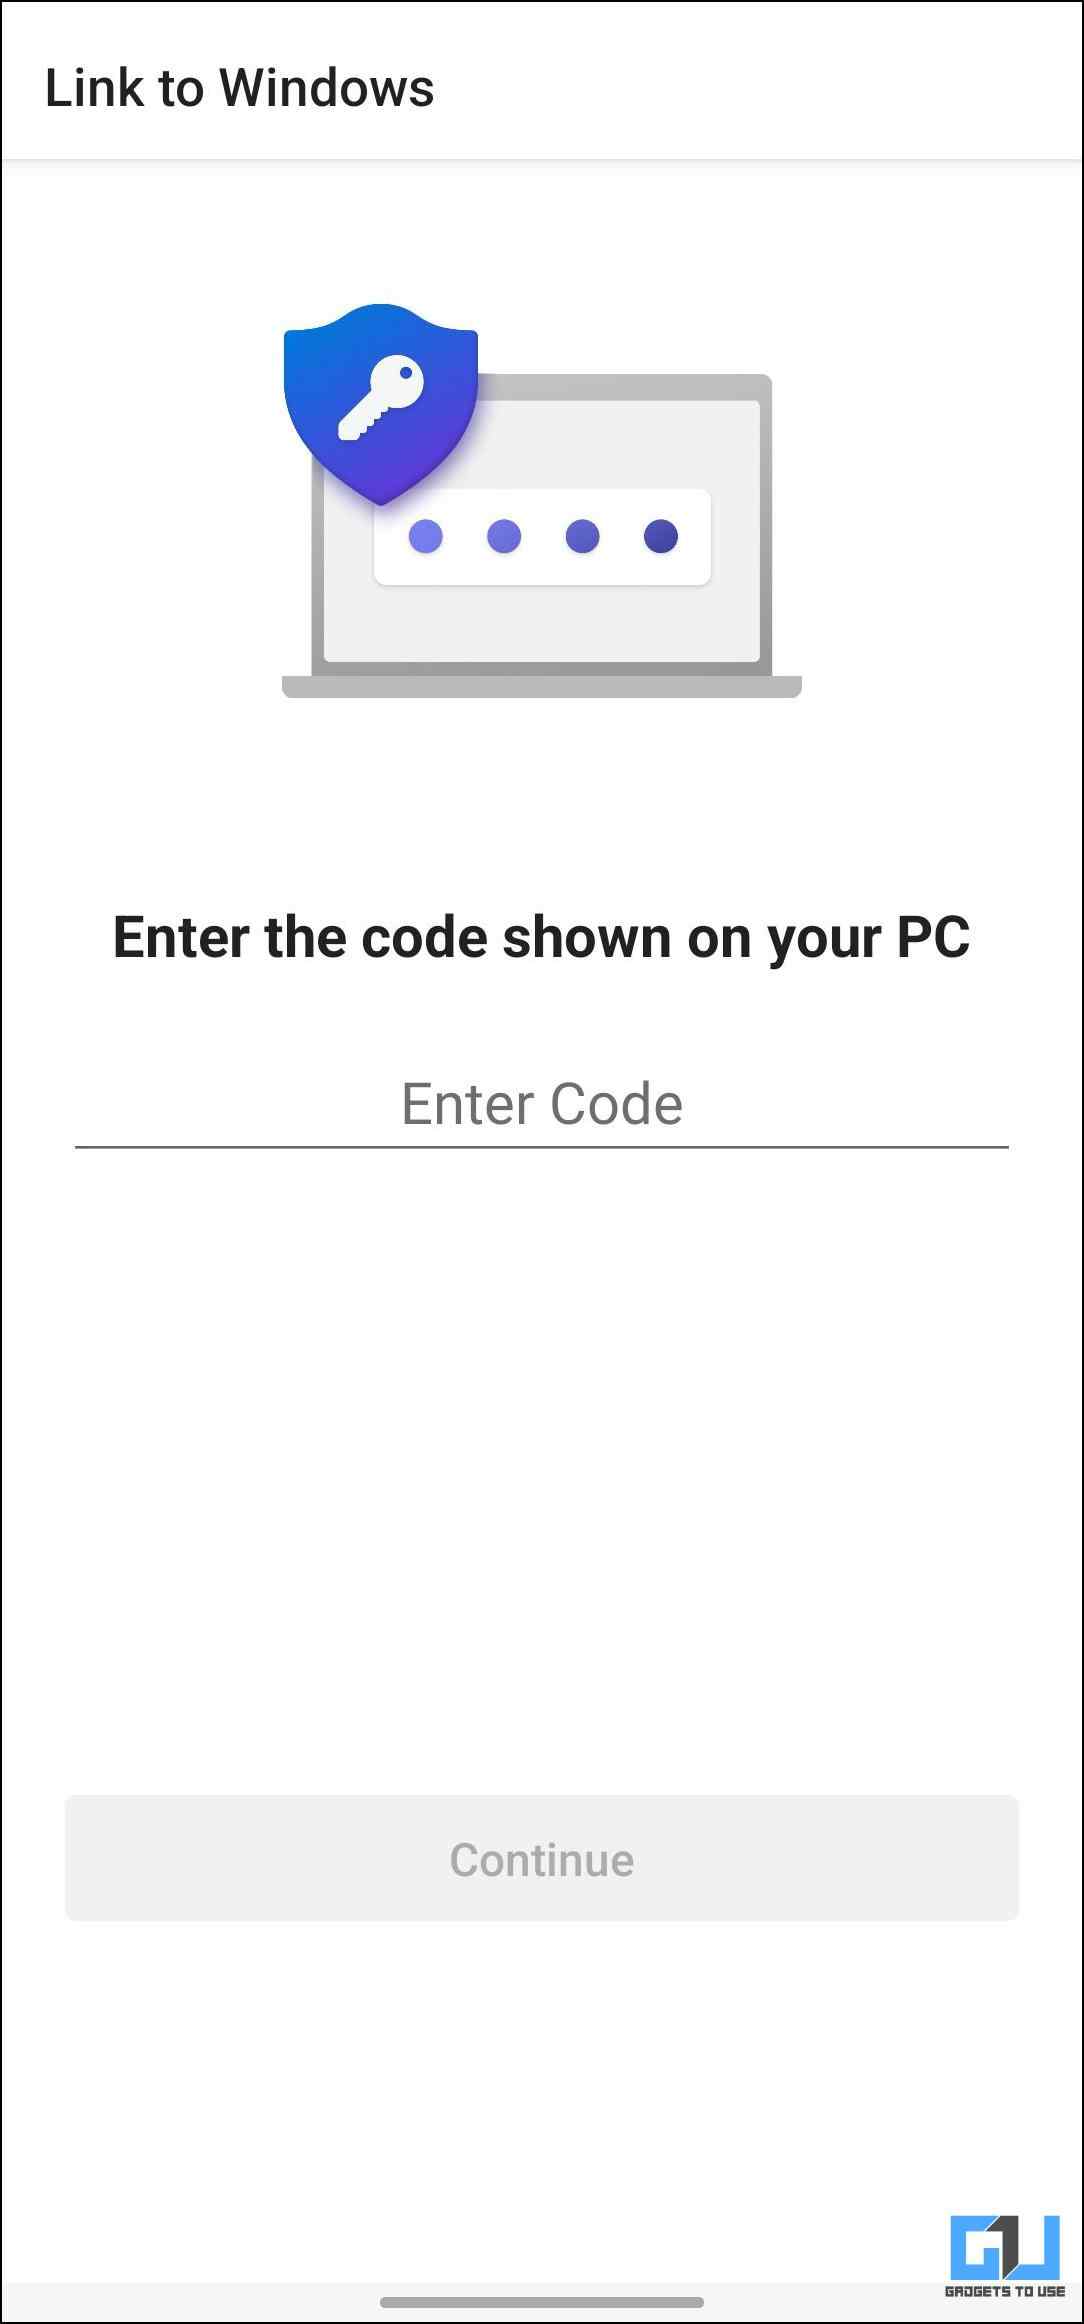
7. Enter the six-digit code shown on the PC on your smartphone, then tap on Continue.
8. The app will redirect you to sign in to your Microsoft account.
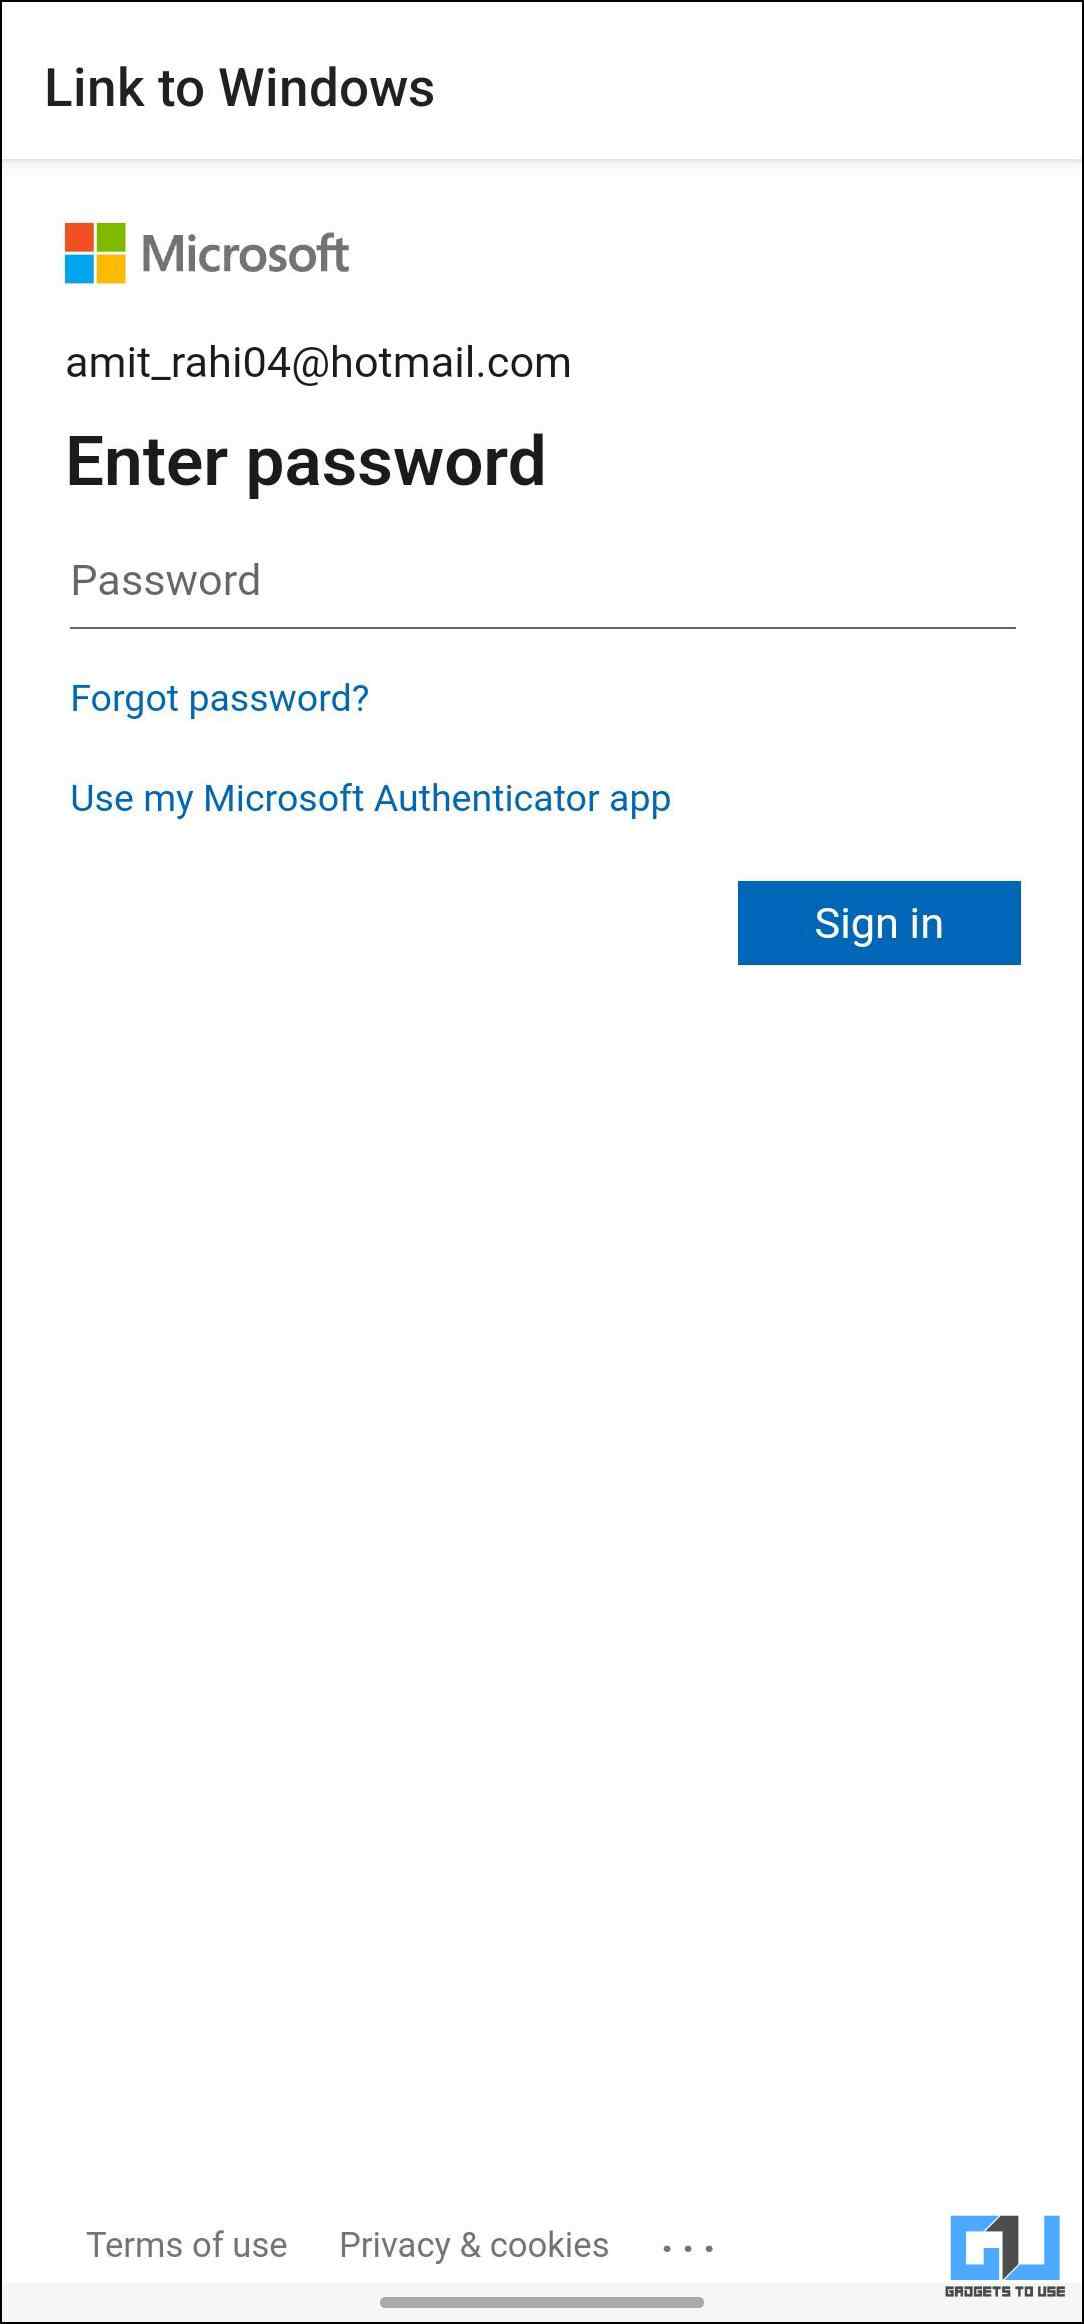
Use the same account that you used to sign in to Phone Link.
Allow the few permissions asked on your phone, including access to photos, videos, messages, and notifications, to use the service.
9. Tap on Done to finish setup for Link to Windows on your smartphone.
Step 3: Mirroring Screen With Phone Link
With the setup for both PC and phone completed, let’s discuss how to mirror your Samsung phone screen on the PC.
1. Open the Phone Link app on your Windows PC once paired.
2. Go to the Apps section.
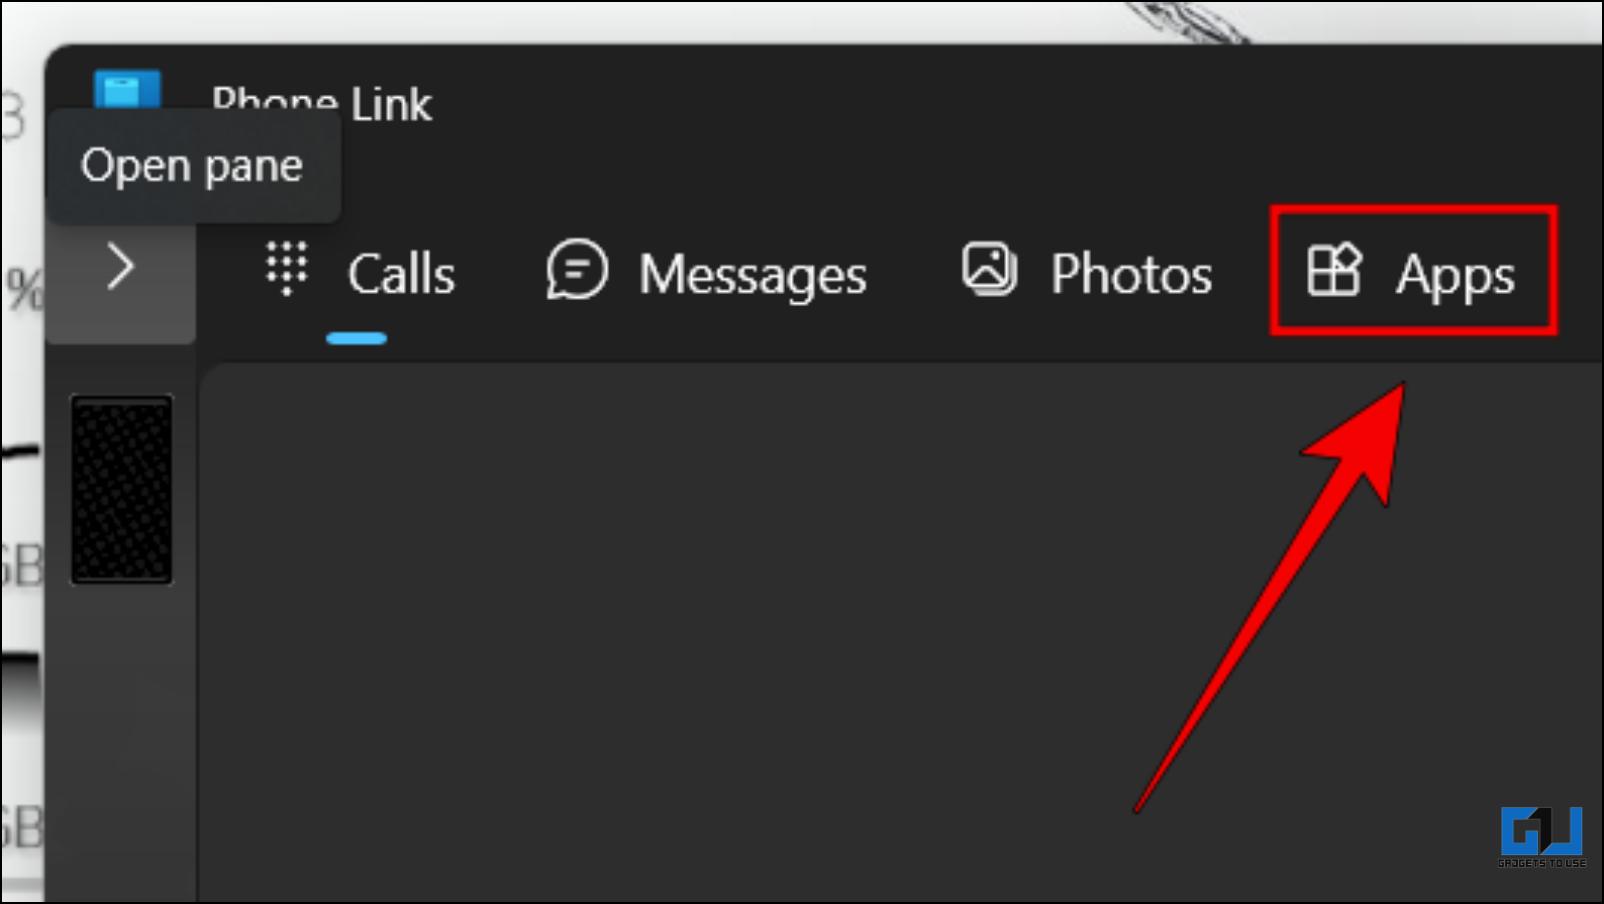
3. Here, click on Open phone screen.

4. It will request your phone to “Start recording or casting with Link to Windows.” Tap on Start now.
Your phone’s display should now be visible on the desktop.
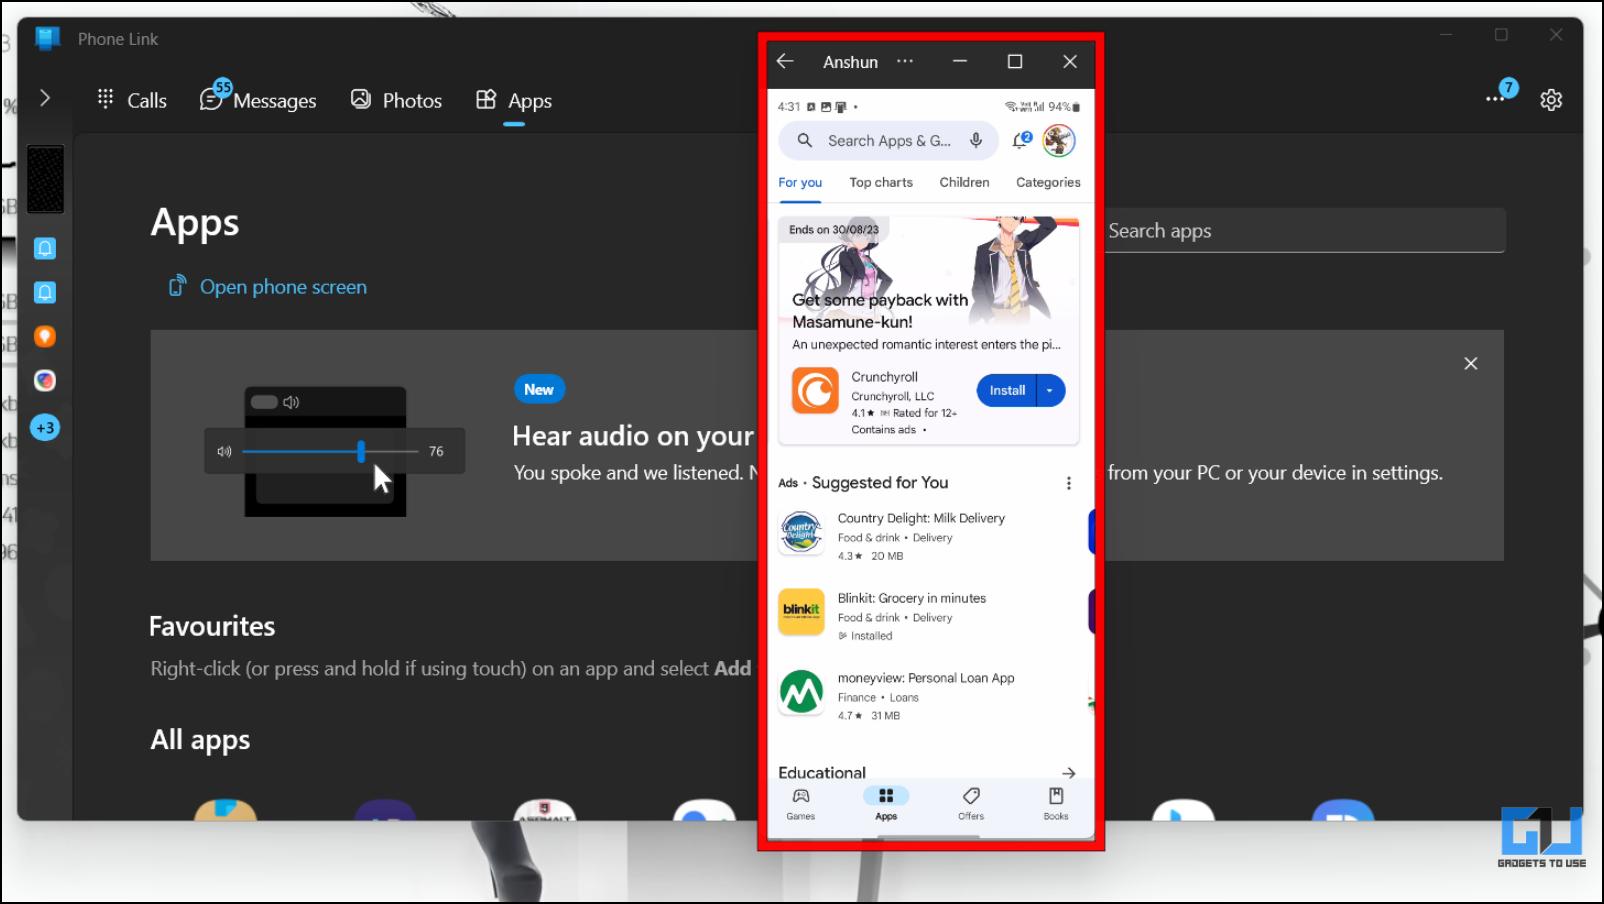
The best part about this method is that it appears as a floating window, which can be dragged across the screen. You can also open apps installed on your phone individually.
Wrapping Up
Though rare for many, there can be instances where you want to use your smartphone on the big screen. This is why it is good that both ecosystem, for the most part, provide their way to cast or mirror your Android phone to Windows 10 or 11 displays. Since I own a Samsung smartphone, I prefer the Link to Windows option. But you can go with any other if you prefer. Stay tuned on GadgetsToUse for more such articles, reviews, and How-Tos.
You might be interested in the following:
- Windows Phone Link vs Intel Unison: Which is Better?
- How to Connect Your iPhone to Windows Phone Link
- Top 5 Ways to Cast or Mirror Content on Android TV From Your Phone
- 6 Ways to Fix Android TV Appearing Twice in the Cast Option
You can also follow us for instant tech news at Google News or for tips and tricks, smartphones & gadgets reviews, join GadgetsToUse Telegram Group or for the latest review videos subscribe GadgetsToUse YouTube Channel.
Was this article helpful?
YesNo
There are so many advantages to using dual monitors. Two monitors can improve your productivity. You can run multiple apps simultaneously. This means, no more need to press Alt+Tab to switch between programs. You can have the entire screen dedicated to the primary application. And, on another screen, you can display critical information for reference purposes. If you’re streaming, then the dual monitor will definitely come in handy for you. On one screen you can run games and on another, you can check comments on Streamlabs OBS. But, before you hit the buy button on Amazon. I will suggest you use your Android smartphone as a second monitor.
Android devices can be helpful in various ways. You can use an Android phone as a webcam. Or, you can use it as a Monitor. If you own an iPad, then you might aware of the duet display (paid). That is the second monitor App for iPad. Thankfully, Android has similar Apps too, for free. Before we begin, I want to point out that, it makes more sense, if you use an Android tablet as the second monitor. Though, these Apps will also work with Android smartphones. If you want to show a tiny bit of information from off your main monitor screen. Then, go ahead, this article will be definitely useful for you.
Use Android as a Second Monitor
Spacedesk
Spacedesk is a Windows network display monitor software. It turns Android devices and Chromebooks into an advanced extra display for Windows PC and surface tablets. It works over WiFi, so your PC and Android smartphone should be on the same WiFi network.
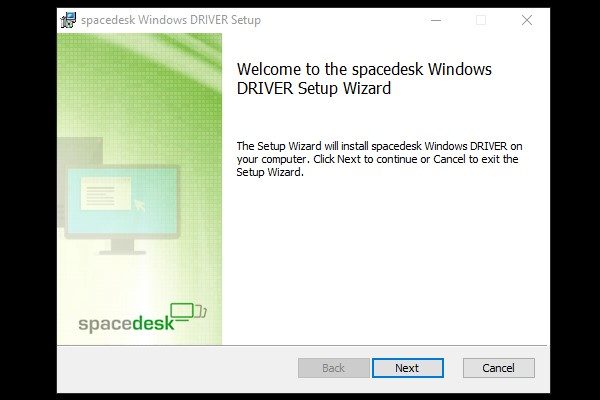
Step 1: Install Spacedesk on Your PC.
First, you”ll need to install Spacedesk driver software on your Windows PC. Head to the link below, and click on Download. And, in the download section, you will find two versions of Windows 11/10 OS. (64-bit and 32-bit.) Most modern PC work on 64-bit. You can check your system type by going into Control Panel\System and Security\System.
Download – SpaceDesk.
Next, Run the SpaceDesk Windows Driver Setup file. And, follow the prompts to install SpaceDesk on your PC. The installation process is just like any other Windows Software. When installation gets finished, you have to reboot/restart your computer. So that new drivers will become active.
Step 2: Install Spacedesk on Android Device.
That’s it, now you have to install Spacedesk on your Android device from the play store. So that you can link Windows and Android through WiFi and can use it as the second monitor.
Install Spacedesk (multi-monitor display extension screen.) App from Google Play Store.
Step 3: Connect your Android Phone to your PC.
After installing the Spacedesk driver on Windows PC, and, Spacedesk App on Android. Using Spacedesk now is incredibly easy.
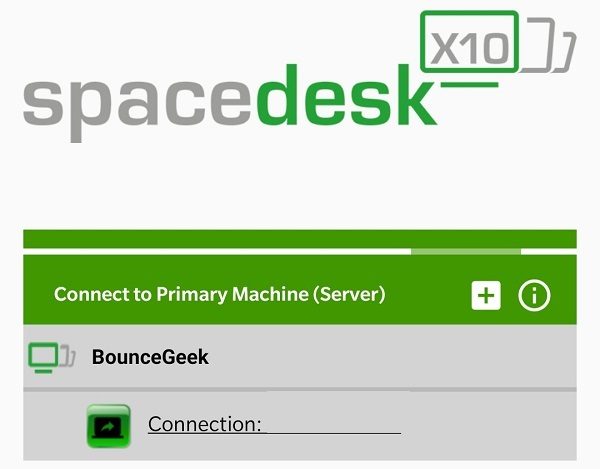
First, make sure both Android and Windows PC are on the same Wi-Fi. Then, simply open the Spacedesk SERVER App on Windows PC. It will show you the IP address.
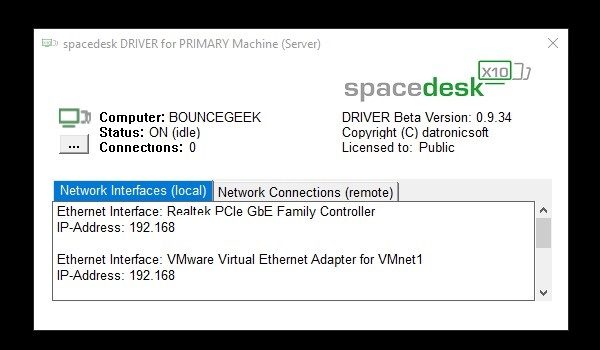
After that, open, Spacedesk App on your Android smartphone. The app will immediately detect your Computer. The computer name and IP address will appear. Just tap on “connection”. And, you will be able to use your Android device as a secondary display. You can also operate Windows from Android with touch.
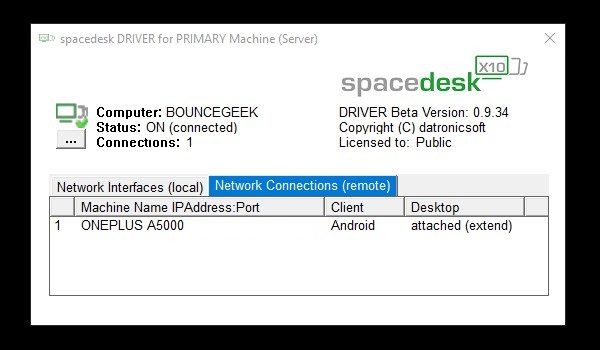
Once, you get connected, in the Spacedesk SERVER windows application, you will see your Android device name. Click on “Network Connections (remote)” to view.
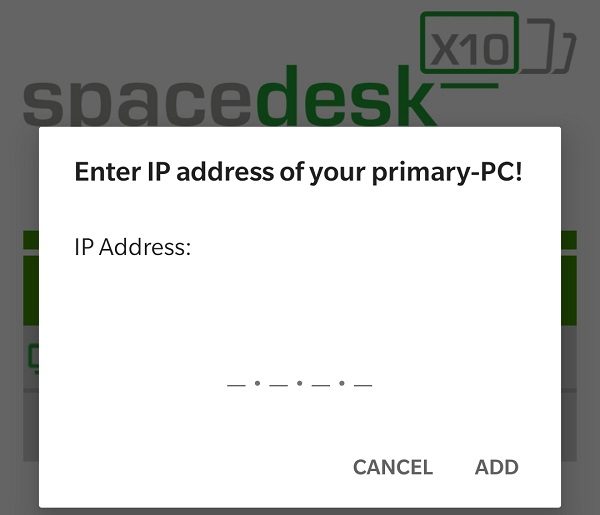
Important: However, due to any reason, Spacedesk doesn’t detect your PC. Then, untick the “Auto network search” option, and tap on the “+” icon to enter the IP address manually.
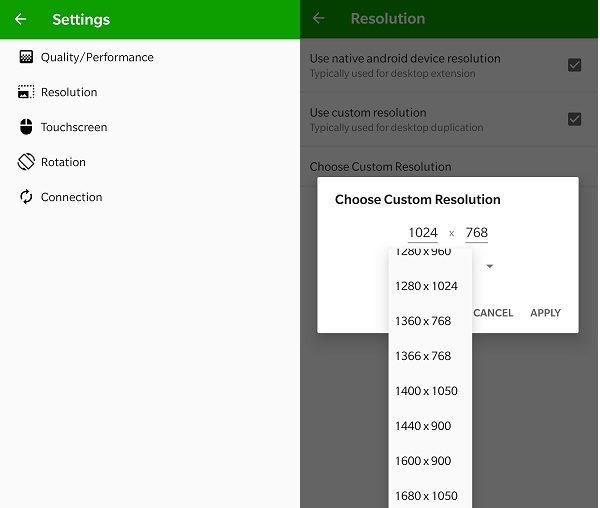
That’s it, you can now use your Android phone or tablet as a wireless second screen. To disconnect, press the back key on Android and then tap on OK. From Spacedesk Android App settings, you can also choose the resolution, FPS, Color depth, image quality, and much more.
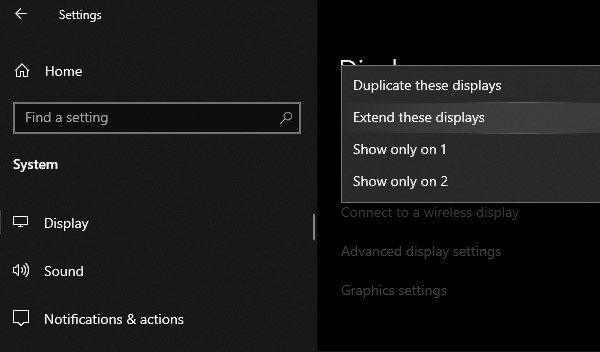
Extend Display.
If you want to use your Android as the second desktop, instead of mirroring the primary screen. Then, right-click on empty space on the Windows desktop. Click on “Display Settings”. Scroll down a little bit, and from Multiple display settings. Choose the ” Extend these displays” option.
You can now do multitasking, and move windows around between the Android and Monitor screen.