
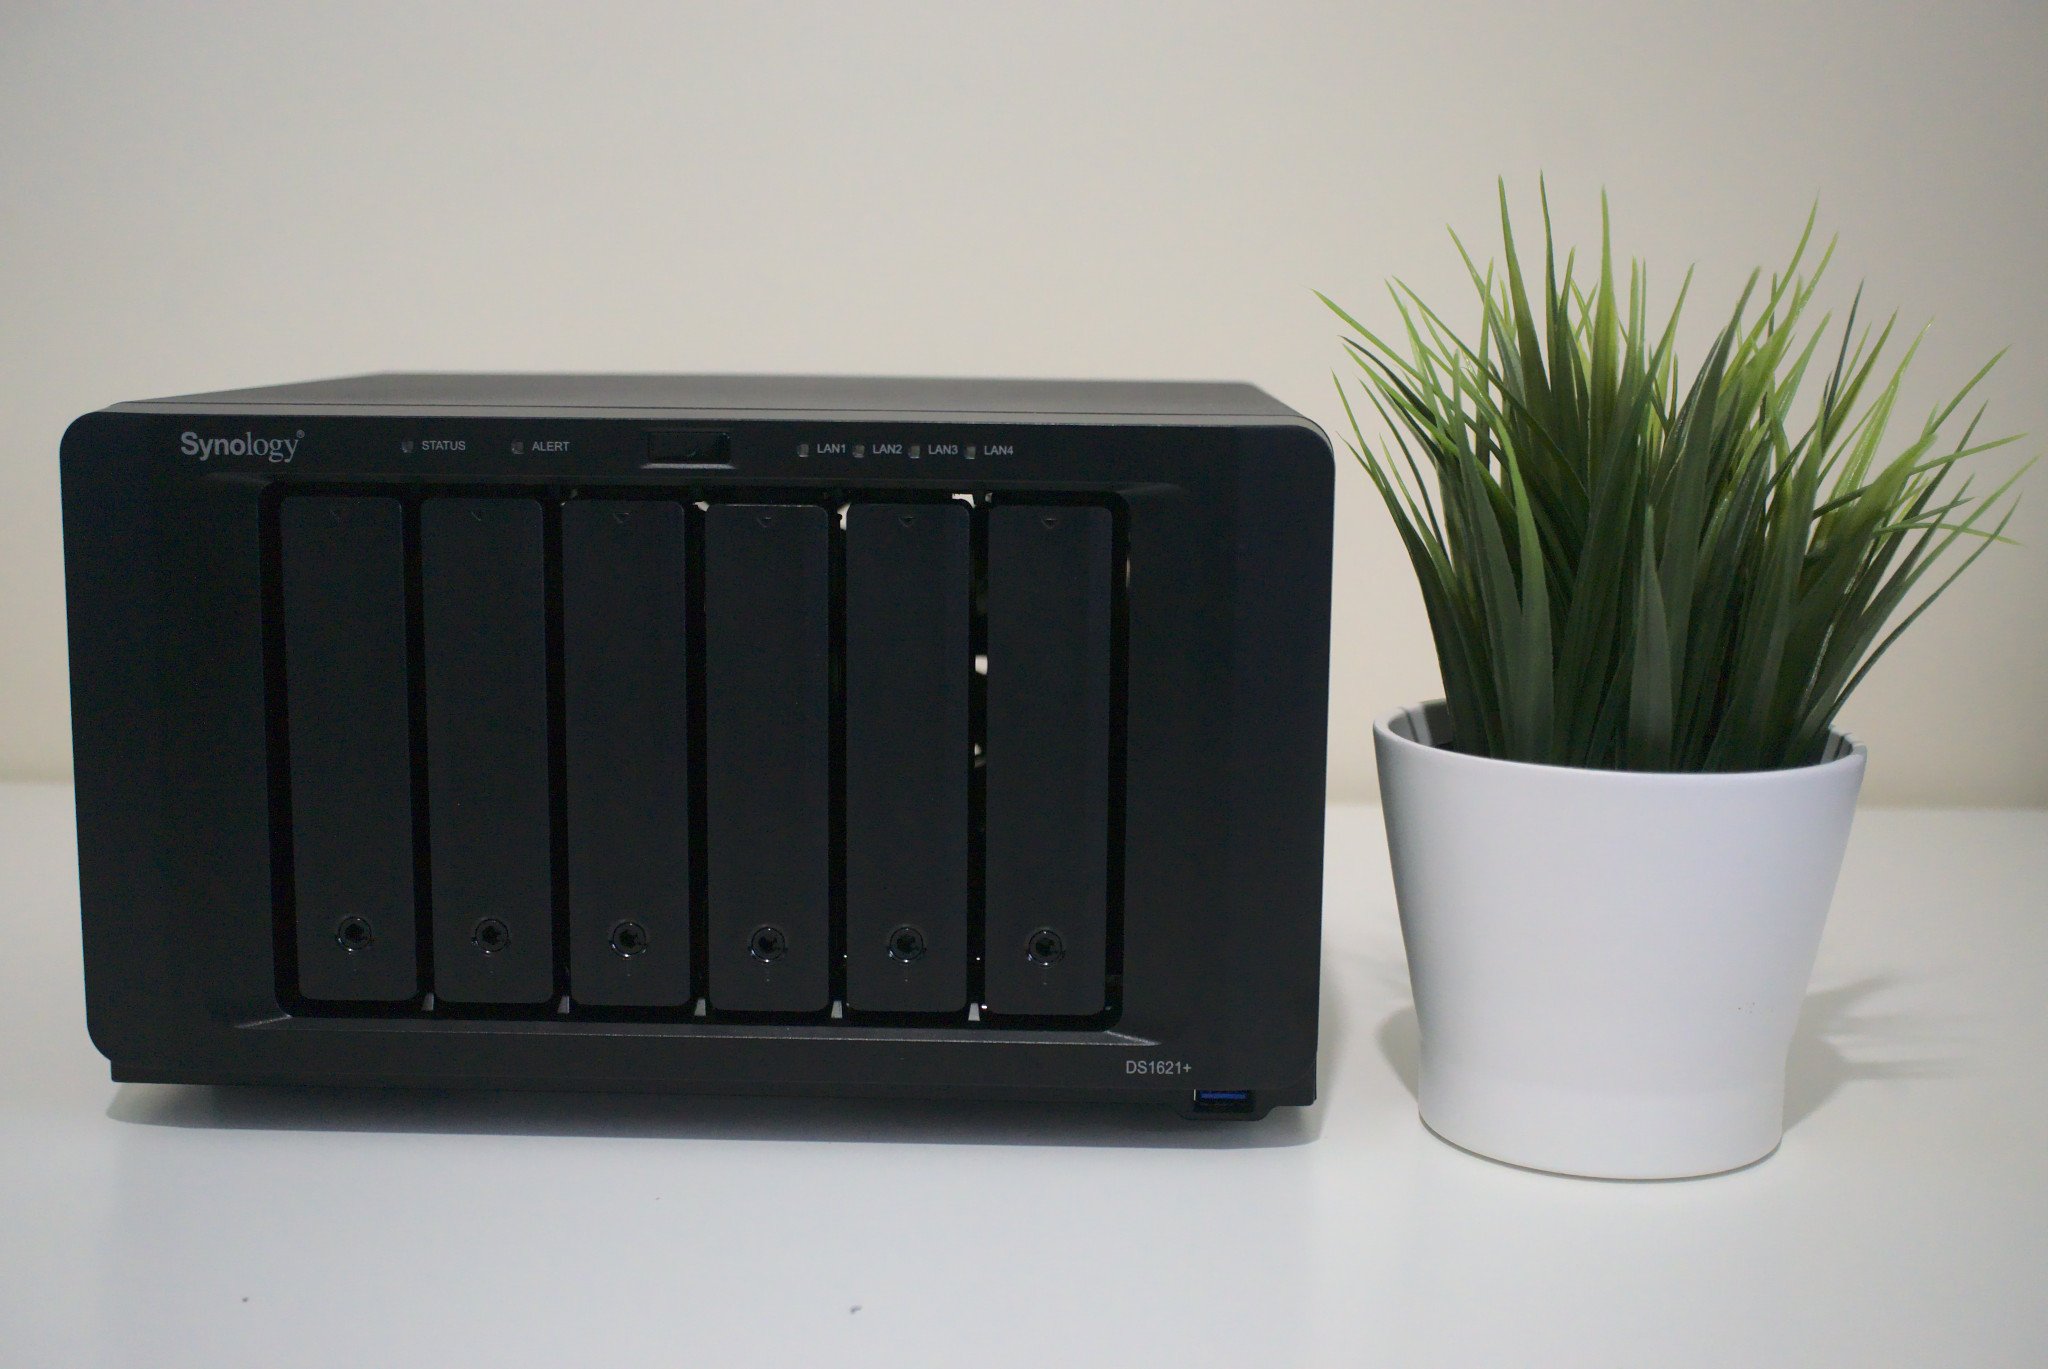
(Image credit: Rich Edmonds / Windows Central)
The best NAS for home are fantastic for storing files, and the easiest way to access them on Windows 10 is to map a network drive within the OS. Instead of connecting to the NAS via a browser, a mapped drive can act much like a local SSD or HDD and allow for quick access.
How to map a network drive
The top reason for mapping network drives to your Windows 10 installation is easy access. It’s far more convenient to simply open Windows Explorer and click on a mapped drive rather than logging into a browser to connect to a NAS.
If you’re using the Synology Assistant suite, it’s possible to map a network drive using the official software, but it requires a similar number of steps and I recommend doing it through Windows Explorer.
Windows Explorer
- On your Windows 10 PC, open Windows Explorer.
- Click on This Computer.
- Click on Map network drive.
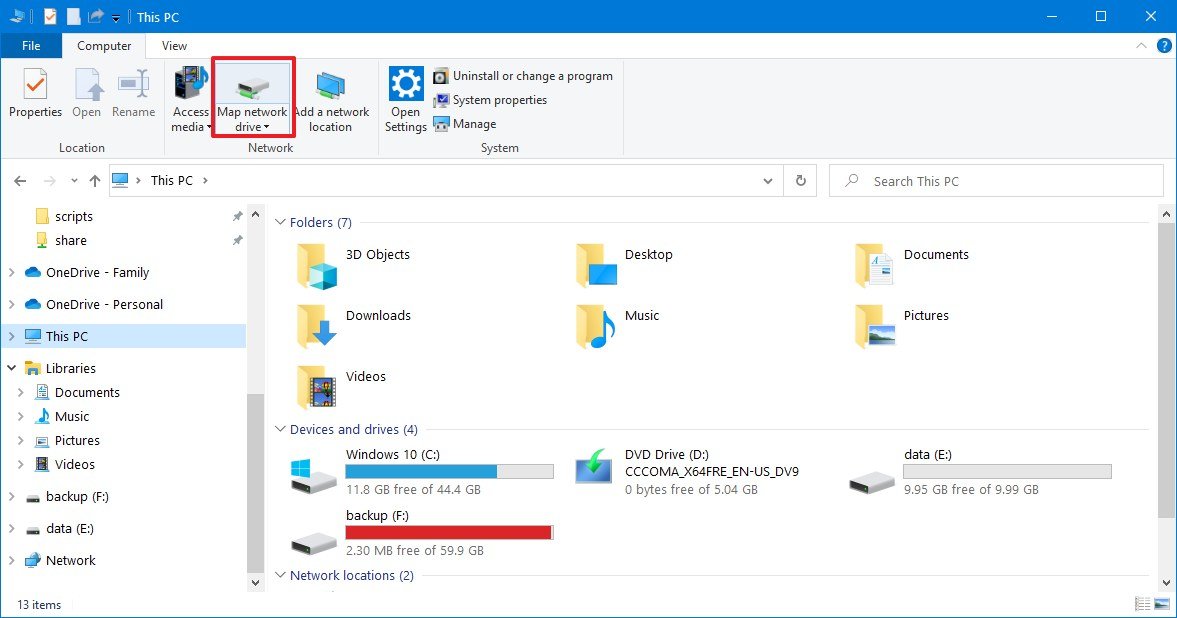
- Select a drive letter from the drop-down menu.
- Enter
\\SERVER\SHAREinto the folder field, replacing SERVER with the NAS IP address and SHARE with the shared folder name. - Click Finish.
- Enter your Synology NAS username and password in the Windows credentials pop-up prompt.
The mapped network drive will now appear within Windows Explorer as local storage, allowing you to quickly transfer files.
Synology Assistant
- On your Windows 10 PC, open Synology Assistant.
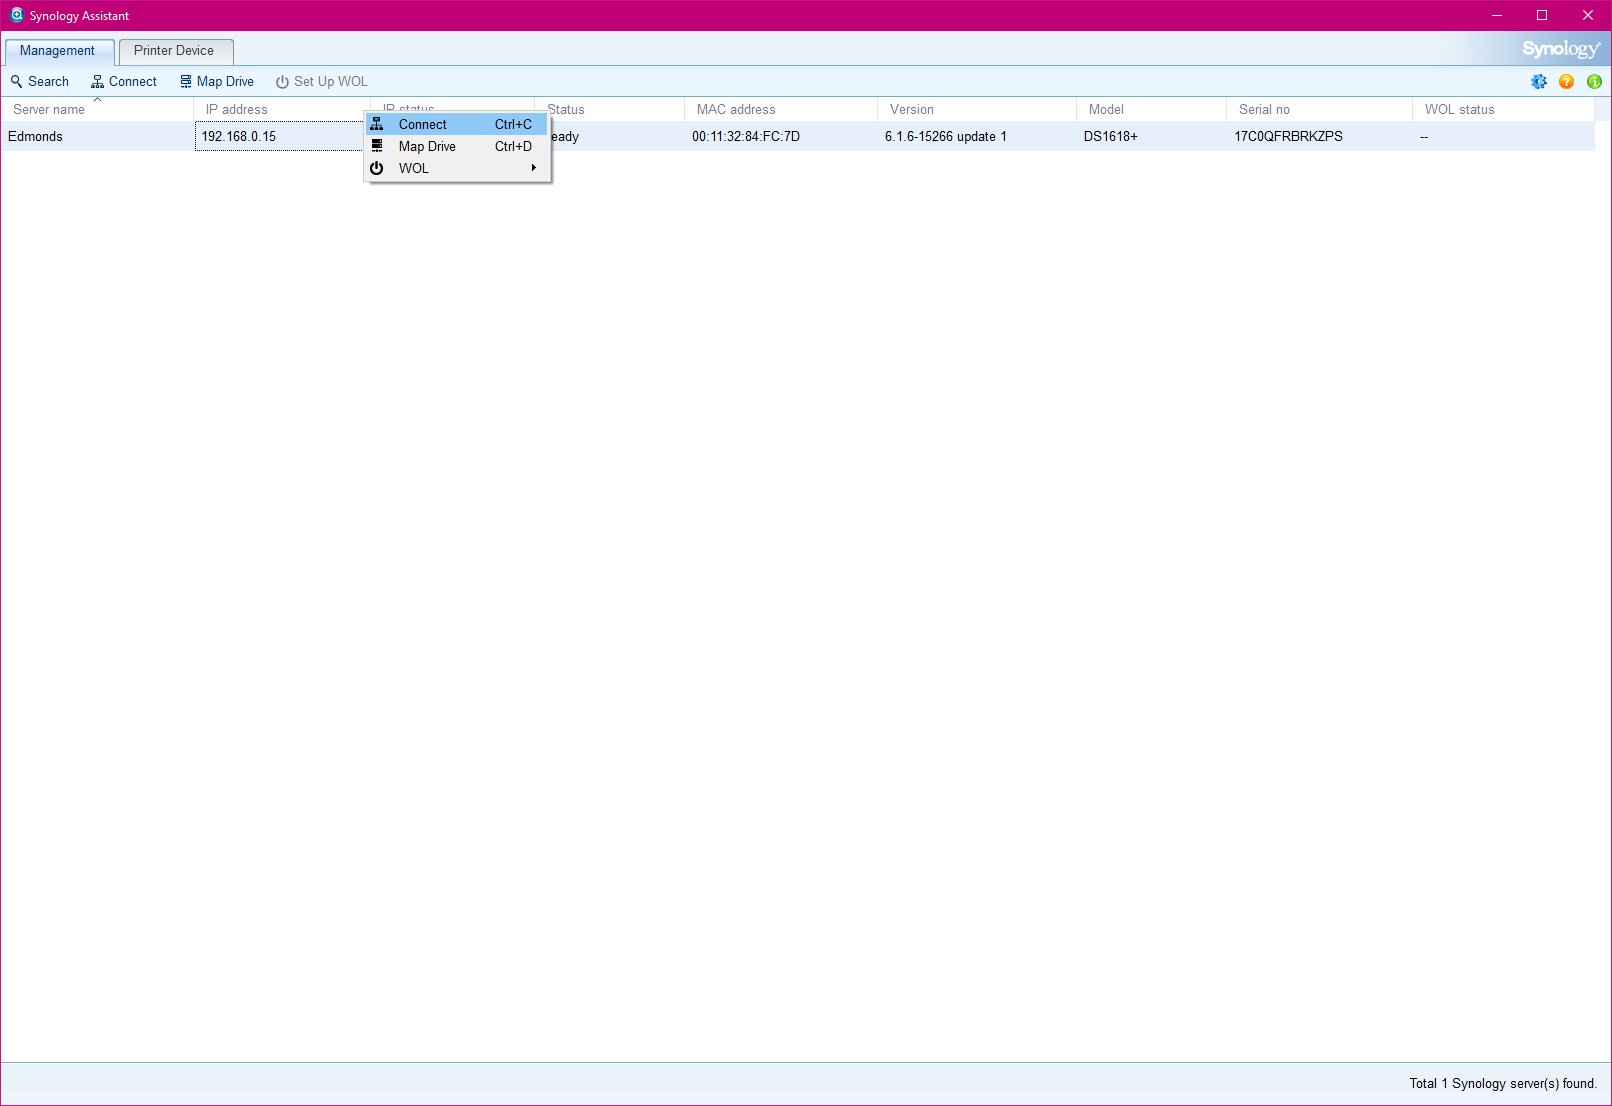
- Click on This Computer.
- Click on your Synology NAS.
- Click on Map Drive.
- Enter your NAS credentials.
- Select the Shared folder to map as a drive.
- Select an available drive letter.Tip: Check the «Reconnect at login» box to have the drive automatically mounted at boot.
- Click on Finish.

Best Overall
Synology DiskStation DS220+
The best overall Synology NAS
The latest two-bay Intel-powered NAS from Synology is a cracking example of value. The newer Intel processor is more than capable of handling some transcoding (just not 4K), as well as other tasks you wish to run on the NAS.
All the latest news, reviews, and guides for Windows and Xbox diehards.
Rich Edmonds was formerly a Senior Editor of PC hardware at Windows Central, covering everything related to PC components and NAS. He’s been involved in technology for more than a decade and knows a thing or two about the magic inside a PC chassis. You can follow him on Twitter at @RichEdmonds.
Let IT Block show you the easy way to connect a Windows computer to a brand new Synology NAS.
There is an easy and simple way to connect your Synology DiskStation NAS to your Windows computer. We have laid out the steps to securely complete the connection process, which also applies to Windows 10. While the process may seem daunting at first, we have broken down the process into easily manageable instructions.
There is no need to worry about connecting your Synology DiskStation NAS to your Windows computer. With this guide, we will walk you through the process step by step, including all of the information you need to know. Even beginners can follow these steps to connect their Synology DiskStation NAS.
For seasoned users, we have also provided an alternative method for connection at the end of this article. If you are not a fan of installing third-party software on your Windows computer, this alternative method may be best for you. Keep reading for a full look at connecting your Synology DiskStation NAS to your Windows computer.
Step one: Install SYNOLOGY assistant in Windows
Easy way to connect your Synology NAS to Windows computer
Start by turning on the NAS and waiting for the unit to get through its complete boot sequence. Next, you can open your preferred web browser and go to find.synology.com or search for diskstation:5000. From here, you should be able to find the configuration wizard.
Alternatively, you can download the file here or click on the logo to download the file. When downloading, make sure to choose the .exe file and install it into Windows. This download works for Windows 10 as well, so there is no need to worry about which version of Windows you are currently using.
The installation process is fairly straightforward, so it should not take too long to complete. To complete the installation, you should run the software as an administrator or use your admin account.
Step two: Setup your DSM, your Synology NAS operating system.
Easy way to connect your Synology NAS to Windows computer
Before we can start conneting your Synoloy NAS to Windows, we have to ensure that the rights, permissions, files, and folders are properly set up on your DSM Synology machine. If you have already gone through the processes that we will cover in this section, feel free to skip on to the next part of this guide.
Connecting directly to your NAS IP is the most straightforward way to connect to your DSM or Disk Station Manager. If you can see the screen shown above, you are ready to proceed to the next step. If you do not know how to access this screen at all, keep reading for more information.
http://find.synology.com/
First, you should find your SYNOLOGY and connect to it. The simplest way to find your SYNOLOGY is to click on the web address listed above. Once the program starts to run in your browser, it will help you find your NAS that is connected to your network. When you find your NAS, you can follow the steps in this guide to complete your installation. The following video illustrates the installation process to help make things a bit easier: https://www.youtube.com/watch?v=jtCoTuGuGL0
As soon as you find the DiskStation that is connected to your network, you should see an image that is similar to the one on the right. Once you see this image on your screen, you can select “Connect” to continue.
Now that your NAS is found, we can log in to the operating system of the NAS. This will allow you to complete some basic user set up functions and group set up functions. Doing so will help you with some shared drives and mapping them to your Windows computer.
Step three: Create a Shared folder in Synology NAS to connect to your Windows computer.
Easy way to connect your Synology NAS to Windows computer
To create a shared folder, navigate to the File Station application in your SYNOLOGY. From here, click on Create, then select Create New Shared Folder.
Next, you can enter the name and description of your shared folder. Both fields are required before you can move on, so don’t skip past this step. Once you have added this information, click on “Next” until the file is launched.
When this step is completed, you have created your first shared folder in your SYNOLOGY NAS. Congratulations! Now, you can set up the rights to this shared folder. Going forward, we will call your new shared folder Folder A to simplify the setup process. Keep in mind that you can name this folder whatever you prefer.
Step four: Create user accounts and groups in Synology DSM for Windows to authenticate a connection.
Easy way to connect your Synology NAS to Windows computer
Creating a group is a very straightforward and uncomplicated process. Follow these steps to set up your first group.
To create a group, navigate to Control Panel, then select Group. It is best to set up groups first, so you can set some access policies before adding users. When we say policy, we are referring to what you are allowed to access or not allowed to access as a group member. Any contradictions in policy usually result in the more restrictive policy taking charge.
For example, one policy set to no will result in “no.” Two policies set to no will also result in “no.” If one policy is set to no and another is set to yes, the “no” will overrule the yes and the policy will be set to “no.” However, two policies set to yes will result in “yes.” As you can see, the restrictive policy will always win.
Once you have set up your group policy, allow the group to access “Read/Write” to the shared folder that you created in the earlier set, Folder A.
Next, we will create a user. There’s no need to worry because the process for setting up a user is as simple as setting up a group.
It is important to make sure that you either give the same rights to both the user and the group or choose to use the group policy for your new user. Keep in mind that the more restrictive policy will win out if the multiple policies conflict.
Allow the new user to access Folder A to simplify the process. It is important to make note of your username and password for your new user. We recommend writing it down on a piece of paper beside you until you have it memorized or can pass the information along to the person who will use the account.
Under “Info:” This tab is the place to input your email address for recovery purposes. You should also input your username and password in this tab. Please remember the password because it will be important for the next step in your Windows computer setup process.
Under “User Groups:” When you allocate a group to your new user, you will set all of the permissions and policies of the group as your default. For now, you do not need to worry about any of the other tabs.
Step five A: Connect to your Synology NAS on your WIndows computer using Synology Assistant.
Easy way to connect your Synology NAS to Windows computer
Once the software or Synology Assistant is running, you can click on “search” to refresh. This process will show you the latest IP of your SYNOLOGY disk drives. Once your disk drives appear, click on the first one you see and then click on «Map Network Drive.» You should input the username and password that you created for your user earlier under the right group policy.
Now, you should see a list that includes a mapped network drive, named Folder A. Click on Folder A and then click on Map. Also, remember to select “Reconnect at logon.» Setting your program to reconnect at login will ensure your computer is always reconnected to the shared drive each time it restarts. You do not want to leave this box unticked because it will save you a considerable amount of time and headache in the future. There is no need to reconnect every time your shared drive starts up.
The same is true for the next page where there is a tick box that says «Open The Mapped Drive.» You should make sure that you select this box as well. Choosing to open the mapped drive will allow you to create a shortcut to the desktop quickly. In any case, you will find the mapped network drive here in Windows Explorer:
Navigate to My Computer.
You can click on the folder icon in your taskbar to open up this window.
As a little bonus, we have added another section below for those who wish to attach or map your Synology NAS folders in Windows without the use of Synology Assistant. If you prefer not to use third-party software and installers, this manual method is your best bet. The process is not difficult, but it may be best left for more seasoned users.
Step five B: Connect to Synology NAS Folders directly from Windows Explorer
Easy way to connect your Synology NAS to Windows computer
The Synology assistant is great and easy to use. However, in our experience, there are glitches from time to time. These glitches may be caused by network settings or firewalls, but we are not completely sure of the cause for the issues. It is also possible that glitches could be the result of a bad internet connection. Whatever the reason may be, we have provided some very easy steps to follow to get around these issues.
Start the process by navigating to your Windows Explorer and right-click on Network, located on the left-hand side of the bar. Once you click on “Map network drive…,” you will see the screen shown below. Before you proceed to the next step, you must find out a few things.
First, find the IP of your Synology NAS within your LAN, or local area network. An easy way to do this is to expand the “Network” on your Windows Explorer and then right-click on your Synology NAS. From here, click on Properties. This should show the IP of your Synology at the bottom of the screen.
The second thing you will need to know is the specific name of the folder you wish to map to or connect to with your Windows computer. In doing so, you will create an easy to use a shortcut to simplify the process of accessing the specific folder in the future.
Now that you have both the server IP address and the name of your folder, input them using the following format in the Folder box: \\192.168.X.X\FolderXYZ.
Connect using the appropriate user and credentials you made with the rights to access this specific folder. And voila! You have successfully mapped a shared folder in Synology to your Windows File Explorer using a manual process. Feel free to pin or create a shortcut to that folder on your desktop for your convenience.
Thank you for reading ‘Easy way to connect your Synology NAS to Windows computer’ and IT Block wishes you a beautiful day. IT Block is an IT support services provider based in Singapore, and we love to share what we learn with the world.
Чтобы настроить доступ к файлам Synology DiskStation, необходимо использовать специальное расширение HTTP-протокола. WebDAV — дает пользователям возможность редактирования и непосредственного управления файлами, которые хранятся на удаленных серверах.. При эксплуатации службы Synology DiskStation Manager, любые программы, которые поддерживают WebDAV без каких-либо проблем получат доступ в удаленном режиме к сетевым дискам Synology NAS, который ничем не отличается от доступа локального типа. Перед началом процедуры, необходимо прежде всего настроить Synology NAS и установить на него DSM (DiskStation Manager). Также убедитесь в том, что черег глобальную сеть Интернет можно получить доступ к Synology NAS.
Изначально, включите службу WebDAV. Это выполняется при непосредственном входе в DSM под администраторской учетной записью. Выбрав из всего перечня центр пакетов WebDAV Server произведите его установку. По окончанию операции, нажмите на «галочку» напротив функции «Включить HTTP». Кликните по кнопке «Применить» для успешного сохранения настроек и переходите к следующему этапу. Если вы хотите избежать возможных ошибок кодировки при обращении с WebDAV службами, настоятельно рекомендуется эксплуатировать версию клиента, которая поддерживает UTF-8 кодировку данных.
В том случае, когда вы используете операционную систему Windows, специалисты рекомендуют эксплуатировать NetDrive. Это абсолютно бесплатное приложение, которое поможет вам подключить диски и использовать их на протяжении 2х месяцев. При этом, чтобы выполнить подключение сетевого диска в OC Windows (для использования протокола WebDAV в файлах Synolody NAS) у вас должен быть SSL сертификат и настроен доступ к Synology устройству, которое обязано выполняться непосредственно через HTTPS подключение.
Настройки на Mac компьютерах
Используя программу Finder вы можете подключиться к Synology NAS на любом Mac компьютере. Зайдите в меню и кликните на кнопку «Перейти», а затем на «Подключиться к серверу». В появившемся окне введите IP-адрес для Synology NAS. В противном случае, вы также можете заполнить имя домена, прописав http-префикс и постфикс с кодировкой «5005». После нажатия кнопки «Подключиться» перед вами откроется окно, в котором необходимо заполнить поле «Имя» и «Пароль». После выполнения всех перечисленных операций, перед вами откроются общие папки Synology NAS. Помимо этого, их можно запросто найти на боковой панели программы Finder, перейдя в раздел «Общее».
,
This guide contains detailed instructions on how to setup Synology NAS DiskStation with WebDav, in order to be able to Map (mount) the NAS Shared drive as a Network drive outside of the local network. (Windows 10, 7, 8 or 7 OS).A few days ago I installed a NAS drive (specifically a Synology NAS DiskStation DS418) for one of my clients. During the installation, my client asked to have the ability to access the NAS shared files over the Internet in an easy way (e.g. as another drive in Windows Explorer) and without using Synology’s Web interface (which is excellent for making basic tasks).
How to Configure and Access Synology NAS with WebDAV over Internet.
Step 1. Set up WebDav on Synology NAS device.
Step 2. Assign a Static IP Address on Synology NAS.
Step 3. Obtain a Free Domain Name using a DDNS Service.
Step 4. Setup Port Forwarding on your Router.
Step 5. Set up DDNS on Synology NAS Device.
Step 6. Map Synology Shared Drive in Windows Explorer.
Step 1. Configure and Enable WebDav Server on Synology NAS.
1. From Synology NAS WEB UI open Package Center.
2. Go to All Packages and then find and install the WebDav Server Package.
3. When done, go to Installed packages and open WebDav Server.

4. At Settings options, enable the HTTPS protocol only (HTTPS Port:5006), in order to have only securely access to your files over Internet (using HTTPS and SSL) and then click Apply.

Step 2. Assign a Local Static IP Address on Synology NAS Device.
1. From Synology NAS WEB UI open Control Panel.
2. Click Network on the left pane and then select the active LAN (connected) and click Edit.

3. in IPv4 tab:
a. Select the Use manual configuration option.
b. Assign a Static IP Address for your Synology NAS device (e.g. 192.168.1.199) and then fill the rest required fields (Subnet mask, Gateway, DNS Server) according to your Network settings.
c. When done click OK

Step 3. Get a Free Domain Name from a Free DDNS Service Provider.
In order to access your files on Synology NAS server from outside, you need to register a free Domain Name from a free DDNS* service provider.**
* A DDNS (Dynamic Domain Name System) service maps Internet Domain Names to Dynamic IP addresses. A DDNS service lets you to access your devices on your local network from anywhere in the world.
** List of some free Dynamic DNS Service Providers:
- DynDNS Service
- No-IP
- Dynu
- duckdns.org
Step 4. Setup Port Forwarding on your Router.
To be able to access your NAS shared files from outside of your local network, you need to forward the port «5006» (on your router) to the NAS IP address (e.g. «192.168.1.199»). To do that:
1. Open your router’s administration page.
2. Go NAT settings and select Virtual server. *
3. Then forward the port «5006» to NAS Synology IP address (e.g. «192.168.1.99»).
* Note: See your router’s manual on how to set up port forwarding.

Step 5. Set up DDNS on Synology NAS Device.
After registering a free DDNS Domain Name (e.g. «example.ddns.net»), proceed to enable DDNS support on Synology NAS DiskStation. To do that:
1. From Synology NAS WEB UI go to Control Panel –> External Access.

2. At DDNS tab click Add.

3. At DDNS settings:
a. Select your DDNS provider. (e.g. No-IP.com»)
b. Type the DDNS hostname you have registered. (e.g. example.ddns.net»)
c. Type your Username/Email & Password on DDNS provider.
d. When done, click the Test Connection button.
e. If the connection is successful, click the OK button to save the changes and continue to the next step.

Step 6. Remotely Map Synology Shared Drive as Another Drive in Windows Explorer.
The final step, is to map (mount) the NAS Synology Shared files, from outside. To accomplish this task you can use one of the following methods:
Method 1. Map Synology Drive using File Explorer.
To map the Synology drive, as a Network Drive using the Windows File Explorer:
1. Right-click on the This PC icon in explorer and choose Map Network Drive.

2. At Map Network Drive settings:
a. Choose a Drive letter for the mapped sinology folder.
b. At Folder box, type the Synology’s web address, in one of the following formats, according your desire:
To map all the shared folders of your NAS Server, type:
-
https://ddns-address-name:5006
To map a specific folder on you NAS server, type:
-
https://ddns-address-name:5006/Shared-Folder-Name
OR
-
\\ddns-address-name@SSL@5006\Shared-Folder-Name
* Notes:
1. Replace the ddns-address name, with your Synology’s DYNDNS web address (e.g. example.ddns.net).
2. Replace the Shared-Folder-Name, with the name of the shared folder you want to access in the NAS Server.
e.g. If you want to map only the shared folder named «Public» on your NAS Server with DYNDNS Address «example.ddns.net» , type:
-
https://example.ddns.net:5006/Public
OR
-
\\example.ddns.net@SSL@5006\Public
c. Click Finish when done. *
* Note: In some cases the «Connect using different credentials» box, must be checked before clicking Finish.

3. Type your credentials, check the Remember my credentials checkbox and click OK.

4. That’s it.
Method 2. Map Synology Drive using WebDrive
The second method to map the Synology Shared Folders is to use the the WebDrive* utility.
* WebDrive is an excellent drive mapping utility that uses open FTP, FTPS, SFTP, and WebDAV protocols to access remote file servers that supports these protocols (FTP, FTPS, SFTP, WebDAV).
1. Download and install WebDrive.
2. Open WebDrive mapping utility and on the Site Wizard select the Secure WebDav server type and click Next.

3. At the ‘Account Information’ screen:
a. Type the DDNS name (e.g. «example.ddns.net») and your credentials on the DDNS provider and then click Advanced Settings.

b. At Connection Settings, uncheck the «Use default port» and then type 5006 (WebDav’s HTTPS Port).
c. When done, click OK.

4. Then click Test Connection.

5. See the connection results and then close the «Status» window. *
* Note: If the connection isn’t successful, then make sure that you have entered the correct account and port details at the previous screens.

6. Then click Next to continue…

7. Assign a drive letter (e.g. «M:») for the Synology NAS drive, click Connect Now and then click Finish to close the «Site Wizard».

That’s it! Let me know if this guide has helped you by leaving your comment about your experience. Please like and share this guide to help others.
If this article was useful for you, please consider supporting us by making a donation. Even $1 can a make a huge difference for us in our effort to continue to help others while keeping this site free:
- Author
- Recent Posts
Konstantinos is the founder and administrator of Wintips.org. Since 1995 he works and provides IT support as a computer and network expert to individuals and large companies. He is specialized in solving problems related to Windows or other Microsoft products (Windows Server, Office, Microsoft 365, etc.).
В каждой семье или небольшом офисе есть компьютеры и мобильные устройства под управлением различных операционных систем. Перенос файлов между ними привычными методами трудно назвать удобной задачей. В особенности, если делать это приходится часто. Необходимость постоянно отвлекаться на перенос данных снижает эффективность работы. Да и настроение от этого не улучшается. К счастью, обо всех этих сложностях вы, при желании, сможете забыть уже завтра.
Если вы располагаете NAS-устройством от Synology, то сможете предоставить пользователям возможность работать с контентом посредством Windows-компьютеров, Mac, смартфонов и планшетов под управлением Android, а также iPhone и iPad. Очень удобное решение, особенно если учитывать, что синхронизация и доступ к контенту осуществляется через Finder вашего Mac и Проводник Windows, после установки клиента Synology Drive. Также можно использовать привычный веб-браузер и мобильное приложение для еще более простого взаимодействия . Все будет работать так, как будто бы вы располагаете одним большим компьютером со множеством дисплеев.
Synology Drive для Android можете скачать отсюда.
Версия для iOS скачивается тут.
В первую очередь нужно обновить DSM до последней версии. А уже после приступать к установке и настройке Synology Drive и Synology Office.
Установка и настройка Synology Drive
Содержание
- Установка и настройка Synology Drive
- Установка клиента Synology Drive на Mac
- Установка клиента Synology Drive на Windows
- Выбор оптимальных дисков для NAS
- Восстановление предыдущих версий синхронизированного файла
- Настройка Synology Office
- В заключение
Нужно открыть Центр пакетов, в строке поиска ввести «drive», после чего увидите ряд приложений, вам нужны:
- Synology Drive Server
- Synology Office

Так как для работы приложений требуется дополнительное программное обеспечение, может выходить уведомление о установке дополнительных программ, соглашайтесь.
После установки нужно перейти в «Панель управления» – «Портал приложений», выделить строку Synology Drive и кликнуть «Редактировать»:
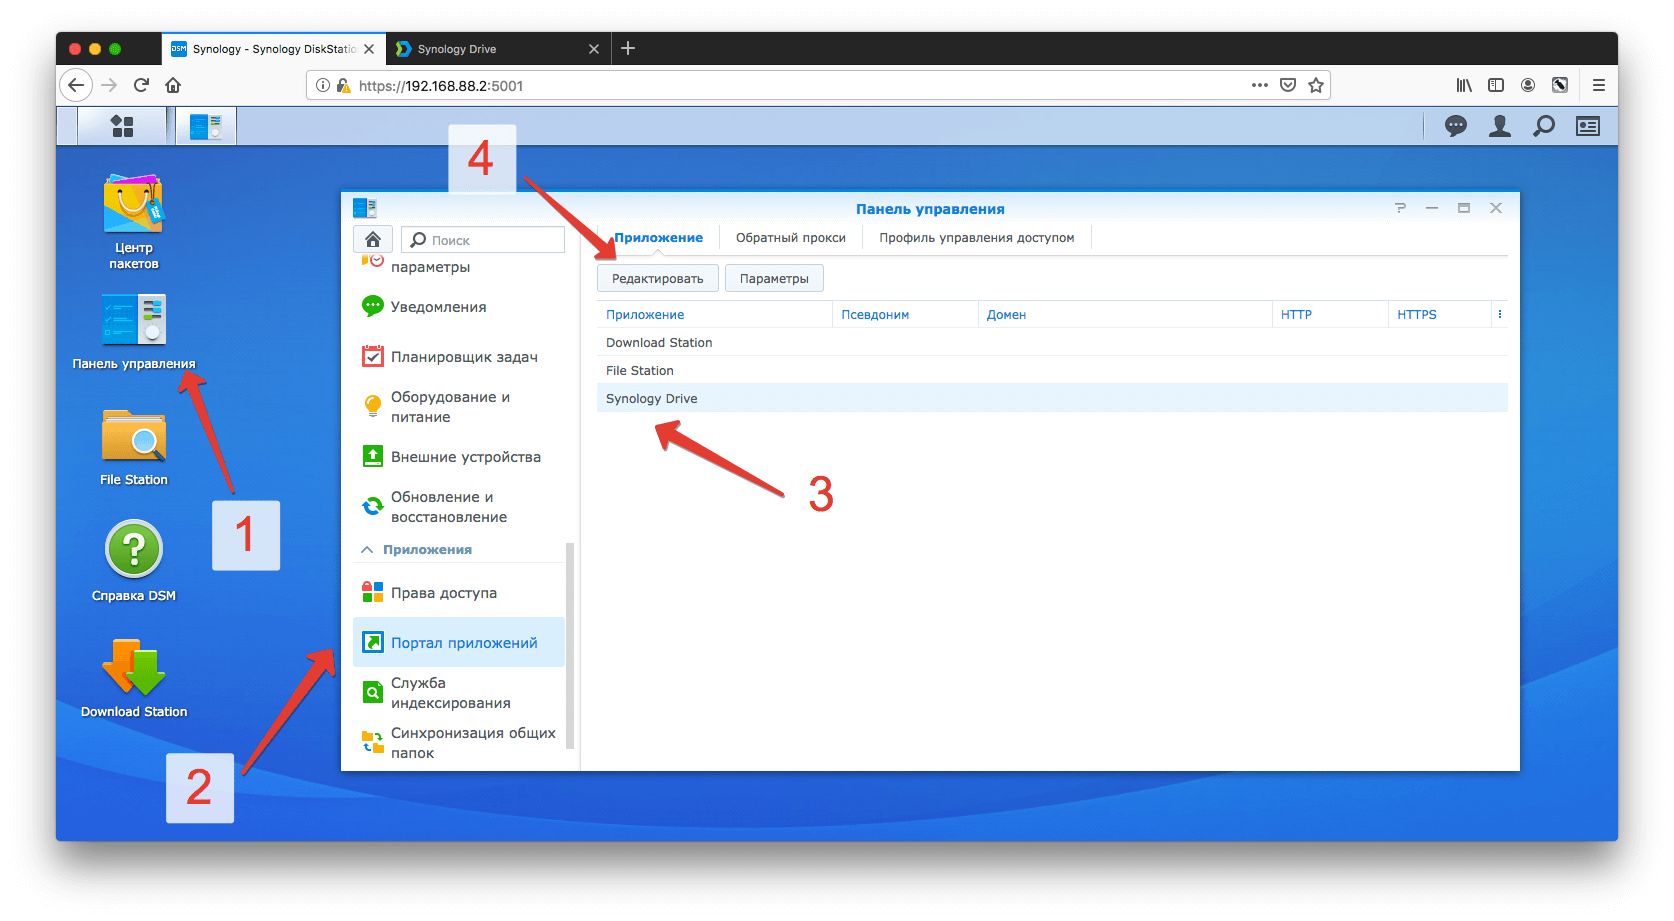
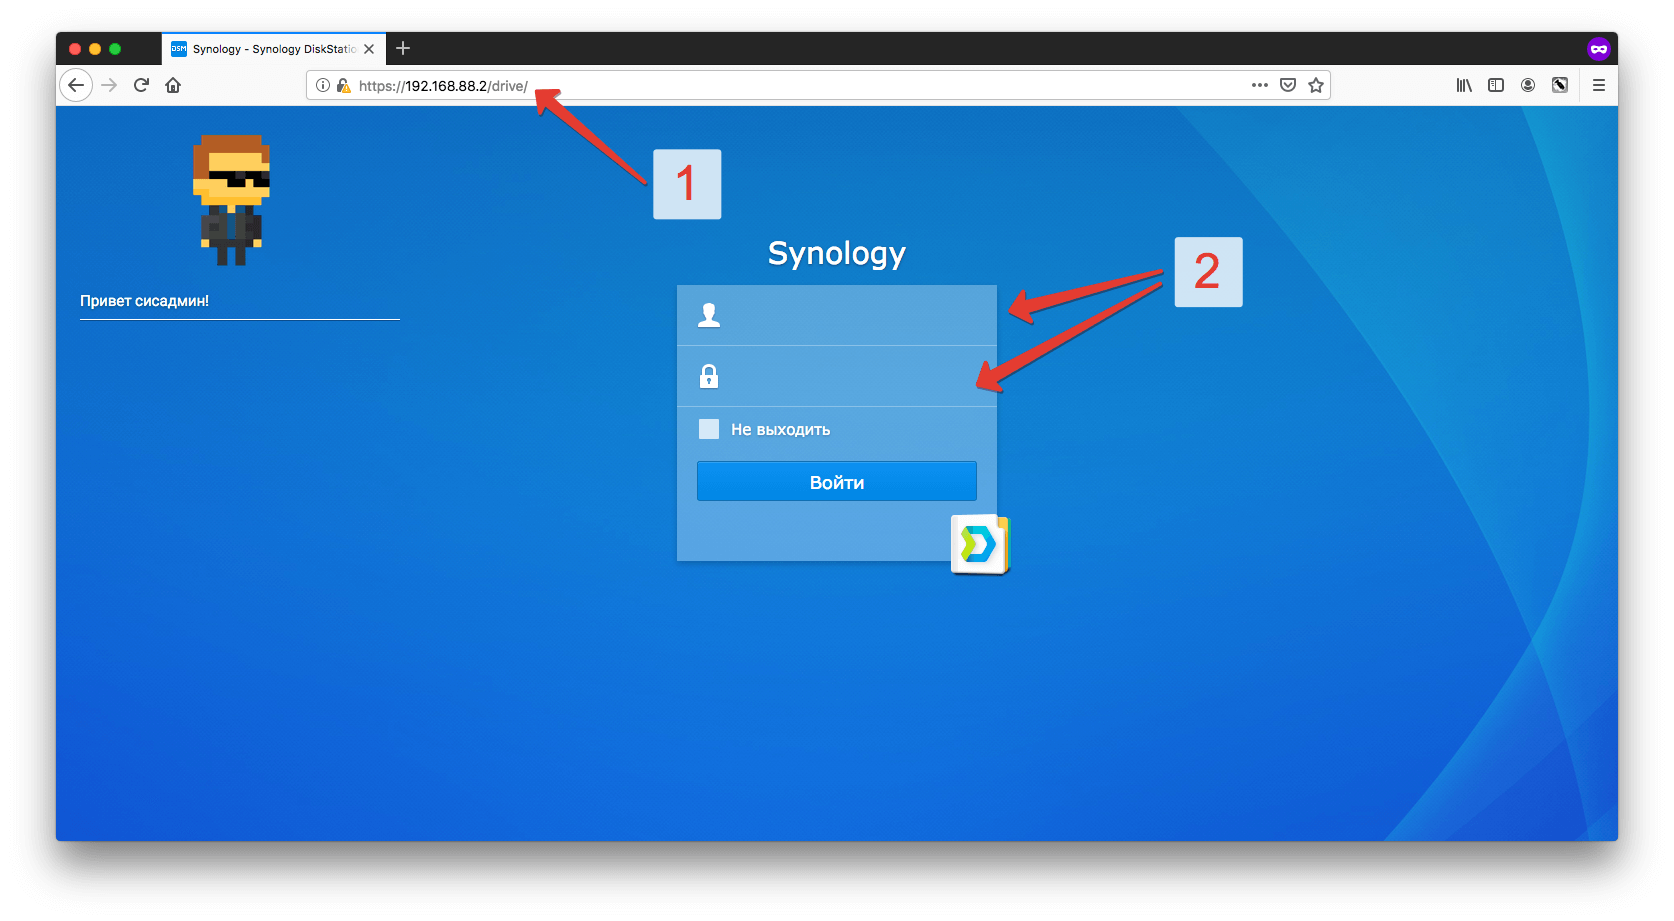
Откроется окно, в котором нужно поставить галочку «Включить пользовательский псевдоним», после чего сможете заходить на Synology Drive через браузер по прямой ссылке, например, в моем случае – https://192.168.88.2/drive

Перейдя в соседнюю вкладку, вы сможете настроить окно приветствия, задав заголовок, приветственное сообщение и загрузив собственный логотип:

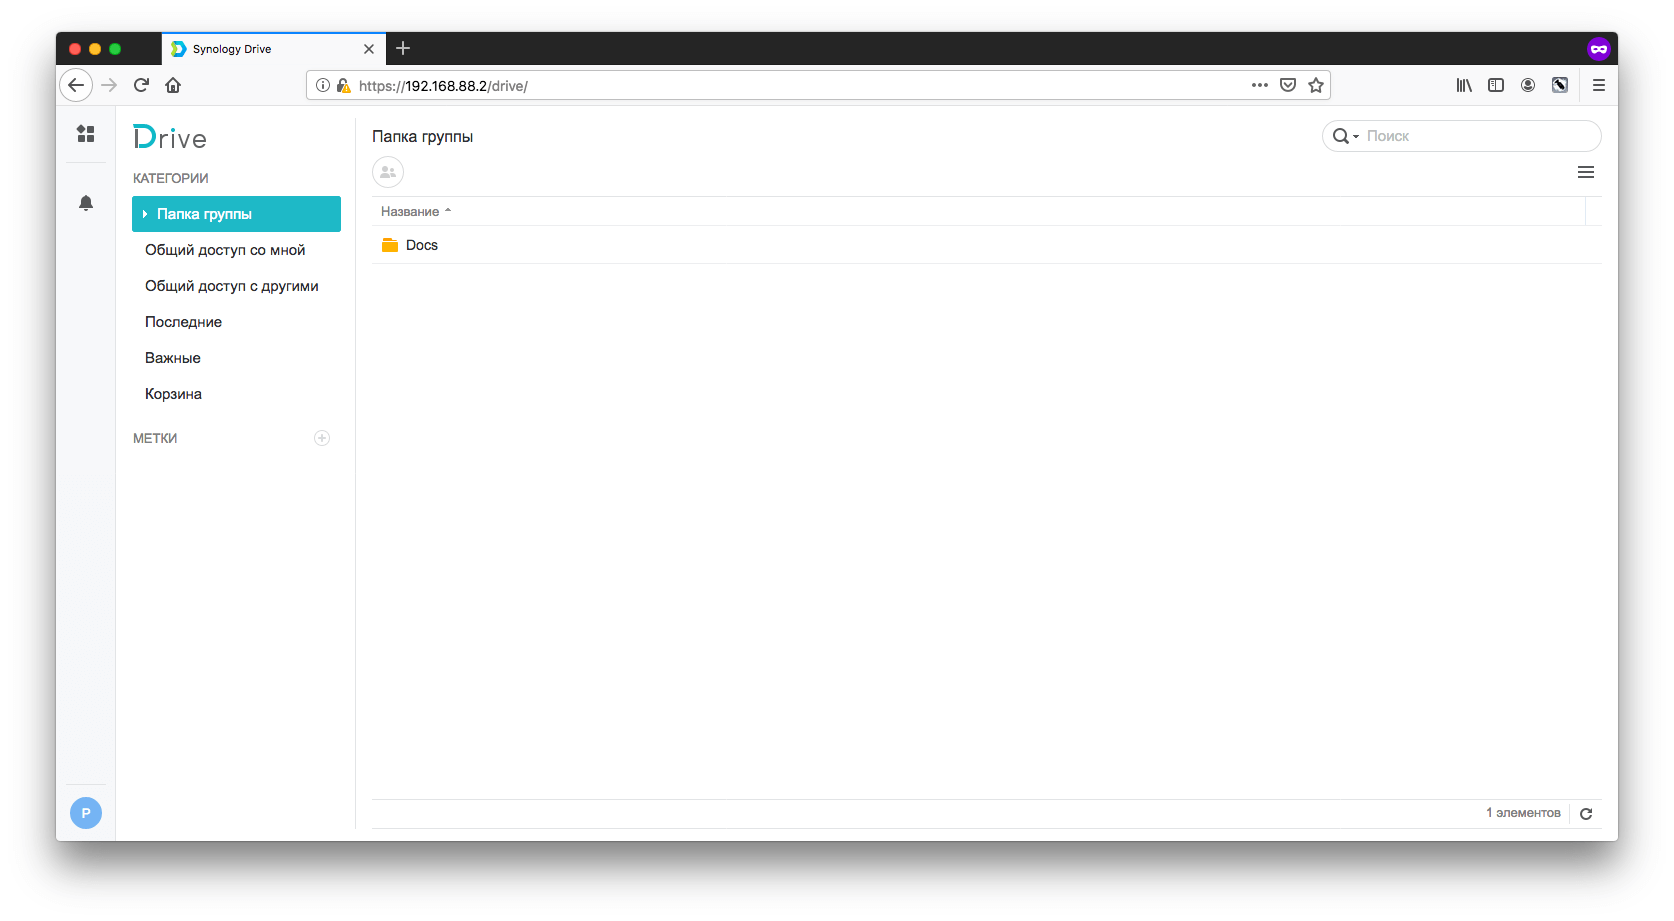
Чтобы начать использовать все возможности Synology Drive, нужно перейти в «Основное меню» и кликнуть по «Консоли администрирования Synology Drive», далее выбрать раздел «Папка группы»:

Выбрав папку, к которой хотите настроить доступ и нажав кнопку «Включить», откроется окно с настройками. Тут можно выбрать какое количество версий файлов хранить и указать период очистки старых версий:

После внесения изменений нажмите «ОК» и переходите по ссылке, с /drive на конце. Потребуется ввести логин и пароль:
Для каждого пользователя Synology Drive вы можете создать отдельного пользователя в «Панели управления» – «Пользователь», задав нужные права.
После входа откроется окно такого вида:
Где в левой части будет навигация по общим папкам, а в правой сами файлы. Этот вариант подойдет для тех, кому доступ к файлам не нужен на постоянной основе. Если же вы планируете работать с NAS не покладая рук, то обязательно установите клиент на компьютер.
Установка клиента Synology Drive на Mac
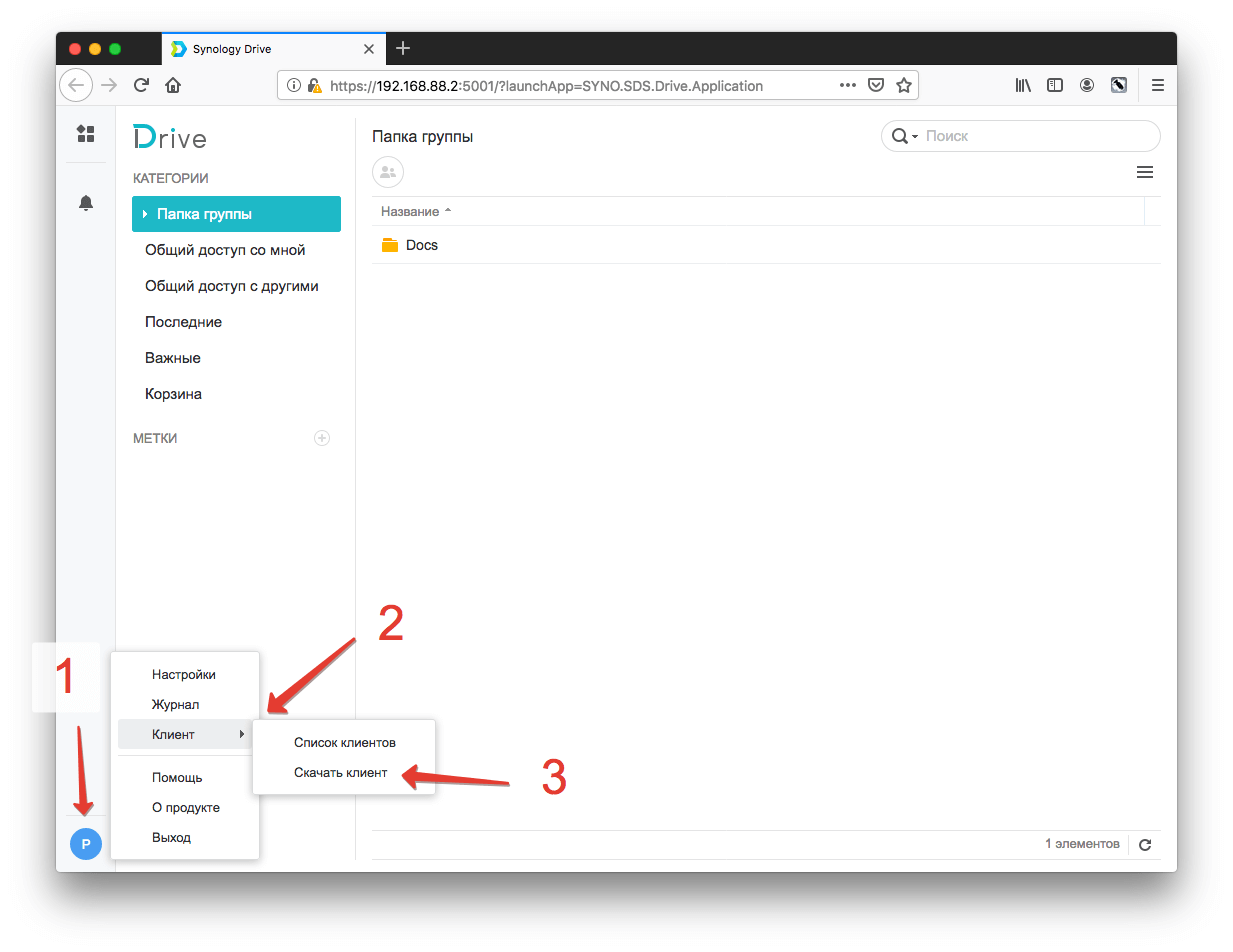
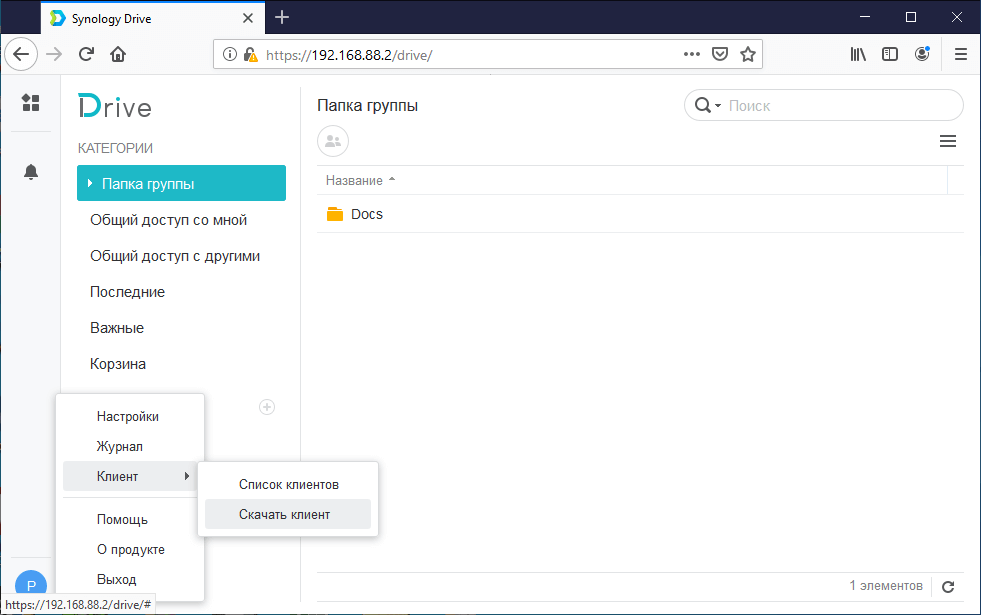
Открыв Synology Drive через браузер, кликните по иконке в левом нижнем углу, далее «Клиент» – «Скачать клиент»:
В открывшемся окне выбирайте «Для ПК»:

Откроется окно установки программы, проведите стандартную процедуру установки.
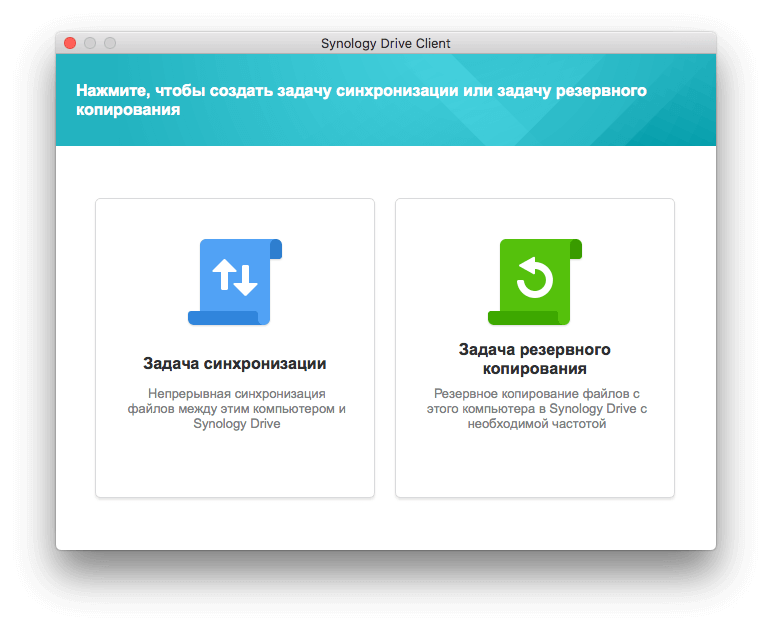
После запуска потребуется выбрать, что вам удобнее: постоянная синхронизация файлов с NAS от Synology или резервное копирование с заданной частотой:
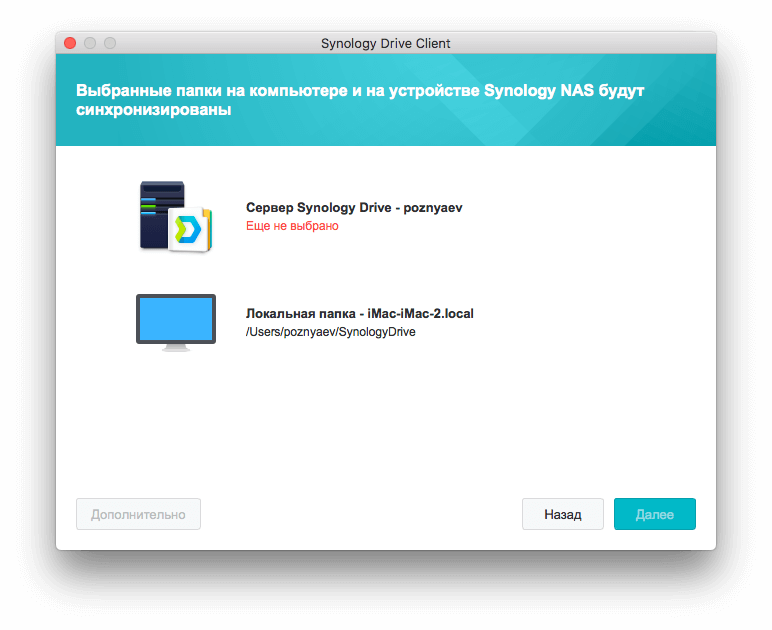
Далее – нужно указать папку для синхронизации на компьютере и вашем NAS:
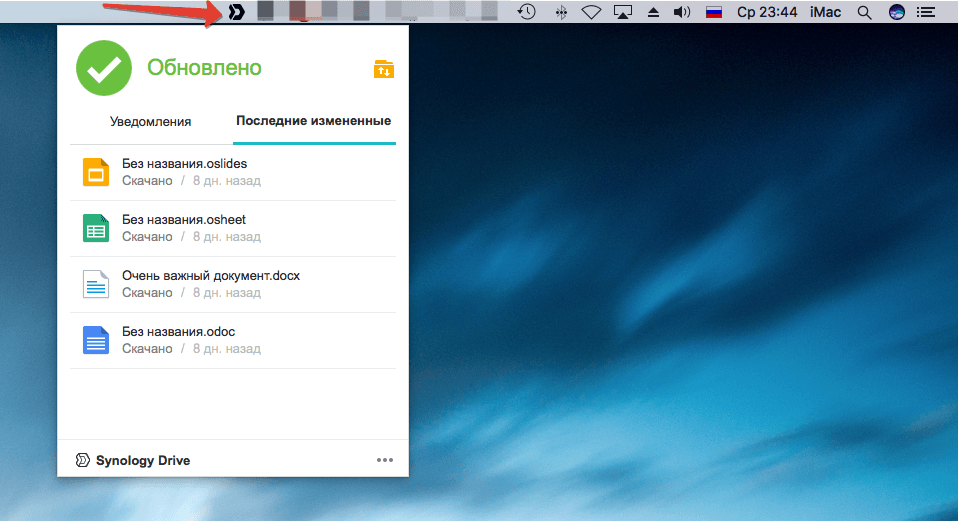
После установки клиент всегда будет доступен в строке навигации вашего Mac:
Перейдя в настройках в раздел «Синхронизация», можно увидеть папку, которая дублирует папку на NAS-устройстве:

Кликнув по кнопке «Правила синхронизации», сможете задавать разные сценарии синхронизации файлов между папкой на компьютере и NAS-устройством:
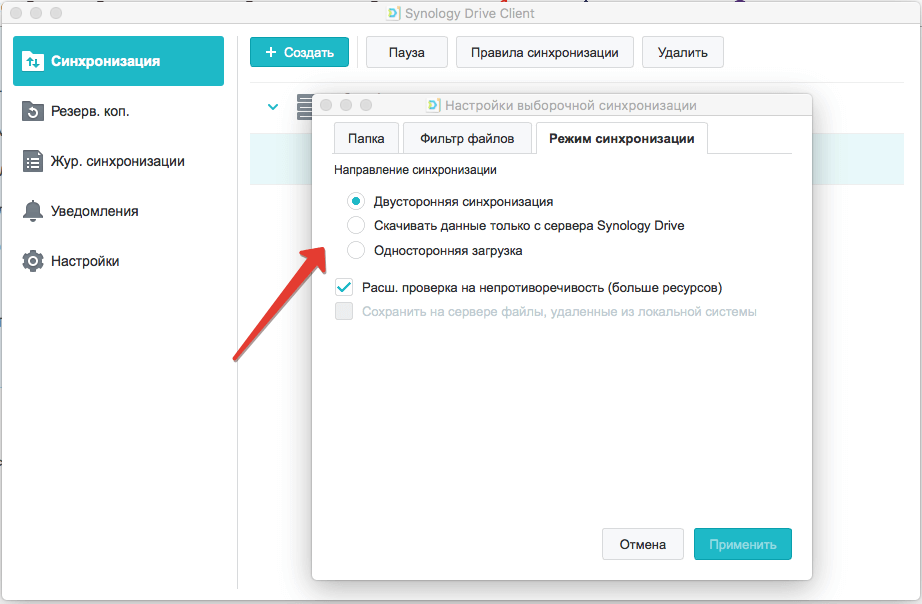
К примеру, если установлена двусторонняя синхронизация, то закинув в папку на компьютере любой файл, он автоматически про дублируется на Synology и наоборот:

Установка клиента Synology Drive на Windows
Процедура установки клиента под Windows аналогична процедуре под Mac, описанной выше. В начале зайдите на Drive Synology через браузер и скачайте клиент, версия для Windows начнет скачиваться автоматически:
Далее следует выбор «Версия для ПК» и стандартная установка:

Выбор оптимальных дисков для NAS
Для того, чтобы ваше устройство от Synology служило долго и радовало ни один год, стоит использовать специализированные накопители. Они должны обладать отказоустойчивостью 24/7, быть достаточно быстрыми и тихими, особенно, если используются в домашних условиях.
Для себя я выбрал диски от компании Seagate. Их серия IronWolf создана специально для NAS-систем и имеет все вышеперечисленные параметры. В них дополнительно реализована технология Health Management, которая позволит избежать потери данных, за счет того, что она позволяет предотвращать отрицательные последствия внешних воздействий на хранилища и накопители. С ее помощью можно проводить профилактическое резервное копирование по запросу системы . Самое приятное – устройства от Synology поддерживают эту технологию:

Как ее включить я описывал в данной статье: Обзор Synology DiskStation DS218 с дисками Seagate Ironwolf.
Восстановление предыдущих версий синхронизированного файла
Если, по ошибке, вы удалили важную информацию и сохранили файл, то благодаря Synology Drive всегда есть возможность восстановить предыдущую версию. Для этого кликните по файлу правой кнопкой мыши и выберите «Обзор предыдущих версий»:

После чего откроется окно со списком дней в которые были изменения и именем компьютера, с которого эти изменения вносили:
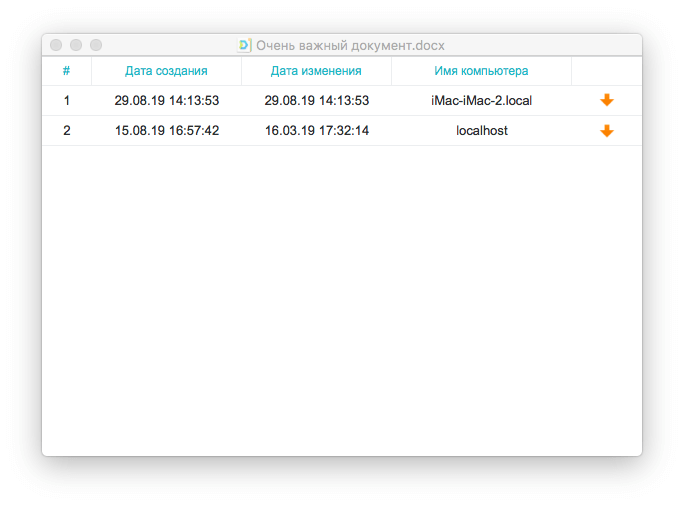
Далее вам останется выбрать нужную версию и указать путь для сохранения файла.
В Synology Drive версии 2.0 и выше стала доступна функция синхронизации по запросу. В отличие от стандартной синхронизации, которая создает дубли файлов на компьютерах, синхронизация по запросу копирует только списки файлов на локальные компьютеры. Сами файлы скачиваются на компьютеры только при обращении к ним, а именно открытии или изменении на компьютере. В настоящее время доступна в Windows 10 версии 1809 и выше.
Настройка Synology Office
Первое, что необходимо вам для комфортной работы — комплекс офисных инструментов. Synology Office, который мы устанавливали в NAS-устройство ранее, предназначен для совместного редактирования пользователями текстов, электронных таблиц и презентаций в Synology Drive.
В процессе работы над проектом вы сможете не только вносить правки в контент, но и обмениваться с родными или коллегами своими мыслями по поводу того, как сделать конечный результат лучше. Для этого предназначена функция создания интерактивных комментариев и чат Synology Chat, реализованный в качестве дополнительного плагина. Предусмотрена возможность шифрования информации. В этом случае файл может быть открыт только после ввода установленного вами пароля.
А сейчас рассмотрим работу Synology Office подробнее.
В верхней части находятся кнопки навигации. К примеру, кнопка в виде плюса позволяет создавать текстовые документы, электронные таблицы и слайды, а также создавать зашифрованные файлы, которые будут защищены паролем.
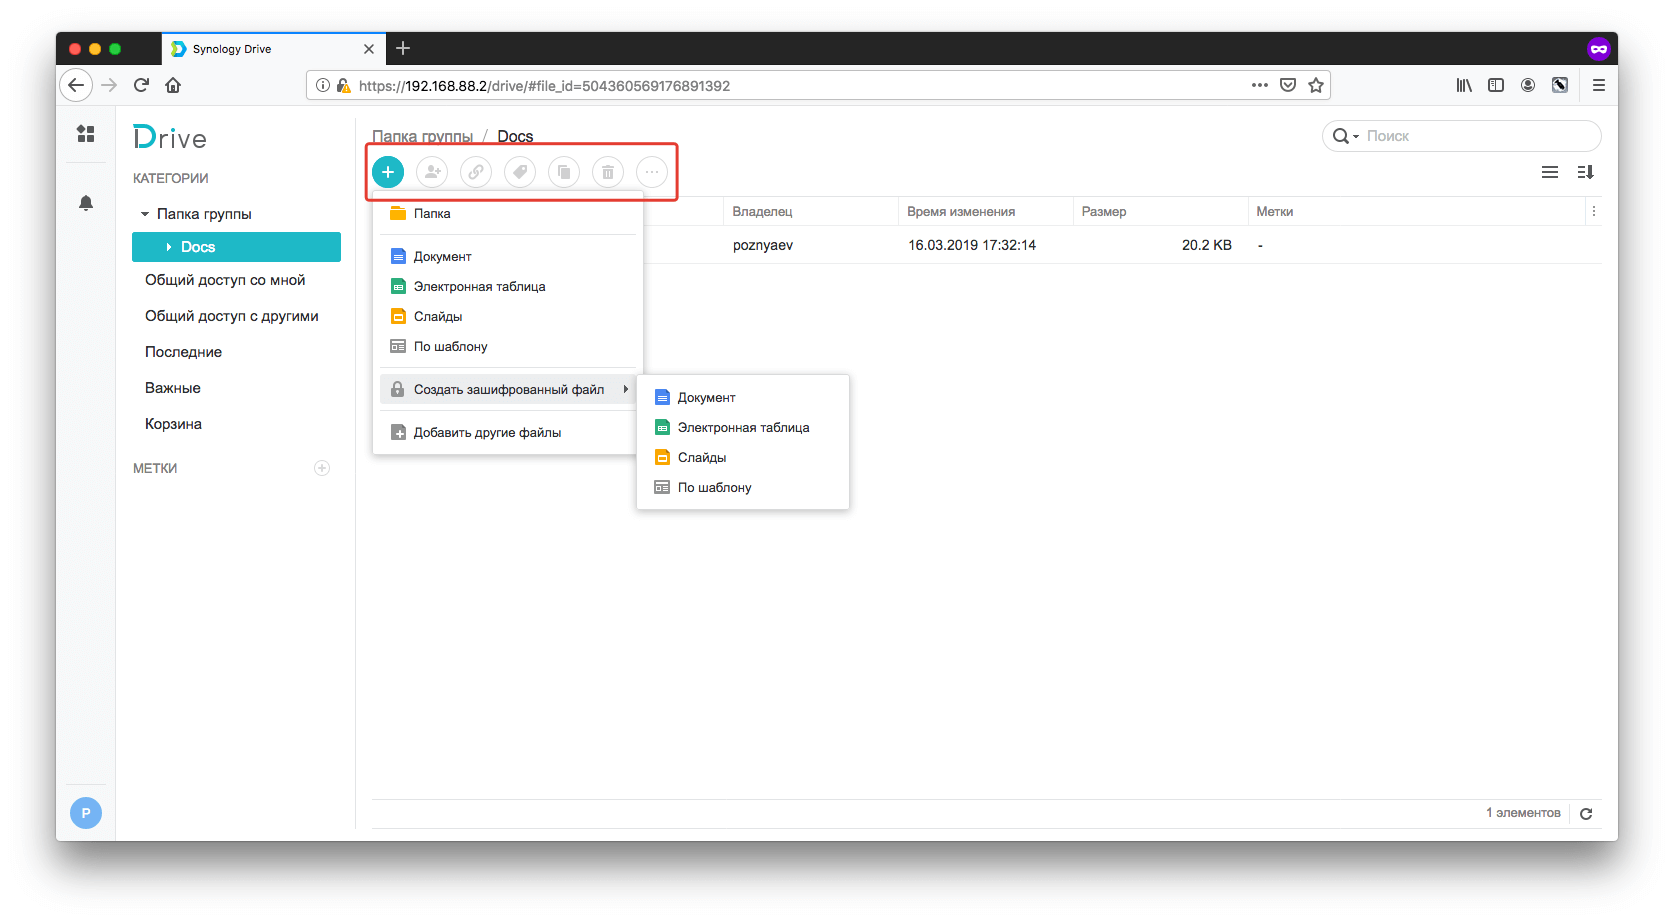
Остальные элементы, находящиеся правее плюса, становятся доступны после выделения конкретного файла. Благодаря им вы можете предоставить общий доступ конкретному пользователю или создать прямую ссылку на файл, также доступны возможности создания копии файла или его удаление.
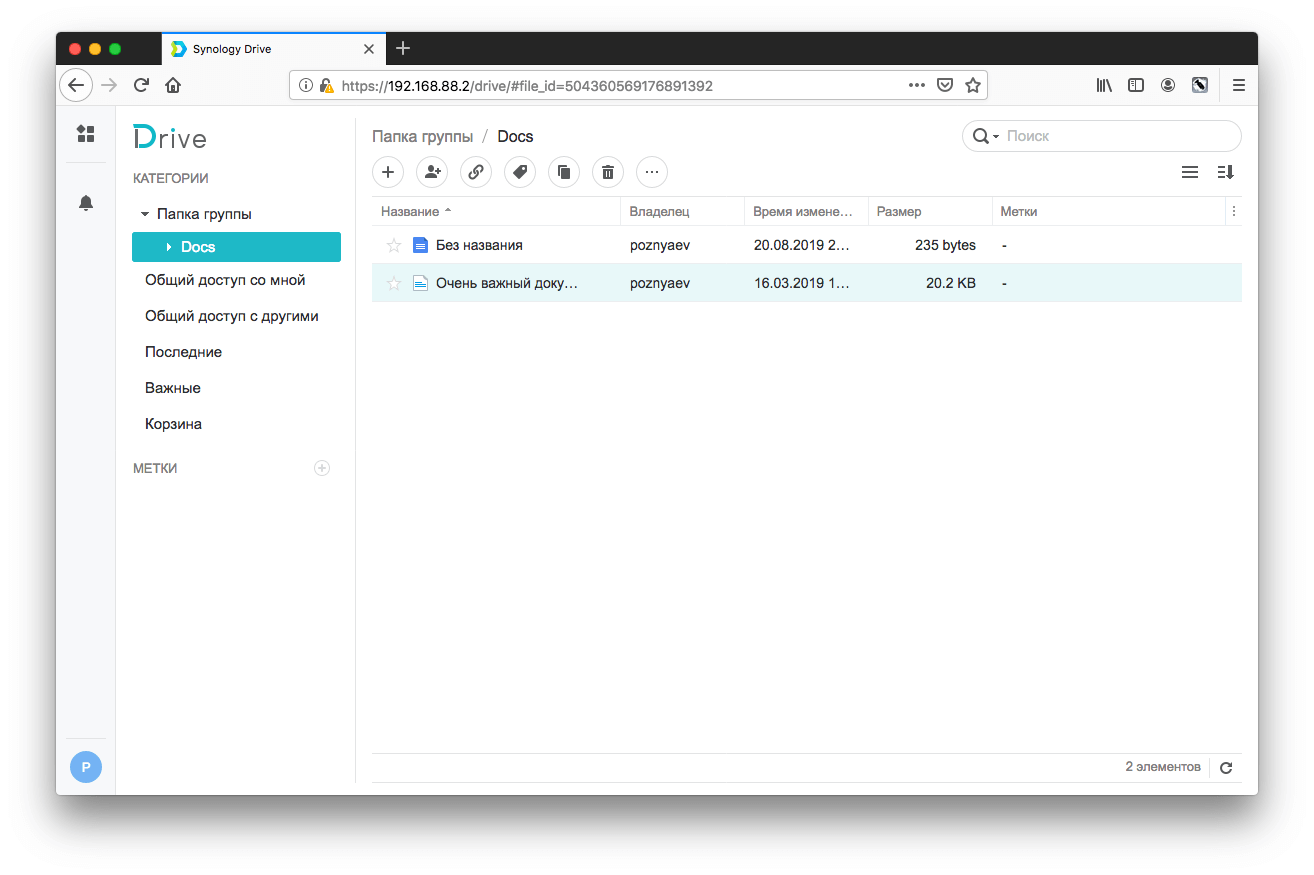
После создания документа, к примеру, в проводнике Windows или Finder вашего Mac, вы увидите файл с расширением .odoc:

А так файл отображается в Synology Drive:
В будущем открыть его можно двойным кликом в самом Synology Drive или через Проводник/Finder. Во втором случае у вас автоматически откроется браузер:

Ничего не напоминает панель редактирования?

Думаю, проблем с ее использованием у вас не возникнет.
Аналогичным образом выглядит работа с электронными таблицами и слайдами.
Пример Электронных таблиц, созданных в Synology Drive:

Пример Слайдов, созданных в Synology Drive:

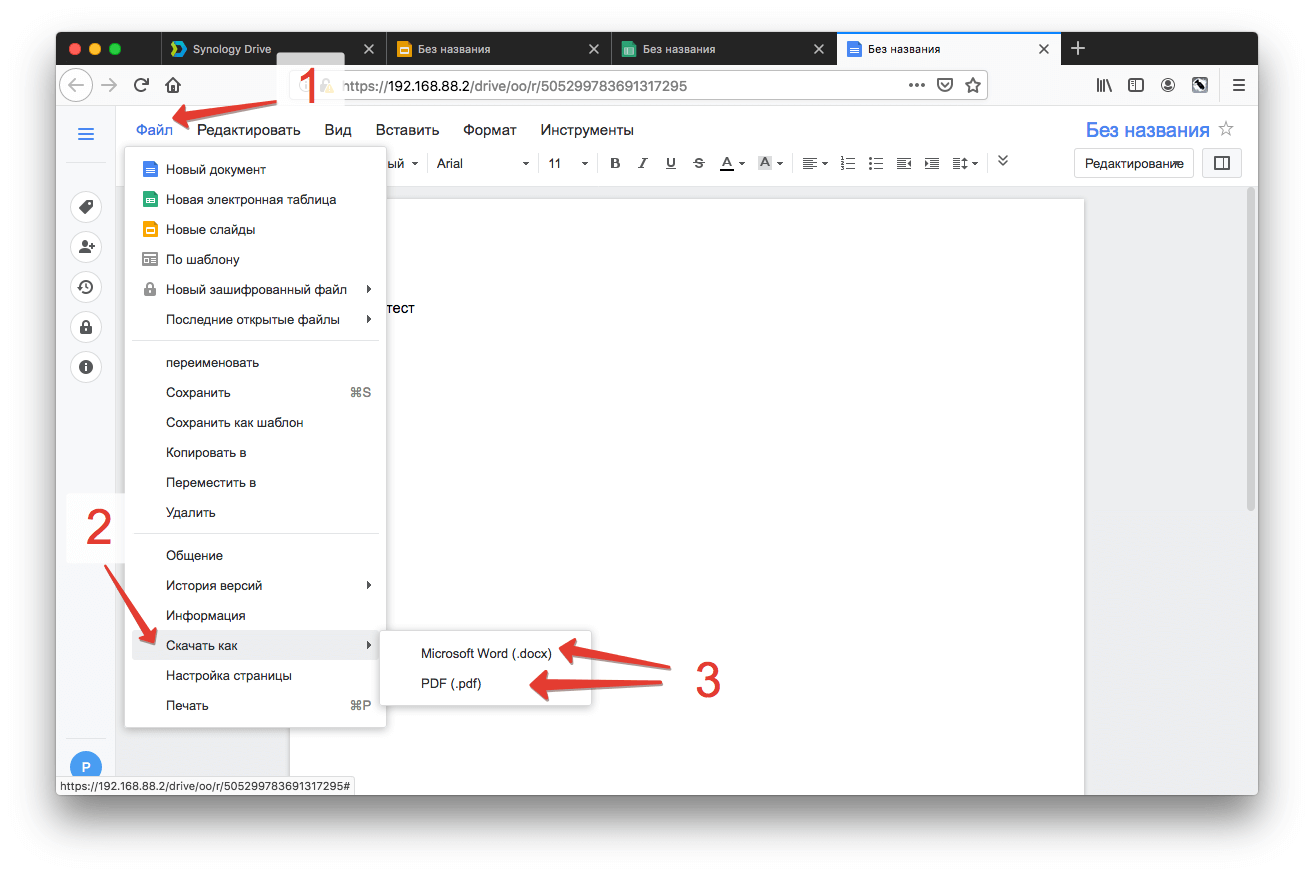
В любой момент вы можете сохранить документ или электронную таблицу в формате Microsoft или PDF.
В заключение
Предлагаемое Synology решение для комфортного хранения файлов и обмена ими — не просто емкий и более функциональный накопитель, а удобная современная платформа.