
Contents
- General Considerations
- Using the File Manager
-
File System Differences
- NTFS
- FAT32
-
Configuring /etc/fstab
- Preface
- Automatic Configuration
- Manual Configuration
- Other Resources
- Footnote
Ubuntu is capable of reading and writing files stored on Windows formatted partitions. These partitions are normally formatted with NTFS, but are sometimes formatted with FAT32. You will also see FAT16 on other devices.
General Considerations
Ubuntu will show files and folders in NTFS/FAT32 filesystems which are hidden in Windows. Consequently, important hidden system files in the Windows C:\ partition will show up if this is mounted. Since it is all-too-easy to accidentally modify or delete files which are essential for Windows, it is advisable to mount your Windows C:\ partition as seldom as possible, preferably not at all, or read-only by configuring /etc/fstab (see below). If you have data which you want to access regularly from both Windows and Ubuntu, it is better to create a separate data partition for this, formatted NTFS.
Whether you write to your Windows C:\ partition or a shared NTFS data partition, be aware that if you are using Windows 7, and Windows 7 is in a hibernated state when you write to the NTFS partition from Ubuntu, you will lose all your changes. This is because when Windows 7 is hibernated it writes the system state to a file stored on disk and restores from that file when the system is re-awakened, thus restoring the whole fileystem to a state before any changes made from Ubuntu. In Windows 7 you must avoid using hibernation. With Windows 8, the situation is more complex in that, by default, it uses a hybrid hibernation/shutdown when you shut the system down. Any changes made by Ubuntu will be lost when you reboot into Ubuntu.
With both Windows 7 and Windows 8 (when installed to a legacy mbr partition table) there is usually a 100-200MB boot partition labelled «SYSTEM». Do not mount it — you do not need to. Similarly it is highly advisable to leave any recovery partitions unmounted.
Using the File Manager
For those using a desktop version of Ubuntu, or one of its offical derivatives, the easiest and quickest way of mounting NTFS or FAT32 partitions is from the file manager: Nautilus in Ubuntu, Thunar in Xubuntu, Dolphin in Kubuntu and PCManFM in Lubuntu. Simply look in the left pane of the file manager for the partition you wish to mount and click on it — it will be mounted and its contents will show up in the main pane. Partitions show with their labels if labelled, or their size if not.
Unless you require your Windows partition — or a NTFS/FAT32 partition for data shared with Windows — mounted every time you boot up for one of the reasons given below, mounting from the file manager in this way should suffice.
If you are using a Wubi version of Ubuntu and you wish to browse the host partition, you do not need to mount it — it is mounted already in the «host» folder. Click on «File System» in the left pane of the Nautilus file browser and then open the host folder which you will see in the main pane.
File System Differences
For a more in depth analysis, see LinuxFilesystemsExplained, but here are some basics:
- Windows 7, Vista, XP, 2000, older NT systems, and Windows Server 2003 and 2008 are formatted with NTFS. In rare cases, OEM manufacturers have pre-installed Windows XP and Windows 2000 to FAT32 filesystems.
- Older versions of Windows such as Windows ME, 98, and 95 are formatted with FAT32.
- Flash drives, such as a USB thumb drive or a camera’s flash card are typically formatted as FAT16. Some Flash drives are formatted with Microsoft’s proprietary exFAT file system.
In Windows, you can check which filesystem your partition is formatted with by right-clicking the partition in Windows Explorer and selecting Properties. In Ubuntu, run from terminal:
-
sudo fdisk -lu
NTFS
The ntfs-3g driver is used in Linux-based systems to read from and write to NTFS partitions.
NTFS (New Technology File System) is a file system developed by Microsoft and used by Windows computers (Windows 2000 and later). Until 2007, Linux distros relied on the kernel ntfs driver which was read-only. The userspace ntfs-3g driver now allows Linux-based systems to read from and write to NTFS formatted partitions.
The ntfs-3g driver is pre-installed in all recent versions of Ubuntu and healthy NTFS devices should work out of the box without further configuration. In Ubuntu versions 11.10 and later the ntfs-3g package included the functionality previously provided by ntfsprogs. Trying to install ntfsprogs in 11.10 (and possibly in 12.04) will cause the package-manager to ask if you wish to remove ntfs-3g. Users who have installed ntfsprogs and failed to notice the message from the package manager have unintentionally uninstalled ntfs-3g, after which the system falls back to the read-only kernel ntfs driver. Loss of the ntfs-3g driver for similar reasons has also been reported when upgrading from 11.04 to 11.10. If you are experiencing inability to write to a NTFS formatted partition or device, check whether or not the ntfs-3g package is installed.
FAT32
The vfat driver is used in linux to read and write FAT32 and FAT16 partitions.
Configuring /etc/fstab
Preface
If you require one or more of your Windows partitions mounted automatically during bootup, it is necessary to add one line to the file /etc/fstab for each partition that is to be mounted. Some reasons for mounting partitions by means of /etc/fstab, rather than relying on the file manager, include:
- Convenience.
- Where more than one user account is in use during a session. Partitions mounted from one user account by means of the file manager are not accessible to the other account(s).
- Where libraries have been set up in applications such as Banshee or Rhythmbox (for music) or Shotwell (for photos). If those libraries contain files on partitions mounted by means of the file manager, an error will occur in a subsequent session if the partition is not mounted first.
-
Where more advanced or special mount options are needed. Three working configurations for different needs are given below, but anything more advanced is beyond the scope of this wiki page. The NTFS-3G manual gives a list of mount options suitable for NTFS filesystems.
Automatic Configuration
Although there are a number of GUI applications available from the Ubuntu Software Centre, none of these can be recommended at the time of this writing, unfortunately. They are obsolete and unmaintained and can all cause problems. Two examples are ntfs-config and PySDM. (PySDM is no longer in the repository with effect from 12.10.) If you find a recommendation anywhere for either of these applications, it is likely to be an old one, and should not be followed. At this time it is advisable to configure /etc/fstab manually.
Manual Configuration
First, you need to find the device locations of the partition(s) you wish to mount. Open a terminal and run:
-
sudo blkid
For illustration purposes, an example output from a computer setup with a Vista/Ubuntu dual-boot and shared NTFS data partition is shown here:
-
/dev/sda1: LABEL="Recovery" UUID="B23613F43613B875" TYPE="ntfs"
/dev/sda2: LABEL="Windows" UUID="38CE9483CE943AD8" TYPE="ntfs"
/dev/sda3: LABEL="Data" UUID="519CB82E5888AD0F" TYPE="ntfs"
/dev/sda5: UUID="00d7d951-2a35-40fd-8e5d-411bb824ff3b" TYPE="swap"
/dev/sda6: LABEL="Ubuntu" UUID="6044b1d0-208e-4ab3-850d-03a92e1516fc" TYPE="ext4"
The first three partitions, all NTFS, are the ones that concern us here. There are no FAT32 partitions. In this instance, all three NTFS partitions have partition labels, which makes it easier to identify the purpose of each. If your blkid output does not include partition labels, this means that the partitions do not have labels and you will have to determine which partition you wish to mount by another means. Of the three NTFS partitions, we are going to configure /etc/fstab with only the third, the Data partition. Partition /dev/sda1 is the OEM manufacturer’s recovery partition and should be left unmounted, or as described below. Partition /dev/sda2 is the Windows C:\ partition and is best not included in /etc/fstab for the reasons described above, or mounted read-only — see below.
You will now need to create a mountpoint for each NTFS partition that you wish to mount by means of /etc/fstab. In our illustration we are going to add one entry only for /dev/sda3. From a terminal:
-
sudo mkdir /media/Data
In this case we have created a mountpoint with the same name – Data – as the partition label. You may use (almost) any string you wish.
Before editing /etc/fstab directly, it is a good idea to make a backup. From a terminal:
-
sudo cp /etc/fstab /etc/fstab.orig
Now open /etc/fstab in a text editor with root privileges. In Ubuntu:
-
gksudo gedit /etc/fstab
In Kubuntu:
-
kdesudo kate /etc/fstab
In Xubuntu or Lubuntu:
-
gksudo leafpad /etc/fstab
For a general-purpose read-write mount, add this line to the end of /etc/fstab:
-
UUID=519CB82E5888AD0F /media/Data ntfs-3g defaults,windows_names,locale=en_US.utf8 0 0
Replace the UUID with the one relevant for your partition as shown in your blkid output. “519CB82E5888AD0F” will not work for you.
Also, substitute your mountpoint for “/media/Data”. In case you have a blank space in the name of the mountpoint you want to use like «New Volume» instead of «Data» located in «/media» use «/media/New\040Volume». The space character is created by using «\040» in the fstab.
You will also need to change the “locale=en_US.utf8” option to one suitable for your location and language if you are not in the USA. You can determine your locale with this terminal command:
-
locale
Or for a list of all locales available on your system:
-
locale -a
Now save your edited /etc/fstab and close the text editor. The partition(s) you have configured will be mounted the next time you reboot, but to mount them now:
-
sudo mount -a
Two special cases
Sample /etc/fstab lines are suggested for two special cases.
Option 1 — for mounting read-only access. For example, this would be suitable for mounting your Windows C:\ partition if you need to access it. Modify the line below with your UUID and mountpoint:
-
UUID=519CB82E5888AD0F /media/Data ntfs defaults,umask=222 0 0
Option 2 — to ensure that Ubuntu does not mount the partition and also disables graphical mounting from the file manager. For example, you may wish to ensure that recovery and system partitions are never inadvertently mounted and do not appear in the file manager. In this case you need to create a mountpoint in /mnt, not /media. Modify the line below with your UUID and mountpoint:
-
UUID=519CB82E5888AD0F /mnt/Data ntfs noauto,umask=222 0 0
Note: with these mount options, the partition does not appear in the Devices list in the left pane of Nautilus (the Ubuntu file manager), but it still appears in Dolphin, the Kubuntu File Manager. Clicking on the partition in Dolphin causes the display of an error message. This solution is less elegant in Dolphin than with Nautilus, but the desired effect is achieved — the partition cannot be mounted.
If you need to revert to the original configuration:
-
sudo mv /etc/fstab.orig /etc/fstab
sudo umount  /media/<mountpoint>
Substitute your mountpoint in the second line.
FAT32 Partition
FAT32 partitions are mostly only found in older systems. If you are creating a partition to be used for data to be shared between Windows and Ubuntu, it is better to choose NTFS. Should you have a FAT32 partition which you need to mount using /etc/fstab, this will work to mount it read-write:
-
UUID=<UUID> /media/<mountpoint> vfat defaults,user,exec,uid=1000,gid=100,umask=000 0 0
Replace <UUID> with the UUID that blkid reveals for your partition, and adjust for your mountpoint. These mount options will make all files in the partition executable. If you have other needs, you will need to modify the options, but this is beyond the scope of this wiki page.
Other Resources
-
ntfs-3g homepage
-
Fstab
-
LinuxFilesystemsExplained
-
How to fstab
-
CategoryBootAndPartition
This page has recently been subject to significant revision. If you have any comments about current content, or suggestions for further additions or edits, please head over to this Ubuntu forums discussion thread so that we can co-ordinate our efforts.
Если у вас на компьютере установлены две операционные системы: Linux и Windows 8, 8.1 или 10 и вы захотите примонтировать системный раздел Windows, чтобы скопировать оттуда или записать туда файлы, то, скорее всего, столкнетесь с ошибкой.
В современных системах такие разделы монтируются в режиме только для чтения по умолчанию, но если вам надо туда что-то записать, то придется немного поработать. В этой статье мы поговорим о том как подключить диск Windows в Linux.
Содержание статьи
- Монтирование раздела Windows в Linux
- Выводы
Скорее всего, если вы попытаетесь примонтировать раздел Windows, утилита mount выдаст вот такое сообщение: Error mounting: windows is hibernated refused to mount и примонтирует его только для чтения:

Это связано с использованием в новых версиях Windows алгоритма гибридной загрузки с использованием гибернации, которая и мешает вам получить доступ к вашим файлам.
Такое сообщение может сбить вас с толку. Обычно мы выключаем компьютер, с помощью пункта Завершение работы в меню Пуск. Никаких упоминаний о гибернации там нет, но Linux утверждает система находиться в режиме гибернации. А дело в том, что современные версии Windows используют гибернацию по умолчанию для ускорения загрузки.
Когда вы выключаете современную операционную систему Windows, она выключается не полностью, часть системных процессов сохраняются на диск, чтобы загрузка выполнялась быстрее. Это ускоряет процесс загрузки, но и имеет недостаток при использовании Linux.
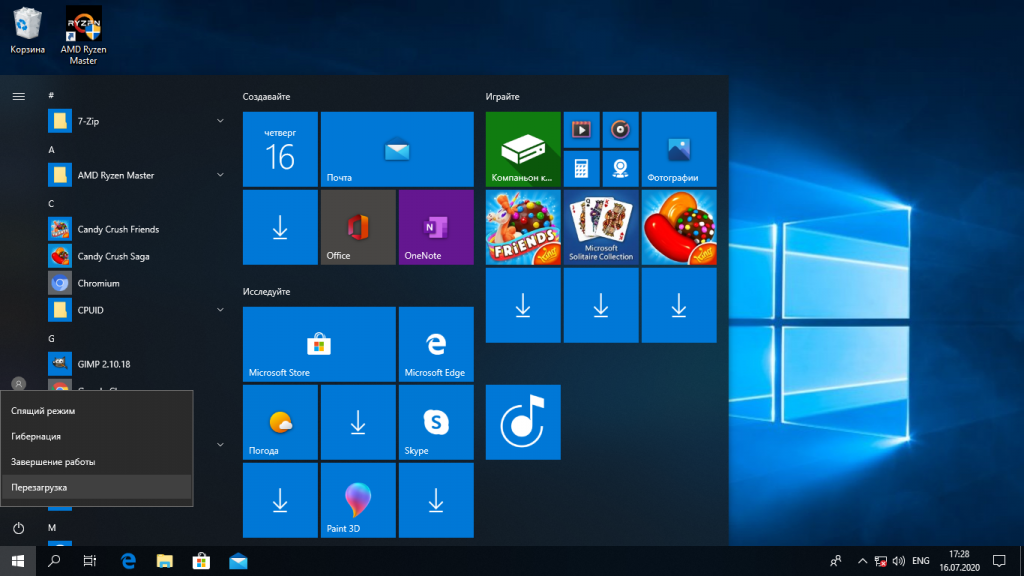
Чтобы исправить эту проблему можно загрузить Windows и отключить гибридную загрузку. Единственным недостатком такого метода будет замедление загрузки системы. Она будет загружаться приблизительно с такой же скоростью, как Windows 7. Но зато вы сможете выполнить подключение раздела Windows в Linux. Ещё можно войти в Windows и перезагрузить компьютер, при выборе этой опции гибернация не используется.
1. Перезагрузка Windows
Windows не использует гибридную загрузку во время перезагрузки. Если выбрать пункт перезагрузка, то сохраненное начальное состояние будет стерто и создано новое.
Поэтому если в следующий раз захотите перейти в систему Linux из Windows — выбирайте пункт перезагрузка. Так система не уйдет в гибернацию и у вас не возникнет ошибок во время монтирования раздела Windows в Linux.
2. Выключение с клавишей Shift
Если вам нужно именно выключить компьютер есть еще один способ. Когда выбираете пункт меню выключить удерживайте нажатой клавишу Shift. Тогда система тоже не будет использовать гибернацию и полностью выключиться.

3. Отключение гибридной загрузки
Если вы не хотите думать какую кнопку нажимать и что делать при каждой перезагрузке Windows, можно полностью отключить гибридную загрузку. Но тогда Windows будет загружаться медленнее. Это также может понадобиться если аппаратное обеспечение компьютера не поддерживает гибридную загрузку. После ее отключения вы сможете легко выполнять монтирование разделов Windows в Linux без каких-либо ошибок в режиме как для чтения так и для записи.
Для этого загрузитесь в Windows, откройте панель управления, откройте пункт Оборудование и звук. В разделе Электропитание выберите Изменение параметров, которые сейчас недоступны:
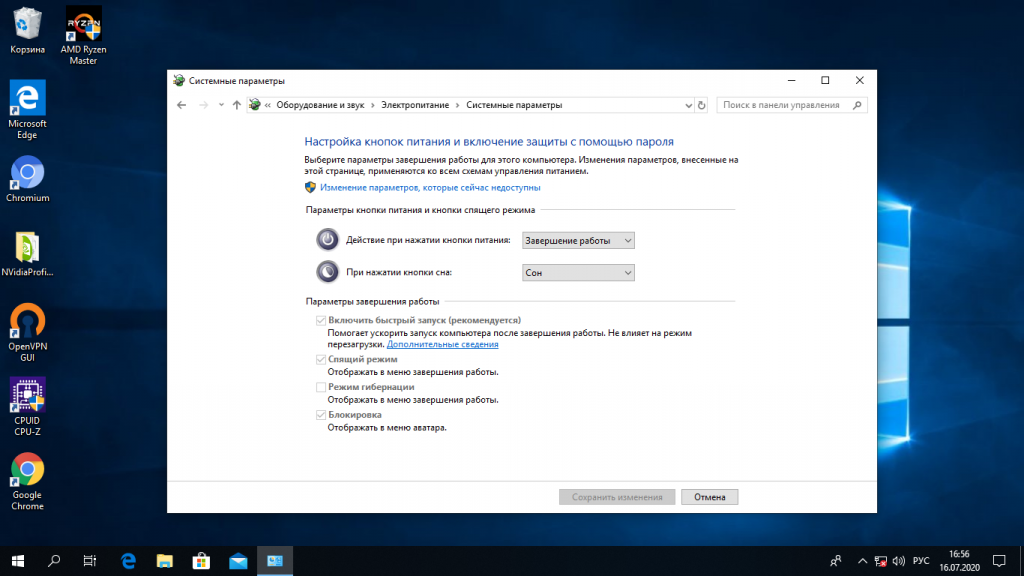
В открывшимся окне кликните по ссылке Изменить параметры, которые сейчас недоступны, затем пролистайте вниз и снимите галочку с пункта Включить быстрый запуск:

Затем нажмите кнопку Сохранить изменения.
4. Удаление файла Hiberfile.sys утилитой диски
Вместо перенастройки Windows, можно автоматически удалять файл гибернации каждый раз когда вам нужно выполнить монтирование разделов Windows в Linux. Конечно, после такой процедуры система будет загружаться медленнее, но потом она снова создаст файлы гибридной загрузки и продолжит использовать быстрый запуск. Это идеальный вариант если вы нечасто пользуетесь системным разделом Windows и не хотите терять скорость загрузки.
Но имейте в виду, что если вы действительно отправите компьютер в режим гибернации оставив открытыми программы и не сохраненные данные, то Linux все равно удалит реальный файл гибернации вместе со всеми вашими данными. Разницу между видами гибернации определить невозможно.
Для удаления файла hiberfile.sys достаточно добавить опцию монтирования файловой системы ntfs remove_hiberfile. Этот же совет вы можете видеть когда пытаетесь монтировать системный раздел с помощью ntfs3g.
В Ubuntu и других дистрибутивах с оболочкой Gnome это можно сделать с помощью утилиты Диски:
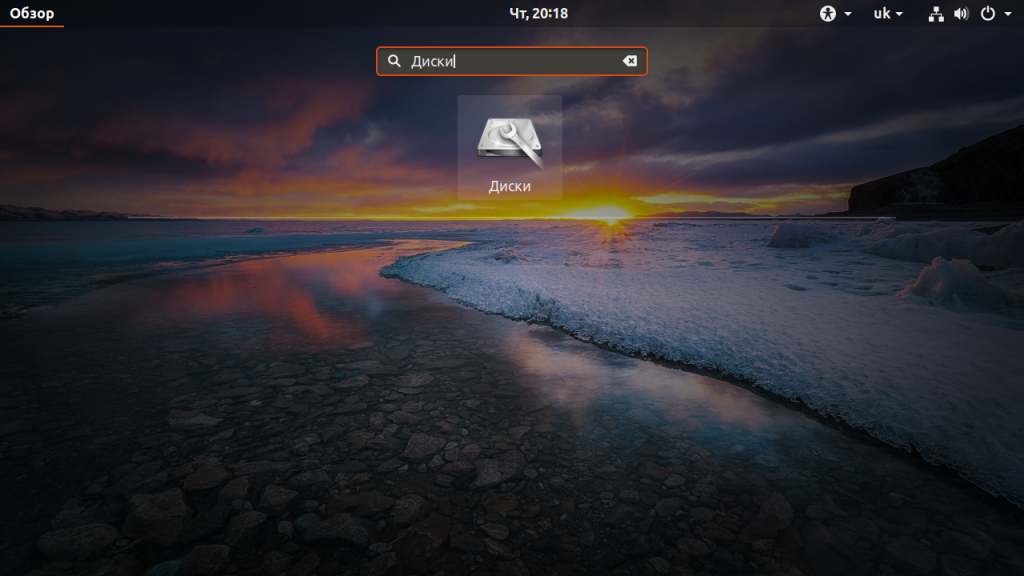
В правой части окна программы выберите жесткий диск с Windows, затем выберите системный раздел Windows. Кликните по кнопке с шестерней и выберите Изменить параметры подключения:
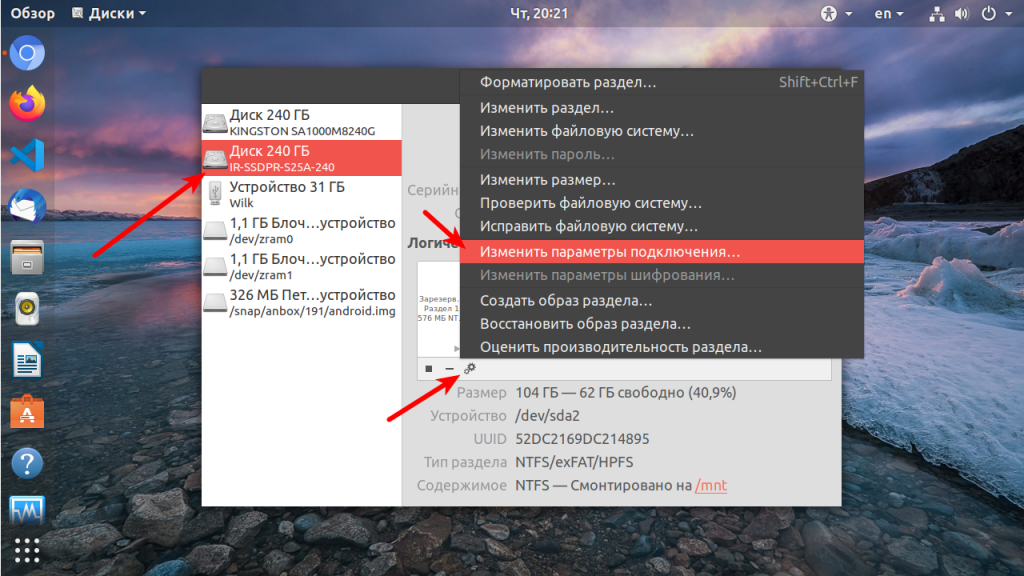
Переключите выключатель Automatic Mount Options в положение Off, затем вставьте следующую строку в конец опций монтирования внизу окна:
,remove_hiberfile
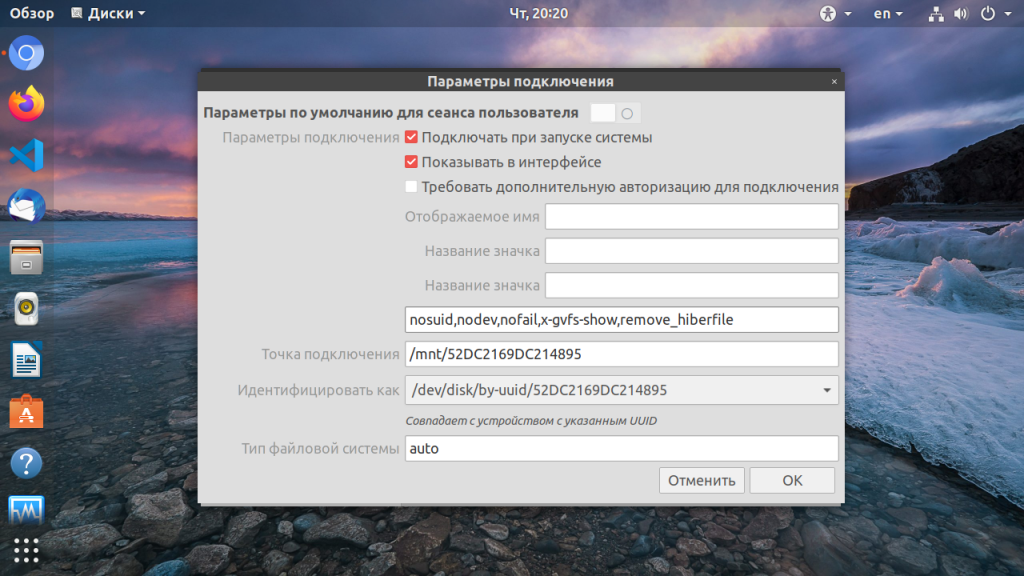
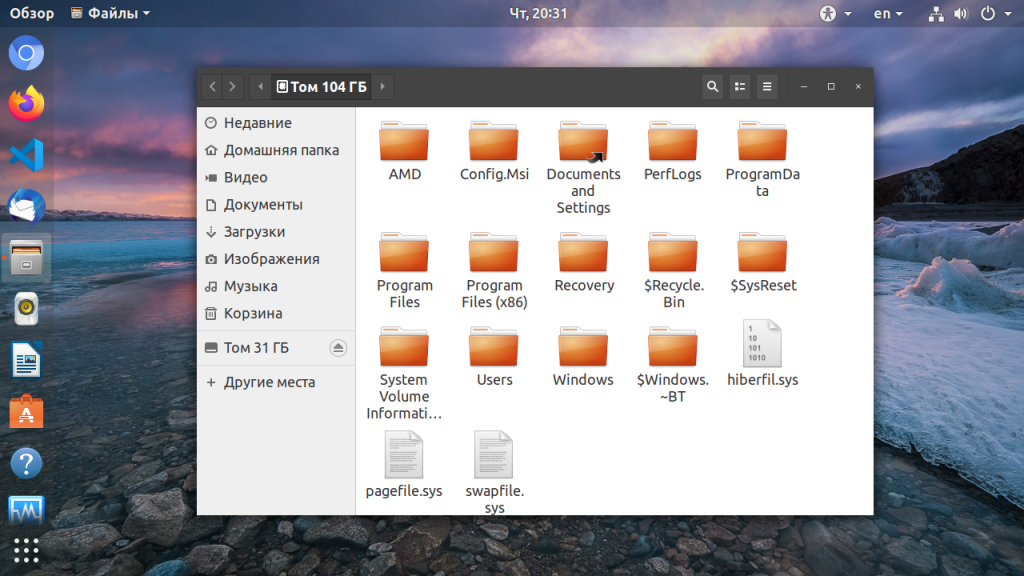
Нажмите OK и введите свой пароль. Теперь можете попробовать примонтировать системный раздел Windows в файловом менеджере Nautilus. Как видите, монтирование выполняется успешно, без каких-либо ошибок. Если файл гибернации был включен система его попросту удалит.
5. Удаление файла hiberfile.sys утилитой mount
Если вам нужно просто один раз подключить Windows раздел в Linux, несмотря на ошибку error mounting windows is hibernated и не настраивая никаких автоматических опций воспользуйтесь утилитой mount. Команде нужно передать имя системного раздела Windows включить ту же самую опцию, например:
mount -o defaults,rw,remove_hiberfile -t ntfs /dev/sda2 /mnt/ntfs
Здесь /dev/sda2 — раздел диска с Windows, а /mnt/ntfs — точка монтирования.
Эти действия необходимы, только если вам нужен доступ для записи файлов на системный раздел Windows. Если же вам просто нужно просмотреть или скопировать тот или иной файл можно выполнить монтирование разделов windows в Linux в режиме только для чтения. Например:
mount -o defaults,ro -t ntfs /dev/sda1 /mnt/ntfs
В Linux можно монтировать системные разделы в режиме только чтение, даже когда система Windows в гибернации.
Выводы
Независимо от того какой способ вы выбрали, в результате вы должны получить возможность подключить раздел Windows для чтения и записи:
Использование нескольких систем на одном компьютере — очень часто практикуется новичками. Обмен файлами между двумя системами — нормальное явление, а поэтому вы очень часто будете сталкиваться с этой ошибкой. Но эта статья поможет вам решить ее раз и навсегда. Если остались вопросы, пишите в комментариях!
If you are running a dual-boot of Ubuntu and Windows, sometimes you might fail to access a Windows partition (formatted with NTFS or FAT32 filesystem type), while using Ubuntu, after hibernating Windows (or when it’s not fully shutdown).
This is because, Linux cannot mount and open hibernated Windows partitions (the full discussion of this is beyond the ambit of this article).
In this article, we will simply show how to mount Windows partition in Ubuntu. We will explain a few useful methods of solving the above issue.
Mount Windows Using the File Manager
The first and safest way is to boot into Windows and fully shutdown the system. Once you have done that, power on the machine and select Ubuntu kernel from the grub menu to boot into Ubuntu.
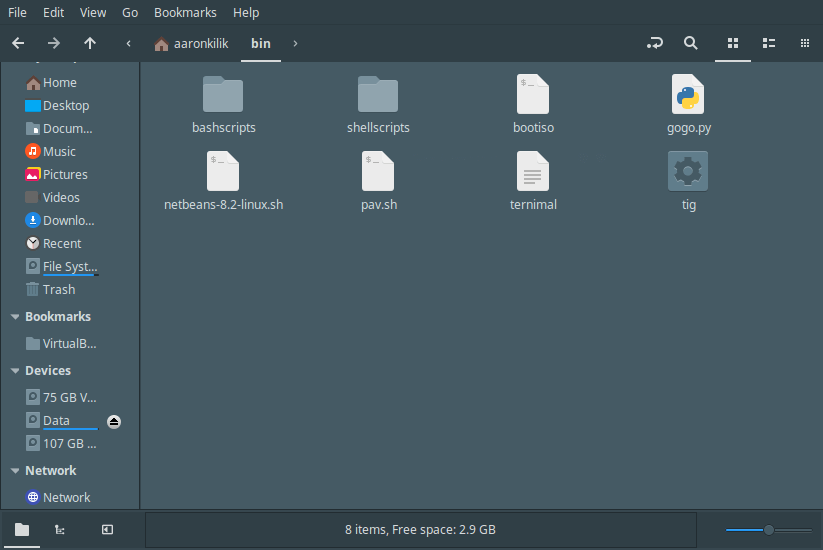
After a successful logon, open your file manager, and from the left pane, find the partition you wish to mount (under Devices) and click on it. It should be automatically mounted and its contents will show up in the main pane.
Mount Windows Partition in Read Only Mode From Terminal
The second method is to manually mount the filesystem in read only mode. Usually, all mounted filesystems are located under the directory /media/$USERNAME/.
Ensure that you have a mount point in that directory for the Windows partition (in this example, $USERNAME=aaronkilik and the Windows partition is mounted to a directory called WIN_PART, a name which corresponds to the device label):
$ cd /media/aaronkilik/
$ ls -l

In case the mount point is missing, create it using the mkdir command as shown (if you get “permission denied” errors, use sudo command to gain root privileges):
$ sudo mkdir /media/aaronkilik/WIN_PART
To find the device name, list all block devices attached to the system using the lsblk utility.
$ lsblk

Then mount the partition (/dev/sdb1 in this case) in read-only mode to the above directory as shown.
$ sudo mount -t vfat -o ro /dev/sdb1 /media/aaronkilik/WIN_PART		#fat32
OR
$ sudo mount -t ntfs-3g -o ro /dev/sdb1 /media/aaronkilik/WIN_PART	#ntfs
Now to get mount details (mount point, options etc..) of the device, run the mount command without any options and pipe its output to grep command.
$ mount | grep "sdb1"

After successfully mounting the device, you can access files on your Windows partition using any applications in Ubuntu. But, remember that, because the device is mounted as read-only, you will not be able to write to the partition or modify any files.
Also note that if Windows is in a hibernated state, if you write to or modify files in the Windows partition from Ubuntu, all your changes will be lost after a reboot.
For more information, refer to the Ubuntu community help wiki: Mounting Windows Partitions.
That’s all! In this article, we have shown how to mount Windows partition in Ubuntu. Use the feedback form below to reach us for any questions if you face any unique challenges or for any comments.
Содержание
Немного теории
-
Если вы раньше использовали ОС Windows, то вы, скорее всего, привыкли к дискам с именами (C:), (D:) и т.д. В ОС Ubuntu Linux все иначе. Если в Windows для каждого раздела винчестера, CD-привода, флешки или картридера, назначалась определенная буква, к примеру (E:), то в Linux содержимое всех подключаемых и внутренних дисков отображается в виде папок, которые монтируются (подключаются) в корень файловой системы (/) По началу это может показаться очень неудобным, но при постепенном осваивании системы Linux, вы поймете что так правильней и даже удобней.
В Linux подключение диска в основную файловую систему называется монтирование.
-
Список всех смонтированных устройств можно узнать командой mount
-
На данный момент Ubuntu Linux выполняет автоматическое монтирование всех обнаруженных подключаемых устройств (внешние винчестеры, флешки, фотоаппараты и т.д.) в корень файловой системы в директорию /media/. Например, если вы вставите флешку с меткой «Flash_card», то система смонтирует ее в каталог /media/Flash_card. В любом случае вам не надо задумываться куда и как монтировать внешние носители, т.к. они автоматически становятся доступны на панели рабочего стола в меню «Переход».
Однако ситуация с NTFS, FAT и FAT32 разделами основного (внутреннего) винчестера несколько иная. Чтобы каждый раз при попытке зайти на NTFS или FAT32 раздел не вводить пароль нужно выполнить действия рассмотренные ниже:
Способы монтирования
Способ 1: монтирование через универсально уникальный идентификатор (UUID)
Монтирование через идентификатор диска UUID является наиболее надёжным, работает во всех версиях Ubuntu (и не только Ubuntu).
UUID — это атрибут конкретной файловой системы, а не произвольное число, зависящее от физического порядка подключения дисков или случайностей инициализации дисковой подсистемы ядром.
Узнаем UUID разделов, для этого
-
в терминале выполняем команду:
sudo blkid
Примерный вывод:
/dev/sda1: UUID="00a4ad8e-dbcc-4c32-a0b4-074b5ee2bfb4" TYPE="ext4"
/dev/sda2: LABEL="Win7" UUID="0E42D6D242D6BE21" TYPE="ntfs"
/dev/sda3: LABEL="Shared" UUID="7ECCC7F5CCC7A62D" TYPE="ntfs"
/dev/sda4: UUID="1050e484-896f-42a9-bdb3-49eb1255cc77" TYPE="swap"
/dev/sr0: LABEL="DrWebLiveCD" TYPE="iso9660"
/dev/sdb1: LABEL="TRENDNET8GB" UUID="355B-FE37" TYPE="vfat"
Предположим, мы хотим подключить раздел «Shared» (NTFS-раздел, находящийся на основном диске компьютера) и «TRENDNET8GB» (флэшка, отформатированная в FAT32).
Бонус использования команды blkid по сравнению с инспекцией каталога /dev/disk/by-uuid/ в том,что вы сразу видите тип файловой системы на блочном устройстве, если ядру удалось его определить.
-
Создаём каталоги для монтирования:
sudo mkdir /mnt/Shared /mnt/TrendNet8Gb
-
Открываем от имени администратора файл /etc/fstab, содержащий информацию о всех монтируемых при загрузке разделах:
sudo nano /etc/fstab
-
Добавляем в конец файла,
для NTFS:UUID="7ECCC7F5CCC7A62D" /mnt/Shared ntfs rw,nls=utf8,gid=plugdev,umask=0002 0 0
для FAT и FAT32:UUID="355B-FE37" /mnt/TrendNet8Gb vfat rw,exec,codepage=866,nls=utf8,gid=plugdev,umask=0002,nofail,users 0 0
-
Монтируем только что вписанные разделы диска:
sudo mount -a
Способ 2: монтирование через имена устройств
Монтирование с помощью таблицы разделов поддерживается практически во всех версиях всех *nix-подобных операционных систем.
Считается устаревшим и строго не рекомендуется к постоянному использованию.
Единственным заметным плюсом является небольшая длина имён устройств, что удобно при прямой работе с консолью. Например, во время реанимации умершей системы.
-
Узнаём имена разделов. Для этого можно, опять же, воспользоваться командой blkid, либо обратиться к помощи системы:
cat /proc/partitions
Примерный вывод:
# cat /proc/partitions
major minor  #blocks  name

   8     0  488386584 sda
   8     1   20971520 sda1
   8     2    2097152 sda2
   8     3  464519168 sda3
   8    16  488386584 sdb
   8    17   20971520 sdb1
   8    18    2097152 sdb2
   8    19  464519168 sdb3
   9     1   10538496 md1
   9     0    6289344 md0
Разделы, оканчивающиеся цифрой — файловые системы. Разделы без цифры на конце — реальные физические устройства. В данном примере участвуют два физических диска (/dev/sda и /dev/sdb) и два рейд-массива (по сути — две файловые системы, не привязанные напрямую к какому-то одному физическому носителю).
Больше информации (как то точная геометрия и серийные номера физических дисков, что бывает нужно в целях более точной идентификации разделов) можно получить, воспользовавшись утилитами fdisk, sfdisk (для дисков, размеченных в MBR), parted (рекомендуется, понимает как разметку MBR, так и более современную GPT, используемую в системах с UEFI BIOS).
Пример вывода команды fdisk (вывод parted отличается очень незначительно):
# fdisk -u -l /dev/sd?

Disk /dev/sda: 500.1 GB, 500107862016 bytes
255 heads, 63 sectors/track, 60801 cylinders, total 976773168 sectors
Units = sectors of 1 * 512 = 512 bytes
Disk identifier: 0x8543ab30

   Device Boot      Start         End      Blocks   Id  System
/dev/sda1   *        2048    41945087    20971520   83  Linux
/dev/sda2        41945088    46139391     2097152   83  Linux
/dev/sda3        46139392   975177727   464519168   83  Linux

Disk /dev/sdb: 500.1 GB, 500107862016 bytes
255 heads, 63 sectors/track, 60801 cylinders, total 976773168 sectors
Units = sectors of 1 * 512 = 512 bytes
Disk identifier: 0x84a90046

   Device Boot      Start         End      Blocks   Id  System
/dev/sdb1   *        2048    41945087    20971520   83  Linux
/dev/sdb2        41945088    46139391     2097152   83  Linux
/dev/sdb3        46139392   975177727   464519168   83  Linux
Попробуем достучаться до массива md0.
-
Как и прежде, создаём каталог для монтирования файловой системы:
sudo mkdir /mnt/raid0
-
Предположим, мы не знаем, какая файловая система на диске. К счастью, в большинстве случаев вполне можно положиться на автоматическое определение системы.
$ sudo mount /dev/md0 /mnt/raid0 -t auto -o rw,nls=utf8,noatime

$ mount
....
/dev/md0 on /mnt/raid0 type ext3 (rw,noatime,nls=utf8)
Дополнительная информация
Я не стал загружать основной текст статьи расшифровкой опций монтирования, но несколько слов пояснения сказать необходимо.
-
rw (read-write, чтение-запись) — файловая система будет подключена с возможностью записи на неё пользователями.
Если вы хотите предотвратить любую запись на файловую систему вообще, указание одной только опции ro (read-only, только чтение) вас не спасёт — такие действия, как восстановление целостности системы по записям из журнала, будут проведены при подключении систем, поддерживающих журналирование. При необходимости предотвратить любую запись на файловую систему пользуйтесь другими средствами для монтирования, либо внимательно читайте документацию на утилиту монтирования для соответствующей файловой системы, если она допускает принудительное отключение подобных действий.
-
exec — все файлы на подключемой системе будут считаться исполнимыми, если система не поддерживает других механизмов указания исполнимости файла. Альтернативно, noexec запрещает исполнение любых бинарных файлов вообще.
-
codepage=866 — указывает, какую кодировку использовать для трансляции имён файлов на файловой системе. Кириллическая русская кодовая страница для файловой системы FAT — 866. Длинные имена на файловой системе (VFAT) сохраняются в уникоде, реально эта настройка нужна только для дисков, записанных на отличных от Windows системах, не поддерживающих соглашения VFAT.
-
nls=utf8 — указывает модулю файловой системы, какую кодировку использовать при передаче данных системе (и пользователю). Старое название этой опции — iocharset использовать запрещено — она будет удалена в следующих версиях программы.
Схематично взаимодействие этих двух опций можно представить как:
FS <=charset=> OS <=nls=> Applications <=> Operator
-
uid (gid) — указывает, какой пользователь (группа) будет владеть точкой подключения (и файлами на ней, если нет других способов определить владельца). gid=plugdev указывает, что все пользователи в группе 46(plugdev) могут обращаться к этому устройству. Локальные пользователи в Ubuntu обычно входят в эту группу.
-
nofail — если указанный том недоступен в момент загрузки, это не создаст ошибок и загрузка нормально продолжится.
Внимание: настольная (desktop) версия Ubuntu всё равно выдаст предупреждение и будет ждать ввода пользователя. -
users — допускает монтирование и размонтирование устройства обычными пользователями, причём, в отличие от user, размонтировать устройство может любой пользователь, не обязательно тот, что его монтировал.
Донастройка системы
Теперь диски стали подключаться автоматически, но так как это делается от имени root, у нас пропала возможность на подключенных дисках давать права на общий доступ, чтобы восстановить эту возможность добавим настройку в Samba:
sudo gedit /etc/samba/smb.conf
добавим в секцию [global]:
usershare owner only = false
Это ОЧЕНЬ ГРУБЫЙ ХАК. Для нормальной работы с пользователями на NTFS дисках — создайте на NTFS разделе файл .NTFS-3G/UserMapping
Ссылки
If you are rocking a dual-boot setup with Windows and Linux, you might want to access data stored in the Windows drives from the Linux system.
However, you might find that Windows drives do not appear in the file manager. This is because, in some distros, you need to manually mount them. Let’s take a look at how you can access your NTFS/Windows drives in Linux.
Step 1: Install the NTFS-3G Driver
To successfully mount and access NTFS drives on Linux, you will need to install a driver to ensure no incompatibility issues arise. The go-to driver when working with NTFS drives is NTFS-3G. It’s cross-compatible between Debian/Ubuntu derivatives, Arch Linux-based systems as well as RHEL/CentOS/Fedora systems.
To install the NTFS-3G driver on your Linux system, fire up a terminal and install it using the package manager of the distro that you’re running:
On Debian and Ubuntu, run:
sudo apt install ntfs-3g
On Arch-based systems, run:
sudo pacman -S ntfs-3g
To install the NTFS-3G driver on Fedora, CentOS, or RHEL, issue the following command:
sudo dnf install ntfs-3g
This should install the driver on your Linux system. Now you can move on to the next steps.
Step 2: Identify the NTFS Partition
A preliminary step before mounting a drive is to first identify its device ID. This is important because you might end up causing unwanted data loss by working with the wrong partition or drive.
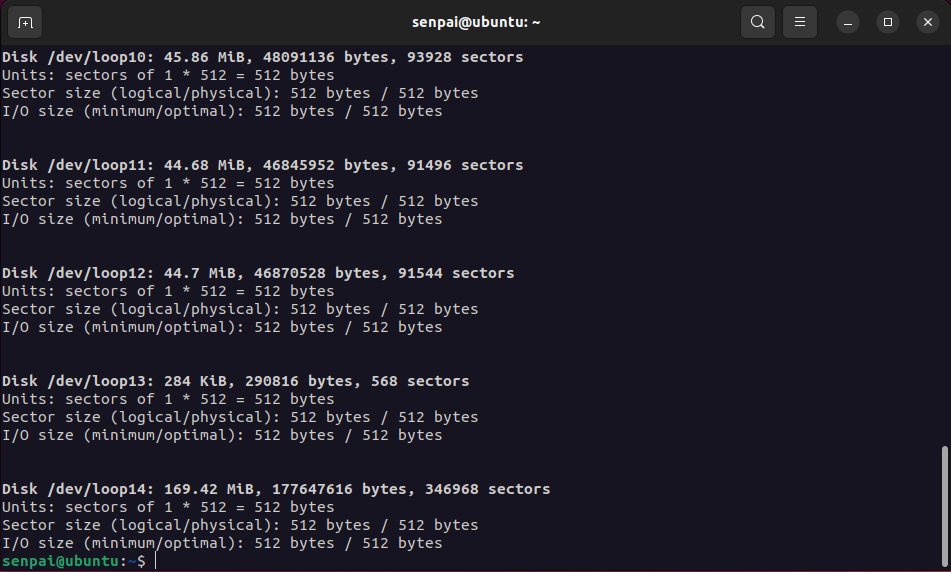
To identify all the drives and their partition types, use the fdisk command with the -l flag.
sudo fdisk -l
The output will display all the different drives and partitions along with useful information like size, available free space, partition type, and more. Take note of the device name carefully. You will be needing it later on in this guide.
Step 3: Make a Directory to Mount the Drive
In Linux, everything is treated as a file, including hardware devices. So, to mount your NTFS drives on Linux, you have to create a separate directory wherein the drive will be mounted, and its content laid out.
This process is as simple as creating a regular directory on Linux. Using the mkdir command, create a new directory in the root partition of your Linux system. For the sake of better organization, make the directory under the /mnt directory and name it «media».
sudo mkdir /mnt/media
Now that we’ve allocated a directory for the NTFS drive, we need to update the file system tables on Linux with the location of the drive.
Step 4: Update the File System Tables and Mount the Drive
Updating the file system tables is a crucial step that enables your Linux machine to recognize and mount new storage drives. In Linux, the /etc/fstab file stores the file system configurations.
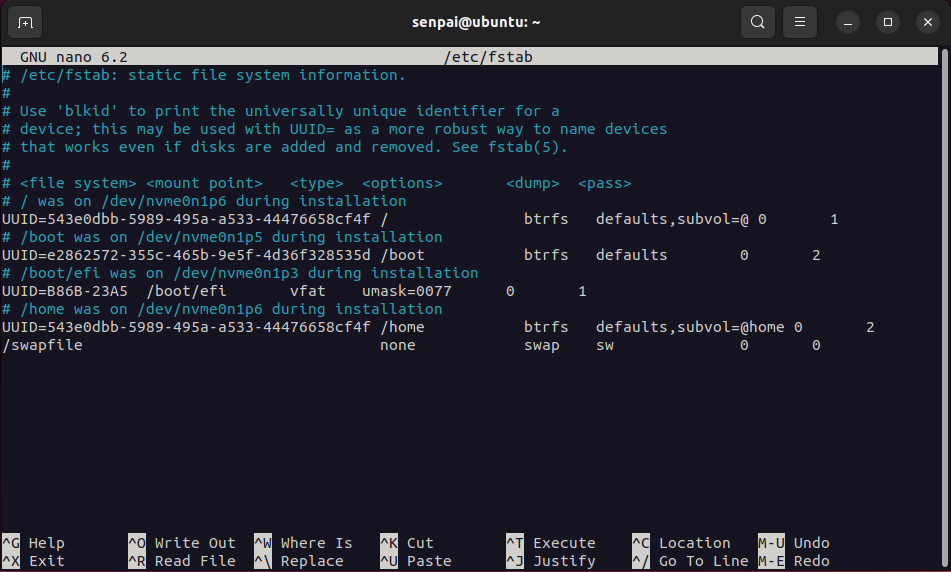
sudo nano /etc/fstab
You need to add the NTFS drive’s location and other important data to make sure that your system can mount it without any hiccups.
To update the file system table of your Linux system, use any text editor of your choice and open the /etc/fstab file.
In a new line, add the NTFS drive location, the directory that you created earlier, the driver to use (NTFS-3g), and read, write, and user access information. Make sure to separate each input with one Tab space. If you’re unsure what to type in, you can replicate the settings for any drive that’s already mounted and functional.
Write out the file once you’re done inputting the data. Fire up the terminal and use the mount command in conjunction with your device ID to mount it:
mount /dev/sda3 /mnt/media/drive_location_here
In case you wish to unmount the drive, you can do that using the umount command:
umount /dev/sda3 /mnt/media/drive_location_here
That’s all you need to do. Optionally you can restart your system, however, it won’t be required in most cases. You can now explore your NTFS drive from the terminal using the cd command or via the file manager of your Linux distro.
Now You Can Access Windows Drives in Linux
While it may be a bit tedious, it is still straightforward and a permanent process. You can now freely mount and unmount your Windows drives when logged into Linux. In case you want to permanently use the drive on Linux, you will need to format it.