
-
#1
I want to transfer files — documents and pictures — from my Nexus 7 2 to my PC. When I connected the two the first time after installing Windows 10, the computer seemed to take ages transferring material from the Nexus to the PC, created a folder called Nexus 7 in ‘This PC’ and then said the folder was empty. It does not see the tablet as a separate drive. Fortunately the material is still on the Nexus, but I want to work on it in my PC. However many times I switch on and off, disconnect etc, the same thing happens, except for the apparent transfer of material. The PC is recognising it as a multi-media device and an empty one at that. When I disconnect, the ‘new folder’ disappears but reappears when I connect it again. Non-techy responses please!
-
#2
I was able to connect to my Nexus 7 as an FTP file server on my home network. There are several steps, but hopefully I can explain them well.
First, you need a file explorer program on your Nexus 7. The one I use is the free «ES File Explorer File Manager.» It includes a utility for making the tablet an FTP server.
Once ES File Explorer is installed, turn on the tablet’s WiFi to connect to your network. Open the ES File Explorer’s main menu, expand the ‘Network’ group, and tap ‘Remote Manager.’ You should see a screen that shows the tablet’s FTP address like this:
ftp://xxx.xxx.x.x:xxxx
From this same screen, activate the FTP function by tapping the «Turn on» button. (To get to this function more quickly in the future, tap the little ‘Settings’ icon at the bottom and click the «Create shortcut» option on the next screen. This will place a shortcut on your home screen.)
Now you have to create a new network place on your PC. Open «This PC» to show your Folders, Devices & drives, and Network locations. If you don’t see a Network locations group, it’s okay because we have to add at least one for it to show up.
Right-click in the window’s blank space and select «Add a network location.» Click NEXT, select «Choose a custom network location», and under «Internet or network address» type the FTP address you saw on your tablet, i.e. «ftp://xxx.xxx.x.x:xxxx» (Without the quotes.)
Click NEXT, check the box for «Log on anonymously», click NEXT, and give the link a friendly name like «Nexus 7» and click NEXT. When you click FINISH, a file explorer window should appear showing the file structure of your Nexus 7.
-
#3
Or there’s a much simpler method than my previous post. (Don’t know why I didn’t think of it earlier.) My Nexus 7 is running Lollipop (5.1.1) and it can connect to my Windows 10 PC as a data storage device via the USB cable by making the following settings on the tablet:
On the tablet’s ‘Settings’ page, under the ‘Device’ group, click «Storage.» On the next screen click the 3 little dots in the upper right corner & tap on «USB computer connection.» Check the box for «Media device (MTP).»
Now, when you connect the tablet to the PC via USB, you should get a familiar popup asking what you want to do. Select «Open device to view files.»
-
#4
Thank you. The second is certainly more appealing to this non techy person! Unfortunately, I suppose because my Nexus is running version 6.0, it doesn’t follow though. When I go to device, I can go to ‘Storage and USB’, and all the 3 little dots offer me is ‘Help and Feedback’. That offers me ‘Copy files to a computer’, that offers me ‘transfer files using a USB cable’ which then tells me the same as you have given, about having MTP ticked. But I have no idea where to find this option!
Also, it says to check that the USB cable works, but it worked perfectly with Windows 7. On the Computer, Settings, Devices, the computer does see the Nexus 7, but as I say above, it identifies it as part of ‘This PC’ in File Explorer, and says it’s empty of files.
Any further avoce would be welcome. I see hat I have Phone Companion/Android/ on my desktop, and it looks as
-
#5
By the way, my PC recognises my camera, no problem.
-
#6
My last para two posts ago went odd. What I wanted to say was that I see I have found Phone Companion/Android/… on my desktop, and it looks as if that MIGHT solve the problem, if I sign up for a Microsoft account, which I have resisted hitherto. (Or have I done so, in signing up for this forum?!!) What do you think?
-
#8
I have just dared return to this problem. I suspect there may have been an update on both Nexus and Windows 10 meantime, but somehow the problem is solved. The sequence is: Storage and USB/three little dots top r h corner/Help and feedback/Copy files to computer/Transfer files using USB cable/Windows Transfer/then follow the instructions. Many, many thanks Wegmand for setting me on the right path!
-
#9
Companion/Android/… on my desktop, and it looks as if that MIGHT solve the problem, if I sign up for a Microsoft account, which I have resisted hitherto. (Or have I done so, in signing up for this forum?!!)
This forum is not linked to Microsoft.
-
#10
I have just dared return to this problem. I suspect there may have been an update on both Nexus and Windows 10 meantime, but somehow the problem is solved. The sequence is: Storage and USB/three little dots top r h corner/Help and feedback/Copy files to computer/Transfer files using USB cable/Windows Transfer/then follow the instructions. Many, many thanks Wegmand for setting me on the right path!
So glad you took another stab at the issue and posted the solution. I’m sure it will be helpful to others using the Android 6.0 version of the Nexus 7.
-
#11
In fact it turns out to be even simpler. 1. Connect tablet and PC with USB cable. 2. Pull down notifications window on tablet. 3. Tap on ‘USB for charging’ to get more options. (I don’t think that was available when I started this thread) 4. Select ‘File transfers’ 5. Nexus 7 then behaves like an external drive, which is what was wanted all along.
-
#12
I have just dared return to this problem. I suspect there may have been an update on both Nexus and Windows 10 meantime, but somehow the problem is solved. The sequence is: Storage and USB/three little dots top r h corner/Help and feedback/Copy files to computer/Transfer files using USB cable/Windows Transfer/then follow the instructions. Many, many thanks Wegmand for setting me on the right path!
Thank you so much for the forum. Didn’t make the link between the Windows 10 upgrade on my PC and being unable to get a proper connection with my Nexus 7.
-
#13
This is still a problem for me. I can set my Nexus 7 to MTP mode, and it shows up as «Internal Storage» just fine in Windows Explorer. The problem is when I go to the «Movies» folder it says «This Folder Is Empty» when I know for a fact that it isn’t. On Windows 7 it showed me the .mp4 files I had in that directory (I use a 3rd party app to play .mp4 files).
How do I get it to show me all the files in that directory?
-
#14
I have just dared return to this problem. I suspect there may have been an update on both Nexus and Windows 10 meantime, but somehow the problem is solved. The sequence is: Storage and USB/three little dots top r h corner/Help and feedback/Copy files to computer/Transfer files using USB cable/Windows Transfer/then follow the instructions. Many, many thanks Wegmand for setting me on the right path!
Thank you so much for this post and getting an answer to this issue. So useful, thanks again.
-
#15
Like with the previous post this is still a problem for me. I too can set my Nexus 7 to MTP mode, and it shows up as «Internal Storage» just fine in Windows Explorer. The problem is when I go to the «Movies» folder it says «This Folder Is Empty» when I know for a fact that it isn’t. In fact, all the folders say they are empty.
Thanks to wegmand’s instructions above I was able to connect to my Nexus 7 as an FTP file server on my home network — so MANY THANKS! However, I’m hoping this is just a workaround and would like to get it Windows to show me all the files in my directories would jumping through hoops.
Does anyone have an update on this issue? Thanks!
Need help with connecting Nexus 7 2013 to Windows 10 (64 bit)
-
Thread starter
Thread startercooljeff913
-
Start date
Start date
You should upgrade or use an alternative browser.
-
-
#1
I have the latest drivers from Google as well as the latest ADB and Fastboot.
My tablet is running Android 6.01 Build MOB30X.
When I connect the tablet to the computer using the original USB cable that came with the device, I receive an error «USB device not recognized».
If I manually add it in the Device Manager, it tries to install and then returns the error
«This device cannot start. (Code 10)
The specified request is not a valid operation for the target device.»
When I look at the USB devices in the Device Manager, I see this:
«Windows has stopped this device because it has reported problems. (Code 43)
A request for the USB device descriptor failed.»
My PC is running the latest version of Windows 10 64 bit.
Last edited by a moderator:
-
-
#2
-
- Jan 8, 2011
-
- 13,052
-
- 7,728
-
- 113
-
-
#3
-
- Mar 9, 2012
-
- 168,262
-
- 8,837
-
- 113
-
-
#4
-
-
#6
It is clear.
I was last able to connect in the beginning of March of this year with no problems.
-
- Mar 9, 2012
-
- 168,262
-
- 8,837
-
- 113
-
-
#7
Similar threads
- Advertising
- Cookies Policies
- Privacy
- Term & Conditions
- Topics
You can use a USB cable to connect your tablet to a Windows computer and transfer music, pictures, and other files in both directions. This connection uses the MTP protocol, which is supported by most recent versions of Windows. If you are using USB tethering, you must turn that off before you can use USB to transfer files between your tablet and computer.
When you connect your tablet to the USB port on your computer, its USB storage is mounted as a drive and appears on your computer screen. You can now copy files back and forth as you would use any other external device. When youre finished, simply disconnect the tablet by unplugging the USB cable.
How to turn on or off USB tethering on Nexus 7
- To turn USB tethering on or off, go to Settings > Wireless & networks > More > Tethering & portable hotspot.
How to change Nexus 7 USB connection options
- To change your tablets USB connection options, go to Settings > Device > Storage > Menu > USB computer connection.
Help Us Grow
If you like this post, please share it with your friends.
You are free to copy and redistribute this article in any medium or format, as long as you keep the links in the article or provide a link back to this page.
Few days back I had a problem that My Nexus 7 Won’t Connect on PC via USB. For me it occur while I was trying to unlock the boot loader.But it might occur for various reason like using multiple smartphones on same Pc etc.When I search for the solution on the web I found out that many people share the same issue. The reason it occurs is because of the nexus 7 drivers are not properly install on your PC.

In this article I will be discussing few solutions to Connect Nexus 7 not connecting to pc.
Solution I
Try connecting to different computer or with different Nexus 7 USB to PC. If the problem not solved then moved to the next solutions.
Solution II
Try ptp options instead of mtp. Now this is Temporary solution to Nexus 7 not connecting to pc and might work for some of you but it work for me and I had used it for a long time until I found the permanent solution.If you go to settings>storage>tap on the top right 3 vertical dots and select usb connections.
By default mtp (media transfer protocol) is selected but when I select ptp (picture transfer protocol) my device was detected in my pc. You will not see your device as SD card but as a camera device and would only able to access the DCIM folder.Ptp only lets you moves the pictures between pc and nexus but you can transfer any files as well, just ignore the warning that you get and click OK.
Solution III
You can also try file transfer using wifi.There are many apps on the plays store but I found Airdroid and ES file Explorer the best.And the file transfer limit is much faster than the normal cable connections.
You can also use the torrent client like bit torrent sync , this create a share folder on your Pc and your device.So whatever is placed in that shared folder gets sync in both system and the best part is no third party server is involved.
Solution IV
I found the permanent solution of Nexus 7 not connecting to pc via usb by reinstalling the Nexus 7 drivers. As stated before this problem is caused when your system is unable to recognized the device drivers properly.I found this method not to be full proof but with some testing and playing around you can easily configure the device drivers and get it working. Follow these steps.
Without connecting you N7 with pc first turn of the USB debugging option.You can do it by going to settings > developer options > uncheck USB debugging.
Now turn on MTP option from settings>storage>tap on the top right 3 vertical dots and select usb connections.
On your Pc Go to device manager by going to (My computer > right click and select manage> select device manager).Delete any ‘Android’ devices in the device manager also delete any other drivers.
Now plugged in your N7 with you PC via USB cables, if you are lucky you will see device drivers installation and everything will be back to normal.
But if nothing happens then you can try updating the device drivers.This is what work for me and surely work for you as well if nothing mention above work for you.
Go to device manager while your device is connected to your pc and under (portable media or Android) select your N7 device ( you can see a yellow error sign in front of it) >right click and update drivers. If you get unable to find drivers online then manually download the USB drivers form here and update it. And then reboot your computer and reconnect the device. Now your device will be detected by PC.

Updating the drivers had work for me and would work for you as well. I know these instructions might sound little confusing in the beginning but as I said with little playing around with these setting and reboot you can make it work. If you still face any problem Nexus 7 not connecting to pc via usb, just let me know and I would do my best to solve your issue.
You can also use other cool ways to Connect Android Device to PC like Nexus 7 Sync with PC using Airdroid and ES file explore.You can also check out the video on Top 5 ways to connect android phone to pc .
Mrinal Saha
Mrinal is a tech geek who spends half of his day reading and writing about tech. While the nights are spent on shooting or editing YouTube videos. Feel free to geek out with him on-
Skip to content
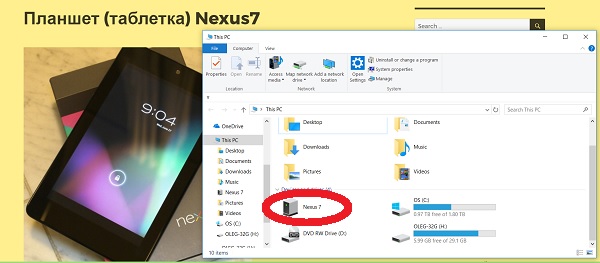
Таблетка Nexus-7 – это мобильный компьютер (гаджет), который можно подключить через USB (Universal Serial Bus) кабель к компьютеру.
Как правило, это нужно для обмена файлами (информацией) между таблеткой и персональным компьютером.
1. Подключение Nexus-7 к персональному компьютеру через USB кабель.
1. Соединить таблетку Nexus 7 с персональным компьютером (РС) через USB кабель.
2. Открыть программу (утилиту) Windows (File) Explorer.
3. Найти таблетку Nexus 7 и открыть её, нажав правой кнопкой мышки и выбрав из выпадающего меню пункт Open.
4. Открыть внутреннюю память таблетки Nexus 7: Internal storage и открыть её.
5. Выбрать нужную папку (Folder), например DCIM и открыть её.
6. Внутри папки DCIM выбрать и открыть папку Camera, в которой хранятся файлы (графические и видео), полученнные программой Nexus 7 Camera.
7. Перенести эти файлы на персональный компьютер и просмотреть.
2. Практическая работа: Подключение Nexus-7 к персональному компьютеру и перенос на РС фото и видео с таблетки.
1. Используя программу Nexus 7 Camera, сделать 5 фотографий (по своему усмотрению) и записать одно видео, в котором Вы рассказываете о том, что Вам дает изучение работы на компьютере.
2. Подключить таблетку Nexus-7 к персональному компьютеру с помощью USB кабеля.
3. Перенести на свою флешку фотографии и видео, сделанные с помощью фото/видео камеры Nexus 7 Camera. Просмотреть свои первые фотографии и видео на персональном компьютере.
4. Перенести видео на свой видеохостинг YouTube Channel.
5. Перенести фотографии на свой фотохостинг Google Photos.