
This is the guide with all necessary information about general information, directions to install / setup drivers, connect the controllers, fixing input issues, etc. We have shared a lot more important information in this guide only for the aspirants like you. Just go ahead and get started with the ds4windows on your pc right away.
Why Only DS4Windows?
It is a leader in the industry and has no competition from any other tools so far. Of course, there are some tools such as DS4Tool, DualsenseX, Xpadder, AntiMicroX, InputMapper but the number of features that DS4Windows has had can’t be beaten by any of them.
It supports a wide range of controllers such as Nintendo Switch / Pro, Playstation, Joycons, etc. Users can either connect their controllers to pc via wired connection or wireless connection. So that you can remap your mouse and keyboard keys to the controller keys to be able to play a countless number of pc games without any restrictions. The tool also has the profile system which allows you create multiple profiles for each game that you play.
Installation & Setup
The DS4 Windows software and the drivers required for it are not available on the windows store. Don’t worry, you can download them from this site. Check out the complete details that you should know about the requirements, drivers, setup instructions, etc. We have shared all the instructions for x64 bit computers. If you are using x86 (32 bit) pc or a desktop, you can download and install the 32 bit based drivers, that’s it.
Requirements:
Below are the must have requirements for it to work smoothly.
- Windows 10 / Windows 11 or Windows 8.1 operating system. Windows 7/xp/vista and older versions are not supported.
- One or more supported Gamepads / Controllers (Check Supported Gamepads List)
- Bluetooth USB Dongle to connect the controllers / gamepads wirelessly (optional only).
- Download and Install .Net 6.0 Runtime (x64 Bit) on your Windows 10/11/8.1/ pc (or) desktop.
Download & Run DS4Windows:
It’s time to download and install the tool on your personal computer / laptop.
- Download DS4Windows for your pc from our Download Page or from it’s official github page.
- The file will be downloaded either in .7z format or in .zip format. Download 7Zip software in order to extract the zip file to a folder.
- Now, install the 7zip software and extract the ds4win tool’s zip file. Make sure to extraact the file on desktop / documents folder / downloads folder.
- Open the extracted folder and scroll down till you see DS4Windows.exe file. Select the file and double click it to launch it.
- Once you launch the tool for the first time on your pc, you will be asked to choose the path to save the profiles and settings of the tool.
- Select the path (of your choice between AppData folder and Program folder) and proceed to futher steps below. We generally recommend you to select the AppData folder because that is where all your settings / profiles data is safe.
Download & Install Drivers:
Some drivers are crucial for the DS4W to work properly. Without them, it’s not at all possible to perform some important tasks such as hinding the name/nature of your real controller, etc.
| Driver Name | Recommendation | Download | Driver Function |
| ViGEmBUS | REQUIRED | Download Link | It is a must have driver which allows the DS4W tool to create X Box 360 / DS4 Controllers on your Windows pc. |
| HidHide | Strongly Recommended | Download Link | It is a highly recommended driver because it can easily hide your real controller. If you don’t use the driver, you may end up facing the double controller input because your pc will easily detect both your real controller and the virtual controller created by ViGEmBUS in combination with DS4W. |
| FakerInput | Optional | Download Link | It is an option driver but has a handful of uses. One of them is the ability to use your controller as the keyboard and mouse with better peformance and features. |
Connect The Controller To Your PC & DS4Windows Tool
The time has come now, you need to connect the controller to your personal computer and the ds4w tool. Check out the below instructions to connect it safely through USB / Bluetooth connection and avoid double input issues.
Connection Method: USB
Connecting the controller through an USB connection with an USB Cable is the most reliable thing. It helps you avoid latency issues and to get the best of the haptic feedback, rumble effects and adaptive triggers as well. Of course, you will get only them those are provided by the DS4W such as Rumble, haptic feedback, etc.
- Plug a goodle USB cable to your controller (DS4 or Dualsense or any other gamepad).
- Connect the other end to your personal computer.
- “Device has been detected” should be displayed as a notification when the controller is connected to your pc successfully.
- If you don’t see that message on your personal computer, then you must change the USB cable. Becuase, some cables are used only for charging the devices through an USB connection. Make sure to select the right one, which is capable of transferring data between the connected devices.
Connection Method: Bluetooth
Bluetooth is another great way of connecting devices safely without having to use any cables. It is recommended to use a bluetooth adapater to avoid high latency issues between your bluetooth controller and pc. Check out the below instructions to establish a strong bluetooth connection for your controller, with your pc.
- Turn on Bluetooth on your personal computer or laptop.
- Now, make sure that the controller is in the “Pairing Mode”. Don’t you know how to turn on the pairing mode on your controller? check out the below table for the tips and steps.
DualShock 4 (DS4)
DualSense (DS5)
DualShock 3
Joy-Con / Switch Pro Controller
Replicas
DualShock 4 (DS4)
DualSense (DS5)
DualShock 3
Joy-Con / Switch Pro Controller
Replicas
- Search for the available bluetooth devices on your personal computer.
- Click the name of your controller and enter “0000” without quotes, if asked for a pin.
- If you have previously conneccted your wireless controller to the pc, you don’t need to worry about entering the pin again.
- If you are unable to connect the controller via bluetooth, remove the device from the known devices list on your pc and re-connect it again.
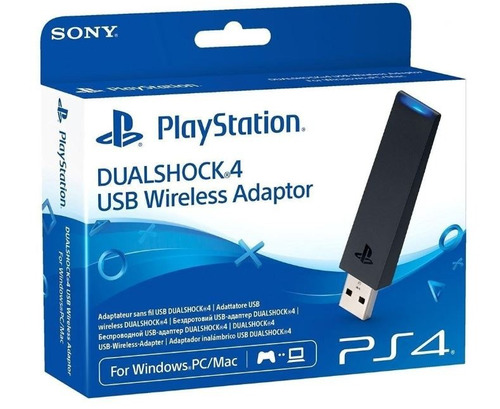
Connection Method: DualShock 4 USB Wireless Adaptor
Here is an alternative method for the dualshock 4 users. Now, you can connect your DS4 device to your pc with the help of a USB Wireless Adaptor. The biggest advantage of connecting the controller through USB wireless adaptor is the support for usage of the headphone jack for both Audio and Mic. Want to know how to pair it with your devices? check below.
- First and foremost, plug in the DualShock 4 USB Wireless Adaptor to your pc.
- Now, press the button of the adaptor towards the usb port and hold it for 1 to 3 seconds until you see the light starts blinking. It means that it is now in the parining mode.
- Press the required buttons of the dualshock 4 to enable the pairing mode.
- Establish the connection between the DualShock 4 and the USB Wireless Adaptor and you are good to go if both are connected to each other.
Important Steps To Use DS4Windows Correctly W/O Any Issues
It’s highly important to be cautious when using it for the first time. Make sure to install required drivers first hand and connect the controller to pc on the other hand. Then, follow the below instructions (only if needed).
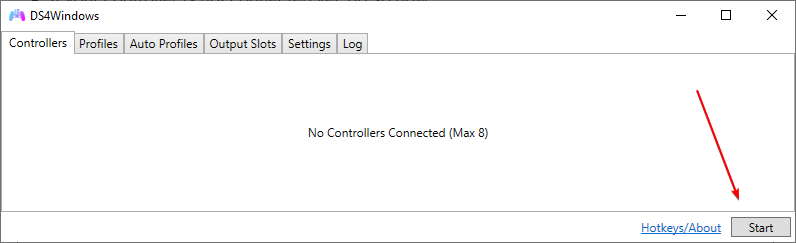
- Hit “Start” button to enable the DS4W if it’s not yet started by default.
- When you connect your real controller to your pc through bluetooth / usb connection, there are chances that your pc detects it.
- If you have installed hidhide driver, you don’t need to worry about it. But, it’s important to cross check the things to avoid double controller input issues.
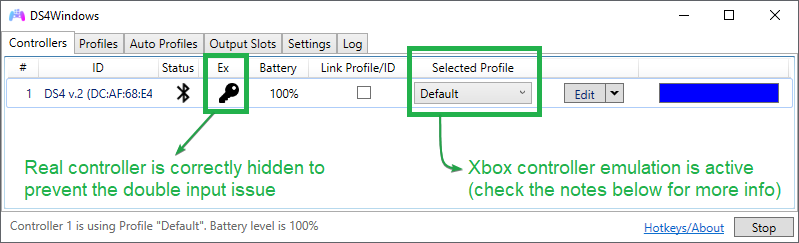
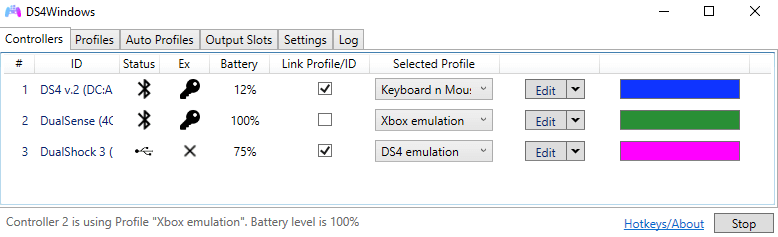
- If you can see the “Key” icon as indicated in the above image, the real controller is hiden successfully.
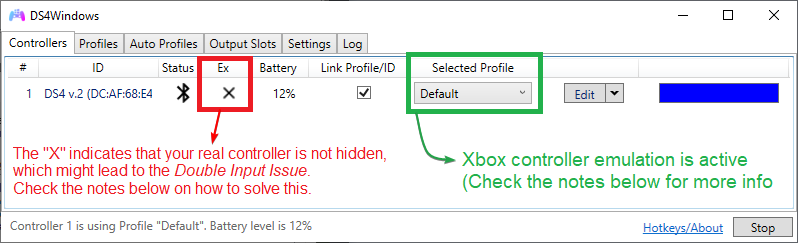
- If you see the “X” mark, it means that your real controller is not hidden. Do not worry about it, you can actually fix it and go ahead. In case if you are facing any other issue, refer the Guide To Fix DS4Windows Not Working Guide.
You can see “Default” under the “Selected Profile” menu. Which means that the xbox virtual controller emulation is active. For more information, read the important information available below.
About The Default Profile:
- The default profile mode enables the x box 360 emulation and makes your computer / games thinking that the connected dualshock 4 or dualsense is actually a real x box controller.
- In the default profile mode, DualSense / DualShock 4 (DS4)’s touch pad is set for the mouse control by default.
- If you want to turn off / on the mouse control, press and hold the “PS button” and touch the touchpad once.
You can actually create a bunch of profiles with various settings and options. On top of that, it’s very easy to switch between the created profiles.
About The DS4 Controller Emulation:
You can actually emulate both X Box gamepad and DS4 gamepad virtually. But most of the games support only x box gamepad and a very few games support the native DS4 controller. Still you can do that but with a custom profile. Want to know more? check out the below instructions.
- If the selected game doesn’t support DS4, you will not be able to use the DS4/Dualsense with DS4 Emulation.
- In case if the selected game allows DS4 emulation, you can switch to it from the xbox gamepad emulation by creating a new profile. On the other hand, you may also edit the already created profile to make it suitable for DS4 emulation.
- To do that, create a new profile by using Gamepad > DualShock 4 Preset.
- Or, you can edit the existing profile and then change the Virtual Controller Settings in the Others tab of the Profile Editor.
Important Note: Rumble won’t work when emulating the DS4 Controller. Don’t worry, you can enjoy Rumble effect with DS4 Controller in combination with the X Box Emulation but not with DS4 Emulation.
How To Prevent Double Controller / Double Input Issue In Games?
What Is Double Input (Controller) Issue?
Double Input issue arise when a game detects your real controller and the virtual xbox controller at the same time. In general, the DS4W tool will make your pc and games think that there is only one controller that is xbox 360 controller. That is better controlled by the Hidhide driver but some games will detect both the real controller and the virtual controller.
That leads to a lot of confusions in terms of in-game commands with your controller. You can see how any pc game detects both the controllers as shown in the below image.
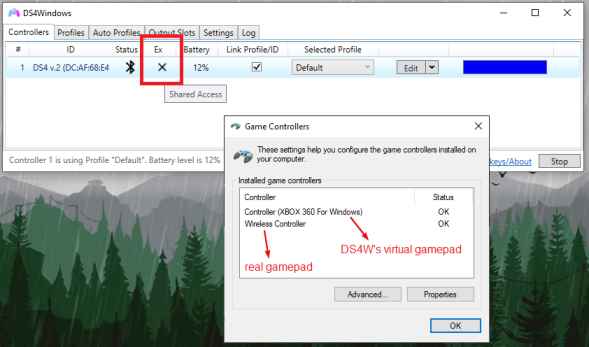
You can clearly see in the above image that the “X” mark is displayed right besides the bluetooth icon. It means that your real controller is not hidden. So that, it will be a cakewalk for the games to detect both the controllers as shown in the second part of the above image.
Whenever this conflict arise, the games and apps on your pc will receive inputs from both the controllers (real & virtual). Which will cause a lot of input issues and you won’t be able to play games in a way that you wanted.
Problems Caused By The Double Input Issue
Clear illustration Of The Double Input Issue
Problems Caused By The Double Input Issue
Clear illustration Of The Double Input Issue
Best Methods To Prevent Double Input Issue:
Below are the best methods that you may follow in order to prevent the double input and double controller issue.
HidHide (Recommended Method)
HidHide is the driver that has all the capabilities to hide any connected controller. It can hide as many connected controllers as you may want. Having it installed, the users can take full control over the connected gamepads and virtual controllers.
If you haven’t installed the HidHide driver on your windows pc, you can follow the below steps to solve the double input issue. The user / gamer has to set the HidHide to the following purposes.
- Hide the real controllers when connected via USB and Bluetooth.
- Allow DS4Windows to detect all the connected hidden devices in order for it to be able to realize there are real controllers connected for the X Box emulation.
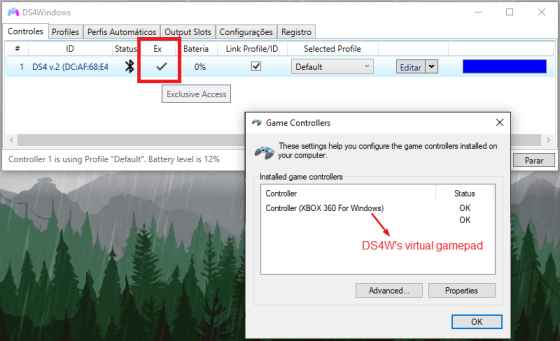
HidHide Result
HidHide Configuration Client
Hiding A DS4 Controller
HidHide Result
HidHide Configuration Client
Hiding A DS4 Controller
Some Important Tips To Use HidHide:
Below are some of the tips for you to make use of the HidHide driver. I am pretty sure that these tips will make a big difference in it’s usage for sure.
Tips For General Usage:
- After finishing the installation process of the HidHide driver on your pc, you must restart your pc in order to be able to use it without any issues. Make sure to restart the pc instantly right after you finish it’s installation.
- If you are done with the configuration of the HidHide driver, you don’t need to enable the Hide DS4 Controllers option under Settings tab of the DS4W tool. If it is turned on for some reason, make sure to turn it off because, you don’t need it now.
- If you are facing any issues with hiding your real controller, you may uninstall the hidhide driver from pc and re-install the same again and restart the pc.
Tips For Configuration:
- When you want to configure HidHide, make sure to close the DS4Windows tool to view only the real controller. If it is open, HidHid will detect the real controller and the virtual controller leading to confusions at the end of the day.
- Make sure that you shoud not Hide controllers with the name “Sony COMPUTER (…)” because they are nothing but the virtual DS4 Controllers.
- Once you are done with whatever settings and changes that you wanted to make, you should close it right away before opening the DS4W tool. In case if you do not close the HidHide driver before launching the DS4W tool, you will definitely face controller identification related issues on your windows pc.
Everything You Need To know About Hide DS4 Controllers Option (Legacy | Not Recommended)
You need to know the fact that you don’t need to rely upon Hide DS4 Controllers option if you’ve already installed HidHide driver and set it up correctly. In fact, it is required to set it disabled by default when you are ready with the correct configuration of the HidHide driver’s client.
Note: The option “Hide DS4 Controllers” is not only applicable for the DualShock controllers but also for any other controller detected by the DS4 Windows tool.
About The Legacy «Hide DS4 Controllers» Option:
You will be able to see this option under the Settings of the DS4Win tool. When you enable this option, the tool will ask the windows os on your pc for the access to the detected controllers. That will help the tool to detect all the connected controllers/gamepads thus avoiding the double input issues.
Windows may deny the permission access to the connected controllers due to the following reasons.
- A gamepad might be already running.
- Any web browser is running (for example: Google Chrome, Opera or Microsoft Edge, etc).
- If there is any issue with the NVidia Graphic cards on your pc.
- If there is any issues with the connection of the controller to the pc (USB or Bluetooth).
In case if windows allows exclusive access to the connected gamepads, the connection may be dropped if a controller is disconnected while playing a game for whatever reasons. So, if you want to get access to it again, close the game and reconnect the gamepad to the pc and launch the game again.
This is somewhat a hectic process and the gamers need to close the game always when they face any such an issue. That’s the reason why the option “Hide DS4 Controllers” option is not recommended and completely optional to the users. In fact, you do not need this option becuase you can go ahead with the HidHide driver.
Everything You Need To Know About Axis Config
Check out how the Dead Zones and Anti Dead Zones work for the given Input and the Output. When the input is inside the Dead Zone (Red Area), the output is properly centered. Do not forget to check out the anti dead zones as well.
Dead Zone Selection
0
0.10
0.20
0.40
0.60
0.80
0
0.10
0.20
0.40
0.60
0.80
Anti Dead Zone Selection
0
0.10
0.20
0.40
0.60
0.80
0
0.10
0.20
0.40
0.60
0.80
Manage Backups, Restoring, Delete User Data & Settings
It’s time to talk about the technicalities such as backups, restoring and managing user data, etc. Check out the valuable information shared below about them.
User Data [Files & Folders]:
Following are the list of important user data related files.
- Profiles folder
- Profiles.xml
- OutputSlots.xml
- Auto Profiles.xml
- LinkedProfiles.xml
- ControllerConfigs.xml
- Actions.xml
How To Take Backup Of The User Data?
Taking a backup of the user data like profiles, settings and other important data would be helpful. If you want to take the backup, you need to be sure about the location of the data files. Following are the step by step instructions that you can follow in order to take the backup without any issues.
- Launch DS4Win tool on your personal computer and go to Settings tab. Tap Profile Folder to see if the user data is saved there.
- Make sure to check out the main folder of the DS4Win tool if the user data is also present here.
- In you don’t find the data in any of the aforementioned folders, you can proceed with the folder where the data is present.
- In case if you have found the user data in both the folders, you should consider the folder which contains the file “Profiles.xml”.
- On the other hand, if you want to take backup of the entire DS4Windows tool and the backup files are also present there, you are good to go.
How To Restore The User Data?
- If you have taken the backup of the user data by following the above steps, you can now restore the same data very easily.
- Copy the data and paste it into the folder where a Profiles.xml temp file is saved. Do not forget to delete the already existing profiles.xml file and paste the backup data.
- On the other hand, if you want to restore the user data to the main folder of the DS4Win tool, you can do that as well.
Note: If you have restored the data to both the folders, DS4Win will select the right folder to use the restored data. On top of that the other folder’s user data will be deleted sooner or later.
How To Delete The User Data?
If you want to delete any user data such as settings, profiles or gamepad configurations, you can do that very easily. First, go to the folder where everything is saved. Select the data that you want to delete and hit delete button or press Shift + Delete button at a time to delete them permanently.
How To Uninstall DS4Windows & Drivers?
Below are the instructions that you can follow in order to uninstall the ds4win and all the associated drivers that you have installed. Make sure to follow the steps to be able to uninstall, delete / remove the installed software and drivers successfully.
Steps To Uninstall DS4Windows:
- It is a portable and standalone software which is not actually installed on your personal computer. So, when you want to uninstall it, you don’t need to go to control panel and follow the old procedure.
- Simply, select the extracted folder and delete the same and you are done.
- In case if you want to install it again, you can extract the zip file that you have already downloaded and double tap the exe file to start using it.
Steps To Remove Settings and User Data:
- Hit Windows Key + R and type %appdata% in the Run Command window and hit enter.
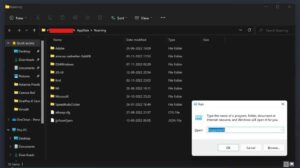
- Now you can see that a folder opens up on your pc. The path of the opened folder is appdata/roaming.
- You can see various folders right there. If you can see the DS4Windows folder, select it and delete it from there.
Steps To Uninstall ViGEmBus Driver:
- ViGEmBus driver is not just used along with the DS4W but also with a lot of other applications.
- If are using ViGEmBus driver for any other purpose apart from the DS4W, you may not need to uninstall it. Otherwise, you can follow the below steps carefully.
- Go to Start Menu on your windows pc and type “Control Panel” in the search bar, hit enter.
- Tap “Uninstall a program” option which is available right below the heading “Programs”.
- Scroll down a bit and select the ViGEmBus driver and double tap the same to start uninstalling it.
- Follow the on-screen instructions to finish uninstalling it from your personal computer.
Steps To Uninstall HidHide Driver:
- Go to start menu of your windows pc and click the “Settings” icon to launch the settings.
- Select “Apps” section on the left hand side menu.
- Tap “Apps & Features” option on the right hand side.
- Type “HidHide” in the search bar and hit enter.
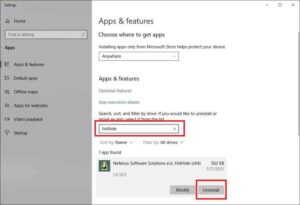
- Now, hit “Uninstall” button as shown in the above image and you are done.
- Restart your windows pc to apply the changes that you have made.
Steps To Uninstall FakerInput Driver:
- Open Apps & Features section by going by the path Windows Start Menu > Settings > Apps > Apps & Features.
- Search for “FakerInput” and hit “Uninstall” button and follow the on-screen instructions.
- Restart your computer now and you are done with it.
Steps To Uninstall Legacy Drivers:
Legacy drivers are of no use now with the latest version of ds4 windows. But if you have been using it from a very long time, you don’t need them anymore. If you want to uninstall them, below tips will help you for sure.
- Go to Control Panel > Programs > Uninstall a program.
- Select the HidGuardian driver and uninstall it.
- In the same manner, select the ScpVBus driver and uninstall it as well.
Now, you should restart your windows laptop/desktop and you are done with it.
How To Prevent Conflicts Between Steam and DS4Windows?
We all know the fact that Steam has the controller remapping functionalities. So, whenever you use DS4W on your pc while actually making use of the Steams controller remapping features, there are good chances to get conflicts between both of them. If this is unsolved, it’s hard for any user to play games and it should be fixed first.
If a user want to avoid the conflicts, the user have to either alter the controller settings of the Steam app or the DS4Win app. Check out the below tips to avoid the conflicts like a pro.
- Launch the Steam app on your windows pc and go to settings.
- Disable the Steam’s Remapping Functions completely.
- Disabiling the configuration settings is really important to fully disable steam input.
- Restart your pc and you are good to go with the DS4W’s remapping settings.
Actually, there is a method to use both DS4W’s and Steam’s remapping settings without any conflicts. But, it’s not a recommended method since it might cause some issues with steam.
How To Use Steam’s Big Picture Mode With DS4 Controller Emulation?
As we have already mentioned, there will be an issue with the steam’s big picture mode when using the emulated DS4 Controllers. To avoid that and use the big picture mode properly, it is recommended to run DS4 Windows under a custom “.exe” name.
If the user is not ready to go with this method, it will not be possible for them to use the big picture mode without any conflicts.
How To Run DS4Windows Under A Custom «.exe» Name?
When you are using DS4Win on your pc, a lot of applications or games may not respond well when they detect the tool. Some examples of those applications/games (or) instances are as follows.
- Shovel Knight: This game will ignore DS4 Controllers.
- Yuzu/Cemu Emulators: These emulators will ignore Playstation Controllers.
- Steam Big Picture: It cannot interact with the steam’s big picture interface while using playstation controllers such as (DS4/DS3/DualSense).
- Steam Input: It will ignore the inputs from the Playstation Controllers no matter even if the PlayStation Configuration Support is turned on.
In order to avoid all the above issues and some other unknown issues, you can run DS4Windows.exe with a differently named exe file. Want to learn how? do not skip the below section where we have shared a step by step procedure for it.
You can use any name of your choice but we have chosen “DS4Win” in this article to show you how you can also do it yourself.
Step 1
Step 2
Step 3
Final Step
Step 1
Step 2
Step 3
Final Step
How To Stop Using A Custom «.exe» Name?
- Make sure to close the software completely if it is open still. You should check if the app is running in the background and close it from there too.
- Launch the original file “DS4Windows.exe” file on your personal computer.
- Disable the option “Run At Startup” if it is turned on by default.
- It’s time to remove the name that you have entered at Custom Exe Name field.
- Hit “Stop” button once and hit the “Start” button again as you do it always.
- Now, you will have to Re-Enable the option “Run At Startup”.
That is all about the guide to getting started with DS4Windows. We have tried our best to explain everything which is helpful to our blog visitors. If you feel that we have missed anything important, kindly let us know in the comments below this page.

Все владельцы геймпадов DUALSHOCK 4, использующие эти замечательные контроллеры совместно с персональным компьютером, знакомы с приложением DS4Windows, которое является сильно переработанной версией утилиты ds4tools. Проблема тут в том, что автор DS4Windows (Jays2Kings) давно забросил разработку приложения, но большинство пользователей, не углубляясь в вопрос, вбивают в гугл: «Скачать DS4Windows», попадают на сайт программы и качают устаревшую версию. На самом деле, поддержка и разработка приложения активно продолжается, но уже другим энтузиастом Ryochan7. Им, со времени выхода последней версии DS4Windows от Jays2Kings, сделано немало изменений. Самым значимым является тот факт, что приложение сменило старый враппер ScpVBus на более новый и продвинутый ViGEmBus. К слову, этот же враппер использует, находящаяся в стадии вечного бета теста, утилита SC Controller, предназначенная для полноценной работы Steam Controller в отвязке от Steam. Для версии от Ryochan7, постоянно вносятся улучшения и исправления. В отличие от старой DS4Windows, в новой поддерживается не только проводное и Bluetooth сопряжение, но и подключение через родной беспроводной адаптер от Sony:

Кроме этого в приложении реализована поддержка некоторых сторонних PS4-совместимых геймпадов, например Hori Fighting Commander и Nacon Revolution Unlimited Pro. Возможно есть и другие, но я не нашёл списка совместимости.
Вернёмся к работе с DS4Windows. Первым делом скачиваем архив с актуальной версией программы. Извлекаем папку с приложением в любое место на вашем жёстком диске, желательно не в системную папку, в этом случае вам постоянно придётся запускать утилиту от администратора:

При первом запуске нам предлагается выбрать место сохранения файлов конфигурации:

Я настоятельно советую выбирать вариант Program Folder. В таком случае все настройки будут храниться в папке с программой, что позволит вам не заниматься настройкой «с нуля», каждый раз, когда вы переустановите Windows или при других форс-мажорных обстоятельствах. Такой себе вариант Portable. Достаточно просто периодически бэкапить папку с программой, целиком.
В следующем окне выбираем Step 1, для установки ViGEmBus драйвера (если он у вас не был установлен до этого):

Сам драйвер можно скачать и установить заранее:

Если у вас на ПК всё ещё стоит ОС Windows 7, дополнительно нажмите на кнопку Step 2 и установите XInput драйвер. Для Windows 10 этого делать не нужно, можно сразу нажимать на «Finished»:

Для перестраховки заглянем в диспетчер устройств и убедимся, что ViGEmBus драйвер на месте:

Всё. Приложение установлено, драйвер встал корректно и при первом запуске DS4Windows в системе появляется дополнительный XBox 360 контроллер:

Но! Сам DUALSHOCK 4 никуда не исчез из игровых устройств и остался видимым для системы. Такой «двойной расклад» может привести к проблемам с нормальной инициализацией геймпада в играх. На этот случай в приложении есть чудесный чекбокс, который называется: «Hide DS4 Controller«. При включении этого режима в системе остаётся только эмулируемый контроллер:

Далее по списку во вкладке «Settings» идут чекбоксы:
- Swipe Touchpad to Switch Profiles. Этот флажок включает\отключает возможность переключения свайпом двумя пальцами созданных вами профилей;
- Run as Startup добавляет приложение в автозагрузку;
- Show Notification предлагает выбрать варианты уведомлений в сайдбаре Windows;
- Disconnect from BT when stopping отключает геймпад при выходе из приложения;
- Flash Lightbar at High Latency позволяет выставить задержку в миллисекундах, по достижению которой световая панель геймпада начнёт моргать красным цветом;
- Start Minimized запуск приложения в свёрнутом состоянии;
- Minimize to Taskbar\Close Minimize сворачивать окно приложение в трей (окно не висит в панели задач);
- Quick Charge эта функция позволяет на лету заряжать геймпад не отрываясь от игрового процесса. Избавляет от эффекта двойного подключения, когда система видит ваш геймпад и по проводу, и по беспроводу;
- White DS4Windows включает белый цвет иконки приложения в трее;
- Check for DS4Windows Update at Startup проверка обновлений при запуске приложения (можно выбрать интервал проверки обновлений);
- UDP Server этот чекбокс нужен для подключения гироскопа в эмулятор CEMU;
- Use language pack выбор языка локализации. Есть и русский, но я привык к дефолтному, английскому, языку приложения;
- Use custom Steam Folder сюда можно прописать путь до основной папки Steam, если он установлена не в дефолтную директорию.
Вкладка «Auto Profiles» позволяет добавлять пути до папок и отдельных игр\приложений к которым будут автоматически применяться созданные вами профили:

На вкладке «Controllers» можно посмотреть статус вашего геймпада и заряд аккумулятора. Помимо этого, можно быстро включить доступный профиль и выбрать цвет подсветки:

И наконец вкладка «Profile». На этой вкладке вы можете: создать, отредактировать, удалить, скопировать, импортировать и экспортировать ваши профили:

Давайте рассмотрим возможности профайлера подробнее. Настроек огромное количество. Я не буду расписывать всё, просто пробегусь по самым значимым возможностям. На вкладке «Other» наибольший интерес представляет меню «Controller», тут можно выбрать, какой контроллер будет эмулироваться в систему: XBox 360 или проводной DUALSHOCK 4 v1. С первым вариантом всё понятно. Зачем нужен второй? Вариант с эмуляцией DUALSHOCK 4 v1 нужен для тех ПК-игр, которые нативно поддерживают DUALSHOCK 4, но только при подключении по проводу и\или только первую ревизию:


Вкладка Gyro позволяет выбрать варианты эмуляции для управления гироскопом и назначить направления осей стиков, на которые вы примените действия сенсора:

Вкладка Lightbar управляет настройкой подсветки. Кроме статического цвета профиля, можно назначить эффект радуги для процесса зарядки, изменение цвета лайтбара в зависимости от уровня заряда и световую сигнализацию для низкого заряда батареи:

Вкладка Axis Config предназначена для тонкой настройки осей:

Для любой кнопки, курка и направления стика можно назначить или записать макрос, например комбинацию кнопок клавиатуры, кликов мыши или управление курсором мыши:

Важно, что прямо «из коробки» с помощью тачпанели геймпада можно управлять курсором мыши. Включение и отключение осуществляется комбинацией PS + тап по тачпанели. По-умолчанию эта функция включена, но можно поставить галку «Start with Slide/Scroll Off» и функция будет включаться только после активации вышеуказанной комбинацией. Прочие настройки подбираются индивидуально. Вот мои:

На вкладке Special Action доступны специальные возможности, их можно назначить на сочетания кнопок геймпада:


Вкладка Controller Reading предназначена для проверки работы элементов управления, а также проверки задержки связи в миллисекундах:

Вроде всё. Вот вам моя уже сконфигурированная версия DS4Windows. В ней создано три профиля:
- Зелёная подсветка — стандартный XBox 360 controller;
- Жёлтая подсветка — проводной DUALSHOCK 4 v1;
- Синяя подсветка — профиль для управления ПК с дивана (геймпад скрыт от системы).
Управление курсором на тачпанели в положении OFF для всех профилей, кроме синего. Для переключения используйте комбинацию PS + тап по тачпанели.
Варианты Special Action видны на этом скриншоте:

Например, комбинацией PS + левый стик вверх\вниз можно управлять системной громкостью, а комбинация PS + L3 отключает системный звук. Комбинация OPTION + PS показывает заряд аккумулятора. Остальное можно удалить, там специфические настройки.
Всем Ку!
Telegram-канал @overclockers_news — теперь в новом формате. Подписывайся, чтобы быть в курсе всех новостей!
Геймпад от PlayStation 4 — один из самых удобных консольных контроллеров прямо сейчас. DualShock 4 остаётся таковым даже после выхода PlayStation 5 и появления следующего поколения геймпада для консолей Sony, DualSense. Секрет популярности DualShock 4 простой: у него много крутых технических возможностей вроде обратной отдачи, тачпада и моушн-управления, и стоит он при этом куда дешевле того же DualSense.
Учитывая то, что Sony активно выпускает игры с PlayStation на ПК, возникает логичный вопрос: можно ли подключить к компьютеру геймпад от PS4 и играть с его помощью в те экшены, которые изначально создавались именно под него? И можно ли использовать этот контроллер в других играх? И если это возможно, как же всё-таки подключить DualShock 4 к ПК? На эти и другие вопросы редакция «Геймдев» Skillbox Media отвечает в этом гайде.
Содержание:
- Есть ли возможность подключить геймпад от PS4 к ПК
- Как подключить геймпад по проводу
- Как подключить контроллер через Bluetooth
- Какие ещё способы подключить геймпад от PS4 к компьютеру существуют
Мы завели телеграм-канал «Чекпоинт». Делимся там впечатлениями от новых игр, рассказываем о культовых разработчиках и делаем подборки на любые случаи жизни (вы ведь наверняка искали список 40 лучших хорроров?). Подписывайтесь!
Есть ли возможность подключить геймпад от PS4 к ПК
Да, владельцы геймпада DualShock 4 могут подключить его к компьютеру и использовать в тех играх на ПК, которые поддерживают контроллер. При этом подключить геймпад можно не только к ПК с Windows, но и к компьютерам с macOS, а также мобильным устройствам с iOS (от тринадцатой версии и новее), iPadOS (от тринадцатой версии и новее) и Android (от десятой версии и новее).
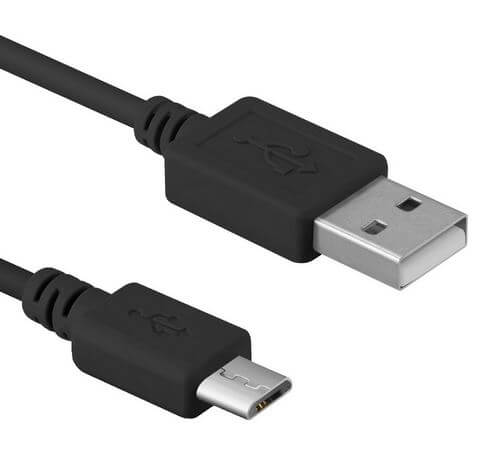
Чтобы подключить геймпад от PS4 к компьютеру с помощью провода, потребуется кабель USB — MicroUSB. Один такой кабель поставляется в комплекте с консолью PlayStation 4, однако использовать именно его вовсе не обязательно — подойдёт любой аналогичный провод.
В операционных системах Windows 10 и Windows 11 уже есть драйверы, необходимые для корректной работы контроллера. После подключения геймпада достаточно будет просто запустить игру — и, возможно, переключить способ управления в настройках.
Чтобы подключить геймпад по беспроводной связи, вам понадобится компьютер с Bluetooth-адаптером. В случае с ноутбуками проблем быть не должно — в них такие адаптеры установлены по умолчанию. В стационарных же компьютерах Bluetooth-адаптер может быть встроен в материнскую плату, но если его не предполагается, то придётся воспользоваться официальным беспроводным адаптером от Sony.
Пошаговое руководство по подключению контроллера через Bluetooth:
- В первую очередь следует убедиться, что геймпад не включён — сенсорная панель и световой индикатор на задней стенке устройства должны быть выключены.
- Затем проверьте, включён ли Bluetooth-адаптер на компьютере и не подключён ли к ПК сторонний адаптер. Это можно сделать в настройках операционной системы в разделе Bluetooth, куда ведут кнопки «Параметры» и «Устройства».
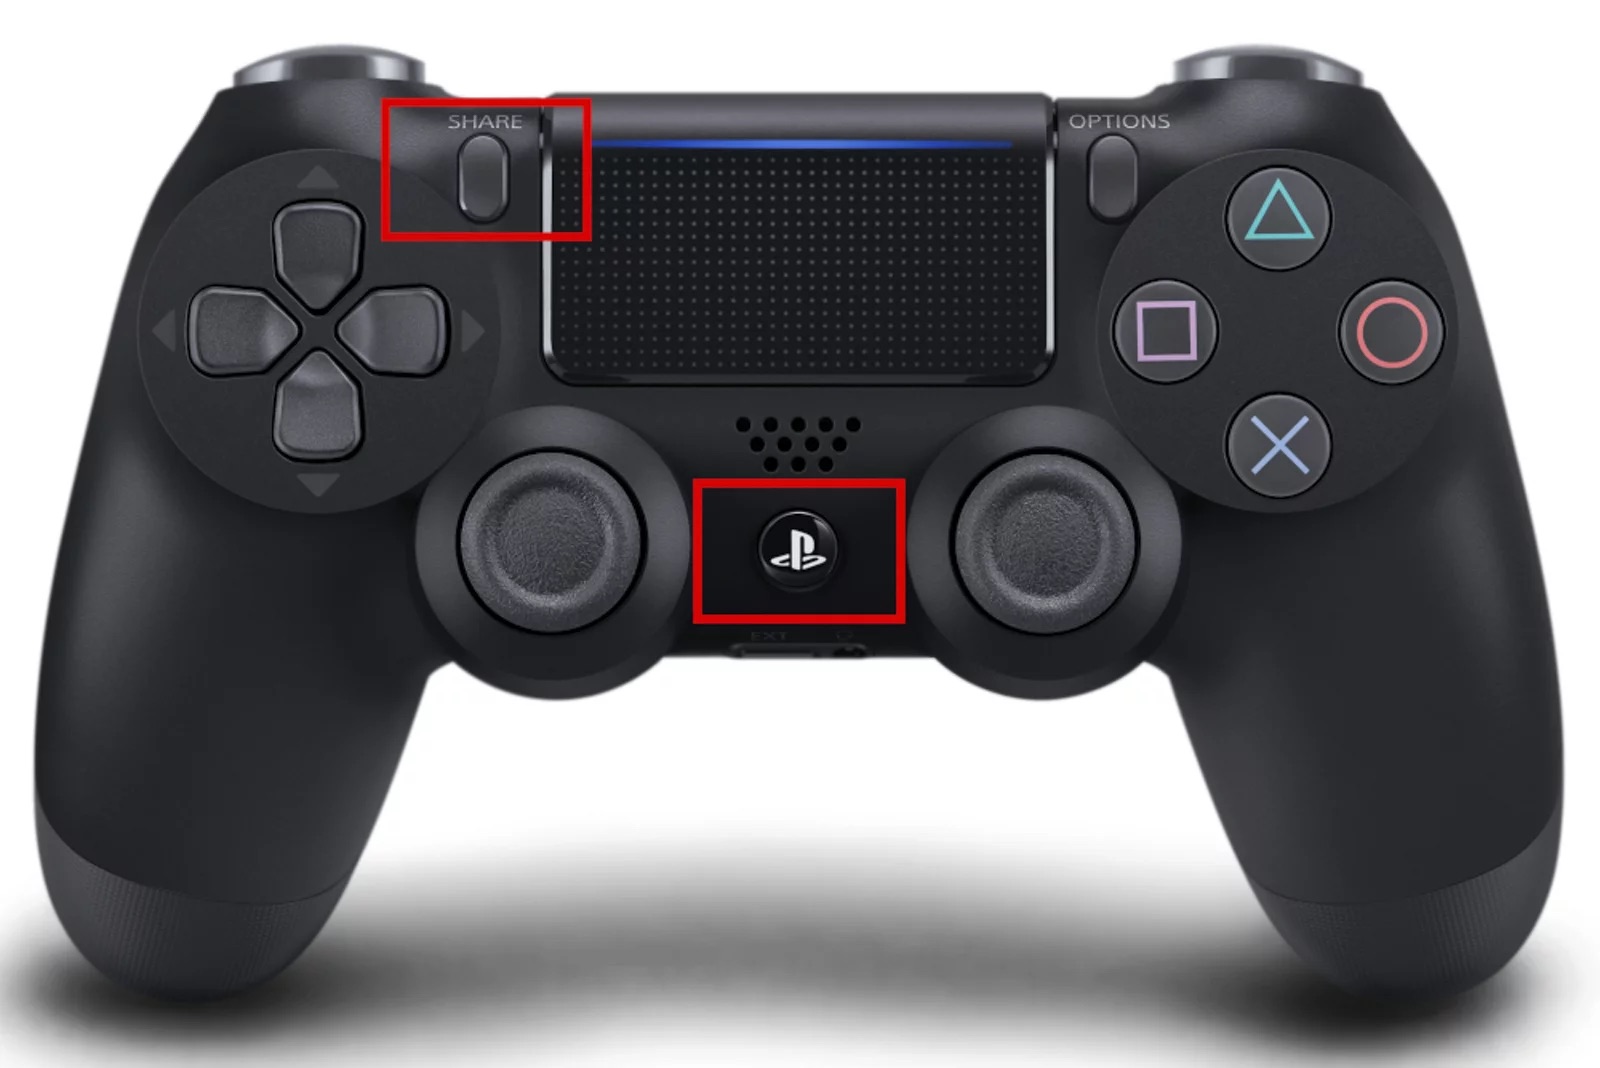
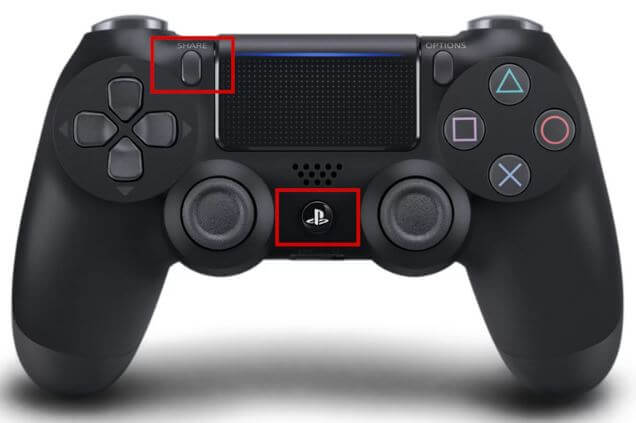
- После этого зажмите на геймпаде кнопки Share и PS — они выделены на изображении ниже.
- Среди новых устройств в разделе Bluetooth должен появиться пункт Wireless Controller — это и есть контроллер DualShock 4.
- Свяжите его с компьютером и дождитесь настройки драйверов.
Есть ещё как минимум два способа использования геймпада от PS4 с компьютером: через программы Xpadder и DS4Windows. Обе утилиты неофициальные, однако они позволяют значительно тоньше настроить контроллер перед использованием в играх — перераспределить значение кнопок, привязать к контроллеру любые клавиши клавиатуры и даже включить или отключить дополнительные функции геймпада вроде обратной отдачи.

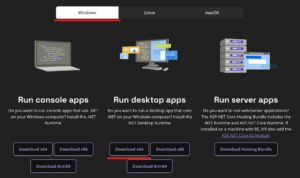
General info
DS4Windows should immediatly recognize any controllers properly connected to the PC.
Though USB cables are the most reliable, connecting controller wirelessly via Bluetooth will offer similar response times (input delay) and stable connections as long as a good quality BT adapter is being used and no major radio interference is affecting the connection.
If facing issues, either when connecting wired or wirelessly, then have a look at the related links at the bottom of the page.
Connection methods
USB
- Should be as simple as just plugging your controller with a good, working USB cable
- Windows should play a «device has been detected» sound when the controller is plugged in
- Keep in mind that some USB cables can only be used for charging. If the cable does not support data transfer then it won’t be of use
Bluetooth
Most of what is written here does not apply to DualShock 3 controllers. If using one, be sure to follow it’s dedicated guide
- Make sure your BT adapter has the minimum specs for your controller
- The controller needs to be set into
pairing modeto be added as a Bluetooth device through Windows’ settings. If a pin is asked try0000 - If a controller has already been previously paired and you can’t reconnect, try removing the device from Windows’ Bluetooth devices list and repairing them

Setting a controller into pairing mode
DualShock 4 / DualSense
Hold at the same time the PS + Share buttons until the lightbar starts flashing in a heartbeat pattern.
Joy-con / Pro Controller
Hold down the sync button until the controller LEDs enter a back n’ forth pattern.
Copy-cats / replicas
- Probably the same as the official ones
- If facing trouble, check the controller’s manual
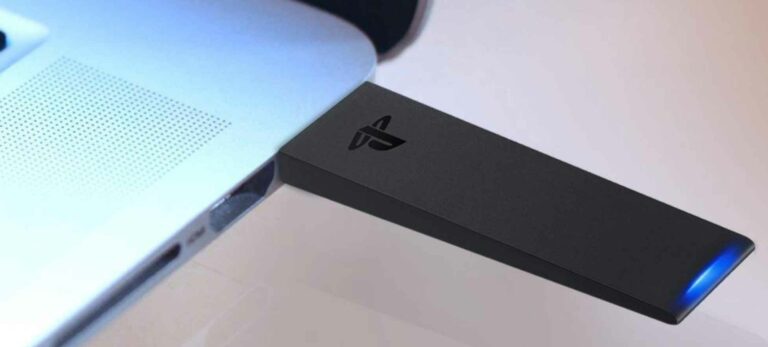
Sony DualShock 4 USB Wireless adapter
The official adapter from Sony supports only 1 controller, but allows the headphone jack to be used wireless for both audio and mic.
To pair a DualShock 4 to it, both must be set to pairing mode. For the Wireless Adapter, its main body must be slightly pressed towards the USB port (until a «click» is felt) then hold it down in this position for 3 seconds, with its LED flashing in a heartbeat pattern indicating that it’s in pairing mode. Set then DualShock 4 into pairing mode (check the previous section) and it it should connect to the adapter.
Final checks
Assuming everything is working as expected then DS4Windows should have no trouble detecting your controller, just make sure you haven’t accidentally stopped DS4Windows (in case you have, just press DS4Windows’ start button)
If for whatever reason DS4Windows is failing to detect your controller or you are not sure if it has been properly connected, check the Controller Detection troubleshoot page.
- Supported controllers
- Controller Detection troubleshoot
- Bluetooth adapter minimum specs
- Bluetooth connection issues troubleshoot
- Lantecy or input delay issues on Bluetooth
How to connect PS4 controller to PC, PS4, PS5, Steam, Iphone, Ipad and Android via USB/Bluetooth
Connecting and using your PS4 Controller to a device shouldn’t be hard and this article will simplify the process of syncing and pairing your dualshock 4 PS4 controller to PC, PS4, PS5, Steam, Iphone, Ipad and Android.
The DualShock 4 is a great controller, but it’s designed specifically for the Sony PlayStation 4. That means, at least on paper, that it’s not meant to be used with PC games. However with the help of powerful tools we can easily setup your PS4 controller to work on PC. So let’s get started!
Requirements
Hardware
- Dualshock 4 PS4 controller
- A micro-USB cable
- (Optional) Dualshock 4 USB wireless Bluetooth adapter
Software
- Steam
- Or Microsoft .NET Framework 4.5
- Xbox 360 controller driver (only for Windows 7 users)
- and DS4Windows
Unfortunately, the DualShock 4’s use of generic DirectInput drivers—as opposed to XInput that the Xbox controllers use—means using a PS4 controller on PC isn’t quite as easy as plugging in an Xbox gamepad. It takes a little bit more work to get the DualShock 4 working on PC, but things are made easier thanks to Steam, the PC gaming community, and an official (optional) Bluetooth dongle. In fact, if Steam is your go-to, native Steam support makes it just as plug-and-play as an Xbox gamepad.
To start we’ll walk you through getting your PS4 controller working with Steam. If you want to play games that aren’t on Steam with your DualShock 4, DS4Windows is the tool for you.
Using a PS4 controller in Steam
Thanks to official Steam support, there’s almost no setup involved in getting your PS4 controller working in Steam. Just be sure to pair or plug in your controller before opening Steam or any Steam games, otherwise your controller may not be recognized.
- Open Steam
- Go to Settings in top left dropdown
- Open Controller tab
- Click General Controller Settings
- Register device to your account
- Change preferences
- Calibrate joysticks
- Tick PlayStation Configuration Support
- Remap from Settings Controller tab/in game
If you run into any connection issues, closing and reopening Steam should do the trick. Otherwise, try using a USB 2.0 port instead of a USB 3.0 port. DualShock 4s are weird like that.
Once connected, navigate to Steam’s settings menu—under the top left dropdown—to get everything running smoothly. Under the Controller tab, open General Controller Settings; you should see your controller listed under Detected Controllers. From here you can register it to your account, so it will remember the settings on any PC you log into.
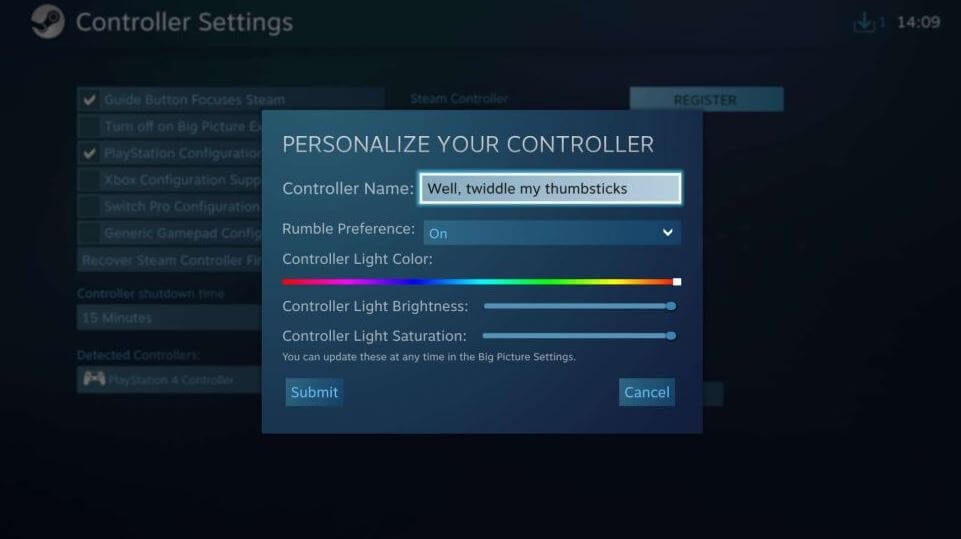
Click Preferences to rename, or change rumble and lighting settings. You can also click Calibrate to fine-tune the joysticks and gyro if you feel the need. One important tip: click the check box next to PlayStation Configuration Support if you want to be able to do extra configuration of the controller on a per-game basis.
Back in the Controller tab of the Settings menu, you can configure your controller for Big Picture and Desktop usage, as well, and even set up Guide Button Chord Configuration.
Using DS4Windows for non-steam games
For those that are still not sure what DS4windows is or why they need this application. See our about us page and FAQ for more information.
In summary, DS4 Windows makes it possible for your to use your PlayStation and Nintendo controllers on a Windows 10/11 PC by emulating a virtual Xbox/DS4 controller. With it, comes added features where you can remap or rebind the keys to your liking (buttons, joysticks, keyboard + mouse etc) and making it possible to play much more games with your controller. No need to buy a supported controller or forcefully play only with keyboard and mouse.
You can read our detailed getting started page on how to install, use and setup DS4windows correctly or by following the below summarized steps;
- Download Microsoft .NET Framework
- For Windows 7, get Xbox 360 controller driver
- Plug controller in via USB cable or Bluetooth dongle
- Download DS4Windows and extract
- Open DS4Windows
- Check connection in the Controllers tab
- In Settings tab Hide DS4 Controller
- Set Use Xinput Ports to one
- Edit/Create a profile and remap
Using Dualshock 4 USB wireless Bluetooth adapter
- Hold controller’s Share and PS button until it flashes
- Push dongle button until it starts flashing
- Or, add your controller in your PC’s Bluetooth menu
- Pairing should happen automatically
- Don’t unplug the adapter, it’ll save the last connection
To connect your PS4 controller via Bluetooth, simply hold the small Share button and the central circular button simultaneously until the controller’s backlight starts flashing, then push on the end of the adapter until it starts flashing. Once both are flashing, they will automatically pair after a few seconds.
For a PC with Bluetooth built-in, just navigate to the Bluetooth menu and select your controller from the Add Bluetooth devices list once it’s started flashing.
Luckily, you don’t have to pair your controller every time you want to use it. As long as you don’t unplug the adapter, it will save its last connection, so you can just tap your controller’s central PlayStation button to reconnect it.
The official Sony DualShock 4 USB wireless adapter is the simplest Bluetooth option. You may have to hunt for it or spend a little more than you would on a standard Bluetooth dongle, but it’s worth it for its out-of-the-box functionality.
How to connect PS4 controller to PS4
Syncing a PlayStation 4 DualShock controller to a PS4 is extremely easy, but it does require one piece of hardware: A USB to Micro-B cable. There’s no wireless workaround for pairing controllers via Bluetooth, so to sync new controllers with your PS4, you’ll need a cable. Your DualShock 4 controller comes with one cable, but any USB 2.0 to Micro-B cable will work.
How to sync PS4 controller
Step 1: Plug the USB cable into the controller, then into the USB port in the PlayStation 4.
Step 2: When you turn on your PS4, your controller should automatically connect with your PlayStation, thanks to the USB cable. You’ll need to push the PlayStation button in the center of the controller to activate the controller. When you do that, the PS4 should take you to the login screen to choose a player account to go with that controller.
You’ll be able to tell the controller is working because the LED light bar on the top of the controller will turn blue (or another color, if it isn’t the first controller connected — red for player 2, green for player 3, and pink for player 4). That cable will also recharge your controller, with the light turning yellow when the controller is charging but not turned on.
DUALSHOCK 4 wireless controller vibration settings
If your DUALSHOCK 4 wireless controller is not vibrating as expected, the controller’s vibration function may be turned off. To turn it back on:
-
Go to Settings > Devices > Controllers > Enable Vibration.
-
If the controller still experiences issues, try resetting the controller.
DUALSHOCK 4 wireless controller audio settings
If you have headphones plugged into the 3.5mm headphone jack on the DUALSHOCK 4 wireless controller and you hear no audio, or the audio from the headphones is very faint, make sure the headphone plug is pushed all the way in. Unplug and then firmly reinsert the headphones.
To route all audio output to headphones:
-
Go to Settings > Devices > Audio Devices.
-
Select Output to Headphones > All Audio.
-
Highlight the Volume Control (Headphones) option and press Right on the D-pad to make sure the controller’s volume is turned up.
If Output to Headphones is greyed out, the headphones aren’t detected by the controller.
Troubleshooting your PS4 controller
Step 1: When you’re having trouble with a controller not working wirelessly with your PS4, the usual issue with pairing is that the controller’s battery is undercharged. If it sounds like the “unplug it and then plug it back in” solution to the problem, it is.
Make sure the controller is charging when you plug it in — when it’s not in use, you’ll see the light bar on the top turn yellow. If it’s not charging, you might have another issue, like a damaged controller port or a bad cable. Be sure to utilize a gamepad tester to see whether the controller is in working condition.
Step 2: If your pairing issues aren’t related to power or your cable, you might need to reset your PlayStation controller, and reset your PlayStation 4 to pair it again. If you’ve got a controller that still works, you can do that in the PS4’s Settings menu. It’s on the home screen on the far-right side, represented by a Suitcase icon.
Step 3: Navigate down to the Devices menu, and then choose Bluetooth Devices. In the Bluetooth settings, you’ll see all your controllers there, as well as any other Bluetooth devices that are compatible with your PlayStation, such as PS4 headsets and the greatly-improved PDP PS4 Bluetooth Remote. Choose the one you’re trying to reset (it can be difficult to tell, and you might need to turn on all your controllers if you have more than one), select it, and hit the X button.
Now hit the Options button on your controller to bring up a contextual menu, and select Forget Device. Doing so will cause your controller to unpair with your PlayStation 4.
Once that’s done, you should be able to plug the controller in with your USB adapter to pair it to the console again, as mentioned toward the start of this guide.
How to reset PS4 controller
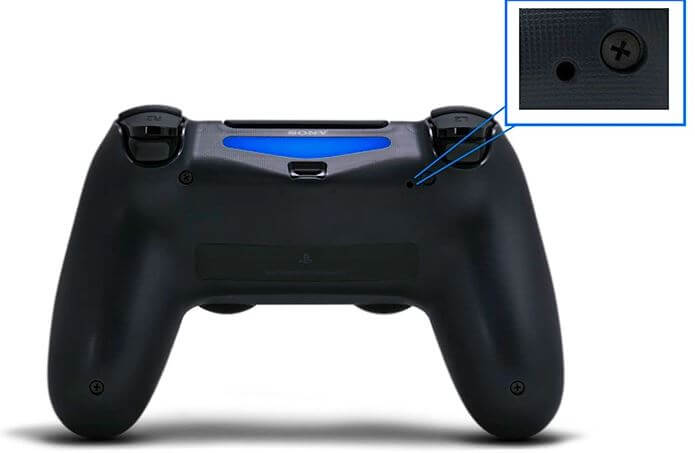
If re-pairing the controller doesn’t work, the issue might be with the controller itself and not the PS4. In that case, you’ll need to reset the controller. You’ll need an unfolded paper clip (or something similarly thin and sturdy) with which to push a hidden button on your PS4 controller to reset it.
-
Turn off and unplug your PS4 console.
-
Locate the small reset button on the back of the controller near the L2 shoulder button.

-
Use a small tool to push the button inside the tiny hole. Hold the button down for roughly 3-5 seconds.
-
Connect the controller to the PS4 console using a USB cable and press the PS button.
-
If the light bar turns blue, the controller has paired.
If the controller is unresponsive or is able to connect to a different USB port or another system, please visit the PlayStation Repairs diagnostic tool to check if your hardware is eligible for an under-warranty repair.
How to connect PS4 controller to PS5
If you want to use a PS4 controller on PS5 we can help you set up a second controller for the newer PlayStation without having to buy a second pad. That said, while it is possible there are also some quite huge caveats so you might want to start saving in the long run. However, in the meantime, here’s everything you need to know about using a PS4 controller on PS5.
How a PS4 controller works with PS5
You can use a PS4 controller with PS5 easily, but the downside is you can only use your PS4 pad to play PS4 games on PS5. You cannot use your DualShock 4 to play any PS5 specific games and that’s because of all the PS5 specific features according to Sony: “We believe that PS5 games should take advantage of the new capabilities and features we’re bringing to the platform, including the features of DualSense wireless controller,” says Sony in a statement on the PlayStation blog. This also extends to “PlayStation officially licensed third-party gamepad controllers” too.
If you do sync up a PS4 pad with your PS5, if you try and play anything designated as a PS5 game it’ll flash up a little warning saying “PS5 games can’t be played using the DUALSHOCK 4”.
Thankfully, the benefits of using the PS5 controller are seriously worth it. You’ll just need to buy a second if you want to play co-op or simply have a spare to switch out.
How to pair your PS4 controller with PS5
For PS4 titles, syncing up a PS4 controller is really simple and easy. All you need to do is plug it into your PS5 via a charging cable, and pick which of the PS5 users you want to use it. Et voila, it’s that easy. You can then unplug the cable and continue playing PS4 games on PS5 with your trusty ol’ PS4 controller.
Can you use a PS5 controller with PS4?
Sadly, the simple answer is just no. A PS5 controller cannot be used with a PS4. Even if you try plugging it in, the PS4 will simply just not recognise it as an input device.
You can however use a PS5 pad on PC by simply plugging in via USB or by utilizing the DualSenseX software.
How to connect PS4 controller to Iphone and Ipad
It took a long time, but now the iPhone, iPad, and Apple TV finally support PlayStation 4 DualShock 4 controllers and some models of Xbox One controllers. It’s super easy to set up these controllers, too, as you’ll see below.
Apple devices using the operating systems listed below or later support DUALSHOCK 4 wireless controller Bluetooth connections. Once connected, you can use your wireless controller to control compatible games and applications via Bluetooth.
- iOS 13
- iPadOS 13
- tvOS 13
How to pair a DualShock 4 with an iPhone or iPad
Before you can connect your wireless controller via Bluetooth, you will need to activate pairing mode:
Step 1
- Press and hold the PS button and SHARE button on the wireless controller at the same time.
- The light bar on the back of the wireless controller will start flashing once pairing mode is active.
Step 2
Connect DUALSHOCK 4 wireless controller via Bluetooth
- On your Apple device, go to the Bluetooth settings and turn Bluetooth ON.
- Select scan for new devices and then choose Wireless Controller.
You can now use your wireless controller to control compatible games and applications on your device.
How to disconnect your DualShock 4 from your iPhone or iPad
Once you’re done playing with the DualShock 4, here’s how to turn it off. If you want to use the controller, you simply need to hold down the PlayStation button for 10 seconds. On the iPhone, the most convenient method is to use the Control Center.
-
Open your Control Center on a Face ID-compatible iPhone by swiping diagonally from the upper right of your screen toward the lower left. On a Touch ID-compatible iPhone, swipe up from the bottom of the display.
-
Press and hold down on the blue Bluetooth icon.
-
In the menu that pops up, press and hold down the icon that says Bluetooth: On.
-
You should see “DUALSHOCK 4 Wireless Controller” in the options that pop up. Press it, and your controller will immediately disconnect.
And here’s the (slightly) less convenient method:
-
Open the Settings app and press Bluetooth.
-
Under My Devices, you’ll see “DUALSHOCK 4 Wireless Controller.” To the right, you’ll see a letter “i” within a blue circle. Press it.
-
In the menu that pops up, press Disconnect. The controller should immediately stop working.
When you want to use the controller again, just press the DualShock 4’s PlayStation button and it should immediately start working.
How to connect PS4 controller to Android
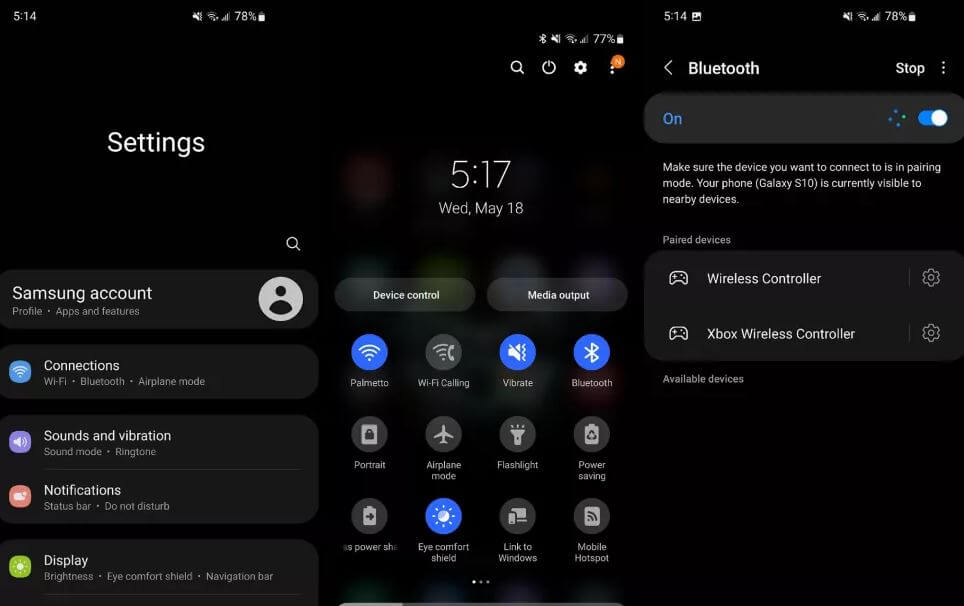
Mobile devices using Android 10 or later support DUALSHOCK 4 wireless controller Bluetooth connections. Once connected, you can use your wireless controller to control compatible games and applications via Bluetooth.
How to use your DualShock 4 on Android devices
1. On your Android device, ensure your Bluetooth is turned on by opening settings and heading to the Bluetooth menu.
2. Make sure the phone is in scan mode.
3. With the controller, simultaneously hold the PlayStation button and the Share button for a few seconds.
4. The controller’s light will begin blinking to let you know it’s in pair mode.
5. Back on the phone, look for a device named something like Wireless Controller in the list of nearby Bluetooth devices.
6. Tap that device to begin the pairing process.
7. The controller’s light should stop blinking and you should get confirmation on your phone that the connection was successful.
If everything is done correctly, you’ll be connected, and the controller can be used to navigate the Android UI, as well as provide extra functionality in some of the best Android games.
Sony updated the DualShock 4 controller with the launch of Android 12, adding new features for the controller when used on Android. These features include the touchpad, motion sensor, rumble, and even a battery indicator, all of which were previously unavailable.