
Все способы:
- Предупреждение об ограничениях
- Шаг 1: Включение Bluetooth
- Шаг 2: Подключение наушников
- Шаг 3: Управление подключением
- Решение возможных проблем
- Вопросы и ответы: 0
Предупреждение об ограничениях
Прежде чем перейти к реализации процедуры подключения AirPods к компьютеру или ноутбуку с ОС Windows 11, важно отметить следующее:
- Вызов Siri по очевидным причинам будет недоступен, а управление касаниями/нажатиями – не работать в принципе либо работать строго так, как это ранее было настроено на Apple-девайсе.
- Воспроизведение звука не будет начинаться и/или останавливаться автоматически при помещении/извлечении наушников в/из ушей и/или зарядный кейс. Подключение/отключение будет осуществляться в момент открытия/закрытия футляра соответственно.
- Гарнитура в целом может и наверняка будет работать нестабильно (особенно на устройствах со старой версией Bluetooth). Это проявляется в прерываниях и рывках во время воспроизведения, разрывах соединения, менее качественном звучании и т. д.
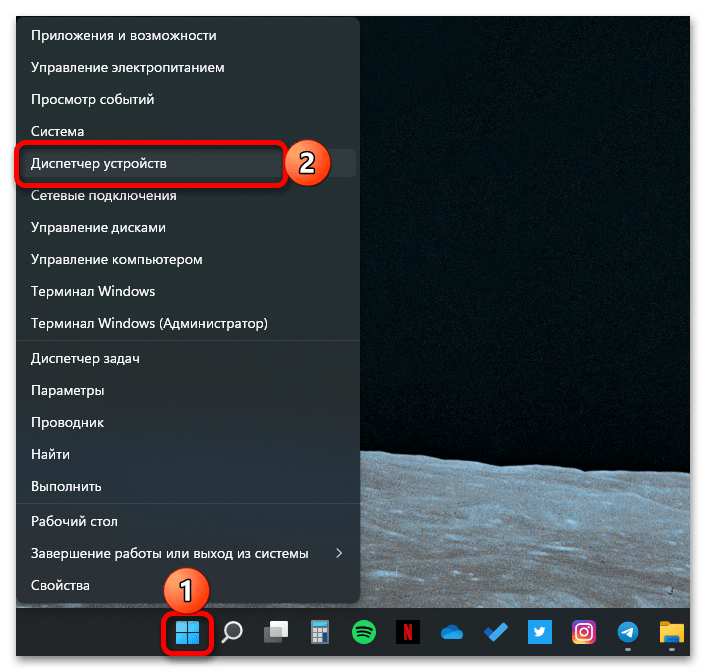
- Для корректной работы АирПодс с ОС Виндовс требуется, чтобы в компьютере или ноутбуке был установлен Блютуз версии 4 и выше. Узнать версию модуля беспроводной связи можно следующим образом:
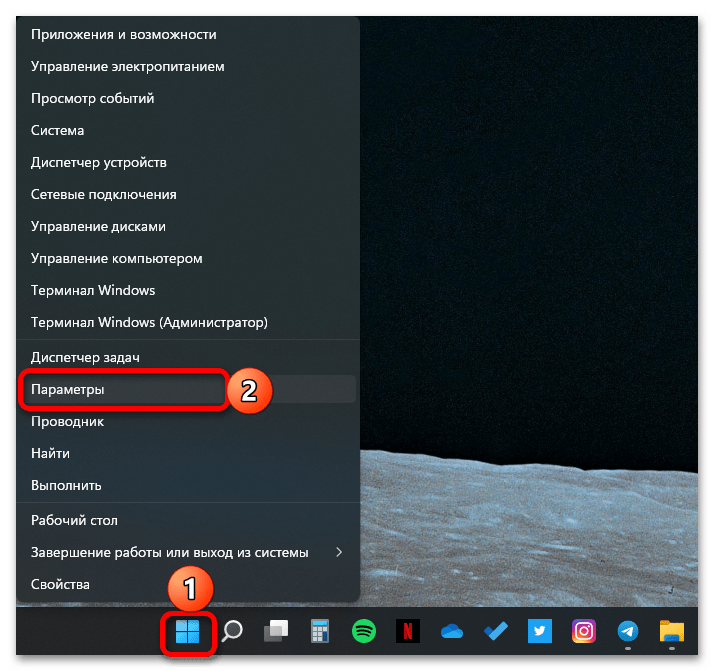
- Откройте «Диспетчер устройств». Проще всего это сделать через контекстное меню кнопки «Пуск», вызываемое нажатием по ней правой кнопкой мышки (ПКМ).
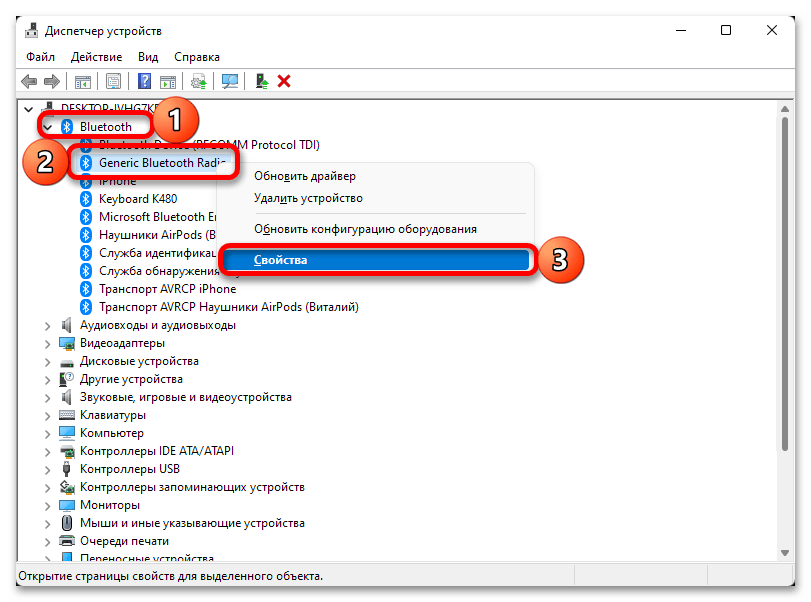
- Разверните список Bluetooth, найдите в нем наименование своего беспроводного адаптера, кликните по нему ПКМ и выберите пункт «Свойства».
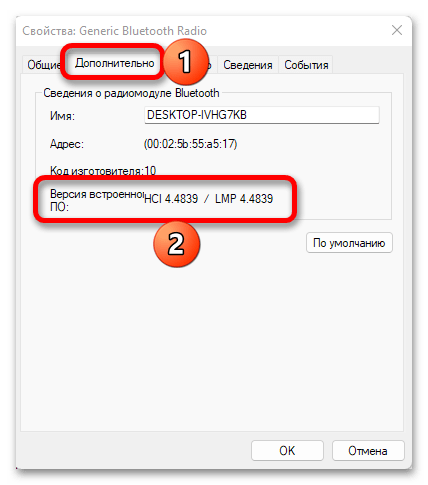
- Перейдите во вкладку «Дополнительно» и ознакомьтесь со сведениями в строке «Версия встроенного ПО». Указанное рядом с параметром «LMP» значение необходимо сопоставить со следующими для Bluetooth:

Версия встроенного ПО Версия Bluetooth LMP 0.x Bluetooth 1.0b LMP 1.x Bluetooth 1.1 LMP 2.x Bluetooth 1.2 LMP 3.x Bluetooth 2.0 LMP 4.x Bluetooth 2.1 LMP 5.x Bluetooth 3.0 LMP 6.x Bluetooth 4.0 LMP 7.x Bluetooth 4.1 LMP 8.x Bluetooth 4.2 LMP 9.x Bluetooth 5.0


В нашем случае, как можно понять по скриншоту выше, используется адаптер LMP 4.4839, что соответствует версии Bluetooth 2.1. AirPods удалось подключить и они работают, но их использование на таком устройстве крайне сложно назвать комфортным.
Шаг 1: Включение Bluetooth
Очевидно, что для подключения любых беспроводных наушников, не только AirPods, к компьютеру или ноутбуку, прежде всего необходимо активировать Bluetooth на последнем. В Windows 11 это можно сделать через «Центр уведомлений» или «Параметры», о чем мы ранее писали в отдельной статье.
Подробнее: Как включить блютуз на компьютере с Виндовс 11
Шаг 2: Подключение наушников
После того как модуль беспроводной связи будет активирован, можно смело переходить к сопряжению наушников и ПК. Делается это по следующему алгоритму:
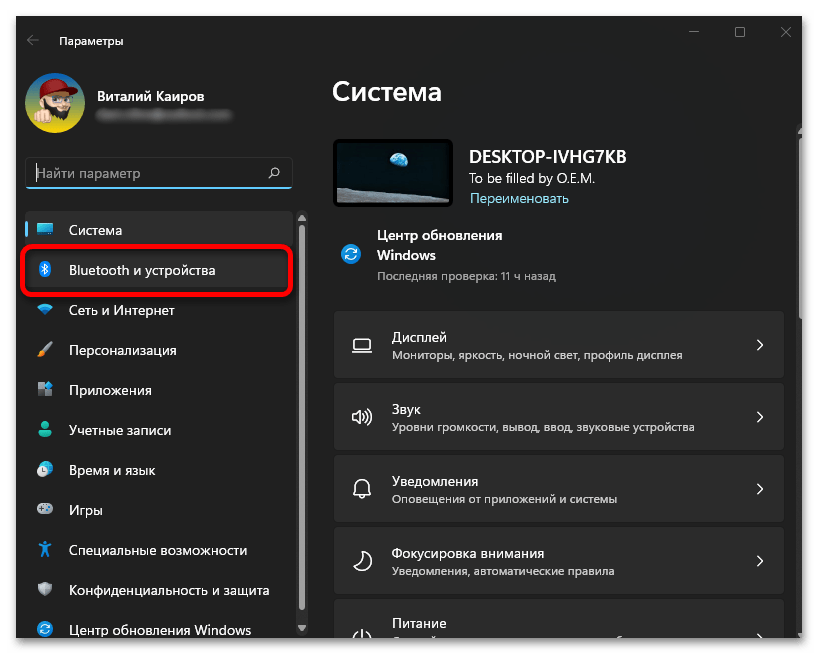
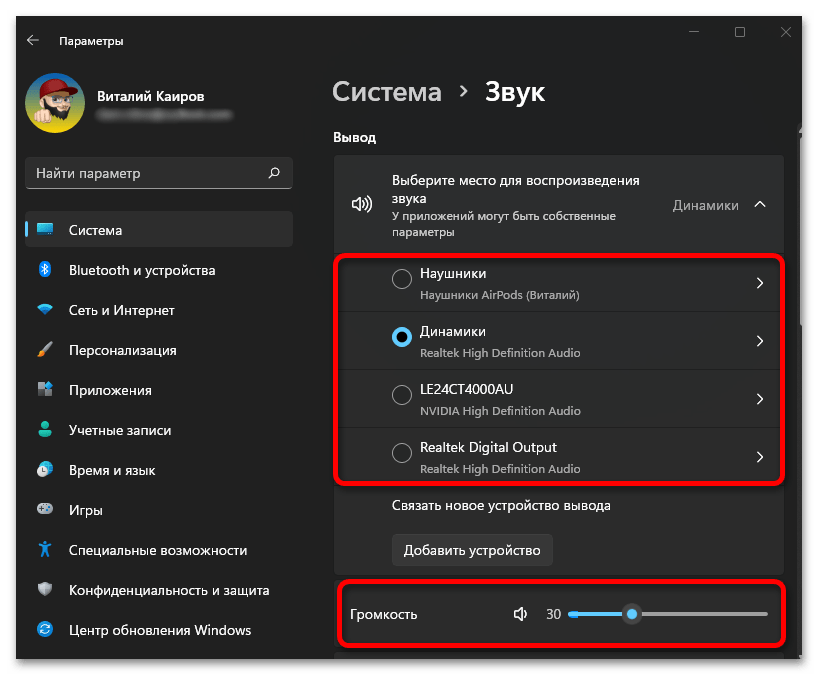
- Откройте «Параметры» операционной системы. Это можно сделать через меню «Пуск», контекстное меню, вызываемое нажатием правой кнопки мышки (ПКМ) на данном элементе, и с помощью клавиш «Win+I».
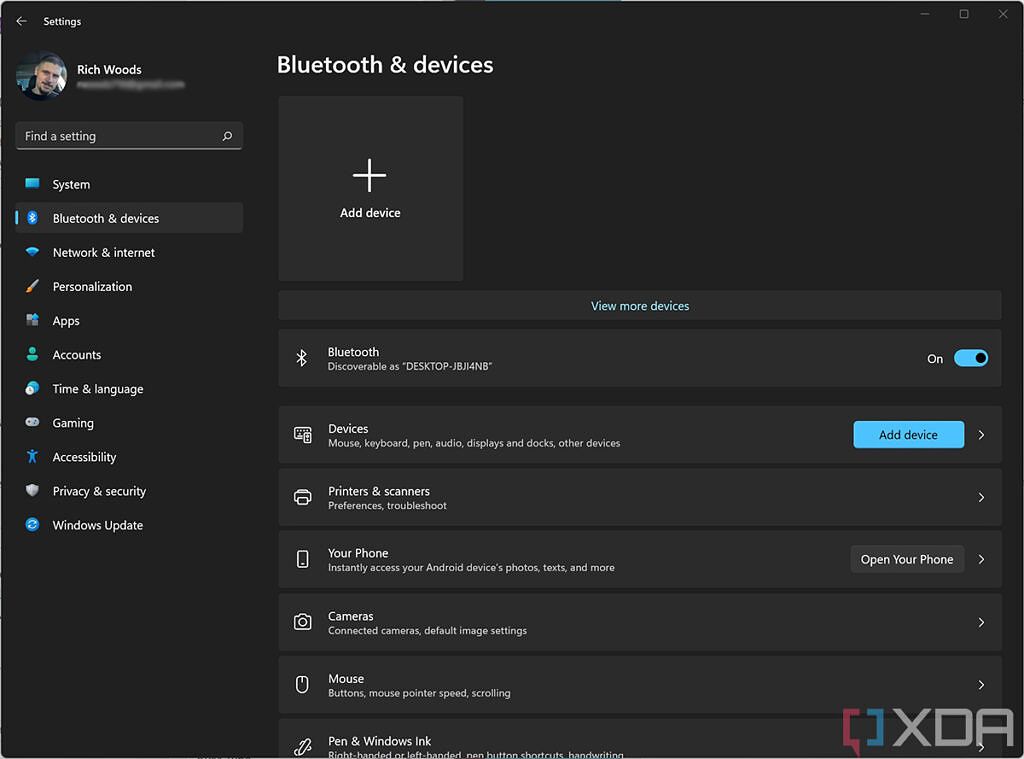
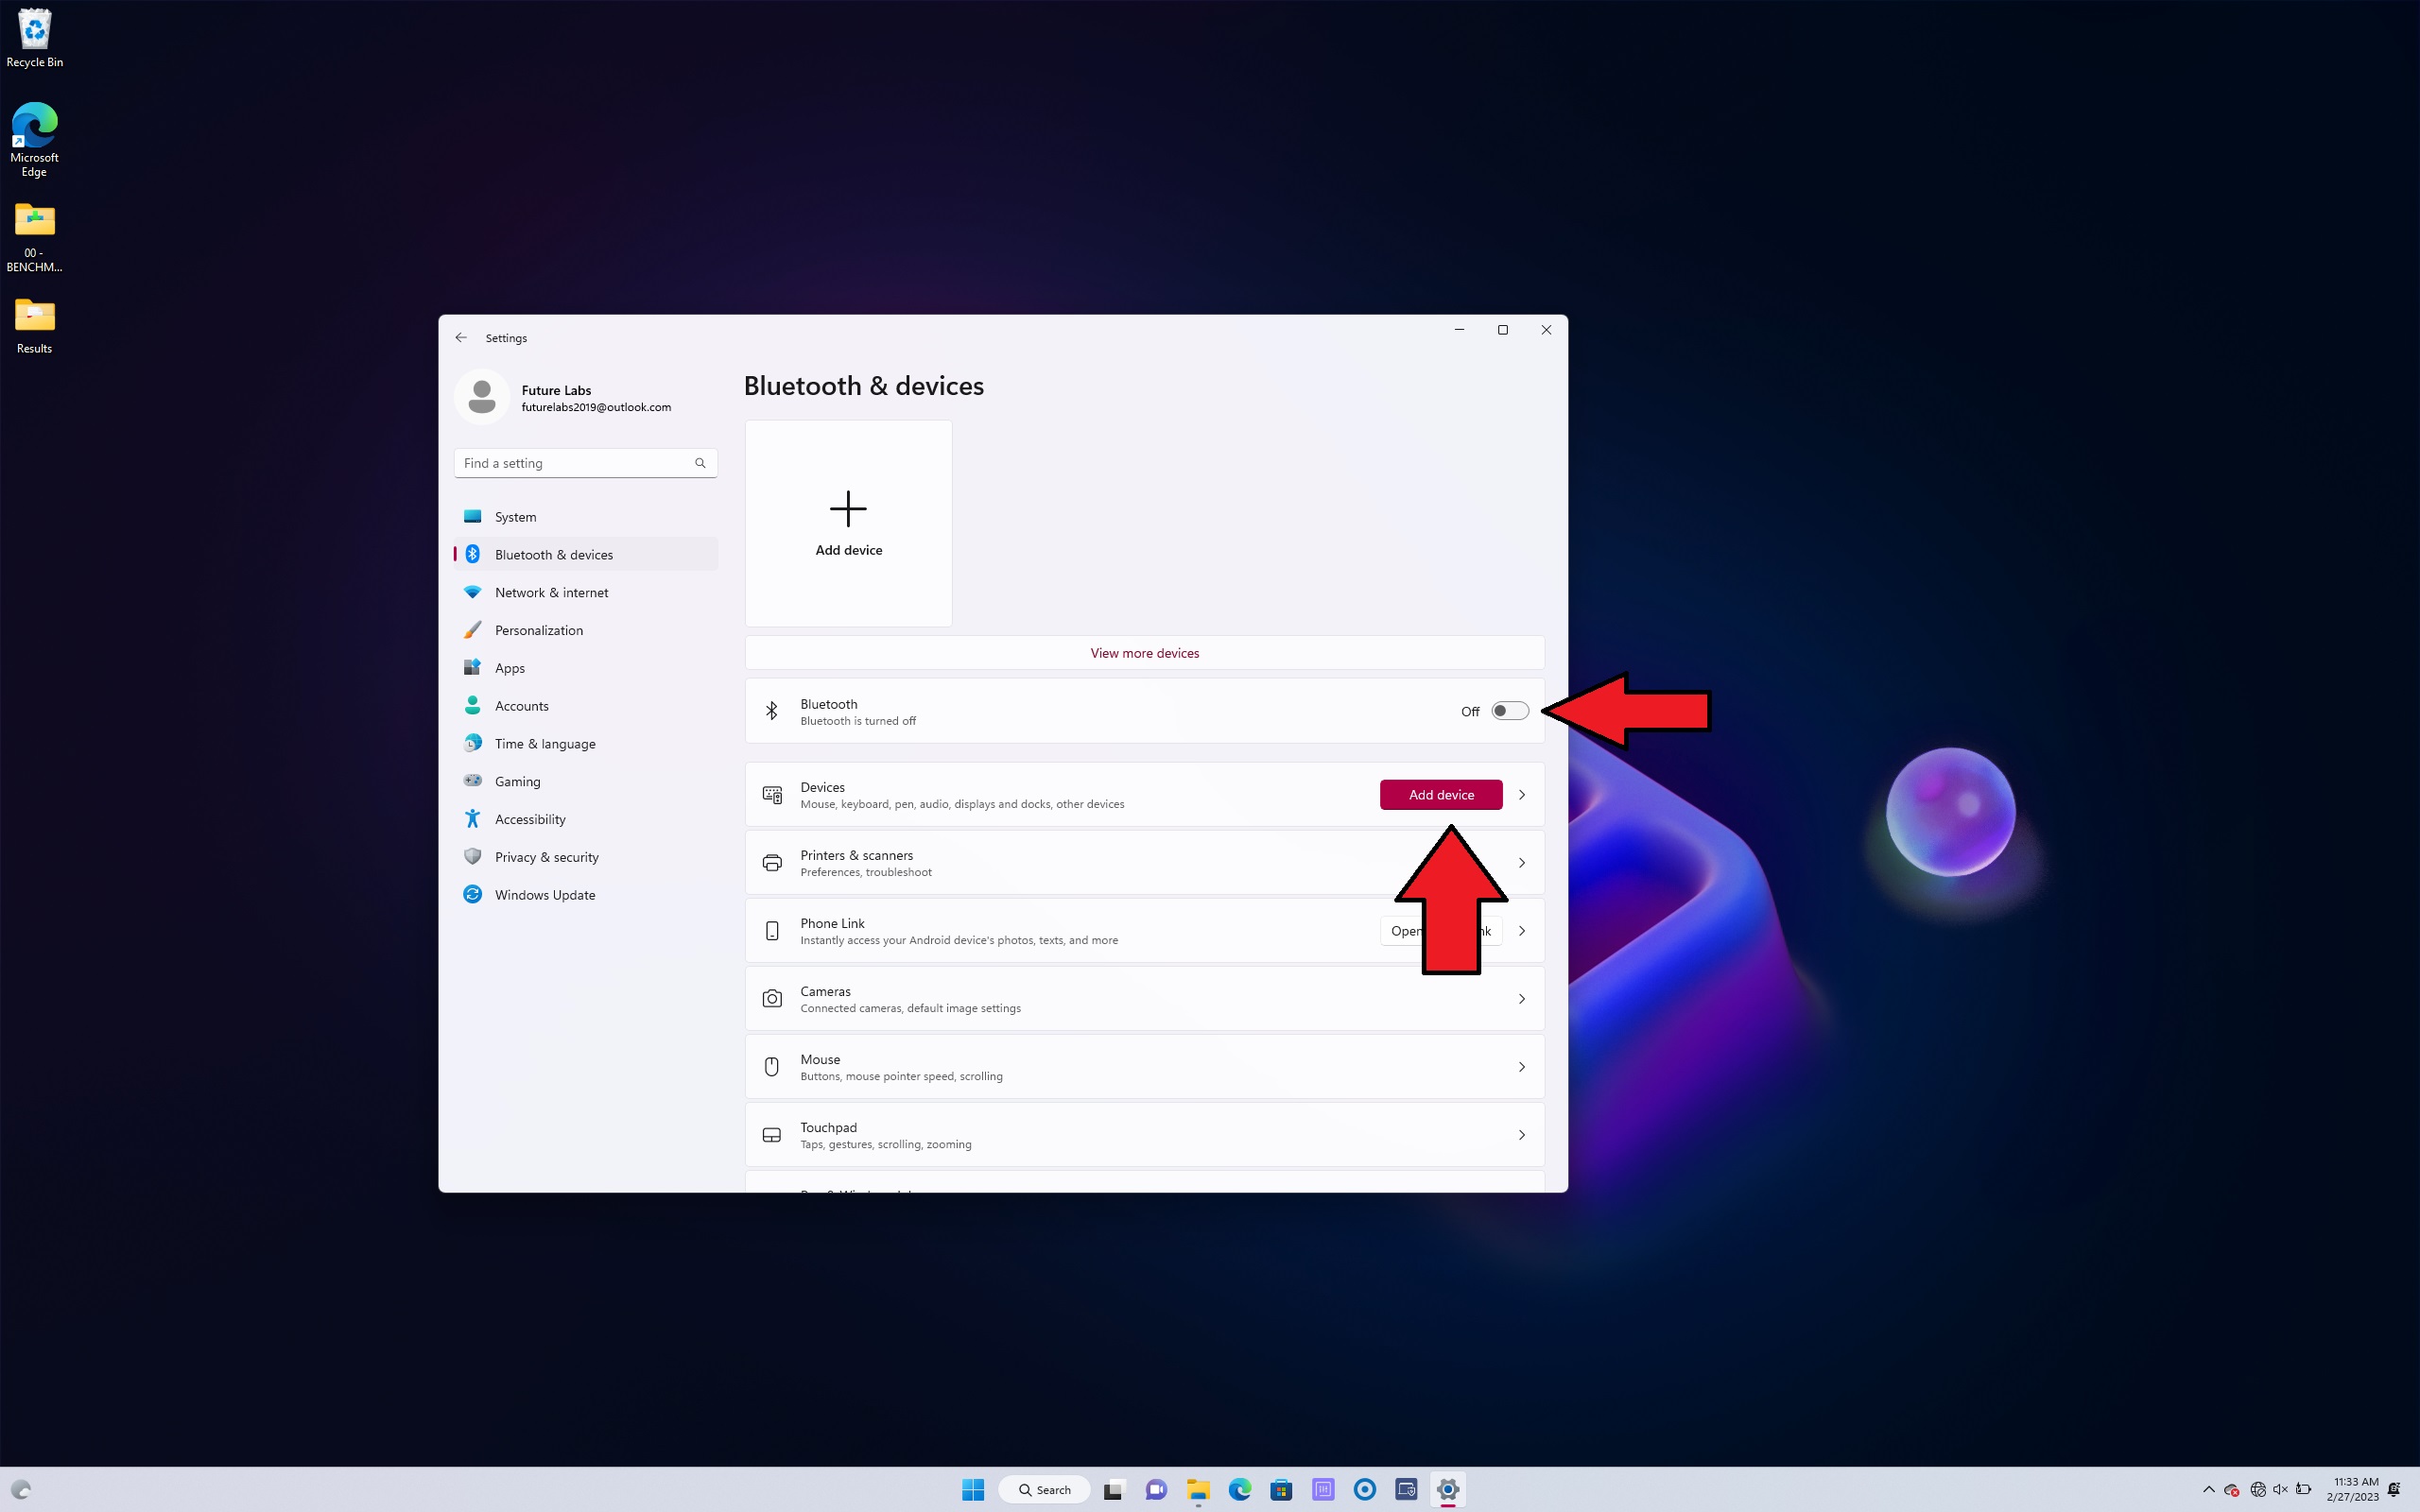
- Перейдите к разделу «Bluetooth и устройства».
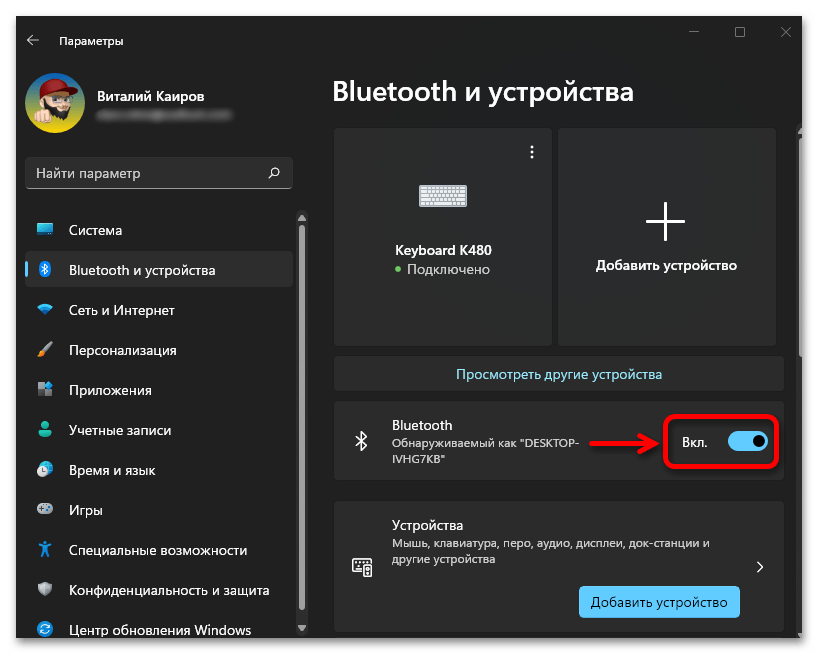
- Убедитесь, что опция «Bluetooth» находится в активированном состоянии.
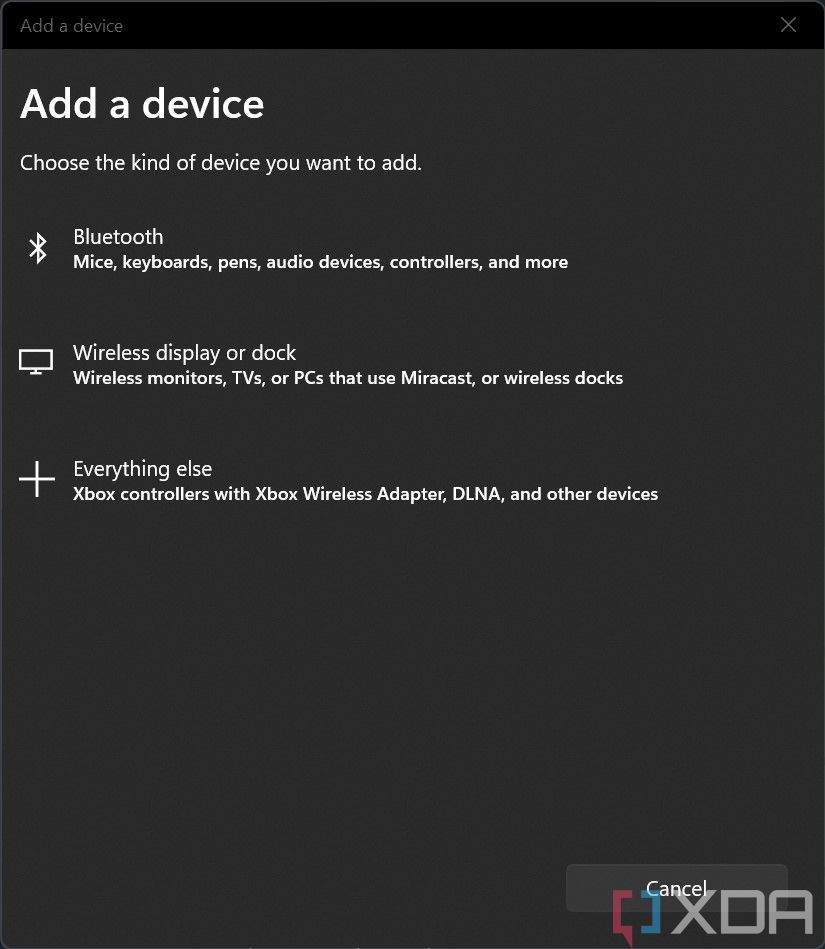
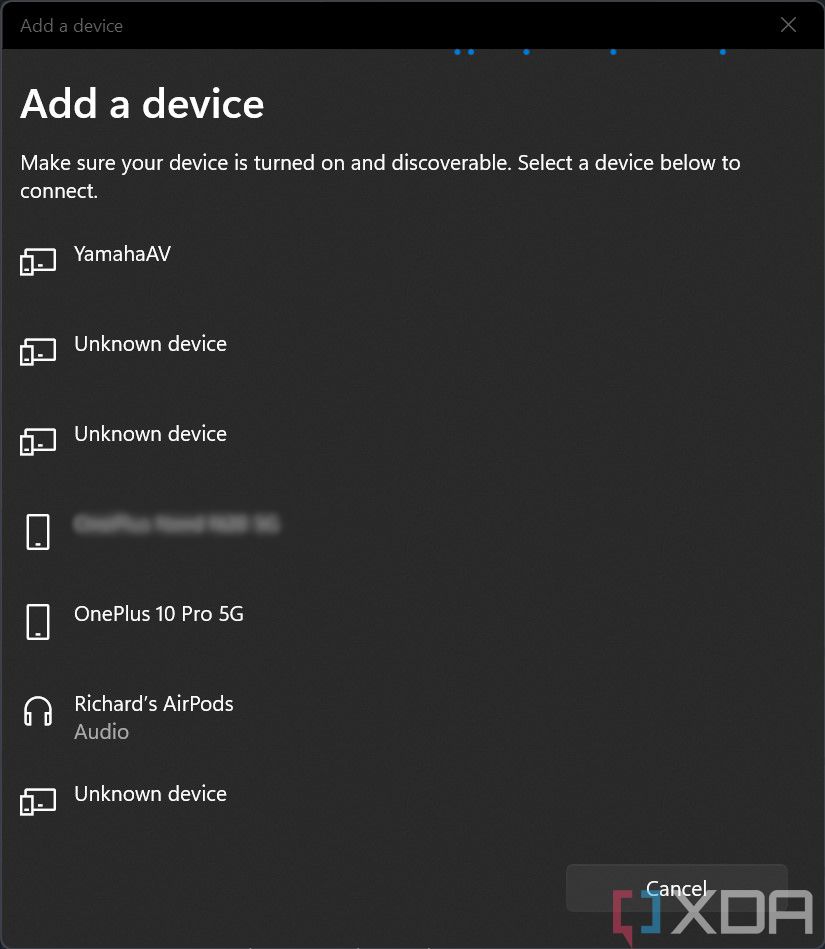
- Нажмите на плитку или кнопку с подписью «Добавить устройство».
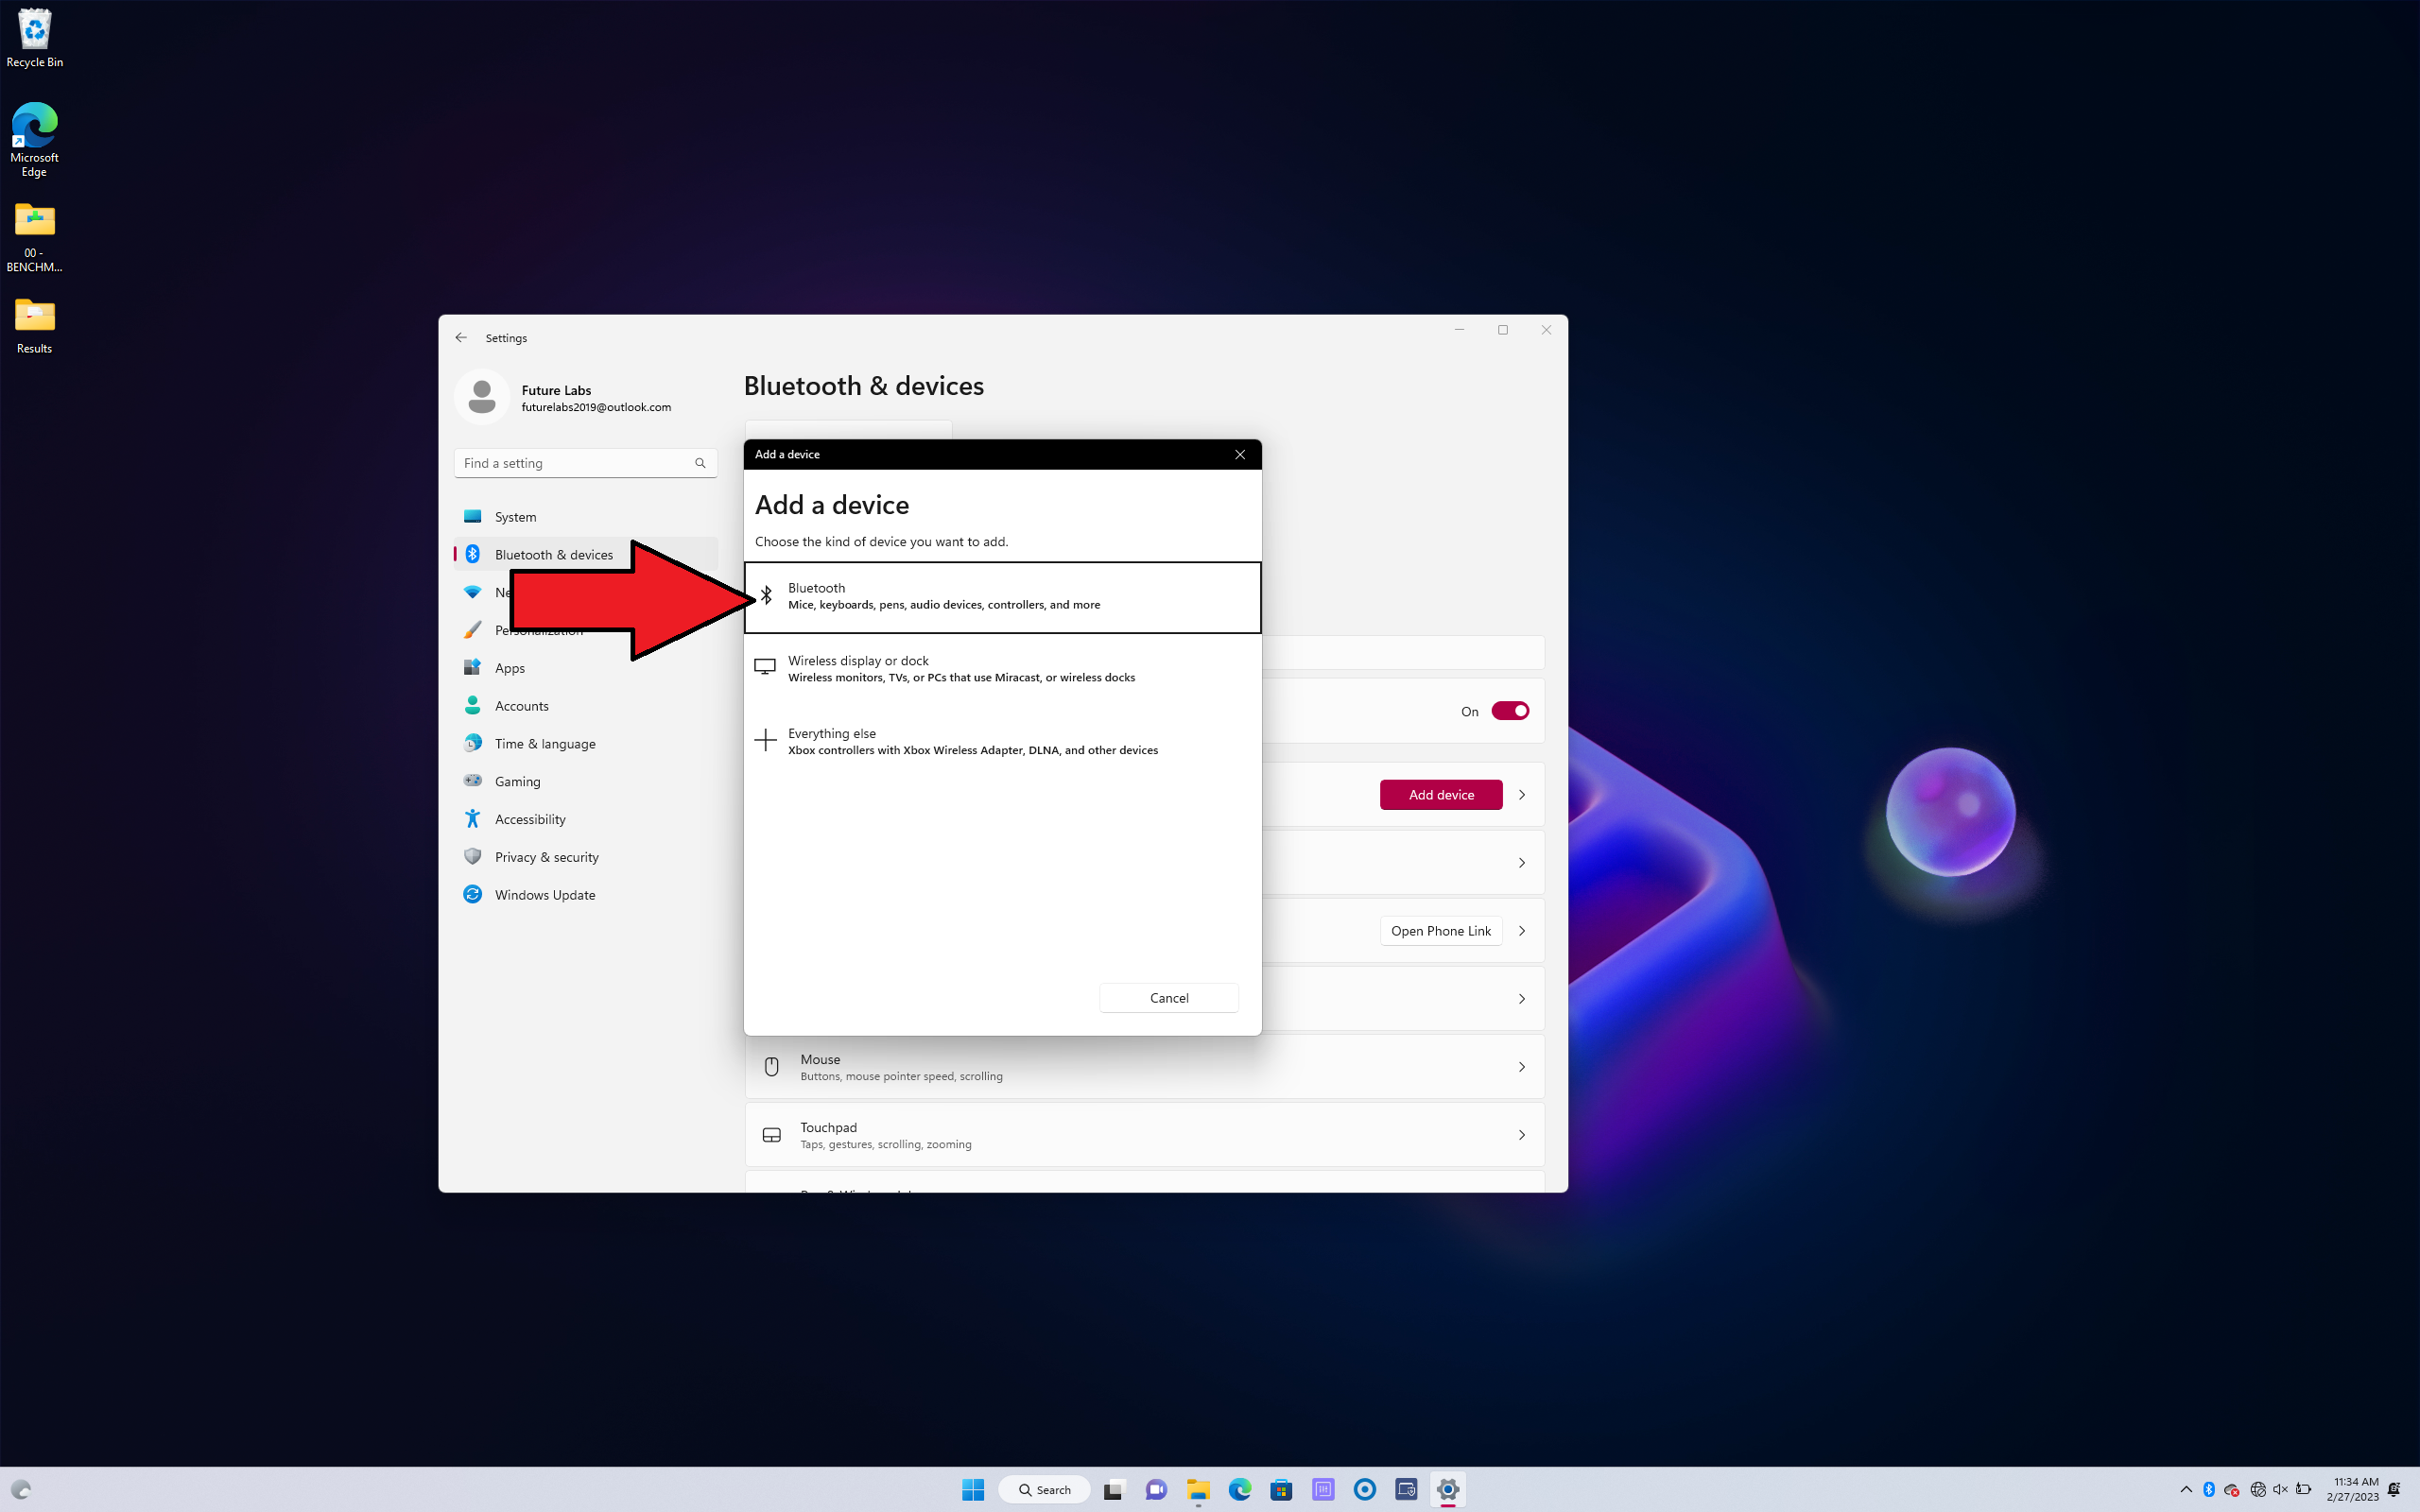
- В появившемся списке выберите первый вариант – «Bluetooth».
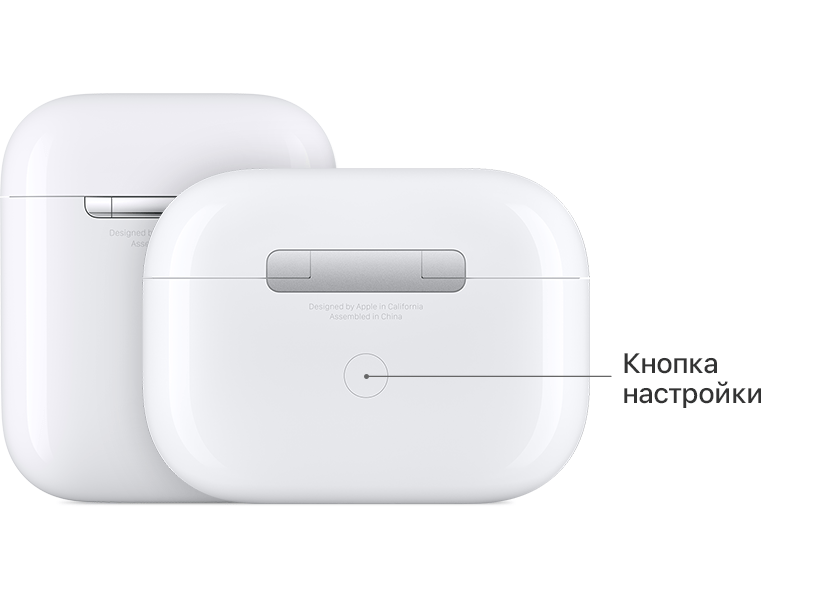
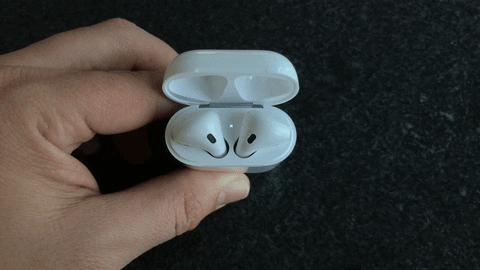
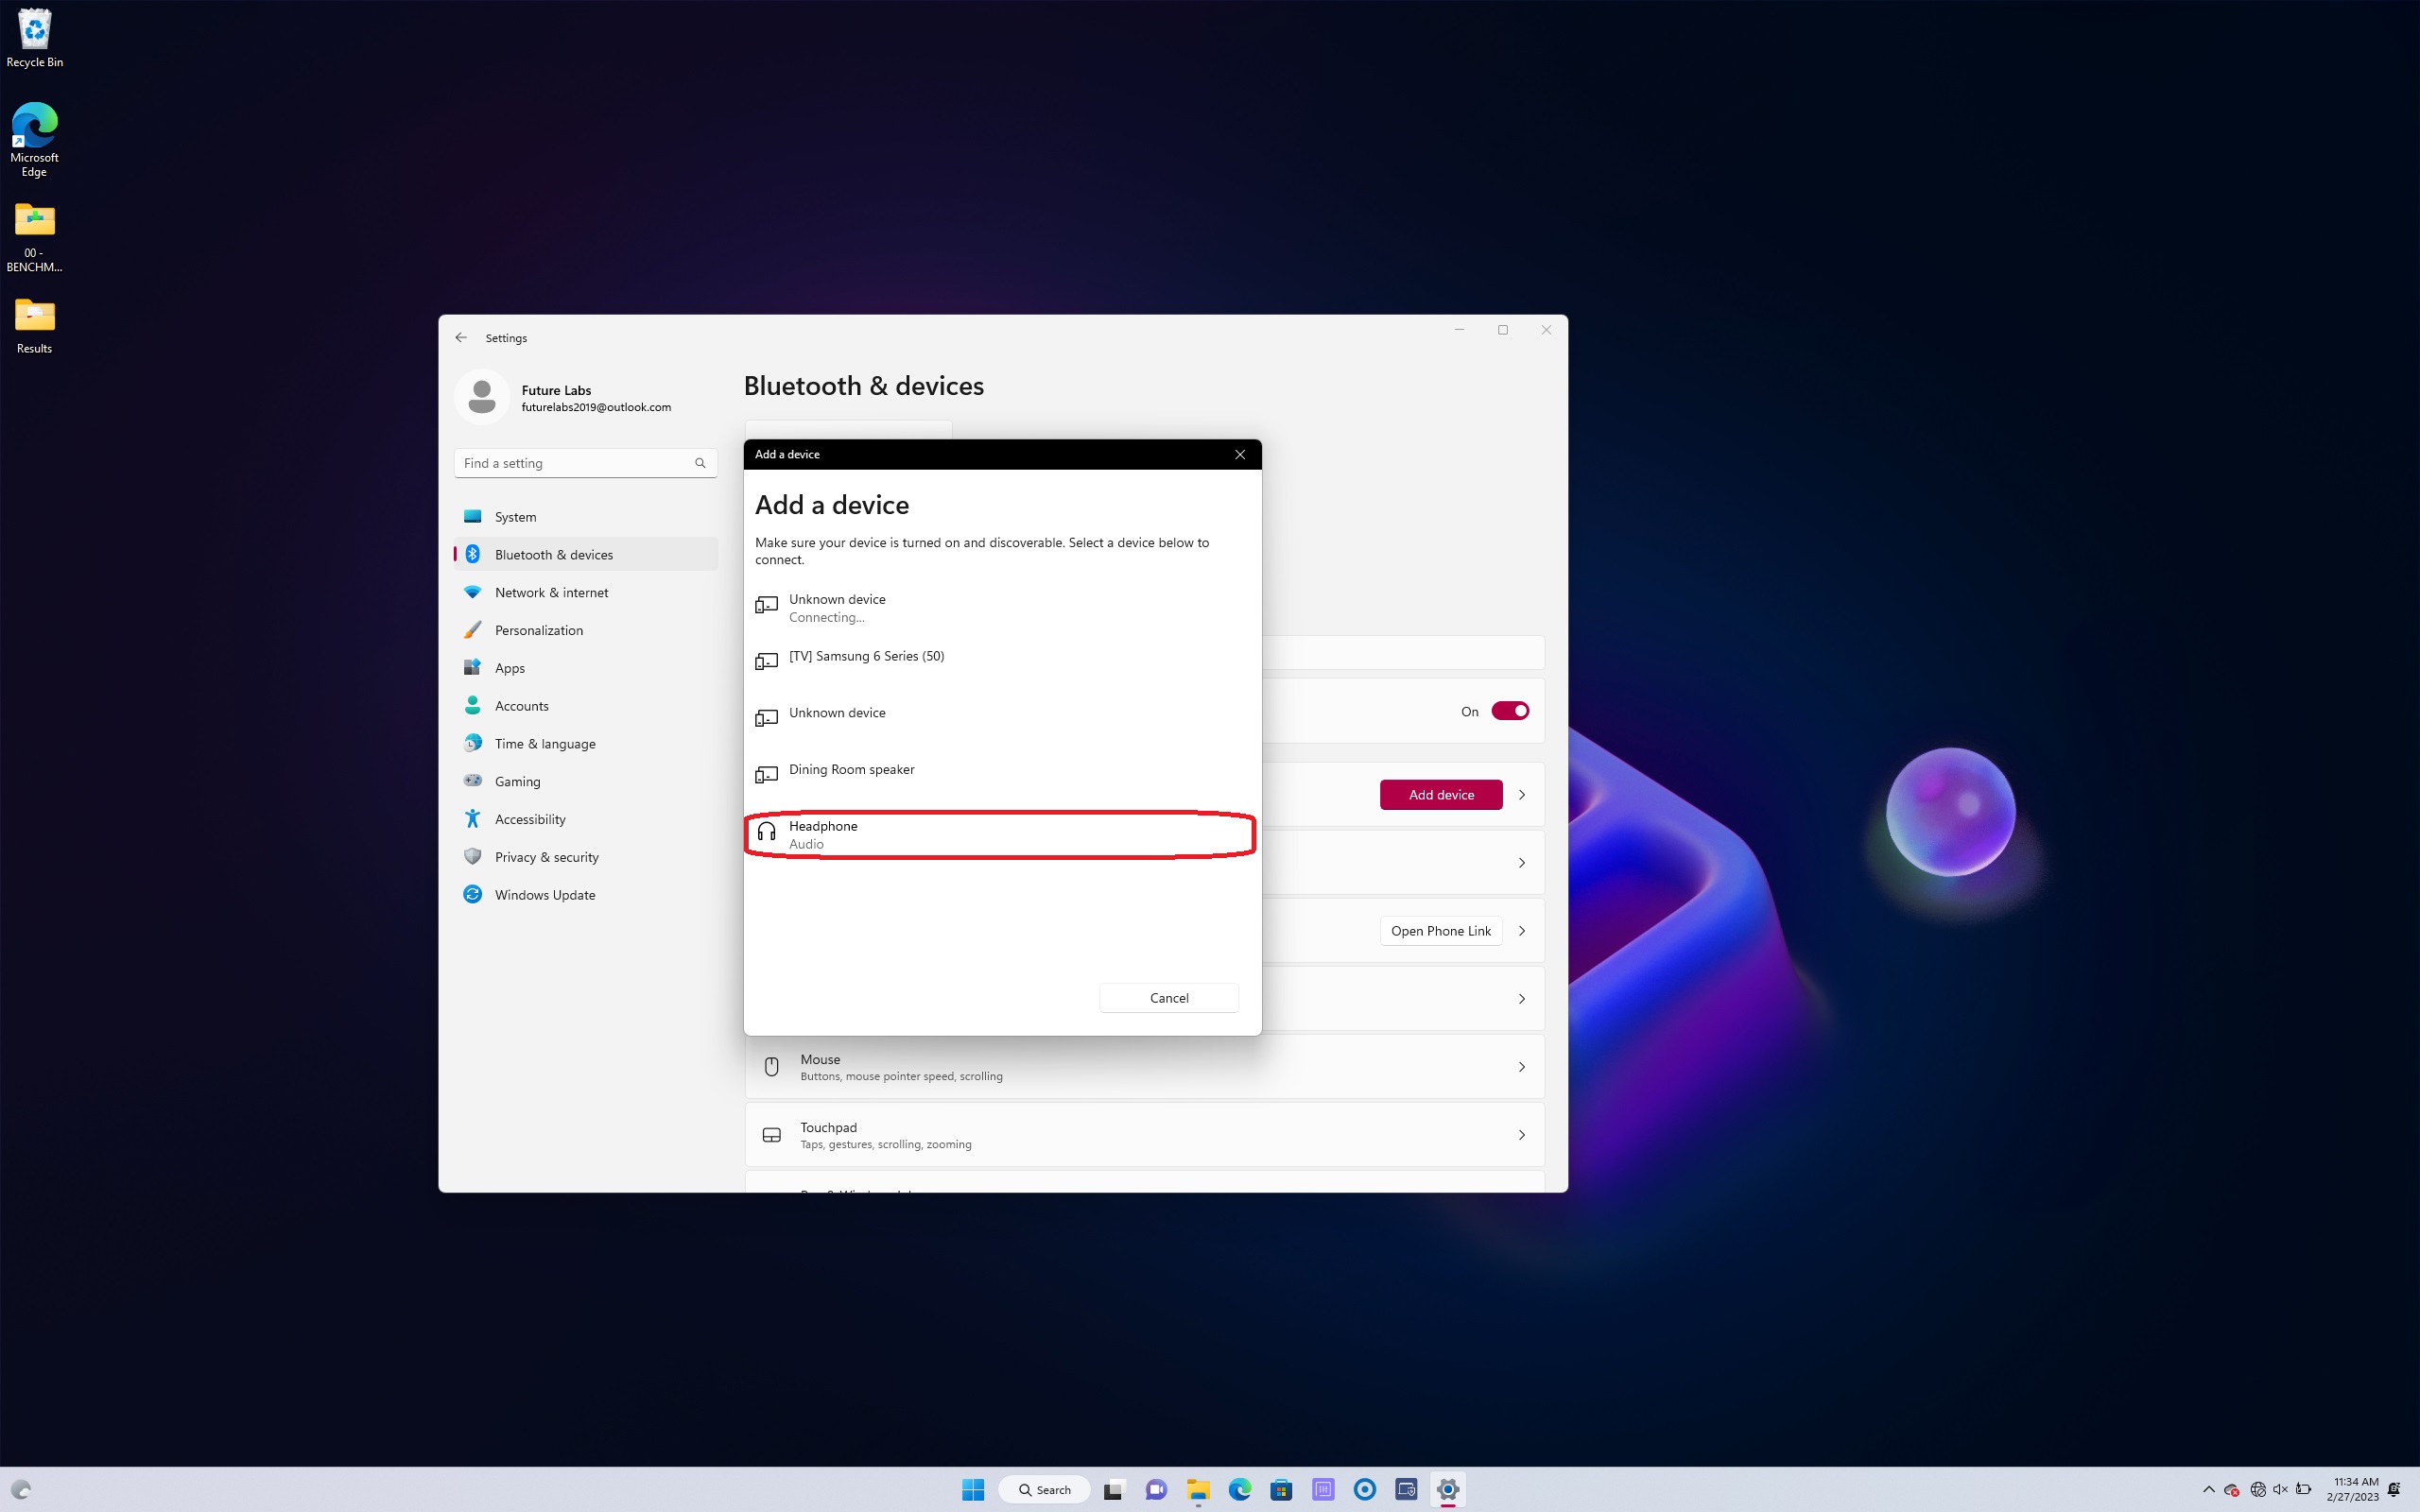
- Откройте зарядный кейс беспроводной гарнитуры (извлекать из него наушники на данном этапе не обязательно).

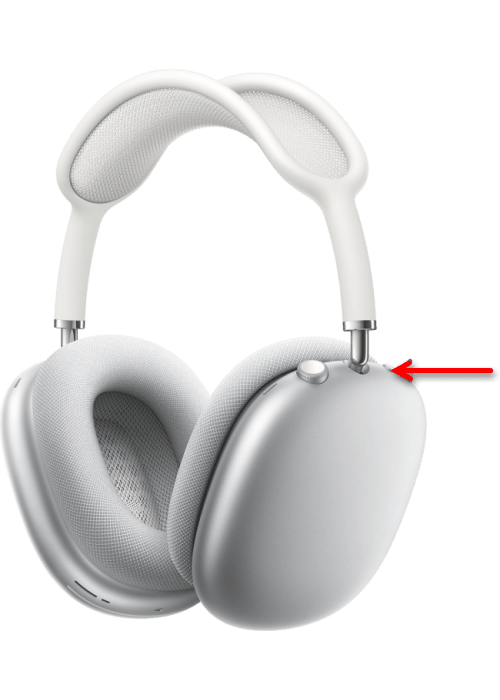
Зажмите и удерживайте расположенную на корпусе кнопку соединения до тех пор, пока зарядный индикатор в или на корпусе (зависит от модели) не начнет мигать белым, как это показано на изображении ниже.

Примечание: На модели AirPods Max для активации режима сопряжения необходимо удерживать кнопку управления шумом.

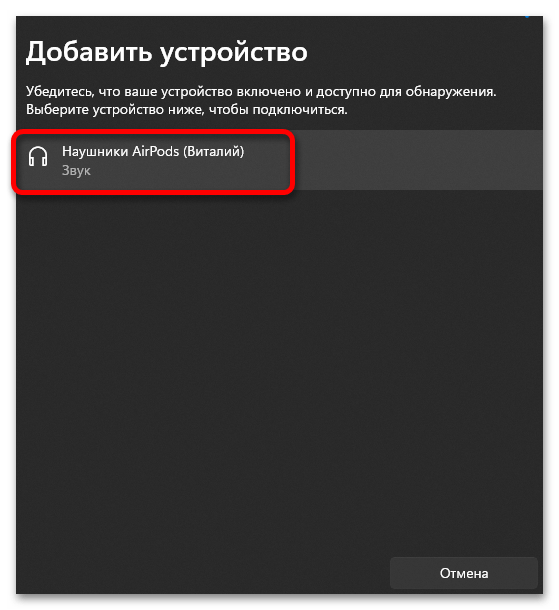
- Ожидайте, пока система найдет наушники,

после чего кликните по их наименованию для продолжения.

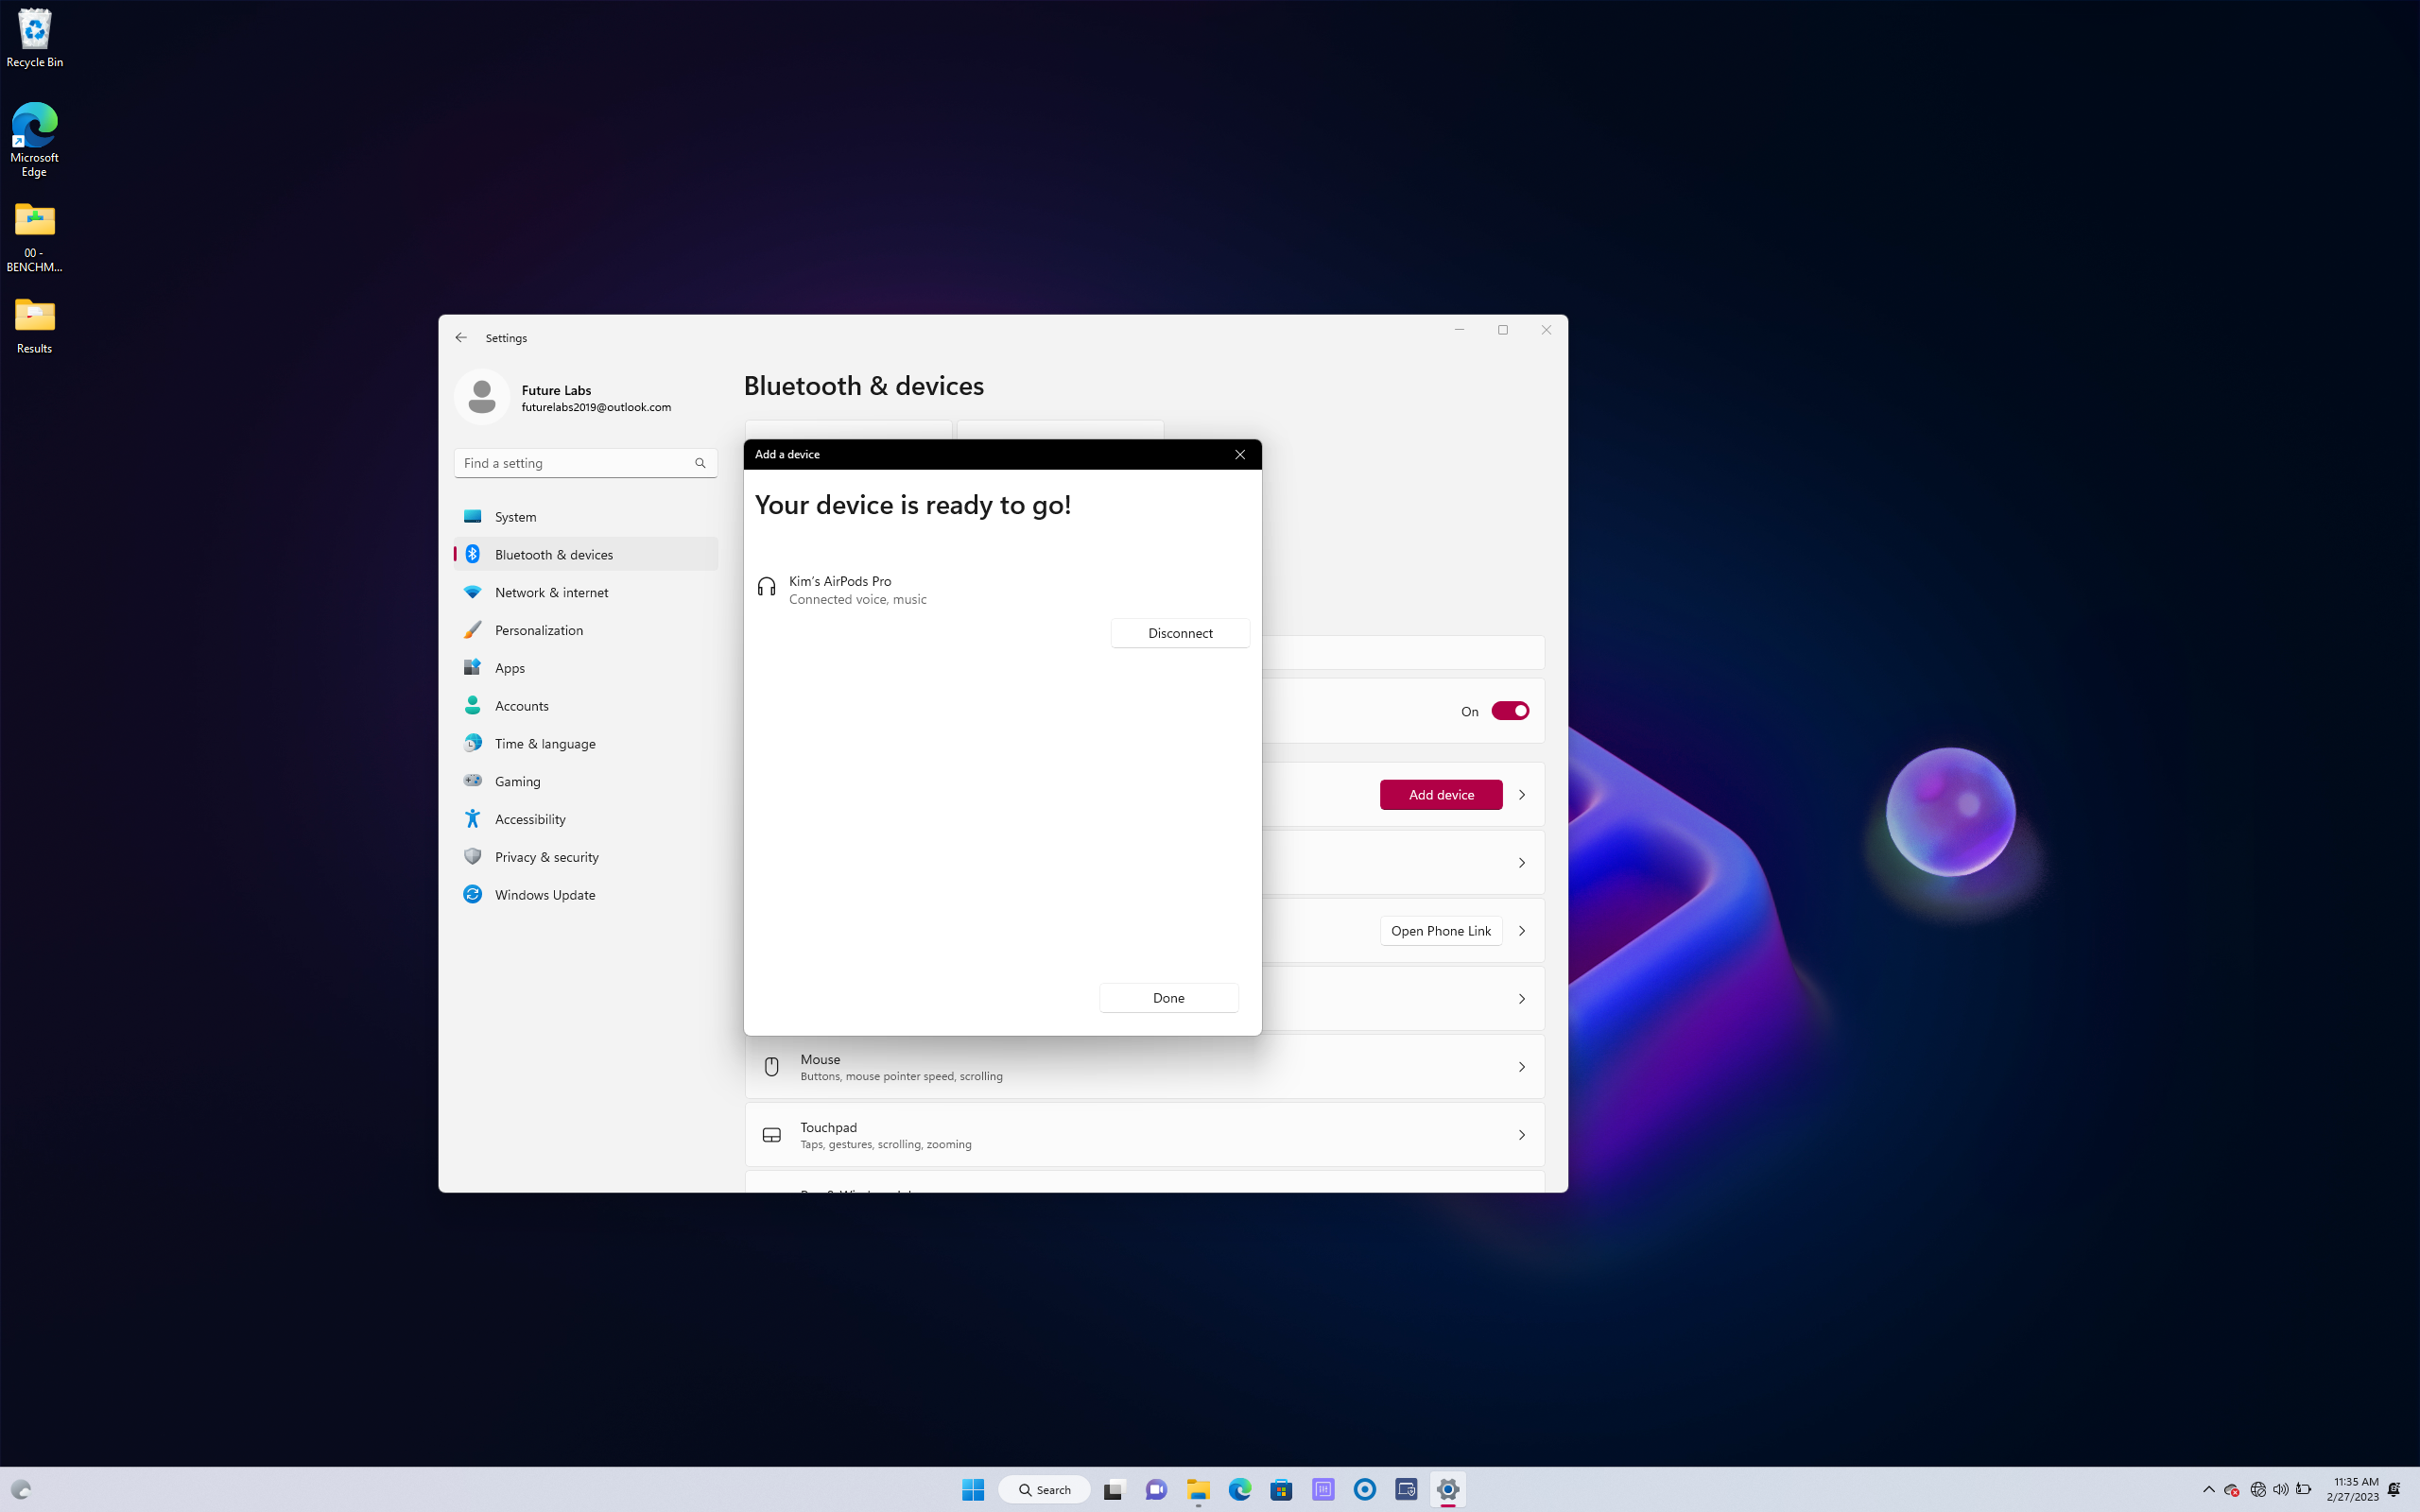
Спустя несколько секунд AirPods будут подключены к компьютеру.
Закройте окно сопряжения, нажав на кнопку «Готово».


Шаг 3: Управление подключением
После того как беспроводные наушники будут подключены, вы сможете пользоваться их базовыми возможностями, такими как прослушивание аудио и общение.
- Управлять подключением можно в уже упомянутом выше разделе «Bluetooth и устройства» системных «Параметров».

Здесь же по необходимости можно отключать
и подключать аксессуар,

а также удалить его из списка доступных к использованию.
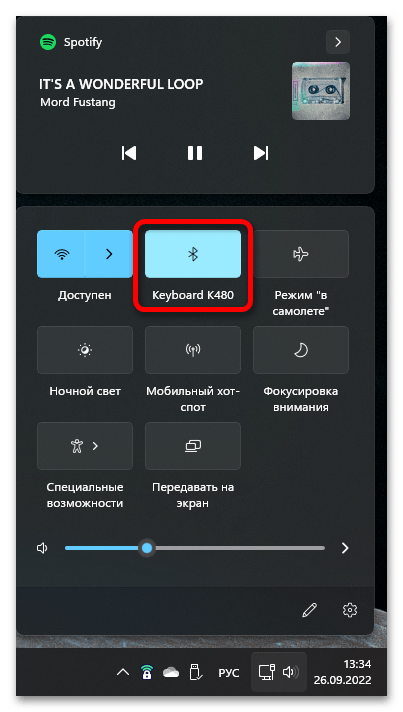
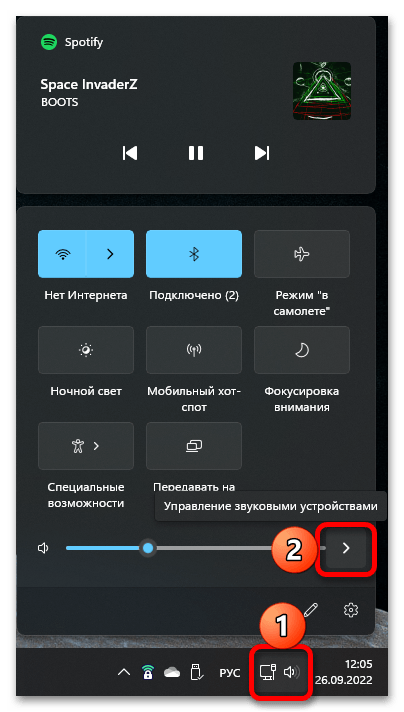
- Для управления громкостью следует воспользоваться доступной в «Центре уведомления шкалой», а если нажать по расположенному справа от нее указателю,

можно быстро переключаться между всеми подключенными к ПК или ноутбуку звуковыми устройствами.
- Аналогичная возможность, как и более тонкая настройка, доступна в разделе «Дополнительные параметры громкости».

Если открыть в них подраздел с AirPods, можно назначить наушники средством воспроизведения звука и/или общения по умолчанию, предоставить дополнительные разрешения, отрегулировать общий уровень громкости и баланс для левого и правого канала, а также по желанию активировать/деактивировать опцию улучшения звука.


Решение возможных проблем
Ввиду того, что АирПодс в первую очередь предназначены для использования в связке с другой техникой Эппл, на ПК и ноутбуках с Виндовс, даже относительно современных, с их подключением и использованием вполне могут возникать проблемы, помимо всех тех ограничений, которые мы обозначили в начале статьи. Узнать о причинах их возникновения и устранить поможет отдельная статья на нашем сайте, ссылка на которую дана ниже.
Подробнее: Устранение проблем с подключением AirPods

Наша группа в TelegramПолезные советы и помощь
Table of contents
- How to Connect Your AirPods to a Windows Computer
- Windows 10
- Windows 11
- How to Disconnect and Unpair Your AirPods from a Windows Computer
- Common AirPods Connection Issues
- Conclusion
- FAQ
If you’re wondering how to connect AirPods to a PC , you’ve just found the right place. Despite being designed to operate seamlessly with Apple devices, you can still easily connect AirPods to a laptop or a PC on Windows.
How to Connect Your AirPods to a Windows Computer
AirPods are specifically made to work within the Apple ecosystem. But can you connect AirPods to a laptop running Windows? You sure can! And it couldn’t be easier. Let’s take a walk through the steps to connect your AirPods to a Windows 10 or 11 running computer.
Windows 10
Here’s how to bluetooth AirPods to a laptop or PC on Windows 10:
- Prepare your AirPods: Before you begin, ensure that your AirPods are in their charging case and have a minimum of 20% battery.
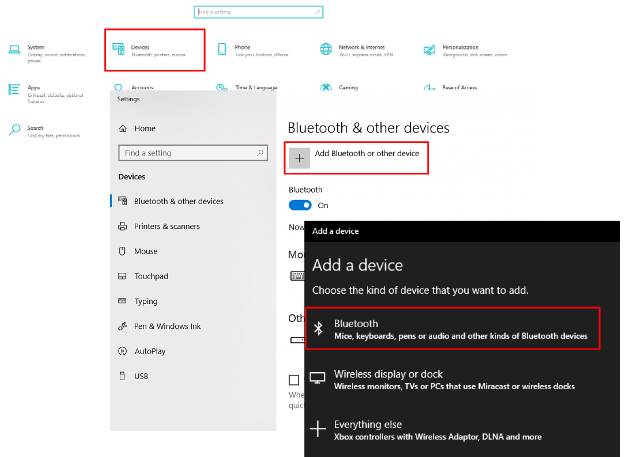
- Turn on Bluetooth: Open Settings and navigate to Devices > Bluetooth & other devices. Make sure Bluetooth is turned on. This is the essential step as you connect AirPods to a Windows 10 running computer through Bluetooth.
- Add a Bluetooth device: Click on “Add Bluetooth or other device” at the top of the Bluetooth & other devices menu. Select Bluetooth from the options presented.
- Activate the pairing mode: Open the lid of your AirPods case and press the small, circular button on the back of the case. Keep holding it until you see the LED lights inside (for older AirPods) or on the front (for AirPods Pro) flashing. This indicates that your AirPods are visible to other devices.
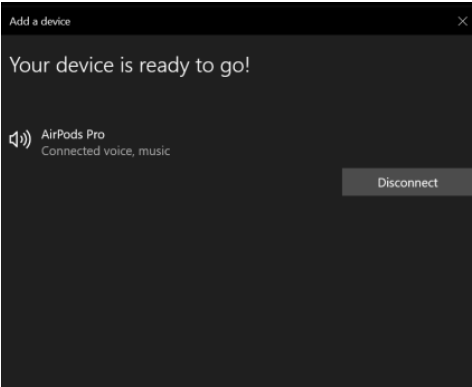
- Select your AirPods: After a few seconds, a list of available Bluetooth devices will appear. Look for your AirPods in the list and click on them to initiate the pairing process.
- Complete setup: Once connected, a pop-up screen will declare “Your device is ready to go.” Click Done. From this point onward, your AirPods should automatically connect to your laptop or PC whenever they are in range.
As you can see, pairing your AirPods with Windows 10 running computers is a walk in the park. But how to connect Apple AirPods to a laptop or a PC on Windows 11 OS? Let’s figure it out.
Windows 11
It’s as simple to connect AirPods to Windows 11 systems as it is with Windows 10 ones. All you need is to follow these steps:
- Prepare your AirPods: Ensure your AirPods are in their charging case and have a minimum of 20% battery.
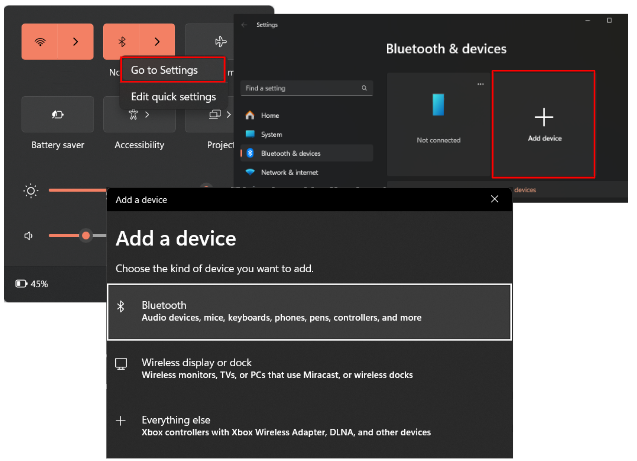
- Turn on Bluetooth: Open Quick Settings located on the right side of the taskbar, locate the Bluetooth sign, and make sure it’s not grayed out.
- Add a Bluetooth device: Right-click on the Bluetooth sign and select Go to Settings. Click on Add device, then select Bluetooth from the options presented.
- Activate the pairing mode: Open the lid of your AirPods case and press the small, circular button on the back of the case. Keep holding it until you see the LED lights inside (for older AirPods) or on the front (for AirPods Pro) flashing. This indicates that your AirPods are visible to other devices.
- Select your AirPods: After a few seconds, a list of available Bluetooth devices will appear. Look for your AirPods in the list and click on them to initiate the pairing process.
- Ready to go: After you get the “Your device is ready to go” pop-up, click Done. Your AirPods are now ready to use with your Windows 11 computer. Whenever your AirPods are in range and Bluetooth is enabled on your computer, they should automatically connect.
All in all, that is how to connect AirPods to a laptop or PC. Whether you are using a Windows 10 or 11 running computer, the process is smooth and easy.
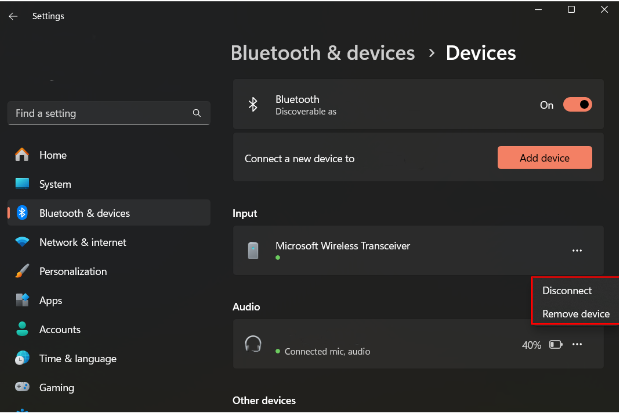
How to Disconnect and Unpair Your AirPods from a Windows Computer
In the previous part of the article, we’ve learned how to connect AirPods Pro to a laptop . But what if it’s your friend’s laptop and you need to disconnect and unpair your AirPods before returning it? Here’s how you can do it:
- Open Bluetooth settings: Navigate to Settings and select Bluetooth & devices (Device > Bluetooth & other devices in Windows 10).
- Locate your AirPods: In the list of paired devices, find your AirPods under the Audio section. They will be listed by their name.
- Disconnect: Click on your AirPods (or the three dots next to them in Windows 11) and select Disconnect. Confirm the action if prompted.
- Unpair AirPods: After disconnecting, click on your AirPods again (or the three dots next to them in Windows 11) and select Remove device. This will unpair your AirPods from the Windows computer permanently.
Now that we’ve covered how to connect AirPods to a Windows PC and learned how to disconnect and unpair them, let’s take a look at the most common AirPods connection issues and ways to avoid them.
Common AirPods Connection Issues
- Intermittent connectivity:
- Issue : AirPods may experience intermittent disconnections or drops in audio during usage.
- Possible causes : Interference from other wireless devices, outdated firmware, or Bluetooth signal disruptions.
- Fixes : Check for interference from other devices; ensure AirPods have the latest firmware updates; reset AirPods by holding the setup button on the charging case.
- Failure to connect:
- Issue : Failure in establishing a connection between AirPods and a device.
- Possible causes : Bluetooth settings, outdated Bluetooth drivers, or AirPods not in pairing mode.
- Fixes : Activate AirPods’ pairing mode and ensure Bluetooth is enabled on the device; forget and re-pair AirPods with the device; check your laptop/PC Bluetooth version (should be 4.0 or higher).
- Audio quality issues:
- Issue : Poor audio quality, distortion, or imbalanced sound.
- Possible causes : Bluetooth signal interference, outdated firmware, or hardware issues.
- Fixes : Check for interference from other devices; ensure AirPods and Windows have the latest updates installed.
- Mic malfunctions:
- Issue : Microphone-related problems, such as low sensitivity or inaudible audio during calls.
- Possible causes : Software issues, debris in the microphone, or hardware malfunctions.
- Fixes : Remove any debris from the microphone area; ensure AirPods and Windows have the latest updates installed.
Related: How to Fix an Auto Muting Microphone
- Unresponsive touch controls:
- Issue : AirPods not responding to touch gestures for play/pause or skipping tracks.
- Possible causes : Software bugs, outdated firmware, or hardware issues with the touch sensors.
- Fixes : Reset AirPods and reconfigure touch controls; ensure AirPods have the latest firmware updates.
Preventive measures
First and foremost, you need to make sure your Bluetooth and audio drivers are up to date. We recommend using Auslogics Driver Updater as it is a reliable and convenient tool that automatically scans your system for outdated drivers (not only those discussed) and installs the most current, manufacturer-recommended ones.
Download Auslogics Driver Updater
Prevent hardware errors and ensure problem-free device operation with this advanced tool that detects outdated drivers and safely gets them updated.
Also read: Auslogics Driver Updater: Update Your Drivers in One Click!
Here are some other general preventive measures to keep you clear of connection issues:
- Keep your Windows system updated,
- Regularly update AirPods firmware,
- Regularly check your computer for malware,
- Regularly clean your devices from dust and debris.
Also read: Auslogics Anti-Malware: Features and Reviews
Just follow these simple recommendations and you should have no problems when trying to connect AirPods to Windows 11 or 10 running computers.
Conclusion
Hopefully, you’re already enjoying your favorite music or a movie, thanks to our tips on how to connect AirPods to a PC provided in this article.
Don’t forget to update your drivers and regularly check for Windows and AirPods updates, and you will most certainly evade connection issues while relishing those precious moments of music listening more often.
Feel free to share your favorite songs and sound settings in the comments section below!
FAQ
How to put AirPods in pairing mode?
To put your AirPods in pairing mode, open the case, press and hold the button on the back until the LED starts flashing. Your AirPods are now ready to connect.
Why do my AirPods keep disconnecting from my Windows PC?
If your AirPods frequently disconnect, try updating Bluetooth drivers, ensuring Windows is up to date, and checking for interference from other Bluetooth devices.
Can I customize touch controls for AirPods when using them with a Windows PC?
As of now, Apple’s official customization of touch controls is primarily designed for iOS devices. You will need an iPhone or another iOS device to customize AirPods touch controls.
Sign in to your XDA account

Apple’s AirPods Pro connect to the latest iPhones seamlessly through a dedicated fast pairing mechanism. However, if you’re not willing to buy a new Mac, you may be wondering if these excellent earbuds work with Windows 11 PCs.
Fortunately, the AirPods Pro, regardless of their generation, work with non-Apple computers. To connect them to a Windows 11 machine, all you have to do is follow the detailed steps we’ve listed below.
Connecting AirPods Pro to a Windows 11 PC
-
Launch the Settings app on your Windows 11 PC.

- Tap on Bluetooth & devices in the sidebar.
-
Click on Add device.
-
Choose Bluetooth in the Add a device section.

- Open the lid of your AirPods Pro case.
- If they don’t show up in the list of Bluetooth devices on your Windows 11 PC, click and hold the button on the button of the AirPods case.
-
When they show up on the list, tap them to connect.
- Wait for the pairing process to complete — it shouldn’t take over a few seconds.
- You can now use your Apple AirPods Pro with your Windows 11 PC.
While AirPods Pro users on Windows can’t take full advantage of the wireless ANC earbuds, they can still utilize some of their features. For example, you can press and hold AirPods’ stems to switch ANC on or off, even though you can’t directly do it from your Windows 11 PC. The experience won’t be as smooth, but it’s still decent. It makes sense for people who have iPhones or other Apple products but also need or own a Windows 11 computer.
Apple AirPods Pro 2
Despite their compact build, the AirPods Pro 2 pack in plenty of features, including active noise cancelation (ANC), Dolby Atmos content, and wireless charging.
AirPods Pro has become one of the most popular choices for wireless earbuds. Its seamless connection with iPhone and iPad made it the optimal choice for Apple users. However, not all Apple users solely use iOS devices. The good news is, you can also use AirPods Pro with your Windows computer. In this blog post, we will talk about how to connect AirPods Pro to PC Windows 11. We will also discuss some common issues you may encounter and additional tips that will optimize your experience.
Video Tutorial:
The Challenge of Connecting AirPods Pro to PC Windows 11
Connecting AirPods Pro to Windows 11 can be challenging, especially if you are not familiar with it. Windows uses Bluetooth to connect devices like AirPods. AirPods Pro connection in Windows needs to be set up manually, unlike the seamless connection for iOS devices. It is essential to know what to prepare for to ensure a successful connection.
Things You Should Prepare for
1. A PC with Windows 11 operating system.
2. Bluetooth 4.0 or later.
3. AirPods Pro with fully charged batteries.
Method 1: Via Bluetooth Settings
Step 1: Turn on the Bluetooth feature on your Windows 11 PC.
Step 2: Place your AirPods Pro inside the charging case and open the lid.
Step 3: Press and hold the button on the back of the charging case until the LED light inside the case turns white.
Step 4: On your PC, go to settings > Bluetooth and other device.
Step 5: Click on «Add Bluetooth or other device» button.
Step 6: Select «Bluetooth» as the device type.
Step 7: A window will appear, and your PC will start searching for nearby Bluetooth devices. Select your AirPods Pro from the list.
Step 8: Once selected, click on «Pair» and follow the on-screen instructions to complete the process.
Pros:
– Easy to follow steps
– Built-in settings in Windows 11
– Does not require any third-party software
Cons:
– May take a while to connect
– May encounter issues with compatibility
Method 2: Via Taskbar
Step 1: Turn on the Bluetooth feature on your Windows 11 PC.
Step 2: Place your AirPods Pro inside the charging case and open the lid.
Step 3: Press and hold the button on the back of the charging case until the LED light inside the case turns white.
Step 4: On the taskbar, click on the Bluetooth icon.
Step 5: From the drop-down list, select «Add Bluetooth or other devices.»
Step 6: Select «Bluetooth» as the device type.
Step 7: A window will appear, and your PC will start searching for nearby Bluetooth devices. Select your AirPods Pro from the list.
Step 8: Once selected, click on «Pair» and follow the on-screen instructions to complete the process.
Pros:
– Easy to access via taskbar
– Built-in settings in Windows 11
– Does not require any third-party software
Cons:
– May take a while to connect
– May encounter issues with compatibility
Method 3: Via Third-Party Apps
Step 1: Download and install a third-party app, such as «AirPods Pro-Bluetooth Explorer» or «AirPods ProPair» on your Windows 11 PC.
Step 2: Place your AirPods Pro inside the charging case and open the lid.
Step 3: Press and hold the button on the back of the charging case until the LED light inside the case turns white.
Step 4: Open the third-party app you installed earlier.
Step 5: Your AirPods Pro should be recognized automatically by the app.
Step 6: Click on «Pair» and wait for the app to finish the process.
Pros:
– Some third-party apps offer additional features like battery percentage and firmware update.
Cons:
– Requires downloading and installing third-party apps
– Some apps may come with potentially harmful malware
Why Can’t I Connect My AirPods Pro?
1. Bluetooth driver is outdated or not installed.
Fix: Update the Bluetooth driver or install it if it is not present.
2. AirPods Pro batteries are not charged.
Fix: Charge the AirPods Pro battery before attempting to connect to Windows 11 PC.
3. The AirPods are already paired with another device.
Fix: Disconnect AirPods Pro from the previously paired device and follow the connection process for Windows 11 PC.
Additional Tips
1. Make sure the AirPods Pro and Windows 11 PC are within the range of each other.
2. Disconnect other Bluetooth devices to avoid interference.
3. Restart the Bluetooth service on Windows 11 if it is not connecting.
5 FAQs about Connecting AirPods Pro to PC Windows 11
Q1: Can I connect AirPods Pro to Windows 11 without Bluetooth?
A: No, Bluetooth is the only way to connect AirPods Pro to Windows 11.
Q2: Why is my AirPods Pro connection unstable?
A: The connection may be unstable if there are too many active Bluetooth connections, the distance is too far, or there are other signal interferences.
Q3: Can I listen to music on my AirPods Pro while connected to Windows 11 PC?
A: Yes, once connected, you can stream audio or listen to music on your AirPods Pro while connected to your Windows 11 PC.
Q4: Will my AirPods Pro microphone work on Windows 11 PC?
A: Yes, once connected, you can use the microphone on your AirPods Pro as a device for audio input in Windows 11 PC.
Q5: Is there any dedicated app to control AirPods Pro on Windows 11 PC?
A: No, there is currently no dedicated app to control AirPods Pro on Windows 11 PC.
In Conclusion
Connecting AirPods Pro to Windows 11 PC requires following specific steps, but it is straightforward to achieve. The methods we discussed in this blog post will help you connect your AirPods Pro to your Windows 11 PC and enjoy high-quality audio. If you encounter any issues, follow the fixes suggested in the blog post. Remember, to get the best out of your AirPods Pro on Windows 11 PC, follow the additional tips shared here.
Wondering how to connect your AirPods to Windows 11? Whether you have the regular ol’ AirPods, the AirPods Pro, or the relatively new AirPods Pro 2, we’ve got you covered.
There’s a good chance that you may have recently upgraded to Windows 11, or perhaps you’re coming from using Mac or Chrome OS, and you want to know how to connect one of the best wireless headphones to your PC. No worries! Check out the step-by-step guide below, and you’ll have your AirPods connected to Windows 11 in no time.
How to connect AirPods to Windows 11
1. Right-click the bottom taskbar and click on Taskbar Settings.

2. Click on Bluetooth & Services on the left panel.
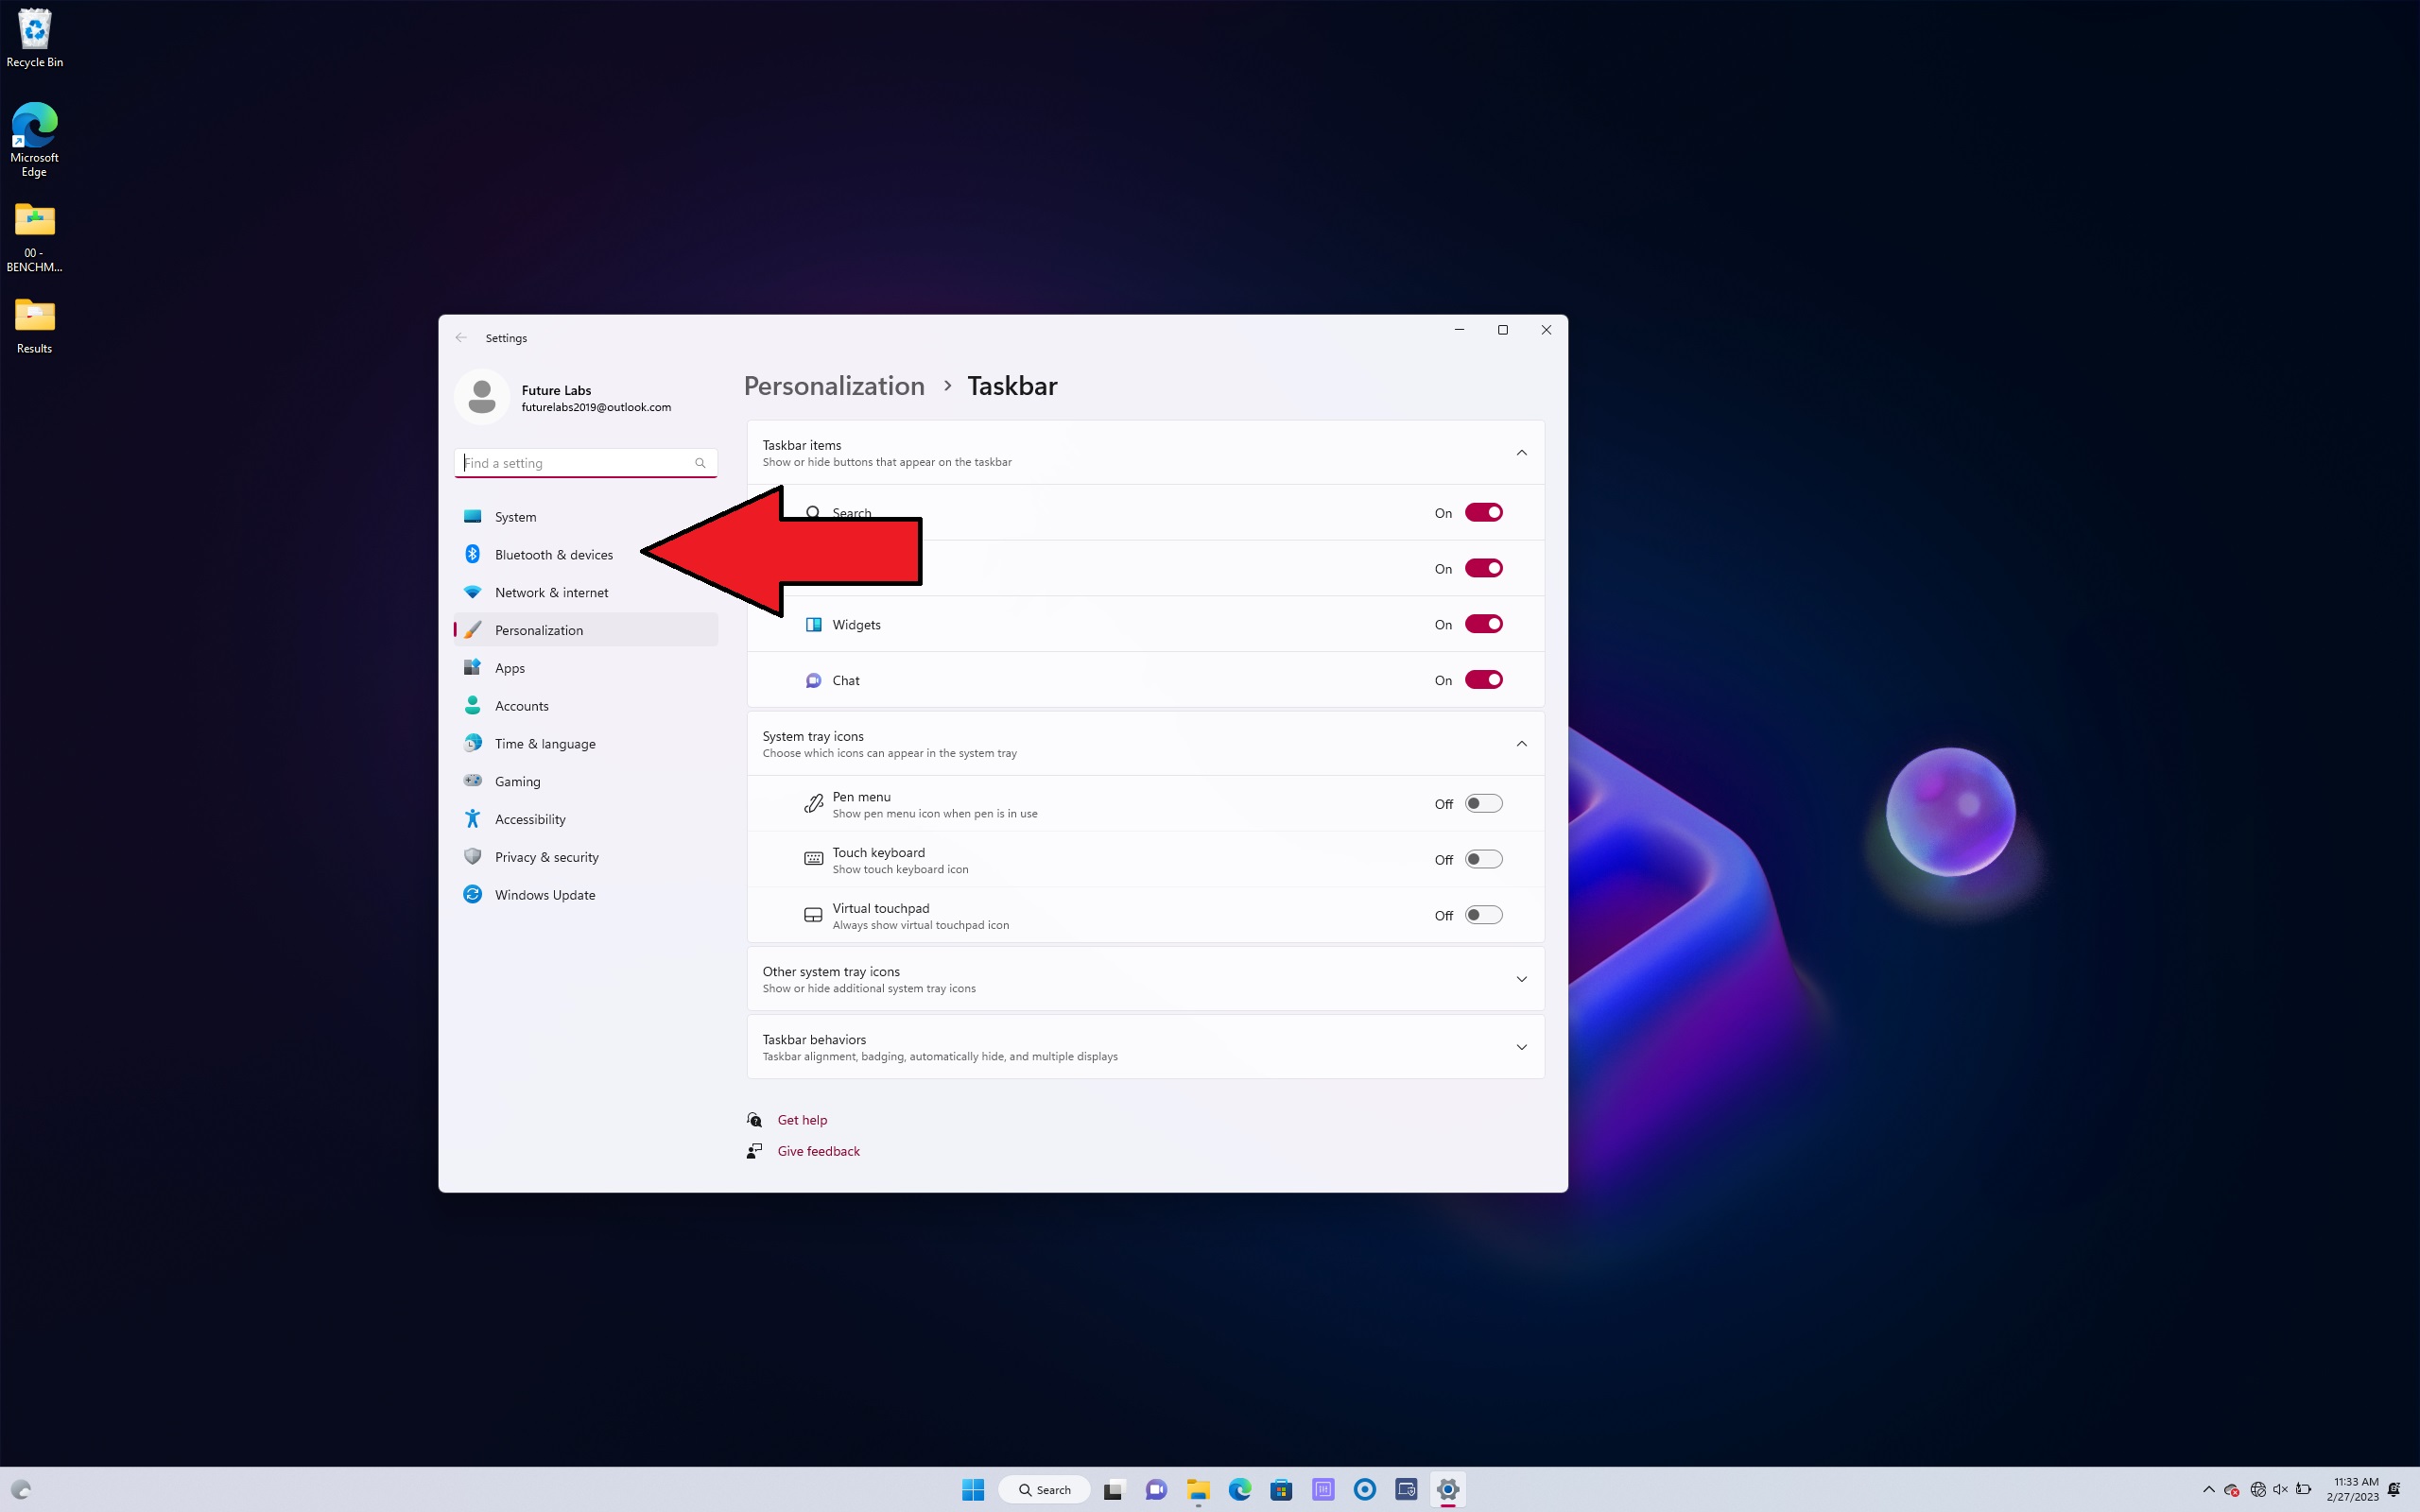
3. Make sure the Bluetooth toggle is turned on.
4. On your AirPods case, press and hold the button the back until you see a blinking white light to make sure your AirPods are discoverable.
5. Click on Add Device.
Sign up to receive The Snapshot, a free special dispatch from Laptop Mag, in your inbox.
6, Click on Bluetooth.
7. In the Add a Device window, your AirPods should appear. Sometimes, it won’t pop up right away. Give it a minute or two.
8. Once you see your AirPods, click on it and hit Done.
Voila! Your AirPods should now be connected to Windows 11.
Back to MacBook Air
Show more
Kimberly Gedeon, holding a Master’s degree in International Journalism, launched her career as a journalist for MadameNoire’s business beat in 2013. She loved translating stuffy stories about the economy, personal finance and investing into digestible, easy-to-understand, entertaining stories for young women of color. During her time on the business beat, she discovered her passion for tech as she dove into articles about tech entrepreneurship, the Consumer Electronics Show (CES) and the latest tablets. After eight years of freelancing, dabbling in a myriad of beats, she’s finally found a home at Laptop Mag that accepts her as the crypto-addicted, virtual reality-loving, investing-focused, tech-fascinated nerd she is. Woot!