
54778
Если вы хотите подключить беспроводные наушники AirPods к Windows 11 и не знаете как это сделать, или что-то не получается, то вы зашли по адресу. В этой статье я подробно покажу процесс подключения, настройки и использования наушников от Apple на ноутбуках и ПК с установленной Windows 11. У нас на сайте уже есть такая инструкция, посмотреть ее можно по этой ссылке, но она написана на примере предыдущих версий Windows (десятки и семерки).
Все версии и поколения наушников AirPods, в том числе AirPods Pro и Max отлично работают в Windows 11. Конечно, они не так сильно интегрированы в систему, как в случае с устройствами от Apple. В Windows 11 они никак не отличаются от любых других Bluetooth наушников, которые мы уже подключали в этой статье: как подключить Bluetooth наушники в Windows 11. Чтобы была возможность подключить наушники, на вашем ПК или ноутбуке должен быть Bluetooth. Должны быть установлены драйверы. В последней версии Windows с этим проблем как правило нет. При условии, что у вас не очень старый ноутбук или адаптер.
Пошаговая инструкция по подключению AirPods к Windows 11
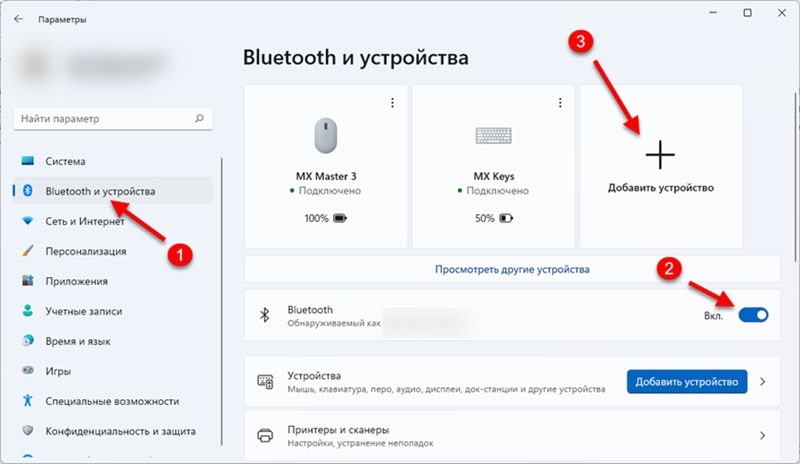
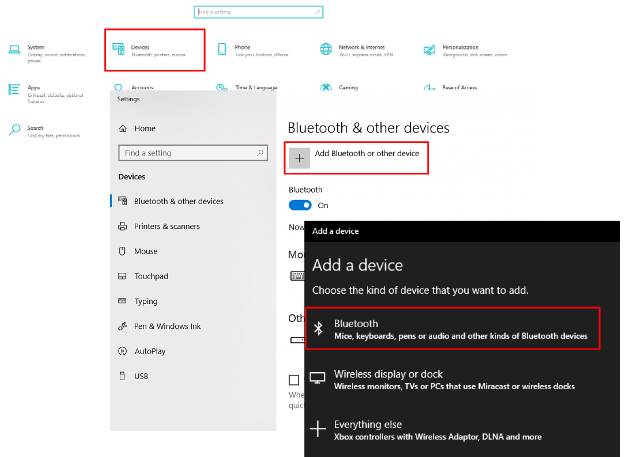
- Нажимаем правой кнопкой мыши на меню Пуск и переходим в Параметры.

- Слева переходим на вкладку «Bluetooth и устройства». Включаем Bluetooth, если он выключен. После чего нажимаем на «Добавить устройство».

- Берем наши AirPods. Их нужно перевести в режим подключения, чтобы компьютер смог их обнаружить. Для этого открываем кейс с наушниками и примерно на 10 секунд зажимаем кнопку на кейсе. Индикатор должен мигать белым цветом. В зависимости от версии AirPods, индикатор может быть как снаружи кейса, так и внутри. На AirPods Max нужно зажать и удерживать кнопку управления шумом. Для активации режима сопряжения на AirPods 4 нужно сделать двойной тап на сенсорную кнопку (она под индикатором). Индикатор так же начнет мигать белым цветом.

- Нажимаем на пункт «Bluetooth», после чего начнется поиск устройств. Напомню, что индикатор на кейсе наушников AirPods должен мигать белым цветом.

- Когда в списке появляться ваши наушник AirPods – нажмите на них.
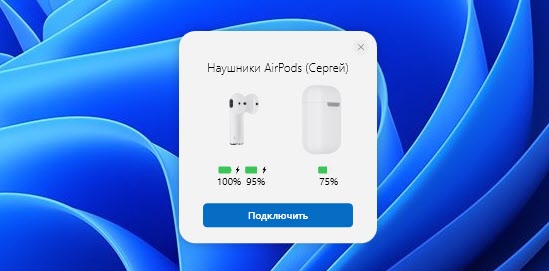
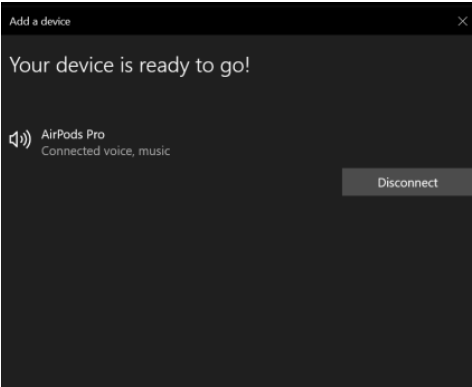
Сразу начнется процесс подключения.
- Через несколько секунд AirPods будут подключены.
Надпись «Подключенный голос, музыка» означает, что наушник могут использоваться как в стерео режиме (для прослушивания музыки), так и работать как гарнитура. То есть Windows 11 будет использовать микрофон в AirPods. Нажмите на кнопку «Готово».


Дальше просто достаньте наушники из кейса, вставьте их в уши и они автоматически подключаться к вашему ноутбуку или ПК. Если убрать их обратно в кейс, они автоматически отключаться от компьютера.
Не удается подключить. Если Windows 11 не находит AirPods, или не получается вывести на них звук после подключения, тогда вам пригодится эта статья: почему AirPods не подключаются к ноутбуку или компьютеру.
Настройка и управление
Дополнительно настраивать ничего не нужно. Но покажу вам несколько моментов, которые, возможно, вам пригодятся.
Подключенные наушник будут отображаться в разделе «Bluetooth и устройства» – «Устройства».

Там их можно либо принудительно «Отключить» (это то же самое, если бы вы просто спрятали наушник в зарядной футляр), или «Подключить» (если они не подключились автоматически). Или же «Удалить устройство» (эта функция полностью удаляет наушник из системы, чтобы вновь их использовать, придется подключать заново, как это показано в инструкции выше).
Если есть проблемы с выводом звука в Windows 11 через AirPods (когда наушник подключены, а звука нет), то проверьте, правильно ли выбран источник для вывода звука. Самый простой способ это сделать – нажать на иконку звука в трее, а затем на стрелку возле регулировки звука.

Выберите наушники из списка устройств.
Уровень заряда и функциональные кнопки
При подключении AirPods к устройствам от Apple можно посмотреть заряд каждого наушника и кейса, настроить функциональные клавиши отдельно на правом и левом наушнике, автообнаружение уха. В Windows 11 все это не работает. Даже уровень заряда не отображается. Я так понимаю, что система просто не умеет определять заряд TWS наушников, так как заряд обычных наушников отображается. Так же нет возможности настроить действие на нажатие функциональной кнопки на правом и левом наушнике. В моем случае, после подключения AirPods 2 функциональные кнопки на каждом наушнике выполняли функцию «Следующий трек».
Залез в Microsoft Store и нашел там несколько утилит, которые немного расширяют функционал наушников AirPods. Правда, все они платные. Возможно, в интернете можно найти и бесплатные подобные утилиты. Если знаете такие – поделитесь в комментариях. Как я понял (по оценкам), самая нормальная – MagicPods (не реклама!). Установил пробную версию. Из основных фишек:
- Всплывающее окно с анимацией и отображением заряда каждого наушника и кейса сразу после открытия кейса с наушниками. Для этого даже не нужно подключать наушник через параметры в Windows.

- Отображение уровня заряда в самом приложении и на иконке в трее.

- Настройка действия, когда один наушник вне уха.


Обратите внимание, что в этом приложении нет возможности настроить функциональные кнопки (следующий/предыдущий трек, старт/пауза) на каждом наушнике. Видимо эту функцию в Windows нельзя реализовать даже с помощью сторонней программы.
Я это приложение покупать не буду. Я не часто использую свои AirPods с ноутбуком. Но возможно кому-то информация об этом приложении пригодится.

Image: Yasar Turanli / shutterstock.com
Pairing AirPods or AirPods Pro with a PC may not be as dead simple as with an iOS device, but it’s only a tiny bit harder. You just connect the earbuds via Bluetooth—a straightforward, fast process in both Windows 10 and Windows 11 (though Windows 11 added steps to connect Bluetooth devices). Just follow our steps below and you’ll be off and running.
Do note, however, that as an Apple product, AirPods and AirPod Pros lose some functionality in Windows. They work well for listening to audio, but fall quite short of microphone quality you’d get on iOS or macOS, and simply having the microphone active can affect audio quality as well. So while Apple’s earbuds can handle Zoom calls in a pinch, we’d steer clear of them as your main Windows headset.
First, make sure your AirPods are fully charged with both earbuds in the case, and the lid is shut. Also confirm your Windows 10 PC is capable of running Bluetooth devices. (The overwhelming majority of modern laptops have Bluetooth built in, as do prebuilt desktop PCs from vendors like Dell and HP.) If your system lacks support, you can buy an inexpensive dongle like this TP-Link oneRemove non-product link to add that feature.
- Open the Settings app in Windows 10. You can find it by typing settings in the Windows 10 search bar and selecting the app once it appears. Its icon looks like a cog. Alternatively, you can press the Windows key + I at the same time.
- In the Settings menu, choose Devices.
- The Bluetooth & other devices page will pop up. First, make sure that Bluetooth is turned on by checking the toggle near the top of the page. If it isn’t, flip it on.
- Select Add Bluetooth or other device.
- The Add a device menu will pop up, asking you which kind of device you’d like to pair with. Select Bluetooth.
- Grab your AirPods or AirPods Pro and open the lid.
- Hold down the circular button on the back of your AirPods for around three to eight seconds. The charging light on your AirPods will eventually start pulsing white. When this happens, lift your finger and look back at the Add a device menu.
- Be patient. It might take a couple of seconds for the AirPods to appear. When they do, they’ll likely appear as “Headphones” at first and then Windows 10 will load them as “AirPods Pro” (or whatever name you gave them on iOS, if you have an iPhone or iPad you previously used them with). Select them.
- You’ll get a notification saying, “Your device is ready to go!”
Your AirPods should immediately become your default listening device. When you put them back into your case, Windows 10 will automatically revert to the last audio device you used.
Hold the button on the back of your AirPods or AirPods Pro to put them into pairing mode.
How to pair AirPods or AirPods Pro with Windows 11
Before pairing, your AirPods should be fully charged, with both earbuds in the case and the lid shut. Also verify that your Windows 11 computer supports Bluetooth connections. Most laptops have Bluetooth built in, as do desktop PCs purchased through companies like Dell or HP. If your PC can’t run Bluetooth devices, you can buy an inexpensive dongle (like this TP-Link model) to add the feature.
- Open the Settings app in Windows 11. You access it by clicking on the Start menu, then clicking on the grey cog icon labled Settings. You can also bring it up by typing settings into the search bar, or pressing Windows + I on your keyboard.
- In the Settings menu, choose Bluetooth & devices.
- Confirm that the toggle for Bluetooth is turned on. If it’s not, click on it.
- At the top of the screen, click on the big button that says Add device.
- When the Add a device menu appears, choose Bluetooth from among the options.
- Now open the lid on your AirPods or AirPods Pro. If this is your first time ever pairing the device, you can skip to Step 8.
- Otherwise, hold down the circular button on the back of your AirPods. The charging light on your AirPods will eventually start pulsing white after several seconds. (It can take as long as 10 seconds, though.) When this happens, lift your finger and look at the Add a device menu.
- Be patient, as it can take a few seconds for the AirPods to appear. They’ll likely appear as “Headphones” at first and then Windows 11 will load them as “AirPods” or “AirPods Pro” (or whatever you’ve renamed them to, if you’ve previously used them with an iPhone or iPad). Select them.
- A new window will appear that says “Your device is ready to go!”
Your AirPods should now be your active listening device. You’ll see it as a new button at the top of the Bluetooth & devices screen; its status should be marked with a green dot and listed as Connected voice, music. You can put them back into the case to automatically disconnect them. Windows 11 will then automatically switch to the last audio device you used.
How to reconnect or disconnect AirPods with your PC (Windows 10)
Your AirPods should automatically start working with your PC once you put them back in your ears. If they don’t, you can connect them manually.
- Open the Settings app in Windows 10.
- Select Devices.
- Scroll down to the Audio section and select your AirPods.
- In the prompt that pops up, press Connect. Your AirPods should now work.
You can also use these same steps to disconnect your AirPods from your PC if you want to use them with an iPhone, iPad, or Mac you’ve previously paired them with. Just keep in mind that you’ll now need to manually connect your AirPods through the Bluetooth menus on those devices while your AirPods are still paired with your Windows PC.
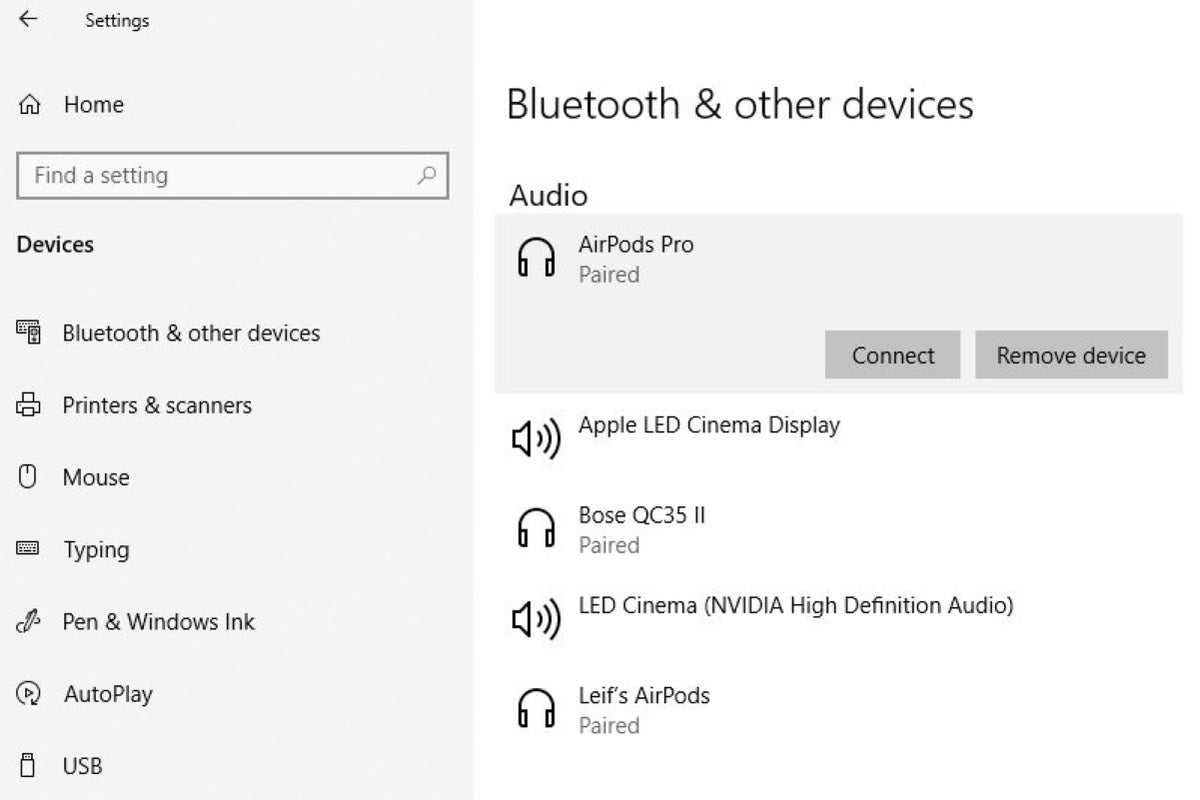
Keep in mind that you might have to scroll down a bit in order to see the Audio section.
How to reconnect or disconnect AirPods with your PC (Windows 11)
Your AirPods should automatically reconnect to your Windows 11 PC after you pull them from your case. If they don’t, you can connect them manually.
- Open the Settings app in Windows 11.
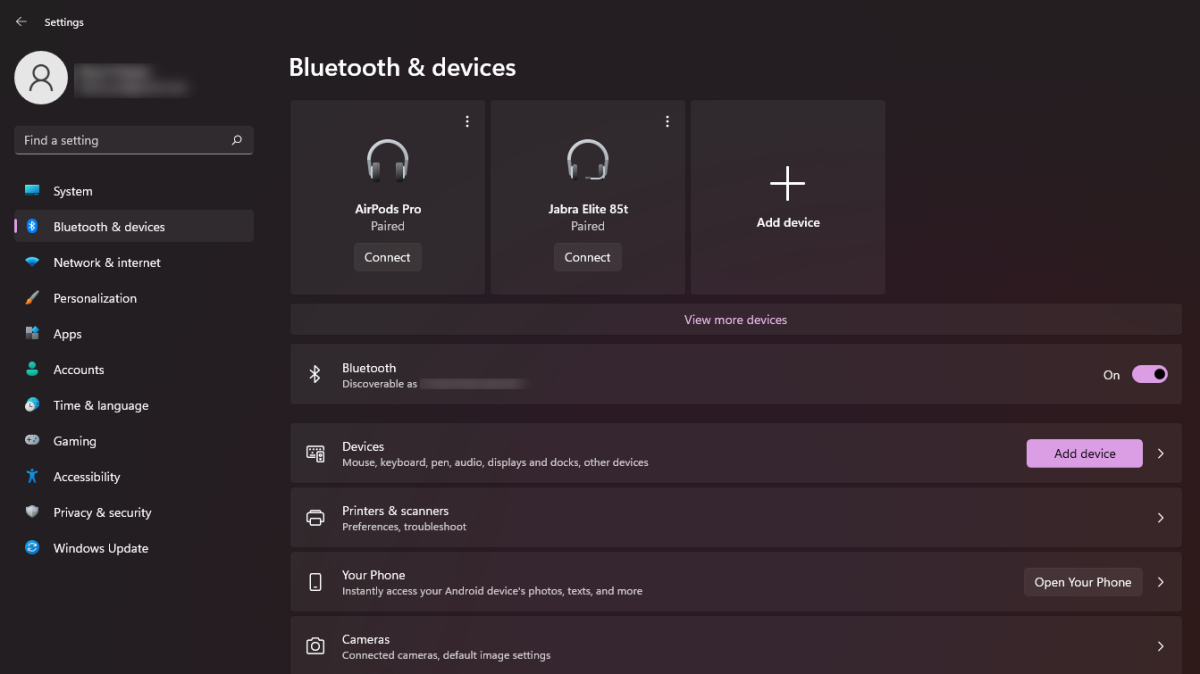
- Choose Bluetooth & devices.
- At the top of the screen, you should see a large button for your AirPods (e.g., “AirPods Pro”).
- Click the Connect button.
- If you don’t see your AirPods among the buttons on this screen, click on View more devices just underneath them. Then scroll down to Audio.
- On the AirPods entry, click on the vertical set of three dots.
- In the pop-up window that appears, choose Connect.
Your AirPods should now work. To disconnect them from your PC, use these same steps. If you want to use your AirPods with a previously paired device, you may need to connect to it manually through its Bluetooth menu if automatic connection fails.
PCWorld
How to unpair your AirPods from your Windows 10 PC
Permanently unpairing your AirPods involves a similar series of steps as reconnecting them, but with a single difference.
- Open the Settings app.
- Press Devices.
- Scroll down to the Audio section and select your AirPods.
- In the prompt that pops up, press Remove device.
How to unpair your AirPods from your Windows 11 PC
To remove your AirPods as a device, you’ll take similar steps as when reconnecting them.
- Open the Settings app.
- Select Bluetooth & devices.
- Locate the big button for your AirPods (e.g., “AirPods Pro”).
- Click on the vertical line of three dots at the upper-right corner of the button.
- In the small pop-up window that appears, choose Remove device.
- If you can’t find your AirPods among the buttons on this screen, click View more devices just underneath them. Then scroll down to Audio.
- On the AirPods entry, click on the vertical set of three dots.
- Choose Remove device.
Troubleshooting when your AirPods won’t connect to your PC
If you’re having difficulties getting your AirPods and your PC to connect, try these suggestions to fix the issue:
- Put the AirPods back into their case until they disconnect from your PC. Then pull them back out to try reconnecting them.
- Try one AirPod at a time (leave the other in the case) to see if they’ll connect independently to your PC.
- Switch off Bluetooth on your PC, wait for all devices to disconnect, then turn the signal back on.
- Reboot your PC.
- Temporarily turn off Bluetooth on any other nearby devices (especially those that the AirPods may also be already paired with).
- Unpair the AirPods from your PC, then re-pair them.
- If you have an Apple device (like an iPhone or iPad), check for any pending updates to your AirPods.
- Run Windows’ hardware troubleshooter (using Win + R, entering msdt.exe -id DeviceDiagnostic into the run box, and clicking Next).
AirPods Pro has become one of the most popular choices for wireless earbuds. Its seamless connection with iPhone and iPad made it the optimal choice for Apple users. However, not all Apple users solely use iOS devices. The good news is, you can also use AirPods Pro with your Windows computer. In this blog post, we will talk about how to connect AirPods Pro to PC Windows 11. We will also discuss some common issues you may encounter and additional tips that will optimize your experience.
Video Tutorial:
The Challenge of Connecting AirPods Pro to PC Windows 11
Connecting AirPods Pro to Windows 11 can be challenging, especially if you are not familiar with it. Windows uses Bluetooth to connect devices like AirPods. AirPods Pro connection in Windows needs to be set up manually, unlike the seamless connection for iOS devices. It is essential to know what to prepare for to ensure a successful connection.
Things You Should Prepare for
1. A PC with Windows 11 operating system.
2. Bluetooth 4.0 or later.
3. AirPods Pro with fully charged batteries.
Method 1: Via Bluetooth Settings
Step 1: Turn on the Bluetooth feature on your Windows 11 PC.
Step 2: Place your AirPods Pro inside the charging case and open the lid.
Step 3: Press and hold the button on the back of the charging case until the LED light inside the case turns white.
Step 4: On your PC, go to settings > Bluetooth and other device.
Step 5: Click on «Add Bluetooth or other device» button.
Step 6: Select «Bluetooth» as the device type.
Step 7: A window will appear, and your PC will start searching for nearby Bluetooth devices. Select your AirPods Pro from the list.
Step 8: Once selected, click on «Pair» and follow the on-screen instructions to complete the process.
Pros:
– Easy to follow steps
– Built-in settings in Windows 11
– Does not require any third-party software
Cons:
– May take a while to connect
– May encounter issues with compatibility
Method 2: Via Taskbar
Step 1: Turn on the Bluetooth feature on your Windows 11 PC.
Step 2: Place your AirPods Pro inside the charging case and open the lid.
Step 3: Press and hold the button on the back of the charging case until the LED light inside the case turns white.
Step 4: On the taskbar, click on the Bluetooth icon.
Step 5: From the drop-down list, select «Add Bluetooth or other devices.»
Step 6: Select «Bluetooth» as the device type.
Step 7: A window will appear, and your PC will start searching for nearby Bluetooth devices. Select your AirPods Pro from the list.
Step 8: Once selected, click on «Pair» and follow the on-screen instructions to complete the process.
Pros:
– Easy to access via taskbar
– Built-in settings in Windows 11
– Does not require any third-party software
Cons:
– May take a while to connect
– May encounter issues with compatibility
Method 3: Via Third-Party Apps
Step 1: Download and install a third-party app, such as «AirPods Pro-Bluetooth Explorer» or «AirPods ProPair» on your Windows 11 PC.
Step 2: Place your AirPods Pro inside the charging case and open the lid.
Step 3: Press and hold the button on the back of the charging case until the LED light inside the case turns white.
Step 4: Open the third-party app you installed earlier.
Step 5: Your AirPods Pro should be recognized automatically by the app.
Step 6: Click on «Pair» and wait for the app to finish the process.
Pros:
– Some third-party apps offer additional features like battery percentage and firmware update.
Cons:
– Requires downloading and installing third-party apps
– Some apps may come with potentially harmful malware
Why Can’t I Connect My AirPods Pro?
1. Bluetooth driver is outdated or not installed.
Fix: Update the Bluetooth driver or install it if it is not present.
2. AirPods Pro batteries are not charged.
Fix: Charge the AirPods Pro battery before attempting to connect to Windows 11 PC.
3. The AirPods are already paired with another device.
Fix: Disconnect AirPods Pro from the previously paired device and follow the connection process for Windows 11 PC.
Additional Tips
1. Make sure the AirPods Pro and Windows 11 PC are within the range of each other.
2. Disconnect other Bluetooth devices to avoid interference.
3. Restart the Bluetooth service on Windows 11 if it is not connecting.
5 FAQs about Connecting AirPods Pro to PC Windows 11
Q1: Can I connect AirPods Pro to Windows 11 without Bluetooth?
A: No, Bluetooth is the only way to connect AirPods Pro to Windows 11.
Q2: Why is my AirPods Pro connection unstable?
A: The connection may be unstable if there are too many active Bluetooth connections, the distance is too far, or there are other signal interferences.
Q3: Can I listen to music on my AirPods Pro while connected to Windows 11 PC?
A: Yes, once connected, you can stream audio or listen to music on your AirPods Pro while connected to your Windows 11 PC.
Q4: Will my AirPods Pro microphone work on Windows 11 PC?
A: Yes, once connected, you can use the microphone on your AirPods Pro as a device for audio input in Windows 11 PC.
Q5: Is there any dedicated app to control AirPods Pro on Windows 11 PC?
A: No, there is currently no dedicated app to control AirPods Pro on Windows 11 PC.
In Conclusion
Connecting AirPods Pro to Windows 11 PC requires following specific steps, but it is straightforward to achieve. The methods we discussed in this blog post will help you connect your AirPods Pro to your Windows 11 PC and enjoy high-quality audio. If you encounter any issues, follow the fixes suggested in the blog post. Remember, to get the best out of your AirPods Pro on Windows 11 PC, follow the additional tips shared here.
Fix AirPods & AirPods Pro Not Connecting to Windows 11
As technology advances, we find ourselves surrounded by an array of devices designed to enhance our productivity and entertainment. Among these devices, Apple’s AirPods and AirPods Pro have gained remarkable popularity for their compact design, seamless integration with Apple products, and impressive audio quality. However, users may experience connectivity issues when trying to pair these wireless earbuds with non-Apple devices, such as computers running Windows 11. This comprehensive guide will explore various methods to troubleshoot and fix AirPods and AirPods Pro not connecting to Windows 11.
Understanding Bluetooth Connectivity
Before diving into the troubleshooting steps, it’s essential to understand how Bluetooth connectivity works. AirPods and AirPods Pro utilize Bluetooth technology to connect wirelessly to devices. Windows 11 has built-in support for Bluetooth, but sometimes these connections can falter due to a variety of reasons, including settings, drivers, or device compatibility.
Basic Checks Before Troubleshooting
-
Battery Levels: Ensure that your AirPods or AirPods Pro are charged. Low battery levels can hinder functionality and connectivity.
-
Proximity: Keep your AirPods close to your Windows 11 device when attempting to connect. Bluetooth has a limited range, usually around 30 feet.
-
Check Device Compatibility: While AirPods can connect to any Bluetooth-enabled device, ensure that your Windows 11 PC has Bluetooth capabilities. If it doesn’t, you’ll need a Bluetooth adapter.
Step-by-Step Troubleshooting
Now let’s get into the detailed troubleshooting steps:
Step 1: Reset the AirPods
Resetting your AirPods may help in resolving connectivity issues. Here’s how to do it:
- Place your AirPods in the charging case and close the lid.
- Wait for about 30 seconds, then open the lid.
- On the back of the charging case, press and hold the setup button until the LED indicator on the front starts flashing amber and then white.
- Now the AirPods are reset and ready for pairing again.
Step 2: Remove Previous Pairings
Sometimes, the computer may have remnants of old pairings that can hinder new connections. To remove these:
- On your Windows 11 PC, go to Settings.
- Navigate to Devices.
- In the Bluetooth & other devices section, find your AirPods. Select them and click Remove Device.
- Confirm the removal and restart your computer.
Step 3: Enable Bluetooth on Windows 11
Ensure that Bluetooth is enabled on your Windows 11 device:
- Click on the Start Menu and select Settings (the gear icon).
- Go to Devices and then Bluetooth & other devices.
- Toggle the Bluetooth setting to On. If it’s already on, toggle it off and back on again.
Step 4: Pairing the AirPods
After ensuring that Bluetooth is enabled, proceed to pair your AirPods:
- With your AirPods in the charging case and the lid open, press and hold the setup button on the back of the case until the LED indicator flashes white.
- On your Windows 11 device, still within Bluetooth & other devices, click on Add Bluetooth or other device.
- Select Bluetooth from the options presented.
- Look for your AirPods in the list. Select them to complete the pairing process.
Step 5: Troubleshoot Bluetooth Issues
If your AirPods still won’t connect, you may need to troubleshoot the Bluetooth settings on your Windows 11 PC. Here’s how to do that:
- Open Device Manager by right-clicking the Start Menu and selecting Device Manager.
- Expand the Bluetooth section. Look for any devices marked with a yellow exclamation mark, indicating a problem.
- If you find any, right-click on them and select Update driver. Follow the prompts to search for an updated driver automatically.
- If no updates are found, right-click on the Bluetooth device and select Uninstall device. Restart your PC; Windows will reinstall the Bluetooth software on reboot.
Step 6: Modify Bluetooth Services
Sometimes, specific Bluetooth services may need to be modified for the AirPods to connect correctly:
- Press
Windows + Rto open the Run dialog. - Type
services.mscand press Enter to access the Services panel. - Locate the service named Bluetooth Support Service and ensure it is running.
- If it is stopped, right-click on it and select Start.
- To ensure it starts automatically in the future, right-click on the service, select Properties, and choose Automatic from the Startup type dropdown.
Step 7: Windows Updates
Keeping your Windows 11 updated is crucial for maintaining compatibility with Bluetooth devices:
- Go to Settings > Windows Update.
- Click Check for updates and install any available updates.
- Restart your PC if updates were installed.
Step 8: Check Audio Settings
When AirPods connect to Windows, they may not be set as the default audio device:
- Right-click the sound icon in the system tray and select Sounds.
- Go to the Playback tab.
- If your AirPods are connected but not set as the default, right-click on them and select Set as Default Device.
- Make sure to click Apply and then OK.
Step 9: Check for Interference
Bluetooth devices can face interference from other wireless devices:
- Ensure that there are no other Bluetooth devices connected to your Windows PC that might be creating conflicts.
- Move any other wireless devices away from your computer and AirPods during the connection process.
Advanced Solutions
If you’ve gone through all the basic troubleshooting steps and still find your AirPods or AirPods Pro not connecting to Windows 11, consider the following advanced solutions:
Step 10: Update Bluetooth Drivers Manually
In some cases, automatic updates may not install the best drivers for your Bluetooth adapter. Here’s how to manually check for updates from the manufacturer:
- Identify your Bluetooth adapter by going to Device Manager.
- Right-click on the Bluetooth adapter, select Properties, and check the Details tab for the hardware IDs.
- Search online for the latest drivers based on this information by visiting the manufacturer’s website.
- Download and install the latest drivers accordingly.
Step 11: Use Bluetooth Troubleshooter
Windows 11 includes a built-in troubleshooter for Bluetooth that can help detect and fix issues:
- Go to Settings > Troubleshoot > Other troubleshooters.
- Scroll down to find Bluetooth and click Run next to it.
- Follow the prompts to let Windows diagnose the issue.
Step 12: Reset Network Settings
Resetting your network settings can resolve deeper connectivity issues, but it will remove all saved Wi-Fi networks and Bluetooth pairings:
- Open Settings and navigate to System.
- Scroll to Recovery and click on it.
- Under Reset this PC, select Network Reset and follow the prompts to reset your network settings.
Conclusion
Fixing AirPods and AirPods Pro connectivity issues with Windows 11 can often feel daunting, especially for users unfamiliar with technology. However, by following these comprehensive troubleshooting steps, you should be able to resolve the issues effectively. If all else fails, consider contacting Apple Support or visiting an authorized service provider to ensure your AirPods are functioning correctly. Remember that while AirPods are designed to work seamlessly with Apple devices, they also function as reliable Bluetooth headphones for Windows and other systems with a little extra effort.
Stay patient and persistent, and you’ll be enjoying your favorite music, podcasts, and calls wirelessly in no time.
Table of contents
- How to Connect Your AirPods to a Windows Computer
- Windows 10
- Windows 11
- How to Disconnect and Unpair Your AirPods from a Windows Computer
- Common AirPods Connection Issues
- Conclusion
- FAQ
If you’re wondering how to connect AirPods to a PC , you’ve just found the right place. Despite being designed to operate seamlessly with Apple devices, you can still easily connect AirPods to a laptop or a PC on Windows.
How to Connect Your AirPods to a Windows Computer
AirPods are specifically made to work within the Apple ecosystem. But can you connect AirPods to a laptop running Windows? You sure can! And it couldn’t be easier. Let’s take a walk through the steps to connect your AirPods to a Windows 10 or 11 running computer.
Windows 10
Here’s how to bluetooth AirPods to a laptop or PC on Windows 10:
- Prepare your AirPods: Before you begin, ensure that your AirPods are in their charging case and have a minimum of 20% battery.
- Turn on Bluetooth: Open Settings and navigate to Devices > Bluetooth & other devices. Make sure Bluetooth is turned on. This is the essential step as you connect AirPods to a Windows 10 running computer through Bluetooth.
- Add a Bluetooth device: Click on “Add Bluetooth or other device” at the top of the Bluetooth & other devices menu. Select Bluetooth from the options presented.
- Activate the pairing mode: Open the lid of your AirPods case and press the small, circular button on the back of the case. Keep holding it until you see the LED lights inside (for older AirPods) or on the front (for AirPods Pro) flashing. This indicates that your AirPods are visible to other devices.
- Select your AirPods: After a few seconds, a list of available Bluetooth devices will appear. Look for your AirPods in the list and click on them to initiate the pairing process.
- Complete setup: Once connected, a pop-up screen will declare “Your device is ready to go.” Click Done. From this point onward, your AirPods should automatically connect to your laptop or PC whenever they are in range.
As you can see, pairing your AirPods with Windows 10 running computers is a walk in the park. But how to connect Apple AirPods to a laptop or a PC on Windows 11 OS? Let’s figure it out.
Windows 11
It’s as simple to connect AirPods to Windows 11 systems as it is with Windows 10 ones. All you need is to follow these steps:
- Prepare your AirPods: Ensure your AirPods are in their charging case and have a minimum of 20% battery.
- Turn on Bluetooth: Open Quick Settings located on the right side of the taskbar, locate the Bluetooth sign, and make sure it’s not grayed out.
- Add a Bluetooth device: Right-click on the Bluetooth sign and select Go to Settings. Click on Add device, then select Bluetooth from the options presented.
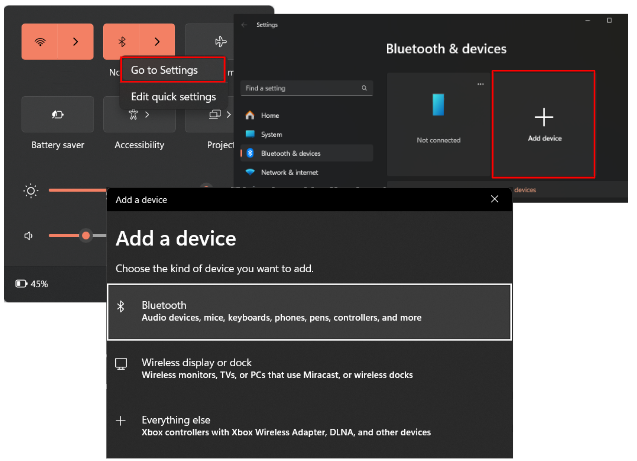
- Activate the pairing mode: Open the lid of your AirPods case and press the small, circular button on the back of the case. Keep holding it until you see the LED lights inside (for older AirPods) or on the front (for AirPods Pro) flashing. This indicates that your AirPods are visible to other devices.
- Select your AirPods: After a few seconds, a list of available Bluetooth devices will appear. Look for your AirPods in the list and click on them to initiate the pairing process.
- Ready to go: After you get the “Your device is ready to go” pop-up, click Done. Your AirPods are now ready to use with your Windows 11 computer. Whenever your AirPods are in range and Bluetooth is enabled on your computer, they should automatically connect.
All in all, that is how to connect AirPods to a laptop or PC. Whether you are using a Windows 10 or 11 running computer, the process is smooth and easy.
How to Disconnect and Unpair Your AirPods from a Windows Computer
In the previous part of the article, we’ve learned how to connect AirPods Pro to a laptop . But what if it’s your friend’s laptop and you need to disconnect and unpair your AirPods before returning it? Here’s how you can do it:
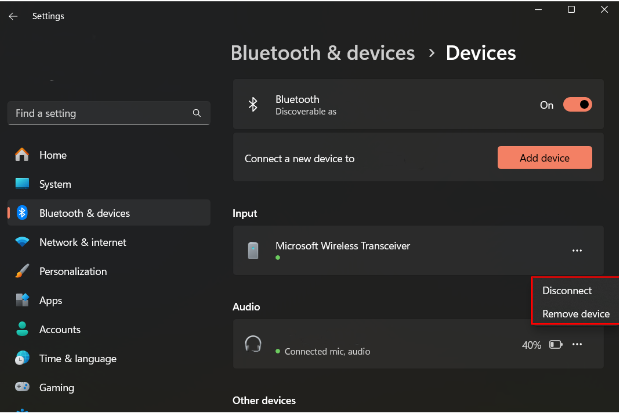
- Open Bluetooth settings: Navigate to Settings and select Bluetooth & devices (Device > Bluetooth & other devices in Windows 10).
- Locate your AirPods: In the list of paired devices, find your AirPods under the Audio section. They will be listed by their name.
- Disconnect: Click on your AirPods (or the three dots next to them in Windows 11) and select Disconnect. Confirm the action if prompted.
- Unpair AirPods: After disconnecting, click on your AirPods again (or the three dots next to them in Windows 11) and select Remove device. This will unpair your AirPods from the Windows computer permanently.
Now that we’ve covered how to connect AirPods to a Windows PC and learned how to disconnect and unpair them, let’s take a look at the most common AirPods connection issues and ways to avoid them.
Common AirPods Connection Issues
- Intermittent connectivity:
- Issue : AirPods may experience intermittent disconnections or drops in audio during usage.
- Possible causes : Interference from other wireless devices, outdated firmware, or Bluetooth signal disruptions.
- Fixes : Check for interference from other devices; ensure AirPods have the latest firmware updates; reset AirPods by holding the setup button on the charging case.
- Failure to connect:
- Issue : Failure in establishing a connection between AirPods and a device.
- Possible causes : Bluetooth settings, outdated Bluetooth drivers, or AirPods not in pairing mode.
- Fixes : Activate AirPods’ pairing mode and ensure Bluetooth is enabled on the device; forget and re-pair AirPods with the device; check your laptop/PC Bluetooth version (should be 4.0 or higher).
- Audio quality issues:
- Issue : Poor audio quality, distortion, or imbalanced sound.
- Possible causes : Bluetooth signal interference, outdated firmware, or hardware issues.
- Fixes : Check for interference from other devices; ensure AirPods and Windows have the latest updates installed.
- Mic malfunctions:
- Issue : Microphone-related problems, such as low sensitivity or inaudible audio during calls.
- Possible causes : Software issues, debris in the microphone, or hardware malfunctions.
- Fixes : Remove any debris from the microphone area; ensure AirPods and Windows have the latest updates installed.
Related: How to Fix an Auto Muting Microphone
- Unresponsive touch controls:
- Issue : AirPods not responding to touch gestures for play/pause or skipping tracks.
- Possible causes : Software bugs, outdated firmware, or hardware issues with the touch sensors.
- Fixes : Reset AirPods and reconfigure touch controls; ensure AirPods have the latest firmware updates.
Preventive measures
First and foremost, you need to make sure your Bluetooth and audio drivers are up to date. We recommend using Auslogics Driver Updater as it is a reliable and convenient tool that automatically scans your system for outdated drivers (not only those discussed) and installs the most current, manufacturer-recommended ones.
Download Auslogics Driver Updater
Prevent hardware errors and ensure problem-free device operation with this advanced tool that detects outdated drivers and safely gets them updated.
Also read: Auslogics Driver Updater: Update Your Drivers in One Click!
Here are some other general preventive measures to keep you clear of connection issues:
- Keep your Windows system updated,
- Regularly update AirPods firmware,
- Regularly check your computer for malware,
- Regularly clean your devices from dust and debris.
Also read: Auslogics Anti-Malware: Features and Reviews
Just follow these simple recommendations and you should have no problems when trying to connect AirPods to Windows 11 or 10 running computers.
Conclusion
Hopefully, you’re already enjoying your favorite music or a movie, thanks to our tips on how to connect AirPods to a PC provided in this article.
Don’t forget to update your drivers and regularly check for Windows and AirPods updates, and you will most certainly evade connection issues while relishing those precious moments of music listening more often.
Feel free to share your favorite songs and sound settings in the comments section below!
FAQ
How to put AirPods in pairing mode?
To put your AirPods in pairing mode, open the case, press and hold the button on the back until the LED starts flashing. Your AirPods are now ready to connect.
Why do my AirPods keep disconnecting from my Windows PC?
If your AirPods frequently disconnect, try updating Bluetooth drivers, ensuring Windows is up to date, and checking for interference from other Bluetooth devices.
Can I customize touch controls for AirPods when using them with a Windows PC?
As of now, Apple’s official customization of touch controls is primarily designed for iOS devices. You will need an iPhone or another iOS device to customize AirPods touch controls.