
Все способы:
- Способ 1: Запуск стандартного средства «Очистка диска»
- Способ 2: Самостоятельное удаление записей реестра
- Способ 3: Использование программ для очистки реестра
- Вопросы и ответы: 2
Способ 1: Запуск стандартного средства «Очистка диска»
Самый простой и безопасный метод очистки некоторых записей в реестре Windows 11 — использование стандартного средства под названием «Очистка диска». Это приложение позволит избавиться от временных файлов и различных системных записей, которые уже не используются. Многие из них как раз имеют свои параметры в реестре, которые должны автоматически удалиться при очистке. Использование упомянутого средства выглядит таким образом:
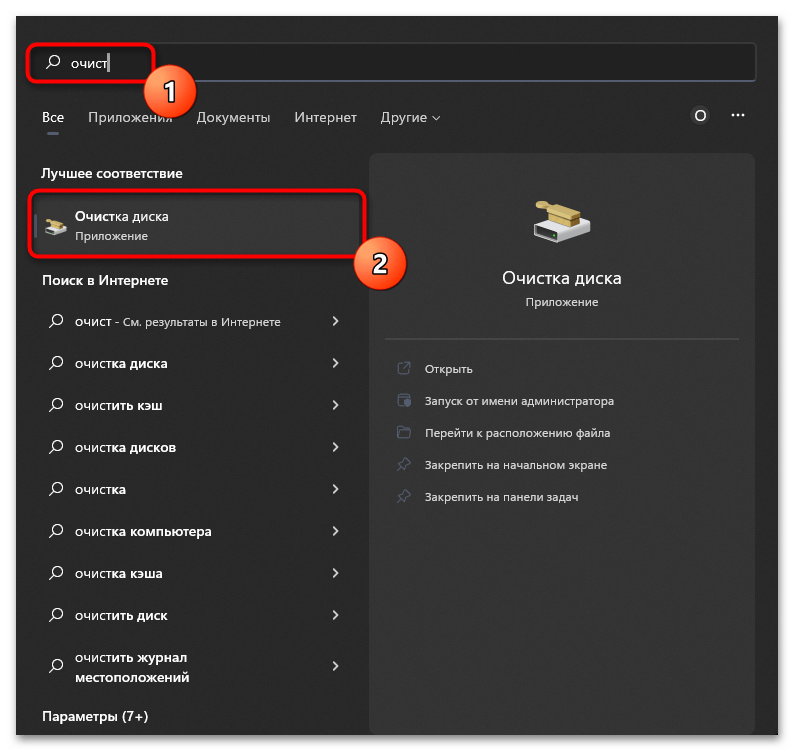
- Откройте меню «Пуск» и через поиск отыщите приложение «Очистка диска», после чего запустите его.
- Выберите системный раздел из выпадающего списка, поскольку именно на нем чаще всего и хранятся различные временные файлы и системный мусор.
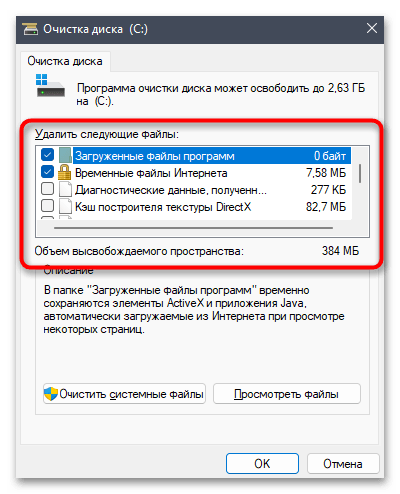
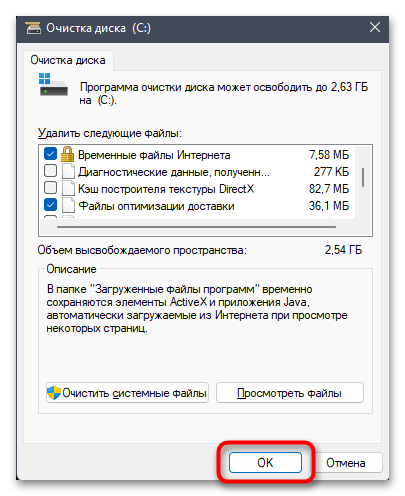
- Следующим шагом будет выбор файлов для удаления. Вы можете выбрать абсолютно все элементы или оставить что-либо на выбор, например, если не хотите очищать файлы в корзине.
- Нажмите «ОК» для подтверждения выбора объектов.
- Понадобится еще раз подтвердить свое действие, щелкнув по «Удалить файлы».
- Ожидайте окончания этой операции, следя за прогрессом в новом окне. После вы можете перезагрузить компьютер, чтобы начать новый сеанс в операционной системе. На этом очистка реестра стандартным средством успешно завершена.
Способ 2: Самостоятельное удаление записей реестра
Вы можете самостоятельно отыскать различные файлы в реестре и удалить их, если считаете ненужными. По большей части это относится к остаточным записям после деинсталляции стороннего софта, а если вас интересуют временные файлы, понадобится перейти по нескольким разным ключам и очистить содержимое директорий, о чем тоже будет сказано в следующей инструкции.
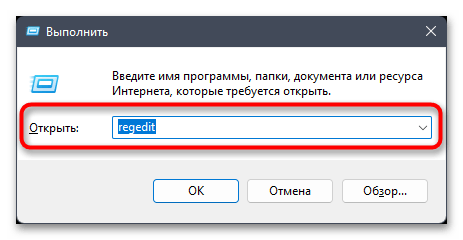
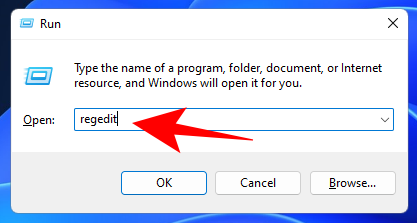
- Выполняется этот метод через «Редактор реестра», поэтому для его запуска вызовите утилиту «Выполнить», используя сочетание клавиш Win + R, затем введите
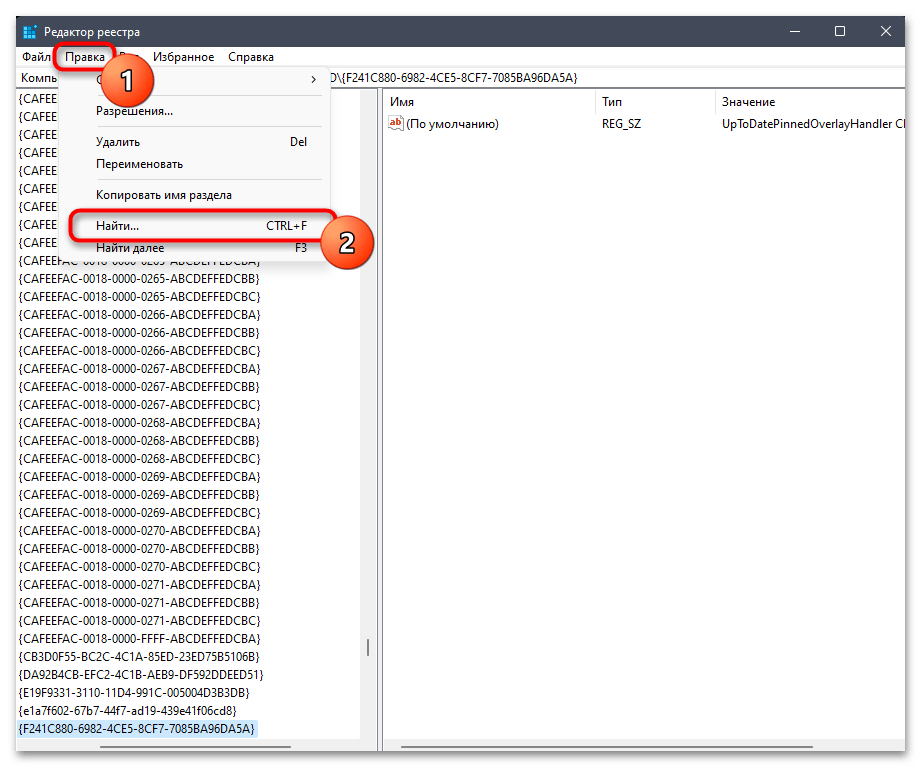
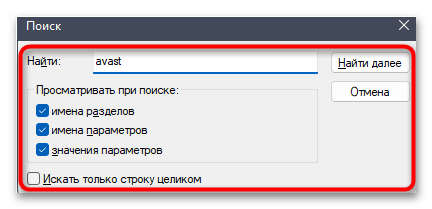
regeditи нажмите клавишу Enter для подтверждения перехода к приложению. - Сначала разберемся с ручным поиском и удалением записей. Вызовите меню «Правка» и выберите пункт «Найти». Вместо этого можно использовать стандартную горячую клавишу Ctrl + F.
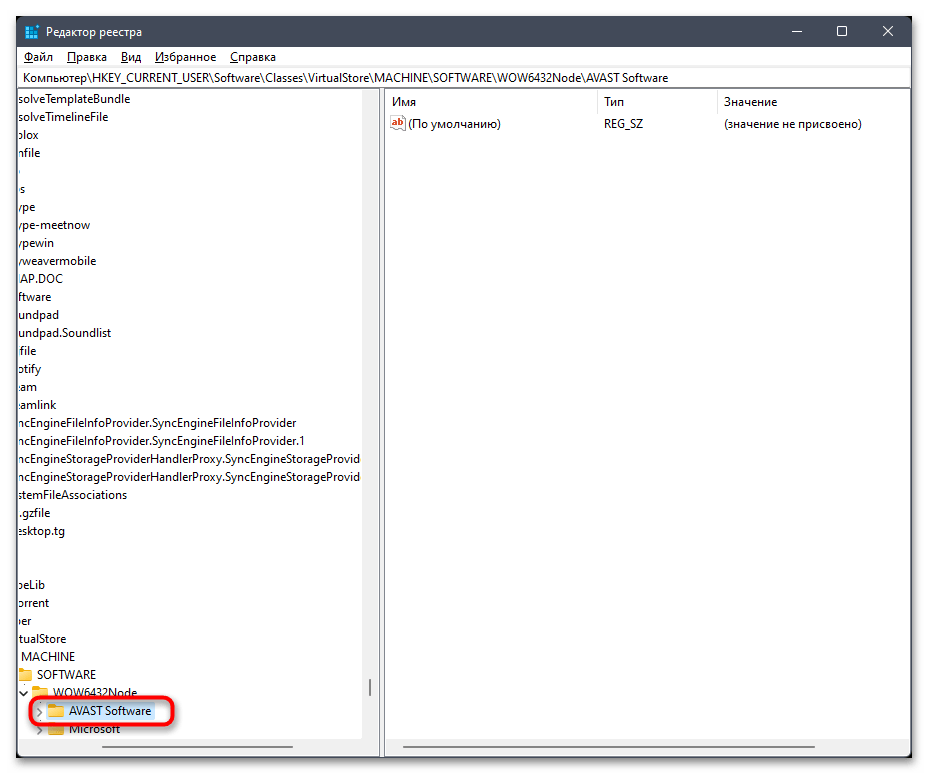
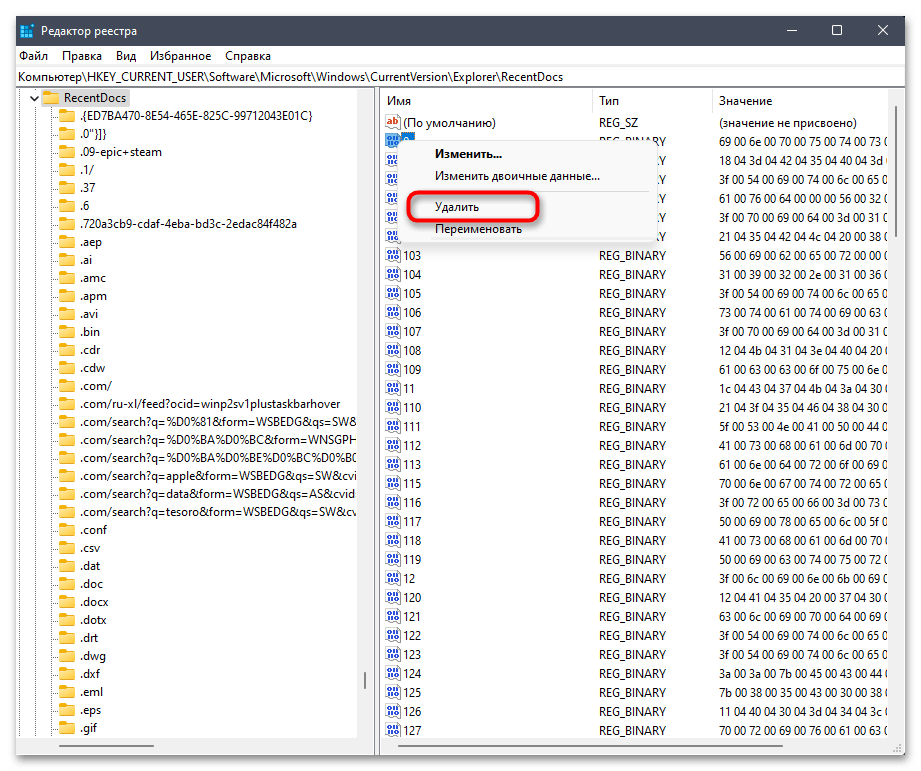
- В открывшемся окне поиска введите название файла, который может быть связан с удаленным ранее софтом, затем щелкните по «Найти далее».
- На экране появится выделенная синим папка или сама запись с соответствием, поэтому можете щелкнуть по объекту правой кнопкой мыши и из отобразившегося контекстного меню выбрать пункт «Удалить».
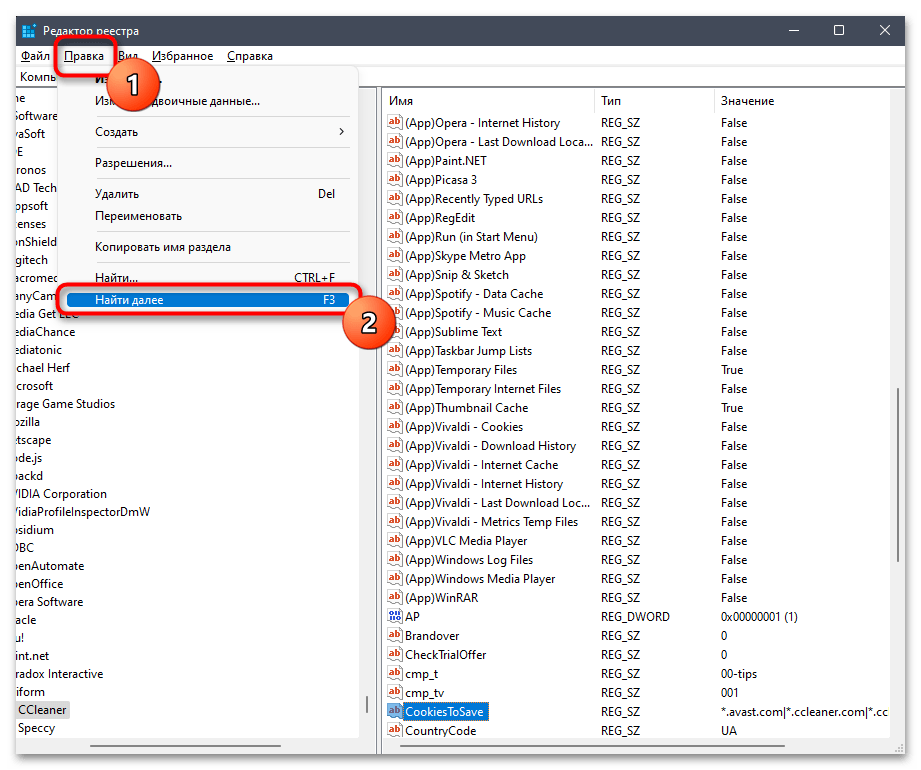
- Нажмите F3 или отыщите соответствующий пункт в том же меню «Правка», чтобы перейти к следующим результатам поиска. Выполните очистку точно так же, как это было показано выше.
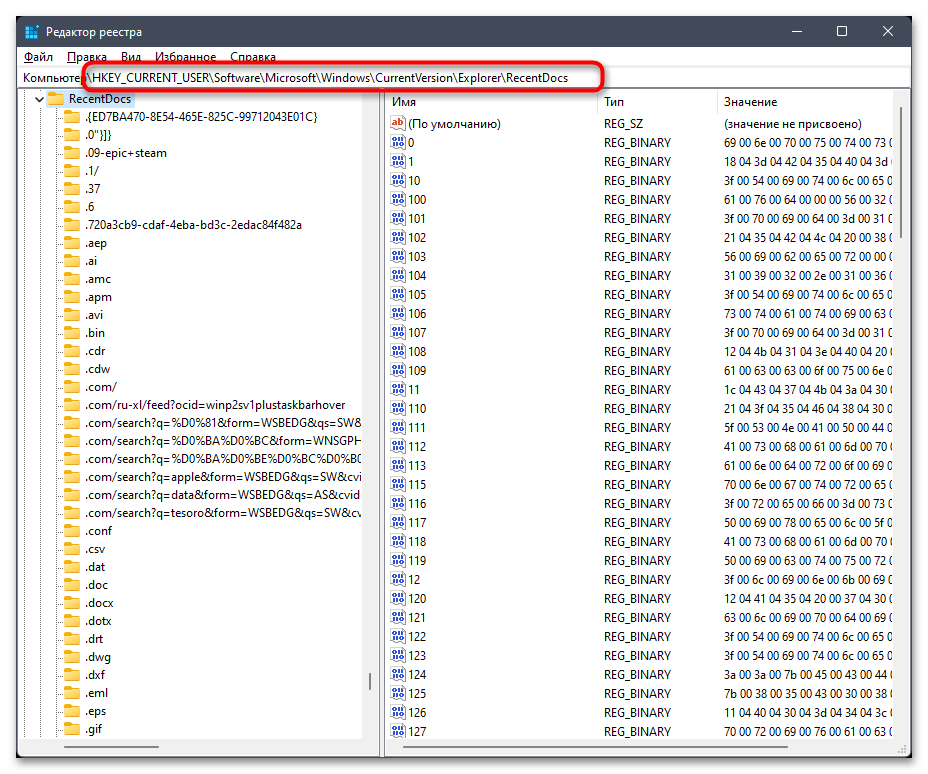
- Теперь можно избавиться от временных файлов. Перейдите по пути
Компьютер\HKEY_CURRENT_USER\Software\Microsoft\Windows\CurrentVersion\Explorer\RecentDocsдля попадания в директорию, которая хранит записи с историей доступа к файлам. - Выделите все находящиеся здесь параметры и удалите их.
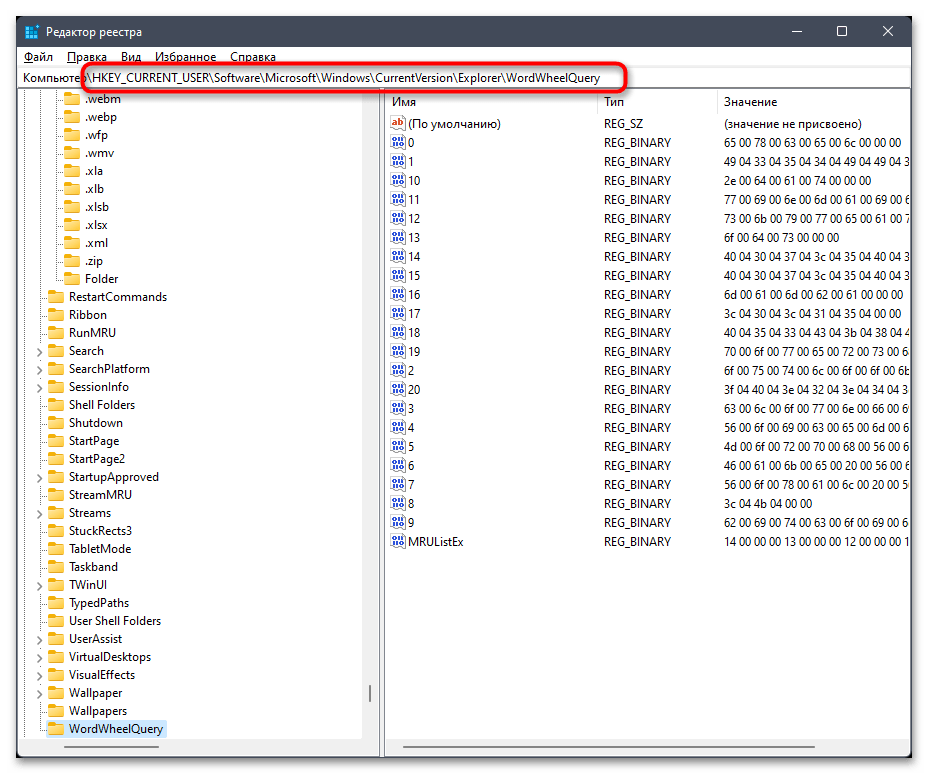
- То же самое сделайте и в директории
Компьютер\HKEY_CURRENT_USER\Software\Microsoft\Windows\CurrentVersion\Explorer\WordWheelQuery, чтобы избавиться от истории поиска в «Проводнике». - По ключу
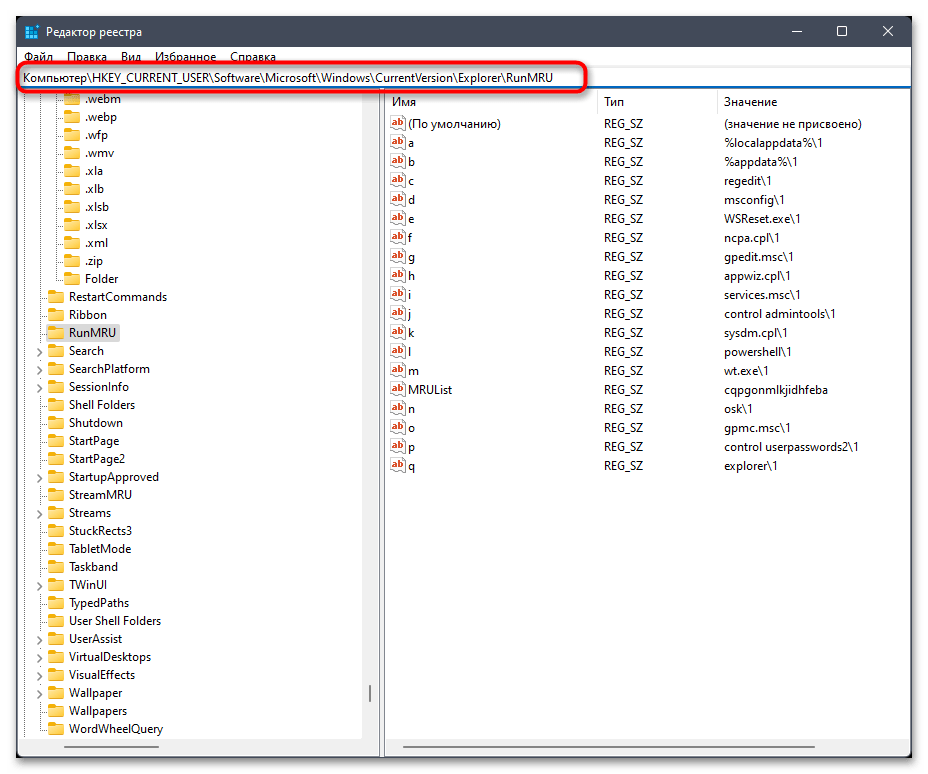
Компьютер\HKEY_CURRENT_USER\Software\Microsoft\Windows\CurrentVersion\Explorer\RunMRUвы найдете историю поиска через утилиту «Выполнить», которую тоже можно очистить.
Это были основные ключи, в которых хранятся записи о временных файлах. Все их можно удалять без негативного влияния на работу операционной системы. Однако если вы самостоятельно через поиск находите параметры реестра и вручную удаляете их, предварительно убедитесь в том, что они действительно не нужны и не являются важными для Windows 11.
Способ 3: Использование программ для очистки реестра
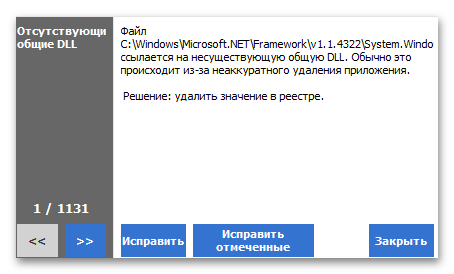
Описанный выше метод с удалением временных файлов через реестр можно упростить, однако для этого понадобится использовать сторонние программы. Они предназначены для того, чтобы сканировать весь реестр, находить ненужные записи и удалять их. Параллельно с этим могут быть найдены и исправлены популярные ошибки, возникающие из-за отсутствия различных DLL-библиотек и других подобных системных файлов.
Скачать CCleaner
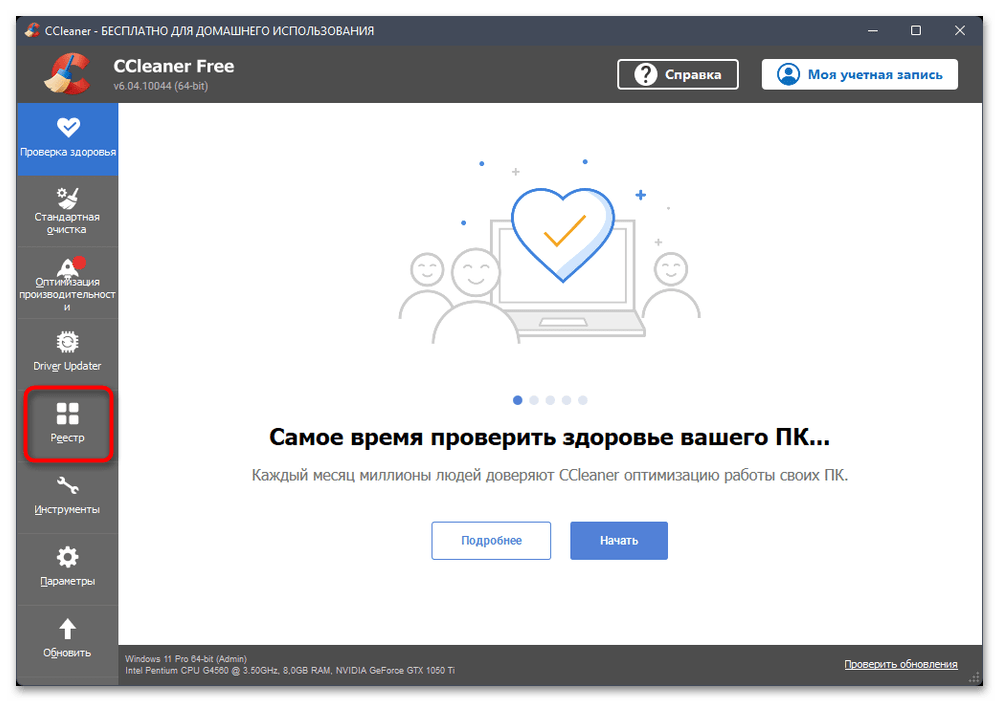
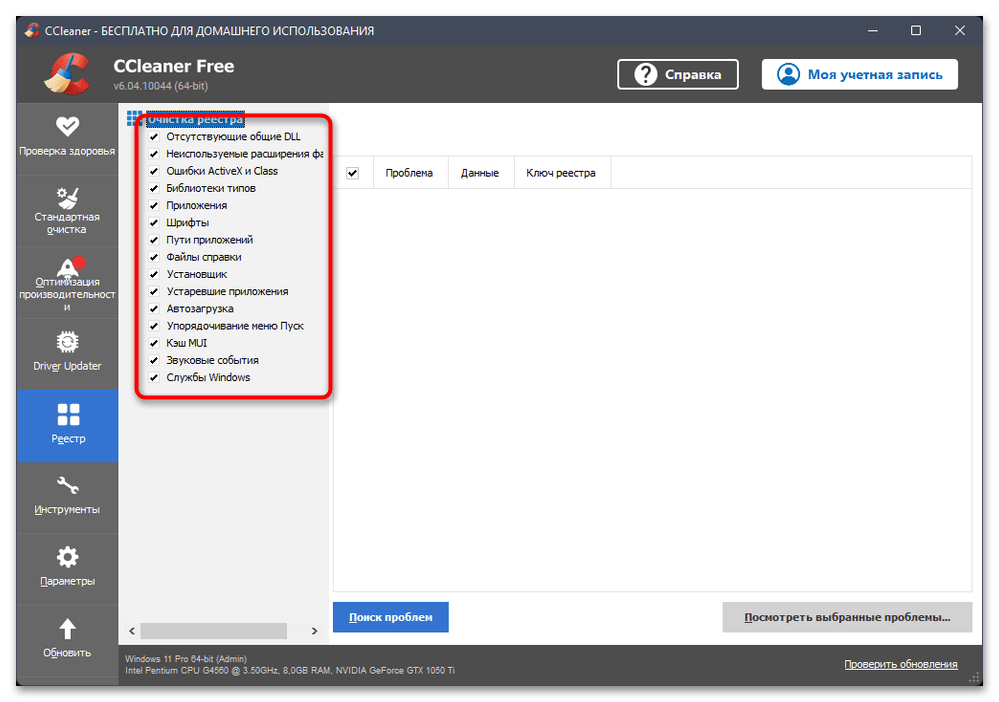
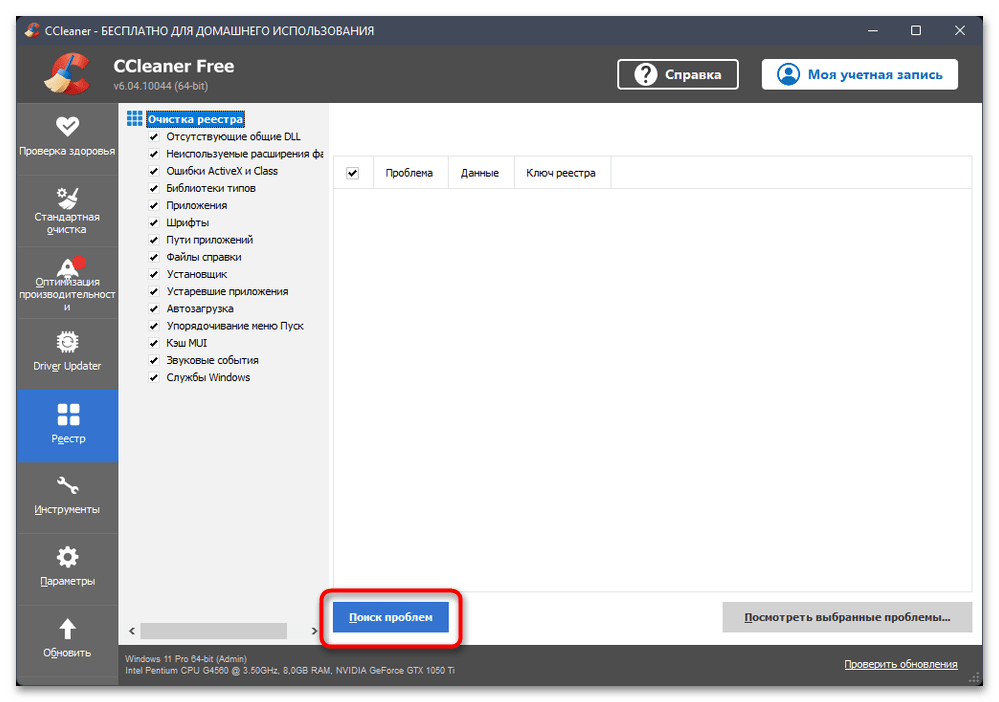
- В качестве примера мы выбрали бесплатную программу CCleaner. В ней понадобится перейти к разделу «Реестр», нажав по соответствующей кнопке на панели слева.
- Далее отметьте галочками все компоненты, проверку и очистку которых хотите осуществить. По умолчанию будут активны они все, поэтому можете не менять настройки.
- Нажмите кнопку «Поиск проблем» для запуска анализа реестра операционной системы.
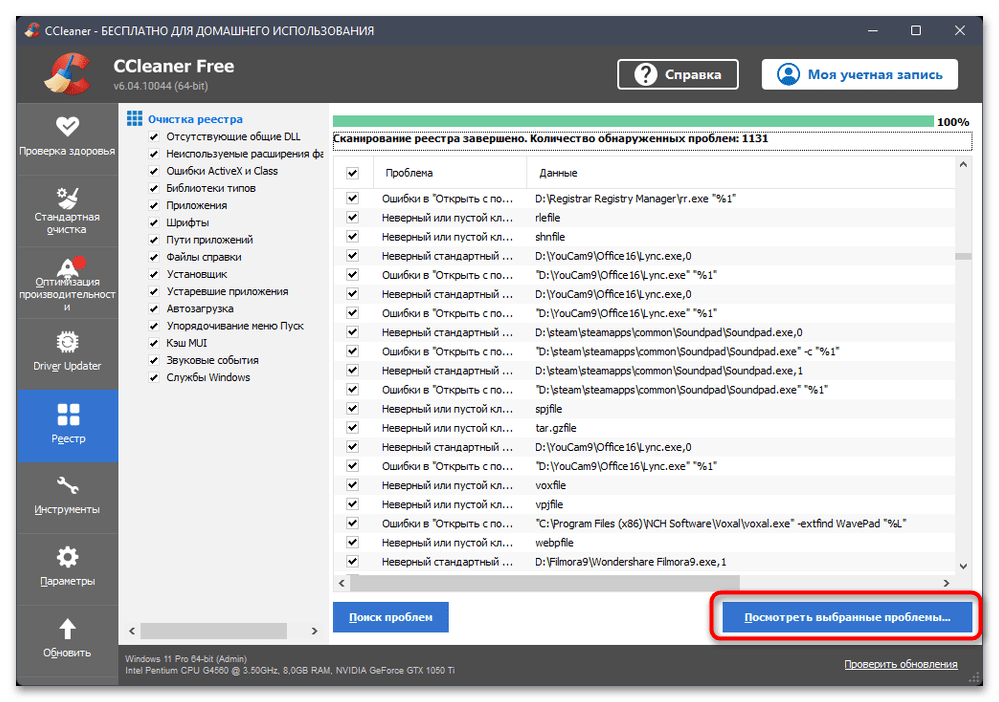
- Через несколько секунд на экране появится целый список с найденными проблемами. В большинстве случаев среди них будут находиться те файлы, наличие которых в реестре ничем не обусловлено и уже не нужно. Нажмите кнопку «Посмотреть выбранные проблемы», чтобы перейти к анализу каждой из них.
- Вы будете уведомлены о том, на что ссылается определенный файл или за что отвечает. Ниже показано рекомендуемое решение, а вы можете решить, исправить это или пропустить. Примерно то же самое относится и к другим программам для очистки реестра, которых существует довольно большое количество.
Как вы уже знаете, CCleaner — не единственная программа для очистки реестра, которая совместима с Windows 11. Если предложенный вариант вам не подходит, можете отыскать и скачать любой другой софт.
Наша группа в TelegramПолезные советы и помощь
24 марта 2025 г. 10:44
311
Содержание:
- Когда нужна чистка реестра Виндовс 11
- Подготовка: создаем точку восстановления
- Способ 1: ручная чистка через редактор реестра
- Способ 2: безопасная автоматическая очистка с помощью CCleaner
- Советы по безопасной работе с реестром
Реестр Windows — это внутренний мозг операционной системы. Он управляет конфигурациями, хранит настройки приложений, драйверов и компонентов. Со временем, особенно после удаления программ или накопления системных изменений, в реестре остаются ненужные или устаревшие записи. Это может замедлить работу компьютера, вызвать ошибки или конфликты. Но, прежде чем бросаться в чистку, важно понимать: неправильные действия могут нанести системе больше вреда, чем пользы. В этом материале разберем, как очистить реестр в Windows 11 и когда стоит это делать.
Когда нужна чистка реестра Виндовс 11
Чистка реестра — не ежедневная рутина, а точечная мера. Она актуальна в следующих случаях:
- После удаления программ, особенно если они оставили после себя системные «хвосты».
- Когда появляются необъяснимые ошибки или сбои в работе проводника и панели задач.
- При торможении системы без видимых причин.
- Если при установке новых программ возникают конфликты.
Если у вас всё работает стабильно — реестр лучше не трогать.
Подготовка: создаем точку восстановления
Перед любыми действиями в реестре важно подстраховаться. Создание точки восстановления позволит вернуть систему в рабочее состояние, если что-то пойдёт не так. Для этого:
1. Откройте «Панель управления» и перейдите в «Восстановление».
2. Нажмите «Настройка восстановления системы», выберите диск и кликните «Создать».
3. Дайте понятное имя, например «Перед чисткой реестра», и подтвердите.
Теперь вы защищены — можно приступать.
Способ 1: ручная чистка через редактор реестра
Этот метод подойдет опытным пользователям, которые точно знают, что ищут. Новичкам лучше воспользоваться автоматическими утилитами. Вот как открыть реестр в Windows 11 и очистить:
- Чтобы зайти в реестр Windows 11, нажмите Win + R, введите regedit и нажмите Enter.
- В редакторе воспользуйтесь поиском (Ctrl + F), чтобы найти остатки от удалённых программ.
- Аккуратно удаляйте только те записи, в которых полностью уверены.
Например, если вы ранее удалили Microsoft Visio, можно вручную удалить оставшиеся записи следующим образом:
- Нажмите Ctrl + F и введите Visio, чтобы найти связанные ключи и значения.
- В правой части окна отобразятся найденные записи — удалите их, нажав Delete или выбрав «Удалить» через правый клик.
- Чтобы продолжить поиск следующих совпадений, нажимайте F3 — редактор автоматически перейдёт к следующей записи.
- Повторяйте действия, пока система не сообщит о завершении поиска.
Такой метод займёт немного времени, но позволит вручную избавиться от цифрового «мусора», не прибегая к сторонним программам.
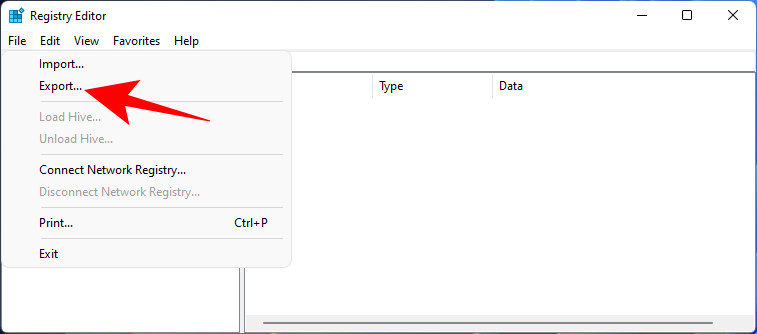
Важно: перед удалением ключей экспортируйте нужную ветку — это позволит восстановить её в случае ошибки. Просто щёлкните правой кнопкой по разделу и выберите «Экспорт».
Способ 2: безопасная автоматическая очистка с помощью CCleaner
Для большинства пользователей оптимальным вариантом будет использование программы CCleaner. Это надежный инструмент, который автоматически сканирует и удаляет неактуальные записи. Чтобы очистить реестр:
- Скачайте CCleaner с официального сайта.
- Установите программу и откройте её.
- Перейдите в раздел «Реестр» → нажмите «Поиск проблем».
4. Дождитесь завершения анализа и нажмите «Исправить выбранные».
После завершения очистки перезагрузите компьютер, чтобы изменения вступили в силу.
Советы по безопасной работе с реестром
Работа с системным реестром требует внимательности и понимания. Пренебрежение мерами предосторожности может привести к серьёзным сбоям. Вот главные советы, которых стоит придерживаться:
- Никогда не удаляйте ключи, если не уверены в их назначении.
- Всегда создавайте резервные копии — вручную или через утилиту.
- Не используйте сомнительные программы с неясным происхождением.
- После любых изменений перезагружайте систему, чтобы они вступили в силу.
Соблюдая эти простые правила, вы не только убережете Windows 11 от ошибок, но и улучшите её стабильность.
The registry is the backbone behind all processes or operations that we perform on Windows 11 or 10 PCs. Whenever a problem occurs, you may solve that simply by tweaking the registry. However, what if the registry itself becomes corrupt, and starts malfunctioning every now and then? This guide presents four working ways that can help clean the registry entries on Windows 11/10.
By purging the registry, what we mean is to bring back its original state or the way it worked after a clean installation. Doing this will not only resolve the broken registries but also address problems like – unwanted app installations, corrupted/outdated/obsolete data removal, and others. Let’s explore how to clean the registry on Windows 11
Should I clean my registry regularly?
Registry Editor is the place where information related to all Windows operations exists. From changing wallpapers to doing any complex changes, you can find them all here inside the registry. Though Microsoft has added several advanced layers and features to Windows 11, it still gets into bugs or issues pretty often.
The root cause behind any issue can be resolved by cleaning the registry. That’s the reason why one should regularly clean it on Windows 11 OS.
Note: Before you go ahead and clean data on the registry, make sure to create a backup of the entire registry. This will help you in restoring your PC in case something bad happens while cleaning it.
How to Create a Registry Backup?
Follow the instructions below to create a registry backup on Windows 11 or 10 PC –
- Press “Windows key + R” to invoke the Run Dialog box.
- Type “
regedit” in the Run command, and hit OK. - Go to File and select the option – Export.

- Put a name to this backup, and hit Save.
The whole backing up process will take around 5-10 minutes depending upon how many entries are there inside your registry.
How do I clean the registry on Windows 11/10?
Now that you have created a registry backup, use any one of the below methods to purge the registry –
- By using the Backup Registry file
- Performing Windows Startup Repair (Safe Mode)
- Running DISM Command
- Via Disk Cleanup tool
1] By Using Backup Registry File
If you had generated a registry backup sometime back when your PC was working all right, you may use that to fix your current issues. For doing so proceed with the following instructions.
- Press the “Windows key + R” together to open the Run Dialog box.
- Type “
regedit” in the Run dialog box. - Hit the OK button.
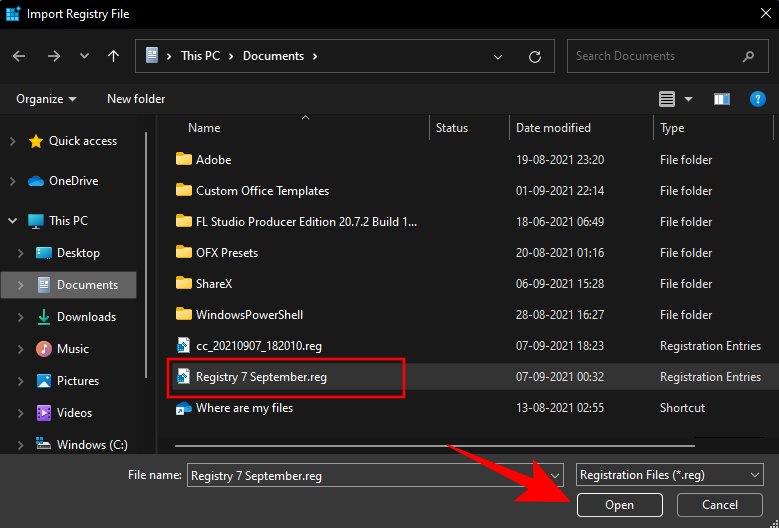
- Go to the File menu on the top bar and select Import.
- Now, browse to the folder where the old registry backup lies.
- Select that file and hit the button – Open.
The chosen file will now start replacing your current files on the registry. I hope this method alone resolves the issue that you are dealing with.
2] Performing Windows Startup Repair (In Safe Mode)
In case you don’t have any registry backup prior to the occurrence of the recent issues, you may initiate the startup repair on Windows 11/10. For this, you need to boot into the Safe Mode first. Here are the essential steps to work on –
- Right-click on the Windows icon and select Settings.
- On the Settings page, click System and then Recovery (right pane).
- Click Restart now and your device will boot into the WinRE.
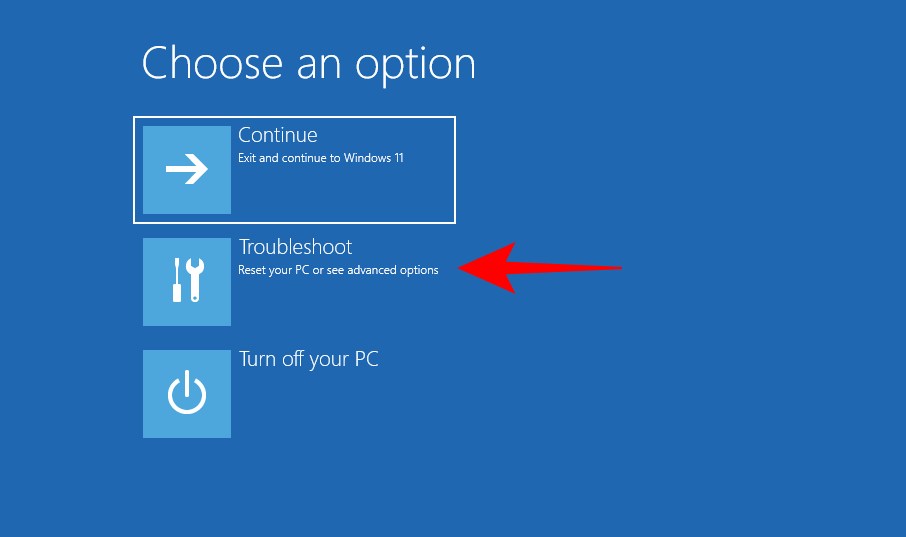
Now, that you are inside the Windows Recovery Environment (WinRE), do the following –

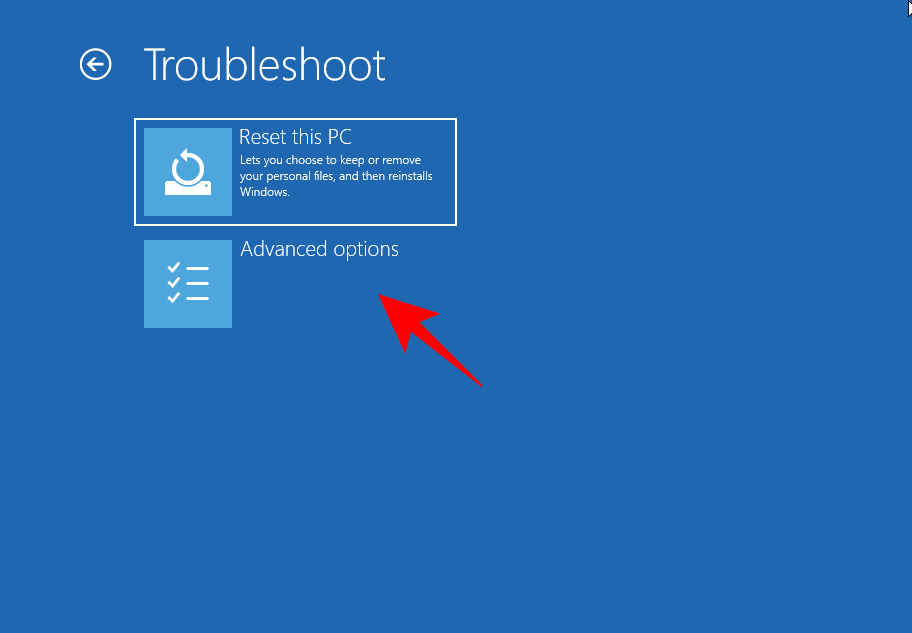
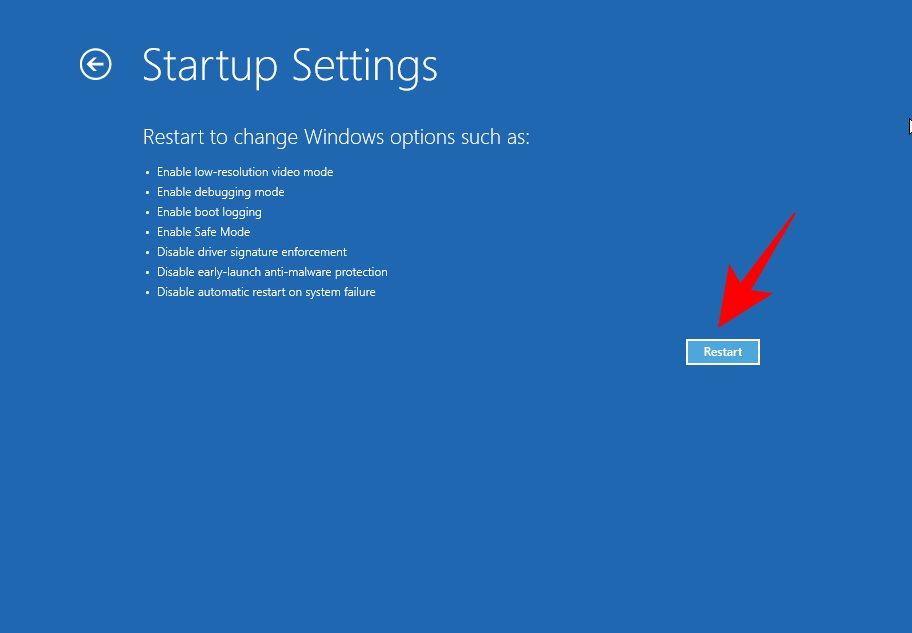
- Click Troubleshoot and then Advanced options.

- You will get a total of 6 options, select Startup Settings.

- Click Restart Again.

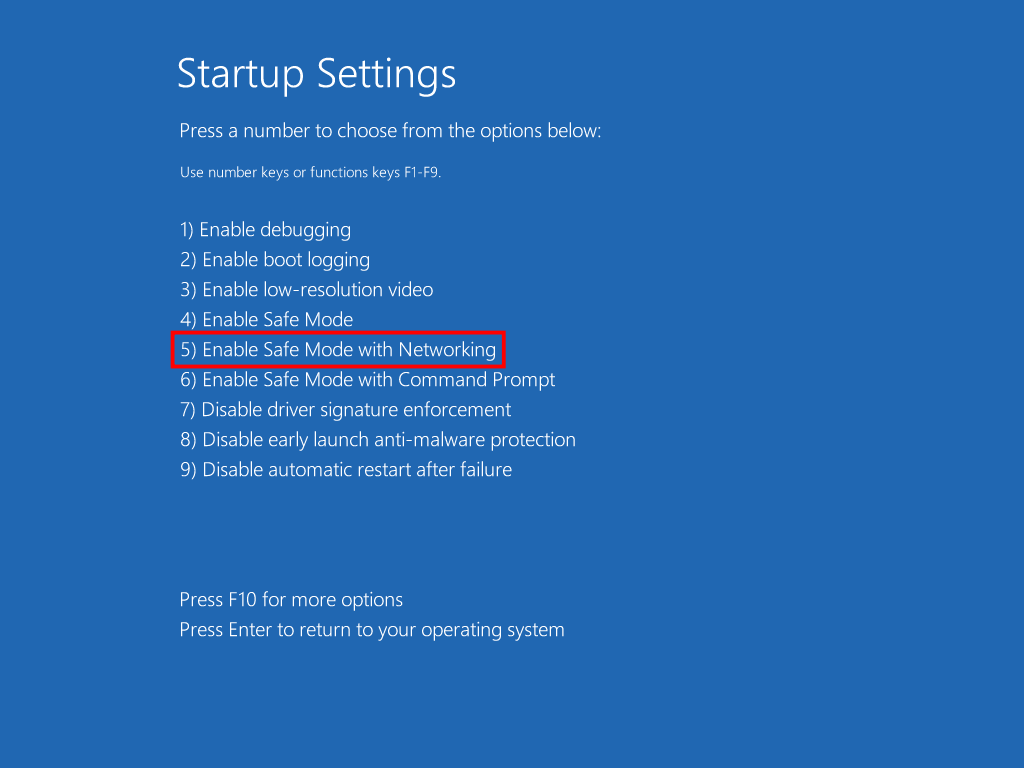
- Using the keyboard, press the key “5”, to Enable Safe Mode with Networking.
- Your device will now boot into the Safe Mode. This is basically a different state where all third-party apps and services don’t run.
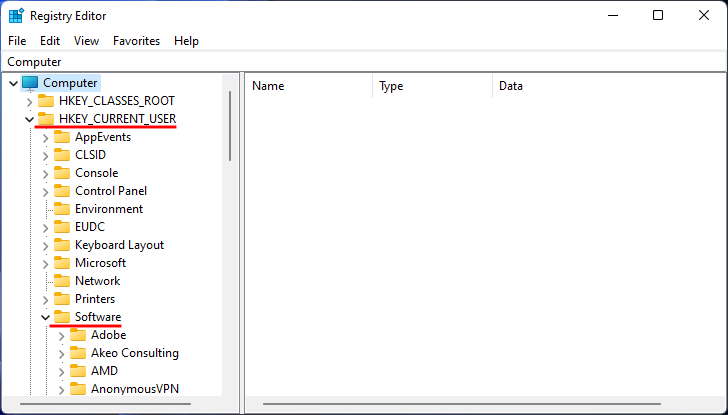
- Launch the Registry Editor next, and head over to the path below –
Compute\HKEY_CURRENT_USER\SOFTWARE
- At this location, you will see a list of apps that you might have uninstalled already. In case you do find such an application here, right-click on that app, and hit Delete. If any confirmation window appears, click Yes.

- Doing so will remove any leftover or residual files of that already uninstalled program.
Do the same for all apps that you know for sure are not running on your computer. Deleting any already-in-use folder will seriously impact your device. So, proceed ahead with caution.
3] By Using Disk Cleanup Tool
Another useful tool by Microsoft to repair corrupt registries is by running the Disk Cleanup Tool. Using this, one can easily get rid of unnecessarily stored cache, old installation files, and several other non-essential files. Here’s how can you run this utility program –
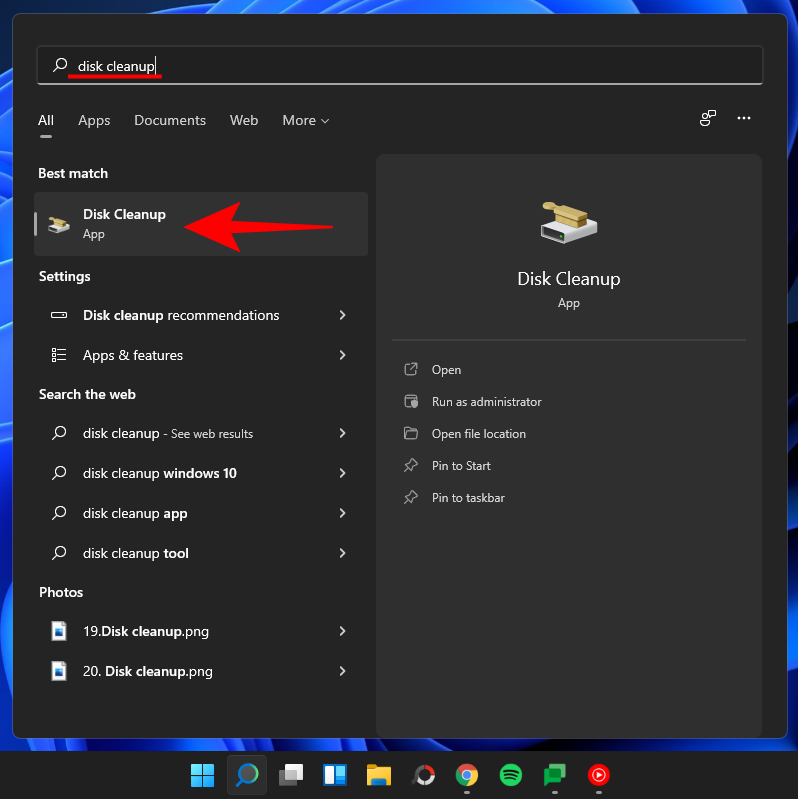
- Use Win + S to launch the Search window.
- Type disk cleanup in the search box, and press the Enter key.
- Using the drop-down menu, select C:\ drive, and hit OK.
- Let this tool run and analyze the spaces that it can free up.
- Once the analysis completes, hit the option – Cleanup system files.
- Redo the steps that you did already i.e. Choose the C:\ drive, and let it analyze the system spaces that it can free up. The whole scanning process will take a few minutes to locate corrupted data, temp files, or old installation files.
- Tick all the checkboxes, and hit OK.
- If any confirmation window pops up, hit Delete Files.
Once this is over, reboot your PC so that the recent changes come into effect from the next login.
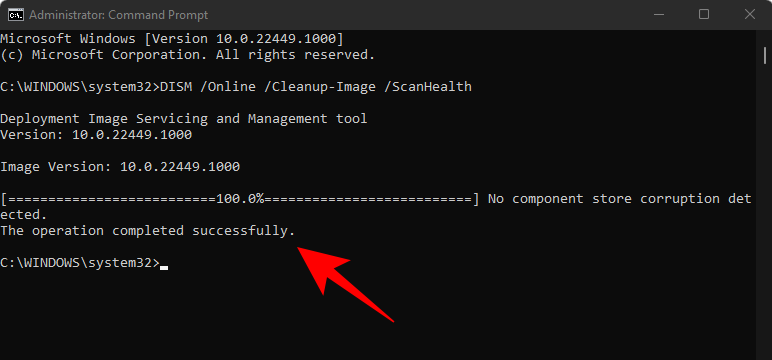
4] By Using DISM Command
To resolve any corruption inside the Windows 11/10 Image, you may also take the help of a command-line program i.e. DISM. Running this tool will help to scan and repair all those files that are either obsolete or have become corrupted somehow. Here’s how can use the DISM tool in Windows 11 –
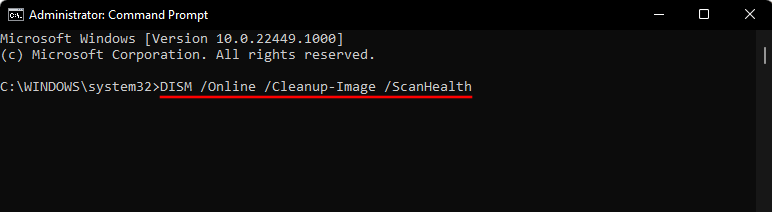
- Launch Command Prompt as Administrator.
- On the elevated console, type the following, and press Enter –
DISM /Online /Cleanup-Image /ScanHealth

- This program will take 15-20 minutes to find and repair any corruption inside the Windows 11 Image. In some scenarios, the timing may increase as well depending upon the number of corrupted files it requires to fix. Worry not, just let this code do what it does best.
- When this process is over, restart your computer so that the changes made become effective from the next login.
Now, that you have applied all of the four workarounds outlined above, check if your device is working perfectly.
Cleaning the registry on Windows 11 can help improve your computer’s performance by removing unnecessary or corrupted entries. It’s a straightforward process that involves using built-in tools and possibly third-party software. In just a few steps, you can tidy up your system’s registry and keep your Windows 11 running smoothly.
Cleaning the registry in Windows 11 involves using tools like the built-in Registry Editor and potentially third-party software to remove unused or corrupted entries. This can help optimize your system’s performance and resolve certain issues.
Step 1: Backup Your Registry
The first step is to back up your registry.
Before making any changes, it’s crucial to create a backup to restore your system if something goes wrong. To do this, open the Registry Editor by typing «regedit» in the search bar. Then, go to File > Export, choose the location, and save the backup.
Step 2: Open Registry Editor
Next, open the Registry Editor.
You can do this by pressing Win + R, typing «regedit,» and hitting Enter. This tool allows you to view and edit the registry.
Step 3: Navigate to Unwanted Entries
Then, navigate to the entries you want to clean.
Use the left pane to browse to locations where you think there might be unnecessary entries, such as HKEY_LOCAL_MACHINE or HKEY_CURRENT_USER. Be careful not to delete essential entries.
Step 4: Delete Unnecessary Entries
Now, delete the unwanted entries.
Right-click on the entry you want to remove, and select Delete. Confirm the deletion. Remember, only remove entries you are sure are unnecessary.
Step 5: Use Third-Party Software
Consider using third-party software for a more thorough clean.
Programs like CCleaner can automate the process and find entries you might miss. Download and install the software, and follow the instructions to clean the registry.
After completing these steps, your Windows 11 registry should be cleaner, which can help improve your computer’s performance. You might notice faster startup times and fewer errors.
Tips for How to Clean Registry Windows 11
- Always back up the registry before making changes to avoid potential issues.
- Be cautious when deleting entries; removing essential entries can harm your system.
- Regularly clean the registry to maintain optimal performance.
- Use trusted third-party software to automate and simplify the cleaning process.
- Keep your system and software updated to minimize registry issues.
Frequently Asked Questions
Is it safe to clean my Windows 11 registry?
Cleaning the registry is generally safe if you know what you’re doing and back up the registry first. Using trusted third-party software can also reduce risks.
How often should I clean my registry?
It’s a good idea to clean the registry every few months or when you notice a decrease in system performance.
Can cleaning the registry improve my computer’s speed?
Yes, cleaning the registry can improve your computer’s speed by removing unnecessary entries that can slow down your system.
Can I use any software to clean the registry?
While there are many options, it’s best to use reputable software like CCleaner to avoid potential risks associated with less known programs.
What if I accidentally delete an important registry entry?
If you’ve backed up your registry, you can restore it by going to File > Import in the Registry Editor and selecting your backup file.
Summary of How to Clean Registry Windows 11
- Backup Your Registry: Create a backup in Registry Editor.
- Open Registry Editor: Access the tool via Win + R and typing «regedit.»
- Navigate to Unwanted Entries: Browse to locations with unnecessary entries.
- Delete Unnecessary Entries: Right-click and delete unwanted entries.
- Use Third-Party Software: Consider CCleaner for thorough cleaning.
Conclusion
Cleaning the registry in Windows 11 is a valuable maintenance task that can significantly enhance your computer’s performance. By following the steps outlined above, you ensure that your system remains optimized and free from unnecessary clutter. Always remember the importance of backing up your registry before making any changes, as this small step can save you from potential headaches down the line.
For those who might feel uneasy about manually editing the registry, trusted third-party software can provide an additional layer of convenience and safety. Regular maintenance, including periodic registry cleaning, helps in keeping your system running smoothly and efficiently.
If you’re new to this or have any concerns, don’t hesitate to seek further reading or consult expert forums. Taking proactive steps in maintaining your Windows 11 registry can lead to a more stable and faster computing experience. So, why wait? Dive in and give your system the tune-up it deserves!
Kermit Matthews is a freelance writer based in Philadelphia, Pennsylvania with more than a decade of experience writing technology guides. He has a Bachelor’s and Master’s degree in Computer Science and has spent much of his professional career in IT management.
He specializes in writing content about iPhones, Android devices, Microsoft Office, and many other popular applications and devices.
Read his full bio here.
Windows registry is the memory bank of your PC where it records just about everything you do on your system. It is exactly what the name suggests – a registry. Be it information about the dozen or so video files that you moved a few weeks back, or the latest program that you installed – everything is documented in this database, including all the settings and preferences that are specific to your machine. It’s natural prudence, then, that guides people to stay away from tinkering with it.
Windows, however, isn’t as adept at cleaning the registry as it is in filling it up. Over time, it invariably gets bloated and slows down the computer, and nobody appreciates that. So, if you’re looking to clean the registry and speed up your computer a bit, you have to know what you’re doing and how to go about it.
What causes Registry junk?
A bloated registry can be the cause of a number of registry errors. For instance, it’s not uncommon for entries of uninstalled programs and software to linger in the registry. If you reinstall programs or upgrade them, the registry will get duplicated keys. Over time, you get hundreds of entries that are just sitting around orphaned and for no good reason other than Windows’ ineptitude at cleaning up after itself.
A registry record is also maintained for system shutdowns. And if the system crashes or is turned off abruptly, it can potentially disrupt these records and cause an issue (remember BSOD?). Furthermore, registry entries also come under attack by malware infestation that can modify the keys and cause dire issues. If these things go unattended, you could be looking at a system that’s on the brink of giving up.
Related: What Windows 11 Services to Disable Safely and How?
Should you clean your registry?
Given the vulnerabilities that the registry is open to, it would make sense to clean the registry from time to time. But a number of complications can arise if one is not careful with the process, especially if one is doing it manually. Accidentally deleting entries essential to the proper functioning of the system can be detrimental to it, leaving it unresponsive and dead. Even if you use third-party applications dedicated to this purpose, it’s not recommended to let the applications auto-clean the registry.
Can you clean your registry easily by yourself?
It is important to know exactly what you’re doing when you’re cleaning the registry yourself. Certain precautions are warranted before you take up the task of cleaning the registry all by yourself. Backing up the registry should be the first thing to do so that you can revert back the changes in case you make any erroneous deletions.
The other thing to ensure is that you don’t delete registry entries that you have no clue about. Though the names of the key folders themselves can tell you what they’re about, if you’re unclear at any stage about where they came from, it’s better to leave them alone.
With all this in mind, let’s see how you can clean the registry on Windows 11.
Related: How To Cast Phone to PC: 5 Ways Explained
How to back up registry
Before going into the various methods for cleaning the registry, whether you’re doing it manually or using a tool for it, backing up the registry is a must. Here’s how to do so.
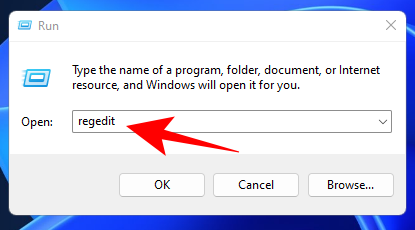
The simplest way to back up the registry is by exporting its records via the Registry Editor itself. Here’s how to go about it:
Press Win + R to open the RUN dialog box, type regedit, and hit Enter.
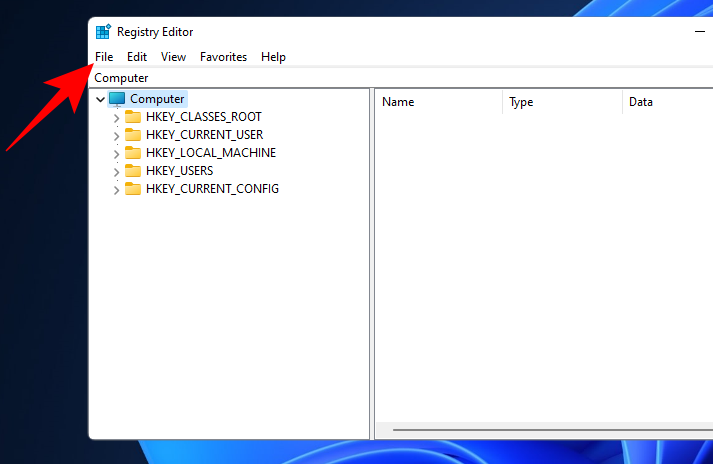
Click on File.
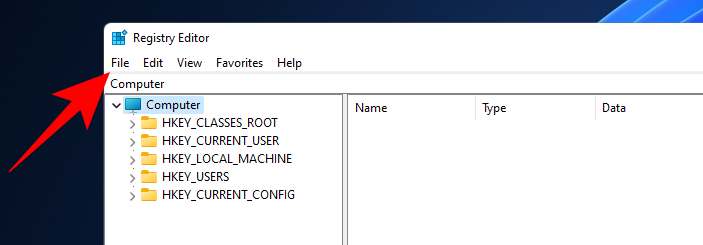
Select Export.
Give this registry backup file a name and click on Save to do so.
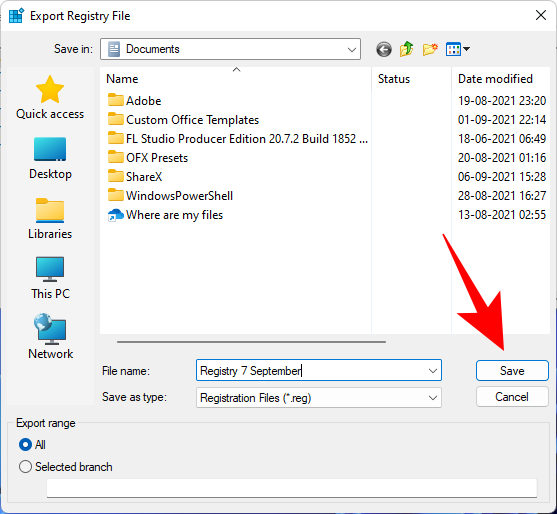
Depending on the number of entries in the registry, this can take some time. Once it’s done, you can start using the following methods to clean up the registry.
Make sure you have backed up your registry first as given above. Once done, use any of the methods below to clean the registry of your Windows 11 PC.
Method #01: Using Disk Cleanup
Though this method isn’t for the registry, strictly speaking, it does clean up the disk where the registry files are stored and removes a whole lot of temporary and system error dump files – all of which are unnecessary files linked to the registry that slows the computer down.
Press Start, type Disk Cleanup, and select the first available option.
Once the tool opens up, select the C: drive (default) and click OK.
Once the tool finishes scanning, click on Clean up system files.
Click OK again. This will make the tool scan a second time and give you some more options.
When the scanning is complete, check for all the additional files that you can delete, and click OK.
Method #02: Using Command Prompt (with the DISM command)
To run the Deployment Image Servicing and Management command, we’re using the Command Prompt. To open it up, press Start, type cmd, and click on Run as administrator.

Now type the following command:
DISM /Online /Cleanup-Image /ScanHealth
Press Enter. The scan will automatically search for and fix any errors found.
Even though this isn’t only related to the registry, your computer will benefit greatly from this checkup.
Method #03: Using Registry Editor itself (in Safe Mode)
Now, onwards to the actual registry cleanup. Since this method requires you to manually delete registry files yourself, and because of the high chance that you may end up deleting something you shouldn’t, it’s better to be safe and do so from the Safe Mode.
To boot your PC into safe mode, press Start, click on the Power button, and then, while pressing the “Shift” key, click Restart.

Now, while the computer is restarting, you will be taken to the Advanced Restart options. Select Troubleshoot.
Click on Advanced options.
Click on Startup Settings.
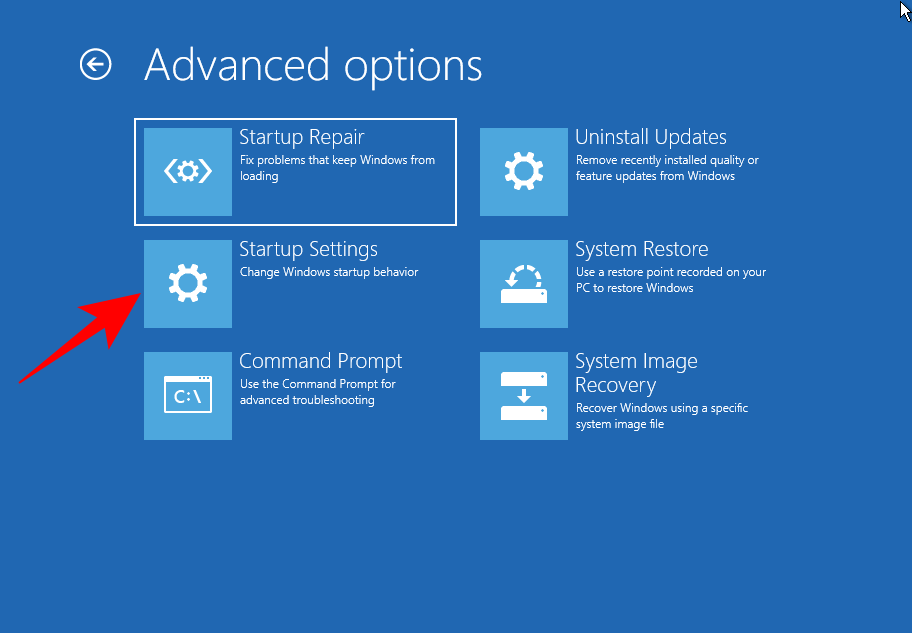
Click Restart.
Now press the number that corresponds to Enable Safe Mode with Networking.
Once you’re booted up in Safe Mode, press Win + R to open the RUN dialog box. Then type regedit and hit Enter.

Now, it’s time to start removing unnecessary registry entries and exercising extreme caution while doing so. The safest registry cleaning option is to look for residual entries of programs and applications that have already been uninstalled. To do so, expand the HKEY_CURRENT USER folder and then Software.
Now look for keys that represent applications already uninstalled, then right-click them and select Delete.
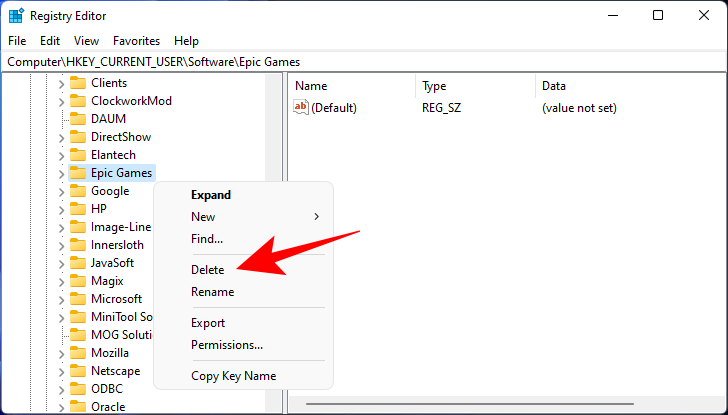
Make sure that you delete keys and folders only if you’re completely sure what they are. For instance, we remember uninstalling Epic Games a few weeks back, which is why we’re removing it from the registry also. You will also be prompted once before you delete the registry entries for good. Click on Yes to confirm.
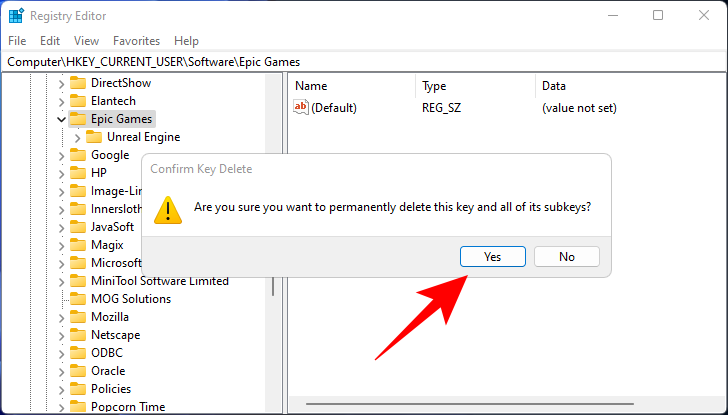
Do so for all keys that you know for sure are just remnants of uninstalled programs. Once you’re finished, close the Registry Editor and restart the computer normally.
Method #04: Using 3rd-party applications
There are tons of third-party applications whose sole purpose is to clean the registry. However, even with all these sophisticated programs, you need to maintain caution while giving them the authority to clean at will.
Many of these applications will give you the option to deep clean the registry. We recommend that you don’t go with this option, and always review the deletions before they’re made.
With that in mind, let’s look at a few popular registry ‘cleaners’.
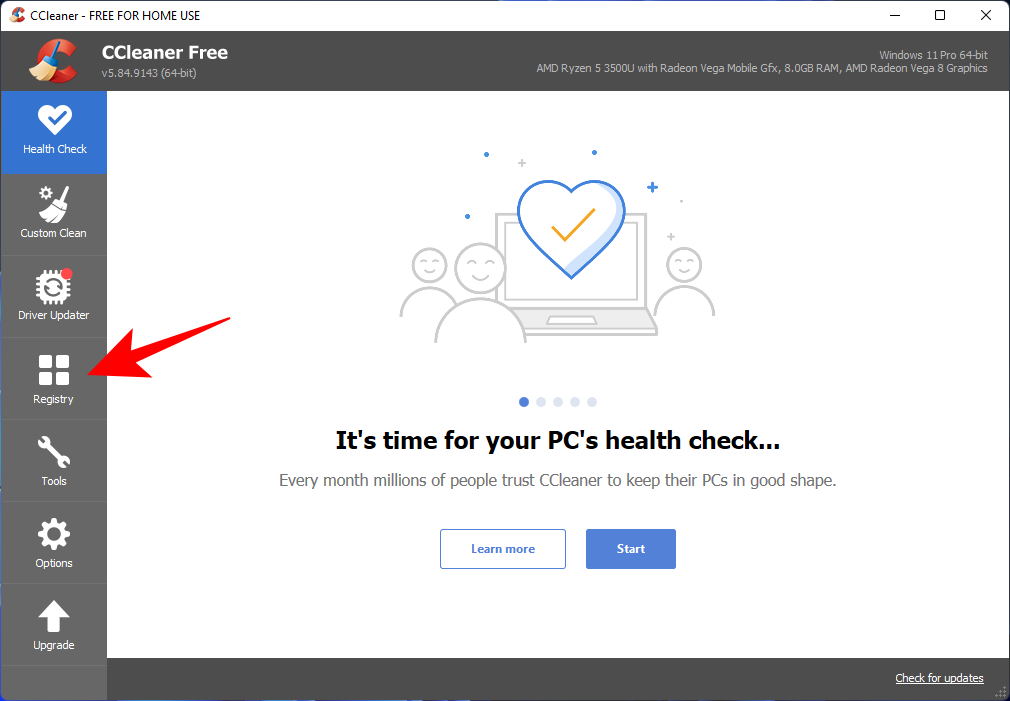
1. CCleaner
CCleaner is a useful tool when it comes to scanning issues related to the PC, especially the registry. The good thing about this program is that it gives you the opportunity to review each entry before ‘fixing’ it (read delete).
Download: CCleaner
After downloading, install CCleaner and open the application. Then click on Registry in the left panel.
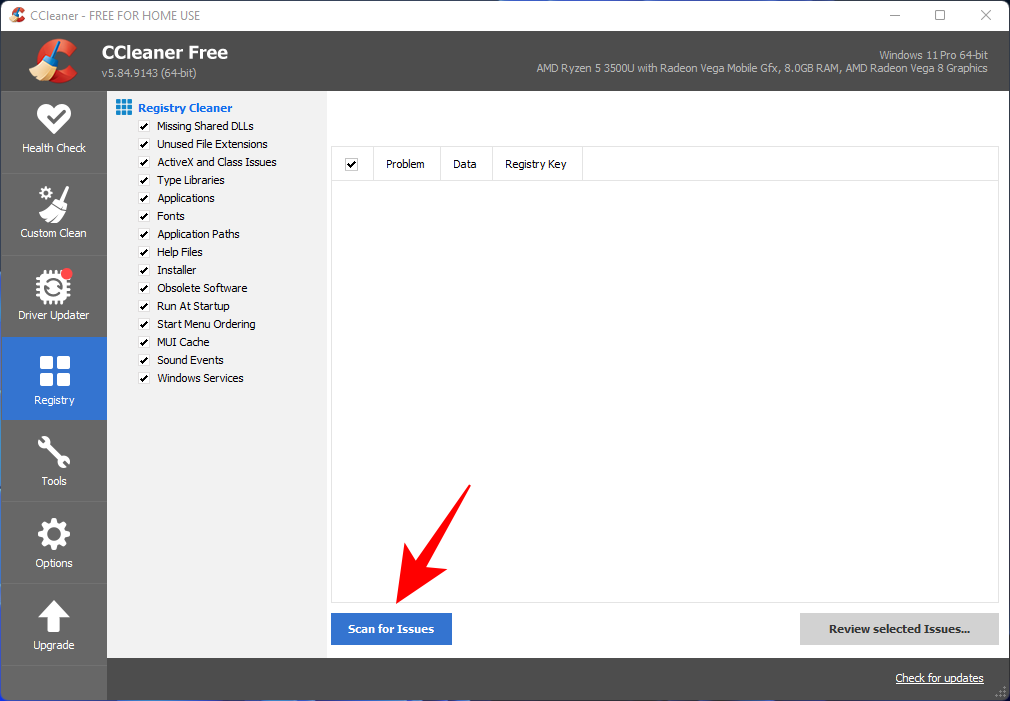
Click on Scan for Issues.
Once the issues are found, click on Review selected Issues.
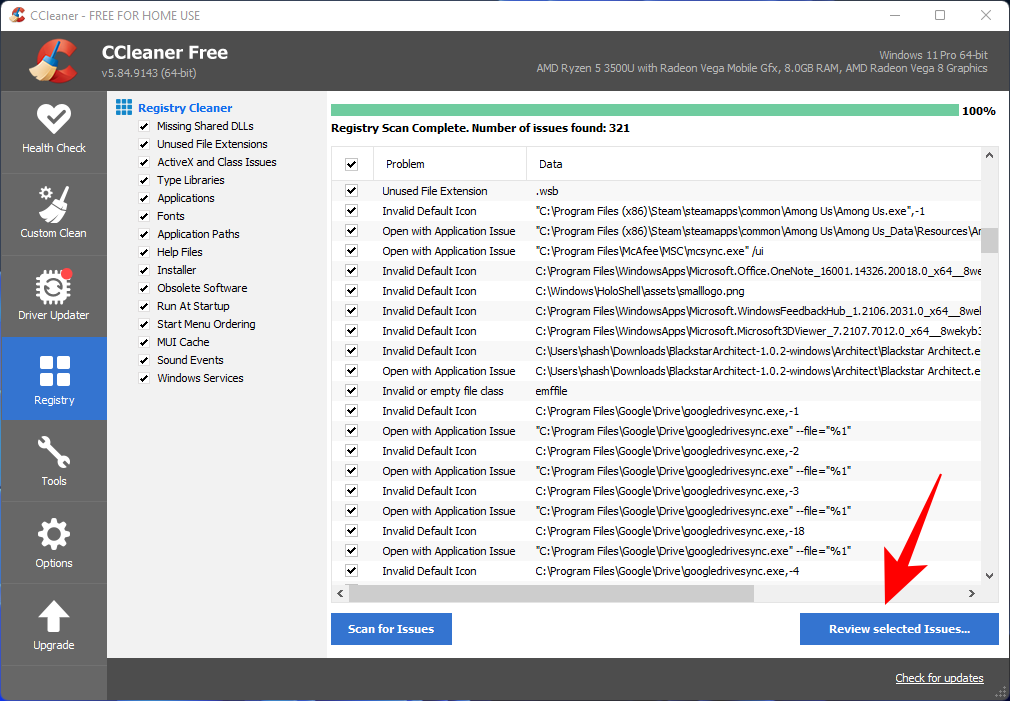
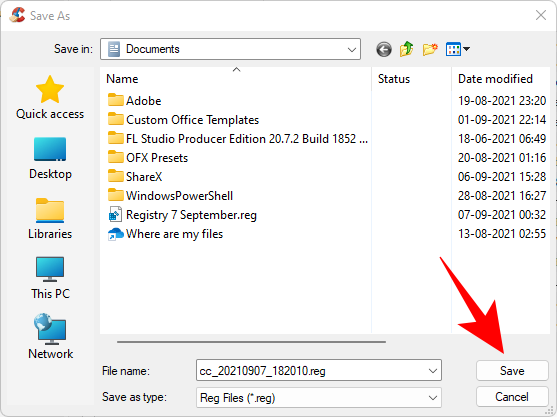
CCleaner will ask if you want to back up the registry. Click Yes if you haven’t done so yet.
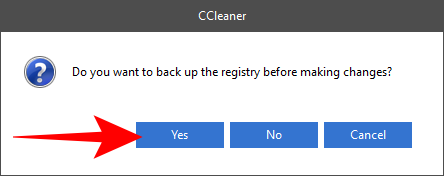
Then save a copy of the registry and click on Save.
Now review the issues one by one. If there is an issue that you’d like to fix, click on Fix Issue.
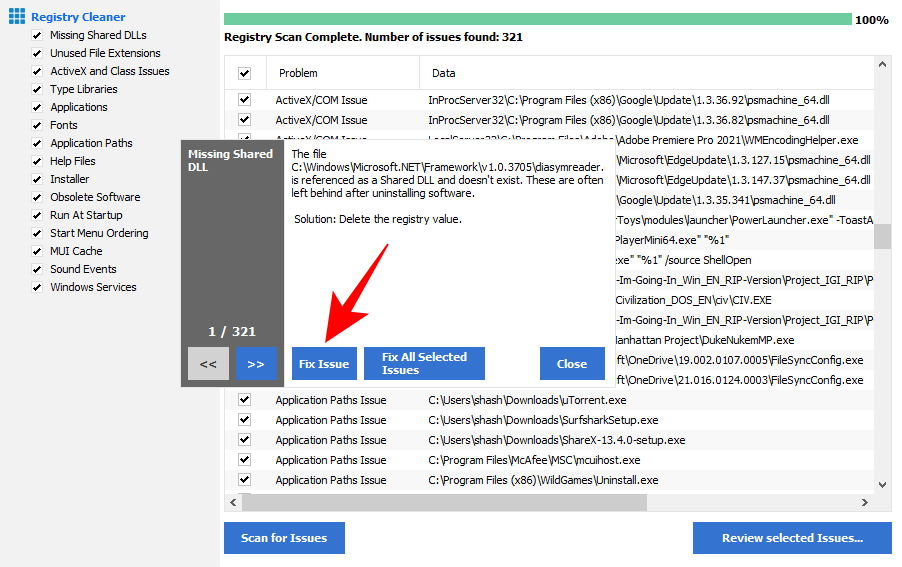
Do so for all issues. If you don’t know if an issue is pertinent or safe to fix, move on to the next one.
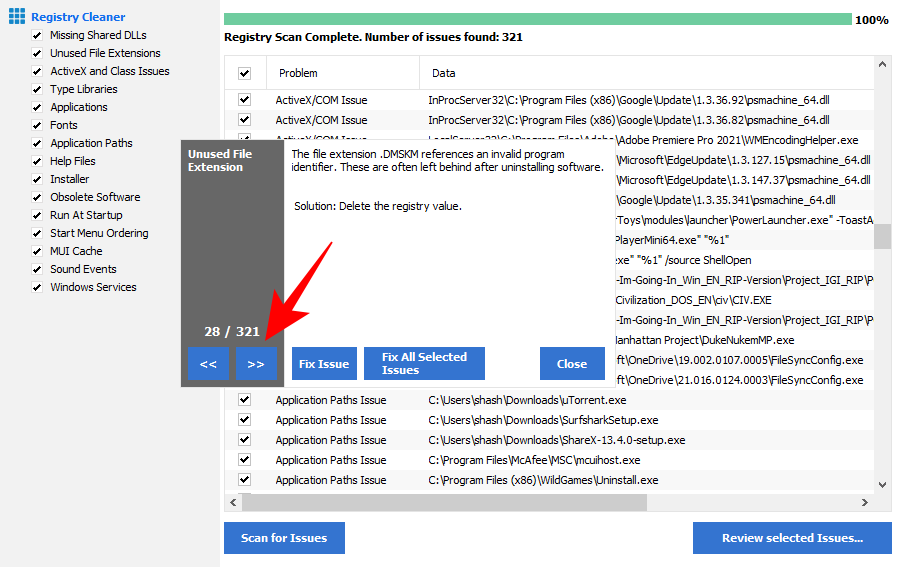
Close CCleaner once you’re done.
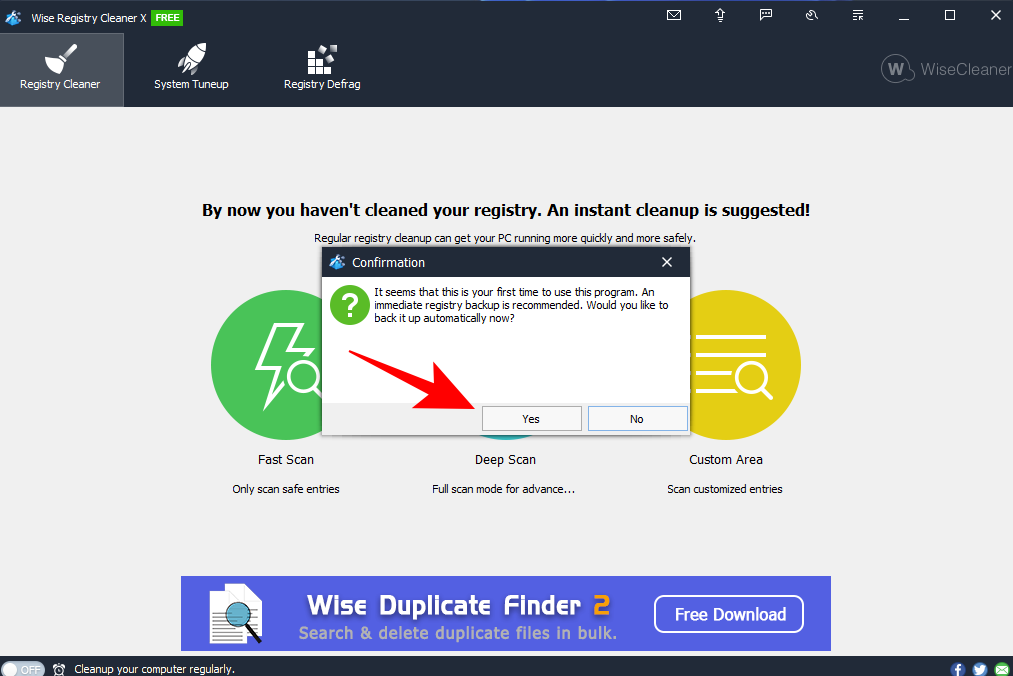
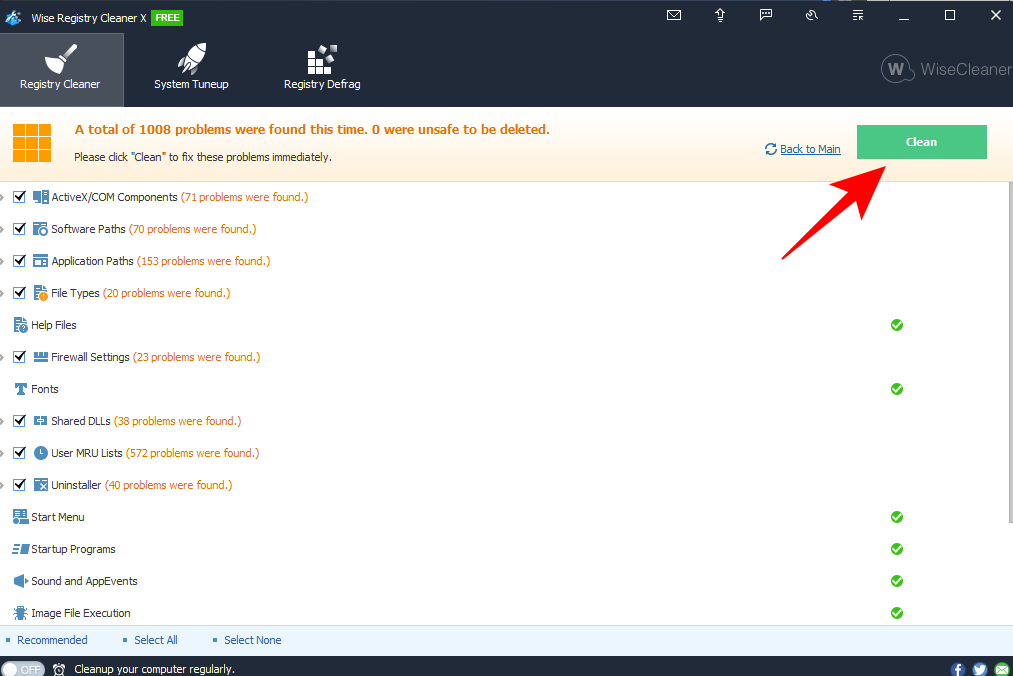
2. Wise Registry Cleaner
Wise Registry Cleaner is another tool that cleans and defrags the registry.
Download: Wise Registry Cleaner
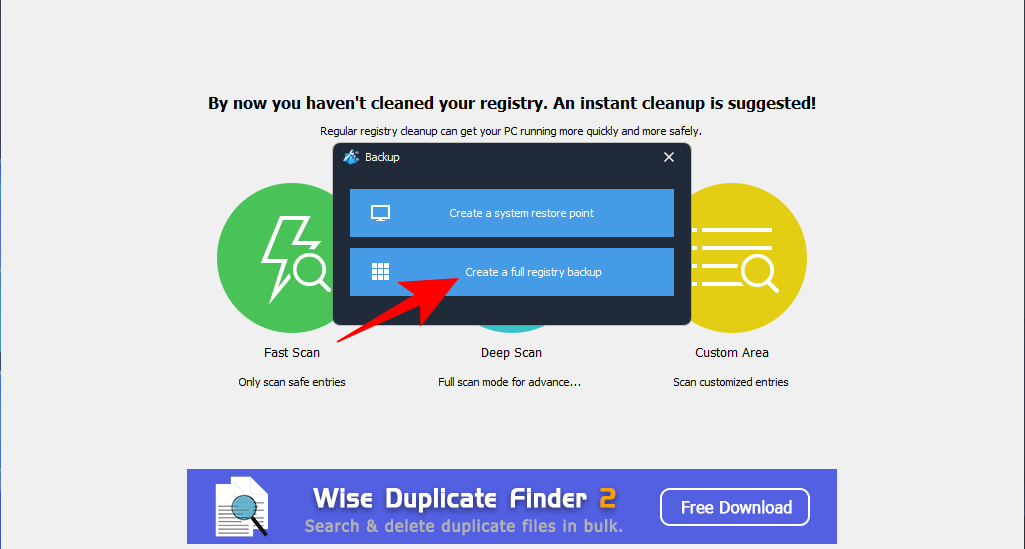
When you run the program for the first time, you’ll be asked to create a backup first. Click on Yes to do so.
Click on Create a full registry backup.
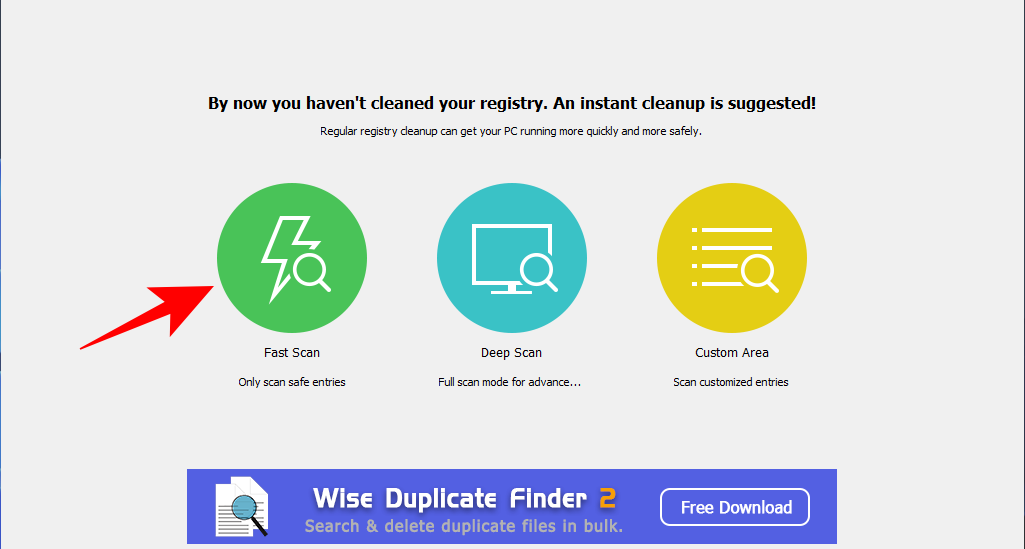
Once the backup is created, scan the registry with the tool. We recommend going for the Fast Scan option as this will only scan safe entries (safe to delete, that is).
Once the scan is completed, you will get a list of issues found with the registry.
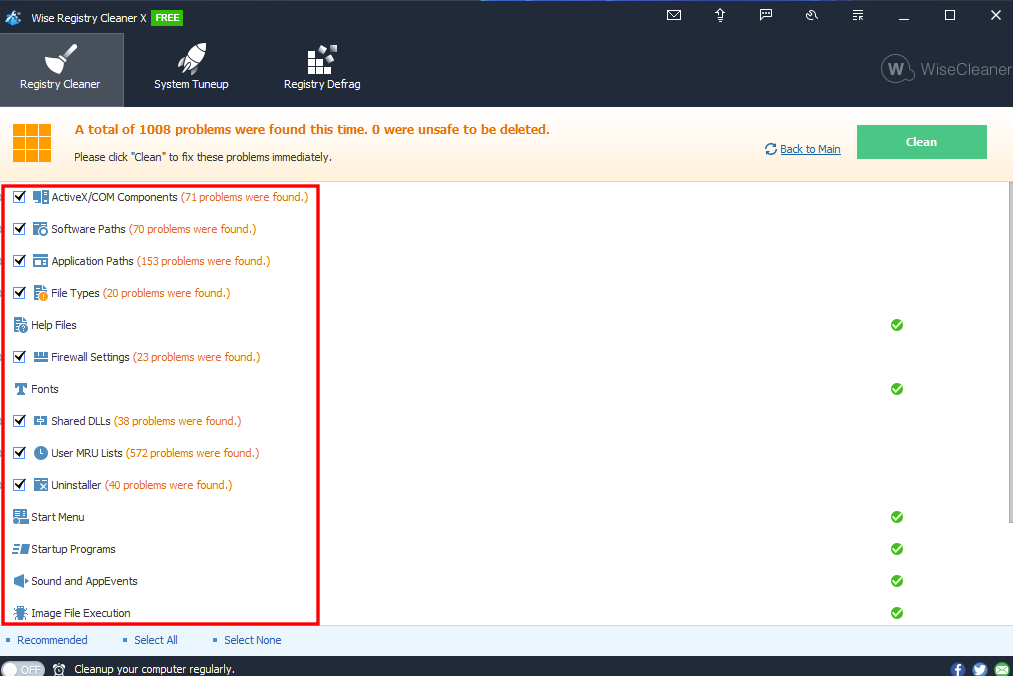
Click on each category to review the issues contained in it. Unselect issues that you are not sure about deleting. Then click on Clean.
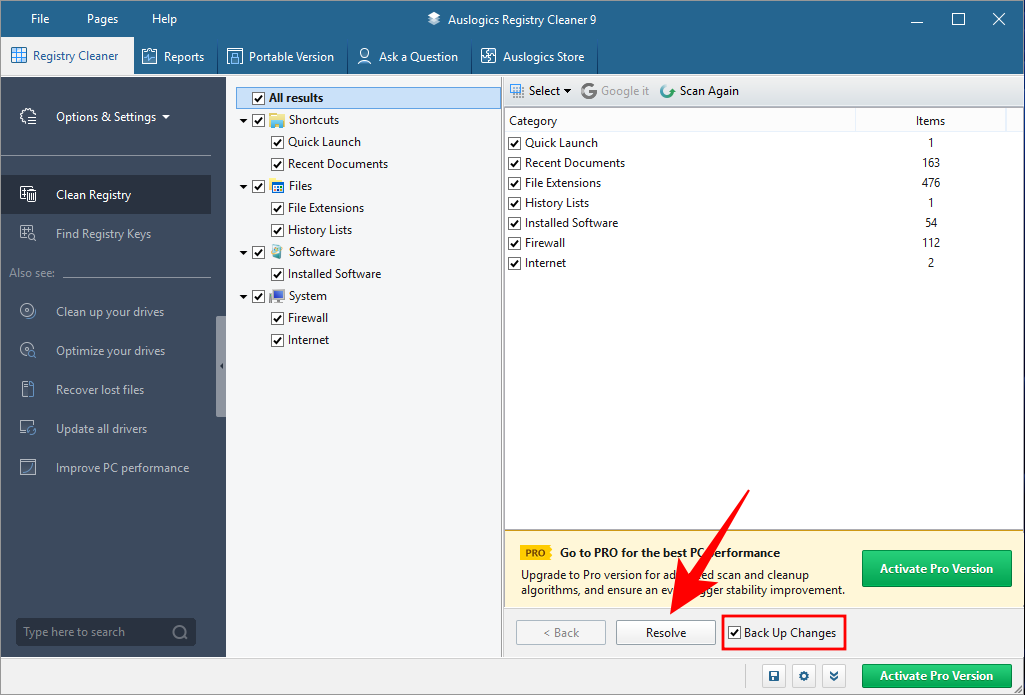
3. Auslogics Registry Cleaner
The last registry cleaner that we’re looking at today is an application that is a little on the heavier side, mainly because of the numerous features that it has.
Download: Auslogics Registry Cleaner
Once you open the application, ‘Clean Registry’ will be the default option. Click on Scan for Auslogics Registry Cleaner to start looking for registry issues.

Once the scanning finishes, go through each category and unselect the issues that you’re not sure about fixing. Once you’re satisfied with the issues that you’re resolving, click on Resolve at the bottom (make sure the Back Up Changes option is selected).
How to restore a Registry backup
If you made a mistake by deleting a few entries that you shouldn’t have, you may want to restore the registry as it was when a backup was made. To do so, first press Win + R to open the RUN dialog box. Then type regedit and hit Enter to open the Registry Editor.
Click on File.
Select Import.

Look for the backup that you created earlier, select it, and click on Open.
And that’s it! You have restored the registry as it was before you started the cleaning process.
Frequently Asked Questions (FAQs)
Cleaning the registry can be a tricky task, to say the least. Users tend to have a lot of questions about the risks involved in the process and whether the benefits really outweigh those risks. Here we answer a few commonly asked questions to allay some of the fears.
What risks are involved when cleaning the registry?
The biggest risk involved when cleaning the registry, whether you’re doing it manually or delegating the task to a Registry cleaning application, is that you may end up deleting registry entries that are crucial to the proper functioning of your system.
This is why throughout our guide we have placed special emphasis on reviewing the entries before going about deleting them. If you want to negate those risks, always back up the registry and clean the registry from Safe Mode, just to be on the safer side.
When is it recommended to clean the registry?
Cleaning the registry isn’t something that most people tend to do, or even need to. But if your computer is being bogged down and appears a little more sluggish than usual, cleaning the registry can be one way of speeding up Windows 11.
It’s a good practice to keep your system free of unnecessary applications so you don’t need to use a registry cleaner. But if you really need to, we hope you were able to clean the registry responsibly with this guide without running into any trouble.
RELATED
- How to Login as Administrator on Windows 11 or Windows 10
- How to Disable Updates on Windows 11
- How to Repair Windows 11 [15 Ways]
- How to Type Accents on Windows 11 [6 Ways]
- How to Unzip Files on Windows 11 Natively or Using a Software