
Утилита очистки диска (Disk Cleanup) позволяет администратору быстро очистить системный диск Windows Server, удалив ненужные и временные файлы, в том числе очистить каталог WinSxS от файлов устаревших компонентов, которые остались после установки обновлений. Утилита Disk Cleanup (cleanmgr.exe) по умолчанию уже установлена в графической версии Windows Server 2016/2019 (Desktop Experience), однако в предыдущих версиях Windows Server (2012 R2/ 2012/ 2008 R2) утилита cleanmgr.exe по-умолчанию отсутствует.
Содержание:
- Очистка диска с помощью Disk Cleanup в Windows Server 2016
- Очистка диска с помощью cleanmgr.exe из командной строки
- Запуск cleanmgr в Windows Server 2012 R2/ 2008 R2 без установки Desktop Experience
- Использование Disk Cleanup в Windows Server Core
Очистка диска с помощью Disk Cleanup в Windows Server 2016
Чтобы очистить системный диск от ненужных файлов в Windows Server 2016 с помощью утилиты Disk Cleanup, нужно в File Explorer открыть свойства диска и нажать кнопку Disk Cleanup.
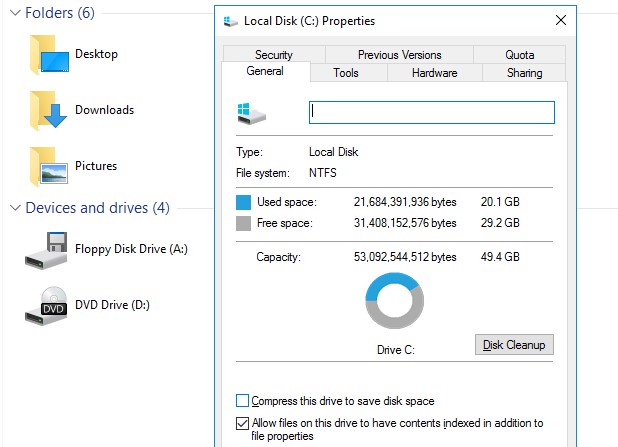
Также можно в поисковой строке набрать «disk cleanup» или cleanmgr.exe.
Выберите диск, который вы хотите очистить.
Дождитесь пока мастер очистки проверит ваш диск и найдет ненужные файлы, которые можно безболезненно удалить.
Вы можете выбрать компоненты, файлы которых можно удалить. Вам предлагается удалить следующие временные файлы:
- Setup Log Files
- Downloaded Program Files
- Temporary Internet Files
- Recycle Bin
- Temporary files
- Thumbnails
Чтобы удалить ненужные системные файлы нажмите на кнопку Clean up system files.
Дополнительно предлагается очистить:
- Устаревшие файлы Windows Defender
- System archived Windows Error Reporting (каталог C:\ProgramData\Microsoft\Windows\WER\ReportQueue)
- System queued Windows Error Reporting
- Device driver packages
- Windows Update Cleanup — при этом выполняется очистка хранилища компонентов в каталоге WinSxS. Удаляются старые версии компонентов, которые остались после установки обновленных версий.
Выберите нужные опции, при этом Disk Cleanup покажет количество места, которое освободится. Нажмите Ок и подтвердите удаление временных файлов.
Дождитесь, пока утилита cleanmgr.exe удалит ненужные файлы.
Очистка диска с помощью cleanmgr.exe из командной строки
Утилита
cleanmgr.exe
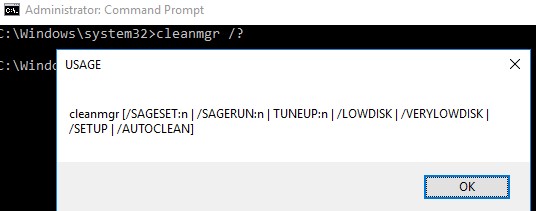
имеет различные параметры командной строки, которые позволяют использовать ее в различных сценариях автоматической очистки системного диска. Их можно использовать как в Windows Server, так и на рабочих станциях пользователей с Windows 10.
cleanmgr [/d driveletter] [/SAGESET:n | /SAGERUN:n | TUNEUP:n | /LOWDISK | /VERYLOWDISK | /SETUP | /AUTOCLEAN]
Ключ
/AUTOCLEAN
используется для очистки старых файлов, оставшихся после апгрейда билда Windows. Параметр
/SETUP
позволяет удалить файлы, оставшиеся от предыдущей версии Windows (если вы выполняли in-place upgrade).
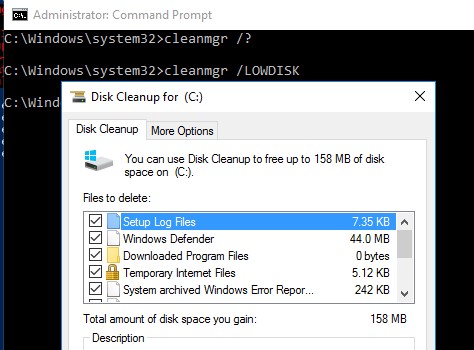
Команда
cleanmgr /LOWDISK
– запускает графический интерфейс Disk Cleanup с уже выбранными параметрами очистки.
Команда
cleanmgr /VERYLOWDISK
выполняет автоматическую очистку, а после окончания оторажает информацией о выполненных действиях и свободном месте.
You have successfully resolved the low disk space condition. Your C:\ volume now has 10000 Mb of free space remaining.
С помощью параметров
/sageset:n
и
/sagerun:n
вы можете создать и выполнить настроенный набор параметров очистки.
Например, выполните команду
cleanmgr /sageset:11
. В открывшемся окне выберите компоненты и файлы, которые нужно автоматически очищать (я выбрал все опции).
Эти настройки сохраняются в ветке реестра HKEY_LOCAL_MACHINE\SOFTWARE\Microsoft\Windows\CurrentVersion\Explorer\VolumeCaches. В этой ветке перечислены все компоненты Windows, которые можно очистить с помощью Disk Cleanup. Для каждой опции, которую вы выбрали создается параметр типа DWORD с именем StateFlags0011 (
0011
это число, которое вы указали в параметре sageset).
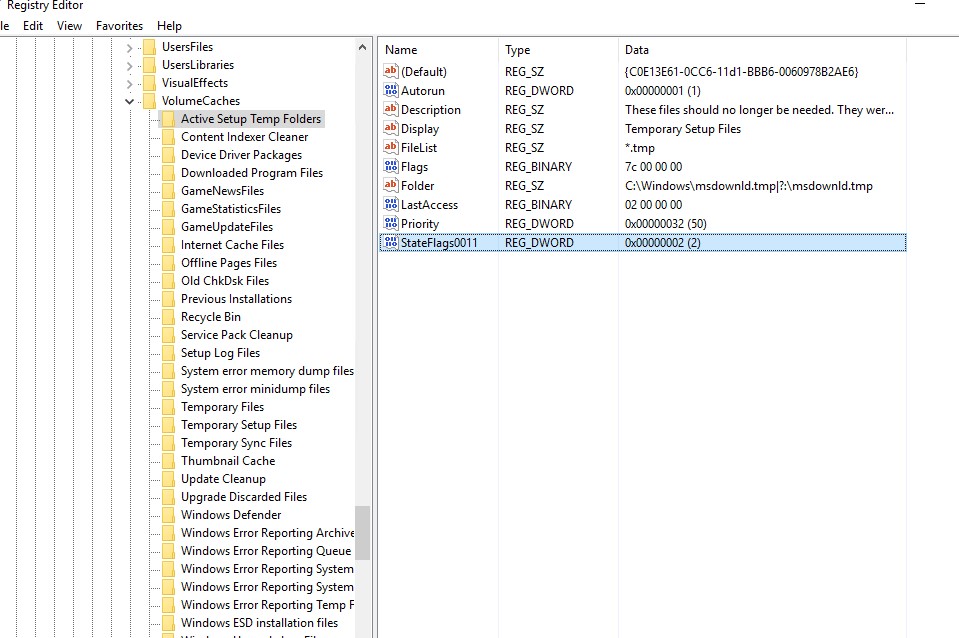
Чтобы запустить процесс очистки с выбранными параметрами, выполните команду:
cleanmgr /sagerun:11
Если вам нужно настроить автоматическую очистку дисков на компьютерах (или серверах) в домене, вам достаточно экспортировать эту ветку реестра и распространить ее через GPO.
Для автоматического запуска очистки системного диска на рабочих станциях с Windows 10 можно создать задание в планировщике со следующим PowerShell скриптом:
Start-Process -FilePath CleanMgr.exe -ArgumentList '/sagerun:11' -WindowStyle Hidden -Wait
Запуск cleanmgr в Windows Server 2012 R2/ 2008 R2 без установки Desktop Experience
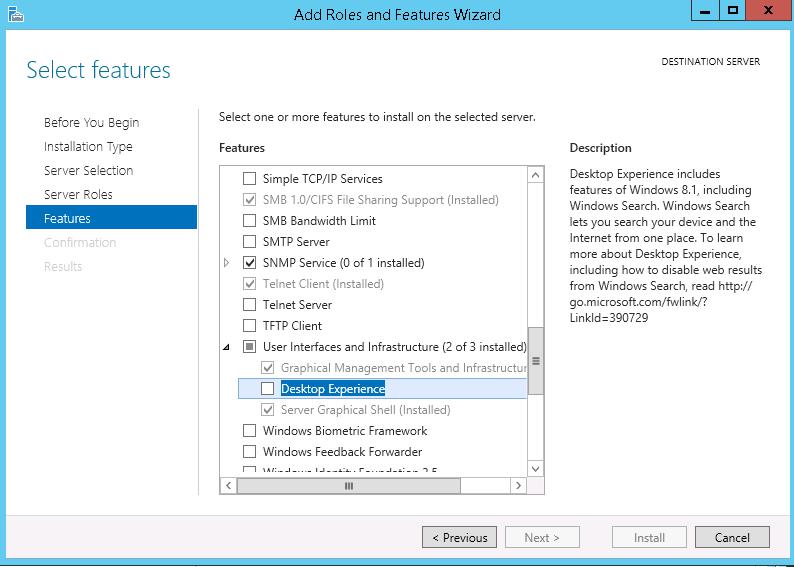
В Windows Server 2012 / R2 и 2008 /R2 по умолчанию не установлена утилита очистки диска Disk Cleanup (cleanmgr.exe). Чтобы воспользоваться утилитой cleanmgr сначала нужно установить отдельный компонент сервера Desktop Experience (Возможности рабочего стола) с помощью Server Manager или PowerShell (
Install-WindowsFeature Desktop-Experience
).
Но вместе с Desktop Experience устанавливается множество других компонентов, которые абсолютно не нужны на сервере:
- Windows Media Player
- Темы рабочего стола
- Поддержка AVI для Windows
- Windows SideShow
- Windows Defender
- Disk Cleanup
- Sync Center
- Запись звука
- Character Map
- Snipping Tool
Для запуска мастера очистки дисков в Windows Server можно воспользоваться более простым методом: достаточно скопировать в системный каталог два файла из каталога WinSxS: Cleanmgr.exe и Cleanmgr.exe.mui. Ниже представлены команды для копирования файлов cleanmgr из каталога WinSxS для разных версий Windows Server (во всех случаях используется путь для английских редакций ОC).
| ОС | Команда копирования файлов cleanmgr |
| Windows Server 2008 R2 x64 |
copy C:\Windows\winsxs\amd64_microsoft-windows-cleanmgr_31bf3856ad364e35_6.1.7600.16385_none_c9392808773cd7da\cleanmgr.exe C:\Windows\System32\
|
| Windows Server 2008 x64 |
copy C:\Windows\winsxs\amd64_microsoft-windows-cleanmgr_31bf3856ad364e35_6.0.6001.18000_none_c962d1e515e94269\cleanmgr.exe C:\Windows\System32\
|
| Windows Server 2012 x64 |
copy C:\Windows\WinSxS\amd64_microsoft-windows-cleanmgr_31bf3856ad364e35_6.2.9200.16384_none_c60dddc5e750072a\cleanmgr.exe C:\Windows\System32\
|
Windows Server 2012 R2 x64
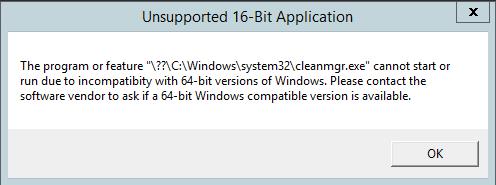
Рассмотренный выше трюк не работает в Windows Server 2012 R2 из-за изменений, внесенных обновлением KB2821895. Дело в том, что после установки данного обновления для хранения бинарных файлов компонентов стала использоваться компрессия. При попытке запустить скопированный cleanmgr.exe появляется ошибка:
The Program or feature \??\C:\Windows\system32\cleanmgr.exe cannot start or run due to incompatibility with 64-bit version of Windows
В качестве обходного решения можно воспользоваться такой методикой:
- Установить компонент Windows Desktop Experience:
Install-WindowsFeature Desktop-Experience - Перезагрузить сервер;
- Скопировать файлы %windir%\system32\cleanmgr.exe и %windir%\system32\en-US\cleanmgr.exe.mui в произвольный каталог (c:\temp)
- Удалить компонент:
Uninstall-WindowsFeature Desktop-Experience - Перезагрузка;
- Скопировать файлы cleanmgr.exe и cleanmgr.exe.mui в указанные выше каталоги
В дальнейшем эти два файла можно скопировать и на все другие сервера или интегрировать в шаблоны виртуальных машин с Windows Server 2012 R2.
Ссылка на скачивание готового комплекта файлов cleanmgr.exe.mui + cleanmgr.exe для Windows Server 2012 R2 на ЯндексДиске (thks Alex Kornev).
Для запуска утилиты очистки диска теперь достаточно выполнять с правами администратора команду
cleanmgr.exe
.

Совет. Для очистки устаревших файлов компонентов, оставшихся после установки обновлений, в Windows Server R2 можно воспользоваться командой DISM:
dism.exe /online /Cleanup-Image /StartComponentCleanup /ResetBase
В Windows Server 2008 R2, чтобы cleanmgr могла удалять устаревшие файлы обновлений нужно установить отдельный патч KB2852386.
Использование Disk Cleanup в Windows Server Core
В Windows Server Core 2016, в котором отсутствует полноценный графический интерфейс, утилита Disk Cleanup также не установлена. Если вы хотите использовать cleanmgr.exe для очистки диска в Server Core, достаточно скопировать следующие файлы из каталога WinSXS:
copy C:\Windows\WinSxS\amd64_microsoft-windows-cleanmgr_31bf3856ad364e35_10.0.14393.0_none_9ab8a1dc743e759a\cleanmgr.exe C:\Windows\System32\
copy C:\Windows\WinSxS\amd64_microsoft-windows-cleanmgr.resources_31bf3856ad364e35_10.0.14393.0_en-us_8b4adb68af596a23\cleanmgr.exe.mui C:\Windows\System32\en-US\
Over time, as your Windows Server runs longer, more and more disk space is eaten. Simply gone! Investigating the disk usage leaves you clueless; there are no large log files, crash dumps, or there is no software to be removed. Where did that space go?
The answer: Windows Updates, Service Pack, and hotfix installations.
The Windows disk cleanup utility cleanmgr is not available in Windows Server 2012 if the Desktop Experience-feature is not installed. This makes cleaning up used disk space a bit harder. You can utilize your cmd.exe or PowerShell command-line, and use Deployment Image Servicing and Management (DISM) to clean up the Windows Component Store (WinSxS) in Windows Server 2012 and up.
This post also shows you how to move the Windows Server SoftwareDistribution folder and user’s Documents folder to a different partition.
WinSxS cleanup in Windows Server — using DISM and PowerShell
The WinSxS folder is located in the Windows folder, for example C:\Windows\WinSxS. It’s the location for Windows Component Store files.
The Windows Component Store contains all the files that are required for a Windows installation. And, any updates to those files are also held within the component store as the updates are installed (source: KB 2795190 — and do read Manage the Component Store). The WinSxS folder will become large…
Let’s clean up WinSxS!
Regain used disk space with Deployment Image Servicing and Management (DISM)

Dism disk cleanup: Deployment Image Servicing and Management (DISM) is a command-line tool that allows you to install, uninstall, configure, and update Windows features, packages, drivers, and international settings. The /Cleanup-Image parameter of dism.exe provides advanced users more options to further reduce the size of the WinSxS folder.
The Dism.exe /Online /Cleanup-Image has a few extra parameters (or switches):
/AnalyzeComponentStore/StartComponentCleanup/ResetBasewith/StartComponentCleanup/SPSuperseded
Throughout this article, I assume you’ll read help options, just add /?, like: dism.exe /Online /Cleanup-Image /?.
If you enjoyed this, you might also enjoy the following post summing up 5 extra ways to clean up disk space in Windows Server!
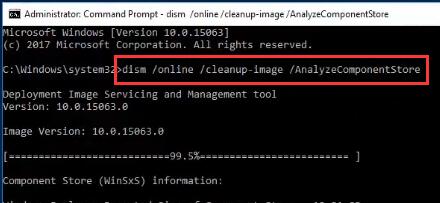
Analyze WinSxS folder (Component Store) with /AnalyzeComponentStore
First you can use the /AnalyzeComponentStore parameter. This analyzes the size of the Component Store in Windows. The AnalyzeComponentStore option is available in Windows 8.1 Windows Server 2012 R2, and it’ll notify you whether a Component Store Cleanup is recommended or not.
& dism.exe /Online /Cleanup-Image /AnalyzeComponentStore

In the above image, AnalyzeComponentStore recommends a Component Store Cleanup. Let’s do so.
/StartComponentCleanup parameter
Dism.exe removes superseded and unused system files from a system with the /StartComponentCleanup parameter.
& dism.exe /Online /Cleanup-Image /StartComponentCleanup

There is also a registered scheduled task called StartComponentCleanup. You can start this task from the command line:
schtasks.exe /Run /TN "\Microsoft\Windows\Servicing\StartComponentCleanup"
The /StartComponentCleanup parameter is supported on Windows 8, Windows Server 2012 and up.
Using the /StartComponentCleanup parameter of Dism.exe on Windows 10 gives you similar results to running the StartComponentCleanup task in Task Scheduler, except previous versions of updated components will be immediately deleted (without a 30 day grace period) and you will not have a 1-hour timeout limitation.
From an elevated command prompt, type the following:
Dism.exe /online /Cleanup-Image /StartComponentCleanup
/ResetBase switch with /StartComponentCleanup parameter
Using the /ResetBase switch with the /StartComponentCleanup parameter of dism.exe, all superseded versions of every component in the component store is removed.
Dism.exe /Online /Cleanup-Image /StartComponentCleanup /ResetBase

All existing service packs and updates cannot be uninstalled after this command is completed. This will not block the uninstallation of future service packs or updates.
The /ResetBase parameter is supported on Windows 8.1 and Windows Server 2012 R2.
/SPSuperseded parameter
The /SPSuperseded parameter removes any backup components needed for de-installation of a service pack. The service pack cannot be uninstalled after this command is completed.
Dism.exe /Online /Cleanup-Image /SPSuperseded
The Service Pack cannot be uninstalled after this command is completed.
The /SPSuperseded parameter is supported on Windows 7 or Windows Server 2008 R2 Service Pack 1, 2012, 2012 R2.
The
/AnalyzeComponentStoreoption is available in Windows 8.1 and Windows Server 2012 R2. Use this to analyze the size of the Component Store (WinSxS folder) in Windows.
As said at the beginning of this article, the Disk Cleanup Tool is available in Windows Server 2012, if you install the Desktop Experience-feature.
In some versions of Windows Server, you can simply copy the Disk Cleanup Tool executable cleanmgr.exe and cleanmgr.exe.mui to C:\Windows\system32 and C:\Windows\system32\en-Us from an old Windows 2008 R2 server, if you don’t want to install the Desktop Experience feature.
The following steps to install (copy) cleanmgr may not work on all versions of Windows Server. Try for yourself.
Disk Cleanup Wizard addon on Windows Server 2008 R2
Microsoft KB2852386 adds a Disk Cleanup option on Windows Server 2008 R2, similar to the Windows 7 update. I’ve tested this on Windows Server 2012. It may not clean up everything, but at least a lot.
Here’s how to make cleanmgr.exe available on Windows Server 2012 Standard (Windows version 6.2.9200), without installing the Desktop Experience feature:
Microsoft Windows [Version 6.2.9200]
(c) 2012 Microsoft Corporation. All rights reserved.
PS C:\Users\jan> $osversion = [System.Environment]::OSVersion.Version
PS C:\Users\jan> write-host $osversion
6.2.9200.0
C:\Windows\System32>cd ..
C:\Windows>copy WinSxS\amd64_microsoft-windows-cleanmgr.resources_31bf3856ad364e35_6.2.9200.16384_en-us_b6a01752226afbb3\cleanmgr.exe.mui \Windows\system32\en-US
        1 file(s) copied.
C:\Windows>copy WinSxS\amd64_microsoft-windows-cleanmgr_31bf3856ad364e35_6.2.9200.16384_none_c60dddc5e750072a\cleanmgr.exe \Windows\system32
        1 file(s) copied.
C:\Windows>system32\cleanmgr.exe
C:\Windows>
Unfortunately, this no longer works on Windows Server 2012 R2 (6.3.9600), probably due to KB2821895. As Aaron pointed out in the comments, the above solution to copy over the cleanmgr.exe and cleanmgr.exe.mui files doesn’t always work well. Therefore I removed this information for Windows Server 2012 R2.
Fortunately, the Disk Cleanup functionality is back in Windows Server 2016 (at least TP5).
After cleaning up the disk, a server reboot is required. Don’t forget to reboot your computer — or server — afterwards! The actual cleanup of the WinSxs directory occurs during the next reboot.
Error 0x800f0906 with DISM /Online /Cleanup-Image, PowerShell Install-WindowsFeature and SFC /scannow
Some reports are available explaining Microsoft Security Bulletin MS14-046 broke DISM /Online /Cleanup-Image /RestoreHealth, PowerShell Install-WindowsFeature with -Source parameter, and SFC /scannow. Yes, it broke a lot…
An update is made available by Microsoft: KB3005628
Update for the .NET Framework 3.5 on Windows 8, Windows 8.1, Windows Server 2012, and Windows Server 2012 R2. This update resolves an issue that prevents the optional Microsoft .NET Framework 3.5 feature from being enabled after you install security update 2966827 or 2966828 (described in Microsoft Security Bulletin MS14-046) for the Microsoft .NET Framework 3.5.
Move Windows Server SoftwareDistribution folder
Over time, your Windows Updates SoftwareDistribution folder in c:\Windows\SoftwareDistribution can become quite large, for example when multiple updates were not installed successfully.
Windows Update files are downloaded to this folder and removed after successful installation. When you find yourself in a situation where your C: partition is rather small, and SoftwareDistribution folder eats up too much disk space, follow these steps to move the SoftwareDistribution folder to a different location.
All in a cmd.exe shell (Start > Run > cmd and press enter). In this example the new location is D:\Windows-SoftwareDistribution.
-
Stop the Windows Update service:
net stop wuauserv -
Rename the folder
c:\Windows\SoftwareDistributiontoc:\Windows\SoftwareDistribution.old:rename c:\windows\SoftwareDistribution SoftwareDistribution.old -
Create a link using Windows Sysinternals Junction, or Windows mklink
-
Create the new directory:
mkdir D:\Windows-SoftwareDistribution -
Create the Junction:
c:\>junction C:\Windows\SoftwareDistribution "D:\Windows-SoftwareDistribution", or:
c:\>mklink /J C:\Windows\SoftwareDistribution "D:\Windows-SoftwareDistribution"
-
-
Restart the Windows Update Service:
net start wuauserv
When, after a while, everything seems to run and update fine, you can delete your SoftwareDistribution.old folder safely.
Move User Documents folder
Another way for you to gain some extra free space is to move the User Documents folder (and others, like Downloads), for instance from C:\Users\$USER$\Documents to D:\User\$USER$\Documents (substitute \(USER\) with the username whose Documents folder you want to move). Here are the steps for you to follow (screenshots taken from Windows Server 2016 TP5):
- Open Explorer and right click on the Documents folder and then Properties
- Choose Location
- Change the location where files are stored
- When the destination does not exist, Windows asks to create the folder for you
- After completion, files are moved to their new location.

Conclusion
Yes, the Windows component store (WinSxS folder) can become large, very large. But fortunately, Microsoft provides us the tools to monitor, manage and clean up the WinSxS folder to regain that used disk space.
If you are comfortable with installing the Desktop Experience Windows feature on your system, you can have the Disk Cleanup utility on your system. Otherwise, you can use the DISM (Deployment Image Servicing and Management) command for various clean up tasks.
To gain some extra free space, you can also move the Windows SoftwareDistribution folder to a different partition.
То же самое с предыдущим Windows версия, раздел диска в Windows Server 2019 не хватает места на диске, тоже. На диски данных, которые используются для резервного копирования или проектов, вы можете передавать файлы и изменять расположение вывода файлов на другие диски. Но к системному диску С это гораздо сложнее. В этой статье рассказывается, как освободить место на диске в Windows Server 2019 с помощью очистки диска и других методов, вы можете освободить место на диске C. Если вы не можете освободить достаточно свободного места, вам лучше добавить больше из других разделов.
Содержание:
- Run Windows Server 2019 Утилита очистки диска
- Дополнительные возможности по освобождению дискового пространства
- Добавьте больше свободного места на диск C
Run Windows Server 2019 Утилита очистки диска
То же самое с предыдущими версиями, Windows Server 2019 имеет встроенную утилиту «Очистка диска», помогающую освободить место на диске. Он может сканировать и удалять большинство ненужных и ненужных файлов на вашем диске. Я использую очистку диска от Windows XP, чей графический интерфейс и шаги остаются неизменными в течение 10 лет. Мне до сих пор нравится пользоваться этим родным инструментом, потому что он простой и быстрый, а самое главное безопасный.
Как освободить место на диске в Windows Server 2019 через инструмент очистки диска:
- Press Windows и R вместе на клавиатуре наберите cleanmgr и нажмите Enter.
- Выберите диск C: в раскрывающемся списке и нажмите кнопку ОК.
- Установите флажки для файлов, которые вы хотите удалить.
- Нажмите OK, и очистка диска начнет очищать ненужные файлы.
Если вы не хотите каждый раз выбирать файлы вручную, выполните следующие действия: очистить с помощью команды автоматически.
Мой тестовый сервер установлен недавно, поэтому нужно очистить несколько ненужных файлов. На серверах, которые работают долго, но никогда не очищают диск, вы получите гораздо больше свободного места. Если вы не можете получить более 20 ГБ свободного места, вы можете попробовать дополнительные методы, описанные ниже.
Дополнительные опции для освобождения дискового пространства в Windows Server 2019
1. Удалить теневые копии
Если вы включили теневое копирование, вы можете удалить предыдущие копии.
- Открыть окно проводника
- Щелкните правой кнопкой мыши диск C и выберите НЕДВИЖИМОСТИ
, а затем переключитесь на Теневые копии. - Выберите предыдущие копии и нажмите Удалить сейчас.
2. Сбросить корзину
Все файлы, которые были удалены нажатием клавиши DEL без клавиши SHIFT, попадут в корзину, где вы можете вручную вернуть эти файлы в исходное местоположение, если удалили их по ошибке. По умолчанию в корзине используется часть пространства диска C, поэтому больше файлов в корзине означает меньше свободного места на диске C.
Вы можете изменить расположение корзины на другой большой раздел.
- Щелкните правой кнопкой мыши Корзина.
- Выберите диск для корзины.
- Выберите размер клиента и введите сумму.
3. Сбросить файл страницы
Файл подкачки использует часть дискового пространства в качестве виртуальной памяти и по умолчанию находится на диске C. Вы можете изменить его на другой раздел, когда диск C заканчивается. шаги:
- Press Windows и R на клавиатуре, чтобы запустить Run.
- Тип sysdm.cpl, 3 и нажмите Enter.
- Нажмите Настройки под выступлением в Фильтр меню.
- Нажмите Изменить под виртуальной памятью.
- Снимите флажок Автоматически управлять размером файла подкачки для всех дисков в верхней части.
- Выберите D: или другой диск, введите количество начального размера и максимального размера в Размер клиента переключатель, а затем нажмите Поставьте.
- Выберите C: диск и выберите Нет файла подкачки переключатель, затем нажмите Set.
- Нажмите OK, (Может потребоваться перезагрузка, чтобы повлиять)
4. Удаление приложений
Вы можете удалить некоторые программы, которые вы больше не используете или которые были предварительно установлены на вашем компьютере от производителя. шаги:
- Откройте Настройки
- Нажмите Мини аппы > Приложения и возможности
- Нажмите на элементы, которые вы хотите удалить, и нажмите Удалить.
5. Сохранить файлы в новом месте
Вы можете изменить места сохранения по умолчанию для приложений, документов, музыки, изображений и видео в другое место, чтобы новые типы файлов были сохранены в других разделах.
- Откройте Настройки.
- Нажмите Система> Память.
- В разделе «Дополнительные настройки хранилища» нажмите Изменение, где сохраняется новый контент.
- Нажмите раскрывающееся меню, чтобы выбрать новое местоположение.
6. Изменить расположение вывода
Все программы установлены на диск C по умолчанию, и многие из них выводят туда файлы. Программы для видео и проектов, а также некоторые Windows сервисы выводят много больших файлов, поэтому лучше изменить расположение вывода по умолчанию на другие большие диски.
7. Включите смысл хранения
Хранение Sense может автоматически освобождать дисковое пространство, когда на диске не хватает места. Он может удалять временные файлы и файлы в корзине и папке загрузок. Чтобы включить Storage Sense в Windows Server 2019:
- Откройте Настройки
- Перейдите на Система > Память
- Выключите и включите под Storage Sense на правой стороне.
Добавить больше свободного места из других разделов
Если вы выполните поиск в Google, вы можете найти более 10 способов освободить место в Windows Server 2019/2022. Конечно, вы можете попробовать все из них, если у вас много времени. Но чтобы получить достаточно свободного места на диске C, наиболее эффективным методом является движущееся свободное пространство с других разделов.
Разделы уже выделены, но вы можете изменить размер раздела без потери данных. Запустите программное обеспечение для создания безопасных разделов, чтобы уменьшить большую перегородку и получить нераспределенное пространство на том же диске. Затем добавить нераспределенное пространство на диск C. Таким образом, на диске C снова будет много свободного места, операционная система, программы и все остальное останется прежним.
Скачать NIUBI Partition Editor и следуйте инструкциям в видео:

- Это программное обеспечение предназначено для работы в виртуальном режиме, реальные разделы диска не будут изменены до щелчка Применить , чтобы подтвердить действие.
- Если вы используете какие-либо типы оборудования RAID массивы, не разбивайте массив и не выполняйте никаких операций с ним RAID контроллер, просто следуйте инструкциям в видео.
- Если весь диск заполнен, выполните следующие действия. клонировать диск на больший и добавьте дополнительное место на диск C.
Помимо сокращения и расширения перегородок, NIUBI Partition Editor помогает выполнять многие другие операции по управлению дисками и разделами.
Скачать
One of my Windows Server 2012 R2 ran out of space. A quick folder analysis using the free portable tool TreeSize revealed that both Windows.old and WinSxS folders are the ones taking most of the spaces.

On Windows desktop systems, both folders are easy to clean up with the built in tool Disk Cleanup Utility. But, it’s not the case in Windows Server, especially the more recent versions like 2012 R2. You probably could enable Desktop Experience feature to bring back the Disk Cleanup Utility but it won’t guarantee to clean up these two giant folders managed by the system upgrades and updates. If you are facing the same challenge as I do, here are the options you can take away.
WinSxS, aka Windows component store, contains all the files required for a Windows installation as well as any updates to those files within the component store. Therefore, the folder could become quite big over time. Because it’s associated with system installation it’s not a good idea just simply deleting the folder. Rather, utilizing a command-line tool called DISM, Deployment Image Servicing Management, is way more appropriate. It has a parameter /cleanup-imagethat provides a few more advanced options to reduce the size of the WinSxS folder.
First of all, you can run the following to analyze the component store to see what’s included in there.
dism /online /cleanup-image /AnalyzeComponentStore

Then, run the following to remove superseded and unused system files from the system and reset the base so all existing updates cannot be removed after the command is completed.
dism /online /cleanup-image /StartComponentCleanup /ResetBase
It didn’t clean up a whole lot in my case, only claimed back a little over 1 GB space.
Note: If you are somehow still using Windows Server 2008 R2, installing KB2852386 after enabling Desktop Experience feature makes things a lot easy to clean up right with the Disk Cleanup Utility tool.
How to clean up WinSxS folder on Windows 2008 R2
How to clean up Windows.old on Windows Server 2012 R2
With Disk Cleanup out of the equation, manual cleanup seems to be the option left. Thanks to this Q&A at ServerFault, here is what I did to bring back over 50 GB of storage space.
First of all, run Sysinternals junction.exe utility to get a list of all junctions in a text file, junc.txt on my desktop.
junction.exe -s -q c:\windows.old > %UserProfile%\desktop\junc.txt
Then, run the following script in PowerShell to remove all junction points and single symbolic links on the system.
foreach ($line in [System.IO.File]::ReadLines("$env:userprofile\desktop\junc.txt"))
 {
     if ($line -match "^\\\\")
     {
         $file = $line -replace "(: JUNCTION)|(: SYMBOLIC LINK)",""
         & $env:userprofile\desktop\pstools\junction.exe -d "$file"
     }
 }
Replace with the correct path for junction.exe utility and the junc.txt files, if needed.
Once that’s done, run the following to take over ownership of the windows.old folder.
takeown /f c:\windows.old /r /d y
And reassign the full control rights to everyone.
cacls c:\windows.old /t /g everyone:F
Then, finally to remove the whole folder.
rmdir /s /q c:\windows.old
It may take a little while for the command to complete but once it’s done you will be so delighted to see how much space you just brought it back to life. Enjoy.
Summary
This page is about how to cleanup Winsxs directory and free up hard disk space on Windows server 2008/2012/2016/2019/2022 sbs 2011.
Table of Contents
- What is Winsxs — what does it do
- Winsxs Cleanup for 2008/2012/2016/2019/2022 SBS 2003/2008/2011
- Third-party Disk Management Software: IM-Magic Partition Resizer Server Edition
Winsxs folder — what does it do
The windows server 2008 SBS and its latest versions i.e. 2012 and 2016 features an operating system with a WinSxS file to deal with the core functions of OS. The system files contained in the WinSxS are linked as per the default windows directory structure. These files in the windows directory can be further linked from different locations. Gradually, the WinSxS folder starts to consume more and more space in the system partition and c-drive becomes full .
Is it safe to delete Winsxs folder?
Well, here I present different ways for cleaning the winsxs folder that may help in extending the c-drive space. Note that it is not recommended to delete the WinSxS folder itself, and don’t ever think about doing it manually. Deleting so may cause the operating system crash or BSOD (Blue screen of death) error.
Winsxs Cleanup for 2008/2012/2016 SBS 2003/2008/2011
Disk cleanup is not enabled in Windows Server, you need to get it activated at first with the following steps.
Video — how to enable disk cleanup on Windows Server OS.
This above video also includes a tutorial for winsxs cleanup server 2008/2012 without desktop experience.
Follow the steps to start the WinSxS Cleanup Wizard
#1, First, add the Desktop Experience Feature to the server
For this, go to the Server Manager and click on “Add Features”
#2, Select the Desktop Experience Feature and install it.
#3, Then search for the Disk Cleanup utility in Windows search column
#4, Click on the Disk Cleanup Utility and select the WinSxS drive(C drive)
#5, Run the Disk Cleanup and re-scan the drive by selecting “Select System Files”
After the rescan, you will see the two options Windows Update Cleanup and Serve Pack Backup Files.
Clean these files and the Disk Cleanup will safely remove the WinSxS files from the computer
Video — how to clean up winsxs using disk cleanup or cmd
You may use Disk cleanup to remove winsxs folder or temp files or Windows update files on Server 2008/2012/2016, or you may also use the following cmd to clean winsxs folder.
Dism /Online /Cleanup-Image /AnalyzeComponentStore
Dism /Online /Cleanup-Image /StartComponentCleanup
Note that after cleaning the WinSxS using the Disk Cleanup, you will not be able to turn back to an older server version. Moreover, this method also includes a risk of data loss. Cleaning winsxs may save up to 10GB disk space at most, if you want to add more disk space to c drive, Partition Resizer is able to help add as much space as the disk has from another volume.
For example, you may add 100GB from another volume to c drive with Partition Resizer without losing data or reinstalling OS.
Better Solution: To combat these problems, try using a third-party software Partition Resizer to defrag disk or resize partition Windows server such as 2008.
Safe Disk Management Software: IM-Magic Partition Resizer Server Edition
Why should you use a third-party disk management software? Well, the answer to this question is because these dedicate software provides high-grade data security and are easier to use – IM-Magic Partition Resizer being one of them.
IM-Magic Partition Server Edition is one of the best disk management utilities that help to manage, shrink, extend, create, copy, delete, and most of all clean up the WinSxS folder C drive by defragment.
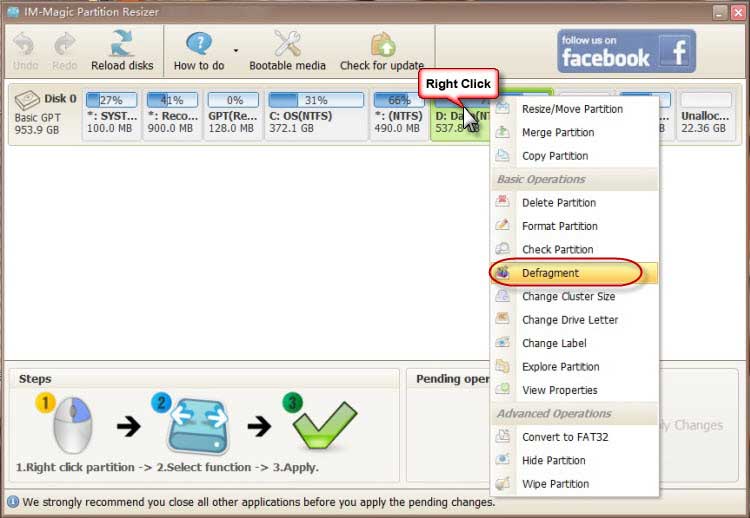
Defragment on C drive would with Partition Resizer would help remove temp files and winsxs files if you right click c drive -> Defragment
There is no need to take hours of backup because IM-Magic has got you covered in every possible way. It is a Windows Server 2008/2012/2016/2019/2022 supported disk management software ensuing 100% data security during all disk operations. Make sure to use the Server Edition of IM-Magic to avail advanced options to manage your partitions effectively.
Video: How to Allocate Disk Space with Partition Resizer
[Guide] Steps to extend volume without data loss
This step by step guide will show you the right way to extend any volume using IM-Magic Partition Resizer Unlimited edition.
Step-1 Download install, and launch the program.
Step-2 Right click the large volume to produce unallocated free space.
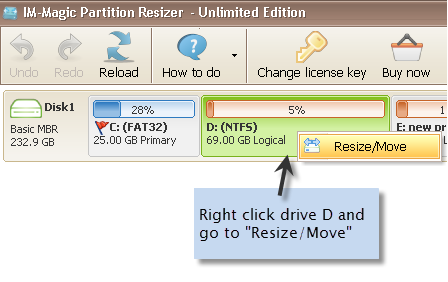

Steps to resize your disk partition
Step-3 Then right click c and drag the border to acquire the free space.
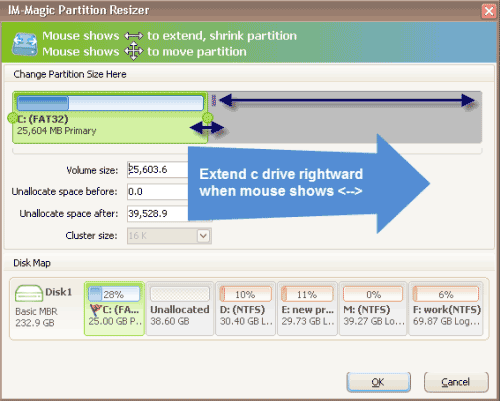
Resize partitions with IM-Magic Partition Resizer
Steps to resize your disk partition
Step-4 Apply the changes.
Also read: how to clean up disk Windows server 2012; or how to extend c drive for server 2012
FAQs
Q: Server 2008 r2 cleanup windows update files
A: Winsxs cleanup server 2008/2012/2016 may count on Disk Cleanup utility if you enable it in service manager that could remove Windows update files at the same time if you click c drive to clean up.
Q: dism /online /cleanup-image /spsuperseded server 2008 r2
A: When cmd reported errors, you may need to enable Disk Cleanup in service manager. Or if powershell cmd could not help cleanup disk for Server 2008, you may use IM-Magic Partition Resizer to defrag disk with its right click option «Defragment».