
Способ 1: Ручная очистка
Ручной способ очистки папки «AppData» подразумевает удаление временных файлов из указанной директории. Но первостепенно ее необходимо открыть в файловом менеджере. Сделать это можно несколькими способами, каждый из которых подробно описан в другой статье на нашем сайте. При необходимости ознакомьтесь с ней, перейдя по ссылке ниже.
Подробнее: Где находится папка «AppData» на Windows 10

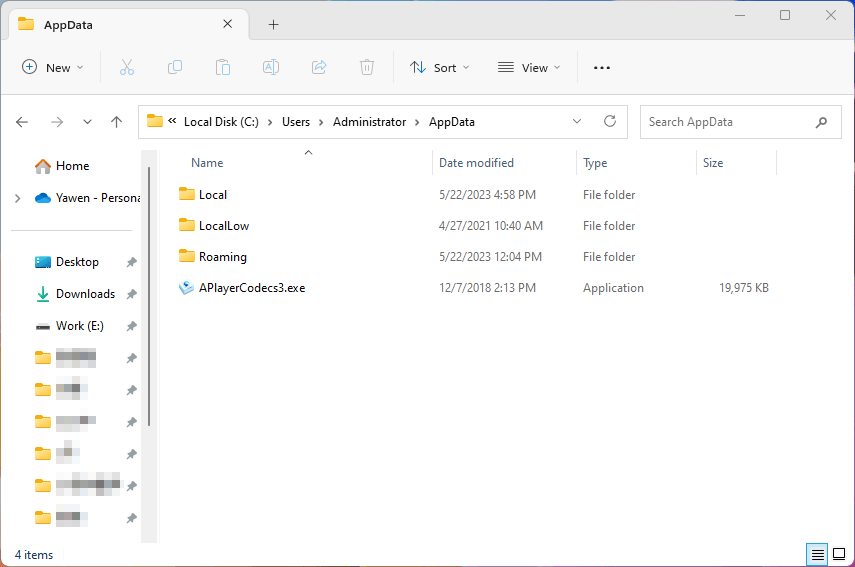
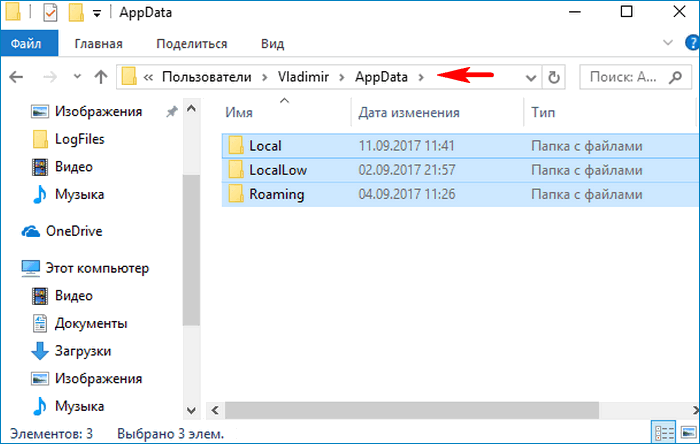
После того как вы войдете в директорию «AppData», перед вами будет находиться три дополнительных каталога, в которых хранятся пользовательские данные установленных на компьютере приложений.
Важно! Удалять эти папки нельзя, так как это приведет к проблемам в работе не только программ, но и операционной системы в целом.
В каждом вложенном каталоге, который соответствует какому-то приложению или игре, есть папка со временными данными. Именно они являются «мусорными», по факту бессмысленно занимая место на диске компьютера. Чтобы вручную не искать каждую директорию, лучше всего воспользоваться поисковой строкой, расположенной в верхнем правом углу окна «Проводника». Сначала необходимо найти все каталоги с названием «Temp» (без кавычек). Введите его в поле поиска и нажмите Enter.
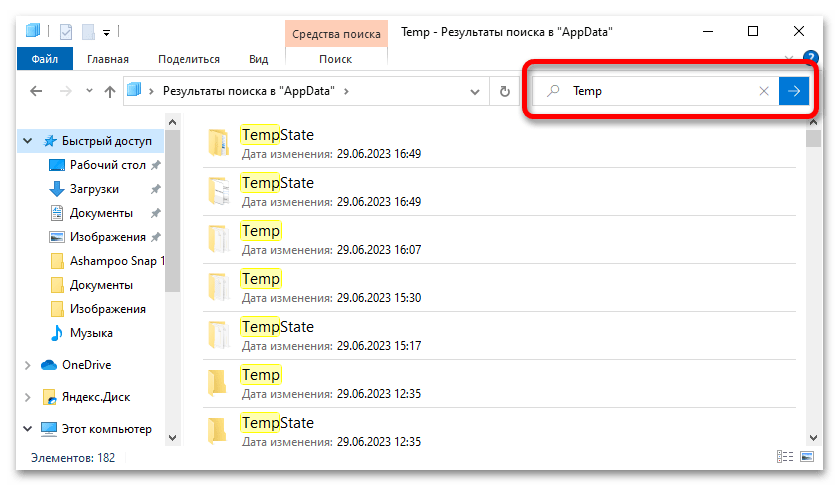
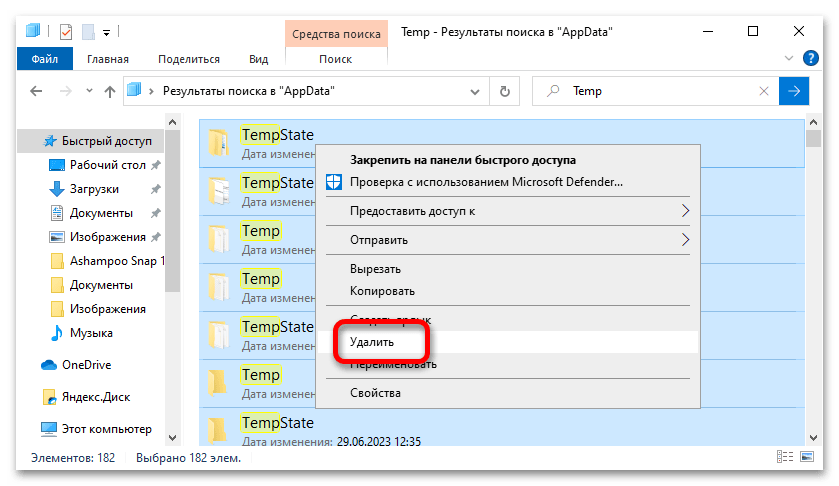
Обязательно дождитесь полного завершения процедуры поиска. За ходом ее выполнения можно следить непосредственно в адресной строке. В результате выделите все найденные папки, воспользовавшись сочетанием клавиш Ctrl + A. Теперь их можно удалить. Кликните по любому из элементов правой кнопкой мыши и в появившемся контекстном меню выберите пункт «Удалить».
В процессе выполнения операции по удалению будут появляться разные диалоговое окна. В некоторых из них нажимайте по кнопке «Пропустить», предварительно установив отметку напротив пункта «Выполнить для всех текущих элементов». Дело в том, что определенные директории в настоящее время открыты в других программах, поэтому их удаление невозможно.
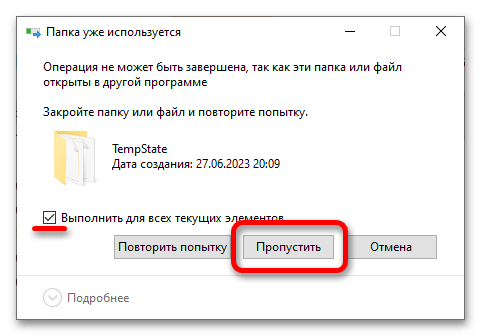
Обратите внимание! Если появится диалоговое окно, сообщающее, что удаление этой директории требует наличия прав администратора, предоставьте их, щелкнув по кнопке «Продолжить».
В конечном результате большая часть директорий, которые содержат в своем названии слово «Temp», будет удалена, оставшиеся очистить не удастся, так как они важны для системы или для какой-то запущенной в данный момент программы.
После удаления папок с именем «Temp» необходимо сделать то же самое с директориями, которые в своем названии содержат слово «Cache» (без кавычек). Все действия аналогичны — воспользуйтесь поиском в верхнем правом углу, а после выделите все найденные элементы посредством сочетания клавиш Ctrl + A и удалите их через контекстное меню.

Примечание! Удаленные описанным способом данные помещаются в «Корзину», а не удаляются с компьютера полностью. Чтобы освободить место на диске, потребуется ее очистить.
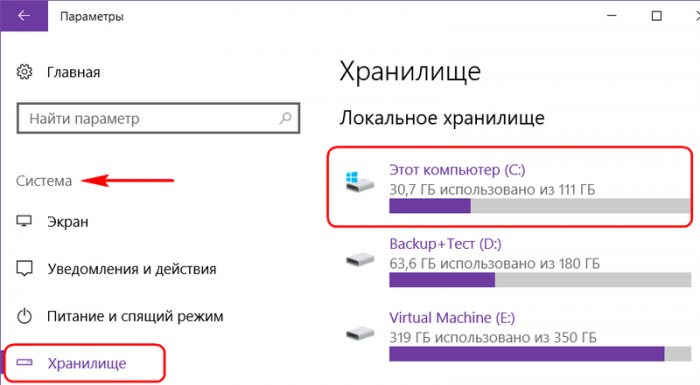
После этого перейдите в хранилище Windows 10 и уже оттуда удалите оставшиеся временные файлы программ. Все действия производятся в настройках:
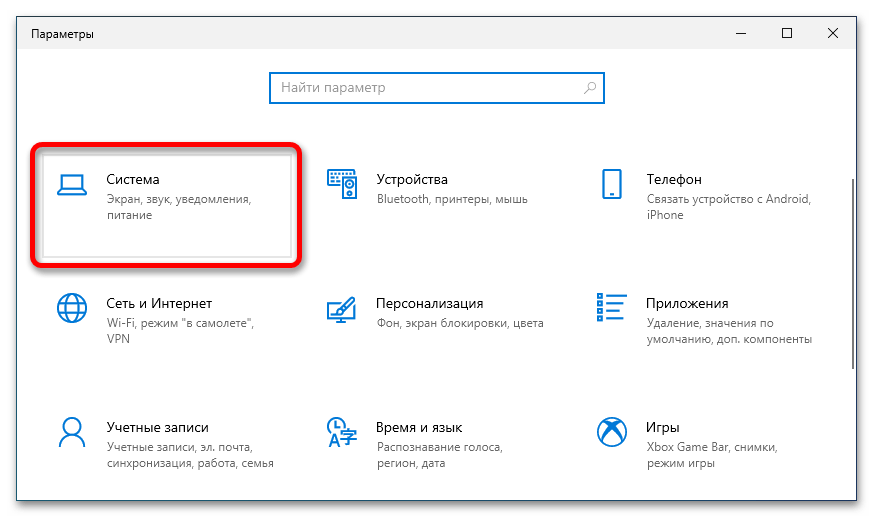
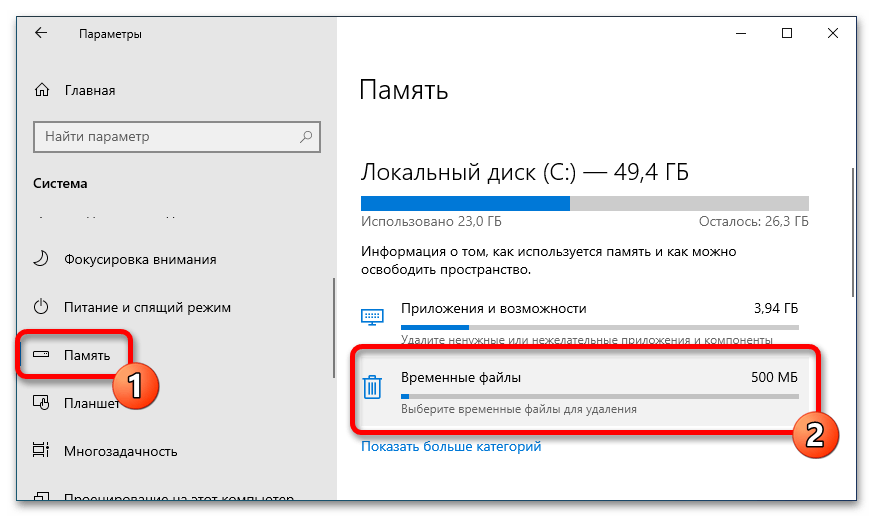
- Откройте системные параметры любым доступным способом. Например, сделать это можно через контекстное меню кнопки «Пуск». Щелкните по ней правой кнопкой мыши и выберите пункт «Параметры».
Читайте также: Как открыть «Параметры» в Windows 10
- В открывшемся окне проследуйте в раздел «Система», щелкнув по одноименному элементу левой кнопкой мыши.
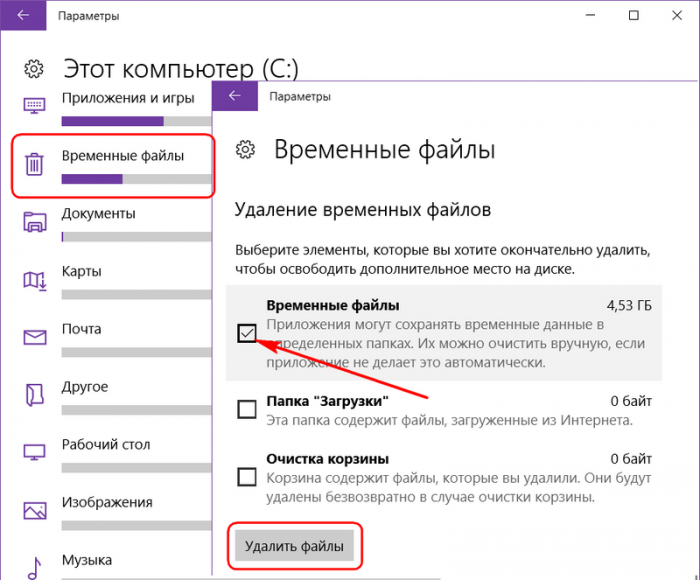
- Воспользовавшись навигацией в левой части, перейдите во вкладку «Память», после чего в основном меню щелкните по кнопке «Временные файлы».
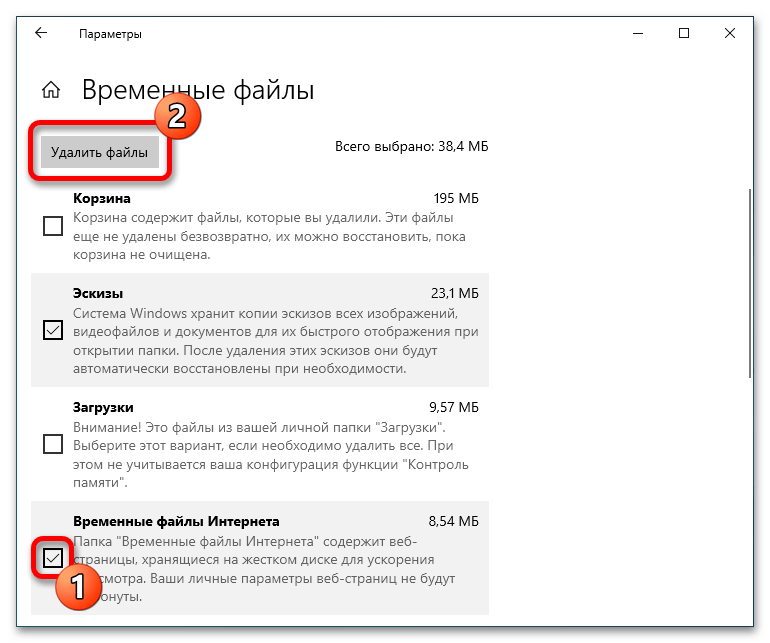
- Дождитесь завершения сканирования, затем убедитесь, что галочкой отмечен пункт «Временные файлы». Далее нажмите по кнопке «Удалить файлы», расположенной в верхней части окна.

Обратите внимание! Вы также можете отметить оставшиеся пункты в списке, чтобы освободить как можно больше места на системном диске.
- Дождитесь завершения процедуры очистки временных файлов. Об этом будет свидетельствовать соответствующая надпись над кнопкой «Удалить файлы».

Способ 2: Сторонний софт
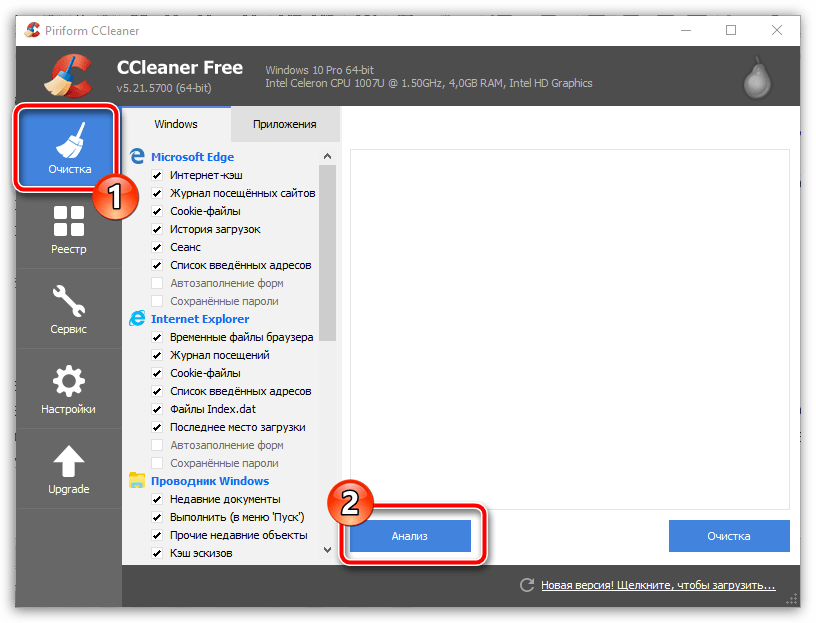
Самостоятельная, ручная очистка директории «AppData» занимает довольно много времени, значительно быстрее это можно сделать с помощью программного обеспечения от сторонних разработчиков. Хороший пример — CCleaner, предназначенный для удаления «мусорных» файлов с компьютера и оптимизации операционной системы. Эта программа содержит не только инструменты для удаления временных данных приложений, но обладает и многими другими полезными функциями.
На нашем сайте есть отдельная статья, в которой подобно рассматривается способ очистки компьютера с помощью этого приложения, рекомендуем с ней ознакомиться.
Подробнее: Как очистить компьютер от мусора с помощью программы CCleaner
Примечание! Очистка папки «AppData» зачастую является частью процедуры оптимизации операционной системы, что в конечном итоге приводит не только к освобождению большого объема внутренней памяти компьютера, но и к повышению его быстродействия. Если вы хотите завершить эту процедуру, не ограничиваясь только папкой «AppData», рекомендуем ознакомиться с другой статьей на нашем сайте, перейдя по ссылке ниже.
Подробнее: Увеличение производительности компьютера на Windows 10
Наша группа в TelegramПолезные советы и помощь
If the AppData folder is taking up too much space on your PC, it’s time to clean up the AppData folder. Here are some ways to help you make AppData cleanup on your Windows computer. If you delete some files by mistake, you can use MiniTool Power Data Recovery to get them back.
What Is the AppData Folder?
The AppData folder is a location where the app data and settings are saved. Every Windows computer has an AppData folder on the C drive. The path of the AppData folder is C:\Users\[UserName]\AppData.
The AppData folder is a hidden folder by default. If you can’t find this folder in the C drive, you can go to View > Show and select Hidden items on Windows 11 or go to View and select Hidden items on Windows 10. This will make your system show the hidden files and folders, including the AppData folder.
AppData Folder Is Taking up Much Space on Drive C
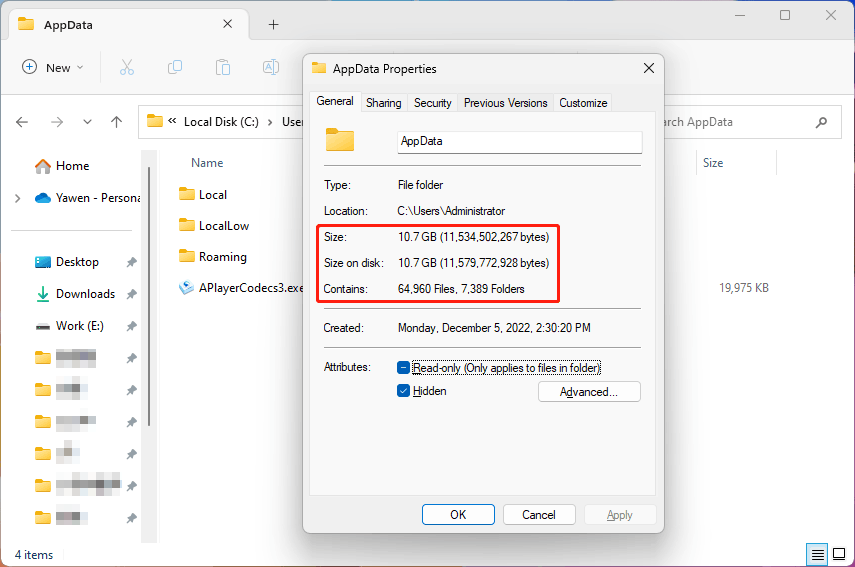
As time goes by, the AppData folder will take up some GBs of space on drive C. This is a common situation. For example, the size of the AppData folder on my PC is 10.7 GB. As you know, too many files in drive C will slow down the system, causing performance issues.
You can choose to clean up the AppData folder to free up disk space for your system drive. In the following part, MiniTool Software will introduce some ways to safely clean up the AppData folder.
How to Clean up The AppData Folder?
Is it safe to directly delete the AppData folder?
It is not safe to delete all files in the AppData folder or directly delete the AppData folder. The files in the AppData influence the apps that are currently installed on your PC. Deleting these files will remove the saved data, user information, and settings of the apps. This may cause apps not to work or other issues.
However, the temporary files in the AppData folder can be safely removed. Here are 3 ways to remove temporary files from the AppData folder to help free up space on the C drive.
Way 1: Manually Delete Files from the AppData Folder
The temporary files of the apps are saved to a Temp folder in the AppData folder. You can delete all files in that folder.
Step 1: Press Windows + R to open Run.
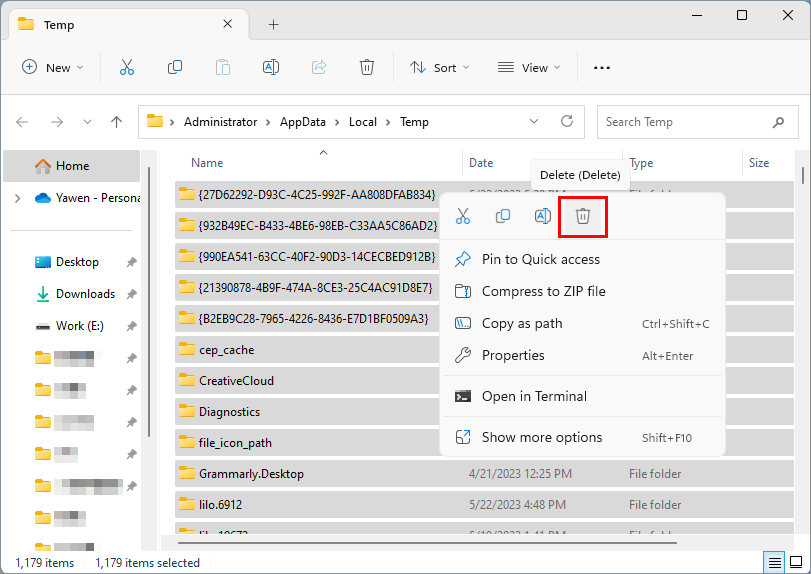
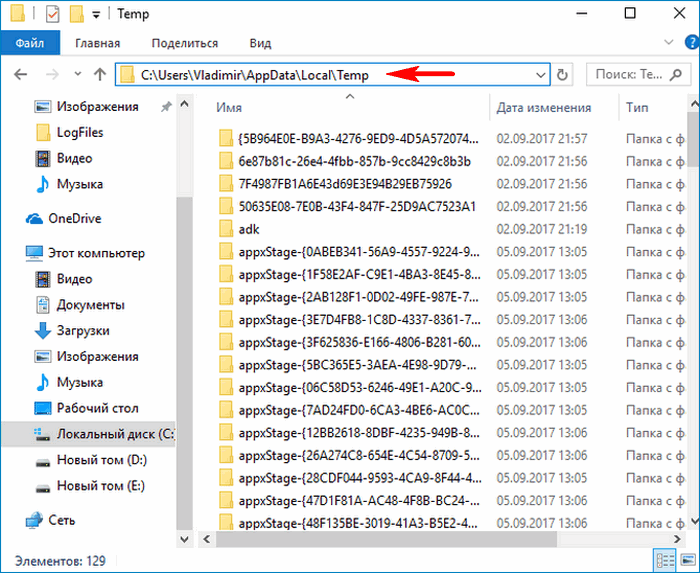
Step 2: Type %LOCALAPPDATA%\Temp into the Run dialog and press Enter. This will navigate to the Temp folder in the AppData folder. These are some temporary files and they are safe to delete.
Step 3: Press Ctrl + A to select all files in the Temp folder. Then, right-click the selected files and select Delete to delete them. You can also directly click the Delete key on your keyboard to delete them.
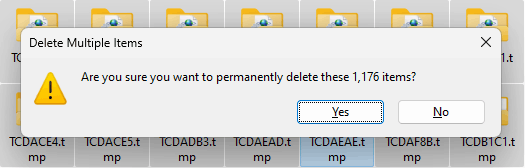
In this step, you can also choose to permanently delete the temporary files: after right-clicking all the selected files in the Temp folder, you can press and hold the Shift key and then click the Delete option from the context menu. Then, a warning window will pop up, saying Are you sure you want to permanently delete these **** items? You need to click the Yes button to delete these files bypassing the Recycle Bin.
Step 4: If you haven’t permanently deleted the temporary files, the files will be moved to Recycle Bin and they are still occupying disk space on the C drive. You need to empty Recycle Bin to get the free space.
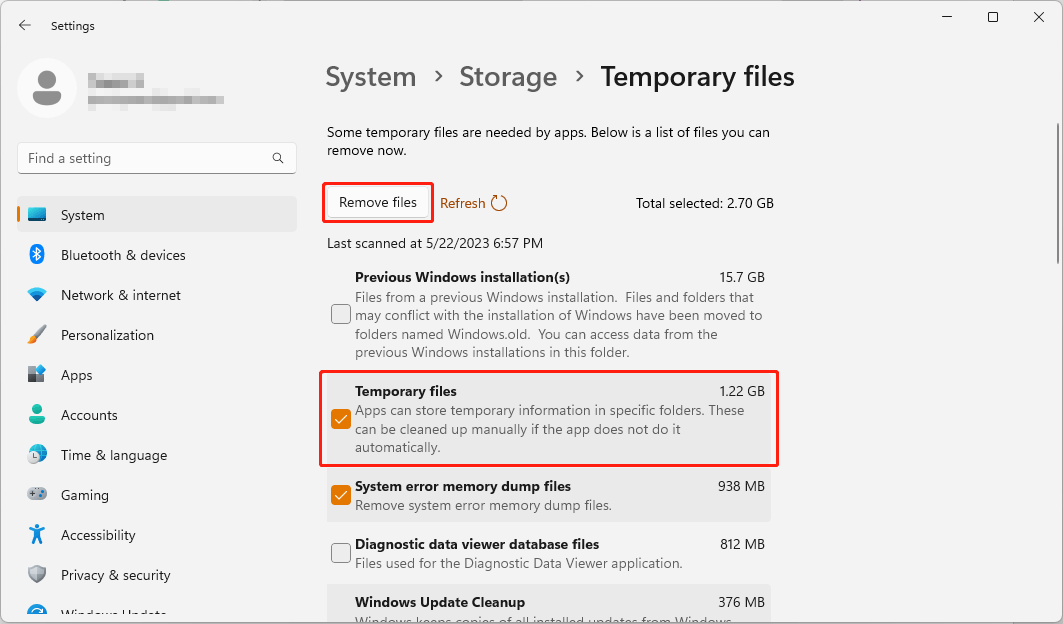
Way 2: Use the Storage Feature in the Settings App
Windows has some built-in features for you to clean up the temporary files in the AppData folder. Storage in the Setting app is one such tool. It can find out unnecessary temporary files and allows you to remove them.
Step 1: Press Windows + I to open the Settings app.
Step 2: Go to System > Storage.
Step 3: Click Temporary files to open the next page.
Step 4: Make sure the Temporary files option is selected, then click the Remove files button. This can help clean up the temporary files in the AppData folder. You can also delete other types of unnecessary files in this step to free up more disk space.
Way 3: Use the Windows Snap-in Disk Cleanup Tool
Disk Cleanup is a Windows built-in cleanup tool that can help you remove junk files from your computer. It can also do AppData cleanup for you. Here is how to use this tool to clean up the AppData folder:
Step 1: Type cleanup into the search box and select Disk cleanup from the search result to open this tool.
Step 2: C drive is selected by default. Click the OK button to start scanning that drive for junk files and temporary files.
Step 3: When you see the Disk Cleanup for (C:) interface, scroll down to select Temporary files. Of course, you can also select other junk files to delete in this step.
Step 4: Click OK when the process ends.
No matter which methods you use, the temporary files in the AppData folder will be removed and your C drive will have more free space.
Recover Temporary Files Deleted by Mistake
As mentioned above, some temporary files are needed by apps and you should not delete them from the AppData folder. However, you may delete the necessary temporary files by mistake and then the corresponding application gets into trouble. You can restore the mistakenly deleted temp files to make everything go back to normal.
Here are two simple ways to restore the deleted temporary files:
- If the files are not permanently deleted, you can directly restore them from Recycle Bin.
- If the files have been permanently deleted, you can use professional data recovery software to get them back.
Now, we will talk about how to recover temp files using these two methods.
Way 1: Restore Deleted Temp Files from Recycle Bin
Step 1: Open Recycle Bin from the desktop.
Step 2: Find the temp files that need to be restored and select them. Here is a tip: you can find where the deleted files were previously saved under the Original Location volume.
Step 3: Right-click the selected files and select Restore.
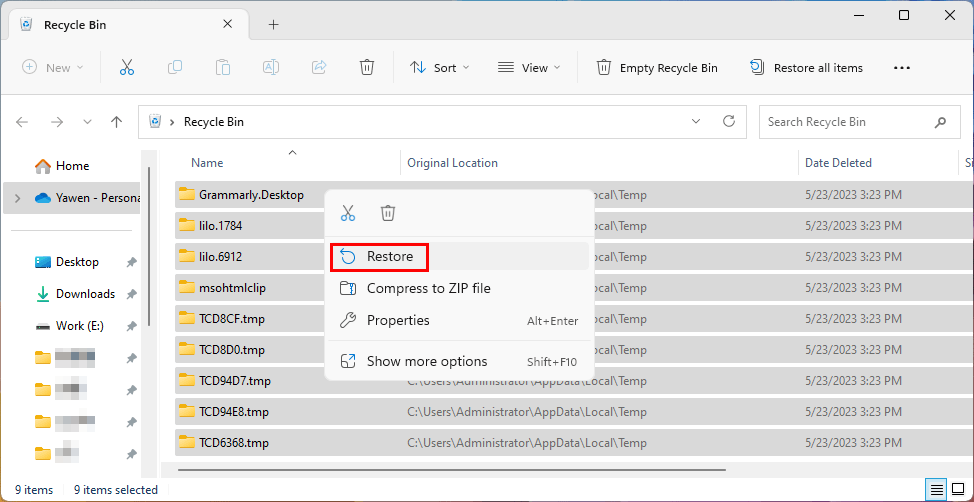
The selected files will be directly restored to the Temp folder in the AppData folder.
Way 2: Use MiniTool Power Data Recovery to Recover the Permanently Deleted Temp Files
If you have permanently deleted these files, you need to use professional data recovery software to get them back. MiniTool Power Data Recovery, the best free data recovery software for Windows, is worth trying.
This software is specially designed to recover all kinds of files from different storage devices like computer internal hard drives, external hard drives, SSDs, memory cards, USB flash drives, SD cards, and so forth.
This software also has some other useful features. For example, it can recover data from a special location like the desktop, Recycle Bin, or a specific folder.
With the free edition of this MiniTool software, you can scan the C drive and check if it can find your needed files. You can also recover no more than 1 GB of files with the free edition. Why not try this freeware before you make a further decision.
MiniTool Power Data Recovery FreeClick to Download100%Clean & Safe
Note:
No matter which data restore tool you use, it can recover deleted files that are not overwritten by new data. MiniTool Power Data Recovery is not an exception. So, you’d better not install the software onto the C drive to prevent the deleted temp files from being overwritten and becoming unrecoverable.
It is very easy to recover deleted files using this software. After downloading and installing this data restore tool on your PC, you can use these steps to rescue your files.
Step 1: Open the software to enter its main interface.
Step 2: The software will display all partitions it can detect under the Logical Drives tab. The AppData folder is in the C drive. So, you can move your mouse cursor to the C drive and click the Scan button to start scanning this drive.
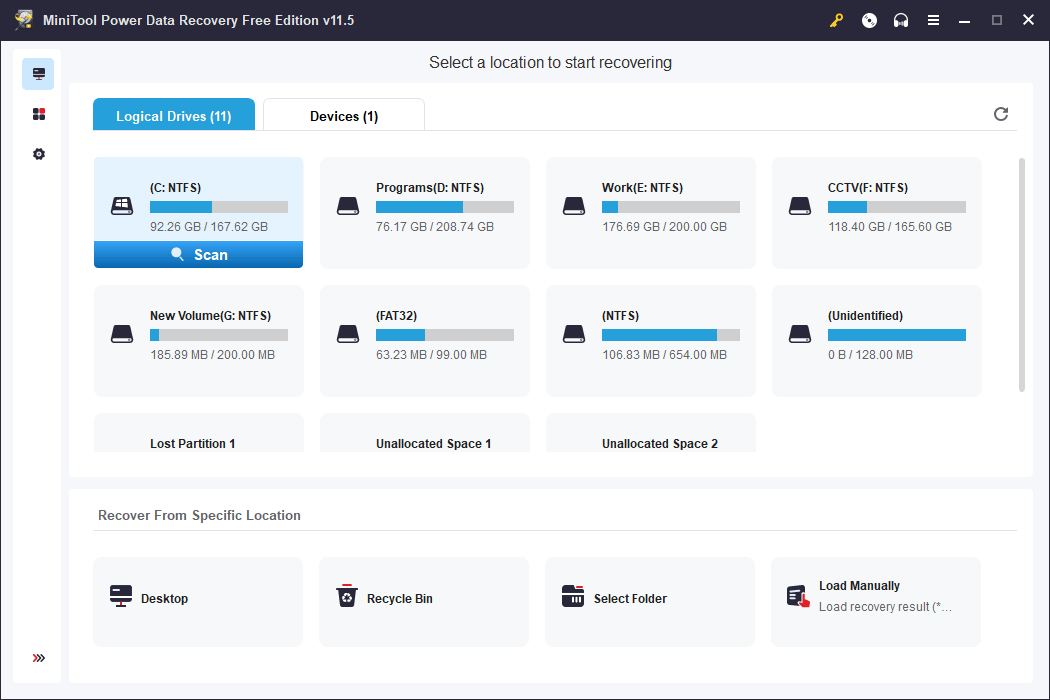
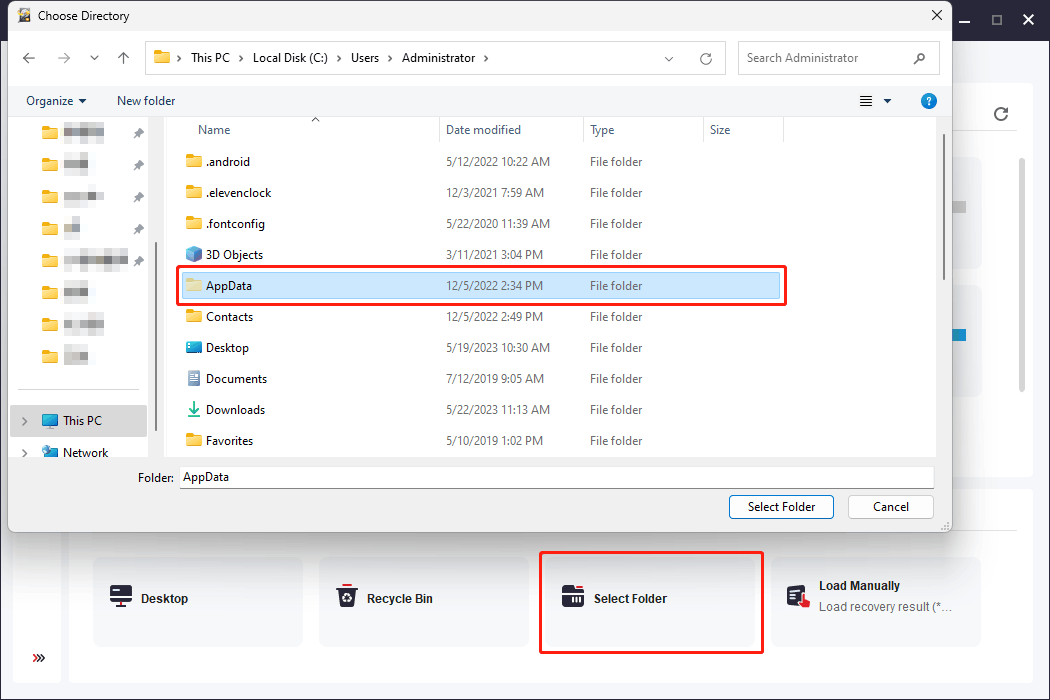
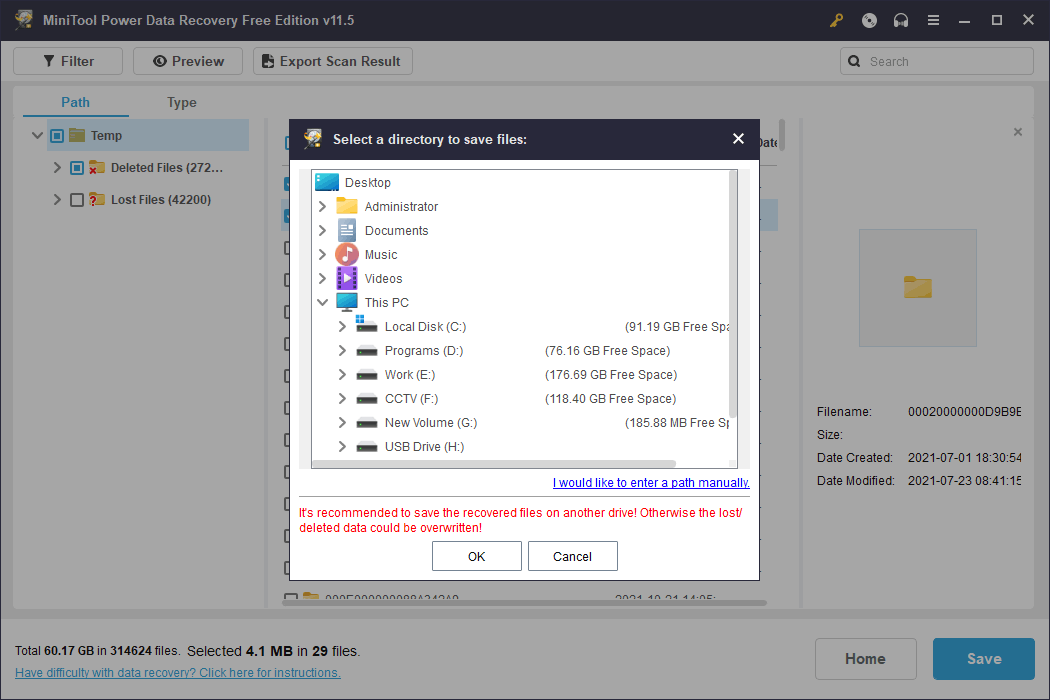
You can also directly recover deleted files from the AppData folder using this software, which can save a lot of time for you. Here is what to do: click Select Folder under the Recover From Specific Location section, then select the AppData folder from drive C, and click the Select Folder button to start scanning the Temp folder.
If the deleted temp files have stayed in Recycle Bin before they were permanently deleted, you can also choose to recover data from Recycle Bin.
Step 3: Wait patiently until the whole scanning process ends. This can guarantee that you get the best data recovery effect. After scanning, this software will list all found files by path by default. You can open each path to find your needed files.
If you know the name of the file you want to recover, you can enter the filename or part of the filename into the search box and press Enter to directly locate the file.
Step 4: Check the files you want to recover, then click the Save button and select a suitable location to save the selected files. In this step, you should not save the files directly to the Temp folder because this can overwrite other deleted files.
After you are sure everything you need is recovered, you can move the selected files to the Temp folder.
MiniTool Power Data Recovery FreeClick to Download100%Clean & Safe
If you want to use this software to recover more than 1 GB of files, you need to use a full edition. You can go to MiniTool’s store to select a suitable edition. If you are a personal user, the Personal Ultimate edition can fully meet your needs.
An Alternative Data Restore Tool: Windows File Recovery
Of course, MiniTool Power Data Recovery is not the only choice to recover deleted and lost files on Windows. You can also use Windows File Recovery, a free file recovery tool designed by Microsoft, to retrieve deleted files. This tool is not preinstalled on your PC. You need to first download it for further use.
However, if this method is suitable for advanced users because it needs to run special and complex winfr commands to recover deleted data.
>> See how to use Windows File Recovery to recover deleted data.
Back up Your Computer to Safeguard It
Data loss issues always happen unexpectedly. You’d better back up your computer (including files and system) to safeguard it.
MiniTool ShadowMaker is a good choice. This is a professional Windows backup software, which has many useful features. For example, it supports schedule and event trigger backup, and differential and incremental backup schemes. You can use it to back up files, folders, partitions, disks, and systems. It also supports files and folders sync.
This software has a trial edition, which allows you to experience all feature for free within 30 days.
MiniTool ShadowMaker TrialClick to Download100%Clean & Safe
Bottom Line
It is a good idea to cleanup the AppData folder by deleting the unnecessary temporary files. This article introduces 3 ways to do this job. You can select one way accordingly. If unfortunately, you deleted some temporary files by mistake, you can restore them from Recycle Bin or using MiniTool Power Data Recovery.
If you encounter issues when using MiniTool software, you can contact [email protected] for help.
Удаление или перемещение файлов в папке AppData может потребоваться, если вам необходимо восстановить поврежденные файлы или освободить место на диске. Однако стоит быть очень осторожным, так как даже один неверный шаг может привести к серьезному повреждению программ.
Сначала просмотрите скрытые файлы в Windows. Как сама папка AppData, так и некоторые документы, содержащиеся в ней, спрятаны от пользователей.
Можно ли удалять файлы из папки AppData
Windows скрывает AppData не просто так: именно в этой папке, среди прочего, находятся важные программные файлы. Поэтому при работе с ней нужно проявлять особую осторожность. Если вы случайно удалите не тот файл, это может привести к сбою в одной программе или даже во всей вашей системе.
Чтобы не ошибиться, лучше всего оставить нетронутыми любые папки, связанные с Windows или Microsoft. Кроме того, не стоит удалять или изменять файлы от производителей процессоров и видеокарт, таких как NVIDIA, Intel или AMD. В основном это файлы видеокарт, которые гарантируют, что компоненты системы, в также все программы отображаются правильно.
Прежде чем вносить какие-либо серьезные изменения, создайте резервную копию системы. Таким образом вы защитите себя от полной потери данных, если что-то пойдет не так.
Безопасная альтернатива: автоматическая очистка папки AppData
Если вы хотите просто освободить место на диске, лучше всего оставить эту задачу Windows или специально разработанным программам. В системе от Microsoft есть встроенная функция для этого: найти и удалить ненужные системные файлы можно с помощью очистки диска. Как это работает, мы рассказывали в отдельной статье.
Кроме того, существуют программы для оптимизации системы, например, CCleaner также быстро удаляет ненужные файлы.
Читайте также:
- Как выбрать материнскую плату для компьютера: лучшие модели в 2020 году=«content_internal_link»>
- Достойные ноутбуки до 40 000 рублей: что купить в 2020 году?=«content_internal_link»>
Cleaning the AppData folder in Windows 10 can help improve your computer’s performance by removing unnecessary files and freeing up storage space. This folder contains data created by installed applications, including caches, settings, and temporary files. By following a few easy steps, you can safely clear out this folder without affecting your system’s functionality.
In this section, we’ll go through the steps to safely clean your AppData folder in Windows 10. These steps aim to help you identify and delete unnecessary files while keeping important data intact.
Step 1: Open the Run dialog box
Press the Windows key + R to open the Run dialog box.
This is the easiest way to access the Run dialog box. It’s a quick shortcut that works on all Windows 10 systems.
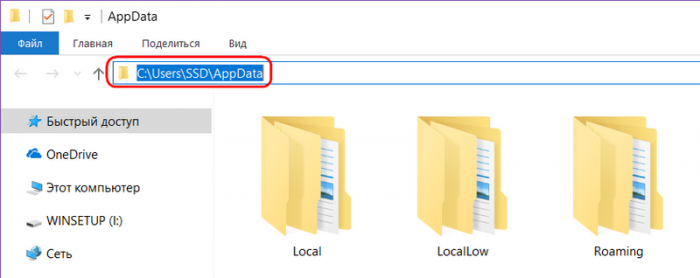
Step 2: Type %appdata% and press Enter
Enter %appdata% in the Run dialog box, then press Enter.
This command will open the Roaming folder within the AppData directory, giving you access to data files created by installed applications.
Step 3: Navigate to the Local folder
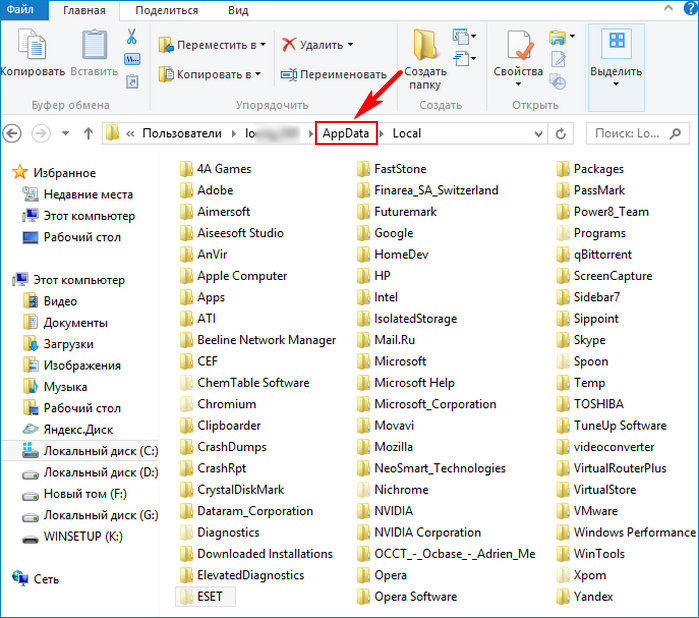
In the File Explorer window that opens, click on AppData in the address bar, and then select the Local folder.
The Local folder contains application data specific to your user account. This is where you’ll find most files that can be safely deleted.
Step 4: Identify and delete unnecessary files
Look through the folders and identify files that are no longer needed. Delete these files.
Be cautious here. Only delete files from applications you recognize and no longer use. Avoid system or application-critical files.
Step 5: Empty the Recycle Bin
After deleting the files, right-click on the Recycle Bin and select Empty Recycle Bin.
This final step removes the deleted files from your system permanently, freeing up storage space.
Once you’ve completed these steps, you’ll notice an improvement in your computer’s performance. The AppData folder will be cleaner, and unnecessary files will be gone.
Tips for Cleaning AppData Folder Windows 10
- Backup Important Data: Before you start deleting files, make sure to back up any important data. This will help you recover files if you accidentally delete something important.
- Use Disk Cleanup: Windows 10 has a built-in Disk Cleanup tool that can help you delete temporary files safely.
- Be Cautious: Only delete files from applications you recognize. Avoid deleting system files.
- Regular Maintenance: Make cleaning the AppData folder a regular part of your computer maintenance routine.
- Check Folder Sizes: Sort folders by size to quickly identify which ones are taking up the most space.
Frequently Asked Questions
What is the AppData folder?
The AppData folder contains data created by installed applications, including caches, settings, and temporary files. It is specific to each user account.
Why should I clean the AppData folder?
Cleaning the AppData folder helps improve your computer’s performance by freeing up storage space and removing unnecessary files.
Can I delete everything in the AppData folder?
No, you should not delete everything in the AppData folder. Only delete files from applications you recognize and no longer use. Avoid system or application-critical files.
Is it safe to delete temporary files?
Yes, it is generally safe to delete temporary files as they are not critical to the operation of your system. However, make sure to double-check before deleting.
How often should I clean the AppData folder?
There’s no set rule, but a good practice is to clean the AppData folder every few months or whenever you notice a decrease in your computer’s performance.
How to Clean AppData Folder Windows 10 Summary
- Open the Run dialog box.
- Type %appdata% and press Enter.
- Navigate to the Local folder.
- Identify and delete unnecessary files.
- Empty the Recycle Bin.
Conclusion
Cleaning the AppData folder in Windows 10 is a straightforward process that can significantly improve your computer’s performance. By following the steps outlined above, you can safely remove unnecessary files and free up valuable storage space. Remember to back up important data before deleting any files and to be cautious about what you remove. Regular maintenance, including cleaning the AppData folder, is essential for keeping your system running smoothly.
For further reading, consider looking into other ways to optimize your Windows 10 system, such as using Disk Cleanup, managing startup programs, and regularly updating your software. By taking these additional steps, you can ensure your computer remains in top shape, providing you with a seamless and efficient user experience.
Matt Jacobs has been working as an IT consultant for small businesses since receiving his Master’s degree in 2003. While he still does some consulting work, his primary focus now is on creating technology support content for SupportYourTech.com.
His work can be found on many websites and focuses on topics such as Microsoft Office, Apple devices, Android devices, Photoshop, and more.
Привет друзья! По вашим многочисленным просьбам в сегодняшней статье мы узнаем все секреты папки AppData в Windows, а именно: Какие функции выполняет каталог AppData в операционной системе, где находится, почему занимает большой объём (иногда более 10 Гб)? Как очистить данную папку? Стоит ли переносить её с диска (C:) в другое расположение?
«AppData» (полное название «Application Data») – это скрытый системный каталог пользовательских профилей Windows Vista, 7, 8.1 и 10. Папка находится внутри профиля каждого из пользователей операционной системы и, соответственно, размещается на диске (C:) по пути:
C:\Users\Имя_пользователя\AppData
{banner_google1}
В ней содержатся рабочие файлы установленного в систему программного обеспечения – временные файлы, конфигурационные файлы, кэш, сохранённые сеансы, логи приложений и т.п. Как видим, практически все установленные в ОС приложения имеют здесь свои личные папки с файлами, в том числе антивирус и сервисная программа принтера.
Браузеры, например, в этой папке хранят данные своих профилей – историю посещённых интернет-страниц, кэш, куки, расширения и пр.
Другой пример: в этой папке находится многое из того, что мы используем при работе с продуктами Microsoft Office — шаблоны документов, параметры автозамены, словари и т.п. «AppData» является родительским каталогом одной из системных папок хранения временных файлов «Temp».
В состав «AppData» входят три подпапки:
- «Local» — хранилище временных файлов и локальных данных программ;
- «LocalLow» — хранилище буферных данных отдельных программ;
- «Roaming» — хранилище конфигурационных и пользовательских данных. Большая часть настроек, которые могут быть перенесены в другую систему, находится именно в этой подпапке.

«AppData» — скрытая папка. Microsoft считает, что обычному пользователю там делать нечего, а лишнее любопытство новичков может привести к нежелательным последствиям. Но эта папка – кладезь возможностей для экспериментаторов. Большая часть существующих программ не предусматривает экспорт-импорт настроек, проектов и прочих пользовательских наработок в заново установленную операционную систему, в этом случае можно использовать папку AppData. С помощью обычного «ручного переноса» – скопировать в старой системе из этой папки нужные каталоги и после установки программ в среде новой системы заменить их. В этом случае программы, в установленной заново Windows, приводятся в рабочий вид за считанные секунды. Такой манёвр когда-то рассматривался в одной из статей нашего сайта: мы вручную осуществляли перенос данных Opera, когда у этого браузера не работал сервис синхронизации.
К содержимому «AppData» особый интерес испытывают не имеющие возможности приобрести SSD-накопитель любители изощрённых способов оптимизации Windows. Таких как, к примеру, перенос рабочих файлов программ на RAM-диск – виртуальный диск, создаваемый в среде операционной системы за счёт ресурса оперативной памяти. На RAM-диск переносятся упомянутые выше рабочие каталоги программ, и производительность последних вырастает в разы.
Есть ещё один тип пользователей, испытывающих интерес к этой папке – шокированные неистовым её поглощением места на диске (C:).
Чтобы получить доступ к этой папке, в файловых менеджерах необходимо включить отображение скрытых файлов и пройти по пути её размещения.
Но есть способ проще. Жмём клавиши Win+R и вводим:
AppData
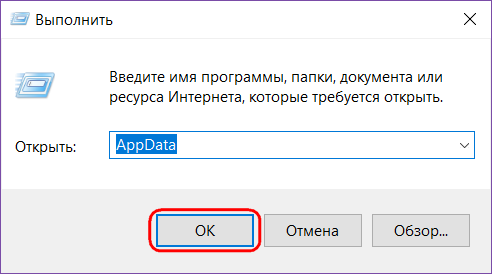
Папка тотчас же откроется в системном проводнике.
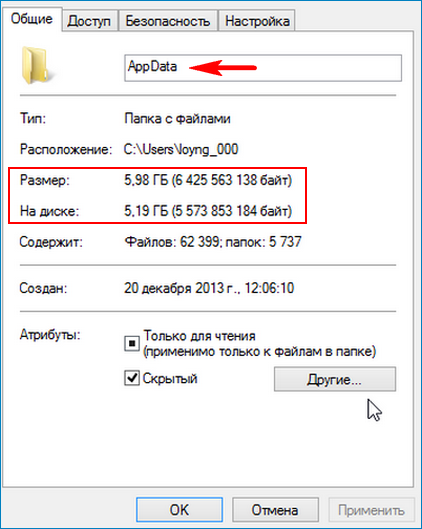
Сразу же после установки Windows эта папка весит не более 300 Мб. Однако её размеры будут увеличиться в геометрической прогрессии по мере инсталляции в систему сторонних программ и игр. Больше софта – больший вес папки. Например у меня она весит 6 Гб.
При этом в большинстве случаев не будет иметь значение даже тот факт, что ненужные программы и игры уже удалены с компьютера. Если их деинсталляция проводилась с использованием штатного инструментария Windows или с помощью сторонних деинсталляторов без функции зачистки остатков, на вес «AppData» существенно это может никак не повлиять.
- При обычной деинсталляции программы и игры убирают свои данные, как правило, только из папок «Program Files» на диске С. Но содержимое своих рабочих каталогов внутри «AppData» оставляют на перспективу быть задействованными при новой установке. Эти данные уничтожают только деинсталляторы с функцией зачистки остатков удаляемых программ.
Лично я после удаления какой-либо программы обязательно наведываюсь в эту папку и подчищаю хвосты приложения вручную.
Удалить эту папку можно только частично, целиком не получится. Поскольку в ней хранятся рабочие данные программ, их активные процессы просто не позволят сделать это. Поможет разве что подход из среды другой операционной системы, установленной на компьютере, или с LiveCD. Вот только делать этого не следует. Удаление «AppData» не повлияет на критически важные сектора Windows – загрузочный и непосредственно обеспечивающий работу самой системы. Однако установленные программы и игры либо будут работать некорректно, либо запустятся с дефолтными настройками, либо вообще не запустятся. Очищать эту папку необходимо выборочно и правильными методами, поговорим об этом дальше.
Чтобы уменьшить вес папки, необходимо поочерёдно проделать следующие шаги:
1. Запустить штатную утилиту очистки диска Windows;
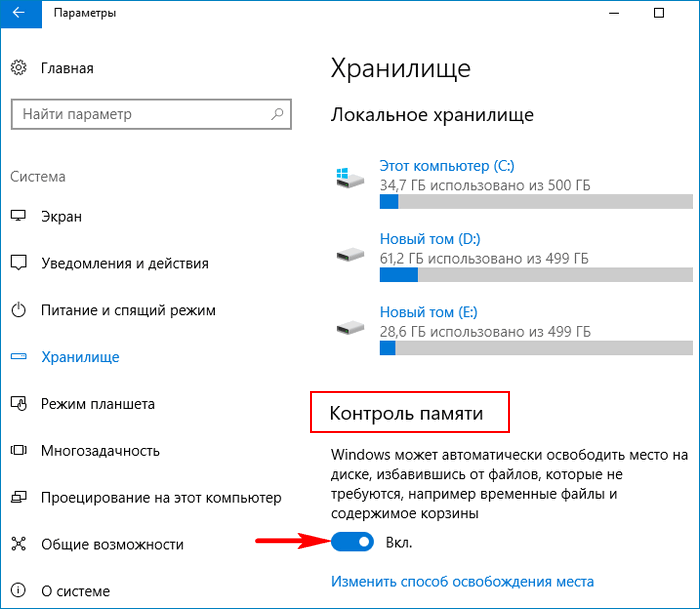
Примечание: в версии Windows 10 возможность очистки дискового пространства, в частности, избавления от временных файлов, которые хранятся в папке «AppData», реализована также в приложении «Параметры». Пройдя по пути «Система – Хранилище – диск С – Временные файлы»,
можем удалить все временные файлы системы.
Более того, накопительное обновление Creators Update пополнило «Десятку» новой функцией «Контроль памяти», автоматически удаляемой временные файлы, если они не используются программами.
2. Исследовать содержимое «AppData» с помощью программы сканера дискового пространства
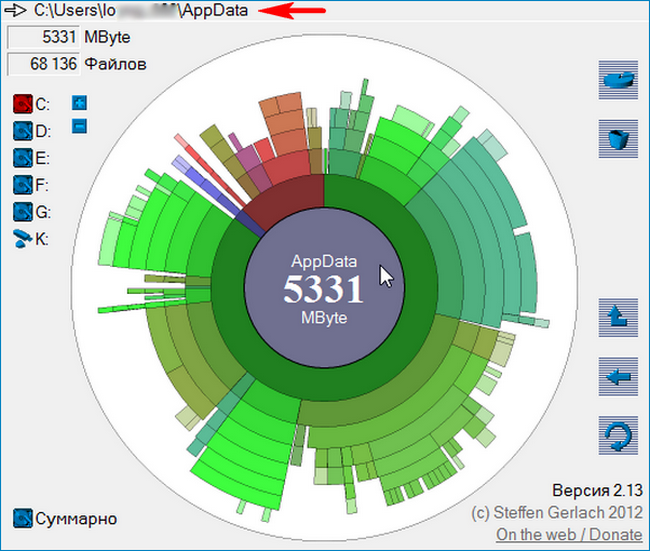
и удалить каталоги уже деинсталлированных программ и игр, прежде поместив архив папки на другой диск или создав точку восстановления системы на случай удаления нужных данных. Например в моей системе оказалось множество папок уже удалённых программ, удалить эти папки лучше вручную.
3. В дальнейшем использовать деинсталляторы с зачисткой остатков программ типа Soft Organizer, Uninstall Tool, Revo Uninstaller и т.п.
Если на компьютере установлены ресурсоёмкие программы и игры, вес папки, естественно, не будет малым. Порядка 10-ти Гб в таком случае может быть нормой, и возможно, стоит поискать другие способы освобождения свободного места на диске (C:). Например:
• изменить физическое расположение папок «Temp» с помощью переменных сред;
• перенести рабочие каталоги браузеров и прочих программ на другие диски с помощью их внутренних настроек или символьных ссылок;
Друзья, в сети есть сайты, на которых вам предложат способы переноса папки AppData на другой раздел жёсткого диска с помощью манипуляций с реестром или проводником, но во-первых, к реальности это не имеет никакого отношения, после переноса папки AppData, установленные в вашу операционную систему программы начнут выдавать такие сюрпризы, что вы быстро откажетесь от этой затеи, а во-вторых, объясните мне, какой в этом смысл? Сэкономить пространство на диске (C:)? Многие читатели скажут, что да, сделать это нужно для экономии дискового пространства твердотельного накопителя SSD (120 Гб), на котором установлена Windows. Но позвольте тогда заметить, что если перенести папку AppData с твердотельника на обычный жёсткий диск, то ваши программы и работать будут медленнее в 5 раз. Я скажу даже так, давайте перенесём ещё папку C:\Windows на другой диск, ведь если постараться, это тоже можно сделать. А самый хороший способ сохранить ресурс твердотельного накопителя на 100 лет, это просто отсоединить его от компьютера и положить на полку.
Статьи по этой теме:
- Папка ProgramData, её назначение, можно ли удалить или перенести
- Что находится в системной папке «FileRepository» и как её очистить
- Как удалить файл hiberfil.sys