
Кэш обновлений Windows — уже скачанные на компьютер файлы обновлений, готовые к установке. При возникновении проблем с их установкой, для освобождения места на диске или для того, чтобы после удаления обновлений они не отображались в Центре обновлений Windows с кнопкой «Установить», вы можете очистить этот кэш.
В этой пошаговой инструкции несколько простых способов очистить кэш обновлений в Windows 11 и Windows 10 встроенными средствами системы, все они безопасны и не должны привести к каким-либо проблемам в работе. Также может быть полезным: Сброс компонентов Центра обновлений (включая очистку кэша) в PowerShell.
Кэш обновлений в утилите «Очистка диска»
Самый простой способ очистки кэша обновлений — встроенная в Windows утилита «Очистка диска». Шаги будут следующими:
- Нажмите правой кнопкой мыши по кнопке «Пуск» и выберите пункт «Выполнить».
- Введите cleanmgr и нажмите Enter.

- При появлении запроса на выбор диска выберите диск C.
- Нажмите кнопку «Очистить системные файлы».
- Отметьте пункт «Очистка обновлений Windows».

- Нажмите «Ок» и дождитесь завершения очистки.


В Windows 11 и 10 вы также можете использовать функции очистки диска в «Параметрах», подробнее об этом в инструкциях Очистка диска Windows 11 встроенными утилитами, Автоматическая очистка диска Windows 10.
Очистка кэша обновлений вручную в командной строке
Кэш обновлений хранится в папке C:\Windows\SoftwareDistribution\Download и мы можем удалить её содержимое вручную с помощью командной строки. Для этого потребуется временно отключить службу Центра обновлений Windows с повторным её включением по завершении процесса.
- Запустите командную строку от имени Администратора. Для этого можно использовать поиск по «командная строка» в панели задач и пункт «Запуск от имени администратора».
- По порядку введите следующие команды
net stop wuauserv
cd C:\Windows\SoftwareDistribution
del /f /s /q Download
net start wuauserv


Удаление кэша обновлений Windows в проводнике
Этот способ, по своей сути повторяет предыдущий, но без использования командной строки:
- Нажмите клавиши Win+R на клавиатуре, введите services.msc и нажмите Enter.
- В списке служб найдите «Центр обновления Windows», дважды нажмите по ней и нажмите кнопку «Остановить».

- В проводнике перейдите в папку
C:\Windows\SoftwareDistribution\Download
- Выделите всё содержимое папки (клавиши Ctrl+A) и удалите его.
- Снова зайдите в «Службы» и запустите Центр обновления.

Сброс кэша обновлений и его параметров без фактического удаления
Если задача — исправить ошибки центра обновлений, а не выполнить удаление кэша, можно использовать следующий набор команд в командной строке, запущенной от имени администратора:
net stop wuauserv
net stop cryptSvc
net stop bits
net stop msiserver
ren C:\Windows\System32\catroot2 catroot2.old
ren C:\Windows\SoftwareDistribution SoftwareDistribution.old
net start cryptSvc
net start bits
net start msiserver
net start wuauserv
Если ошибки были исправлены, созданные папки SoftwareDistribution.old в папке Windows и catroot2.old в папке System32 можно будет удалить.
Очистка кэша обновлений также доступна в сторонних утилитах, предназначенных для исправления ошибок при обновлениях, подробно: Как исправить ошибки Центра обновлений Windows.
Также, в контексте рассмотренной темы могут быть полезными следующие материалы:
- Как удалить обновления Windows 11
- Как удалить обновления Windows 10
- Как отключить обновления Windows 11
- Как отключить обновления Windows 10
Шаг 1: Приостановка «Центра обновления» Windows 10
Для начала нужно приостановить работу «Центра обновлений» Windows 10, чтобы проблем с удалением кеша не возникло:
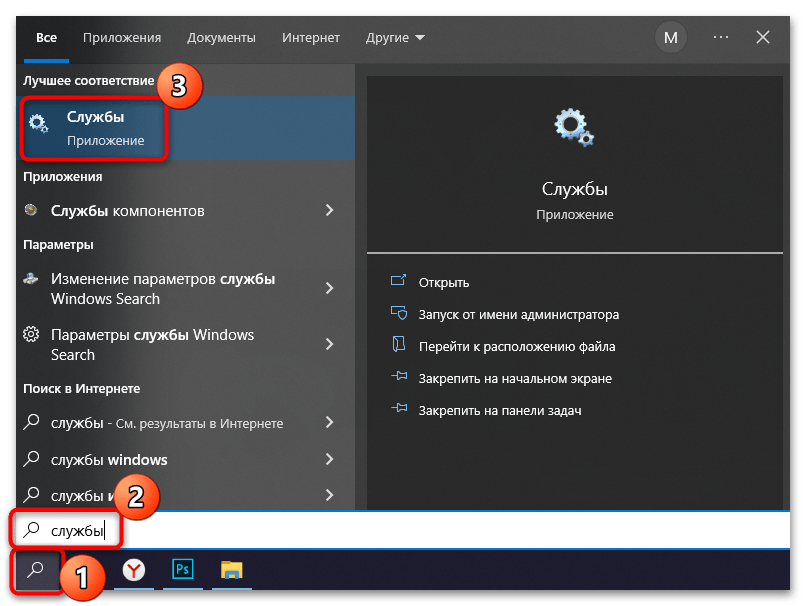
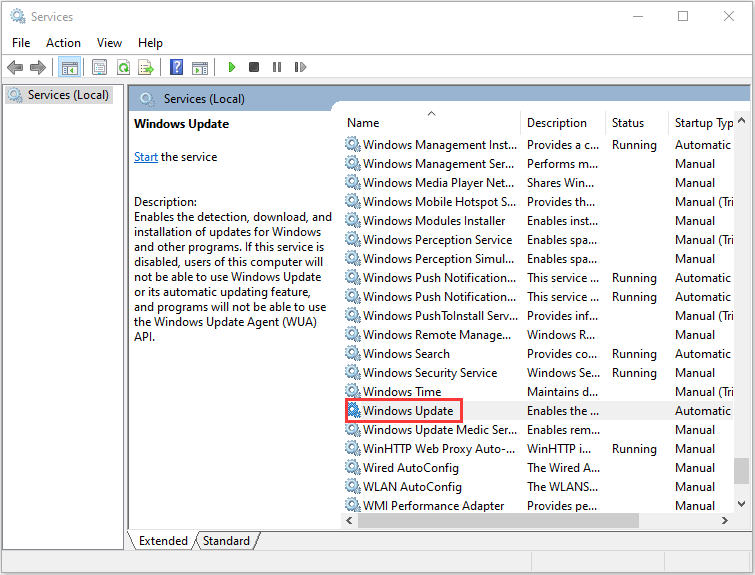
- Откройте окно системного приложения «Службы». Сделать это можно несколькими способами, но самый простой – поисковая строка «Пуска».
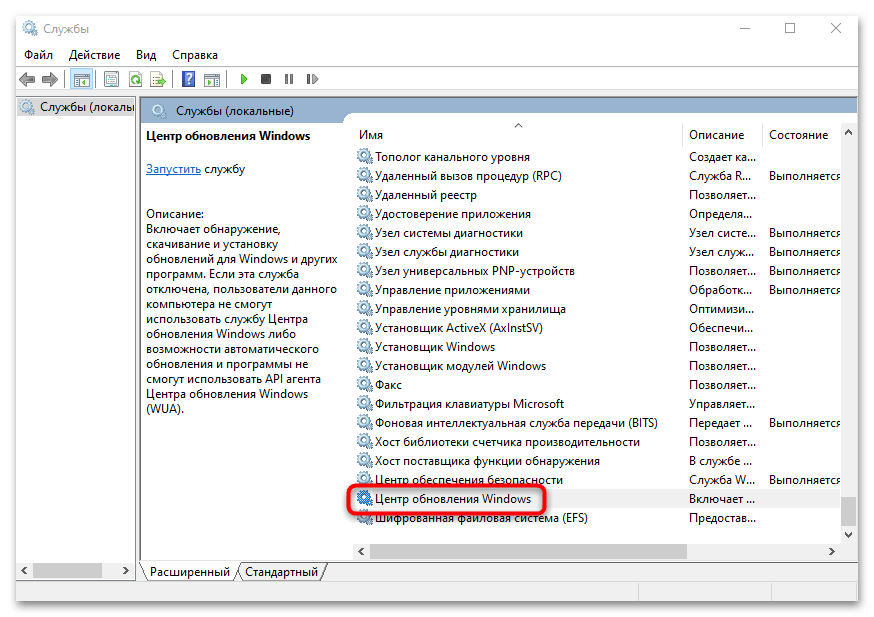
- В списке отыщите службу под названием «Центр обновления Windows». Она находится внизу, если отсортировать службы по алфавиту. Дважды щелкните по службе левой кнопкой мыши.
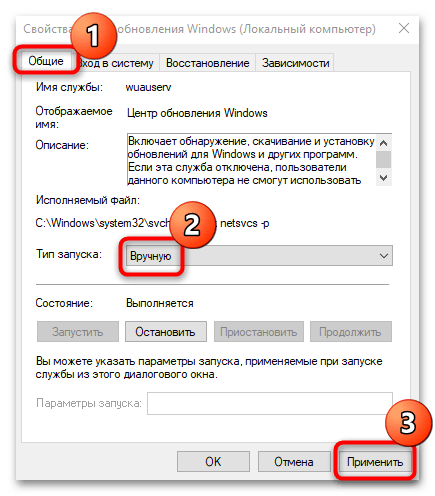
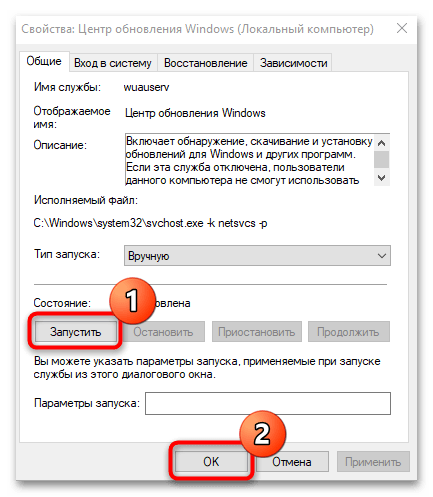
- В новом окне на вкладке «Общие» выберите тип запуска «Вручную» и нажмите на кнопку «Применить».
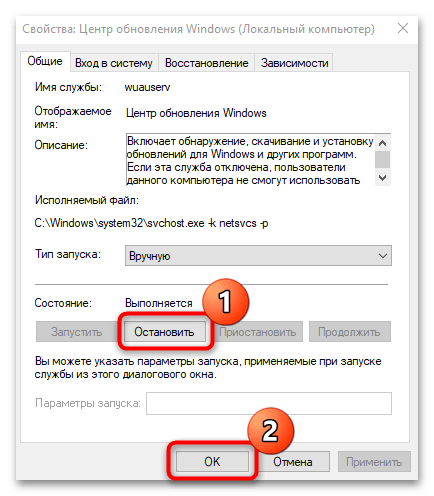
- Затем нажмите на «Остановить» и на «ОК», чтобы подтвердить настройку.
После того как работа службы обновлений остановлена, можно приступать к непосредственной очистке кеша апдейтов Windows 10.
Шаг 2: Удаление кеша обновлений
Следующий этап – это удаление кеша с накопителя. Искомые данные временно хранятся в специальной папке системного тома:
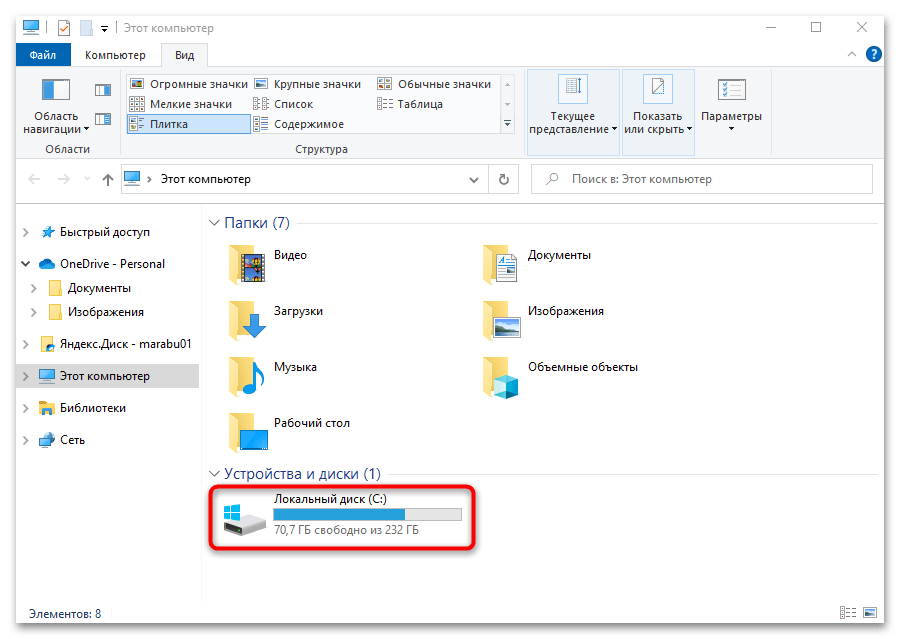
- Запустите «Проводник» или откройте «Этот компьютер» на рабочем столе. Перейдите в содержимое системного диска. Обычно это «Локальный диск (C:)».
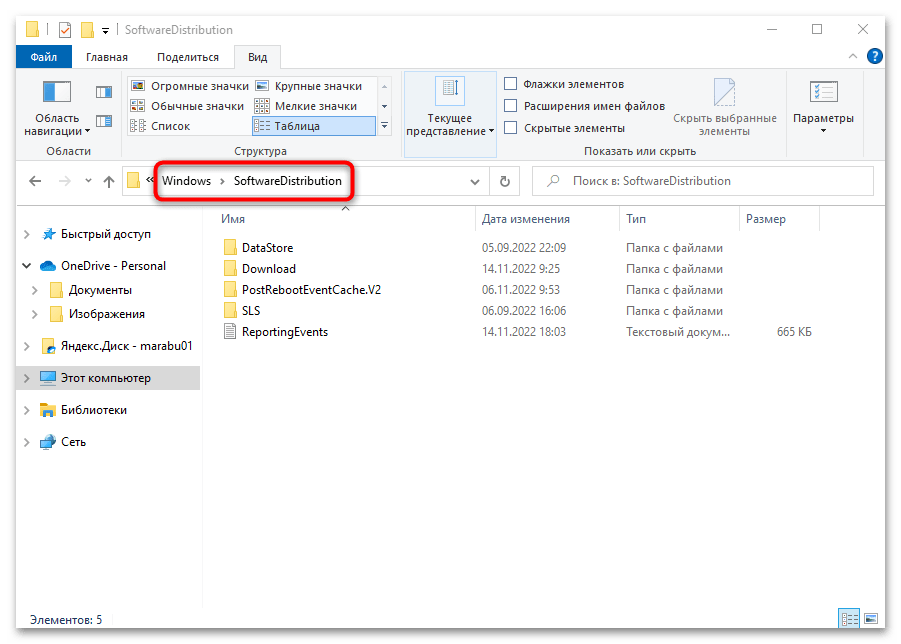
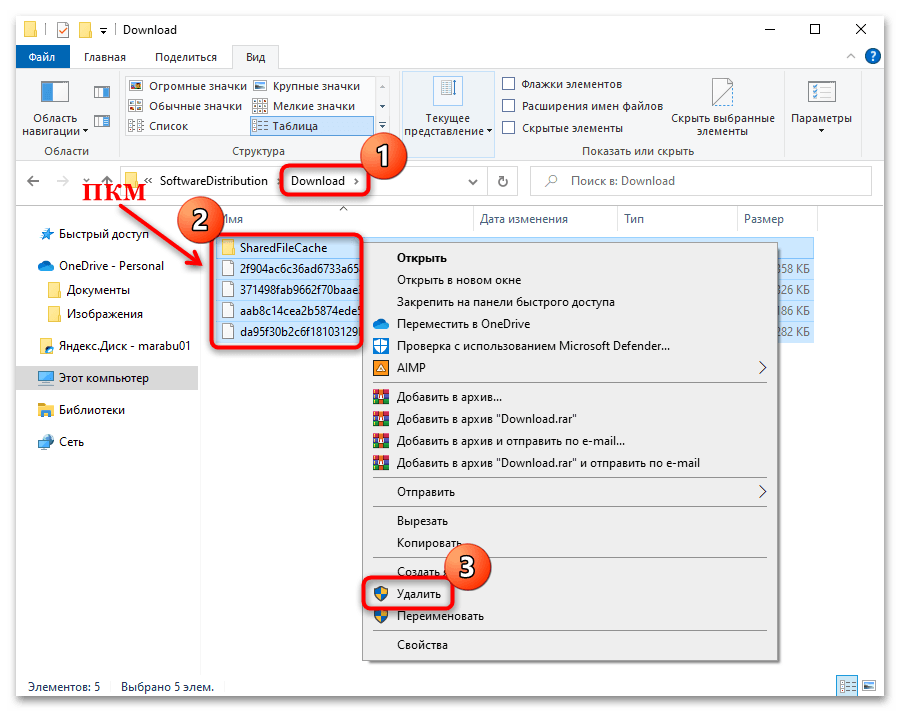
- Затем откройте папку «Windows», а потом «SoftwareDistribution».
- Очистите содержимое каталога «Downloads» любым способом: выделите все файлы и папки, затем вызовите контекстное меню нажатием правой кнопкой мыши или используйте клавишу «Delete».
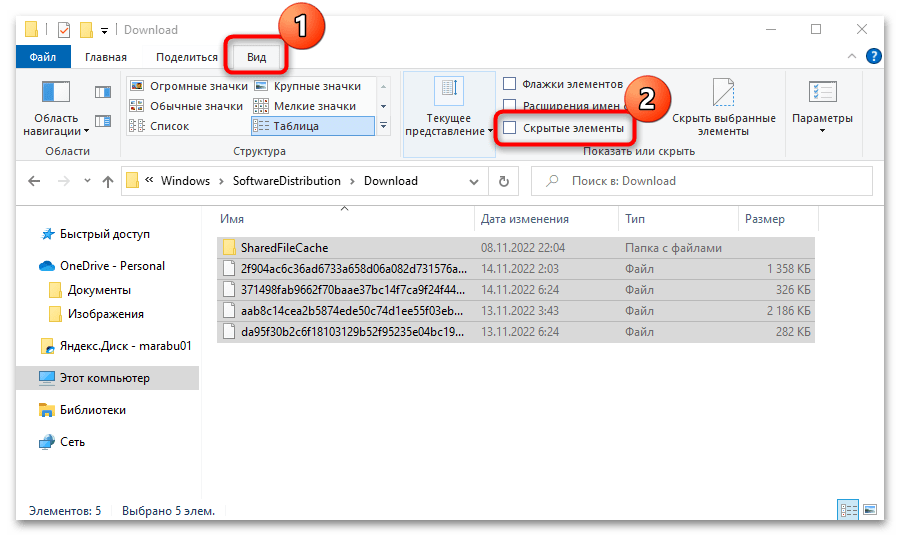
Может потребоваться отображение скрытых элементов в папке. Для этого в окне «Проводника» перейдите на вкладку «Вид», и отметьте галочкой пункт «Скрытые элементы».
Когда все будет готово, останется вновь запустить работу службы «Центр обновления Windows». Проделайте то же самое, что показано в Шаге 1, только на конечном этапе выберите вариант «Запустить».
Наша группа в TelegramПолезные советы и помощь
-
Home
-
News
- How to Clear Windows Update Cache (3 Ways for You)
By Daisy | Follow |
Last Updated
Clearing the Windows 10 update cache manually will solve most of the problems you may have installed the latest Windows 10 update on your computer. This post from MiniTool introduces how to clear Windows update cache.
If you have trouble running Windows Update, it is likely that there is a problem with the update file, or the file is not completely cleared for download or is damaged. Windows update cache location is C:\Windows\SoftwareDistribution\Download. All installation files for Windows updates are stored here.
Tips:
Discover MiniTool System Booster: Unlock Disk Space and Deep-Clean Your PC.
MiniTool System Booster TrialClick to Download100%Clean & Safe
How to Clear Windows Update Cache
There are 3 ways for you. You can choose one based on your needs. Here is how to do that:
Way 1: Clear Windows Update Cache via File Explorer
First, let’s see how to clear Windows update cache via File Explorer.
Step 1: Type File Explorer in the Search box to open it.
Step 2: Find and right-click Local Disk (C) to choose Properties.
Step 3: Then, click Disk Clean-up. After that, click the Clean up system files option.
Step 4: Then, check the Windows upgrade log files and Temporary Windows Installation files boxes and click OK.
Step 5: Press the Windows and R keys at the same time to open the Run dialogue box. Type services.msc and click OK to open the Services application.
Step 6: From the list of applications, right-click Windows Update to select Stop.
Step 7: Next, open File Explorer and go to C:\ > Windows > SoftwareDistribution. Remove all the files in the folder.
Then, you have cleared the Windows update cache successfully.
Way 2: Clear Windows Update Cache via Command Prompt
The second method for you to reset Windows updates cache is via Command Prompt. The detailed steps are as follows:
Step 1: Type Command Prompt in the Search menu. Then right-click it to choose Run as administrator to open it.
Step 2: Type net stop wuauserv and press the Enter key in the Command Prompt window.
Step 3: Type C: and press Enter. Type cd %Windir%\SoftwareDistribution and press Enter. Type del /f /s /q Download and press Enter.
Then, all of the windows 10 cache files on your machine will now be deleted.
Way 3: Clear Windows Update Cache via Script
You can also try to clear Windows Update Cache via Script. Follow the instructions below:
Step 1: Open Notepad and Insert the below code in bold
@Echo On
net stop wuauserv
C:
cd %Windir%\SoftwareDistribution
Type del /f /s /q Download
pause
Step 2: Save the file as Cleardown.cmd on your desktop.
Step 3: Right-click the Cleardown.cmd file and select run as administrator.
Step 4: When the Script has finished it will pause so you can see the output of what it has done.
How to Reset Windows Update Cache
You may also wonder how to reset Windows update cache. Here are the steps:
Step 1: Type Command Prompt in the Search menu. Then right-click it to choose Run as administrator to open it.
Step 2: Type the following command one by one:
net stop wuauserv
net stop cryptSvc
net stop bits
net stop msiserver
Step 3: Next, run the following command one by one.
ren C:\Windows\SoftwareDistribution SoftwareDistribution.old
ren C:\Windows\System32\catroot2 Catroot2.old
Final Words
This post has introduced how to clear Windows update cache and how to reset Windows update cache. I hope that this post can be helpful to you.
About The Author
Position: Columnist
Having been an editor at MiniTool since graduating college as an English major, Daisy specializes in writing about data backups, disk cloning, and file syncing as well as general computer knowledge and issues. In her free time, Daisy enjoys running and going with friends to the amusement park.
Download Article
Get rid of corrupt cache files to fix update installation errors
Download Article
- Why clear the cache?
- Using Command Prompt
- Using File Explorer
- Using a Batch Script
- Using Windows Settings
- Using Disk Cleanup
|
|
|
|
|
Are you having trouble installing Windows Updates? If a Windows update fails mid-way or gets stuck installing, clearing the update cache forces Windows to redownload the installation files from Microsoft, which tends to fix the problem. Read on for simple steps to clear the Windows Update cache using Windows 10 or 11.
Quick Steps
- Open Command Prompt as an administrator.
- Type «net stop wuauserv» and press Enter.
- Type «net stop bits» and press Enter.
- Type «rmdir /S /Q C:\Windows\SoftwareDistribution» and press Enter.
- Type «net start wuauserv» and press Enter.
- Type «net start bits» and press Enter.
-

When Windows installs updates, it first downloads the installation files and saves them to a folder. Once the files are downloaded, Windows uses them to install the updates. If Windows Update fails, gives you an error, or gets stuck, there could be a problem with files in that cache. To fix the failed update, you can easily clear the update cache—it’s safe and will not harm your computer.
- You can also clear the update cache to free up space on your computer. However, Windows does clear the update cache automatically—the files are only saved for a certain period after an update is installed successfully, just in case you need to revert to a previous update.

Advertisement
-
An easy way to clear the Windows Update cache is from the command prompt. Don’t worry—this is simple, even if you’re uncomfortable typing commands. To open Command Prompt as an admin:
- Press the Windows key and type cmd.
- Right-click Command prompt and select Run as administrator.
- Click Yes to confirm.
-
If the services are running, you won’t be able to delete the entire update cache. At the prompt, type the following commands:
- Type net stop wuauserv and press Enter.
- Type net stop bits and press Enter.
-
This command deletes everything in the C:\Windows\SoftwareDistribution folder, which is where cached update files are stored:
- Type rmdir /S /Q C:\Windows\SoftwareDistribution and press Enter.
-
Now that the update cache is clear, you can restart the services you stopped earlier.
- Type net start wuauserv and press Enter.
- Type net start bits and press Enter.


Advertisement
-
Another way to clear the Windows Update cache is using File Explorer. Before you do this, though, you’ll want to stop the Windows Update services so the files can actually be removed. To open Windows Services:
- Press the Windows key or click the Windows menu.
- Type services.msc and press Enter.
-
To do this, scroll down to «Windows Update,» right-click it, and select Stop.
- Leave the window open for now. After clearing the update cache, you’ll need to reenable these services.
-
Scroll back up, right-click «Background Tasks Infrastructure Service,» and select Stop. This will ensure that nothing prompts Windows Update to restart until you do it manually.
-
The Windows folder is located at C:\Windows on most PCs.
- For example, if Windows is installed on your C drive, click This PC in the left panel, click the C drive, then double-click the Windows folder.
-
To fully clear the update cache, you’ll want to delete everything in this folder. Scroll down, select SoftwareDistribution, press the delete key on your keyboard, and click Continue to confirm.
-
Now that the cache is empty, return to the Windows Services window and restart the services you stopped.
- Right-click Background Tasks Infrastructure Service and select Start.
- Right-click Windows Update and select Start.


Advertisement
-
If you want to clear the update cache quickly in the future, you can use this method to write a quick batch script that clears the update cache for you. You will need to run this script as an administrator for it to work.
-
This script stops the Windows Update service, stops the Background Intelligent Transfer Service, clears the cache, and then restarts the services.
@Echo On
net stop wuauserv
net stop bits
C:
rmdir /S /Q %Windir%\SoftwareDistribution
net start wuauserv
net start bits
pause
-
If you’re using Notepad, click the File menu, select Save as, and choose a folder to save the file in. Then, select «All files» from the «Save as type» menu, name the file something like «clear_update_cache.bat», and click Save.
-
To use your script to clear the cache, right-click the file, select Run as administrator, and then click Yes to confirm. A Command Prompt window will open and run the commands from the script.
- When the script is finished running, the Windows Update cache will be cleared, and you’ll see «Press any key to continue . . .» at the bottom. When you press a key, the window will close.


Advertisement
-
Press the Windows key on your keyboard (or click the Windows menu) and select Settings.
- This method can be helpful to free up some disk space, but it usually won’t fix any Windows Update errors. The files you’ll be deleting are update files from previous updates, and they’re meant to help you in case you need to revert to the last version.
-
If you’re using Windows 11, it’ll be in the left panel. On Windows 10, click the System icon.
-
It’s in the center panel on Windows 11, and at the bottom of the left panel on Windows 10. Windows will quickly scan to determine the amount of space used on your PC.
-
This displays a list of different types of temporary files stored by Windows, including how much space each file type is consuming.[1]
-
If you don’t see this option, there aren’t any Windows Update files to delete. They’re deleted automatically after a while.
- You can, however, check «Delivery Optimization Files,» which does contain some cached files relating to Windows Update. However, these cached files are intended to improve update speeds for other computers on your network.[2]
- If you’re low on space, we recommend selecting other types of temporary files to delete as well. Just be careful not to select «Downloads» if you don’t want to delete everything in your Downloads folder.
- You can, however, check «Delivery Optimization Files,» which does contain some cached files relating to Windows Update. However, these cached files are intended to improve update speeds for other computers on your network.[2]
-
This clears the Windows Update cache and frees space from other selected temporary files.


Advertisement
-
To do this, press the Windows key on your keyboard, type disk cleanup, and click Disk Cleanup from the search results.[3]
- Like the Settings method, using Disk Cleanup to clear the Windows Update cache won’t fix problems with Windows Update. The files you’ll be deleting will free up space from existing update files that are no longer needed, but because these files are just backed-up files from your previous update, this is not the equivalent of clearing the cache, despite what some believe.
-
This quickly scans files that can be deleted and displays them in a list.
-
If you don’t see this option, there aren’t any Windows Update files to delete. They’re usually deleted automatically after a while.
- You can, however, check «Delivery Optimization Files,» which does contain some cached files relating to Windows Update. However, these cached files are intended to improve update speeds for other computers on your network.
- If you’re running low on space, select any other types of files you want to delete. You can even select «Recycle Bin» to permanently delete your deleted files.
-
This deletes the selected Windows Update files (and any other files you selected).


Advertisement
Ask a Question
200 characters left
Include your email address to get a message when this question is answered.
Submit
Advertisement
Thanks for submitting a tip for review!
References
About This Article
Thanks to all authors for creating a page that has been read 8,022 times.
Is this article up to date?
В Windows 10 процесс установки накопительных обновлений иногда может вызывать проблемы. Например, обновления не могут быть установлены в результате повреждения файлов, совместимости или неизвестных ошибок.
Независимо от причины, если у вас возникли проблемы с установкой обновления, или проблема с конкретным патчем, вы можете просто удалить обновления ожидающие установки, чтобы повторно загрузить файлы или пропустить обновление. Проблема может быть исправлена путем очистки кэша обновления Windows. После чего, Центр обновления Windows 10 загружает новую копию обновления и устанавливает ее.
Если вы не отключили службу обновления Windows, вручную или с помощью инструмента стороннего разработчика, то обновление системы, работает без проблем для большинства пользователей. Тем не менее, есть пользователи, сталкивающиеся с проблемой во время загрузки или установки обновления в Windows 10.
Если Центр обновления Windows не работает должным образом, хорошая мысль запустить Средство устранения неполадок Центра обновления Windows. Перейдите в приложение «Параметры» → «Обновление и безопасность» → «Устранение неполадок» → кликните один раз на «Центр обновления Windows» и нажмите кнопку «Запустить средство устранения неполадок».
Иногда запустив средство устранения неполадок Центра обновления Windows не может помочь устранить проблемы обновления Windows.
Очистка кэша обновлений Windows может исправить проблемы. В этом руководстве, мы увидим, как очистить кэш обновления Windows (удалить файлы обновлений ожидающих установки) в операционной системе Windows 10.
Как очистить кэш обновления Windows в Windows 10
Это можно сделать, удалив содержимое папки SoftwareDistribution, содержащей файлы, которые Windows Update использует для применения новых обновлений.
Прежде чем мы сможем удалить кэш обновлений, нам необходимо остановить службу Центра обновления Windows.
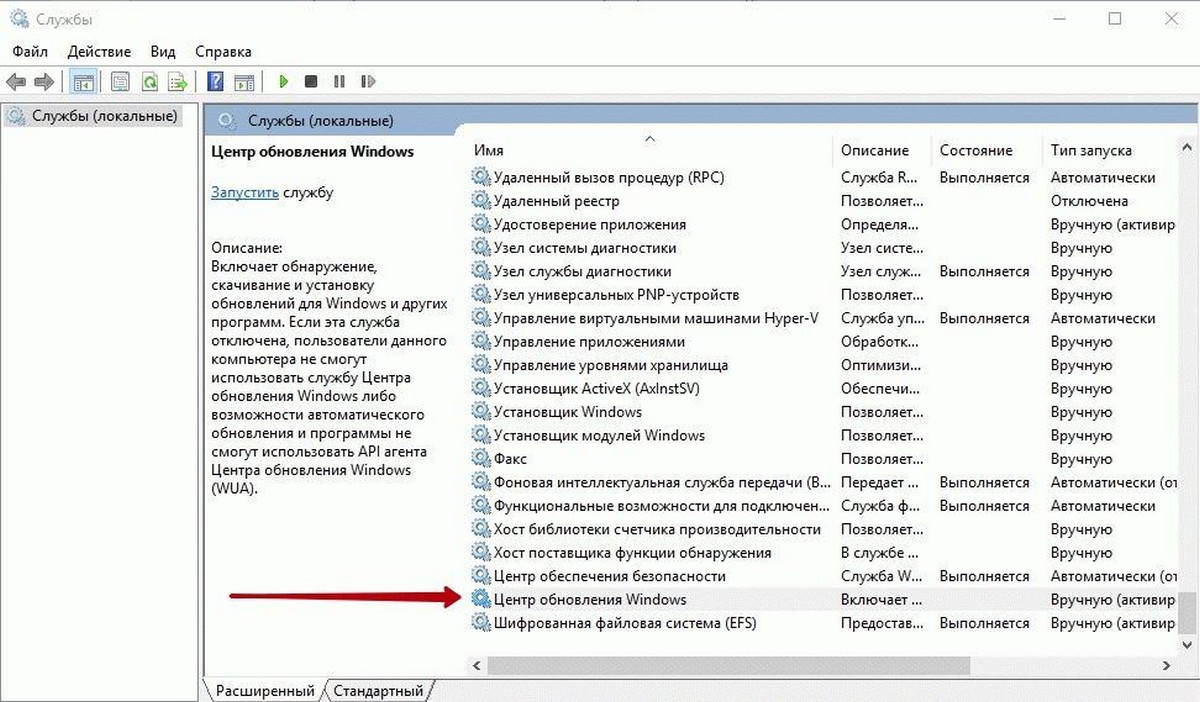
Шаг 1: В меню «Пуск» или в диалоговом окне «Выполнить» введите services.msc, а затем нажмите Enter, чтобы открыть окно Служб.
Шаг 2: Найдите запись службы «Центр обновления Windows» и дважды кликните на ней, чтобы открыть диалоговое окно свойств.
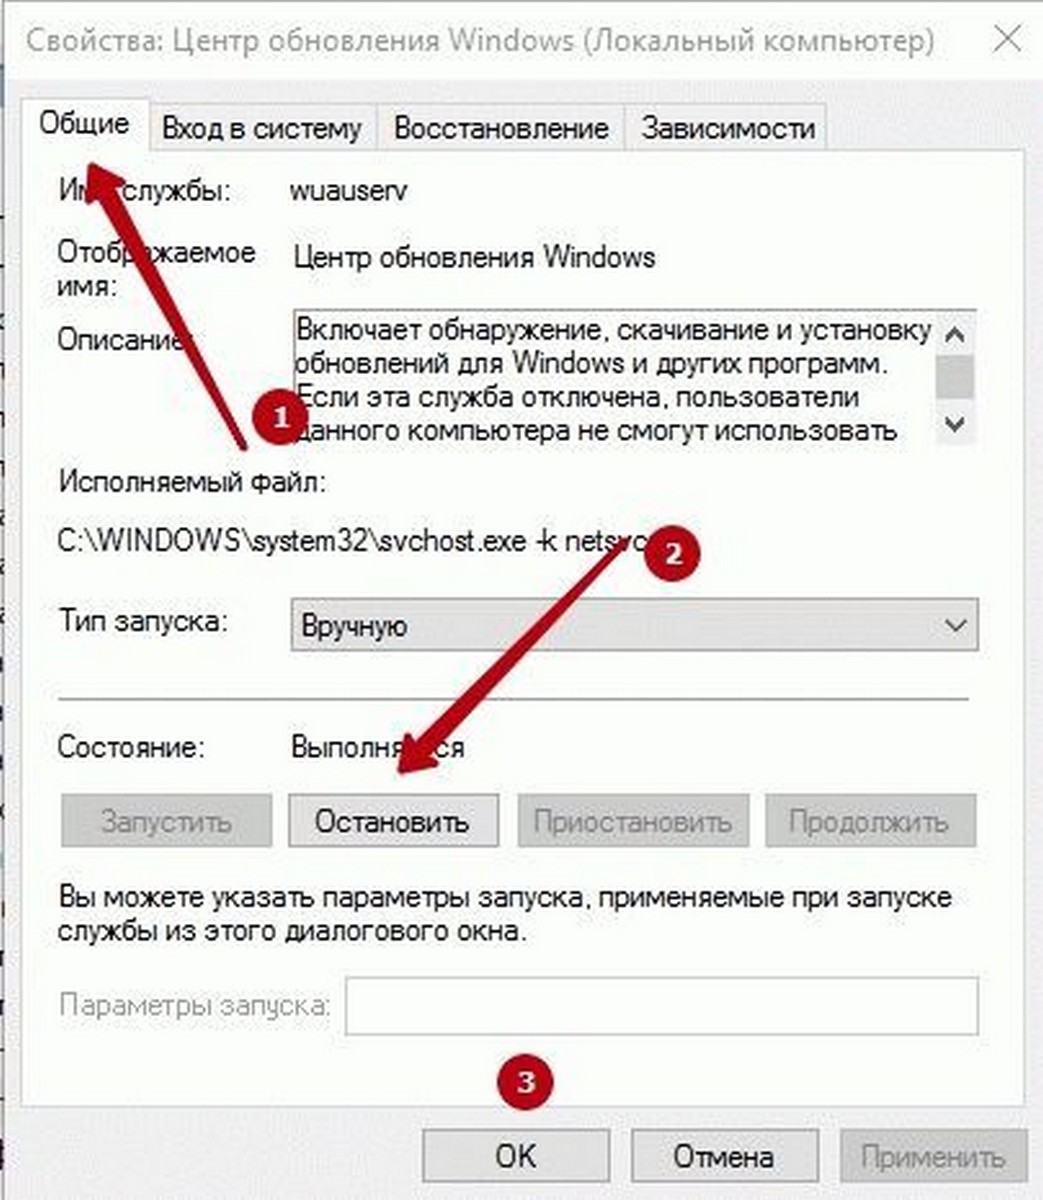
Шаг 3: Во вкладке «Общие», нажмите кнопку «Остановить», и нажмите кнопку «Ок», для остановки службы обновления Windows.
Шаг 4: Откройте диск, на котором установлена ОС Windows 10.
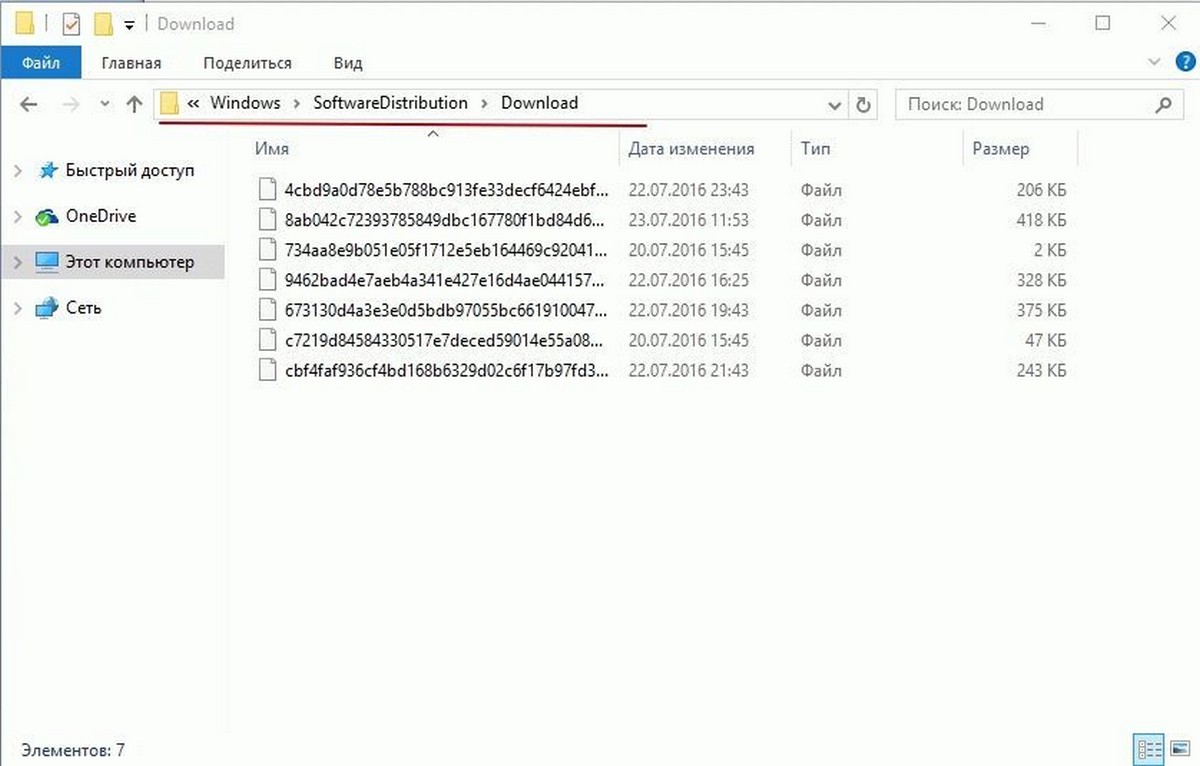
Например, если Windows 10 установлена на диске «C«, откройте его. Перейдите к папке Windows\SoftwareDistribution\Download.
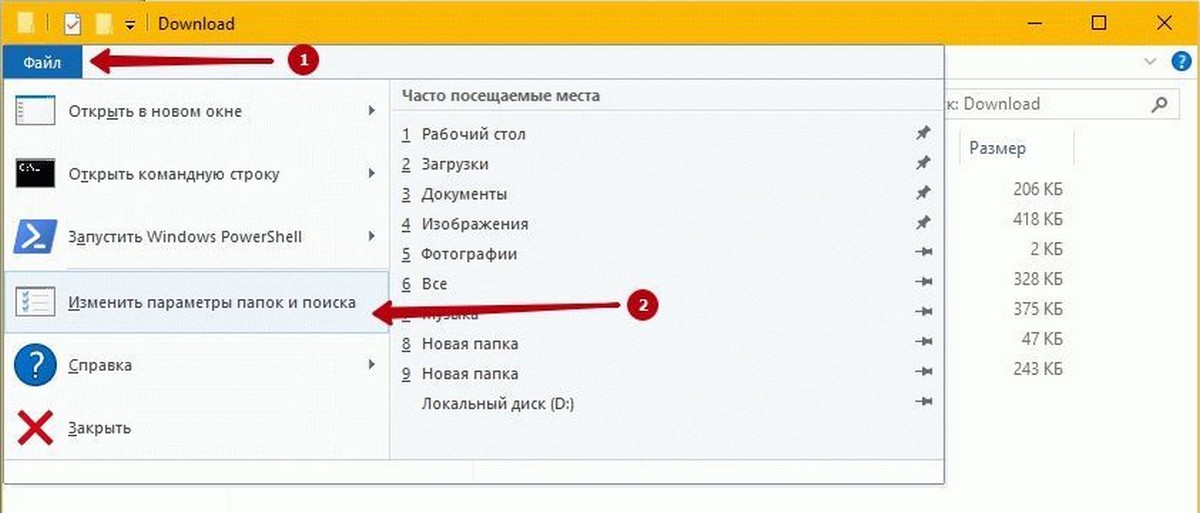
Шаг 5: В папке «Download», кликните меню «Файл» и нажмите кнопку «Изменить параметры папок и поиска». На вкладке «Вид», установите чекбокс напротив надписи «Показывать скрытые файлы и папки и диски». Затем снимите флажок перед опцией «Скрывать защищенные системные файлы» и нажмите кнопку «Применить» (см. картинки ниже).
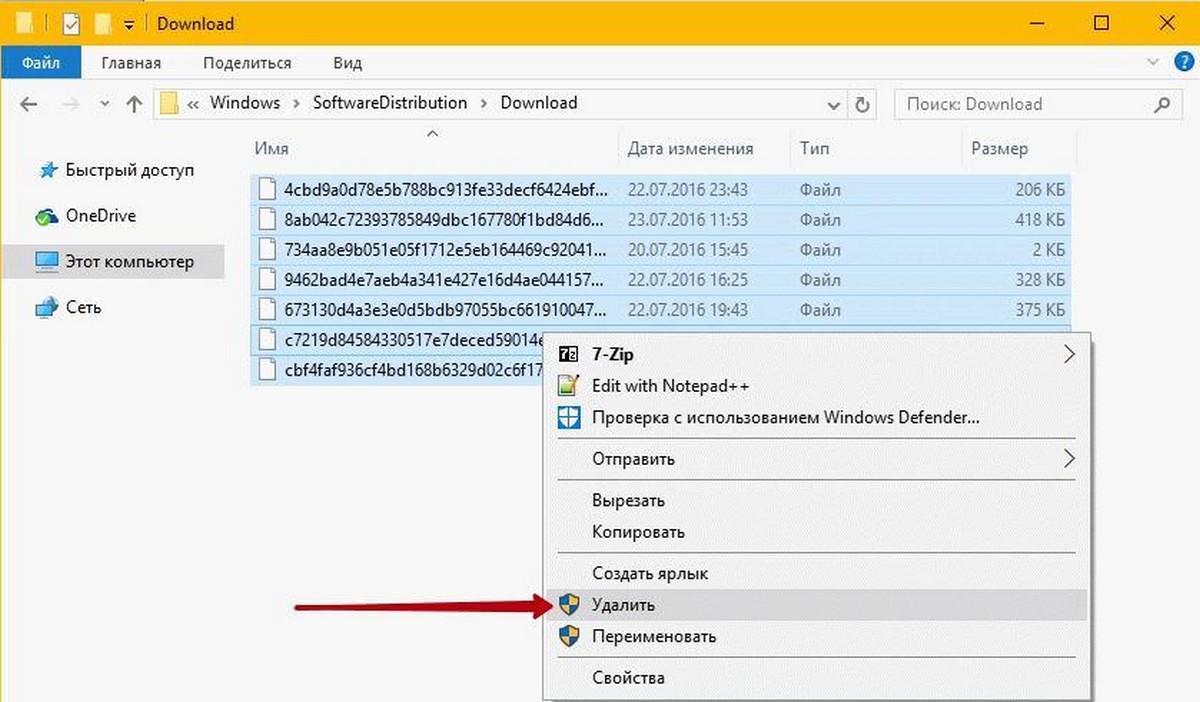
Шаг 6: Теперь в директории C:\Windows\SoftwareDistribution\Download — Выберите все файлы и папки, а затем Удалите их..
Вы только что очистили кэш обновления Windows. Выполните следующие два шага, для запуска службы Центра обновления Windows (Windows Update), которая была остановлена в первые три этапа.
Шаг 7: Введите Services.msc в меню «Пуск» или в «Поиск» на панели задач и нажмите клавишу Enter.
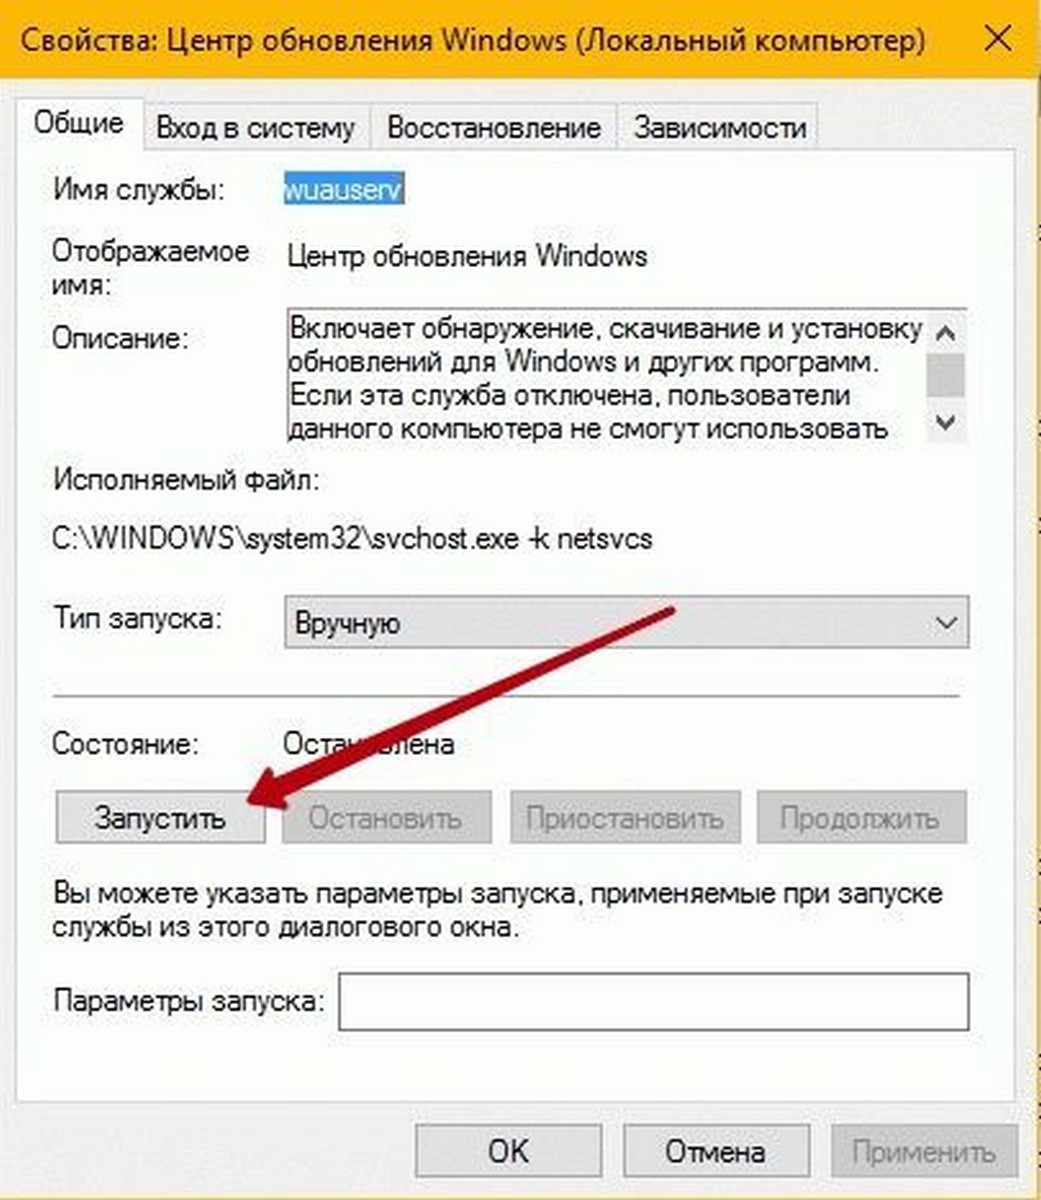
Шаг 8: Дважды кликните на службу «Центр обновления Windows», а затем нажмите кнопку «Запуск», чтобы запустить службу и нажмите «OK».
Вы успешно очистили кэш обновления Windows в ОС Windows 10. Надеемся, что это позволит вам решить проблему обновления Windows.