
In this article we show you the easy way to edit your hosts file on Windows, Mac and Linux. We also go over how to flush your DNS resolver cache.
Please note: that editing the hosts file requires administrator/root privileges.
Most of the guides I have seen on this topic while accurate are also pretty over complicated.
For Windows:
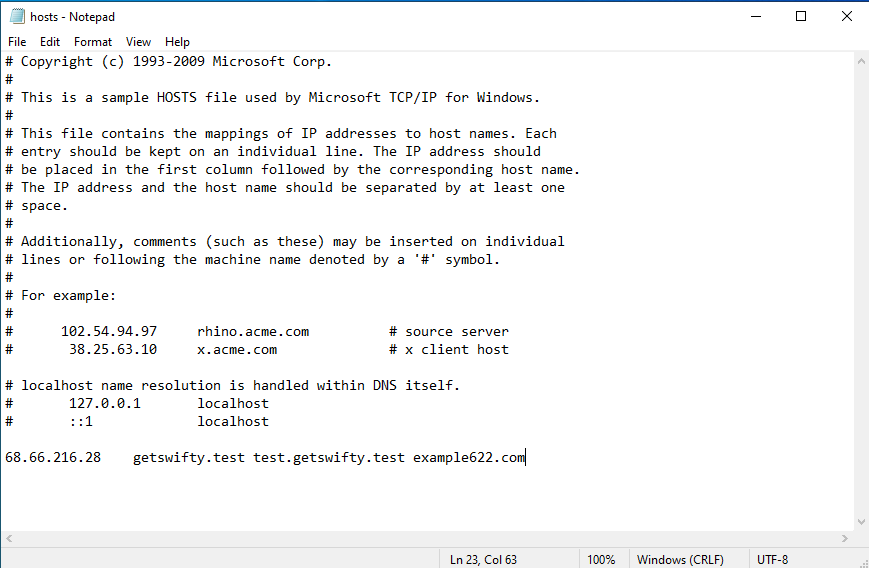
The hosts file is located: C:\Windows\System32\drivers\etc\hosts
To open this file and edit as admin:
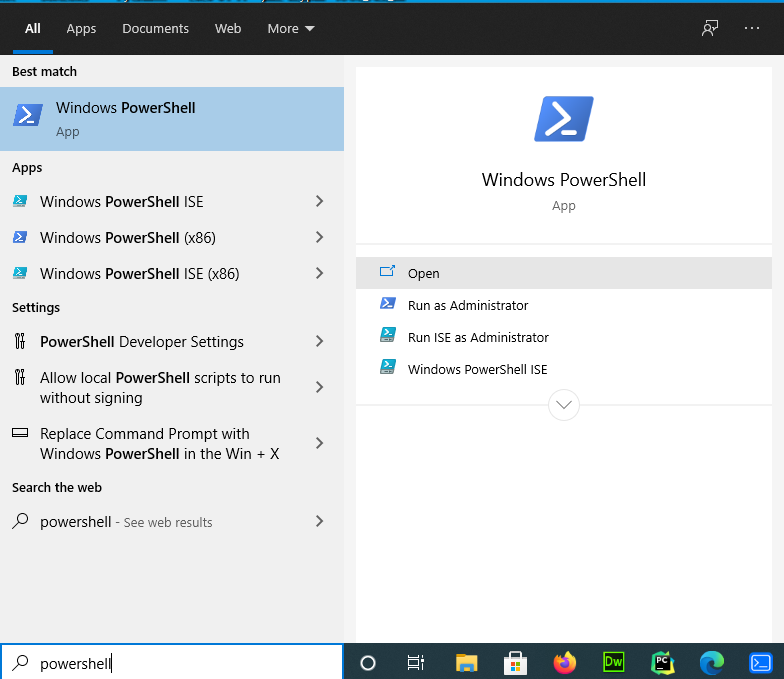
Open powershell: The fastest way to open PowerShell is via a Start Menu Search. Just click the Start or Search icon, and then type “powershell” in the search box.
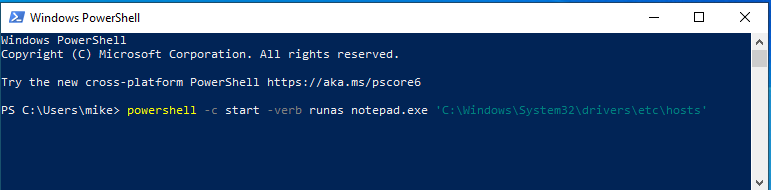
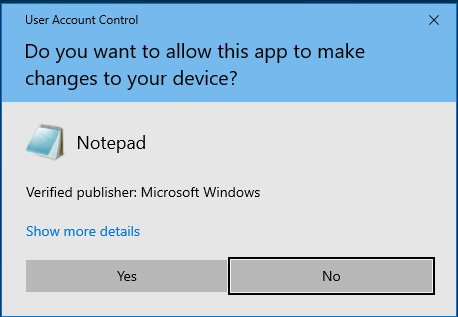
With powershell open you can then paste the below command via right click and hit enter. This will open notepad as administrator and edit the hosts file all in one go. You will see a UAC prompt due to the administrator privileges needed.
powershell -c start -verb runas notepad.exe 'C:\Windows\System32\drivers\etc\hosts'
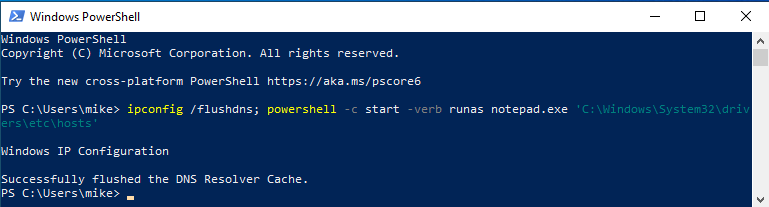
To flush dns and then edit the hosts file you can use the second one to save yourself that step later.
ipconfig /flushdns; powershell -c start -verb runas notepad.exe 'C:\Windows\System32\drivers\etc\hosts'
For a visual walk through see the below.
Once you have made changes you will want to have flushed dns resolver’s so that any cached entries are cleared and the new entries added are used. This is covered in the second command but can be done via the below manually if you still have notepad opened and are editing and saving and need to flush between edits.
For Linux:
The hosts file is located at: /etc/hosts
To edit this via a GUI graphical editor in Ubuntu/Debian one of the below commands can be used to open via xed/gedit which are the default graphical editors in Mint Linux and etc.
Linux Mint:
Ubuntu/Debian:
For cases where you may not have those installed the below alternatives will also work and edit via your default terminal editor.
To flush your resolver cache in linux see the below. There 3 main resolvers and hence ways to do this based on the local OS resolver setup.
- systemd-resolved
- dnsmasq
- nscd
For clearing systemd-resolver the below can be used.
sudo systemctl is-active systemd-resolved.service && sudo systemd-resolve --flush-caches
For clearing dnsmasq the below can be used.
sudo systemctl is-active dnsmasq.service && sudo systemctl restart dnsmasq.service;
For clearing nscd the below can be used.
sudo systemctl is-active nscd.service && sudo systemctl restart nscd.service ;
If you don’t know which one your’s is using you can also just try the below string which chains all the above and only runs if any one of those services is active it will then restart it to flush it.
sudo systemctl is-active systemd-resolved.service && sudo systemd-resolve --flush-caches; sudo systemctl is-active dnsmasq.service && sudo systemctl restart dnsmasq.service; sudo systemctl is-active nscd.service && sudo systemctl restart nscd.service ;
If your on a legacy system or one without systemd and uses upstart/init you can use something like the below to restart dnsmasq or nscd.
sudo service dnsmasq restart; sudo service nscd restart ;
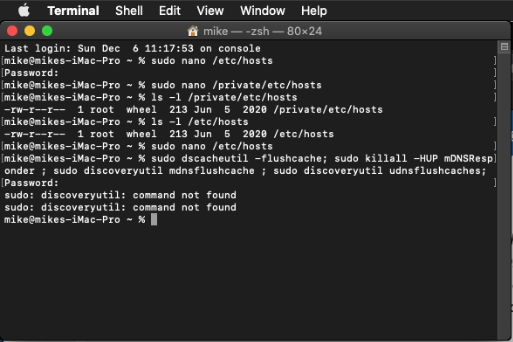
For Mac:
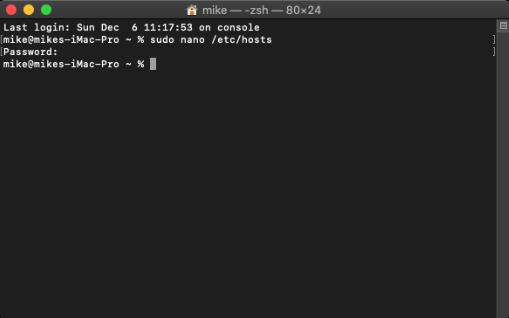
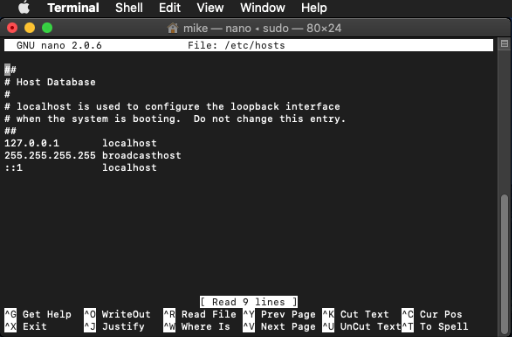
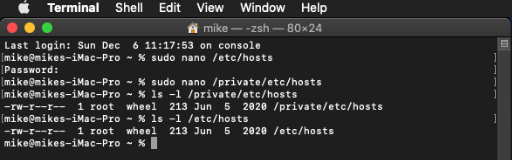
The hosts file is located in: /etc/hosts or /private/etc/hosts
You can edit this via one of the below commands:
Newer Macs:
Older Macs:
sudo nano /private/etc/hosts
To flush DNS:
The below command can be used. Please Note: If any one of them errors it is safe to ignore. MacOS depending on the version has different ways to flush the DNS. The beauty of the below command is that is accounts for all of them in one command if the legacy ones fail it doesn’t matter as it will have still flushed the cache no matter which version.
sudo dscacheutil -flushcache; sudo killall -HUP mDNSResponder ; sudo discoveryutil mdnsflushcache ; sudo discoveryutil udnsflushcaches;
Optimize your workflow:
If you find yourself doing lots of development work, migrations, and troubleshooting where you need to quickly edit your hosts file to check a site on old and new server or with and without the CDN/WAF the above steps can be pretty time consuming even with the super simple methods i condensed from being multiple steps into one or 2 commands per OS.
In the Wizard Assistant desktop app this whole process is even more refined where you can initiate the editing and dns flushing from one click inside the apps Tools menu for Windows and Linux. See example below of it in action.
Стандартный путь к файлу:
Диск С — WINDOWS — system32 — drivers — etc.
Файл открывается с помощью блокнота.
Содержимое файла должно быть таким:
(C) Корпорация Майкрософт (Microsoft Corp.), 1993-1999
Это образец файла HOSTS, используемый Microsoft TCP/IP для Windows.
Этот файл содержит сопоставления IP-адресов именам узлов.
Каждый элемент должен располагаться в отдельной строке. IP-адрес должен
находиться в первом столбце, за ним должно следовать соответствующее имя.
IP-адрес и имя узла должны разделяться хотя бы одним пробелом.
Кроме того, в некоторых строках могут быть вставлены комментарии
(такие, как эта строка), они должны следовать за именем узла и отделяться
от него символом ‘#’.
Например:
102.54.94.97 rhino.acme.com # исходный сервер
38.25.63.10 x.acme.com # узел клиента x
127.0.0.1 localhost
Все что ниже последней строчки можно и нужно удалить, затем сохранить изменения и перезапустить компьютер. После перезапуска еще раз проверьте содержимое файла. Если лишние строки появились вновь — займитесть лечением компьютера от вирусов.
Если изменения файла не допускается, зайдите в свойства файла и снимите отметку напротив строки «Только для чтения».
Вроде все.
P.S. актуально для Виндовс ХР, для других систем — аналогично.
Разного рода проблемы со входом на сайты, когда вы не можете зайти на Одноклассники, в контакте сообщают, что ваш аккаунт заблокирован по подозрению на взлом и просят ввести номер телефона, затем код, а в итоге снимают деньги со счета, чаще всего связаны с вредоносными изменениями в системном файле Hosts.
Существует множество способов исправить файл hosts в Windows и все они достаточно простые. Рассмотрим три таких способа, которых, скорее всего, окажется достаточно для того, чтобы привести этот файл в порядок. Обновление 2016: Файл hosts в Windows 10 (как изменить, восстановить, где находится).
Исправление hosts в блокноте
Первый способ, который мы рассмотрим — как исправить файл hosts в блокноте. Пожалуй, это самый простой и быстрый способ.
Сначала запустите блокнот от имени Администратора (это обязательно, иначе исправленный hosts не сохранится), для чего:
- В Windows 7 зайдите в «Пуск» — «Все программы» — «Стандартные», кликните правой кнопкой мыши по блокноту и выберите «Запустить от имени Администратора».
- В Windows 8 и Windows 8.1 на начальном экране начните набирать первые буквы слова «Блокнот», откроется панель поиска справа. Кликните правой кнопкой мыши по блокноту и выберите «Запуск от имени администратора».
Следующий шаг — открыть файл hosts, для этого в блокноте выберите «Файл» — «Открыть», внизу окна открытия переключите с «Текстовые документы .txt» на «Все файлы», зайдите в папку C:\Windows\System32\drivers\etc и откройте файл hosts.

Обратите внимание, что если у вас несколько файлов hosts, то открыть нужно тот, который без какого-либо расширения.
Последний шаг — убрать все лишние строки из файла hosts, либо просто вставить оригинальное его содержание в файл, которое можно скопировать, например, отсюда (а заодно и посмотреть, какие строки лишние).
# Copyright (c) 1993-2009 Microsoft Corp.
#
# This is a sample HOSTS file used by Microsoft TCP/IP for Windows.
#
# This file contains the mappings of IP addresses to host names. Each
# entry should be kept on an individual line. The IP address should
# be placed in the first column followed by the corresponding host name.
# The IP address and the host name should be separated by at least one
# space.
#
# Additionally, comments (such as these) may be inserted on individual
# lines or following the machine name denoted by a '#' symbol.
#
# For example:
#
#      102.54.94.97     rhino.acme.com          # source server
#       38.25.63.10     x.acme.com              # x client host

# localhost name resolution is handled within DNS itself.
#	127.0.0.1       localhost
#	::1             localhost
Примечание: файл хостс может быть пустой, это нормально, значит ничего исправлять не нужно. Текст в файле hosts бывает как на русском, так и на английском языке, это не играет роли.
После этого выберите «Файл» — «Сохранить» и сохраните исправленный хостс (он может не сохраняться, если вы запустили блокнот не от имени администратора). Также желательно после этого действия перезагрузить компьютер, чтобы изменения вступили в силу.
Как исправить хостс в AVZ
Еще один простой способ исправить hosts — использовать антивирусную утилиту AVZ (она может далеко не только это, но в рамках этой инструкции будет рассмотрено только исправление хостс).
Скачать AVZ можно бесплатно с официального сайта разработчика http://www.z-oleg.com/secur/avz/download.php (ищите в правой части страницы).

Распакуйте архив с программой и запустите файл avz.exe, после чего в главном меню программы выберите «Файл» — «Восстановление системы» и отметьте один пункт «Очистка файла hosts».

Затем нажмите «Выполнить отмеченные операции», а по завершении перезагрузите компьютер.
Утилита Microsoft Fix it для восстановления файла hosts
И последний способ — зайти на страницу http://support.microsoft.com/kb/972034/ru посвященную восстановлению файла hosts и загрузить имеющуюся там утилиту Fix it для автоматического приведения этого файла в исходное состояние.
Кроме этого, на данной странице вы найдете оригинальное содержимое файла hosts для различных операционных систем.
November 1, 2018 updated by
Leave a reply »
Every Windows version comes with a Hosts file which provides a simple mechanism to redirect website to IP address. If the HOSTS file is modified incorrectly or maliciously, it can break your Internet. In this tutorial we’ll show you how to easily reset the HOSTS file (C:\Windows\System32\drivers\etc\hosts) back to default in Windows 10.
How to Reset Hosts File Back to Default in Windows 10?
By default, the HOSTS file is protected by the operating system so you’re unable to edit it without admin rights. Here we’re going to open the HOSTS file with Notepad and restore its content back to default:
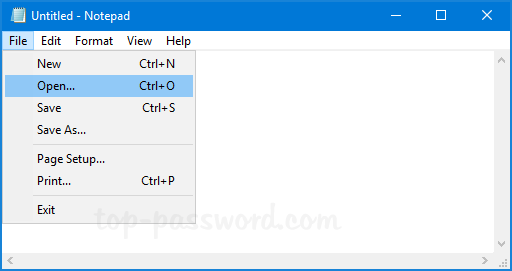
Click the Start button and type notepad. Right-click the Notepad app appeared in the search result, and then select “Run as administrator“.
With Notepad open in administrator mode, you’re ready to open the HOSTS file. Click on the File menu and select Open.
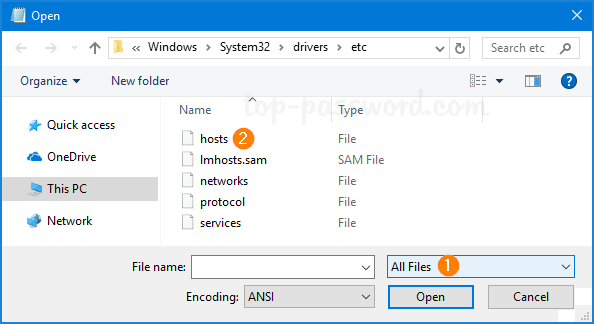
Browse to the directory C:\Windows\System32\drivers\etc\hosts. Change the file filter drop-down box from “Text Documents (*.txt)” to “All Files“, and select the HOSTS file and click Open.
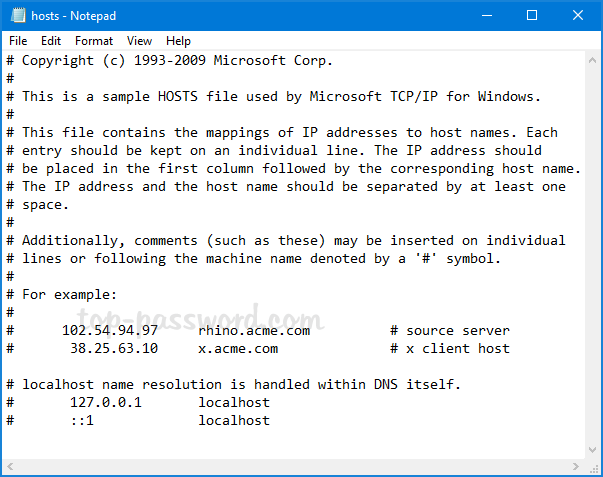
Now, paste the following text into Notepad:
# Copyright (c) 1993-2006 Microsoft Corp.

#

# This is a sample HOSTS file used by Microsoft TCP/IP for Windows.

#

# This file contains the mappings of IP addresses to host names. Each

# entry should be kept on an individual line. The IP address should

# be placed in the first column followed by the corresponding host name.

# The IP address and the host name should be separated by at least one

# space.

#

# Additionally, comments (such as these) may be inserted on individual

# lines or following the machine name denoted by a '#' symbol.

#

# For example:

#

#      102.54.94.97     rhino.acme.com          # source server

#       38.25.63.10     x.acme.com              # x client host

# localhost name resolution is handle within DNS itself.

#       127.0.0.1       localhost

#       ::1             localhost
Click on the File menu and Save. Now you’ve successfully reset the HOSTS file back to default in Windows 10. For Windows 8/7/Vista, the contents of the HOSTS file are different and you can copy them from Microsoft’s website.
- Previous Post: Configure Windows 10 to Prompt for BitLocker PIN During Startup
- Next Post: How to Change BitLocker PIN in Windows 10
Содержание
Зачем чистить файл хостс?
Многие вредоносные программы вносят изменения в файл hosts. Это может приводить к появлению рекламы, установке нежелательных программ, т.к. при вводе знакомого и проверенного имени сайта в адресной строке браузера вы рискуете попасть на совершенно другой — мошеннический ресурс, где выскочит предложение установить какую-нибудь «полезную» программу или «обновить флеш плеер». Поэтому, после удаления вирусов необходимо привести hosts в первоначальное состояние путем очистки от лишних строк. Как это сделать?
Способ 1. Очистка хостов с помощью блокнота
Запустите блокнот от имени администратора (читайте инструкцию)
Нажмите Файл => Открыть
перейдите в папку \Windows\System32\drivers\etc\hosts, выберите в фильтре Все файлы и откройте файл hosts:

Будьте внимательны и убедитесь, что вы открываете именно \Windows\System32\drivers\etc\hosts , который НЕ имеет расширения, а не hosts.txt и прочие варианты. Для этого вы можете настроить вид папки для отображения расширений.

Удалите все лишние строки, добавленные вредоносным ПО:

Нажмите Ctrl+S, чтобы сохранить.
Способ 2. Восстановление исходного состояния hosts с помощью утилиты AVZ
Скачайте программу AVZ с официального сайта: http://z-oleg.com/avz4.zip
Распакуйте архив и запустите программу (файл avz.exe) от имени администратора:

В меню Файл выберите пункт Восстановление системы. Установите галку возле пункта Очистка файла hosts и нажмите кнопку Выполнить отмеченные операции:

В следующем окне нажмите Да:

Затем нажмите ОК и Закрыть.
Способ 3. Очистка при помощи утилиты NetAdapter Repair
- Скачайте утилиту (подробности в нашей статье).
- Запустите NetAdapter Repair.
- Нажмите кнопку Clear Hosts File:

- Закройте программу.
