
Microsoft’s Windows Defender ensures your PC is safe from various threats. If this tool stops working, your machine becomes vulnerable to many types of viruses and malware. Here’s how to resolve problems with Defender.
One common reason Defender stops working is that you’re using a third-party antivirus program. Other causes include corrupt system files, an obsolete Windows version, and more. We’ll walk you through the steps to get Defender working on your computer.
Note: Generally, using more than one full antivirus app isn’t a good idea (and most won’t work right if you try). However, you can use some antimalware apps (such as Malwarebytes) along with Windows Defender to shore up your defenses.

We assume you’ve already tried the basic solutions—like retrying a scan with Defender and restarting your PC—and are still having problems. The following methods should help you resolve your issue.
1. Update the Windows Operating System
A bug in your system can cause Windows Defender not to turn on or work as intended. One way to fix most Microsoft-acknowledged bugs is by updating your Windows system.
When you update, your system receives bug fixes, which help resolve various issues with your computer. Sometimes, you also get new features when you install a Windows update.
- Launch Settings by pressing Windows + I.
- Select Update & Security in Settings.
- Choose Windows Update on the left.
- Select Check for updates on the right.

- Install the available updates.
- Restart your PC.
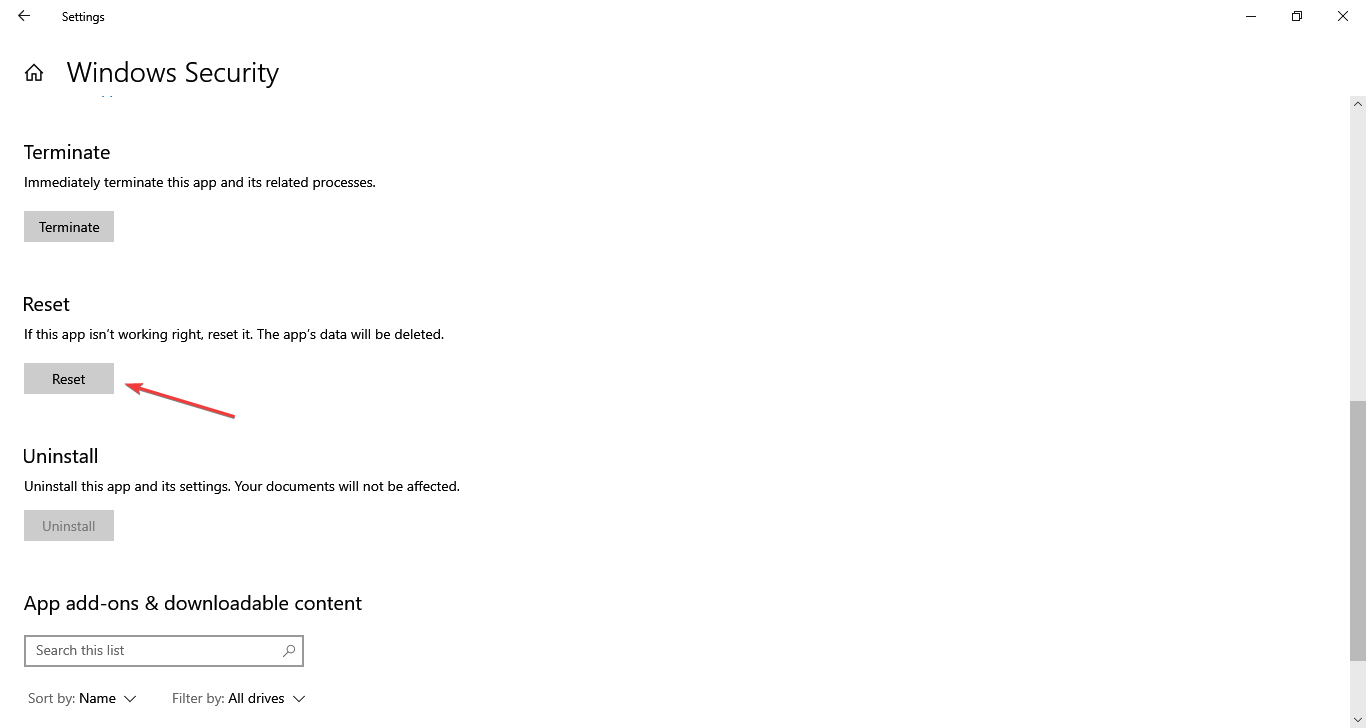
2. Reset Windows Security
When Windows Defender doesn’t work or misbehaves, resetting the Windows Security app should be your first troubleshooting step. This helps because Defender is part of Windows Security and bringing the app back to factory values resolves many minor issues.
Resetting the app will clear the app’s saved data.
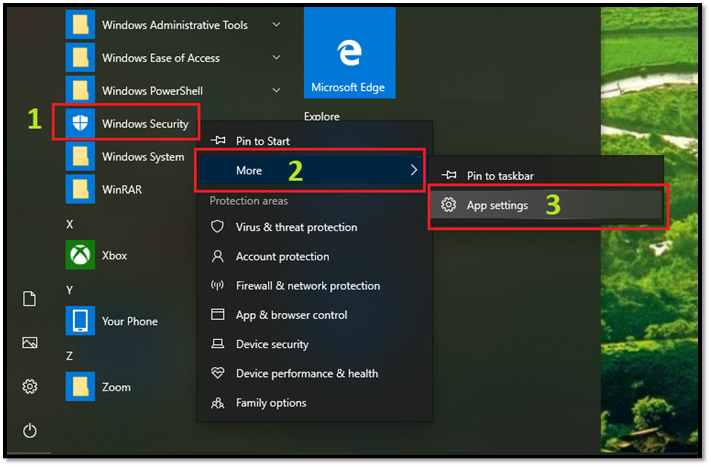
- Open Start, search for Windows Security, select the down-arrow icon on the right, and choose App settings.
- Scroll down the page and select Reset.

- Choose Reset in the prompt.

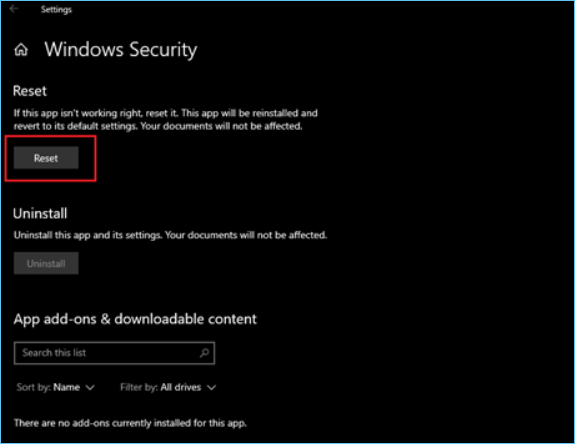
- Restart your PC by launching Start, selecting the Power icon, and choosing Restart.
- Open Windows Security and enable or run Windows Defender.
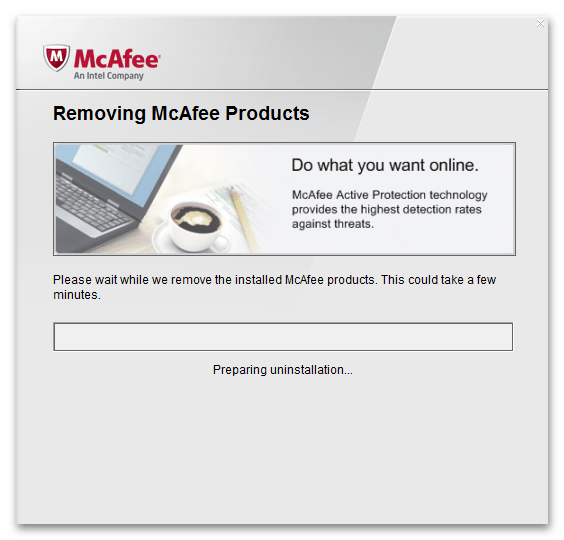
3. Uninstall the Third-Party Antivirus Program
Windows Defender turns off when a third-party antivirus is running on your PC. You can try removing your installed antivirus tool to see if that fixes Defender’s issues.
Remove a Third-Party Antivirus Program
You remove an antivirus tool like how you do other Windows apps.
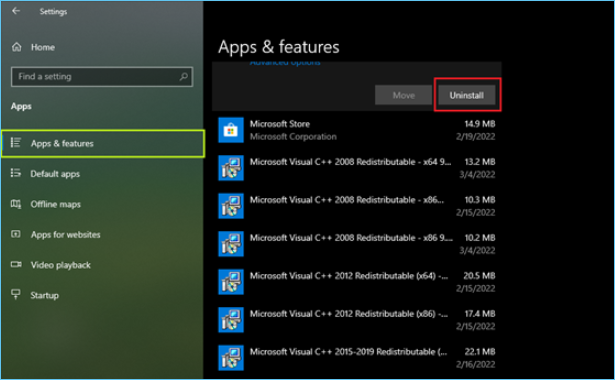
- Open Settings by pressing Windows + I.
- Select Apps in Settings.
- Choose your antivirus on the list.
- Select Uninstall.

- Choose Uninstall in the prompt.
- Reboot your PC.
When your PC turns on, launch Windows Security and see if Defender is working. If the issue persists, try cleaning up your antivirus’ leftover files to fix the problem.
Delete a Third-Party Antivirus’ Leftover Files
Microsoft has published a list of cleanup tools that you can use to remove an antivirus program from your PC completely. These tools dig deeper into your system’s directories, find the files associated with your antivirus, and delete those files.
Use the appropriate tool from the list on your PC and get rid of your antivirus tool’s leftover files. When you’re done, reboot your PC.
4. Restart the Security Center Service
Windows uses various services to keep your PC’s functions running. One of these is a Security Center service, which is related to the Windows Defender tool. You can try turning off and turning on this service to resolve your problem.
- Open Run by pressing Windows + R.
- Type the following and press Enter: services.msc
- Find Security Center in the service list on the right.

- Right-click Security Center and choose Restart.
5. Turn On Windows Defender From Registry or Group Policy Editor
If you have trouble enabling Windows Defender from the Windows Security app, try the alternative methods like Windows Registry and Local Group Policy Editor to activate the tool.
Use the Windows Registry method if you’re running the Windows Home edition. If you’re on the Pro or Enterprise edition, use the Local Group Policy Editor method.
Activate Windows Defender From Windows Registry
- Press Windows + R to open Run, type the following in the Run box, and press Enter: regedit
- Select Yes in the User Account Control prompt.
- Head to the following path in Registry Editor:
HKEY_LOCAL_MACHINESOFTWAREPoliciesMicrosoftWindows Defender - Access the DisableAntiSpyware entry on the right. If you don’t see this entry, create it by right-clicking anywhere blank and choosing New > DWORD (32-bit) Value.

- Enter 0 in the Value data field and select OK.

- Close Registry Editor.
Windows Defender is now enabled on your PC.
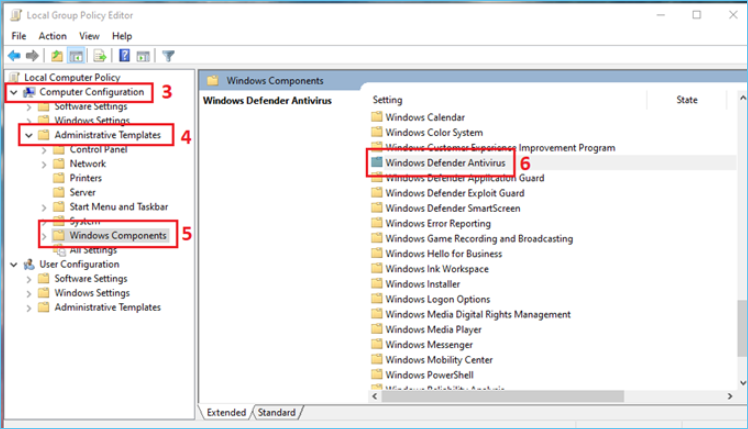
Turn On Windows Defender From Local Group Policy Editor
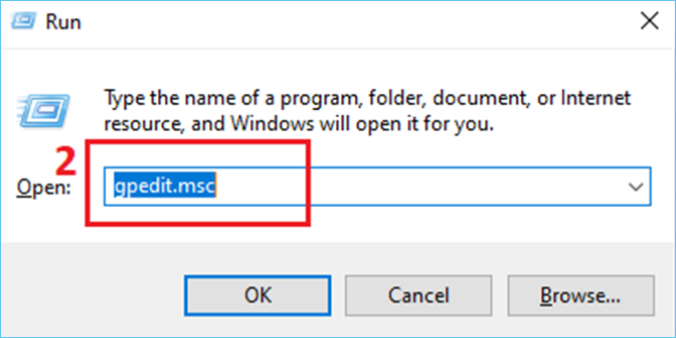
- Open Run by pressing Windows + R, type the following in Run, and press Enter: gpedit.msc
- Navigate to the following path in Local Group Policy Editor:
Computer Configuration > Administrative Templates > Windows Components > Microsoft Defender Antivirus - Open the Turn off Microsoft Defender Antivirus entry on the right.

- Select Disabled and choose Apply followed by OK at the bottom.

- Close Local Group Policy Editor.
Windows Defender is now activated.
6. Perform a Clean Boot on Your Windows PC
One possible reason Windows Defender isn’t working is that your other installed apps are causing interference with the tool. You can verify that by clean booting your system, which only loads the essential system files to turn on your PC.
If you can enable and use Defender when you’ve clean booted your PC, one or more of your installed apps are the culprit. In this case, manually verify your app list and remove the apps that you believe are suspicious.
7. Fix Windows’ Corrupt System Files
When Windows system files become corrupt, you experience unexpected issues on your machine, including Defender not working. Luckily, Windows includes a tool that you can use to find and fix all the faulty system files on your computer.
- Right-click Start and choose Command Prompt (Admin).
- Select Yes in the User Account Control prompt.
- Type the following in Command Prompt and press Enter: DISM.exe /Online /Cleanup-image /Restorehealth

- Wait for the command to finish executing.
- Next, run the following command: sfc /scannow

- Wait for the command to find and fix problematic files.
Fix the Broken Windows Defender Tool on Your Computer
It’s essential to keep Windows Defender running as the tool ensures the safety of your data. However, sometimes, the tool experiences hiccups and doesn’t work as expected. In such a situation, you can follow the above methods to eliminate the error.
Once you’ve fixed the issue, you can run a full scan to ensure no threats are sitting on your computer.
Related Posts
- How to Fix a “This file does not have an app associated with it” Error on Windows
- How to Fix an Update Error 0x800705b4 on Windows
- How to Resolve “A JavaScript error occured in the main process” Error on Windows
- How to Fix the Network Discovery Is Turned Off Error on Windows
- How to Change Folder Icons in Windows
Все способы:
- Способ 1: Удаление сторонних антивирусов
- Способ 2: Использование инструмента сброса и исправления приложения
- Способ 3: Повторная загрузка пакетов через «PowerShell»
- Способ 4: Восстановление через «Командную строку»
- Способ 5: Восстановление Windows 11 из резервной копии
- Способ 6: Сброс Windows 11 до заводских настроек
- Вопросы и ответы: 0
Способ 1: Удаление сторонних антивирусов
Работа стандартного «Защитника Windows» в Виндовс 11 автоматически завершается при установке на компьютер стороннего антивируса. Соответственно, запустить штатное сканирование или активировать защиту в реальном времени не получится, поскольку работа средства ограничена и он видит наличие на ПК другой программы. Если как раз у вас такая ситуация, когда вы используете защиту от сторонних разработчиков, для восстановления работы «Защитника Windows» сначала понадобится избавиться от такого ПО, о чем более детально читайте в другой статье на нашем сайте по ссылке ниже.
Подробнее: Удаление антивируса с компьютера
Всегда отдавайте предпочтение официальным деинсталляторам, которые скачиваются с сайта антивируса или соответствующий для удаления файл уже находится в папке с программой. Такой софт специально предназначен для полного удаления защиты вместе со связанными файлами, что избавит вас от появления конфликтов при дальнейшей попытке активации «Защитника Windows».
Что касается включения стандартной защиты, то это должно произойти автоматически после удаления стороннего антивируса и всех связанных файлов. Если у вас «Защитник» до сих пор не работает, попробуйте перезапустить компьютер и используйте средства для очистки ПК от мусора. Еще можете попытаться самостоятельно активировать защиту, чтобы запустить службы и связанные процессы.
Читайте также:
Включение «Защитника Windows» в Windows 11
Способ 2: Использование инструмента сброса и исправления приложения
В Windows 11 для стандартных приложений есть два инструмента, которые позволяют как сбросить выбранную программу с очисткой файлов кеша, так и исправить ее. Эти действия подразумевают и восстановление настроек с проверкой файлов. Для «Защитника Windows» они тоже актуальны, но распространяются на все компоненты «Безопасности». Их запуск выглядит следующим образом:
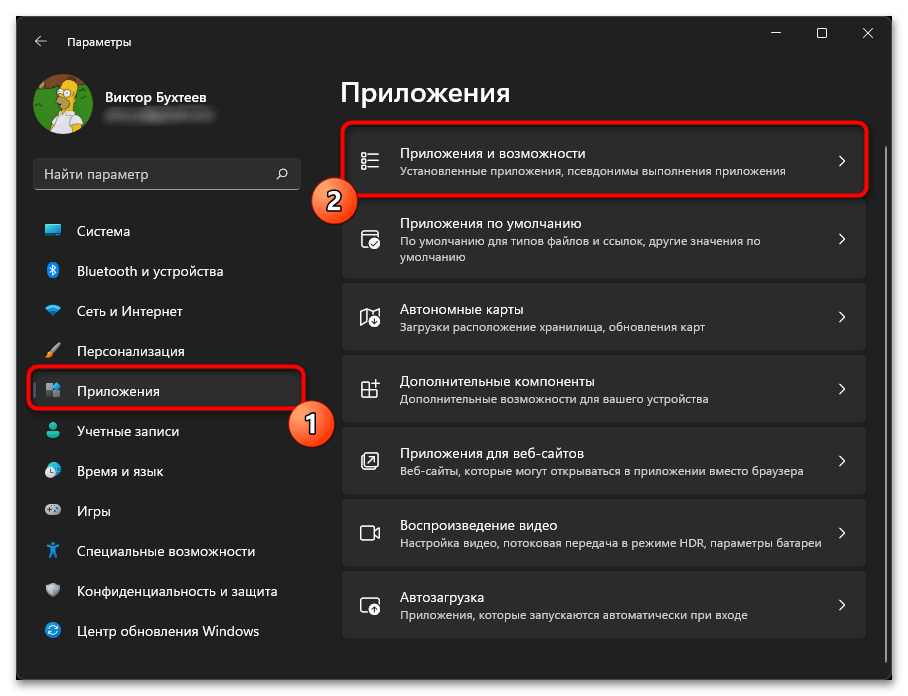
- Откройте меню «Пуск» и нажмите по значку с шестеренкой, чтобы перейти в «Параметры».
- На панели слева выберите «Приложения» и откройте категорию «Приложения и возможности».
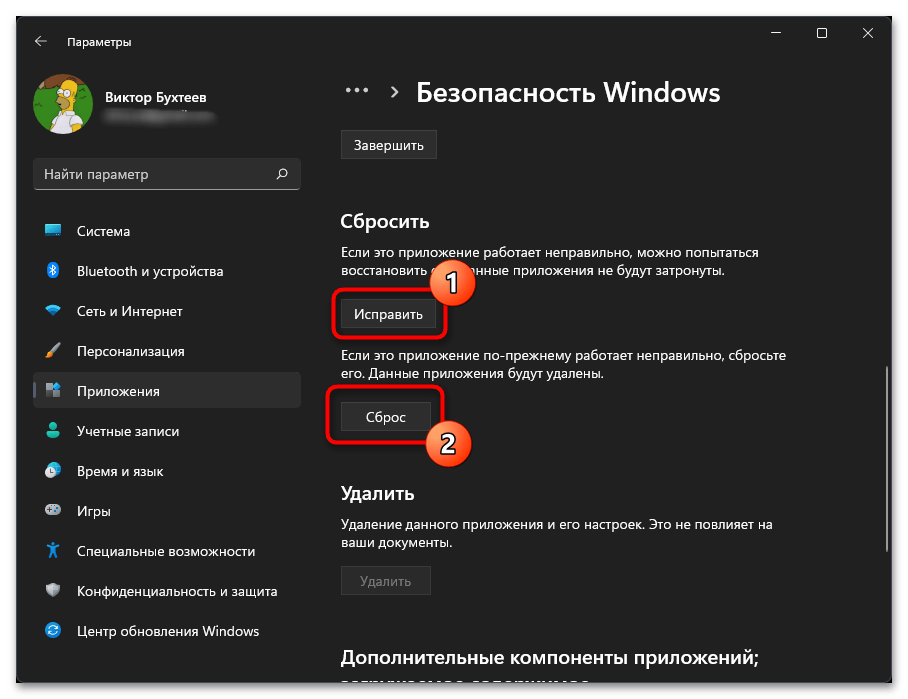
- Подождите несколько секунд, пока список всех классических и сторонних приложений будет загружен. В конце списка отыщите «Безопасность Windows», в этой плитке справа щелкните по значку с тремя точками и из появившегося меню выберите пункт «Дополнительные параметры».
- Для начала мы бы советовали запустить исправление, нажав по кнопке с соответствующим названием. Средство попытается наладить работу приложения без удаления и повторной регистрации всех файлов. После исправления рекомендуем перезапустить компьютер и после этого проверить, восстановится ли работа «Защитника Windows». Если с ним все еще проблемы, откройте это же меню и запустите «Сброс».


Способ 3: Повторная загрузка пакетов через «PowerShell»
Пользователи, которые испытывают проблемы с запуском «Защитника Windows» или вовсе не видят данное средство в операционной системе и в списке приложений, могут повторно выполнить регистрацию пакетов с заменой всех файлов. Для этого понадобится подключение к интернету и ручной ввод всего одной команды, которая запустит скачивание файлов.
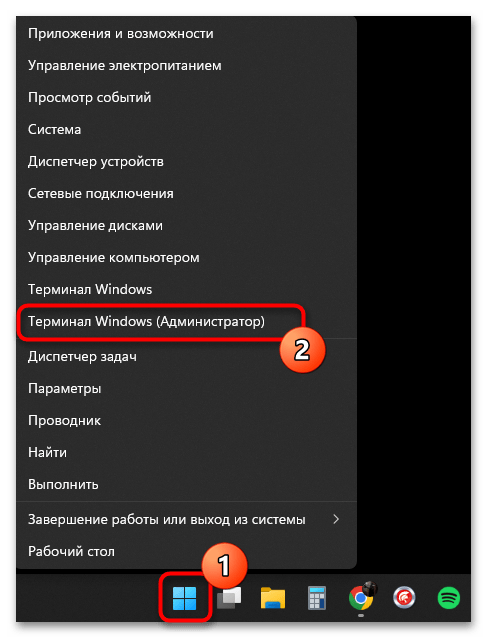
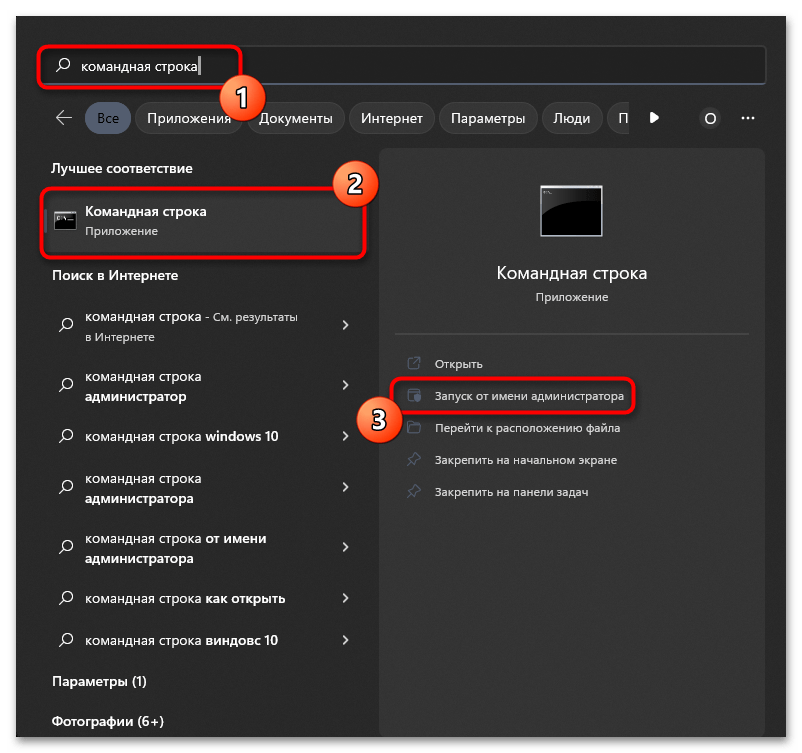
- Щелкните правой кнопкой мыши по «Пуску» и из появившегося контекстного меню выберите пункт «Терминал Windows (Администратор)».
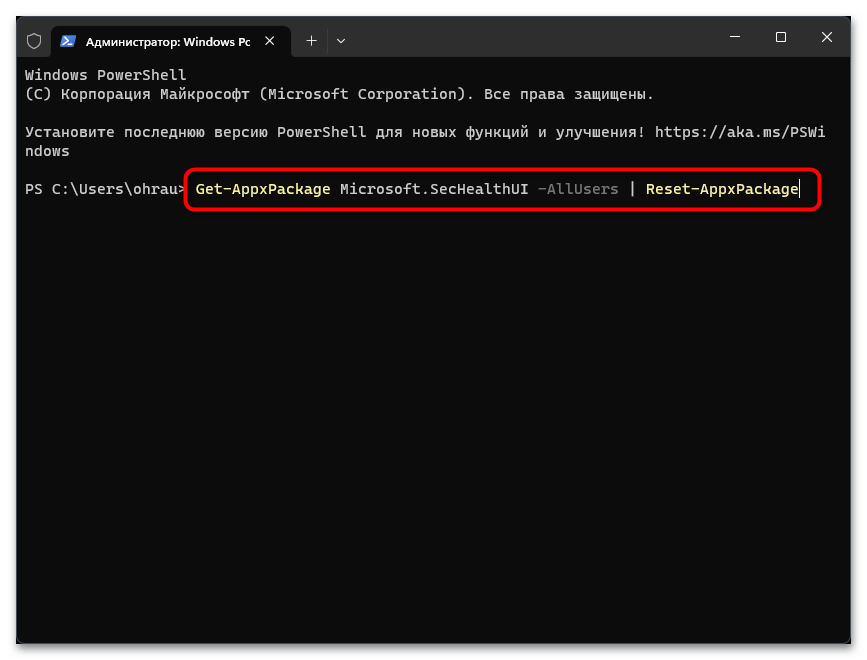
- После запуска консоли введите команду
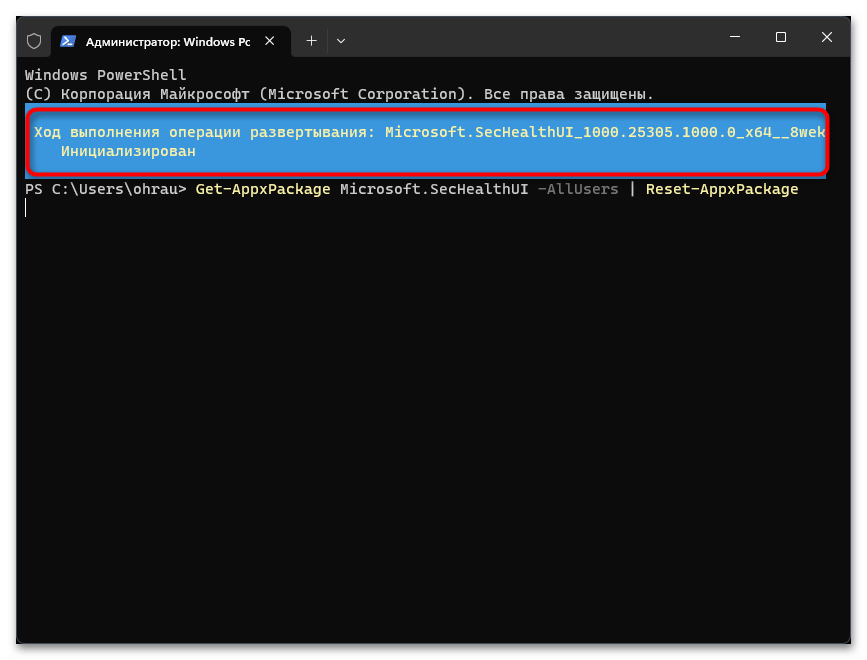
Get-AppxPackage Microsoft.SecHealthUI -AllUsers | Reset-AppxPackageи подтвердите ее выполнение, нажав клавишу Enter. - Вы будете уведомлены о том, что начата операция развертывания. Пока что просто не закрывайте консоль и ожидайте окончания данного процесса.
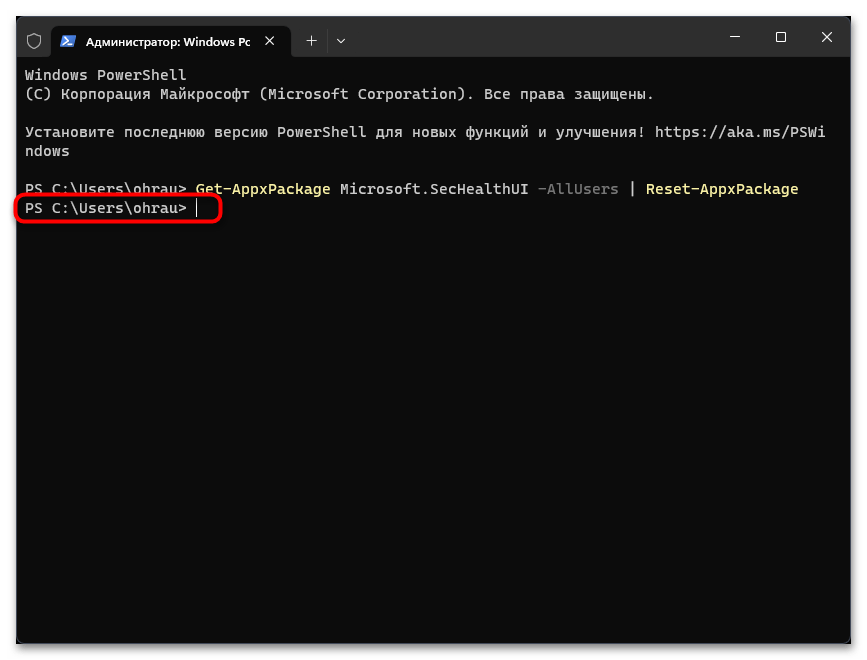
- Далее на экране должна просто появиться такая же строчка ввода команд, которую вы видели и при запуске «Терминала Windows». На этом этапе можете закрыть приложение, перезапустить компьютер и приступить к проверке стандартного антивируса.
Способ 4: Восстановление через «Командную строку»
Примерно такой же принцип действий, который был показан выше, можно выполнить и через «Командную строку». Разница будет лишь в используемых инструментах и затрагиваемых папках, что может помочь решить проблему, если предыдущий способ оказался недейственным.
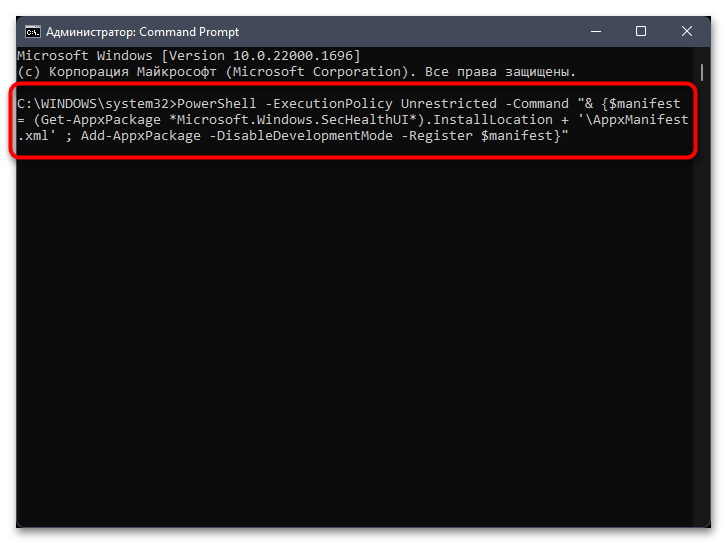
- Вам понадобится запустить «Командную строку» от имени администратора. Проще всего это сделать, отыскав приложение через «Пуск», где справа вы увидите соответствующий пункт.
- Далее введите команду
PowerShell -ExecutionPolicy Unrestricted -Command "& {$manifest = (Get-AppxPackage *Microsoft.Windows.SecHealthUI*).InstallLocation + '\AppxManifest.xml' ; Add-AppxPackage -DisableDevelopmentMode -Register $manifest}"и активируйте ее, нажав по Enter. - Если на экране появилось уведомление «Операция успешно выполнена» или просто отображается новая строка ввода команды, значит, все завершено успешно.
Способ 5: Восстановление Windows 11 из резервной копии
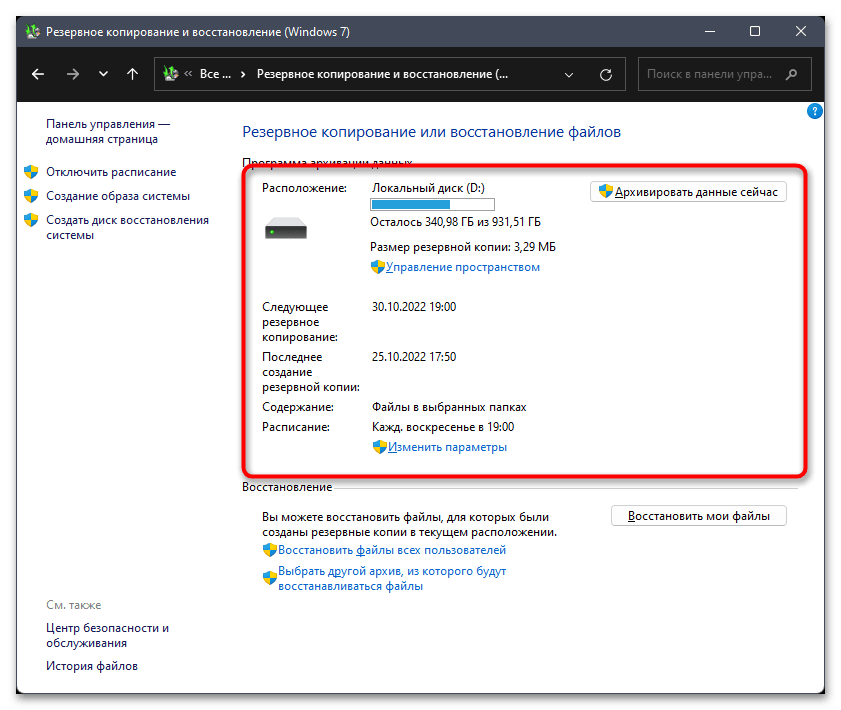
В некоторых случаях системные проблемы решаются исключительно восстановлением Windows до той точки, когда все еще работало хорошо. Это может относиться и к функционированию «Защитника Windows». Однако здесь есть один важный момент — резервная копия уже должна быть создана заранее вручную, поскольку этот процесс не настроен на автоматическое выполнение. Для создания резервных копий используются как стандартные средства, так и сторонние программы. Если у вас есть такая копия в наличии, используйте ее, чтобы откатить изменения и снова не допускать тех же ошибок, которые привели к проблемам в работе штатного антивируса.
Подробнее: Как сделать резервную копию в Windows 11
Способ 6: Сброс Windows 11 до заводских настроек
Всем тем пользователям, у кого нет резервной копии и другие методы восстановления антивируса тоже не помогают, остается только сбрасывать Windows 11 до заводских настроек. Это можно сделать с сохранением пользовательских файлов или с удалением всего содержимого системного раздела жесткого диска. Обо всех нюансах этого процесса и принципах его выполнения советуем прочитать в другом материале от нашего автора по следующей ссылке.
Подробнее: Сброс Windows 11 к заводским настройкам

Наша группа в TelegramПолезные советы и помощь
If you can’t open Windows Defender or access any of its settings, or if you have accidentally uninstalled Windows Defender, this guide will show you how to reinstall Windows Defender in Windows 11 via PowerShell command lines.
Although Windows Defender has always been the default antivirus software that comes preinstalled with Windows, some users may find the app missing after certain events such as after updating Windows or after installing or uninstalling certain third party antivirus software.
When the problem occurs and you try to open Windows Defender, Windows may prompt you the “You’ll need a new app to open this Windows Defender link” pop up that ask you to find a compatible app from Microsoft Store to open Windows Defender related link or setting. This indicates that Windows Defender is either missing or corrupted in Windows 11.
Reinstall Windows Defender in Windows 11
You can reinstall Microsoft Windows Defender in Windows 11 by executing a single line of command through PowerShell or Windows Terminal. However, you will need administrator rights to be able to execute the command.
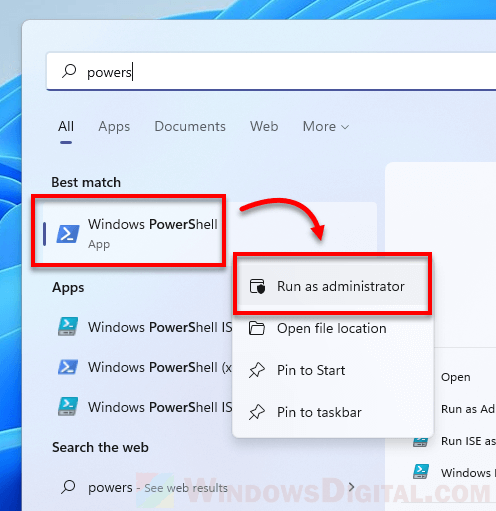
Thus, you will need to first open Windows Terminal or PowerShell with admin rights. To do so, right-click the Start button on the taskbar and select “Windows Terminal (Admin)“.
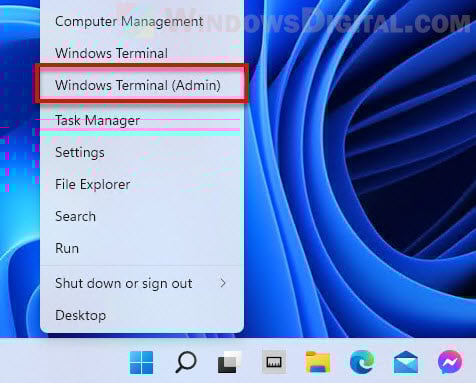
Alternatively, you can search for PowerShell through Start menu. Then, right-click Windows PowerShell from the search result and select Run as administrator.
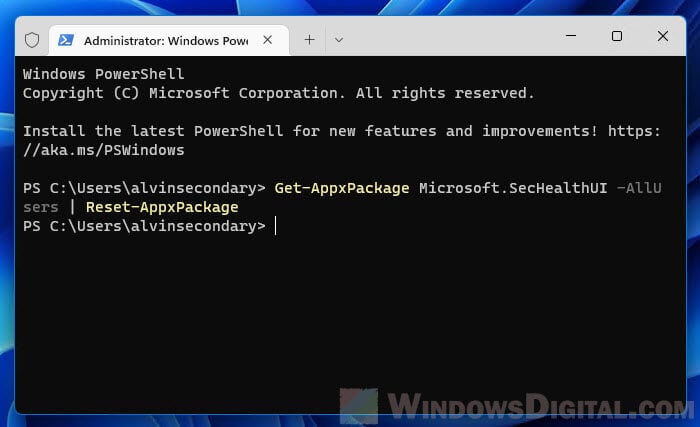
Once you have an elevated (admin) Windows Terminal or PowerShell window opened, enter the following command to reset and reinstall Windows Defender in Windows 11.
Get-AppxPackage Microsoft.SecHealthUI -AllUsers | Reset-AppxPackage
After executing the command, Windows Terminal will begin to reset Windows Defender and show a progress message that says “Deployment operation progress”. It may take a while for the process to complete.
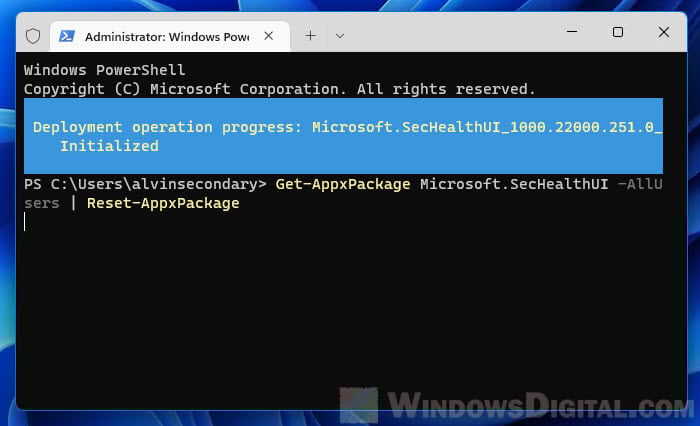
Once completed, the progress message will disappear and Windows Terminal will start at a new line, which indicates the previous command has been executed.
Now, you can press Win + i keys to open Settings and go to Privacy & security > Windows Security. This should open up the Windows Security (Windows Defender) settings like it used to.
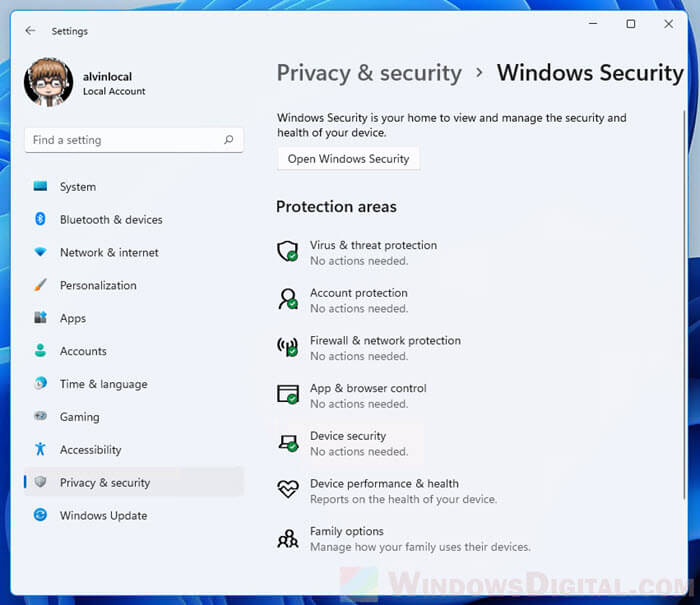
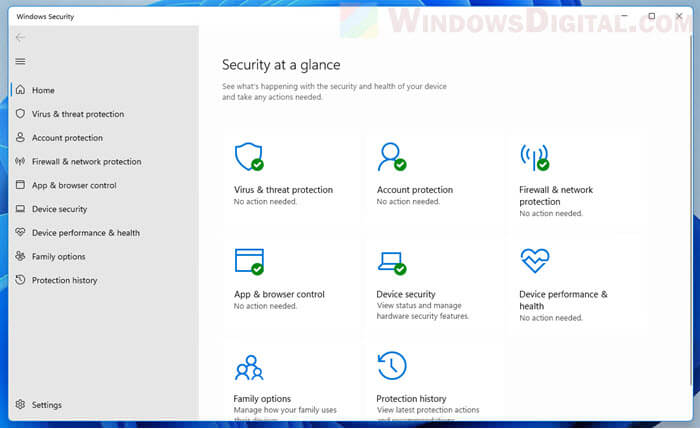
To further verify if Windows Defender is successfully installed, click on the “Open Windows Security” button to open the Windows Security window. From there, you can manage your computer’s security such as virus protection, firewall, network protection, browser control, etc.
PowerShell shows errors when executing the command
If the command above doesn’t work or if you receive errors when you execute the command, try the following commands instead to reinstall Windows Defender in Windows 11.
In an elevated (admin) Windows Terminal or PowerShell window, enter the following commands in the following order.
Set-ExecutionPolicy Unrestricted
Get-AppXPackage -AllUsers | Foreach {Add-AppxPackage -DisableDevelopmentMode -Register "$($_.InstallLocation)\AppXManifest.xml"}
Set-ExecutionPolicy Default
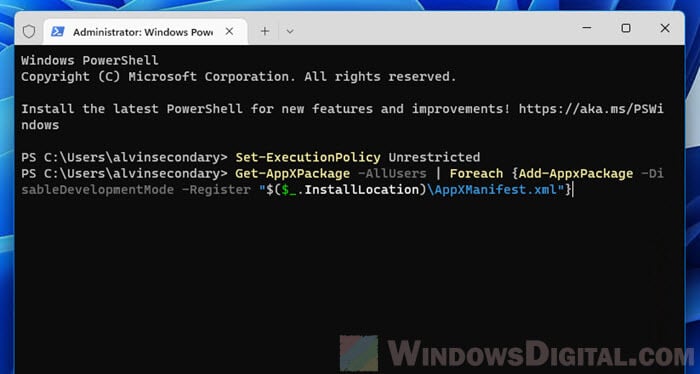
Since the command requires execution policy to be set to unrestricted in order to be executed successfully, you should set the execution policy back to its default (by running the third line of command as shown above) after the Get-AppXPackage process is completed.
If you receive an error that says “Access is denied”, it indicates that you do not have the rights to run the command. As mentioned above, you need to open Windows Terminal or PowerShell as administrator in order to execute the command successfully.
How to enable Windows Defender if you already have an existing antivirus software
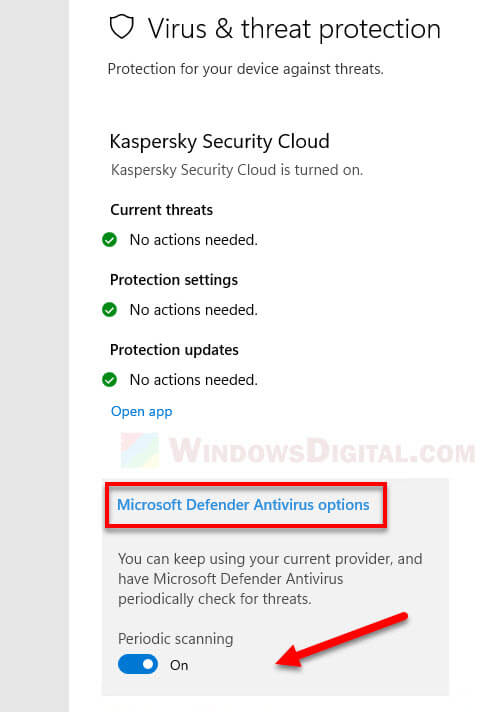
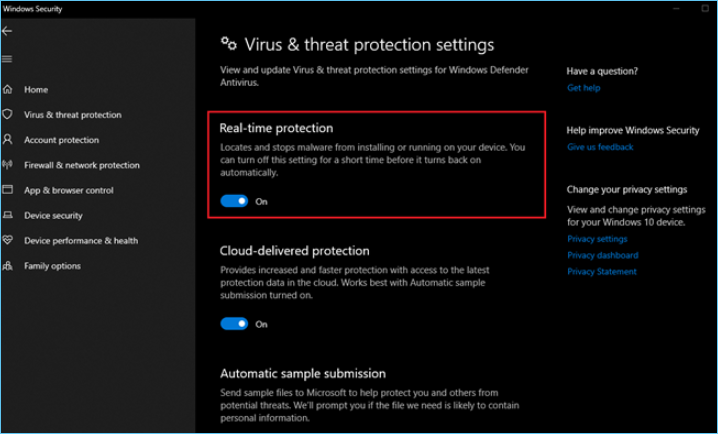
If you already have an existing third party antivirus program actively running and protecting your PC, Microsoft Defender Antivirus will be disabled. However, you can re-enable Microsoft Defender periodic scanning to have it periodically check for threats in conjunction with your other antivirus software.
To enable Windows Defender with periodic scanning when you are already using an existing third party antivirus software, open Settings and navigate to Privacy & Security > Windows Security, then click the Open Windows Security button.
Next, select Virus & threat protection and click Microsoft Defender Antivirus options. This will expand the setting and you should then be able to see a toggle option. Toggle on the Periodic scanning option to enable Windows Defender periodic scan while also using your other antivirus software.
Quick Navigation:
- 1. Why Windows Defender Not Working on Your PC
- 2. How to Get Windows Defender Work Again (7 Effective Solutions!)
- 3. Dual Protection: Keep Your Data Intact Even Viruses and Other Threats
Is Windows Defender not working on your computer? Follow along as we figure out what’s stopping it.
Windows Defender is an antivirus program that’s integrated into our Windows operating systems. This Defender by Microsoft has become one of the leading and best antiviruses today. It’s quick, efficient, and doesn’t require a separate purchase.
However, the problem is that sometimes it may stop working. Many users have complained over the years that this tool can stop working and the error of Windows Defender not turning on. The problem isn’t with the tool itself, but rather some computers, operating systems, and missing files.
So, let’s find out what you can do to fix it if your Windows Defender isn’t working.
10 Best Antivirus Software for PC Free Download
In this post, we introduce you to the top 10 antivirus software for PC free, along with an additional security measure. Check out the software and choose the one that meets your requirements.
Why Windows Defender Not Working on Your PC
Windows Defender is not working has many reasons. The plain and simple reason behind that could be to turn off real-time protection.
However, this is something that is seldom a problem. A few other, more likely and common reasons behind this could be:
- An outdated Windows or Antivirus database
- Windows services disabled or not working
- Third-party tools or antivirus programs preventing Windows Defender
- A tool or software installation that might have disabled Windows Defender
- Corrupted system file or failed Windows Update
- Restart, Shutdown, or power failure during Windows or database update
These are some of the most common reasons that cause the Windows Defender to stop working. That’s why you must check for these before you get started with the rest of the tutorial.
Is Windows Defender Good Enough to Protect My PC? Check the Best Answer
To ensure Windows security, you can spend extra money on the best antivirus software, or you can use a free program like Windows Defender.
How to Get Windows Defender Work Again
Suppose you’re continuously suffering from Windows Defender not working on your computer, then you can try a few things to make it work again. As mentioned before, there could be a few reasons behind it not working.
If you have tried resetting Defender, but nothing has worked so far, you can try these seven fixes we’ve compiled. So, let’s examine what they are.
- Fix 1. Uninstall Third-Party Antivirus
- Fix 2. Reset Windows Security
- Fix 3. Modify Local Group Policy Editor
- Fix 4. Modify the Registry
- Fix 5. Run a System Scan & DISM Repair
- Fix 6. Update the Operating System
- Fix 7. Try a Clean Boot
Fix 1. Uninstall Third-Party Antivirus
The first step you need to take is to remove any third-party antivirus software. With the prowess of Windows Defender, you don’t even need another program. So, here’s what you need to do:
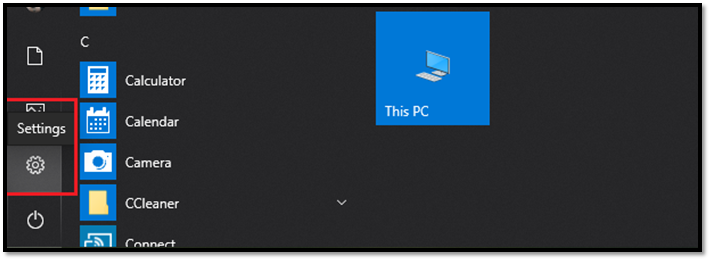
Step 1. Click on the Start button or press the Windows button on your keyboard > Click on the Settings cogwheel.
Step 2. Head into Apps
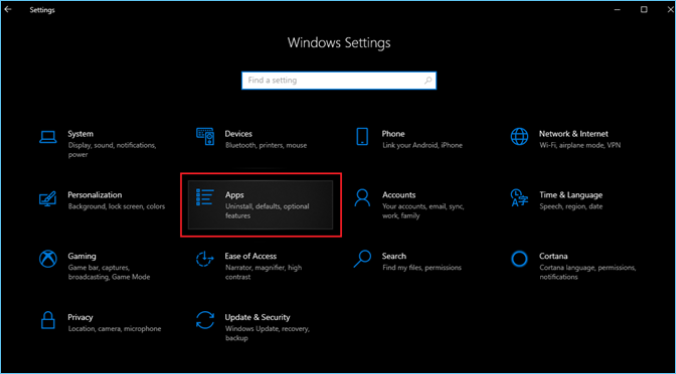
Step 3. Tap Apps & Features from the sidebar > Scroll down and find an antivirus program to uninstall it
Step 4. Click Uninstall to remove the third-party antivirus software
This will ensure no other program meddles with Windows Defender and is most likely to get it running again.
Fix 2. Reset Windows Security
If you have never had an antivirus, yet your Windows Defender isn’t working, you can fix it by resetting the Windows Security app. Here’s how to do it:
Step 1. Press the Windows button on your keyboard > Browse the app menu in Start Menu.
Step 2. Scroll down until you find Windows Security > Click on More > Then click on App Settings
Step 3. Scroll down until you find the Reset option, then click on it
This will remove any errors and underlying problems and help you rerun Windows Defender.
Fix 3. Modify Local Group Policy Editor
You need to ensure your Group Policy’s settings are intact. Sometimes, updates modify this setting, causing Windows Defender to stop working. Here’s how to fix that:
Step 1. Press Windows+R on your keyboard > Type “gpedit.msc” in run command.
Step 2. Click on Computer Configuration > Head to Administrative Templates > Tap Windows Components.
Step 3. Scroll down until you find Windows Defender Antivirus.
Step 4. Enter Windows Defender Antivirus > Scroll and find Turn off Windows Defender Antivirus & click it.
Step 5. Pick Disabled in the configuration section > Click Apply, then Okay.
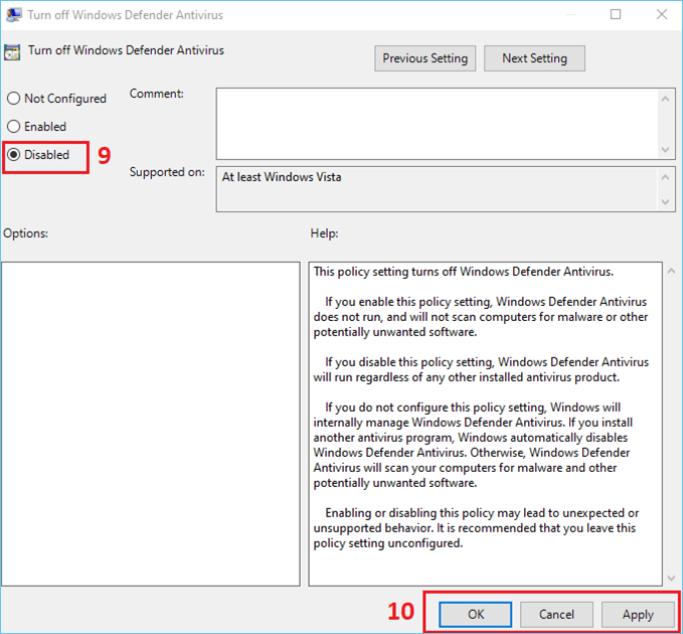
And, done. This will ensure your Windows Defender isn’t being prevented by Group Policy Editor and cause it to run again.
Fix 4. Modify the Registry
If your Windows Defender is still not working, then you can try to enable it through Windows Registry. Here’s how to do that:
Step 1. Press Windows+R and type Regedit.
Step 2. Navigate to HKEY_LOCAL_MACHINE\SOFTWARE\Microsoft\Windows Defender.
You can simply copy and paste the above-mentioned address into the top search bar.

Step 3. Find DWORD value called DisableAntivirus > Double click and set the value to 0.
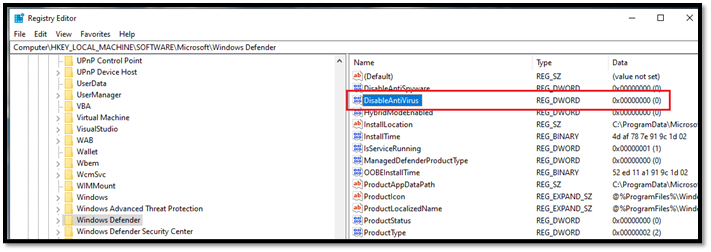
Step 4. Restart the computer for changes to take effect
This will most likely ensure your Windows Defender runs again.
Fix 5. Run a System Scan & DISM Repair
Windows 10 Deployment Image Servicing and Management or DISM is an in-built scanning and repairing command. This allows the operating system to scan and download necessary files to fix any errors within windows. Here’s how you can use it to fix Windows Defender:
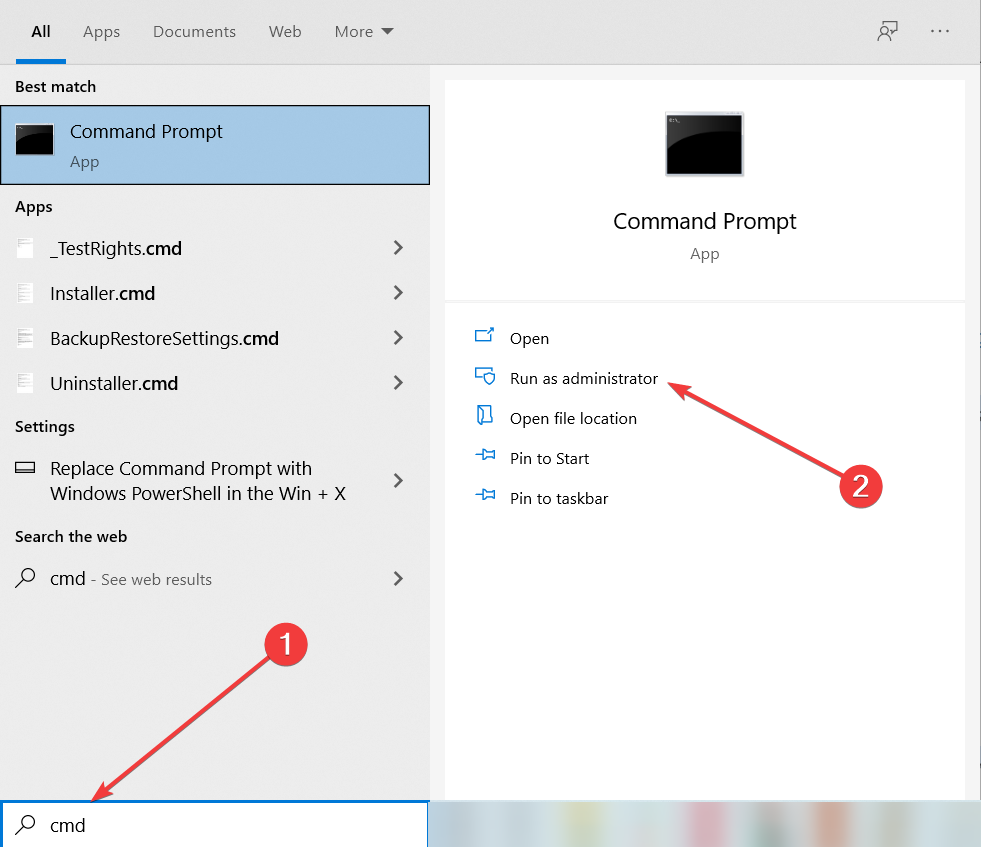
Step 1. Press Windows+R and type CMD, then Open As Administrator.
Step 2. In CMD type “DISM /Online /Cleanup-Image /CheckHealth” > Let the scan run.
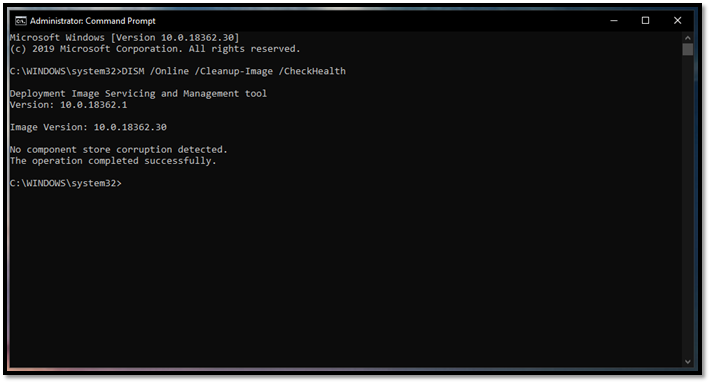
This will find any errors or problems with Windows Defender, then download and fix the files. Since our computer didn’t have any, it said, «No component store corruption detected.» Therefore, you might find it a bit different.
Fix 6. Update the Operating System
If your Windows isn’t up-to-date, it might be causing Windows Defender not to work. Here’s how you can ensure your system is up-to-date. Here’s how you can do it:
Step 1. Head to System Settings > Navigate to Update & Security > Click on Check for updates.
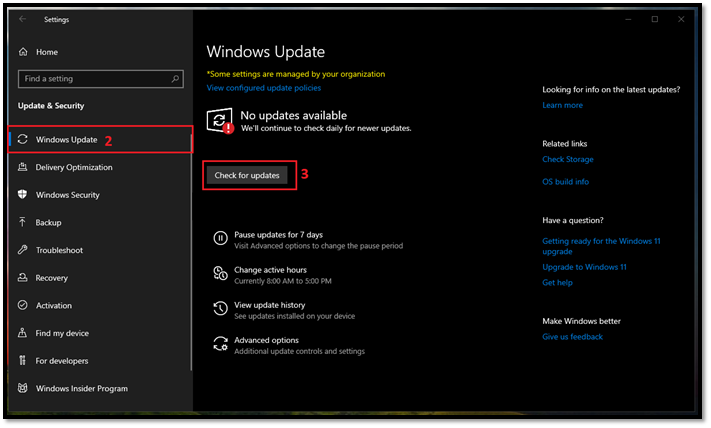
Step 2. Let the update run and wait for it to prompt for a restart
This will also update your antivirus database and cause it to work again.
Fix 7. Try a Clean Boot
A clean boot means no other programs meddling with Windows default software. You can tend it by using your Task Manager or System Configuration. Here’s how to do both:
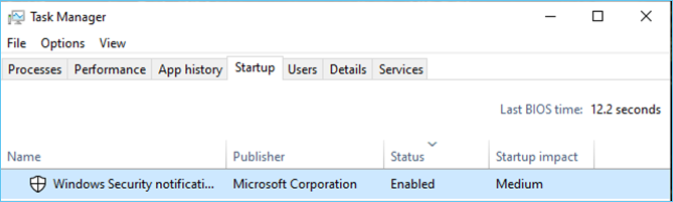
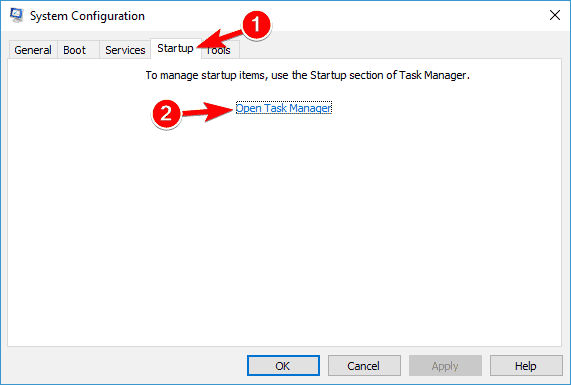
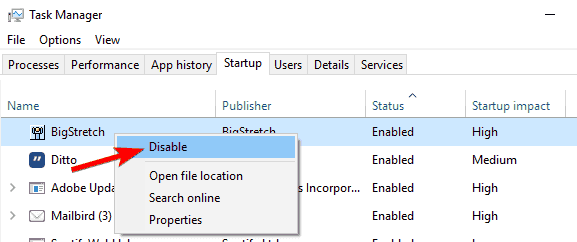
Step 1. Right-click on the taskbar and run Task Manager > Click on the Startup tab.
Step 2. Disable all the unnecessary applications except Windows Defender.
But, before you restart, you need to figure out System Configuration as well. Here’s how:
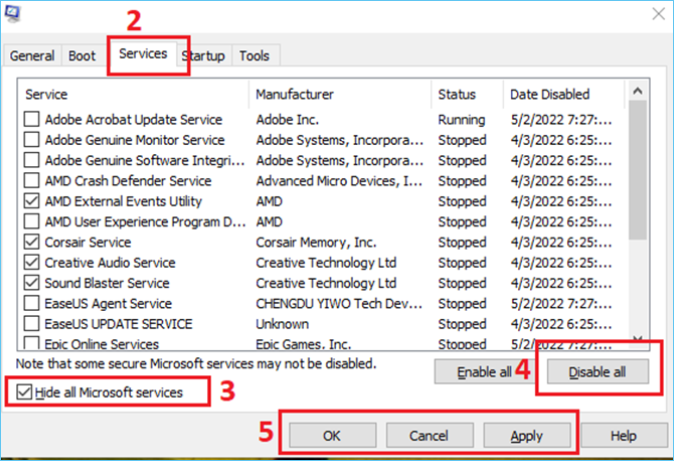
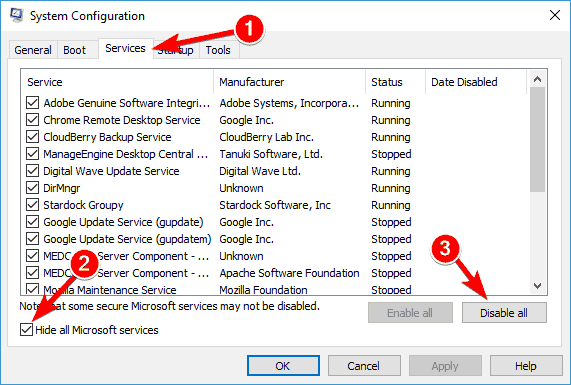
Step 1. Press Windows+R & type msconfig in the run command > Head to the Services tab.
Step 2. Check Hide all Microsoft services > Click Disable all > Click Apply, then OK.
Step 3. Restart your computer
This will ensure only Windows Defender starts up after you boot up Windows.
Dual Protection: Keep Your Data Intact Even Viruses and Other Threats
Once your Windows Defender starts running again, you never have to worry about losing your data again. While Windows Defender protects your computer from malicious content, you can always back up your important data from viruses and other threats. Therefore, you need the assistance of a third-party tool, and nothing is better at backing up your important data than EaseUS Todo Backup. Among all the backup creators, this tool stands out as the most efficient one.
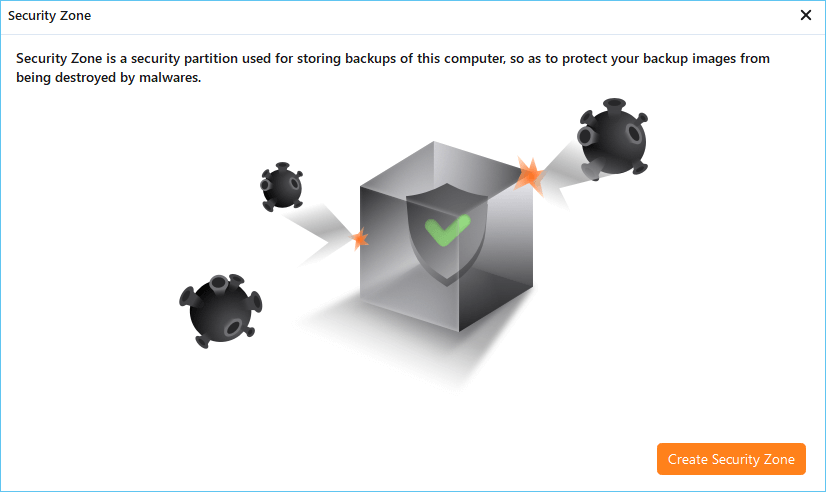
But how exactly will it protect your data from malicious content? It has a unique feature called the EaseUS security zone. This allows you to keep your files secure from any malicious threats from the outside. While Windows Defender secures your computer, EaseUS Todo Backup ensures the security of your important data. Because the security zone that this program creates goes unnoticed or unrecognized by viruses.
Therefore, even if your computer is attacked by viruses, your data will remain unaffected. And you can follow the steps below to learn how to use EaseUS Todo Backup:
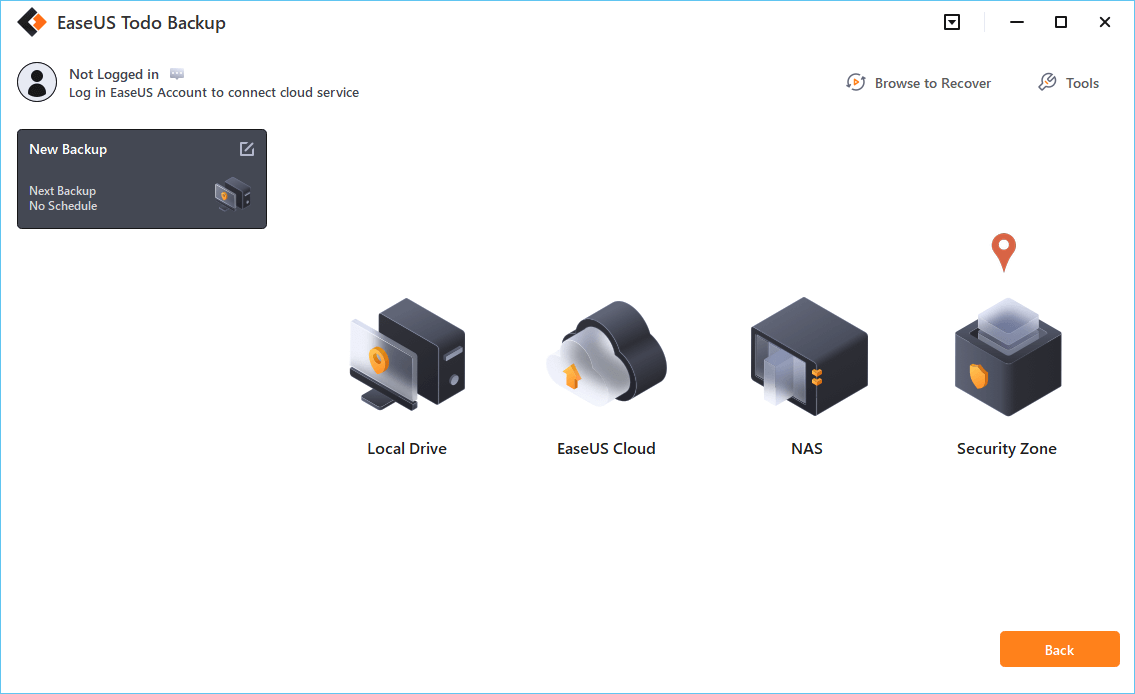
Step 1. Select Backup Contents
On the main window, click the big question mark button to select backup contents. You can choose to back up individual files, entire disk or partition, operating system and mails.

Step 2. Select Security Zone as Backup Destination
While selecting backup destination, you can see the Security Zone option. Click Security Zone and use it as a backup destination.
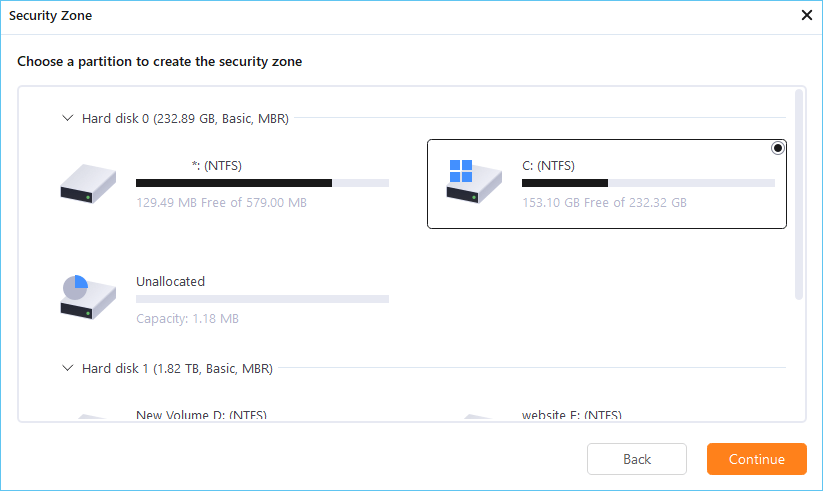
However, if you’re first to use the Security Zone function, EaseUS Todo Backup will guide you to create one. Click «Create Security Zone«.
Choose a partition with enough free space for your backups and then click «Continue«.
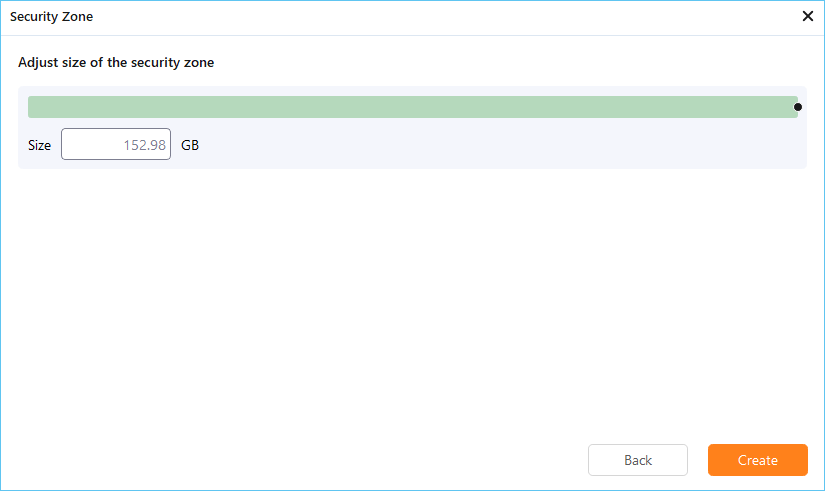
You can adjust the partition size for the security zone. Click «Create» to get it done.
Step 3. Execute the backup task
Click «Backup Now» to start the backup process. Your backups of OS, files, drives and mails in the security zone will be fully protected from being seen or destroyed by virus, ransomeware and trojan.
Conclusion
This is how you can ensure your computer’s security by making Windows Defender work again. Furthermore, you can employ EaseUS Todo Backup to secure your files if Windows Defender ever stops working.
Readers help support Windows Report. We may get a commission if you buy through our links.
Read our disclosure page to find out how can you help Windows Report sustain the editorial team. Read more
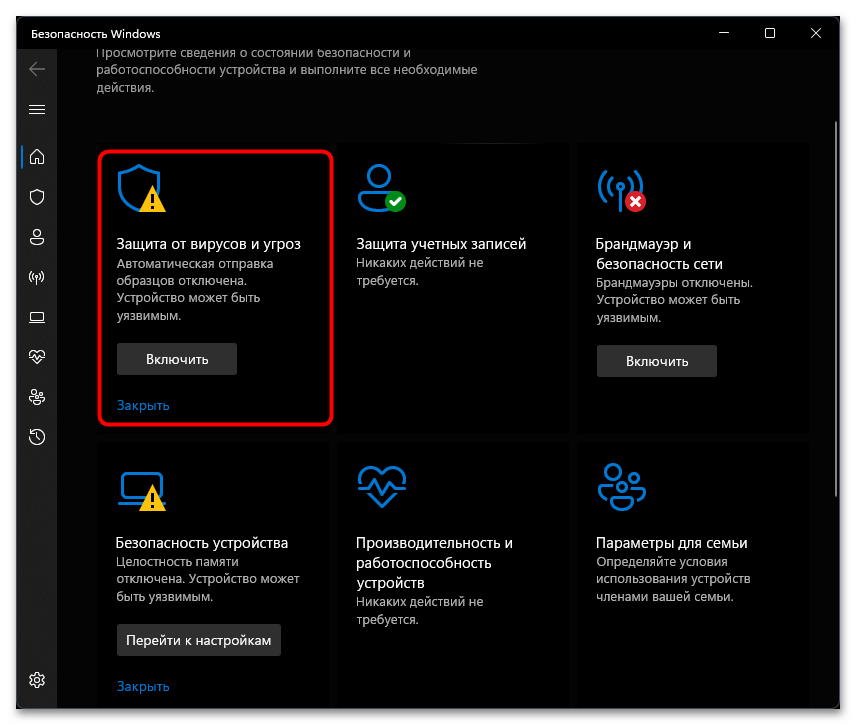
When Windows Defender isn’t working, it’s most likely due to system file problems, or because you have or have had a third-party antivirus installed on your PC. Also, Windows Defender may not open if the Security Center is disabled.
No matter the specific issue, the solutions below should help you sort it out.
How do I fix Windows Defender not working?
1. Check your system files
1.1 Run a SFC scan
- Press the Windows key + S, type cmd, and click on Run as administrator to start Command Prompt as administrator.

- Type the following command and hit Enter, then wait for the scan to complete:
sfc /scannow
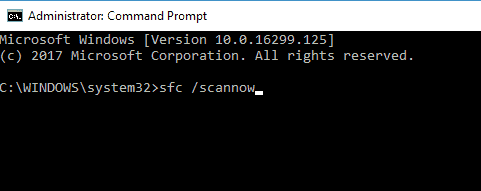
The System File Checker repairs corruption in system files. You can use it to verify whether Windows Defender is corrupted or not.
If you can’t run an SFC scan or if SFC can’t fix the problem, you might want to try using a DISM scan instead. To do that, just follow the next step.
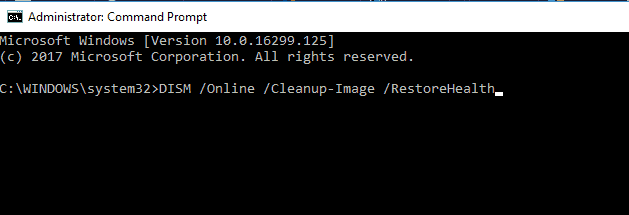
1.2 Run a DISM scan
- Start Command Prompt as administrator, as shown in the previous step.
- When Command Prompt opens, enter the following command and press Enter to run it:
DISM /Online /Cleanup-Image /RestoreHealth
- DISM scan will now start. This scan can take up to 20 minutes, so don’t interrupt it.
2. Clean boot your computer
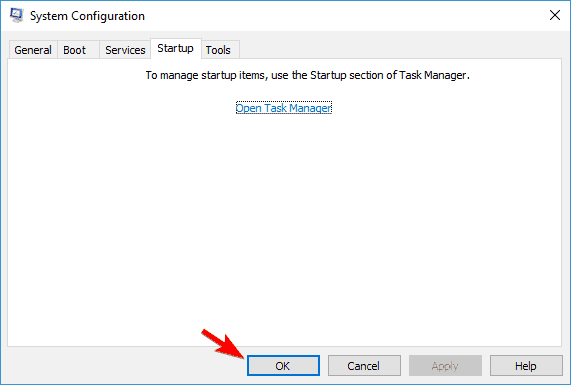
- Press Windows Key + R and enter msconfig. Press Enter or click OK.
- The System Configuration window will now appear. Go to the Services tab and check Hide all Microsoft services. Now click the Disable all button.

- Navigate to the Startup tab and click Open Task Manager.
- Now you’ll see a list of startup applications. Right-click the first entry on the list and choose Disable. Repeat this step for all startup applications.

- Once you disable all startup applications, go back to System Configuration window and click Apply and OK. Now choose to restart your PC.
Sometimes third-party applications can interfere with Windows and cause this problem to appear. However, you can find the problematic application by performing a Clean boot.
3. Remove third-party antivirus tools
If you have another antivirus installed on your PC, it can interfere with Windows Defender. To make it work, uninstall said antivirus. Then make sure it’s completely gone by following the steps below:
3.1. Delete leftover files from Program Files
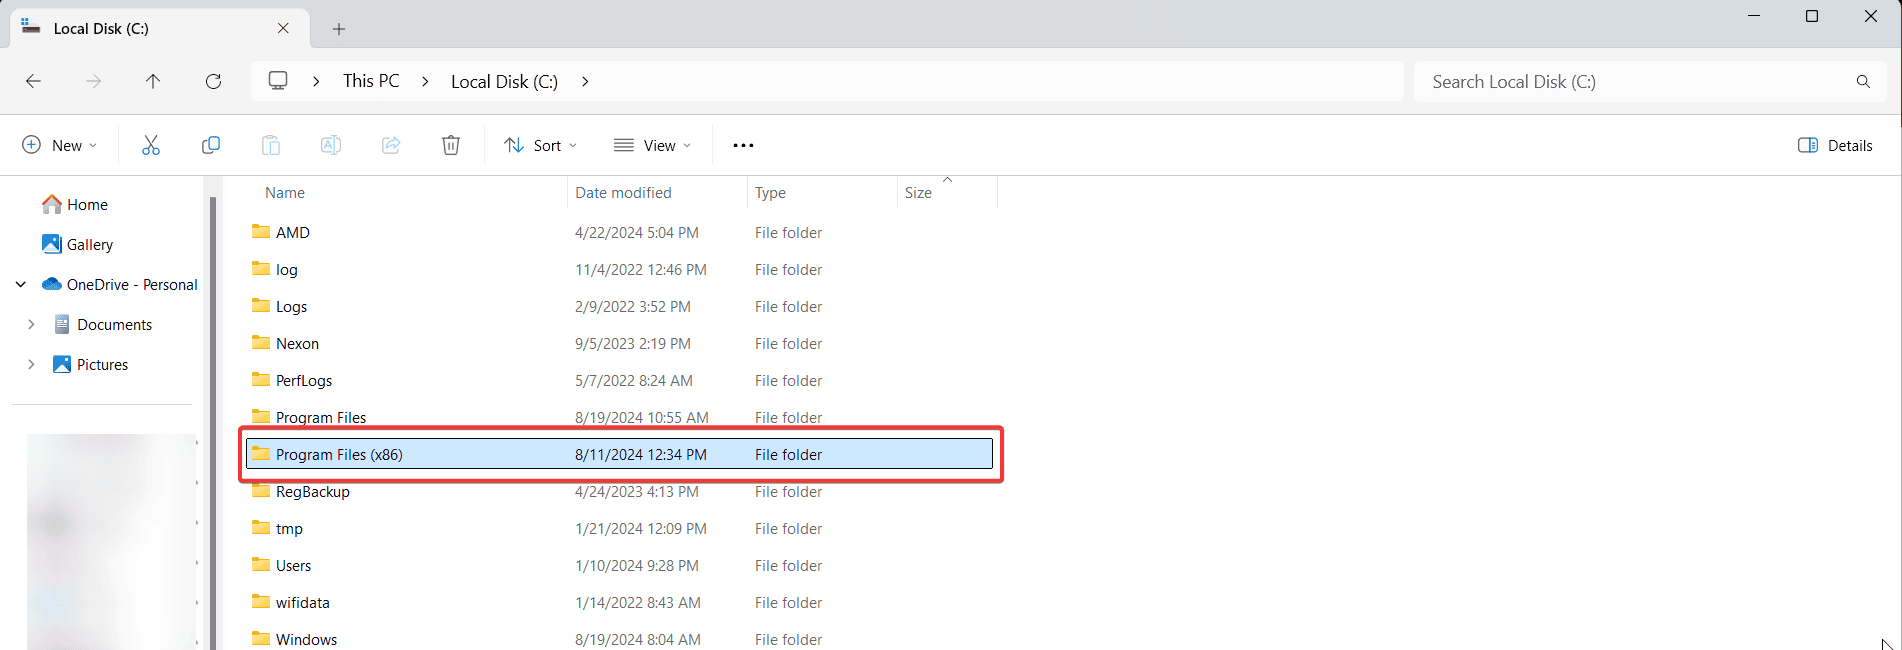
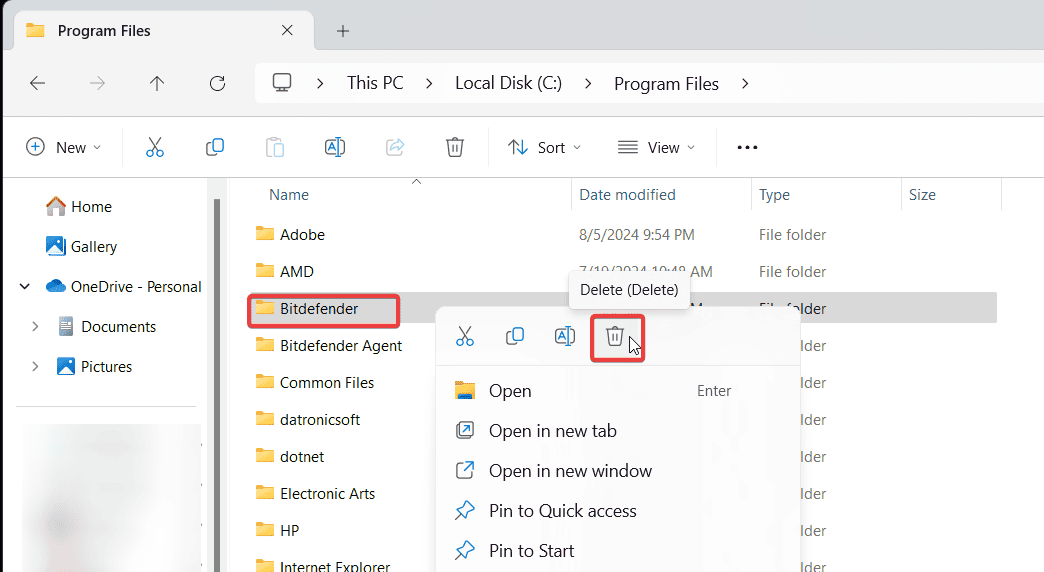
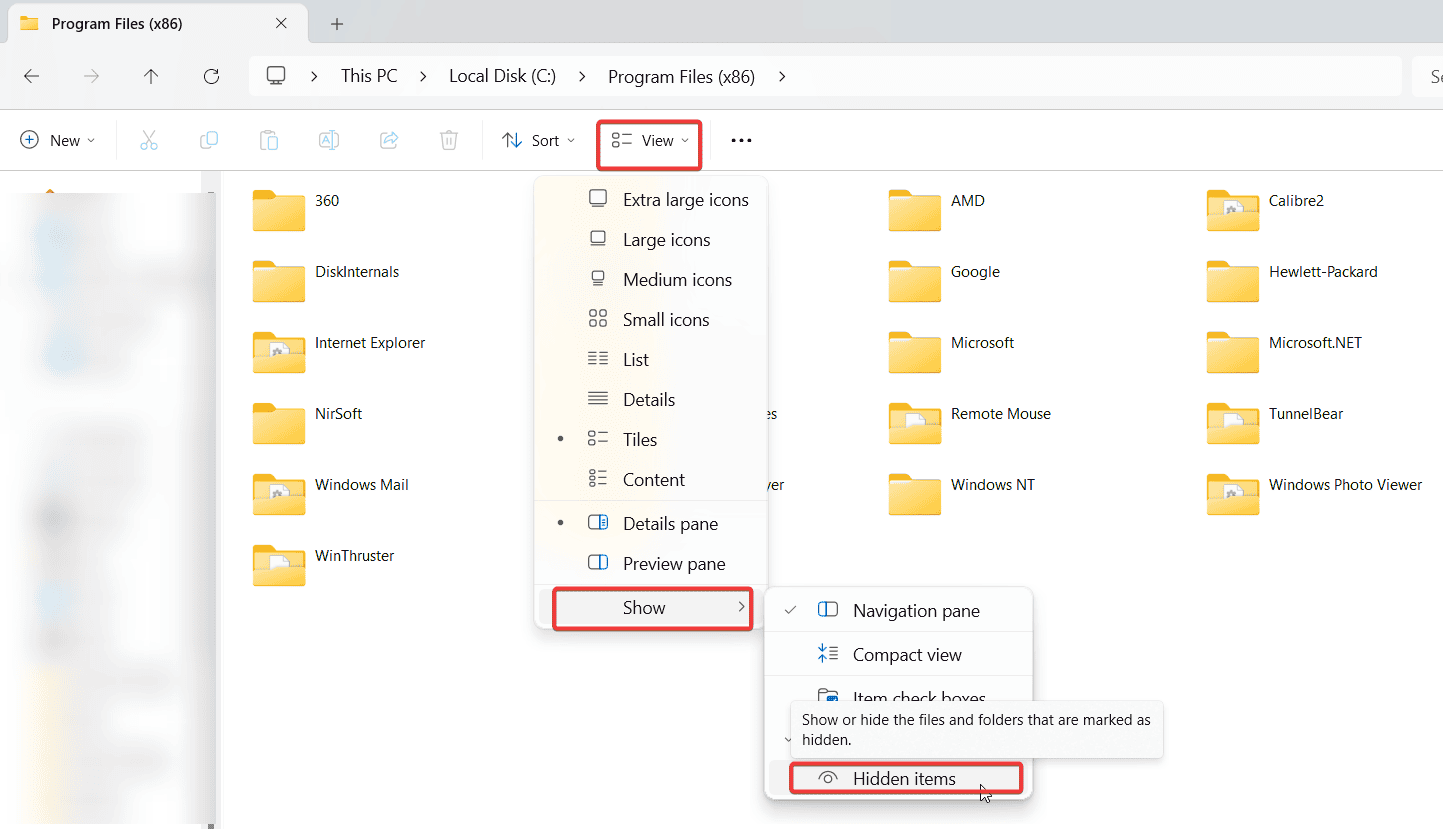
- Open File Explorer (press Windows + E or search for it in the Start menu).
- Go to This PC and then open the C: drive.
- Open both Program Files and Program Files (x86) folders.

- Look for folders related to your antivirus software (e.g., Norton, Avast, McAfee) and delete them by right-clicking the folder and selecting Delete.

- In File Explorer, click on the View tab and check the box for Hidden items to show hidden folders.

- Delete any files and folders related to your antivirus.
3.2. Use an uninstaller software
- Download and install a reliable uninstaller software such as IObit Uninstaller.

- Go to the Software Health Section.
- Locate your Uninstallation Leftovers and Select Scan Now.

- Select and delete any remaining files or registry entries found by the scan.

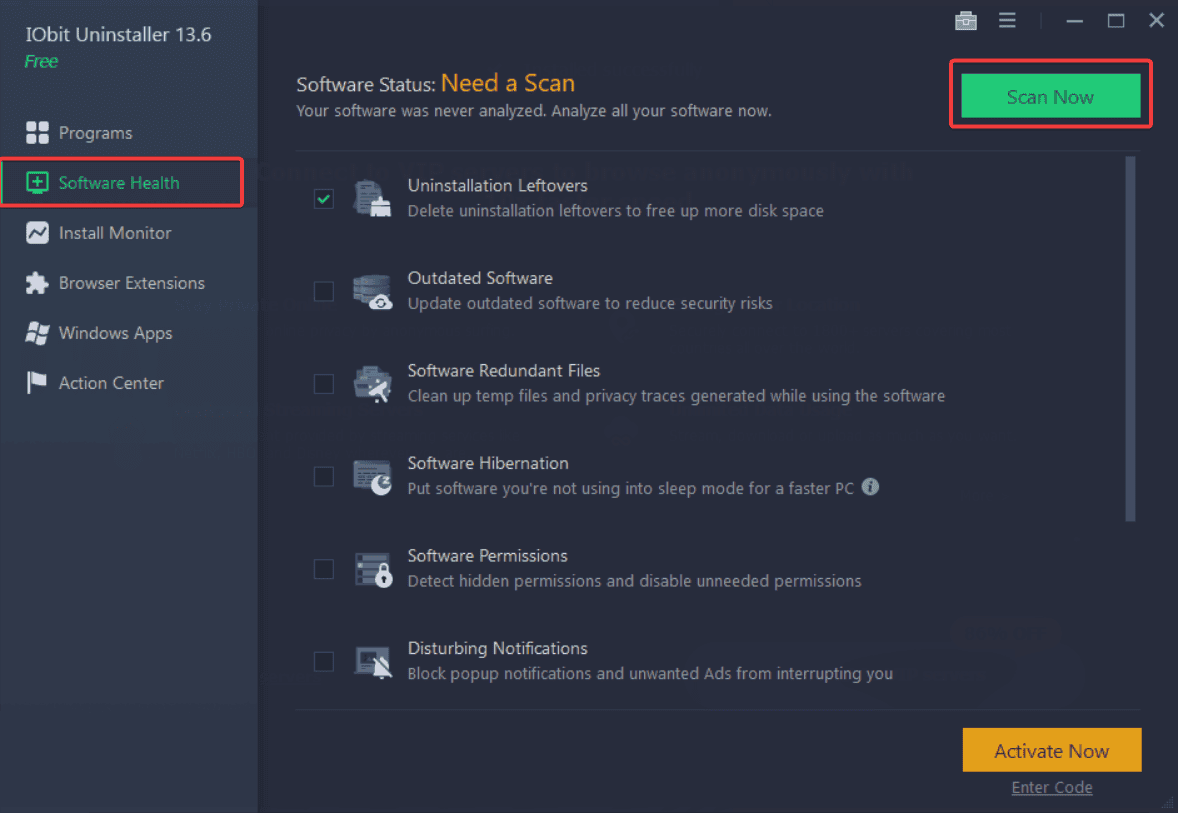
Uninstall the remnants of your previous antivirus, restart your computer and Windows Defender should be automatically enabled.
⇒ Get IObit Uninstaller
4. Restart the Security Center Service
-
1. Press Windows key + R to launch the Run app.
-
2. Type services.msc in the Run dialog box and hit Enter or click OK.
-
3. In Services, search for Security Center.
-
4. Right-click on it and select Restart.

-
5. Once you restart the required services, check if the problem with Windows Defender is resolved.
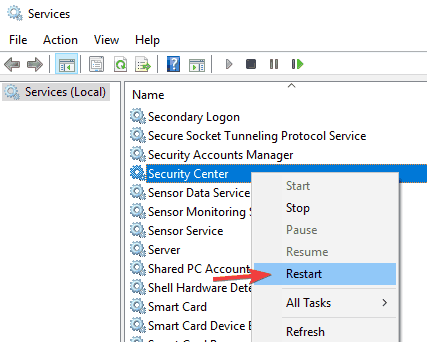
In order for Windows Defender to work properly, you need to have certain services enabled. If those services aren’t running properly, Windows Defender won’t be able to turn on at all.
However, you can always start the necessary services by performing the steps above.
5. Change your group policy
NOTE
If you’ve got a Windows Home version installed on your PC, you will not have access to the Group Policy Editor. However, you can follow our expert guide to install it.
- Press Windows Key + R and enter gpedit.msc. Now press Enter or click OK.
- When Group Policy Editor opens, in the left pane navigate to the following path:
Computer Configuration/ Administrative Template/ Windows Components/ Microsoft Defender Antivirus - In the right pane, double click Turn off Microsoft Defender Antivirus.

- Select Not Configured and click on Apply and OK to save the changes.

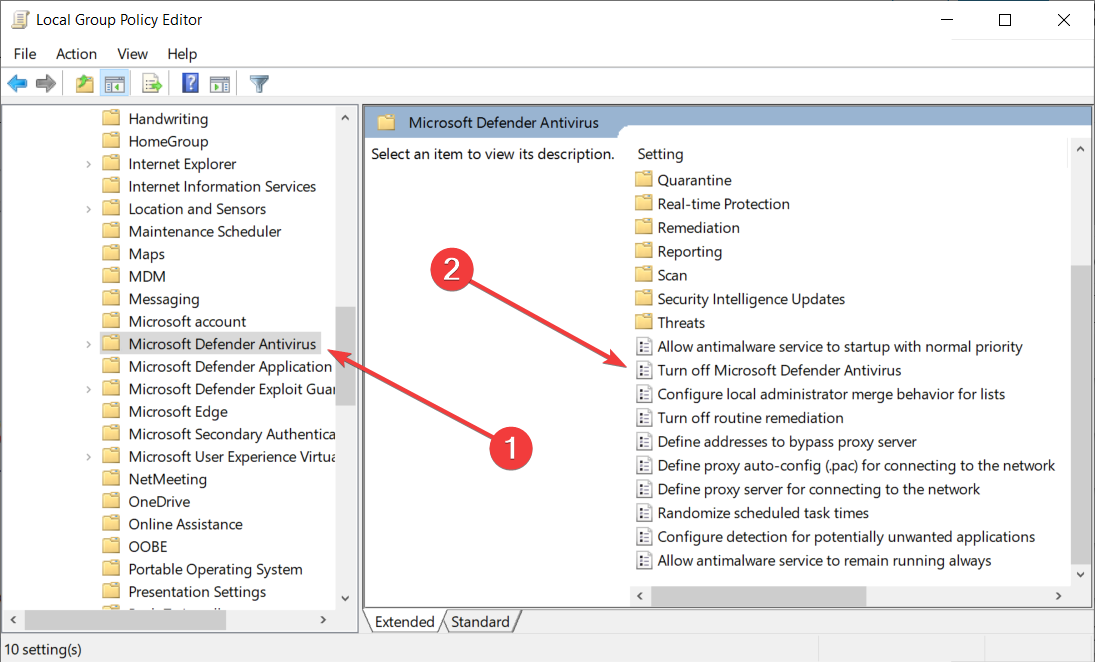
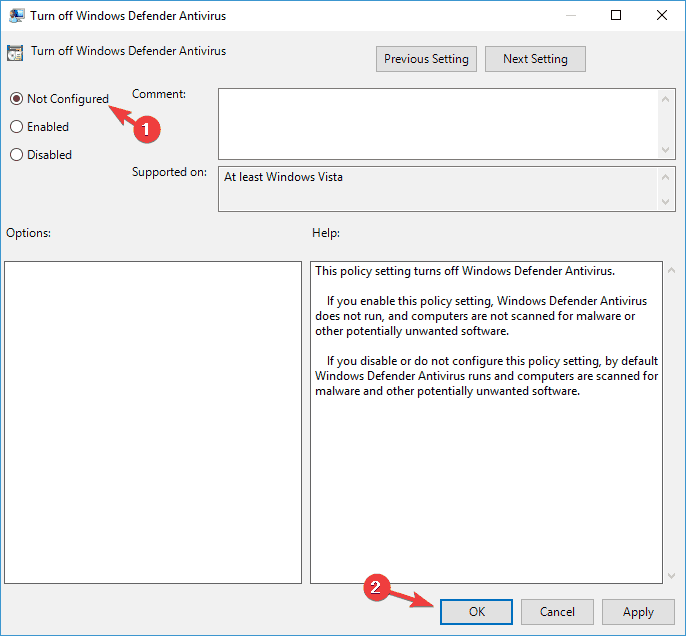
Sometimes Windows Defender won’t turn on because it’s disabled by your group policy. After making these changes, it should work.
6. Modify your registry
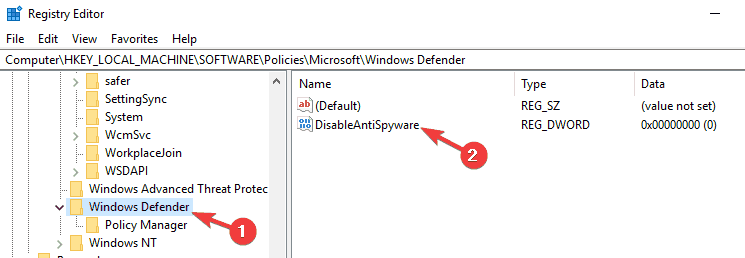
6.1 Use the Registry Editor
- Press Windows Key + R and enter regedit. Press Enter or click OK.
- When Registry Editor opens, navigate to this key in the left panel:
HKEY_LOCAL_MACHINE/SOFTWARE/Policies/Microsoft/Windows Defender - In the right pane, look for DisableAntiSpyware DWORD and double click it.
- If the DWORD isn’t available, right-click the right pane and choose New and select DWORD (32-bit) Value from the menu.

- Set Value data to 0 and click OK to save the changes.
6.2 Use Command Prompt
- Start Command Prompt as an administrator.
- Now enter the following command and press Enter to run it:
REG ADD "HKLMSOFTWAREPoliciesMicrosoftWindows Defender" /v DisableAntiSpyware /t REG_DWORD /d 0 /f
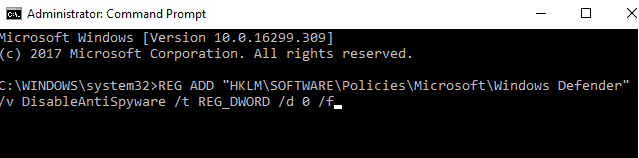
If you’re an advanced user and you prefer using the command line, you can do this from Command Prompt or PowerShell by performing the previous steps.
Some users are also suggesting deleting the DisableAntiSpyware DWORD key, so you might want to try that as well.
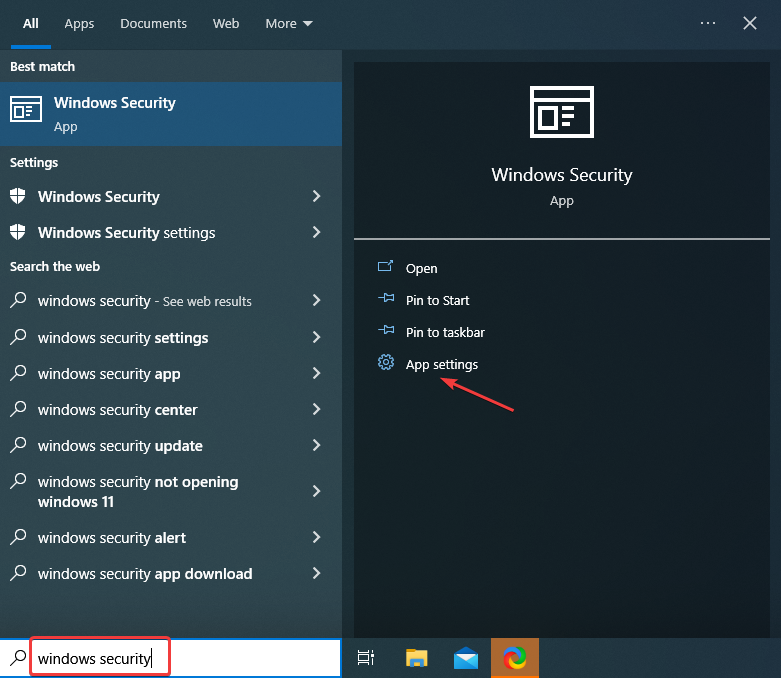
7. Restart Windows Defender
- Type Windows Security in the Search bar, and click on App settings on the right.

- Now, scroll down, locate the Reset button, and click on it.

- Again, click Reset in the confirmation prompt that appears.
8. Install a better antivirus
Windows Defender is a decent security solution for your PC, but it can’t match the services and features of a third-party antivirus.
If you’re using the Internet for shopping, banking, work, and communication, you must protect your sensitive data with a top antivirus like the one recommended below.
This tool supports all major platforms, including Windows and Android, and provides advanced banking and privacy solutions.
Over 110 million users trust ESET’s multilayered protection solution in the world so make sure you try it. You can benefit from a 30-day trial period right now.
ESET HOME Security Essential
Make sure to fully protect your PC with a top antivirus solution like ESET HOME Security Essential.
Wrapping up
With that, we conclude our guide. We hope that our solutions helped you fix this Windows Defender not opening problem for good.
We also have a guide that explains what to do if you cannot open Windows Defender Scans folder, so don’t miss it.
If you’re an advanced user, you can use CMD virus scan command to get rid of the malware.
For any other suggestions on how to deal with this problem, write us a comment below.
Madalina Dinita
Networking & Security Specialist
Madalina has been a Windows fan ever since she got her hands on her first Windows XP computer.
She is interested in all things technology, especially emerging technologies — AI and DNA computing in particular.
Prior to joining the WindowsReport team, she worked in the corporate world for a number of years.