
При отображении иконок различных программ или типов файлов в проводнике File Explorer, Windows вместо обращения к исходным файлам с иконками, получает копии картинок значков из специальных файлов с кэшем иконок. За счет того, что операционной системе не нужно каждый раз загружать оригинальные файлы иконок, ускоряется работа и прорисовка объектов в проводнике Windows.
В некоторых случаях, при повреждении файла с кэшем иконок, в проводнике (и на рабочем столе) могут отображаться белые иконки ярлыков и файлов, или вместо иконок приложений отображаются стандартные иконки Windows. В этом случае рекомендуется выполнить сброс системного кэша иконок.
На скриншоте ниже видно, что в макете стартового меню Windows 10 вместо значков некоторых приложений отображаются стандартные иконки папок.
Примечание. Некоторые пользователи при появлении такого бага пытаются переустановить проблемное приложение, что помогает далеко не всегда.
Кэш иконок в различных версиях Windows представляет собой один или несколько db файлов, хранящихся в профиле пользователя.
- В Windows 7 это файл IconCache.db в каталоге %userprofile%\AppData\Local
- В Windows 10 и Windows 8.1 – это множество файлов, имя которых начинается с iconcache_ (iconcache_16.db, iconcache_32.db, iconcache_48.db и т.д. в соответствии с размерами иконки в пикселях) и хранятся в каталоге %userprofile%\AppData\Local\Microsoft\Windows\Explorer
Не путайте файлы кэша иконок с файлами thumbs.db, которые содержат кэш эскизов изображения и видео в папке.

Сброс кэша иконок в Windows с помощью утилиты ie4uinit
В Windows есть специальная встроенная утилита ie4uinit (IE Per-User Initialization Utility), которую можно использовать для быстрого сброса кэша иконок.
- В Windows 10:
ie4uinit.exe -show - Для Windows 7:
ie4uinit.exe -ClearIconCache
Эту команду нужно выполнить через меню Win+R -> команда -> Enter.
Команды абсолютно безопасные, но помогают восстановить нормальное состояние кэша иконок далеко не во всех случаях.
Скрипт удаления файлов с кэшем иконок в Windows
Чтобы сбросить кэш иконок, достаточно удалить db файлы с кэшем. Но предварительно нужно завершить процесс проводника File Explorer, чтобы он не блокировал доступ к файлам iconcache. Рассмотрим, как сбросить базу данных кэша иконок без перезагрузки Windows.
- Закройте все запущенные приложения;
- Откройте окно командной строки (
cmd.exe
или
powershell.exe
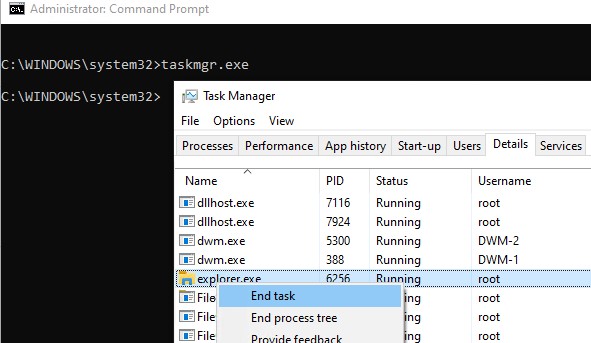
) с правами администратора; - Запустите диспетчер задач
taskmgr.exe - В окне Task Manager перейдите на вкладку Details, найдите процесс explorer.exe и завершите его (End Task);

- Также вы можете завершить процесс из командной строки:
taskkill /f /im explorer.exe - Затем последовательно выполните следующие команды для удаления кэша иконок в профиле пользователя (в зависимости от версии ОС):
Для Windows 10/ 8.1 (просто скопируйте этот код в окно командной строки или сохраните как текстовый файл reset_icon_windows.bat).
taskkill /f /im explorer.exe
cd /d %userprofile%\AppData\Local\Microsoft\Windows\Explorer
 attrib -h iconcache_*.db
del /f IconCache*
del /f thumbcache*
cd /d  %userprofile%\AppData\Local\
attrib -h  IconCache.db
del /f IconCache.db
start C:\Windows\explorer.exe
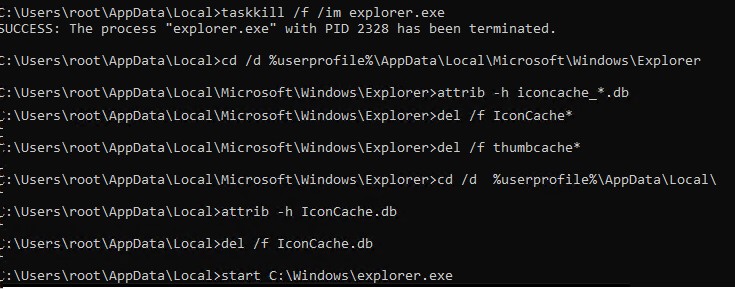
В моем случае скрипт не смог удалить только файл
iconcache_idx.db
(Access is denied), но это не повлияло на итоговый результат. Кэш иконок был успешно сброшен.
Для Windows 7:
cd /d %userprofile%\AppData\Local
del /f /a s IconCache.db
start C:\Windows\explorer.exe<
Последняя команда в обоих случаях перезапустит процесс проводника Windows (
explorer.exe
), который при запуске пересоздаст файлы с кэшем иконок (в соответствии с заданными файловыми ассоциациями).
Table of contents
- What are Windows Icons?
- How do icons work on Windows 10?
- What is the icon cache on Windows 10?
- Where is the icon cache stored on Windows 10?
- How to Rebuild the icon cache on Windows 10?
Sometimes, you may notice that your Windows icons are not displayed properly. Instead of specific application icons, you may be seeing default Windows icons, or the icons may be missing altogether. How do you repair broken icons in Windows 10? This is the question we will try to answer in this article, giving you every information you need on how to reset and rebuild the icon cache on your computer and get your icons working properly on Windows 10.
What are Windows Icons?
Icons are graphic images that represent a file, a program, a web page, or a command on Windows 10 (and other operating systems). They are a really quick and convenient way of executing commands and opening files and documents, and they make the interaction with your PC smooth and hassle-free. All you need to do to open a program or file is double-click the right icon and the program will open instantly.
When everything is working properly on your PC, you will see the icons of the applications on your computer displayed the way they always are, and double-clicking an icon will bring up the needed program. However, if there are issues with your icon cache, you may stop seeing certain icons or they may appear broken.
How do icons work on Windows 10?
You can see icons everywhere on your PC: The Control Panel, Programs and Features, File Explorer, etc. The icons that the system uses for your documents and programs are stored in the icon cache. This way, they can be shown quickly on your computer without having to load from scratch every single time. Storing them on a hard disk and having to retrieve them and render them every single time would take up a lot of system resources.
Most of the time, this system works perfectly well and all your icons show up looking just the way they are supposed to.
However, at some point you may notice that your icons are loading slowly or not working properly. There are instances when you will suddenly see a blank or damaged icon where a perfectly good icon used to be. In this case, you may need to go through the process of rebuilding the icon cache to fix the issue.
So, why are you running into icon issues on your Windows 10 PC in the first place? There are various possible reasons for that. Your icon cache may be out of date, which will lead to icons displaying incorrectly or not showing at all. You may have upgraded an application and the new version of this application came with a new icon— but your desktop may still be displaying the old one.
If you are experiencing any of the issues mentioned above, you will need to rebuild your icon cache on Windows 10. In this mini guide, we will show you the steps on how to reset the icon cache database on Windows 10.
What is the icon cache on Windows 10?
In order to bring up icons quickly and efficiently, Windows stores them in memory. When you shut down or restart your PC, the operating system will write the icon cache to a hidden file on your computer’s hard drive, and this way, the icons won’t need to be reloaded later and will be ready for instant use. The file keeps growing as more information is added to it.
When Windows needs to show an icon, it will first check the cache, and then display the needed icon if a match is found. If a match isn’t located, the system will check the executable file and scan the application directory.
Where is the icon cache stored on Windows 10?
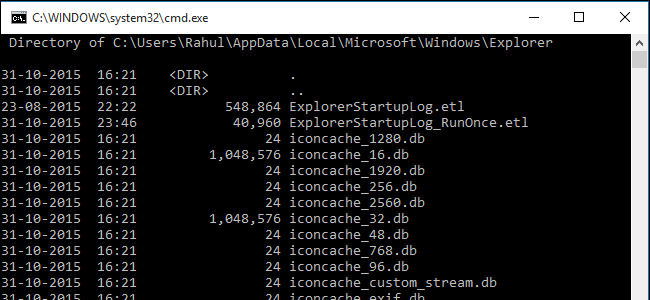
The icon cache file can be found at the following address:
C:\Users\<your username>\AppData\Local\Microsoft\Windows\Explorer.
Where <your username> is the login name for your Windows account.
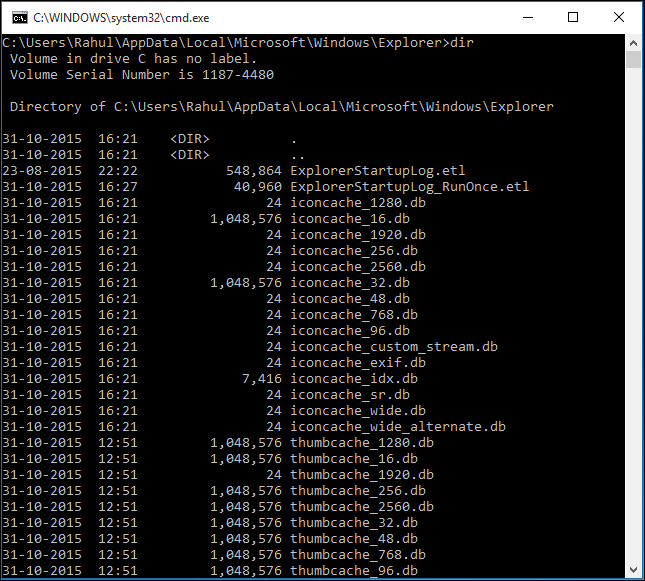
Once you open the folder, you will find several icon cache files here:
- iconcache_16.db
- iconcache_32.db
- iconcache_48.db
- iconcache_96.db
- iconcache_256.db
- iconcache_768.db
- iconcache_1280.db
- iconcache_1920.db
- iconcache_2560.db
- iconcache_custom_stream.db
- iconcache_exif.db
- iconcache_idx.db
- iconcache_sr.db
- iconcache_wide.db
- iconcache_wide_alternate.db
If you decide to rebuild the icon cache, you will need to delete all the “iconcache” files that you see in this folder. However, it’s not as simple as selecting all the files in the folder and pressing Delete. Rebuilding your icon cache is a more complex process that will require you to follow a specific sequence of steps that we will explain below.
Please make sure to follow all the steps in the order that they are presented in order to avoid further issues with your system icons.
How to Rebuild the icon cache on Windows 10?
Rebuilding your icon cache on Windows 10 is not particularly difficult — but it will require going through several steps in a specific order and you will need to enter the commands precisely for all the processes to work properly. Here’s what you should do to rebuild the icon cache on your Windows 10 PC:
- Open Command Prompt with administrative privileges.
- In Command Prompt, type “echo %username%” (without the quotes). The command will let display your username. Make sure to note it down somewhere (preferably, on a piece of paper) because you will use it later on.
- Then, note down the address:
cd C:\Users\<your username>\AppData\Local\Microsoft\Windows\Explorer. Replace “<your username>” in the address with the username you noted down earlier.
- Note down the following command: del iconcache*
- Note down the following command: explorer
- Now, go to Task Manager and click Details.
- Under Details, locate the “explorer.exe” process, single-click it, and then click on End Task.
- In Task Manager, go to the File menu and run “CMD” (without the quotes) as an Administrator.
- In Command Prompt, run the commands you have noted down before and make sure you hit the Enter key after typing each line:
cd C:\Users\<your username>\AppData\Local\Microsoft\Windows\Explorer
del iconcache*
Note that the “*” at the end of the command is necessary for all the files that start with ””concache” to be included in the delete operation. This way, you get to delete all the icon cache files.
- In Task Manager, go to File, click on “Run new task”, type “explorer” (without the quotes), then check the box beside “Create this task with administrator privileges” before clicking on OK.
Once you have gone through the steps above, press the Ctrl + Alt + Del keys on your keyboard and click Sign Off. Next, go on and sign back in. Any broken or missing icon should now be back in order. Please note that rebuilding the icon cache won’t fix your thumbnail issues or restore a missing shortcut icon — you will need to go through a different set of steps to get those issues resolved. In most cases, these things can be easily fixed with just a few tweaks with your system settings.
However, rebuilding your icon cache does help with getting your icons to work and look the way they are supposed to. Thus, after completing the steps above, you should no longer be facing any icon-related issues on your computer.
If you are still experiencing issues with the way your icons are displayed, however, this may have to do with other system issues and it would probably be best to refer to a professional or try running a troubleshooter or a performance boosting program.
In fact, if you are often running into glitches, errors and other issues frequently on your Windows 10 PC, you may need to look for a more comprehensive fix for the problems you are experiencing. As extra files build up and storage gets cluttered, things can get messy — and this can affect not only the icons on your PC, but also lead to a general slowdown and other inconveniences on your computer. This can prevent you from using your PC normally and make it difficult for your system to handle resource-consuming processes like gaming, video editing and more.
If you have noticed that your system has been lagging, consider downloading and installing a performance boosting program such as Auslogics BoostSpeed. Once installed, the software will run a thorough scan of your system and locate any unneeded files (these include user temporary files, web browser cache, error logs, old Windows Update files, temporary Sun Java files, unnecessary Office cache and more). They will then be safely removed from your system without causing any complications. This way, you will be freeing gigabytes of space on your computer without having to invest in pricey hardware upgrades.
Quick Links
-
How the Icon Cache Works in Windows
-
Where the Icon Cache Is Stored
-
How to Rebuild the Icon Cache
The icons that Windows uses for your documents and programs are saved in an icon cache, so they can be displayed quickly instead of having to slowly load them every time. If you ever have problems with the icons on your computer, rebuilding the icon cache might help.
Sometimes the icon cache gets out of date, causing icons to display incorrectly, or even go missing. For example, maybe you upgraded an application and the new version came with a new icon, but you still see the old icon on the desktop. Sometimes a blank or damaged icon may appear when a perfectly good icon was displayed before. When this happens, you have to reset the icon cache and let them automatically re-create it. In this article, we’ll show you how to rebuild the icon cache in Windows 10. This guide also applies to Windows 8 and 7, but the process works slightly different.
How the Icon Cache Works in Windows
Icons are everywhere in Windows: the Control Panel, Programs and Features, File Explorer, and so on. Having to retrieve all possible icon images from hard disk and to render them dynamically can consume lots of system resources. As a result, Windows save icons it’s already retrieved in its memory. When you shut down or restart, it will write this cache to a hidden file on your hard drive, so it doesn’t have to reload all those icons later.
The database file grows as more information is added to it. According to this document from MSDN knowledgebase , when Windows needs to display an icon, it’ll check the cache, and display the cached icon if a match is found. If it doesn’t find one, it’ll check the executable file and scan the application directory.
Caching mechanisms, such as the IconCache database, have been already discussed by multiple system specialists, and in depth by Mark E. Russinovich and David A. Solomon in their Windows Internals book, if you’re curious to learn more, but the basics are all you need to understand for this process.
Where the Icon Cache Is Stored
In Windows Vista and Windows 7, the icon cache file is located in:
C:\Users\<your username>\AppData\Local\IconCache.db
(Replace <your username> with the actual login name for your Windows account.)
This file is still present in Windows 8 and 10, but Windows does not use them to store the icon cache. In Windows 8 and Windows 10, the icon cache file is located in:
C:\Users\<your username>\AppData\Local\Microsoft\Windows\Explorer
(Replace <your username> with the actual login name for your Windows account.) In this folder, you will find a number of icon cache files:
• iconcache_16.db
• iconcache_32.db
• iconcache_48.db
• iconcache_96.db
• iconcache_256.db
• iconcache_768.db
• iconcache_1280.db
• iconcache_1920.db
• iconcache_2560.db
• iconcache_custom_stream.db
• iconcache_exif.db
• iconcache_idx.db
• iconcache_sr.db
• iconcache_wide.db
• iconcache_wide_alternate.db
To rebuild the icon cache, you have to delete all the iconcache files that appear in this folder. It’s not as simple as clicking on them and pressing Delete, though: those files are still in use by Explorer, so you can’t just delete them normally.
How to Rebuild the Icon Cache
Close and save anything that you are working on before proceeding. Open File Explorer and go to the following folder:
C:\Users\<your username>\AppData\Local\Microsoft\Windows\Explorer
(Replace <your username> with the actual login name for your Windows account.)
Press and hold the «Shift» key and right-click on the Explorer folder. Select «Open command window here.»
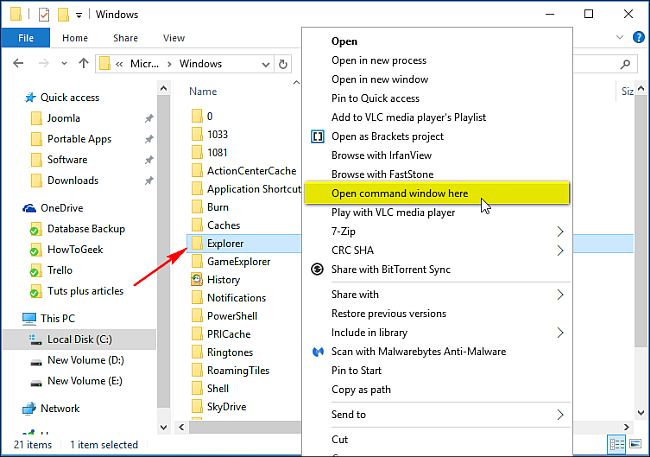
A command prompt window will open at that path:

To make sure the command prompt is in the correct folder, type the dir command. You should see the iconcache and thumbcache files we discussed earlier appear.
Right-click on the Windows taskbar and choose «Task Manager» from the shortcut menu.
Right-click on «Windows Explorer» in the list and choose «End task» from the shortcut menu. The Explorer and desktop will disappear. Exit Task Manager and make sure that no other application is running except for the command prompt window.

In the command prompt window type the following command:
del iconcache*
Press Enter. The asterisk after iconcache is necessary to make sure all files with names that start with iconcache will be included in the delete operation. That should delete all the icon cache files.
Run the dir command to check the list of remaining files. If one or more iconcache files are still listed, it means some applications are still running in the background. Close them and repeat the procedure again, if necessary.
Now press the Ctrl+Alt+Del keys simultaneously, and choose «Sign off.» Sign back in, and any out-of-date or missing icons should hopefully get repaired or re-created.
Remember, rebuilding the icon cache will not help with thumbnails issues (you’ll need to go through this process to do that), the wrong icon for a specific file extension, or a missing shortcut icon. But if you have other icon problems, hopefully rebuilding the icon cache will fix them.
Imagine Windows 10 without app or image icons. Yes, you are right; it would look quite dead. Icons give life to the User Interface of every operating system, whether it is Windows, iOS, or Android.
Windows 10 saves the icons for the files in icon cache and uses this icon cache to display them. This way, the icons can be displayed quickly as Windows does not have to scan for each icon file and load them every time the file icon has to be shown.
To fix various Windows 10/11 problems, we recommend Outbyte PC Repair:
This software will repair common computer errors, protect you from file loss, malware damage, hardware failure, and optimise your computer for peak performance. In three simple steps, you can resolve PC issues and remove virus damage:
- Download Outbyte PC Repair Software
- Click Start Scan to detect Windows 10/11 issues that may be causing PC issues.
- Click Repair All to fix issues with your computer’s security and performance.
This month, Outbyte has been downloaded by 23,167 readers.
However, there may be times when you have a problem with icons or thumbnails not displaying correctly. This usually happens when you have updated an application. Instead of showing the updated icon which came with the upgrade, Windows show you the old icon or a blank or damaged icon appears.
When this happens, you have to remove the icon cache so that a fresh one is created with the updated icons. Though, keep in mind that usually, Windows do this work automatically, every time a new icon is recognized.
In this guide, we will discuss how to refresh icon cache in Windows 10 that would fix every issue you are facing with the icons.
Where are Icons Stored in Windows 10?
In Windows 10 icons are stored in cache files located at the following path:
C:\Users\<your username>\AppData\Local\Microsoft\Windows\Explorer
Put your desktop’s name in place of <your username>
If you find some folders in the path, enable Hidden items from the view so that hidden folders can be accessed. You would find the following cached files of the icons:
• iconcache_16.db
• iconcache_32.db
• iconcache_48.db
• iconcache_96.db
• iconcache_256.db
• iconcache_768.db
• iconcache_1280.db
• iconcache_1920.db
• iconcache_2560.db
• iconcache_custom_stream.db
• iconcache_exif.db
• iconcache_idx.db
• iconcache_sr.db
• iconcache_wide.db
• iconcache_wide_alternate.db
Now, to reset the icon cache, you have to delete all these files first. Remember, not even a single cache file can be ignored because we don’t know which among them is causing the icons problem. However, deleting these files is not straightforward, like removing any other file on the computer. Try yourself deleting any file, some of them would get deleted, the others would display this error:
The reason for this error is because some applications are using those icon cache files in the background.
As already mentioned to rebuild the Icon Cache, first, we have to delete the old cache files. For that, we can use three methods. You can perform any method that works for you.
Method 1: Using Windows PowerShell
-
Before proceeding any further, close all the work and applications that are currently running.
-
Navigate to the folder where old Icon Cache files are present: C:\Users\<your username>\AppData\Local\Microsoft\Windows\Explorer
-
Now you have to open the PowerShell window here. For that press and hold the Shift key and perform a right-click.
-
From the Context menu, choose the “Open PowerShell window here.”
-
A PowerShell window would be launch for that path.

-
To ensure you are on the right folder, enter dir command on PowerShell console. If you see the icon cache files and other files of the folder, you are on the right path.

-
Minimize the PowerShell window, right-click on the taskbar and open Task Manager.
-
Look for Windows Explorer, right-click on it and select End Task. File Explorer and Desktop would be invisible.

-
Exit the Task Manager and again switch to the PowerShell window. Close all the running applications except PowerShell before moving forward.
-
Enter the following command on the console: “del iconcache*” and press the Enter key. It would perform the deletion operation on all the files starting with “iconcache”.
-
Again run dir command to check whether all icon cache files are deleted or not. If all applications were closed, you would have faced no problem, and icon cache files must have been removed.
-
Restart the system. The icon cache should have been rebuild.


Method 2: Using Command Prompt
Note: The last command in this method will instantly restart the PC, make sure you have backed up all your important data.
- Press Windows + R keys, type cmd, and press Enter.
- In the command prompt, enter and execute following commands one by one.
- ie4uinit.exe -ClearIconCache
- taskkill /IM explorer.exe /F
- DEL “%localappdata%\IconCache.db” /A
- shutdown /r /f /t 00
Method 3: Using File Explorer
You can also try deleting the IconCache.db file using File Explorer:
- Open a File Explorer.
- To show hidden files, click on View tab and then click on Hidden Items.
- Go to C:\Users\(Your User Name)\AppData\Local and delete IconCache.db file.
- Empty Recycle Bin and restart your computer.

Note: These steps will not work if the icon file for the application has been deleted or moved.
Rebuild Icon Cache FAQs
1. Why do my icon pictures disappear?
The reason icon pictures of your application or documents disappear because the icon cache might have corrupted or new icons are not updated on the icon cache.
2. How do I restore shortcut icons?
To restore the shortcut icons, go to “Desktop icon settings” by searching on the Windows search and click on Restore Default.
3. Is it safe to delete IconCache DB?
YES, it is safe to delete the iconcache.db file. It does not cause any system failure. Moreover, it automatically generates itself again, and eliminating it can solve the icon errors in Windows 10.
После обновления до Windows 10 (или после чистой установки) некоторые пользователи столкнулись с тем, что при очередном запуске ни с того ни с сего пропадают значки (иконки программ, файлов и папок) с рабочего стола, в то же самое время, в остальном ОС работает нормально.
Выяснить причин такого поведения мне не удалось, очень похоже на какой-то баг Windows 10, но способы исправить проблему и вернуть иконки на рабочий стол имеются, все они совсем не сложные и описаны ниже.
Простые способы вернуть значки на рабочий стол после их исчезновения
Прежде чем приступать, на всякий случай проверьте, а включено ли у вас отображение значков рабочего стола в принципе. Для этого, кликните правой кнопкой мыши по рабочему столу, выберите пункт «Вид» и убедитесь, что отмечен пункт «Отображать значки рабочего стола». Также попробуйте отключить этот пункт, а затем — снова включить, это может исправить проблему.
Первый способ, который не обязательно, но во многих случаях срабатывает — просто кликнуть правой кнопкой мыши по рабочему столу, после этого выбрать в контекстном меню «Создать», а затем — любой элемент, например, «Папку».
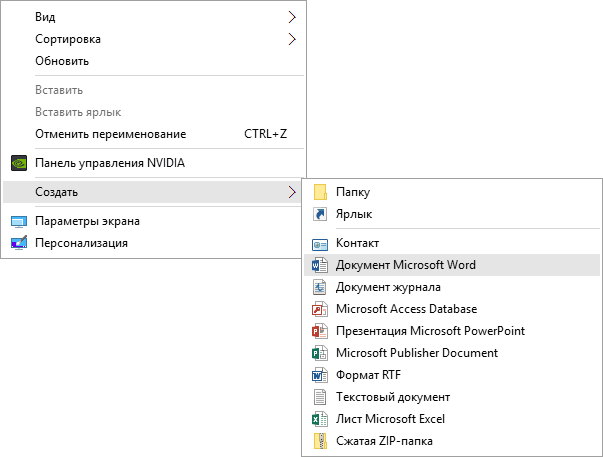
Сразу после создания, если способ сработал, на рабочем столе снова появятся все ранее присутствовавшие там элементы.
Второй способ — использование настроек Windows 10 в следующем порядке (при этом даже если вы ранее не меняли данные настройки, способ все равно следует попробовать):
- Кликните по значку уведомлений — Все параметры — Система.
- В разделе «Режим планшета» переключите оба переключателя (дополнительные возможности сенсорного управления и скрытие значков в панели задач) в положение «Включено», а затем — переключите их в состояние «Выключено».

В большинстве случаев, один из перечисленных выше способов помогает решить проблему. Но не всегда.
Также, если значки пропали с рабочего стола после работы на двух мониторах (при этом сейчас подключен один и в настройках также отображается один), попробуйте снова подключить второй монитор, а затем, если значки появились, не отключая второй монитор, включить в параметрах изображение только на том, мониторе, где оно нужно, и уже после этого отключить второй монитор.
Примечание: существует еще одна схожая проблема — исчезают иконки на рабочем столе, но при этом остаются подписи к ним. С этим пока разбираюсь, как появится решение — дополню инструкцию.