
Applies ToWindows 11 Windows 10
Эта статья поможет использовать Редактор метода ввода (IME) (Майкрософт), включая параметры, функции и сочетания клавиш.
Совет: В этой статье используются ссылки, которые напрямую открывают параметры IME в приложении «Параметры». Сведения о том, как вручную получить доступ к параметрам IME в приложении «Параметры», см. в разделе Параметры Microsoft IME в этой статье.
Пользовательский интерфейс
В окне Прогнозирование кандидатов предлагаются кандидаты typeahead.
Общие операции
|
В этом состоянии |
Клавиши |
Действие |
|---|---|---|
|
Перед тем как фокус попадет в окно кандидатов |
TAB |
Введите окно кандидата прогноза. |
|
SHIFT+TAB |
Введите окно кандидата прогноза. |
|
|
СТРЕЛКА ВНИЗ |
Введите окно кандидата прогноза. |
|
|
СТРЕЛКА ВВЕРХ |
Введите окно кандидата прогноза. |
|
|
С фокусом внутри окна кандидатов |
TAB |
Переместите выбранное вниз. |
|
SHIFT+TAB |
Переместите выбранное вверх. |
|
|
СТРЕЛКА ВНИЗ |
Переместите выбранное вниз. |
|
|
СТРЕЛКА ВВЕРХ |
Переместить выбранное вверх. |
|
|
Число |
Выбор соответствующего кандидата. |
|
|
ВВОД |
Выбор кандидата, на котором фокус. |
Другие функции
-
Предлагаемые кандидаты можно настроить в параметрах Microsoft IME > общие > прогнозные входные данные.
-
Используйте журнал входных данных.
-
Используйте системный словарь.
-
Использование служб предложений. Если этот параметр включен, все написанное шифруется и отправляется в корпорацию Майкрософт для получения текстовых предложений от Bing.
-
-
Щелкните значок крестика или нажмите клавиши CTRL + DELETE , чтобы удалить выбранного кандидата.
Примечание: Некоторые кандидаты не могут быть удалены, например даты.
-
Чтобы выполнить поиск выбранного кандидата в Интернете, щелкните значок лупы или нажмите клавиши CTRL + B.
В окне Преобразование кандидата предлагаются кандидаты, чтение которых соответствует типизированному.
Общие операции
|
В этом состоянии |
Клавиши |
Действие |
|---|---|---|
|
Перед тем как фокус попадет в окно кандидатов |
Космос |
Первое нажатие: Преобразование того, что вы вводите. 2-е нажатие: откройте окно кандидата на преобразование. |
|
SHIFT+ПРОБЕЛ |
Первое нажатие: Преобразование того, что вы вводите. 2-е нажатие: откройте окно кандидата на преобразование. |
|
|
С фокусом внутри окна кандидатов |
Космос |
Переместите выбранное вниз. |
|
SHIFT+ПРОБЕЛ |
Перемещение выбранного вверх (шаблон Microsoft IME) или вниз (шаблон ATOK). |
|
|
СТРЕЛКА ВНИЗ |
Перемещение выделенного фрагмента вниз (шаблон Microsoft IME) или выбор кандидата с фокусом (шаблон ATOK). |
|
|
СТРЕЛКА ВВЕРХ |
Переместите выбранное вверх. |
|
|
TAB |
Развернуть до представления таблицы. |
|
|
Номер |
Выбор соответствующего кандидата. |
|
|
ВВОД |
Выбор кандидата, на котором фокус. |
Другие функции
-
IME может повысить точность ввода в зависимости от типа. Эту функцию можно включить ивыключить с помощью параметра Повышение точности ввода в зависимости от того, что я вводю на этом компьютере в параметрах Microsoft IME > обучение и словарь.
-
Новое слово можно добавить в словарь IME вручную с помощью одного из следующих методов:
-
Откройте средство пользовательского словаря в параметрах Microsoft IME > Обучение и словарь.
-
Щелкните правой кнопкой мыши значок параметров IME в области панели задач и выберите Добавить Word.
-
-
Системные словари можно включить ивыключить в разделе Системные словари в параметрах Microsoft IME > обучение и словарь.
Сочетания клавиш
IME предлагает ключи или сочетания клавиш для использования функций IME.
|
Клавиши |
Действие |
|---|---|
|
Ханаку/Дзенкаку |
Включение или отключение ввода на японском языке. |
|
Eisu (CAPS LOCK) |
Переключение между хираганой и буквенно-цифровым режимом. |
|
Хирагана |
Переход в режим хираганы. |
|
ALT+Хирагана |
Переключение между вводом Кана и вводом Ромадзи. Необходимый компонент: Включите параметр Переключить входные данные Кана/Ромаджи с помощью клавиш ALT+ Катакана Хирагана Ромаджи в параметрах Microsoft IME > Общие. |
|
SHIFT+Хирагана |
Переход в режим Катаканы. |
|
CONVERT |
Рековерсия. |
|
CTRL+Преобразовать |
Откройте контекстное меню IME (контекстное меню). |
|
NONCONVERT |
Переключение между хираганой, полноширинной катаканой и полуширинной катаканой. |
|
SHIFT+NonConvert |
Переключение между полуширинным буквенно-цифровым режимом и полноширинным буквенно-цифровым режимом. |
|
ImeOn (あ ключ) *1 |
Переход в режим хираганы. |
|
ALT + ImeOn (あ клавиша) *1 |
Переключение между вводом Кана и вводом Ромадзи. Необходимый компонент: Включите параметр Переключить входные данные Кана/Ромаджи с помощью клавиш ALT+ Катакана Хирагана Ромаджи в параметрах Microsoft IME > Общие. |
|
CTRL +ImeOn (あ клавиша) *1 |
Рековерсия. |
|
SHIFT + ImeOn (あ клавиша) *1 |
Переход в полноширинный режим катаканы. |
|
ImeOff (ключ A ) *1 |
Переход в полуширинный буквенно-цифровой режим. |
|
CTRL+ImeOff (клавиша A ) *1 |
Переключение между хираганой, полноширинной катаканой и полуширинной катаканой. |
|
SHIFT + ImeOff (клавиша A ) *1 |
Переключение между полноширинными буквенно-цифровыми символами, начинающимися с заглавной буквы, заглавными буквами и первыми заглавными буквами. |
*1: клавиши ImeOn (あ) и ImeOff (A) доступны на определенных японских аппаратных клавиатурах.
Дополнительные сведения для разработчиков см. в статье Keyboard Japan — ImeOn / Реализация ImeOff.
|
Клавиши |
Действие |
|---|---|
|
Ханаку/Дзенкаку |
Включение или отключение ввода на японском языке. |
|
Eisu (CAPS LOCK) |
Переключение между хираганой и буквенно-цифровым режимом. |
|
Хирагана |
Переключение между хираганой и буквенно-цифровым режимом. |
|
ALT+Хирагана |
Переключение между вводом Кана и вводом Ромадзи. Необходимый компонент: Включите параметр Переключить входные данные Кана/Ромаджи с помощью клавиш ALT+ Катакана Хирагана Ромаджи в параметрах Microsoft IME > Общие. |
|
SHIFT+Хирагана |
Переход в режим Катаканы. |
|
Преобразование |
Включение или отключение ввода на японском языке. |
|
SHIFT+ПРЕОБРАЗОВАНИЕ |
Рековерсия. |
|
NONCONVERT |
Переключение между хираганой и полуширинным буквенно-цифровым режимом. |
|
CTRL+NonConvert |
Переключение между хираганой, полноширинной катаканой и полуширинной катаканой. |
|
SHIFT+NonConvert |
Переключение между хираганой, полноширинным буквенно-цифровым режимом и полуширинным буквенно-цифровым режимом. |
|
ImeOn (あ ключ) *1 |
Переход в режим хираганы. |
|
ALT + ImeOn (あ клавиша) *1 |
Переключение между вводом Кана и вводом Ромадзи. Необходимый компонент: Включите параметр Переключить входные данные Кана/Ромаджи с помощью клавиш ALT+ Катакана Хирагана Ромаджи в параметрах Microsoft IME > Общие. |
|
CTRL +ImeOn (あ клавиша) *1 |
Рековерсия. |
|
SHIFT + ImeOn (あ клавиша) *1 |
Переход в полноширинный режим катаканы. |
|
ImeOff (ключ A ) *1 |
Переход в полуширинный буквенно-цифровой режим. |
|
CTRL+ImeOff (клавиша A ) *1 |
Переключение между хираганой, полноширинной катаканой и полуширинной катаканой. |
|
SHIFT + ImeOff (клавиша A ) *1 |
Переключение между полноширинными буквенно-цифровыми символами, начинающимися с заглавной буквы, заглавными буквами и первыми заглавными буквами. |
*1. Клавиши ImeOn (あ) и ImeOff (A) доступны на определенных японских аппаратных клавиатурах.
Дополнительные сведения для разработчиков см. в статье Keyboard Japan — ImeOn / Реализация ImeOff.
|
Клавиши |
Действие |
|---|---|
|
CTRL+DELETE |
Удалите выбранного кандидата из окна кандидата прогноза. |
|
CTRL+B |
Выполните поиск выбранного кандидата в окне прогнозирующего кандидата. |
|
TAB |
Разверните или свернуть представление таблицы в окне кандидата преобразования. |
|
Клавиша Windows +точка (.) |
Открытие средство выбора эмодзи. |
|
CTRL+SHIFT+F10 |
Включение или отключение частного режима IME. |
|
F6 |
Преобразование вводной строки в хирагану. |
|
F7 |
Преобразование вводной строки в полноширинную катакану. |
|
F8 |
Преобразование вводной строки в полуширинную катакану. |
|
F9 |
Преобразование вводной строки в полноширинный буквенно-цифровой режим. |
|
F10 |
Преобразование вводной строки в полуширинный буквенно-цифровой режим. |
Настройка клавиш
С помощью IME можно изменить определенную функцию ключей в параметрах Microsoft IME > настройке ключа и сенсорного ввода.
-
Шаблон ключа. Шаблон ключа — это набор конфигураций ключей. IME предлагает следующие шаблоны:
-
Microsoft IME.
-
ATOK.
Дополнительные сведения см. в разделе сочетаний клавиш этой статьи.
-
-
Назначение ключа. Если вы хотите настроить определенную функцию ключа в выбранном шаблоне, можно настроить несколько ключей в разделе Назначение ключа.
Параметры Microsoft IME
Для открытия параметров Microsoft IME можно использовать следующие методы:
Щелкните правой кнопкой мыши значок параметров IME в области панели задач и выберите Параметры.
Перейдите к параметрам Microsoft IME в приложении Параметры :
-
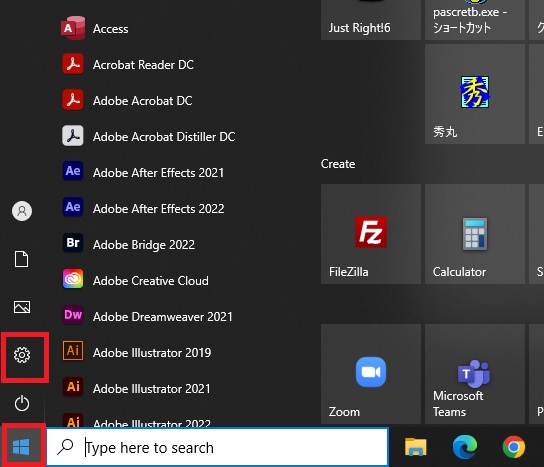
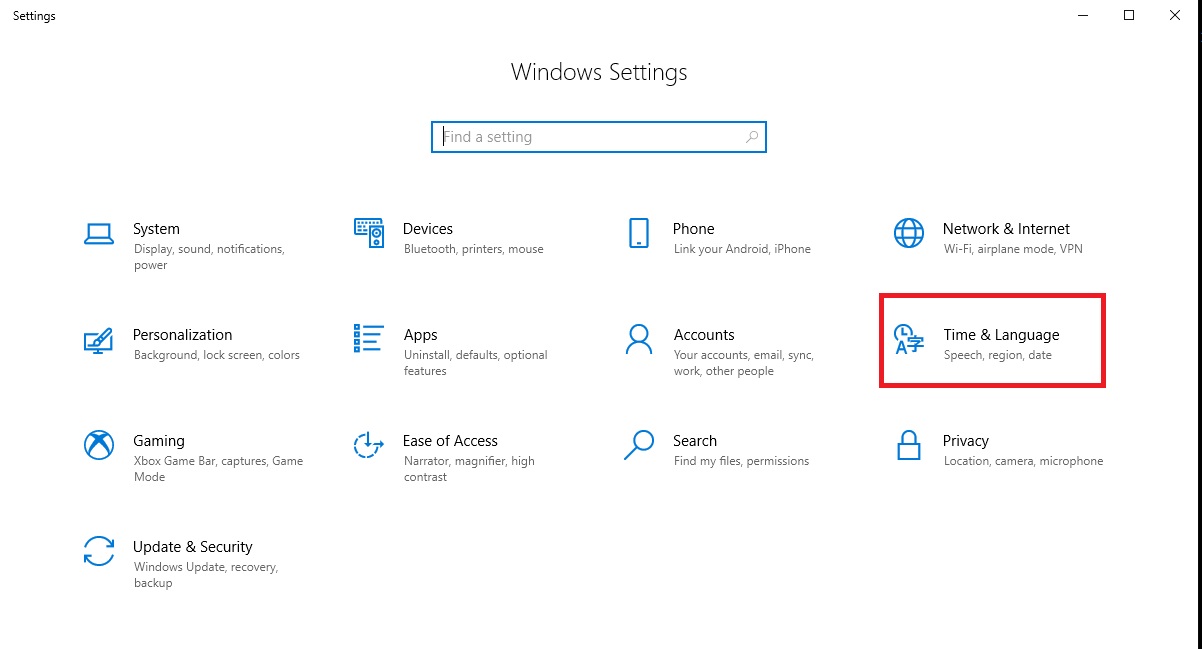
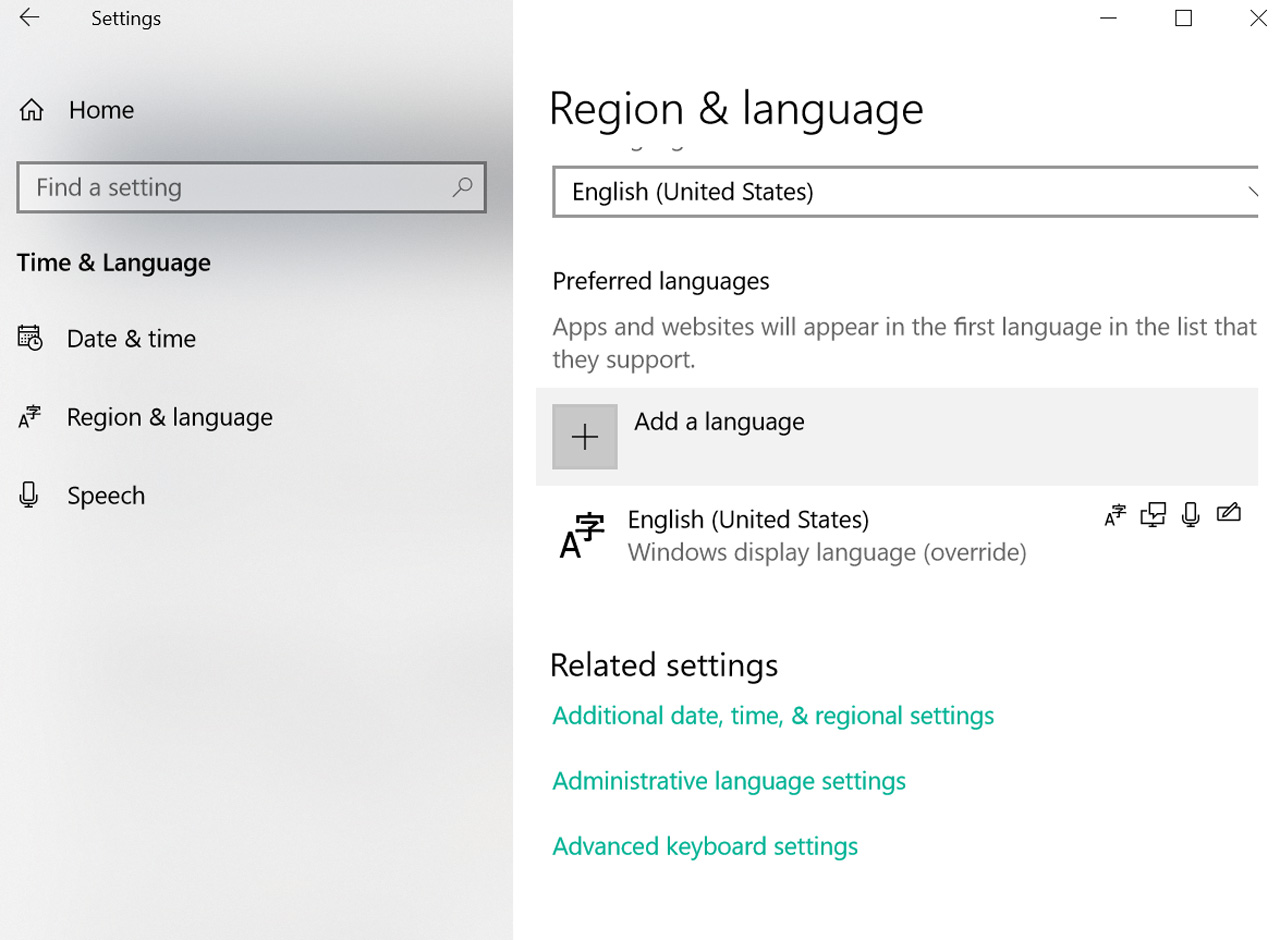
Нажмите кнопку Пуск , а затем выберите Параметры > время & язык > язык & регион .
Или
Выберите следующий ярлык «Язык > & время & язык &»:
«Время & язык > язык & регион
-
В окне Время & язык > язык & регионе в разделе Язык выберите многоточие рядом с пунктом Японский , а затем выберите Параметры языка.
-
В окне & язык > язык & регион > параметры в разделе Клавиатуры выберите многоточие рядом с элементом Microsoft IME , а затем выберите Параметры клавиатуры.
Используйте следующий ярлык Microsoft IME , чтобы напрямую открыть параметры Microsoft IME в приложении Параметры :
Открыть Microsoft IME
Совместимость
Microsoft Японский IME доступен в поддерживаемых в настоящее время версиях Windows. Если возникают проблемы с текущей версией IME, IME поддерживает параметр совместимости, который позволяет использовать предыдущую версию IME. Предыдущую версию IME можно включить, включив в параметрах Microsoft IME > Общие > Использовать предыдущую версию Microsoft IME. IME продолжает улучшаться, поэтому рассмотрите возможность отправки отзывов , чтобы помочь нам предоставить вам отличный опыт ввода.
Как оставить отзыв?
Если у вас возникли проблемы или есть предложения, касающиеся Microsoft IME, оставьте отзыв через Центр отзывов. Выберите один из следующих параметров, чтобы открыть Центр отзывов:
-
Щелкните правой кнопкой мыши значок параметров IME в области области панели задач и выберите отправить отзыв.
Ваш отзыв отправляется непосредственно нашим инженерам, работающим над улучшением IME. Дополнительные сведения о том, как предоставить отзыв, см. в статье Отправка отзывов с помощью приложения центра отзывов.
Нужна дополнительная помощь?
Нужны дополнительные параметры?
Изучите преимущества подписки, просмотрите учебные курсы, узнайте, как защитить свое устройство и т. д.
This post is for Japanese language learners. This explains how to type in Japanese on an English version of a Windows computer.
To type Japanese characters, you need to set up your computer in advance. There are three types of Japanese characters: Hiragana, Katakana, and Kanji, each of which has a different typing method, so you will need to learn how to type them.
It will take some time to learn how to type, but anyone can learn to type Japanese if you read this post to the end.
Installing Japanese keyboard
Before you start, you need to install Japanese keyboard on your computer. The procedure differs slightly depending on the Windows version, so refer to the following instructions for installation.
How to install Japanese keyboard (Windows 10)
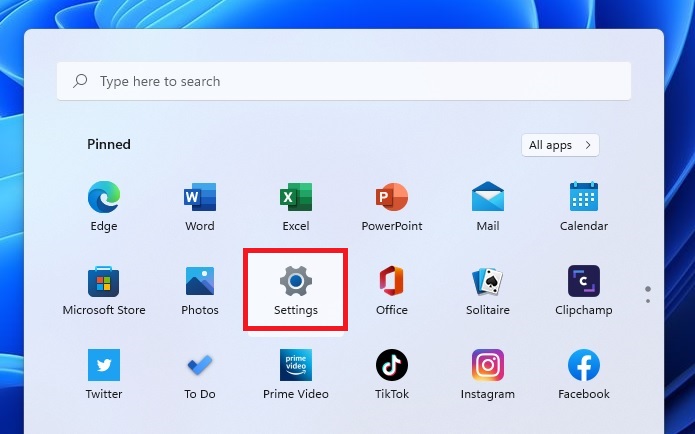
- Click Start and click Settings (Gear icon).

- On the Windows Settings window, click Time & Lanugage.
- Click Language in the left pane and click Add a language.
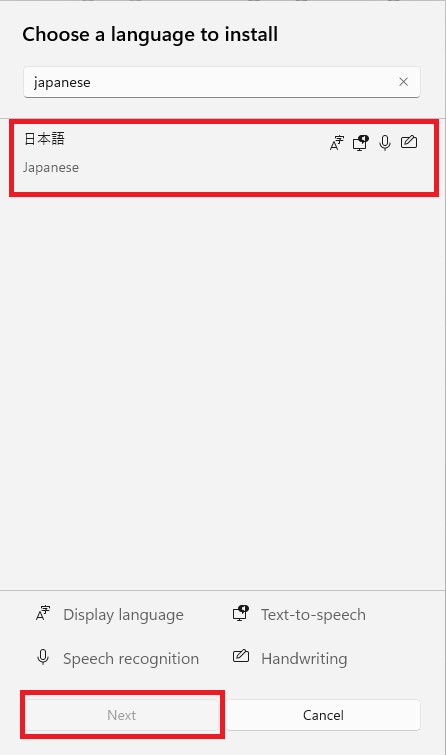
- Find Japanese and click Next.
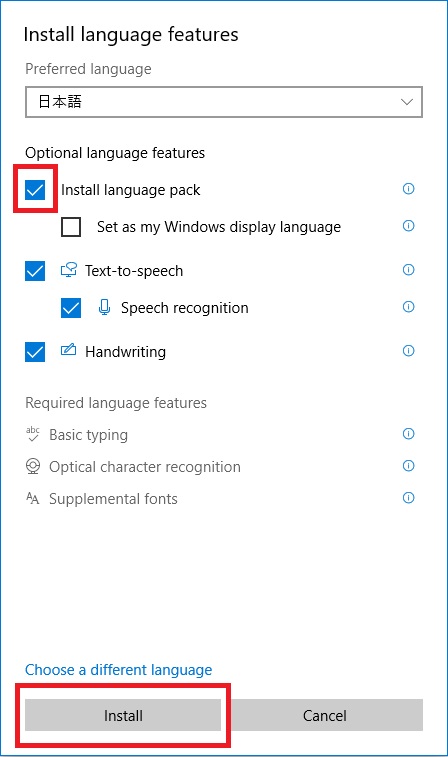
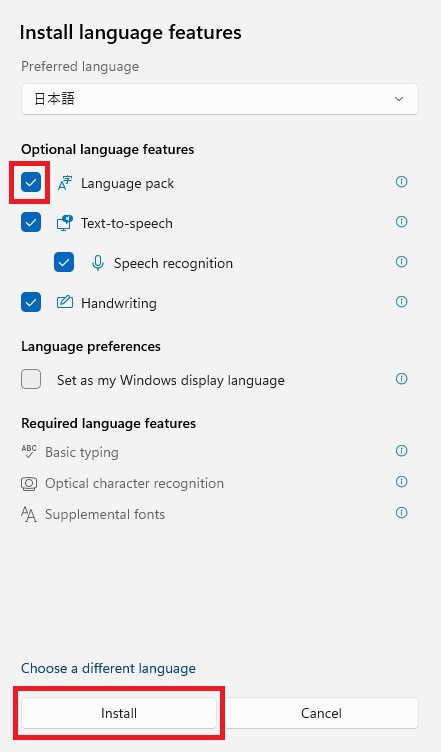
- Make sure that Install language pack is checked and click Install.
- Click the ENG icon on the task bar and select Japanese.

Now you are ready to type Japanese.
How to install Japanese keyboard (Windows 11)
- Click Start and click Settings (Gear icon).
- On the Settings window, click Time & Language in the left pane and click Language & region.
- Click Add a language.
- Find Japanese and click Next.
- Make sure that Language pack is checked and click Install.
- Click the ENG icon on the task bar and select Japanese.
Now you are ready to type Japanese.
Switch between Japanese input mode and romaji input mode
In Japanese, Romaji (English alphabets) are used along with Japanese characters (hiragana, katakana, and kanji). Therefore, you must switch between Japanese input mode and romaji input mode while typing characters. You can check which input mode you are in by looking at the input mode icon on the taskbar.
To switch between Japanese input mode and romaji input mode, press [Alt]+[~]. Alternatively, you can also switch by clicking the input mode icon on the taskbar.
How to easily switch input modes
For those who find it a bit difficult to switch input modes by pressing [Alt]+[~], there is an easier way.
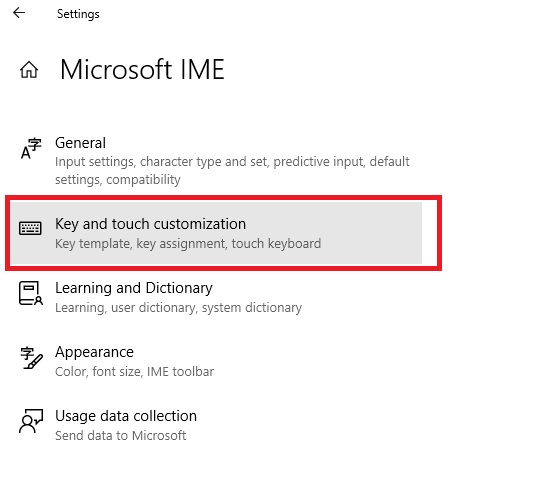
- Right-click A (or あ) icon on the task bar and click Settings.
- On the Microsoft IME dialog box, select Key & touch customization.
- Turn on the Key assignment and change Ctrl + Space from None to IME-on/off.
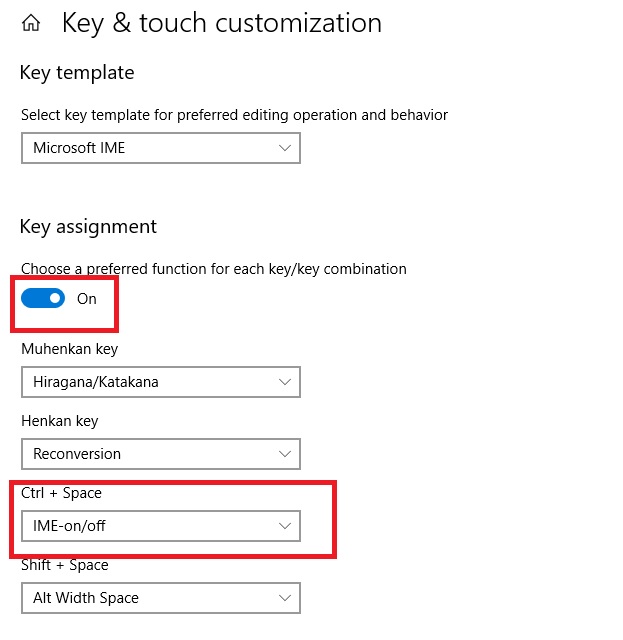
Now you can use [Ctrl]+Space to switch input modes.
How to type hiragana
To type hiragana, set the IME to Japanese input mode.
In Japanese input mode, you can type hiragana by typing the letters in the table below.
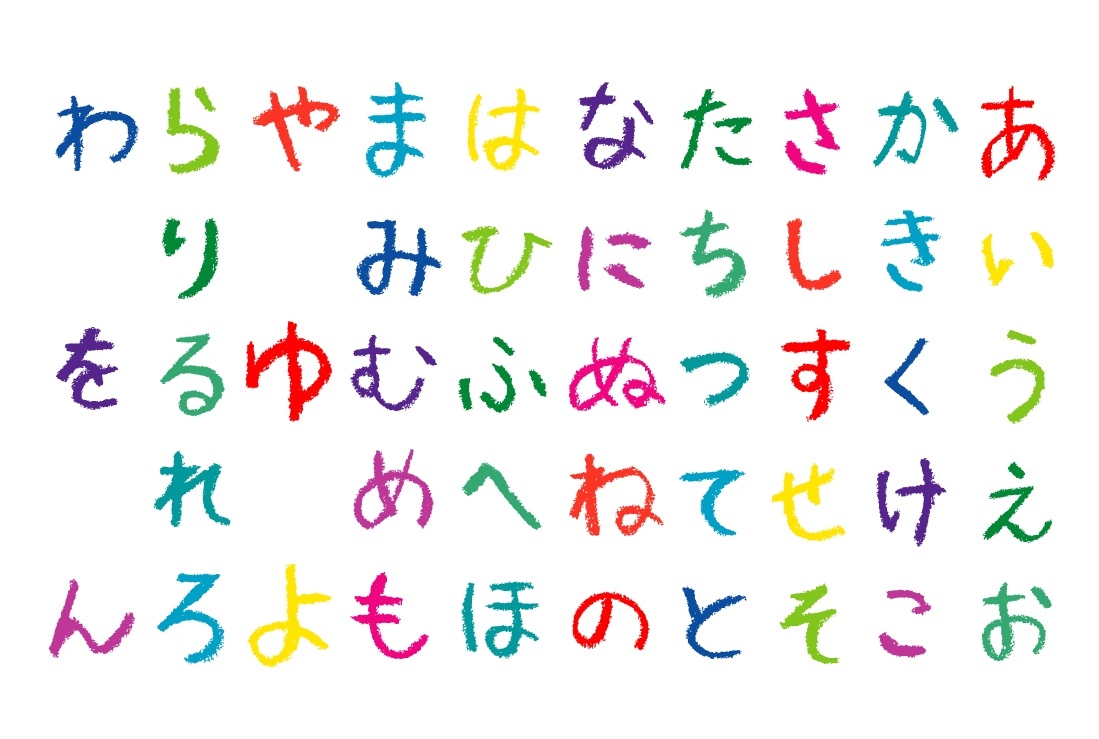
50音 (Goju-on)
| あ | い | う | え | お |
| a | i | u | e | o |
| か | き | く | け | こ |
| ka | ki | ku | ke | ko |
| さ | し | す | せ | そ |
| sa | shi or si | su | se | so |
| た | ち | つ | て | と |
| ta | chi or ti | tsu or tu | te | to |
| な | に | ぬ | ね | の |
| na | ni | nu | ne | no |
| は | ひ | ふ | へ | ほ |
| ha | hi | hu | he | ho |
| ま | み | む | め | も |
| ma | mi | mu | me | mo |
| や | ゆ | よ | ||
| ya | yu | yo | ||
| ら | り | る | れ | ろ |
| ra | ri | ru | re | ro |
| わ | を | |||
| wa | wo | |||
| ん | ||||
| nn |
濁音 (Daku-on) (゛)
| が | ぎ | ぐ | げ | ご |
| ga | gi | gu | ge | go |
| ざ | じ | ず | ぜ | ぞ |
| za | zi or ji | zu | ze | zo |
| だ | ぢ | づ | で | ど |
| da | di | du | de | do |
| ば | び | ぶ | べ | ぼ |
| ba | bi | bu | be | bo |
半濁音 (Handaku-on)(゜)
| ぱ | ぴ | ぷ | ぺ | ぽ |
| pa | pi | pu | pe | po |
拗音 (You-on) (Small “や・ゆ・よ” ゃ・ゅ・ょ)
| ゃ | ゅ | ょ | ||
| lya | lyu | lyo | ||
| きゃ | きゅ | きょ | ||
| kya | kyu | kyo | ||
| しゃ | しゅ | しょ | ||
| sha | shu | sho | ||
| ちゃ | ちゅ | ちょ | ||
| cha | chu | cho | ||
| にゃ | にゅ | にょ | ||
| nya | nyu | nyo | ||
| ひゃ | ひゅ | ひょ | ||
| hya | hyu | hyo | ||
| みゃ | みゅ | みょ | ||
| mya | myu | myo | ||
| りゃ | りゅ | りょ | ||
| rya | ryu | ryo | ||
| ぎゃ | ぎゅ | ぎょ | ||
| gya | gyu | gyo | ||
| じゃ | じゅ | じょ | ||
| ja or jya | ju or jyu | jo or jyo | ||
| ぢゃ | ぢゅ | ぢょ | ||
| dya | dyu | dyo | ||
| びゃ | びゅ | びょ | ||
| bya | byu | byo | ||
| ぴゃ | ぴゅ | ぴょ | ||
| pya | pyu | pyo |
促音 (Soku-on) (small “つ” っ)
To type small “つ” (っ), double the following consonant.
e.g. やっと (yatto), がっこう (gakkou), やっぱり (yappari)
We have created hiragana typing tests so you can practice.
Link
How to type katakana
There are multiple ways to type katakana.
Katakana typing method 1: Right-click the “A” icon in Microsoft IME and select “Full-width Katakana”.
Katakana typing method 2: Type hiragana with the same sound and press the space key to convert.
Usually, katakana is typed this way.
e.g. ア (Type “a” and press the space key.)
Katakana typing method 3 (recommended): Type hiragana with the same sound and press [F7] to convert.
Conversion using the space key is used not only for katakana but also for kanji conversion. Therefore, you may have to press the space key repeatedly to get the katakana you want.
It is recommended to press [F7] instead of the space key because you get the katakana with a single press.
e.g. ニンテンドー (type “nintendo-” and press [F7])
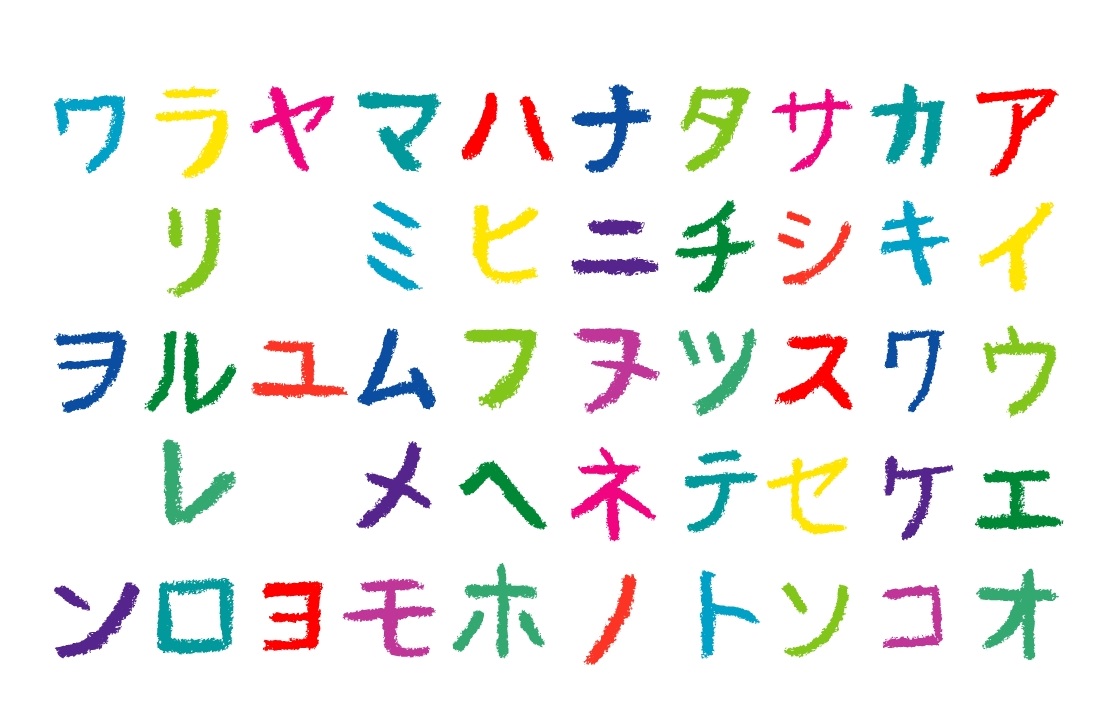
50音 (Goju-on)
| ア | イ | ウ | エ | オ |
| a | i | u | e | o |
| カ | キ | ク | ケ | コ |
| ka | ki | ku | ke | ko |
| サ | シ | ス | セ | ソ |
| sa | shi or si | su | se | so |
| タ | チ | ツ | テ | ト |
| ta | chi or ti | tsu or tu | te | to |
| ナ | ニ | ヌ | ネ | ノ |
| na | ni | nu | ne | no |
| ハ | ヒ | フ | ヘ | ホ |
| ha | hi | hu | he | ho |
| マ | ミ | ム | メ | モ |
| ma | mi | mu | me | mo |
| ヤ | ユ | ヨ | ||
| ya | yu | yo | ||
| ラ | リ | ル | レ | ロ |
| ra | ri | ru | re | ro |
| ワ | ヲ | |||
| wa | wo | |||
| ン | ||||
| nn |
濁音 (Daku-on) (゛)
| ガ | ギ | グ | ゲ | ゴ |
| ga | gi | gu | ge | go |
| ザ | ジ | ズ | ゼ | ゾ |
| za | zi or ji | zu | ze | zo |
| ダ | ヂ | ヅ | デ | ド |
| da | di | du | de | do |
| バ | ビ | ブ | ベ | ボ |
| ba | bi | bu | be | bo |
半濁音 (Handaku-on)(゜)
| パ | ピ | プ | ペ | ポ |
| pa | pi | pu | pe | po |
拗音 (You-on) (Small “ヤ・ユ・ヨ” ャ・ュ・ョ)
| ャ | ュ | ョ | ||
| lya | lyu | lyo | ||
| キャ | キュ | キョ | ||
| kya | kyu | kyo | ||
| シャ | シュ | ショ | ||
| sha | shu | sho | ||
| チャ | チャ | チョ | ||
| cha | chu | cho | ||
| ニャ | ニュ | ニョ | ||
| nya | nyu | nyo | ||
| ヒャ | ヒュ | ヒョ | ||
| hya | hyu | hyo | ||
| ミャ | ミュ | ミョ | ||
| mya | myu | myo | ||
| リャ | リュ | リョ | ||
| rya | ryu | ryo | ||
| ギャ | ギュ | ギョ | ||
| gya | gyu | gyo | ||
| ジャ | ジュ | ジョ | ||
| ja or jya | ju or jyu | jo or jyo | ||
| ヂャ | ヂュ | ヂョ | ||
| dya | dyu | dyo | ||
| ビャ | ビュ | ビョ | ||
| bya | byu | byo | ||
| ピャ | ピュ | ピョ | ||
| pya | pyu | pyo |
促音 (Soku-on) (small “ツ” ッ)
To type small “ツ” (ッ), double the following consonant.
e.g. キック (kikku), バスケット (basuketto)
長音 (Chou-on)(ー)
You can type chouon (long vowels) using the dash key to the right of the “0”.
e.g. ラーメン (ra-men), ギター (gita-), バイオハザード (baiohaza-do)
Small “ア・イ・ウ・エ・オ” (ァ・ィ・ゥ・ェ・ォ)
There are basically the same number of katakana as hiragana, but the small “ア・イ・ウ・エ・オ” (ァ・ィ・ゥ・ェ・ォ) are generally only used in katakana. These are used to make the sound as close as possible to that of foreign words.
ヴァ (va), ファ (fa)
e.g. ヴァイオリン (vaiorin), ファミリー (famiri-)
ウィ (wi), ヴィ (vi), ティ (thi), ディ (dhi), フィ (fi)
e.g. ウィリアム (wiriamu), ヴィーナス (vi-nasu), パーティー (pa-thi-),
ディズニー (dhizuni-), フィンランド (finrando)
ウェ (we), シェ (she), ジェ (je), チェ (che), フェ (fe)
e.g. ウェールズ (we-ruzu), シェフ (shefu), ジェット (jetto),
チェス(chesu), フェンシング (fensingu)
ヴォ (vo)
e.g. ヴォルデモート (vorudemo-to)
We have created katakana typing tests so you can practice.
Link
How to type kanji
You can type kanji by typing the reading of the kanji in hiragana and pressing the space key to convert it. The reading can be either Onyomi or Kunyomi.
Since there are many kanji that have the same reading, if you convert kanji characters one by one, you will have to press the space key repeatedly until the kanji you want appears. Therefore, it is recommended to convert kanji characters word by word.
e.g. 東京 (Type “toukyou” and press the space key)
jissho.org is a useful site to find kanji readings
https://jisho.org/
In addition, the “Satellite Office – Furigana fuyokino” is useful for learning how to read kanji characters written on Japanese websites.
We have kanji typing tests.
Link

How to type Japanese punctuation marks
You can type “、” by pressing the comma key and “。” by pressing the period key.
How to type commonly used Japanese symbols
The following table shows how to input symbols used in Japanese.
| Symbols | How to type (Japanese input mode) | Remarks |
|---|---|---|
| 「 opening bracket | [ | The same as ” in English |
| 」 closing bracket | ] | The same as ” in English |
| 『』white corner bracket | Type “kakko” and convert it | Used to enclose a book title e.g. 『ドラゴンボール』 |
| 〇 circle | Type “maru” and convert it | The same as ✓ in English |
| × x-mark | Type “batsu” and convert it | The same as No in English |
| ① circled number 1 | Type “ichi” and convert it | |
| ② circled number 2 | Type “ni” and convert it | |
| ・ middle dot | / | Used to delimit words |
| ¥ yen | backslash | Appears as “¥” with Japanese fonts |
So far we have explained how to type hiragana, katakana, kanji, and symbols. Practice a lot and do your best to type Japanese smoothly.
Find your Favorite Japanese Instructors

SuraPera is an online learning platform where you can study the language and culture of Japan.
All SuraPera teachers are Japanese native speakers with Japanese teaching certificates. They have extensive experience in online teaching and can provide you with lessons appropriate for your language level and goals.
-
Home
-
Partition Magic
- How to Install and Use Japanese Keyboard on Windows 11/10
By Sherry |
Last Updated
Have you upgraded your Windows 10 to Windows 11? Are you wondering how to install Japanese keyboard on Windows 11 or Windows 10? Don’t worry if you have no idea. You can find a detailed guide in this post from the MiniTool Partition Wizard.
Windows 11 is a new operating system provided by Microsoft. As the successor of Windows 10, Windows 11 comes with many new features and a fresh outlook. The good news is that Windows 11 is free to upgrade.
Whether you are using Windows 10 or Windows 11, if you want to use Japanese keyboard, this post can help.
How to Install Japanese Keyboard on Windows 11
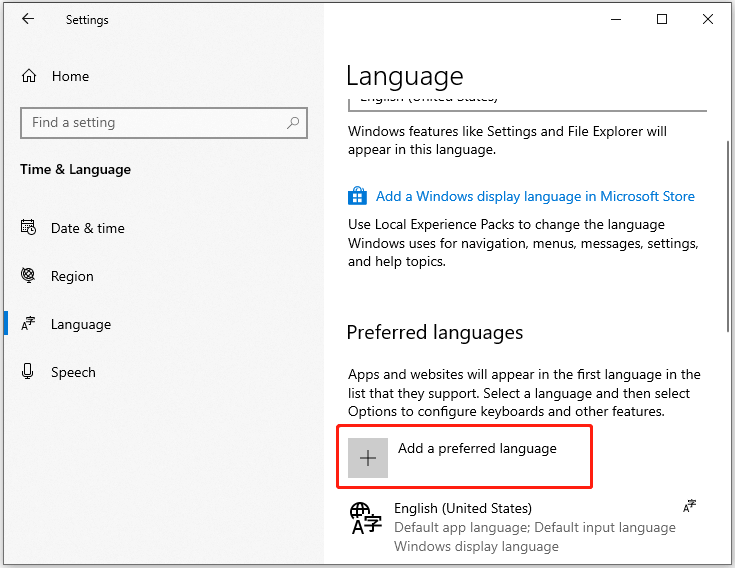
Windows 11 supports a huge number of languages. If you need to type with a second language, you just need to go to Windows Settings to install it. Now, let’s see how to install Japanese keyboard on Windows 11.
Step 1: Press Win + I to open Windows Settings quickly.
Step 2: In the left pane, select Time & language.
Step 3: In the right pane, choose Language & region.
Step 4: Click the Add a language button for the Preferred languages setting.
Step 5: In the pop-up window, search for Japanese and select it. Then click Next. On the next page, configure the optional language features and click Install.
Tip: If you want to set Japanese as the system language, you should check Set as my Windows display language here. For more details, you can refer to this post: How to Change the Default System Language in Windows 11?
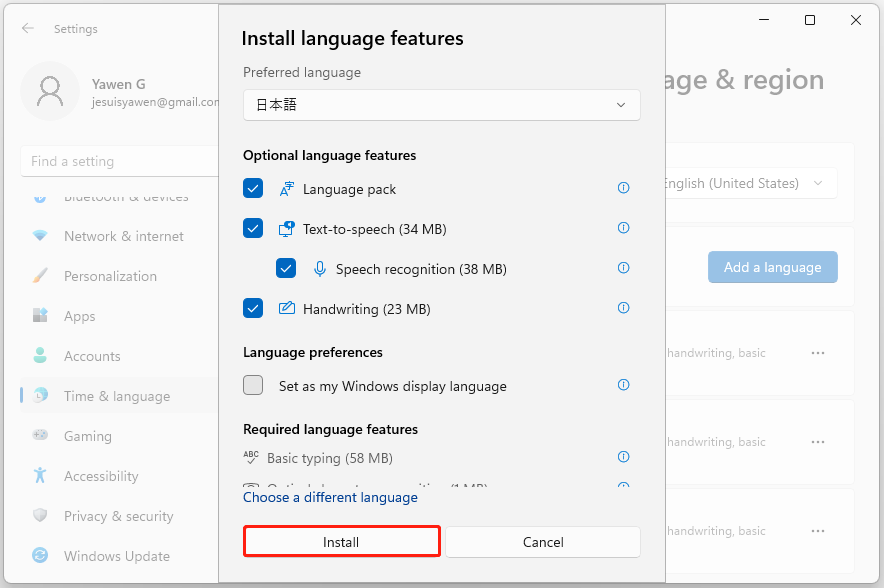
The installation might take a few minutes. Please wait patiently. Once it the Japanese is installed, you can use the Japanese keyboard.
How to Get Japanese Keyboard on Windows 10
As for how to install Japanese keyboard on Windows 10, you can follow the steps below.
Step 1: Go to Settings > Time & Language > Language.
Step 2: Click the Add a preferred language.
Step 3: Select Japanese and click Next, then configure the optional language features and click Install.
When Japanese is installed successfully, you can move to the next part to see how to use Japanese keyboard.
How to Use Japanese Keyboard
On Windows 10 and 11, you can switch the installed keyboard languages by pressing Win + Space. Just press the keyboard shortcut and select Japanese. Then you can start to use it.
Alternatively, you can click the language icon on the taskbar to change the keyboard language to Japanese.
Now, you might see the alphabet A next to the Japanese input icon, which indicates you are still typing in English. Click the A icon and it will change to Japanese.
If you want to change the Japanese keyboard to different variants, you can right-click the A icon and choose the one you prefer. To use the Japanese keyboard, you can choose the Hiragana option.
Now, you can type Japanese with the English keyboard.
Further Tip: Use a Physical Japanese Keyboard
In addition to installing Japanese keyboard on Windows 10/11, you can also use a physical Japanese keyboard to meet your demands. Just connect the keyboard to your computer and go to Settings > Time & Language. Then select Japanese and click Options > Change hardware keyboard layout to add your keyboard.
About The Author
Position: Columnist
Sherry has been a staff editor of MiniTool for a year. She has received rigorous training about computer and digital data in company. Her articles focus on solutions to various problems that many Windows users might encounter and she is excellent at disk partitioning. She has a wide range of hobbies, including listening to music, playing video games, roller skating, reading, and so on. By the way, she is patient and serious.
For Mac, iPhone, iOS click here.
Looking to type in Japanese?
In our modern age, typing has become an essential and integrated part of daily life. From emails to Facebook comments to Google searches, we type almost without thinking on a regular basis.
But what if you want to practice typing in Japanese? Isn’t it exciting that for us in 2020, it’s super easy to do so? Back before Windows came out if you wanted to type in Japanese you had to buy a keyboard with kana. Even now most Japanese keyboards come still standard with kana on them, but not many young people use the kana keys because typing in romaji has become more popular.
In recent years, Windows has come out with a Japanese IME – Japanese typing software that utilizes Hiragana, Katakana, and Kanji using an English keyboard. What’s more: it’s super simple to install and easy to use!
Installing the Japanese IME on Windows 10
Just in case you don’t already have the IME installed on your computer, let’s run through how to do that real quick! (if you already have the IME installed, skip to Typing in Japanese)
First, click on the start button in the bottom left-hand corner and open “Settings”.
Second, navigate to “Time & language” and click to go into that.
Next, open “Region & language” and select the “Add a language” button listed under Languages.
Select “日本語 – Japanese” and voila! “Japanese is added” means that the Microsoft IME is now installed and ready to go. Confirm by checking the language bar on the bottom right side of the display, which is probably still set to ENG (English). So go ahead and switch that to “Japanese Microsoft IME” to try it out!
You will notice that the keyboard still types English characters because it is set to [ A ]. This mode is used for typing English words with a Japanese keyboard, so click [ A ] and the typing mode will change to [ あ ]. Now you can type in Japanese Kana and Kanji on an English keyboard!
Now that we have installed the Microsoft IME, let’s try it out!
Romanization Systems for Typing in Japanese
The first thing you need to know is that there are 3 systems of romanization for Japanese: nihon-shiki (日本式), the Hepburn system, and kunrei-shiki (訓令式).
In short, the nihon-shiki is a transliteration of the Japanese writing system, the Hepburn system was historically the nihon-shiki’s competing system, and the kunrei-shiki is a modernized variation of the Hepburn system. The main difference is that the nihon-shiki directly transliterates the kana into English, whereas the Hepburn and kunrei systems convert into roman words with clear pronunciation. For example, nihon-shiki converts ち into “ti”, even though ち is actually pronounced “chi”.
These are generalizations because the distinctions are more complicated. The main thing to keep in mind is that the Hepburn system uses more punctuation than the others, making it a bit more difficult to type with. I recommend sticking with the kunrei-shiki, but if typing on the IME using the nihon-shiki works better for you then you can use that instead.
Using the Microsoft IME to Type Japanese
Alright, now you are all set to give it a shot! Open up Microsoft Word (or any other word processing app you use) and switch your keyboard mode. It will be in the default mode (Half-width alphanumeric) where you can type in English like normal. The only exception is that some of the punctuation keys will have different values.
Let’s say you wanted to type in Hiragana to start. You can switch the keyboard by right-clicking the language bar on the bottom right-hand side and selecting “Hiragana”.
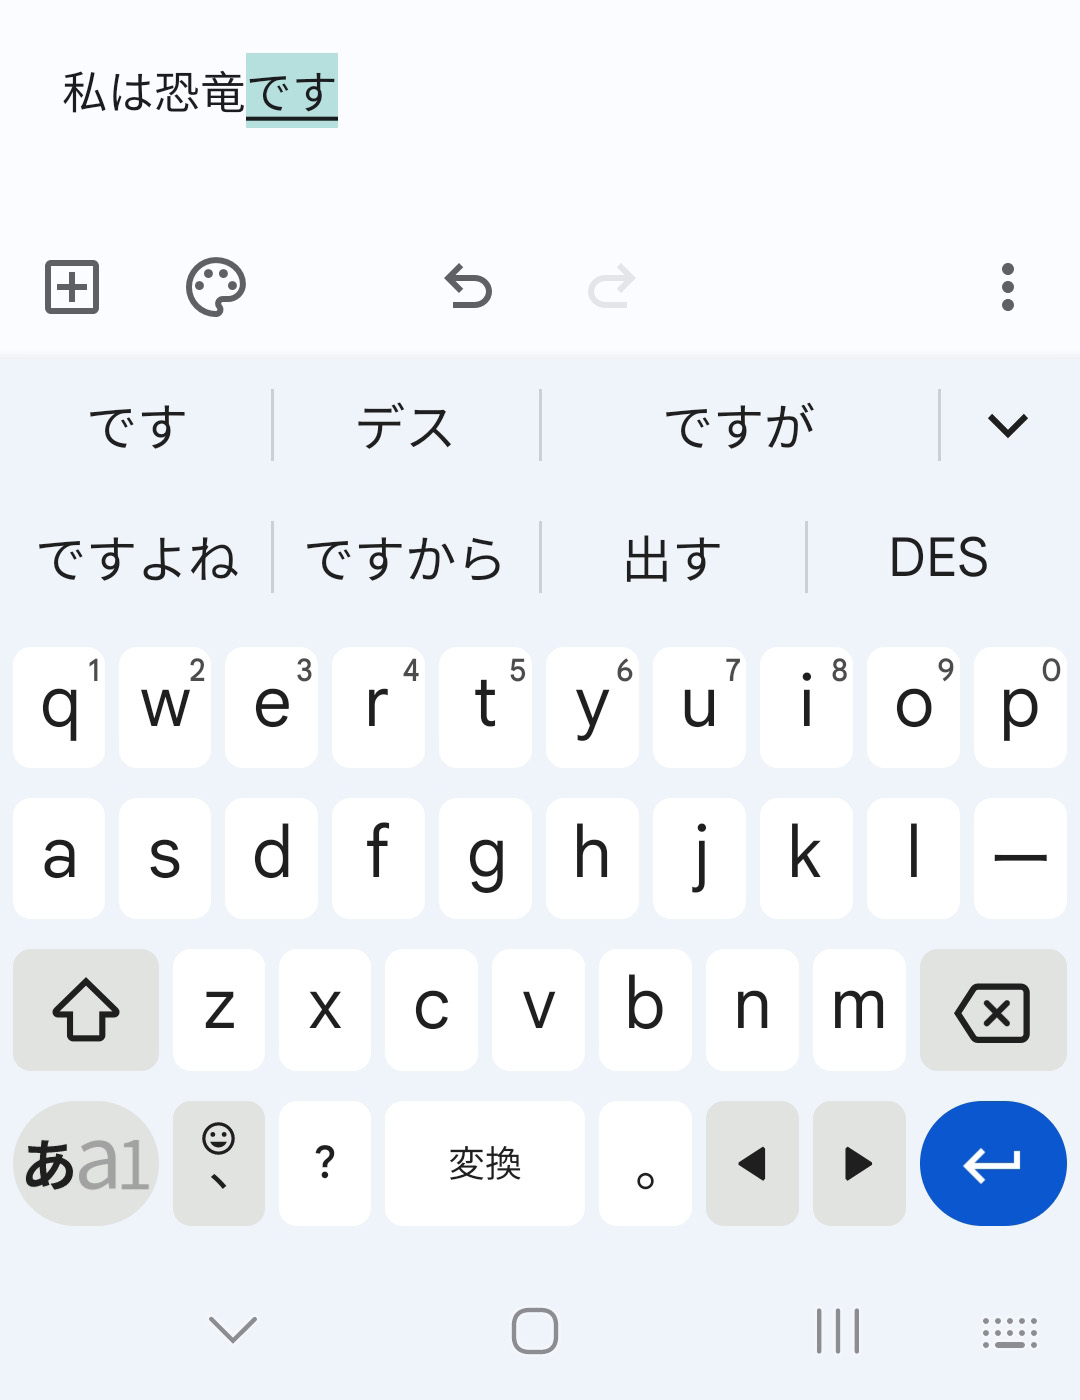
When you type, it will first appear as alpha-numeric (romaji) until you enter a valid kana. Try typing a Japanese word like hajimemashite and it should convert into はじめまして. Then hit “enter” and the IME will leave the kana word as it is, and is ready for you to input the next word.
What About Typing Kanji?
But what about selecting kanji? Let’s say you want to type sushi, for example, and want to use its kanji: 寿司. Type in sushi and it will convert to すし, but instead of pressing “enter”, tap the space bar instead. A list will pop up and you can use the arrow keys and space bar to go through the options available, so go to 寿司 and hit enter.
Since many Japanese kanji share common readings, multiple kanji options will appear for you to select from. However, this means you need to be able to recognize the kanji you are trying to use.
When you are all done, shortcut easily back to English typing mode with “alt” + “shift”.
For information regarding our Japanese courses, click the link below or right here.
Some of the images displayed are from cosom.co.
Start taking Japanese lessons from Coto Academy and become fluent in speaking and typing!
How to Install a Japanese Keyboard
On Apple, Windows, Computers, Phones, You name it!
•
words written by
•
Art by
Aya Francisco
Installing Japanese keyboards on non-Japanese computers has gotten much easier in the past ten years. No more special discs with complicated software. In fact, just about every computer has a Japanese keyboard ready and waiting inside of it.
You just have to know how to get in there, turn it on, and make it work for you.
That’s where we come in. We get a lot of emails from people struggling to install and switch between Japanese keyboards. In this guide we’ll show you how to install Japanese keyboard inputs, set awesome shortcuts for better productivity, and type anything you could ever want, all without needing a «real» Japanese computer or keyboard.
Ready? レツゴーー!
- How to Install Japanese Keyboards on your Computer
- Mac OSX
- OSX Shortcuts
- Windows 10
- Windows 10 Shortcuts
- Windows 10 IME Pad
- Windows 7
- Windows 7 Language Bar
- Windows 7 Shortcuts
- Mac OSX
- How to Install Japanese Keyboards on your Phone or Tablet
- iOS
- iOS Chinese Secrets
- Android
- iOS
How to Install Japanese Keyboards on your Computer
The first thing you need to do is figure out what kind of computer you’re using. If you don’t know, here’s an easy way to tell:
- If there’s an apple on it, you’ve got a Mac.
- If not, you’ve a got a PC.
Kidding aside, you probably already know what kind of computer you have. It’s a really good thing to know.
Mac OSX
We’ll start off with Mac instructions for installing Japanese keyboards.
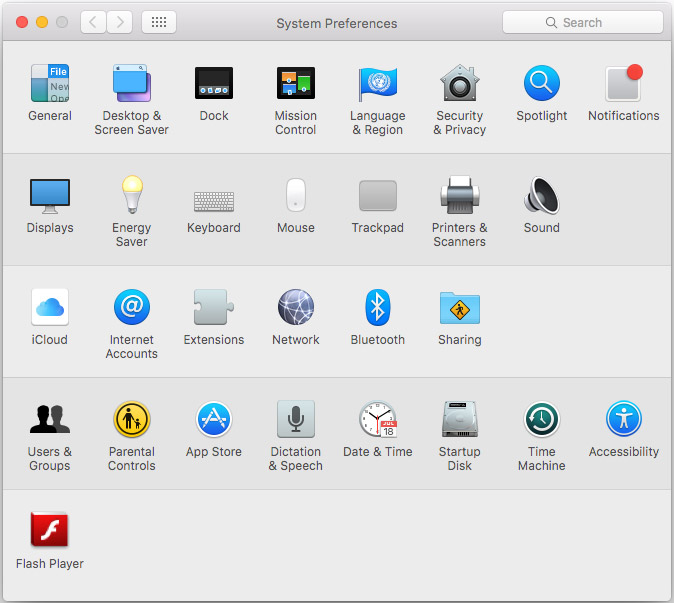
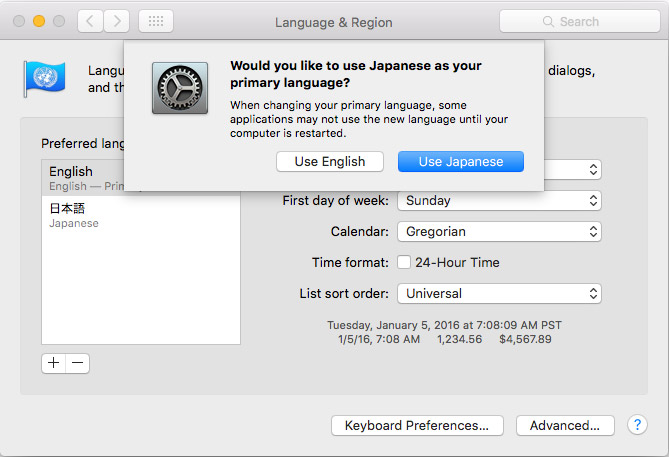
Go to System Preferences > Language & Region.
Once in Language & Region, click the + (plus) sign under the Preferred languages box. It will bring up a list of languages.
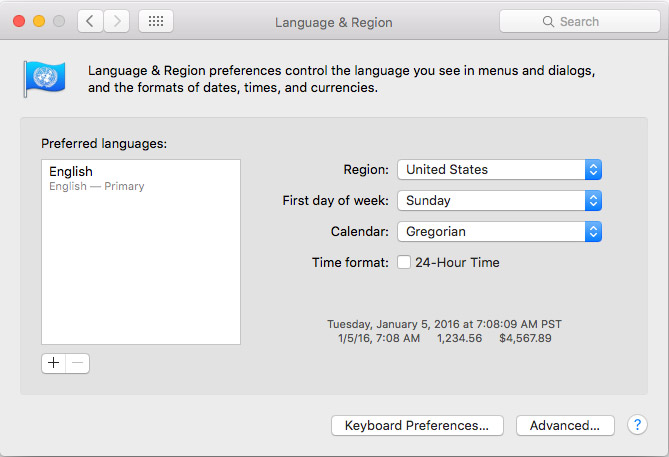
Select 日本語 — Japanese.
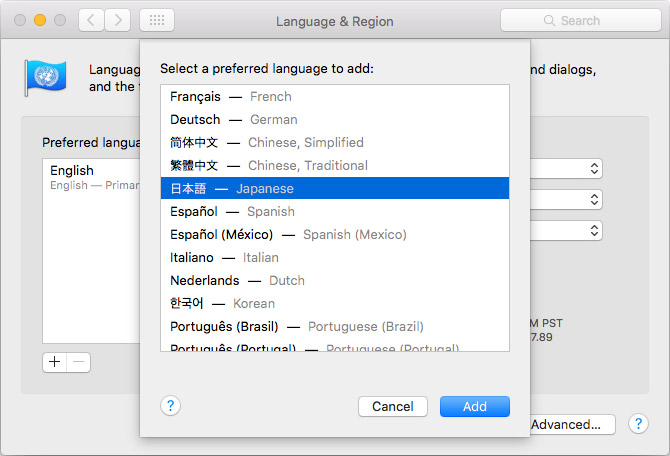
Hit Add.
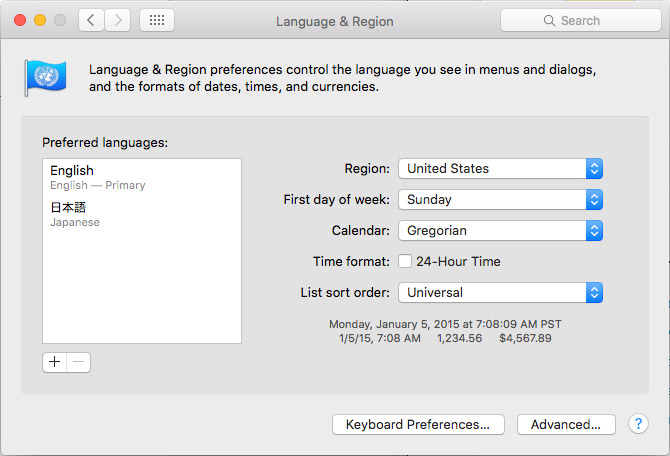
You’ll get a prompt asking whether you’d like to change your primary language from English (or whatever it currently is) to Japanese. Unless you’re fluent in Japanese, don’t switch. Just choose Use English for now.
Next click on Keyboard Preferences at the bottom.
It will bring you to a menu called Input Sources. Click the + (plus) at the bottom left and choose Japanese and hit Add.
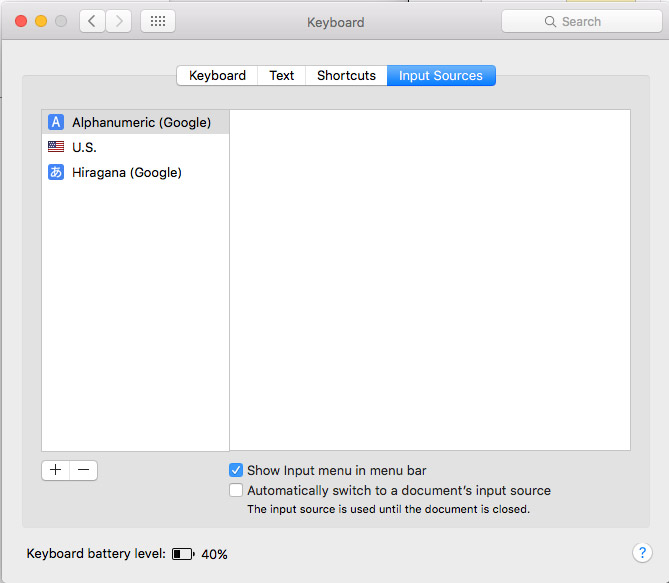
Now you’ll have the option to choose which inputs to use.
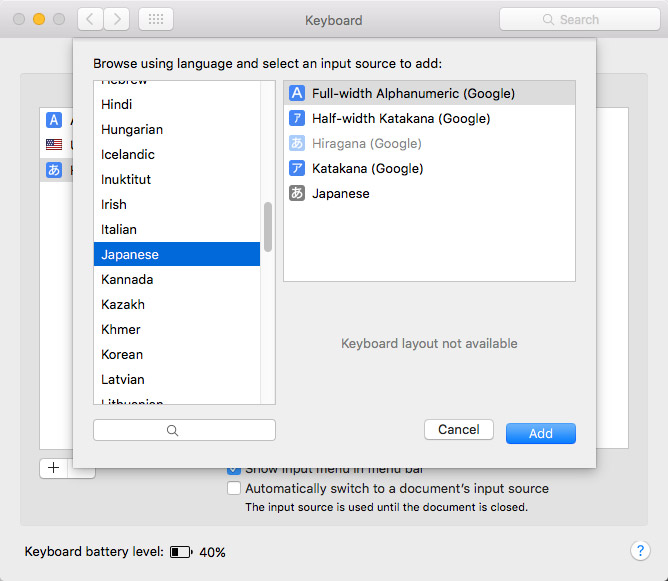
I use Full-width Alphanumeric (Google) for English (better than your default U.S.), and Hiragana (Google) for Japanese. (If you don’t already have Google Japanese Input on your computer, you can get it here)
You don’t need anything else from this list because you’re able to choose everything you need with these two alone.
Now that you have your keyboards set up, you’ll see them in the top right toolbar, right near the time.
If you want to be a slow, sad person, you can drag your mouse up there and click through when you want to switch between your keyboards.
Or, you can be an efficient Japanese beast switching from English to Japanese and back without even blinking! Shortcuts will show you the way.
OSX Shortcuts
Your keyboards will probably already have some shortcuts associated with them. Here are the defaults, which you can use whenever you want to switch between English and Japanese:
English:
control + shift + ;Japanese:
control + shift + j
But now there’s a small problem. When you added the Japanese keyboard, it probably enabled another shortcut that conflicts with other programs. It’s command + space. This filters through your language options, always going to the next one.
If you’re like me, you already use command + space for search programs like Spotlight or Alfred.
Here’s how you turn that off:
Go to back to System Preferences > Keyboard > Shortcuts.
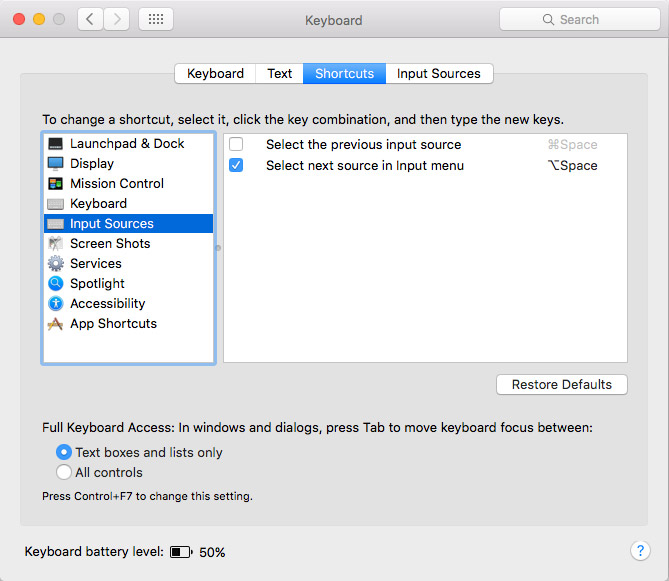
Once in shortcuts click on Input Sources.
Now just uncheck both:
Select the previous input source
Select next source in Input menu
Or, instead of unchecking them, change the inputs to something you aren’t already using.
And that’s it! Now you have an easy to use Japanese keyboard at your fingertips!
Windows 10
Next, let’s walk through how to install a Japanese keyboard in Windows 10.
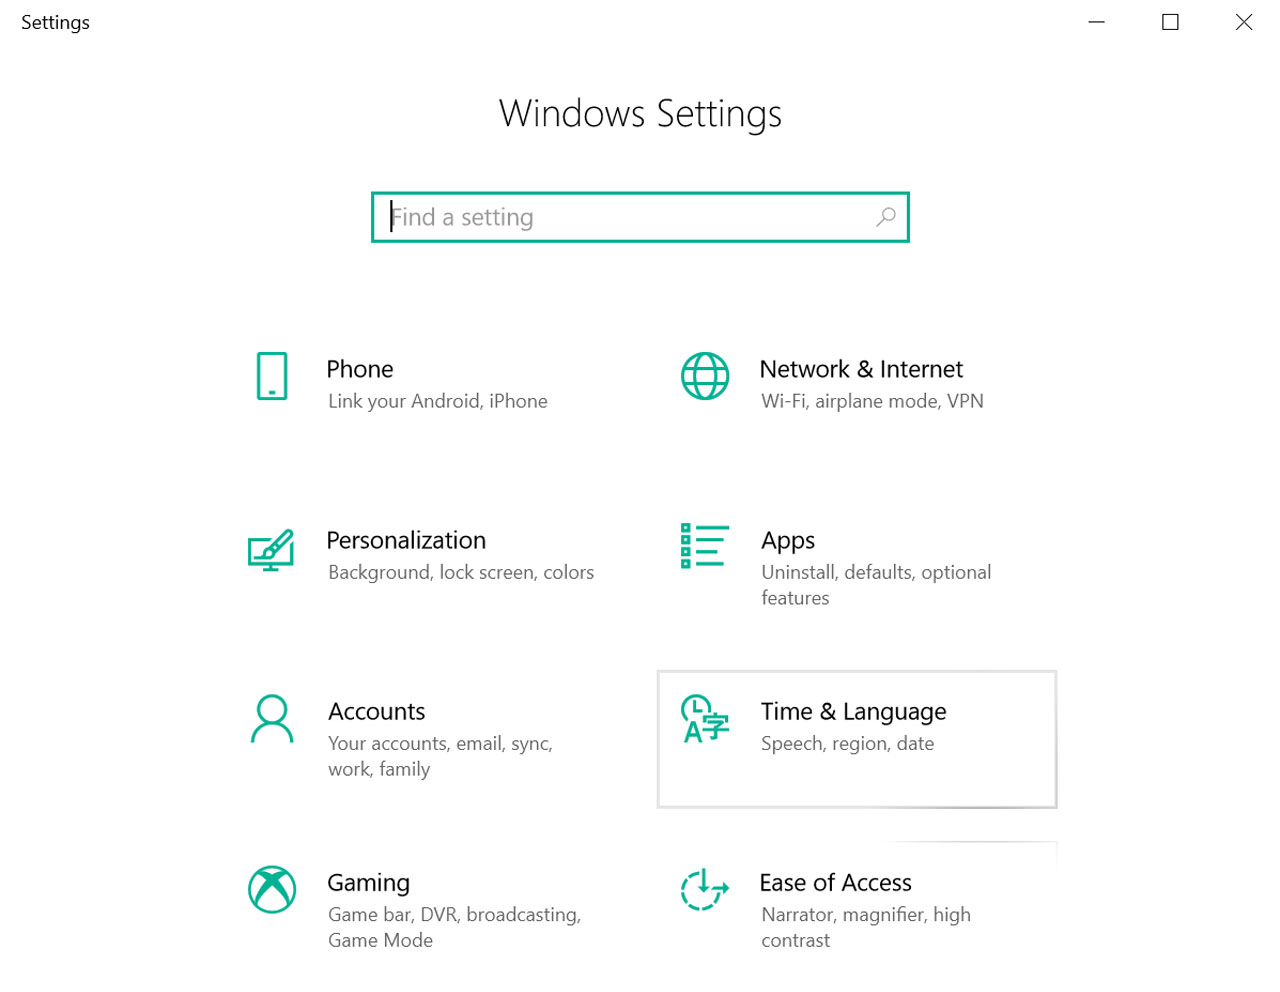
First, click on the little Windows symbol (the one that replaced the old Start bar) in the bottom left corner. From there, click on the cogwheel icon to naviate to Settings.
Inside Settings, you’ll see a menu with eight buttons. Click on Time & Language.
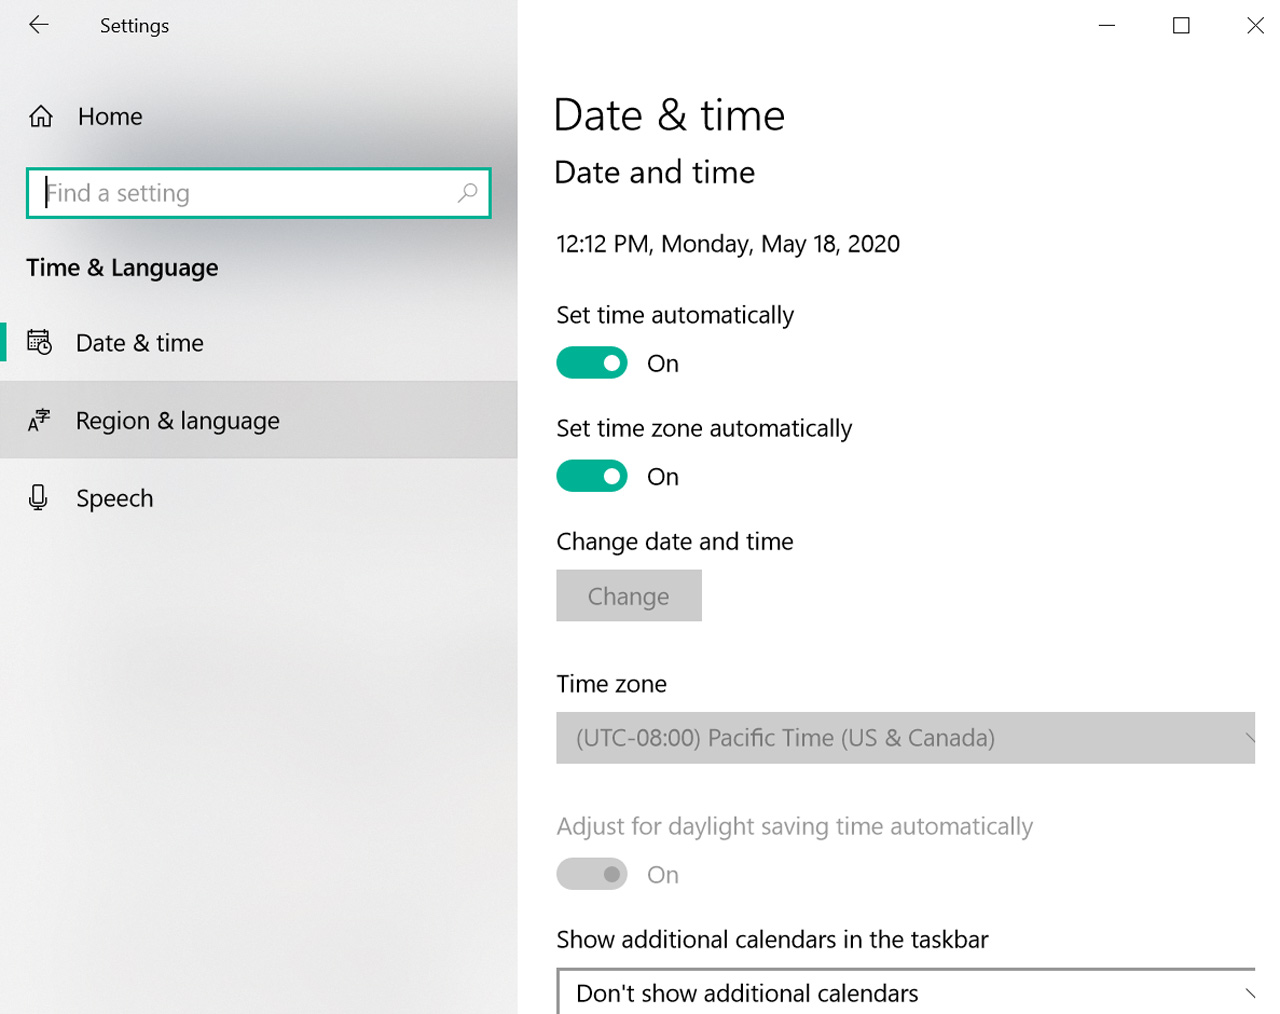
A window will open with Date & time settings. Click on Region & language.
Once you’re on the Region & language screen, click the Add a language button.
You’ll see a bunch of languages in big boxes. Either Scroll down or use the search box to find 日本語 (Japanese) and click Next.
Next you’ll have a couple of options. Chances are you’ll want to unselect the box that says Set as my Windows display language (unless you are looking for some total immersion!). You can also choose to install speech and handwriting tools as well. Once you’ve made your selections, click Install.
Once the installation is complete, you’ll see Language pack installed in the 日本語 box. That’s it! You’re ready to type away in Japanese.
Windows 10 Shortcuts
There are shortcuts for switching between language keyboards already on your PC! To switch between the two, here’s what you do:
Windows button + spacebar
This will cycle between the two languages.
You’ll also be able to see what mode you’re in at the bottom of the screen in your toolbar.
And you can choose your input method by right-clicking on the A or the あ.
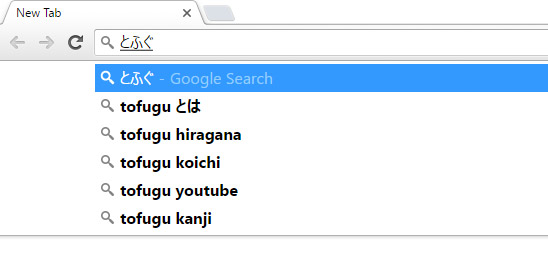
Now you can type in Japanese like this:
Windows 10 IME Pad
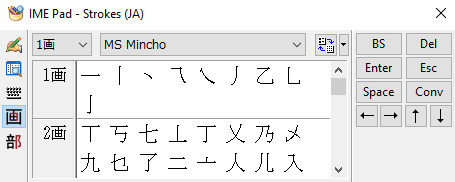
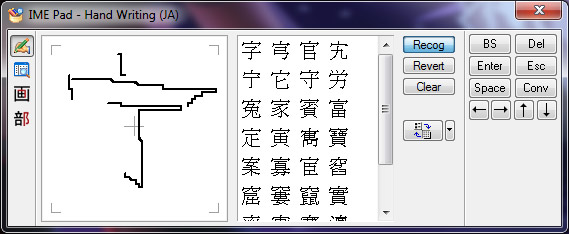
As an added bonus, when you use Windows you get this neat little option called IME Pad.
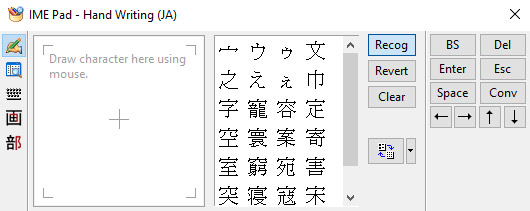
You can use it to draw a kanji character you don’t remember the reading for, or to look up a kanji you don’t know. The stroke order kind of matters, but the quality of your drawing doesn’t so much, as you can see here:
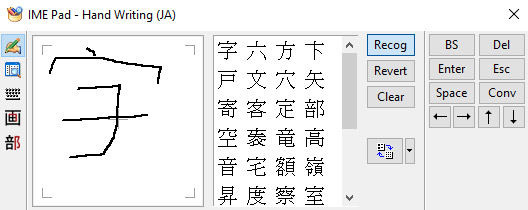
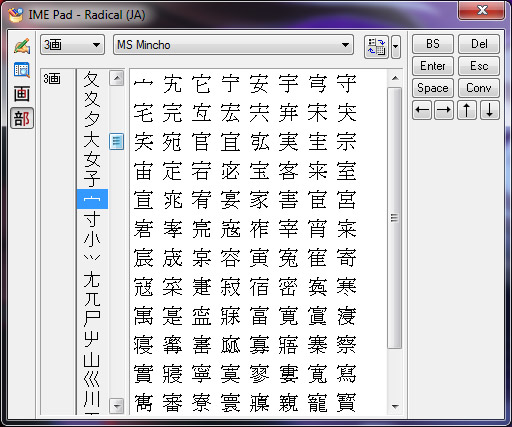
There are also tabs that let you look up kanji by radical.

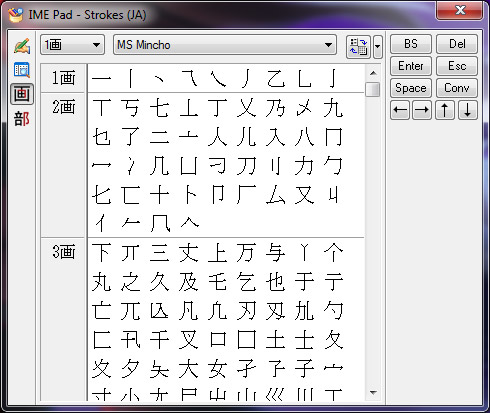
Or the number of strokes.
Very useful for language learners!
Windows 7
A lot of people still have Windows 7 and swear by it. So time to reveal the secrets of Windows 7 Japanese input. The process is a little different than 10, so here’s how to do it:
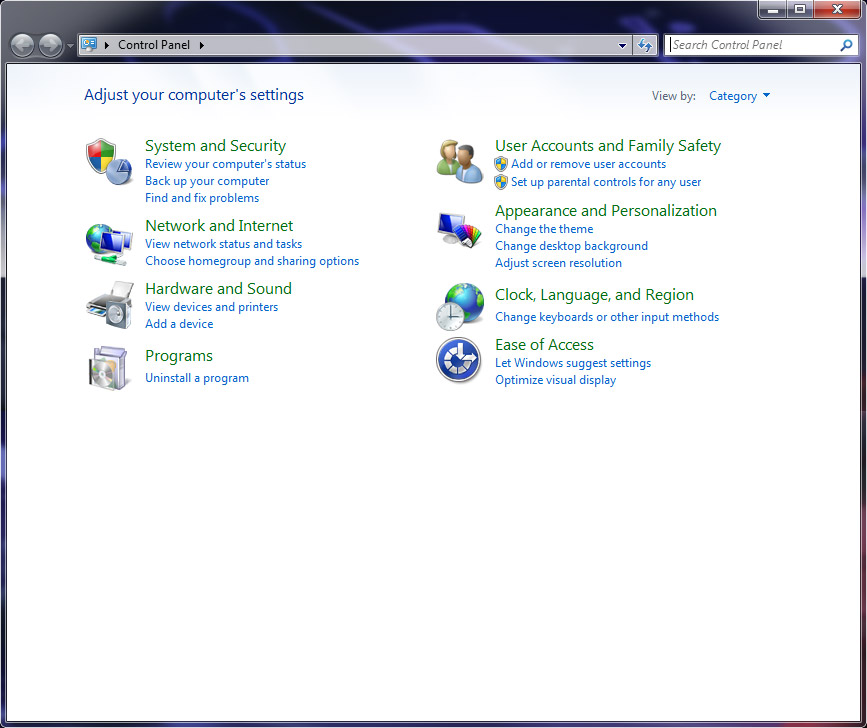
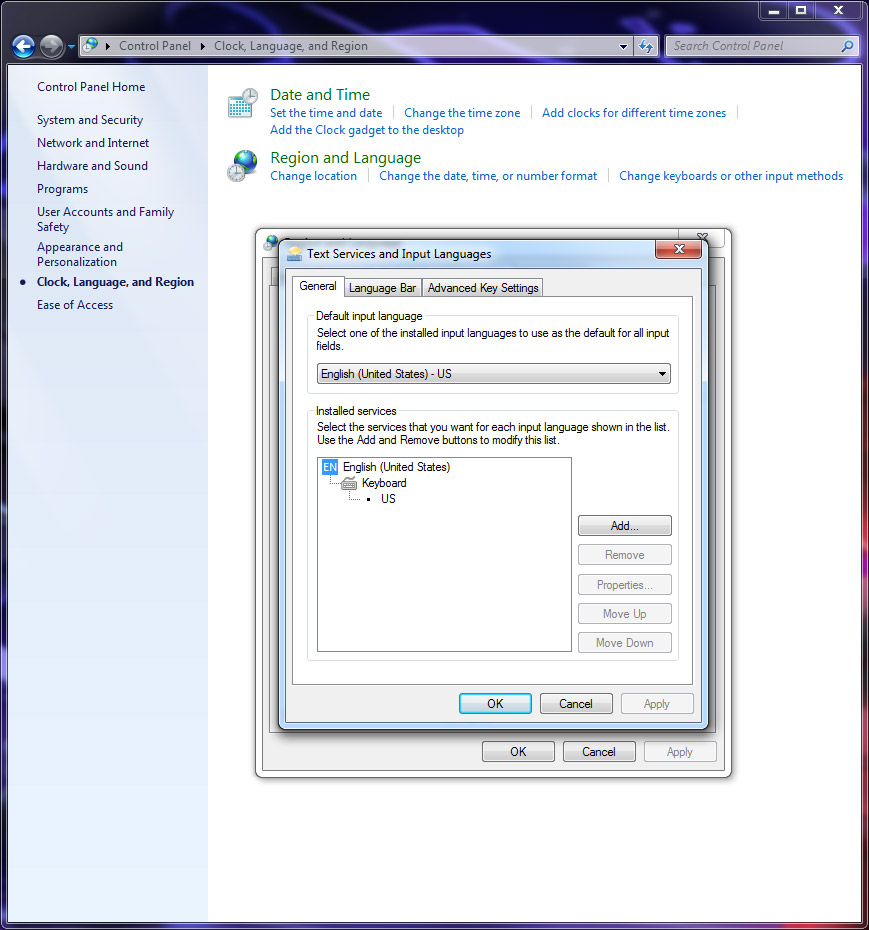
Go to Start or the little Windows Button and click on the control panel.
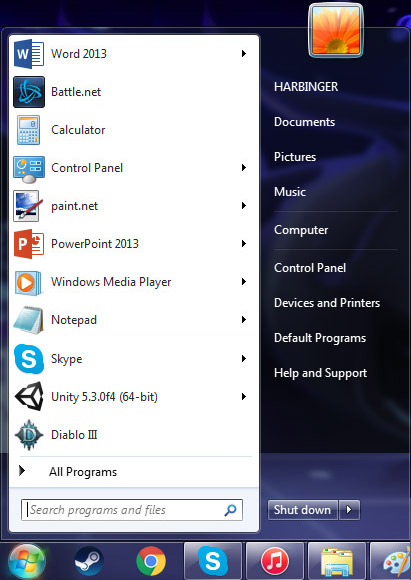
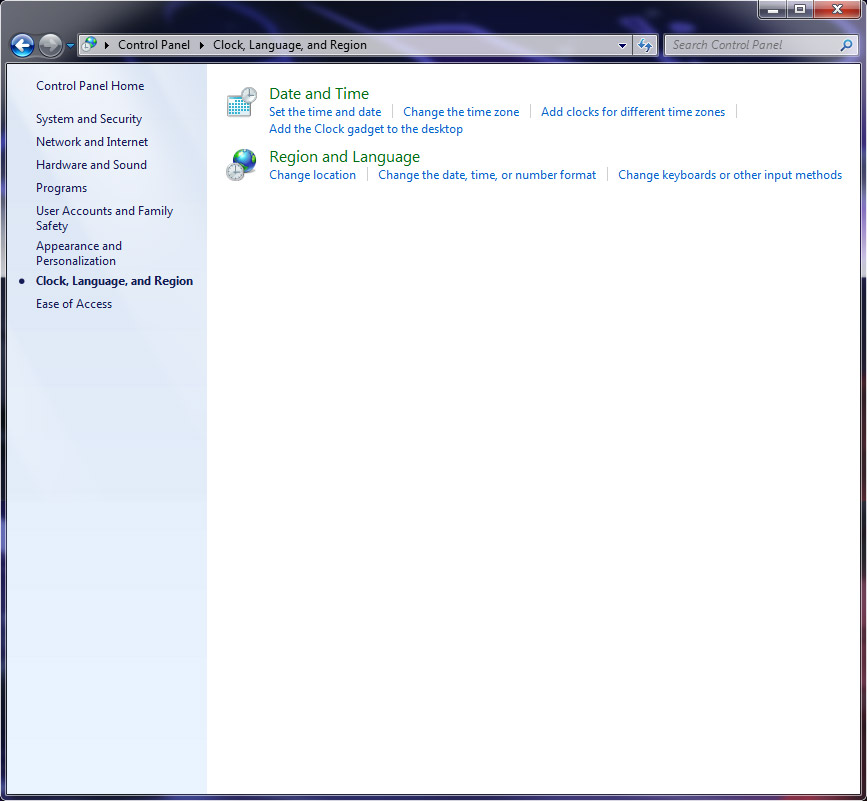
Click on Change keyboards or other input methods under Clock, Language, and Region.
This will bring you to another menu where you choose Change keyboards or other input methods.
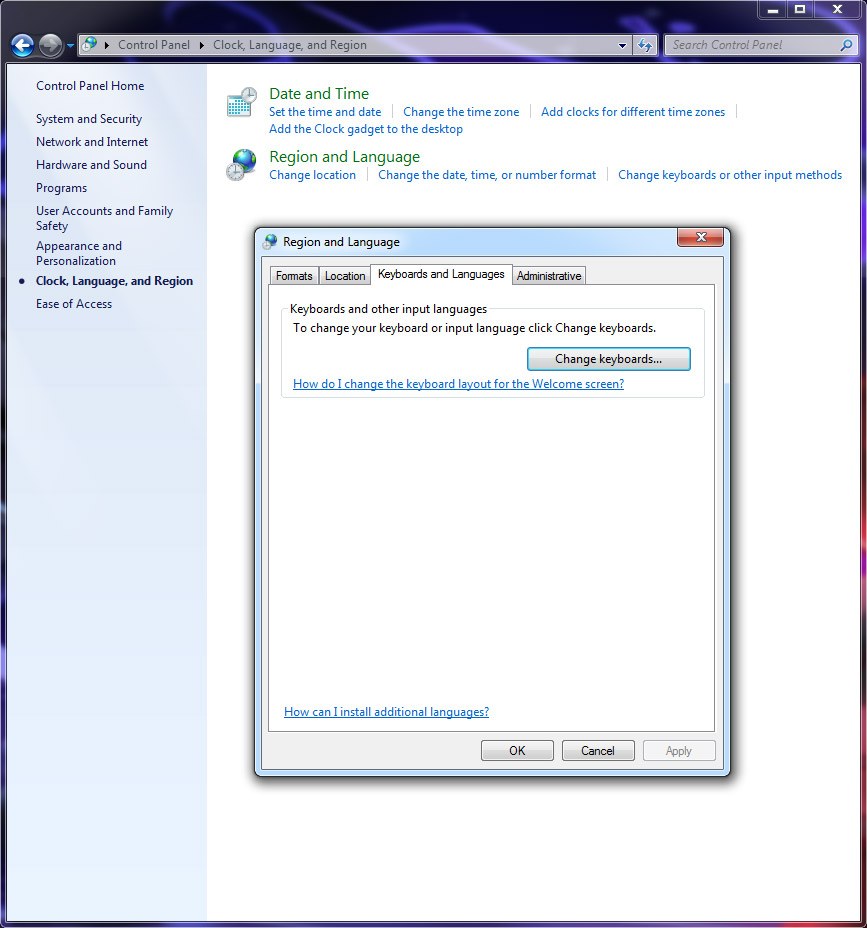
Make sure you’re in the Keyboard and Languages tab and click Change keyboards.
Then click on Add...
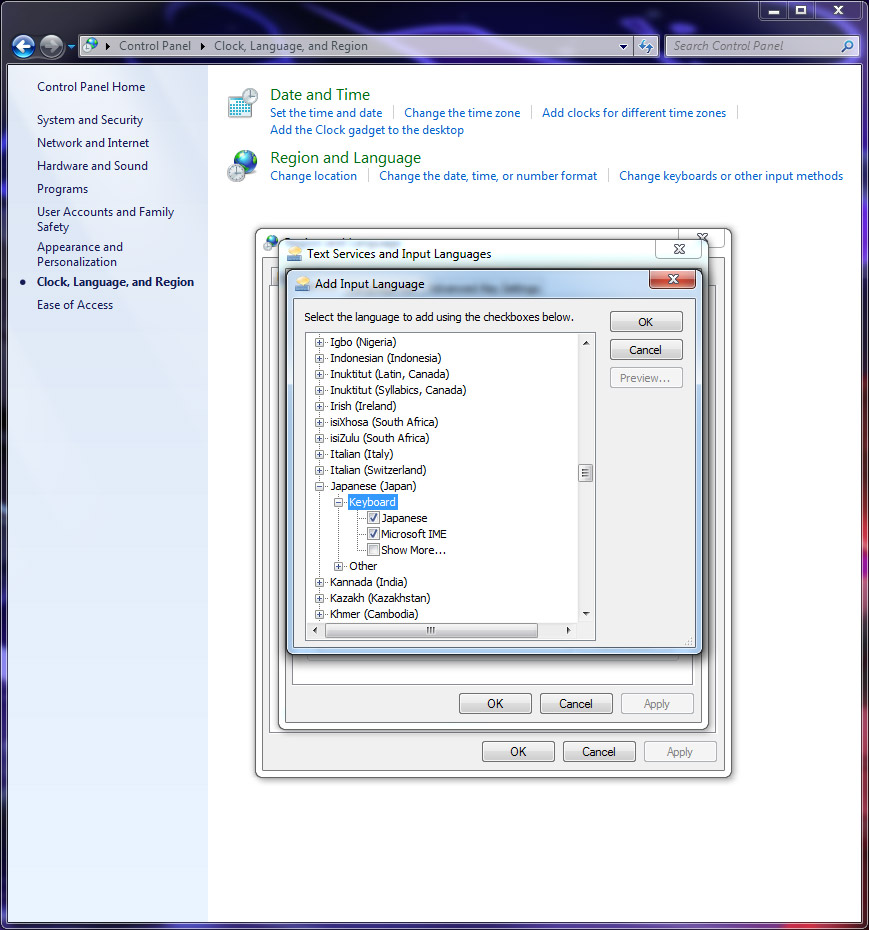
And scroll to the middle and expand the Japanese (Japan) option.
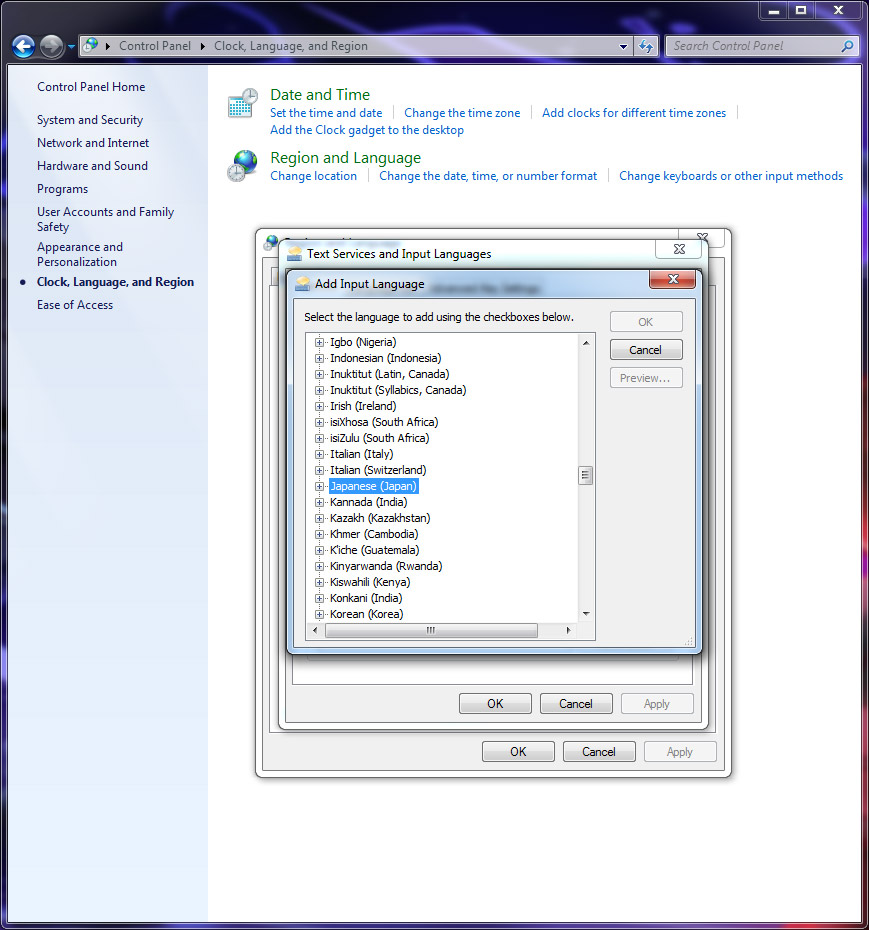
You’ll have a few options. Choose Microsoft IME and hit OK. You can add Japanese too, if you’d like.
Now Apply it and/or hit OK.
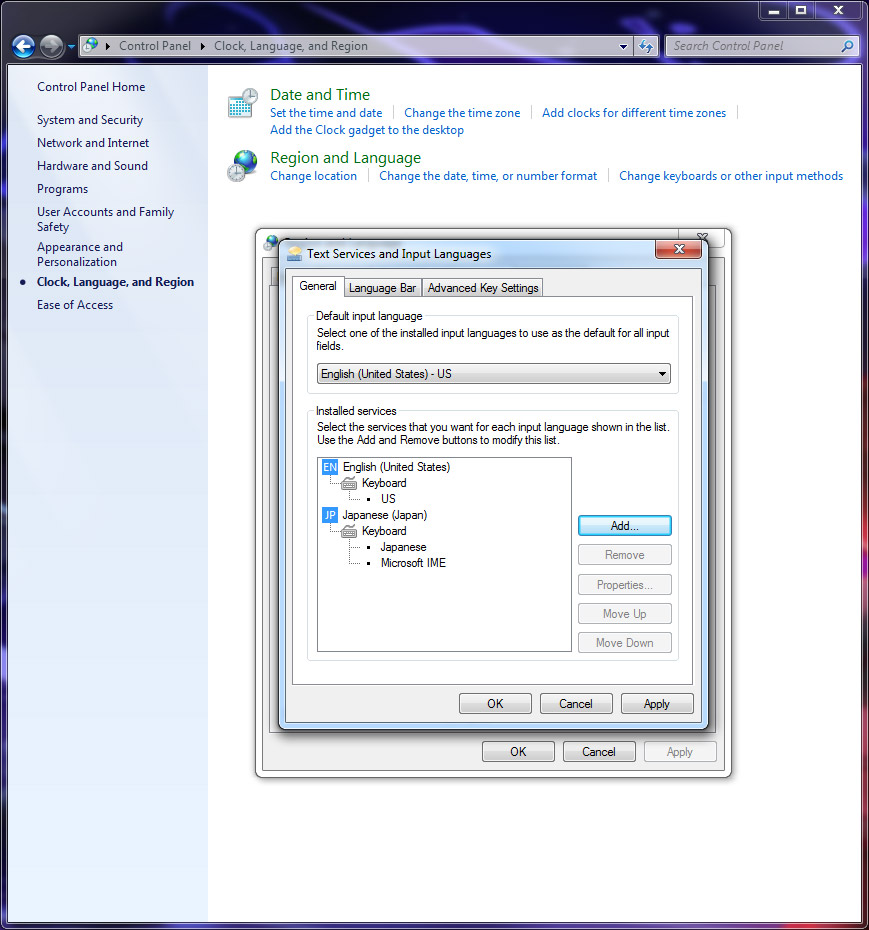
This will add a little EN to the right side of your toolbar.
You can click on it to switch between English and Japanese.
When you do switch to Japanese it will automatically put you into Alphanumeric mode, which isn’t very helpful since you want to be typing in Japanese and not English.
Click on the A to change it to Hiragana.
And the A will change to あ. That’s how you know your Japanese input method.
Windows 7 Language Bar
If you have trouble with all your language options being smooshed into your toolbar, you can go back to the language menu and choose Show the Language Bar.
This will open up a movable bar with all your options attached to it. It also gives easy access to the IME Pad, which is pretty much the same as the one in Windows 10.

You can draw kanji to look them up.
Look up kanji by radical.
And by number of strokes.
Good stuff!
Windows 7 Shortcuts
Like Windows 10, Windows 7 has shortcuts automatically assigned to switching between your languages.
To cycle through your languages use:
left alt + shift
But if you don’t want to use that (for some reason) you can change the settings like this:
Go back to control panel > Change keyboards or other input methods > Change keyboards.
Now here’s where things get different.
Go to the Advanced Key Settings.
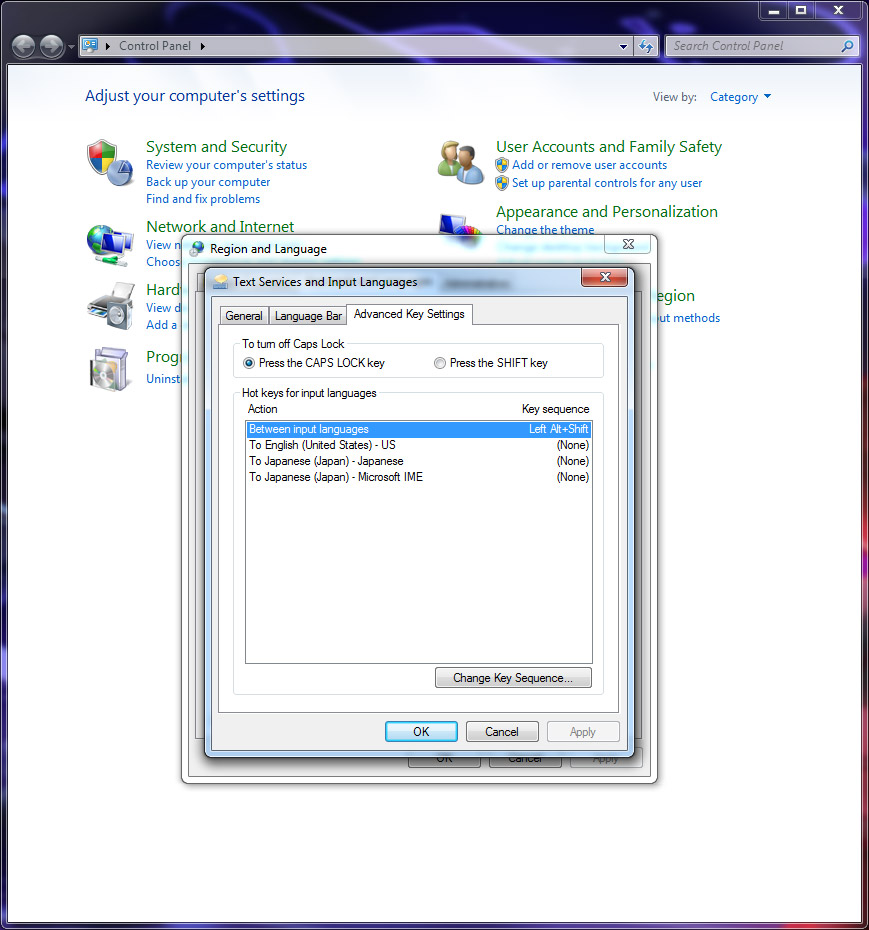
And select whichever language you’d like to change the shortcuts for.

You only have a few options.
Basically:
ctrl + number
ctrl + shift + number
left alt + shift + number
These can be really helpful if you’re typing in more than 2 languages. For example, if you’re writing a paper using English, Japanese, Korean, and Mandarin, this can help make the process much less frustrating.
But you should be careful. If any other shortcuts (which may be default on your computer) are the same as the shortcuts you’re making, they won’t work. So it’s probably best to stick with the default cycle shortcut if you aren’t dealing with 3+ language keyboards.
How to Install Japanese Keyboards on your Phone or Tablet
It’s the future and installing a Japanese keyboard is easy-peasy! Well, mostly. But once you learn how to do it, you’ll have opened a whole new world of fun.
iOS
Installing Japanese keyboards on your iPhone or iPad is a breeze. These instructions will (or should) work for all current iOS devices.
If you’ve installed the emoji keyboard, then this should be very familiar. If you haven’t, then follow these instructions but switch out Japanese for Emoji, and you can thank me later.
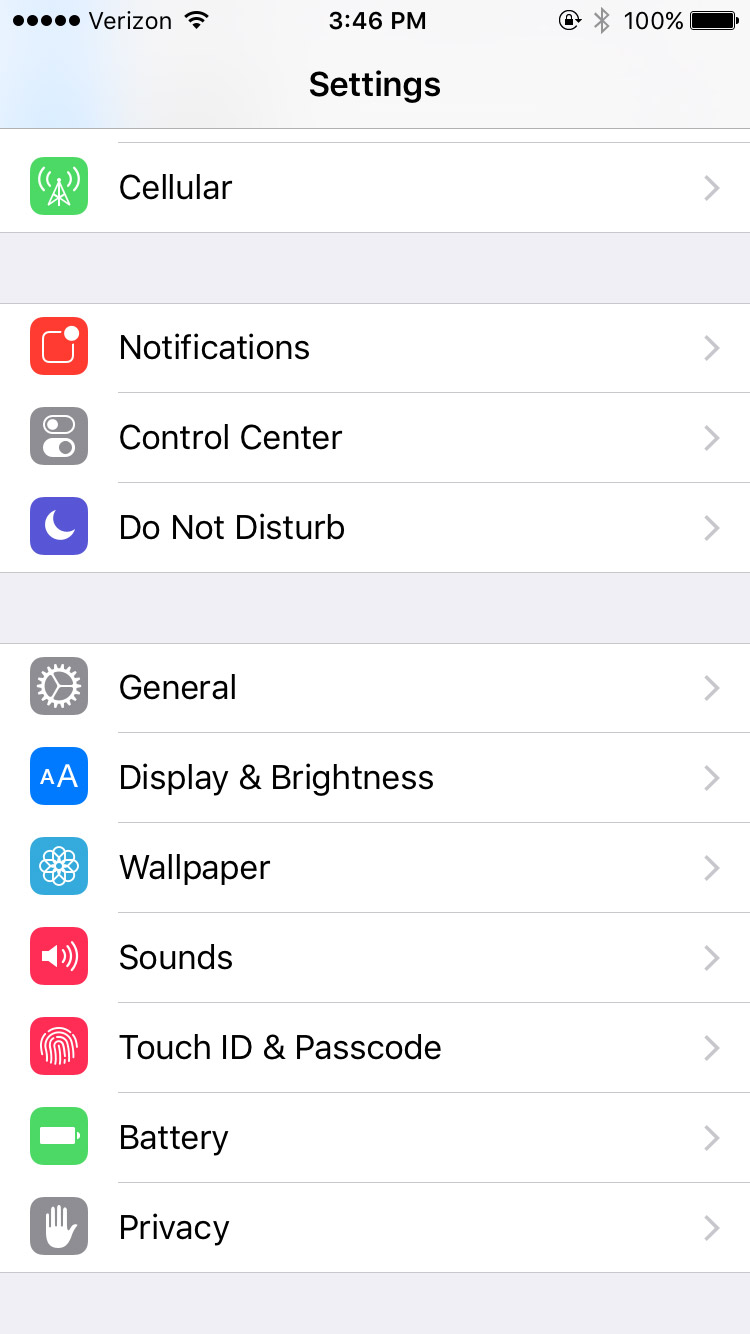
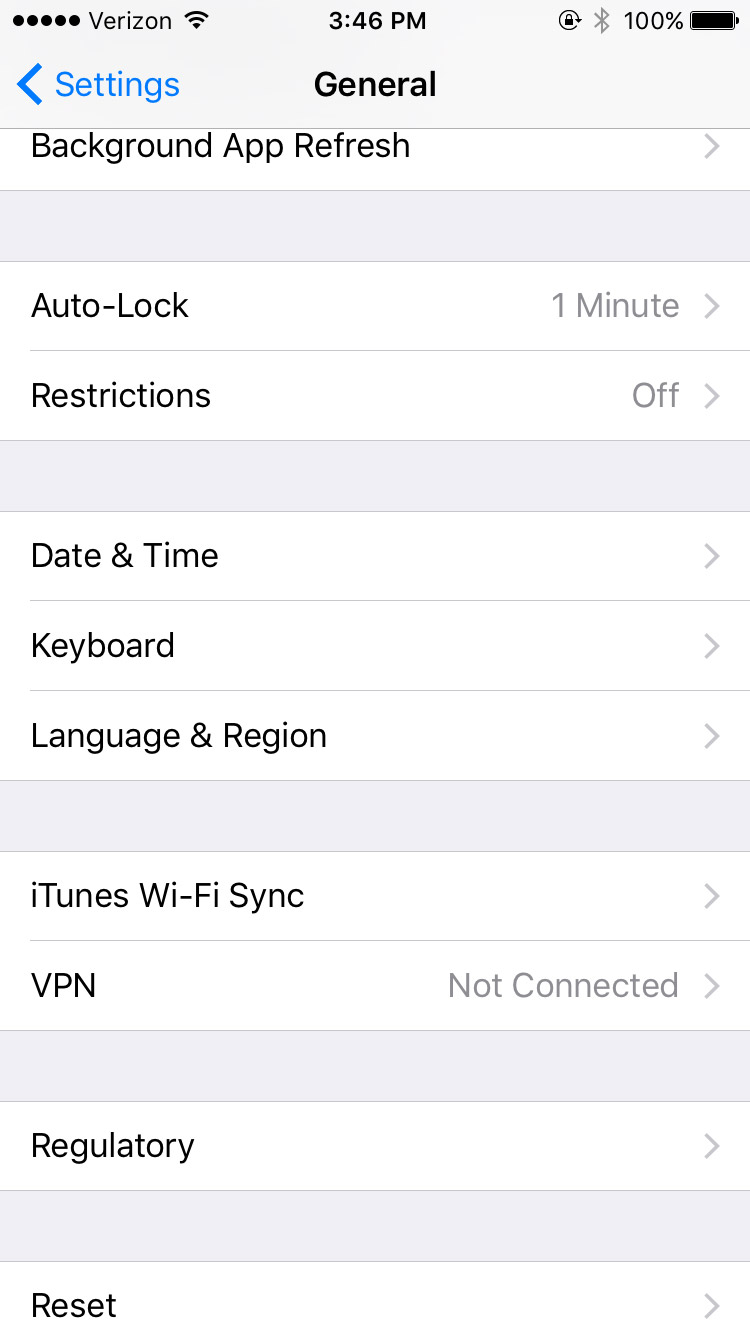
First, go to your Settings and click on General.
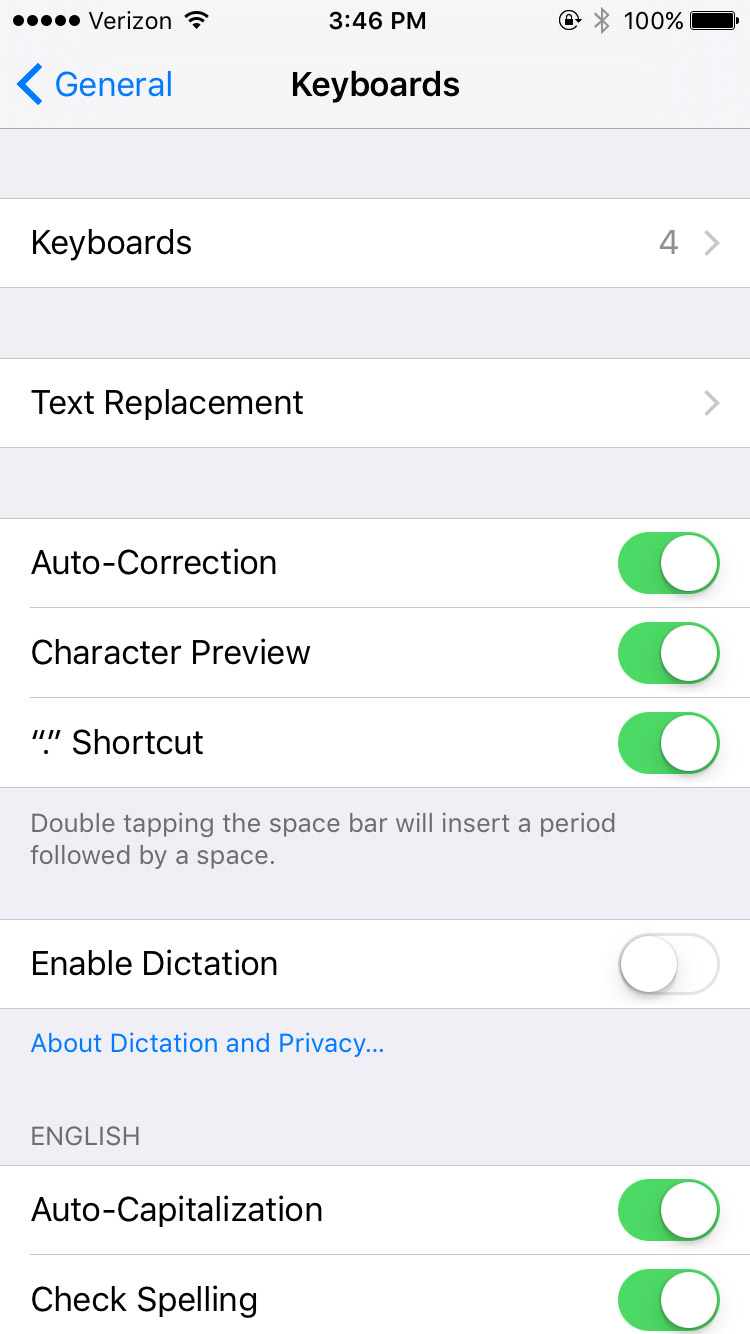
Then Keyboard.
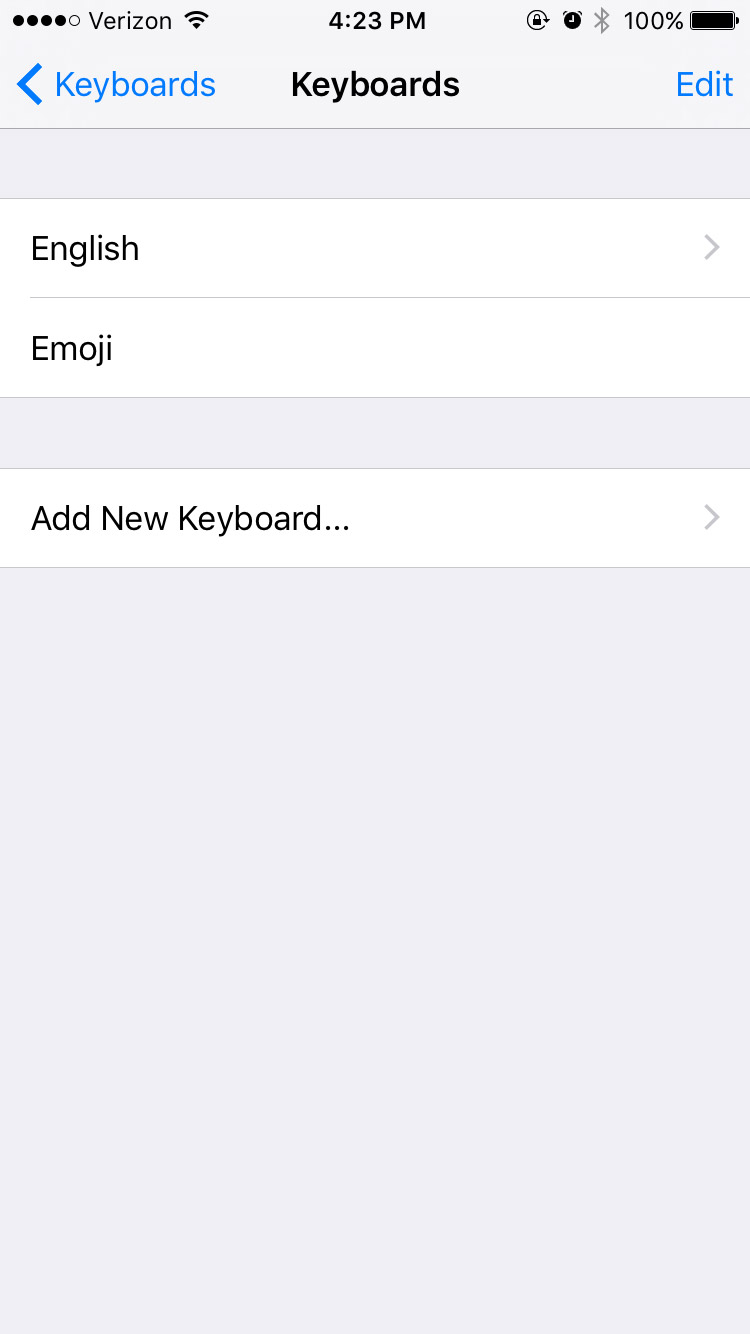
And then Keyboards with an s.
You’ll see a list of the keyboards you already have installed.
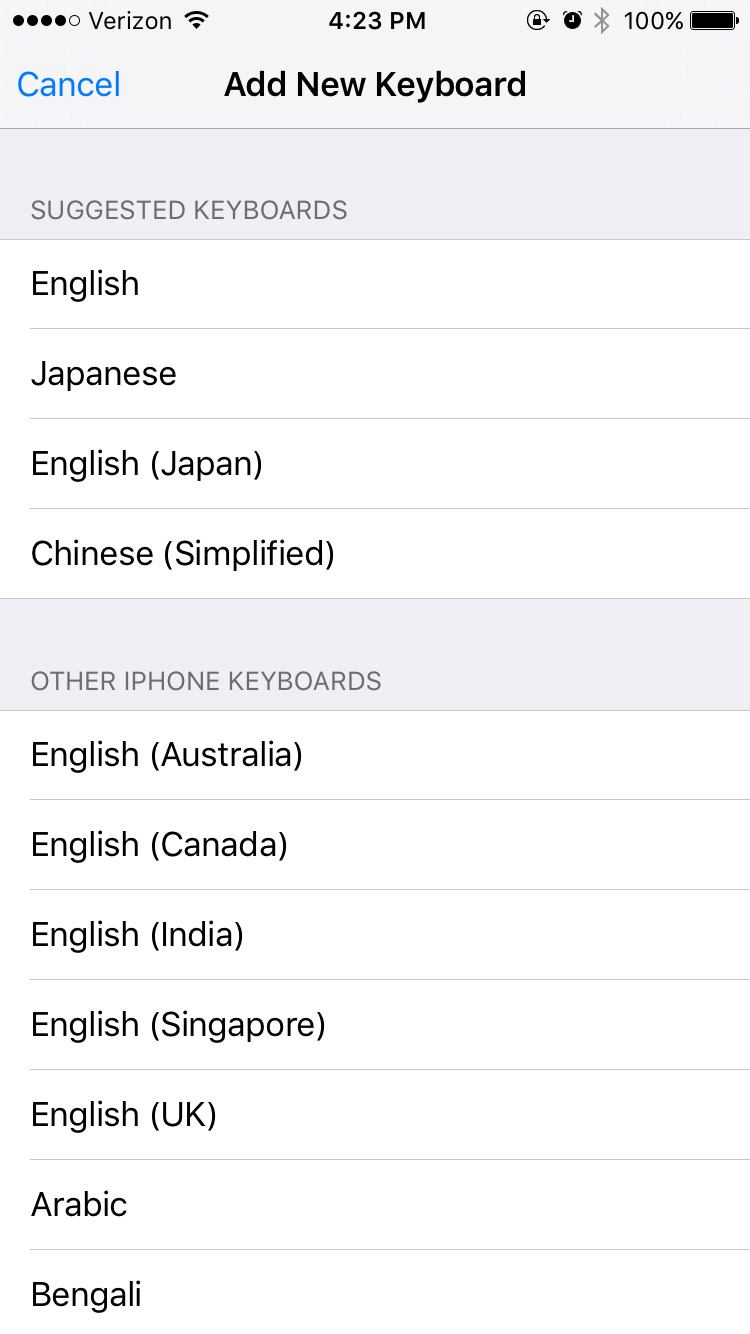
Click on Add New Keyboard.
Scroll down to Japanese. (Mine is suggested because I’ve used it before.)
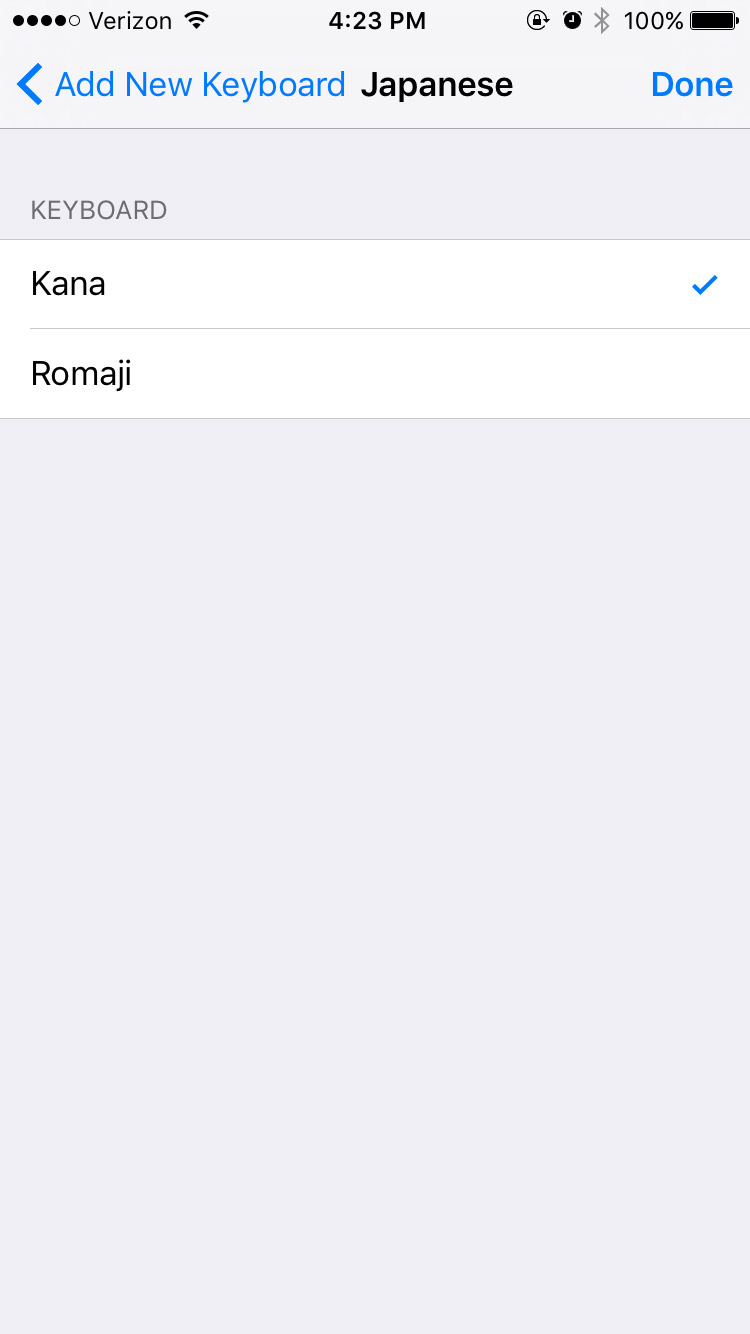
Now choose Kana and/or Romaji and Done at the top right.
That’s it! To use it go to your messages and start as you normally would. But now you’ll see that there is a new symbol, this little globe circle.
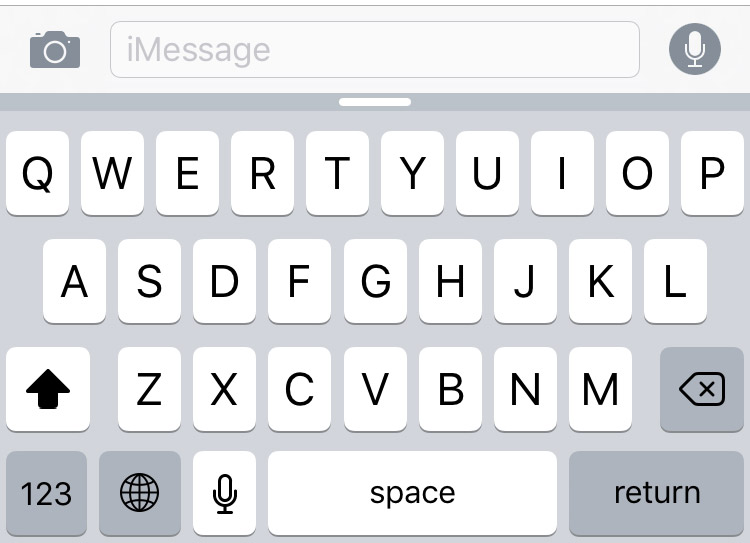
It will switch to the next (or whatever it thinks you want) keyboard, which should be Japanese!
Some versions of Android/Google IME do not show the globe, but fear not! You can also hold down the space bar to switch between input languages.
The Kana mode looks like this:

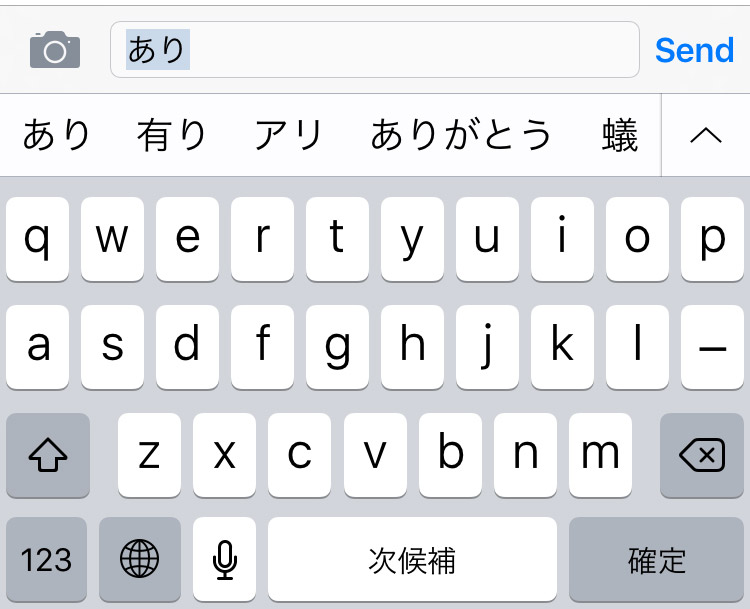
And the Romaji mode looks like this:
iOS Chinese Secrets
Want to quickly look up kanji on your phone without using an outdated app, waiting for your browser, or having to pay for a drawing tool? We’ve got a hack for you!
Follow all those iOS keyboard instructions above, but stop after you hit the Add New Keyboard step.
Instead, scroll down until you reach Chinese (Simplified). Then under the keyboard choices choose Handwriting.
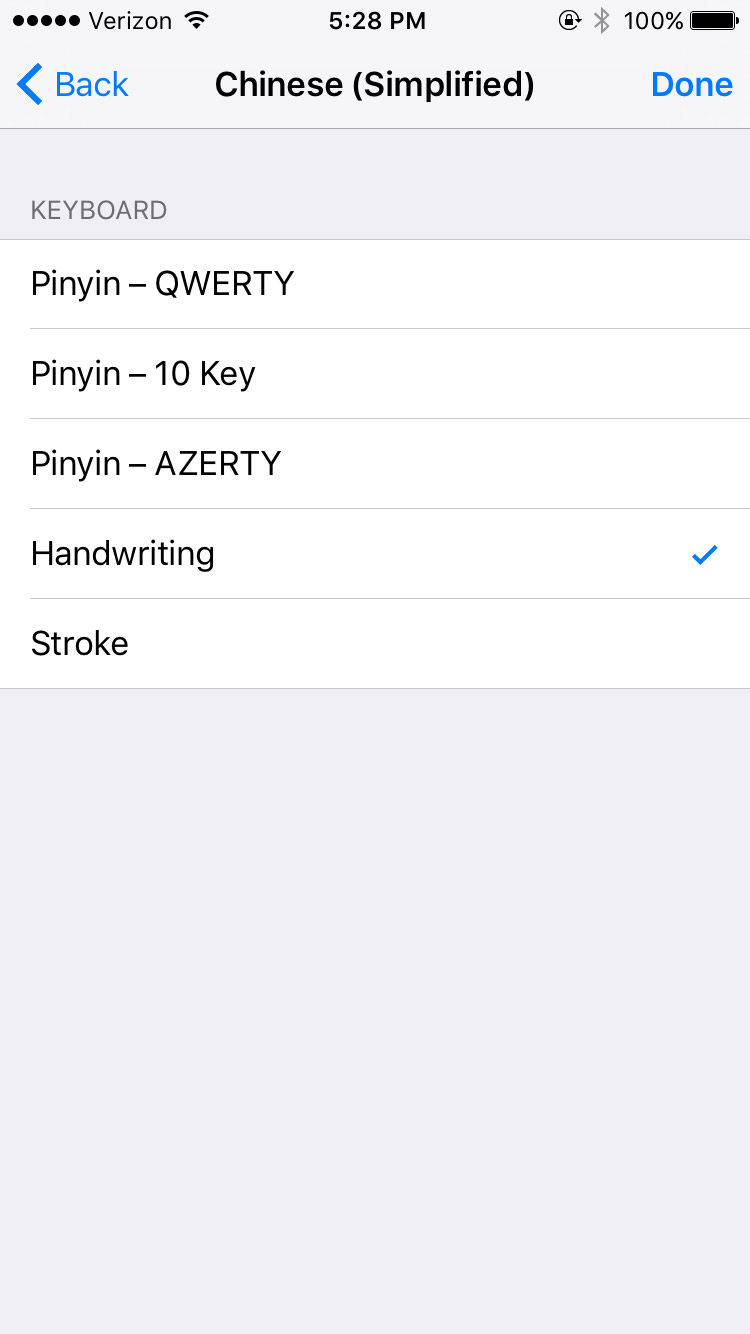
Now you have a new keyboard option that opens up a drawing IME. It may be for Chinese, but remember a ton of Japanese and Chinese characters are shared. And it works for both!
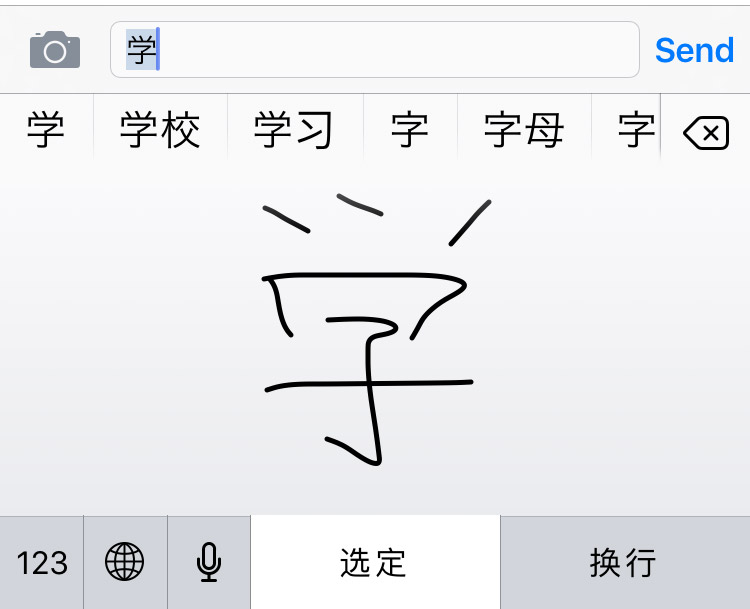
This works when you’re texting your friends and trying to look up or save a kanji to look up later on. Even better, it doesn’t care about stroke order like most Japanese apps. And it doesn’t use the same database as most Japanese — English dictionaries (Jim Breen, Jisho.org, Tangorin, etc.). Also you don’t need an internet connection to use it! Handy, right?
Android
For non-Apple people, there’s only one way to go. Time to look at installing Japanese keyboards on Android. These instructions will (or should) work for all current Android devices.
First, you need to download a Japanese keyboard. To do this open the Play Store.
Then in the search bar type in gboard.
The first non-advertisement option will almost definitely be the Gboard app.

This one is free and easy to use so let’s INSTALL.
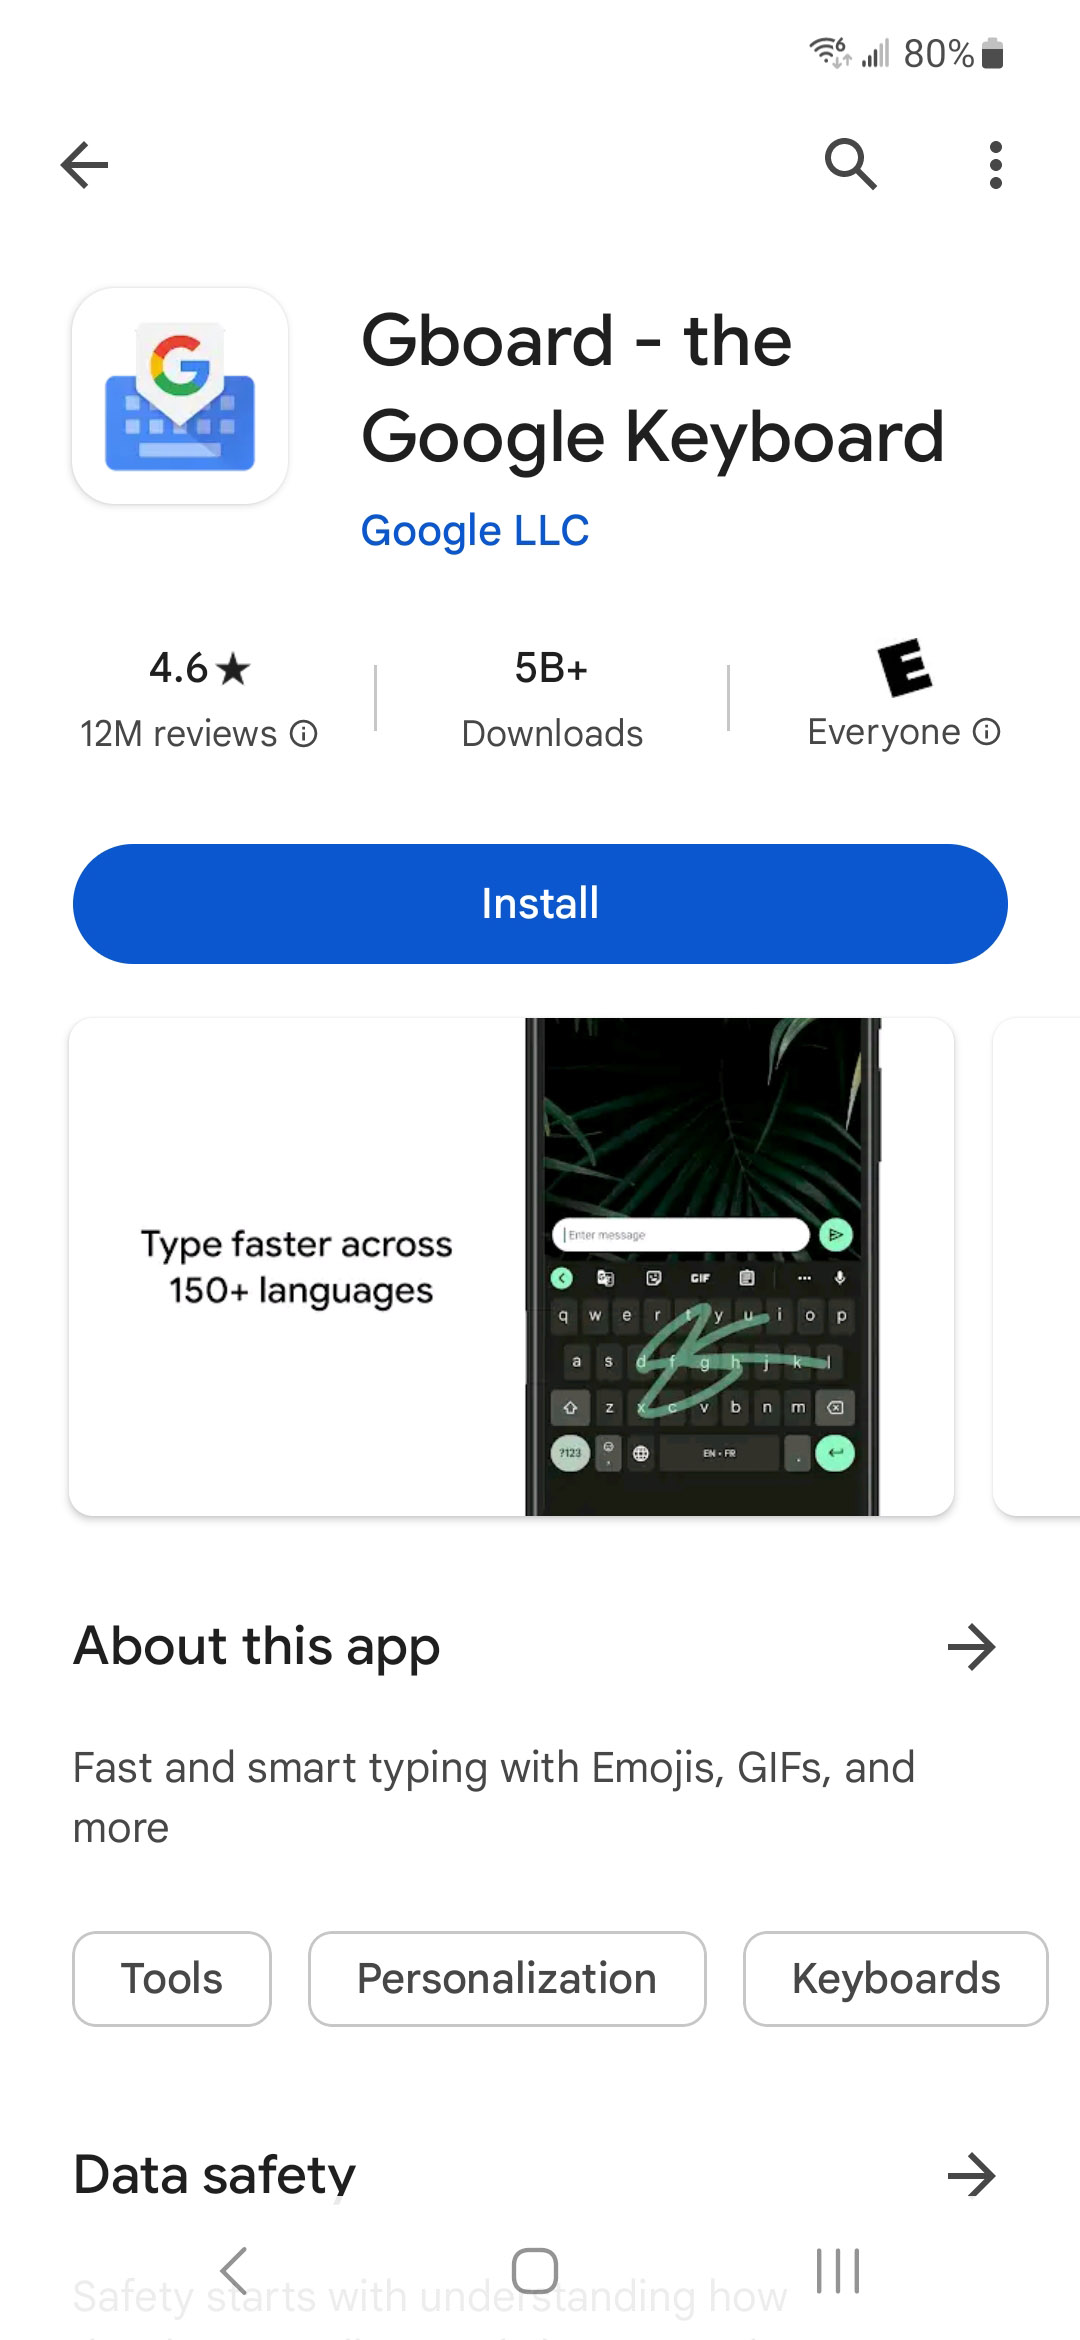
Give it permission and download that baby.

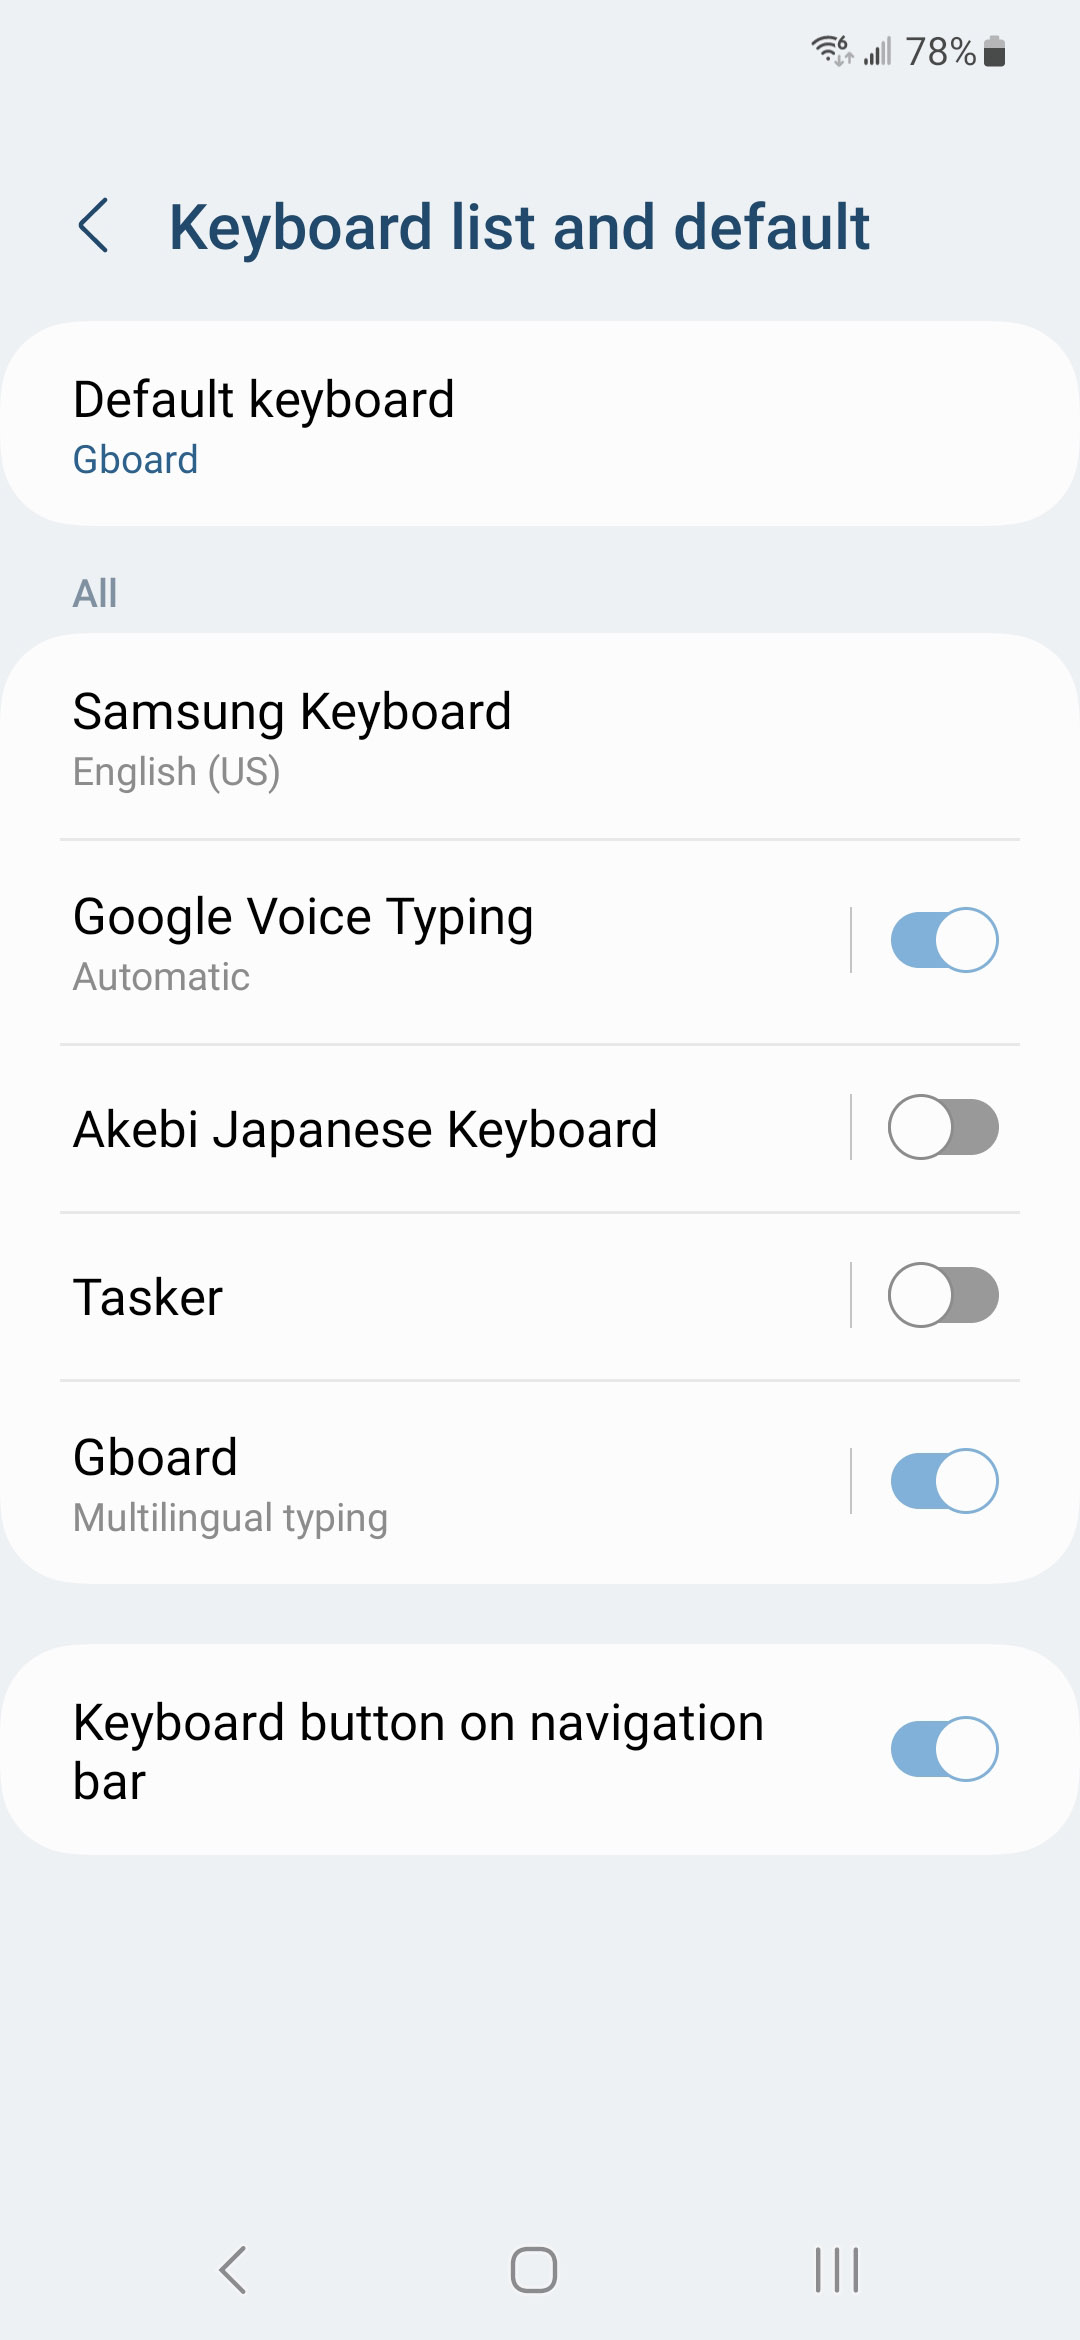
Open it up and tap the button to be brought to your keyboard settings menu.

You should be brought to your phone’s Keyboard & Input Method screen. This may look a little different depending on what phone you have. Look for Gboard and turn it on!
Navigate back to the Gboard app and you should now be on step 2! Tap the Select Input Method button next.
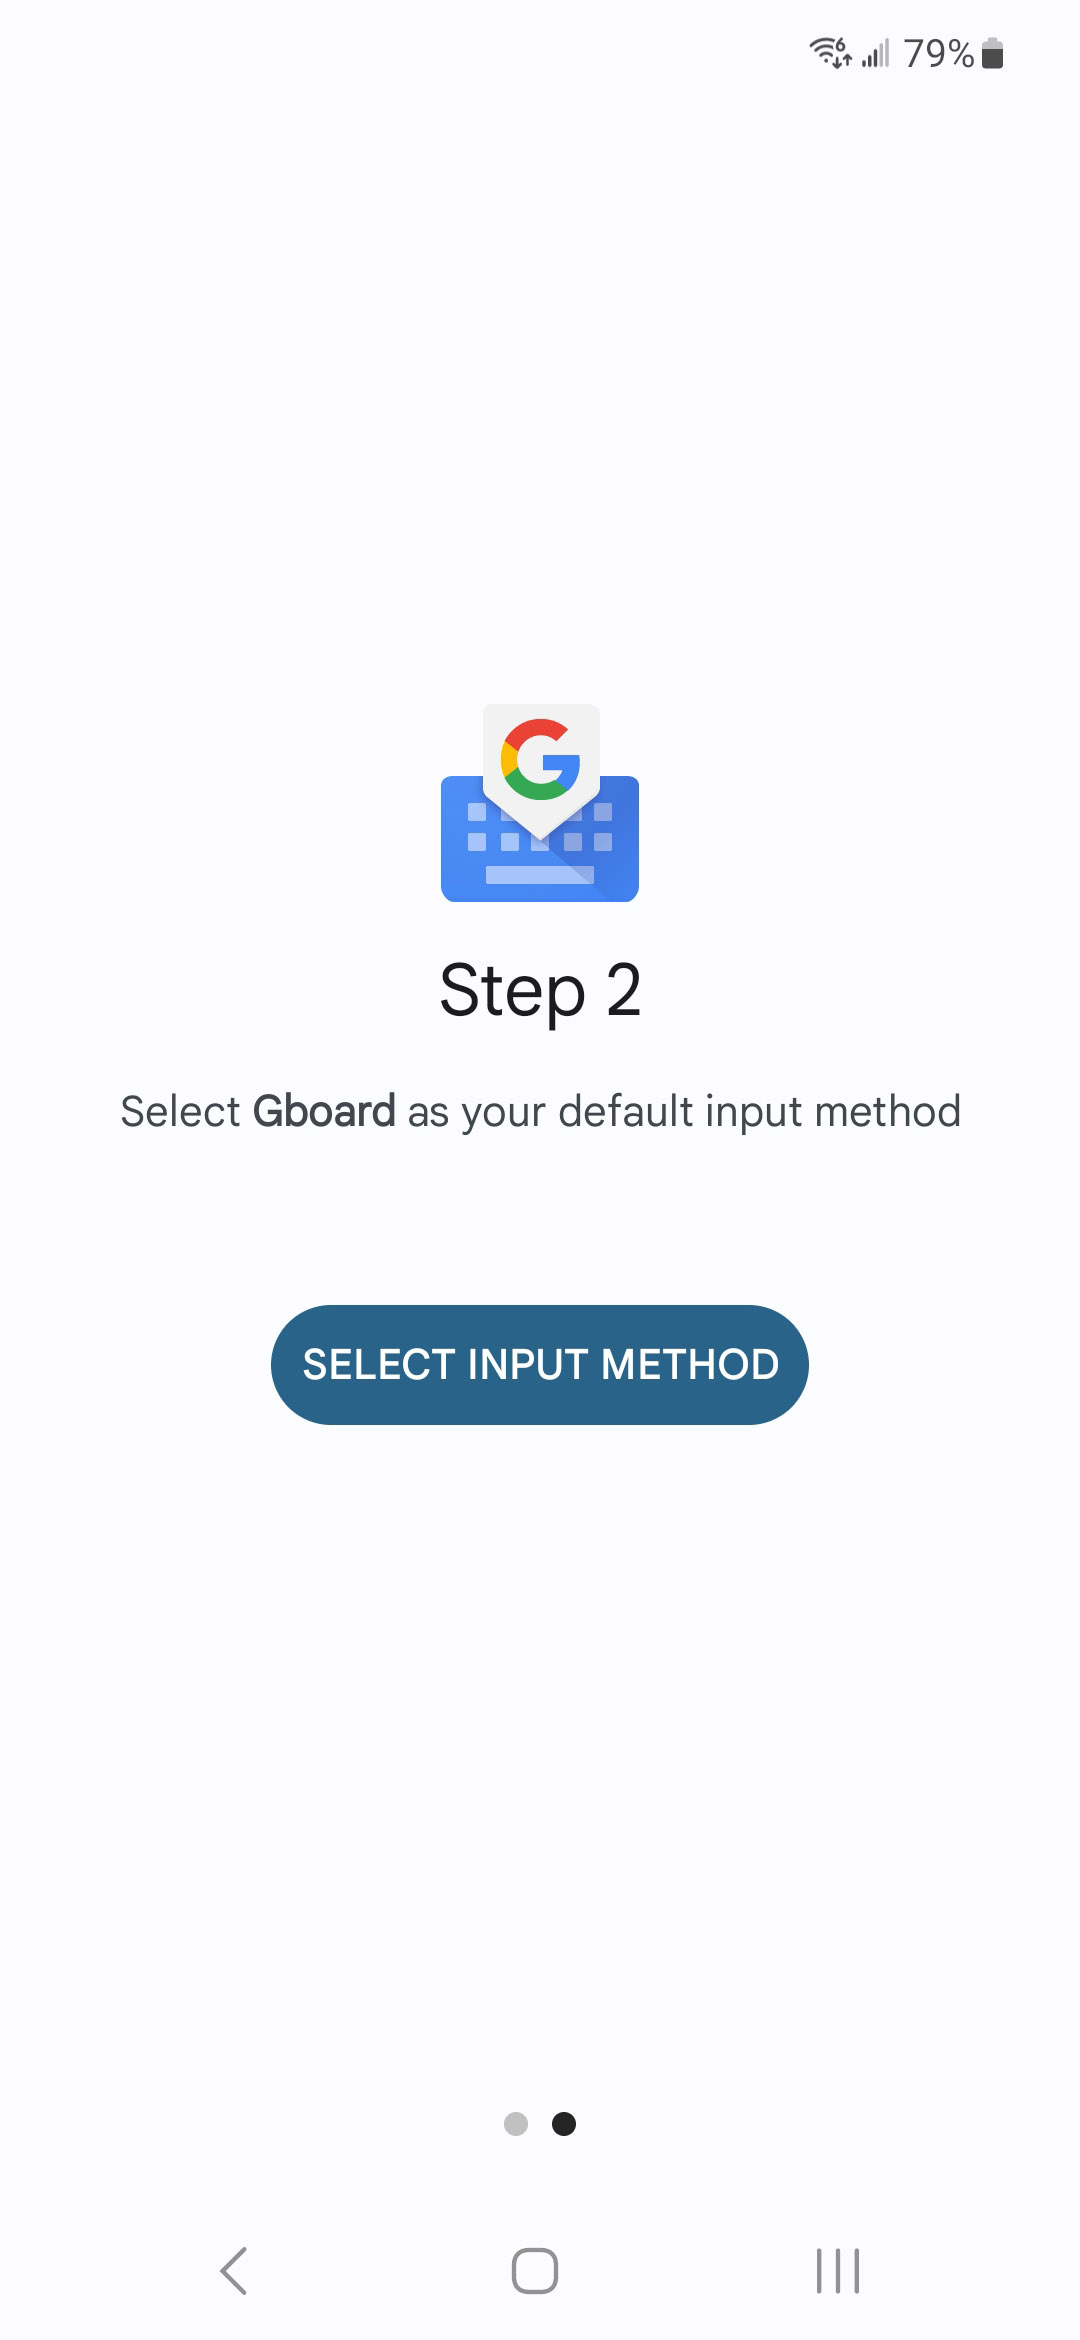
A pop-up menu should appear with Gboard as one of your possible options.
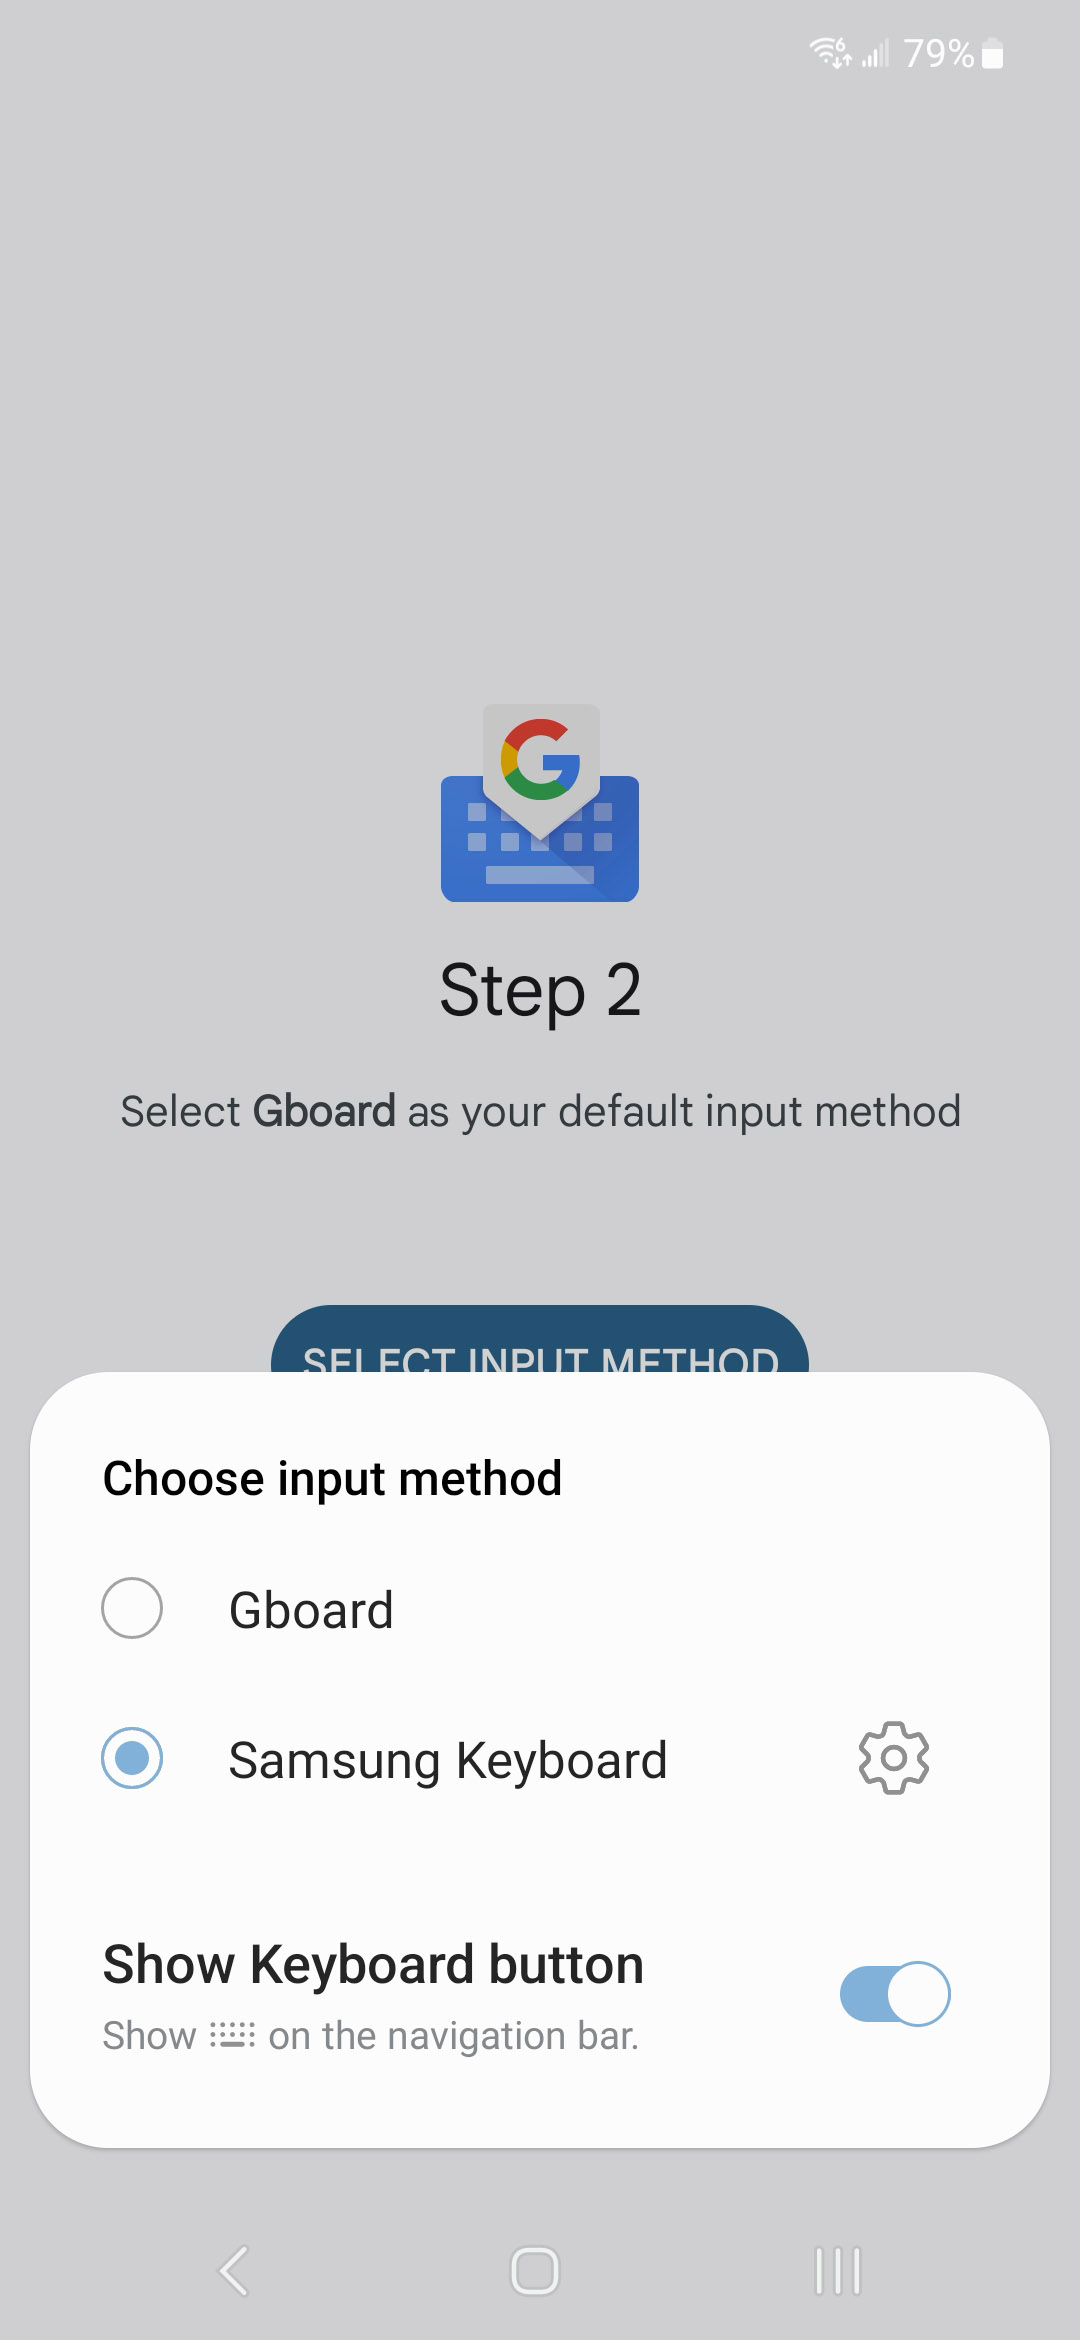
Once you select Gboard, you should be brought to the settings menu for you new Gboard keyboard! Select Languages at the top of the settings menu next.
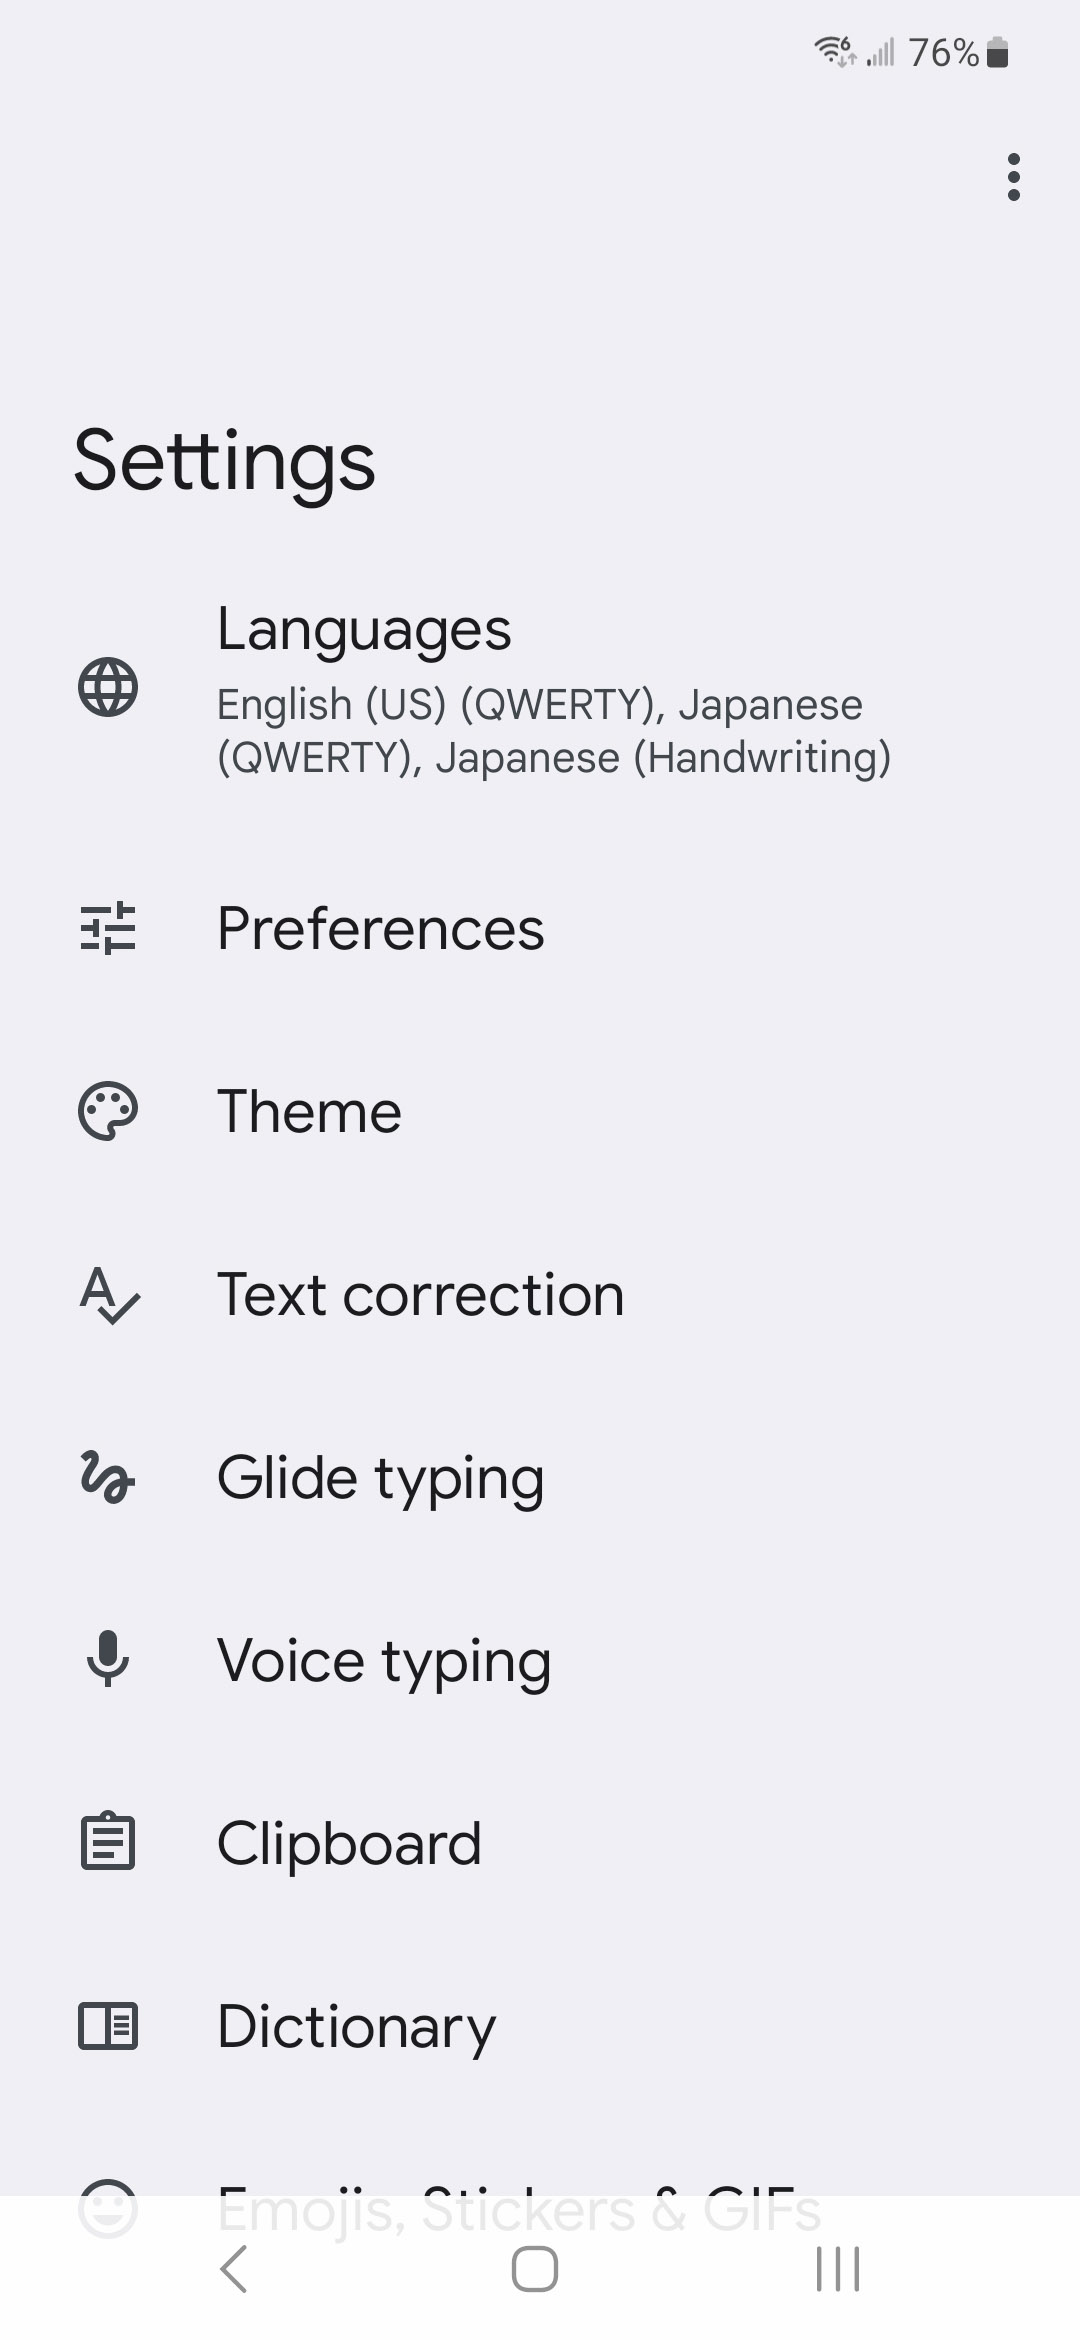
From the languages screen, tap + Add Keyboard.
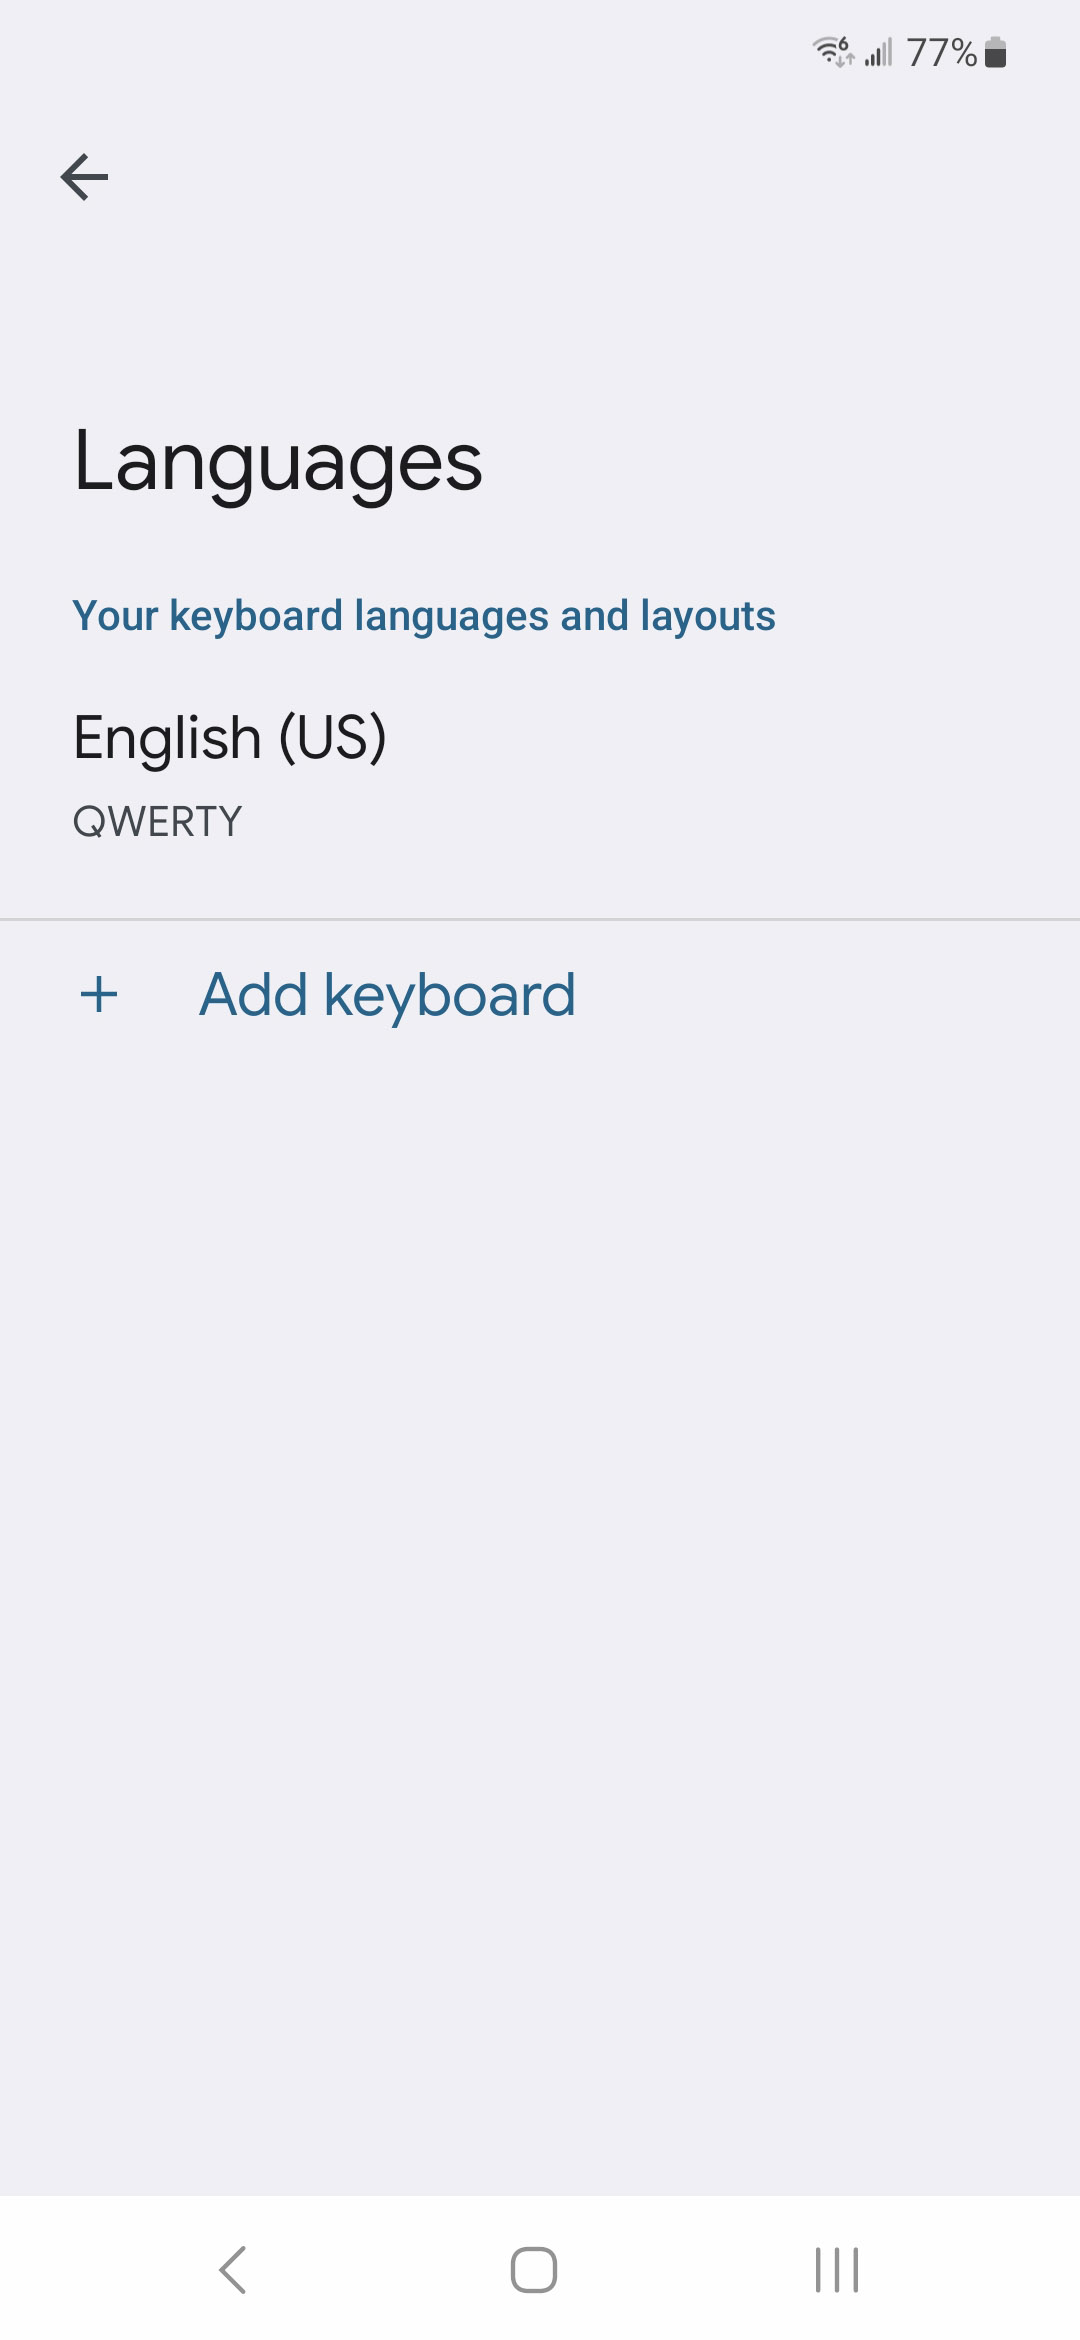
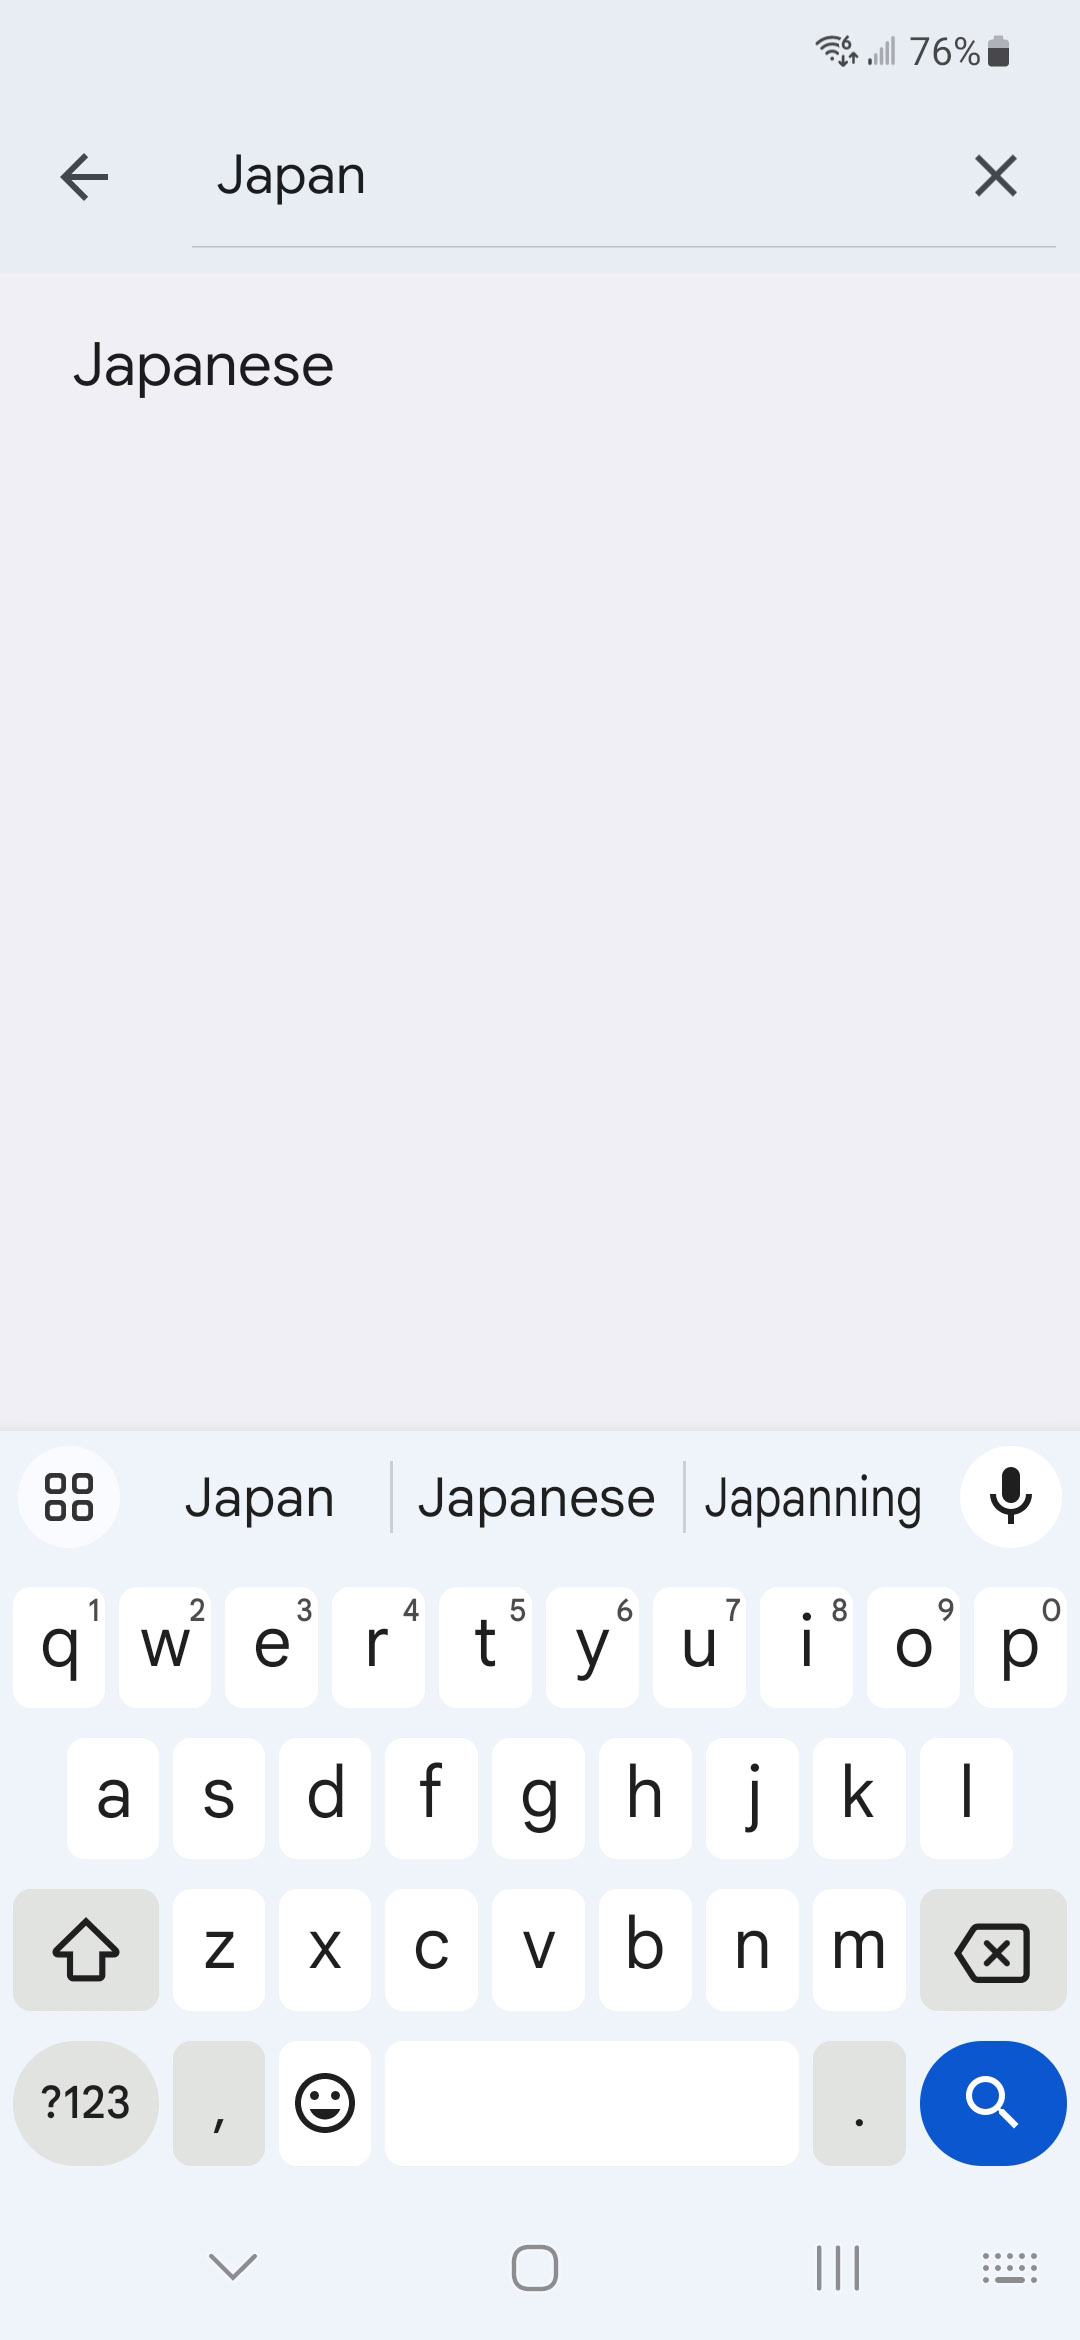
Next, search for Japanese and select it.
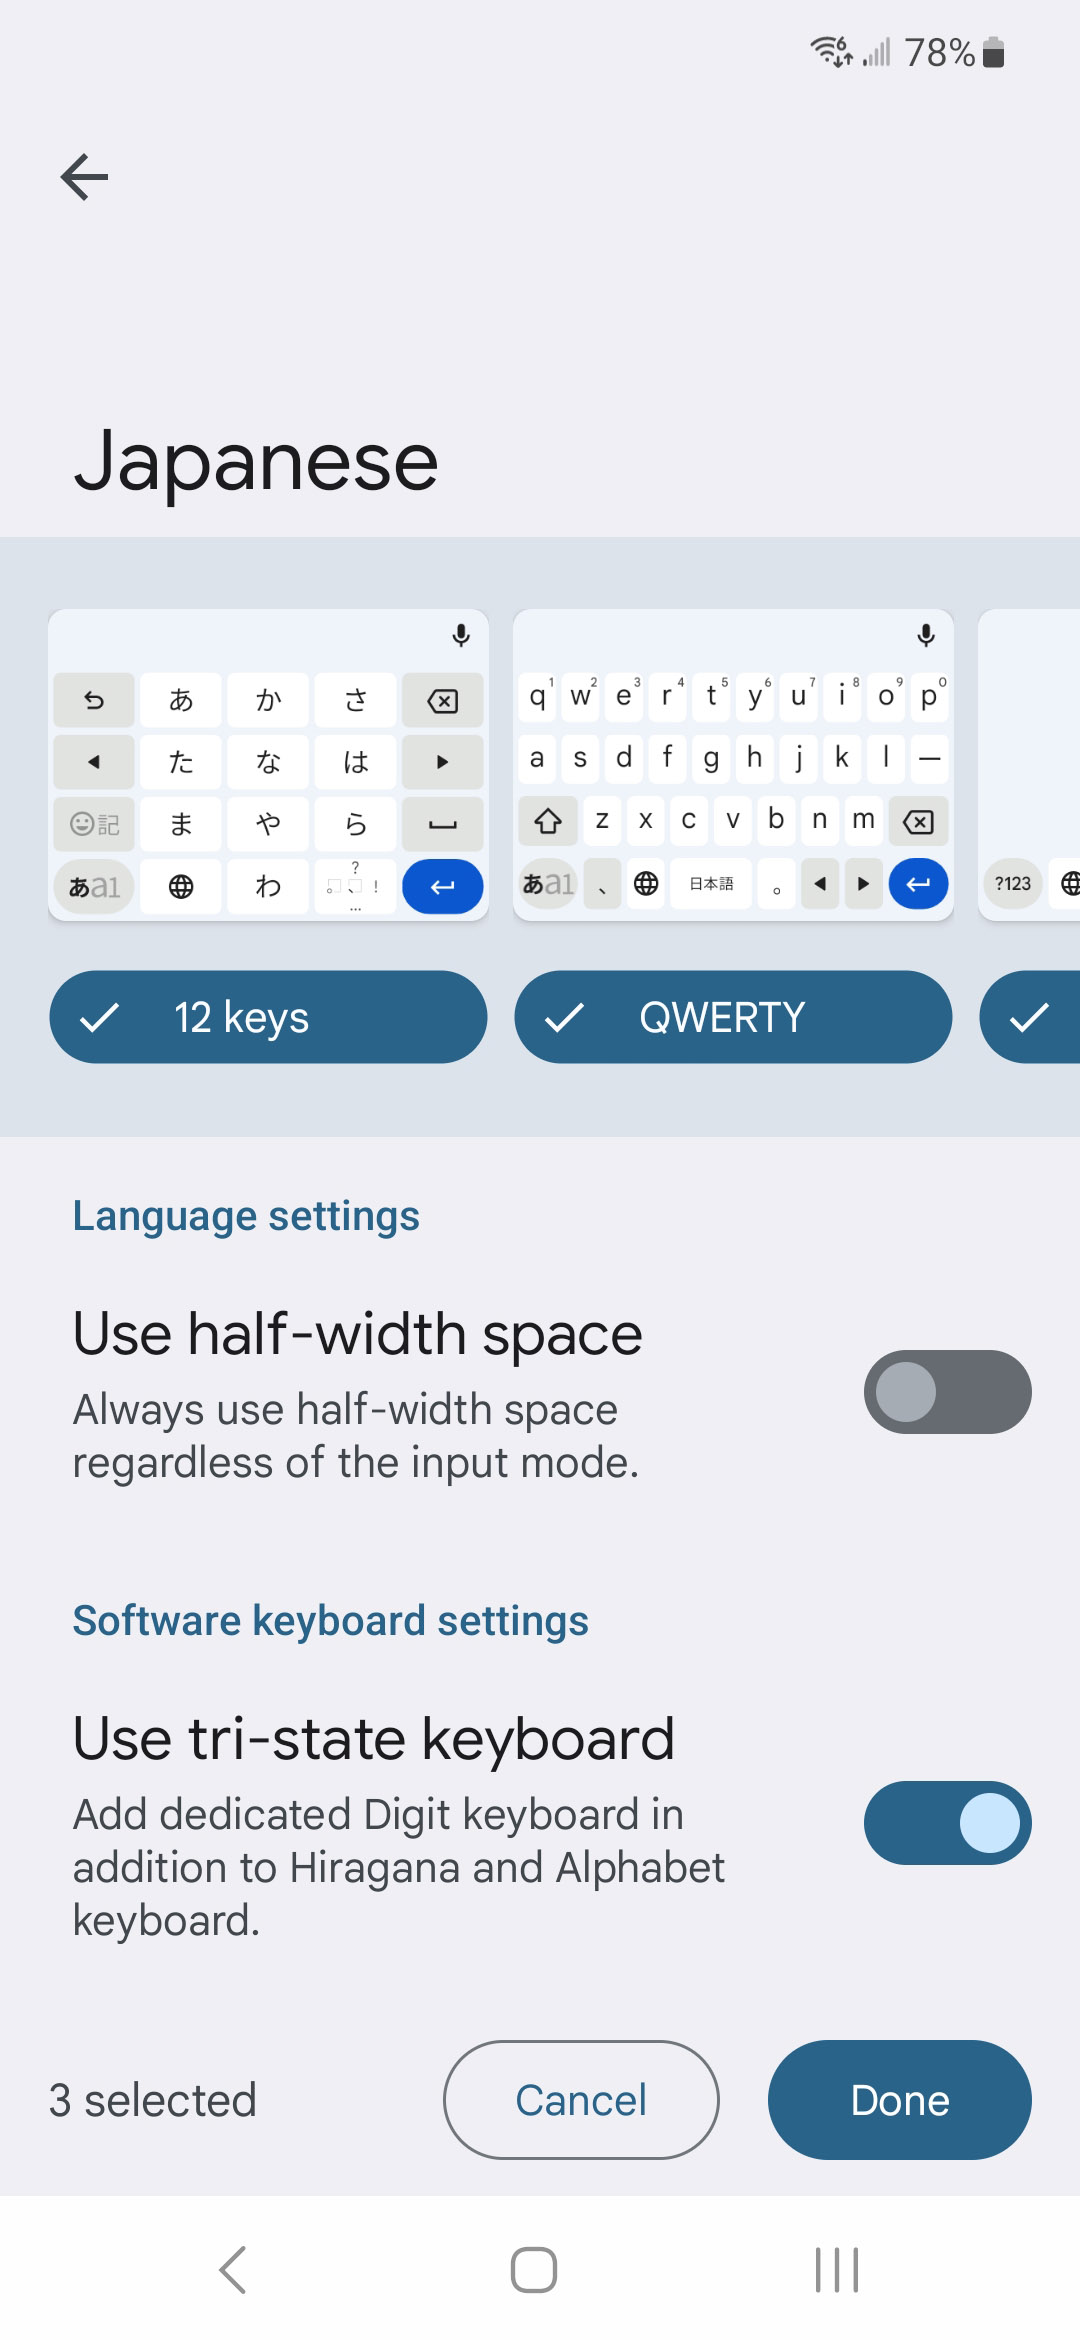
You’ll be brought to another settings menu for the Japanese keyboard. Select your preferred methods of input at the top of the screen and tap Done
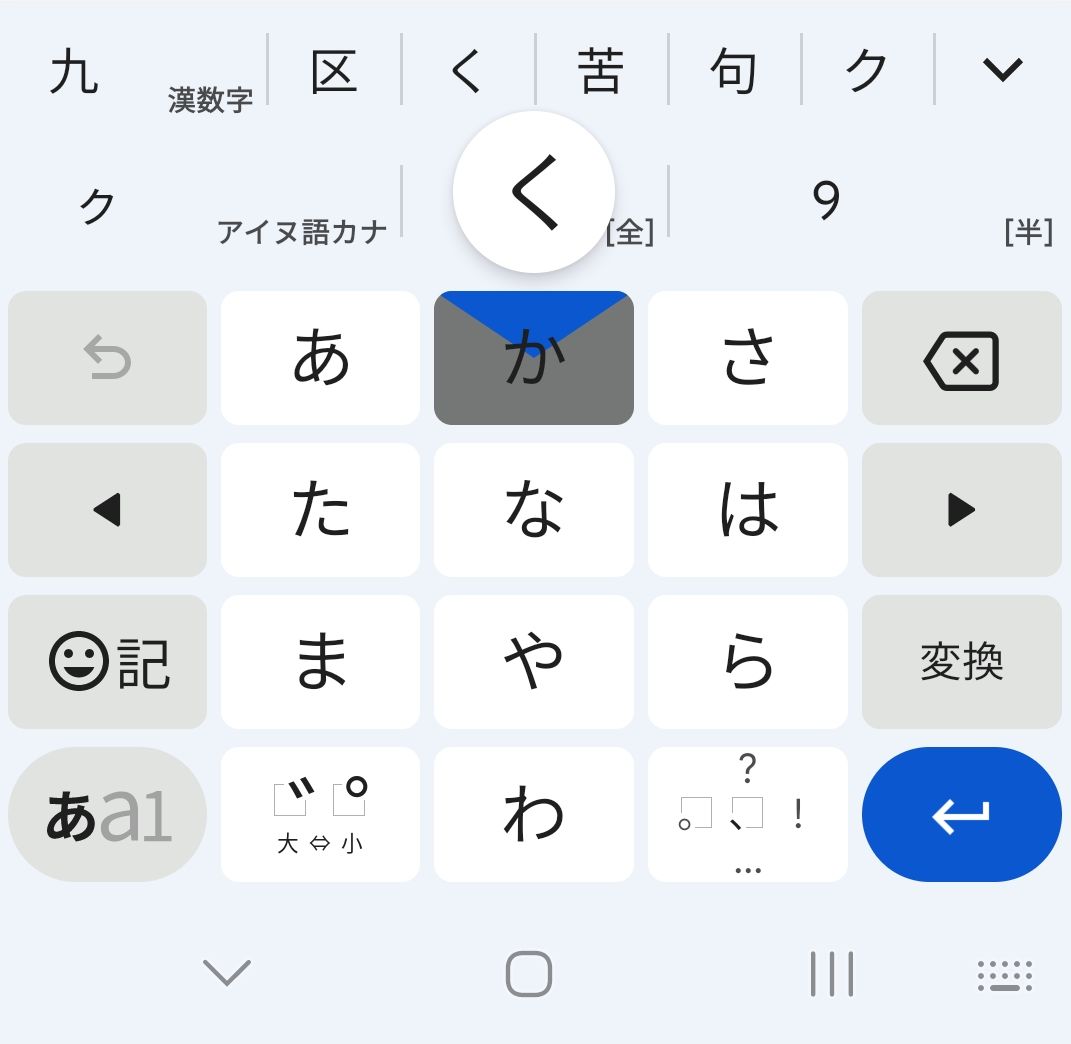
Now when you go to type, you can click the (new) little globe near the bottom left to switch between your different languages and input methods within Gboard.
Here is your new keyboard:
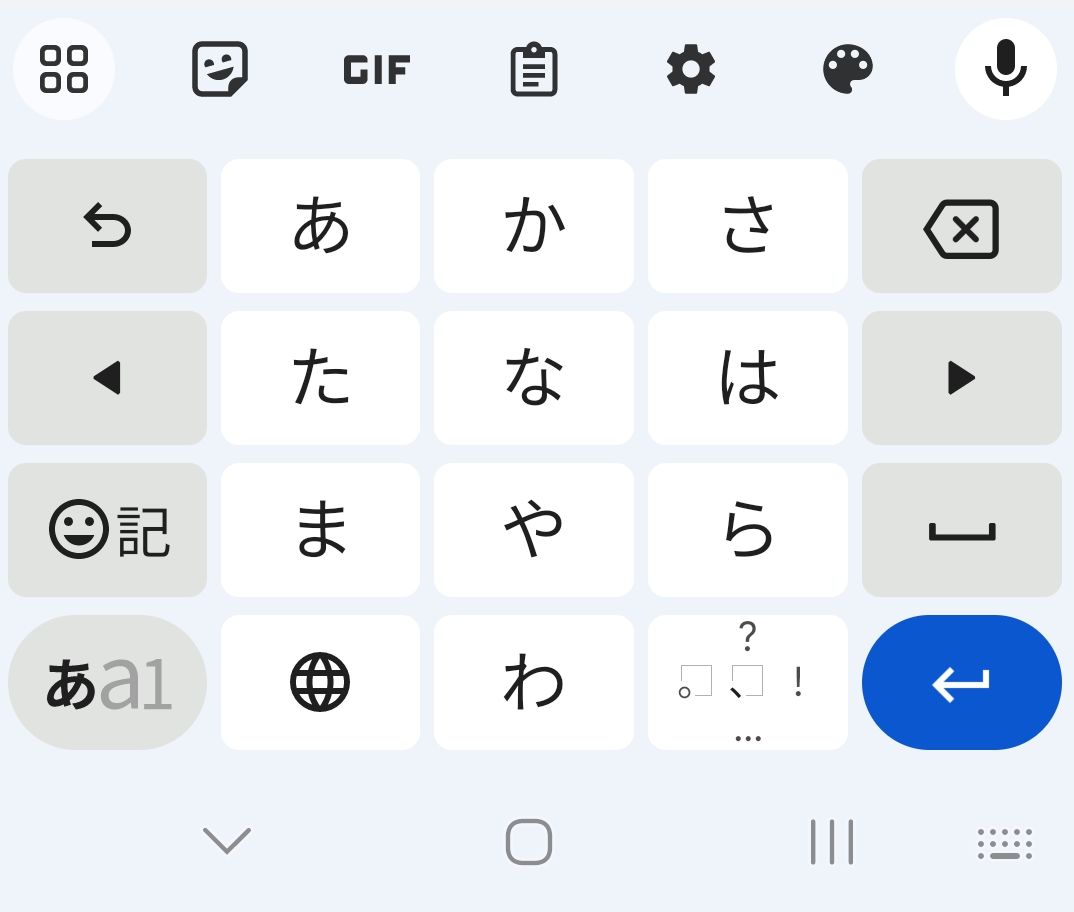
You tap and pull toward the character you’d like to input.
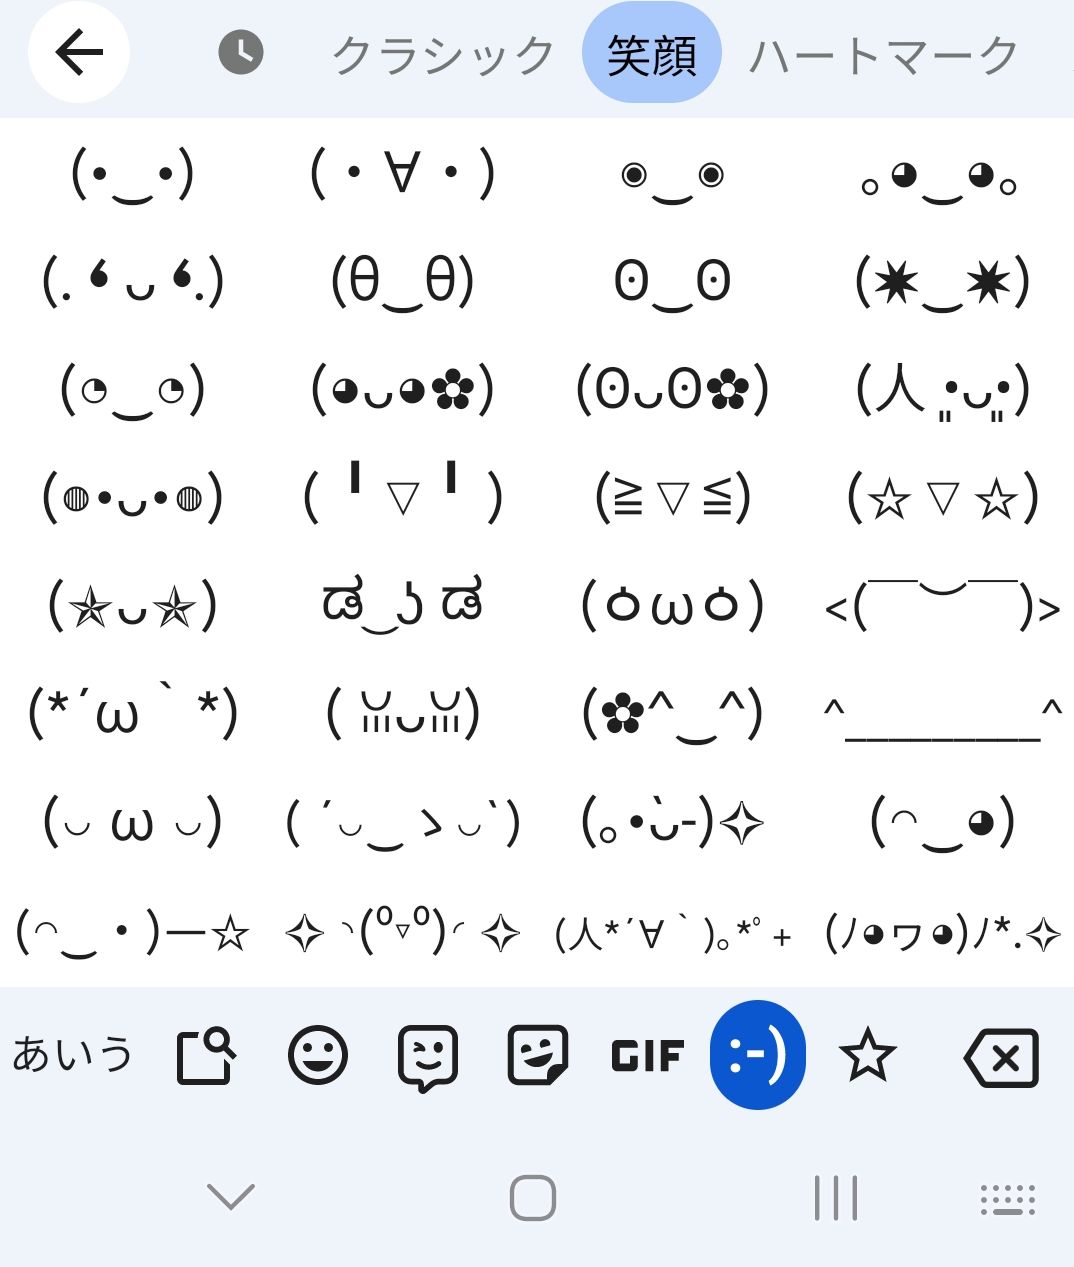
And even better, there is a kaomoji keyboard built in!
If you enabled other input methods from the Japanese settings screen, you can tap the globe icon on your keyboard to switch between your different Japanese input methods!
And there you have it! You know how to install Japanese keyboard inputs. More than you ever dreamed. But what to do with them?
Keep an eye out for Part II, where we teach you how to type in Japanese, using the keyboards you just installed. See ya then.