
Симптомы
- Windows зависла и не работает, но при этом программа Parallels Desktop и macOS работают должным образом
- После запуска Windows отображается черный экран
Причина
Такие проблемы также происходят в Windows на физическом ПК. Это происходит из-за зависания важных системных процессов или неправильной работы драйверов в ОС Windows.
Разрешение
1. Принудительно перезагрузите Windows: в меню Mac выберите Действия, затем щелкните Сбросить.
Если вы используете виртуальную машину в полноэкранном режиме, переместите курсор в верхнюю часть экрана и подождите 1–2 с, пока откроется строка меню Mac. Кроме того, можно воспользоваться сочетанием клавиш Ctrl + Alt.
Примечание. Во избежание подобных проблем в будущем рекомендуем отключать встроенную функцию быстрого запуска Windows. Если сброс Windows не позволяет решить проблему, или меню Действия не отвечает, следуйте инструкциям в статье базы знаний KB 6338.
2. Если перезагрузка Windows не помогла или же меню Действия не отвечает, выполните шаги из данной статьи.
3. Дальнейшие шаги аналогичны решению подобной проблемы на физическом ПК: попробуйте загрузить Windows в безопасном режиме. В безопасном режиме запустите командную строку с правами администратора и выполните следующие команды:
REG ADD "HKLM\SYSTEM\CurrentControlSet\Control\SafeBoot\Minimal\MSIServer" /VE /T REG_SZ /F /D "Service"
REG ADD "HKLM\SYSTEM\CurrentControlSet\Control\SafeBoot\Network\MSIServer" /VE /T REG_SZ /F /D "Service"
net start msiserver
Далее нажмите сочетание клавиш CMD (Win) + R, в появившемся окне Run введите devmgmt.msc и нажмите OK. В открывшемся диспетчере устройств найдите и удалите Parallels Display Adapter (WDDM).
Перезапустите Windows в стандартном режиме и переустановите Parallels Tools.
4. Если Windows не загружается даже в безопасном режиме, или шаги выше не помогли, операционная система не подлежит восстановлению. В этом случае необходимо создать новую виртуальную машину и перенести в нее данные из старой. Для этого подключите жесткий диск от старой виртуальной машины к новой вторым диском и перенесите пользовательские данные на диск С.
Примечание. В связи с особенностями архитектуры Windows, программы необходимо установить заново в новой виртуальной машине. Перенести можно только пользовательские данные.
Parallels is one of the best virtual machine apps to run your Windows operating system on top of any operating system. It’s fast, efficiently integrated, and offers a straightforward UI. But it’s not infallible, and your Windows can freeze on Parallels every once in a while.
Let’s look at the best ways to fix your hanged Windows on Parallels.
Stuck With a Hanged Windows on Parallels? Here’s Why
The Virtual Machine app market is diverse. For Windows, the most popular operating system in the world, the competition is even more intense. It’s littered with quality tools, and in our opinion, Parallels beats them all.
But, even with all its shiny features and design, it will land you in trouble every once in a blue moon—a frozen Windows is one such bug. Though your Windows can get hanged on Parallels for various reasons, we must state from the outset that no single cause will be true for everyone who encounters this error. That said, here are a few of the reasons:
- Insufficient Memory: When you first set up the Parallels app on your Mac, you have to assign a minimum amount of memory necessary to run Windows on top of the virtual machine without any difficulties. So if you’ve not set memory equal to (or even greater in some cases) the minimum requirement, you might face unexpected bugs like computer hanging, etc.
- Hardware Problems: Hardware problems like faulty RAM and overheating can sometimes lead to a frozen Windows computer on your Parallels virtual machine app.
- Corrupt Parallels App: In rare cases the Parallels app itself can get corrupt. This can happen for many reasons—an abrupt shutdown of your Mac or Parallels app last time, a malware attack, or even an outdated version of Parallels. To fix your frozen Windows, you must first take appropriate steps and improve your Parallels app.
Whatever the reason, we’ve rounded up some tricks to help you fix your app and get everything back on track.
1. Restart Parallels
Whether it’s your smartphone or a personal computer, restarting a computer has been and stays the recommended tip that first comes to mind for most abrupt bugs. And it’s not without reason—a simple reboot will free up your memory, freeing your computer from all previous tasks or processes, thus giving you a fresh start once again.
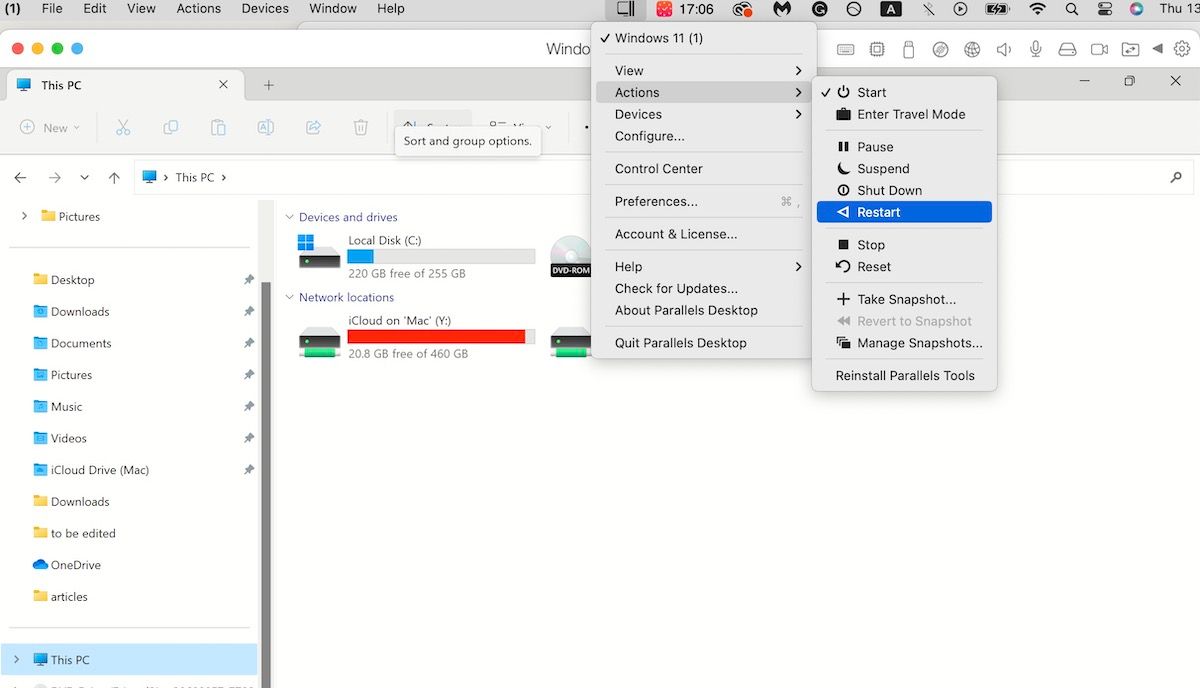
So do it. Go to the top of your host operating system, click the Parallels icon, and select Actions > Restart. Click on Yes to reboot your computer right away. When you boot back again, your Windows won’t be frozen any longer.
2. Boot Windows in Safe Mode
In some cases, instead of the regular hanging Windows where you can’t move anything around, you might get stuck in instances where you end up with a black screen.
Here, you must repeat another famous Windows troubleshooting tip: booting Windows in Safe mode. Since you’re running Windows on Parallels, the steps will slightly differ, but the underlying logic stays the same.
Of course, this requires that you can first access your Settings Windows. In some cases, you might be able to do this; in others, you probably won’t. Nevertheless, it’s worth a try either way. Here’s how you can get started:
- Right-click on the Start menu and select Settings.
- Head to System > Recovery.
- Under Advanced startup, click on Restart now.
- On the reboot, click on Choose an option screen, and select Troubleshoot > Advanced options > Startup Settings.
- Select Restart.
On the next restart, click on 4 (F4) or 5 (F5) from a list of options to reboot your Windows into Safe mode. After you’ve accessed your Windows in Safe mode for the first time, you can try to find the issues (and then fix them) similarly as you would on a Windows computer.
3. Force Quit the Parallels App
In case the above two steps couldn’t fix your unresponsive Windows on Parallels, go for the nuclear option: force quit your Parallels app from Mac.
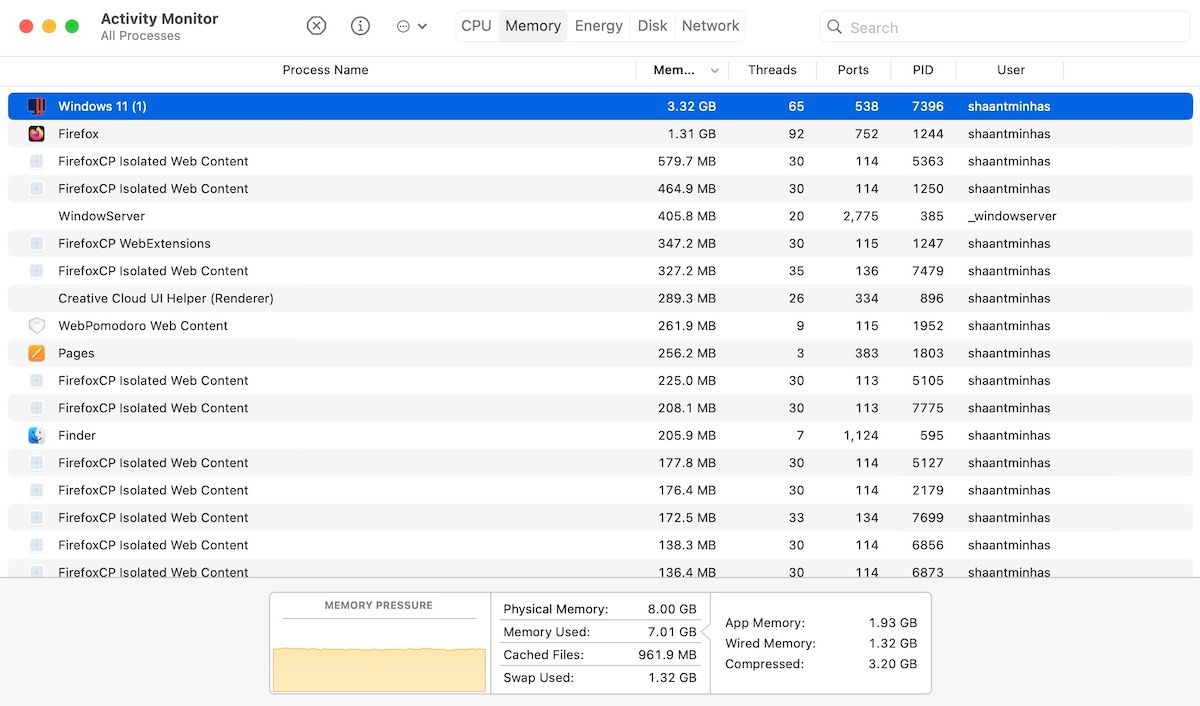
Like most people, if you’re using Parallels to run Windows on a Mac, your best bet for this is Activity Monitor. Think of Activity Monitor as Apple’s own Task Manager. It’s what you go to when a process or app starts behaving badly or sluggishly. In this case, you can terminate the Parallels app from the Activity Monitor. Here’s how:
- Head to Finder > Applications > Utilities.
- Click on Activity Monitor.
- On the Activity Monitor, select the process name and click on Stop (X) menu from the top.
- Select Force Quit to go ahead with the termination.
That’s it—your hanged Windows will be terminated. Now restart the Parallels app and boot up your Windows afresh.
4. Use Task Manager
Task Manager is popular on Windows, and you’ve probably used it many times as well. Task Manager can sometimes be used on virtual Windows to bring it back from its frozen slumber as well. Here’s how you can access Task Manager on Windows on Parallels:
- Press the Control + Option + Delete shortcut on your Mac.
- Now choose Task Manager from the available list of options.
- From there, select all tasks individually and then click on End task.
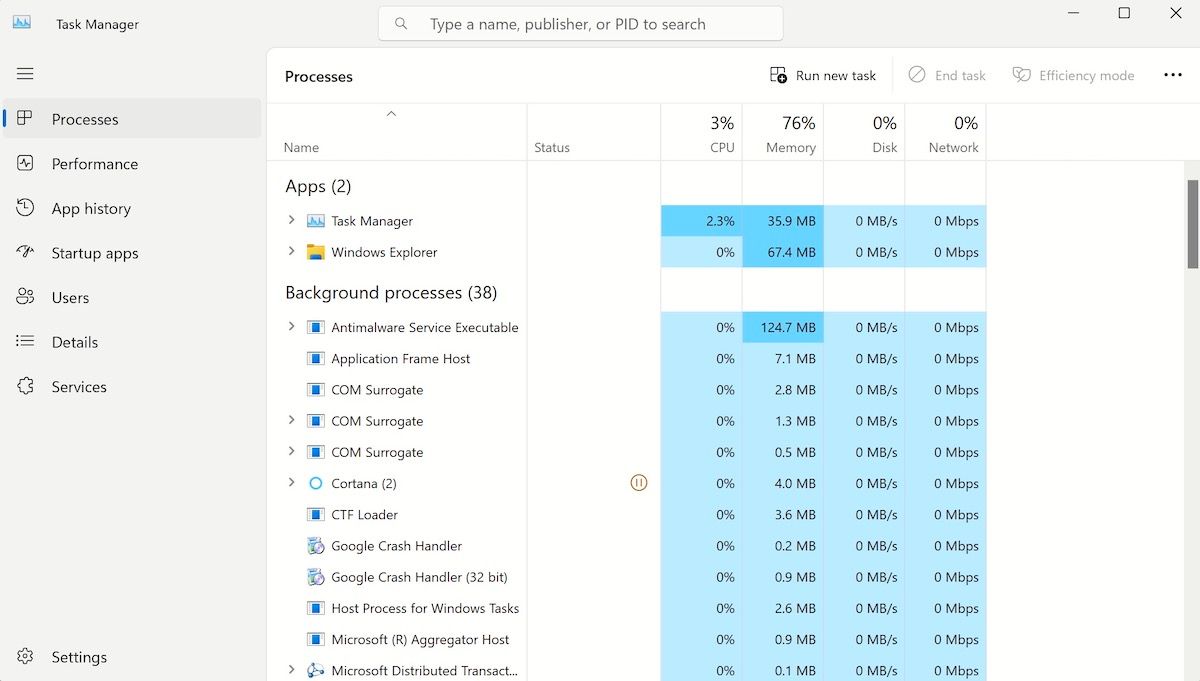
That’s it—terminate all the processes until there aren’t any left, and then see if you can use your Windows normally. If you can’t, head to the next method below.
Alternatively, you can also click on the Switch user from the main menu after the above-mentioned first step. From there click on Power > Restart to boot up your PC again.
5. Update or Reinstall Parallels
Whether it’s because you forgot to update the Parallels app, got an error due to an abrupt shutdown, or something else—a problem with the Parallels app can naturally lead to various issues down the line in your virtual machine. A slow Windows that freezes every now and then is one of them.
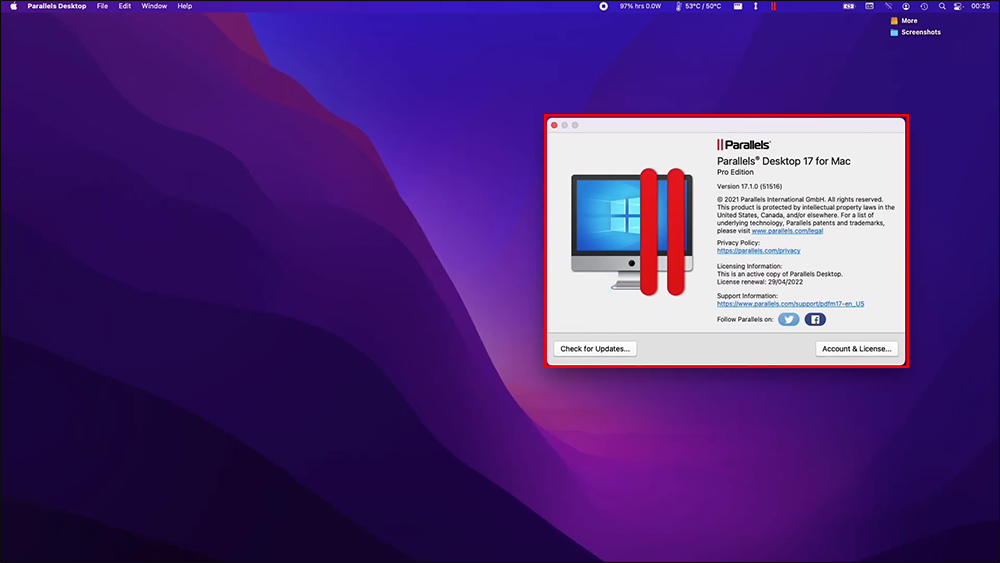
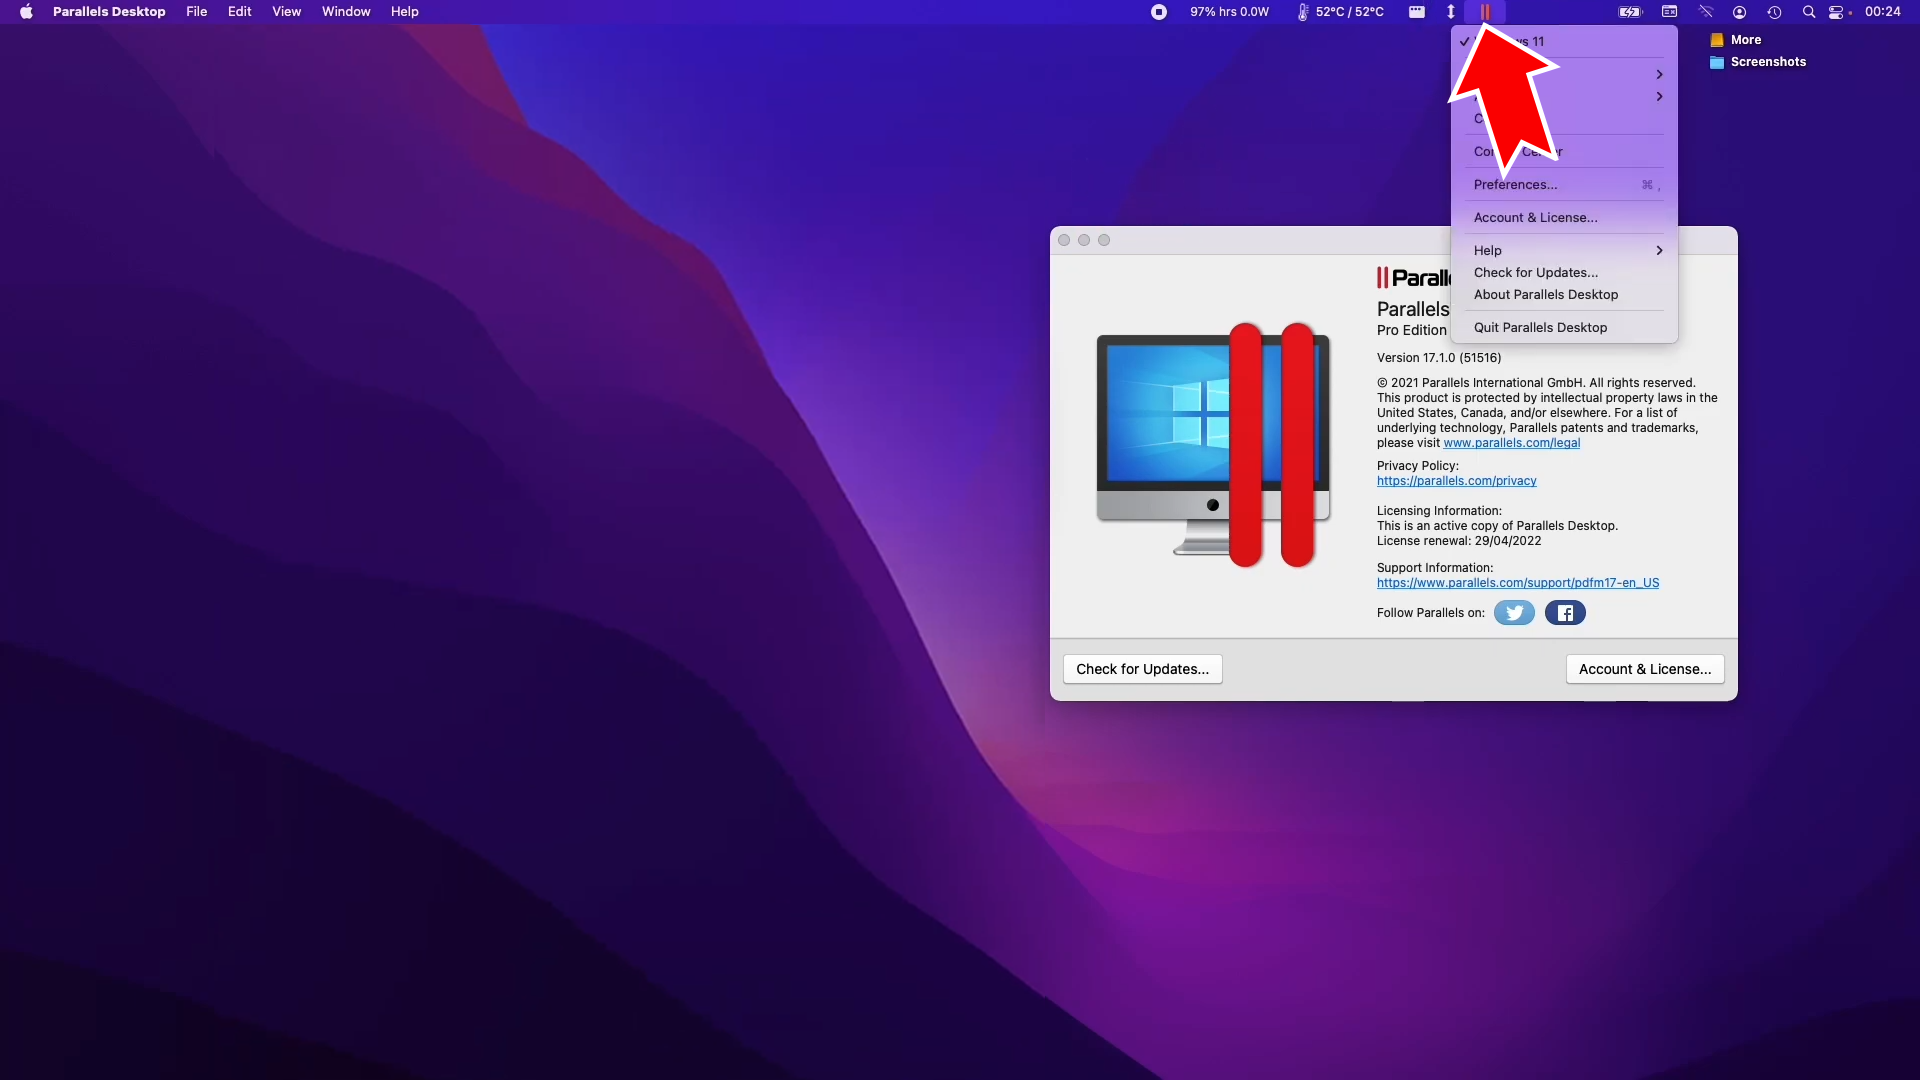
Although Parallels comes with an automatic update, you can also update the app manually. Head to the top, click the Parallels icon, and select Check for Updates….
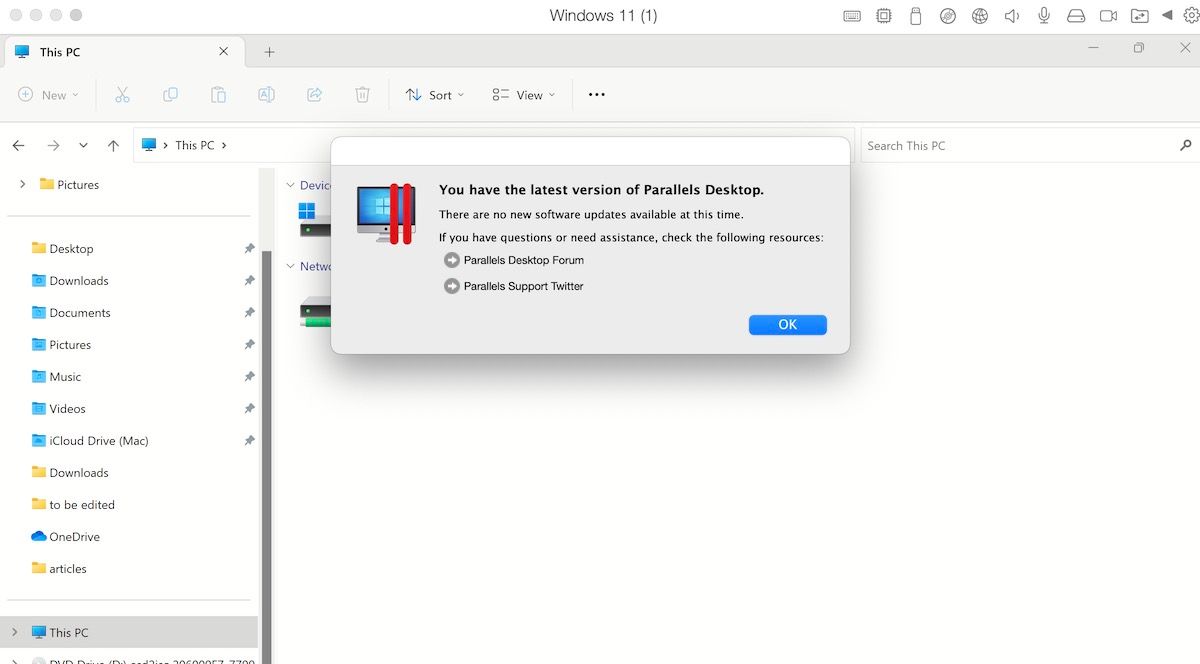
The app will check for new updates and install them if it finds any.
Alternatively, if all fails, you can reinstall the Parallels app and start everything fresh. Here’s how:
- Shut down your application.
- On your Mac, head to Finder > Applications.
- Now drag the Parallels Desktop icon to Trash.
- Empty the trash and then reboot your Mac.
Finally, download the Parallels app again, set up your Windows on it, and begin everything from a clean slate.
Use the Above Tips to Fix your Hanged Windows on Parallels
Parallels is an excellent app to run your Windows computer on Mac. It works fine for the most part, but in rare cases, it can throw errors at you. Getting hit by an unresponsive Windows on Parallels boot up in one such error. Try out the above methods to get your Windows to work again, and if you have other handy tricks, don’t forget to leave them in the comments below.
If you’re using Parallels Desktop on your Mac and want to exit Windows, there are several methods you can use depending on what you want to achieve. Below are some options:
1. Shut Down Windows
You can shut down the Windows virtual machine completely:
-
Using the Windows Interface:
- Click on the Start Menu in Windows.
- Select the Power icon (usually located at the bottom of the Start Menu).
- Choose Shut down.
-
Using the Parallels Menu:
- Click on the «Actions» menu in the top menu bar.
- Select «Shut Down».
2. Close Windows (Suspend)
If you want to close the Windows environment but keep your session active (so you can return later without losing your work):
- Click on the «Actions» menu.
- Choose «Suspend». This will keep your session in a saved state.
3. Switch to macOS
If you want to switch back to macOS without closing the Windows virtual machine:
- Use the keyboard shortcut: Control + Command + F. This toggles between full-screen modes.
- Alternatively, you can also click the green maximize button at the top-left corner of the Windows window if you are in windowed mode.
4. Use Coherence Mode
Parallels offers a Coherence mode, allowing you to run Windows applications alongside macOS applications without the Windows desktop showing:
- If you are in full screen or windowed mode, you can activate Coherence mode by going to the «View» menu and selecting «Enter Coherence». This will let you work with Windows applications seamlessly on your macOS desktop.
5. Exit Coherence Mode
If you are in Coherence mode and want to exit back to the Windows desktop:
- Click on the Parallels icon in the macOS menu bar.
- Select «Exit Coherence» from the dropdown menu.
6. Force Quit (If Necessary)
If Windows becomes unresponsive and you need to exit:
- Click on the «Actions» menu.
- Select «Force Quit» to close the Windows virtual machine immediately.
7. Keyboard Shortcuts
You can also use keyboard shortcuts to manage your virtual machine:
- Control + Command + Q: Sends the virtual machine to the background.
- Control + Command + H: Hides the Parallels window.
Conclusion
Depending on your needs—whether you want to shut down Windows completely, suspend it for later use, or just switch back to macOS—Parallels provides flexible options to manage your virtual machine. Always ensure to save your work before shutting down or force quitting to avoid losing any data.
This question has been answered using artificial intelligence. If there is any problem please contact us.
You’ve been running a virtual desktop version of Windows using the Parallels app on your Mac, but maybe it’s now served its purpose and is no longer needed. Perhaps you also want to free up some disc space or create a new virtual machine. Either way, it’s time to uninstall Windows.
In this article, we’ll guide you through the process of removing various versions of Windows from your virtual machine.
If you’re looking to free up disc space or simply don’t need Windows 11 anymore, you can uninstall it. Simply follow the steps below:
- Close any apps currently open on your Mac. Ensure that no virtual machines are running.
- Launch Parallell’s Desktop.app, but don’t start your virtual machine.

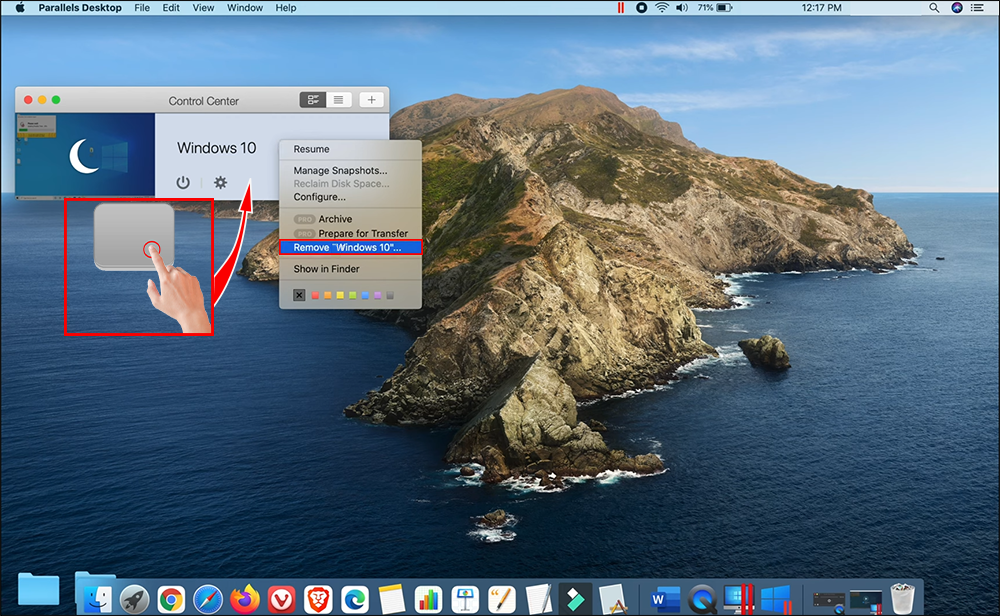
- Go to the menu bar on the top of the screen and click the Parallel icon.
- From the dropdown menu, select “Control Center.”
- Locate your virtual machine from the window, right-click or double-tap your touchpad, and select “Remove.”
- Select “Move to Trash.”


Windows 11 has now been uninstalled. Please note that once you’ve selected “Move to Trash,” this action can’t be reversed. If your goal was to free up disc space on your Mac by removing Windows 11, don’t forget to empty the trash. You won’t gain any disk space until it’s been emptied.
Uninstall Windows 10
You can easily free up disc space by uninstalling Windows 10. The method is similar to the method used for Windows 11. To remove Windows 10, follow the steps below:
- Close any apps currently running on your Mac and ensure that no virtual machines are running.
- Launch Parallell’s Desktop.app, but don’t start a virtual machine.

- Click on the Parallel icon located on the menu bar on the top of the screen.

- Using the dropdown menu, select “Control Center.”

- Next, locate your virtual machine from the window and right-click or double-tap your touchpad and choose “Remove.”

- Click “Move to Trash.”


You’ve now uninstalled Windows 10. Please note that after you select “Move to Trash,” this action is irreversible. If your goal was to free up space on your Mac by removing Windows 10, you’ll need to empty the trash. Once you’ve done that, you’ll gain the disk space you needed.
How to Uninstall Windows 7
To free up disc space or to simply remove Windows 7 from your machine, you can uninstall it. This can be accomplished in a few straightforward steps. To uninstall Windows 7, follow the method below:
- First, ensure that no virtual machines are running and close any apps that are open on your Mac.
- Launch Parallell’s Desktop.app, but don’t start your virtual machine.
- From the menu bar at the top of the screen, locate and tap the Parallel icon.

- From the dropdown menu, select “Control Center.”
- Next, locate your virtual machine from the window and right-click or double-tap your touchpad and click “Remove.”
- Tap “Move to Trash.”


You’ve now uninstalled Windows 7. Please note that after you select “Move to Trash,” this action can’t be reversed. If you removed Windows 7 to free up space on your Mac, you’ll need to empty the trash. You won’t gain any disc space until the trash has been emptied.
Additional FAQs
Can I remove a virtual machine with Windows but keep the files?
Yes, it’s possible to remove a virtual machine and keep the files. This is easily accomplished by following the steps highlighted in this article with one exception. When you reach Step 5, a popup window will give you three options. You see “Move to Trash,” “Cancel,” and on the far right “Keep Files.” By selecting this last option, “Keep Files,” the virtual machine will be removed but the files will remain. This is a great option if you feel you may need to use the virtual machine again in the future.
Is it possible to store the virtual machine on an external drive instead of deleting Windows?
This is a good alternative to uninstalling Windows, but it will take up a lot of space on an external drive. The good news is you’ll only have to put one file on it. Simply locate the .pvm file and move it to the external drive. When you want to restore the virtual machine, it’s just as easy. Just move the .pvm file back to its location on your Mac, open the file, and follow the installation instructions.
Uninstall Windows to Free Up Disc Space or Create a New Virtual Machine
It doesn’t take a lot of time or effort to uninstall Windows from your Parallel virtual machine. You can completely uninstall Windows or simply keep the files to be used again in the future. Alternatively, you can move the .pvm file to an external drive and reinstall it at a later date. Whatever you decide, it only takes a few straightforward steps.
Have you ever had to uninstall Windows from a virtual machine? Did you follow the same methods discussed in this article? Let us know in the comments section below.
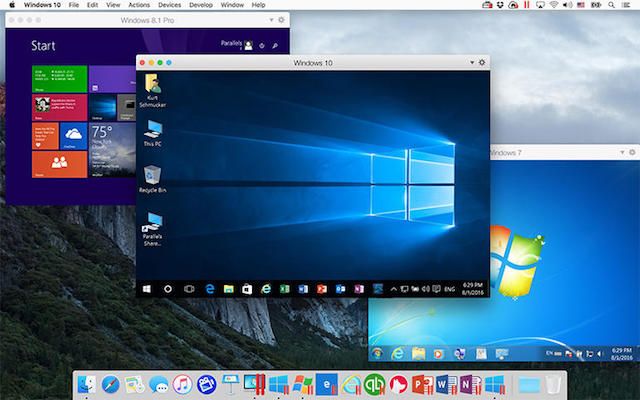
Утилита Parallels Desktop по праву считается лучшим инструментом для запуска Windows-приложений на десктопных компьютерах Mac без перезагрузки и переключения между приложениями Mac и Windows. К слову, в этом году исполнится 10 лет с момента выхода оригинальной версии приложения.
Несмотря на ряд различий в функционале, базовые возможности и улучшения распространяются на все три версии приложения (стандартной, Pro Edition и Business Edition) и даже стандартная редакция вполне удовлетворит запросы корпоративных пользователей, у которых время от времени возникает необходимость запустить Windows-программу на Mac.
Parallels Desktop 12 получила ряд новый функций, некоторые из которых, скорее, подойдут домашним пользователям (например, возможность запуска потокового приложения Xbox на Mac). Разработчики реализовали ряд улучшений, направленных на экономию времени, которые наверняка придутся по душе сотрудникам компаний. Кроме того, отмечается, что производительность Parallels Desktop 12 возросла на 50% по сравнению с предыдущими версиями утилиты.
В числе нововведений также стоит отметить режим «Всегда готова в фоновом режиме«, который автоматически запускает виртуальную машину при каждой загрузке Mac и ставит ее на паузу с сохранением в оперативной памяти всего необходимого для моментального запуска и продолжения работы.

В Parallels Desktop 12 пользователи могут установить так называемое «поведение» для каждого приложения, например, запуск в полномасштабном режиме, автоматическое скрытие рабочего стола или приложений Windows и пр.
Работа Центра обновлений в Windows 10 неоднократно вызывала нарекания со стороны многочисленных пользователей. Parallels Desktop 12 позволяет переопределить обновления и запланировать их на более подходящее время.
В Parallels Desktop 12 разработчики существенно улучшили взаимодействие между окружениями Mac и Windows. Теперь пароли, используемые в браузерах Internet Explorer и Edge можно сохранять в файле Связки ключей на Mac. Кроме того, пользователи, работающие с версией Parallels Desktop для Mac Pro Edition, получили возможность архивировать или сжимать образы редко используемых виртуальных машин и таким образом освободить дополнительное место на диске.

В новой версии Parallels Desktop появился набор инструментов Toolbox, предназначенный специально для Mac.

В частности, опция Hide Desktop позволит скрыть ненужные файлы на рабочем столе.
В большинстве своем инструментарий совместим исключительно со штатными приложениями Mac, поэтому вряд ли будет полезен при работе с виртуальными машинами Windows (или Linux). Компания также намекнула, что в будущем планирует выпустить Toolbox отдельным программным пакетом.
В минувшем году Parallels выпустила крупное обновление Parallels Desktop 11 с поддержкой ряда новых технологий Windows, в частности, виртуального помощника Cortana. Несмотря на то, что нынешнее обновление выглядит значительно скромнее по сравнению с предыдущей версией, оно все же обладает рядом интересных функций, ради которых стоит провести апгрейд.
По аналогии с предыдущими версиями, Parallels Desktop 12, выпущенная в августе 2016 года, предлагается в трех вариантах – стандартном, Pro Edition и Business Edition. Стандартная версия разработана для домашних пользователей (студентам скидка 50%). Стоимость лицензии составляет 3990 тыс. рублей. Заплатив 2490 рублей, пользователи предыдущих редакций Parallels Desktop смогут обновиться до новой версии.
Parallels Desktop для Mac Pro Edition предназначена для разработчиков, тестировщиков и опытных пользователей, версия Parallels Desktop для Mac Business Edition – для корпоративного применения. Для работы с данными версиями потребуется годовая подписка, которая обойдется в 4 990 тыс. рублей. Подписка предусматривает автоматическое обновление при появлении новых версий утилиты.
Скачать Parallels Desktop 12.
Смотрите также:
- 5 лучших программ для работы с окнами на Mac.
- Что такое iCloud и как им пользоваться на iPhone, iPad и Mac.
- Как сохранить фото и видео с iPhone (iPad) на компьютер Mac или Windows, USB-флешку или внешний жесткий диск.