
-
Home
-
News
- How to Perform a Windows 10/11 Factory Reset from BIOS
How to Perform a Windows 10/11 Factory Reset from BIOS
By Stella | Follow |
Last Updated
If you don’t know how to factory reset Windows 10 or Windows 11 from BIOS, this article is helpful. You can find a full instruction here. Additionally, if your computer cannot boot, you can try MiniTool Power Data Recovery Boot Disk to rescue your files before factory reset.
Why Do You Need to Factory Reset Windows from BIOS?
Factory resetting your Windows 10 or Windows 11 computer from the BIOS can be a lifesaver when your operating system is malfunctioning, corrupted, or you simply want to start fresh. This process allows you to restore your computer to its original state, removing all personal files, apps, and settings.
In this article from MiniTool Software, we will guide you through the steps to perform a factory reset from the BIOS on Windows 10 and Windows 11.
- Factory reset Windows 10 from BIOS/Windows 10 factory reset from BIOS
- Factory reset Windows 11 from BIOS/Windows 11 factory reset from BIOS
Before You Begin
Before diving into the factory reset process, it’s crucial to back up all your important files, as this procedure will erase everything on your computer. You can use an external hard drive, cloud storage, or another computer to backup files with the help of MiniTool ShadowMaker.
MiniTool ShadowMaker TrialClick to Download100%Clean & Safe
However, if your computer no longer starts, you can use MiniTool Power Data Recovery to first rescue files from the PC and then factory Windows 10 or Windows 11 from BIOS.
MiniTool Power Data Recovery FreeClick to Download100%Clean & Safe
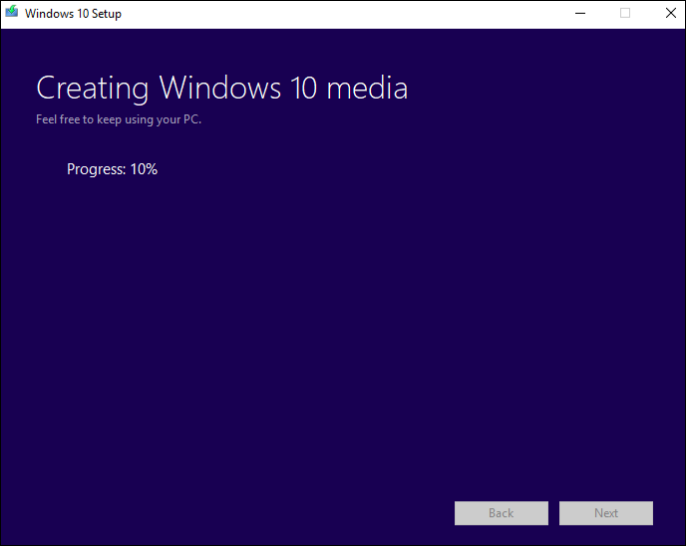
Additionally, make sure you have the installation media or a recovery USB drive for your specific Windows version (Windows 10 or Windows 11) handy. You’ll need this to reinstall the operating system using the installation medium.
- How to create a Windows 10 installation medium.
- How to create a Windows 11 installation medium.
Performing a Factory Reset from BIOS on Windows 10/11
Follow these steps to perform a factory reset from BIOS:
Step 1: Access the BIOS/UEFI Menu
Connect the installation medium to your computer. Then start your computer and press the appropriate key to enter the BIOS or UEFI menu during the boot-up process. The key to access the BIOS/UEFI varies between computer manufacturers but is usually one of the following: F2, F12, Del, Esc, or another key displayed on your screen. Consult your computer’s documentation or manufacturer’s website for the exact key.
Step 2: Navigate to Boot Options
Inside the BIOS/UEFI menu, locate and navigate to the Boot or Boot Options section. The exact location may vary depending on your computer’s motherboard manufacturer.
Step 3: Change Boot Order
In the Boot Options section, change the boot order so that the first boot device is your Windows installation media or recovery USB drive. This change ensures your computer will boot from the installation media or recovery drive rather than the internal hard drive.
Step 4: Save Changes and Exit
After making the necessary changes to the boot order, save your settings and exit the BIOS/UEFI menu. Your computer will restart.
Step 5: Start Windows Installation/Factory Reset Windows from BIOS
When your computer restarts, it should boot from the installation media or recovery USB drive. Follow the on-screen instructions to begin the Windows installation process.
You need to:
- Choose Language and Keyboard Settings
- Click Repair Your Computer.
- Click Troubleshoot.
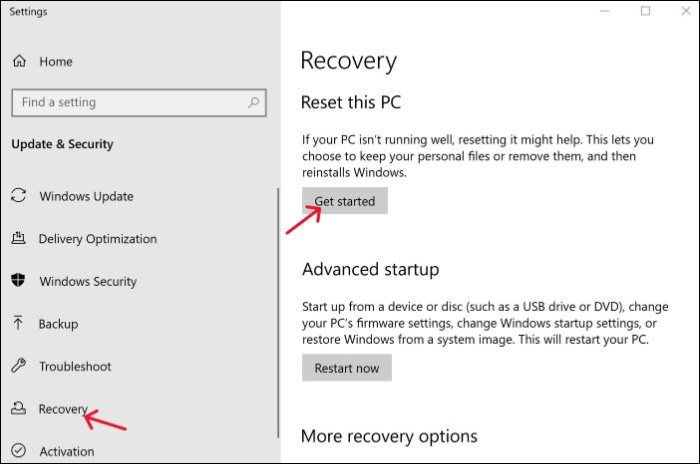
- Click Reset This PC.
- Choose Reset Options.
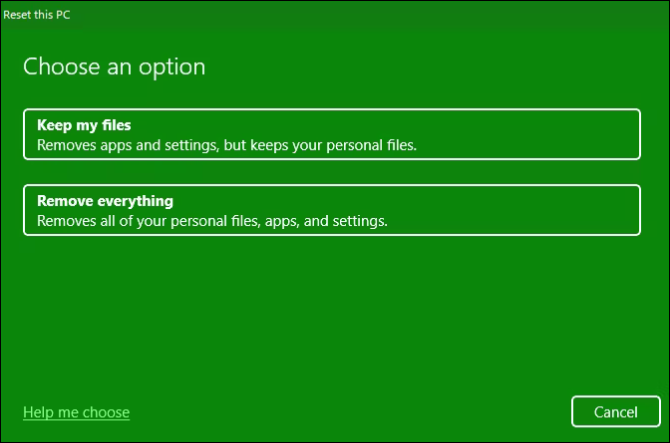
- Select Keep my files or Remove everything according to your situation.
- Follow the onscreen guide to reset Windows 10/11 to factory settings.

Step 6: Complete the Setup
After the reset is complete, you’ll be guided through the initial Windows setup process. Follow the prompts to set up your preferences, create a user account, and personalize your system.
Conclusion
Performing a factory reset from the BIOS can be a powerful troubleshooting tool when your Windows 10 or Windows 11 system is experiencing issues. However, it’s a process that should be approached with caution, as it erases all data on your computer. Always remember to back up your important files and follow the steps carefully to ensure a successful reset. This method can help you resolve various software problems and provide a fresh start for your Windows operating system.
About The Author
Position: Columnist
Stella has been working in MiniTool Software as an English Editor for more than 8 years. Her articles mainly cover the fields of data recovery including storage media data recovery, phone data recovery, and photo recovery, videos download, partition management, and video & audio format conversions.
В самом BIOS нет инструментов для отката системы, но его можно использовать для того, чтобы запустить восстановление с установочного носителя. Благодаря правильной настройке BIOS мы получим доступ к инструментам, которые помогут вернуть Windows в работоспособное состояние.
Подключаем к компьютеру установочный съёмный носитель с дистрибутивом Windows. По умолчанию он будет загружаться уже после жёсткого диска. Но мы можем поменять приоритет через BIOS.
- Перезагружаем компьютер.
- Заходим в BIOS.
- Находим раздел с приоритетом загрузки.
- Выставляем на первое место установочный накопитель, а на вторую позицию — жёсткий диск.
Главная сложность в этой операции — найти в BIOS настройки приоритета. Вот несколько распространённых вариантов.
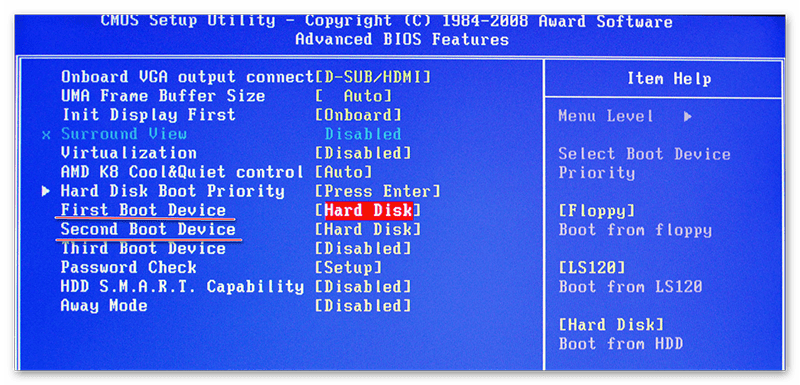
- Phoenix Award BIOS — переходим в раздел «Advanced BIOS Features», выбираем пункт «Hard Disk Boot Priority», меняем накопители местами.
- AMI BIOS — переходим на вкладку «Boot», выбираем пункт«Hard Disk Drives», в строке «1st Drive» ставим установочный накопитель.
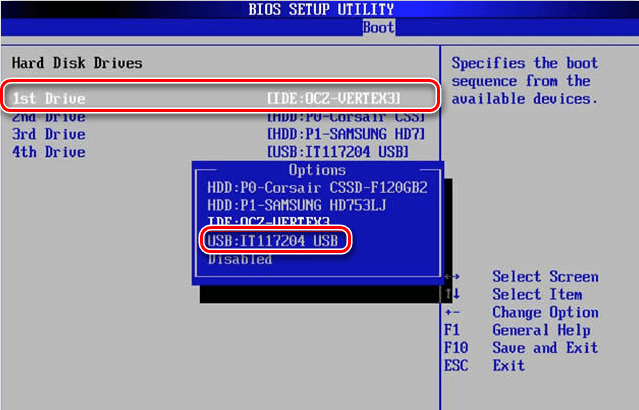
Изменение приоритета загрузки
В интерфейсе UEFI разобраться проще. Часто список устройств с приоритетом загрузки вынесен на первый экран, так что нам остаётся только перетащить установочный диск на первое место.
Восстановление системы
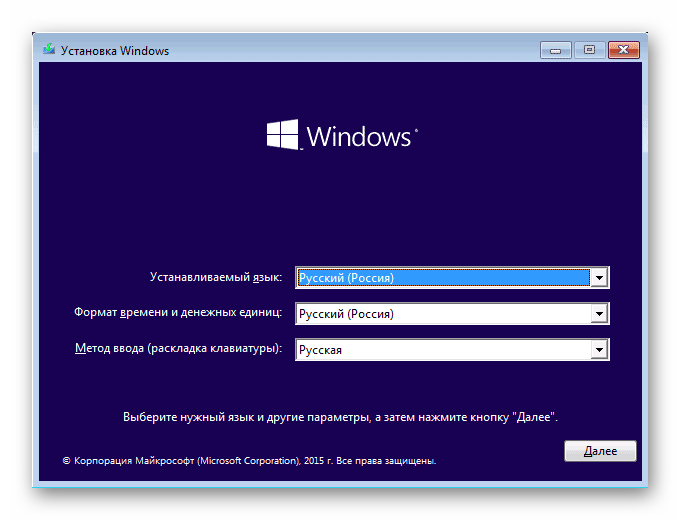
После перезагрузки компьютера появится интерфейс установщика. На первом шаге мастера мы выбираем язык, формат времени и метод ввода. Все параметры можно оставить по умолчанию, потому что саму установку проводить мы не будем. Нажимаем «Далее» для перехода к следующему экрану.
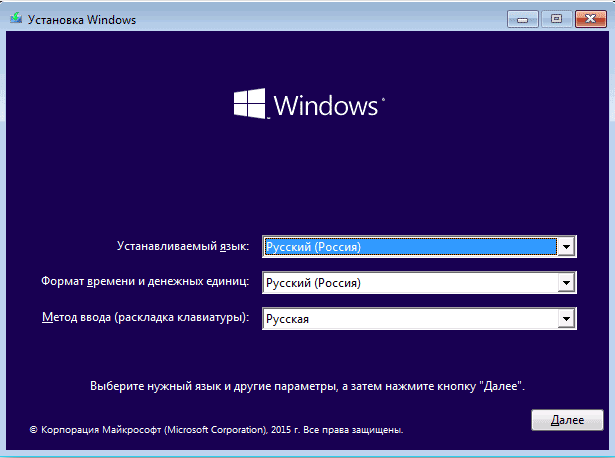
Здесь можно ничего не менять
В окне установщика кликаем по ссылке «Восстановление системы».
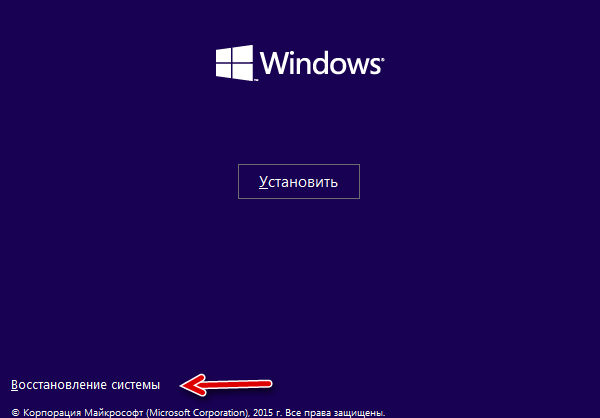
Переходим в среду восстановления системы
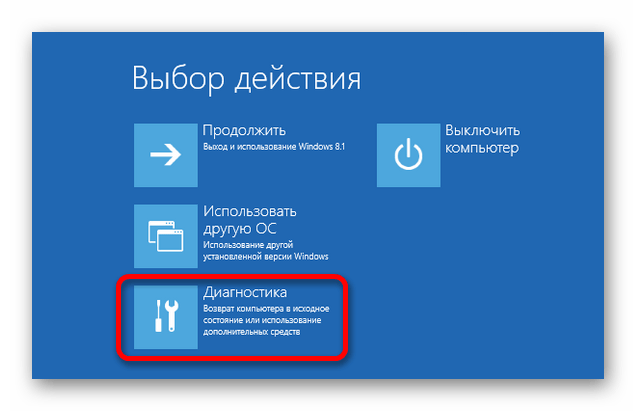
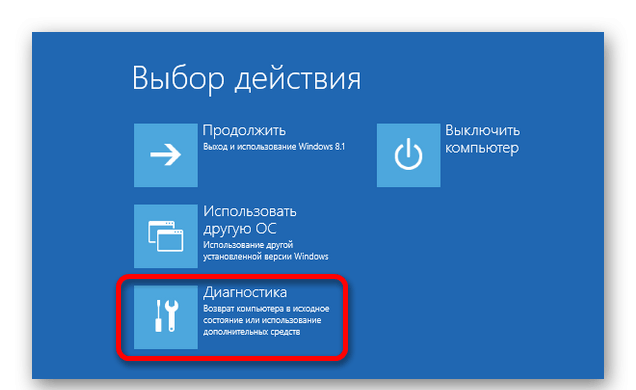
Появится экран с доступными действиями. Выбираем пункт «Диагностика». Затем переходим в «Дополнительные параметры». Здесь мы видим несколько вариантов восстановления системы.
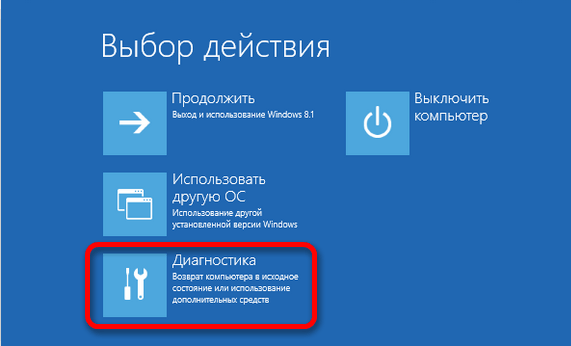
Все инструменты восстановления системы представлены в этом разделе
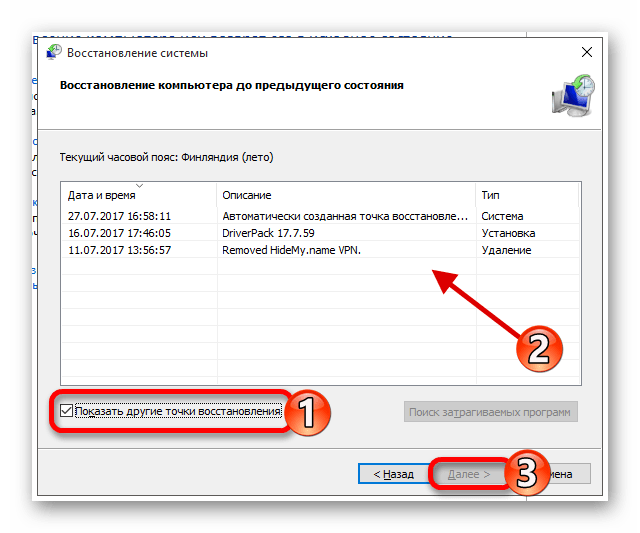
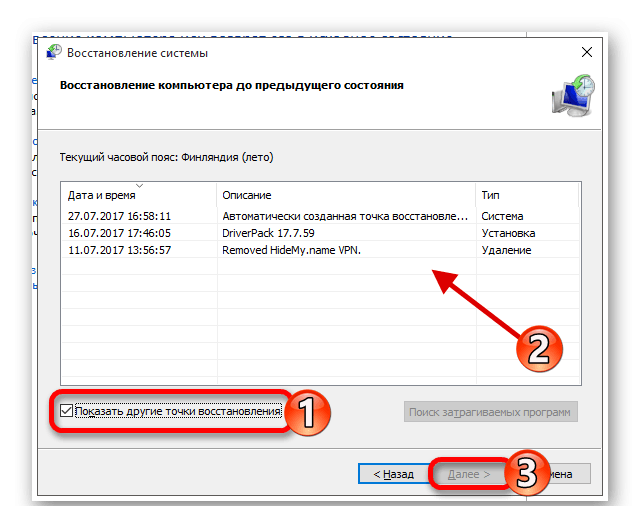
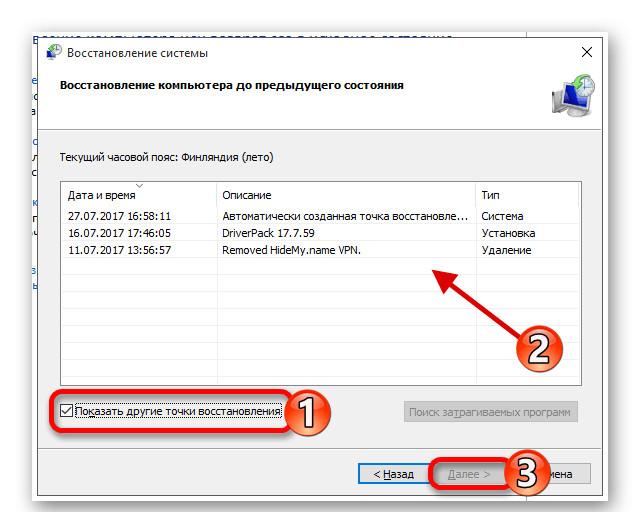
Если у нас есть контрольные точки восстановления, то выбираем первый способ — «Восстановление системы». При его запуске отобразится такое же окно, как при работе в среде Windows. В нём мы выбираем из списка желаемую дату для отката и запускаем восстановление.
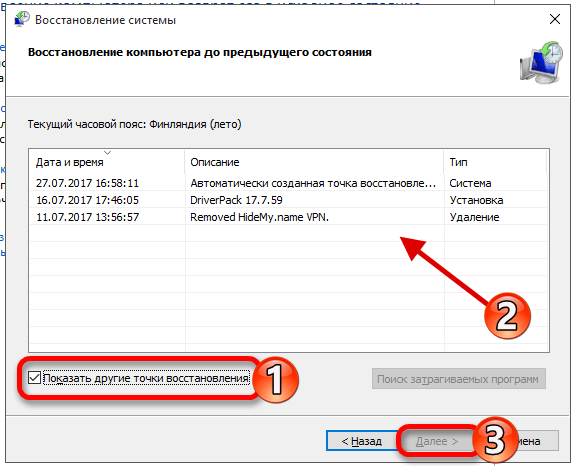
Выбираем подходящую точку
После завершения процедуры компьютер автоматически перезагрузится. Так как в BIOS выставлен приоритет флешки, то мы снова попадём на экран установки Windows. Чтобы проверить, заработала ли система, извлекаем загрузочный диск или меняем приоритет в BIOS, выставляя на первое место жёсткий диск.
Если откат системы к контрольной точке не решил проблему, то снова подключаем флешку (или меняем приоритет) и пробуем восстановить Windows другими способами — например, с помощью командной строки. Выполняем те же действия, чтобы добраться до дополнительных параметров диагностики, и выбираем подходящий режим восстановления.
Запуск дополнительных параметров без установочного диска
Если установочного диска нет, можно перейти к дополнительным параметрам загрузки другими способами. Главное, чтобы Windows загружалась хотя бы до приветственного экрана. Даже если нельзя добраться до рабочего стола, получится использовать такой метод:
- На экране входа в систему находим кнопку выключения. Зажимаем клавишу Shift и нажимаем на неё. Выбираем режим «Перезагрузка».
- Не отпуская Shift, нажимаем «Всё равно перезагрузить».
- После появления меню «Выбор действия» отпускаем клавишу Shift.
- Нажимаем «Продолжить».
- Выбираем «Диагностику» — «Дополнительные параметры» — «Восстановление системы».
Есть и другие способы перехода к дополнительным параметрам загрузки, но они работают только из среды Windows, так что особого смысла в нашем случае в них нет. Если мы можем попасть в меню «Пуск», то можем запустить восстановление системы без сложных манипуляций с перезагрузкой.
Post Views: 20 324
Все способы:
- Что необходимо для начала восстановления
- Способ 1: Использование установочного носителя
- Способ 2: «Безопасный режим»
- Вопросы и ответы: 9
«Восстановление системы» — это функция, которая встроена в Windows и вызывается при помощи установщика. С её помощью вы можете привести систему к тому состоянию, в котором она была на момент создания той или иной «точки восстановления».
Что необходимо для начала восстановления
Сделать «Восстановление системы» чисто через BIOS невозможно, поэтому вам потребуется установочный носитель с той версией Windows, которую нужно «реанимировать». Его придётся запускать через BIOS. Также вам нужно убедиться в наличии специальных «точек восстановления», которые позволят сделать откат настроек к рабочему состоянию. Обычно они делаются системой по умолчанию, но если таковых не обнаружится, то «Восстановление системы» станет невозможным.
Также нужно понимать, что при проведении процедуры восстановления есть риск потерять некоторые пользовательские файлы или нарушить работоспособность программ, которые были установлены недавно. В этом случае всё будет зависеть от даты создания «Точки восстановления», которую вы используете.
Способ 1: Использование установочного носителя
В этом способе нет ничего сложного и он является универсальным практически для всех случаев. Вам понадобится только носитель с правильно записанным установщиком Windows.
Читайте также: Как создать загрузочную флешку
Инструкция к нему выглядит следующим образом:
- Вставьте флешку с установщиком Windows и перезагрузите компьютер. Не дожидаясь начала загрузки ОС, войдите в BIOS. Чтобы сделать это, используйте клавиши от F2 до F12 или Delete.
- В BIOS нужно установить загрузку компьютера с флешки.
- Если вы используете обычный CD/DVD-диск, то первые два шага можно пропустить, так как загрузка установщика начнётся по умолчанию. Как только появится окно установщика, выберите язык, раскладку клавиатуры и нажмите «Далее».
- Теперь вас перебросит в окно с большой кнопкой «Установить», где нужно выбрать в нижнем левом углу «Восстановление системы».
- После откроется окно с выбором дальнейших действий. Выберите «Диагностика», а в следующем окне «Дополнительные параметры».
- Там нужно выбрать «Восстановление системы». После вас перебросит в окно, где потребуется выбрать «Точку восстановления». Выбирайте любую доступную и жмите «Далее».
- Начнётся процесс восстановления, который не требует участия пользователя. Спустя приблизительно полчаса или час всё завершится и компьютер перезагрузится.
Подробнее: Как установить загрузку с флешки в BIOS

На нашем сайте вы также можете узнать о том, как создать точку восстановления на Windows 7, Windows 10 и резервную копию Windows 7, Windows 10.
Если у вас установлена Windows 7, то пропускайте 5-й шаг из инструкции и жмите сразу на «Восстановление системы».
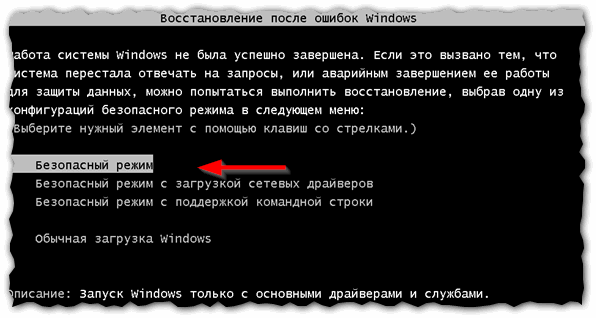
Способ 2: «Безопасный режим»
Данный способ будет актуален в том случае, если у вас нет носителя с установщиком вашей версии Windows. Пошаговая инструкция к нему выглядит следующим образом:
- Войдите в «Безопасный режим». Если у вас не получается запустить систему даже в этом режиме, то рекомендуется воспользоваться первым способом.
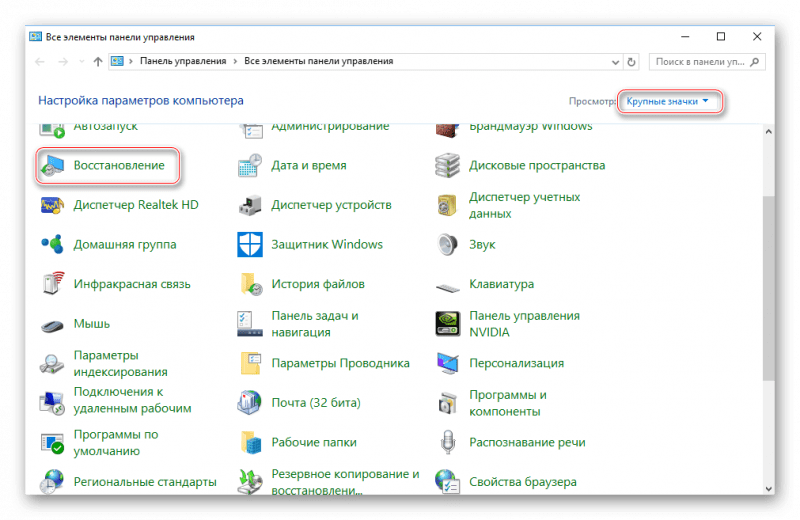
- Теперь в загрузившейся операционной системе откройте «Панель управления».
- Настройте отображение элементов на «Мелкие значки» или «Крупные значки», чтобы увидеть все пункты панели.
- Там найдите пункт «Восстановление». Перейдя в него, вам нужно выбрать «Запуск восстановления системы».
- После чего откроется окно с выбором «Точек восстановления». Выбирайте любую доступную и жмите «Далее».
- Система начнёт процедуру восстановления, по завершению которой перезагрузится.
У нас на сайте вы можете узнать о том, как войти в «Безопасный режим» на ОС Windows XP, Windows 8, Windows 10, а также о том, как войти в «Безопасный режим» через BIOS.
Чтобы восстановить систему, придётся использовать BIOS, но при этом большая часть работ будет производиться не в базовом интерфейсе, а в «Безопасном режиме», либо в установщике Windows. Стоит помнить, что для этого также жизненно необходимы точки восстановления.
Наша группа в TelegramПолезные советы и помощь
You visit every «how to fix an issue on your computer» webpage, and the last solution or fix you would find is to reset or reinstall Windows. If you run into unresolved Windows 10 or 11 issues, the inevitable solution is to reset or reinstall Windows. Now, in such cases, questions like how exactly do you reinstall Windows 10 or 11? Can I reinstall Windows 10 with BIOS, and much more pop up in our heads?
In this post from EaseUS, we will see how to reinstall Windows 10 from BIOS, when it is recommended, and what measures someone should follow to make this process smoother. Stay till the end to know the details.
📃Read more: How to Install Windows 10 from USB from BIOS
Can You Reinstall Windows from BIOS
No, you cannot reinstall Windows from BIOS, but BIOS helps you boot your device based on the boot files. The first thing you need to reinstall Windows is a USB, DVD, .pxe file, or a network to connect the system to the OS files.
Once we insert or connect the bootable devices, this is where BIOS comes into the picture. All popular manufacturers, like ASUS, DELL, MSI, HP, etc, provide keys to enter BIOS setup. It recognizes the device that contains the boot files (usually C drive) and then controls it to install the Windows 10 files on your device.
But here are some reasons why you would reinstall Windows 10 or 11.
- System performance issues.
- Virus or malware attacks.
- Software and driver conflicts.
- Upgrading to a new hard drive or SSD.
- Resolving system issues.
🔥Read More: How to Reinstall Windows 10 Without Losing Programs
What to Do Before Reinstalling Windows 10
While a reinstallation removes all the data on your device, you need to be careful because it may involve data loss. So, here are some things you need to do before starting this process.
- Data Backup: Data loss is the biggest concern while going for a reinstallation. It is important to back up files, photos, and documents.
- Make a list of installed software and product keys.
- Download the latest driver components.
- Check system requirements.
- Create Windows 10 installation media.
A reinstallation might erase all your data, so you need a tool with excellent backup options to safeguard your data. EaseUS Todo Backup Home is proven data backup software with ideal and excellent backup programs.
EaseUS Todo Backup Home provides a comprehensive set of functions for your computer running Windows 11/10/8/7. You can back up files to the cloud and create clones and images along with incremental and differential backups. The software makes your backup and recovery process a whole lot easier.
Follow the steps below to back up your computer data before reinstalling Windows 10.
Step 1. Launch EaseUS Todo Backup on your computer, and click Create Backup on the home screen and then hit the big question mark to select backup contents.

Step 2. To back up your Windows operating system, click «OS» to begin the backup task.

Step 3. Your Windows operating system information and all system related files and partitions will be automatically selected so you don’t need to do any manual selection at this step. Next, you’ll need to choose a location to save the system image backup by clicking the illustrated area.

Step 4. The backup location can be another local drive on your computer, an external hard drive, network, cloud or NAS. Generally, we recommend you use an external physical drive or cloud to preserve the system backup files.

Step 5. Customiztion settings like enabling an automatic backup schedule in daily, weekly, monthly, or upon an event, and making a differential and incremental backup are available in the Options button if you’re interested. Click «Backup Now«, and the Windows system backup process will begin. The completed backup task will display on the left side in a card style.

How to Reinstall Windows 10 in 2 Different Ways
Now that you know what you need to reinstall Windows 10 with BIOS, in this section, we will see two secure and efficient methods to reinstall Windows 10 on your computer.
- Way 1: Reinstall Windows Using the Windows Media Creation Tool
- Way 2: Reinstall Windows 10 from Setting
Way 1. Reinstall Windows Using the Windows Media Creation Tool
Microsoft provides a free tool called Windows 10 Media Creation Tool to reinstall or upgrade Windows 10. Rather than going for a third-party tool, we can use this to reinstall Windows 10. Here’s how you can reinstall Windows 10 with Media Creation Tool.
Before you download the tool, you need to have:
- A strong Internet connection.
- A USB flash drive or DVD with at least 8 GB of free space.
Step 1: Visit Microsoft’s website and download the Windows 10 Media Creation Tool.
Step 2: Double-click on the files to download. After installing, find the tool and run it as administrator to get started.
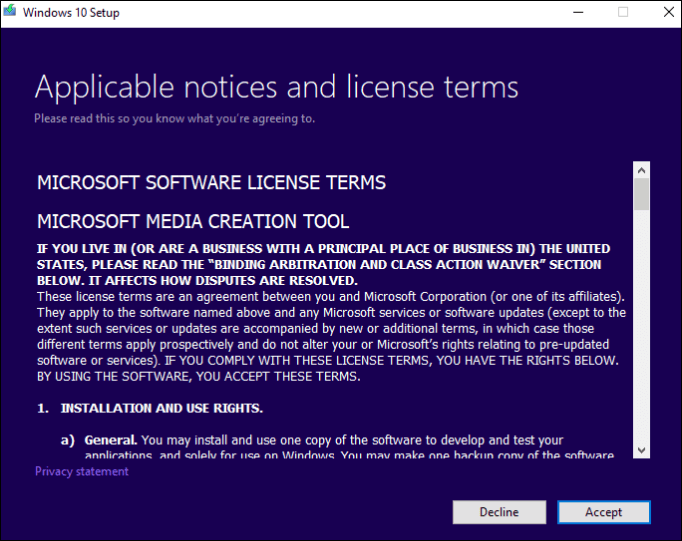
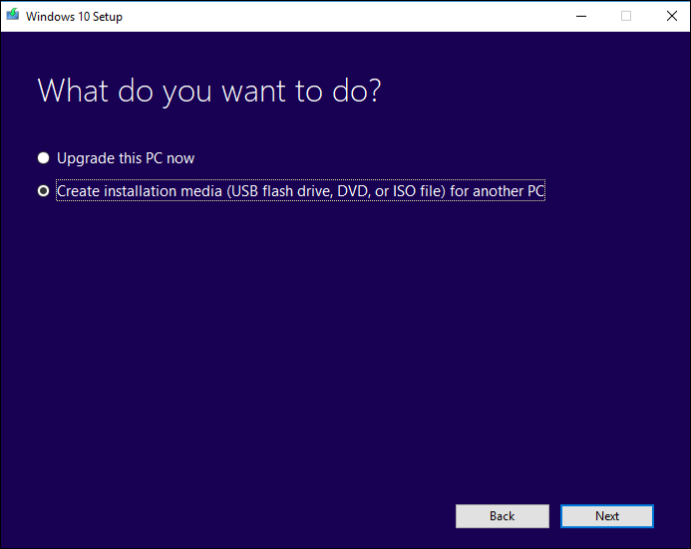
Step 3: Complete the installation and accept the terms and conditions; then, you will be redirected to «What do you want to do?» Page with two options.
You need to create Installation media to reinstall Windows 10 on your PC. So, check the Create installation media (USB flash drive, DVD, or ISO file)for another PC and click Next.
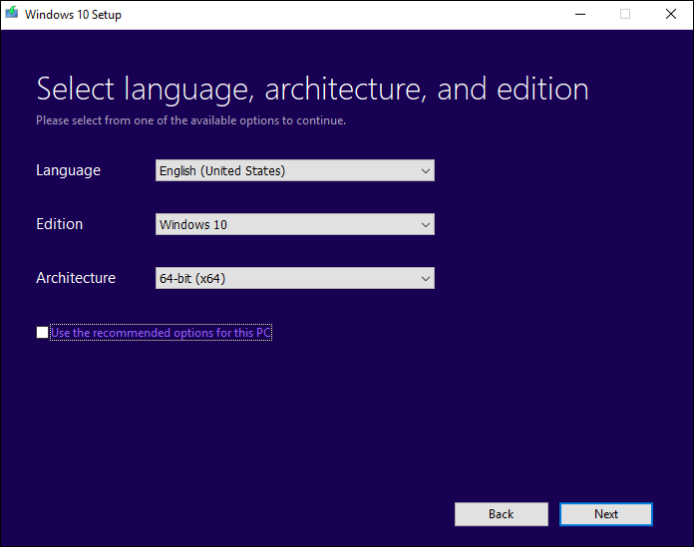
Step 4: Select the Language, Architecture, and Windows Edition you need for creating the installation media. You can tick the checkbox for Use the recommended options for this PC to continue with the language, edition, and architecture of your PC’s current formats.
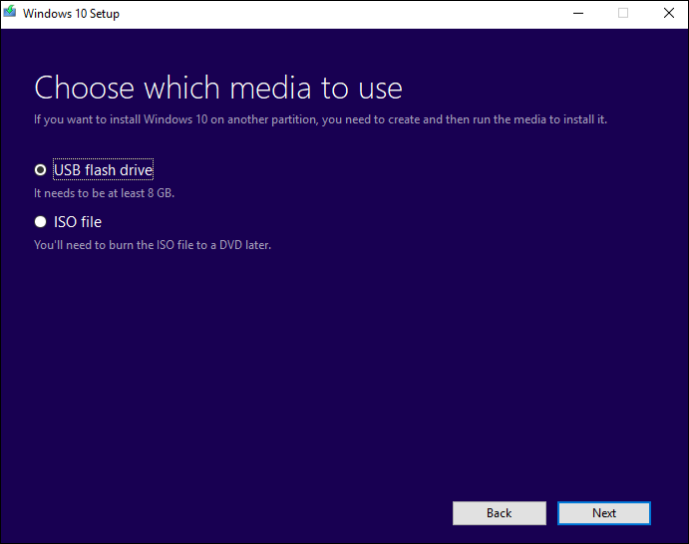
Step 5: In the following windows, Choose which media to use. Here, you can go with USB flash Drive or ISO file.
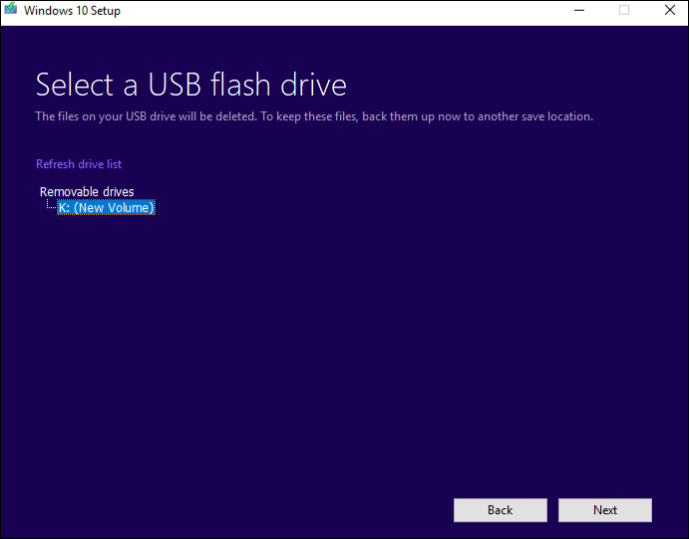
Step 6: Select the USB drive you want to use for reinstalling Windows 10 and click Next.
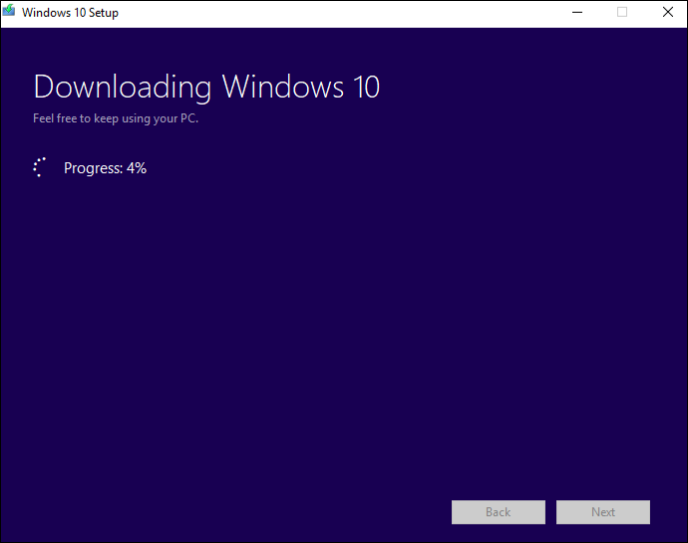
Step 7: Now, Microsoft’s Media Creation Tool starts downloading the latest Windows 10 version installation files onto the USB flash drive on your PC.
Step 8: After downloading the USB installation files to the drive, it will then start creating the Windows 10 media.
Step 9: After finishing, the tool displays «Your USB flash drive is ready» to indicate it. Now, you can use this drive to boot up your computer and reinstall Windows 10.
Tip: All Microsoft’s OS files and installation files are preset on the C drive. When you open your computer, the BIOS reads the files from the C drive (as it is marked active) and boots the device. The best thing you can do is back up your C drive and use it for reinstallation.
Now you’ve successfully reinstalled Windows 10 from BIOS! If this guide helped you share it with your friends and family!
Way 2. Reinstall Windows 10 from Settings
Reinstalling the OS used to be a thing back then with Windows 7. It used to be complex, and a normal user could not do it. But, Microsoft introduced Reset this PC features to reinstall Windows OS from Windows 8. You can reinstall Windows 10 or 11 on your computer using the same features. Make sure you plug in your charger to the laptop to avoid losing power during the process. So, here’s how you can do it.
Step 1: Open Settings on your computer. Navigate to and go to Update & Security > Recovery. Click on Reset this PC header and click on the Get Started button to begin the process.
Step 2: Here, you can choose from two options for how to go about reinstalling Windows 10. The options are Keep my files or Remove Everything.
Remove everything will reset your PC to factory settings with the latest Windows 10 version, and Keep my files sets the OS options back to default and keeps your files like documents, music, etc.
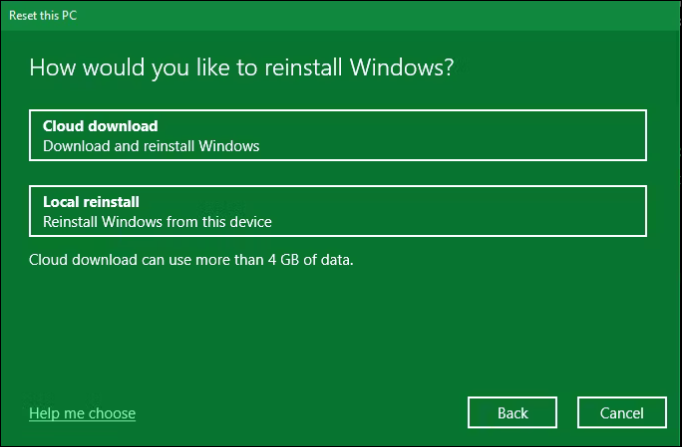
Step 3: In the next window, you must choose «How would you like to reinstall Windows?» Cloud download or Local reinstall.
Cloud download downloads a fresh copy of all the files from Microsoft on the internet and performs a clean install. The Local reinstall uses the current system files to build a fresh copy of Windows 10.
Step 4: Next, you will see an Additional Settings window. This window contains the summary of what you have chosen so far. Under the options, you can see Change Settings options if you wish to revise the criteria for Windows Setup reinstallation.
Step 5: If you choose to «Remove everything», you will see some additional settings like Clean data, Delete files from all drives, and Downalod Windows.
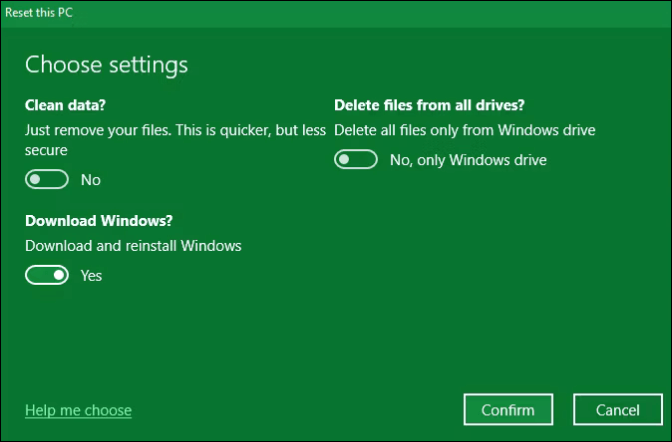
You need to toggle the options based on your needs and make sure you toggle the Download Windows button and click Confirm.
Step 6: This window displays the list of processes you have selected. To cross-check the apps you delete, click on the List of apps to be removed.
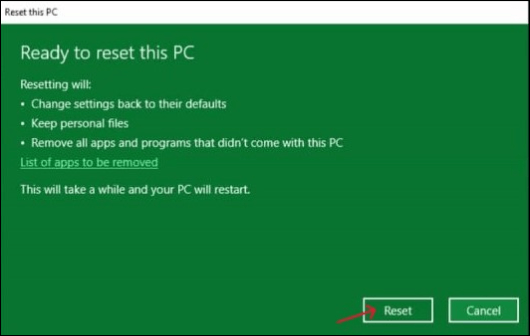
Step 7: Once you confirm your options, a new window titled «Ready to reset this PC» appears. Start the process by clicking Reset, and wait for the process to complete.
After solving this problem, you may be interested in:
To Wrap Things Up
Reinstalling Windows OS is a common practice people follow to get rid of software issues, upgrade the OS, and improve the system’s performance. This post includes two methods about how to reinstall Windows 10 from BIOS and some tips to ease the process.
Since reinstallation is a complex process, it might cause data loss threats on your PC if anything goes wrong. The best solution to protect data is to use a professional Backup tool like EaseUS Todo Backup. It is a one-stop solution for complete backup and recovery for all emergencies.
FAQs on How to Reinstall Windows from BIOS
Here are some of the most frequent FAQs asked on how to reinstall Windows 10 from BIOS. Hope these queries will help you.
1. How can I reinstall Windows 10 from a USB in BIOS?
Connect the USB flash drive to your device. Now, press the power button and the key which opens the BIOS settings on your device. Select the options to boot the device using the flash drive. This will reinstall Windows 10.
2. How do I reinstall Windows 10 without losing programs and data?
You can use installation media like a USB flash drive or DVD to reinstall Windows 10 without losing data. After selecting the installation media like USB or ISO files, on the next window, select Keep personal files to preserve your personal documents and files during reinstallation.
3. How do I reset my computer from BIOS?
- Enter the BIOS setup on your PC using the keys based on your product.
- Switch to the Exit section and select Load Setup Defaults.
- Click Yes to confirm and select Yes in the Exit Saving Changes popup to complete it.
4. Does BIOS Reset remove Windows?
A BIOS Reset will remove the data and loads the system defaults on your PC. This has nothing to do with the Windows OS, and it only restores your PC to factory settings.
Десятая версия Винды считается достаточно стабильной, в сравнении с ранними вариациями ОС. Однако исключить возникновение неполадок в полном объеме невозможно. Пользователям необходимо понимать, как можно восстановить операционную систему Виндовс 10 через БИОС. Существует несколько особенностей процедуры, которые необходимо учитывать при работе с внутренними блоками.
Когда может потребоваться восстановление системы?
При возникновении различных неполадок рекомендуют сначала перезагрузить персональный компьютер (стационарное устройство, планшет, ноутбук). Если перезагрузка операционки не исправила работу необходимых файлов, потребуется выполнить процедуру восстановления ОС через БИОС.

Возможные случаи использования данного ресурса:
- возникновение ошибки после появления экрана рабочего стола (обычно появляется сообщение с кодом неполадок);
- отсутствие возможности стандартной загрузки (может появиться синий «экран смерти»);
- некорректная работа операционной системы персонального устройства (на мониторе также могут отображаться соответствующие уведомления).
Первое, что должен сделать владелец ПК, – откат операционной системы до настроек, выполненных при первоначальной установке (заводские). Если процедура не могла быть активирована или процесс не привел к необходимому результату, переходят к работе с блоком БИОС.

Как откатить Windows 10 через BIOS
Существует два варианта отката операционной системы Windows 10 – с использованием дополнительного носителя, где установлен образ необходимой Винды, и без загрузочного диска или съемной флешки. В первом случае запуск ОС осуществляется следующим образом:
- создать внешний накопитель загрузочного типа;
- вставить флешку (диск), запустить перезагрузку персонального устройства;

- до того, как появится логотип ОС, нажать одну из кнопок «F2»-«F12» (иногда срабатывает комбинация «Ctrl+F2» или клавиша «Delete»);

- в приоритет поставить загрузку с внешнего носителя, нажать «F10» или «Save/Exit» в верхней части меню;

- после загрузки устройства выбрать раскладку, язык;

- затем перейти на раздел «Восстановление системы»;

- в новом окне кликнуть по пункту «Диагностика»;
- нажать на строку «Восстановление».
После этого запустится процесс отката текущей версии ОС до предыдущего состояния. Если дополнительной флешки нет, и отсутствует возможность ее создать, выбирают следующий вариант действий:
- при загрузке персонального устройства нажать и удерживать кнопку «F8», откроется окно запуска ПК в безопасном режиме;
- перейти на раздел «Панель управления»;

- в новом окне выбрать строку «Восстановление».
Внимание! Для использования второго способа отката операционки и устранения возникающих ошибок потребуются активные точки восстановления. Перед запуском программы необходимо проверить наличие и работоспособность данных элементов.
После перехода в новый блок выбирают нужную точку и подтверждают запуск процедуры.
Какие возникают проблемы
При активации процесса отката Винды на персональном устройстве (стационарном компьютере или ноутбуке) могут возникать различные сложности. Среднее время обработки информации – два часа. Если операция затягивается, необходимо проверить работоспособность используемых файлов (самой операционной системы, записанного образа, выбранных точек состояния).
BIOS – это главный элемент операционки, задающий порядок выполнения операций и обеспечивающий взаимодействие элементов персонального устройства. Откат ОС до предыдущего варианта помогает исправить некоторые ошибки, сбои в работе встроенных файлов и приложений.
Вам помогло? Поделитесь с друзьями — помогите и нам!