
Once you make changes in the server network configuration file, then require to restart the server networking service in order to reflect the changes.
This guide will describe the steps to restart the network interface or network adapter in the Linux and Windows servers.
Restarting Network interface/adapter in Linux OS
Ubuntu / Debian
-
Use the following command to restart the server networking service.
# sudo /etc/init.d/networking restart
or
# sudo /etc/init.d/networking stop
# sudo /etc/init.d/networking start
else
# sudo systemctl restart networking
-
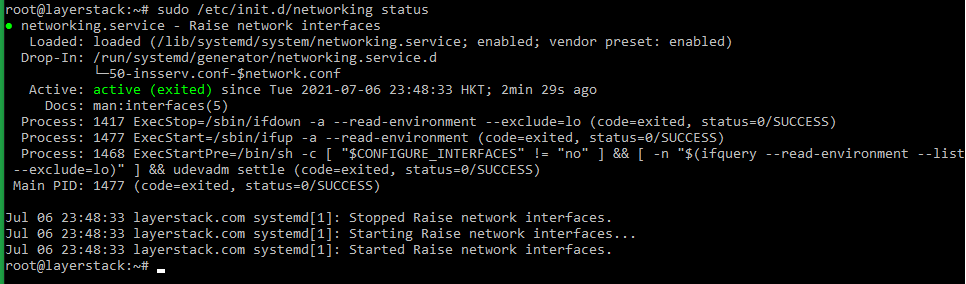
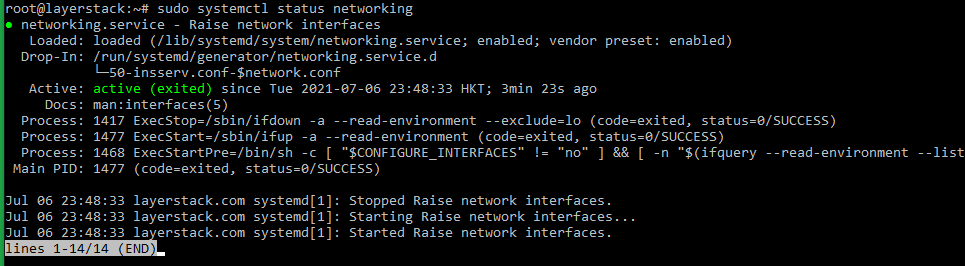
Once this is done, use the following command to check the server network status.
# sudo /etc/init.d/networking status
or
# sudo systemctl status networking


Ubuntu 17.10 and higher versions use NetPlan as the default network management tool and its configuration files are written in YAML syntax with a .yaml file extension.
Run the below command to update networking and then any changes that have been made to the network will take effect:
# netplan apply

AlmaLinux
-
Use the following command to restart the server networking service.
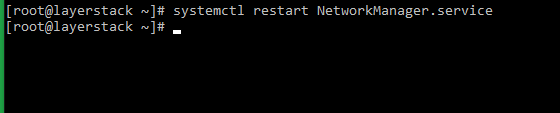
# nmcli networking off
# nmcli networking on
or
# systemctl restart NetworkManager
-
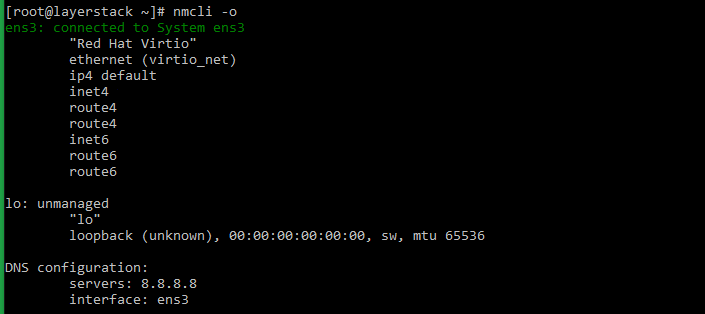
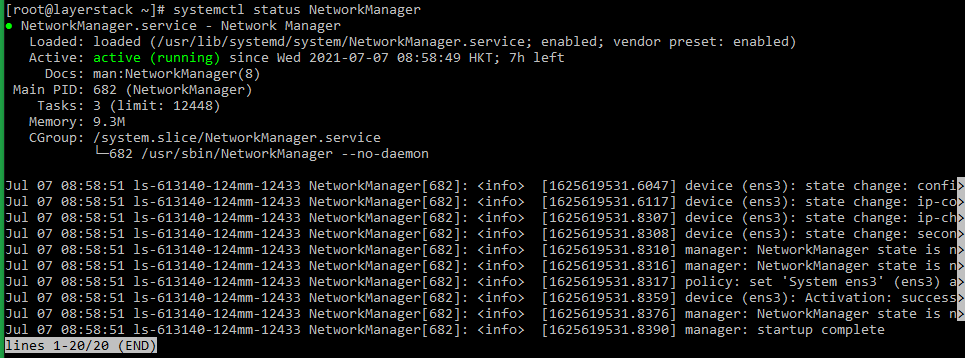
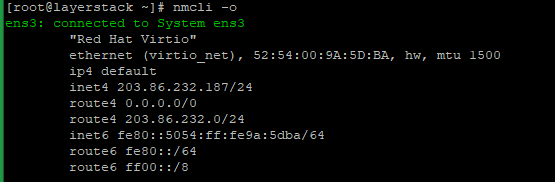
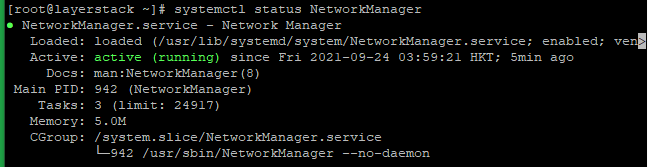
Once this is done, use the following command to check the server network status.
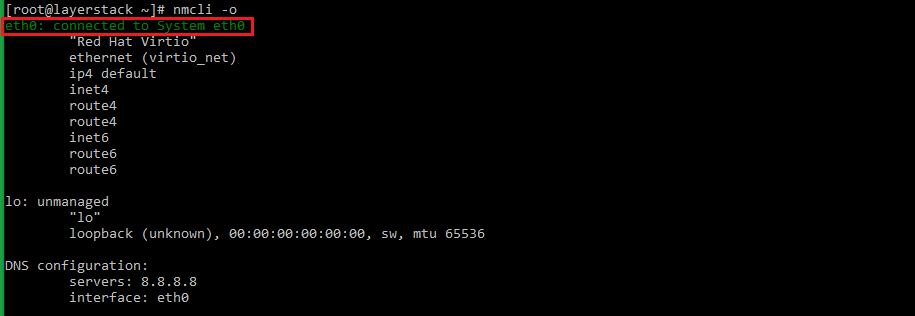
# nmcli -o
or
# systemctl status NetworkManager


Rocky Linux
-
Use the following command to restart the server networking service.
# nmcli networking off
# nmcli networking on
or
# systemctl restart NetworkManager
-
Either of the below commands can be executed to check the status of the networking service.
# nmcli -o
or
# systemctl status NetworkManager


CentOS 8
-
Use the following command to restart the server networking service.
# nmcli networking off
# nmcli networking on
or
# systemctl restart NetworkManager.service
-
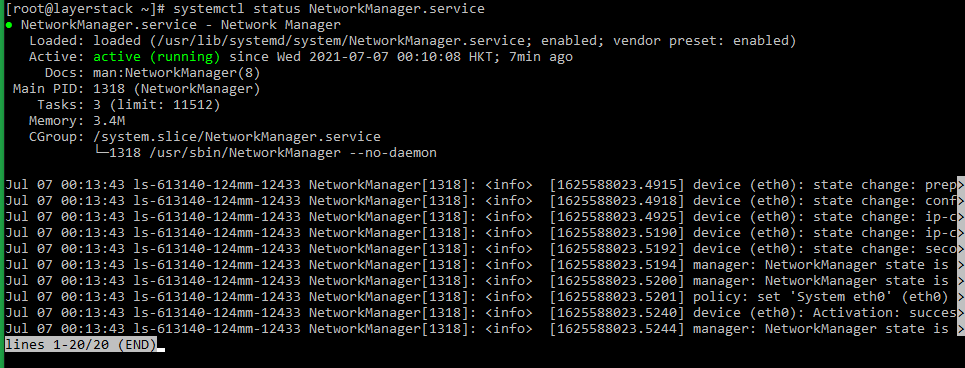
Either of the below commands can be executed to check the status of the networking service.
# systemctl status NetworkManager.service
or
# nmcli -o

CentOS 7
-
Use the following command to restart the server networking service.
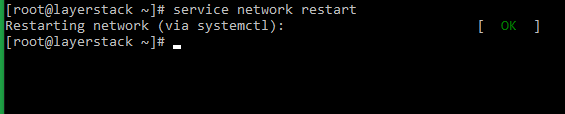
# systemctl restart network.service
or
# service network restart
or
# /etc/init.d/network restart
-
The status of the networking service can be checked by making use of any of the below commands.
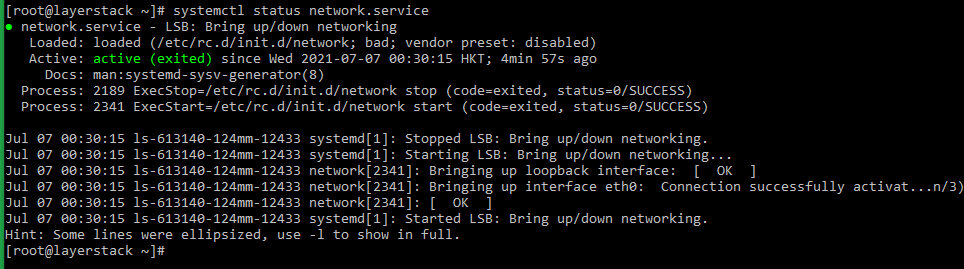
# systemctl status network.service
or
# service network status
or
# /etc/init.d/network status


CentOS 6
-
Use the following command to restart the server networking service.
# service network restart
or
# /etc/init.d/network restart
-
Once this is done, use the following command to check the server network status.
# service network status
or
# /etc/init.d/network status


Windows OS
Using the Enable/Disable mode of network adapter
-
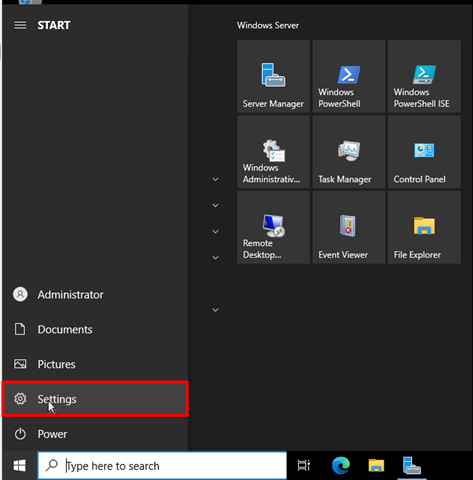
Click on the Windows key to open start and search
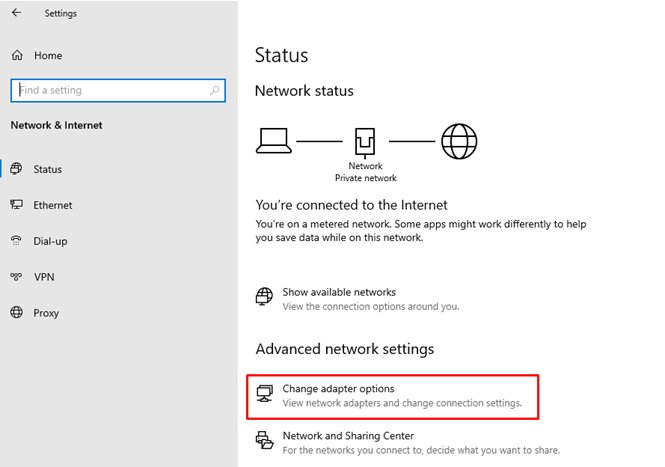
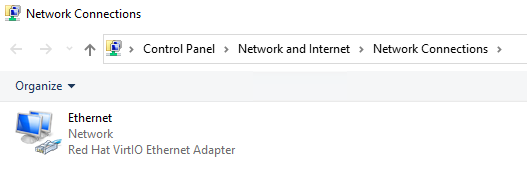
Settingsand go to theNetwork and Internetthen click onChange adapter optionwhich is shown in the below image.
Then will get the below page:
-
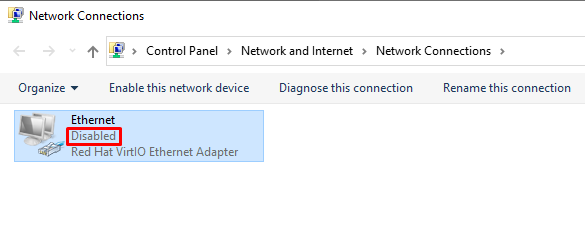
Right-click the
Ethernet deviceand click onDisableoption.
-
Again, Right-click the
Ethernet deviceand click onenableoption. -
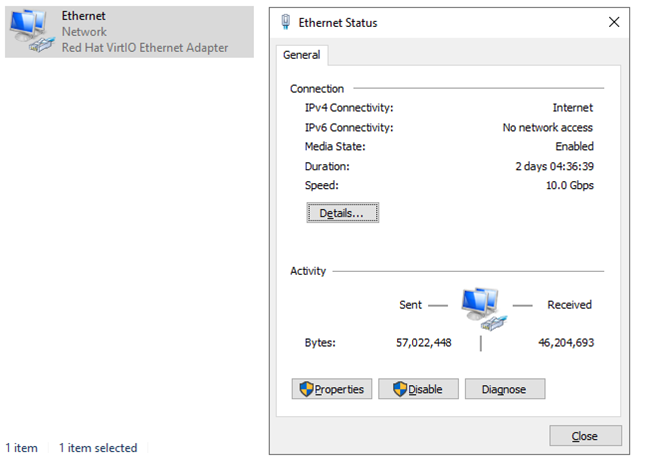
Once this is done, Right-click the
Ethernet deviceand click onstatus.


Using the netsh command
In Windows OS, the command line method involves using the netsh command for resetting the network and TCP/IP stack.
-
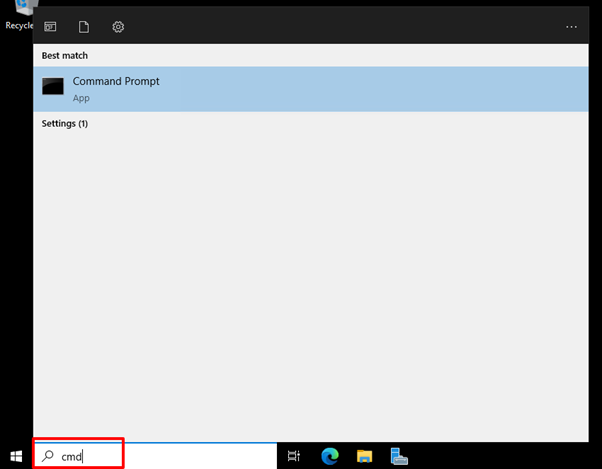
Go to
Startand typeCMDin the search window.
-
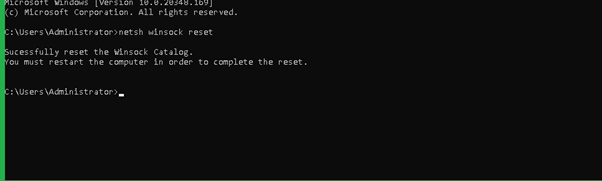
Once opened the
Command Prompt, the command for restarting the network interface, as provided below, can be executed.> netsh winsock reset
-
Regularize the networking process as indicated in the message after restarting the server.
-
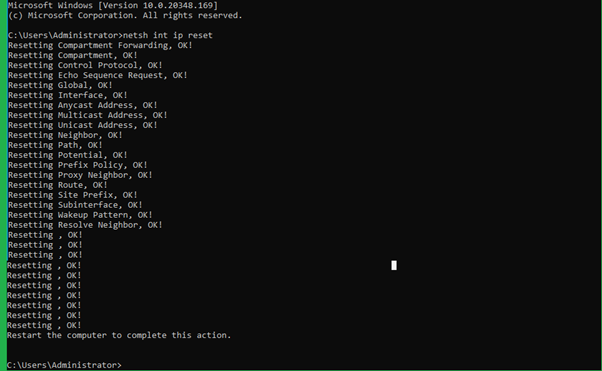
In addition to the above command, may also use the command which resets the TCP/IP stack. The command is as follows.
> netsh int ip resetThe output will be as follows:
Using the Network Reset option (Windows 10/11)
The reset button method can be used in Windows 10 & 11 versions by which the user can restart the Network interface. The steps for this are given below.
-
Click on Windows
Start Menubutton and then selectSettings.
-
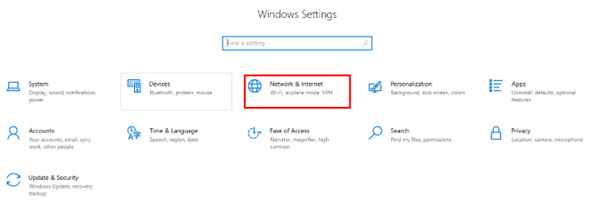
From the
Settingsoption, selectNetwork & Internetoption.
-
Here you would be able to see the adapter options i.e
Advanced Network Settings, from which you can click onNetwork Resetoption. -
Click on the
Reset Nowbutton on the right side ofNetwork resetoption and you will be prompted for the confirmation. ChooseYesfor proceeding with resetting the network settings.Once clicked on
Yes, the network adapter will start to reset and you will be able to restart the network interface.
Related Tutorials
-
How to check if TCP / UDP port is open on Linux & Windows Cloud Servers
-
Installing telnet client on Linux and Windows Cloud Servers
-
How to check TCP/IP configuration with ipconfig on Windows Cloud Servers
-
How to check TCP/IP configuration with ifconfig on Linux Cloud Servers
-
How to configure the Static IP Address & Network Card for Linux & Windows Cloud Servers
- To disable, enable, and restart a network adapter on Windows 11, go to Settings > Network & internet > Advanced network settings.
- You can also disable, enable, or restart a network adapter from the Command Prompt, PowerShell, Device Manager, and the Control Panel on Windows 10 and 11.
All modern computers come with network adapters today so you can connect to the internet and communicate with other devices. However, even the most sophisticated network adapters, whether wired (ethernet) or wireless (wi-fi), can run into issues and not perform as they are supposed to. At this point, a simple restart of the network adapter usually fixes the issues.
By restarting the network adapter, you avoid rebooting the complete computer, and the basic connectivity issues are also resolved.
You may want to restart your network adapter if your computer hasn’t had downtime in quite some time and the internet speed isn’t optimized when you are having trouble connecting to the wireless SSID, or if you are experiencing any sort of issues with network connectivity. Restarting the network adapter should be the first of many steps for troubleshooting.
On Windows 11, restarting the ethernet, wi-fi, or virtual network adapter involves turning it off and then on again. Therefore, the methods discussed in this post to restart any network adapter first let you disable the adapter, and then re-enable it. In case you want to simply disable or enable a network adapter on your Windows PC, you can use the same methods discussed below.
Note: Restarting and resetting the network adapter are two different things. When you reset the network settings, all configurations are lost and need to be redone.
Table of Contents
Restart the network adapter from Settings in Windows 11
Microsoft has introduced the ability to disable and enable any network adapter on your computer directly from the Settings app. You no longer have to open the Control Panel to do it.
Unfortunately, this option is not available in Windows 10.
Use the following steps to restart the ethernet or the Wi-Fi network adapter from the Windows 11 Settings app:
-
Press the Windows Key + i to open the Settings app.
-
Switch to the “Network & internet” tab from the left.
-
Scroll down and click “Advanced network settings.”
 1")
Open advanced network settings -
Click Disable in front of the network adapter that you want to disable or restart.
Disable the network adapter from Settings -
In case you want to restart the adapter, click Enable in front of it.
Enable the network adapter from Settings
 1")
 2")
 3")
If you re-enable the network adapter, you have successfully restarted it. If you were encountering issues with the adapter, check to see if they have been resolved.
Restart the network adapter from Control Panel
Traditionally, you can also restart the network adapter from the Control Panel. This method (and the methods below) also works for Windows 10.
-
Press the Windows Key + R to open the Run Command box.
-
Type in “ncpa.cpl” and press Enter to open the Network Connections applet.
-
Right-click on the adapter that you want to disable/restart and click Disable.
 4")
Disable network adapter from the Control Panel -
To re-enable the adapter, right-click the adapter again and click Enable.
Re-enable the network adapter from the Control Panel
 4")
 5")
Restart the network adapter from Device Manager
To enable, disable, or restart any network adapter of your computer from the Device Manager, use these steps:
-
Press the Windows Key + R to open the Run Command box.
-
Type in “devmgmt.msc” and press Enter to open the Device Manager.
-
Click on “Network adapters” to expand it.
 6")
Expand Network Adapters in the Device Manager -
Right-click on the adapter that you want to disable/restart and click “Disable device.”
Disable network adapter from the Device Manager -
If asked for a confirmation, click Yes.
Confirm action -
To re-enable the adapter, right-click the adapter again and click “Enable device.”
Enable the network adapter from the Device Manager
 6")
 7")
 8")
 9")
After performing the steps above, the selected network adapter will be restarted and should perform optimally now.
Restart the network adapter from PowerShell
If you prefer using the Windows command line instead, then you can use the steps below to disable, enable, or restart the ethernet or the wireless network adapter using Windows PowerShell:
-
Open an elevated PowerShell instance.
-
Run the following command to list all the network adapters:
Get-NetAdapter | format-table 10")
List all network adapter details in PowerShell -
Note down the name of the network adapter that you want to restart/disable.
-
Now use this command while entering your adapter’s name in place of [NetworkAdapterName] to disable it:
Disable-NetAdapter -Name “[NetworkAdapterName]” -Confirm:$false
Disable network adapter from PowerShell -
To re-enable the adapter, use this command:
Enable-NetAdapter -Name “[NetworkAdapterName]” -Confirm:$false
Enable/restart network adapter from PowerShell
 10")
 11")
 12")
Restart the network adapter from Command Prompt
You can also use the Command Prompt to restart any connected network adapter. Here is how:
-
Run the Command Prompt with administrative privileges.
-
List all the network adapter details with this command:
netsh interface show interface
List all network adapter details in Command Prompt -
Note down the name of the network adapter that you want to restart/disable.
-
Now use this command while entering your adapter’s name in place of [NetworkAdapterName] to disable it:
netsh interface set interface “[NetworkAdapterName]” disable
Disable network adapter from Command Prompt -
To re-enable the adapter, use this command:
netsh interface set interface “[NetworkAdapterName]” enable
Enable/restart network adapter from Command Prompt
 13")
 14")
 15")
Ending words
Restarting the network adapters on Windows was already an easy task. However, Windows 11 has made it even more convenient.
Although the Settings app was supposed to replace the Control Panel, Microsoft still hasn’t entirely accomplished the task. They are gradually shifting the controls from the Control Panel over to the Settings app, and the addition of the ability to disable and enable the network adapters from the Settings app is part of that ongoing agenda.
Problems with the network adapter can keep you from connecting to the internet, and from accessing the LAN. Network adapters can be easily configured by end-users; some apps also tend to modify network settings. And while apps don’t necessarily tell you what they’re changing and users assume the changes are necessary and harmless.
They are harmless for the most part but only while the app that has made the modifications is running, or handling everything. There are a lot of settings that go into establishing an internet connection and when they’re changed to the point you can’t connect to the internet, it’s best to just reset the Network Adapter.
A few things about the Network Adapter
The network adapter is a hardware component on a PC/Laptop that connects users to a network. Its specifications determine the maximum transfer speed you can get. It works with both wired, and wireless networks which means that when you connect to LAN and/or a WiFi, the hardware is what is used to establish both types of connections. This means that problems with both wireless and LAN networks may be resolved by troubleshooting the network adapter.
When it comes to troubleshooting a network adapter, there are two different types of solutions that you can try; resetting the network adapter, resetting network settings.
Reset network adapter vs reset network settings
Resetting a network adapter is a lot like turning your PC Off, and then On again. When you do so, anything that’s in the PC’s volatile memory is lost but your settings are untouched, as are your files. When you reset the network adapter, it resets all network components on your system but does not forget your IP or DNS settings, nor does it forget any saved connections.
Resetting network settings is different; it basically involves flushing your DNS, clearing the cache, and getting a new IP address for your computer. Both a network adapter reset and a network setting reset can fix connectivity problems as well as problems with slow network transfer speeds.
You can reset the network adapter on Windows 10 using the following methods. You should restart your computer before you try either one of the following fixes.
Settings app
You can reset the network adapter from the Settings app;
- Open the Settings app.
- Go to the Network and Internet group of settings.
- Select the Status tab.
- Scroll to the bottom, and select the Network Reset button.
- Restart your computer when prompted to.
- When you’re back on your desktop, give Windows 10 time to reinstall everything and then try to connect to your network.
Device Manager
You can manually reset the network adapter by uninstalling the drivers for it.
- Open the Device Manager.
- Expand the Network Adapters group of devices.
- Right-click the network adapter that you want to reset, and select Uninstall Driver from the context menu. You will likely have to do this for more than one device listed under Network Adapter. Do it for all devices you need to connect to the network.
- Restart your PC and allow Windows 10 to automatically install drivers again.
Command Prompt
- Open Command Prompt and run the following command.
netsh interface set interface "wireless network adapter" disable
- Restart your PC. Open Command Prompt again, and run the following command.
netsh interface set interface "wireless network adapter" enable
- Restart your PC
Reset network settings on Windows 10
In order to reset network settings, you need to follow the steps below.
- Open Command prompt with admin rights. Run the command below and restart your PC.
netsh winsock reset
- Open Command Prompt and run each of the commands below, one by one.
netsh int IP reset

ipconfig /release

ipconfig /renew

ipconfig /flushdns
- When you’ve run all the commands, restart your PC.
Troubleshoot Network Adapter on Windows 10
Generally speaking, the above fixes should resolve connectivity problems on your Windows 10 PC however, if you still experience slow speeds, lag, or intermittent connectivity problems, you can always use the network troubleshooter.
- Open the Settings app.
- Go to the Network and Internet group of settings.
- Select the Troubleshoot tab.
- Scroll down and run the Network Adapter troubleshooter.
A few other things you can try if you’re having trouble with your network;
- Remove all VPN apps that are installed, or disable them.
- Check with your ISP if there is a network outage.
- Reset your router.
- Check for firmware updates for your router.
- Check if a cable that leads to your router might have come loose.
- Try moving closer to the router so that you get a stronger signal from it.
- Remove/forget the network you’re trying to connect to, and add it again.
Which one worked for you?
The above are general fixes that can resolve most problems with network connectivity but there may still be niche errors that you experience that may require a closer look.
If your system is part of a domain e.g., a work laptop, and you’re using it at home to connect to your home network, it is possible that your domain settings are blocking the connection. You will need to talk to your system admin to resolve the problem.

Fatima Wahab
Fatima has been writing for AddictiveTips for six years. She began as a junior writer and has been working as the Editor in Chief since 2014.
Fatima gets an adrenaline rush from figuring out how technology works, and how to manipulate it. A well-designed app, something that solves a common everyday problem and looks
Все способы:
- Способ 1: Решение проблем с драйверами
- Способ 2: Сброс сетевых настроек
- Способ 3: Встроенное средство устранения неполадок
- Способ 4: Перезапуск Winsock
- Способ 5: Откат системы до точки восстановления
- Вопросы и ответы: 3
Способ 1: Решение проблем с драйверами
Если в Windows 10 пропали сетевые подключения, то в первую очередь проверьте состояние драйвера для адаптеров, отвечающего за доступ к сети. В большинстве случаев программное обеспечение лучше переустановить.
Практически все сетевые адаптеры, использующиеся на ПК или ноутбуке, успешно определяются системой, которая, в свою очередь, устанавливает подходящие драйверы с собственных серверов. Этого должно хватить для выхода в интернет и скачивания актуального фирменного ПО (то есть драйвер от Майкрософт, установленный автоматически, не всегда является полноценной заменой). Именно поэтому начинать лучше со стандартной переустановки драйверов:
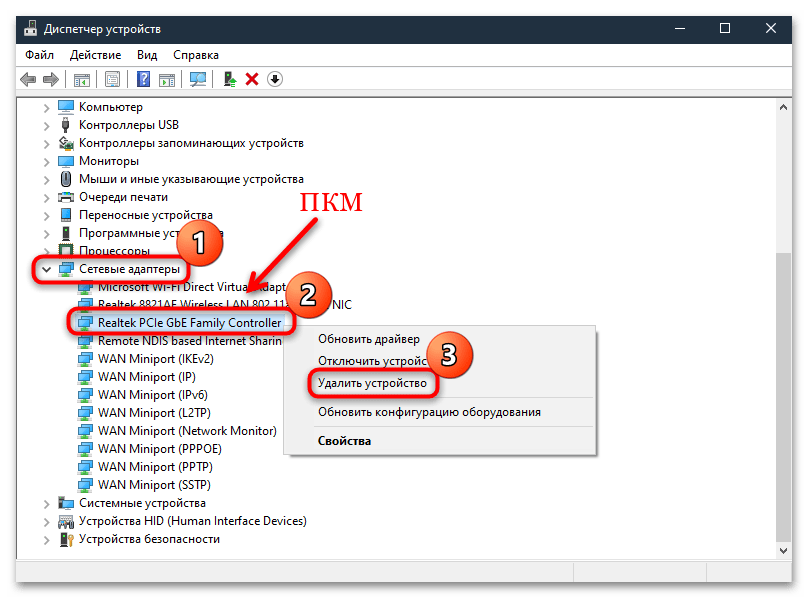
- Откройте «Диспетчер устройств», кликнув по «Пуску» правой кнопкой мыши и выбрав соответствующий пункт из отобразившегося меню.
- Разверните список «Сетевые адаптеры» и найдите сетевую карту (LAN). Обычно в названии устройства есть слово «Realtek» или «Qualcomm», что говорит о производителе компонента. Если таких адаптеров несколько, то выбирайте тот, где есть слова «PCIe», «PCI-E» или «Ethernet». Щелкните по названию устройства правой кнопкой мыши и воспользуйтесь пунктом «Удалить устройство».
- Во всплывающем системном окне подтвердите действие.
Если в «Диспетчере устройств» сетевая карта не отображается, то, вероятно, проблема носит аппаратный характер, например компонент поврежден или неисправен. Если это подозрение подтвердится, потребуется заменить комплектующее.
Когда программное обеспечение для сетевого адаптера будет полностью удалено вручную, перезагрузите систему. При следующем запуске Windows 10 самостоятельно установит ПО для карты. Если это не помогло, то воспользуйтесь инструкциями из нашего отдельного материала о способах установки драйверов для сетевой карты.
Подробнее: Инсталляция программного обеспечения для сетевого адаптера в Windows 10
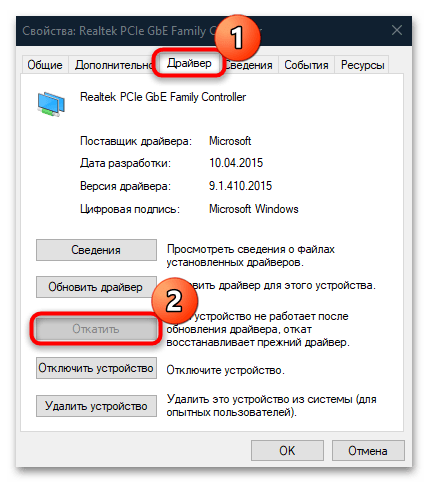
Вместо переустановки можете попробовать обратный вариант: откат состояния программного обеспечения сетевого драйвера. Дело в том, что при его автоматической попытке обновления или из-за ошибок в работе самой системы какие-то файлы могли оказаться повреждены. В этом случае может помочь восстановление предыдущей версии, при которой не было проблем. Однако сразу же отметим, такая возможность имеется не всегда.
Для этого в «Диспетчере устройств» дважды кликните по названию сетевого адаптера, чтобы открыть окно с его свойствами. На вкладке «Драйвер» нажмите на кнопку «Откатить». Если она доступна, значит, восстановление состояния ПО возможно.
Способ 2: Сброс сетевых настроек
Сброс сетевых настроек может помочь в ситуации, когда все подключения пропали. Таким образом, все параметры вернутся к установленным по умолчанию, ведь именно из-за стороннего вмешательства (пользователя или вирусного ПО) сбиваются настройки сетевых подключений. Процедура выполняется довольно просто:
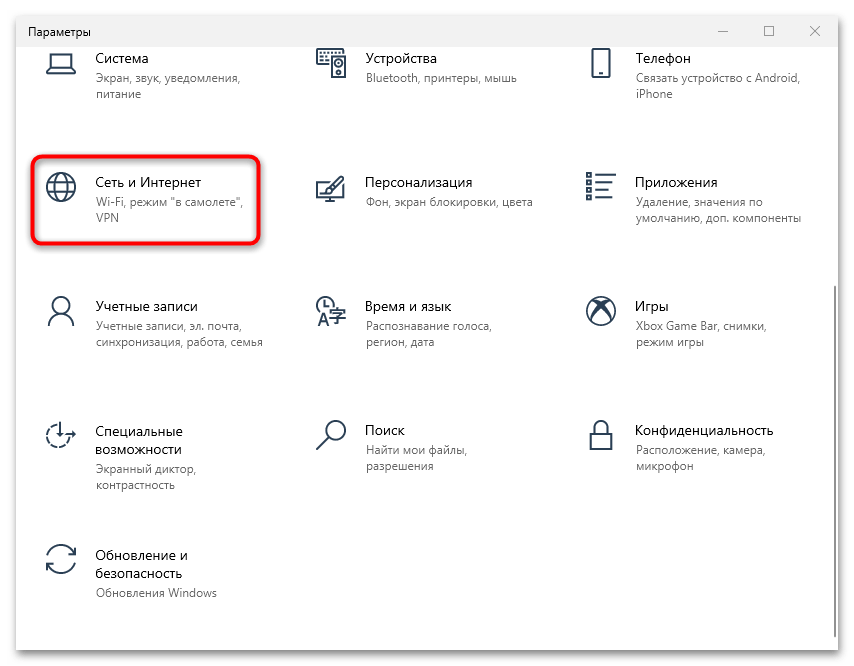
- Щелкните по кнопке «Пуск» и выберите значок в виде шестеренки, чтобы открыть системные «Параметры».
- Перейдите в раздел «Сеть и Интернет».
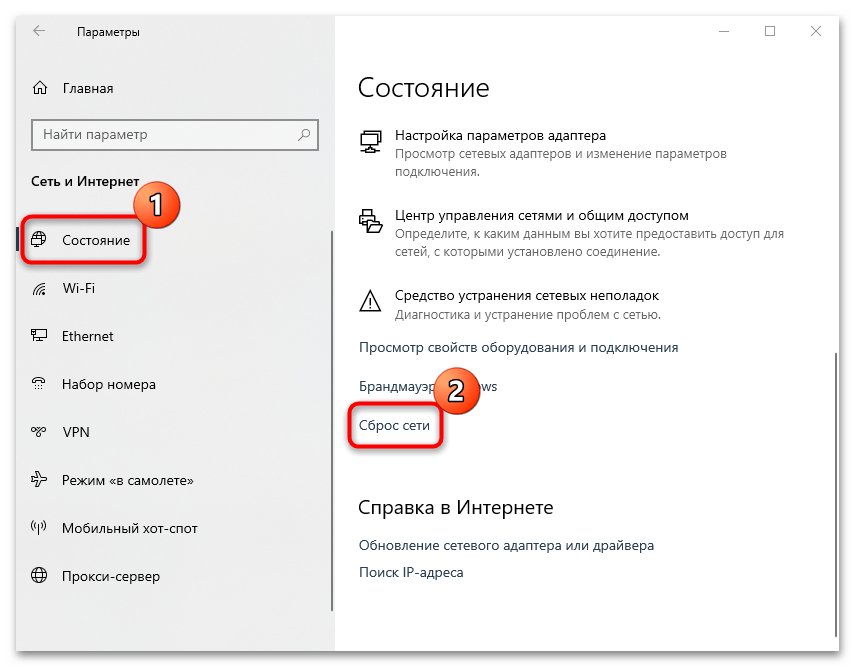
- Далее, оставаясь на вкладке «Состояние», пролистайте основную часть окна вниз и щелкните по строке «Сброс сети».
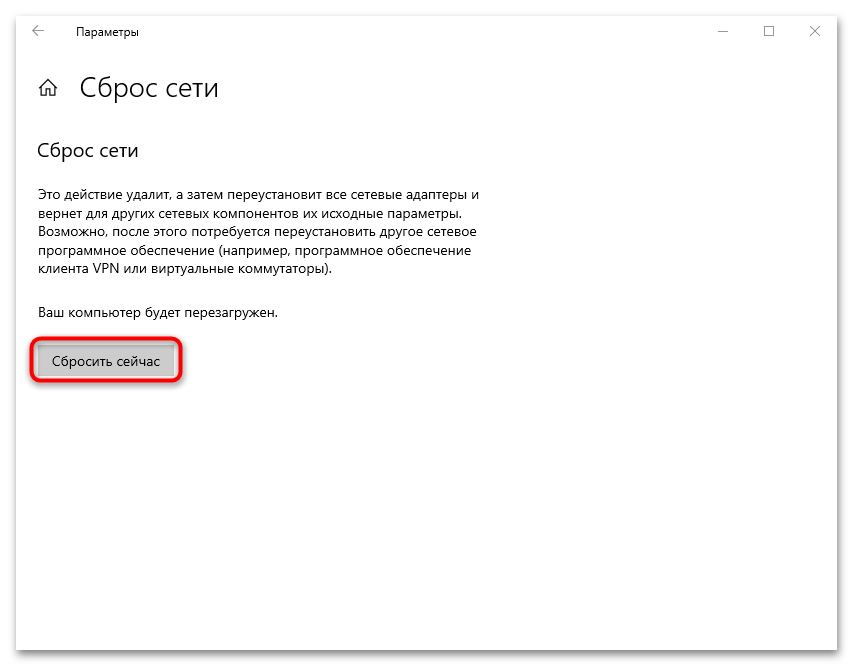
- В следующем окне выберите кнопку «Сбросить сейчас».
После того как все сетевые настройки вернутся к тем, которые были по умолчанию, переходите в раздел «Панели управления» и проверяйте, появились ли сетевые подключения.
Способ 3: Встроенное средство устранения неполадок
Для проверки сетевых подключений (а также других компонентов системы) в Windows 10 предусмотрено встроенное средство, которое позволяет быстро отыскать неисправности и устранить их по возможности. Использовать инструмент можно и в случае сетевых сбоев:
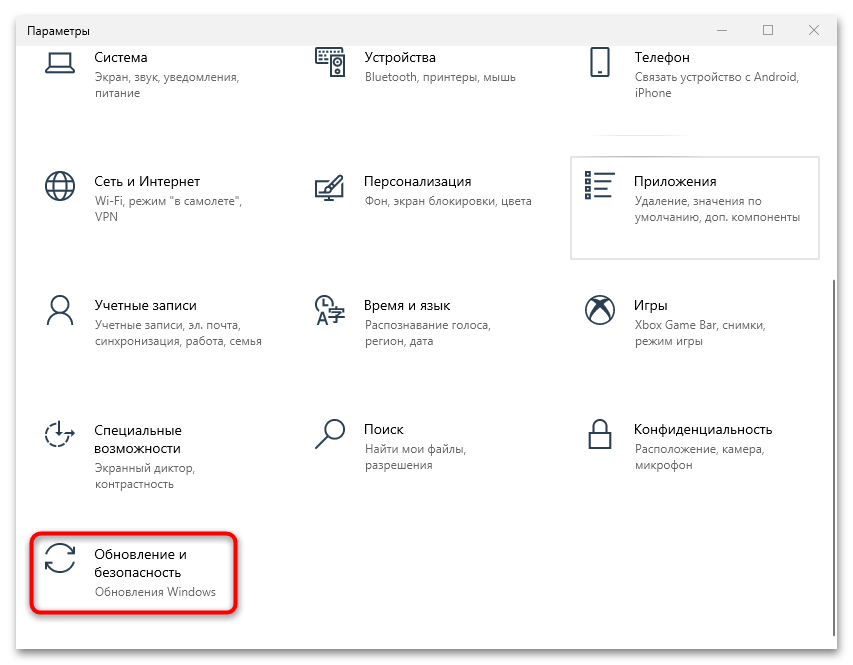
- Перейдите в «Параметры» так же, как и в предыдущем способе, но после откройте раздел «Обновление и безопасность».
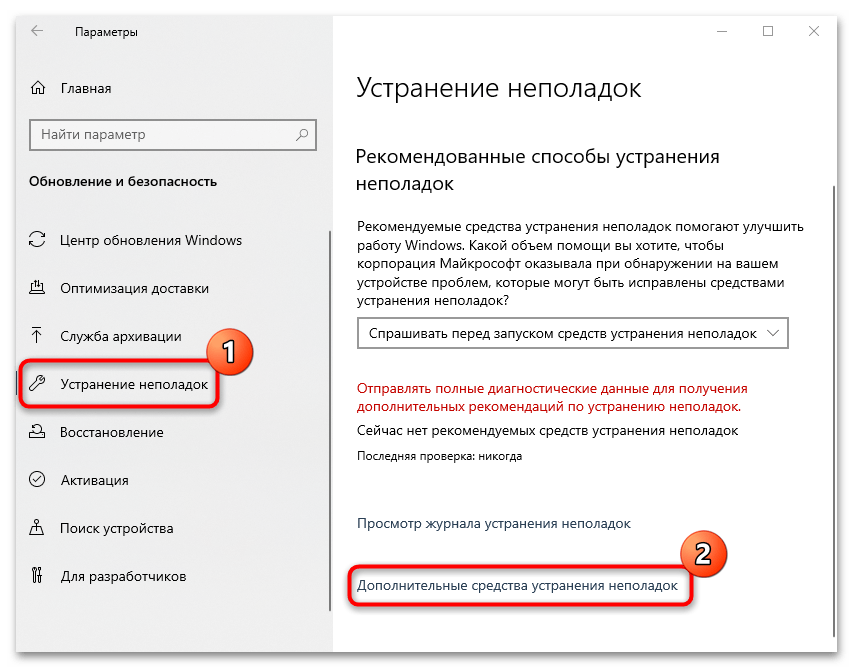
- На панели слева нажмите на «Устранение неполадок», затем по ссылке «Дополнительные средства устранения неполадок».
- В списке компонентов отыщите «Подключения к Интернету». Щелкните по строке ЛКМ, затем нажмите на кнопку запуска средства.
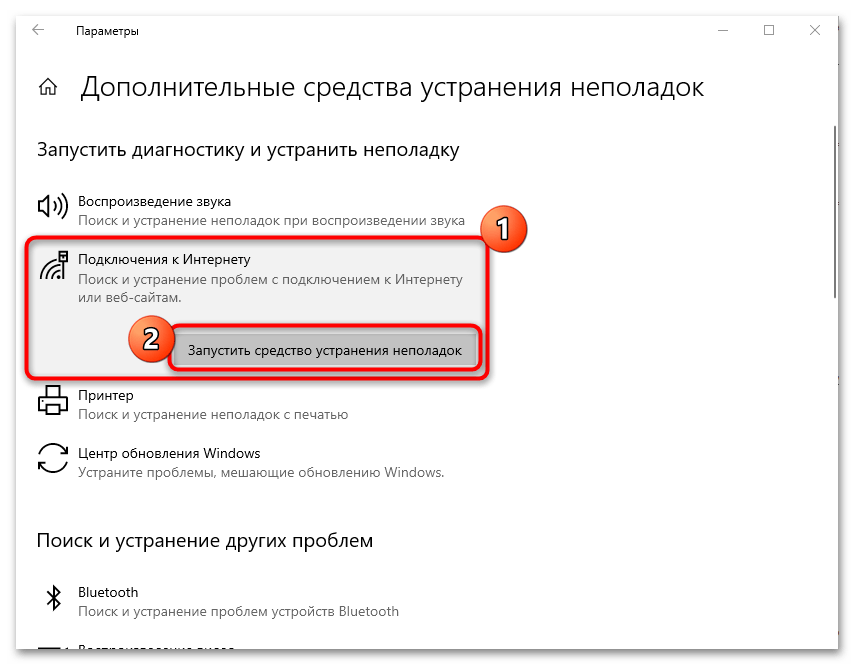
Останется дождаться, пока средство проверит систему на наличие проблем, связанных с сетевыми подключениями, например ошибки, из-за которой они не отображаются.
Способ 4: Перезапуск Winsock
Winsock, или Windows Socket, – это программный интерфейс, который решает, каким программам можно подключаться к интернету через стандарт TCP/IP. В некоторых случаях его перезапуск решает проблему с корректным отображением сетевых настроек. Для этого используется специальный файл «winsock.dll», связывающий штатные утилиты и подключение TCP/IP. Перезапуск интерфейса можно проделать через «Командную строку»:
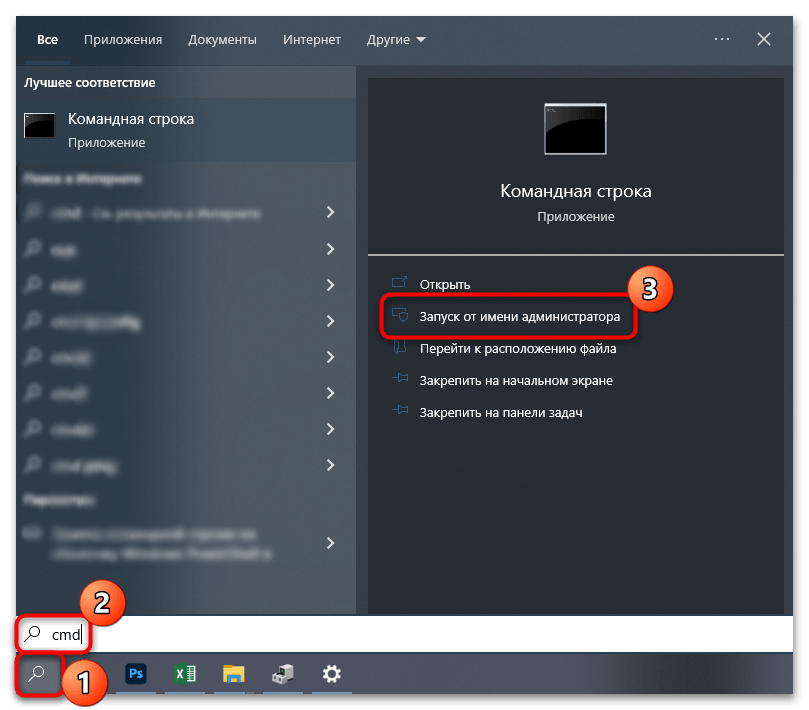
- Откройте консоль от имени администратора: в строке поиска введите «cmd» и выберите соответствующий пункт в окне справа.
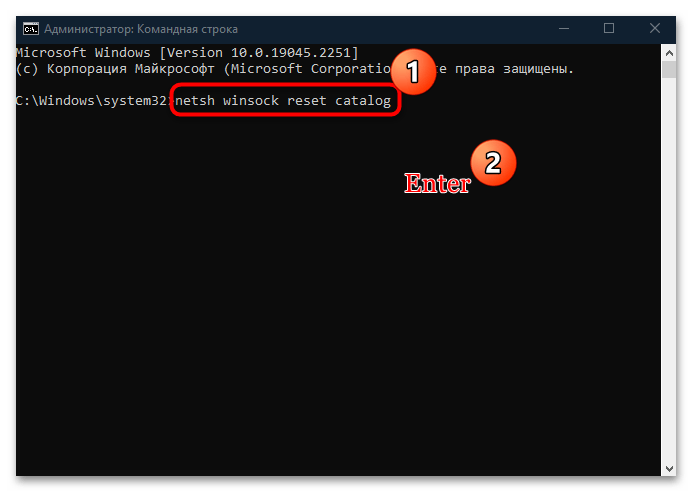
- Введите следующие команды, выполняя каждую нажатием клавиши «Enter»:
netsh winsock reset catalog
netsh winsock reset
netsh int ip reset
Таким образом, будет сброшена конфигурация сетевых подключений, включая программный интерфейс Winsock, после чего произойдет перезапуск параметров.
Читайте также: Запуск «Командной строки» от имени администратора в Windows 10
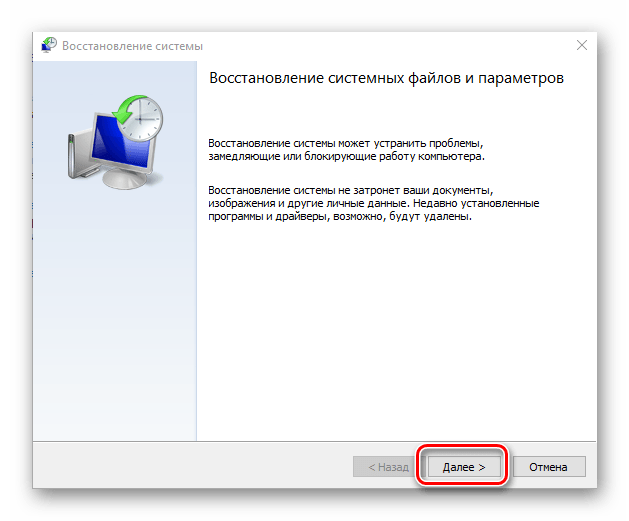
Способ 5: Откат системы до точки восстановления
Если ни один метод не помог, попробуйте откатить состояние системы до того момента, когда таких проблем не наблюдалось. Вероятно, сетевые подключения пропали из-за недавно инсталлированных программ или из-за некорректных настроек, которые пользователь случайно внес сам. Если создание контрольной точки в Windows 10 активно, то восстановить ОС вручную несложно. Более подробно об этом читайте в нашем отдельном пошаговом руководстве.
Подробнее: Откат к точке восстановления в Windows 10
Наша группа в TelegramПолезные советы и помощь
Windows 10 often creates problem with network
adapters connection issues with your laptop or computer like, cant connect this
network when you are trying to connect to wifi and we can easily reset network
adapter in windows 10 using cmd (command prompt) by running commands in cmd
shell. Lets see how to reset network adaptor in windows 10 using cmd.
Reset network adapter windows 10 cmd:
Step 1: In windows
search bar type cmd, Right click and Run as Administrator.
Note: You can also open PowerShell and run as
administrator also.
Step 2: Once command prompt is open, check with the
list of adaptors.
Step 3: In command prompt Type: netsh interface show
interface and press enter.
Note: This will list all the lists of network adaptor
on your laptot. Find your wifi network adaptor name here.
Step 4: Now type: netsh interface set interface name= “networkadaptorname” admin=disabled
Note: Once you run the above command in cmd, it will
disable your network adaptor
Step 5: Now run this command in cmd to enable: type: netsh interface set interface name= “networkadaptorname” admin=enabled.
Note: Once you run above command it will automatically
identify the network and connect to your available wifi network without fail.
Creating batch file to reset network adapter in windows
10 using cmd:
Step 6: Now create a batch file to automate this
process.
Step 7: Create a new txt file on your desktop and
copy and paste this command in txt file
- netsh interface set interface name= “networkadaptorname”
admin=disabled - netsh interface set interface name= “networkadaptorname”
admin=enabled
Step 8: Now save txt file as reset-network-adaptor-wifi
with extension .bat on your desktop.
Step 9: Now right click on created .bat file and click
run as administrator, now it will reset network adaptor in windows 10 ( enable
and disable) automatically for you.
Why to create dat file to reset network Adaptor in
windows 10?
Creating dat file to reset network adaptor will work as magic
settings/cmds in windows 10 is very useful in many ways, it consumes time and
it is also very difficult to remember all cmd commands and perform steps to reset
network adapter in windows 10. If you create
dat file with simple clicks your network adaptor issues in windows 10 will be
resovled.
What is the command prompt to reset network settings?
To reset network settings in windows 10 using cmd ;
Type ipconfig /flushdns
Type ipconfig /registerdns” and
press Enter.
Type “ipconfig /release” and press Enter.
Type “ipconfig /renew” and press Enter.
Type “netsh winsock reset” and press Enter.
After performing
all commands restart your computer.
How to enable network adapter using command prompt windows 10?
Open CMD as administrator and type: netsh interface set interface name= “networkadaptorname” admin=enabled.
How to Disable network adapter using command prompt windows 10?
Open CMD and run as administrator and Type: netsh interface set interface name= “networkadaptorname” admin=disabled
Why is my wireless adapter not working?
If wireless network drivers are not updated on your computer then you may see wireless adapter not working or disconnecting when connected all most all times.
Ramanahttps://www.asavvyweb.com
Ramana Tula is a — Technical Content Writer and he is a Full stack Web and Android Developer also — SEO Manager and also manages Digital Marketing.