
В этой статье мы рассмотрим, как изменить режим загрузки Windows на компьютере с BIOS (Legacy) на UEFI + Secure Boot без переустановки операционной системы и без потери данных. Так как в режиме Legacy компьютеры (виртуальные машины) могут загружаться только с дисков с таблицей разделов MBR, при переключении на режим загрузки UEFI нужно будет сконвертировать таблицу разделов диска на GPT (GUID).
В системных требованиях к Windows 11 указано обязательное наличие чипа TPM 2.0 и режим загрузки UEFI+Secure Boot. Есть обходной способ установки Windows 11 без TPM, UEFI и Secure Boot, но он не рекомендуется для использования на продуктивных системах. Поэтому, например при обновлении Windows 10 до 11 на компьютере с MBR загрузчиком желательно включать UEFI (либо воспользоваться неподдерживаемым официально способом обновления до Windows 11 на несовместимом компьютере).
Прежде, чем приступать к конвертации Windows, установленной на Legacy BIOS устройстве в режиме UEFI, проверьте, что ваше окружение соответствует следующим условиям:
- Прошивка материнской платы компьютера поддерживает режим загрузки UEFI. На текущий момент включен режим совместимости с BIOS (проверьте это в настройках BIOS/UEFI устройства и в спецификации к материнке).
- На компьютере установлена x64 версия Windows, с версией как минимум Windows 10 1703 (или Windows Server 2016)
- На компьютере не используется двойной режим загрузки нескольких ОС (Dual-Boot)
- Шифрование Bitlocker для системного диска отключено
- На системном диске используется таблица разделов MBR (количество разделов не более трех)
- На диске достаточно свободного места для создания загрузочного EFI раздела (размер по-умолчанию 100 Мб)
Откройте командную строку PowerShell и проверьте, что компьютер загружается в режиме BIOS (Legacy):
$env:firmware_type

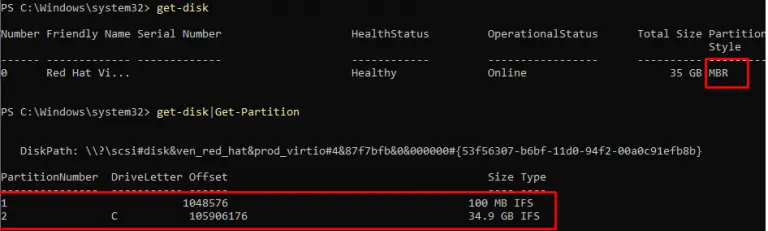
С помощью PowerShell проверьте, что на диске используется таблица разделов MBR и создано не более 3 primary разделов:
Get-Disk
Get-Disk |Get-Partition

Начиная с Windows 10 1703 доступна встроенная утилита Mbr2gpt, позволяющая сконвертировать таблицу разделов диска из MBR в GPT без потери данных. Конвертацию можно выполнить даже в онлайн режиме.
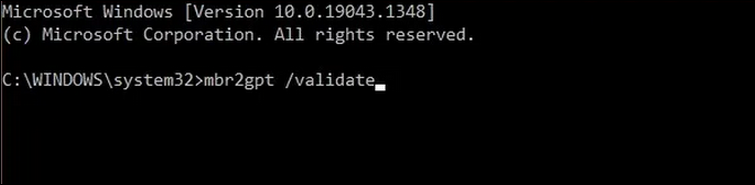
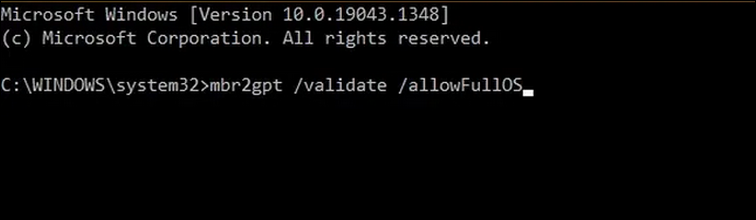
Сначала протестируйте, возможно ли сконвертировать MBR таблицу разделов системного диска в GPT:
mbr2gpt /validate /allowfullos
Если конвертация MBR в GPT возможна, утилита вернет:
MBR2GPT: Validation completed successfully

Если появится ошибка
Disk layout validation failed for disk 0
:
- Проверьте, что на вашем MBR диск создано не более 3 основных (primary) разделов
- Расширенные (Extended), логические (Logical) и динамические разделы должны отсутствовать
- На диске есть как минимум 500 Мб свободного места для создания системных разделов и размещения основной и резервной таблиц разделов GUID
Другая возможная ошибка
Cannot find OS partition(s) for disk 0
указывает на то, что в конфигурации загрузчика BCD отсутствует запись на загрузку в среде восстановлений Wingows. Проверьте это:
reagentc /info
Windows RE status: Disabled
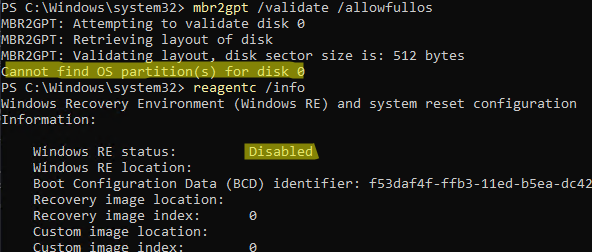
Как включить среду восстановления WinRE описано по ссылке.
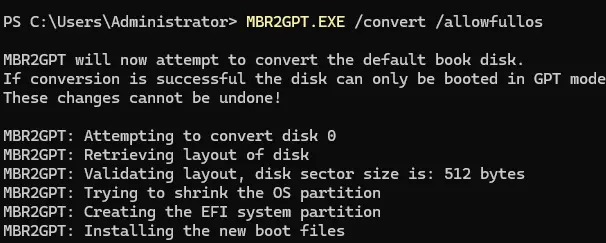
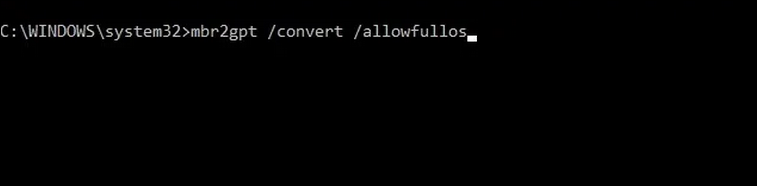
После того, как все предварительные проверки пройдены, запустите конвертацию системного диска из MBR в GPT непосредственно из запущенной Windows:
MBR2GPT.EXE /convert /allowfullos
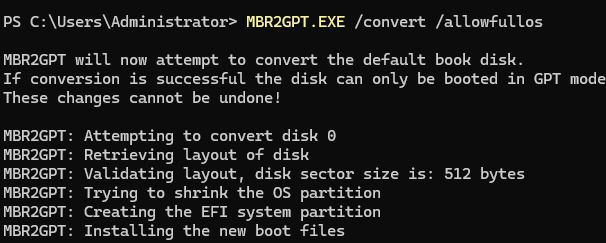
После завершения работы команды, проверьте что таблица разделов была изменена на GPT:
get-disk

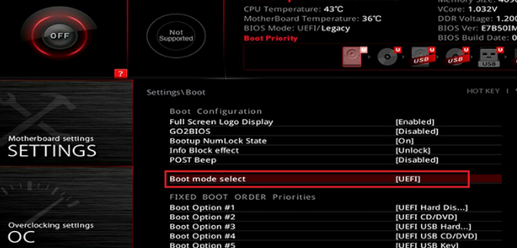
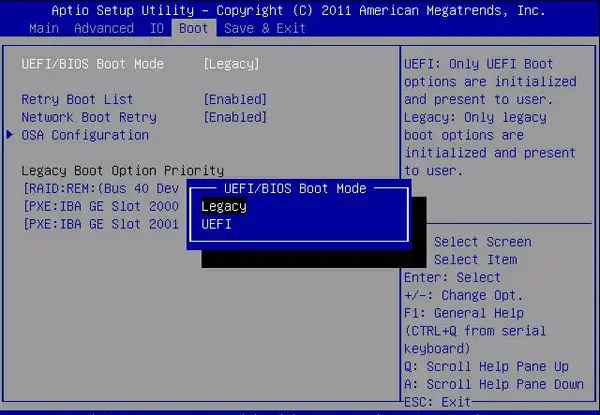
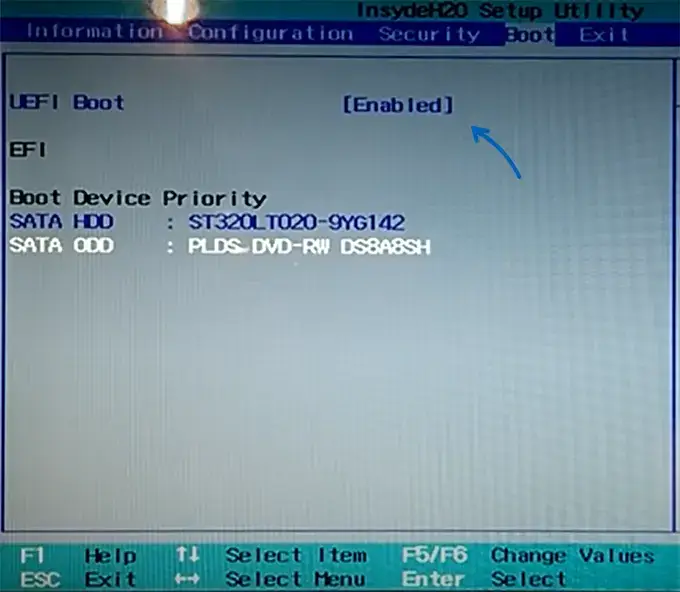
Затем нужно перезагрузить компьютер, войти в меню настроек BIOS/UEFI отключить режим Legacy BIOS и переключиться в режиме UEFI+Secure Boot.
На физическом компьютер, чтобы войти в настройки UEFI, нужно при загрузке нажать клавишу
F2
,
Delete
или
F1
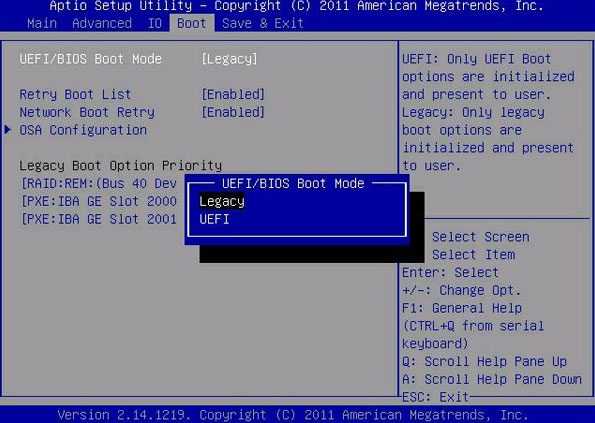
. Название и местоположение пункта меню, которые обеспечивает загрузку в режиме Legacy BIOS, отличается в зависимости от прошивки и версии материнской платы. Возможные названия пунктов — CSM (Compatibility Support Module), Legacy Mode, CSM Boot, Legacy OS и т.д. Измените его на UEFI.
Если это виртуальная машина VMware, нужно в настройках ВМ в разделе Boot Options переключиться в режим EFI и включить опцию Secure Boot.
После загрузки проверьте, что используется режим UEFI+ Secure Boot:
Confirm-SecureBootUEFI
Если режим Secure Boot отключен, проверьте что включен режим UEFI командой:
$env:firmware_type
На старых компьютерах с BIOS, которые не поддерживают режим UEFI, можно загружать Windows с внешней USB флешки с MBR. В этом случае на системном разделе можно использовать таблицу разделов GPT. Смотри статью Загрузка Windows с GPT диска на BIOS компьютере (без UEFI).
В этой статье мы разберём, как перевести компьютер с режима загрузки Legacy BIOS на UEFI + Secure Boot, не переустанавливая Windows и не теряя данные. Поскольку Legacy BIOS поддерживает только диски с таблицей разделов MBR, для перехода на UEFI потребуется конвертировать диск в GPT (GUID Partition Table). Этот процесс безопасен, если соблюдать все рекомендации.
Приобрести оригинальные ключи активации Windows 11 можно у нас в каталоге от 1690 ₽
Зачем переходить на UEFI?
Современные версии Windows, особенно Windows 11, требуют режима загрузки UEFI и включённого Secure Boot. Хотя есть способы обойти эти требования (например, установка Windows 11 без TPM и UEFI), они не рекомендуются для стабильной работы. Переход на UEFI обеспечивает более быструю загрузку, улучшенную безопасность и поддержку современных функций.
Что нужно проверить перед началом?
Перед тем как начать процесс конвертации, убедитесь, что ваш компьютер соответствует следующим условиям:
— Материнская плата поддерживает UEFI. Проверьте это в настройках BIOS/UEFI и документации к устройству.
— Установлена 64-битная версия Windows 10 (начиная с версии 1703) или Windows Server 2016.
— На компьютере не используется Dual-Boot (загрузка нескольких операционных систем).
— Шифрование BitLocker отключено на системном диске.
— Диск использует таблицу разделов MBR (не более трёх основных разделов).
— На диске достаточно свободного места для создания загрузочного EFI-раздела (минимум 100 Мб).
Шаг 1: Проверка текущего режима загрузки
Для начала убедитесь, что компьютер загружается в режиме Legacy BIOS. Откройте PowerShell и выполните команду:
$env:firmware_type
Если результат — BIOS, значит, используется Legacy-режим. Если UEFI, то переход уже выполнен.

Шаг 2: Проверка таблицы разделов
Убедитесь, что диск использует таблицу разделов MBR. Для этого выполните команды:
Get-Disk
Get-Disk | Get-Partition
Если таблица разделов — MBR, и количество основных разделов не превышает трёх, можно переходить к следующему шагу.
Шаг 3: Конвертация MBR в GPT
Начиная с Windows 10 версии 1703, доступна встроенная утилита Mbr2gpt, которая позволяет конвертировать диск из MBR в GPT без потери данных.
1. Сначала проверьте, возможна ли конвертация:
mbr2gpt /validate /allowfullos
Если всё в порядке, вы увидите сообщение:
MBR2GPT: Validation completed successfully

2. Если появляется ошибка Disk layout validation failed for disk 0, убедитесь, что:
— На диске не более трёх основных разделов.
— Нет расширенных, логических или динамических разделов.
— На диске достаточно свободного места (минимум 500 Мб).
3. Если возникает ошибка Cannot find OS partition(s) for disk 0, проверьте состояние среды восстановления Windows:
reagentc /info
Если среда восстановления отключена, включите её.

4. Запустите конвертацию:
MBR2GPT.EXE /convert /allowfullos
5. После завершения проверьте, что таблица разделов изменилась на GPT:
get-disk

Шаг 4: Переключение на UEFI в BIOS
1. Перезагрузите компьютер и войдите в настройки BIOS/UEFI (обычно это клавиши F2, Delete или F1).
2. Найдите пункт, отвечающий за режим загрузки (например, CSM, Legacy Mode или Legacy OS).
3. Отключите Legacy BIOS и включите UEFI + Secure Boot.
4. Сохраните изменения и перезагрузите компьютер.

Шаг 5: Проверка режима загрузки
После загрузки Windows проверьте, что режим UEFI и Secure Boot активны:
Confirm-SecureBootUEFI
Если Secure Boot отключён, убедитесь, что UEFI включён:
$env:firmware_type
Теперь вы знаете, как переключиться с Legacy BIOS на UEFI без переустановки Windows. Этот процесс не только подготовит ваш компьютер к обновлению до Windows 11, но и улучшит производительность и безопасность системы. Следуйте инструкциям, и всё пройдёт гладко!
Большинство современных материнских плат поддерживают два режима загрузки: новый UEFI и устаревший Legacy. В некоторых случаях для загрузки с определённого накопителя или при возникновении проблем с запуском ОС после сброса настроек БИОС, может потребовать переключить тип загрузки с одного на другой.
В этой простой инструкции о том, как изменить один UEFI на Legacy или Legacy на UEFI с примерами переключения для разных БИОС и дополнительная информация, которая может быть полезной в контексте рассматриваемой темы.
Изменение режима загрузки в настройках БИОС/UEFI
Прежде чем приступить, отдельно отмечу, что материал касается только изменения типа загрузки в БИОС/UEFI, но не изменения типа загрузки уже установленной системы. Если вас интересует вопрос изменения типа загрузки уже установленной Windows 11/10 с Legacy на UEFI, вы можете использовать встроенный инструмент mbr2gpt.
Действия по изменению типа загрузки производятся в настройках БИОС, перейти в которые обычно можно, нажав клавишу Del при включении на настольных ПК или какую-любо клавишу (обычно — F2, но есть и другие варианты) на ноутбуке. На сайте есть отдельная инструкция по входу в БИОС на различных устройствах.
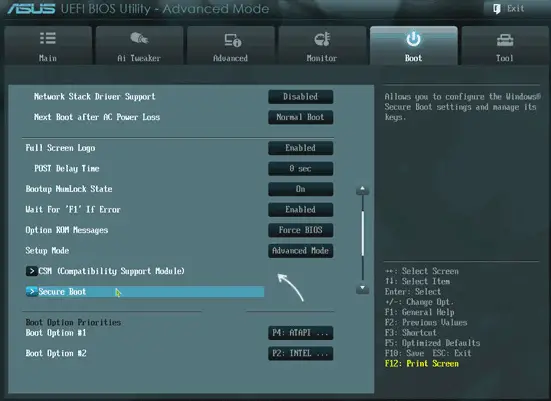
В большинстве случаев нужная настройка находится на вкладке «Boot» (Загрузка) в настройках БИОС, иногда для доступа к ней необходимо перейти в «Advanced Mode» по клавише F7 (информация об этом будет указана внизу экрана конфигурации). Далее — примеры того, как может называться и где находится нужный параметр переключения типа загрузки между UEFI и Legacy:
- Пункт может называться «Boot Mode» или похожим образом, с возможностью выбора между UEFI и Legacy режимом, на некоторых устройствах есть опция «UEFI с поддержкой CSM/Legacy», при таком выборе будет работать оба типа загрузки.

- На некоторых материнских платах информация о режиме загрузки (Boot Mode) на вкладке Boot может быть предназначена только для получения сведений, а само переключение выполняться в другом расположении, например, на некоторых материнских платах MSI — в разделе Advanced — Windows OS configuration — BIOS Mode.
- CSM, Compatibility Support Module, Legacy Support — требуется отключить (установить в Disabled) если требуется только UEFI загрузка, включить, если необходима поддержка двух типов загрузки: в последнем случае тип загрузки будет определяться подключенным накопителем, а если он поддерживает оба типа загрузки, то выбором этого накопителя с пометкой или без пометки UEFI в настройках устройств загрузки или Boot Menu.

- UEFI Boot — с опциями Enabled (Включена UEFI) и Disabled (Отключено).

- OS Type — выбор типа ОС между UEFI и Legacy (CSM, Other OS), либо между Windows и «Другой ОС», в последнем случае Windows будет означать UEFI загрузку, а «Другая ОС» — Legacy загрузку.

- Загрузка модуля CSM, Windows 10/8 Features — если требуется только Legacy загрузка, включить модуль CSM, также можно установить Windows 10/8 Features в Other OS (Другая ОС) и наоборот.

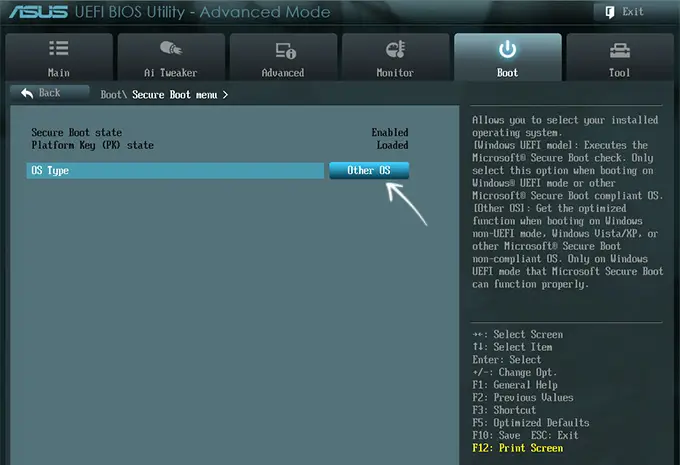

Это лишь несколько примеров, но по аналогии вы, вероятно, сможете найти нужную опция и поменять UEFI и Legacy загрузку или наоборот на вашем компьютере или ноутбуке. После изменения настроек не забудьте сохранить их, обычно это выполняется нажатием клавиши F10 и подтверждением сохранения.
Если найти необходимый пункт не удалось, либо возникли иные проблемы, напишите модель устройства в комментариях, я подскажу и, возможно, добавлю информацию выше.
Что следует учитывать при переключении между режимами UEFI и Legacy в БИОС:
- Если система была установлена в другом режиме, она перестанет запускаться, поскольку для них используются разные загрузчики.
- Secure Boot (Безопасная загрузка) работает только для UEFI-загрузки. В некоторых случаях без предварительного отключения Secure Boot нельзя включить Legacy загрузку. Если вам требуется использовать только Legacy загрузку, отключите Secure Boot (обычно где-то в разделе Security).
- Для отключения Secure Boot и включения возможности переключиться на Legacy режим в некоторых БИОС может потребоваться установить пароль администратора, сохранить настройки, после чего зайти в БИОС с установленным паролем.
- При включении режима загрузки UEFI и полном отключении Legacy загрузки флешки и другие накопители без UEFI-загрузчика перестанут отображаться в меню настройки порядка устройств загрузки.
- Некоторые новые ноутбуки (на ПК пока не встречал) не имеют возможности переключения загрузки на Legacy (CSM) режим, в этом случае единственный вариант — подготовить загрузочную флешку для UEFI-режима и выполнить загрузку именно в нём.
Будет отлично, если вы сможете поделиться информацией о том, где нужная настройка находилась в вашем случае, при условии, что вариант не был представлен в списке выше — это может помочь другим читателям.
-
Home
-
Partition Disk
- How to Change BIOS Mode from Legacy to UEFI Windows 10
How to Change BIOS Mode from Legacy to UEFI Windows 10
By Linda | Follow |
Last Updated
Do you need to convert Legacy to UEFI? If so, you come to the right place. In this post, MiniTool shows you how to do that in detail. You can have a try.
Tips:
In general, on Windows 11, you don’t need to convert Legacy to UEFI. Because once Windows 11 runs, it means that your PC is using UEFI, unless there is something wrong.
Why Do You Need to Convert Legacy to UEFI?
There are many reasons for you to convert Legacy to UEFI. For example:
- The UEFI boot mode uses GPT system disks while the Legacy boot mode uses MBR disks. MBR disks can only use disk space within 2TB while GPT disks break through this limit. GPT disks allow you to create more than 4 primary partitions while MBR disks don’t. MBR disks only allow one active partition while GPT disks allow multiple ones.
- The UEFI boot mode has a faster booting process than the Legacy boot mode.
- The UEFI boot mode supports Secure Boot, which can ensure that no malware tampers with the booting process.
- Windows 11 installation requires the UEFI boot mode. If you need to upgrade from Windows 10 to Windows 11 and you are using the Legacy boot mode, you need to convert Legacy to UEFI first.
Check Whether You Are Using the Legacy Boot Mode
Do you need to convert Legacy to UEFI? You should check whether you are using the Legacy boot mode first. If YES, then you need.
As mentioned above, the Legacy boot mode uses MBR disks while the UEFI boot mode uses GPT disks. Therefore, you can identify the boot mode by checking the type of your system disk because the PC won’t boot up if the disk type and the boot mode do not match. Here is the guide:
- Press the Windows key + R to open the Run box.
- In the Run box, type “diskmgmt.msc” and press Enter to open Disk Management.
- Right-click on Disk 0 and see if there is a “Convert to GPT Disk” option in the context menu. If YES, you are using the Legacy boot mode.
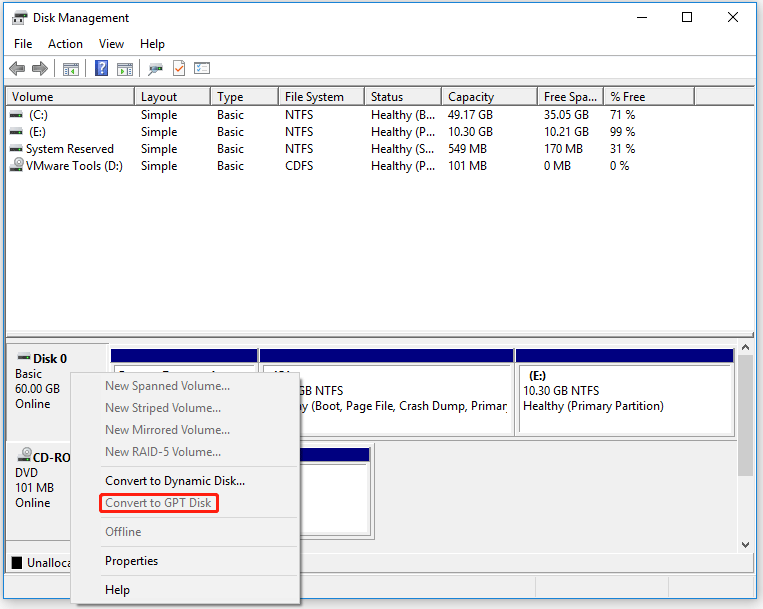
In this part, I will show you how to change BIOS mode from Legacy to UEFI Windows 10.
Stage 1. Convert the System Disk from MBR to GPT
If you are using the Legacy boot mode and want to change it to the UEFI boot mode, you need to convert MBR to GPT before changing the boot mode to UEFI. The reason is that if you don’t convert MBR to GPT, the PC won’t boot after you change the boot mode from Legacy to UEFI.
To convert MBR to GPT, you can use the following 3 ways. Two of them can help you convert MBR to GPT without data loss.
Way 1. Use MiniTool Partition Wizard
MiniTool Partition Wizard is a professional partition manager that not only can help you convert the system disk from MBR to GPT without losing data, but also can migrate OS, clone a hard drive, recover data and partitions, convert partitions between FAT32 and NTFS without data loss, etc.
Here is how to convert MBR to GPT using MiniTool Partition Wizard.
MiniTool Partition Wizard DemoClick to Download100%Clean & Safe
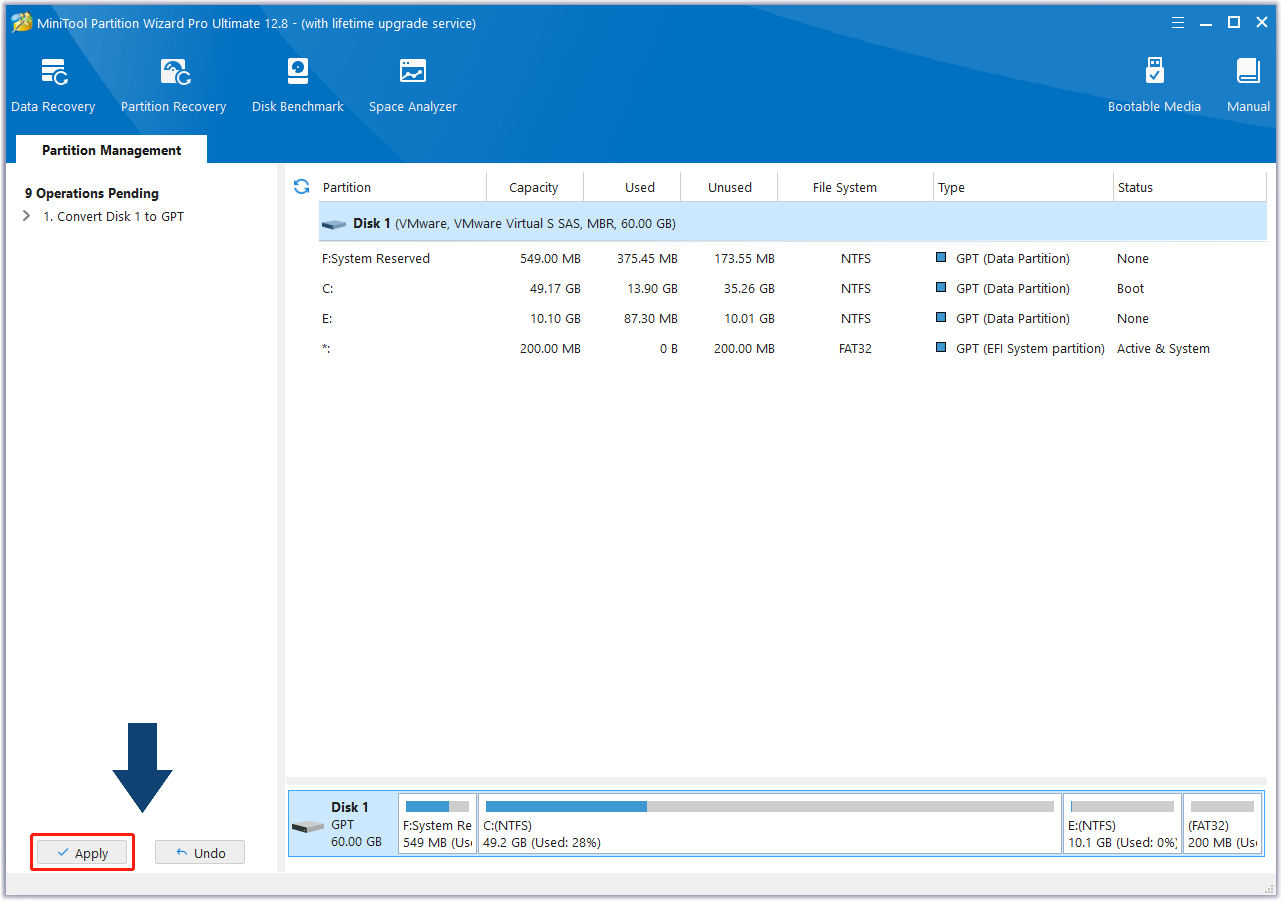
Step 1: Launch MiniTool Partition Wizard. Right-click the system disk and choose the Convert MBR Disk to GPT Disk option from the context menu. Read the warning information and click OK.
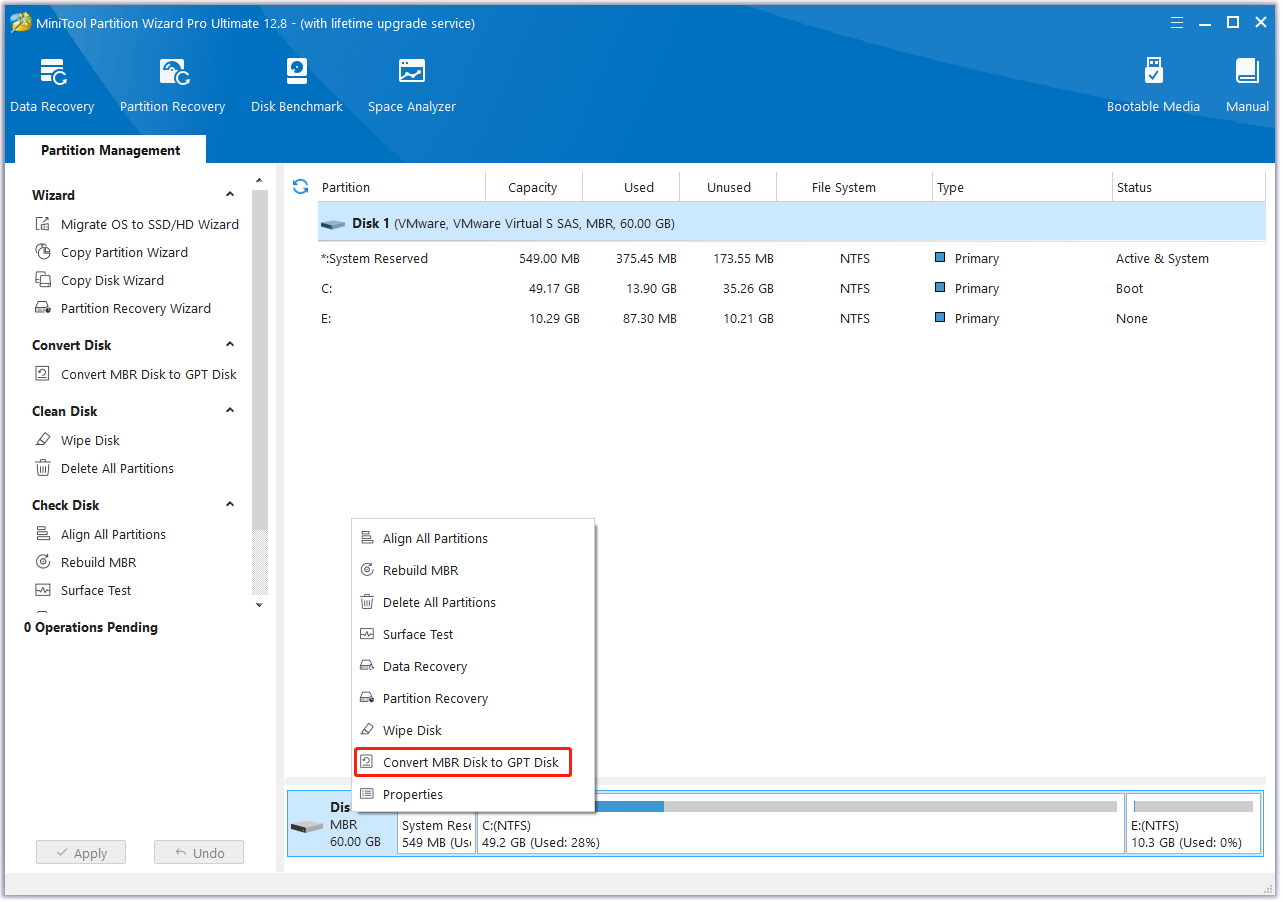
Step 2: Click the Apply button to execute the pending operation. After that, the PC won’t boot. You need to go to the next stage to change the boot mode from Legacy to UEFI.
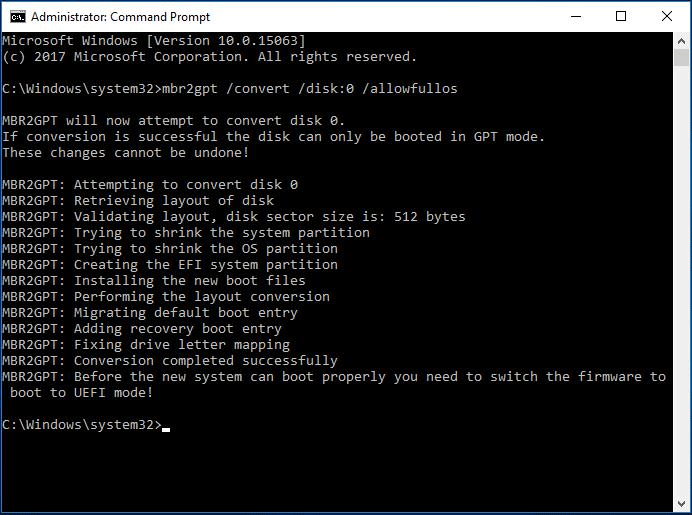
Way 2. Use MBR2GPT
MBR2GPT is a tool offered by Windows and it is usually stored in WindowsSystem32. In addition, this tool is only available on 64-bit Windows 10 version 1703 or later. With this tool, you can also convert MBR to GPT without data loss. Here is how to do that:
- Type “cmd” in the Windows search bar and the Command Prompt app will appear.
- Right-click the app and choose Run as administrator.
- On the Command Prompt window, type “mbr2gpt /convert /disk: 0 /allowfullOS” and press Enter. Disk 0 (usually the system disk) will be converted to a GPT disk.
Way 3. Use Windows Installation Media
If you use this method to convert MBR to GPT, you need to delete all partitions and data on the system disk. Here is the guide:
Step 1: Create a Windows 10 or Windows 11 installation media. Insert the media to your PC and make the PC boot from the media.
Step 2: Go on until you see the Install now window. Then, click Repair your computer button in the bottom left corner. Go to Troubleshoot > Command Prompt. Then, execute the following commands to clean the system disk and convert it to GPT.
- diskpart
- list disk
- select disk 0
- clean
- convert gpt
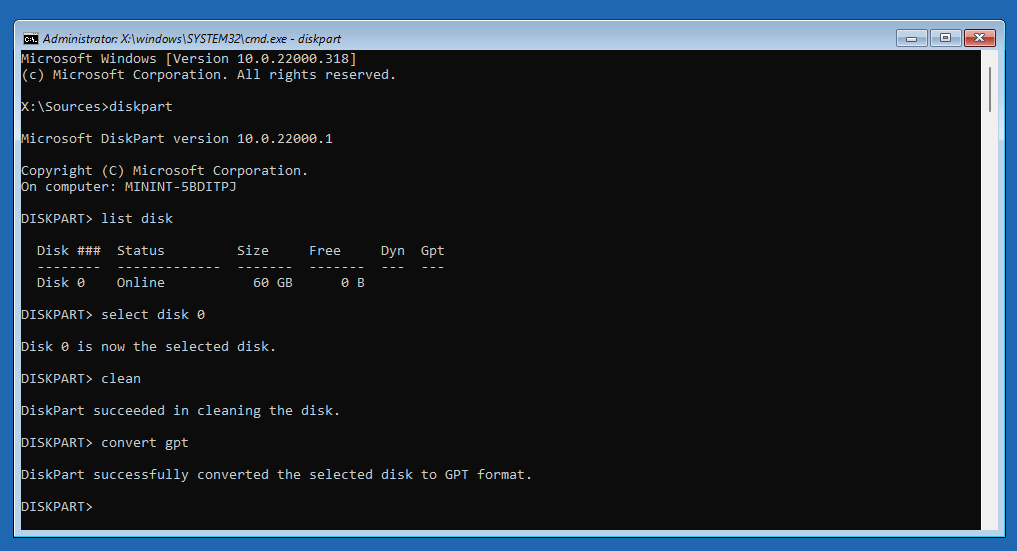
Step 3: You can then clean install Windows on your PC.
Stage 2. Change the Boot Mode in BIOS
In this part, I will show you how to change the boot mode to UEFI. After that, your PC can boot normally.
- Shut down your PC.
- Power on the PC and press the BIOS key (Del, Esc, F2, etc.) immediately when the PC brand logo appears. You can see the BIOS key at the bottom of the PC logo screen. Or, you can search for it online.
- Now, you are in the firmware. Go to the Boot tab and change the Boot Mode from Legacy to UEFI.
- Save changes and exit the firmware. The PC will boot up automatically.
Tips:
If you don’t see the Boot Mode item, you can see the Boot Option and check whether it starts with UEFI.
How to change BIOS mode from Legacy to UEFI Windows 10? Here is the guide.Click to Tweet
Bottom Line
Do you have opinions on changing Legacy to UEFI? Share them with us in the following comment zone. In addition, if you encounter problems when using MiniTool Partition Wizard, please feel free to contact us via [email protected]. We will get back to you as soon as possible.
About The Author
Position: Columnist
Linda has been working as an editor at MiniTool for 5 years. She is always curious about computer knowledge and learns it crazily. Her articles are simple and easy to understand. Even people who do not understand computer can gain something. By the way, her special focuses are disk management, data recovery and PDF editing.
Every time you turn on your computer, you are sometimes greeted by a screen that displays the manufacturer’s information. This is called the BIOS, and it has two main types; Legacy BIOS and UEFI. Older motherboards have legacy BIOS firmware while modern computers come with the UEFI BIOS.
It is possible to completely change the BIOS on your computer, but do so with caution: If you don’t know what you’re doing, it could lead to irreversible damage. We have put together this guide to help you upgrade from Legacy BIOS to UEFI. Let’s get started!
Why Should You Convert Legacy BIOS to UEFI?
Whenever you turn your computer on, you are actually activating the BIOS, which loads the rest of your computer’s hardware. The BIOS of a computer determines how the PC will turn on, from which drive it will boot, and how it will perform basic functions.
Additionally, it is used for identifying and configuring items such as hard drives, floppy drives, optical drives, CPUs, memory, and other equipment in computers.
Old computers come with the Legacy BIOS, which manages the data flow between your operating system and connected devices. However, it has certain limitations. For instance, it cannot recognize drives larger than 2.1TB, and the setup programs are text-only.
On the other hand, modern PCs come with UEFI BIOS, which is extensively customizable and does the same job better. UEFI can support drives 2.2TB or larger thanks to its use of GUID Partition Tables (GPT) instead of the outdated Master Boot Record (MBR). The UEFI stores all the information about initialization and startup in an EFI file called .efi, which resides on an EFI System Partition called ESP. A boot loader program for the operating system installed on the computer is also included in the ESP partition.
To put it simply, switching to UEFI is a worthwhile upgrade that provides you with the following advantages:
- Better performance of the computer as a whole
- Fast booting times
- Removes compatibility issues with Legacy BIOS
Additionally, UEFI is more secure than Legacy BIOS. UEFI’s Secure Boot feature ensures that only approved operating systems can be installed on your computer. However, UEFI can still be vulnerable to certain security attacks.
How to Check if You Are Using Legacy BIOS
You can determine your BIOS version by following these steps if you are not sure which version you are using:
-
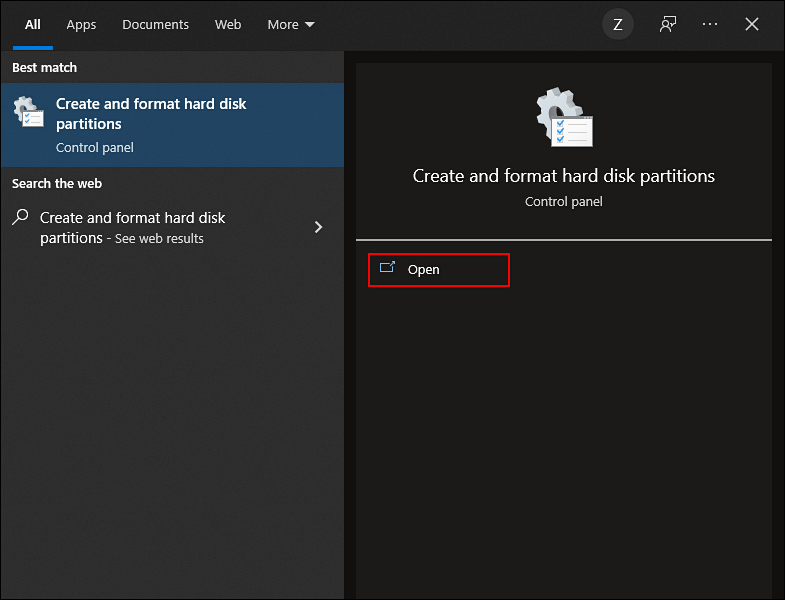
Type Create and format hard disk partitions in the search area of the taskbar and click Open. This should launch the built-in Disk Management tool.

-
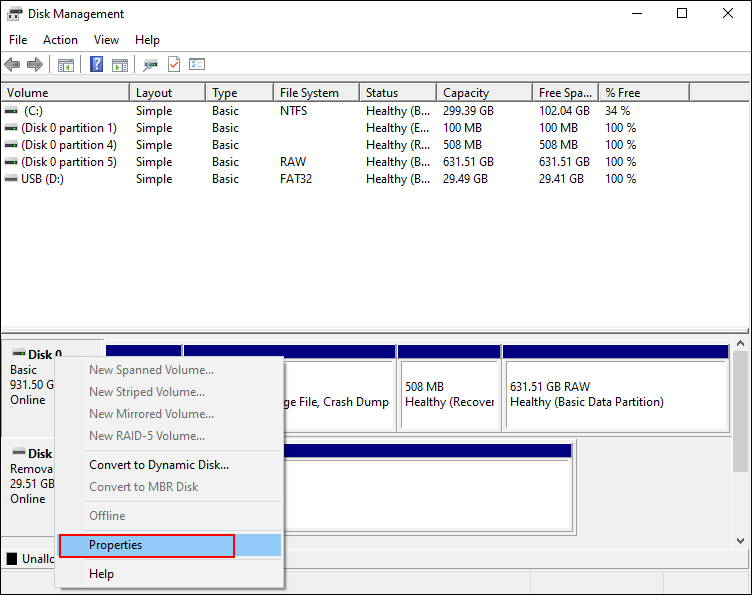
In the Disk Management tool, right-click on the Windows installation disk (Disk 0) and select Properties from the context menu.

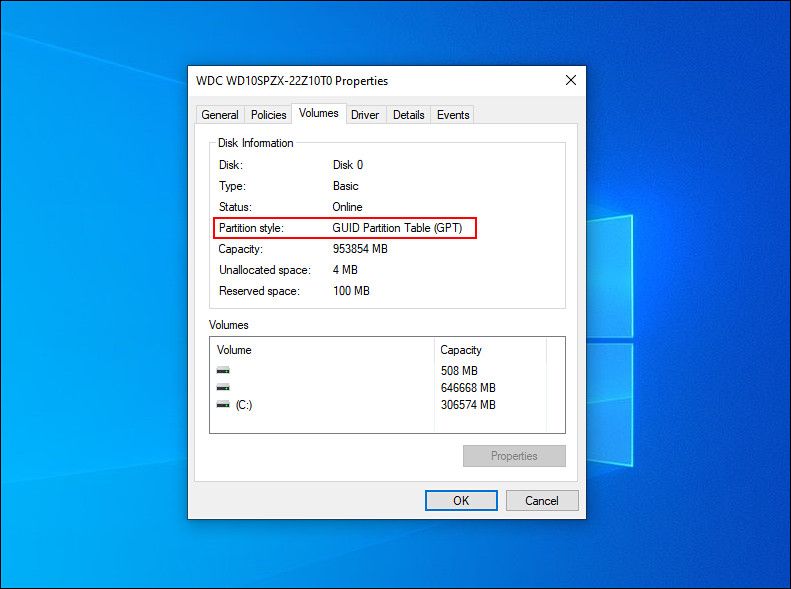
- Go to the Volumes tab inside the Properties window. If you locate Master Boot Record (MBR) next to Partition style, your system is using Legacy BIOS.
-
If you see GUID Partition Table (GPT) instead, then your system is on UEFI already, and you don’t need to do anything else!

Following your determination of which BIOS you are using, you can move on to the practical steps.
The Prerequisites for Upgrading to UEFI
Before you jump into converting Legacy BIOS to UEFI, here are a few things you should know:
-
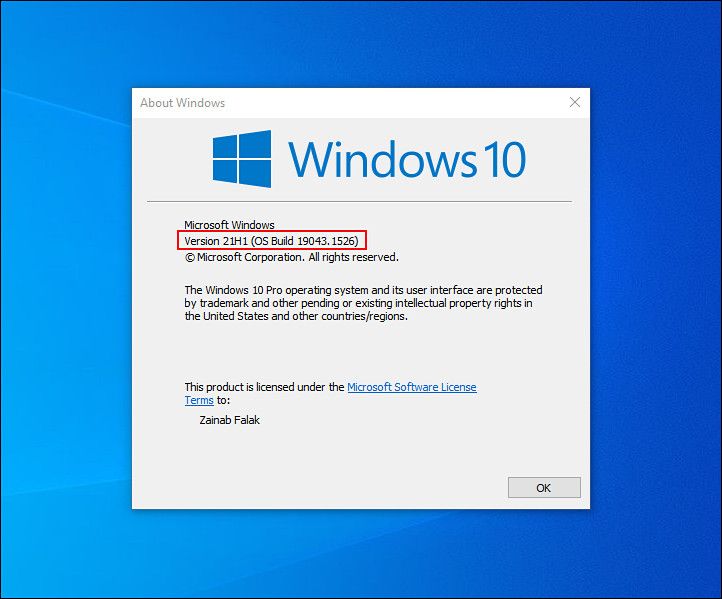
Your Windows version should be Windows 10 v1703 or higher. In case you do not know which operating system version you are on, press Win + R keys simultaneously on your keyboard. In the text field of the dialog box, type winver and hit Enter. In the About Windows box, you should see your current Windows version.

- Your targeted disk shouldn’t contain more than three partitions. If more than three partitions are present on the Windows 10 installation drive, you can merge or delete them.
- BitLocker does not allow Windows to convert your drive from Legacy BIOS to UEFI. This is why if you are using it, we suggest disabling or suspending BitLocker before you proceed.
- Once the conversion process is complete, you may have to change your firmware settings from Legacy BIOS to UEFI. As the process to switch from one to the other will vary depending on your motherboard manufacturer, ensure you have your manual with you.
- You will not lose your data during the conversion process. However, we recommend that you back up your data to be safe.
How to Convert Legacy BIOS to UEFI
Now that you have verified that your system is running Legacy BIOS and have created a backup of your data, let’s begin the conversion process.
Here is what you need to do:
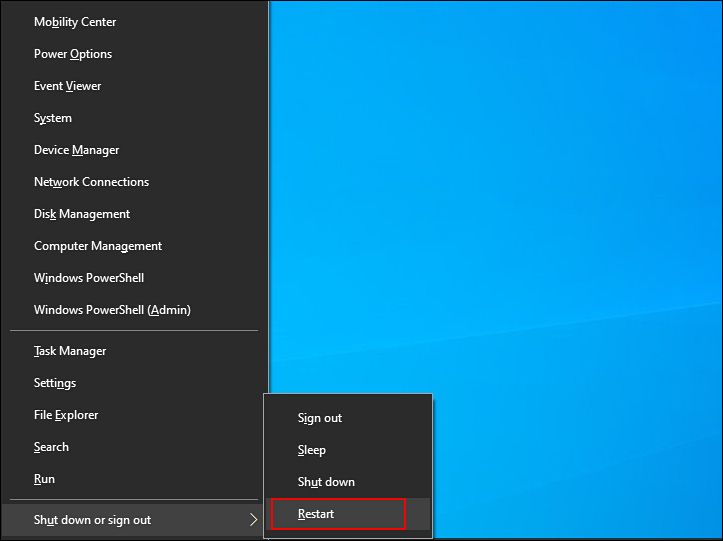
- Press Win + X keys on simultaneously on your keyboard.
-
Select Shut down or sign out and then click on Restart while holding the Shift key from the context menu that appeared on your screen.

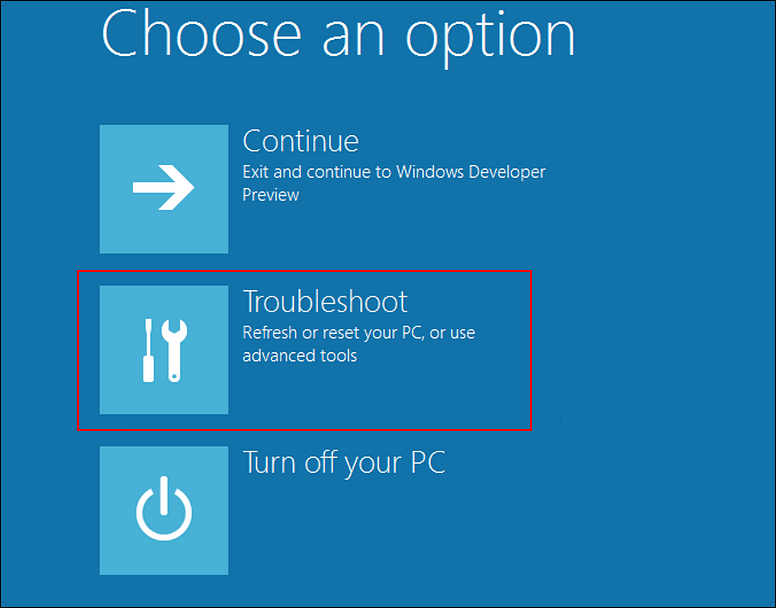
- Your system should not boot into the Advanced Startup screen.
-
From there, click on Troubleshoot.

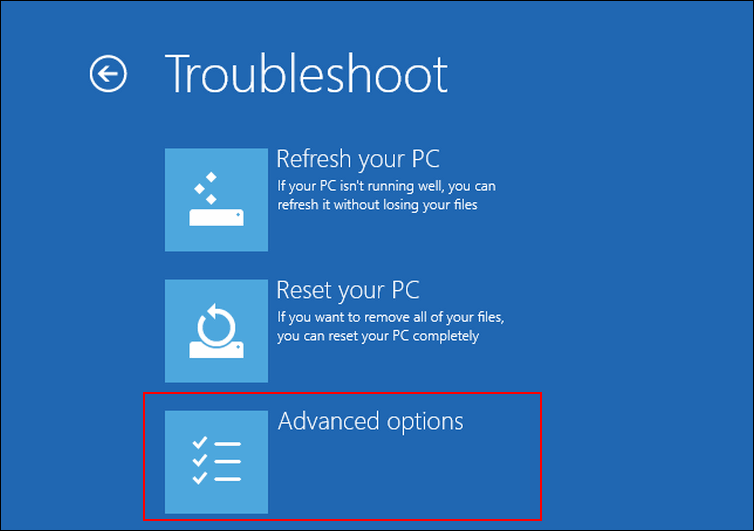
-
Select Advanced option in the next window.

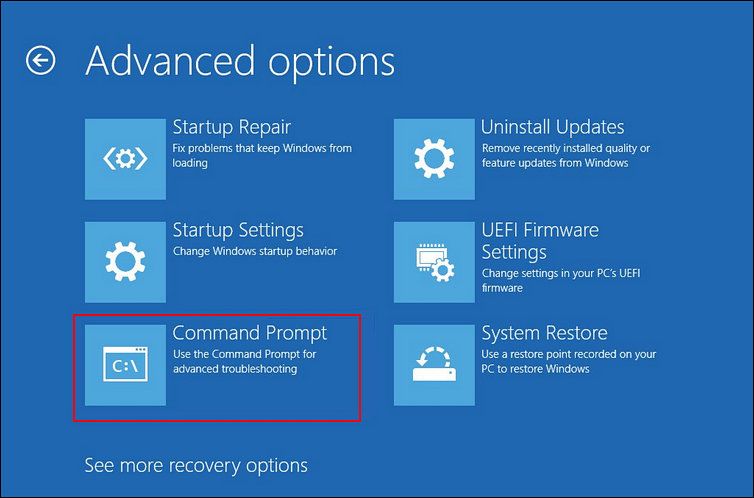
-
Now, click on Command Prompt.

-
Once you are inside the Command Prompt window, type the command mentioned below and hit Enter to execute it.
mbr2gpt /validate

- This command should validate the targeted disk. Continue with the next step if the Validation completed successfully message is displayed. If any error is displayed, then this implies that the disk or system may not have the capacity to handle the conversion.
-
In case you cannot validate using the command above, execute the following command.
mbr2gpt /validate /allowFullOS

-
Once the disk is validated, execute the following command to complete the conversion.
mbr2gpt /convert

- Windows should now begin the conversion process. Wait patiently for the process to complete and then reboot your PC.
- Upon rebooting, launch the firmware settings screen for your motherboard and switch it from Legacy BIOS to UEFI. Since the steps for this vary depending upon your motherboard, consult your manual for the exact procedure.
- Once done, follow the steps we outlined above to verify whether you’ve been converted from Legacy BIOS to UEFI.
BIOS Updated Successfully
The Legacy BIOS upgrade to UEFI has now been completed successfully. The UEFI system is more powerful and has more advanced features than BIOS. UEFI speeds up boot time and offers security features such as «Secure Boot,» which prevents the computer from being booted by unauthorized or unsigned programs. This makes UEFI the next generation of BIOS.