

Last updated on October 25, 2021
Windows 10 is the most popular version of Windows. Installing it on Parallels Desktop® Virtual Machine for Mac is easy to do—and does not require you to purchase Windows 10 beforehand.
There are four different scenarios you might find yourself in, with slightly different steps:
Scenario 1: You have just installed Parallels Desktop on your Mac.
Scenario 2: You have Parallels Desktop on your Mac, and you want to add a Windows 10 virtual machine (VM).
Scenario 3: You want to move Windows 10 from a physical PC into a Parallels Desktop VM.
Here are the individual steps for each:
Scenario 1: You have just installed Parallels Desktop on your Mac.
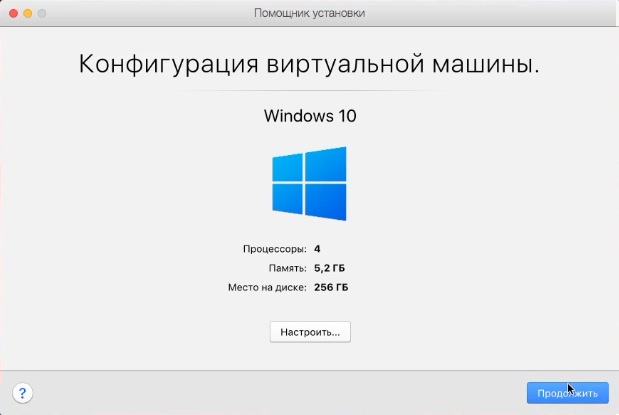
When you first launch Parallels Desktop on a Mac, it will detect that you have no virtual machines and will automatically offer to download and install Windows 10 for you. (See Figure 1.)
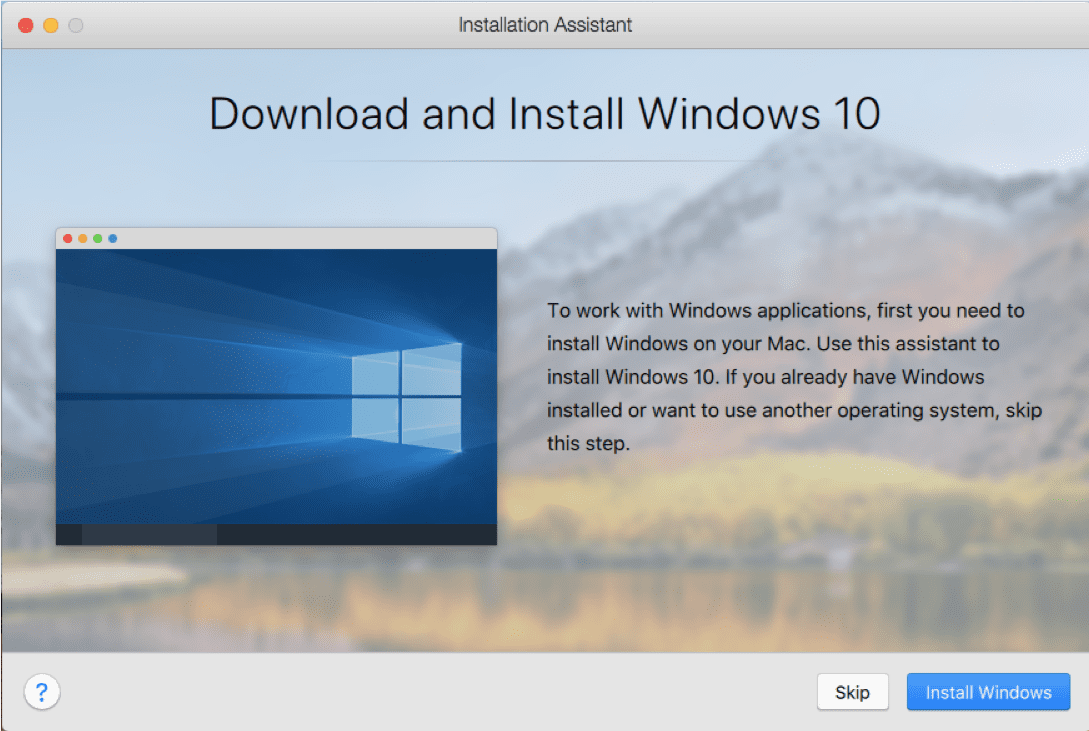
Figure 1_Download and install Windows 10
Once you click “Install Windows,” there is basically nothing else for you to do. The Windows 10 installation files will begin downloading (Figure 2).
Note: If you click on “Skip” instead, you will be directed to the Installation Assitant where you can purchase Windows 10 (see Figure 8).

Figure 2_Downloading Windows 10
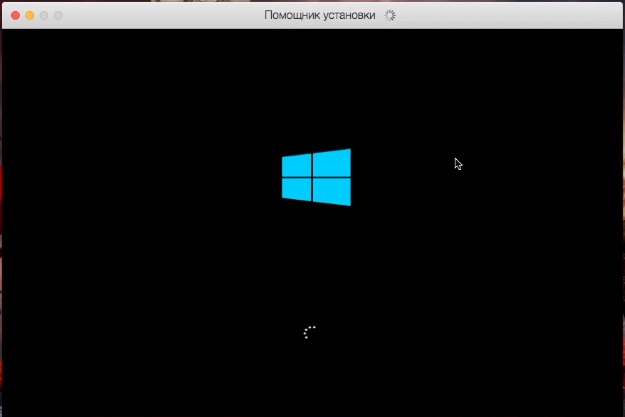
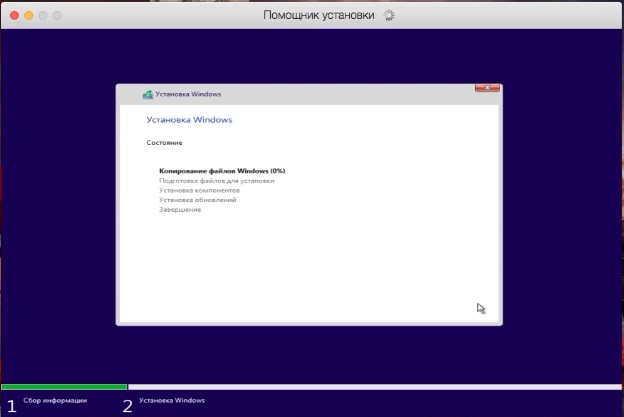
Once the download finishes, the installation of Windows 10 into a new VM in Parallels Desktop will begin (Figure 3).
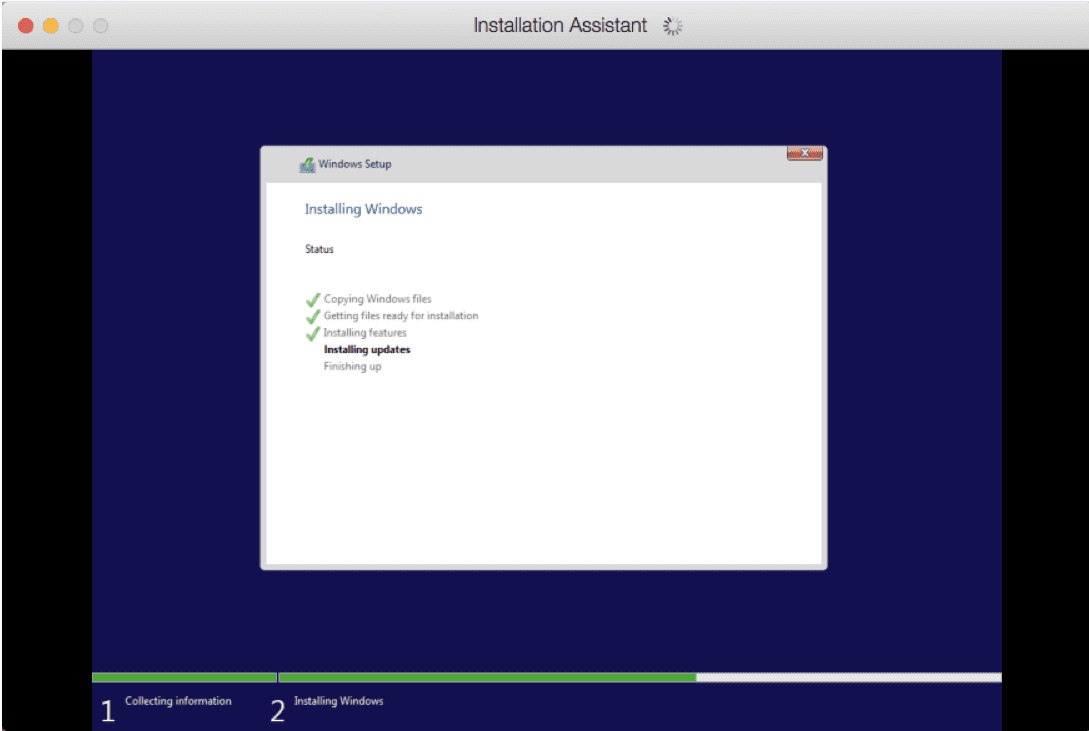
Figure 3_Installing Windows
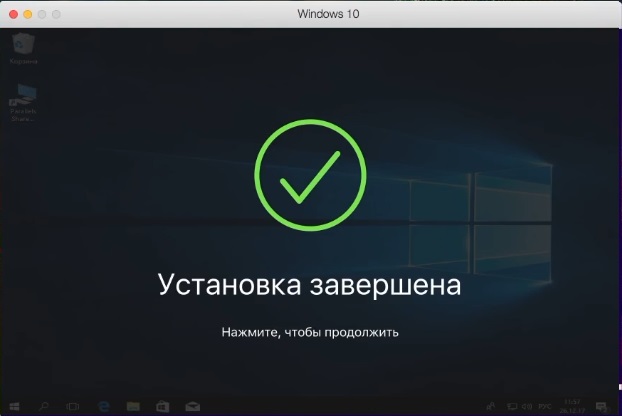
You will be notified when it completes (Figure 4).
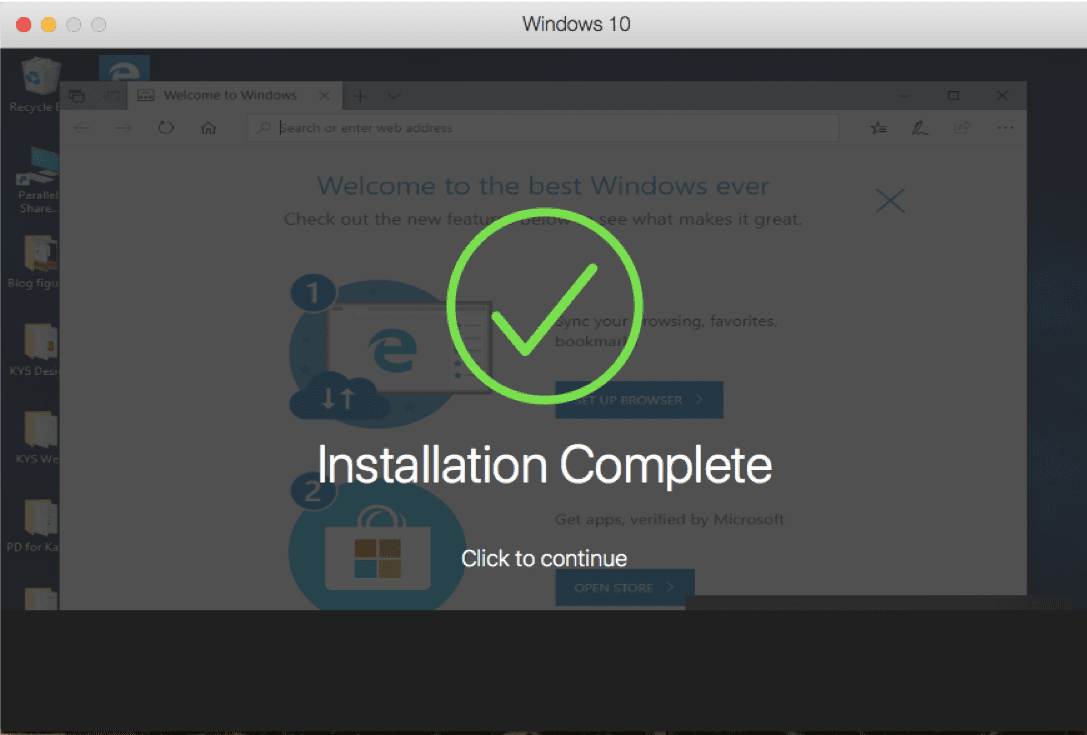
Figure 4_Windows 10 installation complete
How long this process takes depends on the speed of your Internet connection and Mac. For me, at home and on a new MacBook Air, this took about one hour and 40 minutes.
While Windows 10 is installing, you’ll see dialogs about the installation of Parallels® Toolbox, a separate Parallels product that’s bundled with Parallels Desktop (Figure 5).
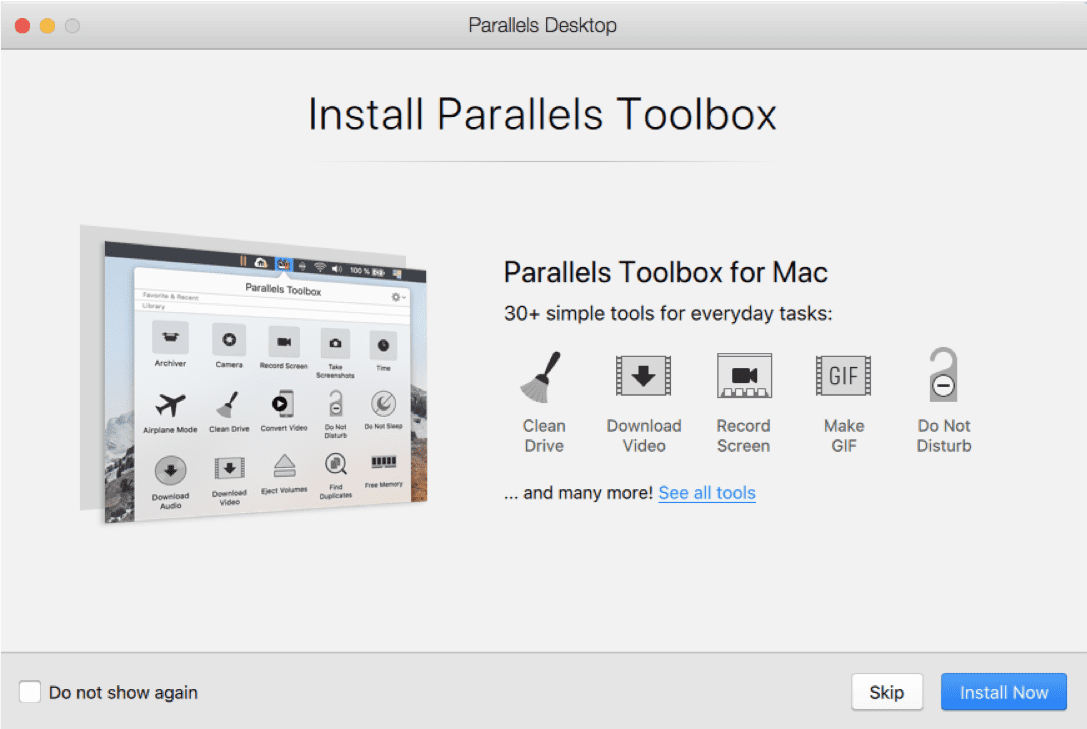
Figure 5_Parallels Toolbox, a product that is bundled with Parallels Desktop
Parallels Toolbox gives you 30+ single-purpose tools for common tasks. I encourage you to install Parallels Toolbox—I think you’ll find the tools very useful.
After Windows 10 is installed, you should get all of the available updates, and probably there will be several of them (Figure 6).
Figure 6_Get all of the available Windows updates
This may take a while but is very important.
At this point, you have a working installation of Windows 10 in a Parallels Desktop VM. You have not yet purchased Windows from Microsoft. A few features will be disabled until you do so. You can purchase and activate Windows from within your Windows VM, and the entire process takes only a few minutes (Figure 7).
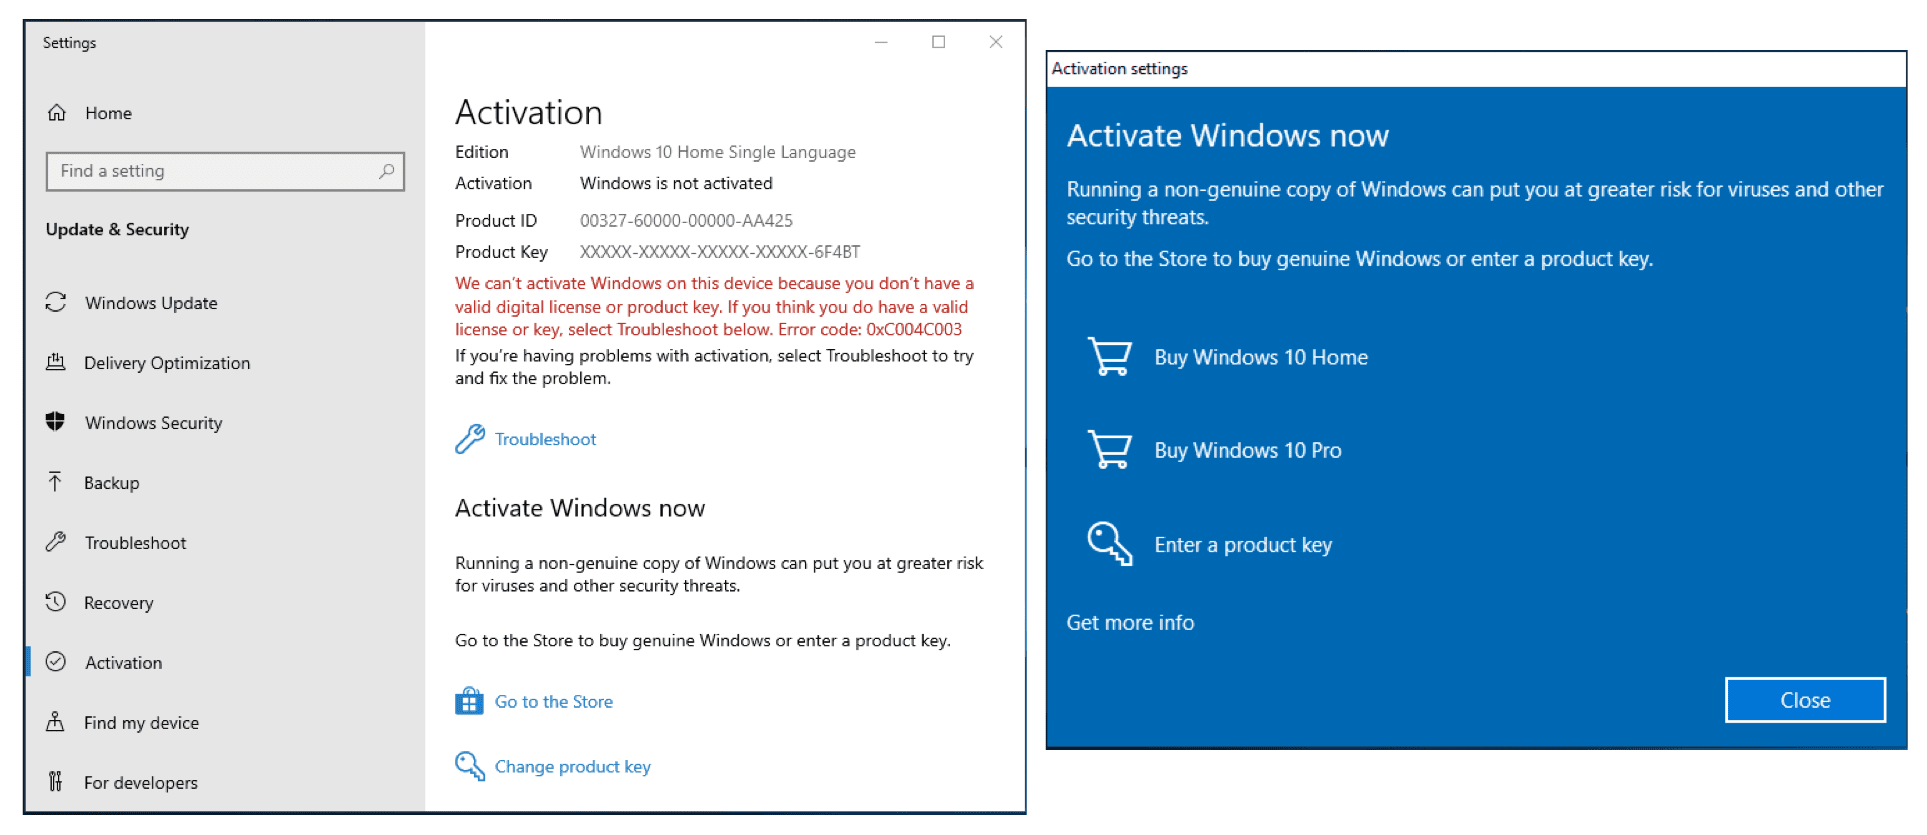
Figure 7_Purchasing and activating Windows 10
Scenario 2: You have Parallels Desktop on your Mac, and you want to add a Windows 10 VM.
Adding Windows 10 as an additional VM in Parallels Desktop is also easy.
To start the process, either choose “New…” in the File menu of Parallels Desktop, or click on the “+” sign in the top right corner of the Control Center window.
Assuming that you don’t have a Windows 10 installation DVD laying around, click on the “Get Windows 10 from Microsoft” button (Figure 8).
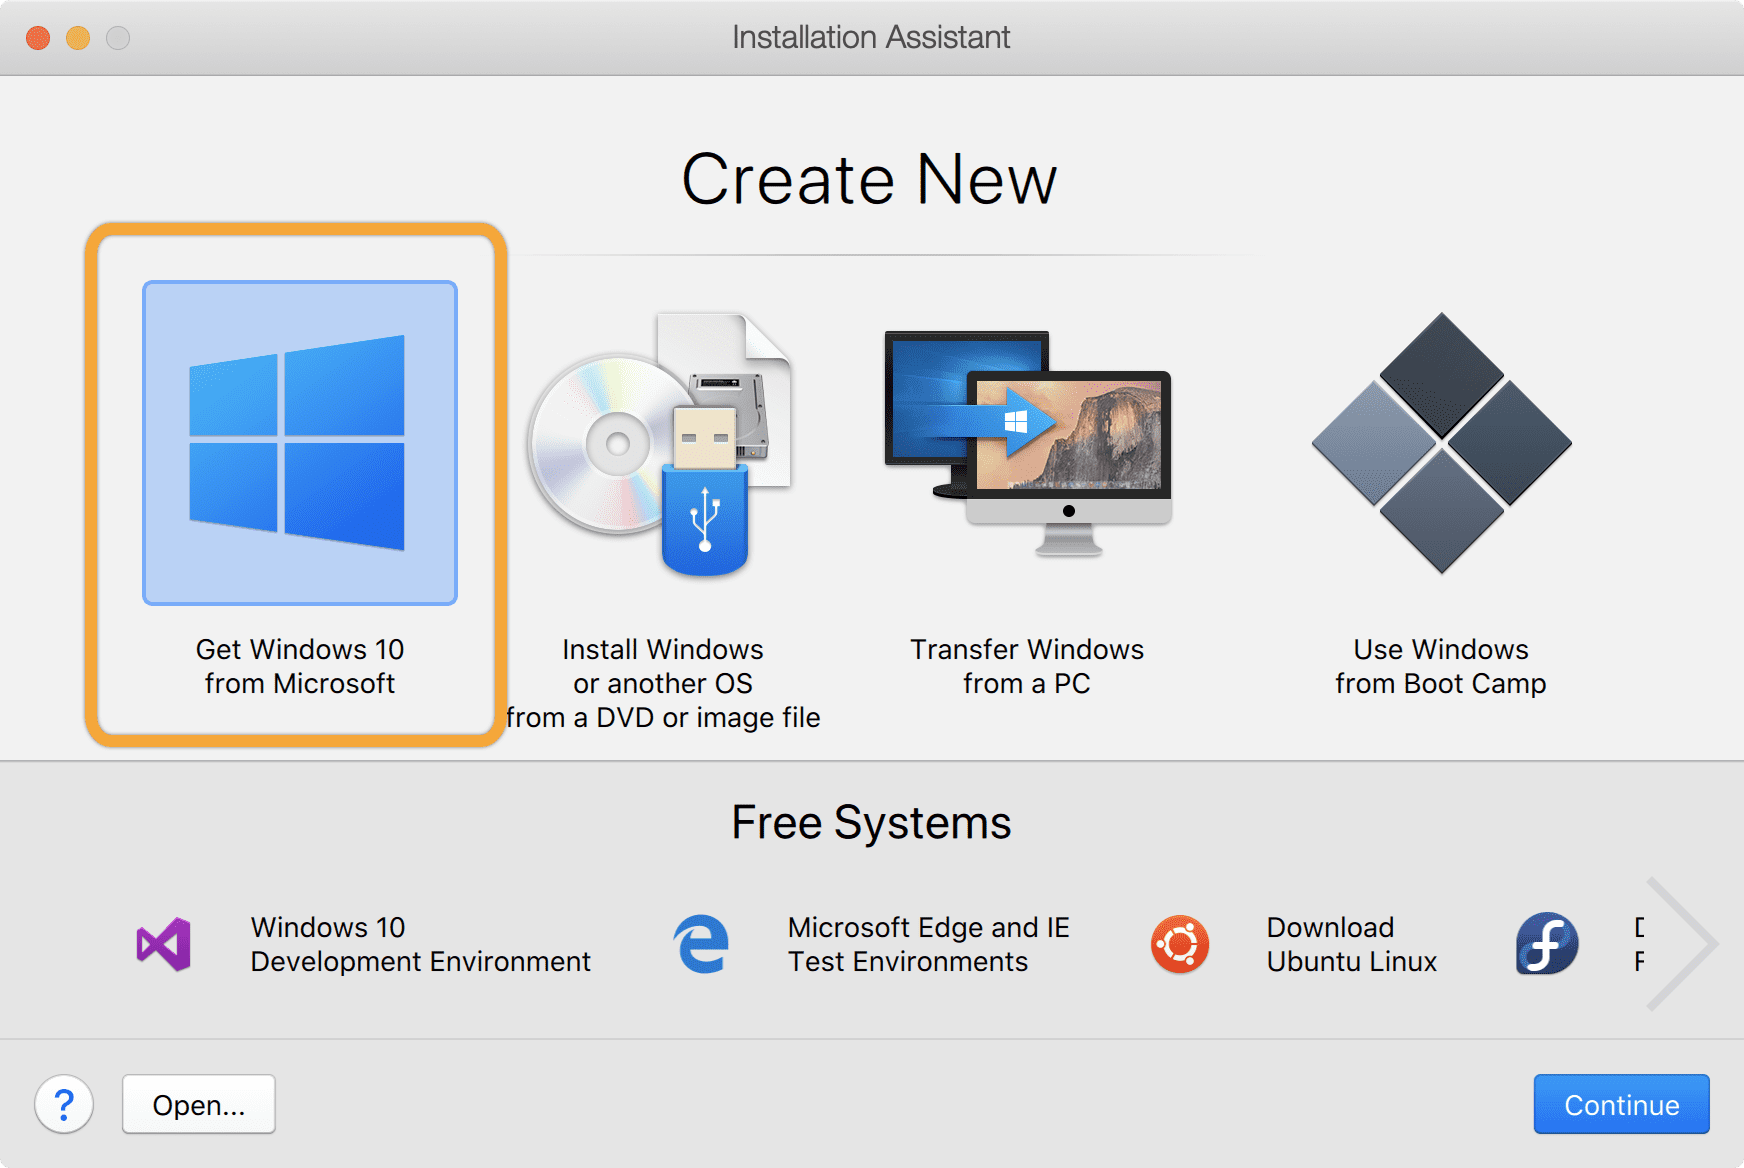
Figure 8_Get Windows 10 button in the Installation Assistant
Then choose to purchase Windows 10 Home or Windows 10 Pro in the next screen. If you want to install Windows 10 without making a purchase yet, choose to download it (Figure 9).
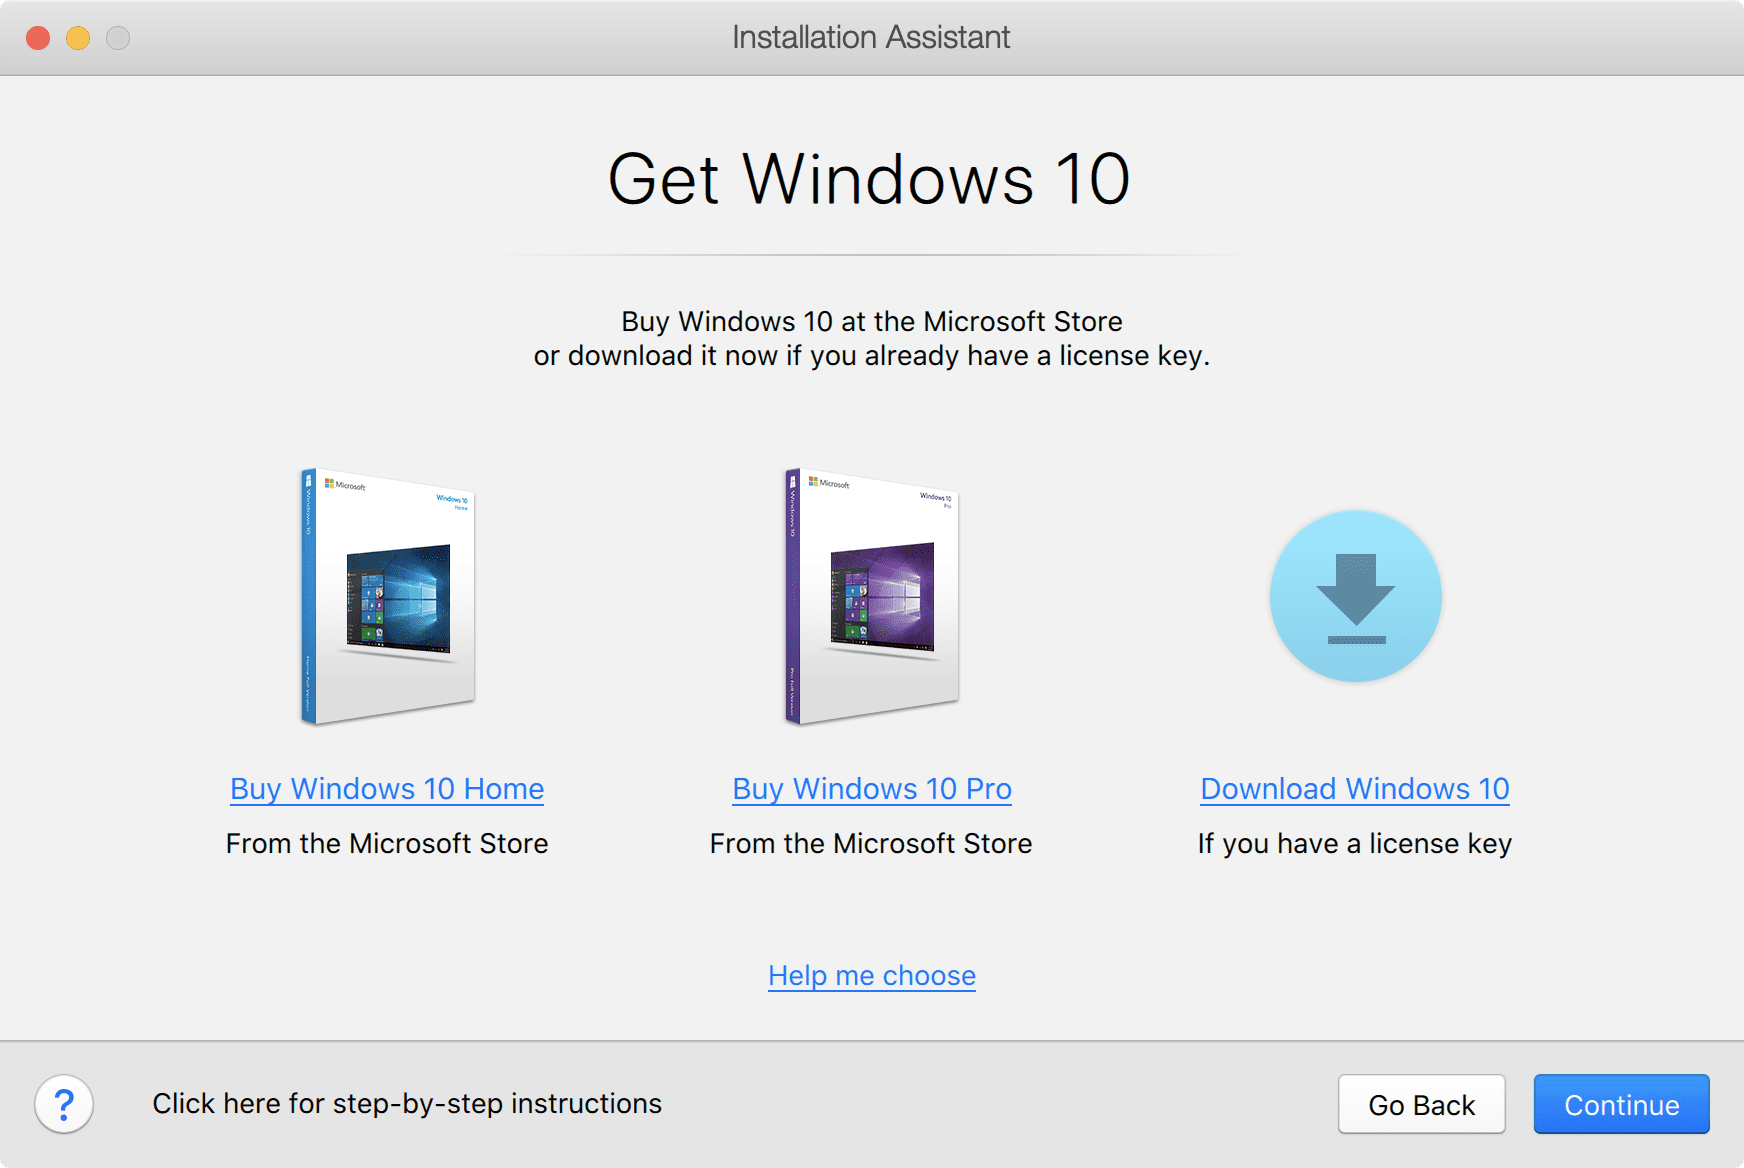
Figure 9_Choose which way to get Windows 10
Whichever path you choose, you will end up with a Windows 10 installation ISO file and a Windows 10 product key. After that, everything proceeds in the same manner as scenario 1. (See the previous Figure 2 as an example.) Don’t forget to install Parallels Toolbox and all the available Windows 10 updates!
Scenario 3: You want to move Windows 10 from a physical PC into a Parallels Desktop VM.
In this last scenario, you start out with the Installation Assistant dialog (see previous Figure  but choose “Transfer Windows from a PC.” You will then see the Transfer Windows dialog shown in Figure 14.

Figure 14_Transfer Your PC
This process will copy everything from a physical PC to a Parallels Desktop VM: apps, data files, and Windows itself. The physical PC will not be modified.
The most common way to transfer is via the network. The amount of time this will take depends on how much information is on the PC and how fast your network is.
There may be several Windows PCs on your network, so you need to indicate which PC you want to migrate into a VM. Do this by installing the Parallels Transfer Agent on the PC to be migrated.
There are two computers involved in this transfer: the Windows PC you are transferring from, and the Mac running Parallels Desktop which you are transferring to. Some of the actions you’ll take to set up this transfer occur on the PC and others on the Mac, so you will need to go back and forth between the two computers to set everything up. These tasks are not complicated, as shown in this video:
I hope you’ve seen how easy it is to install Windows 10 on Parallels Desktop. Feel free to download a free full-featured trial of Parallels Desktop and install Windows 10 like explained in scenario 1 right away at no extra cost.
Feel free to also check out our detailed video about How to install Windows on your Mac with Parallels Desktop – at no cost to you:
Let us know in the comments below, on Twitter or Facebook which way of installing Windows 10 on your Mac worked best for you.
So, you’re ready to install Windows 10 in Parallels and aren’t quite sure where to start? No worries! This guide will walk you through each step to get Windows 10 up and running on your Mac using Parallels. First, you’ll need a copy of Windows 10 and Parallels Desktop installed on your Mac. Let’s dive in!
In this section, we’ll cover the steps needed to install Windows 10 in Parallels. By following these steps, you’ll have a fully functioning Windows 10 environment on your Mac.
Step 1: Download and Install Parallels Desktop
First, you need to download and install Parallels Desktop on your Mac.
You can get Parallels Desktop from the Parallels website. After downloading, open the .dmg file and follow the on-screen instructions to install the program.
Step 2: Get a Copy of Windows 10
You will need a valid Windows 10 ISO file or installation disc for this step.
Head over to the Microsoft website to download a Windows 10 ISO file. Make sure to save it in an easily accessible location, like your desktop.
Step 3: Open Parallels Desktop
Launch Parallels Desktop from your Applications folder or Dock.
When you open Parallels for the first time, it might prompt you to create a new virtual machine or import an existing one. Choose to create a new virtual machine.
Step 4: Select the Installation Source
Choose the source for your Windows 10 installation.
If you’re using an ISO file, select it as the installation source. If you’re using a physical disc, insert it and select the optical drive.
Step 5: Configure the Virtual Machine
Set up the virtual machine’s name, location, and specifications like memory and storage.
You can customize the virtual machine to fit your needs. Parallels usually provides recommended settings, but you can tweak them if you have specific requirements.
Step 6: Start the Installation
Begin the Windows 10 installation process.
Click on «Continue» to start the installation. Parallels will guide you through the Windows 10 setup, including entering your product key and selecting your version of Windows.
Step 7: Complete the Windows Setup
Follow the on-screen instructions to complete the Windows 10 setup.
This includes setting your preferences, creating an account, and configuring settings. Once done, Windows 10 will boot up in Parallels.
Once you complete these steps, Windows 10 will be installed and running in Parallels on your Mac. You can now use it just like any other Windows PC.
Tips for Installing Windows 10 in Parallels
Here are some extra tips to make your installation smoother:
- Make sure your Mac meets the minimum system requirements for both Parallels and Windows 10.
- Keep a backup of your important data before starting the installation.
- Allocate sufficient RAM and storage to the virtual machine for optimal performance.
- Regularly update Parallels Desktop to the latest version for improved compatibility.
- Enable Coherence Mode in Parallels to seamlessly integrate Windows applications with macOS.
Frequently Asked Questions
Is Parallels Desktop free to use?
Parallels offers a free trial, but you’ll need to purchase a license for long-term use.
Can I run other operating systems besides Windows 10 in Parallels?
Yes, Parallels supports various operating systems, including Linux and other versions of Windows.
Will running Windows 10 in Parallels slow down my Mac?
Allocating too many resources to the virtual machine can affect performance. Balance the resource allocation based on your Mac’s specifications.
Is it safe to download Windows 10 from the internet?
Always download Windows 10 from Microsoft’s official website to ensure you get a legitimate and safe version.
Can I share files between macOS and Windows 10 in Parallels?
Yes, Parallels allows you to share files between the two operating systems seamlessly.
Summary of Steps
- Download and Install Parallels Desktop.
- Get a Copy of Windows 10.
- Open Parallels Desktop.
- Select the Installation Source.
- Configure the Virtual Machine.
- Start the Installation.
- Complete the Windows Setup.
Conclusion
Installing Windows 10 in Parallels is a straightforward process that opens up a world of possibilities for Mac users. Whether you need Windows for work, gaming, or just to run a specific application, Parallels makes it easy to switch between macOS and Windows without rebooting your computer.
This dual-operating system setup can be a game-changer, offering the best of both worlds. Once you’ve completed the installation, you’ll find that running Windows on your Mac is seamless and efficient.
With Parallels, you can enjoy the functionality and familiarity of Windows alongside the power and elegance of macOS. So why wait? Get started today and make the most out of your computing experience!
Matt Jacobs has been working as an IT consultant for small businesses since receiving his Master’s degree in 2003. While he still does some consulting work, his primary focus now is on creating technology support content for SupportYourTech.com.
His work can be found on many websites and focuses on topics such as Microsoft Office, Apple devices, Android devices, Photoshop, and more.
Когда-то давно мы публиковали инструкцию по установке Windows 7 на компьютеры Mac, однако с тех пор прошло уже довольно много времени, а Microsoft успела выпустить совершенно новую операционную систему, получившую гордое название Windows 10.
Продукт Parallels Desktop является чем-то вроде эмулятора операционных систем. С его помощью на Mac можно установить любую операционную систему, включая Windows, Android и даже Chrome OS. Программа предлагает огромное количество различных настроек, которые позволяют подобрать для себя оптимальный вариант использования. Приступим к установке Windows 10 на Mac при помощи Parallels Desktop 10.

Шаг 1: Заходим на официальную страницу Windows 10, где в списке языков выбираем «Русский», и в открывшемся окне нажимаем на «Скачать». Версия x64 подходит для всех современных компьютеров, поэтому лучше всего использовать именно ее. Если ваш Mac старше 5 лет, тогда рекомендуем использования версию x86.
Шаг 2: Скачиваем пробную версию Parallels Desktop 10 на свой компьютер Mac. Сделать это можно на официальном сайте компании Parallels. После окончания загрузки необходимо установить приложение на компьютер.
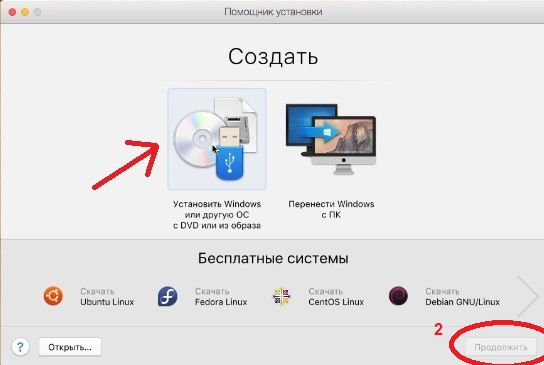
Шаг 3: Когда образ Windows 10 загружен на компьютер, а Parallels Desktop 10 успешно установлена, можно смело приступать к установке новой операционной системы от Microsoft на Mac. Для этого запускаем программу Parallels Desktop 10, выбираем «Установить Windows или другую ОС с DVD или образа» и нажимаем «Продолжить».
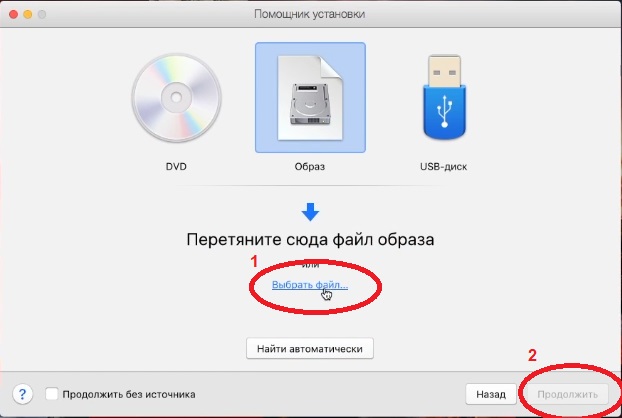
Шаг 4: В большинстве случаев программа сама найдет файл образа операционной системы, однако если этого не произошло, то придется вручную указывать путь до скаченного образа Windows 10. Нажимаем «Найти вручную», затем «Образ» и перетягиваем загруженный файл Windows 10 в окно программы.
Шаг 5: На данном этапе необходимо убрать галочку с пункта «Для это версии необходим ключ продукта».
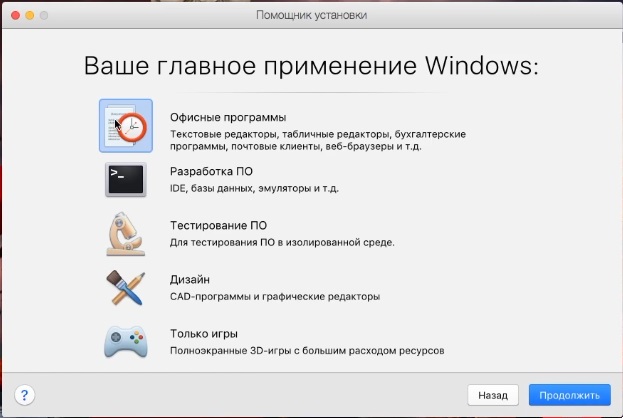
Шаг 6: В этом меню нужно выбрать предназначение операционной системы. Это что-то вроде быстрой конфигурации: количества выделяемой оперативной памяти, мощности, объёма жесткого диска и т.д. Все эти данные после установки Windows 10 можно будет легко изменить.
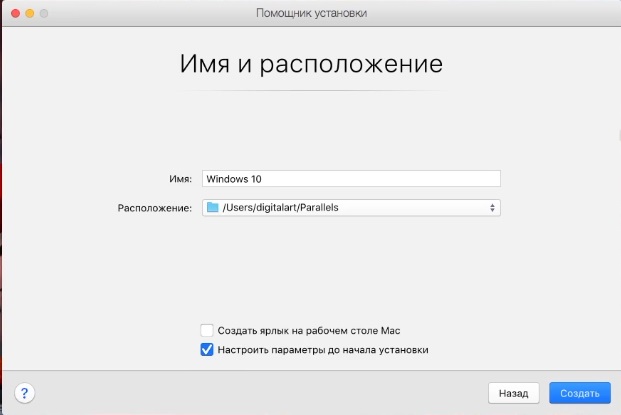
Шаг 7: Вводим любое желаемое название виртуальной машины и путь ее хранения на OS X.
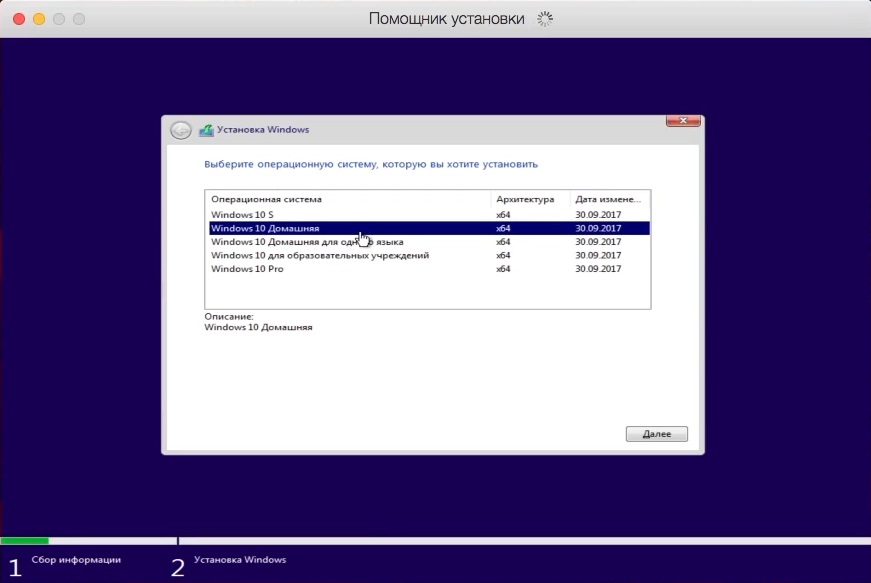
Шаг 8: Началась установка виртуальной машины. На MacBook Pro Retina установка занимает около 8-10 минут, во многом благодаря SSD памяти. Если появилось окно с выбором операционной системы, то необходимо выбрать любую желаемую модификацию Windows 10.
Шаг 9: После окончания установки на экране появится стартовый экран Windows 10. Осталось только дождаться установке всех специальных пакетов от Parallels, и система будет полностью готова к использованию.
Шаг 10: Теперь желательно настроить систему под себя. Для этого переходим в «Центр управления Parallels Desktop» и нажимаем на шестерёнку возле Windows 10. Детально настраиваем систему под свои нужны, и радуемся Windows 10 на своем компьютере или ноутбуке Mac.
Подробную и детальную информацию по настройке Parallels Desktop 10 можно найти на официальном сайте компании.
Источник изображений: «Яндекс Картинки»
Присоединяйтесь к нам в Google News, Twitter, Facebook*, Instagram*, ВКонтакте, YouTube и RSS чтобы следить за новостями и оперативно получать интересные материалы.
* Сервисы признаны судом экстремистскими и запрещены в России.
В данной статье мы рассмотрим как установить Windows на Mac с помощью приложения виртуальной машины Parallels Desktop, по примеру статьи будем устанавливать Windows 10, но Вы так же можете установить любую другую версию Windows, настройки не отличаются.
1) Первое, что нужно сделать — это скачать Parallels Desktop. Скачать саму программу можете по следующей ссылке и устанавливаете приложение на свой компьютер под управлением MacOS.
2) Запускаете приложение. И выбираете «Установить из дистрибутива». У Вас на компьютере, или ноутбуке должен быть дистрибутив Windows 10, если у Вас его нет, то можете скачать его на нашем сайте в следующем каталоге.
3) Далее приложение Parallels Desktop у Вас спросит для чего Вы устанавливаете систему на виртуальной машине. Это нужно для расчета выделяемой мощности под установку и дальнейшей работы ОС. Для обычной работы без игр, рекомендуем Вам выбрать пункт «Офисные программы», либо «Тестирование ПО».
4) На следующем шаге можете изменить имя виртуальной ОС и ее расположение, либо оставить все по умолчанию. А так же, обязательно нужно поставить галку на пункте «Настроить параметры до начала установки» — это нужно для того, чтобы Windows подтянула все необходимые драйверы автоматически.
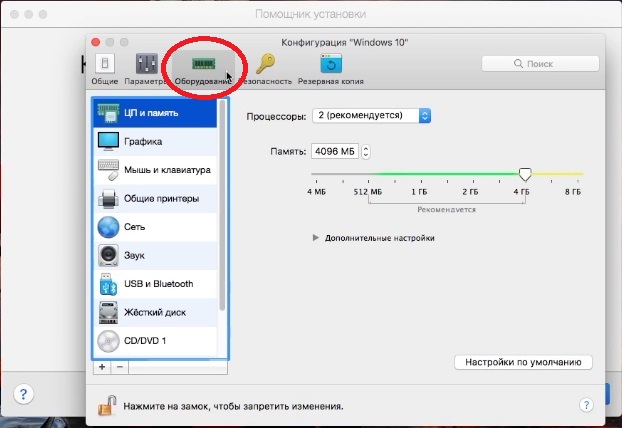
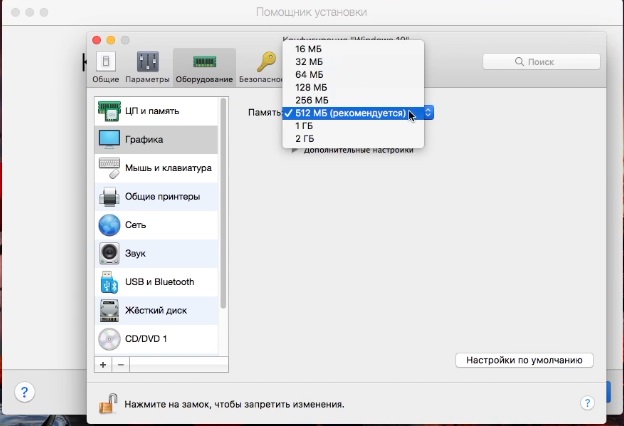
5) Далее можем настроить конфигурацию для будущей виртуальной машины. Т.е Выбрать сколько ядер будет работать для Windows и сколько будет выделено оперативной памяти. По поводу оперативной памяти, рекомендуется не более, чем показано на зеленом ползунке (см. скриншот ниже).

В меню «Графика» можете прибавить выделяемую память графического адаптера под Windows, если Вам нужно работать с какими-либо графическими программами, которые потребляют много графической памяти.
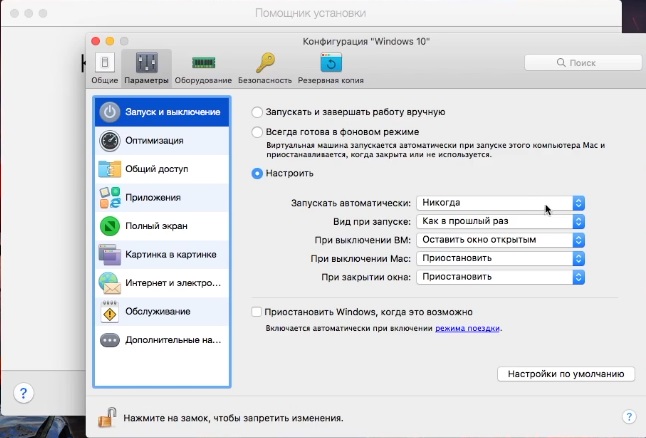
В меню «Параметры» => Запуск и выключение — можете отредактировать параметры запуска, если это необходимо, ставите нужный параметр.
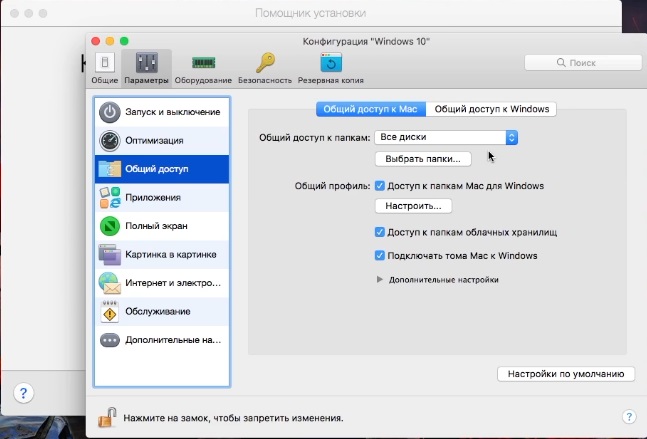
В меню «Общий доступ» в пункте «Общий доступ к папкам» можете выбрать «Все диски». Чтобы Вы из под Windows могли видеть все папки в системе MacOS.
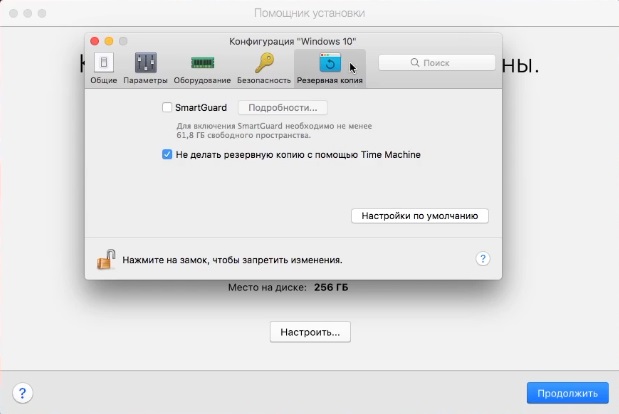
В меню «Резервная копия» рекомендуем поставить галку пункте «Не делать резервную копию с помощью Time Machine». т.к это очень сильно расходует ресурсы Вашего компьютера, если Вам необходимо делать бекапы, то лучше это делать средствами Windows, либо вспомогательными сторонними программами из системы Windows.
6) Завершаем настройку, путем нажатия красного крестика и продолжить.
Установка занимает какое-то время, в зависимости от выделенной конфигурации. Обычно не более 10 минут. Она ничем не отличается от обычной установки Windows. При установке нужно выбрать редакцию Windows, которую Вы хотите и начать непосредственно саму установку.
Установка закончена. Дополнить статью можно только тем, что по умолчанию Parallels Desktop работает в оконном режиме, Вы можете сделать ее в полноэкранный в трее запущенного приложения на рабочем столе Mac => Вид => Перейти полноэкранный режим.
А так же, чтобы в дальнейшем Ваша Windows работала корректно, ее нужно так же активировать как и обычную систему, которая установлена вне виртуальной машины, для этого Вам нужен ключ активации, т.к триальная версия Windows 10 работает 30 дней. Приобрести ключ активации Вы можете в нашем интернет-магазине по самой низкой цене, различные редакции (Pro, Home, Enterprise и др.). Доставка ключа моментальная, в автоматическом режиме сразу после оплаты на Вашу электронную почту. Широкий выбор способов оплаты. Гарантия и бесплатная техническая поддержка 24/7.
Приобрести ключ активации для Windows 10 Вы можете в нашем каталоге на следующей странице.
Лицензионный ключ активации Microsoft Office 365 от
You’ve been running a virtual desktop version of Windows using the Parallels app on your Mac, but maybe it’s now served its purpose and is no longer needed. Perhaps you also want to free up some disc space or create a new virtual machine. Either way, it’s time to uninstall Windows.
In this article, we’ll guide you through the process of removing various versions of Windows from your virtual machine.
If you’re looking to free up disc space or simply don’t need Windows 11 anymore, you can uninstall it. Simply follow the steps below:
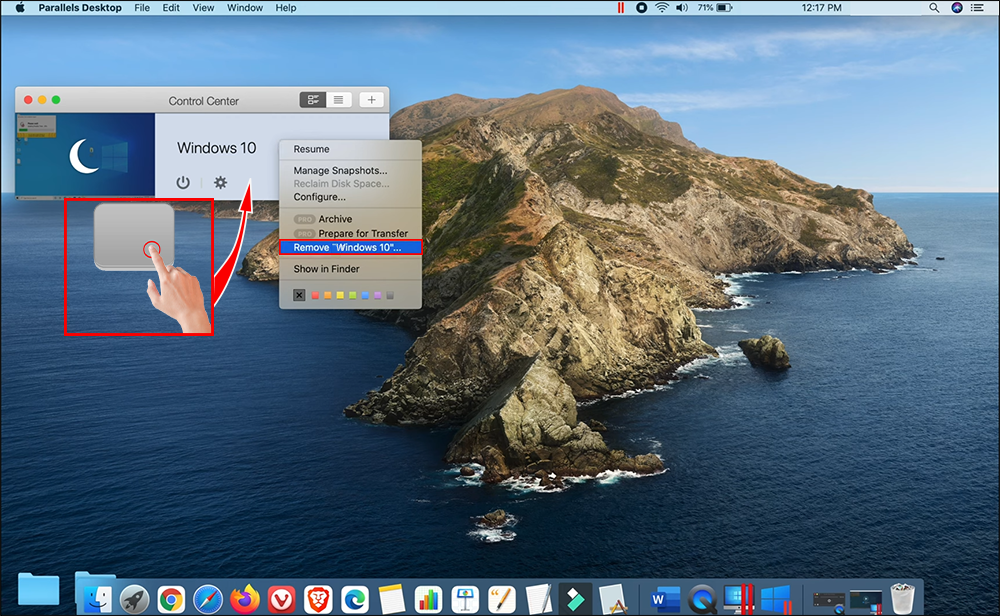
- Close any apps currently open on your Mac. Ensure that no virtual machines are running.
- Launch Parallell’s Desktop.app, but don’t start your virtual machine.

- Go to the menu bar on the top of the screen and click the Parallel icon.
- From the dropdown menu, select “Control Center.”
- Locate your virtual machine from the window, right-click or double-tap your touchpad, and select “Remove.”
- Select “Move to Trash.”


Windows 11 has now been uninstalled. Please note that once you’ve selected “Move to Trash,” this action can’t be reversed. If your goal was to free up disc space on your Mac by removing Windows 11, don’t forget to empty the trash. You won’t gain any disk space until it’s been emptied.
Uninstall Windows 10
You can easily free up disc space by uninstalling Windows 10. The method is similar to the method used for Windows 11. To remove Windows 10, follow the steps below:
- Close any apps currently running on your Mac and ensure that no virtual machines are running.
- Launch Parallell’s Desktop.app, but don’t start a virtual machine.

- Click on the Parallel icon located on the menu bar on the top of the screen.

- Using the dropdown menu, select “Control Center.”

- Next, locate your virtual machine from the window and right-click or double-tap your touchpad and choose “Remove.”

- Click “Move to Trash.”


You’ve now uninstalled Windows 10. Please note that after you select “Move to Trash,” this action is irreversible. If your goal was to free up space on your Mac by removing Windows 10, you’ll need to empty the trash. Once you’ve done that, you’ll gain the disk space you needed.
How to Uninstall Windows 7
To free up disc space or to simply remove Windows 7 from your machine, you can uninstall it. This can be accomplished in a few straightforward steps. To uninstall Windows 7, follow the method below:
- First, ensure that no virtual machines are running and close any apps that are open on your Mac.
- Launch Parallell’s Desktop.app, but don’t start your virtual machine.
- From the menu bar at the top of the screen, locate and tap the Parallel icon.

- From the dropdown menu, select “Control Center.”
- Next, locate your virtual machine from the window and right-click or double-tap your touchpad and click “Remove.”
- Tap “Move to Trash.”


You’ve now uninstalled Windows 7. Please note that after you select “Move to Trash,” this action can’t be reversed. If you removed Windows 7 to free up space on your Mac, you’ll need to empty the trash. You won’t gain any disc space until the trash has been emptied.
Additional FAQs
Can I remove a virtual machine with Windows but keep the files?
Yes, it’s possible to remove a virtual machine and keep the files. This is easily accomplished by following the steps highlighted in this article with one exception. When you reach Step 5, a popup window will give you three options. You see “Move to Trash,” “Cancel,” and on the far right “Keep Files.” By selecting this last option, “Keep Files,” the virtual machine will be removed but the files will remain. This is a great option if you feel you may need to use the virtual machine again in the future.
Is it possible to store the virtual machine on an external drive instead of deleting Windows?
This is a good alternative to uninstalling Windows, but it will take up a lot of space on an external drive. The good news is you’ll only have to put one file on it. Simply locate the .pvm file and move it to the external drive. When you want to restore the virtual machine, it’s just as easy. Just move the .pvm file back to its location on your Mac, open the file, and follow the installation instructions.
Uninstall Windows to Free Up Disc Space or Create a New Virtual Machine
It doesn’t take a lot of time or effort to uninstall Windows from your Parallel virtual machine. You can completely uninstall Windows or simply keep the files to be used again in the future. Alternatively, you can move the .pvm file to an external drive and reinstall it at a later date. Whatever you decide, it only takes a few straightforward steps.
Have you ever had to uninstall Windows from a virtual machine? Did you follow the same methods discussed in this article? Let us know in the comments section below.