
Запуск планшета Surface с USB-диска может пригодиться, если вы хотите изменить параметры встроенного ПО или параметры загрузки Windows.
Загрузка с USB-устройства не обновляет или не возвращает планшет Surface в исходное состояние. Вместо этого он позволяет запустить Surface с помощью Windows или другой операционной системы, которая находится на USB-устройстве.
-
Сведения о создании загрузочного USB-накопителя для Surface см. в статье Создание и использование USB-накопителя восстановления для Surface.
-
Сведения о том, как скачать образ восстановления для устройства Surface, см. в статье Скачивание образа восстановления Surface для дальнейших действий.
Запуск устройства Surface с USB-накопителя
Примечание: Если вы не хотите запускать Surface с USB-накопителя, убедитесь, что диск не вставлен в USB-порт на устройстве Surface при запуске.
Для всех моделей Surface
Перед началом работы убедитесь, что к планшету Surface не подключены другие USB-устройства, включая usb-мышь, клавиатуры и другие накопители. Surface попытается загрузиться с других подключенных USB-устройств. Вот как выполнить загрузку с USB.
-
Завершите работу планшета Surface.
-
Вставьте загрузочный USB-диск в USB-порт на планшете Surface.
-
Нажмите и удерживайте кнопку уменьшения громкости на surface. Во время этого нажмите и отпустите кнопку питания.
-
На экране появится логотип Microsoft или Surface. Продолжайте удерживать кнопку уменьшения громкости. Отпустите кнопку, когда под логотипом появятся вращающиеся точки.
-
Выполните инструкции на экране для загрузки с USB-диска.

Начало работы с USB через Windows
Если у вас возникли проблемы с запуском Surface с загрузочным USB-накопителем, попробуйте загрузиться через Windows. Для этого выполните указанные ниже действия.
-
Вставьте USB-накопитель в USB-порт и выберите Запустить > Параметры > Восстановление системы > .
-
В разделе Особые варианты загрузки выберите Перезагрузить сейчас.
-
На экране Выбор действия выберите пункт Использовать устройство > USB-накопитель.
Настройка surface для запуска с USB-накопителя
После настройки USB-накопителя в качестве загрузочного диска с соответствующей операционной системой на нем необходимо настроить surface для загрузки с этого диска. Для этого необходимо внести изменения в UEFI, чтобы USB-накопитель был первым вариантом. Вот как это сделать.
-
Завершите работу планшета Surface.
-
После выключения Surface нажмите и удерживайте кнопку увеличения громкости.
-
Удерживая кнопку увеличения громкости, нажмите и отпустите кнопку питания.
-
Продолжайте удерживать кнопку увеличения громкости, пока с экрана не исчезнет логотип Surface или Windows.
-
Теперь вы должны увидеть экран Surface UEFI. Чтобы продолжить работу, вам потребуется выполнить определенные инструкции.
Изменение порядка загрузки
Вам потребуется изменить порядок загрузки, чтобы устройство Surface загружалось с USB-устройства.
Для большинства моделей Surface
Эти инструкции применяются к следующим моделям Surface:
-
Surface Pro 6 и более поздних поколений, Surface Pro X
-
Surface Book 3, Surface Book 2
-
Surface Laptop 2 и более поздних поколений, Surface Laptop Studio 2, Surface Laptop Studio, Surface Laptop SE, Surface Laptop Go и более поздних поколений
-
Surface Go 4, Surface Go 3, Surface Go 2
-
Surface Studio 2+, Surface Studio 2
-
Surface Hub 2S
Чтобы изменить конфигурацию загрузки Surface, выполните следующие действия.
-
Выберите пункт Конфигурация загрузки.
-
Выберите USB-накопитель и перетащите его в верхнюю часть списка. Кроме того, можно провести пальцем влево по USB-хранилищу , чтобы немедленно загрузить устройство. Это не повлияет на порядок загрузки.
-
Выберите Выход и нажмите Перезагрузить сейчас.
Если USB-накопитель не работает
Проверьте следующее в Surface UEFI. Сведения об использовании UEFI см. в статье Использование UEFI Surface.
-
Если у вас установлена сборка программы предварительной оценки Windows, может потребоваться сначала отключить, а затем включить безопасную загрузку для распознавания загрузочного usb-диска.
-
Убедитесь, что параметр Включить загрузку с USB-устройствустановлен в разделе Дополнительные параметры экрана конфигурации загрузки UEFI.
-
Если вы настроили порядок загрузки, проверка дополнительные параметры на экране конфигурации загрузки UEFI, чтобы убедиться, что параметр Включить альтернативную последовательность загрузки включен.
-
По возможности используйте другой USB-накопитель.
Если проблема не в этом, убедитесь, что USB-накопитель имеет формат FAT32. Вот как убедиться, что USB-устройство правильно отформатировано в качестве загрузочного диска:
Предупреждение: Настройка USB-накопителя стерет все, что на нем хранится. Перед продолжением обязательно перенесите все важные данные на USB-накопителе на другое запоминающее устройство.
-
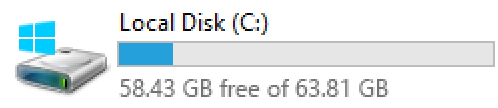
Вставьте USB-накопитель в surface. (Usb-накопитель должен иметь не менее 16 ГБ.)
-
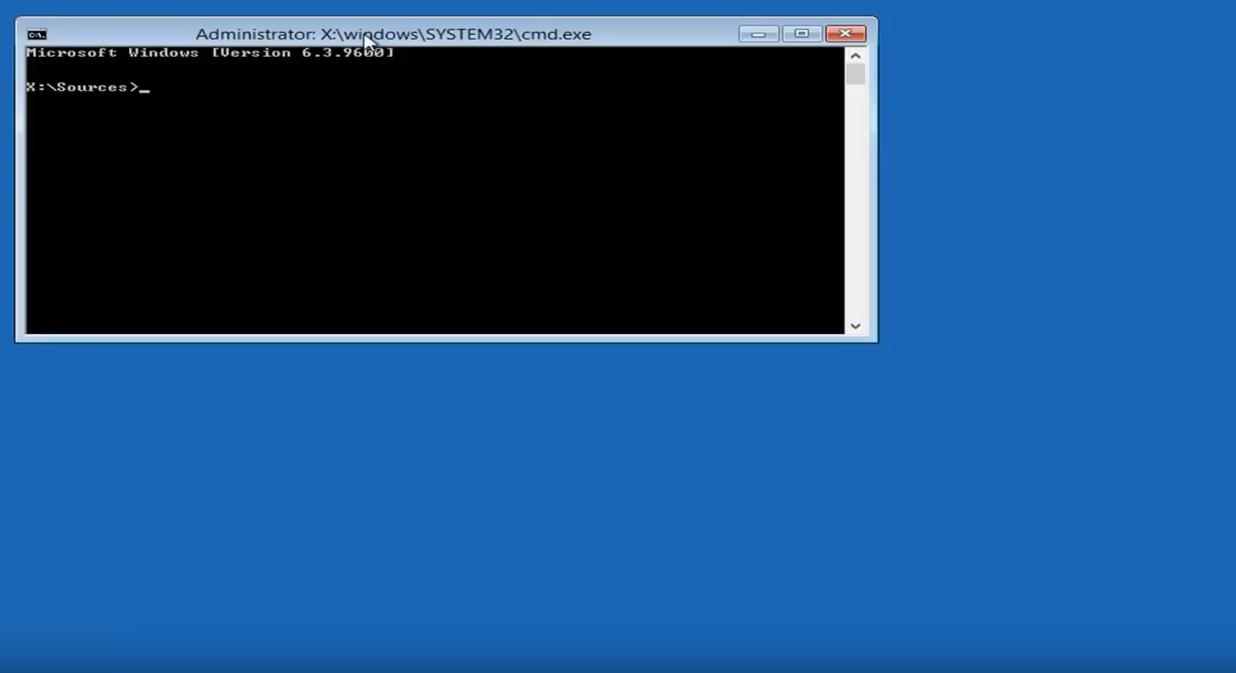
Откройте окно командной строки с правами администратора. (Для этого щелкните правой кнопкой мыши пункт Командная строка и выберите Запуск от имени администратора.)
-
В окне командной строки введите diskpart и нажмите клавишу ВВОД.
-
Чтобы определить номер или букву USB-диска, введите в командной строке list disk и нажмите клавишу ВВОД.
Команда list disk (Список дисков) отображает все диски на компьютере. Запишите цифру или букву USB-диска.
-
В командной строке введите select disk X (где X — это номер диска или буква USB-накопителя, который вы записали на последнем шаге) и нажмите клавишу ВВОД.
-
Введите clean и нажмите клавишу ВВОД. Это приведет к удалению всех данных с USB-диска.
-
Чтобы создать новый основной раздел на USB-диске, введите команду create part pri и нажмите клавишу ВВОД.
-
Чтобы выбрать только что созданный раздел, введите команду select part 1 и нажмите клавишу ВВОД.
-
Чтобы отформатировать раздел, введите команду format fs=fat32 quick и нажмите клавишу ВВОД.
-
Введите команду active, затем нажмите клавишу ВВОД.
-
Введите команду exit, затем нажмите клавишу ВВОД.
-
Сохраните образ операционной системы, который вы хотите использоваться для загрузки, в корневом каталоге USB-диска.
Статьи по теме
-
Создание и использование USB-диска восстановления для Surface
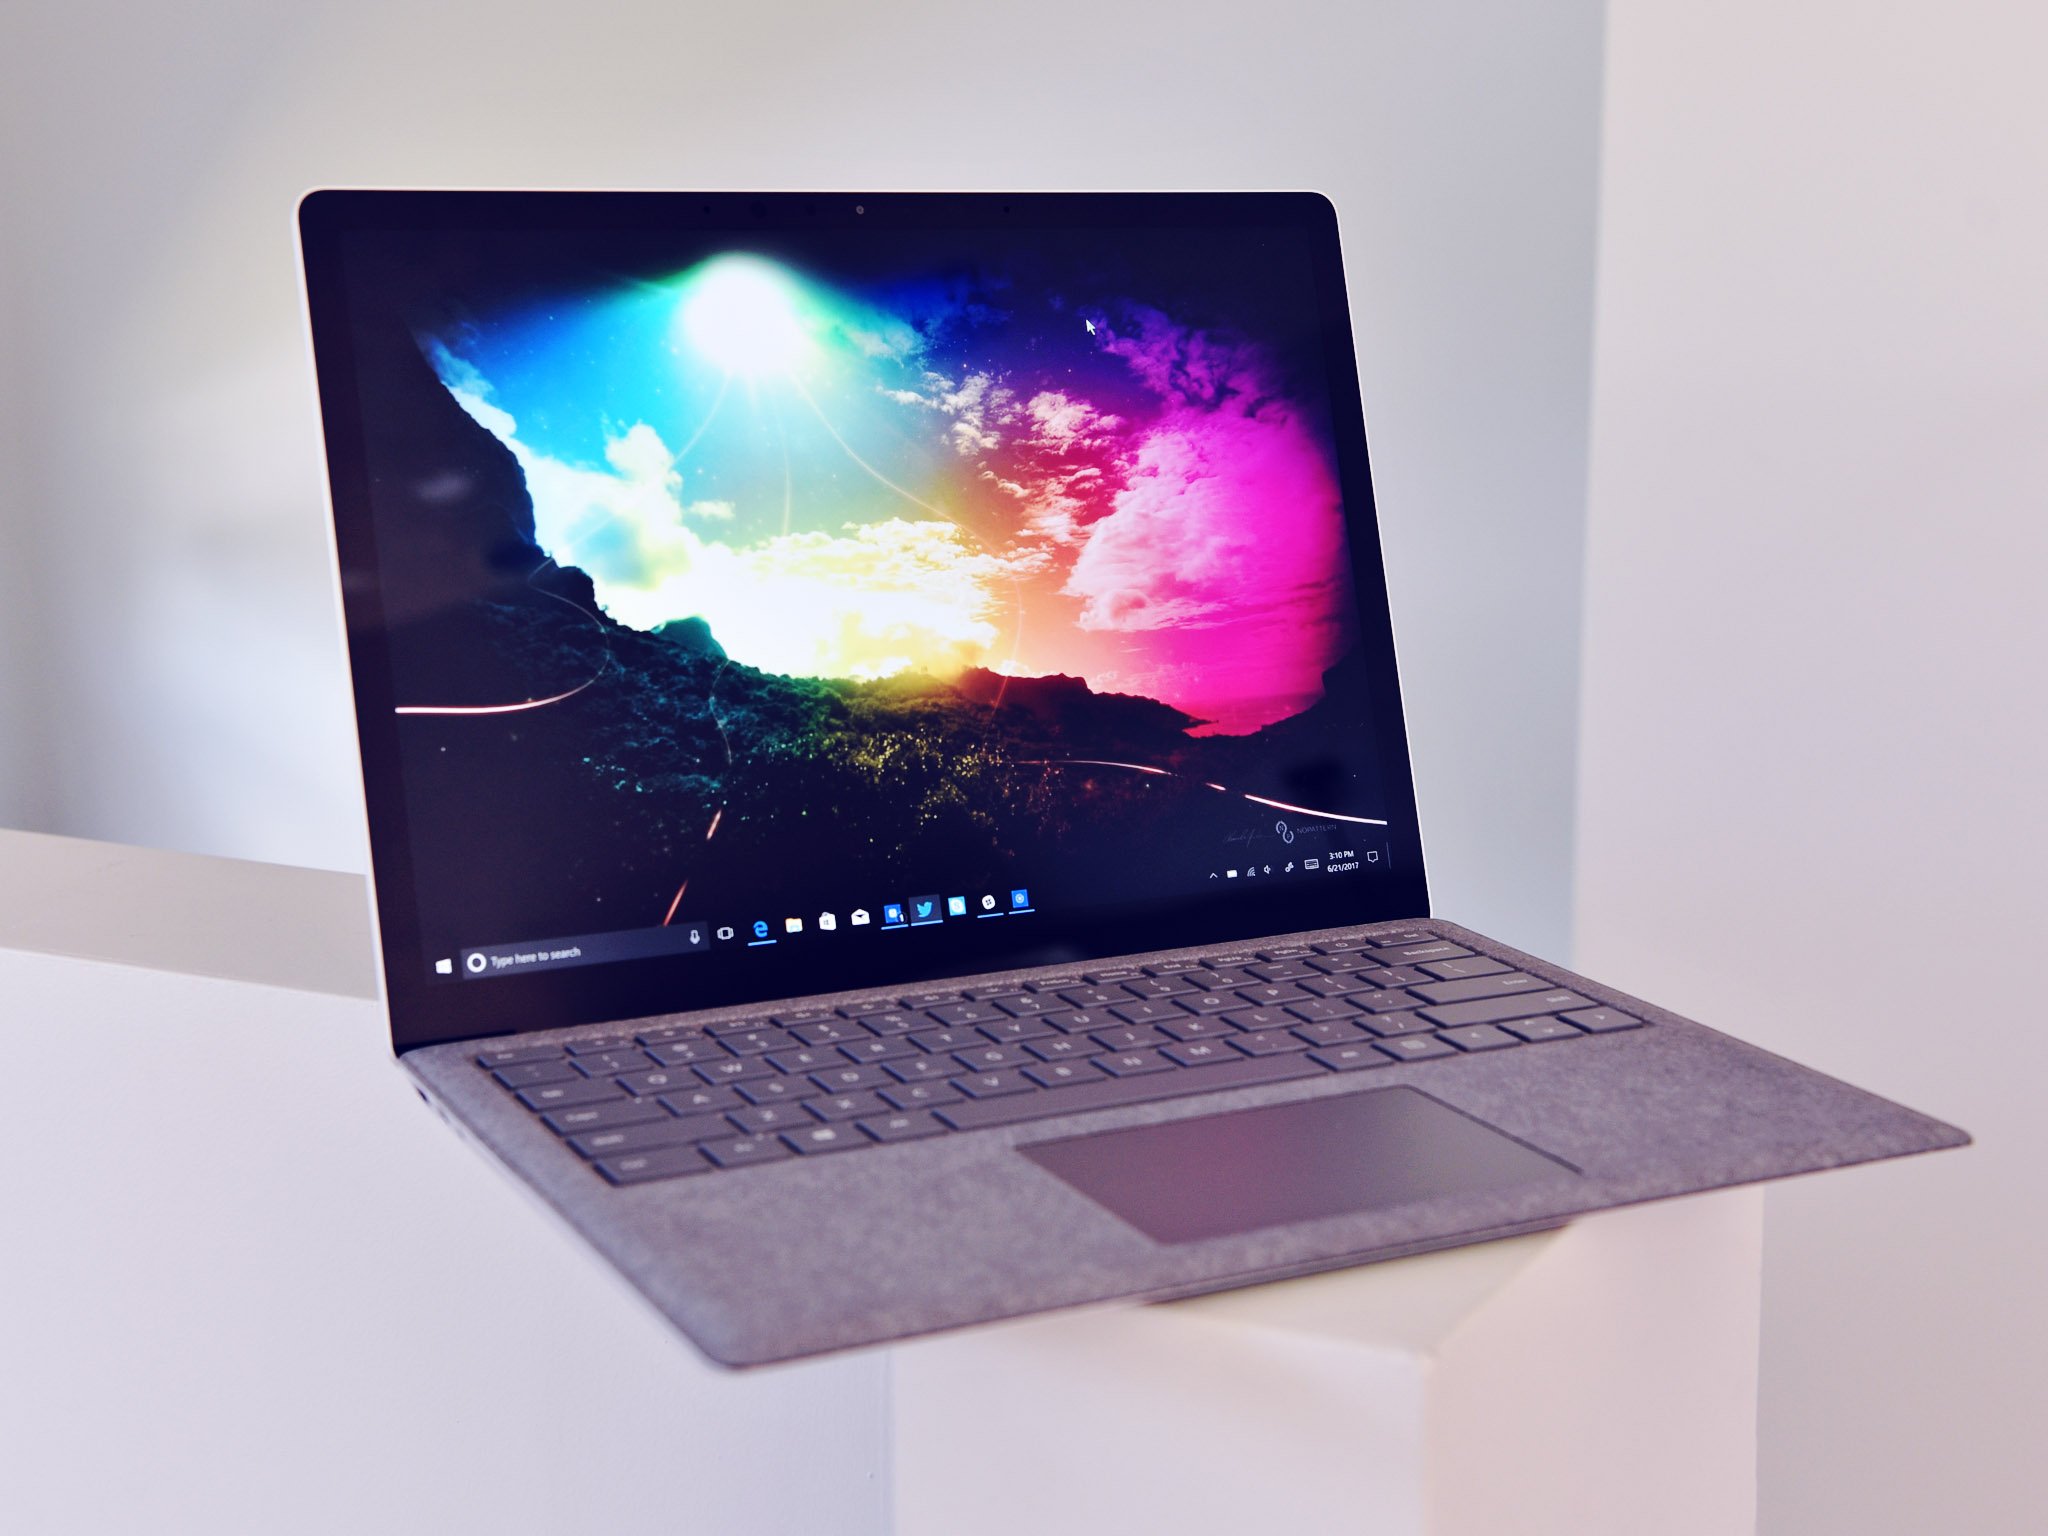
Microsoft provides Surface customers with recovery images that allow you to reset your Surface as if it was just new out of the box. This requires a USB drive, some time, and an internet connection. If you’re planning to sell your Surface Laptop, or are having technical difficulties, recovering the Surface Laptop is recommended. Here’s how to do it.
Products Used in This Guide
- Stylish computing: Surface Laptop ($558 at Amazon)
- Stylish in black: Surface Laptop 2 ($999 at Microsoft)
- Storage on the go: SanDisk USB 3.0 drive ($8 at Amazon)
Download the recovery image
Before we get started, you have to acquire the files necessary for recovery. To do that, you’re going to need your Surface Laptop or Surface Laptop 2 serial number and some time to allow the download to complete. (You can find the 12-digit serial number on the bottom of your device.) The download is around 9GB, so it may take a while depending on your internet connection.
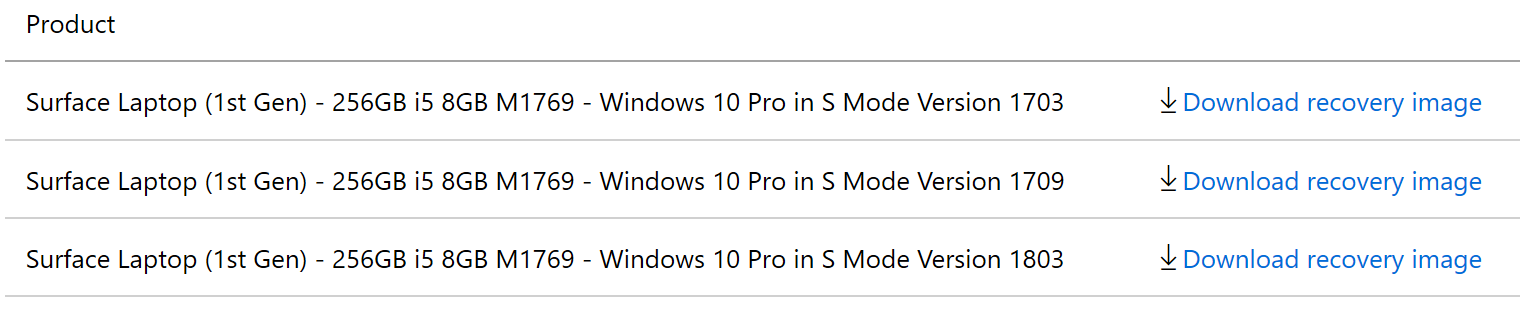
Also, depending on whether your device is a Surface Laptop or Surface Laptop 2, you will either be recovering to Windows 10 Pro in S mode, or Windows 10 Home. The Surface Laptop 2 recovery image is Windows 10 Home, whereas the original Surface Laptop recovery image is Windows 10 Pro in S mode.
- Open Microsoft’s recovery image download page.
- Select Surface Laptop or Surface Laptop 2 in the drop-down menu.
- Enter your Surface Laptop serial number.
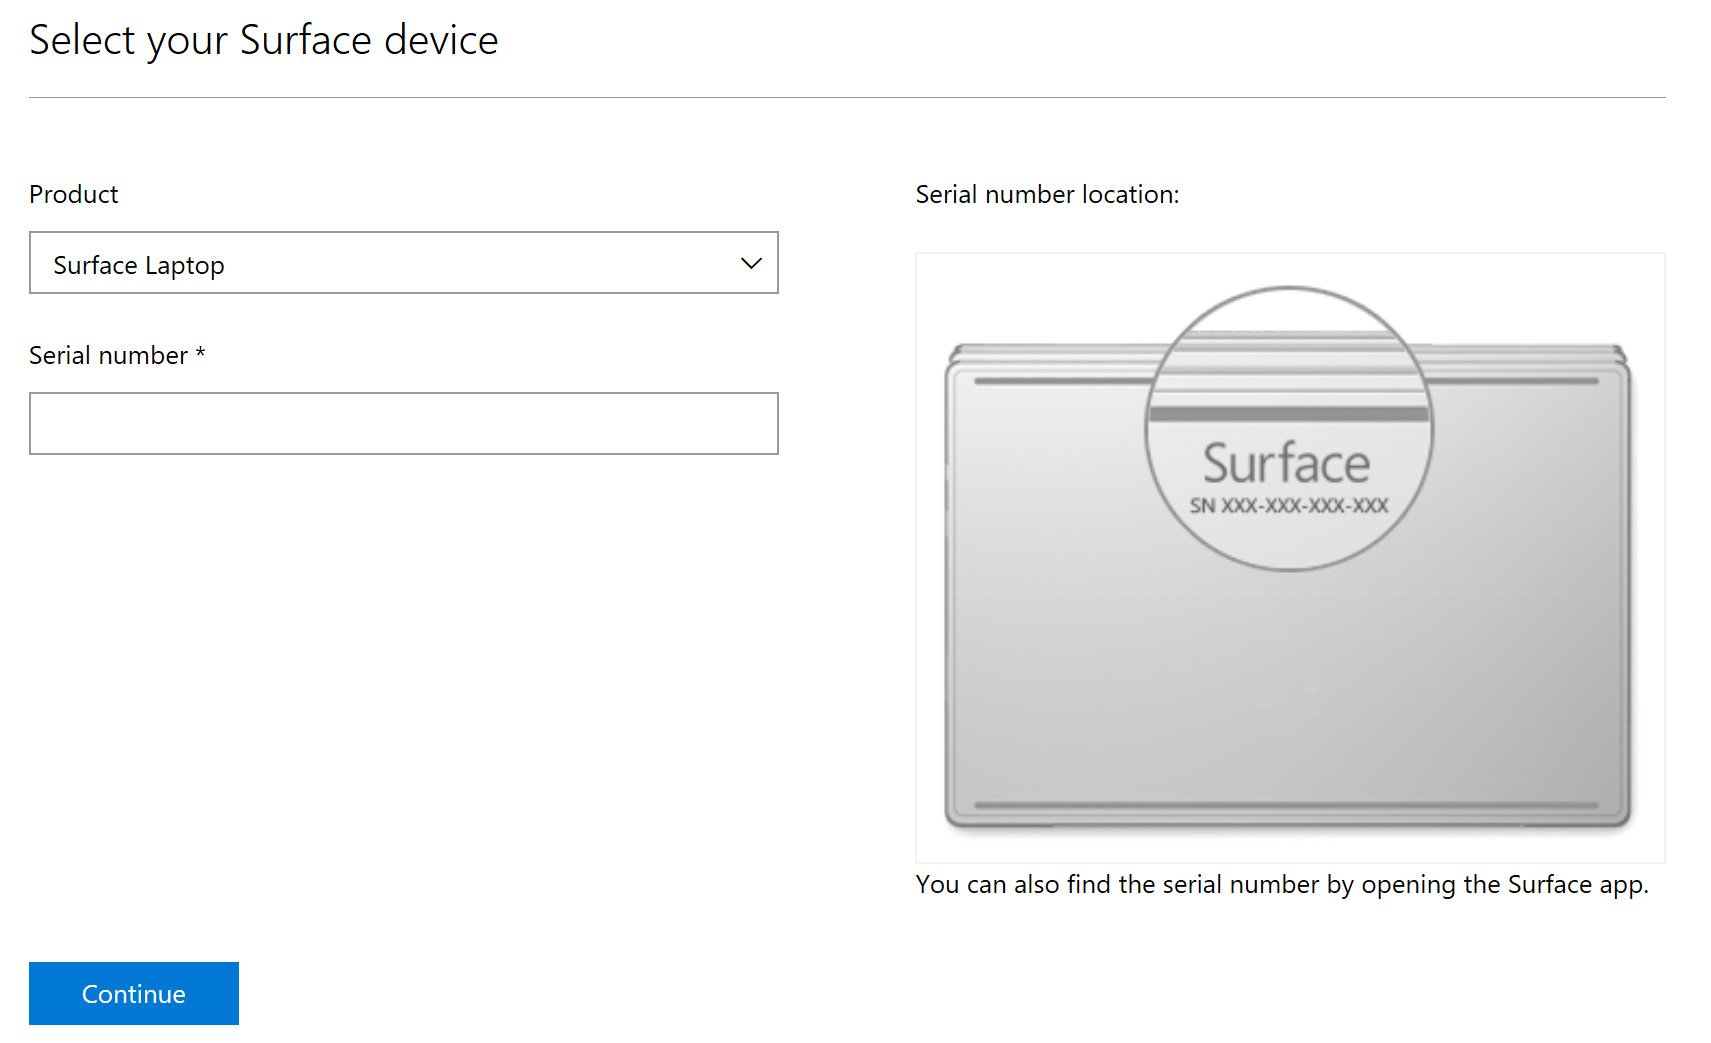
- Select Download recovery image on the latest version available. The download will take some time depending on your internet connection.
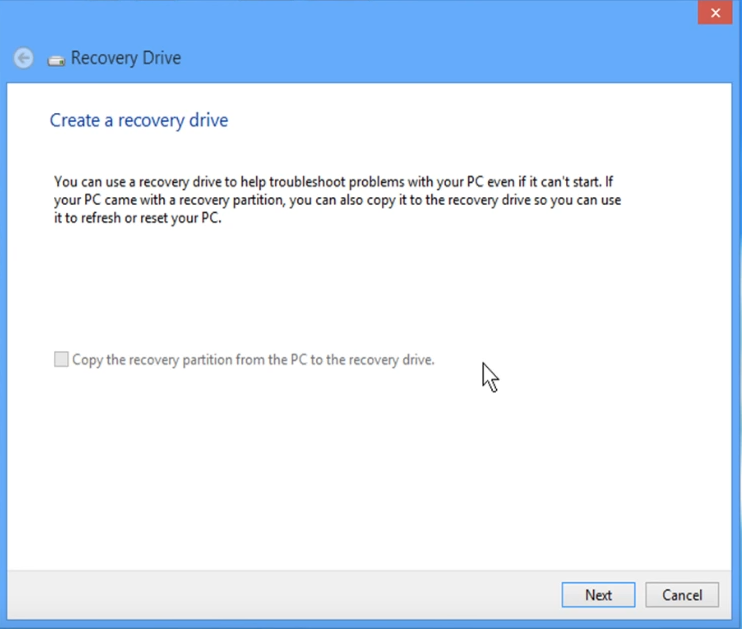
Create a USB recovery drive
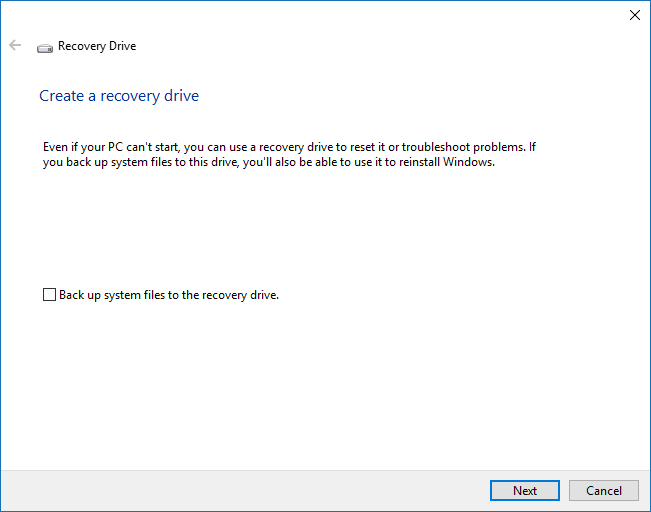
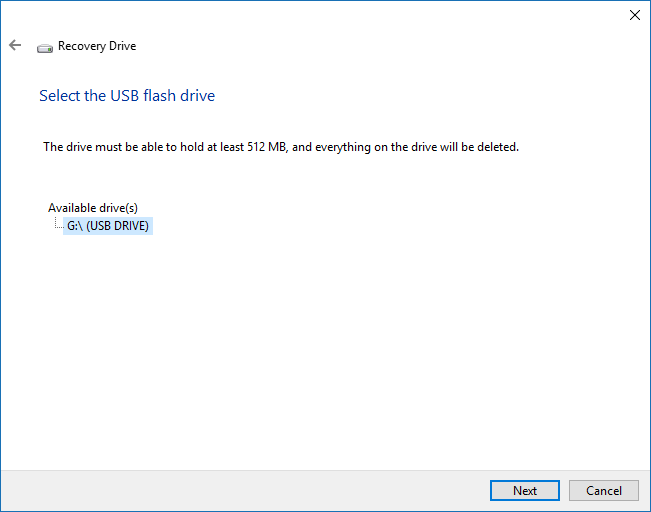
Now that you have the necessary files, you need to set up a USB drive for recovery. We’ll be using the USB drive to recover the Surface Laptop. Make sure the USB drive is at least 16GB in size, and that you backed up all the data on it first.
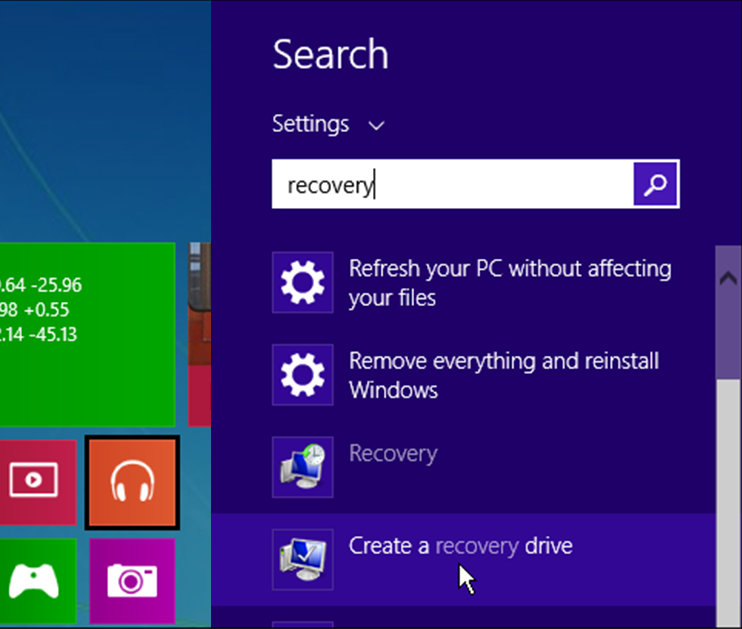
- Press Start.
- Search for «Create a recovery drive».
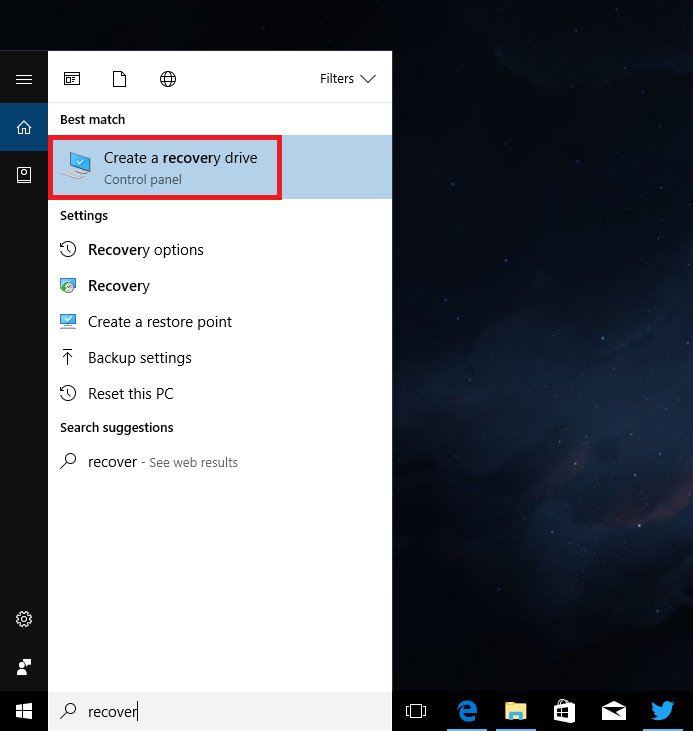
- Deselect Backup system files to the recovery drive.
- Press Next.
- Select the USB drive you’ll be using as the recovery drive.
- Press Next.
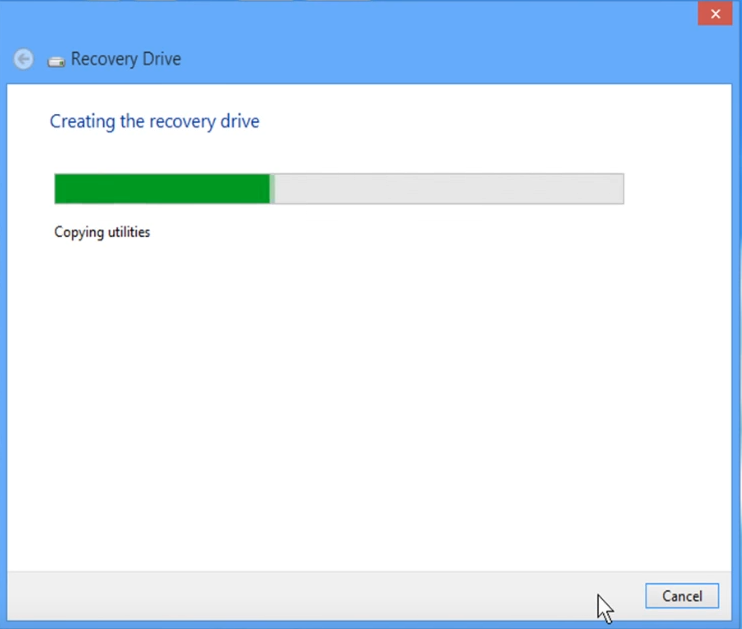
- Select Create drive.
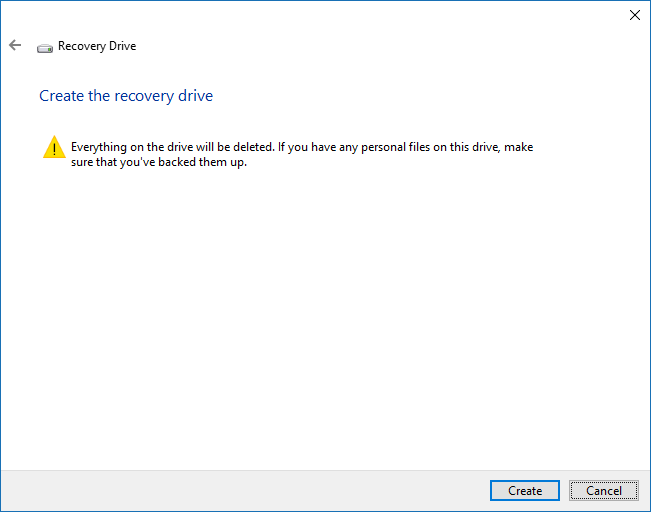
Once your USB recovery drive is created, you need to transfer all of the recovery files you downloaded earlier.
- Right click on the downloaded recovery file.
- Select Extract All.
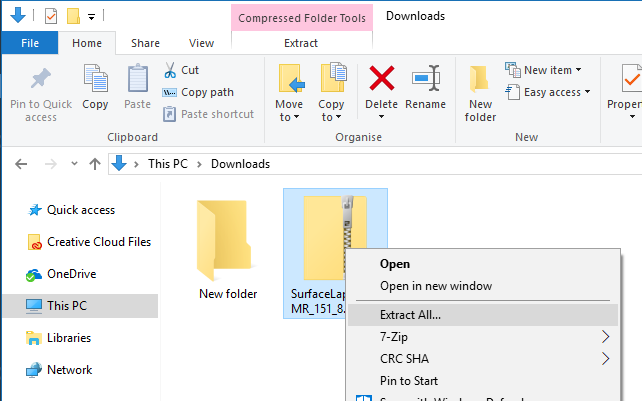
- Select Extract. This will create a folder in the same directory as your downloaded recovery file, into which the contents will be extracted.
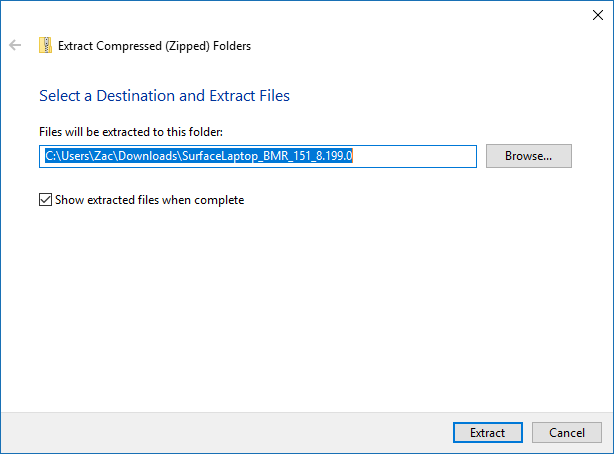
- Open the extracted contents folder. It will have a name along the lines of «SurfaceLaptop_BMR_151_12.761.0» (the specific name may vary depending on the recovery version you download).
- Copy all the files in the extracted folder into your newly created USB recovery drive.
You can press CTRL + A to select all of the files in the folder and drag-and-drop them into the drive labeled «RECOVERY» in the left sidebar.
You may be prompted to replace already existing files in the destination. If so, select Replace files in destination.
All the latest news, reviews, and guides for Windows and Xbox diehards.
Recover Surface Laptop
Now that you’ve created the USB recovery drive and loaded all the necessary files onto it, you can finally get to recovering the Surface Laptop. Make sure you backed up all your data first, as this process will remove all your apps, documents and settings.
- Power off your device.
- Insert the USB recovery drive we just created into the USB port on the Surface Laptop or Surface Laptop 2.
- Hold the volume-down and power button at the same time.
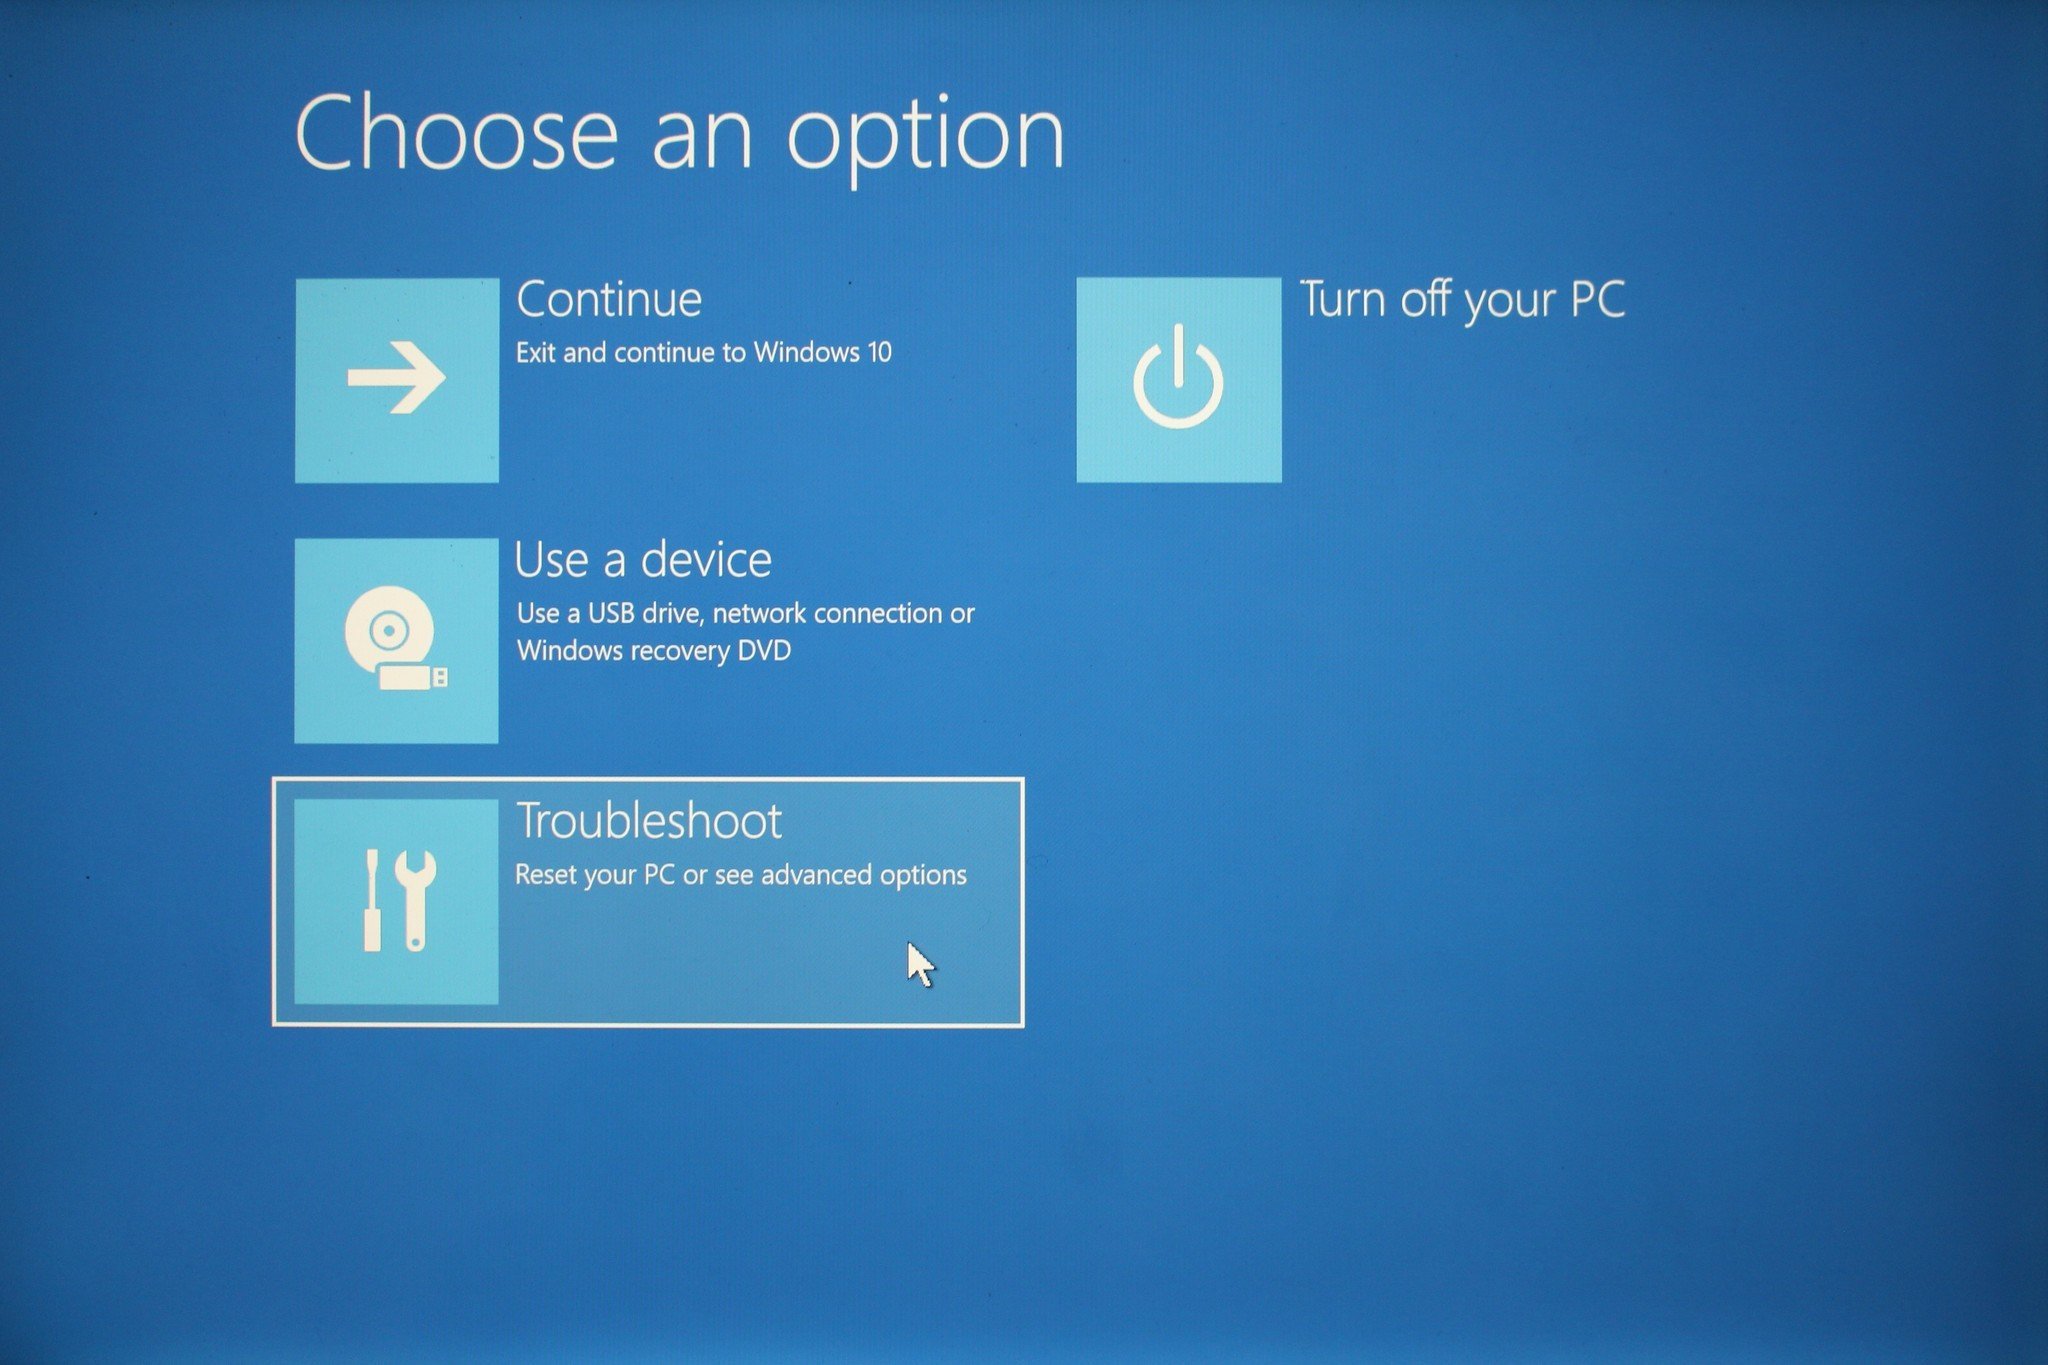
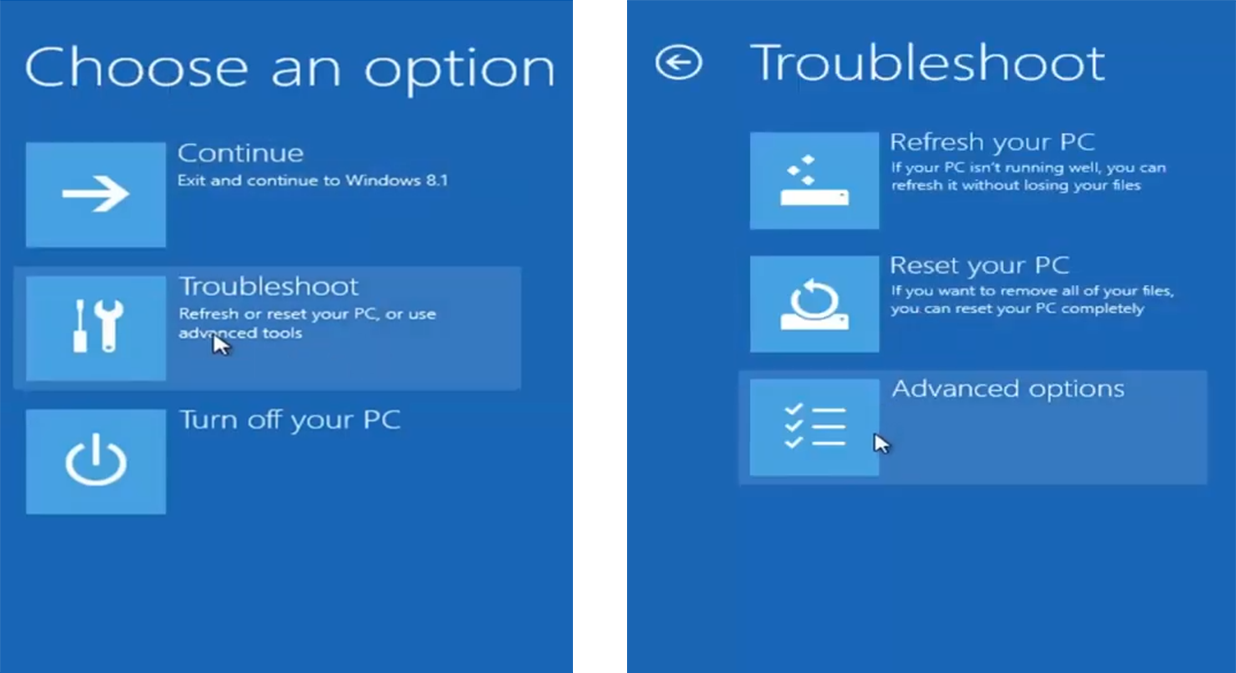
- When the Surface logo appears, let go of the buttons. A blue screen with language selection options will appear.
- Select your language and keyboard settings.

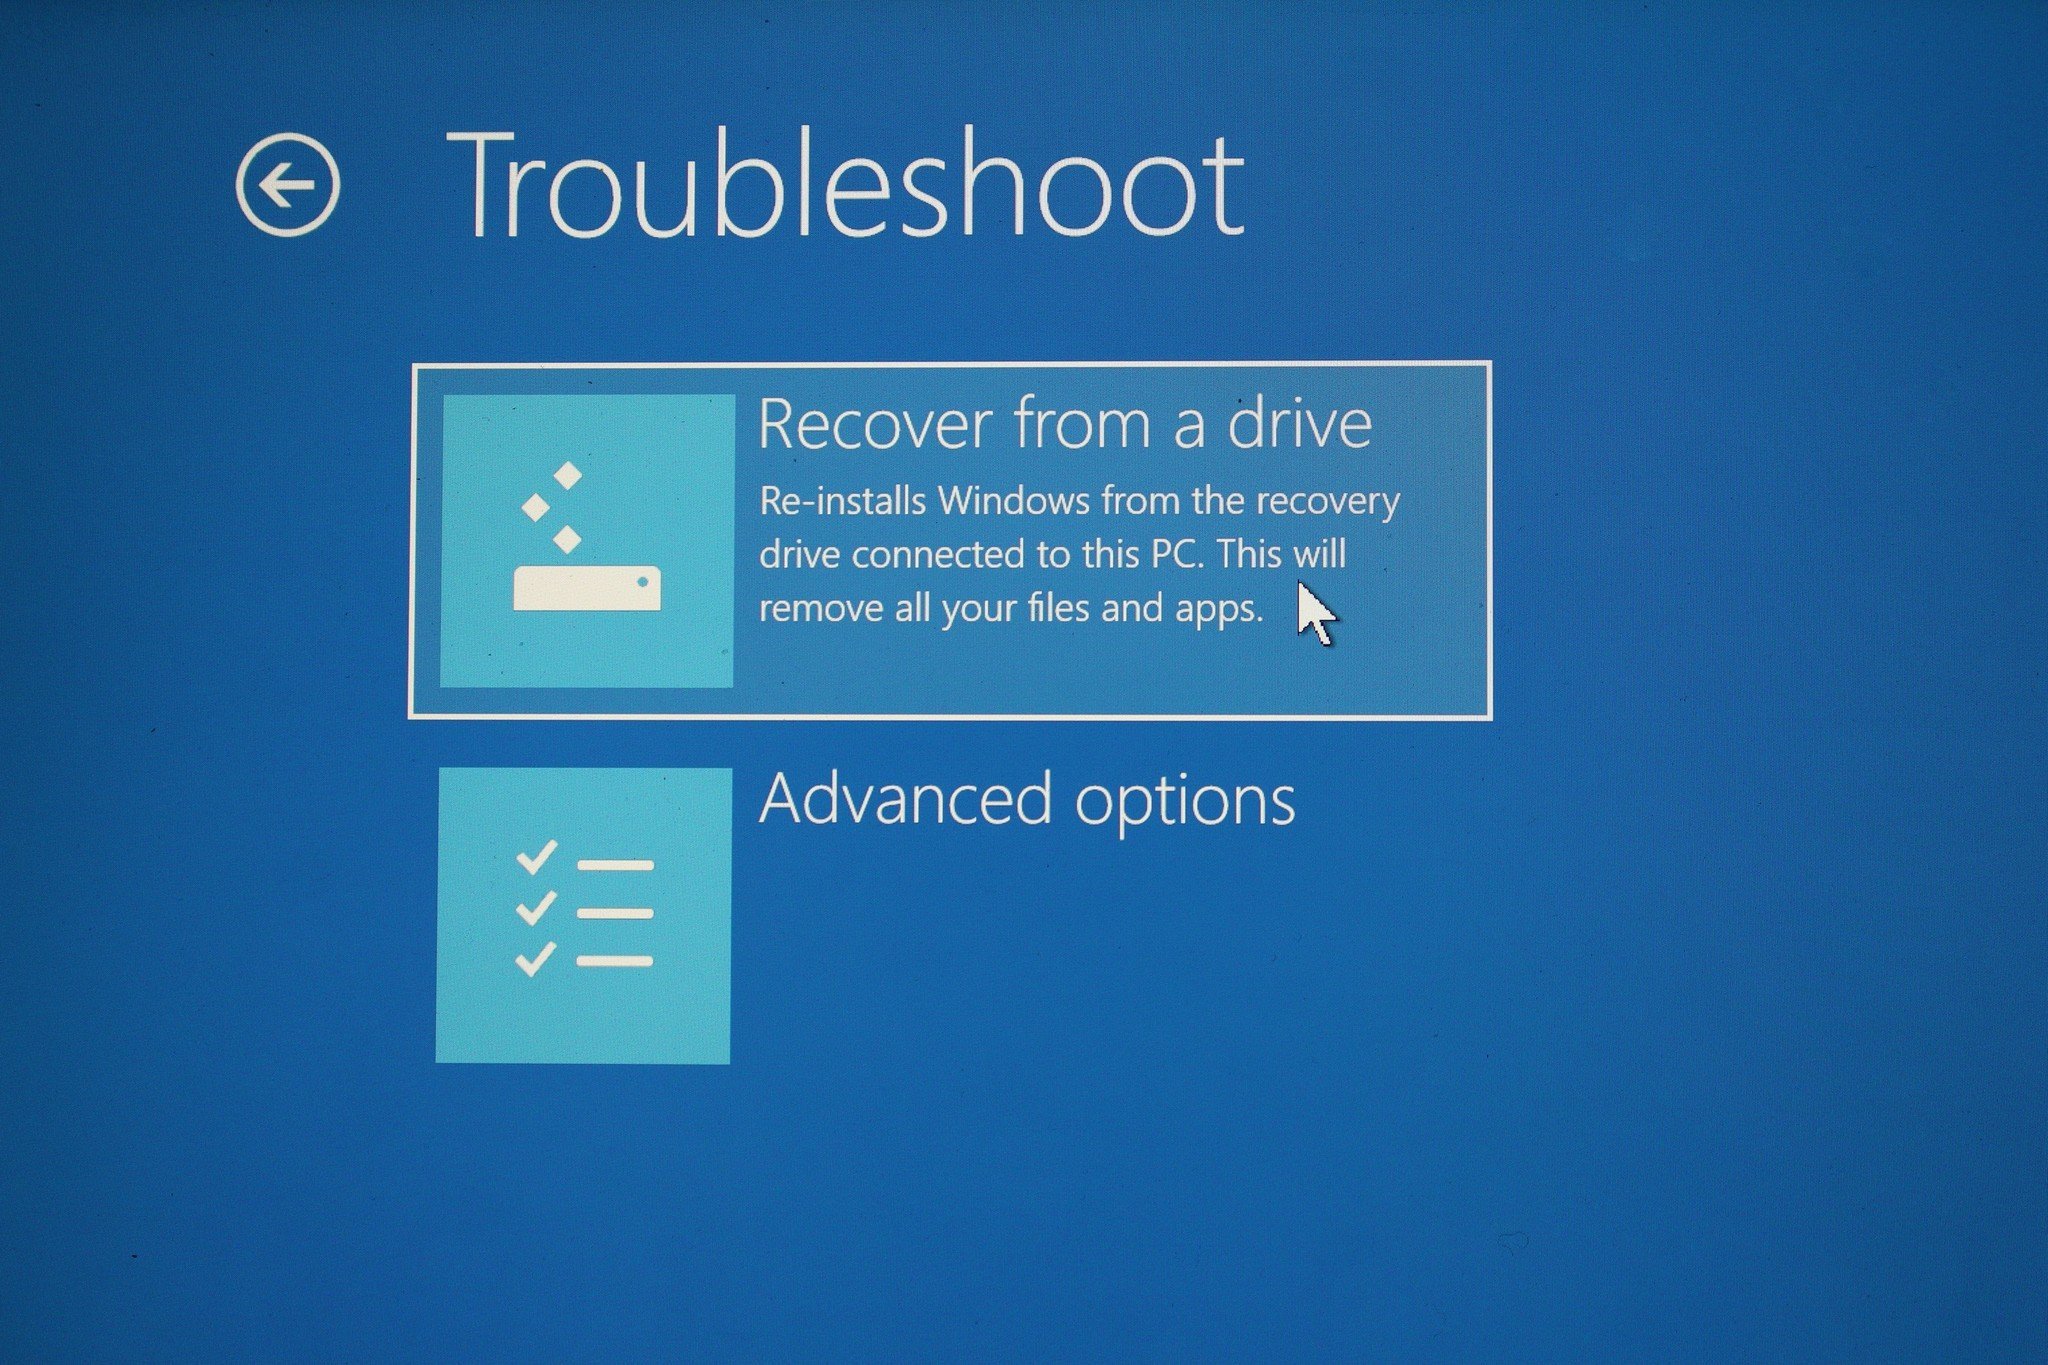
- Select Troubleshoot.
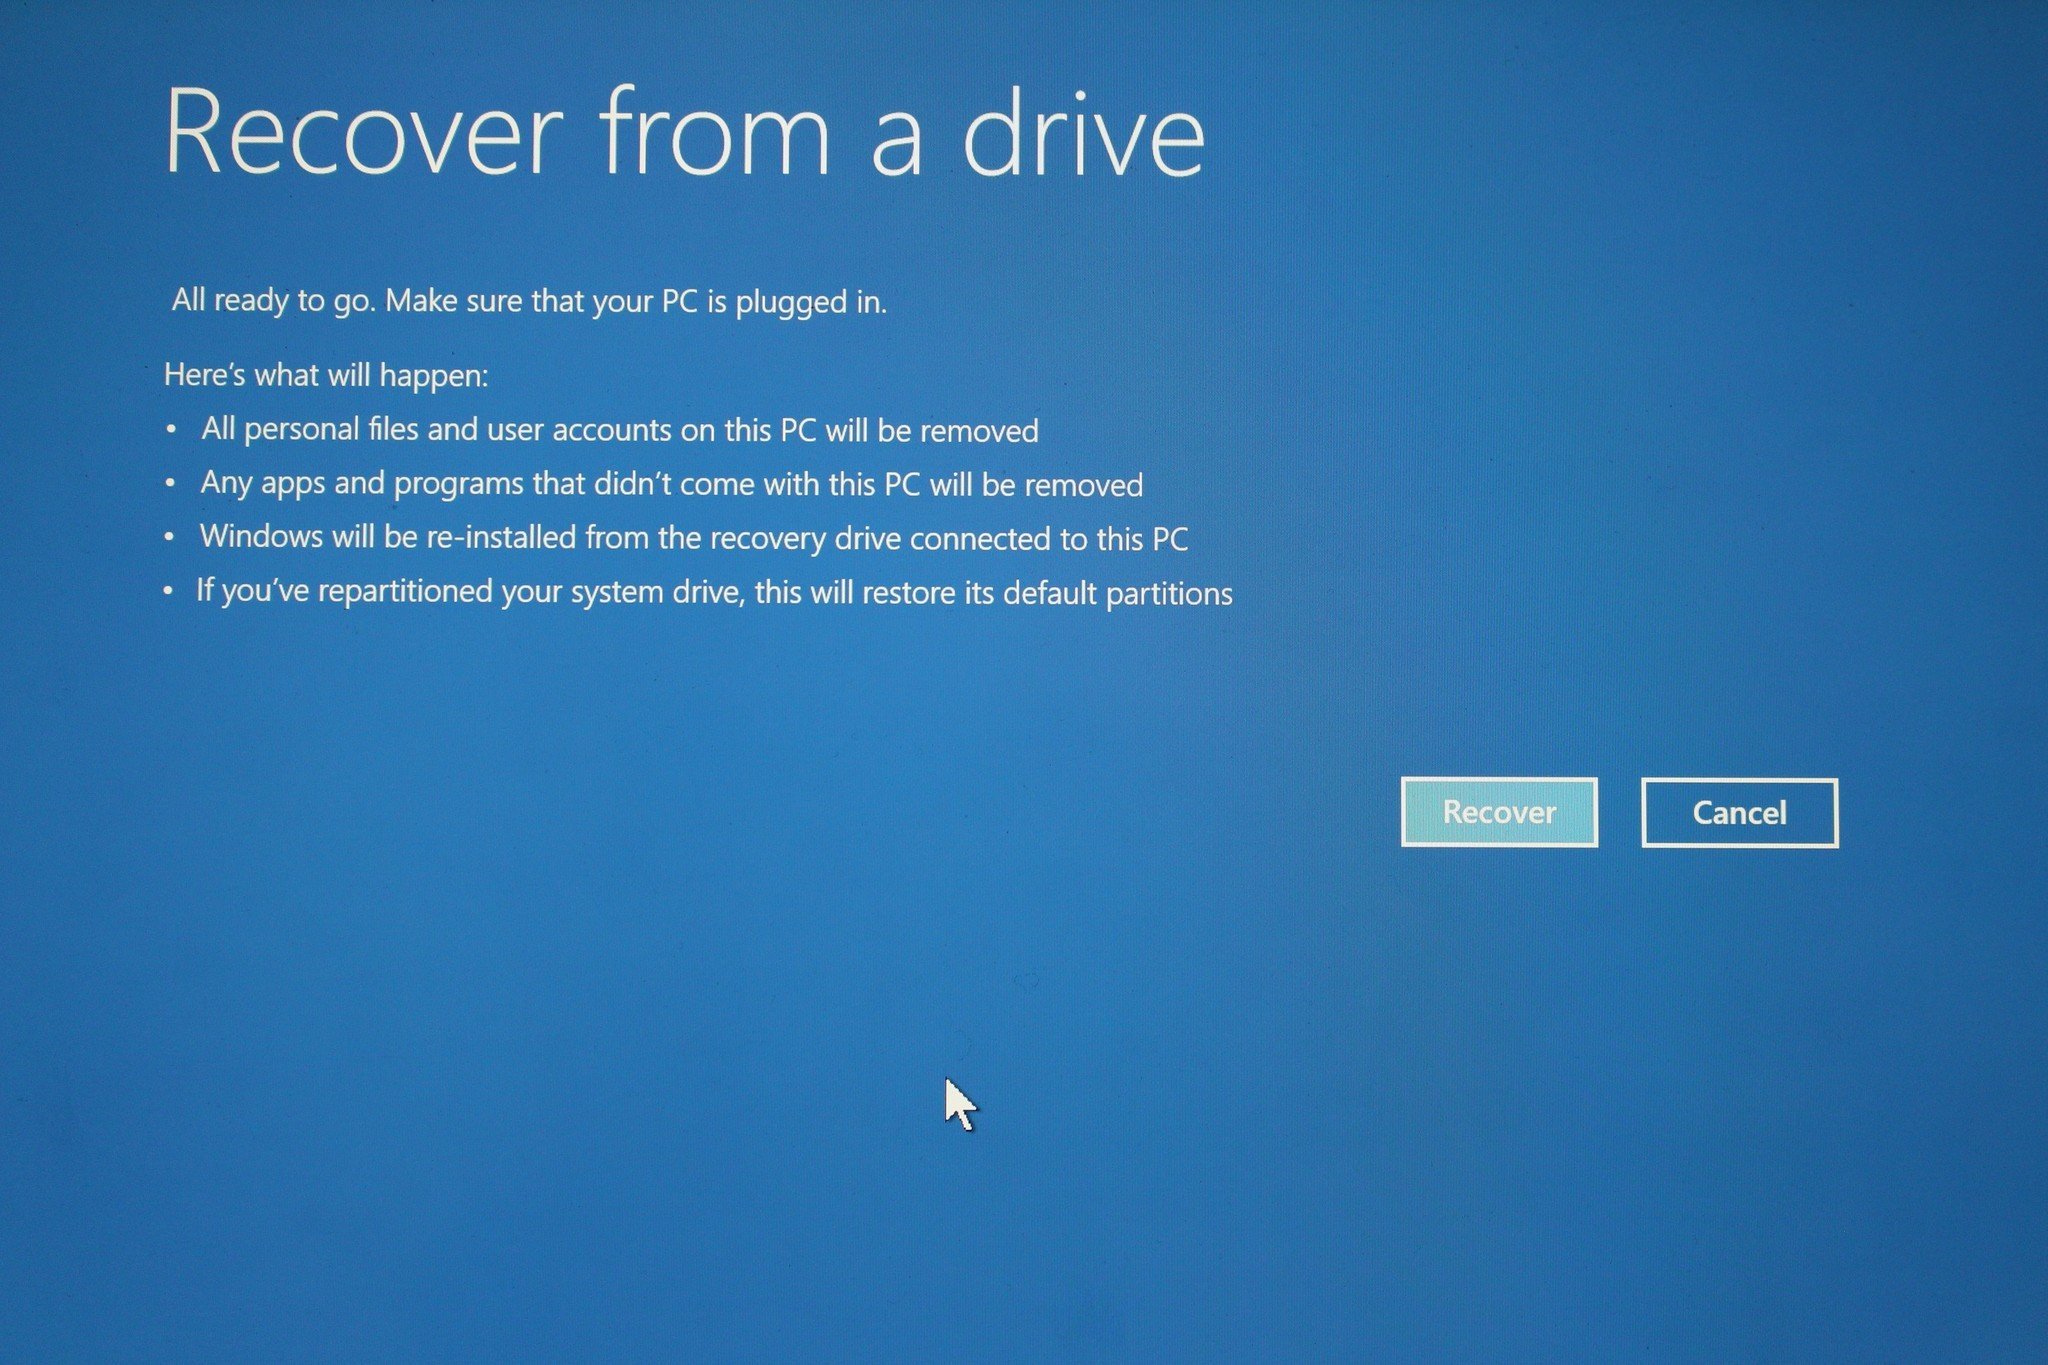
- Select Recover from a drive.
- If prompted for a recovery key, select Skip this drive.
- Select Just remove my files.
- If you’re parting ways with your device, I recommend selecting Fully clean the drive to thoroughly erase your old files.
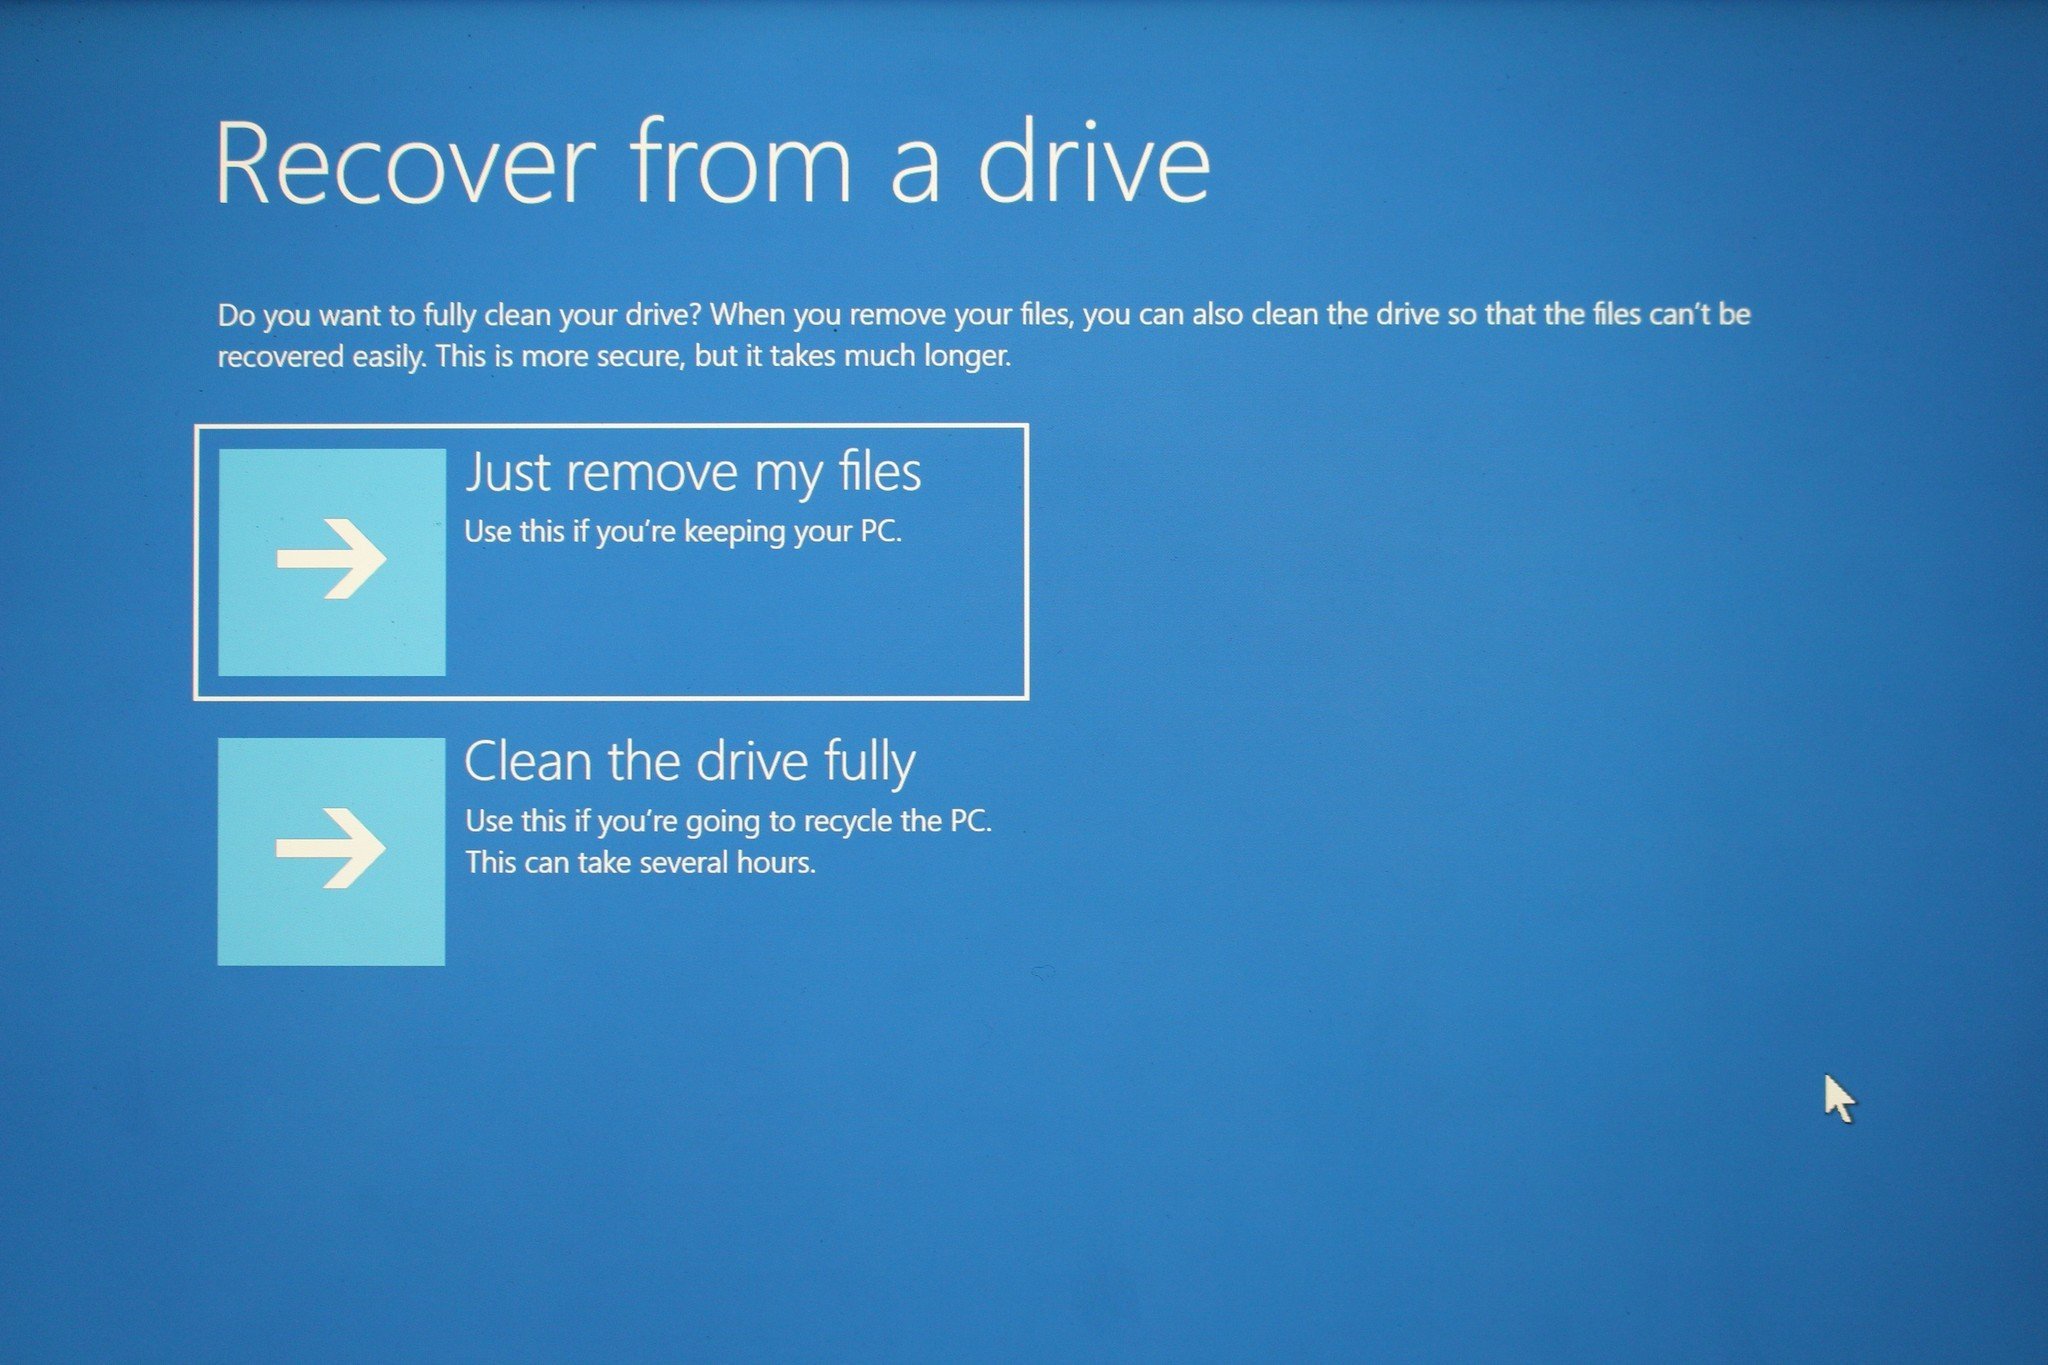
- Select Recover. This will restart your Surface Laptop and take some time, but when it’s done, Windows 10 S will be back on your Surface Laptop.
That’s it. Your Surface Laptop should now be recovered and running Windows 10 S.
The right Surface Laptop
To complete this guide, you’ll need to be using a 1st generation Surface Laptop or a Surface Laptop 2.
High class laptop
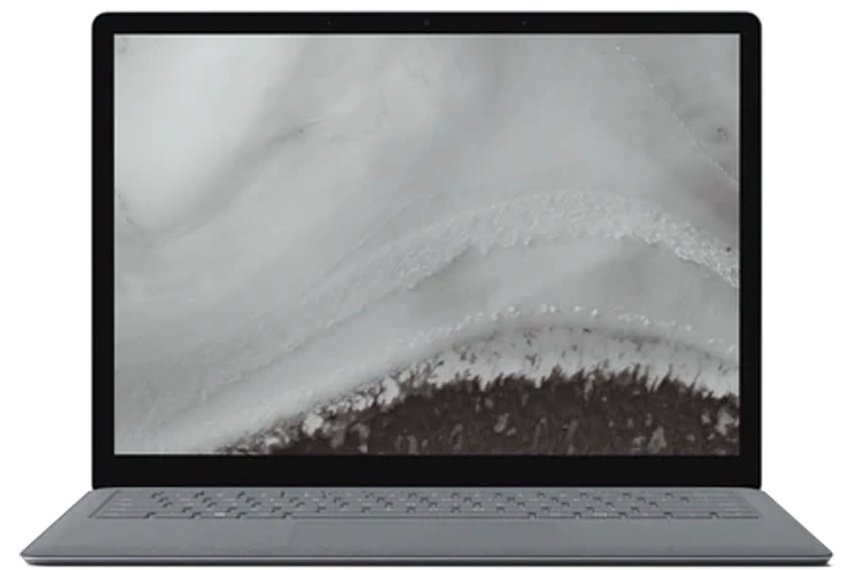
Surface Laptop (1st Gen)
A beautiful laptop for Windows users
The Surface Laptop is a premium laptop device from Microsoft that comes with Windows 10 out of the box.
Stylish computing
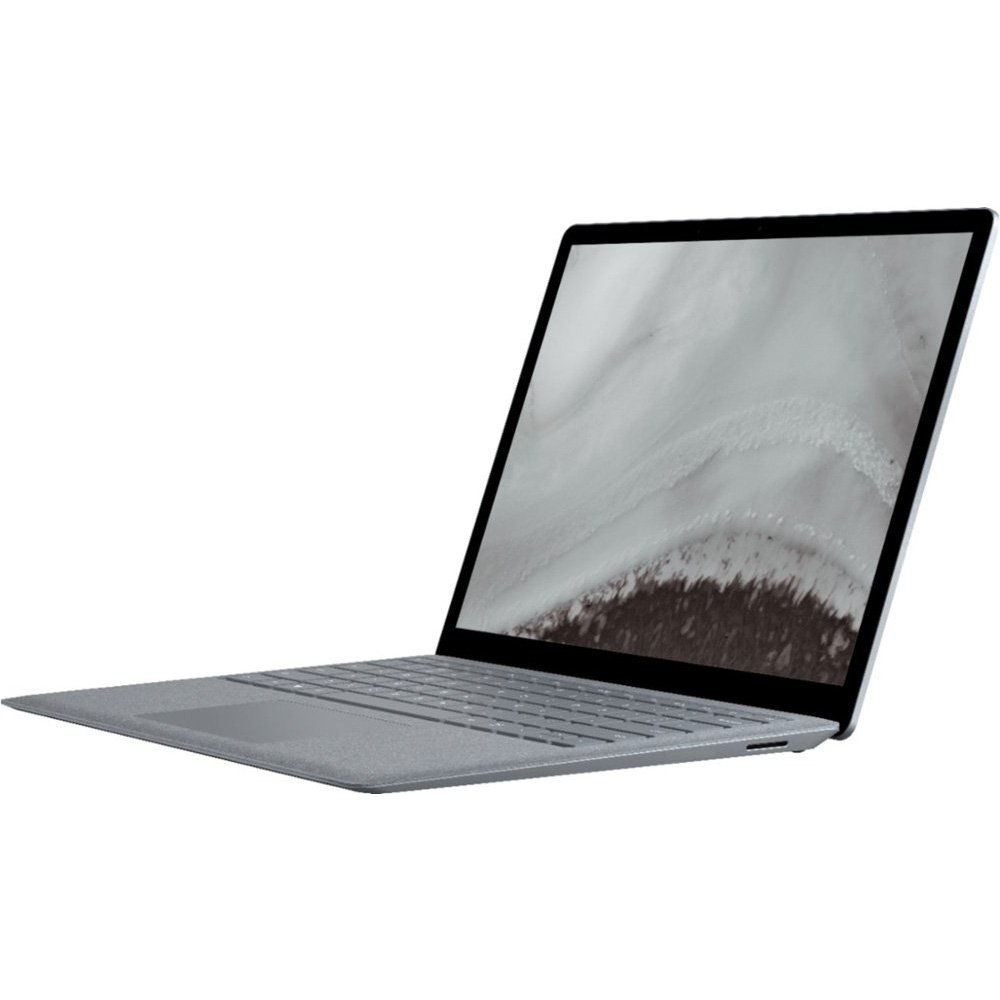
Surface Laptop 2
The same great laptop, but now with more power.
The Surface Laptop 2 continues the premium design of the first one, but now with more power.
Additional Equipment
You’ll also need an extrernal USB flash drive to complete this how-to. Here’s what we used.
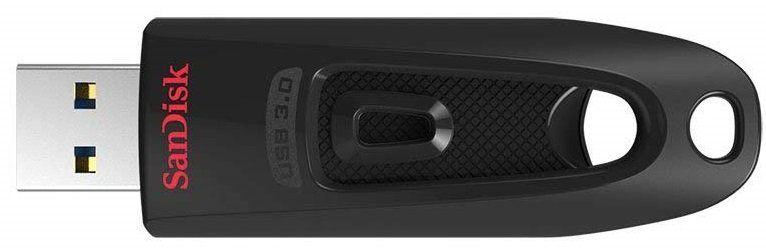
SanDisk USB 3.0 32GB flash drive ($8 at Amazon)
This all purpose USB-A flash drive is perfect for transferring files, reinstalling an OS, and storing content.
Our favorite accessories
Now you’ve got Windows 10 S back up and running, here’s some of our favorite accessories you might also find useful.
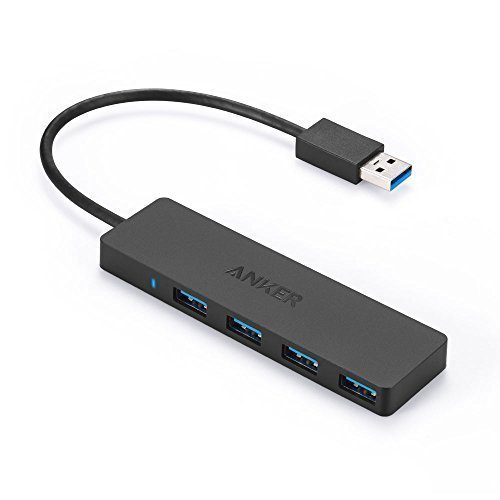
Anker Ultra Slim 4-Port USB 3.0 hub ($10 at Amazon)
Need more USB ports for your Surface Laptop? This USB hub should help! Turn one port into four.
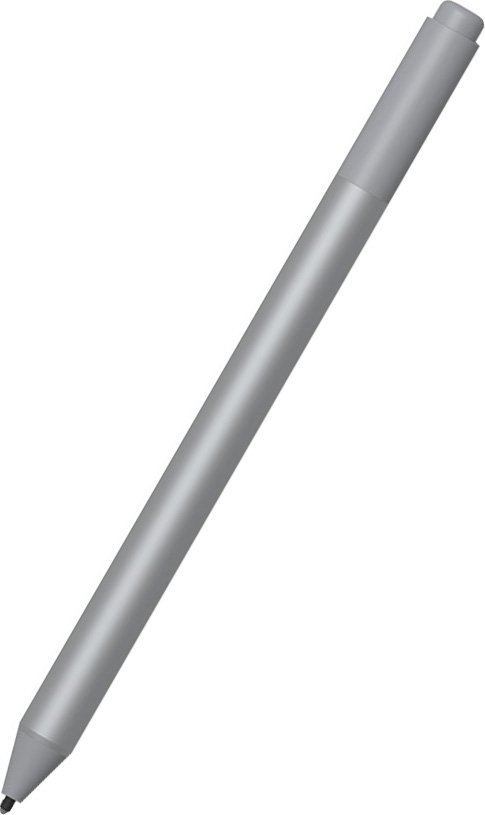
Surface Pen ($99 at Amazon)
Enhance your Surface Laptop with the Microsoft Surface Pen, which allows you to interact with the touchscreen easily.

Surface Dial ($99 at Amazon)
Twist into action with the Surface Dial Bluetooth accessory. You can play with gestures and make certain actions easier.
Zac Bowden is a Senior Editor at Windows Central. Bringing you exclusive coverage into the world of Windows on PCs, tablets, phones, and more. Also an avid collector of rare Microsoft prototype devices! Keep in touch on Twitter and Threads
Устройство Surface поставляется вместе с данными для восстановления Windows, которые позволяют обновить устройство или сбросить его параметры до заводских. Данные для восстановления хранятся в специальном разделе восстановления на планшете Surface. И для перехода в раздел восстановления системы достаточно удерживать клавиш Shift и Alt при загрузке устройства Surface, однако, иногда, например при сбоях питания компьютера или обновления до бета версии Windows 11, встроенные инструменты восстановления Microsoft Surface могут оказаться повреждены и вы не сможете запустить Windows вашем устройстве. В этой статье мы расскажем о том, как создать диск восстановления Windows и переустановить операционную систему на устройстве, которое перестало подавать признаки жизни.
В первую очередь нам потребуется любой компьютер на базе Windows и флешка объемом не менее 16 гигабайн.
Создаем диск восстановления Windows:
Проведите пальцем от правого края экрана к центру, затем коснитесь кнопки Поиск.
(При использовании мыши наведите указатель на правый верхний угол экрана, переместите его вниз и щелкните кнопку Поиск.)
В поле поиска введите слово восстановление и коснитесь или щелкните в результатах поиска пункт Восстановление, а затем коснитесь или щелкните элемент Создание диска восстановления.
Коснитесь или щелкните элемент Скопировать раздел восстановления с компьютера на диск восстановления чтобы отключить функцию, а затем коснитесь или щелкните кнопку Далее.
На следующем экране отобразятся данные о доступном дисковом пространстве на USB-накопителе.
Коснитесь или щелкните кнопку Отмена для закрытия окна инструмента для создания диска восстановления. (Обратите внимание, в результате создания диска восстановления все данные с накопителя будут удалены.
Скачиваем образ операционной системы для вашего Surface:
Теперь, после создания диска восстановления, вам потребуется скачать образ Windows для вашего устройства. Для этого перейдите на сайт https://support.microsoft.com и выберите ваш девайс в выпадающем списке.
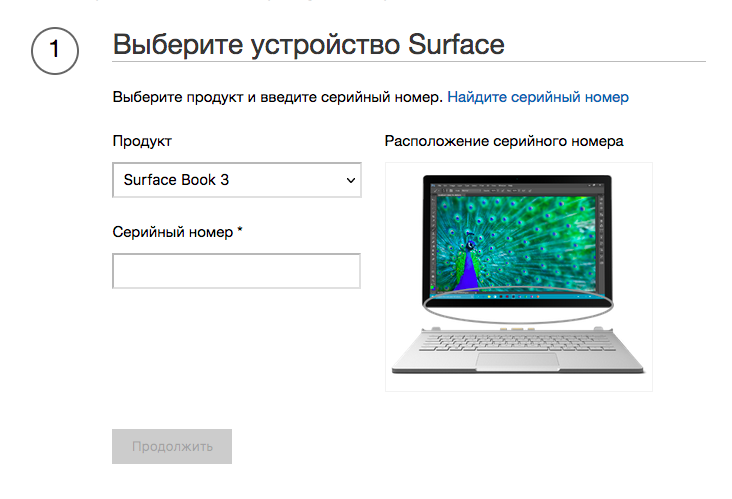
Далее вам потребуется ввести серийный номер вашего Surface — его можно найти на коробке или корпусе устройства — просто следуйте инструкциям. Образ Windows для Surface весит примерно 10 гигабайтов. Сохраните его в любую папку на вашем компьютере (а не на загрузочную флешку. После завершения загрузки распакуйте архив и скопируйте его содержимое на загргузочную флешку. Некоторые файлы будет предложено заменить — подтвердите замену. Загрузочный диск для восстановления операционной системы готов.
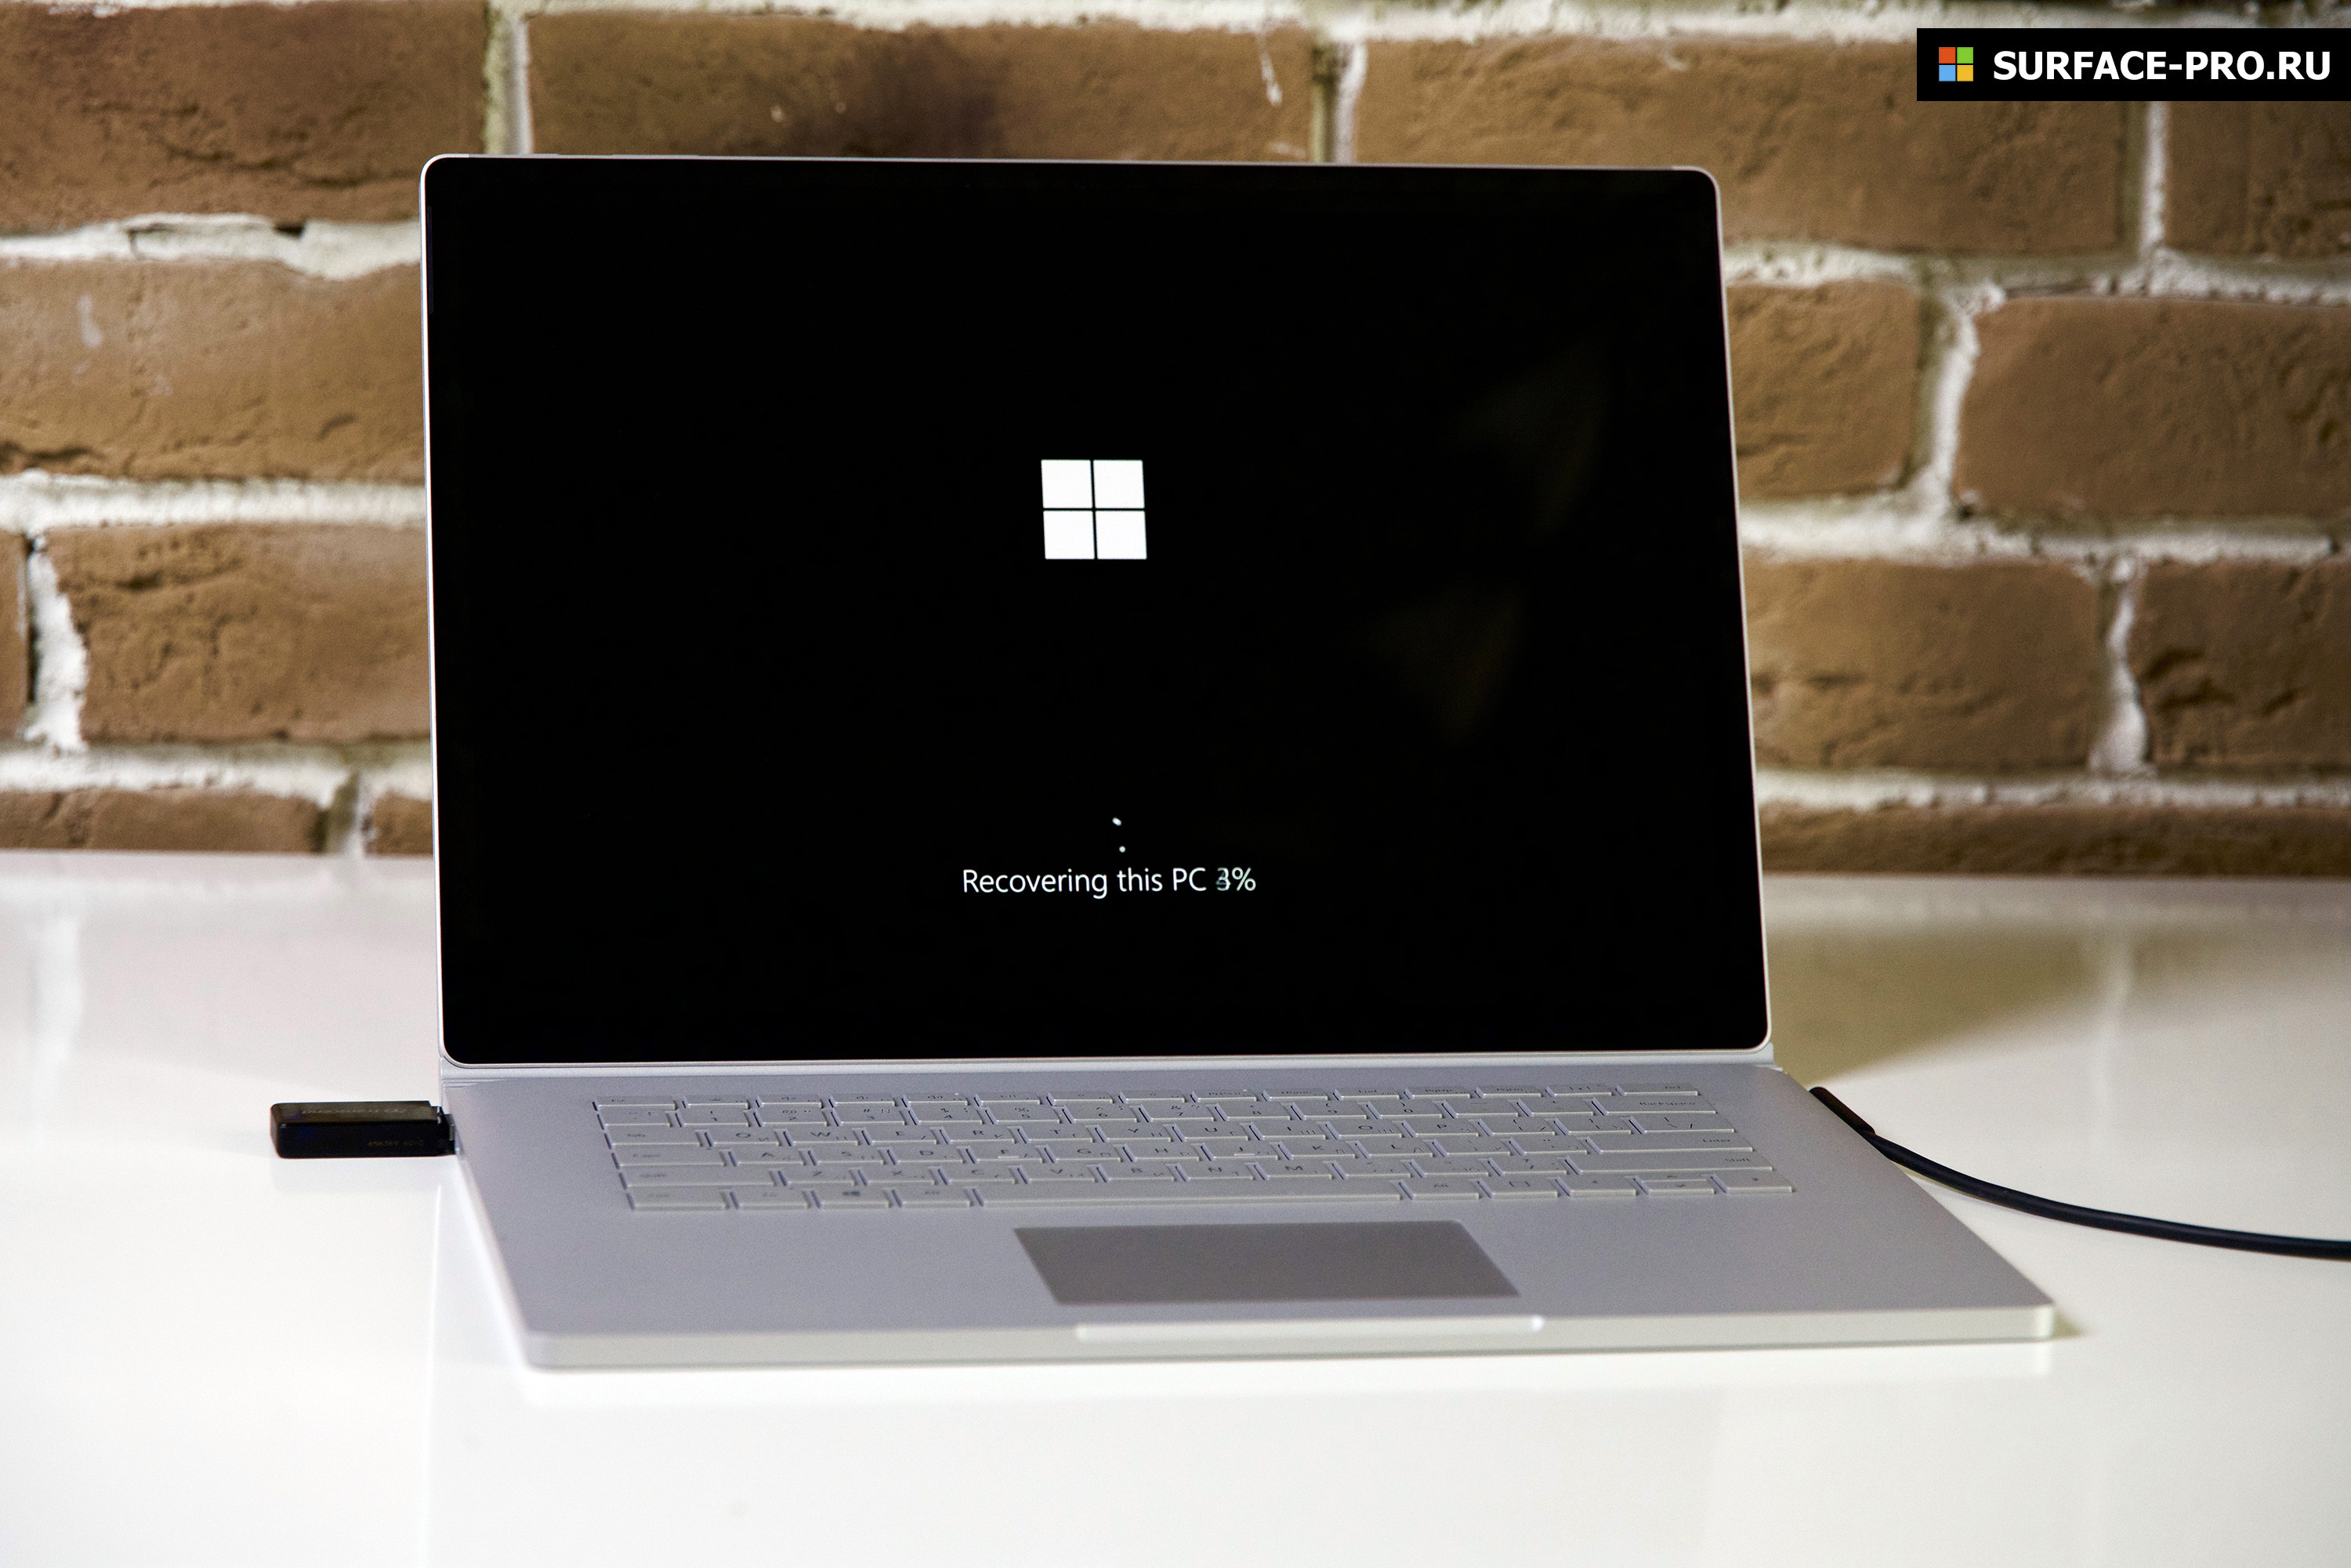
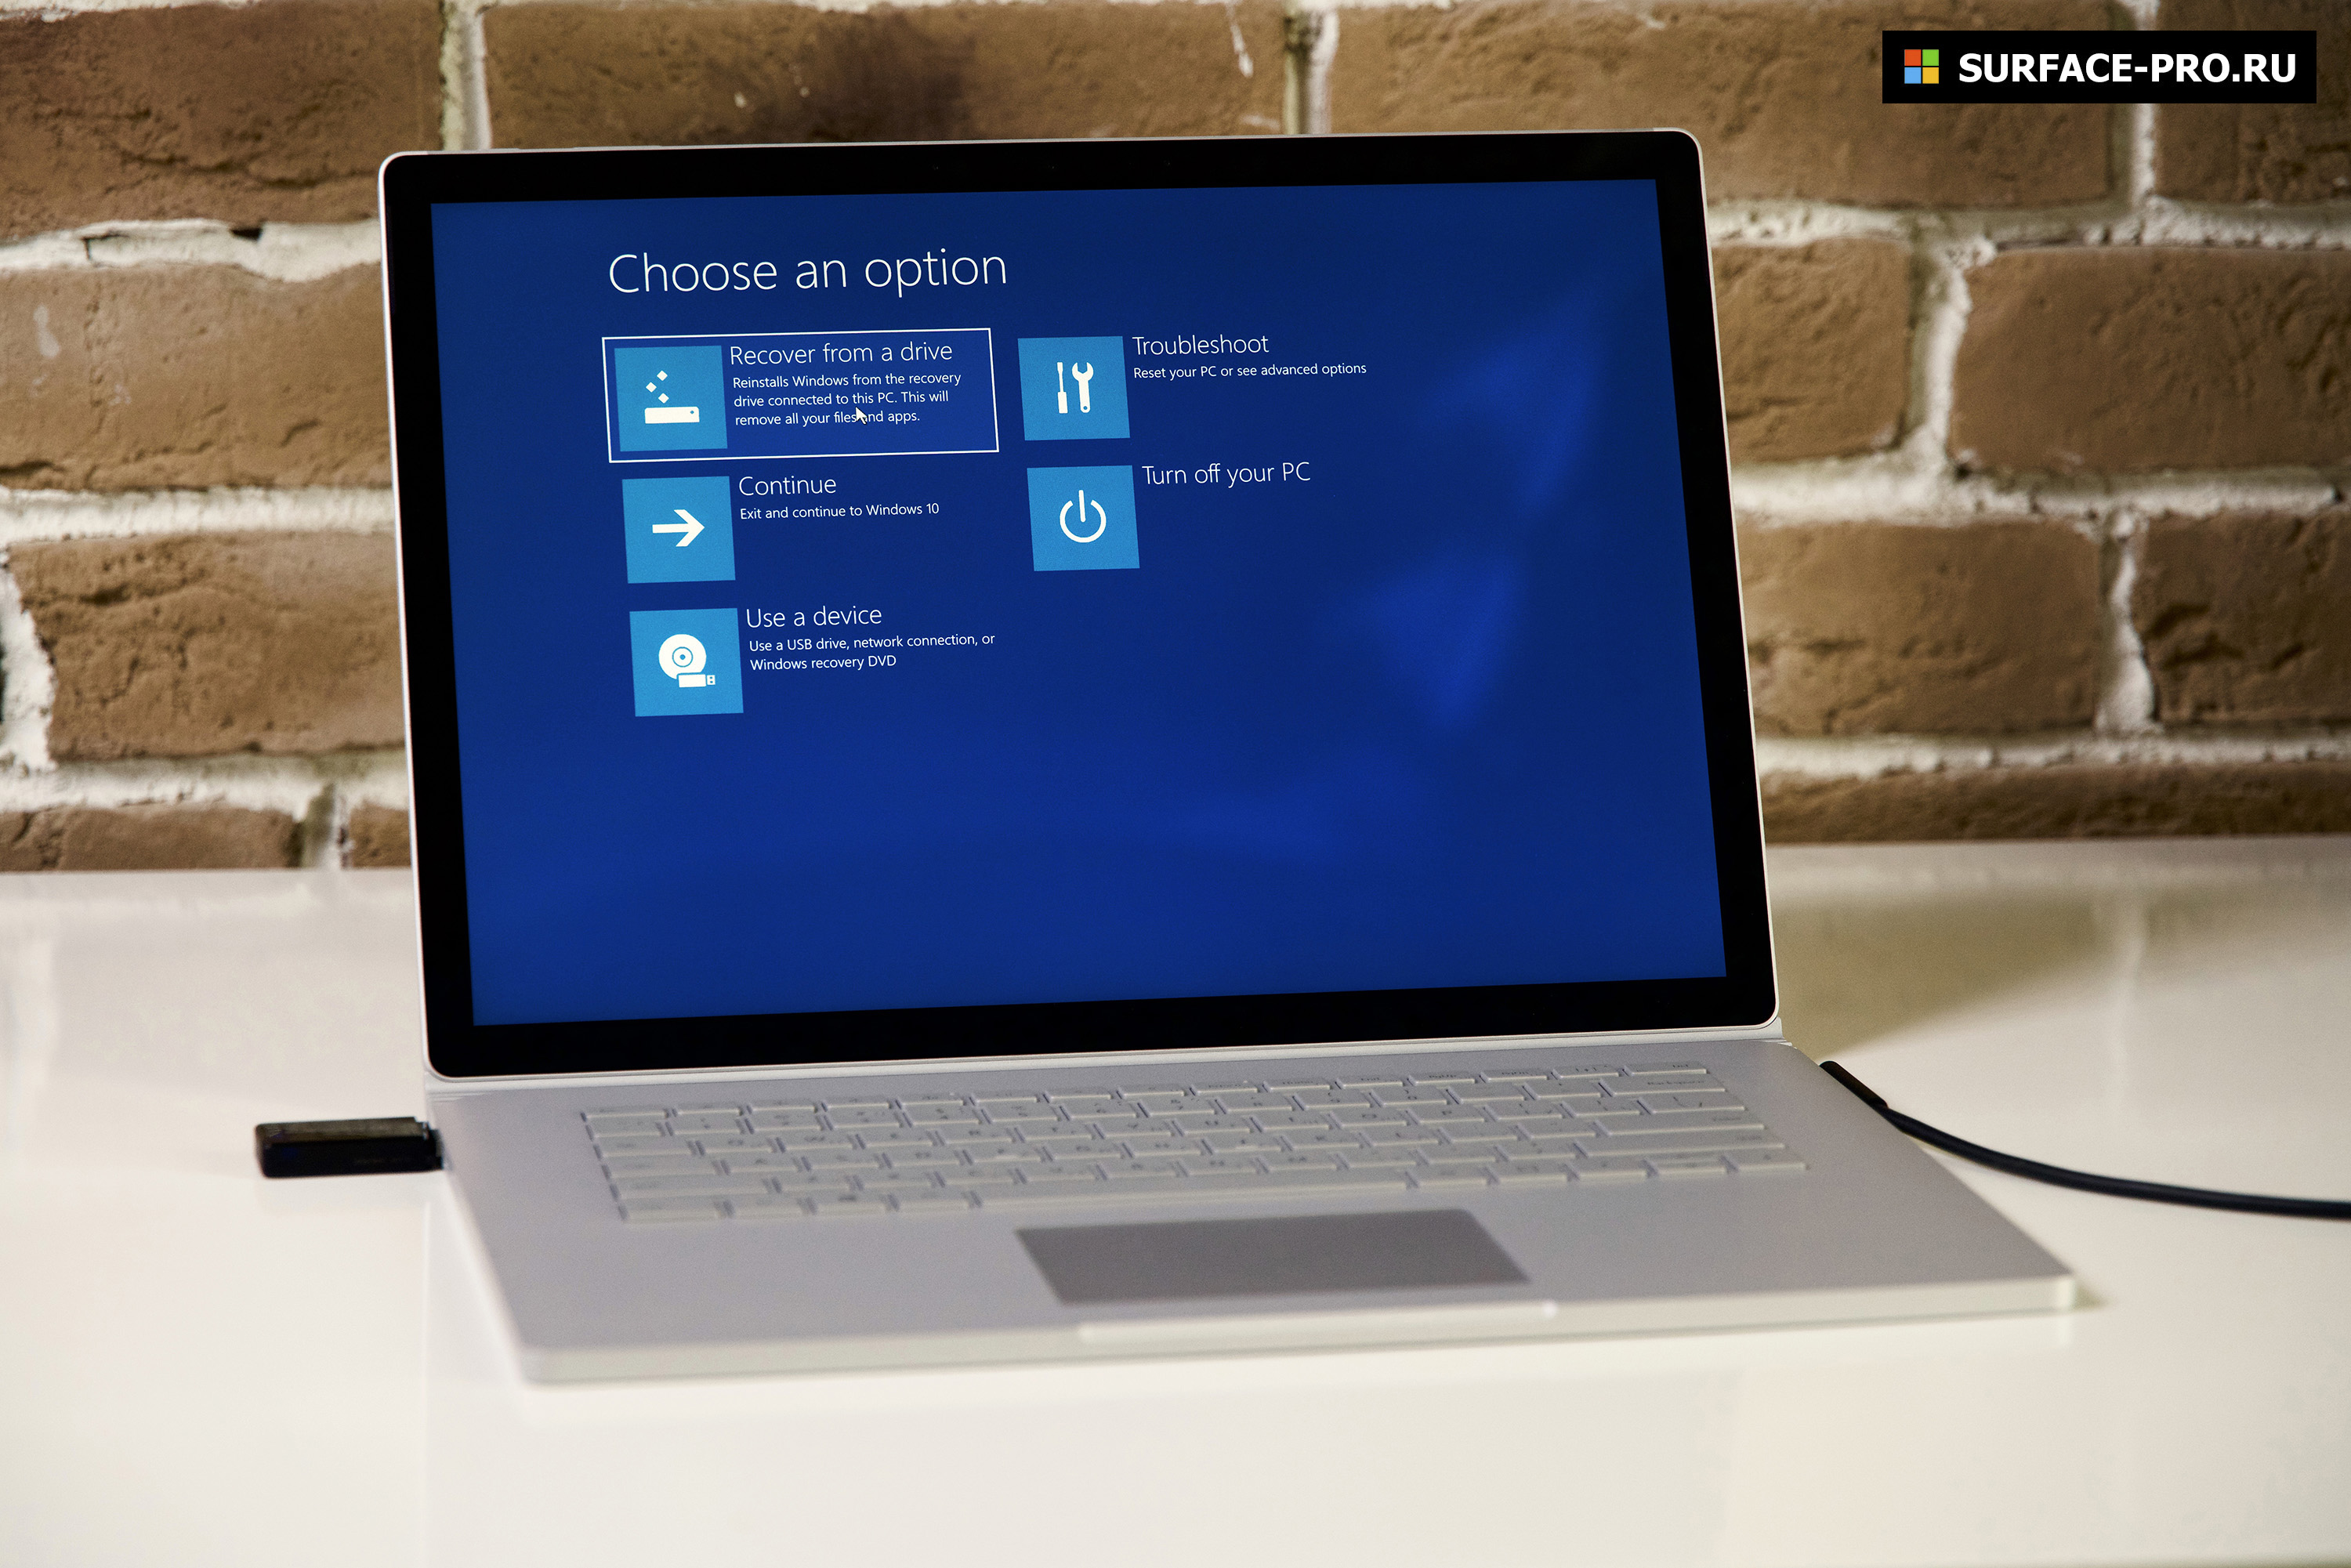
Восстановление операционной системы Microsoft Surface
Если область восстановления операционной системы повреждена — запустить восстановление с диска можно следующим образом. Зажмите и удерживайте клавишу питания и клавишу громкость вниз до перезагрузки устройства и появления логотипа Windows. Отпустите клавишу питания и продолжайте удерживать клавишу снижения громкости до запуска программы восстановления.
Этот способ восстановления удалит все ваши данные и сбросит компьютер до заводских настроек. Не лишним стоит напомнить, что перед установкой обновлений или бета версий — не стоит пренебрегать резервным копированиям данных.
Больше советов для пользователей Microsoft Surface — на нашем сайте!
May 15th 2020
September 16th 2021
Alexenferman
⚠ WARNING:
Alexenferman, Google, Microsoft, XDA Developers, are not responsible for any damages or bricks made to your device. Please do some research if you have any concerns about this installation, the leaked Windows 10 build, features and downsides. You are choosing to make these modifications, you should blame yourself for any mistakes you make. Once installed, the partition 4 of the drive (i.e. C:) will be completely wiped. Make sure you backed up all of your data to another drive or on a computer.
Do not install Windows 10 unless you have followed very carefully the tutorial and have Secureboot disabled! Not disabling Secureboot properly might lead to a unrecoverable soft bricked device as reported by some members.
The download links associated to Yandex Disk are not owned by Alexenferman. The files can be changed at any moment by its owner without further notice. If a file in question is not accessible, please leave a comment below.
BEFORE STARTING
Please read the warning very carefully. You understand that you are responsible for any damages made to your device.
Frequently asked questions
A lot of people have asked the same questions, so here are some of the questions and answers: FAQ: Windows 10 on the Surface RT
You will need:
- Surface RT or Surface 2
- USB Flash drive (Minimum 8GB)
- Keyboard (USB Keyboard or Surface Keyboard
- Basic familiarity with the command prompt (cd / del / file.exe)
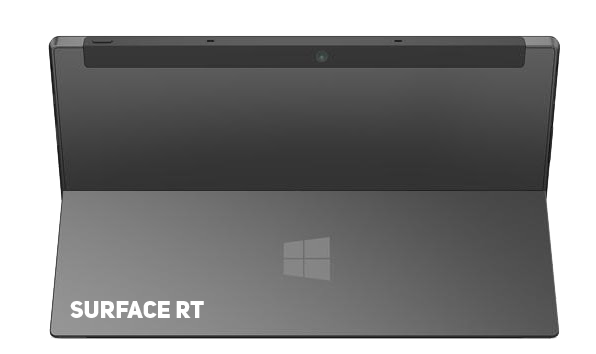
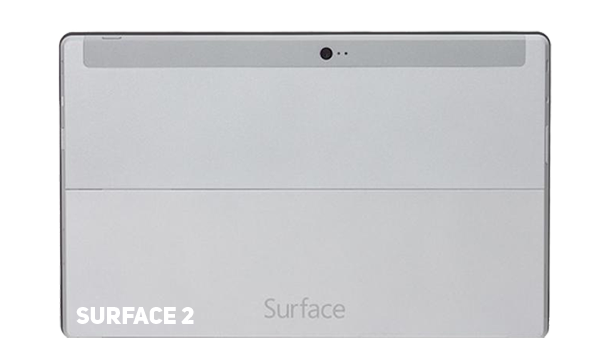
Identifying the Surface tablet generation
There are 2 different models of Surface tablets running Windows RT. You must know the model of your tablet to get the appropriate files for it. Turn your tablet around to see the colour of the metal back cover. The left one is the Surface RT and the right one is the Surface 2.
Download Options
There are different ways to get your files. You don’t have to download them now, as the tutorial will link you to the files when they will be necessary.
Yandex disk: Due to the recent addition of the «Download limit exceeded» message, Yandex Disk is no longer a viable option to download files from. Instead, a Google drive mirror will be offered.
RT Drive (Google Drive)
PART 1: PREPARING THE INSTALLATION
Creating a USB recovery drive
On your Surface RT, Click Start and click on the search icon, type «Create Recovery Drive» and select the search result. You may be asked to enter an administrator password or confirm your choice.
After the tool opens, make sure that «Back up system files to a recovery drive» is not selected, and then select «Next».
Make sure that «Back up system files to a recovery drive» is not selected. If you do not disable this option, it will cause errors in the future.
Connect the USB flash drive to your computer, select it, and then select «Next».
Select «Create». A large number of files need to be copied to the recovery drive, so it may take some time to complete.
It’s time to download the install.wim file. Download the one for your specific device. (Surface RT or Surface 2)
Make sure to download the correct file for your specific device. By installing the wrong image, you will not be able to get past the setup screen.
Windows RT Surface 1 (RT).wim
Windows RT Surface 2.wim
Mega.nz Mirrors: Windows RT Surface 1 (RT).wim and Windows RT Surface 1 (RT).wim
To make the installation process easier, rename the downloaded file to «install.wim».
Copy the install.wim to your flash drive.
PART 2: INSTALLING THE PATCHED WINDOWS RT IMAGE
Basically, this patched Windows image is necessary since it has Bitlocker disabled and updates that patch the secureboot vulnerability are not installed, which allows you to take advantage of the exploit to partially disable secureboot.
Entering Recovery mode
Make sure Surface is turned off.
Plug the USB drive in the USB port of the tablet.
Hold the volume down button and press the Power button once.
When the Microsoft or Surface logo is displayed, release the buttons.
After seeing the prompt, select English US.
Select «Troubleshooting», «Advanced Options» and «Command Prompt»
If prompted for a recovery key, select «Skip this drive» at the bottom of the screen.

Formatting partition 4
In the command prompt window, type the following commands:
diskpart
sel dis 0
sel par 4
for quick fs = ntfs override
exit
Installing the patched Windows RT image
In the command prompt window, type the following command:
dism /apply-image /imagefile:[DIRECTORY] /applydir:c: /index:1
[DIRECTORY]: Replace this path with the path of the install.wim we copied to the drive.
Example: dism /apply-image /imagefile:d:\sources\install.wim /applydir:c: /index:1
Restart your tablet
Setup the tablet quickly, do not set any Microsoft account, do not connect to the internet.
For Surface 2 users, Windows will be in Chinese. Use Google translate with the camera function. You can change the Windows language in the Settings app.
Once you are done, open file explorer and click on «This PC»
If the C: drive does not have a lock icon, you successfully cracked Bitlocker and have installed the patched Windows 8.1 image!
PART 3: DISABLING SECUREBOOT
Disabling UAC
Download the disabling_uac.reg file.
Disabling_UAC.reg
Mega.nz Mirrors: Disabling_UAC.reg
On your Surface RT, run this file as an administrator.
Restart your tablet.
Modifying Registry keys
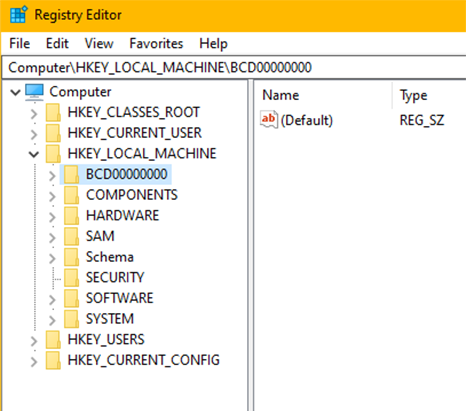
Open the registry editor
Navigate to HKEY_LOCAL_MACHINE \ BCD00000000
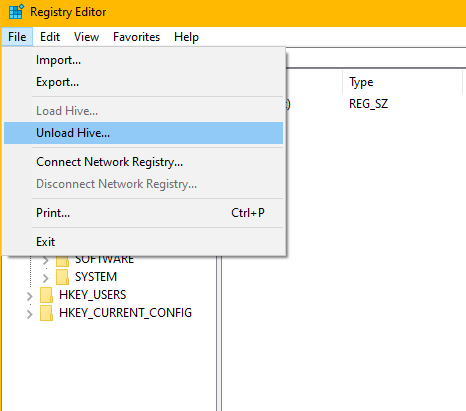
Make sure that the folder BCD00000000 is selected and click [File], [Unload/Uninstall Hive]
Installing the Secure Boot Debug Policy
Download the following file:
SecureBootPatch.zip
Extract the SecureBootPatch.zip and transfer it in the internal storage of the device.
Right-click the InstallPolicy.cmd and click «run as administrator».
Restart your tablet.
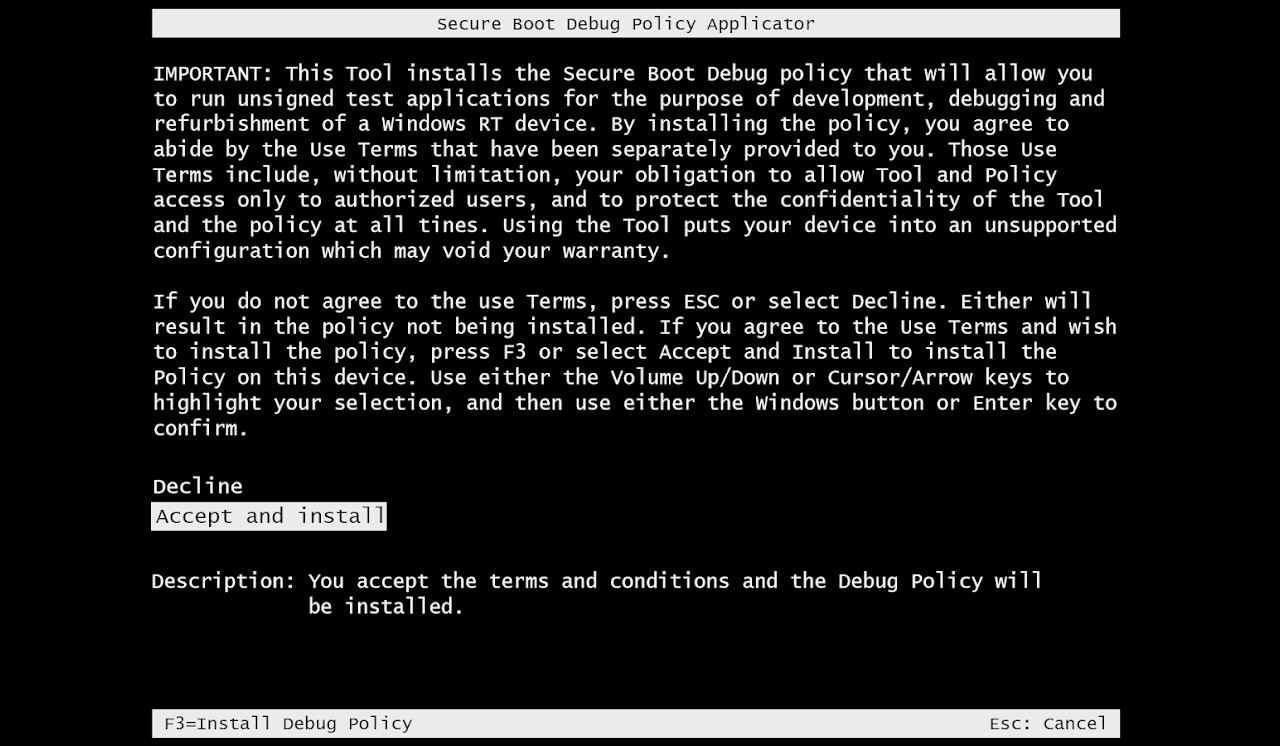
After restarting, you will see a «Secure Boot Debug Policy Applicator» screen.
Using the Volume buttons, select the option «Accept and Install»
Press the Windows button to select the option.
If you see the Windows boot manager error 0xc000000f instead, follow these steps to fix it and come back here
Installing the Secure Boot Debug Policy
Run the command prompt and enter:
bcdedit /set {default} testsigning on
bcdedit /set {bootmgr} testsigning on
bcdedit /set {default} NoIntegrityChecks Yes
Restart your tablet.
If you see an error after applying the commands, follow these steps to fix it and come back here
If your Surface does not turn on anymore, follow these steps to fix it and come back here
To make sure that you have disabled Secure Boot (VERY IMPORTANT)
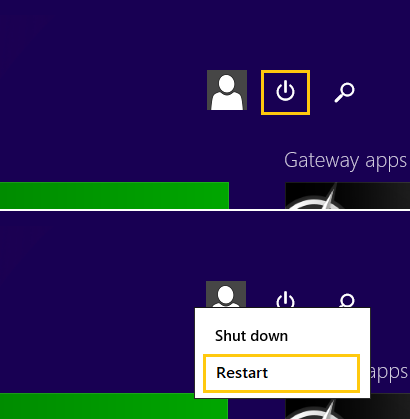
Click Start
Plug in a USB keyboard or your Surface keyboard
Click on the power icon on the top right part of the start menu
Press shift on your keyboard and at the same time click on restart
It will go into the recovery mode on the tablet (not the USB recovery)
Select «Troubleshooting»
Select «Advanced Options»
Select «Command Prompt»
It might ask for a password. Leave it empty and click on next.
You should see this text at the bottom right of the screen:
If you see this, you can now proceed to part 4!
Otherwise, if you don’t know what you did wrong, you can repeat Part 3.
You must make sure that Secure Boot is actually disabled before proceeding! Do not skip this step, otherwise, if you do not disable secureboot, your Surface RT might refuse to boot anything at all! By this stage, Alexenferman, Google, Microsoft, XDA Developers, are not responsible for any permanent damages or bricks made to your device. You are choosing to make these modifications, you should blame yourself for any mistakes you make. You have been warned!
PART 4: INSTALLING WINDOWS 10
It’s time to download the Windows 10 install.wim file. Download the one for your specific device. (Surface RT or Surface 2)
Make sure to download the correct file for your specific device. By installing the wrong image, you will not be able to get past the setup screen.
Windows 10 Surface 1 (RT).wim
Windows 10 Surface 2.wim
Mega.nz Mirrors: Windows 10 Surface 1.wim and Windows 10 Surface 2.wim
To make the installation process easier, rename the downloaded file to «install.wim».
Copy the install.wim to your flash drive.
NOTE: you can delete the old Windows 8 install.wim on your flash drive if the storage space is getting low. You will not need it anymore.
Entering Recovery mode
Make sure Surface is turned off.
Plug the USB drive in the USB port of the tablet.
Hold the volume down button and press the Power button once.
When the Microsoft or Surface logo is displayed, release the buttons.
After seeing the prompt, select English US.
Select «Troubleshooting», «Advanced Options» and «Command Prompt»
If prompted for a recovery key, select «Skip this drive» at the bottom of the screen.
Formatting partition 4
In the command prompt window, type the following commands:
diskpart
sel dis 0
sel par 4
for quick fs = ntfs override
exit
Installing Windows 10 image
In the command prompt window, type the following command:
dism /apply-image /imagefile:[DIRECTORY] /applydir:c: /index:1
[DIRECTORY]: Replace this path with the path of the install.wim we copied to the drive.
Example: dism /apply-image /imagefile:d:\sources\install.wim /applydir:c: /index:1
Restart your tablet.
If you see a blue screen with error 0xc000000f or 0xc000428 instead, follow these steps to fix it and come back here
Booting up Windows 10
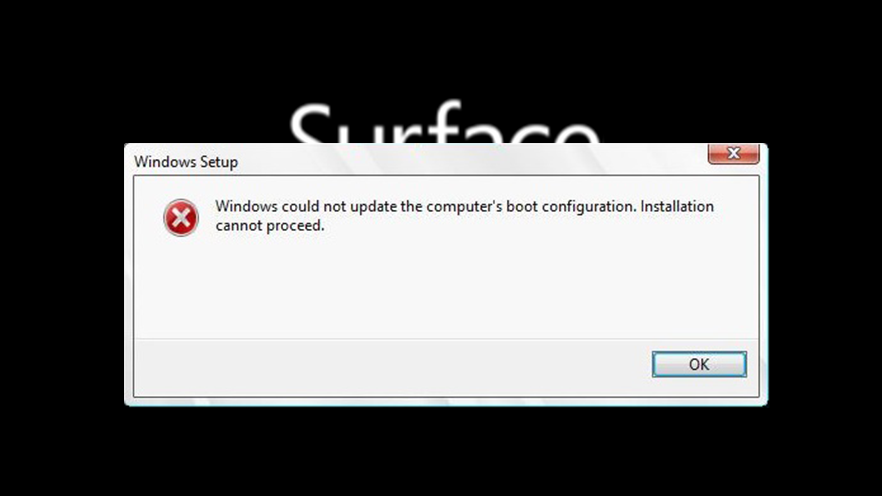
After waiting for a few minutes, you should see an error message. Don’t worry, this is normal.
Using a keyboard, press the following keys:
External USB keyboard: Press SHIFT + F10
Surface keyboard: Press FN + SHIFT + End
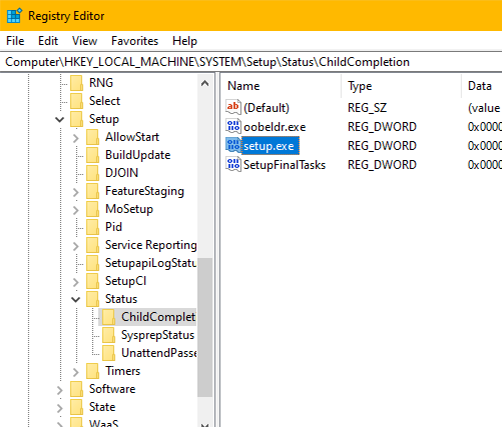
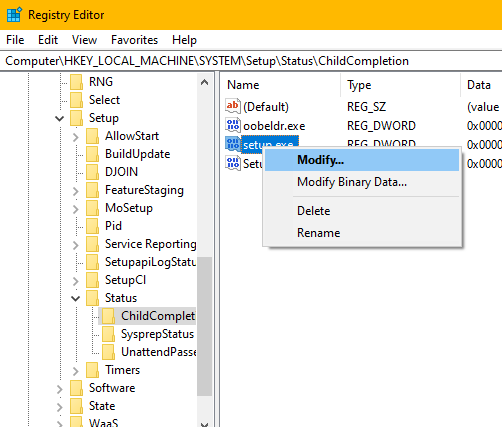
Type «Regedit»
Navigate to HKEY_Local machine/SYSTEM/SETUP/STATUS/ChildCompletion
On the right pane, right-click «setup.exe»
Click on «Modify»
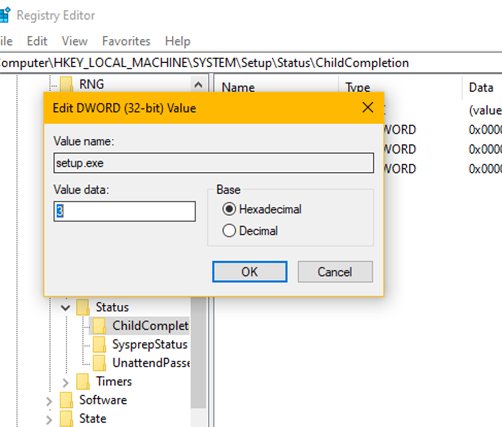
Change the Value to 3
Click OK
On the error message, click on OK.
PART 5: SETTING UP WINDOWS 10
Setting up Windows 10 for the first time
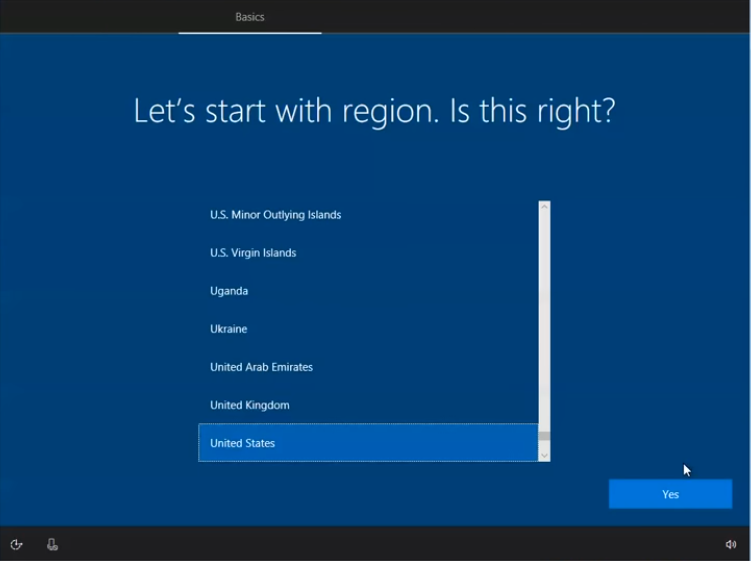
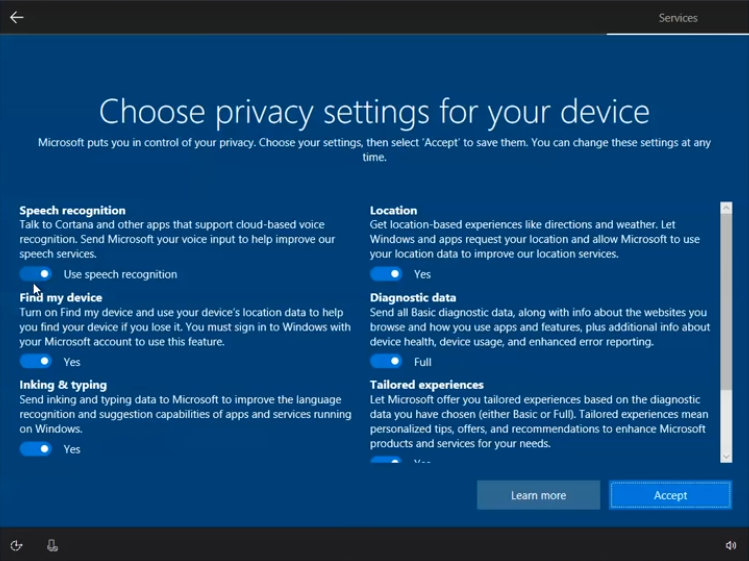
Follow the instructions on the screen to setup Windows 10.

Activating Windows 10
Open Powershell and type:
slmgr.vbs /upk
slmgr /ipk NPPR9-FWDCX-D2C8J-H872K-2YT43
slmgr /skms kms.03k.org
slmgr /ato
slmgr /skms zhang.yt
Installing frameworks and programs
Download the following files:
APPX1.rar
Microsoft.NET.Native.Framework.1.1.appx
Microsoft.NET.Native.Runtime.1.1.appx
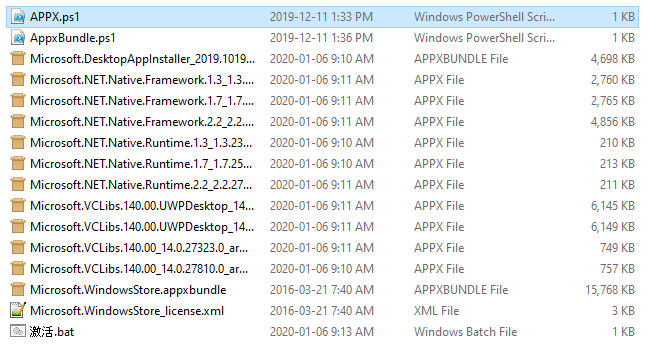
Extract APPX1.zip
Open the APPX1 folder
copy the files on the USB drive and copy them to the Surface RT internal storage.
Right-click Appx.ps1, select «run with powershell».
Right-click AppxBundle.ps1, and select «run with powershell».
From the other files downloaded, install the Microsoft.NET.Native.Runtime.1.1.appx and Microsoft.NET.Native.Runtime.1.1.appx packages by simply running them.
You are done!
EXTRAS
You may notice that the OS is quite bear bones, and might not have all of the Surface features. See this section to install App Updates, Office 2013, and fix a few issues. Visit Extras Section
ALTERNATIVE INSTRUCTIONS
How to install Windows 10 on the Surface RT 💻
YouTube
13:28
Elektrohax
COMMENTS
Upgrading to Windows 11 can significantly enhance your computing experience, with its sleek interface, improved gaming capabilities, and increased performance. Installing Windows 11 on a Surface Pro device can be a straightforward process if you have the right tools and follow the correct steps. This article will guide you through the process of installing Windows 11 from a USB drive on a Surface Pro with detailed instructions, troubleshooting tips, and additional considerations.
Preparing for Installation
Before embarking on the installation process, there are several key preparations to ensure a smooth transition to Windows 11.
Requirements and Specifications
First, ensure that your Surface Pro meets the minimum system requirements for Windows 11. These include:
- Processor: 1 GHz or faster with at least two cores on a compatible 64-bit processor or system on a chip (SoC).
- RAM: 4 GB or more.
- Storage: 64 GB or larger available storage device.
- System Firmware: UEFI, Secure Boot capable.
- TPM: TPM version 2.0.
- Graphics Card: DirectX 12 compatible graphics / WDDM 2.x.
- Display: >9” with HD resolution (720p).
You can check your Surface Pro specs by going to «Settings» > «System» > «About».
Backing Up Your Data
Installing a new operating system can sometimes lead to data loss, so it’s crucial to back up your files before proceeding. You can use various methods for backing up, such as:
- Cloud Storage: Use services like OneDrive, Google Drive, or DropBox to save important files.
- External Hard Drive: Connect an external hard drive and copy your crucial files.
- Windows Backup: Use the built-in Windows backup tool to create a system image.
Creating a Bootable USB Drive
To install Windows 11, you need a bootable USB drive. Here’s how to create one:
- Get a USB Drive: You’ll need a USB drive with at least 8 GB of space.
- Download the Media Creation Tool:
- Go to the Windows 11 Download page.
- Download the Media Creation Tool for Windows 11.
- Run the Media Creation Tool:
- Insert the USB drive into your Surface Pro.
- Open the Media Creation Tool and accept the license terms.
- Create Installation Media:
- Select «Create installation media (USB flash drive, DVD, or ISO file)» and click “Next.”
- Choose the language, edition, and architecture (64-bit) for Windows 11, then click «Next.»
- Select your USB drive from the list and click “Next.” The tool will download Windows 11 and create the bootable USB.
- Complete the Process:
- Wait for the process to complete, then safely eject the USB drive once finished.
Installing Windows 11 on Surface Pro
Now that you have the bootable USB drive, it’s time to install Windows 11.
Booting from the USB Drive
- Insert the USB Drive: Plug in the bootable USB drive into your Surface Pro.
- Enter UEFI Settings:
- Shut down your Surface Pro completely.
- Press and hold the Volume Up button on the side of the device, and while holding it, press and release the Power button.
- Continue holding the Volume Up button until the Surface logo appears, then release.
- Select Boot Configuration:
- In the UEFI settings, navigate to the “Boot Configuration” section.
- Make sure the USB drive is listed as one of the boot devices. Adjust the boot order if necessary, placing the USB device at the top of the list.
- Save Changes and Restart: Exit the UEFI settings, saving changes as needed, and allow your Surface Pro to restart. It should boot from the USB drive.
Installing Windows 11
- Windows Setup: When you boot from the USB, you will see the Windows setup screen.
- Choose your language, time, and keyboard method, then click “Next.”
- Install Now: Click on the “Install Now” button.
- Enter Product Key: If prompted, enter your Windows 11 product key. If you don’t have one, you can select the option to skip this step and continue the installation.
- License Agreement: Accept the license terms and click “Next.”
- Choose Installation Type:
- Select “Custom: Install Windows only (advanced)” for a fresh installation.
- Partitioning:
- Choose the drive where you want to install Windows 11. It’s recommended to delete the old partitions (but ensure backups are done) and create a new partition for the installation.
- Select the unallocated space and click “Next.” The installation will start, and this may take some time.
Completing the Installation
- Personal Settings:
- After the files are copied and the installation is complete, your Surface Pro will restart.
- Follow the prompts to set your preferences (time zone, network, etc.).
- Sign in with Microsoft Account: You can sign in with a Microsoft account or create a local account.
- Privacy Settings: Configure your privacy settings according to your preference.
- Windows Update: Once on the desktop, Windows will likely begin checking for updates. Make sure to install all necessary updates to ensure your system is up to date.
Post-Installation Steps
After installation, there are some essential steps to finalize and customize your Surface Pro with Windows 11.
Installing Drivers
- Check for Drivers: Windows 11 usually installs drivers automatically, but it’s good to verify if all drivers are correctly installed.
- Visit Microsoft Support: Go to the Surface Pro drivers and firmware page to download the latest drivers if necessary.
- Install Drivers: Follow the instructions on the Microsoft support page to install any missing drivers.
Personalization
- Customize Settings: Go to “Settings” > “Personalization” to customize the desktop background, themes, and colors.
- Install Software: Reinstall your applications and software that you backed up before installation.
- Explore New Features: Take some time to explore Windows 11’s new features, such as Widgets, Snap Layouts, and the redesigned Microsoft Store.
Data Restoration
If you backed up data, restore it as needed. Move files from your external drive or re-sync your cloud storage to access documents, photos, and other crucial files.
Troubleshooting Common Issues
While installing Windows 11 can be straightforward for most users, you may encounter some issues. Here are common problems and their solutions:
USB Not Booting
- Check USB Drive: Ensure the USB drive was created correctly. If necessary, recreate the bootable USB using the Media Creation Tool.
- UEFI Settings: Revisit UEFI settings to confirm the USB is set as the primary boot device.
Storage Space Error
If you receive an error regarding insufficient storage space:
- Delete Unused Partitions: If you have existing partitions from a previous OS, consider removing them (after backup) during the installation process.
- Consider External Drive: You might also install Windows 11 on an external drive if internal storage is insufficient.
Activation Issues
If Windows 11 does not activate:
- Check Product Key: Ensure the product key is entered correctly.
- Troubleshoot Activation: Go to «Settings» > «Update & Security» > «Activation» and use the «Troubleshoot» option.
- Contact Support: If issues persist, reach out to Microsoft support for assistance.
Conclusion
Installing Windows 11 from a USB drive on your Surface Pro can breathe new life into your device with enhanced performance, new features, and a more modern interface. By following the careful steps outlined in this article, you can ensure a smooth installation process. Always remember to back up your data and verify your system specifications before beginning the upgrade. Enjoy your upgraded Surface experience and explore all the innovative features that Windows 11 has to offer!