
Драйвера видеокарты обеспечивают стабильную и правильную работу ускорителя. Кроме того, они улучшают ее эффективность как в играх, так и в рабочих задачах. Своевременное обновление драйверов позволяет получить максимум пользы, однако не все знают, как их обновить.
Рассказываем, как правильно установить или переустановить драйвера на видеокартах Nvidia, AMD и Intel.
Зачем обновлять драйвера
Главная польза от обновления — повышение производительности и стабильности. Когда выходят новые крупные игры, разработчики выпускают обновление ПО для видеокарт, чтобы улучшить их эффективность и объяснить ускорителю, как правильно обрабатывать текстуры.
К тому же производители GPU периодически выпускают апдейты, которые:
- исправляют ранее возникшие ошибки в работе ускорителей;
- устраняют проблемы с совместимостью ПО;
- оптимизируют работу видеокарт.
Тем не менее время от времени возникают ситуации, когда драйвера работают некорректно. В таких случаях необходима их полная переустановка.
Подготовка к установке
Перед установкой или переустановкой убедитесь, что вы знаете модель своей видеокарты. Для этого нажмите на клавишу Windows, введите «Диспетчер устройств», откройте программу и раскройте пункт «Видеоадаптеры». Также проверить модель GPU можно, если перейти в Параметры — Система — Дисплей — Расширенные параметры дисплея.
Оба способа не требуют дополнительных программ, так как являются системными
Перед установкой драйверов убедитесь, что установлена программа для обновления драйверов:
- Nvidia — Nvidia App;
- AMD — AMD Software: Adrenalin Edition;
- Intel — Intel Driver & Support Assistant, для загрузки требуется зарубежный IP-адрес.
Удаление старых драйверов
Перед тем как устанавливать новые драйвера, важно удалить старые. Это необходимо во избежание конфликтов программного обеспечения. Чтобы их удалить, нажмите на клавишу Windows, введите в поиске «Установка и удаление программ» и откройте программу.
В поиске введите «Драйвер»
В случае видеокарты Nvidia нужно выбрать графический драйвер, нажать «Удалить» и подтвердить удаление.
Процесс простой и интуитивный
Далее откроется окно, в котором нужно еще раз подтвердить удаление.
После завершения процесса все настройки дисплея сбросятся, и потребуется установить ПО заново
После удаления NVIDIA рекомендует перезагрузить компьютер — сделайте это. В противном случае драйвера могут не установиться.
Если такой способ не сработал, есть альтернативный вариант: полное удаление через Display Driver Uninstaller (DDU). Это бесплатная программа, предназначенная для очистки системы от драйверов видеокарты и связанных с ними файлов. Она помогает устранить конфликты, возникающие из-за некорректной работы старого ПО, и подготовить систему к чистой установке нового.
Скачайте DDU с официального сайта — может потребоваться зарубежный IP-адрес.
Перезагрузите ПК в безопасном режиме. Для этого нажмите сочетание клавиш Win + R, введите msconfig и нажмите «ОК».
Опытные пользователи знают, что таким образом открывается конфигуратор системы
Перейдите в раздел «Загрузка», выберите «Безопасный режим», нажмите «Применить», затем «ОК» и перезагрузите ПК.
Другие галочки не устанавливайте, они нам ни к чему
Запустите DDU, выберите «Видеокарта» и название производителя, нажмите «Удалить и перезагрузить».
У меня процесс удаления занял три минуты
После перезагрузки снова откройте msconfig, отключите запуск безопасного режима и нажмите «ОК».
Делаем все то же самое, что и в начале, только в обратном порядке
Этот способ действенный, но неудобный — нужно постоянно перезагружать ПК. Он подойдет, если первый вариант удаления драйверов не сработает.
Установка драйверов видеокарты Nvidia
Запустите Nvidia App, если он установлен. В противном случае загрузите его с официального сайта или softportal и запустите.
В нем перейдите в раздел «Драйверы» и загрузите их актуальную версию. Они могут быть двух видов: Game Ready — для игр, Studio — для работы с программами Adobe и Autodesk. Меню расположено в правом верхнем углу, а что касается выбора — отдавайте предпочтение тому или иному варианту исходя из ваших задач.
Рекомендую установку драйверов Game Ready, они универсальные
После загрузки нажмите на клавишу «Установка» и запустите экспресс-установку.
Нажмите «Продолжить» и дождитесь завершения процесса
По завершении появится окно с информацией о том, какие драйвера были установлены: их версия и название.
Если какой-то компонент уже имеет актуальную версию ПО, он не будет установлен
Если не хочется ставить очередную программу на ПК, драйвера можно загрузить с официального сайта. Для этого выберите модель вашей видеокарты, версию операционной системы, тип драйверов и нажмите на «Поиск».
В моем случае это Game Ready для RTX 2070 Super на Windows 11
Nvidia предложит все доступные версии ПО — загружайте актуальную, она расположена сверху.
На момент написания актуальные — 566.36
Откройте загруженный файл и нажмите на пункт «Выборочная установка», затем «Далее». Это нужно, чтобы выполнить чистую установку, которая приведет к полному удалению остатков старого софта.
Также программа предложит установить Nvidia App, чтобы не приходилось загружать драйвера каждый раз вручную с сайта
В случае невозможности зайти на сайт с российского IP-адреса можно воспользоваться сторонним сервисом. Например, techpowerup. С его сайта тоже можно скачать и установить актуальные драйвера — процесс не отличается от ручной инсталляции, описанной выше.
Установка драйверов видеокарты AMD
Для установки драйверов на видеокарты AMD можно воспользоваться фирменным ПО AMD Software: Adrenalin Edition. Программа автоматически определит модель вашей видеокарты и предложит установить подходящую версию софта для GPU. А если этого не произошло, проверить наличие драйверов можно в разделе «Система».
Нажмите на красную кнопку «Загрузить» в разделе «Система»
Откроется окно программы установки. В нем можно выбрать тип установки, например, если нужно обновить только драйвера видеокарты без установки другого софта AMD. Рекомендую полную установку для более корректной работы системы.
Если не хотите разбираться — просто нажмите на «Установить»
Далее запустится процесс установки с примерным временем ожидания.
В этот момент компьютером лучше не пользоваться
Как и в случае с Nvidia, «красные» позволяют вручную загрузить драйверы с официального сайта. Для этого выберите Graphics, семейство видеокарты (например, Radeon RX) и ее серию. Далее найдите свою модель из списка доступных и нажмите «Submit», чтобы подтвердить поиск.
Главное проверьте, что выбрали свою видеокарту
Далее выберите версию своей операционной системы и загрузите AMD Software: Adrenalin Edition.
Драйвера доступны как для Windows, так и для различных дистрибутивов Linux
Запустите ее и следуйте инструкции по установке. Она ничем не отличается от того, что описано выше в апдейте ПО видеокарты с помощью AMD Software.
Если сайт AMD по каким-то причинам не работает, драйвера можно загрузить с techpowerup.
Установка драйверов видеокарты Intel
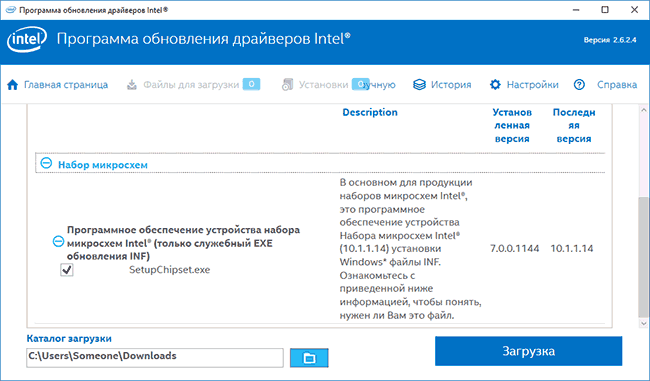
Запустите загруженный Intel Driver & Support Assistant, заранее обеспечив подключение к зарубежному IP-адресу, так как программа официально не работает в России. В новой вкладке в браузере откроется сайт Intel, где нужно нажать на клавишу «Download».
Если есть апдейт, желтая полоска просигнализирует об этом
После загрузки установите галочки в чек-боксе и запустите скачанный файл, нажав на «Install».
Без них установка не запустится
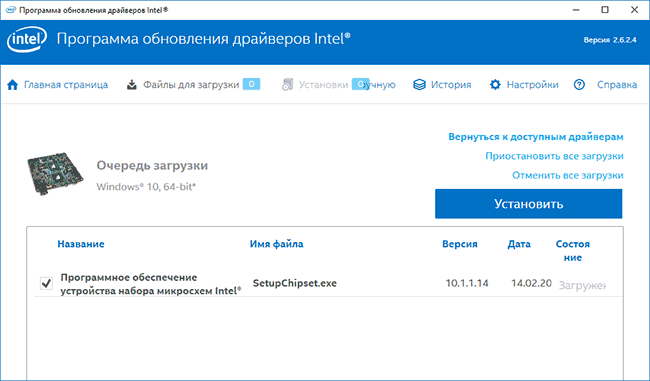
Далее откроется окно программы, в котором нужно начать установку.
Кнопка одна — не запутаетесь
Программа проанализирует конфигурацию системы и отобразит список апдейтов, которые будут установлены. После этого нажмите на «Запуск».
После запуска начнется удаление текущих драйверов видеокарты
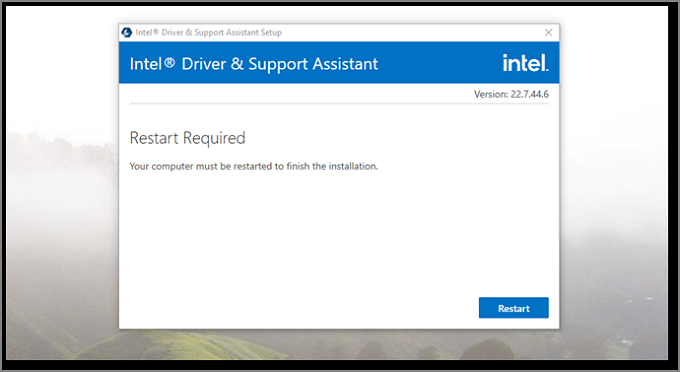
После завершения установки программа предложит перезапустить компьютер для внесения изменений в работу системы.
Если все установлено верно, в программе Intel Graphics Software отобразятся зеленые галочки
Процесс инсталляции ничем не отличается от установки «дров» на Nvidia или AMD, за исключением обязательного наличия зарубежного IP-адреса. Если нет желания искать обходные пути, ПО также можно загрузить с сайта techpowerup.
Современные Windows 10 и 8.1 как правило обновляют драйверы автоматически, в том числе и для оборудования Intel, однако драйверы, получаемые из Центра обновления Windows не всегда последние (особенно для Intel HD Graphics) и не всегда именно те, что нужны (иногда — просто «совместимые» по мнению Майкрософт).
В этой инструкции подробно об обновлении драйверов Intel (чипсета, видеокарты и др) с помощью официальной утилиты, как скачать любые драйверы Intel вручную и дополнительная информация, касающаяся драйверов Intel HD Graphics.
Примечание: рассматриваемая далее утилита Intel для обновления драйверов предназначена в первую очередь для материнских плат ПК с чипсетами Intel (но не обязательно ее производства). Обновления драйверов для ноутбуков она также находит, но не все.
Программа обновления драйверов Intel
Официальный сайт Intel предлагает собственную утилиту для автоматического обновления драйверов оборудования до их последних версий и её использование предпочтительнее, чем собственная система обновления, встроенная в Windows 10, 8 и 7, и тем более чем какой-либо сторонний драйвер-пак.
Загрузить программу для автоматического обновления драйверов можно со страницы http://www.intel.ru/content/www/ru/ru/support/detect.html. После короткого процесса установки на компьютер или ноутбук, программа будет готова для обновления драйверов.
Сам процесс обновления состоит из следующих простых шагов.
- Нажать кнопку «Начать поиск»

- Подождать, пока он будет выполняться/
- В списке найденных обновлений выбрать те драйверы, которые следует скачать и установить вместо имеющихся в наличии (будут найдены только совместимые и более новые драйверы).
- Установить драйверы после загрузки автоматически или вручную из папки загрузок.

На этом весь процесс будет завершен, а драйверы обновлены. При желании, в результате поиска драйверов, на вкладке «Более ранние версии драйверов» вы можете скачать драйвер Intel в предыдущей версии, если последний работает нестабильно.
Как скачать нужные драйверы Intel вручную
Помимо автоматического поиска и установки драйверов оборудования, программа обновления драйверов позволяет выполнить поиск необходимых драйверов вручную в соответствующем разделе.

В списке присутствуют драйверы для всех распространенных материнских плат с чипсетом Intel, компьютеров Intel NUC и Compute Stick для различных версий Windows.
Об обновлении драйверов Intel HD Graphics
В некоторых случаях драйверы Intel HD Graphics могут отказываться устанавливаться вместо уже имеющихся драйверов, в этом случае есть два пути:
- Сначала полностью удалить имеющиеся драйверы Intel HD Graphics (см. Как удалить драйверы видеокарты) и только после этого производить установку.
- Если пункт 1 не помог, а у вас ноутбук, загляните на официальный сайт производителя ноутбука на страницу поддержки вашей модели — возможно, там найдется обновленный и полностью совместимый драйвер интегрированной видеокарты.
Также в контексте драйверов Intel HD Graphics может быть полезной инструкция: Как обновить драйверы видеокарты для максимальной производительности в играх.
На этом завершаю эту короткую, возможно, полезную для кого-то из пользователей инструкцию, надеюсь, всё оборудование Intel на вашем компьютере работает исправно.
In Windows 10, if you’re having issues with the Intel HD Graphics driver, you may not be able to watch videos or play games as usual. In addition, the PC may run slowly. You can fix the issues by updating the Intel graphics driver.
We’ve put together three ways below to update the driver. Not every way works in all situations. You can work your way down until you find the one that works for you.
Way 1: Update your Intel(R) HD Graphics driver manually
Way 2: Use Windows Update for new drivers
Way 3 (Recommended): Automatically Update the driver
Way 1: Update your Intel(R) HD Graphics driver manually
Intel has released drivers for the vast majority of display cards. You can go to Intel’s website and find the right driver. Please make sure you find the right version, as incompatible or wrong drivers can cause issues.
After downloading the driver, you can just double-click on the installer file (.exe) to install the driver. If you cannot install the driver successfully in that way, follow the steps below to update the driver manually step by step.
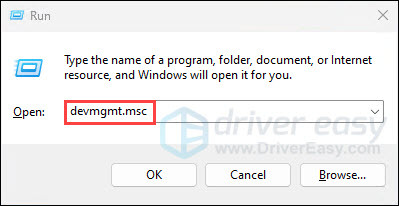
1. On your keyboard, press the Windows logo + R keys simultaneously to open the Run box.
2. Type devmgmt.msc and hit Enter to open the Device Manager.
3. In the Device Manager, expand the category Display adapters. Right-click on the Intel graphics device and select Update driver…
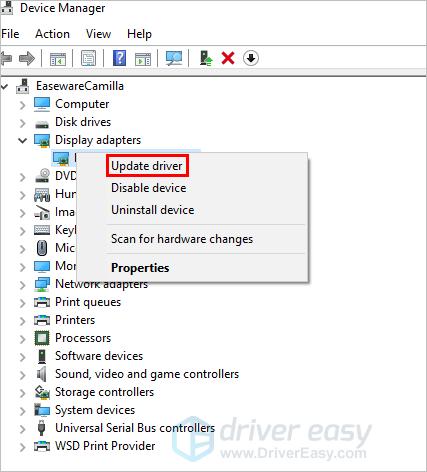
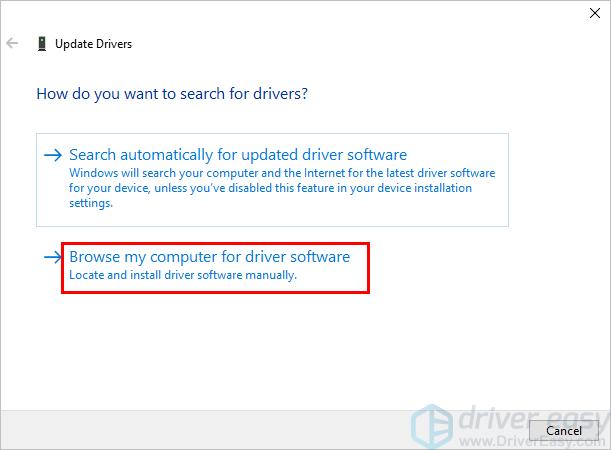
4. Click Browse my computer for driver software.
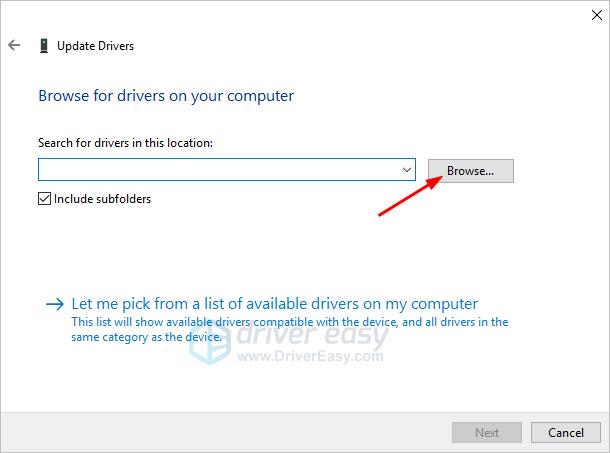
5. Click Browse to navigate to the location where you save the downloaded driver file. Then follow the on-screen instructions to install the driver.
Way 2: Use Windows Update for new drivers
You can update the Intel graphics driver through Windows Update:
1. On your keyboard, press the Windows logo key.
2. Type check for updates. Then click Check for updates from the list of results.
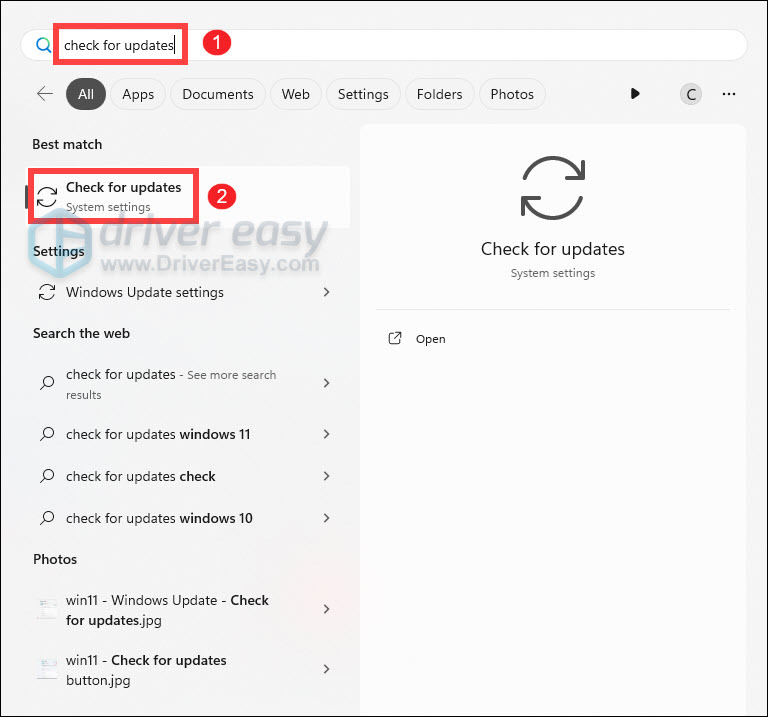
3. Click the button Check for updates. You may need to a few minutes while Windows is searching for the latest updates.
4. Click the link that tells you optional updates are available. (If you don’t see this link, it means Windows Update didn’t find any updates for your computer.)
5. Select the driver you want to install, click OK, and then click Install updates.
Way 3: Automatically Update the driver
If Way 1 and Way 2 don’t work for you, or if you’re not confident playing around with drivers manually, you can do it automatically with Driver Easy.
Driver Easy will automatically recognize your system and find the correct drivers for it. You don’t need to know exactly what system your computer is running, you don’t need to risk downloading and installing the wrong driver, and you don’t need to worry about making a mistake when installing.
You can update your drivers automatically with either the FREE or the Pro version of Driver Easy. But with the Pro version, it takes just 2 clicks (and you get full support and a 30-day money-back guarantee):
1. Download and install Driver Easy.
2. Run Driver Easy and click the Scan Now button. Driver Easy will then scan your computer and detect any problem drivers.
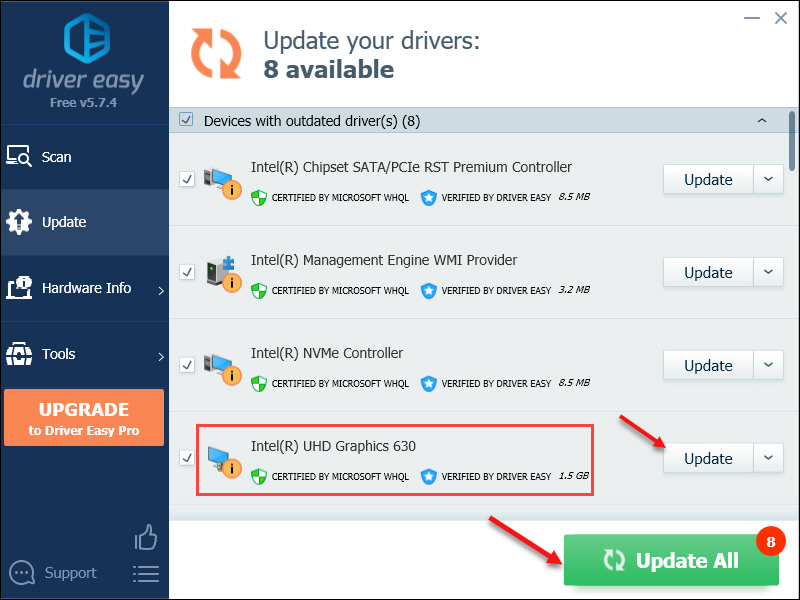
3. Click the Update button next to a flagged Intel graphics card driver to automatically download the correct version of the driver, then you can manually install it (you can do this with the FREE version).
Or click Update All to automatically download and install the correct version of all the drivers that are missing or out of date on your system (this requires the Pro version – you’ll be prompted to upgrade when you click Update All).
Hopefully, you can update the Intel HD graphics driver in Windows 10 successfully. If you have any questions, ideas, or suggestions, feel free to leave your comments below.
198
198 people found this helpful
Available in other languages
In diesem Beitrag erfahren Sie die Methoden, damit Sie Ihren Intel HD Graphics Treiber mühelos auf dem neuesten Stand halten können.
Updated by Cici on Apr 15, 2025
Intel Graphics Card Driver is a software application that enables the operation of Intel graphics cards on PCs and laptops. It is designed to provide the best performance for Intel’s graphics processors and allows users to take full advantage of their hardware capabilities.
But the Intel graphics driver update doesn’t always go so smoothly. If you’re trying to update your Intel drivers, this article will teach you how to do that. So, let’s keep going.
Why Do We Need Intel Graphics Driver Update
Intel Graphics Driver Update is essential for users who want to get the best out of their Intel graphics cards. The following are some reasons for an Intel graphics driver update:
- Get a better visual experience and fix screen flickering
- Fix the bugs in the old version to meet the demands of the game version
- Improve the game performance
- Fix overheating PC/Laptop
- Run videos and software smoothly
- Set your monitor to a higher refresh rate
These are some major reasons you need a driver update for your Intel graphics. It will improve the performance by miles and fix any underlying issues. Besides that, it’ll ensure features in Windows run smoothly, such as themes.
If you have an Intel graphics card on your computer, it is important to keep its driver up-to-date. Throughout the article, we have discussed that this will ensure that the card runs optimally and that you get the best performance.
So, we’re going to guide you through two ways of updating your Intel drive, including:
Guide 1. Intel Graphics Driver Update via EaseUS DriverHandy
Guide 2. Intel Graphics Driver Update via Intel Driver & Support Assistant Utility
Both these methods will show you two separate and essential ways of conducting a successful Intel graphics driver update. So, let’s dive into these methods.
Guide 1. Intel Graphics Driver Update via EaseUS DriverHandy
EaseUS DriverHandy is a remarkable third-party tool to update drivers and keep them up-to-date all year round. The software provides proper performance upkeep by ensuring a fast connection between the operating system and your hardware.
This software is the ideal solution to successfully do an Intel graphics driver update. So, how do you do that? Once you download and install EaseUS DriverHandy, here’s how:
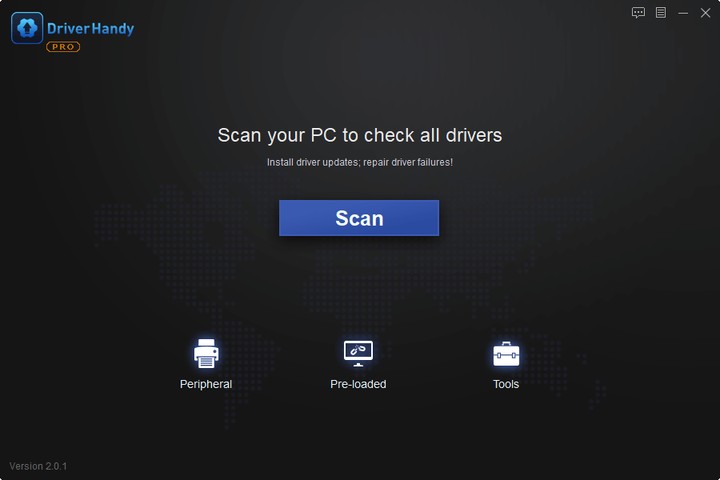
Step 1. Launch EaseUS DriverHandy and click the «Scan» button.
Step 2. Choose the drivers and click «Install All» in the upper right corner to update all drivers. Or you can select the single Motherboard, Sound, or Graphisc drivers and click «Update» on the right side.
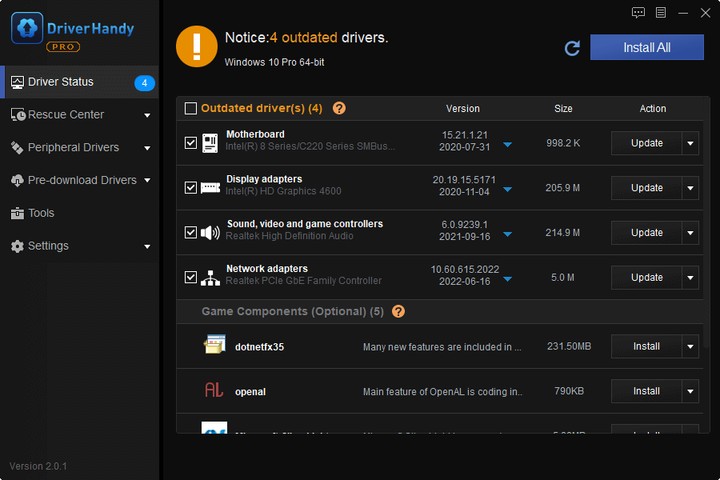
EaseUS DriverHandy is a powerful tool to support many brands, such as AMD driver update and it is also the best alternative to NVIDIA drivers auto detect.
Other Features of EaseUS DriverHandy:
This remarkable tool is the first choice for many computer users around the globe for its outstanding ability to update drivers without any hassle. What makes it so great? Let’s list some key features of this tool:
- Scans to check and fix all driver-related problems constantly.
- Clears previous driver and its junk before updating to the new driver.
- Ensures smooth gaming experience by automatically updating drivers such as audio and video.
- Finds the best drivers for all your devices after scanning your PC—including graphics card.
- Find out the drivers that need to be backed up and backup them.
Guide 2. Intel Graphics Driver Update via Intel Driver & Support Assistant Utility
The second method is to use Intel Driver & Support Assistant Utility and its usage. Intel Driver & Support Assistant Utility is a powerful tool that helps users to keep their Intel-based devices up to date and running smoothly.It can automatically detect and update drivers, optimize system settings, and troubleshoot any issues with Intel hardware.
You can follow the steps we’re going to show you. Here’s how:
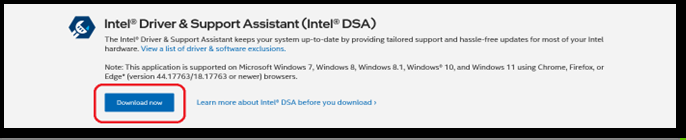
Step 1. Head to Intel Driver & Support Assistant Utility (DSA).
Step 2. Locate and click the download button to download the utility.
Step 3. Run the downloaded file on your PC.
Step 4. Agree to the terms and click on the Install option.
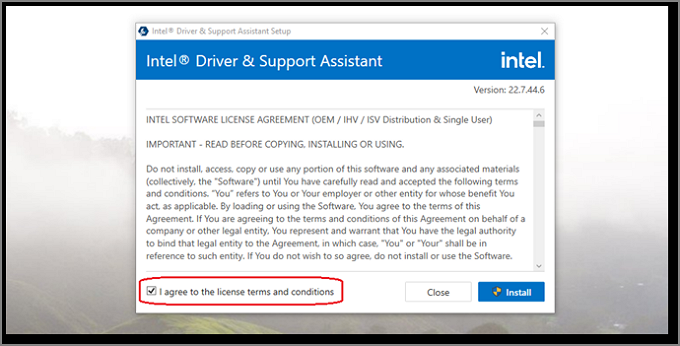
Step 5. Wait for the Installation to finish.
Step 6. Restart your PC when prompted.
Step 7. Once restarted, run the Utility again and scan your PC.
Step 8. When the utility prompts for a new Graphics driver installation, agree and proceed.
This will download the driver to your PC and begin the installation. While the download depends entirely on your internet, the installation will take about a minute or two. Once your PC restarts, the updated driver will be installed.
Conclusion
These are the two primary methods of downloading and installing the Intel graphics driver on your PC. The first method of using EaseUS DriverHandy is the best one.
Not only because of its ability to download and install the software quickly but also because it will clean up the existing driver quite comprehensively. And it provides myriad other benefits, such as keeping your drivers updated around the clock.
FAQs About Intel Graphics Driver Update
If you have further questions, these queries will answer them.
1: How do I update my Intel graphics driver?
The first and perhaps the best solution for many would be to head to Intel’s website and download the exact model of driver needed. If you don’t know which driver you have, then use EaseUS DriverHandy to find and install your driver quickly and comprehensively.
2: Should I update the Intel graphics driver?
Yes, you should. Updating any graphics driver won’t only ensure a performance uplift but also cause your graphics card to run a bit more comprehensively hence, why you should always update your graphics driver every 2-3 months.
3: Does Windows 10 update Intel drivers?
It does, but sometimes the update isn’t recent or as clean as it should be. Hence, it’s better to directly download the graphics card driver or use a third-party tool like EaseUS Driver handy to update your drivers.
Updating the Intel graphics driver on Windows 10 is essential to ensure your system runs smoothly and efficiently. Updating can fix bugs, improve performance, and ensure compatibility with the latest software. Here’s how you can easily update your Intel graphics driver in just a few simple steps.
Updating your Intel graphics driver ensures that your system performs optimally. The following steps will guide you through this process quickly and efficiently.
Step 1: Open Device Manager
To start, you’ll need to open the Device Manager on your Windows 10 computer.
You can do this by right-clicking on the Start menu and selecting «Device Manager.» This tool allows you to manage all the hardware devices connected to your computer.
Step 2: Find Your Graphics Driver
The next step is to locate your Intel graphics driver within the Device Manager.
Look for the «Display adapters» section and click on the arrow beside it to expand the list. You should see your Intel graphics driver listed there. Double-click it to open the properties.
Step 3: Update the Driver
Now, you’ll need to update the driver from the properties window.
Click on the «Driver» tab, then select «Update Driver.» This will open a new window with options to automatically search for updated driver software or browse your computer for driver software.
Step 4: Choose How to Update
Choose the method you’d like to use to update your driver.
For most users, selecting «Search automatically for updated driver software» is the easiest. Windows will search online for the latest driver and install it for you. Alternatively, you can download the driver from the Intel website and select «Browse my computer for driver software.»
Step 5: Follow the Prompts
Follow the on-screen instructions to complete the update process.
If you chose to search automatically, Windows will download and install the driver if a newer version is available. If you chose to browse your computer, navigate to the location of the downloaded driver and follow the prompts.
Once the update is complete, your system might ask you to restart your computer. This ensures that the new driver is properly installed and running.
Tips for Updating Intel Graphics Driver Windows 10
- Backup Your System: Before making any updates, it’s always a good idea to back up your important files.
- Use Intel’s Tool: Intel provides a Driver & Support Assistant tool that can automatically detect and update your drivers.
- Check for Compatibility: Ensure that the driver you are updating to is compatible with your system to avoid issues.
- Stay Updated: Regularly check for driver updates to keep your system running smoothly.
- Uninstall Old Drivers: If you encounter issues, uninstall the old driver before installing the new one.
Frequently Asked Questions
Why should I update my Intel graphics driver?
Updating your Intel graphics driver can improve your system’s performance, fix bugs, and ensure compatibility with new software and games.
How do I know if my driver needs updating?
If you experience graphic issues or your system is running slow, it might be time to check for driver updates. Alternatively, Device Manager can tell you if a newer version is available.
Can I revert to an older driver?
Yes, you can roll back to a previous driver through the Device Manager if you encounter issues with the new one.
Is it safe to update the graphics driver?
Yes, updating your graphics driver is generally safe as long as you download the driver from the official Intel website or use automatic updates through Device Manager.
What if my update fails?
If the update fails, try restarting your computer and attempting the update again. You can also use the Intel Driver & Support Assistant for assistance.
Summary
- Open Device Manager: Right-click Start, select Device Manager.
- Find Your Graphics Driver: Expand Display adapters, double-click the Intel driver.
- Update the Driver: Go to Driver tab, click Update Driver.
- Choose How to Update: Select automatic search or browse your computer.
- Follow the Prompts: Complete the update and restart if needed.
Conclusion
Updating your Intel graphics driver on Windows 10 is a straightforward process that can significantly enhance your system’s performance. By following the steps outlined above, you can ensure that your driver is current and functioning correctly.
Regularly updating your drivers can prevent potential issues and keep your system in top shape. If you’re unsure or run into problems, Intel’s support tools are there to help you out. Remember, keeping your graphics driver updated not only improves performance but also ensures you can enjoy the latest features and games without a hitch. So, take a moment to update your Intel graphics driver and keep your system running smoothly!
Kermit Matthews is a freelance writer based in Philadelphia, Pennsylvania with more than a decade of experience writing technology guides. He has a Bachelor’s and Master’s degree in Computer Science and has spent much of his professional career in IT management.
He specializes in writing content about iPhones, Android devices, Microsoft Office, and many other popular applications and devices.
Read his full bio here.