
If your laptop keyboard is not functioning properly, then you would probably need to update your keyboard drivers on your Windows 10/11 system. If “how to update keyboard driver” is one of the most pertinent questions on your mind, then your search has brought you to the right page.
Usually, users have reported encountering keyboard errors after upgrading their OS to Windows 10. Some users also experienced trouble with their Windows 10 keyboards after installing the infamous KB4074588 patch update. The error could also be triggered by bad keyboards drivers.
So, this article will help you look at the ways to update and reinstall the keyboard drivers. We will also look at some easy ways to fix the problem besides telling you how to perform some preliminary checks to determine the cause of the error.

If you are thinking about how to update keyboard drivers of your Windows 10 system, then read ahead to find out the most effective solutions.
Solution 1: Perform a Few Checks and Try the Below Suggested Hacks
Below mentioned are a few methods of checking the keyboard to detect problems as well as their possible countermeasures before opting to update the keyboard drivers.
1: Check if Your Keyboard is Damaged
At times, if the keyboard is physically damaged, then it might lead to malfunctions and errors such as if some liquid is spilled on the keyboard, then you might need to replace it totally.
2: Check the Keyboard Connections
Before updating the keyboard drivers, check if the keyboard connections are proper. This is because if the keyboard is not connected properly, then the drivers won’t load correctly.
- You can check the keyboard wire connection if you have a desktop.
- You should also verify if the keyboard is connected to the proper USB port. Try changing the USB port to see if that resolves the issue.
- If you have wireless keyboards then consider replacing the batteries.
3: Check the Driver Software
Some keyboards need proprietary drivers based on Windows to access and perform advanced features and functions such as hot keys and media controls functions.
Proprietary software usually can be installed simultaneously with the driver installation. You can find it from the manufacturer’s website.
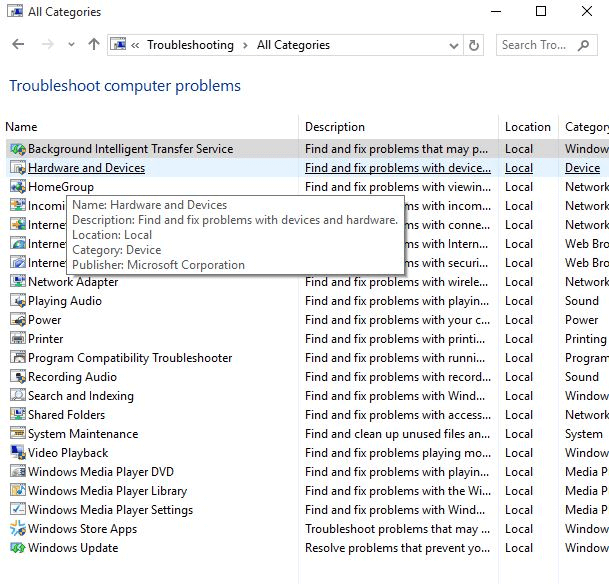
Solution 2: Run the Hardware and Devices Troubleshooter
Using the Windows in-built troubleshooter, you can try to fix keyboard malfunctions before considering updating the keyboard drivers.
- Launch the Control Panel and then click on Troubleshooting.
- Choose View all from the side panel.
- Then, click on the Hardware and devices troubleshooter.
- After this, follow the on-screen instructions and wait till the troubleshooting completes.
Solution 3: Reinstall the Keyboard Drivers
If the above mentioned preliminary solutions did not seem to resolve the keyboard malfunction issue, then you can consider reinstalling the keyboard drivers to get rid of the keyboard problems.
You can easily reinstall keyboard drivers from the manufacturer’s website or else you can try to do it from the Device Manager alone. Before going for re-installation, you will need to uninstall the existing keyboard drivers. So, we will first see how to uninstall the keyboard drivers and then reinstall them.
- Launch the Device Manager and scroll to find the keyboard section.
- Then, click on the Keyboards section to expand it.
- After this, right-click on the Standard PS/2 Keyboard and choose the Uninstall option from the drop-down menu.
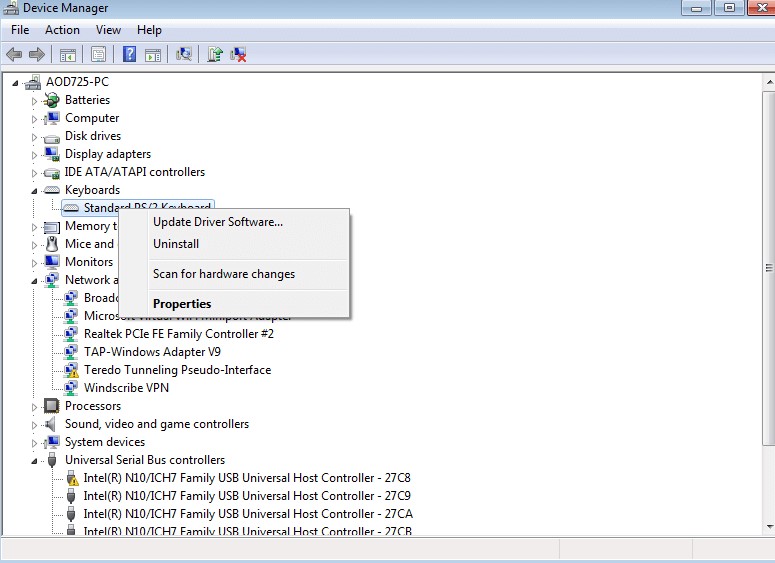
- Further click OK to confirm the action.
- Wait for some time, till the uninstallation completes.
- Then, restart your system.
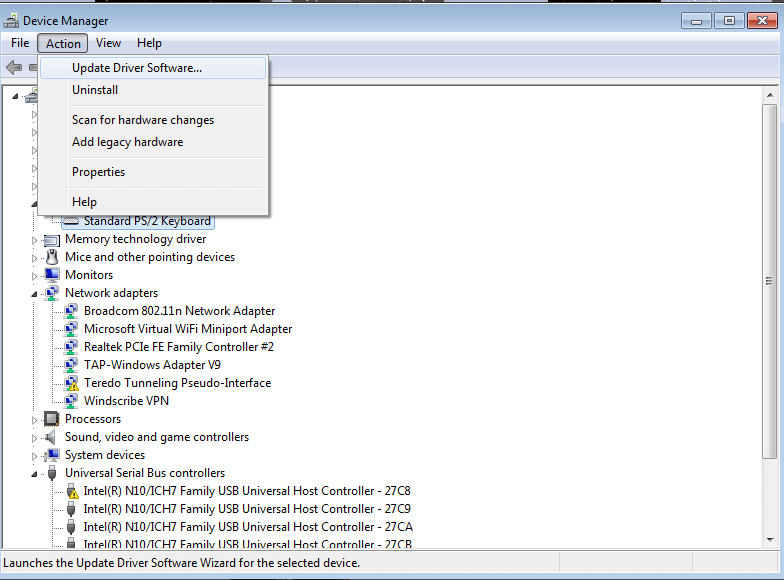
- Further, click on Action and then select the Scan for hardware changes option.
- This will prompt Windows to detect the changes made and then it will search for the keyboard drivers online.
- You can then reinstall the keyboard drivers and restart the system.
Solution 4: Update the Keyboard Drivers
Updating the keyboard drivers can be the last resort to end your troubles with the keyboard devices. If the above methods failed to sort the keyboard-related problems, then you can try updating your keyboard drivers to the latest available manufacturer-recommended versions.
There are basically three ways through which you can find and replace outdated keyboard drivers on a PC.
Way 1: Update Keyboard Drivers Manually
You can try using the Windows Device Manager to download and install the latest driver for your keyboard device. Here’s how to run this tool in Windows to update your out-of-date keyboard driver.
- In the Windows Search box, type device manager and then open the application from the results.
- Once Device Manager appears on your screen, go to the keyboard category and click on it to expand the same.
- Right-click on your keyboard device and click on “Update driver” from the list of options.
- On the subsequent prompt, select the first option, i.e., “Search automatically for updated driver software.”
- Now, just wait patiently until Windows finds and installs the most updated version of the keyboard driver on your computer.
- Lastly, restart your computer.
See, how easy it is to perform Windows 10 keyboard driver download using Device Manager.
Way 2: Update Keyboard Drivers Automatically (Recommended)
Updating drivers manually requires a great deal of time and technical expertise. Hence, if you are not entirely familiar or confident playing around with system drivers, you can do it automatically with the aid of the best free driver updater tool like Bit Driver Updater.
Bit Driver Updater not only installs the latest and rectified version of the keyboard driver automatically with a single mouse click but also helps make your computer run faster and smoother. Below is how to use this exceptional utility to install the latest keyboard driver updates.
Way 4: Run Windows Updates to Install Keyboard Drivers
Last but not least, you can also try Windows Update to find and automatically install the available driver updates. In addition to installing the latest keyboard drivers for Windows 10, and Windows 11, Windows Updates also brings the latest system updates, new features, bugs fixes, and performance improvements. To use this method, follow the steps outlined below:
- On your keyboard, altogether press the Win logo and I keys. This will take you to the Windows Settings.
- Choose Update & Security.
- In the next prompt, be sure Windows Update is selected from the left menu pane.
- After that, click on Check For Updates.
Now, sit back and wait until Windows finds and installs the latest version of keyboard drivers on your device. Once everything is done, reboot your computer to save the recently made changes.
Keyboard Drivers: Frequently Asked Questions (FAQs)
Q1. What are keyboard drivers?
Keyboard driver is a group of files that provides an interface between your computer’s operating system and the keyboard device you’re using. Without a proper keyboard driver, the computer would not be able to process the input data sent by the attached keyboard device.
Q2. How to download keyboard driver for Windows 10?
The quickest and safest way to download keyboard drivers on Windows 10 is by using a renowned automatic driver update utility. However, if you wish to do it manually, then you can either go to the official manufacturer’s website or you can use Windows built-in tool called Device Manager. Keep in mind that the manual process is time-consuming and requires a certain level of computer skills.
Q3. What will happen if I uninstall keyboard driver?
Uninstalling the keyboard driver from your PC may render your keyboard device inoperable. In order to make it work again, you can reboot your computer, and then Windows will automatically install the missing keyboard driver.
Q4. How do I fix my keyboard driver Windows 10?
In order to fix keyboard driver issues on Windows 10, you can try updating or reinstalling the keyboard driver using the methods shared in the article above.
Q5. Is there any Driver for the Keyboard?
Some keyboards need proprietary Windows-based drivers in order to access advanced and full features of the keyboard like hotkeys and media controls. These drivers are available on the CD that accompanied your keyboard. Although, you can also get them from the official support page of the manufacturer.
Q6. How Do I Fix Keyboard Driver Problems?
The simplest and most workable way to resolve all the keyboard driver problems is to update the driver software for your keyboard. Hit Windows and X keyboard keys together and click Device Manager. Expand the Keyboards category by double clicking on it. Click right on your keyboard driver and choose Update Driver Software.
Lastly, click Search Automatically for your Driver. Wait for Windows to find and install keyboard driver Windows 10, once it’s done, reboot your system to implement the new changes.
Q7. How Do I Reinstall Keyboard Drivers in Windows 11?
To reinstalling the keyboard drivers in Windows 11, you will first need to uninstall the currently installed keyboard drivers on your computer. Once existing keyboard drivers are uninstalled, then you can reinstall the corresponding drivers either from the official website of the manufacturer or using Windows default tool Device Manager.
Concluding Words: Reinstall & Update Keyboard Drivers in Windows 10
So, this is how you can update and reinstall your keyboard drivers on your PC. We have given some hacks to try before considering updating and reinstalling the keyboard drivers.
If those preliminary fixes don’t seem to fix the keyboard problems, then you can go for reinstalling the keyboard drivers from the Device Manager or else update the keyboard drivers with the help of an effective driver updater tool.
You are here:
Home » Windows 10 » How To Reinstall Keyboard Driver In Windows 10/11
Without a fully functional keyboard, using a computer is difficult. When your Windows 10/11 PC’s keyboard is not functioning, all or some keys might stop working.
If the common fixes like reconnecting the keyboard (applies only to external keyboard), restarting the computer, changing keyboard settings, and running the built-in keyboard troubleshooter could not solve the keyboard problem, you can consider reinstalling the keyboard driver.
This guide will show you how to reinstall the keyboard driver in Windows 10/11.
IMPORTANT: By default, the keyboard driver will be automatically installed by Windows when you uninstall the same. However, we recommend you visit your PC manufacturer’s website and download the keyboard driver (before uninstalling the current keyboard driver) for your model just in case Windows does not automatically install it.
Step 1: First of all, we need to uninstall the keyboard driver. For that, we will use the built-in Device Manager. To open it, right-click the Start button on the taskbar and then click the Device Manager option.

Step 2: In the Device Manager, expand the Keyboards tree to see your laptop’s keyboard entry. If you see more than one entry, it’s likely because you have connected an external mouse or keyboard to your laptop. If that is the case, please disconnect the external mouse or keyboard to know your laptop’s keyboard entry.

Step 3: Perform a right-click on the keyboard entry and then click the Uninstall device option.

Step 4: When you get the confirmation dialog, click the Uninstall button.

Step 5: You might now get the following dialog asking you to reboot your computer to uninstall the keyboard. Please save your work and click the Yes button to restart your computer.

Step 6: After the reboot, the keyboard driver will be automatically installed in the background.
If the keyboard is still not working, go to Settings > Update & security > Windows Update (Windows 10) or Settings > Windows Update (Windows 11) and then click the Check for updates button to download and install the keyboard driver.


Alternatively, you can visit your PC manufacturer’s website, download the newest version of the keyboard driver and then run the installer to install the driver.
Does your Keyboard not working perfectly? Then, it is happening so due to the outdated Keyboard driver. So, try out the below-mentioned methods to update Keyboard driver.
Undoubtedly, Keyboard is the utmost crucial part of our system. But, do you ever wonder what if, when it lags in doing the work that it is supposed to do. Of course, you’ll be depressed to no end. Isn’t so? And, even it is an irony too that you can’t use your system without the Mouse and Keyboard. So, now think about how you can keep your Keyboard always on board. Well, if you are new to this, then we explain to you how you can do so. Drivers are the heart of the device that establishes an effective connection between the device and the operating system of your Windows.
Hence, by updating the Keyboard drivers you can keep your Keyboard stable for long ages. But, many individuals have reported that after updating the drivers still the issue isn’t fixed. If you are one of them, then we advise you to first uninstall the drivers and then reinstall it again.
To do so within the least time and effort, you can use a powerful updater tool, such as Win Riser by the maker of Bit Driver Updater. This program performs automatic driver updates in a single mouse click, thereby eliminating the need to manually search for the correct drivers yourself. Win Riser includes many more features to keep your PC performance smooth.
Our aim behind this write-up is to explain to you how to update keyboard driver on Windows 10. But, before reinstalling the Keyboard drivers try simple hacks in order to fix the issue. Below, we’ve shared them. Without more baffling, let’s jump to the next section!
Simple Tips To Fix the Issues Before Reinstalling the Keyboard Driver
Sometimes, simple solutions can also fix the biggest issues. So, here are a few easy tips that you can use before reinstalling the keyboard driver, in order to fix the keyboard issues.
Tip 1: Inspect the Keyboard for Damages
Currently, we are working from home, right so we have gone into our comfort zone. Isn’t it the same as you do? And, many users have the habit of taking coffee or some snacks while working. But, what if, when unknowingly it spills on your Keyboard. Obviously, your Keyboard gets damaged and stops working. That is what we want to explain to you that ensures your Keyboard may not be damaged. If it is then repair the damages as soon as possible. If, after repairing it still doesn’t work as it used to, then replace it with another or new one.
Tip 2: Make Sure Keyboard is Connected Correctly
The next tip is that you must have to pay proper attention and which is to make sure that Keyboard may be adequately connected to your system. If it is not connected accurately, then it lags to load the drivers. Plus, check the USB ports too, if there is any fault in them, and change it instantly. Those who are using the wireless keyboards, change the batteries frequently to ensure the accurate working of the Keyboard.
Tip 3: Run Windows Troubleshooter
Windows comes up with the in-built apparatus i.e., Windows Troubleshooter that detects the issues and fixed them too. Moreover, it boosts the performance level of your system too by resolving the issues that hamper the effectiveness. In order to fix the issues, you can run the Windows Troubleshooter. We’ve listed down the steps below for the very same!
Step 1:- Type Troubleshooting in the search bar of your Windows.
Step 2:- Then, click on the best match from search results.
Step 3:- After this, from the left-pane side click on the View All option.
Step 4:- Now, a list will show up on the screen then, locate Hardware and Devices from the list and click on it.
Next, to finish the troubleshooting process follow the on-screen results.
Read More: Fix Laptop Keyboard Not Working on Windows 10
Tip 4: Look to Driver Software
Want to use the advanced Keyboard features? Then, you need to have the proprietary Keyboard driver introduced to your system. If they are not present then you can download and install it from the official website of the Keyboard manufacturer.
So, these all are the simple tricks by which you can easily fix the Keyboard issues. If after trying above all the tricks, still the issue is not solved. Then, you need to update Keyboard drivers. Below is everything that you should know about the same.
How to Download & Install Keyboard Driver on Windows 10
This section of our write-up explains to you how you can download Keyboard driver, when it is not present on your PC. From the official website of the manufacturer, you can do so. Steps to download & install the Keyboard driver via the official website of the manufacturer.
Step 1:- Visit the official support page of the Keyboard manufacturer.
Step 2:- Then, switch to the Support & Download tab.
Step 3:- Next, search for the compatible driver according to your Keyboard model.
Step 4:- After this, download the driver file and unzip it.
Step 5:- Now to move forward, follow the on-screen steps.
That’s it! you need to do to download & install Keyboard drivers from the official website of the manufacturer.
Read More: Fix Mouse Double Clicks Issues On Windows 10
How to Uninstall & Reinstall Keyboard Driver on Windows 10
Maybe, after updating the Keyboard driver still, you have to face the Keyboard related issues. Well, it might be possible because of the wrong installation Keyboard driver. In this situation, you need to reinstall the keyboard drivers. Don’t know how to do it, no worries, we’ve shared the steps to reinstall Keyboard drivers on windows 10.
Step 1:- Press the Win and R key at a time from your Keyboard.
Step 2:- This will open up the Run Dialog box, then type devmgmt.msc and hit the enter key.

Step 3:- Now, you will land at your destination i.e., Device Manager. Locate Keyboards and expand the category.
Step 4:- Thereafter, click right on the Standard PS/2 Keyboard and choose Uninstall from the drop-down menu list.

Step 5:- Then, a confirmation box asks you to make your final choice hence, click on Ok.

And, here you go, you’ve uninstalled the Keyboard driver successfully. After this, to reinstall Keyboard driver on Windows 10 do not forget to restart the PC. After doing so, still, your issues haven’t solved then you have to update your Keyboard drivers.
Read More: Update Network Adapter Driver on Windows 10, 8, 7
How to Update Keyboard Driver on Windows 10
You may have two ways to update Keyboard drivers on Windows 10 either it is through the Windows Update or via the driver updater tool. We understand that updating drivers is nothing but a daunting task, especially for newbies. Isn’t it? But, here we are going to explain to you how you can do so quite easily. Below, we’ve shared the steps to both of the ways. Let’s read them!
Way 1: Check for Windows Update
Windows operating system provides you the facility to update drivers by running Windows Updates. So, below are the steps that you are required to follow!
Step 1:- Go to the Start icon and click on it.
Step 2:- Now, select Settings from the available options and click on it.
Step 3:- This will trigger the Windows Settings. Now, locate Windows Update & Security and click on it.
Step 4:- Thereafter, select Windows Update from the left side and then click on Check for Updates option.
If there are new updates available then Windows will download it automatically. However, sometimes Windows Update lags in updating the drivers. That is the only reason, we advise you to use the driver updater tool which we’ve referenced below. Scroll down, and read!
Way 2: Use Bit Driver Updater to Update Keyboard Drivers
Bit Driver Updater is an ideal driver updater tool that automatically updates the new drivers. Plus, it enhances the overall performance of the system. And, surprisingly, it allows you to update all the drivers in one click. Sounds quite-cool! String with the below steps to know how it works!
Step 1:- Launch Bit Driver Updater on your system.
Step 2:- Now, automatic scanning will start on its own. If it doesn’t start then you need to click on the Scan option on the left side.
Step 3:- After this, review the list of drivers wisely.
Step 4:- Lastly, hit the Update Now option and if you want to update all the drivers at once then click on the Update All option.

That’s all what you need to do to update Keyboard drivers via Bit Driver Updater. It is the most facile method to update drivers. So, download Bit Driver Updater from the given download tab below!
Bonus Tip: Roll Back Driver to its Previous Version
If updating or reinstalling driver software didn’t solve your keyboard problems, you can try restoring the previous driver version by using the rollback option that’s available within the Device Manager tool in Microsoft Windows. Here’re the detailed instructions on how to roll back the keyboard driver to its previous version in Windows 10:
- Right-click on the Start button and click on Device Manager to launch the tool.
- Expand the Keyboards category in Device Manager.
- Right-click on the keyboard driver and select the ‘Properties’ option from the pop-up menu.
- Go to the ‘Driver’ tab and click on the ‘Roll Back Driver’ button.
- Click the OK/Yes button on the confirmation window.
Frequently Asked Questions: Keyboard Drivers on Windows
For all your queries related to the keyboard driver, we have brought together the most frequently asked questions below and answered them for your reference.
Q.1 What is a keyboard driver?
Just like the name suggests, a keyboard driver is a set of files or data that allows the keyboard to run on your system with ease. The driver defines how a device, in this case, the keyboard, will respond to your commands as a user.
Q.2 If I uninstall the keyboard driver, what will happen?
If you uninstall the keyboard driver, you may not be able to use the keyboard anymore. When you try to use the keyboard after uninstalling the driver, the system may also fail or crash.
Q.3 What is the method to fix the Windows 10 keyboard driver?
The best method to fix the keyboard driver on Windows 10/11 is to take the help of Bit Driver Updater. This is a free tool that allows you to download and install any driver, including the keyboard one, even if the driver is corrupted, faulty, damaged, outdated, or missing.
Q.4 Is a keyboard driver available?
Yes, for every keyboard, there is a specific keyboard driver available to help you. This driver will allow you to run the specific keyboard with ease.
Q.5 How can I download the keyboard driver on Windows 10 PC?
There are multiple methods to download the keyboard driver including the official manufacturer’s website, the Device Manager as well as the Bit Driver Updater. You can take the help of any of these methods to download the driver. Refer to the descriptions of the tools provided above for a detailed explanation.
Update and Reinstall Keyboard Drivers on Windows 10 [Done]
That’s all for now, expecting that now you could be able to bring back the effective performance of your Keyboard. As of now, you are familiar with the tips and hacks that you needed to know for the very same.
If you are satisfied with our post then do subscribe to our Newsletter for more such latest tech updates. And, do share your views on this through the comment box below. We will be so happy to hear you out. We know it’s hard to say bye-bye, but don’t worry we’ll back shortly with yet another engaging but helpful article. Till then, stay tuned with us. And, Type Wisely!
Reinstallation of a keyboard driver is an all in one solution to any issue that occurs with the device on Windows 11 or 10. Being an important part of the OS, if the software fails to perform, you get various problems. This may be Keyboard not working, hanging, Right Click on Desktop Taking Too Long and other. So you will find here the ways to Uninstall and Reinstall Keyboard Driver in Windows 10 easily.
One such driver that users are frequently complaining about is the keyboard. If the keyboard driver goes bad, it most certainly results in faulty operation of the keyboard. Drivers operate quite closely with the system and they are integral to the efficient functioning of the device it is responsible for. In many circumstances, when your keyboard stops functioning, uninstalling and reinstalling the driver resolves the issue. Also, you might want to reinstall it if you accidentally uninstalled the keyboard driver. The process is quite simple and would hardly take a few minutes. So, let us delve into the procedure and see how you can do this in Windows 10 and 11.
Uninstall and Reinstall Keyboard Driver in Windows 11 and 10
Here is how to uninstall and reinstall Keyboard Driver in Windows 11 or 10 –
Step-1: Right-click the bottom-left corner (over the start button) of the screen. Alternatively, you can press Windows logo key along with ‘X’.
Step-2: Win+X menu will show up, select the option namely “Device Manager.”
Step-3: Once Device Manager will appear, you can view all the devices which are installed on your system. Click on the small arrow that you see alongside Keyboard to expand.
Step-4: Find the driver that you would like to uninstall and right-click on it.
Step-5: Click on the Uninstall device option. A dialog box will pop up asking to confirm if you want to uninstall the driver.
Step-6: Hit the Uninstall button in the dialog box. This will remove the driver from the system.
Step-7: Restart Windows 10 PC and the system will automatically reinstall the Keyboard driver to your system.
How to Roll Back to the Previous Driver
Though new device drivers almost always improve Windows 10 performance, there are cases when it does just the opposite. This can be the case, especially if you update or install drivers from unreliable sources. If you believe the problematic functioning is due to the new driver, you can roll back to the previous driver. To do this:
- Open Run dialog box by jointly hitting Win logo + R hotkeys. Here, type in devmgmt.msc and click OK.
- When Device Manager shows up, click on the small arrow that you see alongside Keyboards.
- Right-click on the driver as before. Select Properties.
In the Properties window, click on the Driver tab. Then click on the Roll Back Driver button (see snapshot).
A dialog box will appear warning about roll-back and asking for your confirmation. Click on OK/Yes.
That’s all!!!
Applies ToWindows 11 Windows 10
Возникли проблемы с устройством? Убедитесь, что все подключено правильно, устройство имеет питание и правильно настроено.
Прежде всего проверьте оборудование
-
Отключите USB-кабели и немного подождите, пока Windows выгрузит драйвер устройства, а затем снова подключите устройство.
-
Попробуйте использовать другой USB-порт на компьютере.
-
Если вы используете USB-концентратор между устройством и компьютером, убедитесь, что в концентраторе есть питание. Если он по-прежнему не работает, попробуйте удалить USB-концентратор и подключить устройство непосредственно к USB-порту на компьютере.
-
Убедитесь, что кабели устройства не повреждены.
-
Если какие-либо устройства питаются от аккумуляторов или батарей, проверьте, полностью ли заряжены аккумуляторы и свежие ли батареи используются.
-
Убедитесь, что нет грязи, блокирующей ключи или датчики.
Проверьте беспроводные подключения
-
Найдите в нижней части беспроводного устройства кнопку Сброс. Если нажать кнопку сброса, беспроводное соединение будет отключено, а затем повторно создано. На USB-приемнике устройства также может быть кнопка Сброс.
-
Для беспроводных USB-устройств это может быть так же просто, как отключить беспроводной приемник USB, подождать около 10 секунд, а затем подключить беспроводной приемник USB обратно к USB-порту. После этого беспроводное соединение должно быть автоматически воссоздано.
-
Если ваше беспроводное устройство использует подключение Bluetooth, см. также статью Устранение проблем с Bluetooth в Windows для возможных решений.
Проверьте устройство
Если устройство совсем не работает (при подключении устройства не светятся индикаторы, курсор не перемещается или вообще не отображается на экране), подключите устройство к другому компьютеру и проверьте, работает ли оно на нем. Если устройство не работает и на другом компьютере, возможно, потребуется заменить его.
Примечание: Некоторые устройства не будут работать, если не установить для них необходимый драйвер. При проверке устройства на другом компьютере убедитесь, что вы установили правильный драйвер для устройства.
Драйверы средства устранения неполадок в оборудовании
Обновите драйвер устройства с помощью Центра обновления Windows
-
В поле поиска на панели задач введите проверить наличие обновлений, а затем выберите пункт Проверить наличие обновлений в списке результатов.
-
В разделе Центр обновления Windows нажмите Проверка наличия обновлений. клиентский компонент Центра обновления Windows сообщит вам, нужны ли вам обновления или нет, и успешно ли установлены последние обновления.
Обновления драйверов могут быть недоступны.
Перейдите к клиентский компонент Центра обновления Windows
Самостоятельное скачивание и установка драйвера
-
В поле поиска на панели задач введите диспетчер устройств, а затем выберите диспетчер устройств в списке результатов.
-
В списке категорий оборудования выберите устройство, для которого необходимо обновить драйвер, и дважды щелкните его.
-
Перейдите на вкладку Драйвер, нажмите Обновить драйвер и следуйте инструкциям.
Нужна дополнительная помощь?
Нужны дополнительные параметры?
Изучите преимущества подписки, просмотрите учебные курсы, узнайте, как защитить свое устройство и т. д.