
In this article, we’ll see how to automatically copy and migrate user profiles from old domain to new domain (or a local user to a domain user). In addition to profiles and data, you will also be able to copy applications and their settings, should you decide to transfer those as well.
Do you need to switch to a new domain on same PC? That guide is here.
Need to migrate within same domain? That’s even easier – see general user profile migration guide.
Looking for a way to migrate an actual Windows server, and not just end-users?
Check out our tutorial for server migration.
When changing to a new domain, the old domain user profiles will not be accessible automatically. Then will have to be re-created for each user. Of course, populating that profile with user settings and user data is a process that should be automated as much as possible – and this is what we will see here.
The product we will use is Zinstall Migration Kit Pro. It can do all kinds of migration tasks, and profile migration happens to be one of them. The transfer includes all of user data and personalization. Plus, it can even transfer user install applications, if needed. This process works for Windows 11, Windows 10, Windows 8/8.1, 7, Vista and XP (yes, you can transfer profiles from an XP domain to a Windows 11 domain!)
This process does not disrupt the profile SIDs, and transfers settings in a way that is identical to a human operator manually transferring data and reconfiguring settings. This part ensures that the new domain is not “trashed” with remnants of the old one.
Here is how the process works:
How to transfer user profiles from old computer to new domain
- Log in as the original, old domain user (OLD-DOMAIN\USER) on the source machine
- Log in as the replacement, new domain user (NEW-DOMAIN\USER) on the target machine
- Run Zinstall Migration Kit Pro on both machines
Note: You can get the Kit here, and its user guide here. - You can do the transfer either directly between the machines (over the network), or first capture the source into a container, store it on a network share, and then deploy on the target. This last option works even if the machines are not in the same physical location, or if you are doing an in-place switch on the same physical machine.
- If you do NOT want to transfer programs, and are only interested in a profile transfer, switch the radio button on the main screen to “profile and settings only” mode
- If you’d like to select exactly what you want to transfer, press the Advanced menu. If you just want to transfer everything, you don’t need to go to the Advanced menu.
- Press “Go” on the new computer to start the transfer
- The transfer will take a while (depending on how much data you have to transfer), and report to you when done.
Note that you can also use the Kit in a command-line mode, which is useful in SCCM and other management tools integration.
That’s it! The profile contents are transferred to the new domain’s user profile – and the migration is complete.
Ready to transfer your users to a new domain?
Get Zinstall Migration Kit Pro here
(or contact us for volume discounts).
Video tutorial – migrating user profiles and programs to a new computer
Администраторы время от времени должны удалять старые профили пользователей (уволенные пользователи, неактивные пользователи, и т.д.) в каталоге C:\Users на рабочих станциях и серверах Windows. Чаще всего с задачей очисткой профилей пользователей Windows сталкиваются на терминальных серверах RDS (Remote Desktop Services).
Основная проблема терминальных серверов – постоянный рост размеров каталогов профилей пользователей на диске. Частично эта проблема решается политиками квотирования размера профиля пользователя с помощью FSRM или NTFS квот, использованием профилей типа FSLogix или User Profile Disk, перемещаемыми папками и т.д. Но при большом количестве RDS пользователей в папке C:\Users со временем накапливается огромное количество каталогов с неиспользуемыми профилями пользователей.
Содержание:
- Как вручную удалить профиль пользователя в Windows?
- Групповая политика для автоматической очистки старых профилей
- PowerShell скрипт для удаления старых профилей пользователей в Windows
Как вручную удалить профиль пользователя в Windows?
В Windows вы можете вручную удалить профиль пользователя через панель управления.
- Откройте Advanced System Settings (команда
SystemPropertiesAdvanced
) -> User Profiles -> Settings; - В этом окне перечислен список всех профилей пользователей (локальных и доменных), которые хранятся на этом компьютере. Размер каждого профиля пользователя на диске указан в столбце Size.
- Выберите пользователя, чей профиль нужно удалить и нажмите кнопку Delete.


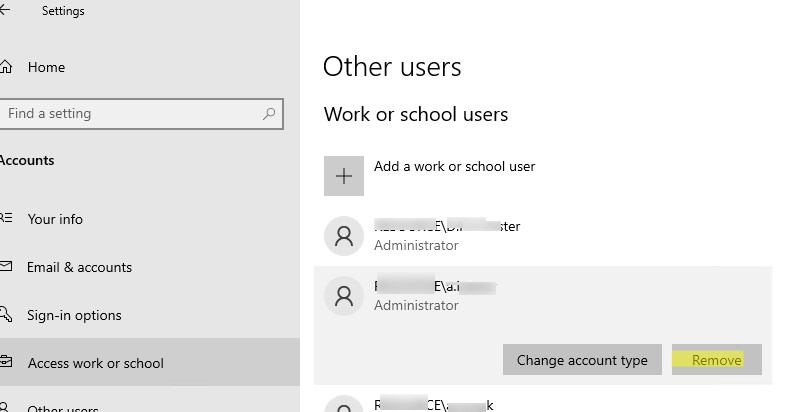
В Windows 11/10 и Windows Server 2022/2019 вы можете удалить профили пользователей с диска через приложение Settings. Перейдите в раздел Accounts -> Access work and school (или выполните команду быстрого доступа
ms-settings:otherusers
). Выберите пользователя и нажмите Remove чтобы удалить его данные с компьютера.
При корректном удалении профиля пользователя с диска будет удален каталог профиля в C:\Users и запись о пользователе в реестре.
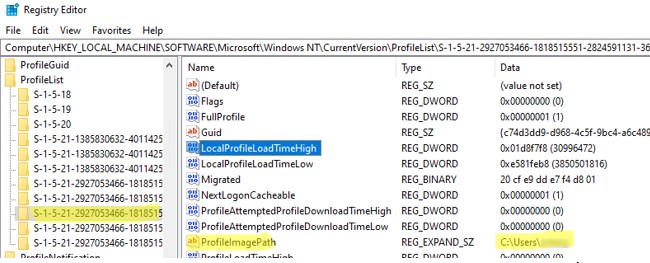
Многие начинающиеся администраторы пытаются вручную удалить каталог с профилем пользователя из папки C:\Users. В этом случае нужно обязательно вручную удалить информацию о профиле из реестра Windows:
- Откройте редактор реестра
regedit.exe
; - Перейдите в ветку HKEY_LOCAL_MACHINE\SOFTWARE\Microsoft\Windows NT\CurrentVersion\ProfileList
- Для каждого пользователя, выполнившего локальный вход в систему (этот метод входа должен быть разрешен пользователю настройками параметра Allow log on locally в GPO), создается отдельная ветка с SID пользователя в качестве имени;
- Вы можете найти раздел реестра, соответствующий пользователю по SID, или можете вручную просмотреть содержимое всех вложенных разделв, пока не найдете раздел, в котором значение ProfileImagePath указывает на каталог с профилем пользователя на диске (например,
C:\Users\kbuldogov
);
- Удалите данный раздел реестра, чтобы завершить корректное удаление профиля.
Также вы можете удалить профиль конкретного пользователя с помощью PowerShell:
Get-CimInstance -Class Win32_UserProfile | Where-Object { $_.LocalPath.split(‘\’)[-1] -eq 'kbuldogov' } | Remove-CimInstance
Эта команда удалит как каталог на диске, так и ссылку на профиль пользователя kbuldogov в реестре HKEY_LOCAL_MACHINE\SOFTWARE\Microsoft\Windows NT\CurrentVersion\ProfileList.
Эта команда будет работать как в Windows PowerShell, так и в новых версиях PowerShell Core 6.x,7.x
Можно удалить профиль пользователя на удаленном компьютере с помощью PowerShell Remoting и командлета Invoke-Command:
$compname="wks21s32"
$user = "kbuldogov"
Invoke-Command -ComputerName $compname -ScriptBlock {
param($user)
Get-CimInstance -Class Win32_UserProfile | Where-Object { $_.LocalPath.split(‘\’)[-1] -eq $user } | Remove-CimInstance
} -ArgumentList $user
Групповая политика для автоматической очистки старых профилей
В Windows есть специальный параметр групповой политики для автоматического удаления старых профилей пользователей старше xx дней. Вы можете включить этот параметр с помощью локального редактора GPO (
gpedit.msc
) или с помощью консоли управления доменными GPO (
gpmc.msc
). В этом примере на назначим политику автоматической очистки профилей на хосты в ферме RDS, которые вынесены в отдельный контейнер (Organizational Unit) Active Directory.
Прежде чем применять политику удаления старых профилей ко всем хостам, настоятельно рекомендуем проверить ее на тестовом сервере. Выведите один из серверов RDSH в режим обслуживания и протестируйте политику на нем.
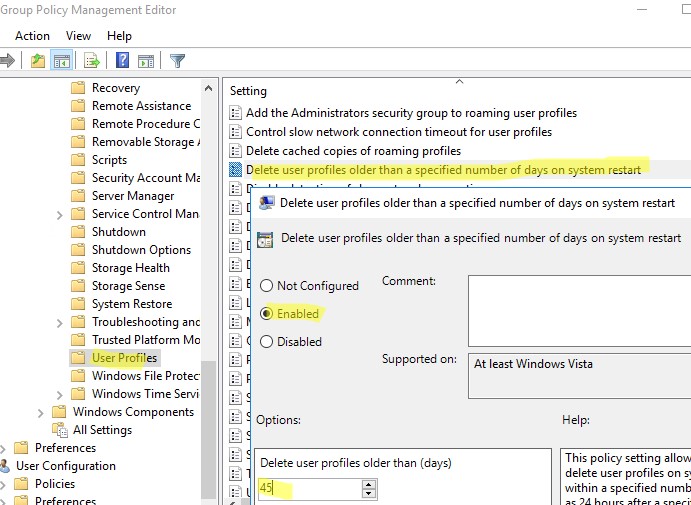
- Найдите OU с компьютерами/серверами, на который вы хотите применить политику очистки старых профилей пользователей. Щелкните по OU и выберите Create a GPO in this domain and Link it here;
- Укажите имя политики и отредактируйте GPO;
- Перейдите в раздел Конфигурация компьютера -> Административные шаблоны -> Система -> Профили пользователей (Computer Configuration -> Administrative Templates -> System -> User Profiles);
- Откройте параметр “Удалять при перезагрузке системы профили пользователей по истечении указанного числа дней” (Delete user profiles older than a specified number days on system restart);
- Включите политику и укажите через сколько дней профиль пользователя считается неактивным и “Служба профилей пользователей Windows” можно автоматически удалить такой профиль при следующей перезагрузке. Обычно тут стоит указать не менее 45-90 дней;

- После применения новых настроек групповых политк, служба User Profile Services на ваших серверах Windows будет автоматически удалять старые профили пользователей. Удаление выполняется при перезагрузке сервера.
При использовании этой политики нужно быть уверенным, что при выключении/перезагрузке сервера нет проблем с системным временем (время не сбивается), иначе могут быть удалены профили активных пользователей.
Другой недостаток — вы не можете запретить удаление определенных профилей, например, локальных учетных записей, администраторов и т.д.
В версиях до Windows 11/10 и Windows Server 2022/2019 эта политика работала некорректно. Дело в том, что неактивноть профиля пользователя ранее определялась по дате именения файла NTUSER.dat. При установке обновлений Windows, служба Trusted Installer может менять дату изменения файла NTUSER.dat в профиле каждого пользователя. В результате служба Win32_UserProfile считает, что профиль использовался недавно.
В современных версиях Windows эта политика проверяет активность профиля пользователей по параметрам LocalProfileUnloadTimeLow и LocalProfileUnloadTimeHigh в ветке
HKEY_LOCAL_MACHINE\SOFTWARE\Microsoft\Windows NT\CurrentVersion\ProfileList\<User Sid>
.
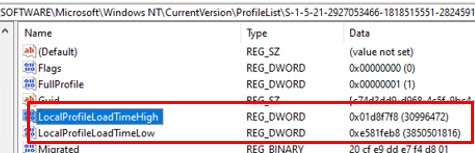
Вы можете получить значения параметров реестра LocalProfileLoadTimeLow и LocalProfileUnloadTimeHigh в привычном формате времени с помощью скрипта:
$profilelist = Get-ChildItem "HKLM:\SOFTWARE\Microsoft\Windows NT\CurrentVersion\ProfileList"
foreach ($p in $profilelist) {
    try {
        $objUser = (New-Object System.Security.Principal.SecurityIdentifier($p.PSChildName)).Translate([System.Security.Principal.NTAccount]).value
    } catch {
        $objUser = "[UNKNOWN]"
  }
    Remove-Variable -Force LTH,LTL,UTH,UTL -ErrorAction SilentlyContinue
    $LTH = '{0:X8}' -f (Get-ItemProperty -Path $p.PSPath -Name LocalProfileLoadTimeHigh -ErrorAction SilentlyContinue).LocalProfileLoadTimeHigh
    $LTL = '{0:X8}' -f (Get-ItemProperty -Path $p.PSPath -Name LocalProfileLoadTimeLow -ErrorAction SilentlyContinue).LocalProfileLoadTimeLow
    $UTH = '{0:X8}' -f (Get-ItemProperty -Path $p.PSPath -Name LocalProfileUnloadTimeHigh -ErrorAction SilentlyContinue).LocalProfileUnloadTimeHigh
    $UTL = '{0:X8}' -f (Get-ItemProperty -Path $p.PSPath -Name LocalProfileUnloadTimeLow -ErrorAction SilentlyContinue).LocalProfileUnloadTimeLow
    $LoadTime = if ($LTH -and $LTL) {
        [datetime]::FromFileTime("0x$LTH$LTL")
    } else {
        $null
    }
    $UnloadTime = if ($UTH -and $UTL) {
        [datetime]::FromFileTime("0x$UTH$UTL")
    } else {
        $null
    }
    [pscustomobject][ordered]@{
        User = $objUser
        SID = $p.PSChildName
        Loadtime = $LoadTime
        UnloadTime = $UnloadTime
    }
}

PowerShell скрипт для удаления старых профилей пользователей в Windows
Вы можете удалять профили неактивных или заблокированных пользователей с помощью скрипта PowerShell.
Сначала попробуем подсчитать размер профиля каждого пользователя в папке C:\Users c помощью простого скрипта из статьи “Вывести размер папок с помощью PowerShell”:
gci -force ‘C:\Users\’-ErrorAction SilentlyContinue | Where { !($_.Attributes -match " ReparsePoint") }| ? { $_ -is [io.directoryinfo] } | % {
$len = 0
gci -recurse -force $_.fullname -ErrorAction SilentlyContinue | % { $len += $_.length }
$_.fullname, ‘{0:N2} GB’ -f ($len / 1Gb)
$sum = $sum + $len
}
“Общий размер профилей”,'{0:N2} GB’ -f ($sum / 1Gb)
Итого суммарный размер всех профилей пользователей в каталоге C:\Users около 22 Гб.
Теперь выведем список пользователей, профиль которых не использовался более 60 дней. Для поиска можно использовать значение атрибута профиля LastUseTime.
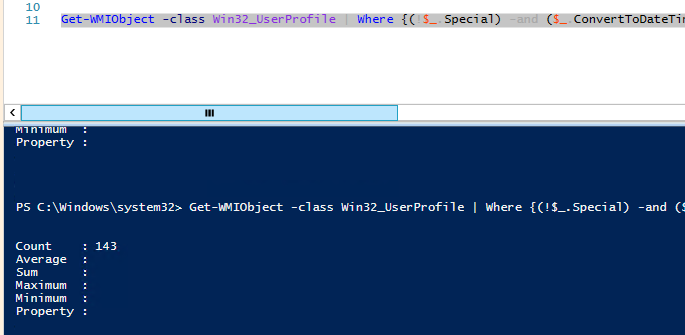
Get-WMIObject -class Win32_UserProfile | Where {(!$_.Special) -and ($_.ConvertToDateTime($_.LastUseTime) -lt (Get-Date).AddDays(-60))}| Measure-Object
У меня на терминальном сервере оказалось 143 профиля неактивных пользователей (общим размером около 10 Гб).
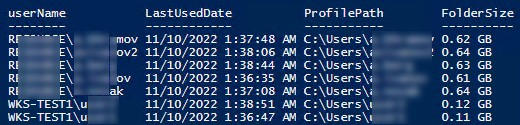
Следующий PowerShell скрипт выведет список подробную информацию о профилях пользователей, которые не обновлялись более 60 дней. Скрипт сконвертирует SID пользователя в имя, посчитает размер профиля каждого пользователя и выведет все в таблице:
$allprofilesinfo = @()
$OldProfiles=Get-WMIObject -class Win32_UserProfile | Where {(!$_.Special) -and ($_.ConvertToDateTime($_.LastUseTime) -lt (Get-Date).AddDays(-60))}
Foreach ($OldProfile in $OldProfiles)
   {$objSID = New-Object System.Security.Principal.SecurityIdentifier ($OldProfile.SID)
    $objUser = $objSID.Translate( [System.Security.Principal.NTAccount])
        $userinfo = New-Object PSObject -Property @{
            userName = $objUser.Value
            ProfilePath = $OldProfile.localpath
            LastUsedDate = $OldProfile.ConvertToDateTime($OldProfile.LastUseTime)
            FolderSize =  "{0:N2} GB" -f ((gci –force $OldProfile.localpath –Recurse -ErrorAction SilentlyContinue| measure Length -s).sum / 1Gb)
        }
    $allprofilesinfo += $userinfo
   }
$allprofilesinfo
Чтобы удалить все эти профили достаточно добавить перенаправить список на команду Remove-WmiObject (перед использование скрипта удаления желательно несколько раз перепроверить его вывод с помощью параметра –WhatIf ):
Get-WMIObject -class Win32_UserProfile | Where {(!$_.Special) -and (!$_.Loaded) -and ($_.ConvertToDateTime($_.LastUseTime) -lt (Get-Date).AddDays(-30))} | Remove-WmiObject –WhatIf
Как мы уже упомянули выше, при установке некоторых обновлений Windows, служба Trusted installer может менять дату изменения файла NTUSER.dat в профиле каждого пользователя.
На скриншоте выше видно, что все профили были изменены примерно в одно и тоже время. Проверьте дату последней установки обновлений в Windows:
gwmi win32_quickfixengineering |sort installedon |select InstalledOn -Last 1
Или с помощью модуля PSWindowsUpdate:
Get-WUHistory | Select-Object -First 20
Скорее всего она совпадет с датой изменения профилей. Поэтому в старых версиях Windows можно получить список неактивных профилей с помощью другого скрипта, который проверяет атрибуту lastwritetime каталога пользователя:
$USERS= (Get-ChildItem -directory -force 'C:\Users' | Where { ((Get-Date) — $_.lastwritetime).days -ge 60 } | % {'c:\users\' + $_.Name})
foreach ($User in $USERS) {
Get-WMIObject -class Win32_UserProfile | Where {(!$_.Special) -and (!$_.Loaded) -and ($_.LocalPath -eq $User)} | Remove-WmiObject WhatIf }
Чтобы не удалять профили некоторых пользователей, например, специальные аккаунты System и Network Service, учетную запись локального администратора, пользователей с активными сессиями, список аккаунтов-исключений), нужно модифицировать скрипт следующим образом:
#Список аккаунтов, чьи профили нельзя удалять
$ExcludedUsers ="Public","zenoss","svc",”user_1”,”user_2”
$LocalProfiles=Get-WMIObject -class Win32_UserProfile | Where {(!$_.Special) -and (!$_.Loaded) -and ($_.ConvertToDateTime($_.LastUseTime) -lt (Get-Date).AddDays(-60))}
foreach ($LocalProfile in $LocalProfiles)
{
if (!($ExcludedUsers -like $LocalProfile.LocalPath.Replace("C:\Users\","")))
{
$LocalProfile | Remove-WmiObject
Write-host $LocalProfile.LocalPath, "профиль удален” -ForegroundColor Magenta
}
}
Вы можете настроить запуск этого скрипта через shutdown скрипт групповой политики или по расписанию заданием планировщика. (перед настройкой автоматического удаления профилей внимательно протестируйте скрипт в своей среде!).
Можно модифицировать скрипт, чтобы автоматически удалять пользователи всех пользователей, которые добавлены в определенную группу AD. Например, вы хотите автоматически удалять профили уволившихся пользователей. Просто добавьте такие учетные записи в группу DisabledUsers и выполните на сервере скрипт:
$users = Get-ADGroupMember -Identity DisabledUsers | Foreach {$_.Sid.Value}
$profiles = Get-WmiObject Win32_UserProfile
$profiles | Where {$users -eq $_.Sid} | Foreach {$_.Delete()}
Not being able to login to computer due to Corrupted User Profile can be quite frustrating. Hence, we are providing below two different methods to Fix Corrupt User Profile on a Windows computer.
According to Microsoft, User Profile an get corrupted if the Antivirus program on the computer was busy scanning the PC for malware, while you were trying to Login to the User Account.
In our testing, it was possible to repair the corrupted user profile and gain access to the User Account by using registry editor.
Another way to deal with a corrupt user profile is to create a new user account and transfer all your files from the corrupted User Account to New User Account.
Advertisement
Method 1. Fix Corrupt User Profile Using Registry Editor
Login to your main Admin Account or another User Account with admin previlages and follow the steps below to identify and fix the corrupted user profile.
1. Right-click on the Start button and click on Run.
2. In the Run Command window, type regedit and click on OK.
3. On the Registry Editor screen, navigate to HKEY_LOCAL_MACHINE\SOFTWARE\Microsoft\Windows NT\CurrentVersion\ProfileList.

4. Open ProfileList Folder and you will see Folders starting with S-1-5. Each of these Folders represents a User Profile linked to User Account that was created on your computer.

Now, the difficult task is to identify the S-1-5 Folder that belongs to the Corrupted User Profile. You can do this by clicking on each S-1-5 Entry and taking a look at ProfileImagePath in “Data” Column.
As you can see in above image, the “User Name” is clearly visible in ProfileImagePath Entry for the selected S-1-5 entry in the ProfileList Registry.
5. Once you find the right S-1-5 Folder, double-click on the State Field in right-pane.

Advertisement
6. In the Edit DWORD Window that appears, change the Value Data from 1 to 0 and click on the OK button.
7. Similarly, double-click on RefCount entry and change the Value Data from 1 to 0. If you cannot find “RefCount”, you need to create a New RefCount.
Right-click anywhere (blank space) in the right pane > click on New > DWORD (32 bit) Value and type RefCount as the Name for this New DWORD.
8. Close the Registry Editor and Restart the computer.
After this, you should be able to login to the user account and gain access to all your files.
Method 2. Transfer Files from Corrupted User Account to New Account
Create a New User Account by logging into your admin account and follow the steps below to transfer files from corrupted user account to new user account.
1. Open File Explorer > select Local Disc (C:) in the left-pane and double-click on Users Folder in the right-pane.

2. Once you are in Users Folder, open the Corrupted User Account by double-clicking on it.

3. Individually select Desktop, Documents, Pictures and other Files/Folders that you want to transfer to New User Account.

Important: Do not right-click and select all Files/Folders in the corrupted user account, as you will also end up copying hidden system files (Ntuser.dat, Ntuser.dat.log and Ntuser.ini) linked to the corrupted user profile.
4. Once Files/Folders are selected, right-click and select the Copy option to copy the files to clipboard.

5. Once files are copied to the clipboard, open the New User Account that you created and Paste copied files into the New User Folder.
After this, login to New User Account and you will be able gain access to files that were transferred from the corrupted user account.
What to Do If the Admin Account is Corrupted?
If the Admin account is corrupted, you can activate or enable the Hidden Admin Account that Microsoft makes available on Windows computers for such rare occasions.
After logging in to the hidden admin account, you can try to repair the corrupted user profile on your computer by using steps as provided in the first method.
The other option is to create a new user account and transfer files from corrupted user account to new user account by using the second method as provided above.
Important: The name of the new user account needs to be different from that of the corrupted user account.
After deleting the corrupted user account, you can rename the new user account to the original user account name (if you want to maintain the same user name).
2023-09-26
·
2 мин. для прочтения
1 Утилиты переноса данных пользователя
1.1 User Profile Wizard
- Сайт: https://www.forensit.com/
- Лицензия: EULA, FreeWare
- Видео: https://www.youtube.com/watch?v=-YRqK_eLrQo
- Программа устанавливается как переносимый исполняемый файл.
1.1.1 Описание
- Для ситуации, когда в компании внедряется доменная сеть и необходимо компьютеры пользователей подключать к домену.
- Необходимо перенести локальные профили пользователей а домен.
- Утилита связывает доменную учётную запись с локальным профилем.
- В результате пользователь так же работает в том же самом окружении, но уже в домене.
- Программа можно запускать до ввода компьютера в домен, ввод в домен можно сделать через саму утилиту.
- После входа под доменной учётной записью видим, что все настройки сохранились.
- Папка профиля доменного пользователя совпадает с папкой профиля исходного пользователя.
1.1.2 Использование
- Учётную запись в которую собираетесь имортировать настройки лучше создать заблаговременно иначе программа выдаст ошибку: Account does not exist.
- Запускаем программу, жмем далее и видим окно Select a User Profile. Выбираем из списка профиль пользователя, который нужно перенести в нашу учетную запись.
- Опции:
- Если включить опцию Show Unassigned Profiles, то программа покажет профили пользователей, которые не подключены к текущей ОС Windows.
- Disable Account — отключит аккаунт, профиль которого был перенесён.
- Delete Account — удалит аккаунт после переноса.
- Следующий шаг User Account Information — Информация об учетной записи пользователя. Здесь указывается информация о профиле в который будут импортированы настройки другого профиля.
- Enter the domain — указываем домен в котором зарегистрирован пользователь.
- Если включить опцию Join Domain, то программа попытается присоединить компьютер к этому домену.
- Тогда вводим имя пользователя и пароль администратора, имеющего право ввести компьютер в домен.
- Enter the accont name — имя учетной записи пользователя, в профиль которого будут перенесены настройки.
- Если отметить Set as default logon, программа установит профиль этого пользователя как загружаемый по умолчанию.
- Запускается процесс переноса профиля. При завершении работы будет выдано сообщение Migration Complete!
- После работы программы может потребоваться перезагрузка для обновления профилей пользователей.
1.2 Transwiz
- Сайт: https://www.forensit.com/
- Лицензия: EULA, FreeWare
- Видео: https://www.youtube.com/watch?v=BsznBtuD8Xg
- Программа устанавливается как переносимый исполняемый файл.
1.2.1 Описание
- Утилита предназначенная для переноса профиля на другой компьютер.
- Утилита просто правит все необходимые пути, чтобы можно было пользоваться учётной записью и локально и в домене.
If you are leaving a company and keep your corporate laptop, that is in a company’s AD domain (e.g. AzureAD), with you, you may wonder how to keep your user’s profile settings and data before removing it from the domain.
Unfortunately, by the moment, Microsoft doesn’t propose any official tool to migrate the domain user profile to the local one (at least i couldn’t find one).
Nevertheless, there is a tool called “User Profile Wizard”, created by ForensiT’s, that can be used to copy the domain user profile to the local one and in this article I will show you how to do this.
Cool Tip: How to determine whether the current user is a Domain User account or a Local User account! Read more →
- Create a local user account:
Press ⊞ Win keybutton to open the start menu, type in
cmdto search for the command prompt and press Ctrl + Shift + Enter to startCMDas administrator.In the elevated command prompt, execute the following commands to create the local user account, set the password and add it to the local “Administrators” group:
C:\> net user <local_user_name> /add
C:\> net user <local_user_name> <password> /add
C:\> net localgroup Administrators <local_user_name> /add
- Download, install and launch the “User Profile Wizard”.
- Select the domain user account and click the “Next”.
- Select the local computer name from the drop-down, check the “Join Workgroup” box, enter the username of the local profile created above, click the “Next” and wait for the migration to complete.
- Once the domain user profile is copied to the local one, you will be able to click the “Next” and the computer will reboot.
- After reboot, the default login will be the new local user account that you have created.
Note that after migration of the domain user profile to the local one, the path to the user profile folder will remain the same, i.e. C:\Users\<DomainUserName>.
Cool Tip: Check if the computer is in a domain! Read more →
If your local user name is different from the domain one, you may want to rename the user profile folder. for this:
- Log in by using another administrative account.
- Rename the
C:\Users\<DomainUserName>to the new user name. - Open the registry editor (press ⊞ Win + R and execute
regedit), go to theHKEY_LOCAL_MACHINE\SOFTWARE\Microsoft\Windows NT\CurrentVersion\ProfileList\<UserSID>and change the value of theProfileImagePathto the new path name (to find out the<UserSID>, execute thewmic useraccount get name,sid).
Cool Tip: How to find a user’s SID (security identifier) in Windows! Read more →
Was it useful? Share this post with the world!