
Within the C drive of your computer, AppData is a hidden system folder that stores application-specific data and settings. As we know, your C drive can fill up quickly, especially if you have many applications installed on your PC. To avoid this issue, we recommend you move AppData to another drive on Windows 10 to free up significant space. Other than that, you can carry out this transfer process to improve application performance.
However, moving AppData can cause issues with installed applications and system stability if not done correctly. So, we recommend you back up your data before making such changes and proceed with caution. EaseUS aims to put forward the two best methods to help you move AppData to another drive on Windows 10.
As discussed, users may need to migrate AppData from their C drive to other drives present on their PC for performance optimization. For this purpose, you can utilize the copy-and-paste method, containing many complexities, including creating a new user with administrator permissions and utilizing command lines.
However, you also have the option to utilize third-party transfer tools for this purpose. Users who want to move AppData to another drive on Windows 10 can get help from these valuable methods.
Way 1. Use EaseUS Todo PCTrans
Users who lack the technical knowledge to apply complex AppData transfer methods can utilize this third-party software due to its easy-to-navigate interface. Using EaseUS Todo PCTrans , you will be able to move the AppData folder from the C drive to another without data loss.
With the help of this offline software, you can secure your data using the backup and restore feature before trying to make changes to the system application. Now, Download this data tool to move AppData to another drive on Windows 10.
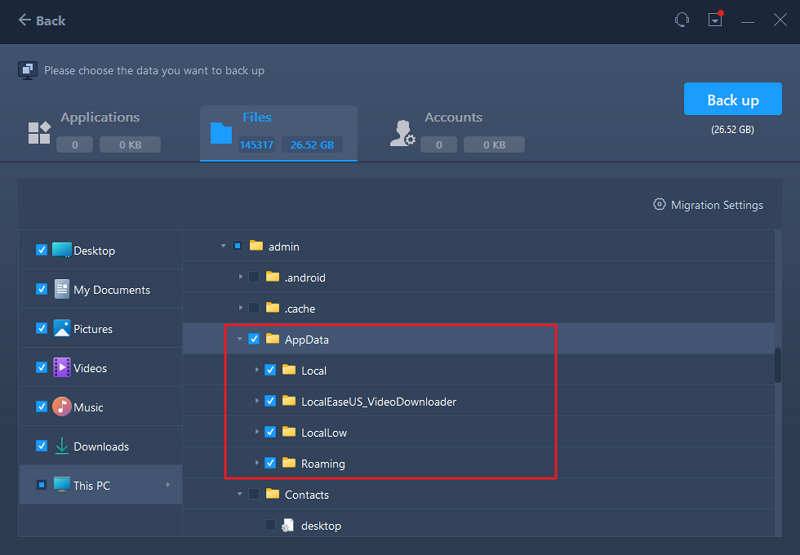
Step 1. Create a backup file of the source hard drive
- Launch EaseUS Todo PCTrans on your Windows computer. Navigate to the «Backup & Restore» mode and click «Start».
- Now select the AppData Folder from the path — C:\users\username\AppData.
- Then click «Finish». In the end, click «Backup.» Wait for the process to complete.
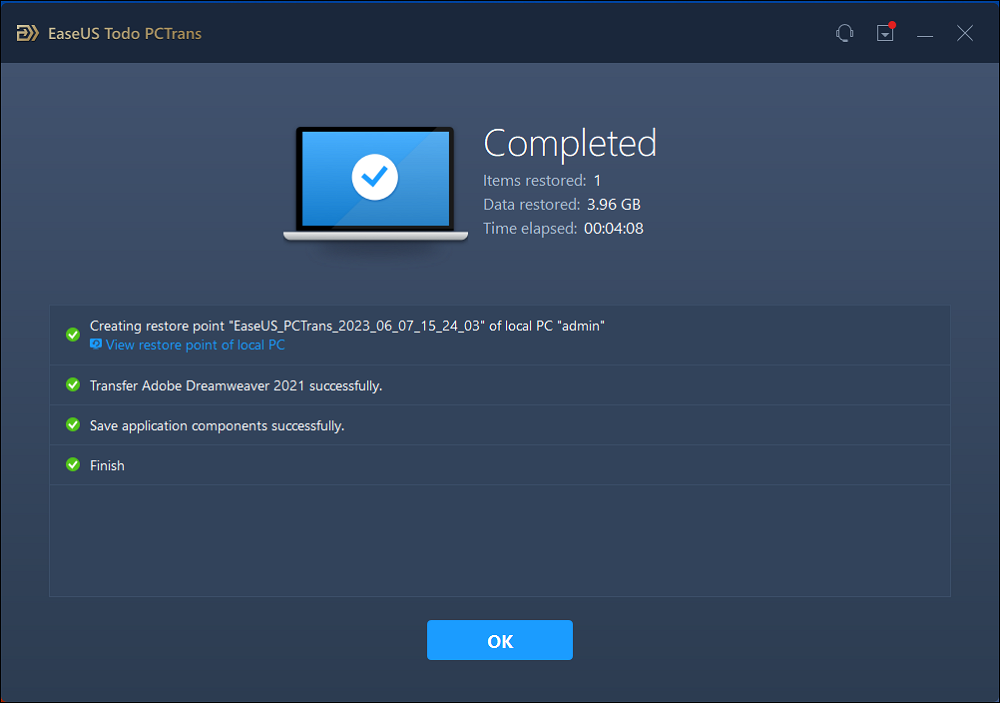
Step 2. Restore the Appdata Folder to the destination drive
- Launch EaseUS Todo PCTrans and follow the same steps to select a transfer method. This time, choose «Data Restore» and click «Next».
- Choose the existing backup file presented on the interface, or navigate to the exact file path where the backup file is and click «Restore.»
- You’re back to the «Files;» click «Edit» to get in. The backup AppData folder is viewable here. You need to click the pencil icon to set the target location, which is the other hard drive, and submit the change.
- After the basic settings, click «Finish» and finally «Restore». Wait patiently until the transfer process is over.
Key Features
- This data migration tool supports multiple modes, including PC to PC, Drive to Drive, and PC to USB, external drive, and more.
- Besides transferring data from C drive, this tool allows you to search and remove files that slow down your system.
- Users can transfer multiple types of data, such as games, applications, account settings, and user profiles, with the help of this software.
All these features indicate the multi-functionality of this software, so download this tool to enjoy effective data migration capabilities. To make it easier to transfer AppData to another drive on Windows 11/10/8/7, it’s time to download it.
Way 2. Copy and Paste AppData from One Drive to Another
AppData too big? This method can help you move AppData to another drive on Windows 10. With the help of this technique, you have to create a new user with administrative prowess to simply copy and paste AppData from one drive to another. However, users need to create a directory junction to successfully implement this method.
Moreover, this AppData transfer technique can cause data loss and severe system problems. So, you need to back up your system using EaseUS Todo PCTrans before applying the following steps to move AppData to another drive on Windows 10.
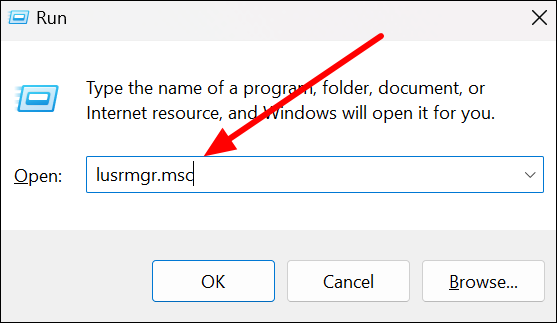
Step 1. Create a New Administrative User
Start the process by creating a new user within the Local Users and Groups console and give it administrative permission using the following instructions.
1. First, press «Windows + R» to enter the «Run» dialog box, after which you can paste the «lusrmgr.msc» command to access the Local Users and Groups window.
2. Moving forward, right-click on the «Users» tab on the left of this window and choose the «New User» option from the dropdown menu.
3. Within the newly appeared «New User» dialog box, fill in your details and check the «Password Never Expires» box before pressing the «Create» button.
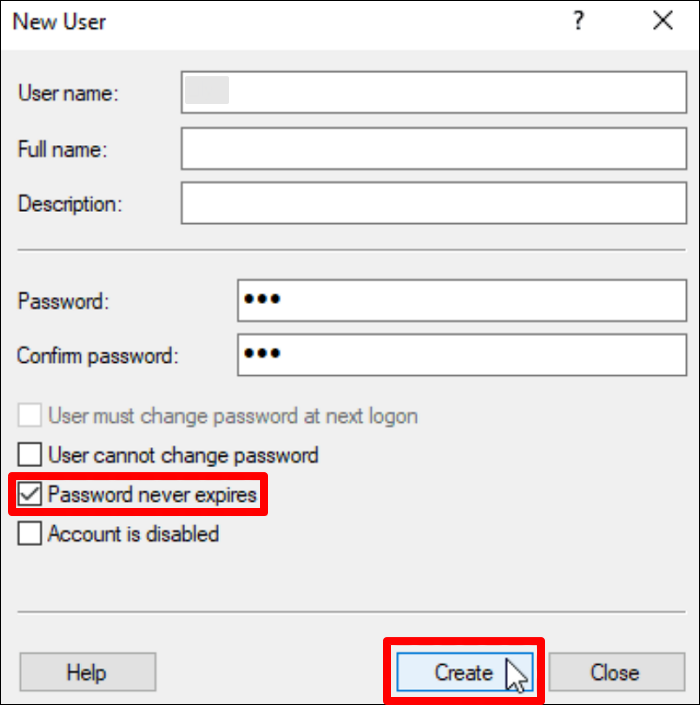
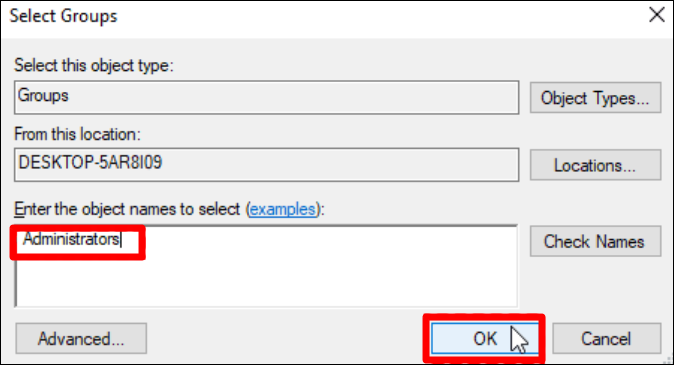
4. Now, double-click on the newly added user within the «Local Users and Groups» console and enter the «Member Of» tab. After pressing the «Add» button, write «Administrators» in the relevant text box and press the «OK» button to create this new user successfully.
Step 2. Transfer AppData Folder from C Drive to Another
Upon creating a new user with administrative capabilities, we will proceed to move AppData to another drive on Windows 10 using the steps given below:
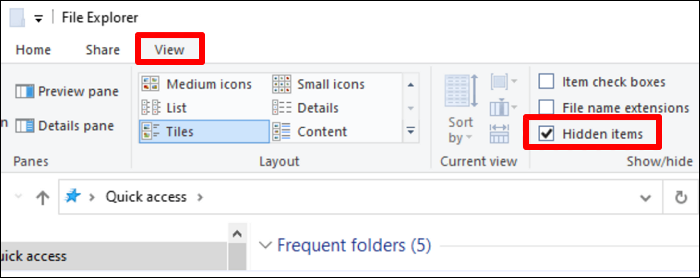
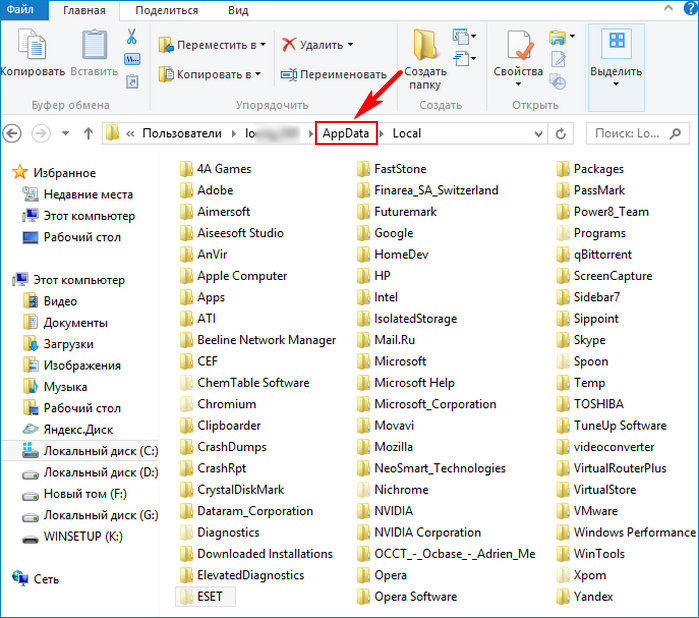
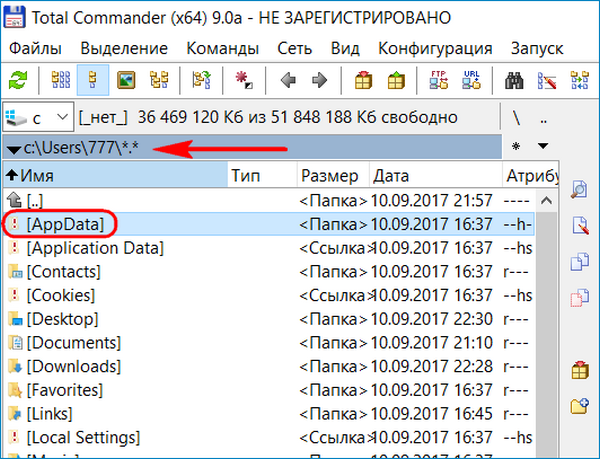
1. After logging into the newly created user, navigate to the C drive within «File Explorer» and enter the «Users» folder. From the above ribbon, access the «View» tab and check the «Hidden Items» box to reveal AppData folders.
2. Afterward, access the user’s account from which you want to copy the AppData. Now, cut this data from the particular user account and paste it into the desired destination drive. Once you paste the data, you need to tick the «Do this for all current items» box and hit the «Skip» button in case an error appears. Moreover, you need to repeat the procedure and press the «OK» button to confirm the migration of the TBRES and other such file types.
3. Upon moving AppData to another drive on Windows 10, go back to the original location of the AppData and delete this particular folder.
Step 3. Build a New Directory Junction
After you move the AppData, the process is still incomplete, as you have to create a new directory junction with the help of the following instructions.
1. Begin this process by launching the Command Prompt as the administrator using the «Run» dialog box. To do so, enter «cmd» in the «Open» text box and press the «Ctrl + Shift + Enter» keys at the same time.
2. Upon entering the terminal, paste the commands below and hit the «Enter» key to execute them successfully.
“cd C:\Users\Administrator\AppData”
“mklink /D AppData E:\AppData”
Here, «/D» represents a command to build a directory symbolic link, and «E:\AppData» shows the path referred by the new link.
Step 4. Log into Your Default User and Troubleshoot Issues
Once you have created a new directory junction, proceed to log into your default user to see if the application runs normally. Follow the steps given below to delete the newly created user and troubleshoot any app-related issues.
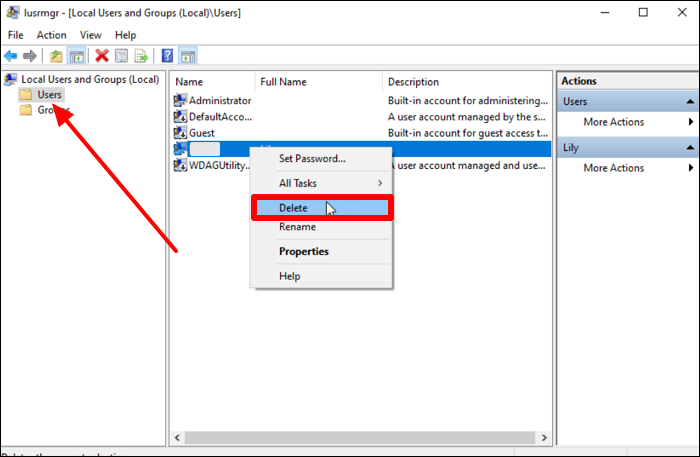
1. Upon logging into the default user, launch the «Local Users and Groups» consoles with the help of the command pasted above. Now, access the «Users» tab and right-click on the newly created users to reveal a pop-up menu. From here, choose the «Delete» option to successfully remove this user from the system.
2. Now, check if your application is running normally after deleting the new user from the computer. To fix abnormal application behavior, enter PowerShell through the «Run» dialog box and paste the following command.
«Get-AppXPackage *WindowsStore* -AllUsers | Foreach {Add-AppxPackage -DisableDevelopmentMode -Register «$($_.InstallLocation)\AppXManifest.xml»}»
Here, you can add the name of your problematic application in place of «WindowsStore.»
Users who get successful in moving AppData to another drive on Windows 10 using this method should share this article in their circle to help others carry out this process.
Conclusion
After reading this article, you will learn the best two methods to move AppData to another drive on Windows 10. As we have seen, the copy-and-paste method requires technical knowledge to carry out the complex steps. So, we recommend you utilize EaseUS Todo PCTrans due to its ability to transfer any type of data from one drive to another with just a few clicks.
Move AppData to Another Drive Windows 10 FAQs
We have tried our best to explain the complex procedure of migrating AppData from one drive to another using the copy and paste method. However, if you still have any questions left go through the detailed answers given below for better understanding.
1. Is it safe to copy and paste the AppData to another system drive?
When moving AppData to another drive on Windows 10, you have to be cautious, as this method has the capability to crash your system applications. We recommend you backup your data before carrying out this procedure in case anything goes wrong due to your mistake. In addition, several users have reported performance issues after migrating data from one drive to another.
2. Can you move the AppData folder to another drive?
Yes, users can easily migrate the whole AppData folder within different drives using the copy and paste method. To do so, you have to create a new user account with administration powers before pasting the AppData folder to the destination drive. Afterward, create a new directory junction using CMD and then delete the newly created user account to complete the process.
3. How do we move the AppData folder from the C to the D drive?
To successfully transfer this particular folder from your C drive to any other drive, such as D, you need to follow the steps given below.
1. Begin this AppData transfer process by creating a new user through the «Local Users and Groups» console and assigning it administrative permissions.
2. Moving forward, you need to check the «Hidden Item» box from the «View» tab after accessing the «Users» folder in the C drive. Now, copy the AppData folder from the source user account and paste this copied folder within the D drive.
3. Afterward, you need to build a directory junction by executing the following commands within CMD.
“cd C:\Users\Administrator\AppData”
“mklink /D AppData E:\AppData”
4. Once this junction is created, log into the default user account and delete the newly created user to complete this task.
The AppData folder is a folder that is created by Windows 10. It is hidden by default but can be accessed directly if a user chooses to show hidden files and folders on their system. The folder is located at the root of every user’s user folder.
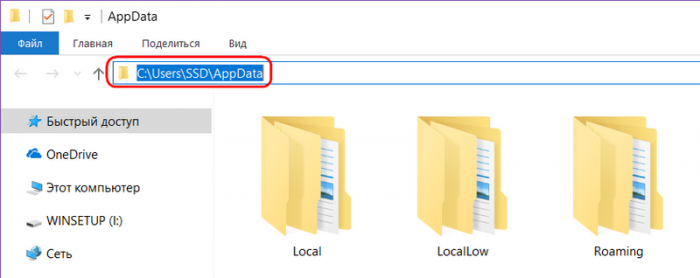
We’ve talked in length about the AppData folder on Windows 10, and the three sub-folders that it contains; Local, LocalLow, and Roaming. These folders contain other folders created by apps. Apps install to the C drive but they store user-specific data to the AppData folder e.g., Chrome’s profiles are stored in the AppData folder.
It can get pretty big and end up taking substantial space on the C drive (or whichever drive is your Windows drive). Users cannot move this folder the way they can move an app installation because apps are hardwired to look for it in its default location. If you need to move AppData, you will have to use a junction or a symbolic link.
- Decide where you want to move AppData to, and move the folder to the new location.
- You must now create a junction link to the AppData folder at the following location;
C:\Users\YourUserName
- Open Command Prompt with admin rights.
- Run the following command but update the file paths.
- ‘path to junction link’ should be replaced with this path
C:\Users\YourUserName\AppData - ‘Path to target folder’ should be replaced with the path to the AppData folder at its new location.
- ‘path to junction link’ should be replaced with this path
mklink /J "path to junction link" "path to target folder"
Example
mklink /J "C:\Users\fatiw\AppData" "D:\AppData"
Undo AppData Move
If you later decide you’d like to put the AppData folder back where it originally was, you can do so easily.
- Open Command Prompt with admin rights.
- Run the following command to remove the junction link that you created but update the path in the command before you run it.
rmdir "path to junction link"
- Move the AppData folder back to the following location.
C:\Users\YourUserName
Conclusion
Apps cannot be told to look elsewhere for the AppData folder and that it the biggest impediment in moving it. The junction link allows apps to access the AppData folder as though it were still present in its original location. This method should work flawlessly but in the event an app has trouble running, it’s best to restore the AppData folder to its original location. If you’re pressed for space on your C drive, go through the AppData folder and remove folders for apps that you’ve uninstalled. They are rarely cleaned up during uninstallation.

Fatima Wahab
Fatima has been writing for AddictiveTips for six years. She began as a junior writer and has been working as the Editor in Chief since 2014.
Fatima gets an adrenaline rush from figuring out how technology works, and how to manipulate it. A well-designed app, something that solves a common everyday problem and looks
-
Star
(30)
You must be signed in to star a gist -
Fork
(9)
You must be signed in to fork a gist
-
Clone this repository at <script src="https://gist.github.com/Demiu/2a41441a67fedb7fab20bc0696b5c8f5.js"></script>
- Save Demiu/2a41441a67fedb7fab20bc0696b5c8f5 to your computer and use it in GitHub Desktop.
Clone this repository at <script src="https://gist.github.com/Demiu/2a41441a67fedb7fab20bc0696b5c8f5.js"></script>
How to properly move AppData in Windows 10
Moving AppData folder on Windows 10
- Create a new user with administrator permissions
- Sign out of the current user and sign in as the newly created user
- Navigate to
C:\Usersin File Explorer - Click into the account you want move AppData from
- There could be a popup telling you that you need to allow yourself to access that user’s data, do so
- Cut the AppData folder
- If invisible, go to View and check Hidden Items
- Paste in the desired location
- Some errors will show up:
- exe’s with size of 0 will pop up errors 0x80070780 «This file cannot be accessed», skip them
- tbres’ and other various files will pop up saying they shouldn’t be moved and are you sure, always yes
- Some errors will show up:
- Wait for the operation to finish
- Navigate back to the AppData location before the move
- Delete the old folder
- It contains those exe’s that couldn’t be accessed, they can be deleted though
- Launch Command Prompt as admin
- I recommend
ctrl+R, typingcmdandctrl+shift+enter
- I recommend
- Navigate to the User folder of the moved account
cd ..\..\Users\Account_name_here
- Create a junction named AppData to the moved folder location
mklink /j AppData "Z:\Path\To\New\AppData"
- Log out of the new user, log back in as the user with the moved AppData
- Start menu will not work, throw an error and ask you to sign out to fix it, that won’t work, ignore it
- Start powershell as admin
- Same method as with cmd
- Fix the UWP packages
Get-AppXPackage -AllUsers | Foreach {Add-AppxPackage -DisableDevelopmentMode -Register "$($_.InstallLocation)\AppXManifest.xml"}- This will fix the start menu by adding back the applications you «deleted» in step 10
- Some packages may fail because a newer version is already installed, that’s not a problem
- Some may fail because on the new user the packageds cannot be installed while they’re running (notable: StartMenuExperienceHost), kill them:
taskkill /F /IM explorer.exe
taskkill /F /IM SearchApp.exe
taskkill /F /IM SearchUI.exe
taskkill /F /IM ShellExperienceHost.exe
taskkill /F /IM StartMenuExperiencehost.exe
- Sign out, restart, sign back back in
- Delete the user created in step 1
- Some packages may still be broken, you may fix them as needed
Get-AppXPackage *WindowsStore* -AllUsers | Foreach {Add-AppxPackage -DisableDevelopmentMode -Register "$($_.InstallLocation)\AppXManifest.xml"}- Replace the WindowsStore with name of various UWP apps that break

Do you want to move the AppData folder to Windows 10? Windows 10 creates the AppData folder. However, the folder is hidden by default but can be accessed directly if a user-selected to show hidden files and folders on their PC. However, the folder is located at the user folder root. Normally these are the system folders and removing them or changing them can break the operating system. Some of these folders can be removed without damaging the operating system but due to their nature, they’re secure or protected.
Also See: Remove WindowsApps Folder On Windows 10 – HowTo
Contents
- 1 Steps To Move AppData Folder:
- 1.1 How To Undo Or Revoke AppData Move
- 1.2 Conclusion
Steps To Move AppData Folder:

We’ve talked in detail about the AppData folder on Windows 10, and it contains three sub-folders i.e Local, LocalLow, and Roaming. However, these folders contain many other folders created by applications. Apps install to the C drive but they save user-specific data to the AppData folder like Chrome’s profiles are saved in the AppData folder.
It takes too much space on the C drive (or any drive is your Windows drive). Users can’t move this folder in the same way as they can move an app installation as apps are hardwired to look for it in its default location. If you want to move AppData, then try to use a junction or a symbolic link.
- At first, you should decide where you like to move AppData to, and move the folder to the new location.
- Then create a junction link to the AppData folder at the given location;
C:\Users\YourUserName
- Head over to the Command Prompt with admin rights.
- Then execute the following command but update the file paths.
- ‘path to junction link’ should be replaced with this path
C:\Users\YourUserName\AppData - You can also replace ‘Path to target folder’ with the path to the AppData folder at its new location.
- ‘path to junction link’ should be replaced with this path
mklink /J "path to junction link" "path to target folder"
Example
mklink /J "C:\Users\fatiw\AppData" "D:\AppData"
How To Undo Or Revoke AppData Move
If you later plan you would like to put the AppData folder back where it was originally, you can also do so easily.
- Head over to the Command Prompt with admin rights.
- Execute the following command to erase the junction link that you created but try to update the path in the command before you execute it.
rmdir "path to junction link"
- Then move the AppData folder back to the following location.
C:\Users\YourUserName
Conclusion
The junction link allows the app to easily access the AppData folder as though it were still present in its original place. This workaround works flawlessly but in the event, an application has trouble running. So it’s good to recover the AppData folder to its original place. If you are facing the space issue on your C drive, then move through the AppData folder and erase folders for apps that you’ve uninstalled. During installation, they are rarely cleaned up.
Here’s all about ‘Move AppData Folder’. Is this article helpful? Do you know any other alternative method to move the AppData folder? Share your thoughts with us in the comment down the section below. Also, for further queries and questions let us know in the comment section below!
Also Read:
- How to Play No Mans Sky in Linux – Tutorial
You may also like
Привет друзья! По вашим многочисленным просьбам в сегодняшней статье мы узнаем все секреты папки AppData в Windows, а именно: Какие функции выполняет каталог AppData в операционной системе, где находится, почему занимает большой объём (иногда более 10 Гб)? Как очистить данную папку? Стоит ли переносить её с диска (C:) в другое расположение?
«AppData» (полное название «Application Data») – это скрытый системный каталог пользовательских профилей Windows Vista, 7, 8.1 и 10. Папка находится внутри профиля каждого из пользователей операционной системы и, соответственно, размещается на диске (C:) по пути:
C:\Users\Имя_пользователя\AppData
{banner_google1}
В ней содержатся рабочие файлы установленного в систему программного обеспечения – временные файлы, конфигурационные файлы, кэш, сохранённые сеансы, логи приложений и т.п. Как видим, практически все установленные в ОС приложения имеют здесь свои личные папки с файлами, в том числе антивирус и сервисная программа принтера.
Браузеры, например, в этой папке хранят данные своих профилей – историю посещённых интернет-страниц, кэш, куки, расширения и пр.
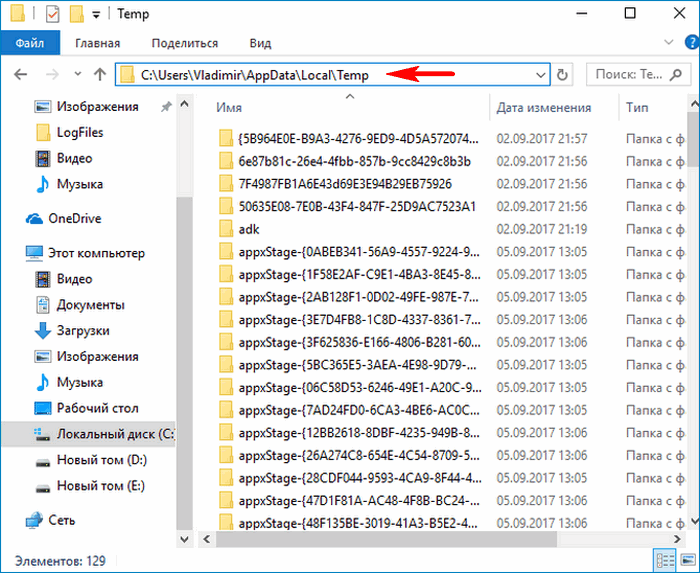
Другой пример: в этой папке находится многое из того, что мы используем при работе с продуктами Microsoft Office — шаблоны документов, параметры автозамены, словари и т.п. «AppData» является родительским каталогом одной из системных папок хранения временных файлов «Temp».
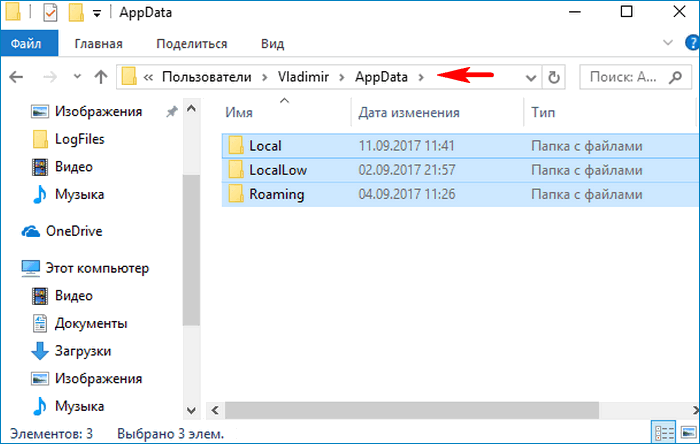
В состав «AppData» входят три подпапки:
- «Local» — хранилище временных файлов и локальных данных программ;
- «LocalLow» — хранилище буферных данных отдельных программ;
- «Roaming» — хранилище конфигурационных и пользовательских данных. Большая часть настроек, которые могут быть перенесены в другую систему, находится именно в этой подпапке.

«AppData» — скрытая папка. Microsoft считает, что обычному пользователю там делать нечего, а лишнее любопытство новичков может привести к нежелательным последствиям. Но эта папка – кладезь возможностей для экспериментаторов. Большая часть существующих программ не предусматривает экспорт-импорт настроек, проектов и прочих пользовательских наработок в заново установленную операционную систему, в этом случае можно использовать папку AppData. С помощью обычного «ручного переноса» – скопировать в старой системе из этой папки нужные каталоги и после установки программ в среде новой системы заменить их. В этом случае программы, в установленной заново Windows, приводятся в рабочий вид за считанные секунды. Такой манёвр когда-то рассматривался в одной из статей нашего сайта: мы вручную осуществляли перенос данных Opera, когда у этого браузера не работал сервис синхронизации.
К содержимому «AppData» особый интерес испытывают не имеющие возможности приобрести SSD-накопитель любители изощрённых способов оптимизации Windows. Таких как, к примеру, перенос рабочих файлов программ на RAM-диск – виртуальный диск, создаваемый в среде операционной системы за счёт ресурса оперативной памяти. На RAM-диск переносятся упомянутые выше рабочие каталоги программ, и производительность последних вырастает в разы.
Есть ещё один тип пользователей, испытывающих интерес к этой папке – шокированные неистовым её поглощением места на диске (C:).
Чтобы получить доступ к этой папке, в файловых менеджерах необходимо включить отображение скрытых файлов и пройти по пути её размещения.
Но есть способ проще. Жмём клавиши Win+R и вводим:
AppData
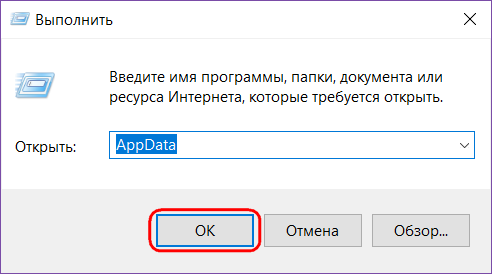
Папка тотчас же откроется в системном проводнике.
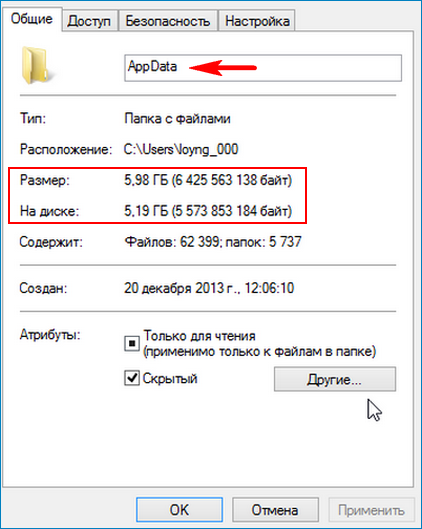
Сразу же после установки Windows эта папка весит не более 300 Мб. Однако её размеры будут увеличиться в геометрической прогрессии по мере инсталляции в систему сторонних программ и игр. Больше софта – больший вес папки. Например у меня она весит 6 Гб.
При этом в большинстве случаев не будет иметь значение даже тот факт, что ненужные программы и игры уже удалены с компьютера. Если их деинсталляция проводилась с использованием штатного инструментария Windows или с помощью сторонних деинсталляторов без функции зачистки остатков, на вес «AppData» существенно это может никак не повлиять.
- При обычной деинсталляции программы и игры убирают свои данные, как правило, только из папок «Program Files» на диске С. Но содержимое своих рабочих каталогов внутри «AppData» оставляют на перспективу быть задействованными при новой установке. Эти данные уничтожают только деинсталляторы с функцией зачистки остатков удаляемых программ.
Лично я после удаления какой-либо программы обязательно наведываюсь в эту папку и подчищаю хвосты приложения вручную.
Удалить эту папку можно только частично, целиком не получится. Поскольку в ней хранятся рабочие данные программ, их активные процессы просто не позволят сделать это. Поможет разве что подход из среды другой операционной системы, установленной на компьютере, или с LiveCD. Вот только делать этого не следует. Удаление «AppData» не повлияет на критически важные сектора Windows – загрузочный и непосредственно обеспечивающий работу самой системы. Однако установленные программы и игры либо будут работать некорректно, либо запустятся с дефолтными настройками, либо вообще не запустятся. Очищать эту папку необходимо выборочно и правильными методами, поговорим об этом дальше.
Чтобы уменьшить вес папки, необходимо поочерёдно проделать следующие шаги:
1. Запустить штатную утилиту очистки диска Windows;
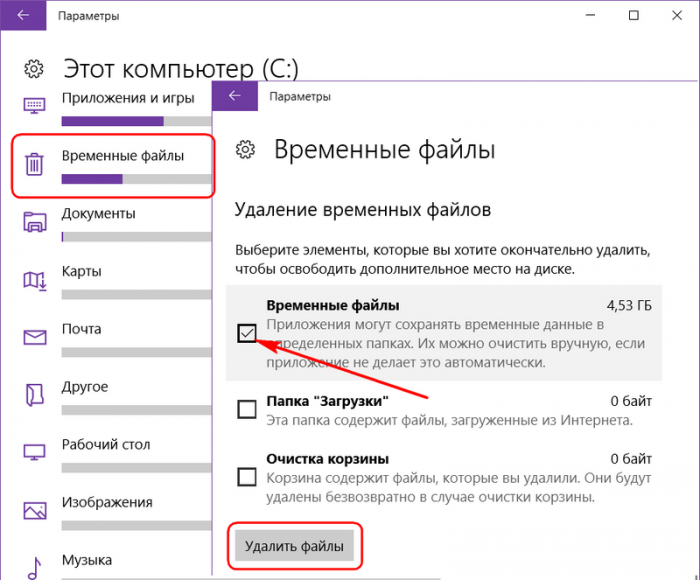
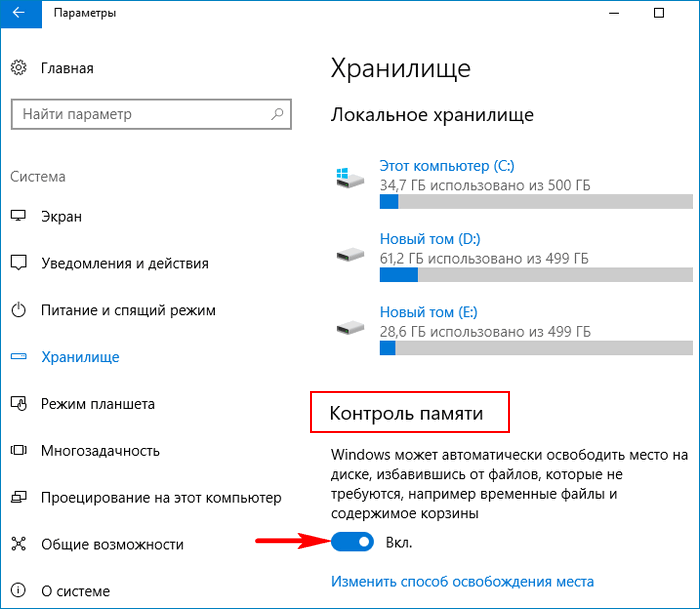
Примечание: в версии Windows 10 возможность очистки дискового пространства, в частности, избавления от временных файлов, которые хранятся в папке «AppData», реализована также в приложении «Параметры». Пройдя по пути «Система – Хранилище – диск С – Временные файлы»,
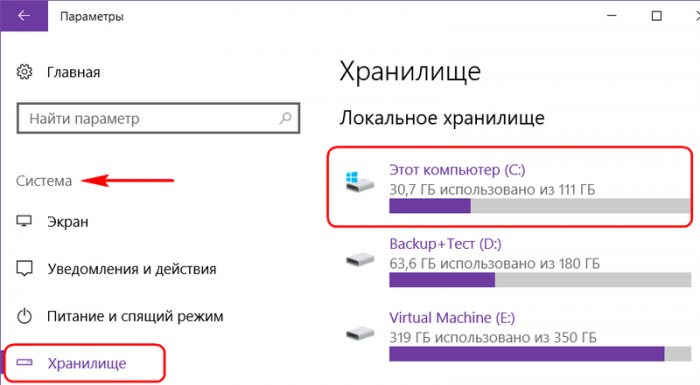
можем удалить все временные файлы системы.
Более того, накопительное обновление Creators Update пополнило «Десятку» новой функцией «Контроль памяти», автоматически удаляемой временные файлы, если они не используются программами.
2. Исследовать содержимое «AppData» с помощью программы сканера дискового пространства
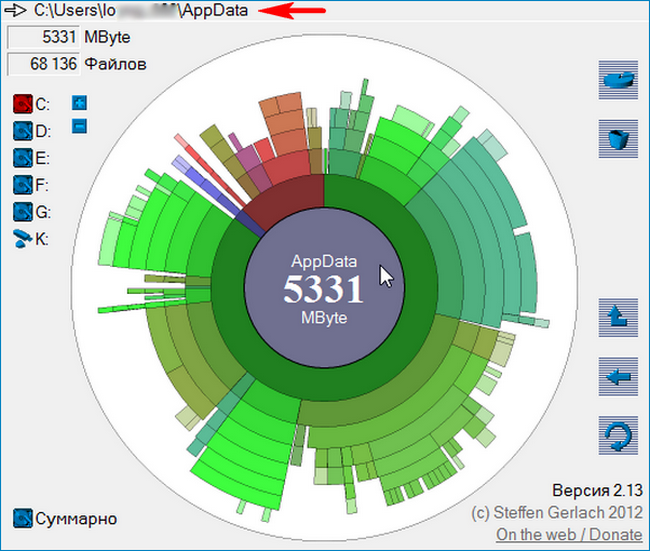
и удалить каталоги уже деинсталлированных программ и игр, прежде поместив архив папки на другой диск или создав точку восстановления системы на случай удаления нужных данных. Например в моей системе оказалось множество папок уже удалённых программ, удалить эти папки лучше вручную.
3. В дальнейшем использовать деинсталляторы с зачисткой остатков программ типа Soft Organizer, Uninstall Tool, Revo Uninstaller и т.п.
Если на компьютере установлены ресурсоёмкие программы и игры, вес папки, естественно, не будет малым. Порядка 10-ти Гб в таком случае может быть нормой, и возможно, стоит поискать другие способы освобождения свободного места на диске (C:). Например:
• изменить физическое расположение папок «Temp» с помощью переменных сред;
• перенести рабочие каталоги браузеров и прочих программ на другие диски с помощью их внутренних настроек или символьных ссылок;
Друзья, в сети есть сайты, на которых вам предложат способы переноса папки AppData на другой раздел жёсткого диска с помощью манипуляций с реестром или проводником, но во-первых, к реальности это не имеет никакого отношения, после переноса папки AppData, установленные в вашу операционную систему программы начнут выдавать такие сюрпризы, что вы быстро откажетесь от этой затеи, а во-вторых, объясните мне, какой в этом смысл? Сэкономить пространство на диске (C:)? Многие читатели скажут, что да, сделать это нужно для экономии дискового пространства твердотельного накопителя SSD (120 Гб), на котором установлена Windows. Но позвольте тогда заметить, что если перенести папку AppData с твердотельника на обычный жёсткий диск, то ваши программы и работать будут медленнее в 5 раз. Я скажу даже так, давайте перенесём ещё папку C:\Windows на другой диск, ведь если постараться, это тоже можно сделать. А самый хороший способ сохранить ресурс твердотельного накопителя на 100 лет, это просто отсоединить его от компьютера и положить на полку.
Статьи по этой теме:
- Папка ProgramData, её назначение, можно ли удалить или перенести
- Что находится в системной папке «FileRepository» и как её очистить
- Как удалить файл hiberfil.sys