
Windows 8 по умолчанию настроена таким образом, что все Metro приложения из магазина Microsoft Store (Windows 8 Apps) устанавливаются на системный диск, причем задать альтернативный путь установки для каждого отдельного apps-приложения, как в ситуации с классическими приложениями Windows, невозможно. Это означает, что рано или поздно пользователь Windows 8 Apps может столкнуться с исчерпанием свободного места на системном диске. Особенно критичной эта проблема может быть пользователей для планшетов с Windows 8 (в планшете Surface RT, например, размера системного диска ограниченного 32 Гб и 64Гб) и обычных компьютеров с SSD дисками в качестве «быстрого» системного диска (обычно небольшого по емкости) и большими внешними дисками (например, USB дисками для хранения данных). Перенос каталога с Metro приложениями с системного тома Windows 8 поможет освободить дополнительное место на диске.
Внимание! Описанная процедура не всегда дает положительный результат! Настоятельно рекомендуем перед выполнением инструкции создать резервную копию системы!
Как всегда, Microsoft не предоставила простого способа изменения каталог установки Windows 8 Metro Apps и переноса установленных приложений с системного диска, это означает, что нам вновь придется немного поработать руками.
Перенос установленных приложений Windows 8 Apps на другой диск
Предположим, нам нужно перенести все установленные Metro приложения Windows 8 на диск G:\. Диск G:\, а это может быть отдельный раздел на этом же диске, отдельный внешний диск, например SSD, USB флешка или SD карта или даже сетевой диск, должен быть обязательно отформатирован в файловой системе NTFS. Создадим на диске G:\ каталог G:\Windows8Apps.

Затем попробуем выяснить, где же хранятся приложения Windows8 Apps. По традиции Microsoft в качестве «дефолтого» каталога приложений использует каталог C:\Program Files. Для Metro Apps в Windows 8 внутри Program Files создан отдельный каталог с именем WindowsApps, который является скрытым (как отобразить скрытый каталог) и доступ к нему закрыт для всех, кроме системы (при попытке его открыть появится сообщения You don’t currently have permission to access this folder).

Чтобы зайти в каталог WindowsApps , даже в том случае, если вы работаете под учетной записью администратора, придется сначала стать владельцем данного каталога, и затем задать на него нужные NTFS права доступа. Сделать это можно с помощью графического интерфейса проводника (Свойства папки ->Security->Advanced), но гораздо удобнее и быстрее это выполняется с помощью командной строки.
Чтобы стать владельцем каталога C:\Program Files\WindowsApps, откройте командую строку с правами администратора и выполните команду
takeown /F "C:\Program Files\WindowsApps" /A /R

После выполнения команды (может занять несколько минут в зависимости от количества установленных приложений Metro Apps) станет возможен просмотр содержимого каталога WindowsApps.
Далее необходимо предоставить своей учетной записи (в данном примере это root) полные права доступа (NTFS Full Control) на содержимое данного каталога. И опять же проще и быстрее всего это сделать через командую строку:
icacls "c:\program files\windowsapps" /grant root:(D,WDAC)

Скопируем (не перемещаем!) содержимое каталога windowsapps на новый диск в каталог G:\Windows8Apps.
robocopy "C:\Program Files\WindowsApps" E:\Windows8Apps /E /COPYALL /DCOPY:DAT
Убедитесь, что операция копирования файлов завершена успешно, а по ее завершении отсутствуют сообщения об ошибках (в итоговом отчете нет информации о пропущенных, Skipped, или ошибочных, FAILED, элементах).

Удалим исходный каталог WindowsApps.
rmdir /S "C:\Program Files\WindowsApps"
После чего создадим символическую ссылку (symlink), позволяющую прозрачно переадресовать запросы к папке C:\Program Files\WindowsApps в новый каталог E:\Windows8Apps (тем самым мы решаем проблему «потерянных» путей для установленных приложений apps).
mklink /D "C:\Program Files\WindowsApps" "E:\Windows8Apps"

Меняем путь установки для новых приложений Metro Apps в Windows 8
Следующий этап — переопределение пути к каталогу с приложениями Windows 8 apps в реестре. Откройте редактор реестра (regedit.exe) и перейдите в ветку
HKEY_LOCAL_MACHINE\SOFTWARE\Microsoft\Windows\CurrentVersion\Appx

По-умолчанию система не разрешает вносить изменения в данный куст реестра. Поэтому сначала предоставим себе необходимые права. Щелкните правой кнопкой мыши по кусту Apps и выберите пункт меню Permissions. Затем нажмите кнопку Advanced.

В расширенном окне свойств безопасности нажмите на ссылку Change и укажите свое имя пользователя (которому нужно предоставлять права владельца). В данном примере это root.

Нажмите ОК дважды и предоставьте своей учетной записи (или группе) полные права на данную ветку реестра (флажок Full Control).
Осталось изменить значение параметра PackageRoot, указав в нем новое местоположение папки с Metro приложениями. В данном примере — это E:\Windows8Apps.

Перезагрузите компьютер и проверьте работоспособность установленных Metro Apps, перенесенных на новый диск. Таким образом все установленные приложения Windows 8 будут перенесены на новый диск с сохранением работоспособности, и в дальнейшем все приложения Windows 8 Apps из Microsoft Store (который, кстати говоря можно совсем отключить) будут устанавливаться на него, а не на системный диск.
Примечание. Вы можете заблокировать установку и запуск приложений из Microsoft Store с помощью Applocker.
You just downloaded a four-star game from the Microsoft Store. Easy games, such as Gardenscapes, can take up at least 300MB of disk space not to mention other games that take up more space.

Most people don’t know where their Microsoft games are actually stored. You can crack the mystery today. The Microsoft apps and games are saved in: C:\Program Files\WindowsApps
But you are not allowed to access this folder. You receive this message You Don’t Currently Have Permission To Access This Folder every time you try to access this folder. You cannot access this folder directly, you cannot change the apps’ location by copy and paste. What else can you do? Here are two ways to change the location of Microsoft Store games or programs.
| ⏱️Duration | 3-5 minutes |
| 💻Supported programs | All Microsoft store games and programs |
| ⛏️Tools | App mover — EaseUS Todo PCTrans |
| 👣Difficulty |
✔️With App Mover — 3 easy steps suitable for all ✔️With manual way — time-consuming and suitable for experienced |
| ✍️Solutions |
[Fastest] Move Microsoft Store Apps and Games to Another Drive Using Software [Manual] Manually Change Microsoft Store Installation Location |
Read on and follow the details below.
Further Reading: Transfer Xbox Games to PC
Method 1: Move Microsoft Store Apps and Games to Another Drive Using Software
Why not use an easy-to-use program? EaseUS Todo PCTrans Free is an easy PC transfer tool that can satisfy your needs. It can not only migrate apps to another drive, but also transfer your data, applications, and account settings from one PC to another for free quickly. More information about this software:
- Supports more than 100 types of applications migration.
- Supports almost all Windows OS — Windows XP/Vista/7/8/8.1/10 & Windows Server 2003/2008/2012/2016/2019.
- Three ways to transfer data and apps: PC to PC transfer, image transfer, and app migration.
You can get this software and transfer Microsoft games to another drive by the following steps:
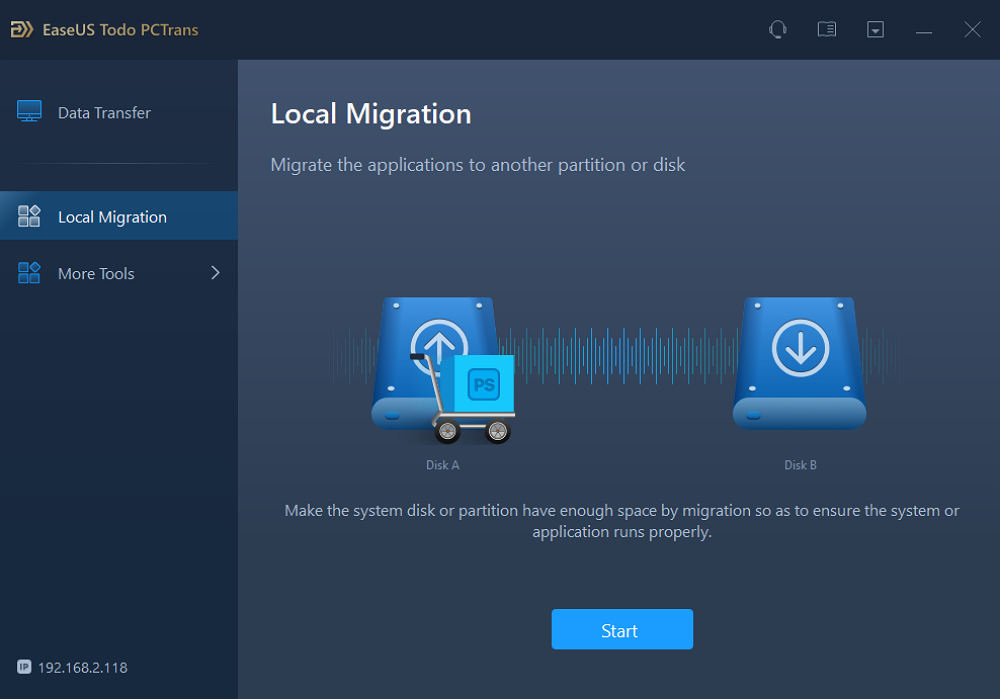
Step 1. Launch EaseUS Todo PCTrans and select transfer mode
On the main screen of EaseUS Todo PCTrans, go to «Local Migration» section and click «Start» to continue.
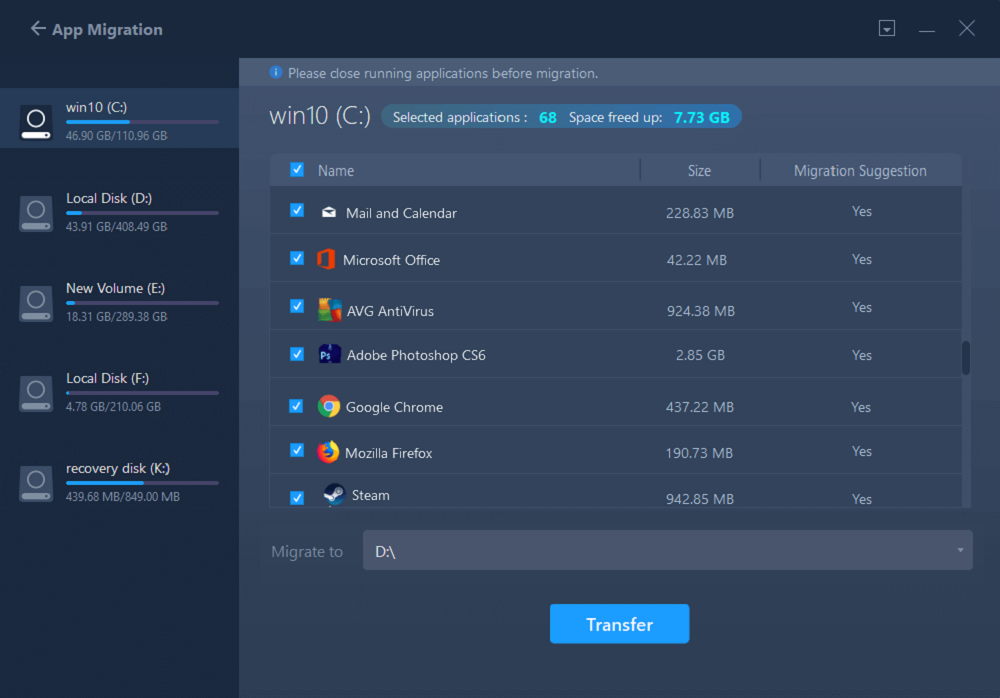
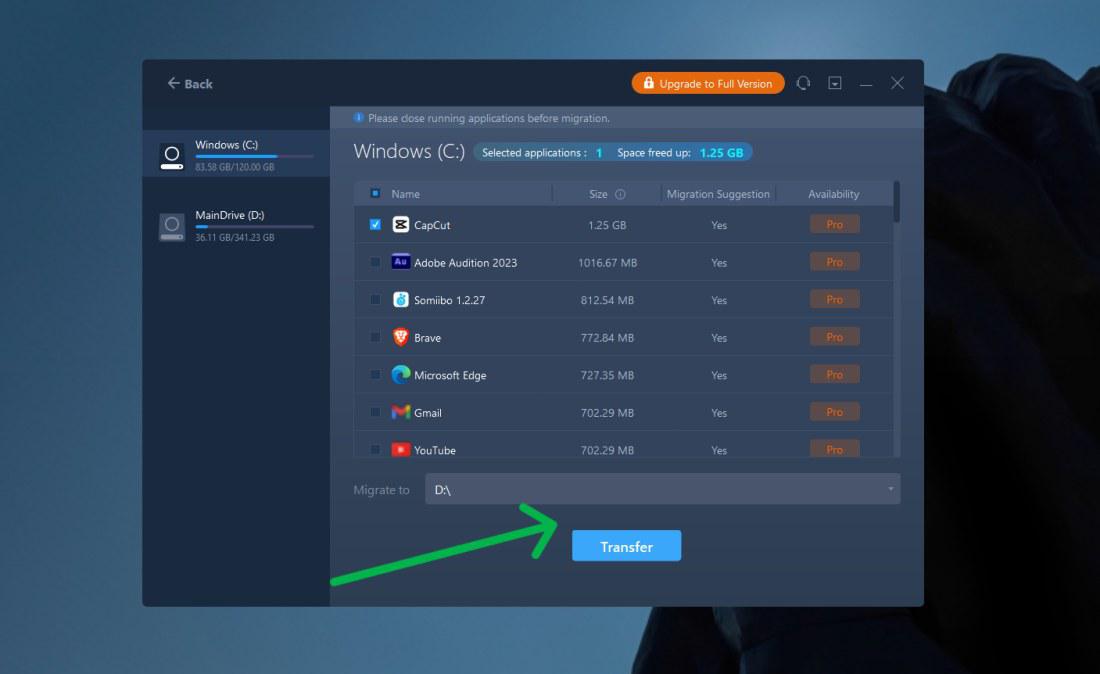
Step 2. Select apps and another drive to transfer
1. Select the source partition and tick applications, programs and software (marked as «Yes») that you’d like to migrate.
2. Click triangle icon to select another drive or disk as your target device and click «Transfer» to start the migration.
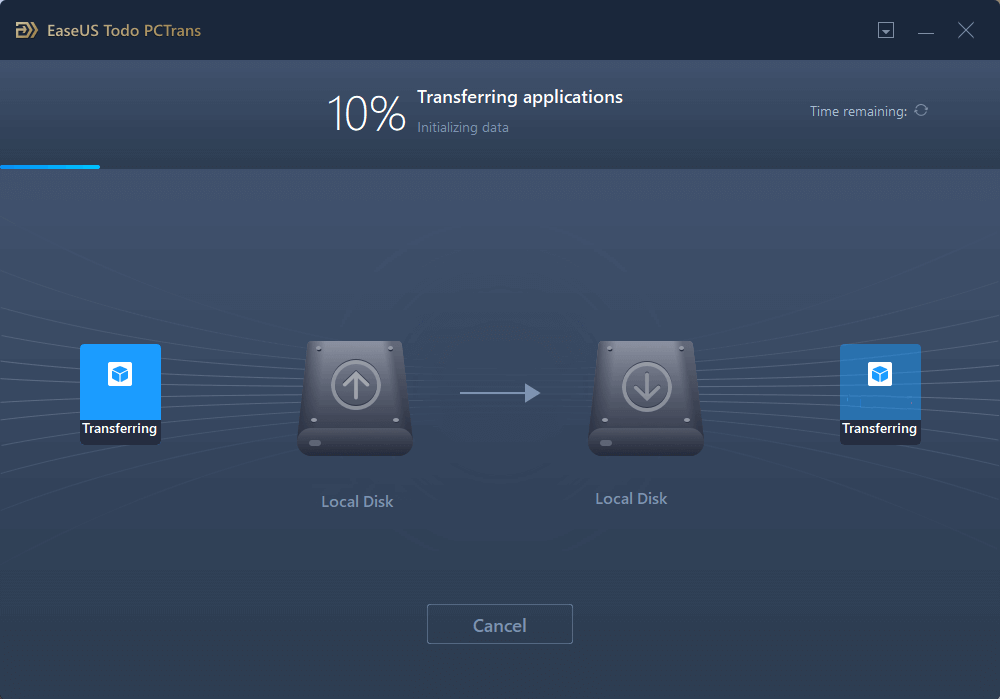
Step 3. Finish the migration process
When the transferring process finishes, click «OK» to complete.
You can restart your PC to keep all the changes, and you should be able to run your migrated apps on the other drive again.
Method 2: Manually Change Microsoft Store Installation Location
This is a manual way to move the wanted app. I move Candy Crush Soda Saga to Local Disk (D:).
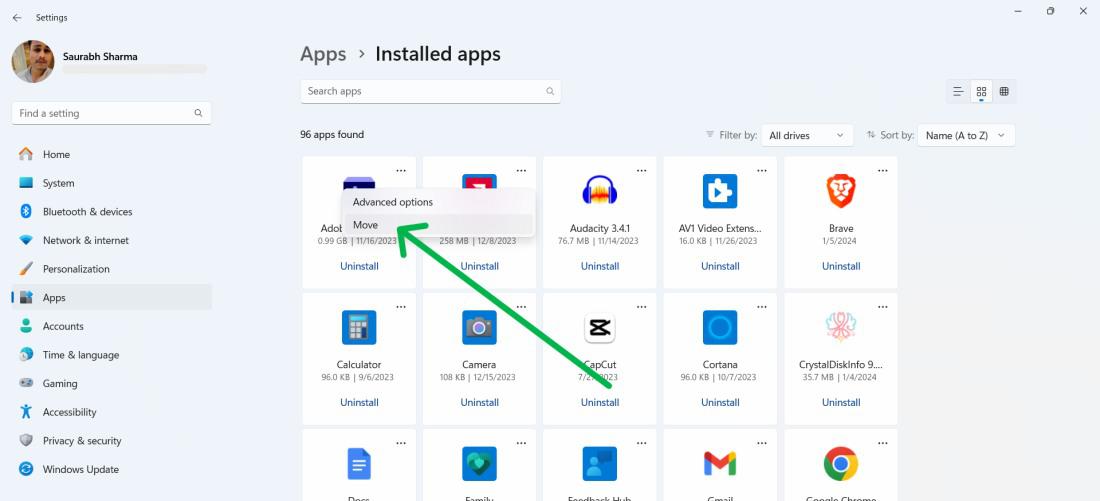
- Step 1: Go to «Settings > Apps > Apps & Features»
- Step 2: Find the game and select «Move»
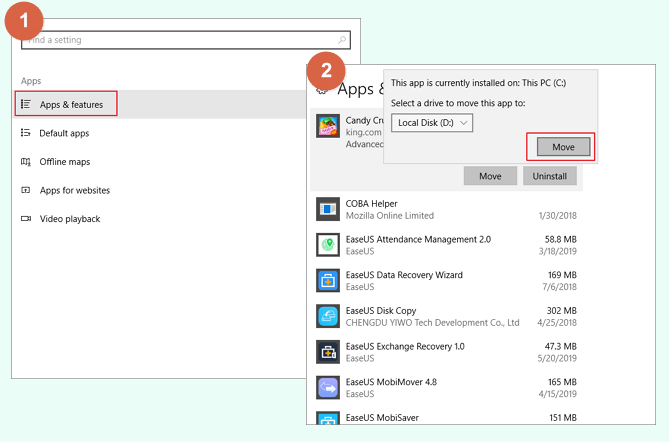
This is also easy, but not all games or apps have this feature to move to a different drive. For some apps, there is no such option as “Move” only «Uninstall». If you cannot move it, you can go back to Method 1 to solve your problem. And if you like this page, you can click the social buttons to share with others in need.
Conclusion
Moving Microsoft Store applications and games to another drive is very simple. This guide provides two detailed step-by-step instructions for migrating your games: change the location manually or use migration software.
For a quicker solution, I recommend using EaseUS Todo PCTrans, which has several migration features and supports PC-to-PC, image, and application migration. You can ask it for help with any migration questions you have.
FAQs About Moving Microsoft Store Apps and Games to Another Drive
This section will provide additional questions about moving Microsoft Store apps and games to another drive. If you have similar confusion, you can check the answers.
1. Can I transfer Microsoft games to another computer?
Whether you can transfer Microsoft games or not depends mainly on the type of games you have. If it’s an online cloud sync game, you won’t be able to use the software, but you can by logging into the same Microsoft account on the new computer. You can then sync your game progress in the cloud. If you have a locally cached game, you won’t be able to use that transfer method. You can try the professional App mover.
2. How to change the Microsoft Store game installation?
Changing the Microsoft Store game installation location is a very simple task:
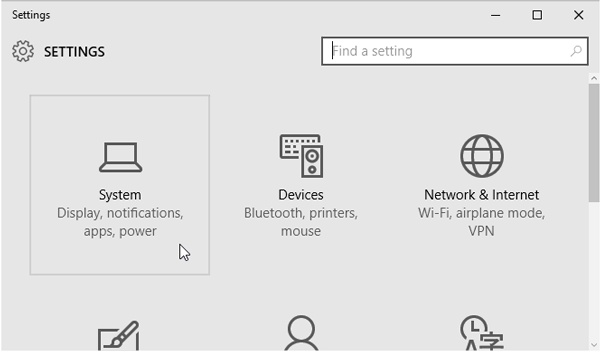
- Click Windows+I to open Windows settings and click System.
- Under System, find Storage.
- Select Change save location for new content under Save location, and the new application will be saved.
3. How to move Xbox games to another drive Windows 11?
You can move games by changing the Xbox installation location: In the Xbox app, select Settings, and on the left side, select General. Under the General option, change the default installation location of the games.
If you want to migrate the game directly, you can use a game mover or Windows’ built-in tool to move the game to another drive: open Windows’ Settings, find the Applications and Features option, select the game, and move it.
Download Windows Speedup Tool to fix errors and make PC run faster
One useful feature Windows 10 or Windows 11 has is letting users move the installed Microsoft Store apps to any other drive. You can also change the path of the default installation directory for new apps. This post shows how to move installed Microsoft Store Apps to another Drive in Windows 11/10.
There was a not-so-easy way to change the default installation location for apps, but it worked for some and not for others. Windows 11/10 has made it easy to get things done. The new Settings window has all the options to move the Windows 11/10 apps to any other drive.
Windows 11

To move the installed Microsoft Store app to another drive in Windows 11, do the following:
- Press Win+I to open Windows Settings
- Select Apps settings
- Click Apps and features
- Scroll down and locate the app
- Click on the 3-dotted line and select More
- Next, select the drive you want to move the app to and press Move
- The app will be moved.
Please note that this option is not available for all apps.
Windows 10
Press Win + I to open the Settings panel. Then, click on the System button.
Next, go to Apps & Features section and wait for Windows to determine the app size. Now, find the app that you want to move to another drive. Then, click on the app and select Move.

Next, select a drive and click on Move.

It will take a few moments to complete since this depends on the app size.
Once the process is completed, the Windows Store app will be moved to a new location.
If you are facing low disk-space issues after upgrading, you can use this technique to move apps from the default system drive to another drive, and even direct new installs to another location.
UPDATE: Move installed apps setting appears to be grayed out for many, including me. Caleb adds in comments that Microsoft has decided to postpone offering this setting for the moment.
Related reads:
- Move installed Programs using Application Mover
- How to move Games & Programs using FolderMove
- How to Move Steam Games to another Drive.
PS: Also, see how you can change the default Program Files installation directory location or Pick a Drive for installation in Microsoft Store before downloading the app.
Anand Khanse is the Admin of TheWindowsClub.com, a 10-year Microsoft MVP (2006-16) & a Windows Insider MVP (2016-2022). Please read the entire post & the comments first, create a System Restore Point before making any changes to your system & be careful about any 3rd-party offers while installing freeware.
Reader Interactions
Папка WindowsApps — стандартная папка Windows 10, в которой хранятся приложения из магазина (UWP приложения). По умолчанию, она присутствует как скрытая папка C:\Program Files\WindowsApps\, но когда вы пользуетесь функциями установки или переноса приложений из магазина на другой диск, аналогичная папка появляется также в корне этого диска — обычно пользователи хотят удалить именно её.
Простое удаление этой папки невозможно, вследствие отсутствия доступа к ней. Однако, если по той или иной причине вам нужно удалить WindowsApps, особенно если речь идет об этой папке на диске D или другом не на системном разделе, вы можете это сделать, настроив права доступа соответствующим образом, об этом — в инструкции.
Удаление папки WindowsApps на диске D или в Program Files
Вне зависимости от того, из какого расположения вам требуется удалить папку WindowsApps, действия будут одинаковыми. Учитывайте, что, удаляя папку вы также удалите и установленные в ней приложения и, если для папки на не системном разделе диска (например, диске D) это относительно безопасно, при удалении WindowsApps из Program Files могут быть проблемы (делайте это только на свой страх и риск) и часть вложенных папок удалены не будут.
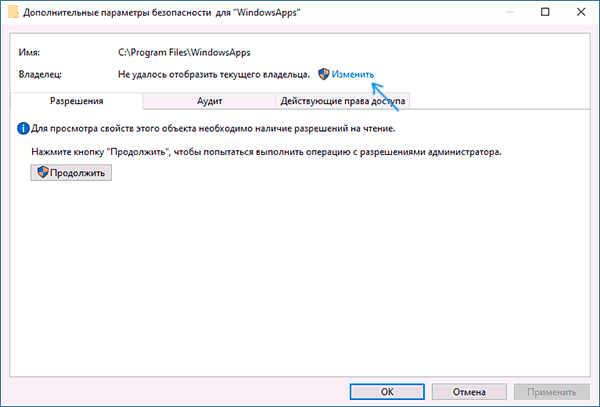
- Нажмите правой кнопкой мыши по папке WindowsApps и откройте её свойства, а затем перейдите на вкладку «Безопасность» и нажмите кнопку «Дополнительно».
- Нажмите «Изменить» в пункте «Владелец».

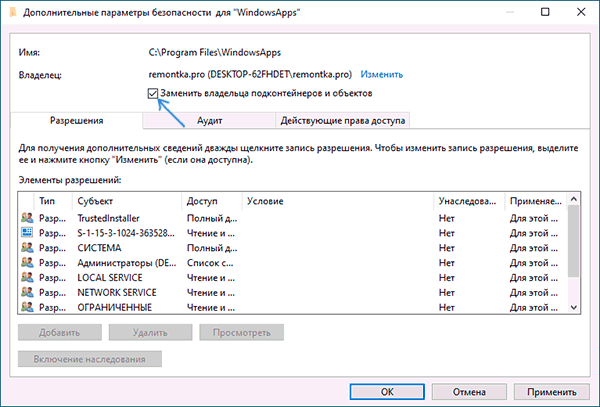
- В поле «Введите имена выбираемых объектов» введите имя вашего пользователя, а затем нажмите кнопку «Проверить имена». Если имя было введено верно, к имени пользователя добавится имя компьютера, как на скриншоте. Для учетной записи Майкрософт можно ввести соответствующий ей E-Mail в качестве имени. Нажмите «Ок».

- Отметьте пункт «Заменить владельца подконтейнеров и объектов» и нажмите «Применить». Дождитесь окончания применения изменений.
- Нажмите «Ок». Вы вернетесь в окно свойств папки. В нем снова нажмите кнопку «Дополнительно» на вкладке «Безопасность».
- Нажмите «Изменить разрешения», а затем — кнопку «Добавить». В поле «Субъект» укажите вашего пользователя, также как вы это делали на 3-м шаге, а затем установите отметку «Полный доступ» и нажмите «Ок».

- Установите отметку «Заменить все записи разрешений дочернего объекта» и нажмите «Ок». Дождитесь завершения применения параметров безопасности. Учитывайте, что при их изменении для системных приложений (если вы удаляете WindowsApps на диске C), могут быть сбои, придется нажать «Продолжить» (права на указанную вложенную папку изменены не будут).


После применения параметров безопасности удалите папку WindowsApps обычным способом. Учитывайте: в случае если какие-то из приложений, находящихся в папке WindowsApps работают в настоящий момент времени, вы можете получить сообщение о том, что удаление невозможно, так как эти папка или файл открыты в другой программе.
В этом случае вы можете начать удалять папки внутри WindowsApps, пока не будет ясно, какая из папок не удаляется (а по её имени можно установить соответствующее приложение).
Если после удаления вы снова будете скачивать приложения из магазина Windows 10, при этом в качестве места сохранения будет использоваться папка на не системном разделе диска, папка WindowsApps будет снова создана автоматически.
Last Updated :
03 Apr, 2025
Quick Solution!
Here is a quick solution for our active and speedy learners. Follow these steps to move installed programs to another drive on your Windows PC
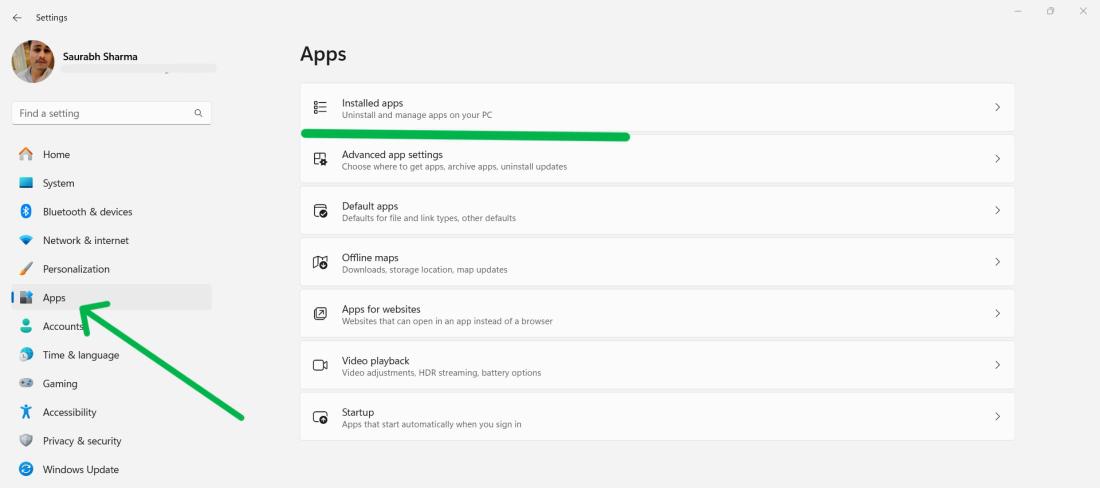
- Go to Settings > Apps > Installed Apps
- Select the App to move > click on the 3-dots button > click Move.
- Choose the destination drive from the drop-down and click Move again.
The program is now on the new drive!
If you have several programs installed on your computer, you might encounter storage issues on your C drive, impacting the performance and stability of your PC. Luckily, Windows 11 offers the option to transfer installed programs to a drive, allowing you to free up space and optimize your system. In this article, we will show you three methods for moving Windows 11 apps to another drive.
Method 1: Move Installed Apps to Another Drive Using Settings
Step 1: Open Settings by pressing Win + I, then click on «Apps.»
Step 2: Select «Installed apps» from the right sidebar.
Step 3: Scroll through the list and find the app you want to move.
Step 4: Look for the three dots (…) next to the app’s name, then click «Move«.
Method 2: Move Installed Apps to Another Drive Using Registry Editor
Step 1: To open Registry Editor, Press Win + S then on search bar «Registry Editor»
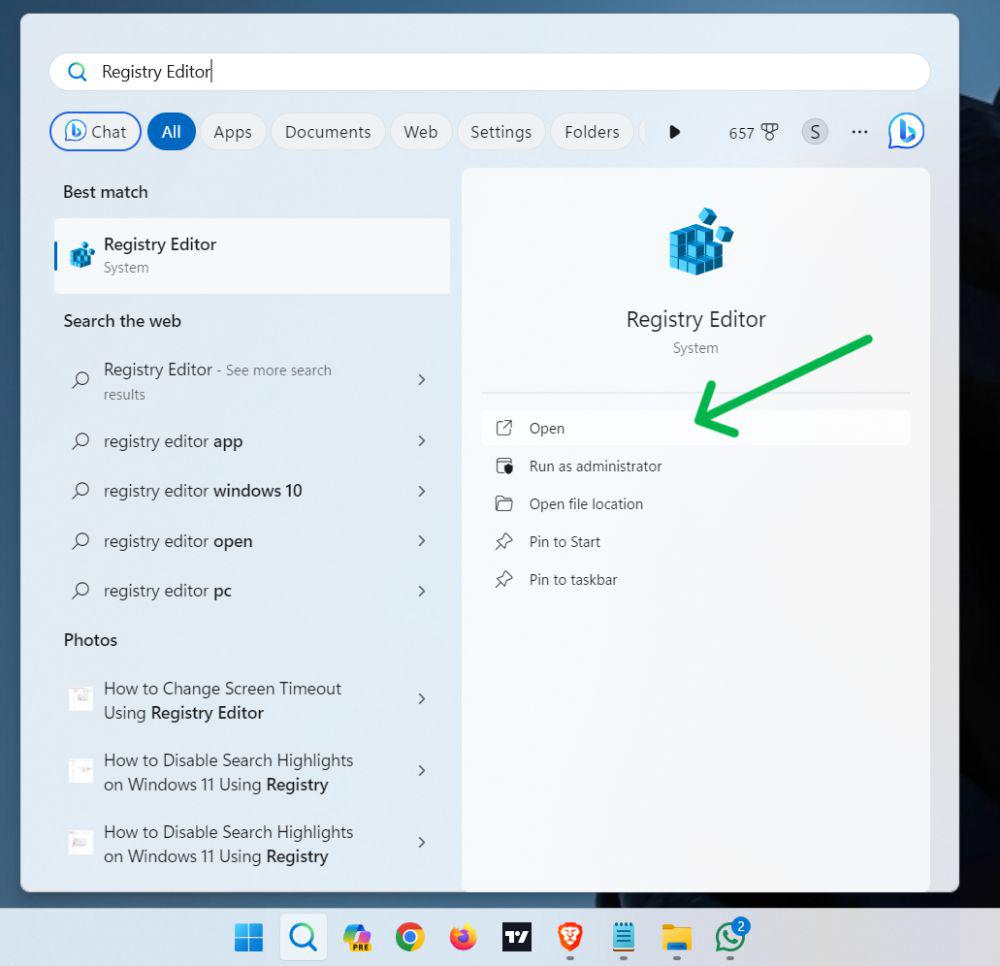
Step 2: To this path
HKEY_LOCAL_MACHINE\SOFTWARE\Microsoft\Windows\CurrentVersion\App Paths.
Locate the subkey with your program’s name or developer.
Step 3: Double-click the «Path» entry, change the path to your new drive location, and save.
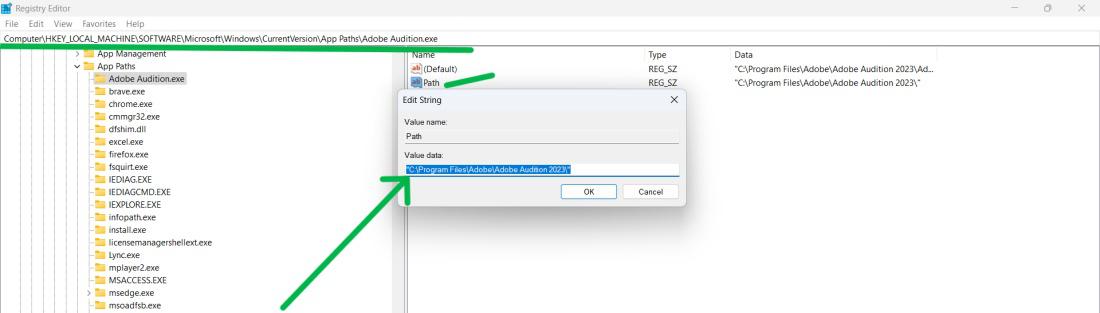
Step 4: Restart your PC to ensure the changes take effect.
Step 1: Download and install from this link.
Step 2: Open the EaseUS Todo PCTrans
Step 3: On right sidebar click on «App Migration» then click on «Start«
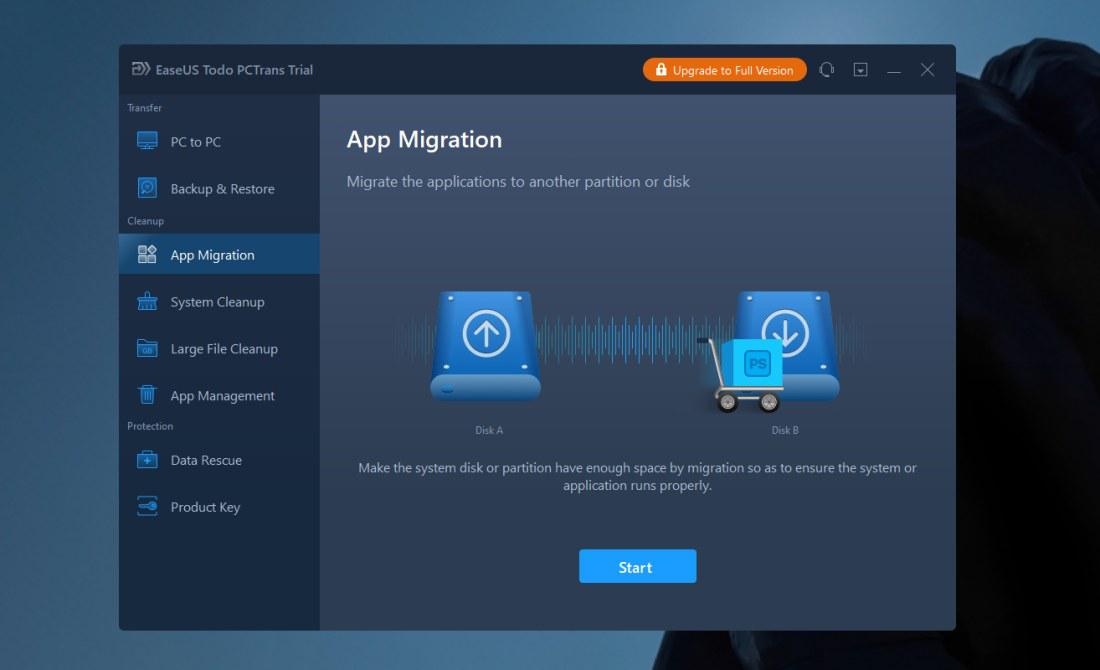
Step 4: Locate the desired programs for relocation and select them. Additionally, click the triangle icon to choose the destination for migrating the programs. Then Click on «Transfer«
How to Change the Default Installation Path on Windows 11?
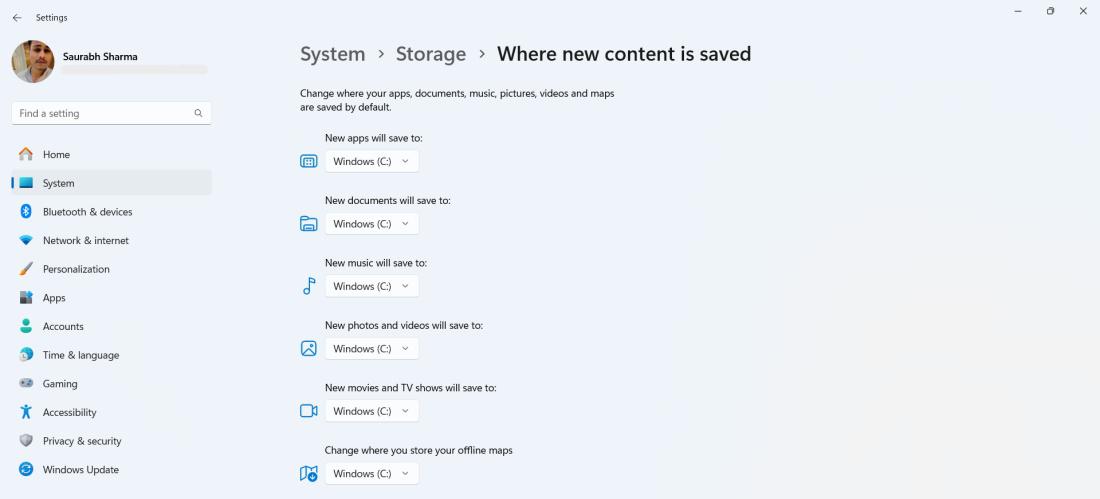
Step 1: Open Settings by pressing Win + I, Navigate to «System» > «Storage«.
Step 2: Click «Advanced storage settings» then «Where new content is saved».
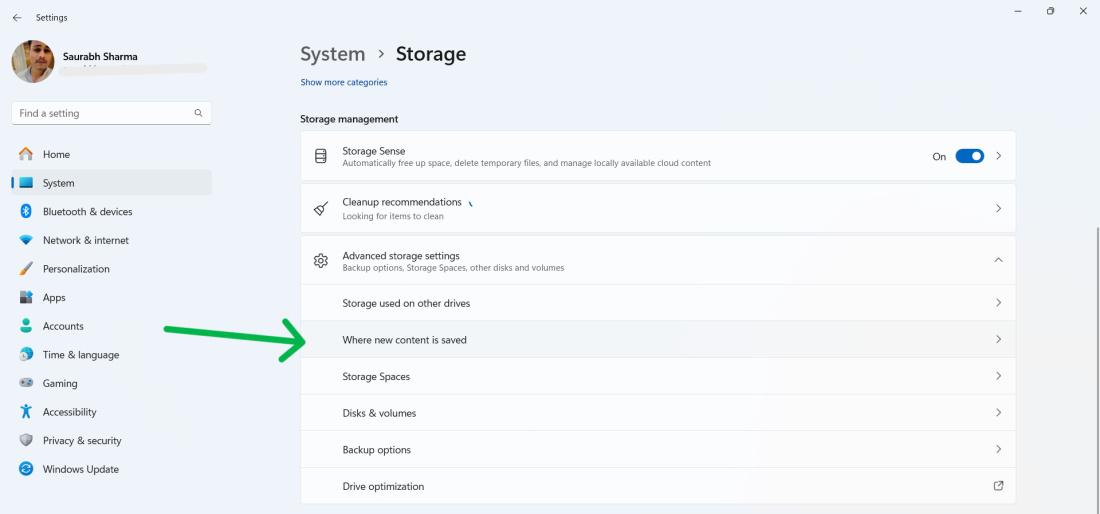
Step 3: Select the desired drive for «New apps will save to» and «documents«.
Conclusion
In Conclusion, If you’re running low on space on your C drive and want to enhance your system’s performance shifting installed programs to another drive, in Windows 11 can be beneficial. We’ve outlined three methods to accomplish this task along with instructions on modifying the default installation path for applications. You can select the method that best aligns, with your requirements and personal preferences.
Also Read
- How To Free up Drive Space in Windows?
- How to Create Partitions of a Hard Drive in Windows?
- How to Format a Hard Drive in Windows?
- How to move all files from one directory to another using Python?