
Introduction
While there are various methods available for file transfers from a Windows system to a Linux system, using the Command lines provides a straightforward and reliable approach. In this guide, we’ll walk you through the step-by-step process, highlighting the necessary commands and techniques to seamlessly transfer your files from Windows to Linux.
Prerequisites
Verify Your Remote Linux Server is Ready
If you have ordered one from Database Mart, you will receive an email containing the information of your VPS, including server IP and login credentials. You can also obtain the information on the overview page in the control panel. Please refer to this guide on how to get server credentials if you need assistance.
Steps to Transfer Files from Windows to Linux Using Command Prompt
Step 1. Open the Command Prompt in Local Windows
Search cmd in the search bar, and double-click the Command Prompt to open it. Or press the Windows key + R, then type cmd or cmd.exe in the Run command box, and press Enter.
Then, you should see the command prompt interface as below.
Step 2. Transfer Files between Local Windows and Remote Linux
Before the transfer, we will explain some terms used in the command. When using the command, you should replace these terms with the actual value.
filename.extension: it’s the name of a file and file extension that’s to be transferred. In this case, we may use mydata.txt and website.txt.
folderName: it’s the name of a folder that’s to be transferred. In this case, we may use the Website folder.
customPort: it’s the custom port you use to connect to your remote Linux server.
localFilePath: it’s the path on your local Windows PC.
username: it’s the username used to log into the remote Linux server.
remoteServerAddress: it’s the server IP of the remote Linux server.
remoteFilePath: it’s the path on the remote Linux server. In this case, we use /home/administrator.
2.1 Transfer a File from Local to Remote Server
For demonstration purposes, we have created a file in the desktop>website named «mydata.txt». First, we need to go to the file’s directory by inputting cd, followed by the file path on our local Windows. In this case, the file is located at desktop\website. Therefore, we enter the following command.
After that, you can see that we navigate to the folder where the file is located.
Then, we use the following command to transfer the «mydata.text» from local Window to the remote Linux server.
scp filename.extension username@remoteServerAddress:remoteFilePath
After entering the command, you will be prompted for the password for connecting to the remote server. Input the password and hit the Enter button, the file will be transferred. In this case, we have transferred the local file mydata.txt (located at desktop/website) to the /home/administrator directory on the remote Linux server.
2.2 Transfer a File from Remote Server to Local
You can run the following command to copy a file from the remote server to your local Windows PC.
scp username@remoteServerAddress:remoteFilePath/filename.extension localFilePath
In this case, we have transferred the mydata.txt (located at home/administrator on the remote server) to the desktop directory on the local server.
2.3 Transfer Multiple Files from Local to Remote Server
The SCP command also allows you to transfer multiple files in a single command. Navigate to the file folder and run the following command.
scp localFilePath/filename1.extension localFilePath/filename2.extension username@remoteServerAddress:remoteFilePath
In this case, we have transferred two local files mydata.txt (located at desktop) and mywebsite.txt (located at desktop/website) to the /home/administrator directory on the remote Linux server.
2.4 Transfer a Folder from Local to Remote Server
Besides files, the SCP command also allows you to securely copy folders between the local and remote server. Use the following command to copy a folder from local to the remote server.
scp -r localFilePath/folderName username@remoteServerAddress:remoteFilePath
In this case, we have transferred the local Website folder, which contains two files mydata.txt and mywebsite.txt, to the /home/administrator directory on the remote Linux server.
2.5 Transfer a File Faster
Adding the -c option after the scp command will compress the file while it’s being transferred. Once the file reaches its destination, it returns to its normal size.
scp -c localFilePath/filename.extension username@remoteServerAddress:remoteFilePath
In this case, we have transferred the local Website folder, which contains two files mydata.txt and mywebsite.txt, to the /home/administrator directory on the remote Linux server.
2.6 Transfer a File Using a Custom Port
The scp command uses the 22 port by default. If you have changed to a custom port, please run the following command to transfer a file. Make sure to capitalize the P.
scp -P customPort localFilePath/filename.extension username@remoteServerAddress:remoteFilePath
In this case, we have transferred the local file mydata.txt to the /home/administrator directory on the remote Linux server using a custom port.
Step 3. Verify the File has been Transferred
Then, Use a preferred editor to open the file. Here, we use the «Nano editor.» In this example, the remoteFilePath is /home/administrator, and the filename.extention can be mydata.txt, mywebsite.txt, and myweb.txt.
nano remoteFilePath/filename.extention
We can also check if the folder has been copied to the remote server. Go to the /home/administrator directory and check if the Website folder is there.
cd /home/administrator
ll
Conclusion
In conclusion, transferring files from a local Windows machine to a remote Linux server using the command prompt (CMD) is a powerful and efficient method for managing data. By following the step-by-step guide outlined in this blog, you can establish a secure connection, utilize the SCP (Secure Copy Protocol) command, and successfully transfer files between these two platforms.
Other Methods to Transfer Files between Windows and Linux Server
Let’s say you want to copy or move files from a Windows drive into your WSL instance. You could use /mnt/c/path/to/file from within WSL, e.g.:
cd $HOME
mv /mnt/c/Users/youruser/Documents/project/myproject .
Another way is to access the WSL instance’s drive from the outside.
- Navigate to
\\wsl$\Ubuntu-20.04\home\your_usernameand drop the files there
Please note that WSL prohibits access to any root-owned files or directories through the \\wsl$\<distro> share.
- Create a directory under root
/andchownto your user:sudo mkdir /project sudo chown $USER:$USER /projectYou should be able to drop into that folder as well.
Transferring files between Linux and Windows might seem tricky at first, especially if you’re new to working across different operating systems. Now, whether you’re sharing documents, moving project files, or backing up data, knowing how to transfer files between these two platforms is very important.
In this blog, we’ll walk you through simple and effective methods to transfer files from Linux to Windows. From using shared networks and USB drives to leveraging powerful tools like Samba, SSH, and cloud services, we’ve got you covered. No matter your level of expertise, this guide will help you choose the best method for your needs and ensure your files are transferred quickly and securely.
Methods to How To Transfer File From Linux To Windows
Explore this section to get three methods that will help you in-order to transfer file form Linux system to Windows system.
Method 1: Using SSH Transfer Protocol with PuTTy
One of the easiest methods to transfer files from Linux (Ubuntu) to Windows OS is to use PuTTy pscp (PuTTy Secure Copy Client). PuTTy is used to create a client-server link to connect both platforms via a Wireless connection. PuTTy is a free open-source SSH client which works across multiple platforms and has become a mode for easy file transfers across platforms.
Step 1: Install SSH
- To start with Install SSH if you don’t have it in your Linux OS. Follow the Command prompt codes to do so.
Ubuntu/Debian OS
sudo apt update
sudo apt install ssh-server
sudo service ssh start
Red Hat and other Linux-based OS
sudo yum install openssh-server
sudo systemctl start sshd
Step 2: Install PuTTy
- Install PuTTy in your system if you don’t have it. Otherwise, ignore this step. If you want to install PuTTy in your Linux OS, follow the command prompt lines below:
For Ubuntu and Linux Mint OS
For Ubuntu, you’ll need to access the universal repository available and install PuTTy there. Hence, there are additional commands to access the universal repository below:
sudo add-apt-repository universe
sudo apt update
sudo apt install putty
For Debian OS
sudo apt-get putty
For Arch Linux OS
sudo pacman -S putty
For RHEL, Fedora, CentOS, AlmaLinux
sudo dnf install putty
For others
sudo yum install putty
Now you have successfully installed PuTTy in your Linux OS. Now, you can use it for file transfer from Linux to Windows and vice-versa. Similarly, you can also download PuTTy in Windows OS.
Step 3: Start Transferring Files
Transfer files across different OS. It becomes easy using PuTTy pscp (PuTTy Secure Copy Client). Simply provide the source path and the destination paths for file transfer and the files would be transfered.
Point to Note
In this case, the IP address of a sample Linux system is 192.168.0.18. Let’s see the skeletal structure of the command prompt line we’ll need to type:
[path_where_pscp_is_downloaded]>pscp user@[host:source destination]
Example 1:
For example, assume that PuTTy pscp is downloaded on the Windows Program Files directory and we’ll need to transfer files from Linux to Windows OS to send a file called “a.txt”. Follow the command prompt code below:
C:\Program Files\PuTTY>pscp user@192.168.0.18:/tmp/a.txt \Users\<username>
Example 2:
For vice-versa, to store the file in a new directory follow the code below:
Important: Check whether the directory exists or else, you’ll get an error. You can use the following command to create a new directory:
mkdir <directory_name>
C:\Program Files\PuTTY>pscp \Users\<username>\a.txt user@192.168.0.18:/<directory_name>
Now, you’ve successfully transferred files from Linux OS to Windows OS and vice-versa.
Method 2: Using FTP with FileZilla or Shared Network Folders
Another simple method used for file transfer is using FTP (File Transfer Protocol). This is the easiest method since this involves no coding/ command lines. Let’s see how to do that. If you don’t have FileZilla, check out How to install FileZilla on Windows. After installing FileZilla, follow the following steps.
Step 1: Download and Install FileZilla on Windows
- To trasnfer file from Linux to Windows you need a FTP server and for this you need to install FileZilla on Windows
Step 2: Open FileZilla
- Once the installation process is over open FileZilla on you Windows system.
Step 3: Open File
- Navigate to “File” section and select “Site Manager” after opening FileZilla.
Step 3: Choose SFTP Protocal
- Change the protocol to SFTP.
Step 4: Add Your Linux Address
- Type your Linux Address in the Host coloumn, which in this case is 192.168.0.18.
Step 5: Modify General Settings
- Under the General section, go to “Logon Type” and select “Normal” as shown in the image below:

Step 6: Enter the User Credentials
- Enter the Username and Password of the Linux OS machine.
Step 7: Share Files
- After all the 6 steps are done, click “Connect”.
- Now you’ve created a client-server connection with SFTP between Linux and Windows OS. After the connection is created, it is simply a matter of dragging and dropping files between the platforms mentioned earlier.
Method 3: Using SMB Protocol
One other way of transferring files from Linux to Windows is by connecting both OS systems using the SMB (Server Message Block) protocol. SMB can be used both in Windows and Linux to initiate a connection to share and transfer files.
Step 1: Use/ Install Samba in Linux
- Samba is an open-source software which provides clients with file and print services in a Windows-based network. This software supports connections between Windows systems and can be used to transfer files.
- To install Samba, type the following commands in your Linux terminal.
sudo apt install samba -y
- After successfully installing samba-client, check its status by typing the command:
systemctl status smbd
Step 2: Create a shared directory
- When transferring files from Linux to Windows, create a shared directory which will be used by both Linux and Windows OS. Follow the command below to see how to do so.
mkdir <directory_of_your_choice>
- Give administrative permission using the chmod command.
chmod 777 <directory_of_your_choice>
Note: There are several numbers in chmod which are used to give specific permissions. They are
- 777— everyone can read, write and edit (full access)
- 755— Owners can read, write and execute, and group users can read and edit the file.
- 644— Only owners can read, write and execute the files. The other people included by the owner can only view the file.
Step 3: Create a New uUer Specifically for File-Sharing
- While sharing files, create a new user whose account will be used for the sharing/ transfer of files. The command for this is
useradd <username>
Step 4: Give an SMB Password for the User
- To facilitate SMB protocol under the user, you must create an SMB password by executing the command below
smbpasswd -a <username>
- Then type out the password in the terminal.
Step 5: Edit the Config File in Samba Using Any Editor (or nano)
- Type out the command below
sudo nano /etc/samba/smb.conf
- After opening the file, scroll to the bottom of the file and add the following lines.
path = <directory_of_your_choice>
valid users = <username>
read only = no
browsable = yes
public = yes
writable = yes
browsable = yes
- Save and exit the file, then check if everything was edited and saved successfully by running the following command.
testparm
Step 6: Find the IP Address of Your Linux System
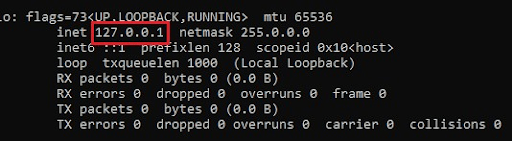
- Using ifconfig, find the IP address of your Linux system.
ifconfig wlo1
- Your IP address will be shown below:
Step 7: Connect to the Network from the Windows Side
- Launch the “Run” program by pressing the “Windows button” and “R”. Then type the IP address of the Linux system you got from the previous step. Type the IP address with two slashes before it.
- This will open the Linux-shared folders. Now you can view it and transfer files in between.
Methods 4 Use USB Drive (Easiest Method)
If you do not want to do any scription tasks or do not want to use FTP, then you can simple use USB drive to share files between Linux to Windows systems. Just insert your USB drive and copy all the files into the USB drive that you want to transfer into Windows. Once the copying task is completed, eject the USB drive from your Linux system, insert it into Windows system, and paste in anywhere in your Windows system.
Conclusion
Successfully transferring files from Linux to Windows can streamline your workflow and ensure that your data is accessible across different platforms. Whether you choose to use network sharing, SCP, or a USB drive, the methods covered in this guide provide you with the tools you need for efficient Linux to Windows file transfer. Understanding these techniques will help you handle cross-platform data management with ease.
Also Read
- How to Download a File from a Server with SSH / SCP?
- How to Troubleshoot SSH Connection Issues?
- How To Transfer Files From Android to iPhone?
Настройка файлового обмена между Windows и Ubuntu.
В данной статье расскажу о настройке файлового обмена между Windows и Ubuntu. Мы научимся расшаривать папки (каталоги) в Ubuntu и подключаться к ним из Windows 10 и наоборот. В этой статье все действия мы будем выполнять без использования терминала.
Этой статьей я хочу развеять предрассудки, что шарить папки на Ubuntu очень сложно. Так как же расшарить папку в Ubuntu?
Открываем файловый менеджер (Nautilus). Выбираем папку, которую хотим расшарить другим пользователям в локальной сети. Кликаем по ней правой кнопкой мыши, в контекстном меню выбираем «Свойства» и переходим на вкладку «Общедоступная папка по локальной сети»:

Если проставить галочку «Опубликовать эту папку» и нажать кнопку «Применить», то наша папка станет доступна другим пользователям в локальной сети. И у эта папка будет подсвечена значком общего доступа:

Но есть нюансы. Не спешите закрывать статью.
Если мы это сделаем в первый раз, то система нам радушно предложит установить «Службу общего доступа к папкам»:

Соглашаемся и жмём «Установить службу», появится окно, непосредственно, с установкой пакета Samba:

Устанавливаем и соглашаемся на перезапуск сеанса:

Давайте разберёмся подробнее с открытием общего доступа к папке.
Создадим какую-нибудь папку, к примеру, назовём её LinuxFiles. Проставим галочку «Опубликовать эту папку» и нажать «Применить»:
В поле «Наименование» можно вписать имя сетевого ресурса, как оно будет отображаться у нас в сети.
К примеру, мы создаём название каталога с пробелами и прочими символами, а здесь, в поле «Наименование» указываем нормальное название сетевого ресурса латинскими буквами.
Как подключиться к расшаренной папке Ubuntu из Windows?
Для этого нам надо узнать наш ip или название устройства (hostname).
Это можно сделать в графическом интерфейсе через «Параметры» системы.
В пункте «Сеть» посмотреть подробности вашего подключения:

В пункте «Подробности» (О системе):

Тоже самое можно посмотреть и в терминале, выполнив следующие команды:
ifconfig
hostname
После чего в Windows подключаемся, введя в адресной строке Проводника два обратных слеша \\, а затем ip адрес или имя устройства Ubuntu:

Отобразятся все расшаренные каталоги на Ubuntu машине. Но если мы попытаемся зайти в нашу папку LinuxFiles, то получим ошибку доступа:

Есть два пути решения данной проблемы.
Если хотите, чтобы любой имел доступ к вашей расшаренной папке, то надо в свойствах её общего доступа проставить галочку «Гостевой доступ» и нажать «Применить»:
Если хотите подключаться к папке с помощью учетной записи вашего текущего пользователя Ubuntu, то придется задать ему Samba пароль и это сделать можно в терминале (да, я вас обманул, один раз придется в терминал зайти):
sudo smbpasswd -a $USER

Теперь можно в Windows зайти в нашу расшаренную папку. Либо с вводом имени пользователя и пароля (вашего Ubuntu пользователя). Либо, если проставили галочку «Гостевого входа», то сразу.

Но если в Windows вы попытаетесь создать, изменить или удалить файл/папку, то получите ошибку:

У вас нет доступа на изменение в этом каталоге.
Если это проблема, и вы хотите, чтобы пользователи в локальной сети могли изменять файлы в этой папке, то для решения этой проблемы нужно в свойствах общего доступа папки проставить галочку «Разрешить другим пользователям изменять содержимое папки» и нажать «Применить»:
После чего у вас будет запрошено подверждение на изменение прав на папку:

Соглашаемся на изменение прав на каталог.
Теперь пользователи локальной сети смогут изменять файлы внутри вашей расшаренной папки.
Стоит упомянуть, что не только пользователи Windows смогут подключаться к вашей расшаренной папке, но и пользователи Ubuntu или других дистрибутивов Linux, аналогично, как они бы подключались к расшаренной папке Windows.
Давайте теперь расшарим папку на Windows и подключимся к ней из Ubuntu.
Настройка общего доступа папки в Windows и подключение к ней из Ubuntu.
Создаём папку в Windows где-нибудь, кликаем правой кнопкой мыши, выбираем «Свойства» — «Доступ» и жмём «Расширенная настройка»:

Далее проставляем галочку «Открыть общий доступ к этой папке» и нажимаем «Применить»:
Всё, мы расшарили папку в Windows и к ней можно подключаться.
Как подключиться к расшаренной папке Windows из Ubuntu?
Нам нужно знать ip адрес или имя устройства (hostname).
Полный сетевой путь к расшаренной папке написан на вкладке «Доступ» в Свойствах папки:
Открываем файловый менеджер (Nautilus) в Ubuntu и слева выбираем пункт «Подключиться». Вводим smb и сетевой путь к папке Windows, не забывая развернуть слеши в другую сторону, и нажимаем «Подключиться»:

После попытке подключения, если адрес ввели правильно, то будет запрошена авторизация:

В Windows есть несколько нюансов с настройкой общего доступа.
Если мы хотим подключаться с авторизацией, введя имя пользователя и пароль, то в Windows нужно создать локальную учетную запись с латинским логином и ввести пароль.
Если кто не знал, то в Windows 10 есть сетевые и локальные учетные записи. С сетевой учетной записью мы не сможем подключиться.
В расширенных настройках общего доступа папки Windows в «Разрешениях» по умолчанию выбрана группа «Все»:

Но авторизация у нас запрашивается, и если мы попытаемся подключиться «Анонимно», то ничего не выйдет.
Как же подключиться без ввода пароля к Windows папке из Ubuntu?
Нужно в Windows открыть «Центр управления сетями и общим доступом», выбрать «Изменить дополнительные параметры общего доступа»:

В пункте «Все сети» в самом низу будет пункт «Общий доступ с парольной защитой»:

Надо отключить общий доступ с парольной защитой и «Сохранить изменения».
После чего можно будет заходить с Ubuntu в расшаренные папки Windows, на которых разрешен доступ для всех. Но только после перезагрузки Windows для применения этих изменений.
Для удобства и быстрого доступа к сетевому ресурсу, можно добавить его в закладки файлового менеджера (Nautilus) Ubuntu:

А если нужно защитить папку, то надо удалить группу «Все» и добавить своего пользователя в «Разрешения»:
Вот и всё. В этой статье мы не правили никакие конфиги Samba и не пользовались терминалом. Простому пользователю этого более чем достаточно.
А в ближайших статьях мы более подробно разберем Samba, научимся конфигурировать эту службу.