
Иногда может возникнуть задача переноса данных профиля пользователя Windows в другую учётную запись, на другой компьютер или в новую систему после переустановки. Файлы пользователя можно перенести вручную из папки C:\Пользователи\Имя_пользователя, но иногда может потребоваться также и перенос других параметров учетной записи.
Transwiz — бесплатная для личного использования программа, позволяющая легко перенести профиль пользователя со всеми данными в пользовательских папках на новый компьютер, восстановить параметры и данные профиля после переустановки системы, либо выполнить перенос данных в другую учётную запись на том же компьютере. В этом материале — о том, как использовать программу.
Сохранение данных профиля в файл
Скачать полнофункциональную бесплатную версию Transwiz с поддержкой Windows 11, 10 и предыдущих версий ОС можно с официального сайта.
Запустите скачанный файл .MSI, файлы программы будут распакованы в папку C:\ProgramData\ForensiT\Deployment Files, из которой достаточно запустить исполняемый файл Transwiz.exe (по факту, это Portable программа, и вы можете перенести исполняемый файл в удобное расположение).
Дальнейшие шаги по сохранению данных профиля пользователя:
- Выберите опцию «I want to transfer data to another computer» (Я хочу перенести данные на другой компьютер).

- Выберите пользователя, данные которого следует перенести. Учитывайте, что данные по умолчанию включают в себя всё содержимое папок пользователя: Рабочий стол, Документы и Изображения, Загрузки. Если что-то переносить не нужно, либо очистите соответствующие папки, либо отредактируйте файл конфигурации (о чём в последней части инструкции).
- Укажите место сохранения данных профиля пользователя программой.
- При желании установите пароль на архив с данными профиля пользователя, если он не требуется — просто нажмите «Ок».
- Дождитесь завершения создания файла для переноса данных профиля.


На этом первый этап завершён. Теперь созданный файл с данными можно использовать для импорта на другом компьютере или в другой системе.
Перенос данных профиля на другой компьютер или в другую систему
Импорт данных профиля пользователя Windows из созданного файла осуществляется схожим образом:
- Запустите Transwiz в систему, в которую осуществляется перенос и выберите пункт «I have data I want to transfer to this computer» (у меня есть данные, которые я хочу перенести на этот компьютер).

- Укажите путь к файлу с данными.

- Укажите имя пользователя (по умолчанию то же, которое было на компьютере, где создавался файл).
- Если имя пользователя отсутствует в текущей системе, вам будет предложено создать новый аккаунт с этим именем (на скриншоте). Если такой пользователь уже есть — то объединить данные с имеющейся учетной записью (Merge).
- Укажите группу пользователя, если создается новый пользователь: стандартный пользователь (группа «Пользователи»), администратор или другая.
- Укажите (можно оставить пустыми) полное имя пользователя, описание, пароль, установите другие параметры при необходимости.
- Дождитесь завершения переноса данных и конфигурации пользователя: переносятся не только файлы, но и записи в реестре, ACL, параметры приложений UWP.


Готово. Теперь, можно попробовать зайти в новую учётную записи (если создавался именно новый профиль) и убедиться, что всё было перенесено именно так, как ожидалось.
Дополнительная информация
Некоторые дополнительные нюансы, касающиеся использования Transwiz:
- Если перенос данных осуществляется в новую учётную запись, следует учитывать, что Transwiz создаёт только локальные учётные записи.
- На официальном сайте присутствует инструкция по использованию программы, в которой описаны дополнительные возможности, в частности редактирование файла конфигурации для включения или исключения папок при переносе данных, что также может оказаться полезным, например, для исключения папки «Загрузки» при переносе.
Download Windows Speedup Tool to fix errors and make PC run faster
Windows lets each user create, store, and access his or her own files and folders under his or her User Account. But there may be times when you want to transfer files from one user account to another on a Windows PC or laptop. Or maybe you need to share files between users. If you need to do this, then this post will show you how to share or transfer files and folders between users on Windows 11/10.
A user with an Administrator account can access the files of all other users on his computer system.
Transfer files from one User Account to another on Windows PC
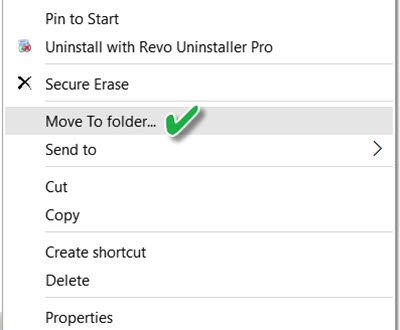
If you need to move or transfer files from one user account to another, the simplest way would be to log in with an administrator account, and cut-paste the files from one user account to the personal folders of the other user account. If you do not have access to an admin account, ask your administrator to do it. If you use our freeware Ultimate Windows Tweaker, you can easily add Move to (or Copy to) to your context menu. Then you need to simply select the files and folders you want to transfer, right-click on them, and select Move to from the context menu. Designate the folder where you want to move them.
Share files between User Accounts
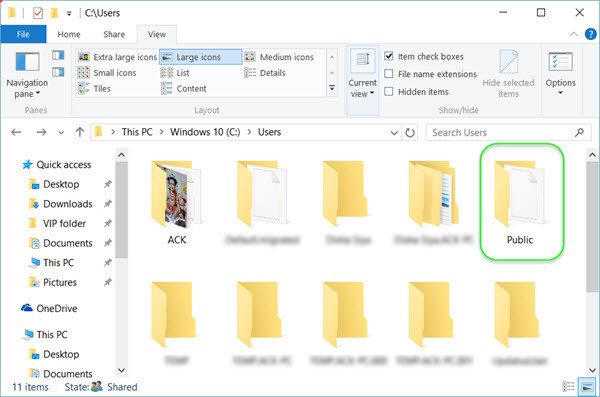
Windows includes a Public folder, located at C:\Users, which is accessible to all users. If you save files in this folder, they can be shared among all the users. If you want to create and save files to share them with other users, you should save them in the Public folder. If you move your existing files and folders to this Public folder, you can share them with all.
The Windows operating system will also add the Public folder to Libraries, which you and others can easily access.
There is one more thing. If you wish, you can even share this Public folder publicly among all on your local network. If you wish to do this, you will have to open Control Panel > > All Control Panel Items > Network and Sharing Center > Advanced sharing settings. You’ll find the Public folder sharing option here.

Select Turn on sharing so anyone with network access can read and write files in the Public folders.
How to copy a file from one user to another user in Windows?
To copy a file from one user to another in Windows, navigate to the file, right-click, select “Copy,” switch to the other user’s account, and paste the file into the desired location. Alternatively, use a shared folder for easier access.
Read: How to share files between computers using LAN
How do I transfer user files to another user?
To transfer user files to another user, copy the files to a shared location, then change the file ownership and permissions. Use File Explorer on Windows to facilitate the transfer. Ensure both users have the necessary access rights.
Does Windows separate programs files between 2 users of the same PC?
Yes, Windows separates program files between users by creating distinct user accounts. Each account has its own storage, applications, desktop settings, and personalized configurations, ensuring individual experiences and file organization.
Anand Khanse is the Admin of TheWindowsClub.com, a 10-year Microsoft MVP (2006-16) & a Windows Insider MVP (2016-2022). Please read the entire post & the comments first, create a System Restore Point before making any changes to your system & be careful about any 3rd-party offers while installing freeware.
Загрузить PDF
Загрузить PDF
Если на одном компьютере работают несколько пользователей, то может потребоваться перенос файлов между учетными записями. Это легко сделать как в Windows, так и в Mac OS.
-

-
-
Откроется Проводник Windows..
-
-
.
- Для выделения нескольких файлов щелкайте по ним, удерживая нажатой клавишу CTRL.
- Если вы хотите выбрать сразу все файлы, нажмите Ctrl + A.
-
Этот процесс будет зависеть от вашей версии Windows::
- Windows 7. В меню окна нажмите «Правка» и в выпадающем меню выберите либо «Переместить в папку» (файлы будут удалены и перенесены), либо «Копировать в папку» (файлы будут скопированы).
- Windows 8. Нажмите «Переместить в» или «Копировать в» (в верхней части окна). Выберите одну из двух опций и нажмите «Выбрать местоположение» (в нижней части расширенного меню).
-
Выберите общую (shared) папку для переноса файлов и нажмите «Переместить» или «Копировать». :
- Ваши файлы будут скопированы (или перемещены) в общую папку. Теперь другой пользователь может скопировать/переместить их из общей папки.
Реклама


-
-
-
-
Для получения доступа к папке нажмите «Users» (Пользователи) — «Shared» (Общие)
-
Теперь другой пользователь может скопировать/переместить их из общей папки.
Реклама


Об этой статье
Эту страницу просматривали 86 642 раза.
Была ли эта статья полезной?
Если вы видите это сообщение, значит, произошла проблема с загрузкой файлов в стилей (CSS) нашего сайта. Попробуйте сбросить кэш браузера (Ctrl+F5).
Если это не поможет, а вы находитесь в регионе, где возможны ограничения интернет-трафика с российских серверов — воспользуйтесь VPN.
|
Проще всего завести на втором жёстком диске папочку, куда и скопировать все файлы, назначенные к перемещению. Желательно в свойствах — в настройках безопасности — дать полный доступ для всех пользователей (учётных записей). После перехода в другую учётку, проверьте на читаемость файлов в этой папке. Тогда уже можно убить их в первой учётной записи окончательно. модератор выбрал этот ответ лучшим Megaw 12 лет назад Очень просто скопировать. Берем ваши файлы в вашей учетной записи (основная, откуда копируем), отмечаем их, жмем копировать. Потом заходим на системный диск, в папке «Пользователи» выбираем нужную учетную запись (вы должны быть администратором компьютера), находим там, например, папку «Рабочий стол» и и копируем туда (желательно копировать папкой). Потом переместите куда надо. Буков 12 лет назад Пуск — все программы — стандартные — служебные — мастер переноса данных. Знаете ответ? |
Due to varied needs and diverse reasons, many Windows users are now having problems with how to transfer and move a user account with a password, personalization, and even the power settings to a new PC or laptop. If you are one of these people who are urgent about transferring user account profiles between PCs, relax and find the best solution here now.
View Necessary Information on How to Transfer User Account to New PC in Windows:
How Do You Transfer A User Account to Another Computer?
Transferring user accounts from one computer to another is of great concern to users. We have found a lot of questions from the forum about transferring user accounts. Here are two common cases:
Case 1. Can I transfer my user account from my desktop to a new laptop?
«Does anyone know how to transfer the Windows user account and its password, personal settings, etc., to a new laptop in the same network?
I bought a new laptop home yesterday, and I want to use my old user account with settings on the new laptop instead of creating a new account.
So is there a way that can help me do this?«
Case 2. How do you transfer a user account to a new PC under a different network?
«Here is my case I forgot to bring my laptop, and I’m on a trip to a new city with a borrowed laptop. I created a new user account on it and created some useful documents on the laptop.
There will be two days left before I go home. I want to carry the user account with all the new files that I created on the borrowed computer. So I want to know, is it possible to transfer a user account with all settings and files from the current computer to my laptop at home? I mean that these two computers are under different networks, so do I still have the chance? How?«
If you have similar confusion, keep reading. We will provide detailed information to solve this problem.
One-Click Transfer User Account with Settings to New PC
Some of you may think that the Windows built-in transfer tool — Windows Easy Transfer, might help to transfer a user account between two computers. Indeed, Windows Easy Transfer does work to transfer files in Windows 7 and Windows 8.
But the problem is that Windows Easy Transfer doesn’t support Windows 10. It means that if you are a Windows 10 user, you can’t transfer files to a new PC. The User Account is unsupported, of course.
So what is the best way to do the job? There are many Windows transfer tools on the market now. However, for the consideration of protecting your privacy and network security, we would recommend you to be very careful than to download a ‘just-ok’ tool for help.
EaseUS Todo PCTrans Free is a safe Windows transfer software that has three advantages listed below that you can fully trust and apply to transfer and move a user account with all settings to a new PC on your own now:
1. All Windows OS supported: EaseUS Todo PCTrans supports all Windows Operating Systems, including Windows 11/10/8.1/8/7/XP and even Vista.
2. «PC to PC» and «Backup & Restore» modes satisfy different needs: EaseUS Todo PCTrans supports you to transfer files to another PC via network or backup. If your PCs are using the same network, you can transfer files via the network. «Backup & Restore» mode is free and allows you to back up files to restore them on another PC or not in the same network with some simple clicks.
3. Safe for transferring files, no privacy leaking: EaseUS Todo PCTrans is 100% secure for you to apply for file transferring and even user account transferring without leaking or losing your private information.
How do I get this tool? It’s available for you to download and install on your PC for Free here now:
Tutorial: Steps to Transfer User Account to New PC for Free
- Notice:
- There are two ways to transfer user accounts between PCS by using EaseUS Todo PCTrans.
- If you want to transfer many files between PCs, activate this tool to its pro version before you follow the guidelines below.
You can follow either way to transfer the user account with all settings to a new PC now:
Transfer User Account to a new PC via the network
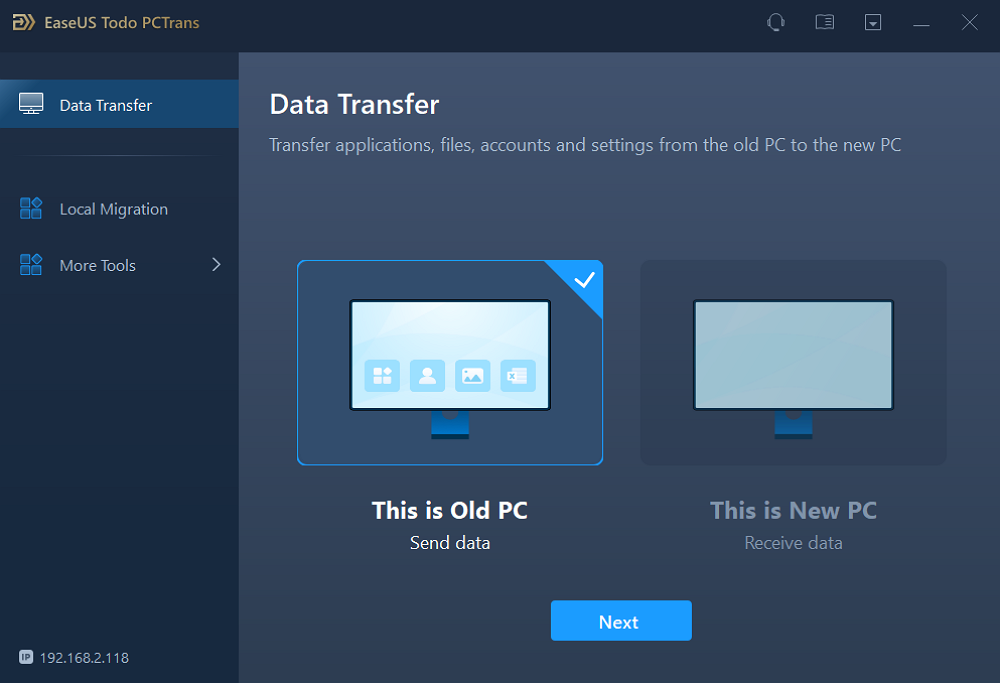
Step 1. Install and launch EaseUS Todo PCTrans on both two devices. On the source PC, select «PC to PC» to continue.
Step 2. Select the transfer direction — as an Old PC or a New PC.
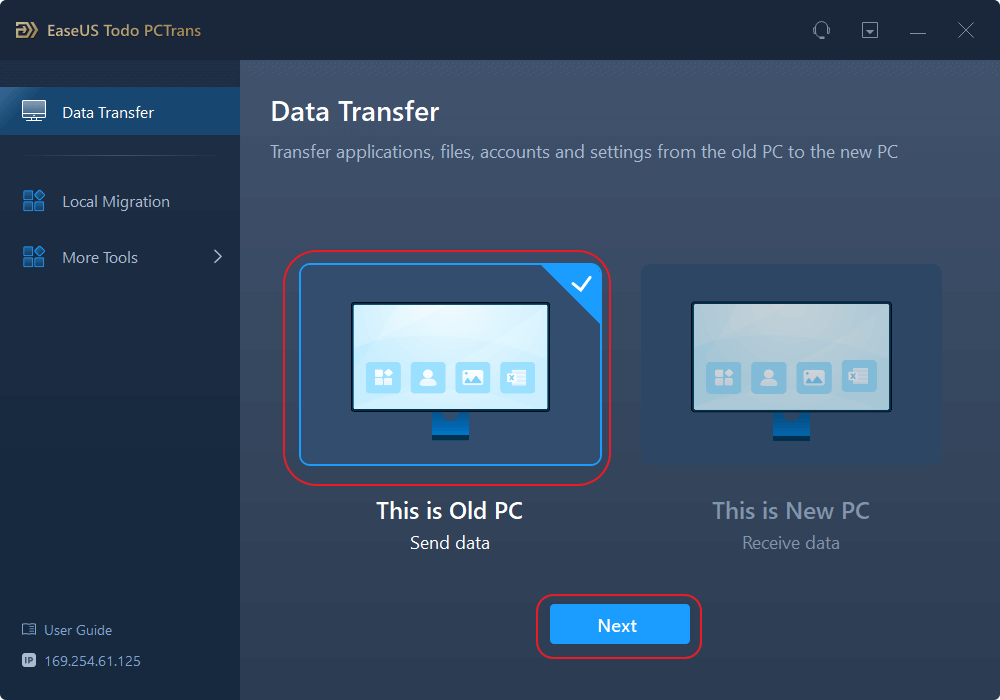
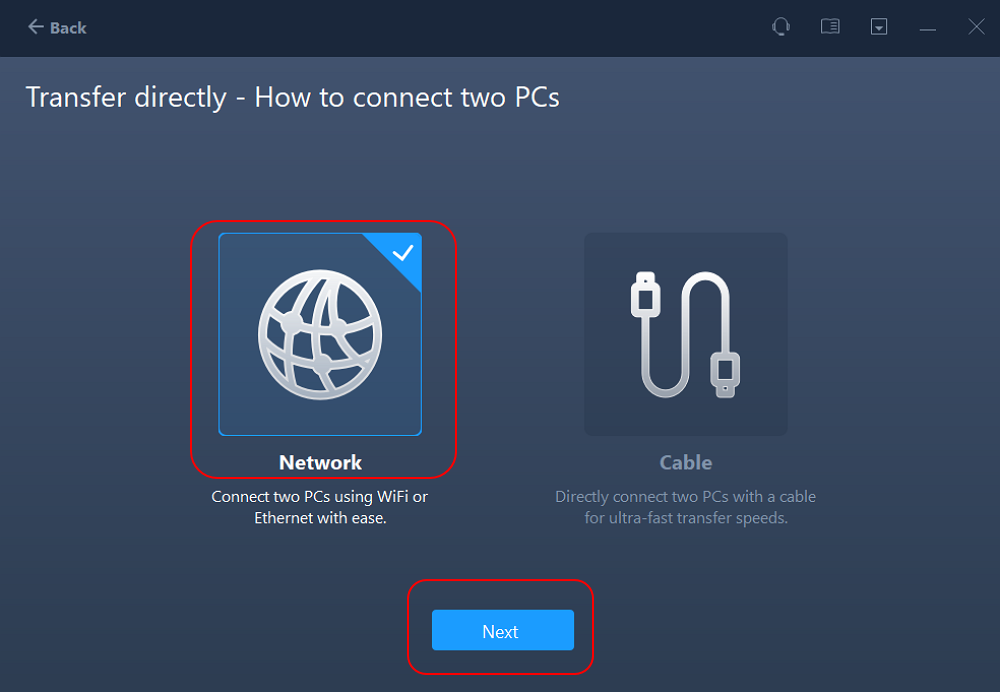
Then, on the new PC, select «Transfer directly» and click «Next» to continue.
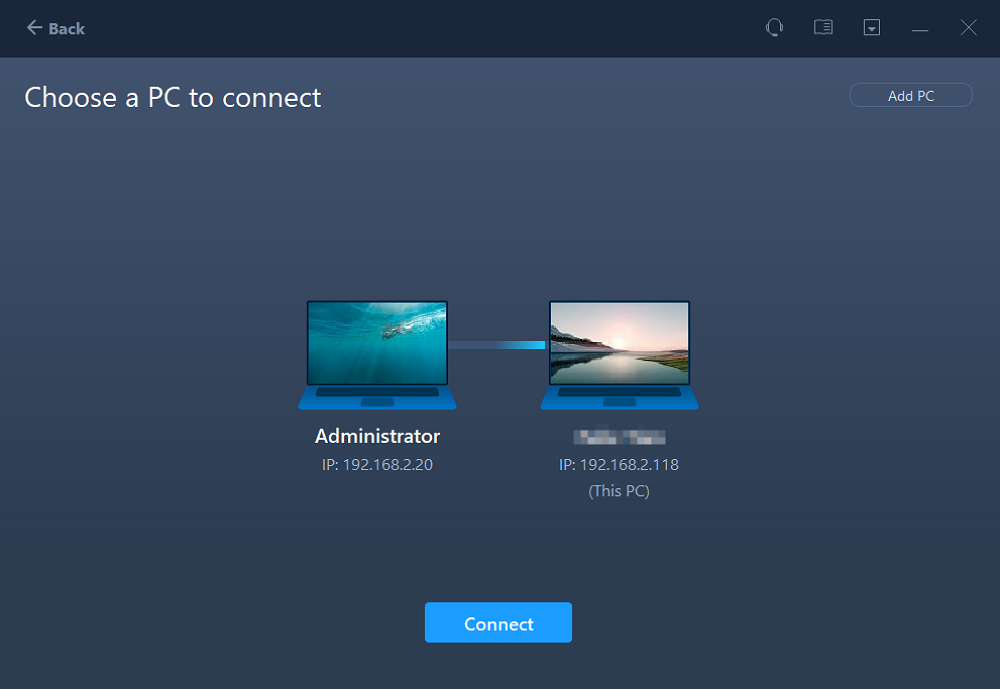
Select «Network» and click Next to continue. This will automatically scan the old PC. (Make sure the two PCs are connected to the same LAN.)
Select the target PC and click Connect. Then, it will take some time to scan and analyze the data in old PC.
Step 3. Click at the «Accounts» section to specify User Accounts and Settings for transferring.

Step 4. Enter the user account and password of the source computer, select the User Account Settings, User Data and other settings that you want to transfer.
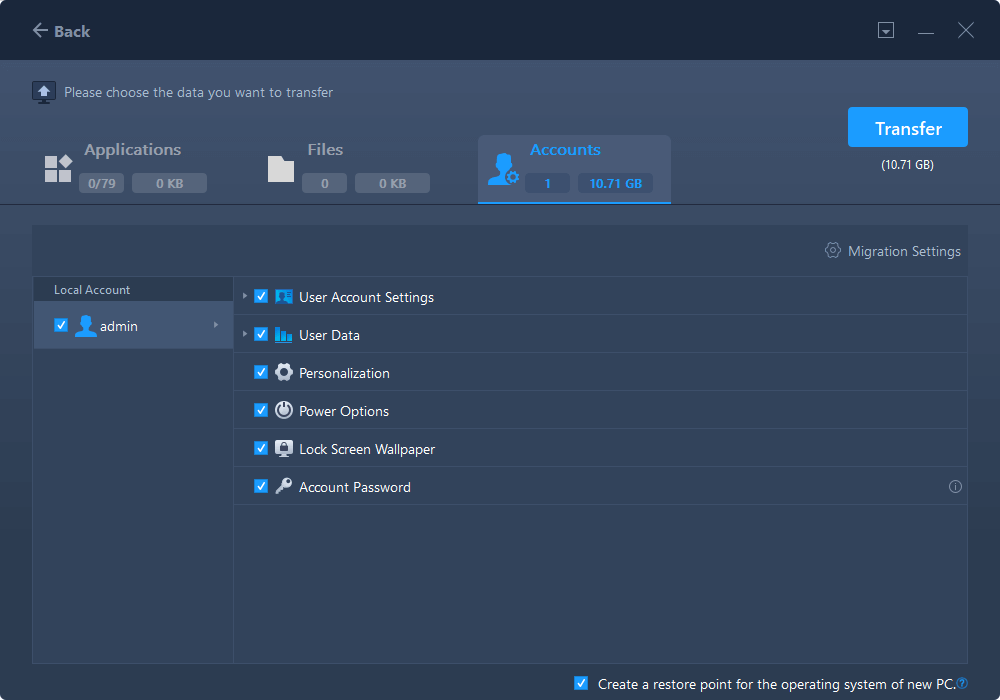
Step 5. After selection, click «Transfer» to start to transfer user accounts and settings.

As you can see, EaseUS Todo PCTrans makes it easy and quick to transfer a user account to a new PC via the network. Next, we will continue to introduce how to transfer via the backup file. If you like this tutorial, you can share it with other people in need.
Transfer User Account to a new PC via the backup file
On the old PC:
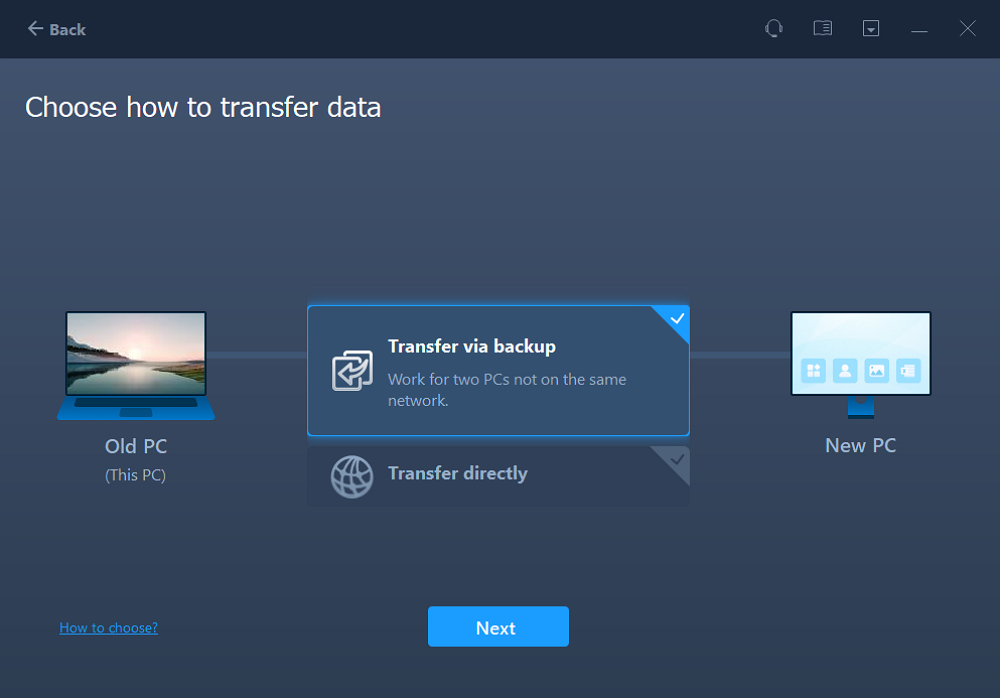
Step 1. Launch EaseUS Todo PCTrans and click «Data Transfer» on the main screen. Select «This is Old PC» and click the «Next.»
Step 2. Choose the «Transfer via backup» method and click the «Next.»
Step 3. Confirm the backup file name and backup location (Please save your files to a location where the new PC can access, like an external hard disk or shared network location.)
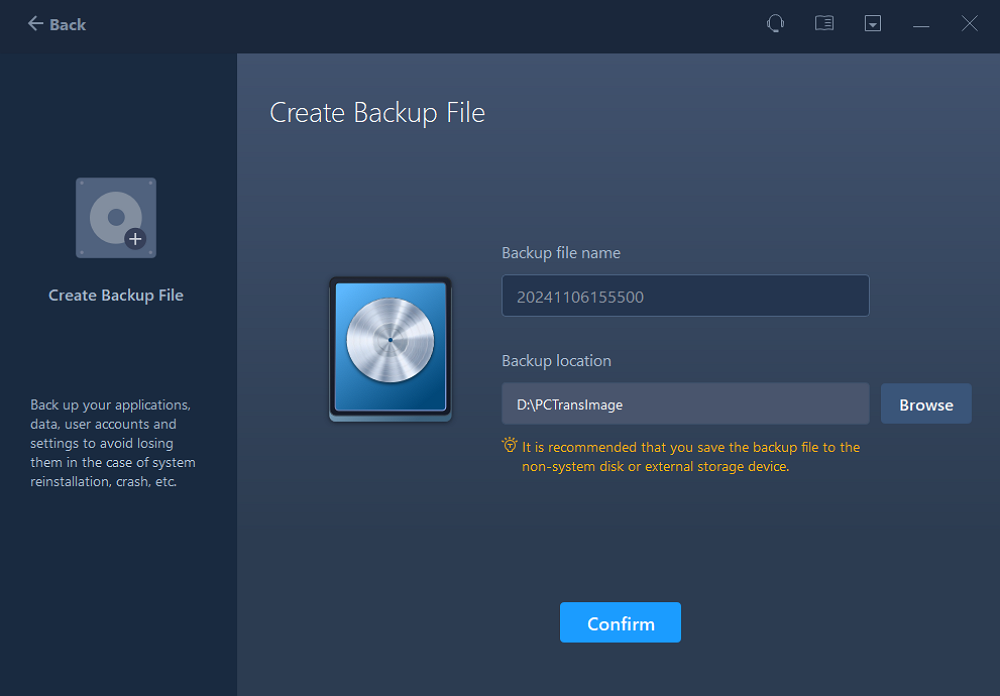
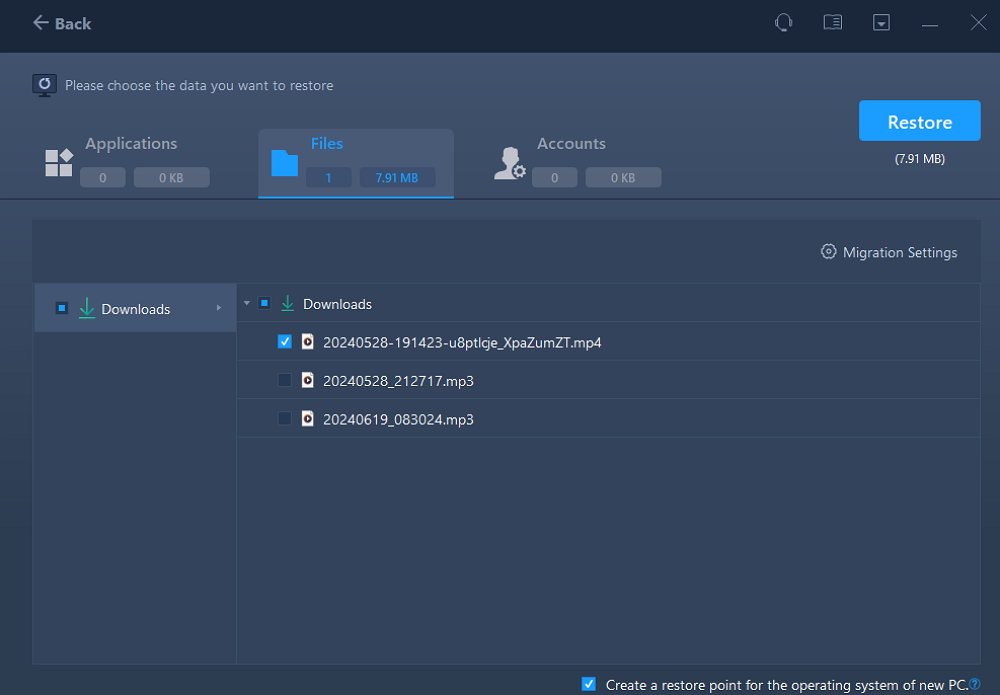
Step 4. Tick the Applications, Files, and Accounts that you wnat to backup. Click the «Backup» option to execute the process.

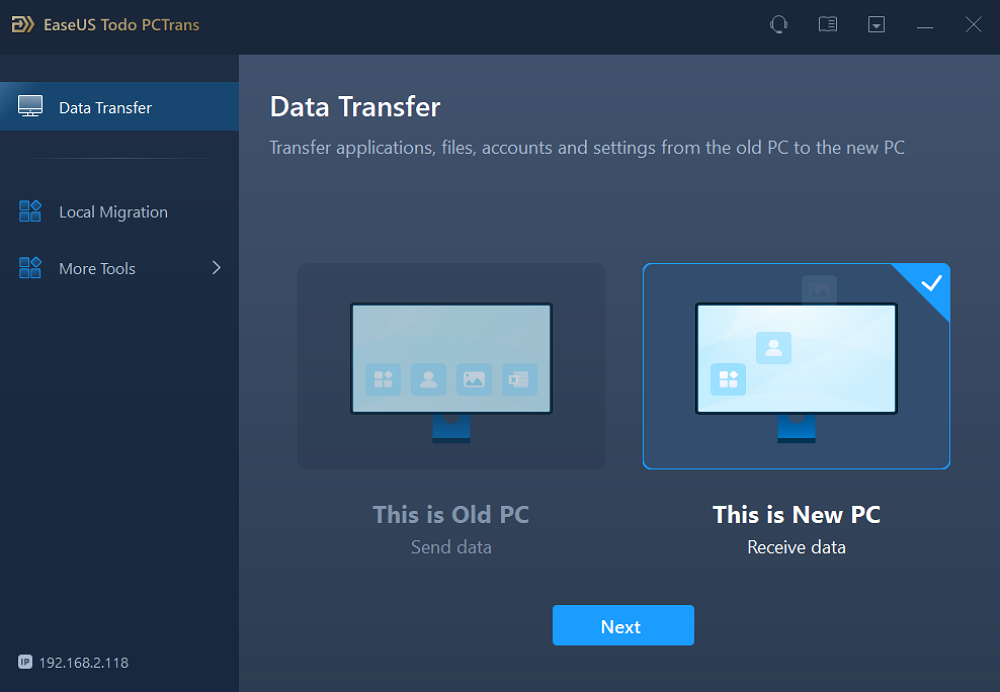
On the new PC:
Step 1. Lauch EaseUS Todo PCTrans on your new PC, and choose «This is New PC» in the «Data Transfer» section.
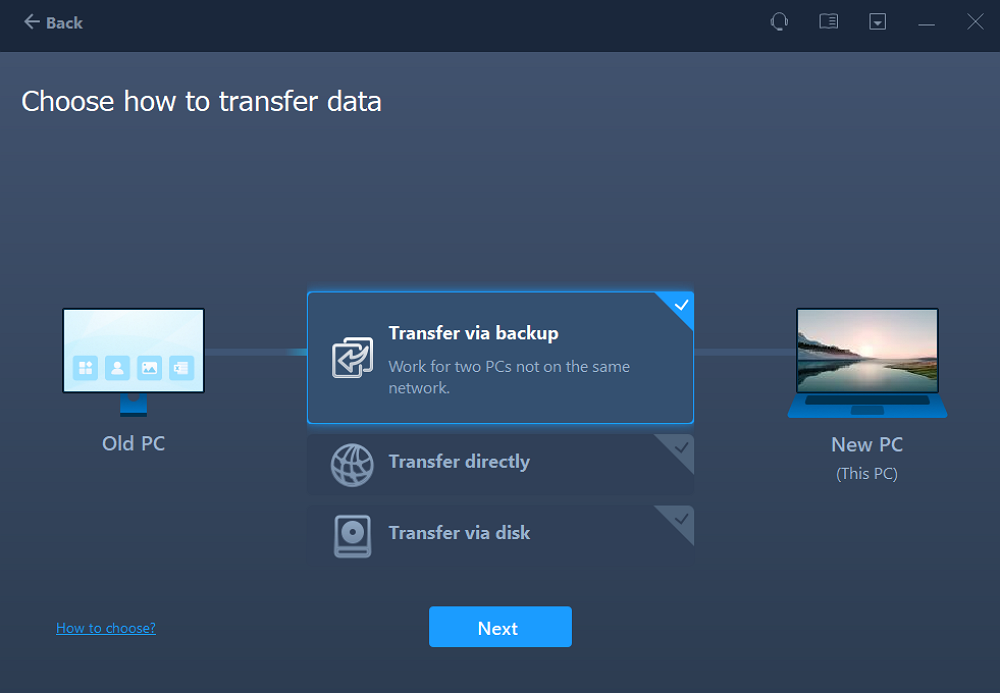
Step 2. Selcet «Transfer via backup» and click «Next.»
Step 3. Browse the «Backup location» of your existing backup files.
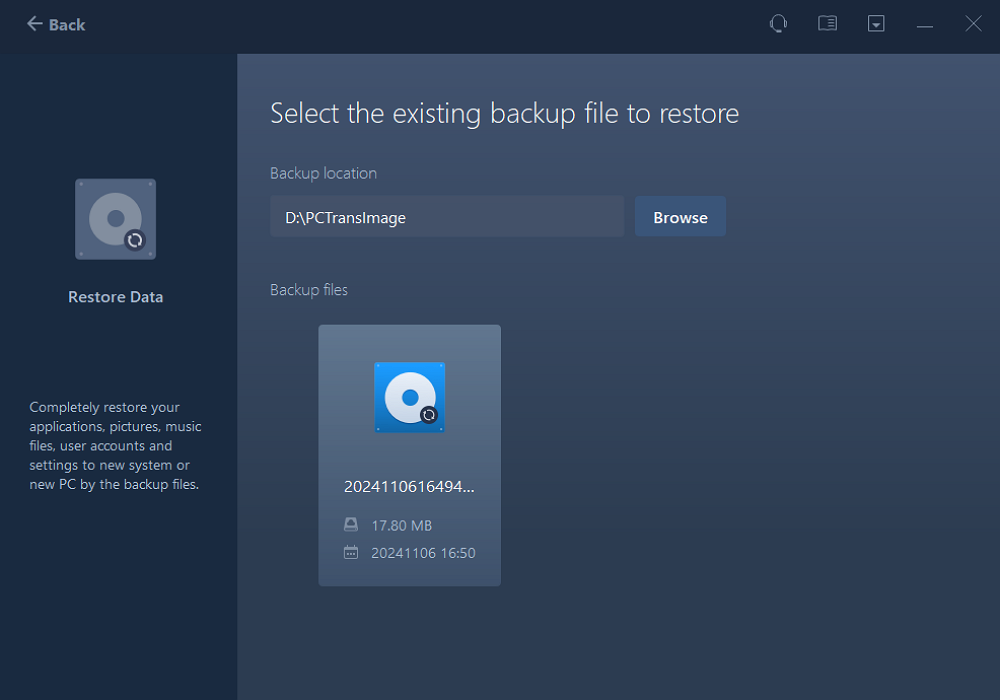
Step 4. Select the wanted Applications, Files , and Accounts to «Restore.»
Conclusion
The user file is a file that contains the user’s Windows account, password, and personal settings. This article provides two practical ways to move Windows 10 user configurations to another computer: transfer user accounts and user profiles over the network and transfer user accounts to a new computer by backing up files.
EaseUS Todo PCTrans provides details on both methods. This versatile transfer tool also supports image and application migration. Download the software for free to see more details.
This section will provide three additional questions and answers related to transferring user accounts in Windows 10/11. If you are interested, keep reading.
1. How to export a user profile to an external hard drive?
You can export your Windows 10 profile through Windows File Explorer:
- Connect the external hard drive to the PC and ensure it works properly.
- Open Windows File Explorer.
- Open the path: This PC/Local Disk (C:)/User/UserName/
- Copy and paste the opened user profile.
2. What is the best Windows 10 profile migration tool?
User profiles are files that contain user-specific data, such as desktop, system files, and application data. User profile migration is the process of moving the above to another account. The best user profile migration wizard should be able to help users transfer their data quickly and securely with minimum hassle. Here, I will provide three of the best tools:
- EaseUS Todo PCTrans Free — simple and secure transfer process.
- Profwiz — easy to use.
- Windows User State Migration Tool (USMT) — requires custom migration.
3. How to back up the Windows 10 user profile?
Windows provides built-in tools to back up and copy user profiles:
- In This PC, open Properties > Advanced System Settings > User Profile > Settings.
- Then, select the default profile and copy and paste it.
Related Articles
-
[Easy and Fast] How to Transfer Everything to a New Laptop
Brithny/2025/01/23
-
How to Migrate User Profiles to New Server 2021
Daisy/2025/03/27
-
How to Transfer Avast with License to A New Computer
Tracy King/2025/03/27
-
How to Uninstall Once Human Completely
Oliver/2025/01/23