
If you want to switch from a Dev Insider build to a stable build of Windows 11 or switch from a Beta Insider build to a stable build of Windows 11, do you know how to do it? In this article, MiniTool Software shows you different methods to switch from Insider to a stable build of Windows 11 under different Channels.
Want to Switch to a Stable Build of Windows 11 from Insider?
Before the final release of Windows 11, Microsoft released many Insider preview builds for testing to Insiders in the Dev Channel, the Beta Channel, and the Release Preview Channel of the Windows Insider Program.
In the beginning, Microsoft only rolled out preview builds to the Dev Channel. When the Windows 11 preview builds became stable, the company gradually released preview builds to the Beta Channel and then the Release Preview Channel. Since Windows 11 preview build 22000.160, Microsoft began to prompt Insiders who want to use stable Windows 11 builds to switch to Dev Channel if they are still in the Dev Channel.
Now, Microsoft continues to release Windows 11 builds to the Dev Channel, the Beta Channel, and the Release Preview Channel. But the Windows 11 preview builds in the Dev Channel don’t match the official and stable Windows 11 builds any more. The preview builds in the Dev Channel are higher.
Windows 11 was official released on October 5, 2021. Since then, you can free upgrade from Windows 10 to Windows 11 as long as your device is Windows 11 eligible. But many users are still in the Windows Insider Program. If you are one of them, do you know how to switch from Insider to a stable build of Windows 11?
There are three different Channels in the Windows Insider Program. Different Channels have different methods to switch from Windows 11 preview to full. Now, we will show you how to switch from Insider to a stable build of Windows 11 under different Channels.
How to Switch from a Beta/Release Preview Insider Build to a Stable Build of Windows 11?
Since the Windows 11 preview builds in the Beta Channel and the Release Preview Channel still match Windows 11 full and official versions, it is easy to switch from Windows 11 Insider preview to full under these two Channels. You just need to leave the Windows Insider Program and then upgrade to the latest Windows 11 version via Windows Update in the Settings app.
Now, we will show you how to leave the Beta/Release Preview Channel and get the full version of Windows 11.
Step 1: Leave the Windows Insider Program
If you want to use a stable and official version of Windows 11, it’s time to leave the Windows Insider Program now.
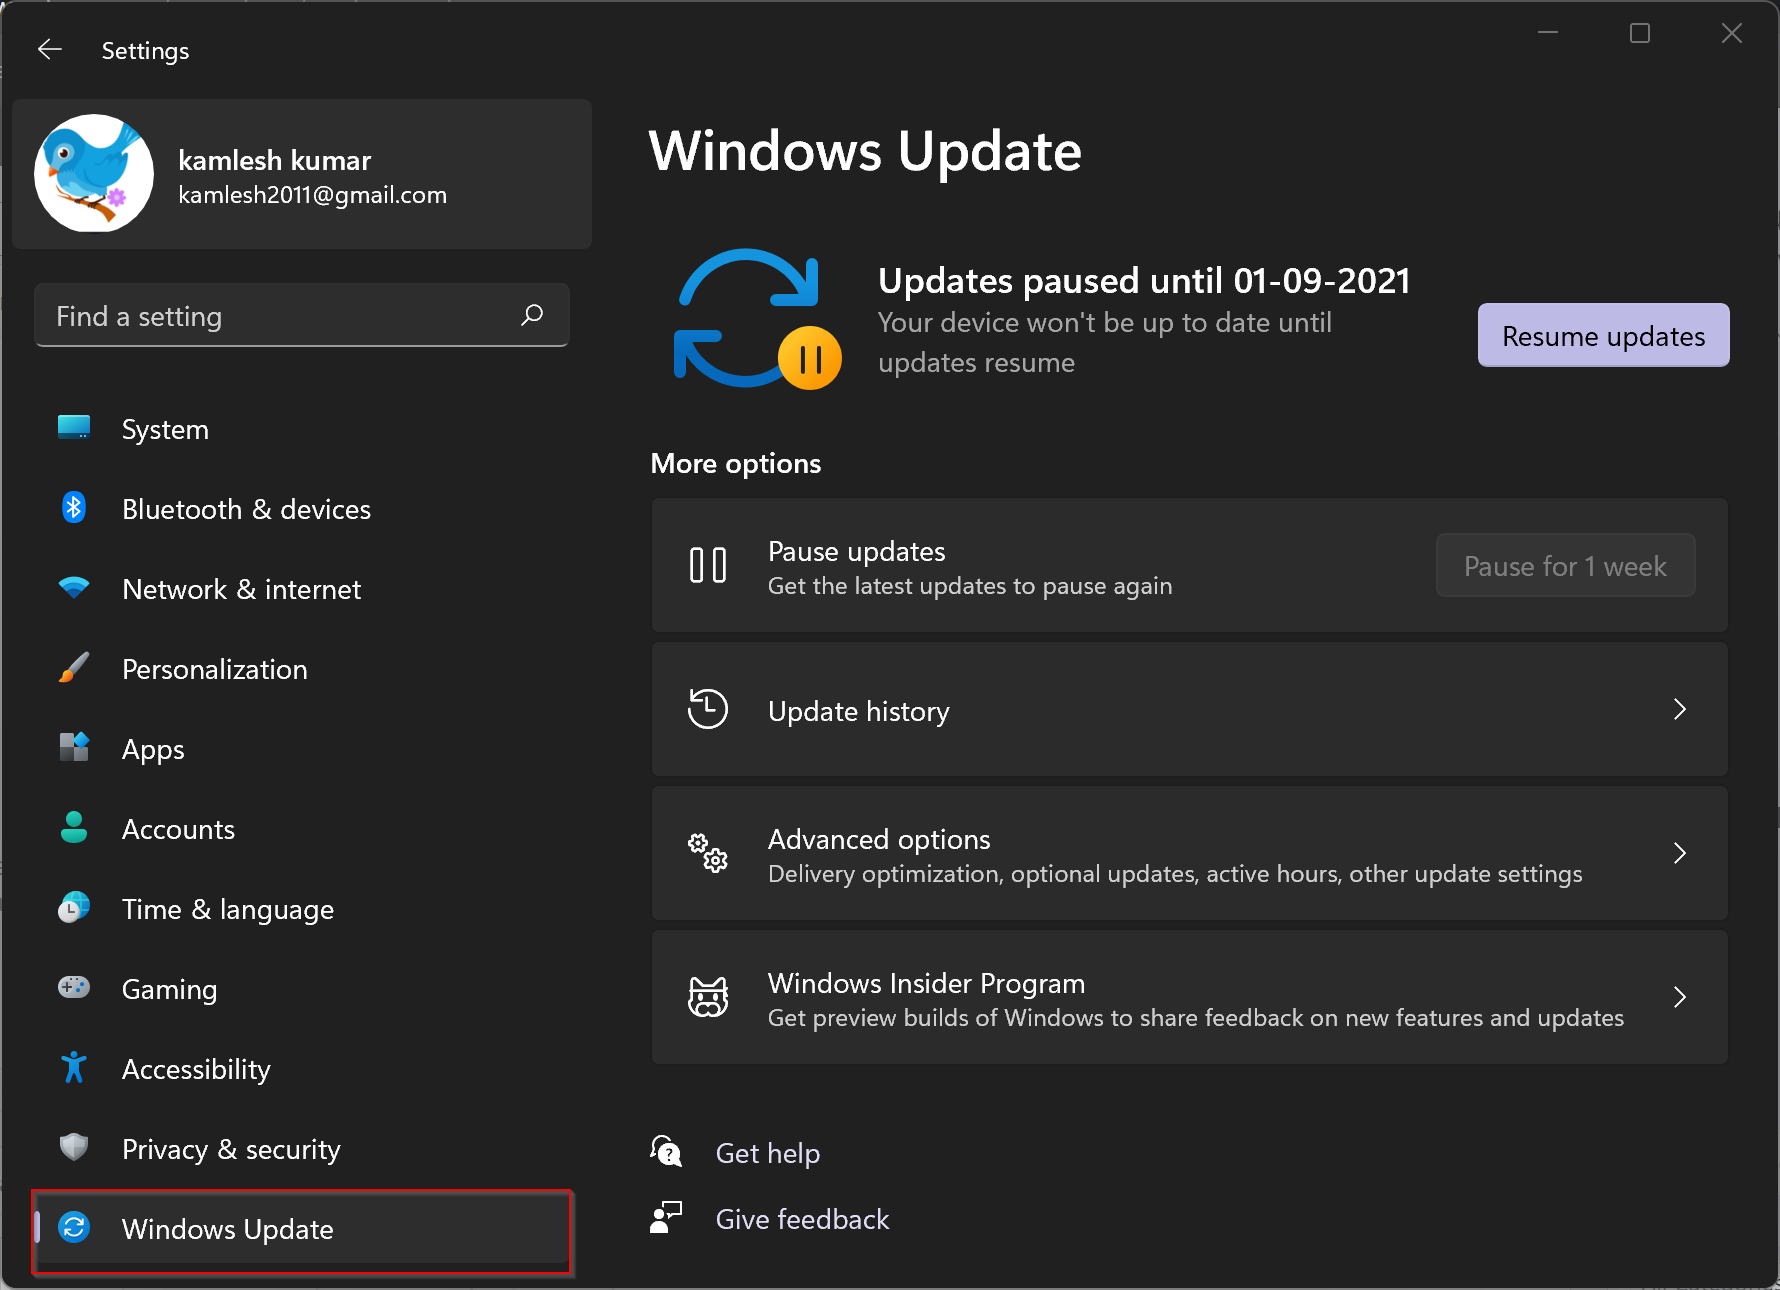
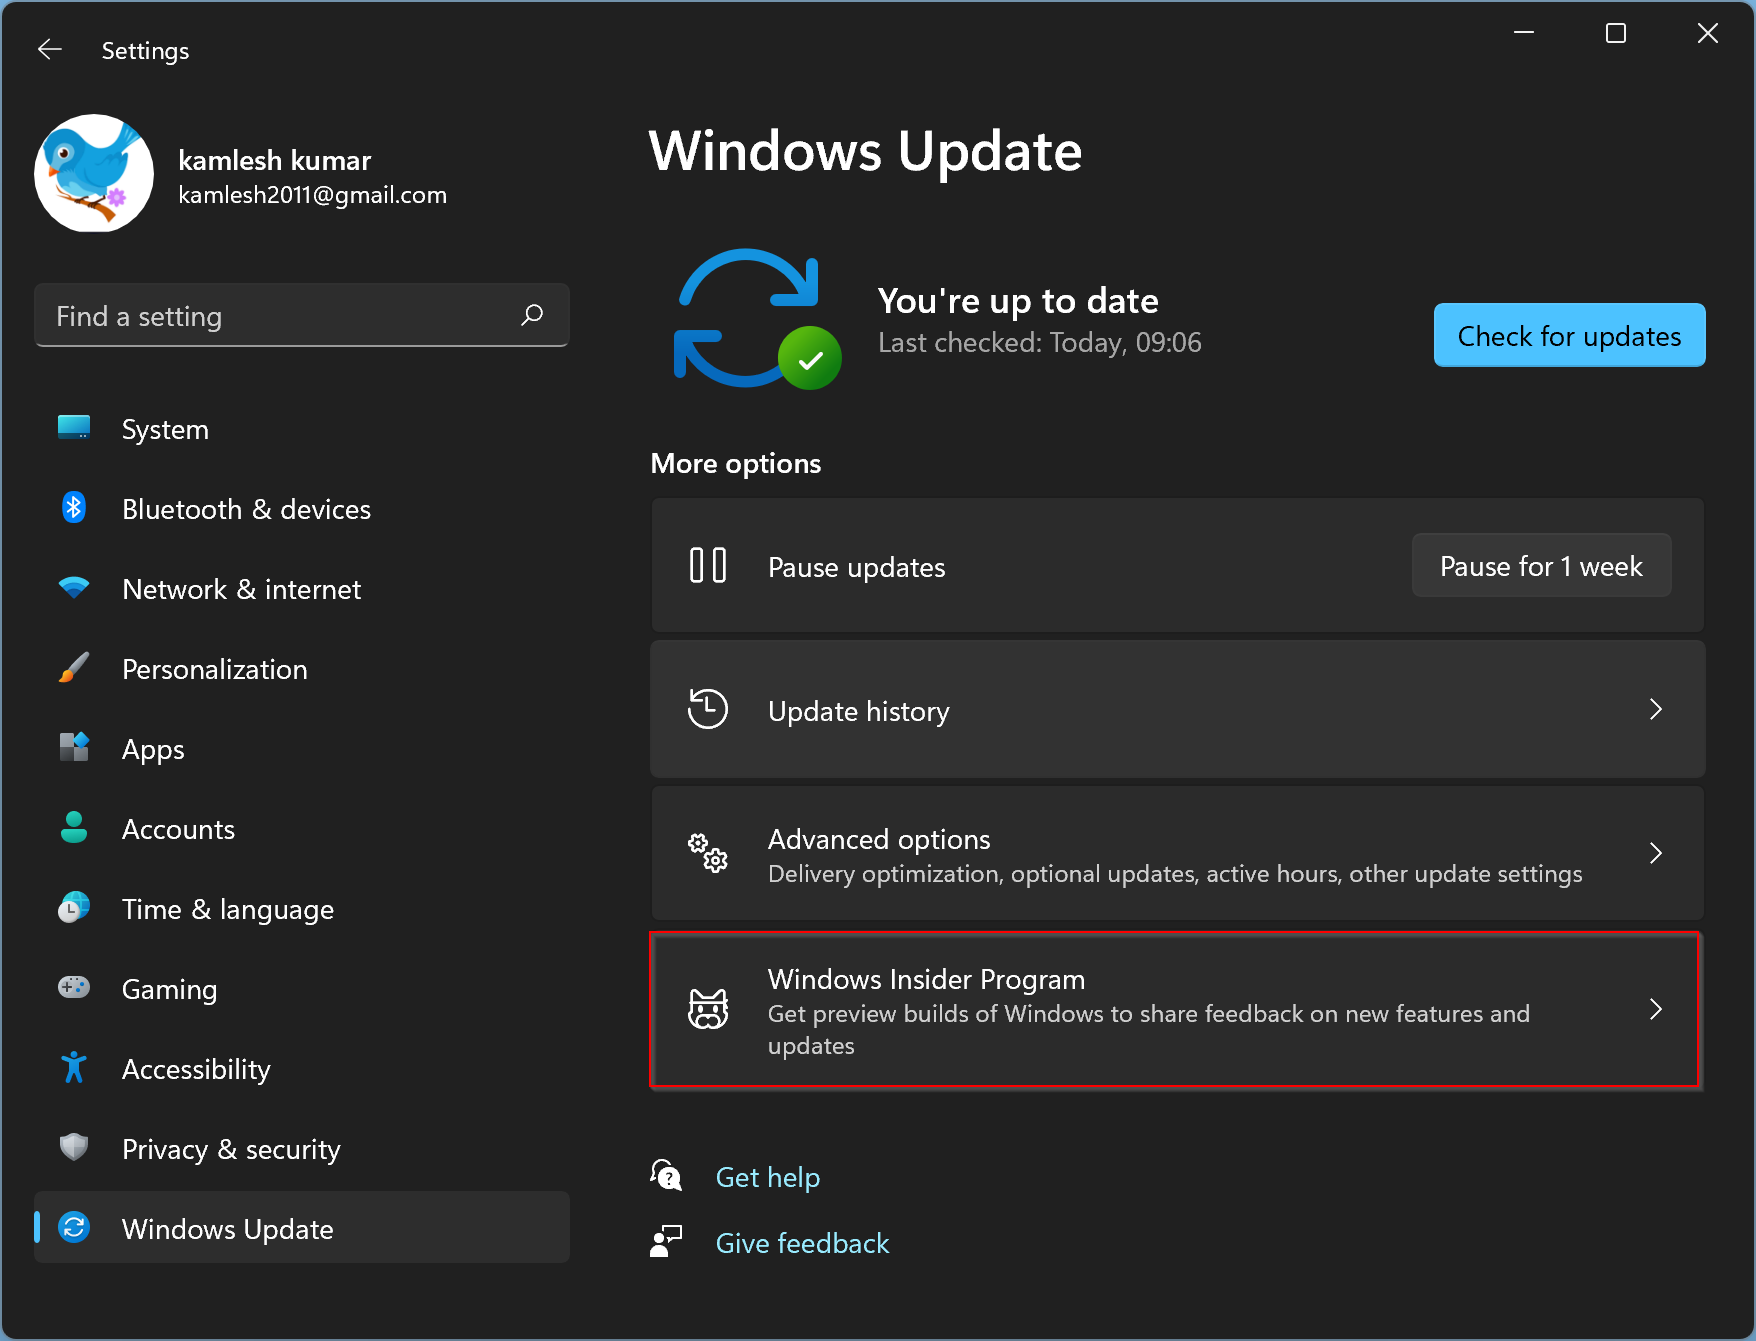
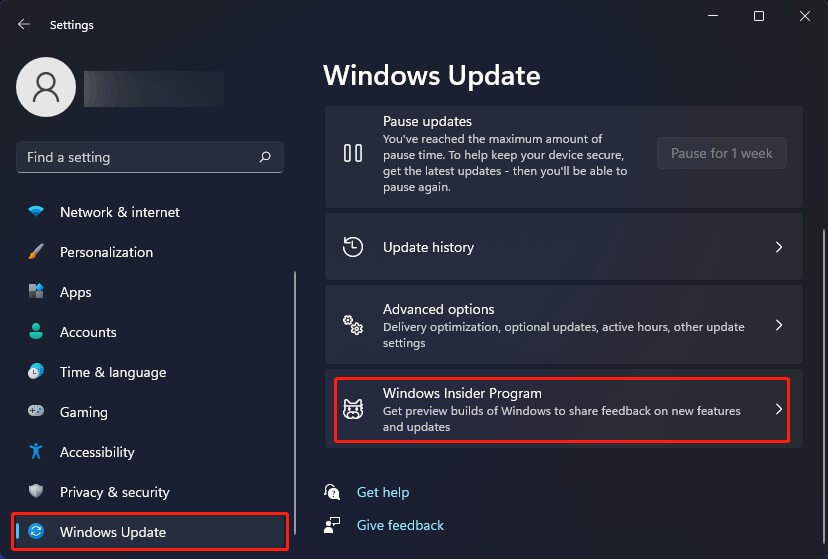
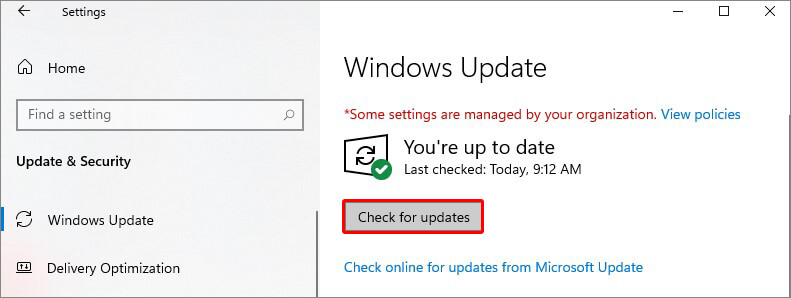
1. Go to Start > Settings > Windows Update.
2. Click Windows Insider Program from the right panel.
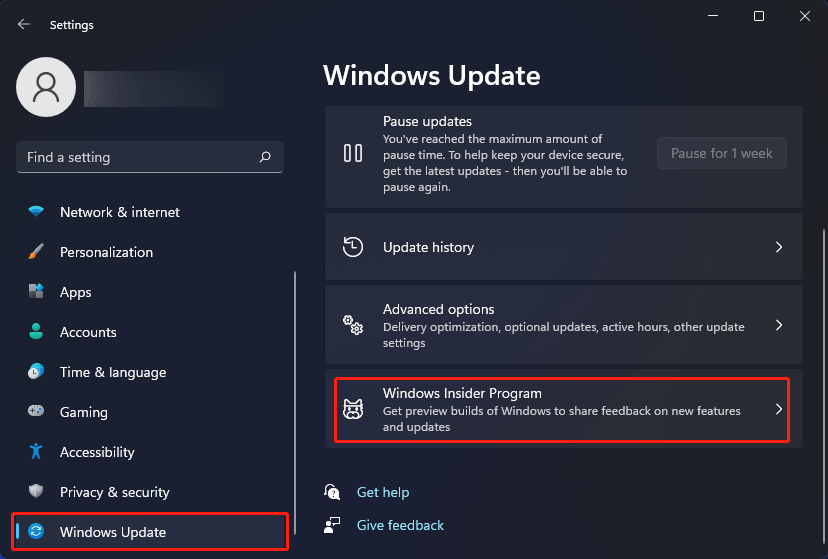
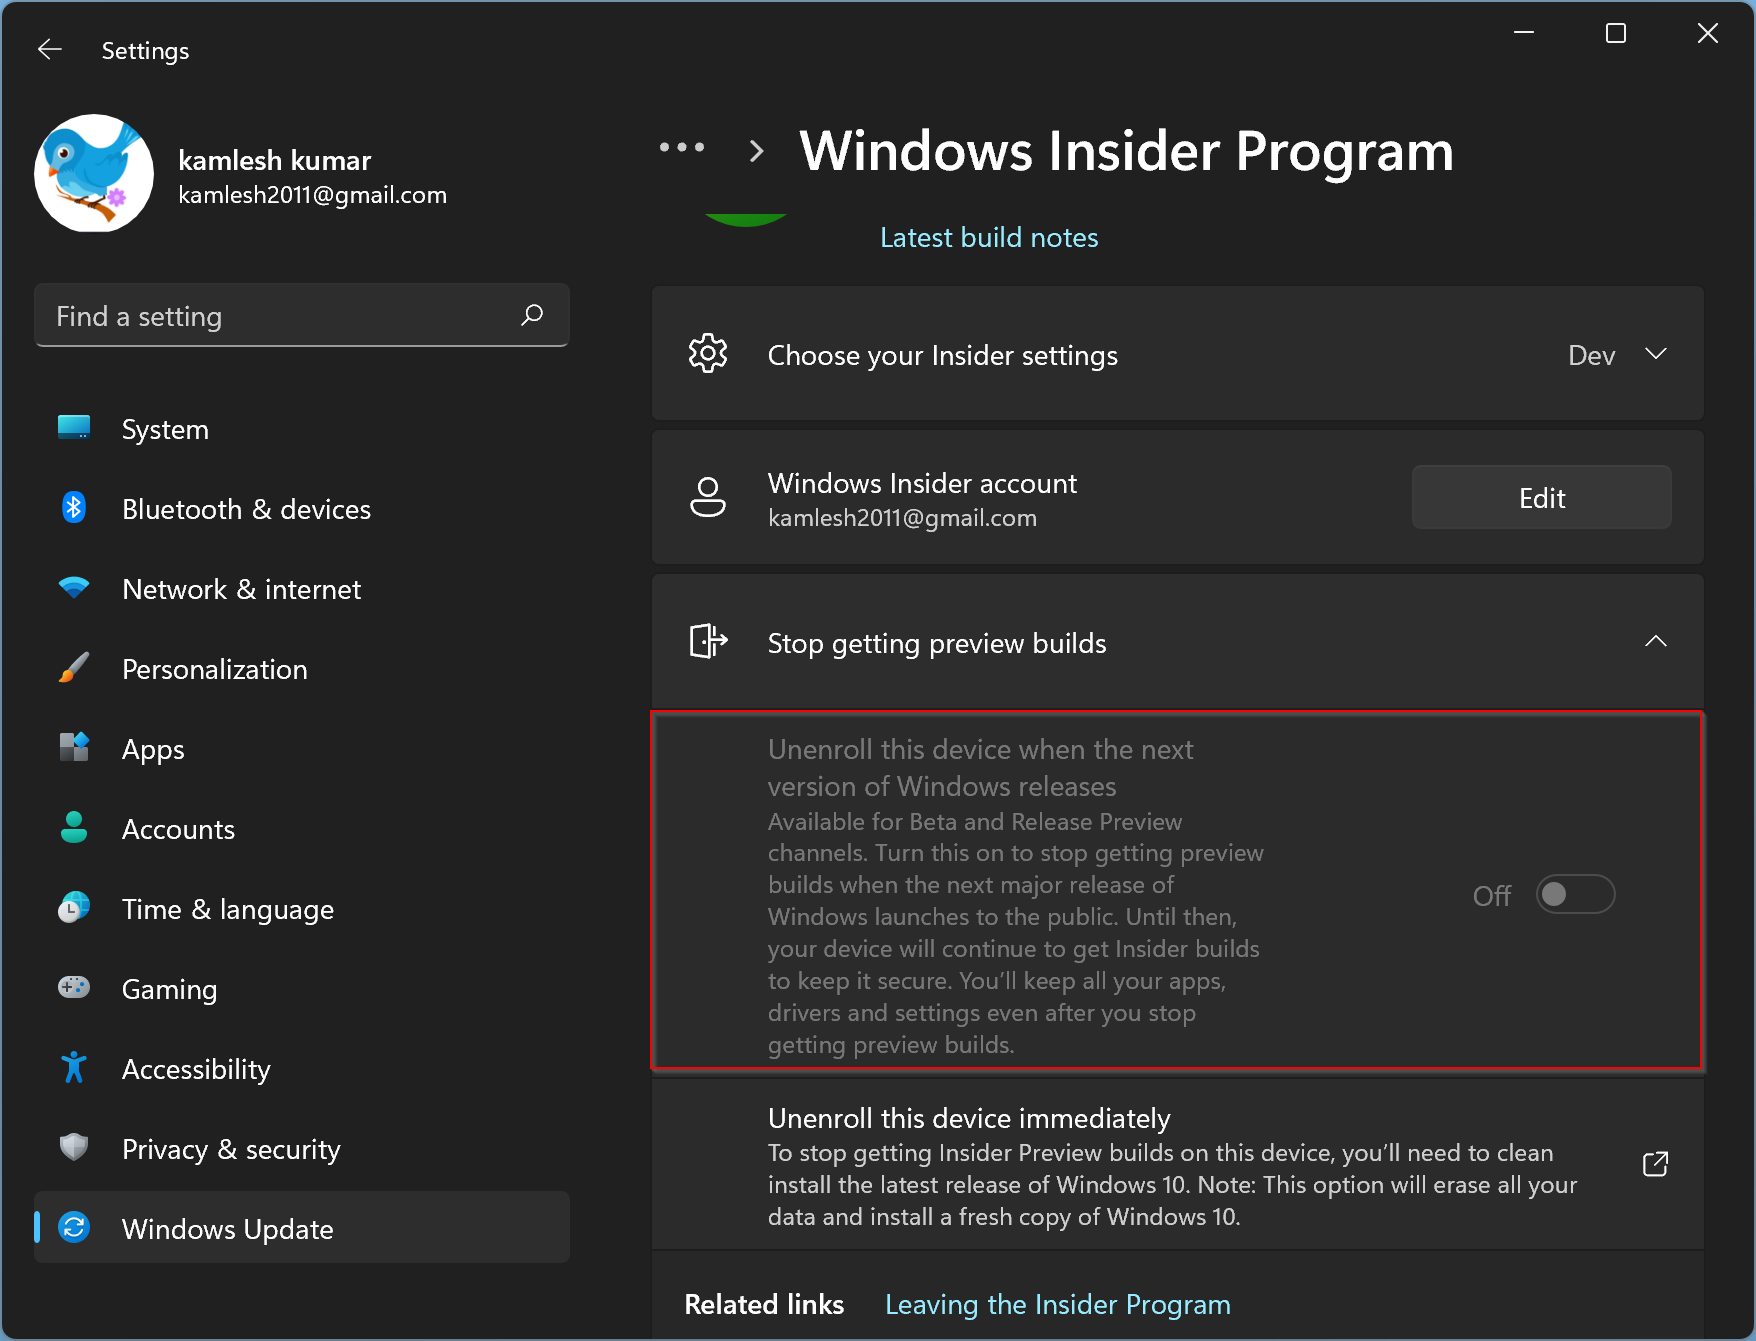
3. Click Stop getting preview builds on the next page.
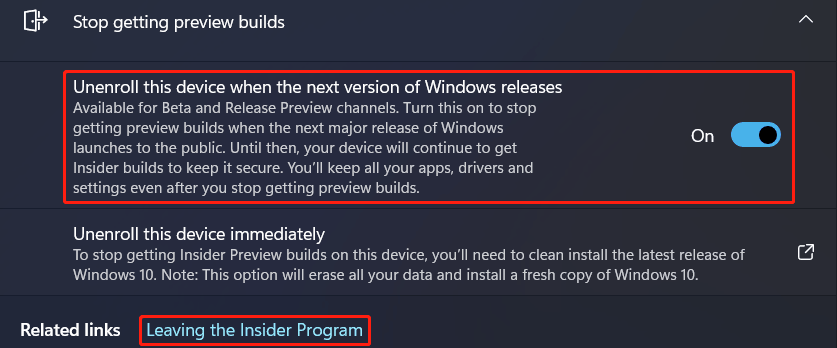
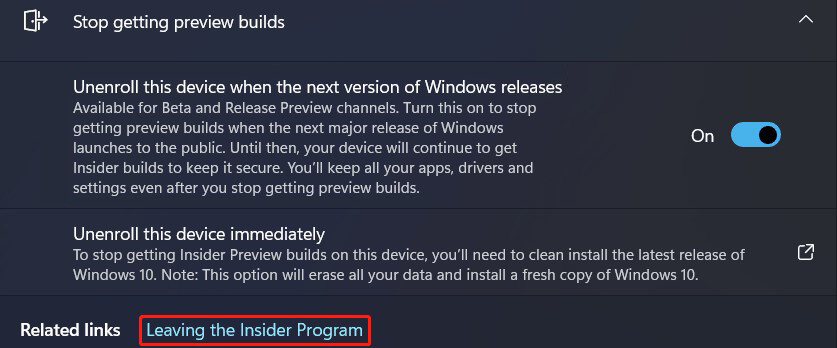
4. Here, you will see two options:
- Unenroll this device when the next version of Windows releases
- Unenroll this device immediately.
If you are in the Beta Channel or the Release Preview Channel, both of these two options are available. However, if you just want to switch from a Beta/Release Preview Insider build to a stable build of Windows 11, the first option is enough. You need to turn on the button next to this option (Unenroll this device when the next version of Windows releases) to stop getting Windows 11 preview builds.
5. Click the Leaving the Insider Program link at the bottom to continue.
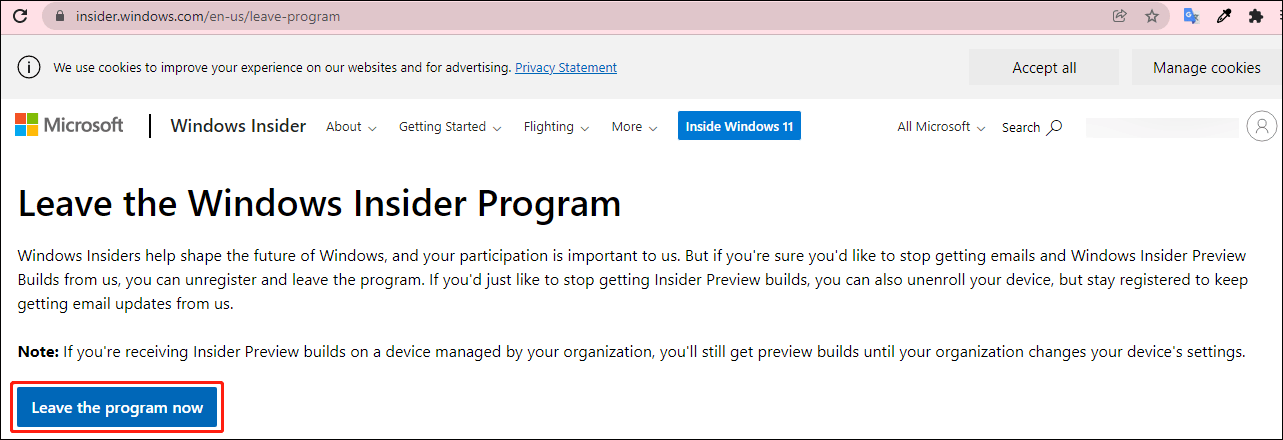
6. You will be guided to a webpage where you can click the Leave the program now button to opt out of the Windows Insider Program.
Now, you leave the Windows Insider Program. Your device will not receive Windows 11 preview builds. If you want to get a stable version of Windows 11, you need to continue with the next step.
Step 2: Upgrade to Windows 11
You are not in the Windows Insider Program. But currently you are still running a Windows 11 preview build. If you need to switch to a stable Windows 11 version, you need to check for updates on your computer.
It is easy to do this:
- Go to Start > Settings > Windows Update.
- Click the Check for updates button to get the latest version of Windows 11. Your system will automatically download and install Windows 11 full version on your computer. The whole process may last for even hours and your computer may restart several times. You should wait patiently until the whole process ends.
Another Choice: Reset This PC
After leaving the Windows Insider Program, you can also use the Reset This PC tool to reinstall the latest version of official Windows 11 on your computer.
- Go to Start > Settings > System > Recovery.
- Click the Reset PC button under Recovery options.
- On the pop-up interface, select Keep my files or Remove everything according to your requirements.
- Select Cloud download or Local reinstall to continue.
- Follow the on-screen guide to reset your computer and get the stable Windows 11 version.
TIP: Back up Your Data
If you choose to remove everything during the PC reset process, you should make a full back up of your important files in advance. You can use MiniTool ShadowMaker, professional data backup software, to do this job.
This software focuses on files/folders/partitions/disks/systems backup and restore. It even supports automatic backup, full backup, differential backup, and incremental backup. You can use the trial edition of this software to experience it for free within 30 days.
MiniTool ShadowMaker TrialClick to Download100%Clean & Safe
To protect your data, you’d better back up your Windows 11 files to an external hard drive using MiniTool ShadowMaker. After resetting your computer, you can use this software to restore the backup files to your device.
If you want to switch from a Beta Insider build to a stable build of Windows 11, here is a guide.Click to Tweet
How to Switch from a Dev Insider Build to a Stable Build of Windows 11?
If you are still in the Dev Channel now, you will be unable to use the above method to switch to a stable version of Windows 11. The Windows 11 preview builds in the Dev Channel are higher versions. You can’t switch to the Dev Channel or the Release Preview Channel from the Dev Channel now. Besides, you can’t stop your device from receiving the preview builds unless you clean install Windows 11 on your computer.
How to confirm?
Now, you can go to Start > Settings > Windows Update > Windows Insider Program > Stop getting preview builds to see if the Unenroll this device when the next version of Windows releases option is available.
You can see the first option is greyed out. From the following explanation, you can see that this option is only available for the Beta and Preview Release Channels.
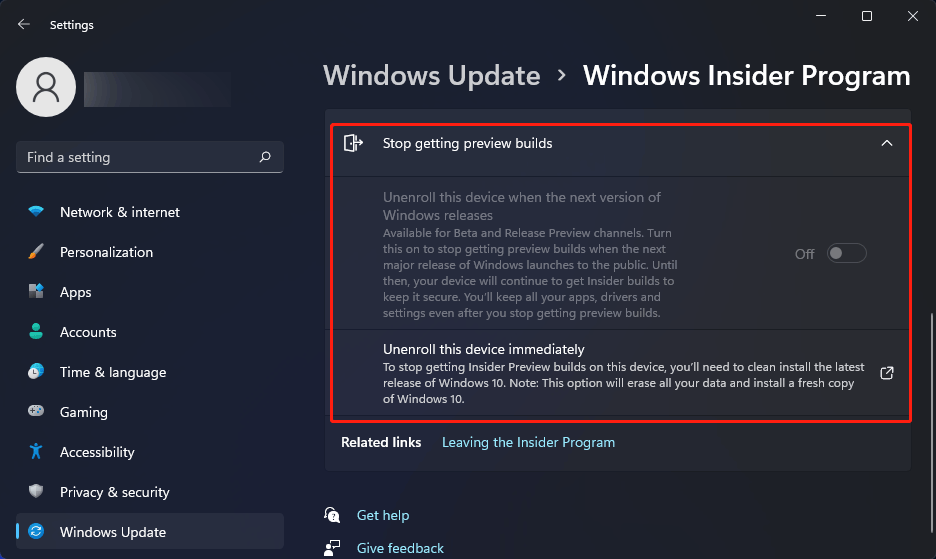
Then, you can continue to read the explanation of the second option:
To stop getting Insider Preview builds on this device, you’ll need to clean install the latest release of Windows 10. Note: This option will erase all your data and install a fresh copy of Windows 10.
However, if you want to use Windows 11, you can also choose to clean install Windows 11 on your computer.
Now, we will show you how to switch from a Dev Insider build to a stable build of Windows 11.
Step 1: Leave the Windows Insider Program
If you want to use the official Windows 11, you should leave the Windows Insider Program first. Likewise, you can go to Start > Settings > Windows Update > Windows Insider Program > Stop getting preview builds, click the Leave the Insider Program link, and then click the Leave the program now button on the pop-up webpage to opt out of the Windows Insider Program.
Step 2: Back up Your Files Using MiniTool ShadowMaker
Since a Windows 11 clean install will erase all files on your computer, you should back up your data in advance. As we have mentioned above, you can use MiniTool ShadowMaker to do the job.
MiniTool ShadowMaker TrialClick to Download100%Clean & Safe
Step 3: Create a Windows 11 Installation USB Drive
You can use Windows 11 Media Creation Tool to create a Windows 11 Installation USB drive. Here is a guide:
- Go to Windows 11 software download page.
- Click the Download now button under Create Windows 11 Installation Media to download Windows 11 Media Creation Tool on your computer.
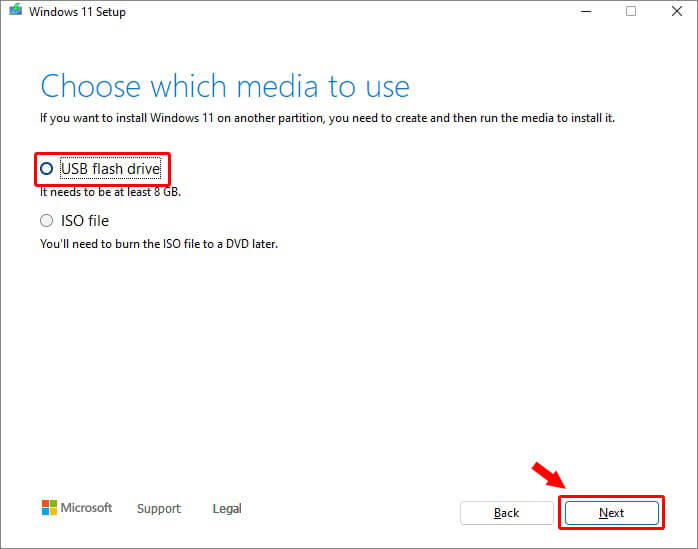
- Prepare a USB flash drive that has at least 8GB space and connect it with your computer. All files on the USB drive will be deleted during the creation process. So, you should make sure that there is no important data on it.
- Open the downloaded Windows 11 Media Creation Tool.
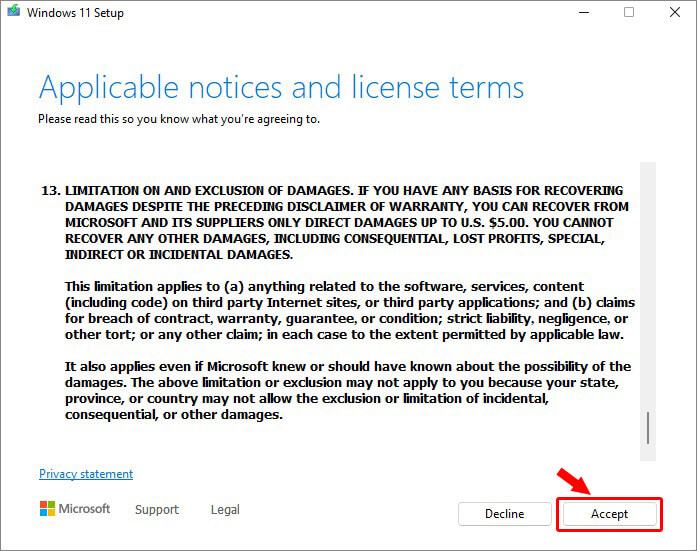
- If you see the User Account Control interface, click Yes to continue.
- Click Accept.
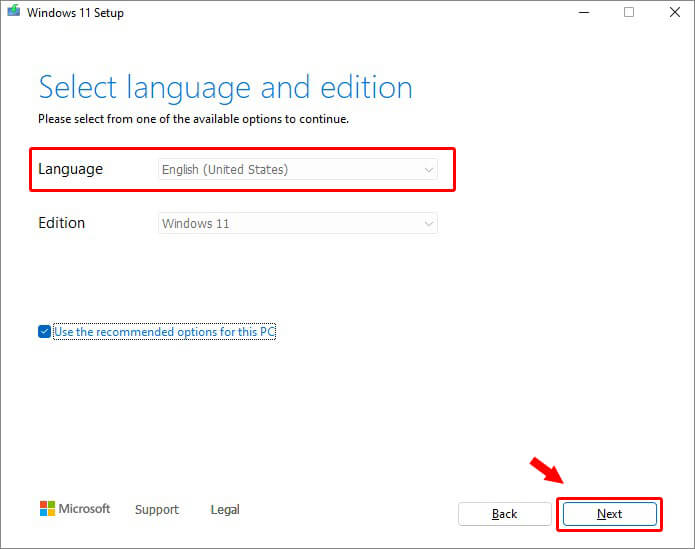
- Select the language and edition according to your requirements.
- Click Next.
- Select USB flash drive.
- Click Next.
- Select the connected USB flash drive from the next page.
- Click Next.
Windows 11 Media Creation Tool will begin to create a Windows 11 installation USB drive. You should wait until the whole process ends.
Step 4: Clean Install Windows 11 on Your PC
- Close your computer.
- Make sure the Windows 11 installation USB drive is connected to your computer.
- Boot your computer into BIOS and set the PC to start from the USB drive.
- You will see the Windows Setup interface. Select your needed language, time, and keyboard layout.
- Click Next.
- Click Install now on the next page.
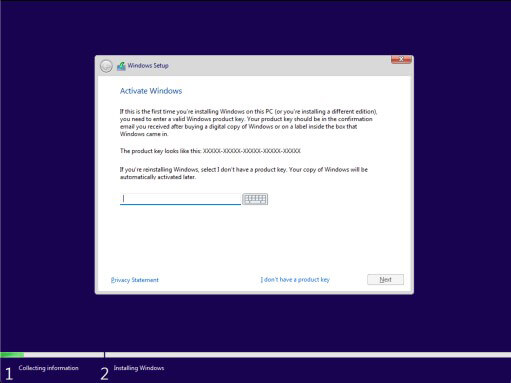
- Click I don’t have a product key.
- Select the operating system you want to install.
- Click Next.
- Select I accept the Microsoft Software License Terms.
- Click Next.
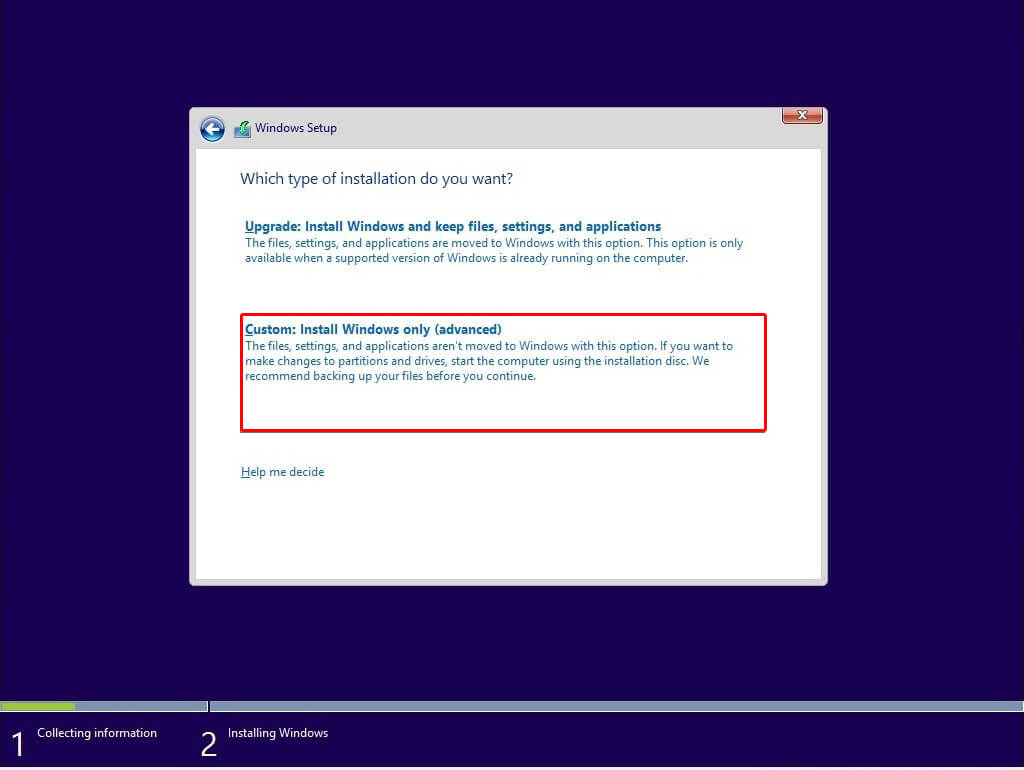
- Click Custom: Install Windows only (advanced).
- Select the partition drive you want to install Windows 11 to. Usually, it is the Drive 0 Partition 1.
- Click Delete.
- Click OK to confirm the operation.
- Select the deleted drive and click Next.
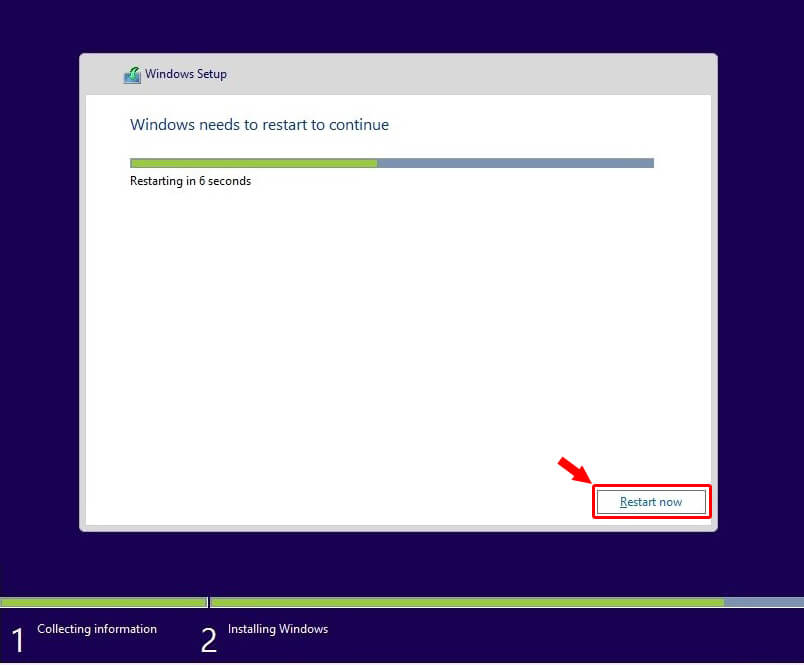
- Windows 11 installing process starts. The process will last for some minutes. You should wait until the whole process ends.
After cleaning install Windows 11, you still need to continue with the Windows 11 out-of-box experience (OOBE) to complete the whole settings.
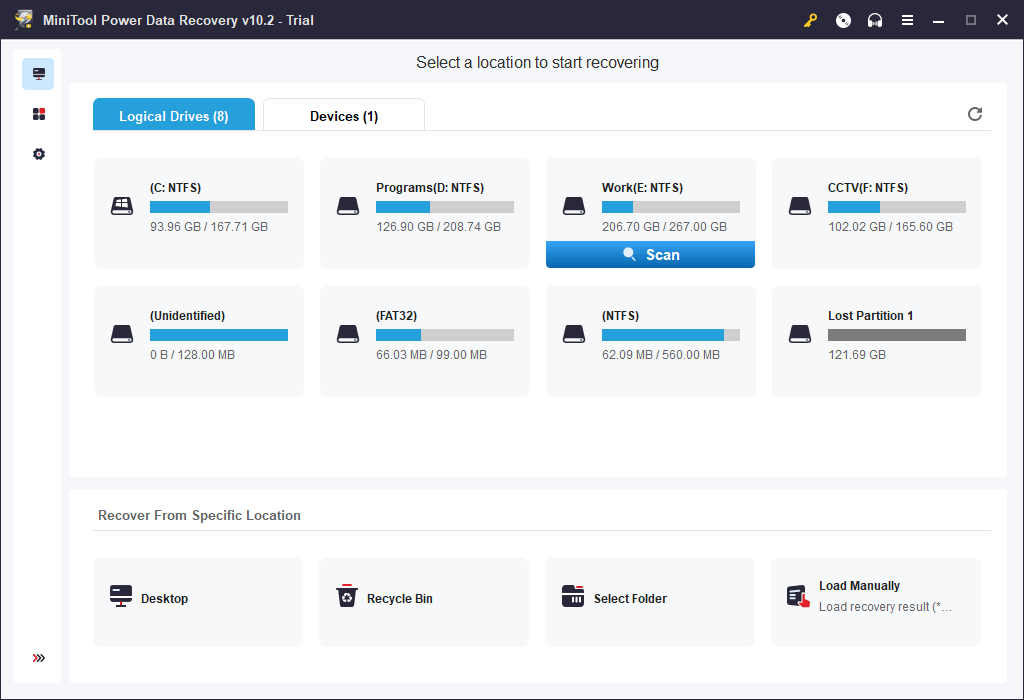
Step 5: Recover Your Lost Files Using MiniTool Power Data Recovery
If you lost your important files after cleaning install Windows 11 on your computer but there is no available backup, you can use MiniTool Power Data Recovery to get them back.
This software is a free file recovery tool. With it, you can recover data from all kinds of data storage devices including computer hard drives, memory cards, USB flash drives, SD cards , and more.
This software has a trial edition. You can first use it to scan the drive you want to recover data from. If this data recovery software can find the files you want to recover, you can use a full edition to recover all your needed files.
MiniTool Power Data Recovery TrialClick to Download100%Clean & Safe
Bottom Line
How to switch from Insider to a stable build of Windows 11 without data loss? After reading this article, you should know how to do it no matter you are in the Dev Channel, or the Beta/Preview Release Channel. Should you have any other related issues, you can let us know in the comments. You can also contact us via [email protected].
Если вы участвуете в инсайдерской программе предварительной оценки Windows 11 и хотите переключиться с каналов Beta или Release Preview на стабильную версию при следующем обновлении, просто отмените их получение в параметрах.

Если вы планируете использовать стабильную сборку Windows 11 после ее запуска 5 октября 2021 года и используете каналы Beta или Release Preview, то можно отменить регистрацию Windows 11 в программе предварительной оценки (Insider Preview) после выхода следующей основной стабильной версии.
После релиза операционной системы Windows 11 необходимо дождаться крупного обновления, чтобы переключение на финальную сборку произошло автоматически. Если вы этого не сделаете, то останетесь на каналах бета-версии или предварительного выпуска Windows 11.
Примечание. Переход с канала Dev на финальную версию невозможен, вам необходимо выполнить чистую установку.
Как перейти с инсайдерской программы на стабильную версию Windows 11
1. Откройте параметры Windows, нажав Windows + i на клавиатуре. Или просто задействуйте соответствующую кнопку в меню «Пуск».

2. Нажмите «Центр обновления Windows» на боковой панели, затем выберите «Программа предварительной оценки Windows».

3. В настройках программы предварительной оценки Windows разверните раздел «Прекратить получение предварительных сборок» (щелкнув его). Затем переведите переключатель рядом с «Отменить регистрацию этого устройства, после выхода следующей версии Windows» в положение «Вкл».

В следующий раз, когда Microsoft выпустит крупное стабильное обновление для Windows 11, ваш компьютер выйдет из программы предварительной оценки и переключится на обычную стабильную сборку.
Источник: How-To Geek
Windows Insider Program on Windows 11 lets you enjoy all the features before they are actually released to the public. Since Windows 11 is scheduled to release on October 5, 2021, you’d like to switch from the Beta or Release Preview channels to a stable build on the next upgrade. It is possible to change channels using the Settings app on a Windows 11 PC.
Suppose you plan to use the stable build of Windows 11 when it launched on October 5, 2021. In that case, flipping a switch in Settings will automatically unenroll your Windows 11 machine from the Windows Insider program upon the next major stable release.
How to Change from Insider to Stable Builds of Windows 11?
To switch or change from Windows Insider to a stable build on Windows 11, use the following steps:-
Step 1. First, open Windows Settings by pressing Windows + I on your keyboard.
Step 2. When Windows Settings opens, select the Windows Update category from the left sidebar.
Step 3. Click the Windows Insider Program on the Windows Update settings page.
Step 4. In Windows Insider Program settings, expand the “Stop getting preview builds” section by clicking it. Then toggle on the switch beside “Unenroll this device when the next version of Windows releases.”
Please note that you can only unenroll your machine for the next version of the Windows 11 stable release if you have enrolled for a Beta or Release Preview channel. That means, if you are using the Dev channel, you’ll need to install a fresh Windows 11 if you wish to receive stable updates only.
When done, close the Settings app. The next time Microsoft releases a significant, stable update to Windows 11, your PC will leave the Insider program automatically and switch to a regular sturdy build.
Good luck!
Conclusion
In conclusion, the Windows Insider Program on Windows 11 is a great way to test out new features and updates before they are released to the public. However, if you prefer to use a stable build of Windows 11, it’s essential to know how to switch from Insider to Stable builds. With the simple steps outlined above, you can easily unenroll your device from the Insider program and switch to a regular stable build upon the next major release. So, whether you want to test out new features or stick with a stable build, Windows 11 has got you covered.
-
Updated on 1 Feb 2024
-
Min Reading 6 Min
Microsoft decided to roll out Windows 11 in phases (builds) to provide the best experience to its end user. With the help of the Windows Insider Community, the first Windows 11 Insider Preview build to the Dev Channel Build 22000.51 was released. Later, Beta Channel insider builds (21H2) and Release Preview Channel Builds 22621.457 came into existence.
Now, Microsoft keeps rolling the builds to all Dev, Beta, and Release Preview Channels; however, Build numbers are higher in Dev Channel and no longer match the stable release of this new OS. If you’re currently using Windows Insider Program and wish to switch to Windows 11 Stable Build, here’s how you can do it.
Switch from Windows Insider to Windows 11 Stable Build
Here, we’ll discuss how to download Windows 11 official release for all Windows insiders. However, if using Dev Channel, you’d need to clean install the OS. So let’s start without further ado!
Switch from Beta or Release Preview Channel
You’d have to flip a switch in Settings to unenroll Windows 11 devices from the Windows Insider program if currently using Beta or Release Preview.
- Open the Settings app and go to Update & Security.
- Then select Windows Update and click Windows Insider Program.
- On the next page, expand Stop getting preview builds and flip the switch ON beside the option – “Unenroll this device when the next version of Windows releases.”
- You’ll stop receiving the preview builds when the major release of this OS launches.
- If you want to stop the preview builds instantly, click Leaving the Insider Program, given at the end of the same page.
- It will redirect you to a web page where you must click Leave the program now.

- That’s it. You’ll no longer receive preview builds.
- Next, you can check for the Windows 11 update in the Settings by following Start > Settings.
- You can also press Windows + I to open Settings.
- In the app, click Update & Security and then go to Windows Update.
- Next, click Check for Updates.
- If the stable release update is available for this newest OS, click Download/Install.
- Wait until the process ends, and then reboot your system. Windows 11 Stable Build will be installed on your laptop/PC.
Switch from Dev Channel to Windows 11 Official Build
In Dev Channel, the build number is higher than Beta or Release Channel, due to which builds released for this channel no longer match the Windows 11 experience. Hence, if you want to switch from the Dev channel to the stable build of this OS, you would need to change Dev to another Channel first. However, there are two scenarios:
Scenario A: Both Channel Build Number is Similar
To do the same, you need to check the current build number in the current channel and then check the build number in the channel you want to switch. If the build number is equal in both channels,
- Open Settings and follow Settings > Windows Update > Windows Insider Program.
- Next, click Choose your insider settings and select the one you find similar to your channel build.
- The next update you’ll receive for your new channel.
- Once switched to Beta or Release Channel, you can follow the above method to switch from Windows Insider to Windows 11.
Scenario B: Dev Channel Build Number is higher than the other channel
If the Dev Channel build number is higher than the channel you want to move to, you’d need to perform a clean installation of Windows 11.
We’d recommend you first take a backup of all your files, folders, apps, and other data. You can also use dedicated data recovery software, such as Stellar Data Recovery Free Edition to recover all types of data from your system.
Next, do as the following instructions say:
Create Windows 11 Installation Media
- On Download Windows 11 page, click Download now under Create Windows 11 Installation Media.
- Connect the USB flash drive to your system and run the downloaded file.
- Click Accept after reading the license terms.
- Select the language and edition, and click Next.
- Choose a USB flash drive and click Next.
- Once the process ends, your bootable media drive will be ready.
Perform Clean Install of Windows 11
- Now, reboot your system with the USB bootable media. After this, Windows 11 Setup interface will show up on the screen.
- Choose Language, Time and currency formats, and Keyboard/input method.
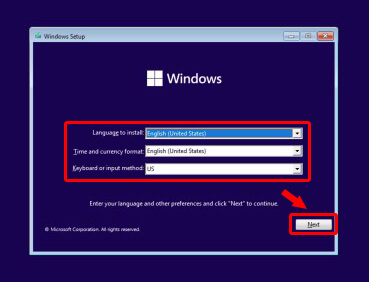
- Next, click Install Now.
- Enter the product key for Windows 11 if you have one. Else, click ‘I don’t have the product key.’
- Choose the edition you have the license for and click Next.
- Accept the license terms and then click Next to proceed.
- On the next step, click Custom: Install Windows only (advanced).
- Choose the drive partition on which you want to install this OS and click New. If you have single partition, select the unallocated drive, click New > Apply > OK. It will create multiple partitions. You can choose the Primary partition to install Windows and click Next.
- Let the process complete, and then click Restart now. You’ll successfully download and install Windows 11 on your system.
After this, you’ll be required to complete the Windows 11 Out of Box Experience to create a user account, configure privacy, sync PC settings, and so on.
All the best possible ways to switch from Windows Insider to Windows 11 Stable Build are discussed above. Hopefully, you’ll be able to follow the steps, get this latest OS installed on your system, and enjoy a seamless experience.
Was this article helpful?
FAQs
What is the Windows Insider Program?
Windows Insider Program by Microsoft is an open software-testing program. It contains features and functionality to better support developers, customers, and IT professionals with valid Windows 10, 11, or Windows Server licenses. In addition, this program helps its users enjoy early access benefits to the pre-release builds of the OS.
Why Can’t I leave Windows Insider Program?
If you’re having a problem leaving the Windows Insider Program in Windows 11, then the possibility is that you may have the Dev Channel Build in your system currently. Microsoft doesn’t let you switch to the Beta/Release Preview Channel or leave the Insider program unless your current Build number of the Dev Channel is similar to the build number of the channel you want to move.
Can I lose my data while clean installing Windows 11?
A clean install of Windows 11 will delete all your apps, files, settings, etc. Hence, it’s always advised to back up your system data.
How do I recover my data lost due to Windows 11 installation?
You can use Stellar Data Recovery Free Edition to recover your data lost due to Windows installation. The software allows recovery for all types of files, folders, and other data free of cost. You can recover up to 1 GB of data with the free version.
If you’ve been dipping your toes into the world of Windows 11 Enterprise Evaluation—perhaps you’ve revelled in the snazzy features and polished interface, only to find that your trial is nearing its 90-day expiration—fear not! You’re in the right place. Today, we’re going to unpack the nitty-gritty of converting your temporary evaluation copy into a fully-fledged version of Windows 11 Enterprise.

Understanding Windows 11 Enterprise Evaluation
Before we dive into the conversion methods, it’s vital to grasp what you’re working with. Windows 11 Enterprise Evaluation is primarily designed for IT pros to test Enterprise features. This trial version is like a first date; it has a time limit, and after 90 days, it will no longer be available unless you hit that magical “activate” button or reinstall the whole kit and caboodle.
Prerequisites for Conversion
Before you don your superhero cape and embark on the activation quest, make sure you have the following items ready:
- A valid Windows 11 Enterprise product key.
- Administrator rights on your PC.
- A stable internet connection (we don’t want any pit stops in the middle of this journey).
- A backup of your important files—better safe than sorry in the world of tech!
Conversion Methods
Let’s explore some straightforward methods to convert your evaluation copy. The beauty of these approaches is that you can choose the one that best fits your style.
Method 1: Command Line with SKUs
This method is one of the most direct ways to transform your Windows 11 evaluation into a permanent version:
- Access the SKUs Folder: Head over to
C:\Windows\System32\spp\tokens\skus. - Download Enterprise Folder: Extract the folder to your desktop after downloading the zipped Enterprise SKU.
- Methodical Command Line Magic:
- Open Command Prompt as an Administrator.
- Enter the following commands meticulously:
Code:
cscript.exe %windir%\system32\slmgr.vbs /rilc cscript.exe %windir%\system32\slmgr.vbs /upk >nul 2>&1 cscript.exe %windir%\system32\slmgr.vbs /ckms >nul 2>&1 cscript.exe %windir%\system32\slmgr.vbs /cpky >nul 2>&1 cscript.exe %windir%\system32\slmgr.vbs /ipk NPPR9-FWDCX-D2C8J-H872K-2YT43 sc config LicenseManager start= auto & net start LicenseManager sc config wuauserv start= auto & net start wuauserv - After this, simply add your legitimate Windows 11 Enterprise product key if prompted.
Note: The product key NPPR9-FWDCX-D2C8J-H872K-2YT43 is a generic key, merely facilitating conversion—not activation!
Method 2: Using Command Prompt (Recommended)
Prefer a simpler route? Choose this method:
- Open Windows Terminal (Admin).
- Check your license status to confirm it shows “EVAL” with:
- To disrobe the current key:
- Enter your product key (something like
XXXXX-XXXXX-XXXXX-XXXXX-XXXXX) using:Code:
slmgr /ipk XXXXX-XXXXX-XXXXX-XXXXX-XXXXX - Finally, activate using:
Method 3: Using the Settings App
If command lines aren’t your cup of tea, let’s switch gears:
- Open Settings (
Windows + I). - Navigate to System > Activation.
- Click on Change Product Key and input your key.
Troubleshooting Common Issues
- Error Code 0xC004F069? This indicates your key may not be valid for conversion. It’s like trying to fit a square peg in a round hole—double-check that product key!
- Activation Failed? Try running the activation troubleshooter in Settings. Check your internet, or contact Microsoft for additional support if issues linger.
What Happens After Conversion?
Once you successfully convert:
- Your Windows installation will be permanently activated, stopping the ominous countdown from your trial period.
- Access to full Enterprise features is yours for the taking.
- Windows Update continues, keeping your system fresh and secure.
Final Thoughts
Converting your Windows 11 Enterprise Evaluation to the full version can be as easy as pie if you follow these steps. Remember, always use legitimate product keys, and keep your important data backed up—because nobody enjoys a tech crisis!
Have you made the leap and successfully converted your evaluation? Feel free to share your experiences in the comments—your fellow Windows warriors would love to hear from you!
Note: Always check for the latest updates from Microsoft, as activation procedures may change in future iterations. Happy converting!
Source: Cyber Kendra How To Convert Windows 11 Enterprise Evaluation to Full Version