
Applies ToWindows 11 Windows 10
Support for Windows 10 will end in October 2025
After October 14, 2025, Microsoft will no longer provide free software updates from Windows Update, technical assistance, or security fixes for Windows 10. Your PC will still work, but we recommend moving to Windows 11.
Learn more
Fonts play a crucial role in the overall aesthetics and readability of your documents and presentations. Whether you’re a designer looking to add a unique touch to your work or simply someone who wants to expand their creative toolkit, knowing how to manage fonts in Windows is essential.
This article guides you through the steps to view, install, and remove fonts on your Windows device. You’ll learn how to explore the fonts currently available on your computer, add new ones to enhance your projects, and remove those you no longer need to keep your system organized and efficient.
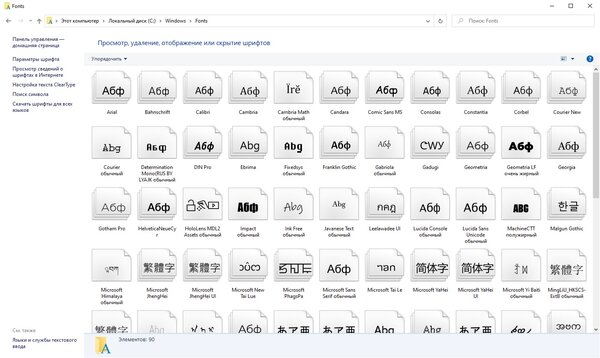
Check which fonts are available on your device
-
In the Settings app on your Windows device, select Personalization > Fonts or use the following shortcut:
Fonts
-
Fonts are listed under Available fonts
Note: Not all apps support custom fonts. If your font isn’t showing up in an app or program, try a different app to check and see if the font is installed and working properly.
The Available fonts section offers several options to help you manage your fonts effectively. Here are the key features available:
-
Search and filter: You can easily search for a specific font by typing its name in the search bar. This helps you quickly locate the font you need without scrolling through the entire list
-
View a preview: You can view a preview of each font, which includes different sizes and faces. This allows you to see how the font will look in various styles and sizes before you use it
-
Hide: If you have fonts that you don’t use frequently but don’t want to uninstall, you can hide them. This keeps your font list organized without permanently removing the fonts
-
Uninstall: You can uninstall fonts that you no longer need. This helps free up space and keeps your system tidy by removing unnecessary fonts
Common operations
Expand the following sections to learn more about common operations with fonts in Windows:
-
In the Settings app on your Windows device, select Personalization > Fonts or use the following shortcut:
Fonts
-
Select Get more fonts in Microsoft Store or use the following shortcut
Explore fonts in the Microsoft Store
-
Select the font you want to add, and then select Get or Buy. The font will download and install automatically
-
Obtain or download the font file, and make sure the file is a True Type (.ttf) or OpenType (.otf) file
-
If the file is compressed into a .zip file, right-click it and select Extract to extract the files
-
-
Right-click the font file, and then select Install. To install for all users on a computer, select Install for all users
-
If you’re asked to allow the program to make changes to your computer, make sure you trust the source of the downloaded file, and then select Yes
-
In the Settings app on your Windows device, select Personalization > Fonts or use the following shortcut:
Fonts
-
Select the font you want to remove
-
Select Uninstall
-
In the Settings app on your Windows device, select Personalization > Fonts or use the following shortcut:
Fonts
-
Under Related settings, select Download fornts for all languages and confirm by pressing OK
Need more help?
Want more options?
Explore subscription benefits, browse training courses, learn how to secure your device, and more.
Стандартно в операционной системе Windows 10 для всех элементов используется шрифт Segoe UI. К сожалению, изменить его в настройках параметров ОС нельзя — такой возможности просто нет. Для изменения системного шрифта придётся прибегнуть к работе с реестром или запуску сторонних приложений, созданных специально для этих целей. Эта статья поможет изменить шрифт на компьютере с Windows 10 тремя способами разной степени сложности, плюс имеется отдельный пункт о том, как вернуть шрифт по умолчанию.
Изменение шрифта в Windows 10 с помощью редактора реестра
Заменить стандартный шрифт в операционной системе можно при помощи редактора реестра — преимущество данного способа в том, что пользователю не нужно загружать дополнительный софт.
Перед тем, как приступить к процессу замены, пользователю нужно найти название нужного ему шрифта:
- откройте проводник;
- введите в адресную строку C:\Windows\Fonts;

- просмотрите варианты, выбрав подходящий шрифт;
- запишите его название в блокнот (например, Times New Roman).
Теперь можно приступать к процессу замены стандартного системного шрифта.
Пошаговая инструкция:
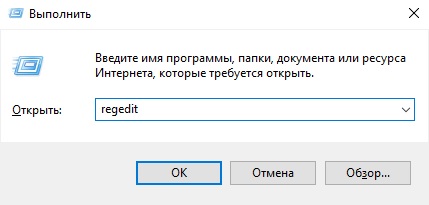
- нажмите клавиши Windows + R на клавиатуре;
- в появившемся окне введите команду regedit, после чего нажмите на кнопку «ОК»;

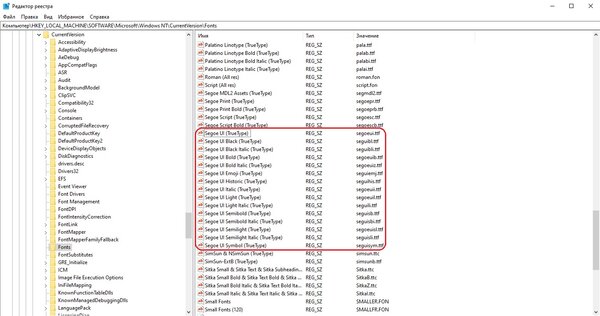
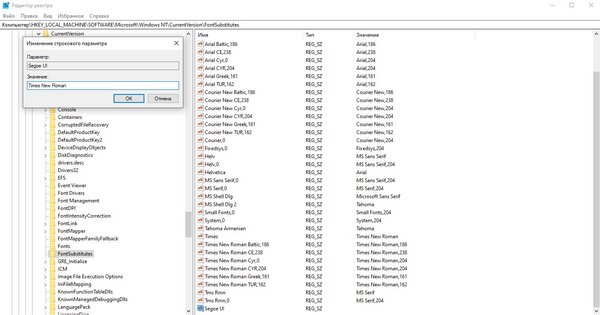
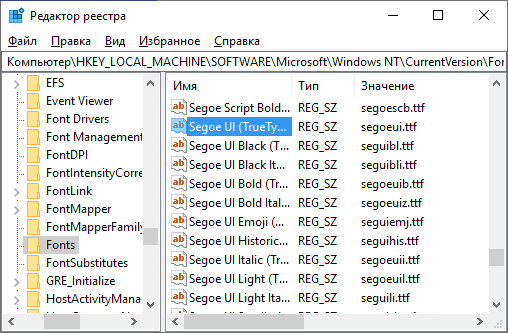
- перейдите по адресу HKEY_LOCAL_MACHINE\SOFTWARE\Microsoft\Windows NT\CurrentVersion\Fonts (можно скопировать и вставить в адресную строку, либо открыть нужный раздел в ручном режиме);
- найдите в списке шрифт Segoe UI и все его вариации;

- нажмите два раза левой клавишей мыши на Segoe UI;
- в открывшемся окне удалите всё содержимое из поля «Значение», нажмите «ОК»;
- повторите процедуру для всех вариаций шрифта Segoe UI, кроме Segoe UI Emoji;
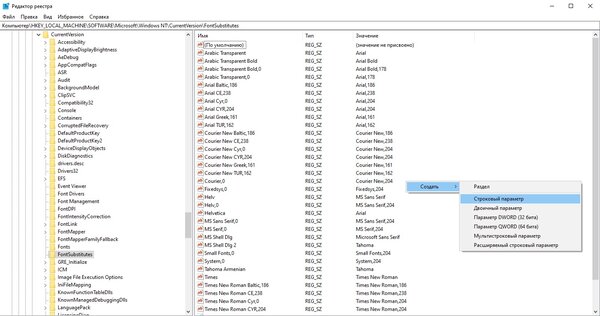
- перейдите по адресу HKEY_LOCAL_MACHINE\SOFTWARE\Microsoft\Windows NT\CurrentVersion\FontSubstitutes (можно скопировать и вставить в адресную строку этого же окна);
- в правом окне нажмите правой клавишей мыши, после чего выберите пункт меню «Создать» и кликните по «Строковый параметр»;
- введите название параметра «Segoe UI»;
- введите в поле «Значение» название необходимого для замены шрифта, которое было записано на этапе подготовки (с учётом заглавных букв);

- нажмите «ОК»;
- закройте редактор реестра, после чего перезагрузите компьютер.
Важное уточнение: шрифт в меню «Пуск» и «Параметры» не меняется, он останется стандартным.
Изменение шрифта в Windows 10 с помощью программы Winaero Tweaker
Если пользователь по каким-то причинам не желает работать с редактором реестра, можно воспользоваться специальной полностью бесплатной программой Winaero Tweaker, которая позволяет настраивать внешний вид операционной системы Windows 10. Важно уточнить, что если предыдущий способ заменял все системные шрифты ОС на один выбранный вариант, то настройка при помощи ПО более гибкая.
Пошаговая инструкция:
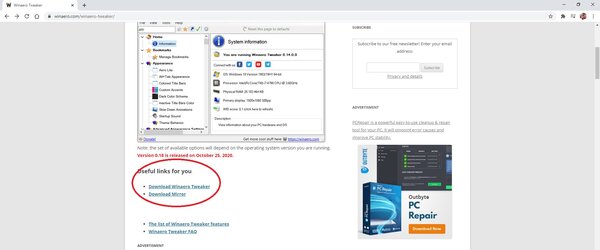
- перейдите на официальный сайт Winaero Tweaker;
- пролистайте вниз до ссылки Download Winaero Tweaker, кликните по ней;

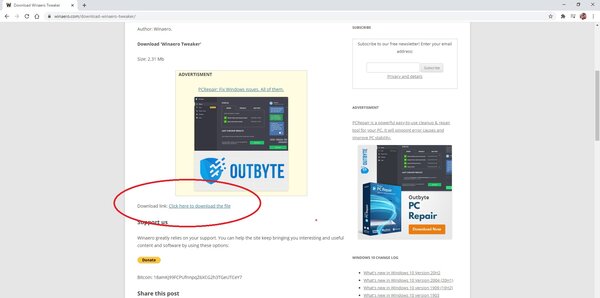
- вновь пролистайте до ссылки Click here to download the file, кликните по ней;

- извлеките файлы из загруженного архива;
- установите приложение на свой компьютер;
- нажмите правой клавишей мыши на ярлык, выберите пункт меню «Запустить от имени администратора»;
- в окне приложения в меню слева выберите пункт «Advanced Appearance Settings»;

- кликните по одному из пунктов данного меню, например, «Icons»;
- в окне справа кликните по кнопке «Change font»;
- в появившемся окне выберите тот шрифт, который вам нравится;
- нажмите «ОК»;
- повторите данную процедуру со всеми пунктами меню «Advanced Appearance Settings»;
- закройте программу;
- перезагрузите компьютер.
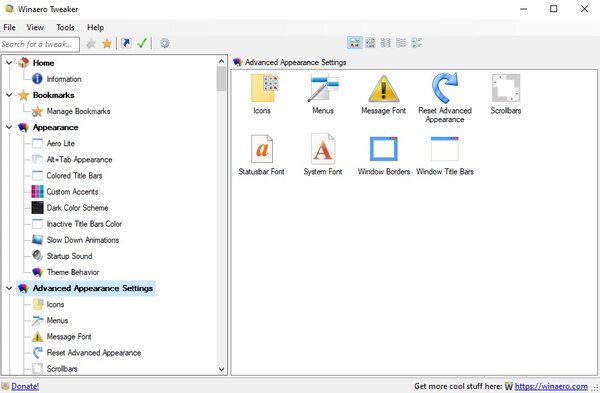
Пункт меню «Advanced Appearance Settings» позволяет настраивать шрифты отдельно для определённых элементов системы. То есть, пользователь может выбрать один шрифт для иконок, другой — для заголовков окон, а третий в качестве системного шрифта.
Список доступных для настройки элементов:
- Icons — подписи иконок;
- Menus — меню программ;
- Message Font — шрифт для сообщений программ;
- Statusbar Font — шрифт для строки состояния;
- System Font — системный шрифт (заменяет Segoe UI на любой другой);
- Window Title Bars — шрифт для заголовка окон.
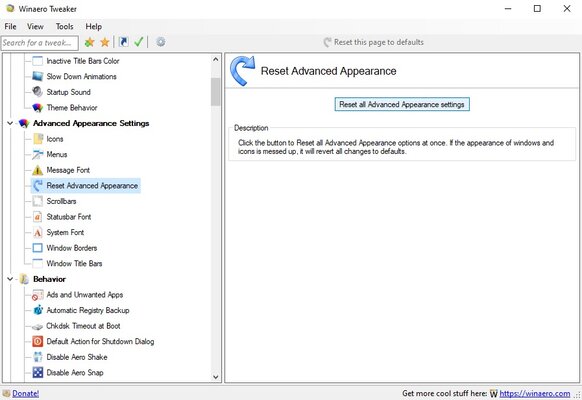
В случае, если пользователь захочет отказаться от изменённых шрифтов, нужно лишь открыть меню «Advanced Appearance Settings», кликнуть по пункту «Reset Advanced Appearance» и в окне справа нажать на единственную кнопку «Reset Advanced Appearance settings». После этого нужно перезагрузить компьютер.
Изменение шрифта в Windows 10 с помощью программы Advanced System Font Changer
Если предыдущее приложение обладает целой россыпью функций для кастомизации операционной системы Windows 10, то программа Advanced System Font Changer создана специально для изменения системных шрифтов. Соответственно, интерфейс и сам процесс работы в данном случае немного проще.
Пошаговая инструкция:
- скачайте программу Advanced System Font Changer с официального сайта разработчика;

- запустите загруженный exe-файл от имени администратора;
- в первом появившемся окне нажмите «Да» и сохраните файл в любое удобное для вас место (программа спросит, хотите ли вы сохранить стандартные настройки системы, чтобы потом, при необходимости, восстановить их);
- после этого на экране появится главное меню приложения со списком доступных элементов для настройки;

- кликните по одному из пунктов, например, «Menu»;
- откроется меню выбора шрифта;

- выберите тот вариант, который необходим;
- нажмите «ОК»;
- повторите процедуру для всех элементов, которые необходимо настроить;
- закройте приложение;
- перезагрузите компьютер.
Список доступных для настройки элементов:
- Title bar — шрифт для заголовка окон;
- Menu — меню программ;
- Message box — шрифт для сообщений программ;
- Palette title — шрифт для заголовков панелей в окнах;
- Icon — подписи иконок;
- Tooltip — шрифт для строки состояния.
В случае, если пользователь захочет отказаться от изменённых шрифтов, ему нужно нажать на кнопку «Default» в правом верхнем углу приложения.
Восстановление до стандартных шрифтов
В случае, если после проделанных манипуляций пользователь захочет восстановить стандартный шрифт, нужно будет выполнить лишь несколько простых команд:
- откройте проводник;
- введите в адресную строку C:\Windows\Fonts;
- слева в меню кликните по пункту «Параметры шрифтов»;

- нажмите на кнопку «Восстановить параметры шрифтов по умолчанию»;
- перезагрузите компьютер.

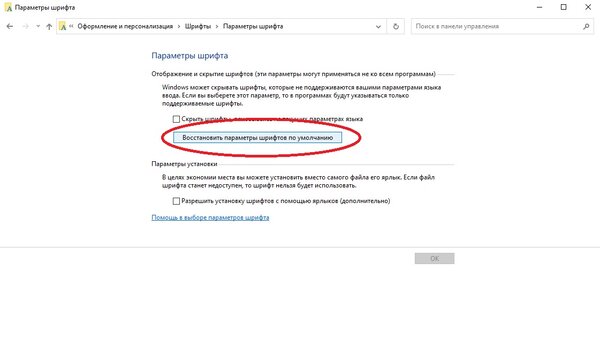

Image Source
Text fonts are important in writing. They have the potential to transform your message into an impactful statement. You should also know what font style to use for the type of message you want to convey. For instance, you will not use the font “Comic Sans MS” to deliver a message of loss and grief. The “Comic Sans MS” is a comical, fun and upbeat font style. If you use that on a card sent on the occasion of someone’s funeral, people will think you are insensitive.
While looking for the right font style to match the mood and tone of your message, you may have to rename a font file. Sometimes when you download a font file, the name on it is incorrect. For example, the file might say “Helvetica” but when you open it you realize that it is actually “Calibri”. Such instances can confuse you and waste your time.
This article will show you how to rename a font so you can work smoothly.
How to Rename a Font
Image Source
In this section you will find many methods on how to rename a font. Remember, these instructions particularly apply to the users of Windows 10 platform.
First, you will explore how to rename a font using Windows 10 File Explorer feature. It is a very capable tool. For changing the name of a font, File Explorer offers 4 techniques. Then, you will learn other techniques to rename files with Command Prompt and Windows PowerShell.
The aforementioned techniques and methods are explained below in detail –
Method 1: Making use of the Home Menu in File Explorer
- Open the File Explorer on your desktop. To do this, press “Windows” Key + “E” letter key on your keyboard.
- Now visit the location where you have saved your font files. If you know the font file’s name, drag your mouse up to the “Search” bar and click on it. Now type in the name of the font and the font explorer will search for that file.
- Once you find the file you were looking for, click on it to select it. Now bring your mouse cursor up to the Home Menu.
- In the Home Menu you will find options like “Move to”, ”Delete”, ”Copy to” and ”Rename”. You need to click on the “Rename” option.
- It is now possible to change the name of the font file. If you have administrative privileges, you can also change the file extension. A file extension is what comes after the “.”. For example, in the file “ArialBlack.ttf” the file extension is “.ttf”. Changing the extension will alter the file’s format. If it is the wrong format then many applications or software will not be able to read it. So unless you want to change the file type, make sure that you only change the name that appears before the “.”.
- After you have typed in the new name, press the “Enter” key on your keyboard to save the new font file name. Another option is, click your mouse button on any blank space on the screen. That will also save the file name.
Method 2: Double-clicking on a Font File
- To begin, open the File Explorer (“Windows + E” keys) and locate the font whose name needs to be changed (search for it in the “Search” bar).
- Once you locate the file that is to be renamed, click on it then pause for a second. Then click on it again.
- The font file name will now be highlighted with a blinking cursor.
- Now type the new font name. If you have the rights of an administrator, be careful not to change the file extension (unless you know what you are doing).
- On your keyboard, press the “Enter” key or click anywhere on the screen with your mouse. The changed font name will be saved.
Method 3: Making use of the Context Menu
- Similar to previous methods, locate your font files using the file explorer.
- Once you find the font file, bring your mouse cursor over the file and right click on it.
- This will open the “Context” menu. You will see many options here like – “Open”, “Copy”, “Cut, “Send to”, “Delete” and more. Somewhere near the bottom of the “Context” menu, you will find the “Rename” option. Click on this option.
- The moment you click on “Rename”, the “Context” menu will disappear. Instead, your file name will become highlighted with a blinking cursor.
- Now type the new font file name over the highlighted text.
- Like the previous methods, to save the new name press “Enter” on the keyboard or left click on the screen with your mouse.
Method 4: Making use of Shortcut Keys
- You can rename font files using only your keyboard.
- To start, open the file explorer by pressing the “Windows” key and the “E” letter key together.
- Now, to access the “Search” bar from your keyboard, press the shortcut keys – “Control” + “F” letter. This will activate the “Search” bar and you can type the name of the file in it.
- Click “Enter” key once you are done typing.
- When you see the font file on your screen, use the arrow keys on your keyboard to navigate towards the file.
- After reaching the file whose name you want to change, press “Function” key and “F2” key together on the keyboard.
- This will highlight the name of the font file. Now type the desired name over it.
- Once you have written the new name, press the “Enter” key. That is it. You have successfully renamed a font file.
Method 5: Using the Command Prompt
- Open the Windows File Explorer and visit the location where your font files are stored.
- Upon reaching the desired directory, you are ready to open a Command Prompt.
- To do this, take your mouse over the “Address” bar in the File Explorer and click on it.
- Now type “cmd” in the “Address” bar and press the “Enter” key on your keyboard. This will open the Command Prompt.
- You need to enter a command to rename a font file. Do this by entering this command – ren “current_filename.ext” “new_filename.ext“. For example, if you want to rename a file name “Verdana.ttf” to “Serif.ttf” you must type in the code – ren “Verdana.ttf” “Serif.ttf” and press the “Enter” key.
- Now check in the font folder. The name of the file would have changed.
Method 6: Using Windows Powershell
- The PowerShell tool is more versatile and powerful than the Command Prompt to rename font files.
- To open the PowerShell window, navigate through the File Explorer and visit the desired location of your font files.
- Once you have opened the folder where your font files are stored, take your mouse to the top of the explorer window. Now click on the “File” tab and a drop menu will appear.
- You will see a couple of options in the drop menu like “Open new window”, “Change folder and search option” and “Help”. What you are looking for is the option called “Open Windows PowerShell”. Click on it.
- A side menu will appear which will give you two options – “Open Windows PowerShell” and “Open Windows PowerShell as administrator”. If you only want to rename the file, click on the first option, that is, “Open Windows PowerShell”.
- The PowerShell window will appear on screen. You need to type a syntax in there to rename the desired font file.
- The syntax to rename a file is – rename-item “current_filename.ext” “new_filename.ext”
- For example, if you want to change a font file name from “Italics22.ttf” to “Bold33.ttf”, your syntax will look like this – rename-item “Italics22.ttf” “Bold33.ttf”.
- Now hit the “Enter” key on your keyboard to complete the process. Check the font folder to see the new renamed font file.
These were some techniques on how to rename a font using Windows features. You may also choose a different technique which involves using special software to rename font files. One such software is FontForge. Follow the steps mentioned below to get started –
Method 7: Using FontForge
- Download the FontForge software from the internet.
- After installing it on your computer, open the application.
- The application will scan your computer to display a list of all available font files on your system.
- Select the font file you want to rename by clicking on it.
- Now click on the option “Font info”. This will display all the font file details like its name, format, size etc.
- Rename the font file. Then click on the “Ok” button.
- Your font file now has a new name.
In Conclusion
Hope the techniques and methods in this article taught you how to rename a font. Renaming font files can be handy, especially when you have customized or created your own fonts. It is also a safe way to keep track of your unique font styles. But remember to keep an appropriate name so you do not forget it. It can be a nightmare to look for a font among hundreds of files.
По умолчанию в Windows 10 для всех системных элементов используется шрифт Segoe UI и пользователю не предоставлены возможности для изменения этого. Тем не менее, изменить шрифт Windows 10 для всей системы или для отдельных элементов (подписей иконок, меню, заголовков окон) возможно и в этой инструкции подробно о том, как это сделать. На всякий случай рекомендую создать точку восстановления системы прежде, чем выполнять какие-либо изменения.
Отмечу, что это тот редкий случай, когда я рекомендую использовать сторонние бесплатные программы, а не ручную правку реестра: так будет проще, нагляднее и эффективнее. Также может быть полезным: Как изменить шрифт на Android, Как изменить размер шрифта Windows 10.
- Изменение шрифта в Winaero Tweaker
- Advanced System Font Changer
- В редакторе реестра
- Видео инструкция
Изменение шрифта в Winaero Tweaker
Winaero Tweaker — бесплатная программа для настройки оформления и поведения Windows 10, позволяющая, помимо прочего, изменить шрифты элементов системы.
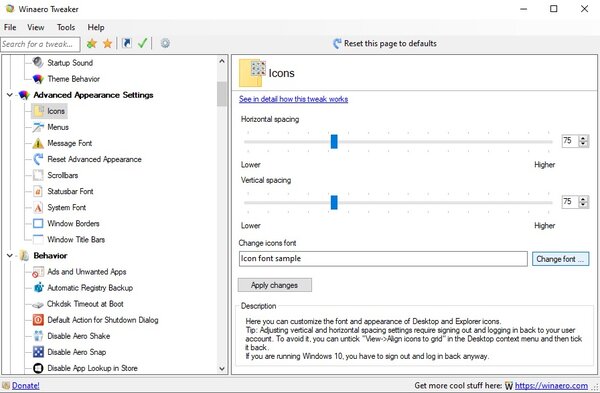
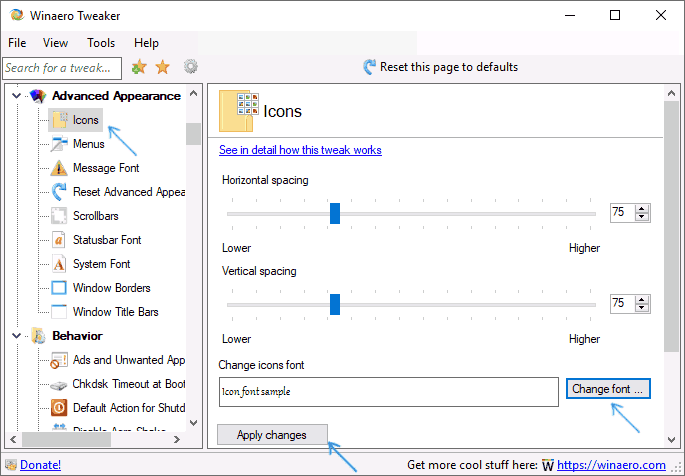
- В Winaero Tweaker перейдите к разделу Advanced Appearance Settings, в нем собраны настройки для различных системных элементов. Например, нам требуется изменить шрифт иконок.
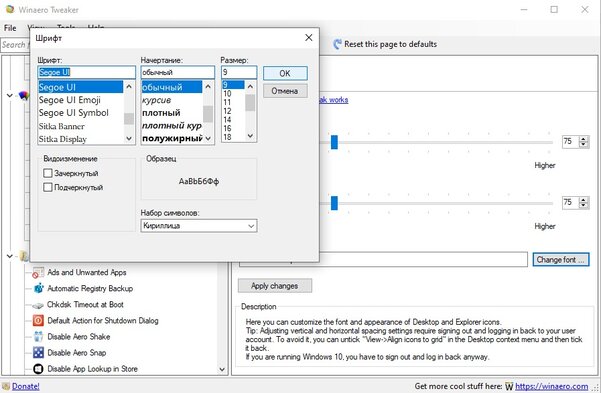
- Откройте пункт Icons и нажмите кнопку «Change font» (изменить шрифт).

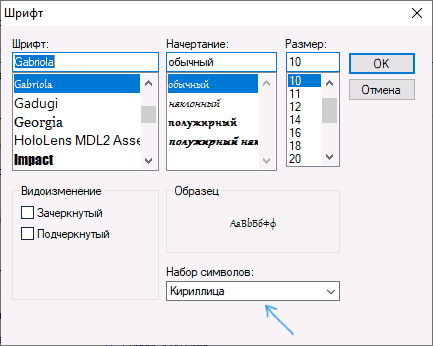
- Выберите нужный шрифт, его начертание и размер. Особое внимание обратите на то, чтобы в поле «Набор символов» было выбрано «Кириллица».

- Обратите внимание: если вы меняете шрифт для иконок и подписи начали «сокращаться», т.е. не помещаться в поле, выделенное для подписи, вы можете изменить параметры Horizontal spacing и Vertical spacing для того, чтобы устранить это.
- При желании поменяйте шрифты для других элементов (список будет приведен ниже).
- Нажмите кнопку «Apply changes» (применить изменения), а затем — Sign Out Now (чтобы выйти из системы для применения изменений), либо «I’ll do it myself later» (чтобы самостоятельно позже выйти из системы или перезагрузить компьютер, предварительно сохранив нужные данные).
После проделанных действий сделанные вами изменения шрифтов Windows 10 будут применены. При необходимости сбросить сделанные изменения, выберите пункт «Reset Advanced Appearance settings» и нажмите по единственной кнопке в этом окне.
В программе доступны изменения для следующих элементов:
- Icons — иконки.
- Menus — главные меню программ.
- Message Font — шрифт текстов сообщений программ.
- Statusbar Font — шрифт в строке состояния (внизу окна программ).
- System Font — системный шрифт (меняет стандартный шрифт Segoe UI в системе на выбранный вами).
- Window Title Bars — заголовки окон.
Подробнее о программе и о том, где её скачать — в статье Настройка Windows 10 в Winaero Tweaker.
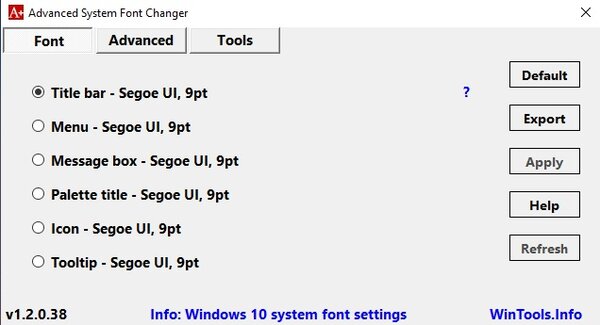
Advanced System Font Changer
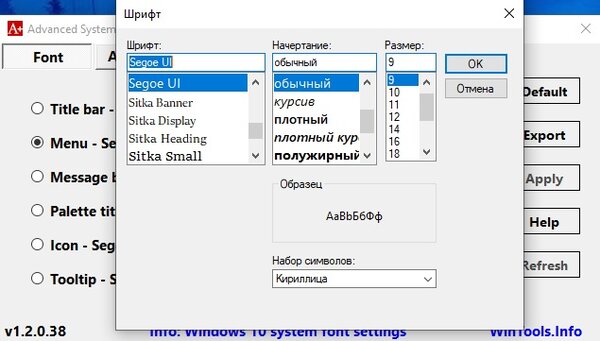
Еще одна программа, позволяющая изменить шрифты Windows 10 — Advanced System Font Changer. Действия в ней будут очень похожи:
- Нажмите по названию шрифта напротив одного из пунктов.

- Выберите нужный вам шрифт.

- Повторите при необходимости для других элементов.
- Если необходимо, на вкладке Advanced измените размеры элементов: ширину и высоту подписей значков, высоту меню и заголовка окна, размеры кнопок прокрутки.
- Нажмите кнопку Apply для выхода из системы и применения изменений при повторном входе.
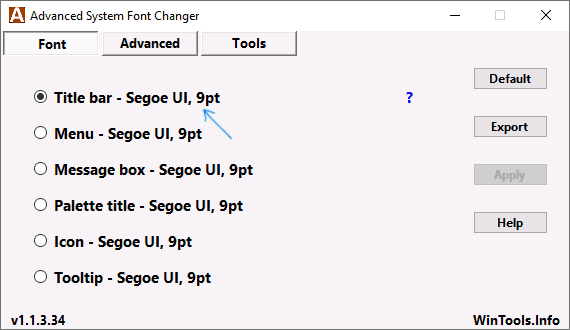

Изменить шрифты можно для следующих элементов:
- Title bar — заголовок окна.
- Menu — пункты меню в программах.
- Message box — шрифт в окнах сообщений.
- Palette title — шрифт заголовков панелей в окнах.
- Tooltip — шрифт панели статуса внизу окон программ.
В дальнейшем, если будет необходимость сбросить сделанные изменения, используйте кнопку Default в окне программы.
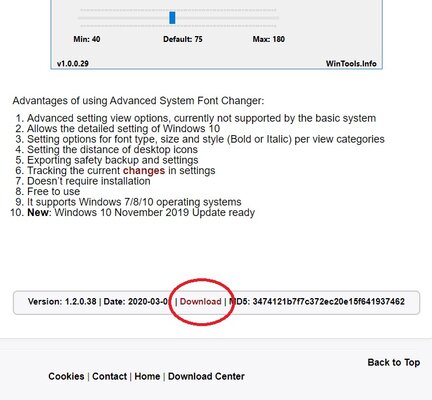
Скачать Advanced System Font Changer можно бесплатно с официального сайта разработчика: https://www.wintools.info/index.php/advanced-system-font-changer
Изменение системного шрифта Windows 10 с помощью редактора реестра
При желании, вы можете изменить системный шрифт по умолчанию в Windows 10 с помощью редактора реестра.
- Нажмите клавиши Win+R, введите regedit и нажмите Enter. Откроется редактор реестра.
- Перейдите к разделу реестра
HKEY_LOCAL_MACHINE\SOFTWARE\Microsoft\Windows NT\CurrentVersion\Fonts
и очистите значение для всех шрифтов Segoe UI кроме Segoe UI Emoji.

- Зайдите в раздел
HKEY_LOCAL_MACHINE\SOFTWARE\Microsoft\Windows NT\CurrentVersion\FontSubstitutes
создайте в нем строковый параметр Segoe UI и в качестве значения введите имя шрифта, на которое мы меняем шрифт. Имена шрифтов вы можете посмотреть, открыв папку C:\Windows\Fonts. Название следует вводить точно (с теми же заглавными буквами, что видны в папке).
- Закройте редактор реестра и выйдите из системы, а затем снова зайдите.
Сделать всё это можно и проще: создайте reg-файл, в котором нужно указать только имя нужного шрифта в последней строке. Содержимое reg файла:
Windows Registry Editor Version 5.00

[HKEY_LOCAL_MACHINE\SOFTWARE\Microsoft\Windows NT\CurrentVersion\Fonts]
"Segoe UI (TrueType)"=""
"Segoe UI Black (TrueType)"=""
"Segoe UI Black Italic (TrueType)"=""
"Segoe UI Bold (TrueType)"=""
"Segoe UI Bold Italic (TrueType)"=""
"Segoe UI Historic (TrueType)"=""
"Segoe UI Italic (TrueType)"=""
"Segoe UI Light (TrueType)"=""
"Segoe UI Light Italic (TrueType)"=""
"Segoe UI Semibold (TrueType)"=""
"Segoe UI Semibold Italic (TrueType)"=""
"Segoe UI Semilight (TrueType)"=""
"Segoe UI Semilight Italic (TrueType)"=""

[HKEY_LOCAL_MACHINE\SOFTWARE\Microsoft\Windows NT\CurrentVersion\FontSubstitutes]
"Segoe UI"="Название Шрифта"
Запустите этот файл, согласитесь с внесением изменения в реестр, а затем выполните выход и вход в Windows 10 для применения изменений системного шрифта.
Видео
Можете предложить свои способы? Буду рад прочесть о них в комментариях.
This tutorial will show you how to name font families, so that they all group together in your operating system’s font location, as well as in Adobe Illustrator and Adobe Photoshop font previews, using Fontforge.
How this Tutorial is Organized
- We’ll start by defining terms and discussing the reasons why you may want to change a font’s name.
- From here, we’ll open Fontforge and select a font file.
- Then we’ll change the font name and review error messages.
- Next, we’ll generate our re-named font.
- Then, we’ll review and test our font.
- Finally, I’ll provide tips on why it may not be working for you.
i. You can download Fontforge for Windows, Mac, or Linux from here.
ii. The font used in this tutorial is called Linux Libertine. It’s a free font for personal and commercial use with an open source license.
iii. This tutorial is shown on a Windows 10 computer with Fontforge version 03142020.
iv. Fontforge does crash, so save often.
v. Detailed information on naming conventions can be found at Fontforge, Microsoft, Adobe.
Definitions
This is ‘Font View’
- Given font naming can be a little confusing, the following definitions will be used for this tutorial;
| Title | Meaning | Example |
|---|---|---|
| Font family name or family name | The name of a font | Linux Libertine, or Goodlight, or Lovers Quarrel. |
| Font family or family | Font family name + the group of font styles associated with this Font family name | Linux Libertine has 16 font styles and as a group (family name + font styles) this is a font family called Linux Libertine. Lovers Quarrel has one (1) font style and as a group this is a font family called Lovers Quarrel. |
| Font styles or style | The style of font | bold, italic, small caps, regular, display capitals etc. These are all font styles. Linux Libertine has 16 font styles. |
| Font name | Windows name for Font family + font style | Linux Libertine Bold, Linux Libertine Italic, Lovers Quarrel Regular |
Why Would You Change the Name of a Font
-
There may be several reasons why you may want to change the name of a font or a group of fonts. This tutorial will review some of the more common reasons and solutions, which are present using Linux Libertine as an example. The approach taken in this tutorial applies to all fonts not just the example font Linux Libertine.
-
To get started, I’ve gone ahead and installed all 16 font styles of Linux Libertine.
Problems
-
The first problem I see when reviewing Linux Libertine in my Windows font directory, is
a) only nine (9) font styles out of 16 showed up, and
b) it has installed in a manner where some font styles are grouped and others are not. -
This is a problem for me because I want them all grouped as one, not scattered in a random way that expands my font library, and I want to be able to use all 16 font styles not just nine (9).
-
The next problem I see is, in Adobe Illustrator, when opening the font preview list.
a) Again, some font styles are grouped, others are not, and some don’t appear at all. -
The problem with this is, it makes it hard to find fonts and it’s time consuming having to scroll through hundreds of fonts in Adobe Illustrator or Photoshop. I also want to be able to use all 16 font styles not just nine (9).
Why Don’t They All Show Up?
-
The reason why some font styles appear and others don’t is because many or all of the font styles, have the same ‘Font name’.
a) For example when I click on the original thumbnails to open Linux Libertine, I can see some have the same ‘Font name’, which means only one file will appear when installed. -
The remainder font styles (or files), you installed, will be buried and saved in your system. You will never see them and they will not be displayed or recognized unless you delete the font you can see, or of course change each file’s ‘Font name’.
Why Are Some Grouped & Others Not?
-
The reason why some font styles are grouped and others are not is because,
a) some font styles do not have identification that associates them to their font family, or
b) they have identification, but it’s in the wrong place and therefore not recognized, or
c) they have identification, and therefore they are grouped. -
There’s also the following, which display different groupings,
a) a Microsoft naming convention which only allows four (4) font styles to be grouped. These are regular, bold, italic, bold italic.
b) a Mac naming convention, and
c) an Adobe naming convention.Hidden Fonts Solution
-
The solution, to be able to see and use all 16 font styles of Linux Libertine, is to make sure each font style has a different ‘Font name’.
a) For example: Linux Libertine Regular, Linux Libertine Bold, Linux Libertine Bold Italic.
b) These changes need to be made using software that’s designed for fonts, like Fontforge.Ungrouped Fonts Solution
-
If I want all 16 font styles to be grouped or nested within the same font family in Windows and Adobe software, then each file needs to include identification that associates them to their font family.
a) These changes can be made using Fontforge.
The next section of this tutorial will go through the steps, to change the ‘Font name’ and identification, so that all font styles are visible and grouped into font families.
Selecting a Font File
-
To change a font name we need to open Fontforge, locate the font, select it and click ‘OK’.
-
Ignore and close any warning dialogue boxes that open up.
- Make sure you’re not selecting, changing or saving any fonts within your Windows font directory, or system directory.
- If you want to change these ones, copy them onto your desktop, make changes to the copy, then move the original to a safe place.
- Delete the one you’re replacing, do not save over the top of it because Windows will not ‘replace’ the file with this new one, it will bury the original beneath the replacement. This will slow down your computer.
Changing A Font Name
Next we’ll be changing the details of the font name.
-
Starting in ‘Font View’,
a) click on ‘Element>Font Info’, -
The ‘Font Info’ dialogue box will pop up,
a) select ‘PS Names’ in the left hand column. -
We’ll be changing what’s written in the boxes next to ‘Fontname’ and ‘Family Name’.
a) Change ‘Fontname’ so there are no spaces and include a hyphen between the font family name and font style.LinuxLibertine-DisplayCapitalsb) On the second line called ‘Family Name’, you need to include a hyphen between the font family name and font style. There are no spaces between the hyphen.
Linux Libertine-Display CapitalsOS/2 Settings
-
Now in the left hand column,
a) Select ‘OS/2’
b) Then, type either a ‘4’ or ‘5’ into the ‘OS/2 Version’ field.i. This applies to all fonts. Currently there are 6 versions with 0 being the oldest. Apple provides an easier to read document on OS/2 tables, and at the bottom of their page describes how Mac OS handles the OS/2 table.
After changing the settings in ‘OS/2’, we’ll move on to changing the information within ‘TTF Names’.
TTF Names
-
Make sure you’ve selected ‘TTF Names’ in the left hand column, then
a) Check that the cell next to ‘Family’ is populated with the same name you entered in the previous step from ‘PS Names>Family Name:’.Linux Libertine-Display Capitals -
Next we’ll be changing the cell next to ‘Styles (SubFamily)’.
a) select and right mouse click on the cell next to ‘Styles (SubFamily)’, then
b) select ‘Same as PostScript Names’ from the drop down.i. The field will ‘go blank’, which is normal.
ii. If this drop down box doesn’t pop up, left mouse click into the dell and delete whatever is in there. In this example it’s ‘Small Caps’.
iii. Then type the words that appear after the hyphen in your ‘Fontname’ field from the previous steps. In this example it’s ‘DisplayCapitals’. -
The next line we’ll change is the ‘UniquieID’ line.
a) Select and right mouse click on ‘UniqueID’, then
b) select ‘Delete’ from the drop down box.i. If you forget to delete the ‘UniqueID’ line, a helpful message pops up when you click ‘OK’.
ii. If you do receive this pop up, click ‘Change’ which will delete the entry and take you back to ‘Font View’.iii. When you generate the font, and ‘UniqueID’ has been deleted, Fontforge will generate a new ‘UniqueID’ line. Fontforge takes the information from the ‘Name For Humans’. The ‘Name For Humans’ is found under the ‘PS Names’ tab.
Identification
-
Now we’ll create 4 new entries so that our font styles associate and identify with their font family and group together.
-
This section is a little tricky and annoying.
a) If nothing pops up when you left mouse click on the cells, just click in the cell and start manually typing.
b) Sometimes, clicking on the cell, deletes the line entirely and you’ll have to re-add the line and start again.
c) You can also follow Fontforge’s inbuilt prompts which display when you hover over text. -
To create a new line,
a) click on ‘New’,
b) celect your language from the pop up list – English (US). -
In the next column,
a) click on ‘UniqueID’ and select ‘Preferred Family’. -
In the last column we need to manually type our preferred family name.
a) The ‘Preferred Family’ is the first half of the name you entered in the previous step from ‘PS Names>Family Name:’.
b) In other words, it’s the words that appear before the hyphen in your ‘Family Name’ field from the previous steps.
c) In this example it’s ‘Linux Libertine’. -
Next, we’ll add a second line just like we did in the previous step, but this time we’ll select ‘Preferred Style’.
a) Click on ‘<New>’
b) Select ‘English (US)’ from the list. -
In the next column,
a) click on ‘UniqueID’ and select ‘Preferred Style’. -
In the last column we need to manually type our preferred style name.
a) The ‘Preferred Style’ is the second half of the name you entered in the previous step from ‘PS Names>Family Name:’.
b) It’s the words that appear after the hyphen in your ‘Family Name’ field from the previous steps.
c) In this example it’s ‘Display Capitals’. -
Now go ahead and create two (2) more rows, just as we did in the previous two rows, only this time changing the second column to ‘WWS Family’ and ‘WWS Subfamily’.
-
When completed the additional 4 rows should look like this:
a) Click ‘OK’ to save the changes and return to ‘Font View’.
After clicking ‘OK’, you may receive an error message about long font names. The next section will help you overcome this.
Error Messages
-
If your ‘Fontname’ and or ‘Family Name’ are too long, a dialogue box will pop up.
-
If you receive one or both of these dialogue boxes,
a) Click ‘Cancel’ and reduce the number of characters.
b) ‘Family Name’ is related to the Windows error.
c) ‘Fontname’ is related to the Adobe error. -
When you’ve finished reducing the name,
a) click ‘OK’ to save the changes and return to ‘Font View’.
b) There is no need to change the information within OS/2 or TTF Names.
Generating Your Font
-
Now we’re ready to generate our font. Make sure you’re in ‘Font View’ then,
a) click on ‘File>Generate Fonts’. -
Head on over to my Abg Font Thumbnail tutorial for detailed instructions on generating fonts.
-
When you’ve completed all the settings in the ‘Generate Fonts’ dialogue box,
a) click ‘Generate’. -
After clicking on ‘Generate’ you may receive an error pop up,
a) click ‘Yes’. -
Your updated font will save to your nominated file path ready for reviewing.
Review And Test
-
Open your generated font and check the font name for correctness.
-
Delete any legacy Linux Libertine fonts in your system.
a) I’ve found it’s best to delete or uninstall the font you want to replace, then install the replacement font, rather than letting Windows ‘replace’ the new font, because Windows often saves over the top and buries the unwanted font deeper into the operating system. -
Then install your re-named Linux Libertine font styles and test them out to see if they’ve grouped within your font directory, and software font preview drop down lists.
It’s Not Working
- If it’s not working out correctly, after you’ve followed this tutorial, then
a) review what you’ve entered in the ‘PS Names’ section and the ‘TTF Names’ section,
b) make sure the ‘PS Names’ section matches the ‘TTF Names’ section,
c) check spelling throughout,
d) check spaces, no spaces and hyphens are in the right place,
e) go back and make sure you’ve followed the instructions, step by step.
That brings us to the end of this tutorial.
I hope this tutorial has been of assistance and you can put some of the information to good use when you want to change the font attributes using Fontforge.