
Как вы возможно уже знаете, в последнем обновлении Windows 10 1803 April Update Microsoft решила отказаться от функционала «Домашней группы» (HomeGroup), позволяющего организовать простой общий доступ к файлам и принтерам в домашней локальной сети. Вместо использования «Домашней группы» в Windows 10 1803 предлагается новый способ обмена файлов между соседними устройствами под названием Обмен с устройствами поблизости (Nearby sharing). Данный способ передачи файлов похож на режим передачи AirDrop в уставах Aplle.
Как и AirDrop, Nearby sharing может использоваться для передачи файлов с соседними устройствами по Wi-Fi или Bluetooth. Microsoft специально сделала этот способ передачи файлов максимально простым и эффективным в использовании и практически не требующим настройки. Таким образом любой пользователь должен легко передать или получить нужный файл, документ, изображение, видео, ссылку или другой контент на соседний компьютер в своей домашней сети.
Содержание:
- Как включить режим Обмена с устройствами поблизости в Windows 10
- Как передать файл на соседний компьютер с помощью Nearby sharing
- Не работает режим Обмен с устройствами поблизости (Nearby sharing) в Windows 10
Как включить режим Обмена с устройствами поблизости в Windows 10
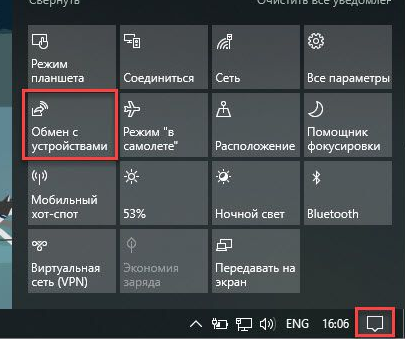
Для передачи файлов между устройствами с помощью данной функции, на обоих устройствах должен быть включен адаптер Bluetooth или Wi-Fi. Включить режим Обмен с устройствами поблизости можно через Центр действий / Action Center (плитка Обмен с устройствами / Nearby Sharing).
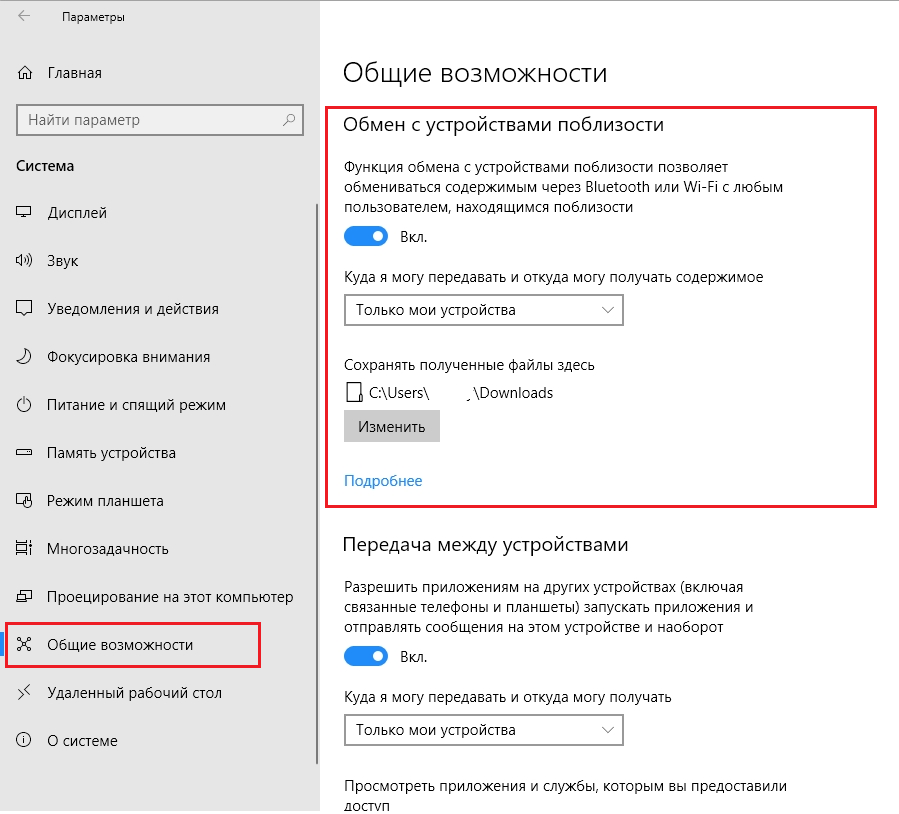
Настроить режим работы обмена данных с устройствами можно а приложении Параметры -> Система -> Общие возможности (Settings -> System -> Shared experiences). Найдите секцию «Обмен с устройствами поблизости» (Nearby sharing).
Функция обмена с устройствами поблизости позволяет обмениваться содержимым через Bluetooth или Wi-Fi с любым пользователем, находящимся поблизости.
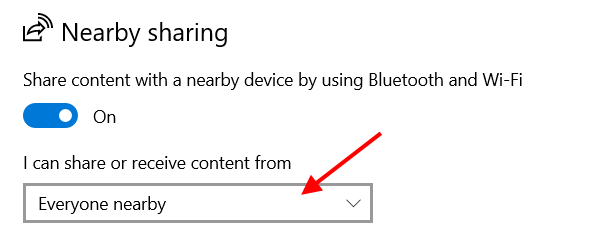
Переведите переключатель в положение Вкл. Чуть ниже в параметре «Куда я могу передавать и откуда получать содержимое» выберите хотите ли вы обмениваться файлами только со своими устройствами (My devices only) или всеми устройствами поблизости (Everyone nearby). Также можете указать папку, куда Windows 10 будет сохранять полученные с других устройств файлы (по умолчанию это папка Загрузки / Downloads в профиле пользователя).
Также можно включить режим Nearby sharing через реестр. Для этого запустите regedit.exe и перейдите в раздел HKCU\Software\Microsoft\Windows\CurrentVersion\CDP. Найдите в этой ветке два REG_DWORD параметра:
- CdpSessionUserAuthzPolicy
- NearShareChannelUserAuthzPolicy
Чтобы отключить Nearby sharing измените их значение на 0, при значении 1 – разрешен обмен данными только с авторизованными устройствами, значение 2 – разрешен обмен со всеми соседними устройствами. Для применения настроек компьютер нужно перезагрузить.

Как передать файл на соседний компьютер с помощью Nearby sharing
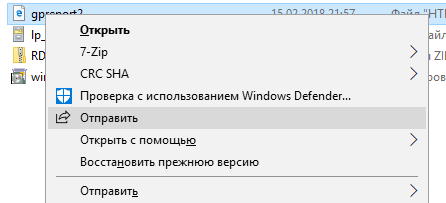
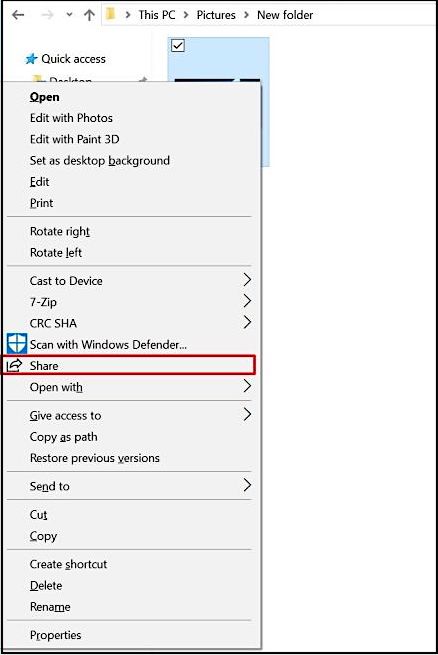
После того, как вы включили режим «Обмен с устройствами поблизости», вы можете отправить любой файл на соседний компьютер через беспроводную сеть. В проводнике щелкните правой кнопкой но нужному файлу и в меню выберите пункт Отправить.
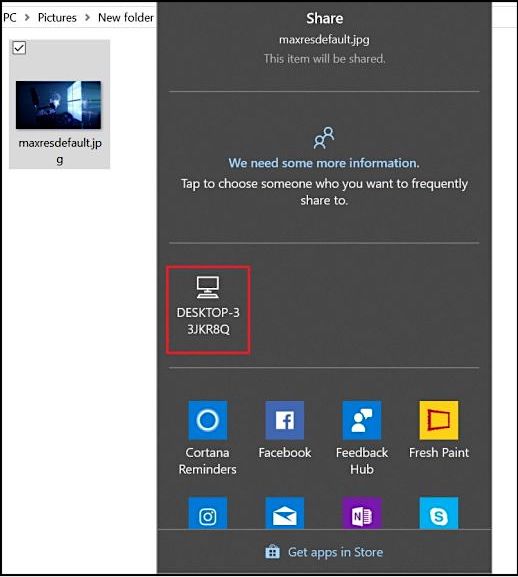
В открывшемся окне «Поделиться» будет выполнен поиск доступных через беспроводную сеть устройств (Поиск устройств поблизости). Если нужного устройства нет в списке, убедитесь, что нам нем включен режим «Обмена с устройствами поблизости» и активен Wi-Fi / Bluetooth адаптер.
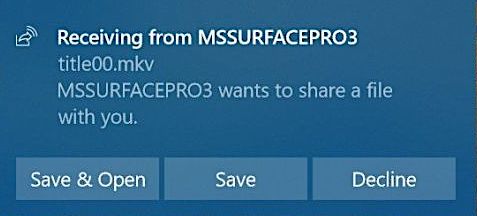
Выберите имя компьютера, на который вы хотите отправить файл. На втором компьютере появится уведомление о том, что вы хотите поделится файлом. Он может принять или отклонить передачу файла.
Естественно, передача файлов через Bluetooth выполняется намного медленнее, чем через WiFi сеть.
В большинстве приложений магазина Windows Store доступна кнопка Поделиться (например в Edge, приложении Фотографии и т.д.). Таким образом вы можете передать ссылку, фото или другой файл прямо из окна приложения.
Не работает режим Обмен с устройствами поблизости (Nearby sharing) в Windows 10
Если при нажатии кнопки «Поделиться» компьютер не обнаруживает другое устройство, необходимо проверить следующие условия:
- На обоих устройствах установлена Windows 10 1803 или выше, и режим Nearby sharing включен.
- Должен быть включен режим обмена со всеми соседними устройствами, либо устройства добавлены в аккаунт Microsoft или в друзья.
- Wi-Fi или Bluetooth адаптеры активны. Необходим адаптер Bluetooth 4.0 (LMP 6.x) или выше с поддержкой режиме Low Energy (LE). Это можно проверить в свойствах драйвера адаптера в разделе Bluetooth radio supports Low Energy Central Role = True.
- Компьютеры находятся в одной Wi-Fi сети (вы можете использовать свой компьютер с Windows 10 как виртуальную точку доступа Wi-Fi).
- При передаче файлов через Bluetooth устройства нужно держать ближе друг к другу.
- Измените профиль сети на с Public на Private на обоих устройствах (Settings -> Network and Internet -> Status Change connection properties -> Private).
Microsoft анонсировала, что в ближайшем времени приложение для поддержки Nearby sharing появится для устройств с Android и iOS. Таким образом со своего компьютер с Windows 10 вы сможете легко передать файл на свой смартфон и планшет.
Applies ToWindows 10 Windows 11
Общий доступ поблизости в Windows позволяет обмениваться документами, фотографиями, ссылками на веб-сайты и т. д. на близлежащих устройствах с помощью Bluetooth или Wi-Fi. Вы можете совместно использовать файлы между компьютерами под управлением Windows.
Примечания:
-
Если на компьютере, с которым вы предоставляете общий доступ, установлена последняя версия Windows 11, вы можете предоставить общий доступ через Wi-Fi, если компьютер Windows 10/11, к которому вы предоставляете общий доступ, подключен к той же частной Wi-Fi сети. В противном случае вы можете предоставить общий доступ по Bluetooth.
-
Чтобы предоставить общий доступ к файлам на компьютере под управлением Windows 10, он должен работать Windows 10 версии 1803 или более поздней. Чтобы узнать, какая версия Windows установлена, см. статью Какая операционная система Windows используется?
Включение общего доступа поблизости
Чтобы включить общий доступ поблизости, выполните следующие действия на обоих устройствах— на устройстве, с которого вы предоставляете общий доступ, и на устройстве, на которое вы предоставляете общий доступ.
-
Нажмите кнопку Пуск , а затем выберите Параметры > системный > общий доступ поблизости .
-
В разделе Общий доступ поблизости выберите устройства, с которыми вы хотите предоставлять общий доступ или получать содержимое.
Примечание: Если выбрать Все поблизости, MAC-адрес Bluetooth и имя компьютера становятся доступными для других устройств, расположенных поблизости, чтобы вы могли поделиться с другими компьютерами поблизости. Эта информация может использоваться для связывания вашего компьютера с вашим устройством.
-
Чтобы изменить место хранения получаемых файлов, в разделе Сохранять полученные файлы здесь нажмите кнопку Изменить, выберите новое расположение, а затем нажмите кнопку Выбрать папку.
Общий доступ к вещам
-
На компьютере, с которого вы предоставляете общий доступ, нажмите кнопку Пуск , а затем выберите Параметры > Системный > общий доступ поблизости . Укажите, хотите ли вы предоставлять общий доступ к файлам и получать их всем пользователям или только на собственных устройствах (где вы вошли с помощью учетной записи Майкрософт). Сделайте то же самое на компьютере, с которым собираетесь поделиться.
-
На компьютере с документом, которым вы хотите поделиться, выберите Поиск , введите проводник в поле поиска, а затем выберите документ, к которому вы хотите предоставить общий доступ.
-
В проводник выберите файл, к которому вы хотите предоставить общий доступ, а затем выберите Поделиться на панели инструментов в верхней части окна.
Совет: Существует другой способ предоставления общего доступа: щелкните правой кнопкой мыши (или выберите и удерживайте) файл, к которому вы хотите предоставить общий доступ, а затем выберите в контекстном меню пункт Общий доступ .
-
Выберите имя устройства, с которым вы хотите поделиться.
-
На устройстве, с которым вы предоставляете общий доступ, выберите Сохранить & открыть или Сохранить при появлении уведомления.
-
На компьютере, с которого вы предоставляете общий доступ, нажмите кнопку Пуск , а затем выберите Параметры > Системный > общий доступ поблизости . Укажите, хотите ли вы предоставлять общий доступ к файлам и получать их всем пользователям или только на собственных устройствах (где вы вошли с помощью учетной записи Майкрософт). Сделайте то же самое на компьютере, с которым собираетесь поделиться.
-
На компьютере, с которого вы хотите предоставить общий доступ, откройте Microsoft Edge и перейдите на веб-страницу, к которой вы хотите поделиться.
-
В Microsoft Edge выберите Параметры и другие > Поделиться > параметры общего доступа Windows, а затем выберите имя устройства, которым вы хотите предоставить общий доступ.
-
На устройстве, с которым вы предоставляете общий доступ, нажмите кнопку Открыть , когда появится уведомление, чтобы открыть ссылку в веб-браузере.
-
На компьютере, с которого вы предоставляете общий доступ, нажмите кнопку Пуск , а затем выберите Параметры > Системный > общий доступ поблизости . Укажите, хотите ли вы предоставлять общий доступ к файлам и получать их всем пользователям или только на собственных устройствах (где вы вошли с помощью учетной записи Майкрософт). Сделайте то же самое на компьютере, с которым собираетесь поделиться.
-
На компьютере с фотографией, которой вы хотите поделиться, откройте приложение «Фотографии «, выберите фотографию, которой вы хотите поделиться, выберите Просмотреть дополнительные > Поделиться , а затем выберите имя устройства, с которым вы хотите поделиться.
-
На устройстве, на которое вы предоставляете общий доступ к фотографии, выберите Сохранить & открыть или Сохранить , когда появится уведомление.
Нужна дополнительная помощь?
Нужны дополнительные параметры?
Изучите преимущества подписки, просмотрите учебные курсы, узнайте, как защитить свое устройство и т. д.
| Workable Solutions | Step-by-step Troubleshooting |
|---|---|
| Transfer Files via EaseUS Todo PCTrans | Step 1. Open EaseUS Todo PCTrans on both of your computers. Choose «PC to PC» to go to the next step. Step 2. Make…Full steps |
| Transfer Files over WiFi in Windows 10 | Step 1: Go to «Settings > System > Shared Experience» on the PC. Step 2: Turn on the «Nearby sharing» toggle switch…Full steps |
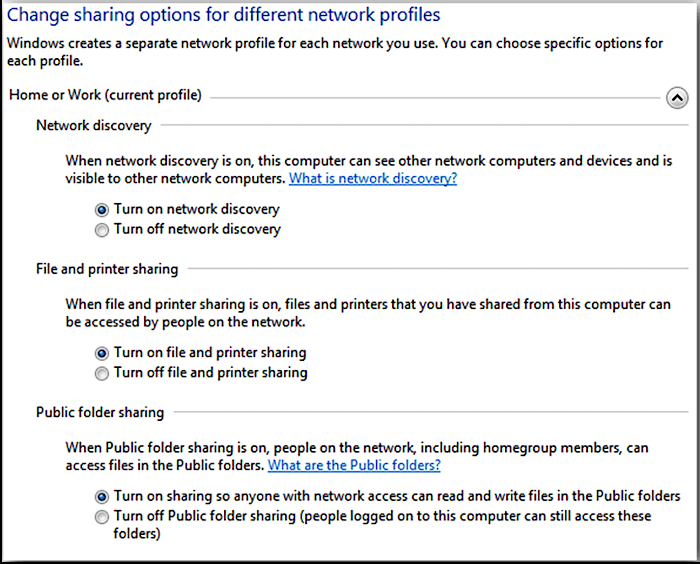
| Transfer Files over WiFi in Windows 7 | Step 1: Click the Network icon and click «Open Networking and Sharing Center». Step 2: Click on «Change advanced…Full steps |
Sometimes, people want to share large files and data between two PCs to free up the storage space. Transferring files from PC to PC used to be a time-consuming and frustrating process. Nowadays, however, it’s as easy as connecting to a Wi-Fi network. Whether you’re looking to transfer photos, music, documents, or other types of files, there are several different ways to do it wirelessly.
Here are some advantages of using WiFi to transfer files between PCs:
- Save money & time
- No extra external device
- Fast speed
- Convenient
Overall, transferring files between PCs via WiFi is an excellent way to get the job done. This article will show you the solution on how to transfer files from PC to PC over wifi. Follow us!
Transfer Files from PC to PC over WiFi — Software [Ease & Safe]
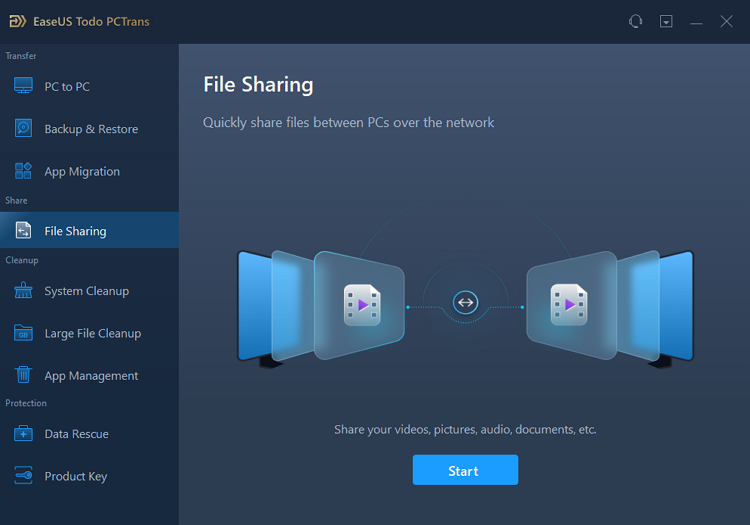
Transferring files from PC to PC over WiFi is a great way to move large amounts of data quickly and easily. There are a few different ways to do this, but we recommend using a third-party transfer software like EaseUS Todo PCTrans. This software makes it easy to transfer files from one PC to another over WiFi, and it offers you a trial version.
Here’s how to transfer files from PC to PC over WiFi using EaseUS Todo PCTrans:
Step 1. Install and open EaseUS Todo PCTrans on source and target PCs. Navigate to the «File Sharing» tab and click «Start» to begin.
Step 2. To build the connection between two PCs, you need to ensure both of them are under the same network. Then, choose the target PC icon or click «Add PC» and enter the other PC’s connection code.
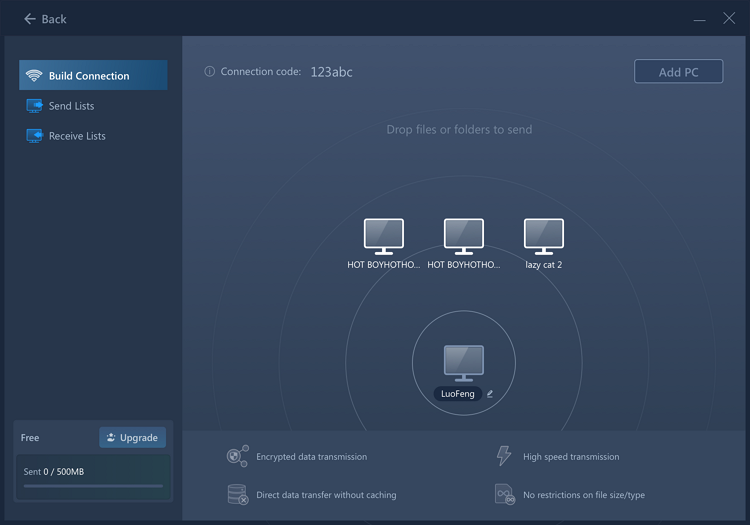
Step 3. Drag and drop the large files that you want to transfer. Then, you can see it in the Receive lists on the target PC.
That’s all there is to it! With just a few simple steps, you can easily transfer files from one PC to another over WiFi using EaseUS Todo PCTrans.
Pros:
- Move installed programs to another drive.
- Data Rescue-Recover data from a broken or dead computer.
- Send files over 20 GB for free
- Seamless data migration for Windows PCs.
- Free Technical Support.
This video covers eight methods of transferring files between laptops:
«Nearby Sharing» is a great new feature in Windows 10/11 that allows users to share files between two PCs nearby over WiFi. The files are transferred over the network, so there is no need for a USB cable or other physical connection. It is a great way to share files between PCs, but it is important to note that it only works with computers that are running Windows 10 or 11. If you are not sure whether your PC has this feature or not, you can check it in your settings option.
Step 1: Go to «Settings > System > Shared Experience» on the PC.
Step 2: Turn on the «Nearby sharing» toggle switch.
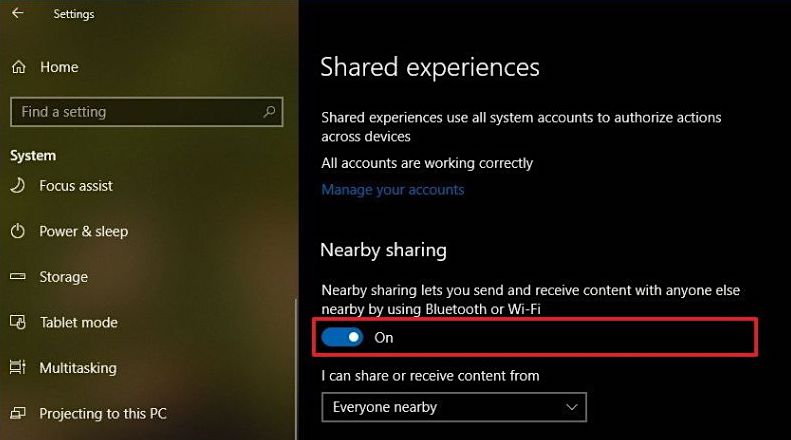
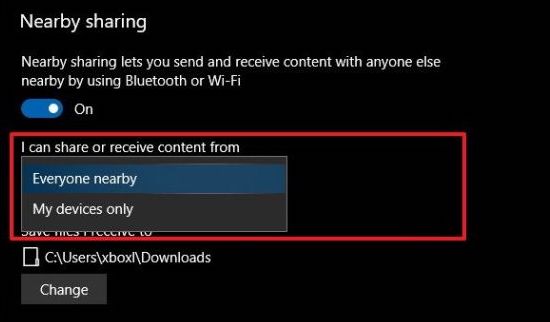
Step 3: Select the sharing pattern from the drop-down menu.
«Everyone nearby» — Your PC will share and receive content from all nearby devices.
«My devices only» — Your PC will share and receive content only with devices using the same Microsoft account.
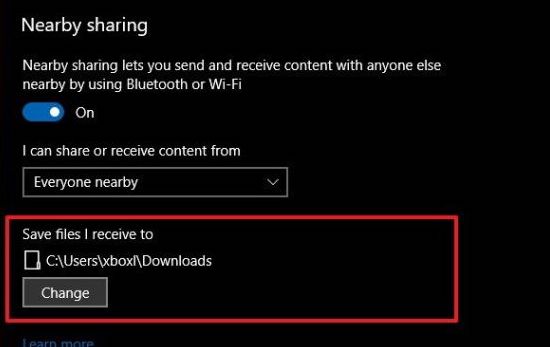
Step 4: Choose the location to save the received files. Click «Change» to change the location.
Then, you can transfer files over WiFi via Nearby sharing. And don’t forget to share this article to help others.
Step 5: Go to the File Explorer. Right-click the file you want to share and click the «Share» option.
Step 6: Select the destination device from the pop-up window.
Step 7: The destination device will receive a notification. Click «Save» or «Save & Open» to start the transfer.
Note: The destination device should be within Bluetooth range and running at least Windows 10. Connecting the source device and the destination one with the same network will improve the transfer speed.
If the Nearby Sharing not working, check the tutorial to fix it:
How to Transfer Files from PC to PC Using WiFi Windows 7
Windows 7 and XP users can enjoy the features of a file-sharing program, which allows them to transfer files over WiFi.
Step 1: Click the Network icon and click «Open Networking and Sharing Center».
Step 2: Click on «Change advanced sharing settings» from the left panel.

Step 3: Choose «Turn on file and printer sharing» under the «File and Printer Sharing» section. Click «Save Changes».
Step 4: Find the file you want to share. Right-click or press it, and select «Give access to» > «Specific people».
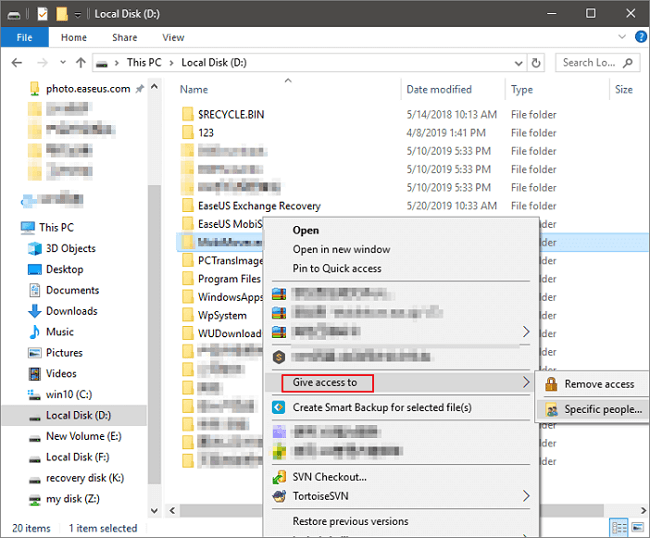
Step 5: From the new pop-up window, select the recipient’s system from the list or choose «Everyone» from the dropdown menu.
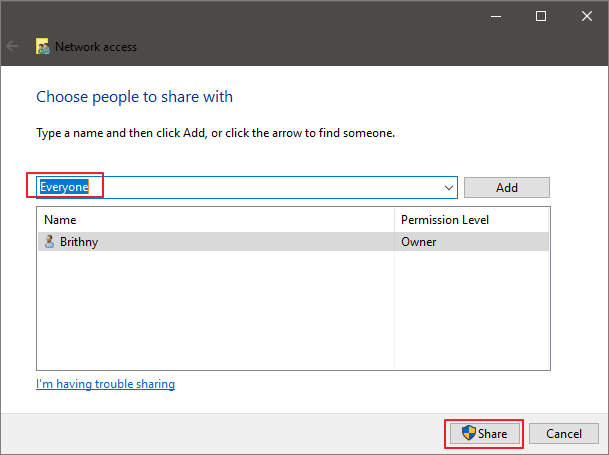
Step 6: Click on «Share» to start sharing the contents of that folder with another system on the same network.
Share these methods to help you transfer files from one PC to another using WiFi.
Conclusion
If you need to transfer files from PC to PC using WiFi, there are a few different ways you can go about it. You can use the file-sharing feature in Windows directly. Besides, you can also use a file transfer program like EaseUS Todo PCTrans to solve the problem of how to transfer files from PC to PC over WiFi. The program is easy to use and transfers files quickly, which is a good option if you need to move large files between two PCs.
FAQs about Transfer Files from PC to PC Wifi
1. Why Near sharing feature is not working on my PC?
Check the Bluetooth and network connection on your PC. You can turn on the Bluetooth toggle switch in «Settings > Devices > Bluetooth & other devices.» You may have to install the latest Bluetooth driver on your device.
2. Is transferring files from PC to PC over WiFi the best way to transfer files?
There are a few things to consider when sending files from PC to PC. If you want to send 1-2 GB of files, you can use WIFI to send them. However, WIFI is not always the best option, especially when you need to send files more than 10 GB. You may consider using a USB cable or other external storage devices such as SDD or HDD.
3. Can I transfer files over WiFi from PC to Android?
Yes, you can transfer files from PC to Android via Bluetooth, cloud service, network, or other third-party apps.
4. How do you transfer files from PC to PC using a USB cable?
To do so, you need a USB-to-USB bridging cable or USB networking cable. The PC data transfer cable has a small electronic circuit in the middle, allowing the two PCs to talk to each other. Once the machines are connected successfully, you can quickly transfer files from one computer to another. Learn more details about how to transfer files from PC to PC using a USB cable.
Если вам требуется передать файлы между двумя компьютерами или ноутбуками Windows 11/10, при этом они находятся рядом и в одной сети, обмен файлами можно осуществить без использования кабелей, флешек, настройки сети или стороннего ПО — с помощью встроенной функции «Обмен с устройствами поблизости» (или «Трансляция поблизости»).
В этой инструкции подробно о том, как использовать Обмен с устройствами поблизости в Windows последних версий для беспроводной передачи файлов между устройствами и дополнительная информация, которая может быть полезной. На близкую тему: Обмен с окружением между Windows и Android.
Использование функции обмена с устройствами поблизости
Для того, чтобы воспользоваться функцией, обмен с устройствами поблизости должен быть включен как на ПК или ноутбуке, отправляющем файле, так и на принимающем устройстве. Включить функцию можно следующими способами:
- С помощью кнопки в панели быстрых действий:
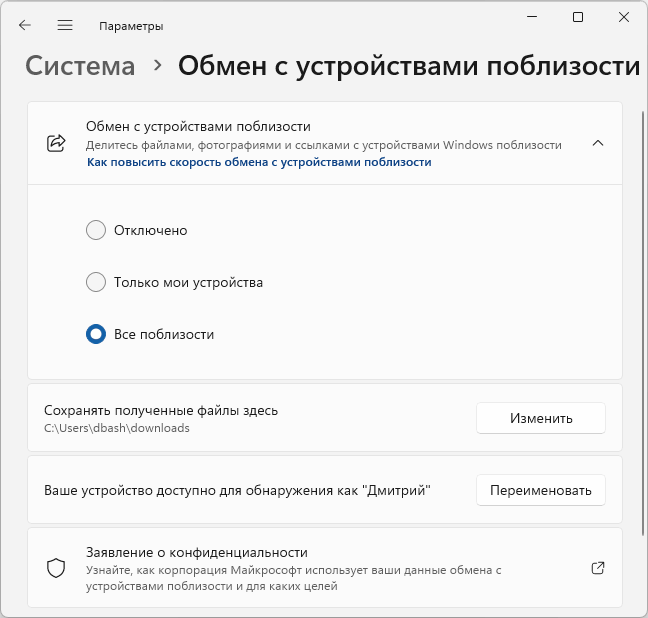
- В Параметры — Система — Обмен с устройствами поблизости в Windows 11 или Параметры — Система — Общие возможности — Передача между устройствами в Windows Там же можно настроить, возможна ли передача только между своими устройствами (с одной учетной записью Майкрософт) или между всеми устройствами.

- На компьютере, с которого отправляются файлы — непосредственно при отправке.
После того, как функция включена на обоих устройствах, для отправки файла или нескольких достаточно выполнить следующие действия:
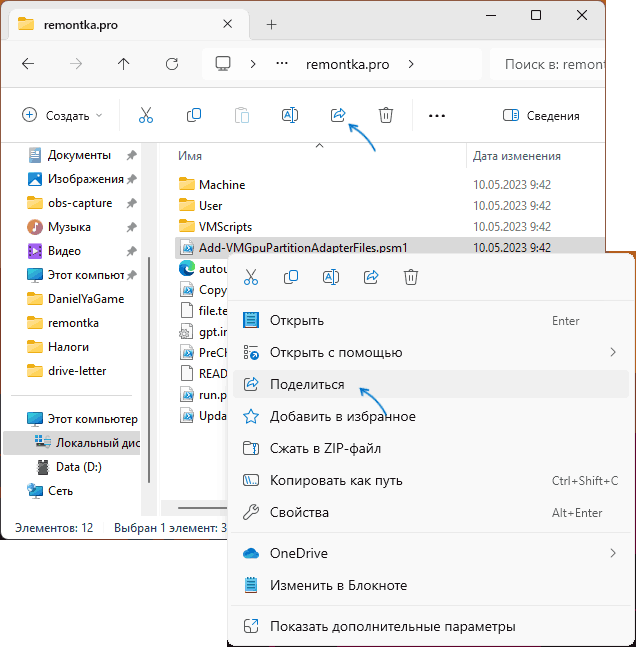
- Выберите файл или группу файлов, нажмите по ним правой кнопкой мыши и выберите пункт «Поделиться», либо используйте кнопку «Поделиться» в Проводнике.

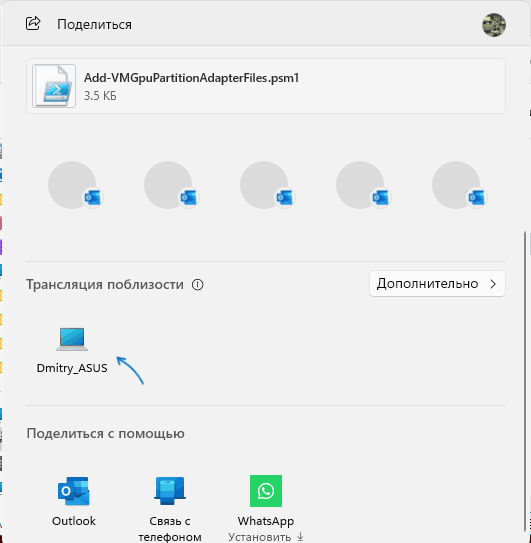
- В разделе «Трансляция поблизости» выберите устройство, на которое требуется отправить файлы (должно отобразиться после непродолжительного поиска, при условии, что оно находится рядом, а Wi-Fi и Bluetooth на нём включены), появится уведомление об ожидании подтверждения принимающей стороны.

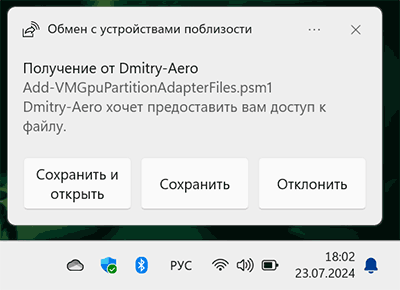
- Подтвердите получение файла на принимающем компьютере — в скором времени выбранные файлы будут отправлены и сохранены в папку «Загрузки» (по умолчанию, можно изменить в параметрах обмена с устройствами поблизости).

- Помимо файлов, можно делиться ссылками из Microsoft Edge с помощью меню «Поделиться».
В моём тесте всё работало исправно и без каких-либо нареканий.
Единственное условие — включенный Wi-Fi и Bluetooth модули на обоих устройствах, желательно подключение к одной беспроводной сети. Несмотря на то, что на официальном сайте Майкрософт фигурирует «или», у меня отключение любого из модулей отключало и функцию обмена с устройствами поблизости.
File transfer between two computers is probably one of the most straightforward tasks. If you have the slightest knowledge about how computers operate, you can quickly transfer files between two laptops. But things start to get a bit tough when you do not have any external data transfer device handy with you. So, what if you want to share files between two Windows 10 PCs and you do not have a USB device to transfer files?
Well, in that case, we are going to take a look at a couple of methods that you can use to transfer data between two laptops wirelessly. Here, we will focus on using Wi-Fi for file sharing. Why? Because using WiFi offers a broader bandwidth for data transfer, making the whole file transfer process fast.
One of the methods to transfer files wirelessly is through Bluetooth. We will not talk about that because the file transfer speed via Bluetooth is comparatively prolonged. It would take hours to transfer a file over Bluetooth that could be shared within minutes using WiFi file sharing.
You will read all you need to know about sharing files between PCs through WiFi in the following sections.
Table of Contents
Is it Possible to Transfer Files Between 2 Laptops using WiFi?
It is possible to transfer files from one computer to another through WiFi. There is more than one method to do so. You can choose any of the methods provided below according to your ease and understanding.
Advantages of Transferring Files between Laptops using WiFi
Before we look into the methods to transfer files from one laptop to another wirelessly, it is essential to know its advantages. It has several plus points that make it advantageous over conventional file transfer modes, such as file sharing via USB memory drives. Let us take a look:
- No External USB Memory Drive Hardware Required: Usually, we look for a USB Flash Drive or a USB Hard Disk Drives whenever we want to transfer files from one PC to another. Moving files through WiFi gives you freedom from using any external device to share data between two PCs. All you need is an active WiFi connection.
- Fast Data Transfer: Sharing files over WiFi lets you transfer files between PCs faster. When two laptops are connected over WiFi, the bandwidth to transfer files is high. Moreover, the time taken to copy files from one PC into an external drive and then to move those files from the memory drive to another PC is also reduced. Through Wi-Fi, files are directly copied from a PC to another, reducing the time by half. Furthermore, the transfer rate is also high, which also reduces the overall time taken for transferring files on the local network.
- Secure Transfer: Using WiFi to transfer data also keeps you safe from threats. Using a flash drive or memory drive can be harmful to your PC as they may contain viruses or some malware. Using WiFi to share the file you want makes you steer clear of this threat.
Here, we will discuss two ways through which you can transfer the files you want between two laptops using WiFi. One of the methods can be carried out using Windows 10’s default tool named Nearby Sharing. Another technique that we will talk about requires third-party software to transfer files between Windows 10 computers. Let us check out the methods:
Use Nearby Sharing to Transfer Files in Windows 10
Nearby Sharing is a feature introduced in Windows 10 that lets you share data between multiple PCs. The only requirement to share files is that the laptops must be connected to the same wireless network connection. Before proceeding with this method, you must make sure that both laptops are connected to the same WiFi connection. Once both the PCs are connected to the same WiFi network, go ahead and follow the steps that are provided below:
Note: The steps provided below must be carried out on both the laptops between which files are to be shared.
Step 1: Open the Settings app on both computers. For this, press the Win + I keys on the keyboard.
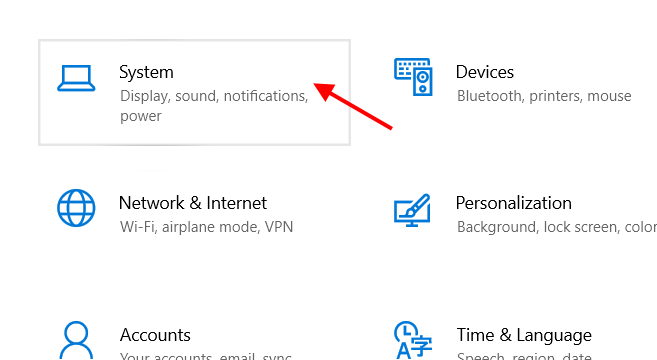
Step 2: As the Settings app opens, you will find many options on the screen. Click on the System option.
Step 3: A new Settings window will now load. Here, see the left panel and select the Shared experience option. Go to the panel on the right-hand side and turn on the toggle switch below the Nearby sharing section.
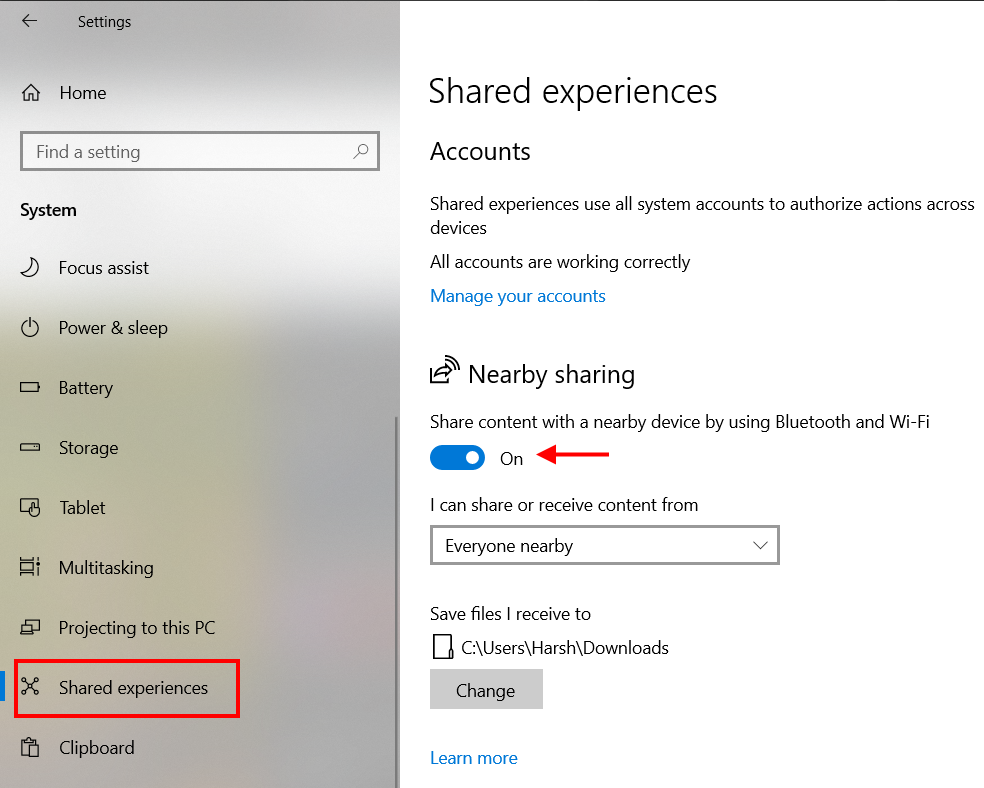
Step 4: Now, go to the dropdown menu available below the I can share or receive content from section and select the Everyone nearby option.
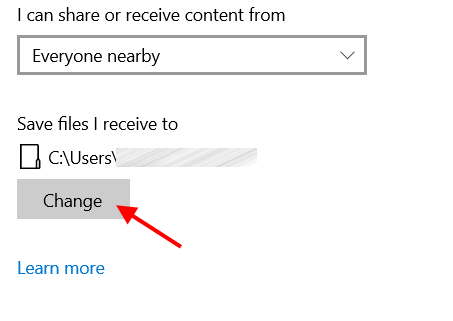
Step 5: If you want, you can select the folder location where you would like to store the files being transferred to your PC. Click on the Change button and select the folder where you would prefer to keep the shared file.
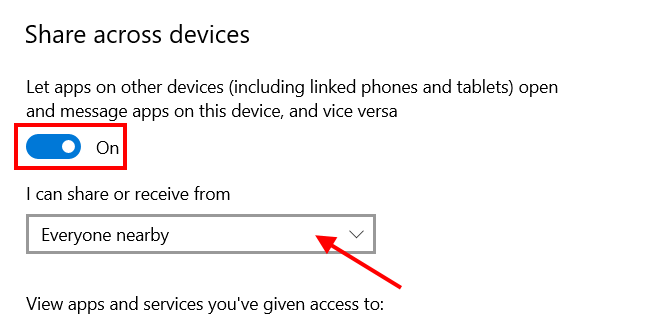
Step 6: Scroll down a bit further on the same screen. Below the Share across devices section, you will find a toggle switch. Turn the switch to On. Once done, you will find a dropdown menu below. Click on it and make sure that the Everyone nearby option is selected.
Additional steps:
Once you have made the preferred changes in the Nearby Sharing through the Settings app, you can now quickly switch Nearby Sharing on or off through the Action Center menu.
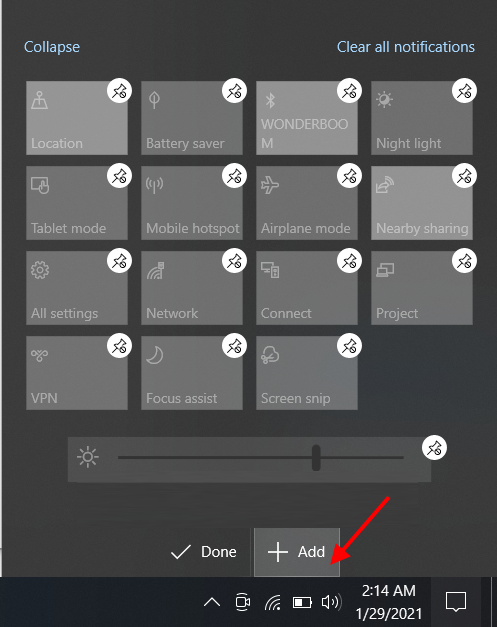
Press the Win + A keys together to launch the Action Center menu. Here, you will find a couple of default options. If you cannot see the Nearby Sharing option, click on the Expand option. Now, you will be able to see the Nearby Sharing button. By clicking on the button, you can toggle Nearby Sharing on or off. When the button is blue, the sharing is on and vice-versa.
If you cannot find the Nearby Sharing option in the Action Center menu, don’t be afraid. You can make a bit of tweak in the Windows Settings to place the Nearby Sharing button in the menu. Here’s how:
Open the Settings app; for this, press Win + I keys. In the Settings app, select the System option.
On the new screen, click the Notifications & action option from the left panel. After this, go to the right panel and select the Edit your quick actions option.
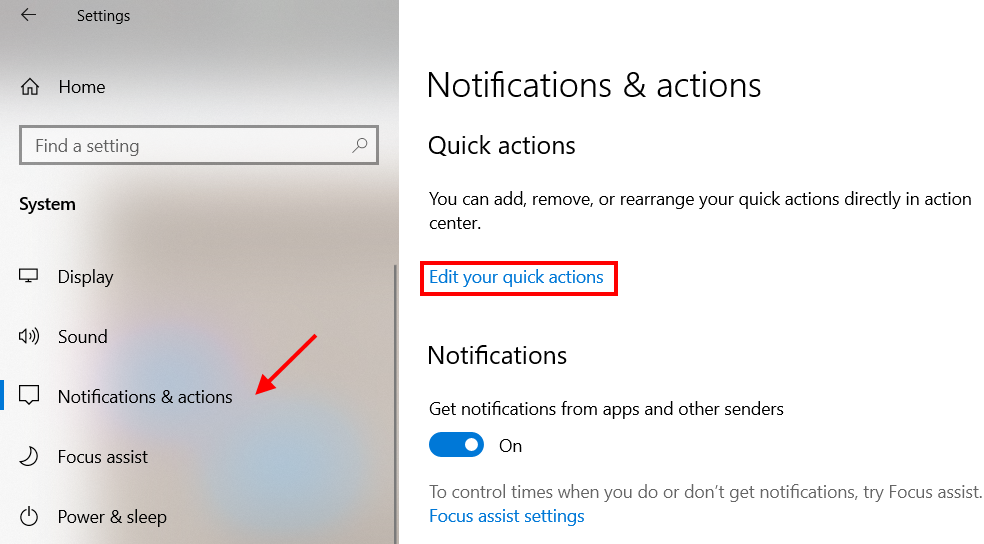
The Action Center menu will open on the right corner of the screen. Here, click on the +Add button. A popup menu will open where you will be able to find the Nearby sharing option. Add it to the menu, and you will be all set.
That is it. Till here, you carried out all the necessary steps required for your PC to share files through WiFi to another PC. Next up are the steps that are needed to transfer files between laptops in Windows 10.
Steps for Sharing Files from one laptop to another
Now that you are done with the settings, it’s time to check out the steps involved in sharing files. The steps are pretty simple once Nearby sharing settings have been made. Find out how:
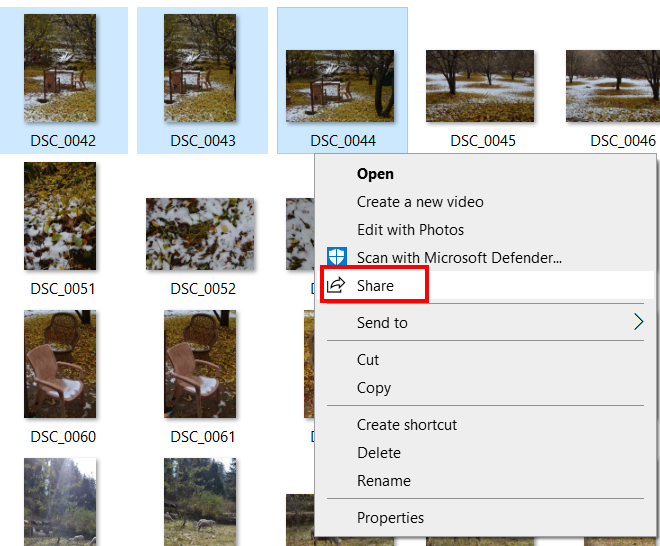
Step 1: Go to the laptop from which you need to send the file(s). Open File Explorer and go to the folder where the desired file(s) to transfer has been stored. Select the file(s), then make a right-click. A context menu will open. From the menu, select the Share option, as shown in the following screenshot.
Step 2: A new pop-up window will open. Here, you will find all the sharing options. Among one of the sections, you will find the other PC’s icon with its name. Click on the icon to initiate the transfer of the file you want to share.
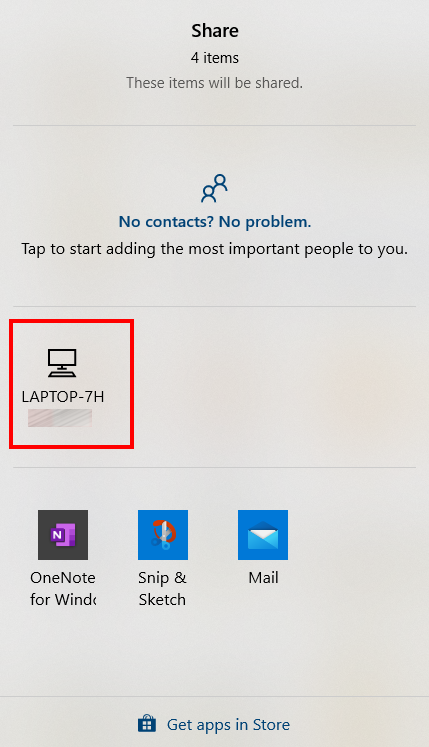
After initiating the transfer, go to the other PC. There, you will get a notification regarding the transfer of the file. You can choose to decline, save, or save and view the file(s). Select the save or save and view option according to your choice. The file will be kept at the folder location set by you, as mentioned in Step 5 mentioned above.
Now, if you want to carry out file transfer the other way around, you can follow the same steps. You have to make sure that the Nearby sharing option is enabled on both laptops running on Windows 10 operating system.
Use SHAREit to Transfer Files
SHAREit is a popular cross-platform file-sharing software. This agile application lets you share files between a variety of devices. You can transfer files to and fro on devices like Windows 10 PC, Android Devices, iOS devices, and MAC computers. The transfer of files is carried out using the wireless connection of the devices themselves. This means that you do not even require the devices to be connected to the same wireless network.
SHAREit lets the devices connect wirelessly through a P2P connection. Let us find out how:
Step 1: You will need to download and install SHAREit on both Windows 10 laptops. For this, go to the SHAREit Download Page. Download the .exe file from the link available under the Download SHAREit for PC section on the download page.
Step 2: After downloading the .exe file, make sure to install the software—launch SHAREit on both the computers after the installation.
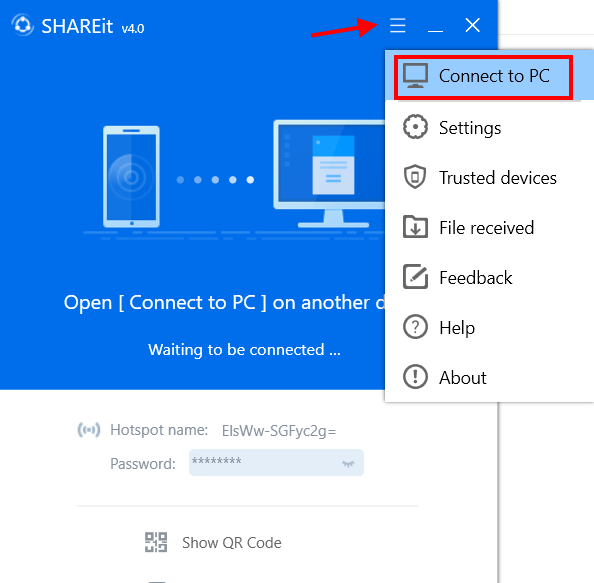
Step 3: When the SHAREit interface opens, click on the top panel’s menu icon. From the menu that opens, select the Connect to PC option.
Step 4: Once the other PC is found on your laptop, it will appear on the interface, as shown below. Click on the icon to establish a connection.
Step 5: When you try to connect to the other laptop, you will see a notification on the other PC. Click on the Accept button.
Step 6: Now, go to the first PC from which you want to transfer the file(s). On the SHAREit interface, you can now drag and drop the files that you want to share. You can also manually select files through the File Explorer window by clicking on the Select Files button.
As the files are transferred, you will see a progress bar that shows the status of sharing.
As the required files are shared, go to the SHAREit interface, then click on the Disconnect button.
SHAREit lets you select the folder where you need to save the transferred files on your PC. For this, go to the SHAREit interface, click on the Menu button and select the Settings option. Here, you can change the download file location. You can also access all the shared files via SHAREit instantly. You need to open the SHAREit menu and click on the File received option.
Closing Words
Here we got to know about all the methods you can use on your Windows 10 computers to transfer files between two laptops using a wireless network. In my opinion, the Nearby Sharing option is the best way to carry out the transfer of files between two computers. It doesn’t require you to use any third-party software. All the necessary steps can be carried out using the default settings of Windows 10. However, using SHAREit has its perks. With it, you can transfer data between two laptops and between different devices based on other platforms.