
Quick Answer: To mirror your webcam on Windows 10, you can use the built-in Camera app or third-party software like ManyCam or OBS Studio. These tools allow you to display your webcam feed in a mirrored format, which can be useful for various purposes like video conferencing or creating mirrored videos for tutorials or presentations. In this blog article, we will guide you step-by-step on how to mirror your webcam on Windows 10 using both the Camera app and third-party software. So, let’s get started!
Are you looking for a way to mirror your webcam on Windows 10? Whether you need it for video conferencing, creating mirrored videos for tutorials, or just for your personal preference, we’ve got you covered. In this article, we will show you how to mirror your webcam in a few simple steps. No need to worry if you’re not a tech pro – we’ll guide you through it in a conversational style. So, let’s dive right in!
First, let’s explore how to mirror your webcam using the built-in Camera app on Windows 10. If you prefer using third-party software, we’ll also walk you through the process using tools like ManyCam or OBS Studio.
Whether you’re a professional or someone who simply enjoys playing around with technology, mirroring your webcam on Windows 10 can be a useful feature. So, let’s explore the different methods and find the one that suits you best.
Windows 10 offers a range of features and functionalities, and one of the most useful is the ability to mirror your webcam. This can be particularly handy for various purposes such as video conferencing, live streaming, or simply monitoring your surroundings in real-time. In this article, we will guide you through the step-by-step process of how to mirror your webcam on Windows 10, allowing you to make the most of this useful feature.
Step 1: Check Webcam Compatibility
Before proceeding, it’s essential to ensure that your webcam is compatible with Windows 10. Most modern webcams will work seamlessly with the operating system; however, it’s always a good idea to check for any specific driver updates or compatibility issues. Visit the manufacturer’s website or consult the user manual to gather all the necessary information.
Step 2: Launch the Camera App
To initiate the process of mirroring your webcam on Windows 10, open the Camera app. You can do this by clicking on the Start menu and typing “Camera” in the search bar. Once the Camera app appears in the search results, click on it to launch the application.
Step 3: Access Camera Settings
Once the Camera app is open, you should see the live view from your webcam. To access the webcam settings, click on the gear icon located at the top left corner of the app window. This will open the Settings menu, where you can customize various options to enhance your webcam experience.
Step 4: Enable Webcam Mirroring
Within the Camera app’s Settings menu, you need to enable the mirror mode for your webcam. Look for an option such as “Mirror my video” or “Flip horizontally.” Toggle the switch to enable this setting. Once enabled, your webcam will mirror the video feed, allowing you to see a mirrored image on the screen.
Step 5: Adjust Webcam Settings
In addition to mirroring the webcam, you can also adjust various other settings to optimize your video output. Experiment with options such as brightness, contrast, exposure, and white balance to achieve the desired image quality. Take some time to explore these settings and find the best configuration for your needs.
Step 6: Test the Webcam Mirroring
After making the necessary adjustments, it’s time to test the webcam mirroring. Close the Camera app’s Settings menu and return to the webcam’s live view. You should now see the mirrored video feed. Smile, wave, or move around to ensure that the mirroring is working correctly, and you’re satisfied with the result.
Step 7: Utilize Webcam Mirroring for Various Purposes
Now that your webcam is successfully mirrored on Windows 10, you can leverage this feature for multiple applications. Here are some practical examples:
- Video Conferencing: During video calls and conferences, mirrored video can help you see how others view you, making it easier to adjust your appearance or gestures accordingly.
- Content Creation: If you record video tutorials or create content that involves showcasing objects or demonstrating actions, a mirrored webcam can provide a more natural viewing experience for your audience.
- Live Streaming: Whether you’re streaming games, events, or any other live content, mirrored video can make it easier for you to interact with your viewers, as your movements will match their expectations.
- Surveillance: If you’re using your webcam for surveillance purposes, mirroring the video feed can help you monitor your surroundings more efficiently, as it presents a familiar perspective.
Feel free to explore and experiment with the mirrored webcam feature on Windows 10, as it can significantly enhance your video-related activities.
How to Flip, Mirror & Rotate Webcam on Windows & Mac
Frequently Asked Questions
How do I mirror my webcam on Windows 10?
To mirror your webcam on Windows 10, follow these steps:
- Open the Start menu and click on the “Settings” icon.
- In the Settings window, click on “Privacy.”
- Choose “Camera” from the left menu.
- Toggle the switch under “Allow apps to access your camera” to the “On” position.
- Scroll down to the “Choose which Microsoft Store apps can access your camera” section and ensure the app you want to use is enabled.
- Launch the app that you want to use with your webcam.
- Look for an option within the app’s settings to mirror the camera feed.
- Enable the mirror option, and your webcam feed will be mirrored.
Can I mirror my webcam using third-party software?
Yes, there are numerous third-party software options available that allow you to mirror your webcam on Windows 10. Some popular examples include ManyCam, WebcamMax, and SplitCam. These applications offer additional features and effects along with the ability to mirror your webcam feed. Make sure to download and install a reputable software from a trusted source, and follow the instructions provided by the respective application.
Why would I want to mirror my webcam?
There are several reasons why you might want to mirror your webcam on Windows 10. One common use case is for video conferencing or online meetings, where mirroring the webcam can ensure that your movements and gestures appear consistent to the receiver. Additionally, if you are recording videos or streaming content, mirroring the webcam can help you adjust the orientation and ensure the final output appears as intended to your audience.
What if I don’t see the mirror option in my webcam app?
If your webcam app does not have a built-in mirror option, you can try using a third-party software that offers this feature. Alternatively, you can use video conferencing or streaming applications that provide mirror options within their settings. Remember to check the software’s documentation or support resources to verify if the mirror functionality is available.
Can I mirror my webcam on Windows 10 without any additional software?
Yes, you can mirror your webcam on Windows 10 without any additional software by utilizing the built-in camera settings. Follow the steps mentioned in the first question to access the camera settings and enable mirroring. However, some webcam apps or external software might provide more flexibility and additional features that might enhance your overall experience.
Final Thoughts
To mirror your webcam on Windows 10, follow these simple steps. First, open the Camera app on your computer. Then, click on the settings icon and select “Change camera” to ensure the correct webcam is active. Next, click on the three dots in the upper right corner and choose “Settings.” From there, select the “Mirror my video” option to enable the mirroring effect. Now, your webcam will display a mirrored image. It’s that easy! Mirroring your webcam on Windows 10 allows for a more natural and intuitive video experience.
Перевернутое изображение веб камеры — как исправить?
Частая и распространенная проблема многих пользователей — перевернутое изображение веб-камеры ноутбука (и обычной USB веб-камеры) в Skype и других программах после переустановки Windows или же обновления каких-либо драйверов. Рассмотрим, как исправить эту проблему.
При этом будет предложено три варианта решения: с помощью установки официальных драйверов, с помощью изменения настроек веб-камеры, а также, если ничто другое не помогает — с использованием сторонней программы (Так что если вы все перепробовали — можете прямиком перейти к третьему способу).
1. Драйвера
Самый частый вариант возникновения ситуации — именно в скайпе, хотя возможны и другие варианты. Наиболее частая же причина того, что видео с камеры вверх ногами — драйвера (или, вернее, не те драйвера, что нужны).
В случаях, где причиной перевернутого вверх ногами изображения являются драйвера, это происходит когда:
- Драйвера были установлены автоматически при установке Windows. (Или так называемой сборки «где есть все драйвера»).
- Установка драйверов была произведена с использованием какого-либо драйвер-пака (например, Driver Pack Solution).
Для того, чтобы узнать, какой драйвер установлен для вашей веб камеры, откройте диспетчер устройств (наберите «Диспетчер устройств» в поле поиска в меню «Пуск» в Windows 7 или на начальном экране Windows 8), затем найдите свою веб-камеру, которая обычно находится в пункте «Устройства обработки изображений», кликните по камере правой кнопкой мыши и выберите «Свойства».
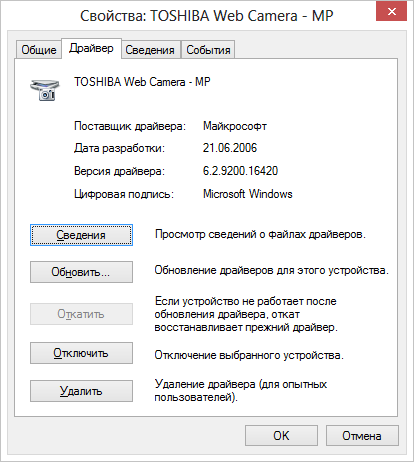
В диалоговом окне свойств устройства откройте вкладку «Драйвер» и обратите внимание на поставщика драйвера и дату разработки. Если вы увидите, что поставщик — Microsoft, а дата далека от актуальности, то практически точно причина перевернутого изображения именно в драйверах — у вас на компьютере используется стандартный драйвер, а не тот, который специально предназначен именно для вашей веб-камеры.
Для того, чтобы установить правильные драйвера, зайдите на официальный сайт производителя устройства или же вашего ноутбука, где все нужные драйвера можно скачать полностью бесплатно. Более подробно о том, где найти драйвера именно для вашего ноутбука вы можете прочесть в статье: Как установить драйвера на ноутбук (откроется в новой вкладке).
2. Настройки веб-камеры
Иногда может случиться так, что даже несмотря на то, что для веб-камеры в Windows установлены те драйвера, которые разработаны специально для использования с этой камерой, изображение в скайпе и в других программах, использующих ее изображение все равно остается перевернутым. В этом случае, возможности вернуть изображение в нормальный вид можно поискать в настройках самого устройства.
Самый простой и быстрый способ для начинающего пользователя попасть в настройки Web камеры — запустить Skype, в меню выбрать «Инструменты» — «Настройки» — «Настройки видео», затем, под своим перевернутым изображением нажать «Настройки веб-камеры» — откроется диалоговое окно, которое для разных моделей камеры будет выглядеть по-разному.
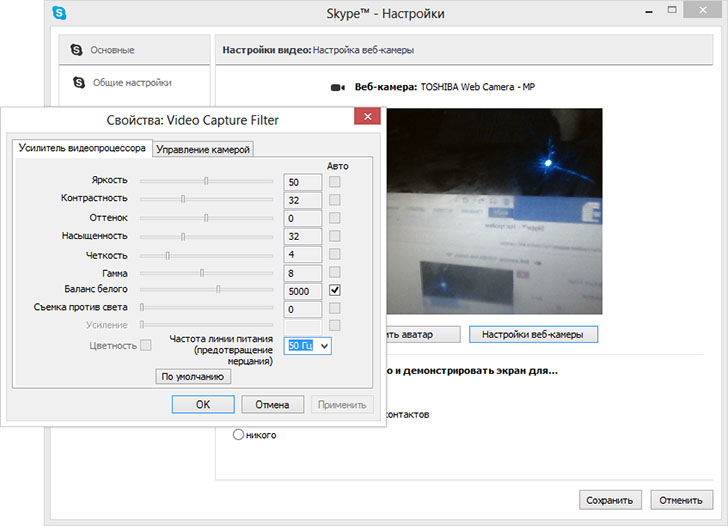
Например, у меня возможность для поворота изображения отсутствует. Однако для большинства камер такая возможность есть. В английском варианте это свойство может называться Flip Vertical (отразить по вертикали) или же Rotate (поворот) — в последнем случае, нужно задать поворот на 180 градусов.
Как я уже сказал, это простой и быстрый способ попасть в настройки, так как скайп почти у всех есть, а в панели управления или устройствах камера может и не отображаться. Еще один несложный вариант — воспользоваться программой для управления вашей камерой, которая, скорее всего, была установлена одновременно с драйверами еще при выполнении первого пункта этого руководства: там так же могут присутствовать необходимые возможности для поворота изображения.
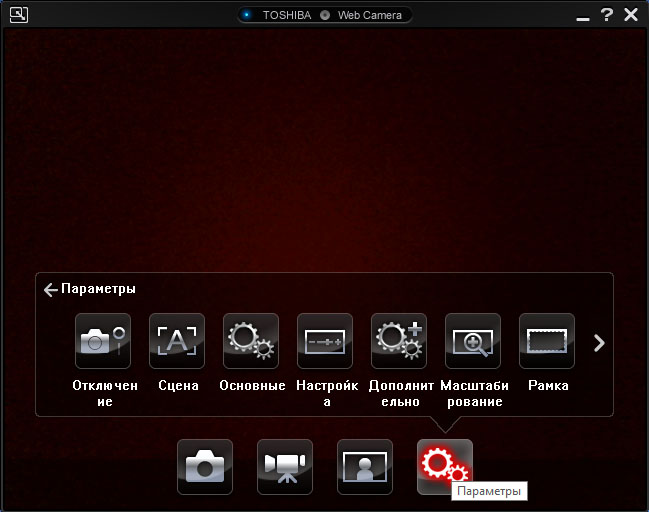
Программа управления камерой от производителя ноутбука
3. Как исправить перевернутое изображение веб-камеры с помощью сторонних программ
Если ничто из вышеперечисленного не помогло, все равно остается возможность перевернуть видео с камеры таким образом, чтобы оно отображалось нормально. Один из лучших и почти гарантированно работающих способов — программа ManyCam, которую вы можете скачать бесплатно здесь (откроется в новом окне).
Установка программы не представляет особых сложностей, только рекомендую отказаться от установки Ask Toolbar и Driver Updater, которые программа попытается установить заодно с собой — этот мусор Вам не нужен (нужно нажимать Cancel и Decline там, где вам их предлагают). В программе поддерживается русский язык.
После запуска ManyCam, проделайте следующее:
Готово — теперь изображение в скайпе будет нормальным. Единственный недостаток бесплатной версии программы — ее логотип внизу экрана. Тем не менее, изображение будет показываться в нужном Вам состоянии.
Если я вам помог, то прошу поделиться этой статьей, используя кнопки социальных сетей внизу страницы. Удачи!
Все способы:
- Шаг 1: Поиск и установка драйверов
- Шаг 2: Включение веб-камеры
- Шаг 3: Управление разрешениями
- Шаг 4: Активация опции «Windows Hello»
- Шаг 5: Настройка камеры в Skype
- Вопросы и ответы: 10
Если вы обладаете веб-камерой как отдельным устройством и еще не подключили ее к компьютеру, перед началом настройки обязательно сделайте это. Весь процесс состоит всего из пяти простых шагов, ознакомиться с которыми можно по ссылке ниже.
Подробнее: Подключение веб-камеры к компьютеру
Шаг 1: Поиск и установка драйверов
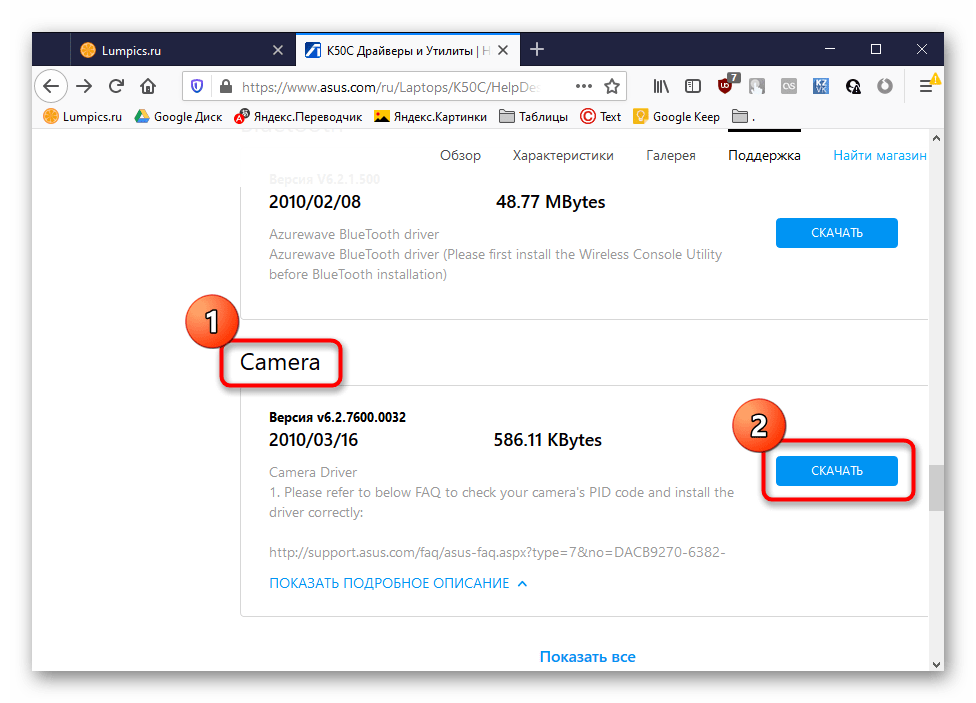
Перед началом использования веб-камеры потребуется установить соответствующий драйвер, разработанный производителем оборудования. Конечно, функциональность Windows 10 подразумевает то, что файлы, обеспечивающие нормальную работу устройства, должны быть найдены и инсталлированы автоматически, но это происходит далеко не всегда. Обладатели ноутбуков могут ознакомиться с представленной далее статьей на примере ASUS, чтобы понять принцип поиска драйверов всеми доступными способами.
Подробнее: Устанавливаем драйвер веб-камеры для ноутбуков ASUS
Что касается юзеров, приобретших веб-камеру отдельно, например, для своего компьютера, то для них поиск соответствующего программного обеспечения немного отличается. На нашем сайте собраны руководства по самым популярным моделям от известных производителей подобных девайсов. Кликните по одному из расположенных далее заголовков, чтобы перейти к прочтению подходящих инструкций.
Подробнее: Скачивание драйверов для веб-камеры Logitech / Genius / A4Tech / Defender / Trust Webcam
Шаг 2: Включение веб-камеры
Не всегда веб-камера активируется автоматически сразу же после подключения к ПК или установки операционной системы на ноутбук. У обладателей лэптопов есть дополнительная опция, позволяющая регулировать активность камеры. Они могут включать ее или отключать при помощи функциональных клавиш F1-F12. Необходимо лишь изучить значки, которые находятся на самих клавишах, чтобы понять, какая из них отвечает за управление. В ОС тоже есть функция, активирующая веб-камеру для устройства. Более детально об этом читайте далее.
Подробнее: Включение камеры в Windows 10
Шаг 3: Управление разрешениями
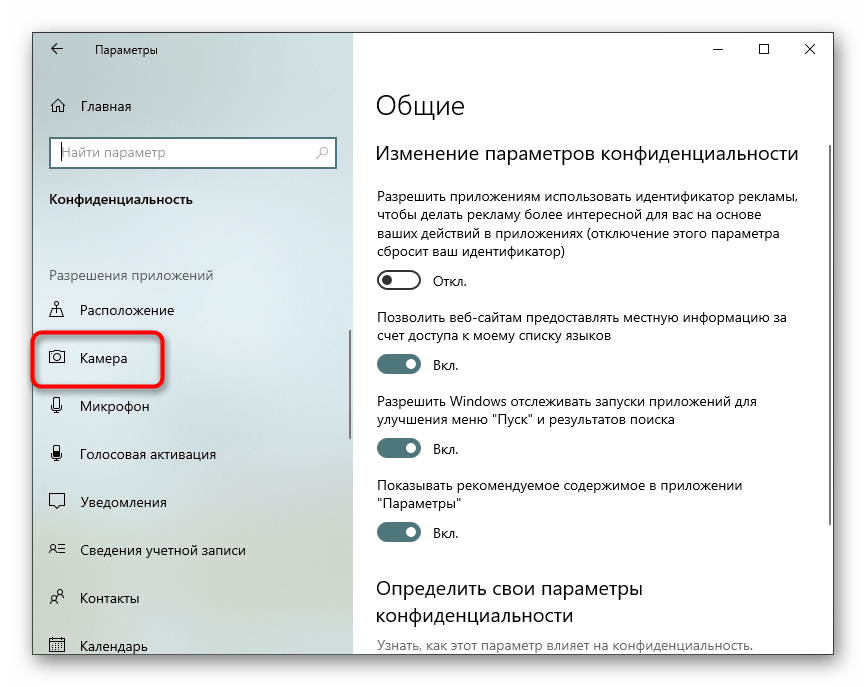
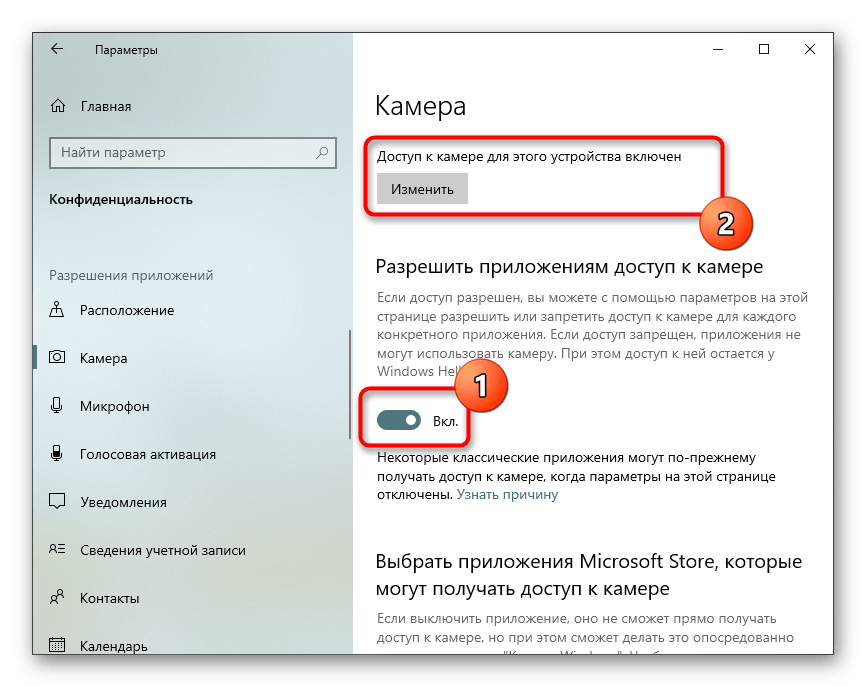
В Виндовс 10 разработчики уделили должное внимание конфиденциальности, позволяя каждому устройству настроить свои разрешения в общем для системы и отдельно для каждого приложения. Относится это и к веб-камере, поэтому следующий алгоритм и будет посвящен данной теме.
- Откройте меню «Пуск» и перейдите оттуда в «Параметры».
- Опуститесь вниз по списку и выберите раздел «Конфиденциальность».
- Через левую панель переместитесь к пункту «Камера».
- Первая кнопка «Изменить», расположенная вверху, позволяет вовсе отключить веб-камеру, чтобы компьютер или ноутбук не мог ее использовать. Второй переключатель отвечает за общий доступ к девайсу для всех приложений.
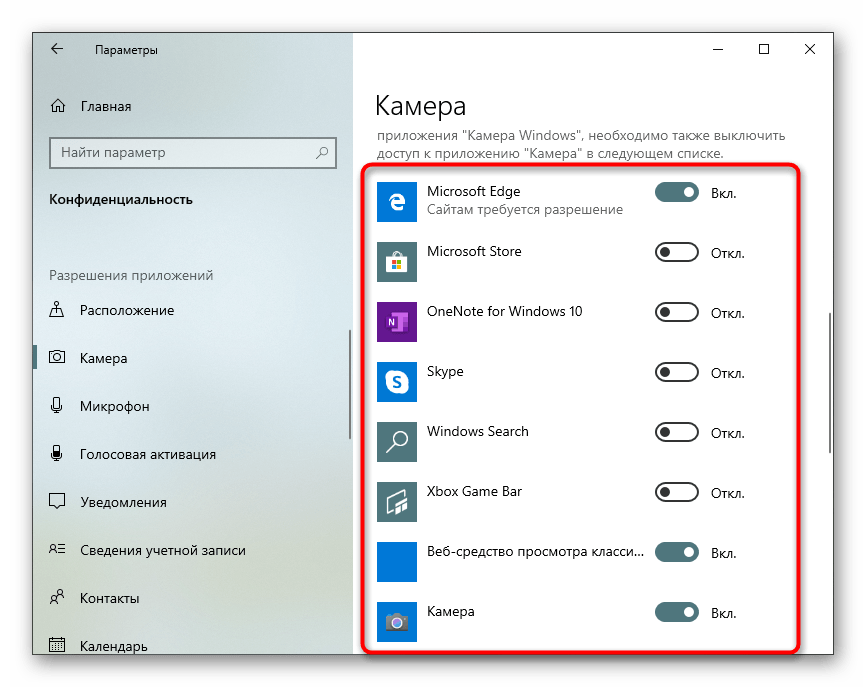
- Немного ниже вы увидите список с доступными программами. Устанавливайте для каждой из них свои ограничения или разрешения, перемещая расположенные напротив ползунки.


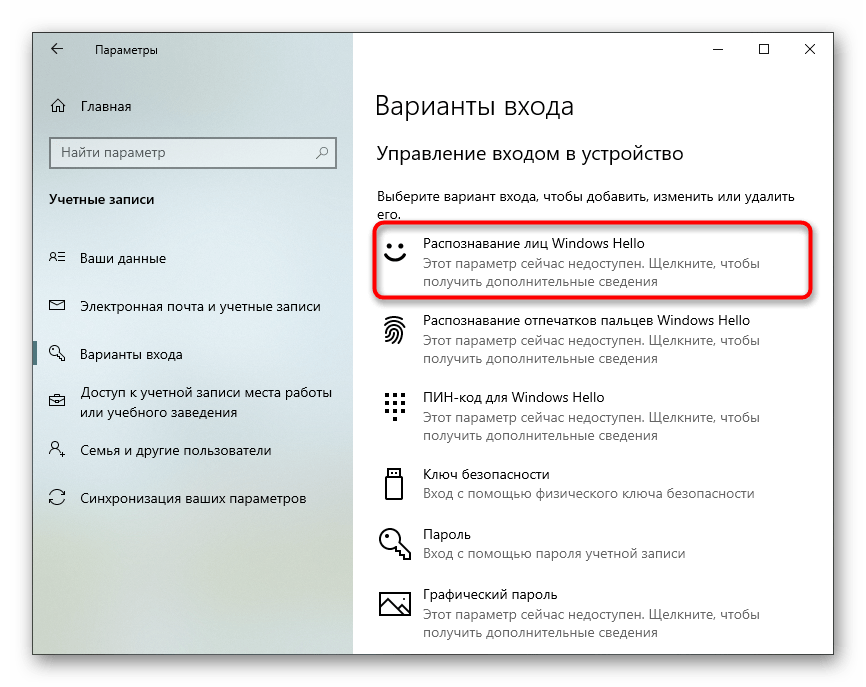
Шаг 4: Активация опции «Windows Hello»
Встроенная в Виндовс 10 функция под названием «Windows Hello» позволяет авторизовываться в системе без ввода пин-кода или установленного пароля. При открытии крышки ноутбука или включении веб-камеры происходит сканирование лица и вход в ОС автоматически разрешается. Однако для этого само действие сначала нужно настроить, добавив в память фото своего лица.
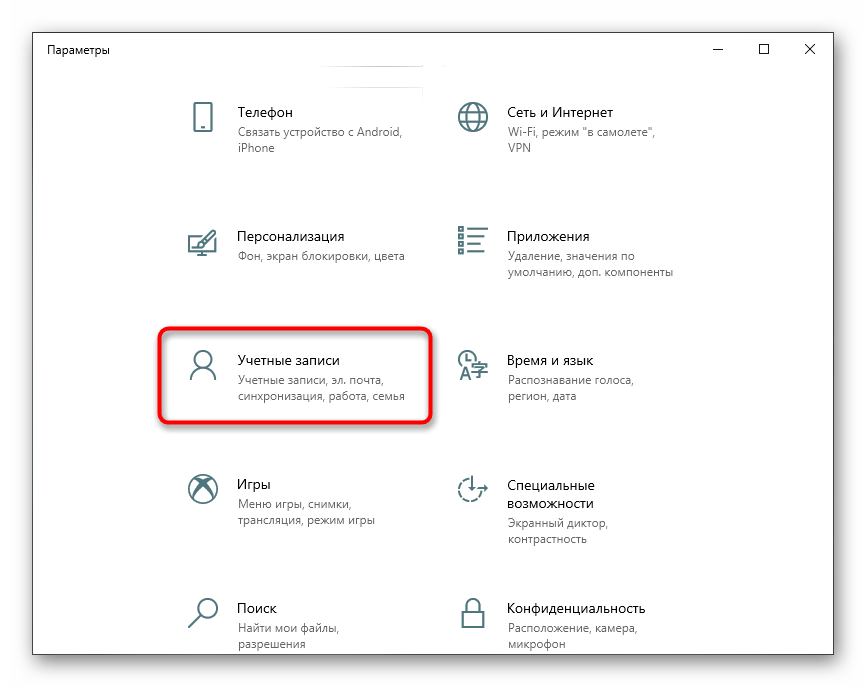
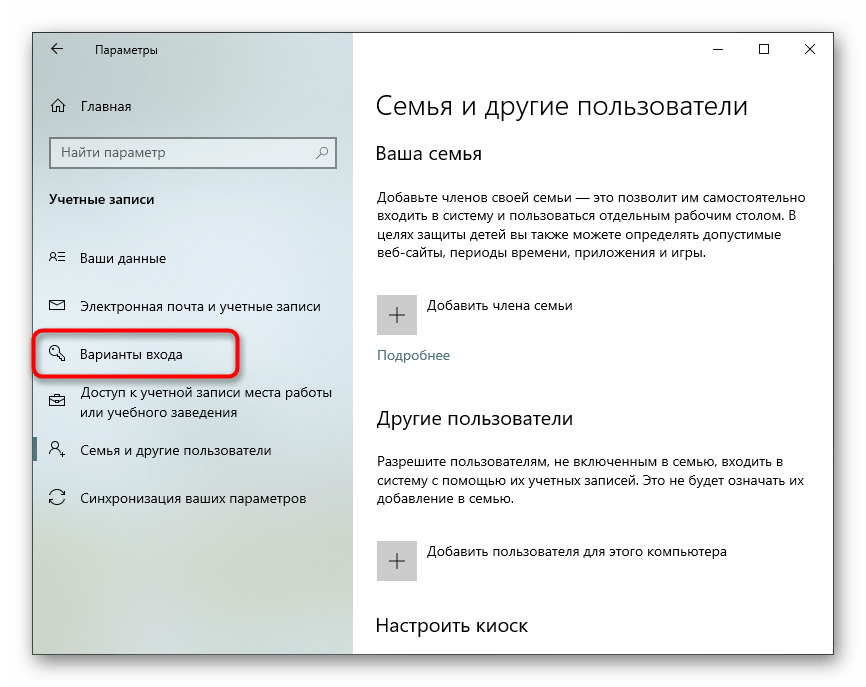
- В том же меню «Параметры» откройте раздел «Учетные записи».
- Перейдите к разделу «Варианты входа».
- Здесь выберите «Распознавание лиц Windows Hello».
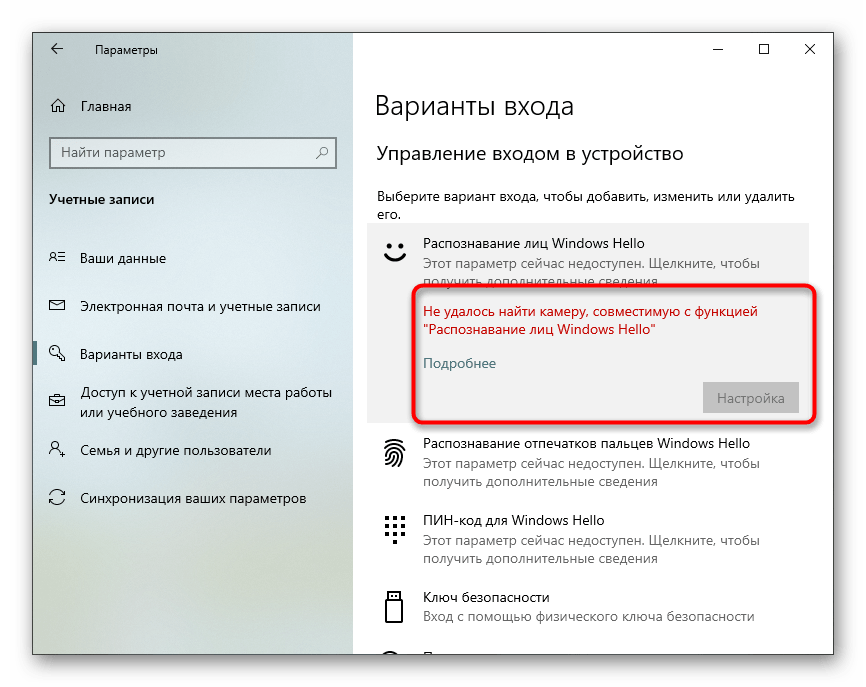
- Уточним, что не все камеры совместимы с этой возможностью. Если такое случится, вы получите соответствующее уведомление.
В случае, когда опция доступна для настройки, следуйте появившимся на экране инструкциям, создав скан лица и задав пароль. Сам пин-код необходим для входа в учетную запись при возникновении ситуации, когда веб-камера вдруг сломается или функция по каким-то причинам не сработает.
Шаг 5: Настройка камеры в Skype
Часто пользователи заинтересованы в настройке веб-камеры для того, чтобы в дальнейшем общаться со своими коллегами, друзьями и родственниками через специальное программное обеспечение. Наиболее популярным приложением, обеспечивающим подобную связь, можно считать Skype, поэтому в качестве завершающего шага статьи мы решили упомянуть процесс конфигурирования девайса именно в нем. Развернуто об этом процессе читайте в статье по ссылке ниже.
Подробнее: Настройка камеры в программе Skype
Дополнительно предоставляем ссылки на другие вспомогательные материалы, которые могут пригодиться каждому юзеру, столкнувшемуся с необходимостью настройки веб-камеры в Windows 10. В следующих руководствах вы найдете рекомендации по исправлению частых проблем, а также другие руководства по конфигурированию микрофона.
Читайте также:
Проверка веб-камеры в Windows 10
Исправление ошибки 0х00f4244 при включении камеры в Windows 10
Наша группа в TelegramПолезные советы и помощь
Most laptops and computers come with a webcam that you can use with teleconferencing apps, such as Zoom and Skype. Of course, you can use the webcam for other programs. You can also use a variety of software to record videos from your webcam.
However, an issue arises where the webcam’s images show upside-down or flipped. When you are in a meeting or making videos, you notice that your image is mirrored. Some users have come to accept mirrored images as normal. However, it’s mostly an issue caused by the webcam settings or software.
Reversed images could be an issue with the webcam settings, drivers, or the program itself. Taking these into consideration, we’ve compiled the best fixes to straighten your webcam image and make it display correctly.
If the images or video from your webcam display upside down or in reverse in Windows 11/10, you don’t have to worry because you can repair it easily. Read this section, as it explains the following solutions to fix the issue.
- Disable the mirroring or flip/rotate feature.
- Reset Webcam settings to default.
- Update the webcam’s driver.
- Rollback the drivers.
The above solutions will get your webcam working right. In the following sections, you’ll find more in-depth steps for carrying out the above processes.
How to fix inverted or upside down camera on Windows
1] Disable the mirroring or flip/rotate feature

So many teleconferencing applications make use of your computer’s webcam. You could be noticing the reverse images of Zoom but not on Skype or Meet. If the issue arises on specific applications, then it may be from settings in the program.
In the Video settings area, find image mirroring settings. This feature can also be called Flip or Rotate in other applications. Ensure that the setting here is disabled.
For Zoom, open the client and click on the gear-shaped icon at the top right-hand corner of the screen. Click on Video on the left-hand pane and click on Rotate 90 until it’s straight.
In Skype, go to Settings > Audio & Video > Webcam settings. Switch to the Camera Control tab and uncheck the Horizontal and Vertical options for Flip.
2] Reset Webcam settings to default
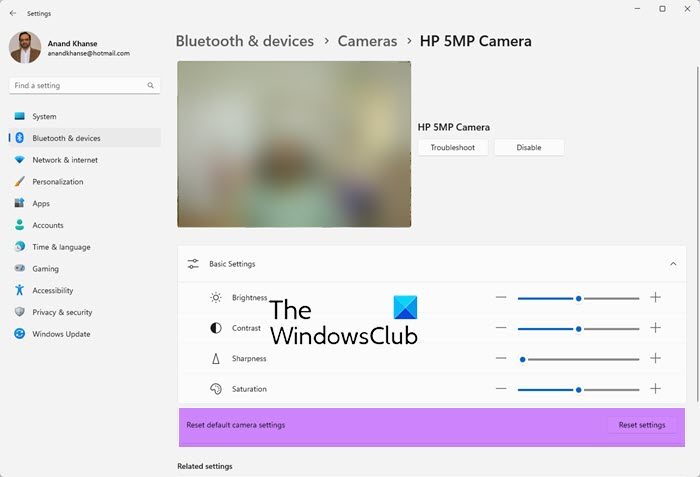
To reset your webcam settings to default:
- Press Win+I to open Settings
- Open Bluetooth and devices section
- Select Camera settings
- Here locate your Camera and click on it
- Finally, click on the Reset settings button against Reset default camera settings.
3] Update the webcam’s driver
Your webcam’s driver may be outdated if the images are inverted in every program. Visit your webcam manufacturer’s website and download the latest version of the drivers.
After downloading the driver updates, double-click on it and follow the on-screen instructions to finish the installation. Finally, restart your machine to apply the driver update.
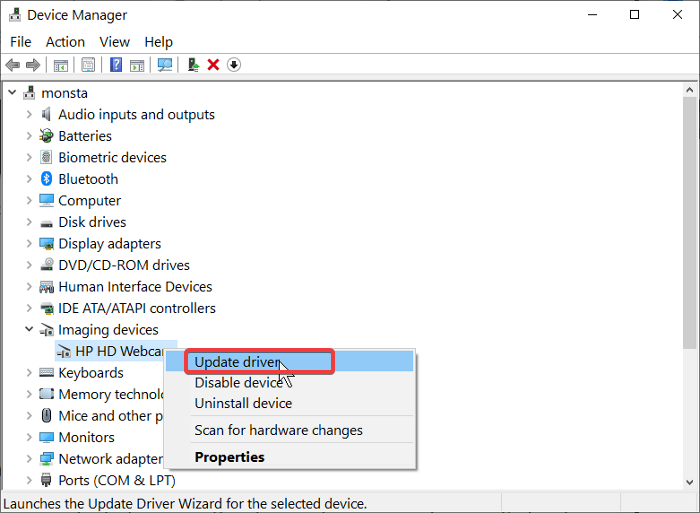
If you can’t find your manufacturer’s website or the drivers, then follow these steps to update it through Windows:
Press the Windows button and search for Device Manager. Open it from the search results.
Expand Camera or Imaging devices and right-click on your webcam from the list. Select the Update driver option and follow the on-screen instructions to perform the update. Restart your computer when you’re done.
4] Rollback these drivers
If you started noticing the upside-down or reverse images after updating your computer or drivers, the updates may be the cause. In this case, rolling back the driver to a later edition may solve the problem.
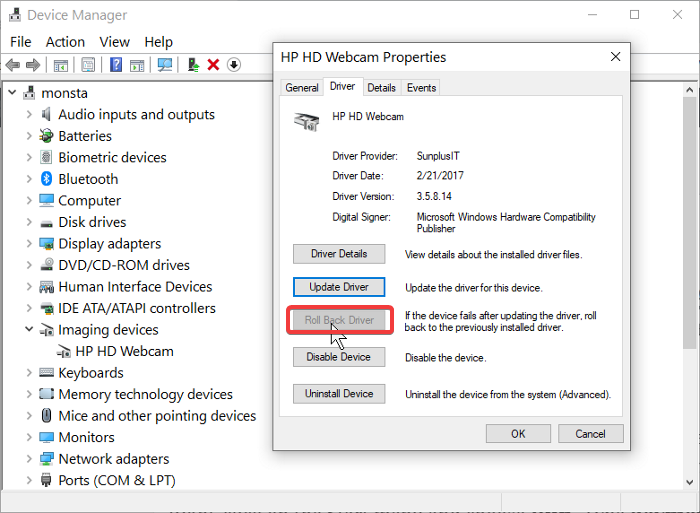
Right-click on the Start menu and choose Run. Type devmgmt.msc and hit ENTER. Right-click on your webcam under Cameras or Imaging devices and select Properties.
Switch to the Driver tab. Now, hit the Roll Back Driver button. Select the Previous version of the driver performed better option and click Yes. Click on the OK button to finalize and then restart your machine.
Upside-down images from your webcam can be caused by software or hardware issues. In any case, the solutions we’ve explored in this guide will help you fix the issue of reversed webcam images.
Read next: Laptop Camera or Webcam is not working in Windows 11/10.
To flip your webcam on Windows 10, you can rotate or flip your webcam in Windows 10 using the Camera app, though this functionality might depend on your webcam’s manufacturer or the software it uses. Here are the steps to do it:
- Use Windows Camera App
- Open the Camera app by typing «Camera» into the Windows Search bar at the bottom left of your screen, then select the Camera app from the list.
- In the Camera app, you’ll see a settings icon or a gear icon usually at the top or bottom corner of the app window. Click on it to open the settings.
- Look for an option that allows you to rotate or flip the camera. If this option is available, you can use it to flip your webcam. The placement and wording of this option will vary depending on your device.
- Use Manufacturer’s Software
- Many webcams come with their own software, and often these will have much more settings options than the default Windows Camera app. This software should have been installed along with your webcam, and you can typically access it by searching for the webcam manufacturer’s name in the Windows Search bar.
- Once you have the manufacturer’s software open, look for an option to flip or rotate the camera. The placement and wording of this option will vary depending on the software.
- Third-Party Software
- If neither of the above options is available or they do not work, you can use third-party software like OBS Studio, ManyCam, or others. These programs have more advanced settings, including the ability to flip or rotate your webcam. Be aware, however, that these programs can be complex and may require some learning to use effectively.
Note: Always remember to respect privacy and follow all applicable laws and terms of service when using webcam software.
How do I flip my webcam mirror?
How do I turn off mirroring on my camera Windows 10?
To turn off mirroring on your camera Windows 10, follow these steps:
1. Right-click the Start button, and then select Device Manager.
2. In the Device Manager window, double-click the Imaging devices category.
3. Right-click your camera, and then select Properties.
4. Select the Driver tab, and then click the Disable button.
5. Close the Device Manager window.
How do I change the orientation of my webcam?
If you would like to change the orientation of your webcam, you can follow the steps below:
1. Right-click on the webcam icon in the bottom right-hand corner of your screen.
2. Select «Properties» from the drop-down menu.
3. Click on the «Effects» tab.
4. Select the «Rotate» drop-down menu and choose the desired rotation.
5. Click «OK» to save the changes.
Can you flip a webcam upside down?
Yes, you can flip a webcam upside down. This is helpful if your webcam is physically installed upside down, or if you’re using software that inverts the video image for some reason. Here’s how you can do it:
1. Using Your Webcam’s Software:
Many webcams come with their own software and drivers, which often provide the option to rotate or flip the video image. Check your webcam’s software settings to see if this option is available.
2. Using Third-Party Software:
If the software that came with your webcam does not provide this functionality, you can use third-party software to achieve this.
One popular example of third-party software that can flip your webcam image is OBS (Open Broadcaster Software). Here are the steps to do it with OBS:
- Download and install OBS Studio.
- Open OBS Studio, click the «+» button under «Sources» and add a «Video Capture Device«.
- In the «Properties for ‘Video Capture Device’» window, select your webcam from the «Device» drop-down menu.
- Check the «Flip Vertically» box to flip your webcam image upside down.
- Click «OK» to save your changes.
Remember, when you use OBS Studio, you’ll have to select OBS as your webcam source in the application you want to use your webcam with.
How do I flip my camera on my laptop?
To flip your camera on your laptop, you will need to open the camera application. Once the camera application is open, you will need to click on the «Settings» icon. In the «Settings» menu, you will need to click on the «Flip Camera» option.
How do I fix my flipped camera?
There are a few things that you can do to fix a flipped camera:
– Restart your device: This is the first and easiest thing to try. Sometimes all you need is a fresh start to fix the problem.
– Check your settings: Make sure that the camera is set to the correct orientation. You can usually find this setting in the camera app under «Settings» or «Options«.
– Update your software: If you’re still having problems, it might be due to a software issue. Check for updates for your camera app and device software.
– Contact customer support: If you’ve tried all of the above and you’re still having problems, you can contact the customer support for your device or camera app.
Why is my webcam reversed?
There are a few possible reasons why your webcam might be reversed. One possibility is that your computer’s webcam settings are configured to mirror your image. To check this, open your webcam’s settings menu and look for an option to disable mirroring. If you can’t find such an option, try resetting your webcam to its default settings. Another possibility is that your webcam driver is outdated or corrupt. Try updating your webcam driver and see if that fixes the problem.
How do I fix an inverted webcam?
If your webcam is inverted, you can try the following steps to fix it:
1. Check if your webcam is properly connected to your computer. If it is not, reconnect it and try again.
2. If your webcam is properly connected, try restarting your computer. This may fix the problem.
3. If restarting your computer does not fix the problem, try uninstalling and reinstalling your webcam drivers. This may fix the problem.
4. If uninstalling and reinstalling your webcam drivers does not fix the problem, try resetting your computer’s BIOS settings. This may fix the problem.
5. If resetting your computer’s BIOS settings does not fix the problem, you may need to replace your webcam.
Where are webcam settings Windows 10?
To change your webcam settings in Windows 10, you’ll need to go to the Settings app and select Devices. Then, select the Camera tab. From here, you can change your webcam’s resolution, frame rate, and other settings.
How do I change my webcam settings in Windows 10?
To change your webcam settings in Windows 10, you’ll need to open the Camera app and select the Settings icon. From there, you can adjust the camera’s resolution, field of view, frame rate, and other settings.
Why is my Webcam opposite?
There could be a few reasons why your webcam is positioned opposite of your screen. It could be that your computer is configured that way by default, or it could be that you or someone else physically positioned the webcam that way.
If you would like to change the position of your webcam, you can do so by physically moving the camera or by adjusting the settings in your computer’s webcam software.
How do I Unflip my front camera?
If you are using an iPhone, you can unflip your front camera by going to the Settings app, selecting the «Camera» option, and then flipping the «Front/Rear Camera» switch to the rear-facing camera position.
To unflip your front camera on other device, you’ll typically need to adjust the camera settings within the app or software you’re using to access your front-facing camera. I can provide some general steps that may help:
- Open the camera app or the application that you’re using to access your front camera.
- Look for a settings icon or gear icon within the app. It is often located in the top or bottom corners of the screen.
- Tap on the settings icon, and a menu should appear with various camera options.
- Look for an option related to camera orientation, flipping, or mirroring. It might be labeled as «Mirror Front Camera» or «Flip Front Camera.«
- Toggle the option off or on, depending on your desired camera orientation. If it’s currently flipped, toggle it to the off position.
- Exit the settings menu and return to the camera preview. The front camera should now be unflipped, showing a normal orientation.
Why is my camera flipping my face?
There could be a few reasons why your camera is flipping your face. It could be a setting on the camera itself, or it could be an issue with the lens. If you’re using a DSLR camera, make sure that the mirror lock-up setting is turned off. If you’re using a point-and-shoot camera, check to see if the lens is installed properly. If the lens is installed backwards, it will cause the image to be flipped.
How do I get my front camera to flip?
There are a few ways to get your front camera to flip. One way is to go into your camera settings and look for the option to flip the camera. Another way is to download a camera app that has the option to flip the camera. The process of flipping the front camera on your device depends on the specific device and operating system you are using. Here are the general steps for some common platforms:
- Android:
- Open your camera app.
- Look for a camera icon with two circular arrows or a similar icon usually located in the top or bottom toolbar.
- Tap the icon to toggle between the front and rear cameras. This will flip the view.
- iOS (iPhone or iPad):
- Open your camera app.
- Look for a «flip» or «rotate» icon, usually resembling two circular arrows, located in the top or bottom toolbar.
- Tap the icon to switch between the front and rear cameras, which will flip the view.
- Windows PC or Laptop:
- Launch the camera app or any video calling application that utilizes the camera.
- Within the app, look for a «settings» or «options» icon, usually represented by a gear or three vertical dots.
- Click on the icon to access the settings menu.
- In the settings menu, search for a «flip» or «mirror» option and enable it. This will flip the front camera view.
- Mac:
- Open the «Photo Booth» application on your Mac.
- In the menu bar at the top of the screen, click on the «Camera» option.
- From the drop-down menu, select «Flip Horizontal» to flip the front camera view.
Please note that the exact steps may vary depending on your device’s manufacturer, camera app, or operating system version. If none of these steps work for your specific device, it’s recommended to consult the user manual or search online for instructions tailored to your device model.