
Иногда бывают такие ситуации, необходимо протестировать работоспособность удаленного/или своего почтового сервера, либо же нет возможности отправить электронную почту обычным путём (не работает/отсутствует почтовый клиент).
В этом случае на помощь приходит командная строка. Как же отправить почту из командной строки?
Доступ к SMTP через telnet (отправка почты). Жирным выделены команды, набранные пользователем
telnet mail.testdomain.ru 25
mail.testdomain.ru – это адрес smtp сервера, к которому вы хотите присоединиться
25 — smtp-порт сервера с которым должен соединиться клиент telnet
220 mail.testdomain.ru ESMTP Sendmail 8.13.3/8.13.4; Sat, 21 Jul 2010 09:50:16 +0400
ehlo lo
ehlo lo – здесь мы должны поздоровались с удалённым smtp-сервером
250-ENHANCEDSTATUSCODES
250-PIPELINING
250-8BITMIME
250-SIZE
250-DSN
250-ETRN
250-AUTH GSSAPI DIGEST-MD5 CRAM-MD5
250-DELIVERBY
250 HELP
mail from: [email protected]
здесь мы указываем, что адрес отправителя письма — [email protected]
250 2.1.0 [email protected]… Sender ok
информация о том, что проверка отправителя прошла успешно
rcpt to: [email protected]
здесь мы вводим почтовый адрес получателя письма [email protected]
250 2.1.5 [email protected]… Recipient ok
информация о том, что проверка получателя прошла успешно
data
комманда data говорит о том, что дальше пойдёт тело письма
354 Enter mail, end with «.» on a line by itself
сервер говорит нам, что можно набирать текст письма, а чтобы закончить письмо мы должны набрать точку «.» в новой строке в конце тела письма
testing mail system!!
это наш текст
.
точка — даём понять серверу, о том, что письмо окончено и его можно адресату
250 2.0.0 l365oGFR435164 Message accepted for delivery
уведомление сервера — письмо встало в очередь на отправку
Email remains one of the most powerful tools for both personal and professional communication. Beyond staying in touch with friends and family, it’s essential for real-time notifications and alerts. Whether you need to know when your server goes down via a monitoring service like Pingdom or require automated status updates from third-party backup software, email notifications keep you informed at every step.
If you’re writing a batch file and want to automatically send an email upon completion—or using a third-party tool that lacks built-in email alerts—a command-line email-sending tool for Windows is your go-to solution. This guide explores seven robust utilities that simplify sending emails via the command line.
How to Use These Tools
Each tool example below uses a sample command line for sending an email through Gmail. Before running any commands, update these parameters accordingly:
[email protected]– Replace with your full Gmail address[email protected]– Replace with the recipient’s email addressYourGmailPassword– Replace with your Gmail passwordsubject– The email subject (use double quotes if it contains spaces, e.g.,"This is a long subject")message– The email body (also use double quotes if it contains spaces)
1. SwithMail
Among command-line email tools, SwithMail stands out due to its intuitive configuration GUI, minimizing errors in command syntax. You can even test your email settings directly before execution.
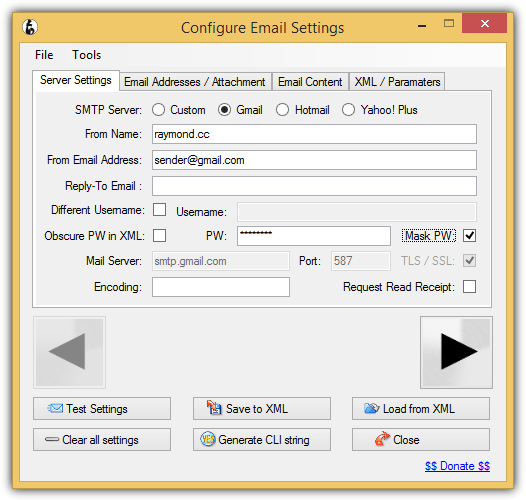
SwithMail supports attachments, CC, BCC, wildcard attachments for log files, and error code returns.
Command example for sending an email via Gmail:
shCopyEditSwithMail.exe /s /from [email protected] /pass YourGmailPassword /server smtp.gmail.com /p 587 /SSL /to [email protected] /sub subject /b message
Download SwithMail
2. CMail
If proxy support is essential (SOCKS or HTTPS-based proxies), CMail is a great choice. It also supports wildcard attachments and delivery status notifications.
Gmail command example:
shCopyEditCMail.exe -secureport -host:[email protected]:[email protected]:465 -from:[email protected] -to:[email protected] -subject:subject -body:message
Download CMail
3. SendSMTP
SendSMTP offers both an interactive GUI and a powerful command-line tool. Beginners can configure it via GUI, while advanced users benefit from direct command-line execution.
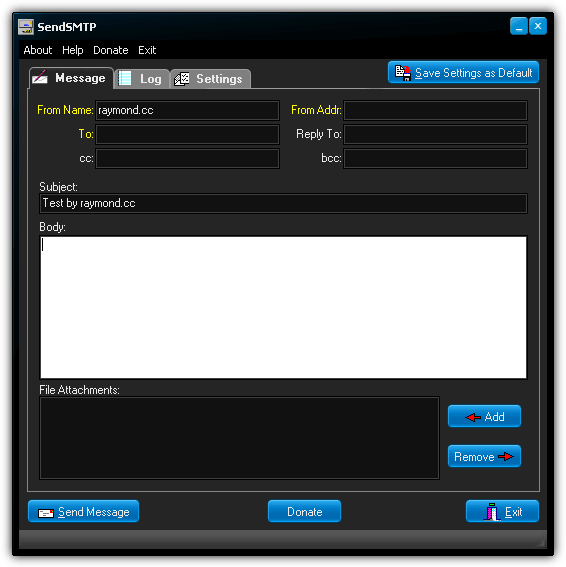
Gmail command example:
shCopyEditSendSMTP.exe /nos /host smtp.gmail.com /port 587 /auth 2 /userid [email protected] /pass YourGmailPassword /from [email protected] /to [email protected] /subject subject /body message
Download SendSMTP
4. mailsend
mailsend is a simple SMTP command-line tool for Windows and Linux. While it lacks a GUI or encryption features, it provides a useful -info option to display SMTP server details.
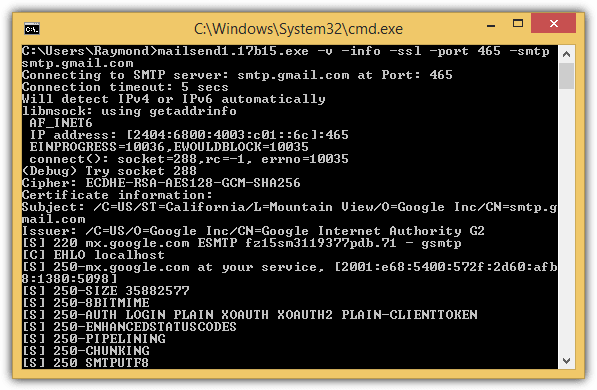
Gmail command example:
shCopyEditmailsend1.17b15.exe -t [email protected] -f [email protected] -ssl -port 465 -auth -smtp smtp.gmail.com -sub subject -M message -user [email protected] -pass YourGmailPassword
Download mailsend
5. Send-It-Quiet
Send-It-Quiet is a lightweight SMTP mailer (14KB) built on the .NET Framework. It supports custom registry parameters and return values via ERRORLEVEL.
Gmail command example:
shCopyEditsenditquiet.exe -s smtp.gmail.com -port 587 -u [email protected] -protocol ssl -p YourGmailPassword -f [email protected] -t [email protected] -subject subject -body message
Download Send-It-Quiet
6. SendEmail
Despite its last update in 2009, SendEmail still supports TLS for Gmail SMTP and doesn’t require Perl installation on Windows.
Gmail command example:
shCopyEditsendEmail.exe -o tls=yes -f [email protected] -t [email protected] -s smtp.gmail.com:587 -xu [email protected] -xp YourGmailPassword -u subject -m message
Download SendEmail
7. PowerShell
Windows PowerShell provides a built-in way to send emails via Gmail SMTP without third-party tools.
Run the PowerShell script:
shCopyEditPowershell.exe -executionpolicy remotesigned -File C:\Users\Raymond\sendemail.ps1
Final Notes
Older tools such as Blat lack SSL support and are omitted from this list. Tools like Bmail and XmlSendmail are outdated and do not support Gmail SMTP authentication.
By choosing the right command-line email tool for your needs, you can easily automate email notifications for various tasks—whether for monitoring servers, sending logs, or integrating alerts into scripts.
Sending emails is an essential task in today’s digital age, and as a system administrator, you may need to send emails from the command line to automate this task. In this article, we’ll show you how to send emails from the Windows command line with PowerShell, streamlining your email communication and improving your productivity.
Prerequisites
Before we begin, make sure that you have the following:
- A Windows computer with PowerShell installed
- Access to an SMTP server with your login credentials
- The SMTP server address and port number
Step 1: Open PowerShell
First, open PowerShell by searching for “PowerShell” in the Start Menu or by pressing the Windows key + X and selecting “Windows PowerShell” from the menu.
Step 2: Define the Email Properties
Next, define the properties of your email, including the sender, recipient, subject, and body. Use the following commands to do this:
$From = "[email protected]"
$To = "[email protected]"
$Subject = "This is the subject of the email"
$Body = "This is the body of the email"
Replace “[email protected]” with the email address of the sender and “[email protected]” with the email address of the recipient. You can also change the subject and body of the email to whatever you like.
Step 3: Define the SMTP Server Details
Now, define the SMTP server details, including the server address, port number, and credentials. Use the following commands to do this:
$SMTPServer = "smtp.example.com"
$SMTPPort = 587
$SMTPUsername = "username"
$SMTPPassword = "password"
Replace “smtp.example.com” with the address of your SMTP server, and change the port number to the appropriate value for your server. Replace “username” and “password” with the credentials for your SMTP server.
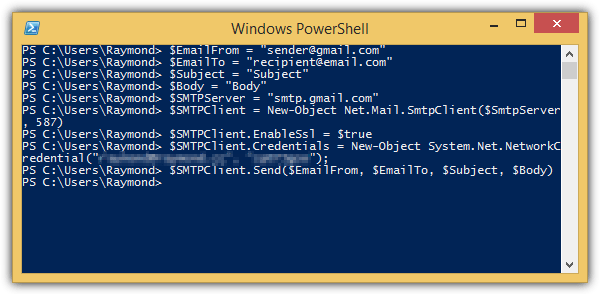
Step 4: Create and Send the Email
Finally, use the following commands to create and send the email:
$Email = New-Object System.Net.Mail.MailMessage($From, $To, $Subject, $Body)
$SMTPClient = New-Object System.Net.Mail.SmtpClient($SMTPServer, $SMTPPort)
$SMTPClient.EnableSsl = $true
$SMTPClient.Credentials = New-Object System.Net.NetworkCredential($SMTPUsername, $SMTPPassword)
$SMTPClient.Send($Email)
This will create a new email object, set the SMTP client details, and then send the email using the Send method.
Complete PowerShell Script to Send the Email
Here’s the complete example of the PowerShell script that will send an email via SMTP:
# Define the email properties
$From = "[email protected]"
$To = "[email protected]"
$Subject = "This is the subject of the email"
$Body = "This is the body of the email"

# Define the SMTP server details
$SMTPServer = "smtp.example.com"
$SMTPPort = 587
$SMTPUsername = "username"
$SMTPPassword = "password"

# Create the email object
$Email = New-Object System.Net.Mail.MailMessage($From, $To, $Subject, $Body)

# Set the SMTP client details and send the email
$SMTPClient = New-Object System.Net.Mail.SmtpClient($SMTPServer, $SMTPPort)
$SMTPClient.EnableSsl = $true
$SMTPClient.Credentials = New-Object System.Net.NetworkCredential($SMTPUsername, $SMTPPassword)
$SMTPClient.Send($Email)
Here’s what each section of the script does:
- # Define the email properties: This section defines the sender, recipient, subject, and body of the email.
- # Define the SMTP server details: This section defines the address, port number, and login credentials of the SMTP server that will be used to send the email.
- # Create the email object: This section creates a new email object using the properties defined in the first section.
- # Set the SMTP client details and send the email: This section sets the SMTP client details, including SSL and login credentials, and sends the email using the Send method.
To use this script, simply replace the placeholders with your own email properties and SMTP server details. Once you’ve done that, save the script with a .ps1 extension, and then run it from the PowerShell console or Windows Command Prompt by typing .\scriptname.ps1 (where scriptname is the name you saved the file as).
By using this script, you can easily send emails via SMTP without having to manually open your email client, saving you time and making your email communication more efficient.
Conclusion
In conclusion, sending emails from the Windows command line with PowerShell is a simple and effective way to streamline your email communication and improve your productivity as a system administrator. By following the steps outlined in this article, you can quickly and easily send emails from your Windows computer using PowerShell, saving time and improving your workflow.
Remember to replace the email addresses, subject, body, SMTP server details, and credentials with the appropriate values for your email communication needs. With this powerful tool at your disposal, you can automate your email tasks and streamline your workflow, making you a more efficient and productive system administrator.
Quick Links
-
Sending Email From PowerShell
In Windows there is no way to natively send mail from the Command Prompt, but because PowerShell allows you to use the underlying .Net Framework, you can easily create and send an e-mail from the command line.
Note: I have uploaded a sample over here, due to many requests.
Sending Email From PowerShell
Note: We decided to use the GMail SMTP Servers for this article, that means you will need a GMail account to send mail using the provided code. However, you could easily hack my script to work with any SMTP Server should you want to.
The first thing you need to do is fire up PowerShell.
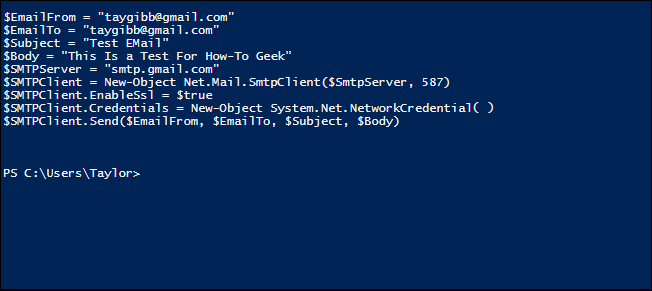
It’s pretty easy to send an e-mail from PowerShell, all you need to do is copy the template we provided and change some of the details.
$EmailFrom = «yourgmailadress@gmail.com»
$EmailTo = «destination@somedomain.com»
$Subject = «The subject of your email»
$Body = «What do you want your email to say”
$SMTPServer = «smtp.gmail.com»
$SMTPClient = New-Object Net.Mail.SmtpClient($SmtpServer, 587)
$SMTPClient.EnableSsl = $true
$SMTPClient.Credentials = New-Object System.Net.NetworkCredential(«usr», «pass»);
$SMTPClient.Send($EmailFrom, $EmailTo, $Subject, $Body)
You will need to change the following:
- $EmailFrom = Your GMail address.
- $EmailTo = The recipient’s email address.
- $Subject = What you want the subject of the mail to say.
- $Body = What you want the main part of the mail to say.
- usr = You will need to replace this with your GMail username.
- pass = You will need to replace this with your GMail password.
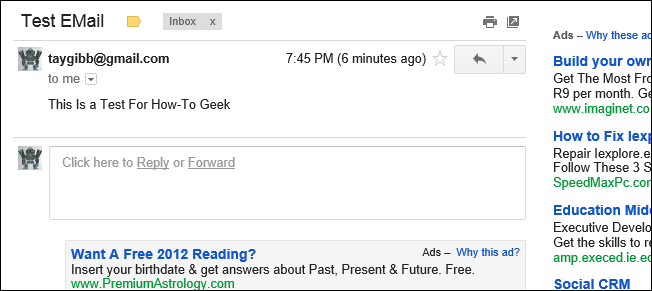
Below is an example of me sending mail to myself.
Note: For obvious reasons, I removed GMail credentials from the screenshot.
That’s all there is to it.
msmtp — простой консольный клиент для отправки сообщений электронной почты по протоколу SMTP.
Поскольку в сети достаточно статей про настройку msmtp через файлы конфигурации, рассмотрим возможность отправки сообщений без использования таких файлов. Это может потребоваться, например, когда адрес отправителя и данные аутентификации формируется непосредственно в скрипте перед отправкой (запрашиваются из БД и т.п.)
В данной статье рассматривается отправка почты через публичные серверы smtp на примере версии 1.4.31
Публичные серверы обычно предоставляют порты для обычного и защищенного обмена по протоколу SMTP. При обычном передача сообщений протокола идет открытым текстом. При защищенном — шифруется SSL.
Для обычного обмена как правило используется стандартный порт 25. Пример простейшего скрипта для отправки представлен ниже:
#!/bin/sh

MAIL_SERVER=smtp.from.ru
MAIL_PORT=25
MAIL_DATE=`date +"%d %b %Y %T"`
MAIL_FROM=user@from.ru
MAIL_TO=user@to.ru
MAIL_PASSWORD=12345678
MAIL_SUBJECT="Email notice"
MAIL_TEXT="This is a test Это тест"
MAIL_MESSAGE="Date: ${MAIL_DATE}
\nFrom: ${MAIL_FROM}
\nTo: ${MAIL_TO}
\nSubject: ${MAIL_SUBJECT}
\nContent-Type: text/plain; charset=UTF-8
\n\n${MAIL_TEXT}"

echo -e ${MAIL_MESSAGE} | /usr/bin/msmtp --host=${MAIL_SERVER} \
--port=${MAIL_PORT} --auth=login --user=${MAIL_FROM} \
--passwordeval="echo ${MAIL_PASSWORD}" \
-f ${MAIL_FROM} ${MAIL_TO} -d
В данном примере тело сообщения формируется в переменной MAIL_MESSAGE. Отправка сообщения производится на 25 порт сервера smtp.from.ru. Для авторизации в данном случае используются имя пользователя и пароль. В качестве имени пользователя используется адрес отправителя. Такая процедура авторизации является обычной практикой для публичных серверов. Пароль в примере передается открытым текстом, что не очень хорошо. Возможные способы защиты пароля можно найти в сети, например здесь.
Ключ -d используется для отладки обмена с сервером.
Для защищенного обмена обычно используется порт 465. При обмене с использованием SSL (SMTPS) предыдущий пример требуется немного изменить:
#!/bin/sh

MAIL_SERVER=smtp.from.ru
MAIL_PORT=465
MAIL_DATE=`date +"%d %b %Y %T"`
MAIL_FROM=user@from.ru
MAIL_TO=user@to.ru
MAIL_PASSWORD=12345678
MAIL_SUBJECT="Email notice"
MAIL_TEXT="This is a test Это тест"
MAIL_MESSAGE="Date: ${MAIL_DATE}
\nFrom: ${MAIL_FROM}
\nTo: ${MAIL_TO}
\nSubject: ${MAIL_SUBJECT}
\nContent-Type: text/plain; charset=UTF-8
\n\n${MAIL_TEXT}"

echo -e ${MAIL_MESSAGE} | /usr/bin/msmtp --host=${MAIL_SERVER}
--port=${MAIL_PORT} --tls=on --tls-certcheck=off --tls-starttls=off --auth=login --user=${MAIL_FROM} --passwordeval="echo ${MAIL_PASSWORD}" -f ${MAIL_FROM} ${MAIL_TO} -d
В данном примере отличается номер порта MAIL_PORT, а также добавились следующие опции:
—tls=on, включает TLS туннель;
—tls-certcheck=off, без проверки сертификата (проверка сертификата выходит за рамки данной статьи);
—tls-starttls=off, данная опция выполняет немедленный запуск TLS при старте обмена с сервером;
msnmp может включать TLS туннель STARTTLS SMTP командой из обычного режима. При этом для обмена с сервером используется стандартный порт 25 (иногда 587). Чтобы включить данный режим в предыдущем примере необходимо изменить номер порта MAIL_PORT=587 и включить опцию —tls-starttls=on (можно удалить из параметров командной строки, поскольку эта опция включена в настройках программы по умолчанию)
К сожалению, программа не умет отсылать письма с вложениями. Тело письма с вложениями нужно формировать самостоятельно. Следующий пример, демонстрирует отправку такого письма:
#!/bin/sh

MAIL_SERVER=smtp.from.ru
MAIL_PORT=465
MAIL_DATE=`date +"%d %b %Y %T"`
MAIL_FROM=user@from.ru
MAIL_TO=user@to.ru
MAIL_PASSWORD=12345678
MAIL_SUBJECT="Email notice"
MAIL_TEXT="This is a test Это тест"
BOUNDARY=`date +%s|md5sum`
MAIL_BOUNDARY="0__=${BOUNDARY:0:32}"
MAIL_MIMETYPE="video/ogg"
MAIL_FILE="video.avi"
MAIL_ATTACH=`uuencode -m ${MAIL_FILE} ${MAIL_FILE} | sed '1d'`
MAIL_MESSAGE="Date: ${MAIL_DATE}
\nFrom: ${MAIL_FROM}
\nTo: ${MAIL_TO}
\nSubject: ${MAIL_SUBJECT}
\nMime-Version: 1.0
\nContent-Type: multipart/mixed; boundary="${MAIL_BOUNDARY}"
\nContent-Disposition: inline
\n\n
\n--${MAIL_BOUNDARY}
\nContent-Type: text/plain; charset=UTF-8
\nContent-Disposition: inline
\n\n
\n${MAIL_TEXT}
\n\n
\n--${MAIL_BOUNDARY}
\nContent-Type: ${MAIL_MIMETYPE}; name="${MAIL_FILE}"\n
\nContent-Disposition: attachment; filename="${MAIL_FILE}"\n
\nContent-Transfer-Encoding: base64\n
\n\n
\n${MAIL_ATTACH}
\n--${MAIL_BOUNDARY}
\n"

echo -e ${MAIL_MESSAGE} | /usr/bin/msmtp --host=${MAIL_SERVER} \
--port=${MAIL_PORT} --auth=login --user=${MAIL_FROM} \
--passwordeval="echo ${MAIL_PASSWORD}" \
-f ${MAIL_FROM} ${MAIL_TO} -d
В этом примере параметры командной строки msmtp такие же, как в первом скрипте.
Сообщение состоит из двух секций, разделяемых специальной меткой MAIL_BOUNDARY.
Секция с текстом сообщения находится непосредственно в теле письма.
Вложение в данном примере представляет собой секцию с содержимым видеофайла, кодированную base64 при помощи утилиты uuencode.