Время на прочтение9 мин
Количество просмотров225K
Curl (client URL) — это инструмент командной строки на основе библиотеки libcurl для передачи данных с сервера и на сервер при помощи различных протоколов, в том числе HTTP, HTTPS, FTP, FTPS, IMAP, IMAPS, POP3, POP3S, SMTP и SMTPS. Он очень популярен в сфере автоматизации и скриптов благодаря широкому диапазону функций и поддерживаемых протоколов. В этой статье мы расскажем, как использовать curl в Windows на различных примерах.
▍ Установка в Windows
Во всех современных версиях Windows, начиная с Windows 10 (версия 1803) и Server 2019, исполняемый файл curl поставляется в комплекте, поэтому ручная установка не требуется. Чтобы определить местоположение curl и его версию в системе, можно использовать следующие команды:
where curl
curl --version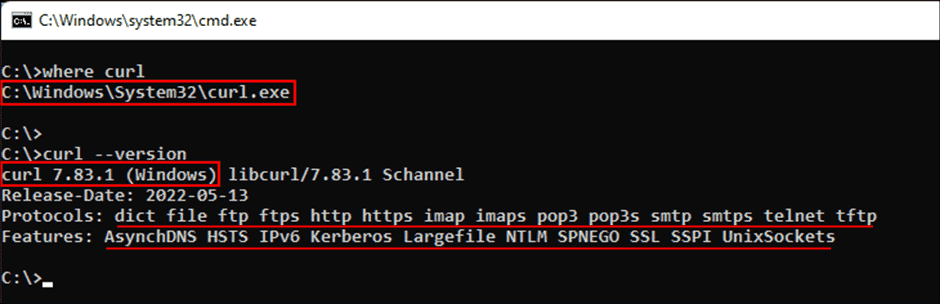
Определение местоположения и версии curl в Windows
Команда curl —version также выводит список протоколов и функций, поддерживаемых текущей версией curl. Как видно из показанного выше скриншота, к использованию встроенной утилиты curl всё готово. Если вместо этого отображается сообщение об ошибке, curl может быть недоступен потому, что вы используете более раннюю версию Windows (например, Windows 8.1 или Server 2016). В таком случае вам потребуется установить curl в Windows вручную.
▍ Синтаксис curl
Команда curl использует следующий синтаксис:
curl [options...] [url]Инструмент поддерживает различные опции, которые мы рассмотрим ниже. Как и в любом инструменте командной строки, вы можете использовать для получения справки команду curl —help.
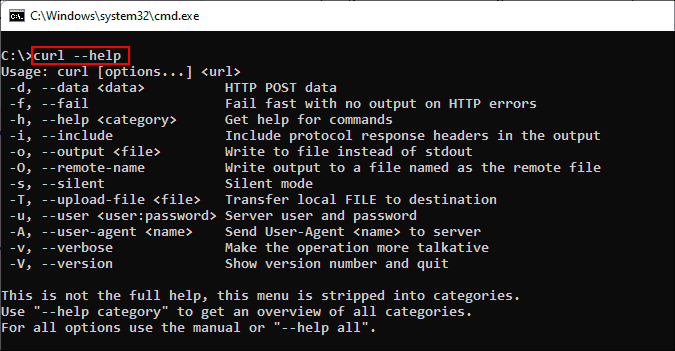
Получение справки при помощи команды curl
Для получения подробной справки можно использовать команду curl —help all. Справка разделена на категории, поэтому при помощи curl —help category можно просмотреть все темы.
Ознакомившись с синтаксисом curl, давайте рассмотрим различные способы применения этого инструмента на примерах.
▍ HTTP-запрос GET
При использовании curl с URL и без указания опций запрос по умолчанию использует метод GET протокола HTTP. Попробуйте выполнить такую команду:
curl https://4sysops.comПриведённая выше команда по сути эквивалентна curl —request GET 4sysops.com, отправляющей запрос GET к 4sysops.com по протоколу HTTPS. Чтобы указать версию протокола HTTP (например, http/2), используйте опцию —http2:
curl --http2 https://4sysops.comВ случае URL, начинающихся с HTTPS, curl сначала пытается установить соединение http/2 и автоматически откатывается к http/1.1, если это не удаётся. Также он поддерживает другие методы, например, HEAD, POST, PUT и DELETE. Для использования этих методов вместе с командой curl нужно указать опцию —request (или -X), за которой следует указание метода. Стоит заметить, что список доступных методов зависит от используемого протокола.
▍ Получение информации об удалённом файле
Если вы администратор, то иногда вам могут быть интересны только заголовки HTTP. Их можно получить при помощи опции —head (или -I). Иногда URL может перенаправлять пользователя в другую точку. В таком случае опция —location (или -L) позволяет curl выполнять перенаправления. Также можно использовать —insecure (или -k), чтобы разрешить незащищённые подключения и избежать ошибок с сертификатом TLS в случае, если целевой URL использует самоподписанный сертификат. Пользуйтесь этой опцией только при абсолютной необходимости. Все эти три опции можно скомбинировать в одну краткую запись, как показано в следующей команде:
curl -kIL 4sysops.com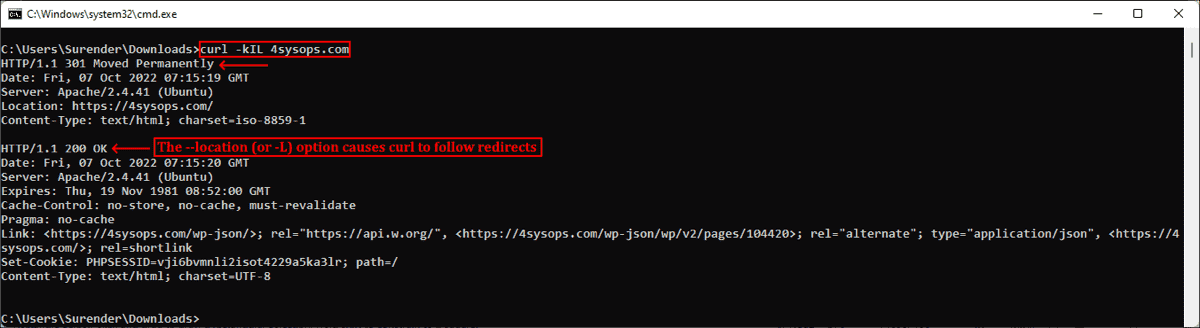
Опции просмотра заголовков запросов, включения незащищённого соединения и использования перенаправлений
Как можно заметить, такая краткая запись особенно полезна для комбинирования нескольких опций. Приведённая выше команда по сути эквивалентна команде curl —insecure —head —location 4sysops.com.
Опция —head (или -I) также даёт основную информацию об удалённом файле без его скачивания. Как показано на скриншоте ниже, при использовании curl с URL удалённого файла он отображает различные заголовки, дающие информацию об удалённом файле.
curl -IL https://curl.se/windows/dl-7.85.0_5/curl-7.85.0_5-win64-mingw.zip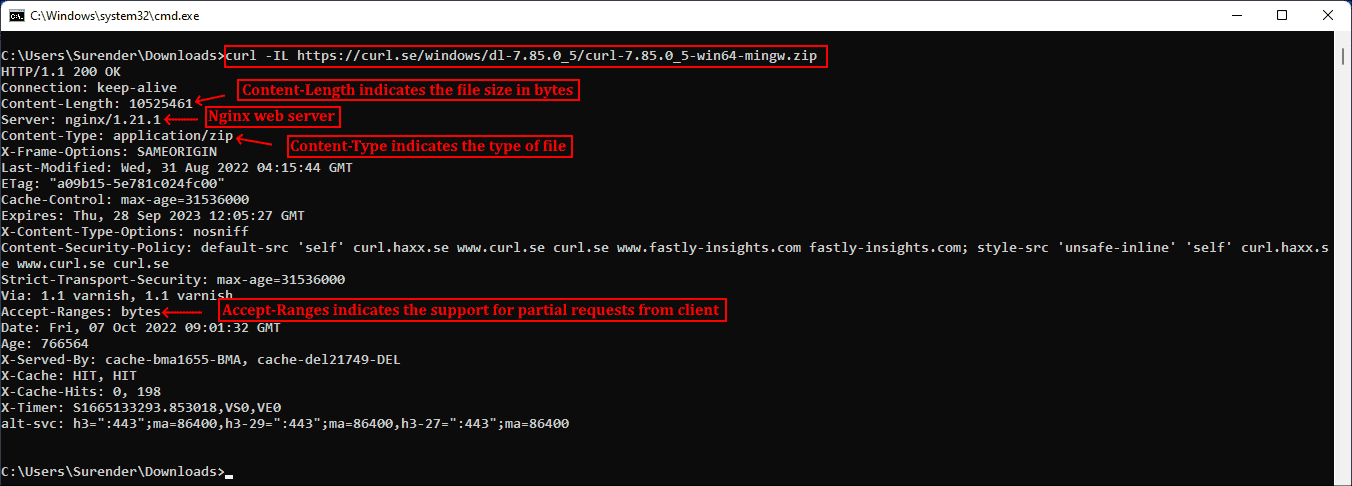
Использование curl для просмотра основной информации удалённых файлов
Заголовок Content-Length обозначает размер файла (в байтах), Content-Type сообщает о типе медиафайла (например, image/png, text/html), Server обозначает тип серверного приложения (Apache, Gunicorn и так далее), Last-Modified показывает дату последнего изменения файла на сервере, а заголовок Accept-Ranges обозначает поддержку частичных запросов для скачивания от клиента, что по сути определяет возможность продолжения прерванной загрузки.
▍ Скачивание файла
Для скачивания файла и сохранения с тем же именем, что и на сервере, можно использовать curl с опцией —remote-name (или -O). Показанная ниже команда скачивает последнюю версию curl для Windows с официального сайта:
curl -OL https://curl.se/windows/latest.cgi?p=win64-mingw.zip
Скачивание файла с именем по умолчанию и индикатором прогресса
При необходимости для нахождения ресурса добавляется опция -L, разрешающая перенаправления. Если нужно сохранить файл с новым именем, используйте опцию —output (или -o). Кроме того, при использовании команды curl в скрипте может понадобиться отключить индикатор прогресса, что можно сделать при помощи опции —silent (или -s). Эти две опции можно скомбинировать:
curl -sLo curl.zip https://curl.se/windows/latest.cgi?p=win64-mingw.zip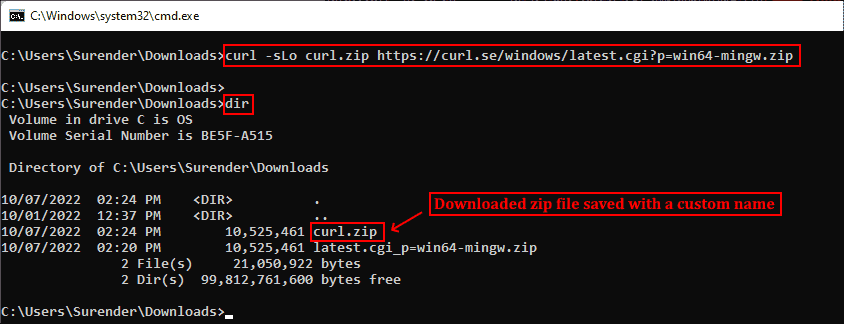
Скачивание файла без индикатора и сохранение под произвольным именем
▍ Продолжение прерванного скачивания
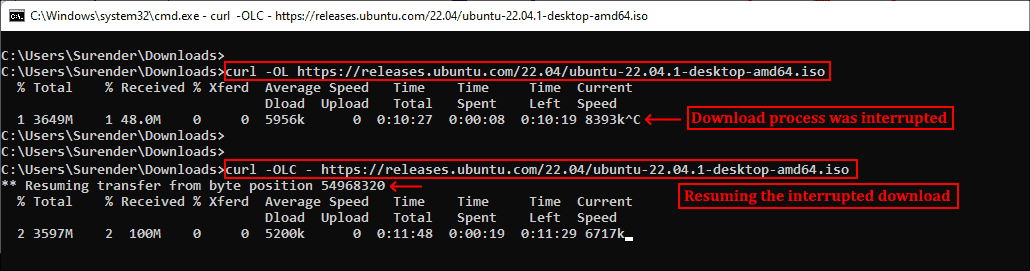
Наличие Accept-Ranges: bytes в заголовке ответа в буквальном смысле обозначает, что сервер поддерживает скачивания с возможностью продолжения. Чтобы продолжить прерванное скачивание, можно использовать опцию —continue-at (или -C), получающую смещение (в байтах). Обычно указывать смещение непросто, поэтому curl предоставляет простой способ продолжения прерванной загрузки:
curl -OLC - https://releases.ubuntu.com/22.04/ubuntu-22.04.1-desktop-amd64.isoПродолжение прерванного скачивания
Как видно из скриншота, я скачивал iso-файл Ubuntu, но скачивание было прервано. Затем я снова запустил команду curl с опцией -C, и передача продолжилась с того диапазона байтов, на котором была прервана. Знак минус (—) рядом с -C позволяет curl автоматически определить, как и где продолжить прерванное скачивание.
▍ Аутентификация с Curl
Также Curl поддерживает аутентификацию, что позволяет скачать защищённый файл, предоставив учётные данные при помощи опции —user (or -u), принимающей имя пользователя и пароль в формате username:password. Если не вводить пароль, curl попросит ввести его в режиме no-echo.
curl -u surender -OL https://techtutsonline.com/secretFiles/sample.zip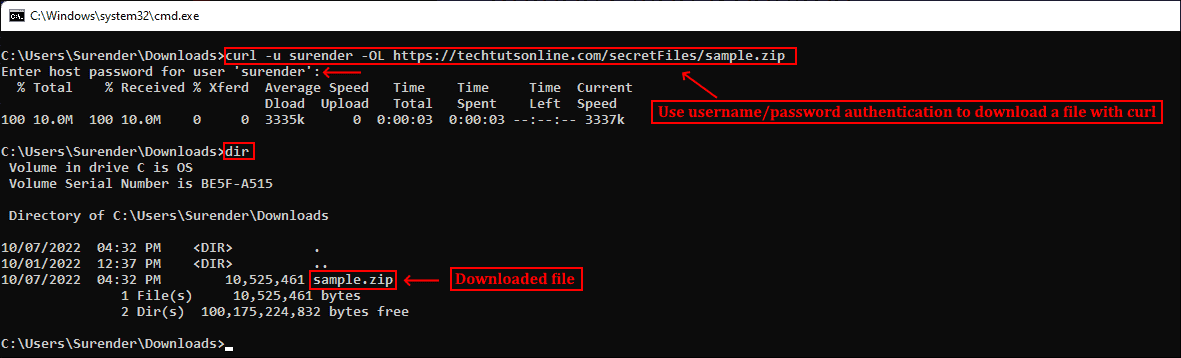
Скачивание файла с аутентификацией по имени пользователя и паролю
Если вы используете Basic authentication, то необходимо передать имя пользователя и пароль, а значит, воспользоваться защищённым протоколом наподобие HTTPS (вместо HTTP) или FTPS (вместо FTP). Если по каким-то причинам приходится использовать протокол без шифрования, то убедитесь, что вы используете способ аутентификации, не передающий учётные данные в виде простого текста (например, аутентификацию Digest, NTLM или Negotiate).
Также curl поддерживает использование файлов конфигурации .curlrc, _curlrc и .netrc, позволяющих задавать различные опции curl в файле, а затем добавлять файл в команду при помощи опции curl —config (или curl -K), что особенно полезно при написании скриптов.
▍ Выгрузка файла
Опция —upload-file (или -T) позволяет выгружать локальный файл на удалённый сервер. Показанная ниже команда выгружает файл из локальной системы на удалённый веб-сервер по протоколу FTPS:
curl -kT C:\Users\Surender\Downloads\sample1.zip -u testlab\surender ftps://192.168.0.80/awesomewebsite.com/files/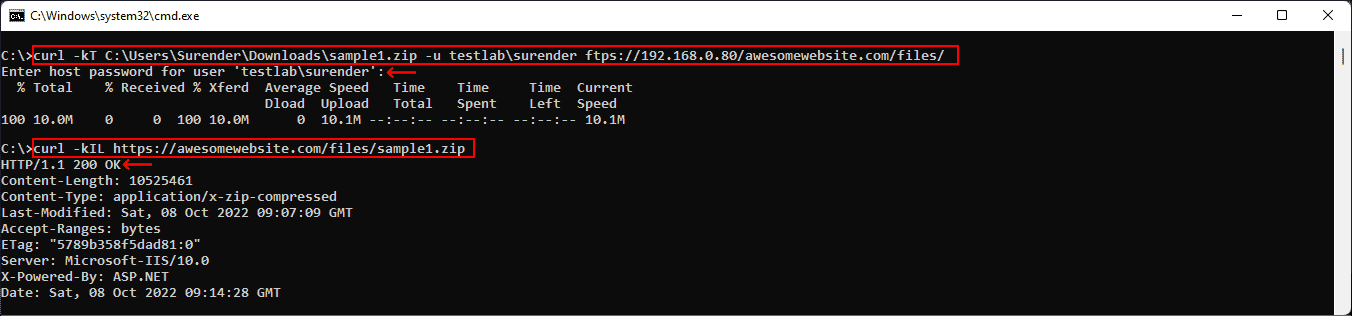
Выгрузка файла на удалённый сервер
Опция -k добавляется для устранения проблем с сертификатами на случай, если веб-сервер использует самоподписанный сертификат. Наклонная черта в конце URL сообщает curl, что конечная точка является папкой. Можно указать несколько имён файлов, например «{sample1.zip,sample2.zip}». Ниже показано, как с помощью одной команды curl можно выгрузить на сервер несколько файлов:
curl -kT sample[1-5].zip -u testlab\surender ftps://192.168.0.80/awesomewebsite.com/files/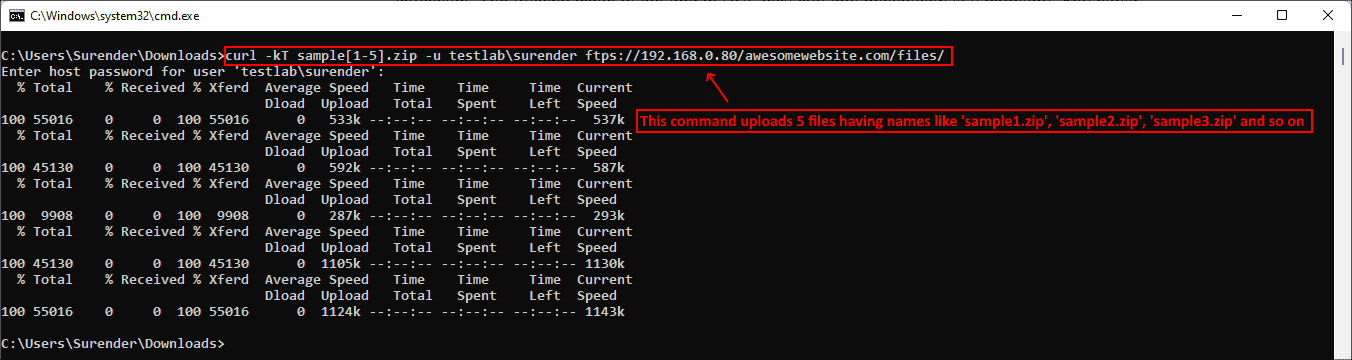
Выгрузка нескольких файлов на сервер
▍ Последовательность команд
Как говорилось ранее, curl поддерживает различные методы в зависимости от используемого протокола. Дополнительные команды можно отправлять при помощи —quote (или -Q) для выполнения операции до или после обычной операции curl. Например, можно скачать файл с удалённого сервера по протоколу FTPS и удалить файл с сервера после успешного скачивания. Для этого нужно выполнить следующую команду:
curl -u testlab\surender -kO "ftps://192.168.0.80/awesomewebsite.com/files/sample1.zip" -Q "-DELE sample1.zip"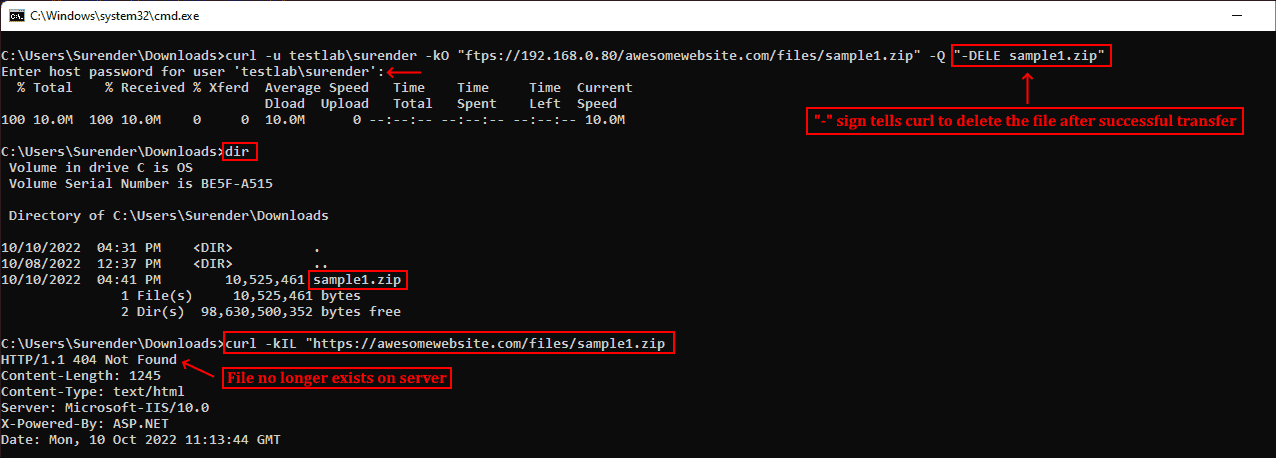
Удаление файла после успешного скачивания
В показанном выше примере я скачал файл sample1.zip с FTPS-сервера при помощи опции -O. После опции -Q я добавил минус (-) перед командой DELE, что заставляет curl отправить команду DELE sample1.zip сразу после успешного скачивания файла. Аналогично, если вы хотите отправить команду на сервер до выполнения операции curl, используйте плюс (+) вместо минуса.
▍ Изменение user-agent
Информация user-agent сообщает серверу тип клиента, отправляющего запрос. При отправке запроса curl на сервер по умолчанию используется user-agent curl/<version>. Если сервер настроен так, чтобы блокировать запросы curl, можно задать собственный user-agent при помощи опции —user-agent (или -A). Показанная ниже команда отправляет стандартный user-agent Google Chrome:
curl -kIA "Mozilla/5.0 (Windows NT 10.0; Win64; x64) AppleWebKit/537.36 (KHTML, like Gecko) Chrome/106.0.0.0" https://awesomewebsite.com/files/secretFile.zip
Использование собственного user-agent с командой curl, чтобы избежать блокировки сервером
На показанном выше скриншоте видно, что обычный запрос curl был отклонён веб-сервером (с ответом 403 Forbidden), но при передаче другого user-agent запрос выполняется успешно, возвращая ответ 200 OK.
▍ Отправка куки
По умолчанию запрос curl не отправляет и не сохраняет куки. Для записи куки можно использовать опцию —cookie-jar (или -c), а отправить куки можно опцией —cookie (or -b):
curl -c /path/cookie_file https://awesomewebsite.com/
curl -b /path/cookie_file https://awesomewebsite.com/
Первая команда записывает файл куки, а вторая отправляет куки с запросом curl. Также можно отправить куки в формате ‘name = value’:
curl -b 'session=abcxyz' -b 'loggedin=true' http://echo.hoppscotch.io
Отправка нескольких куки командой curl
Я воспользовался веб-сайтом echo.hoppscotch.io для демонстрации заголовков HTTP-запросов, которые обычно невидимы клиентам, отправляющим запрос. Если вы не хотите пользоваться этим веб-сайтом, то можете применить опцию –verbose (или -v) для отображения запроса в сыром виде (который отображает и заголовки запросов).
▍ Использование прокси-сервера
Если вы пользуетесь прокси-сервером для подключения к интернету, в curl можно указать прокси опцией —proxy (или -x). Если прокси-сервер требует аутентификации, то добавьте —proxy-user (или -U):
curl -x 192.168.0.250:8088 -U username:password https://awesomewebsite.com/Прокси-сервер указывается в формате server:port, а пользователь прокси — в формате username:password. Можно не вводить пароль пользователя прокси, тогда curl попросит ввести его в режиме no-echo.

Использование прокси-сервера и аутентификации
▍ Дополнительные заголовки запросов
Иногда вместе с запросом к серверу необходимо отправить дополнительную информацию. В curl это можно сделать при помощи —header (или -H), как показано в следующей команде:
curl -vkIH "x-client-os: Windows 11 Enterprise (x64)" https://awesomewebsite.com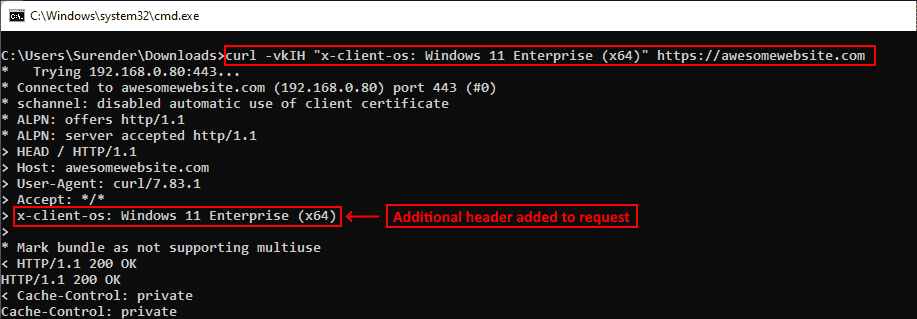
Указание дополнительных заголовков для запроса curl
Можно отправлять любую информацию, недоступную через стандартные заголовки HTTP-запросов. В этом примере я отправил название своей операционной системы. Также я добавил опцию -v для включения verbose-вывода, отображающего дополнительный заголовок, отправляемый вместе с каждым моим запросом curl.
▍ Отправка электронного письма
Так как curl поддерживает протокол SMTP, его можно использовать для отправки электронного письма. Показанная ниже команда позволяет отправить электронное письмо при помощи curl:
curl --insecure --ssl-reqd smtps://mail.yourdomain.com –-mail-from sender@yourdomain.com –-mail-rcpt receiver@company.com --user sender@yourdomain.com --upload-file email_msg.txt
Отправка электронного письма командой curl
Давайте вкратце перечислим использованные здесь опции:
- Опция —insecure (или -k) используется, чтобы избежать ошибки сертификата SSL. Мы уже применяли её ранее.
- Опция —ssl-reql используется для апгрейда соединения передачи простого текста до зашифрованного соединения, если оно поддерживается SMTP-сервером. Если вы уверены, что ваш SMTP-сервер поддерживает SSL, то можно использовать непосредственно имя сервера smtps (например, smtps://smtp.yourdomain.com), как показано на скриншоте.
- Опция —mail-from используется для указания адреса электронной почты отправителя.
- Опция mail-rcpt указывает адрес электронной почты получателя.
- Опция —user (или -u) отправляет имя пользователя для аутентификации, оно должно совпадать с адресом mail-from, потому что в противном случае письмо может быть отклонено или помечено как спам.
- Опция —upload-file (или -T) используется для указания файла, в котором находится отправляемое письмо.
На скриншоте ниже показано письмо, полученное мной во входящие:
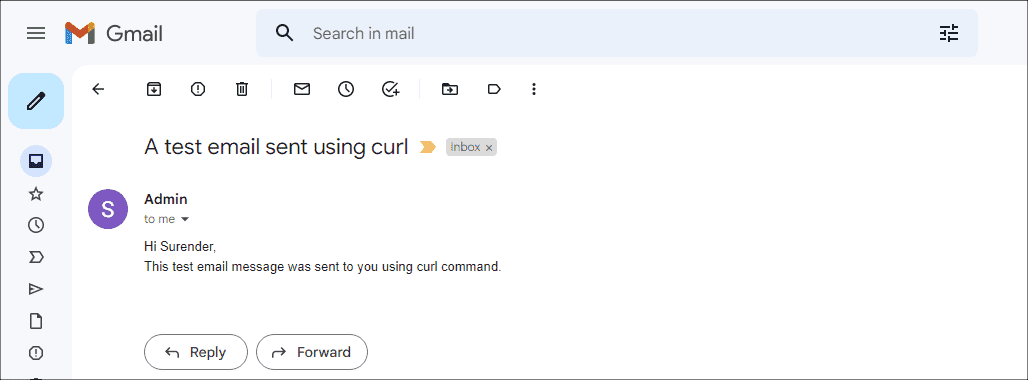
Просмотр письма, отправленного с помощью curl
Это всего лишь несколько примеров использования curl — на самом деле их гораздо больше. Я настоятельно рекомендую проверить справку по curl и поэкспериментировать с ней.
А вы используете curl? И если да, то для чего?
Telegram-канал с полезностями и уютный чат

Contents:
- NTKRNLMP.EXE BSOD Overview
- How to Fix Windows 10 NTKRNLMP.exe BSOD?
- What is NTKRNLMP.exe?
- Why NTKRNLMP.exe Blue Screen of Death Comes up on Windows 10?
NTKRNLMP.EXE BSOD Overview
It is a common phenomenon that when you start Windows 10 or just install Windows 10 update KB4056892, a blue screen of death error of ntkrnlmp.exe pops up and prompts you that your PC ran into a problem that it couldn’t handle, now it needs to restart.
And sometimes, when you occurs a Blue Screen and using windbg analysis, the error displays: Probably caused by: ntkrnlmp.exe (nt!KeStackAttachProcess+115).
So you would better work hard to troubleshoot this ntkrnlmp.exe BSOD on Windows 10 and fix this issue with targeted measures.
Before that, there is much need for you to grasp what the ntkrnlmp.exe is and why you stumble upon the BSOD by this file.
How to Fix Windows 10 NTKRNLMP.exe BSOD?
The ways below can help you resolve the ntkrnlmp error efficiently for Windows 10. You may as well try them one by one to figure out what leads to your BSOD and then deal with this issue quickly.
Solutions:
1: Enter Safe Mode
2: Uninstall and Update Drivers
3: Uninstall the problematic Applications
4: Stop Windows 10 Overclocking
5: Disable BIOS C-States and ELST
Solution 1: Enter Safe Mode
If the ntkrnlmp.exe BSOD appears again and again when you reboot your computer, you should go to the safe mode at first. In safe mode, do the next things.
Solution 2: Uninstall and Update Drivers
The incompatible drivers may cause ntkrnlmp.exe BSOD, so uninstall the faulty drivers and update all the drivers have the chance to fix this issue.
1. Open Device Manager.
2. Check if there is an faulty driver. If yes, uninstall it.
3. Try to update drivers by find the driver and click Update Driver.
There is a problem that maybe you do not know what driver is outdated, so you can try to update the outdated drivers with Driver Booster.
Driver Booster, an automatically drivers download and update tool, can help users to get the latest graphic driver, audio driver, USB driver, mouse driver etc. with one click. And as the best driver scanner, it can detect the most outdated and missing drivers for your computer.
4. Download, install and run Driver Booster on Windows 10.
5. Click Scan. After that, Driver Booster will scan all the hardware device drivers, find the outdated, missing and faulty drivers.

6. Click Update Now. Select all the drivers, and click Update Now. It will help you download and update all the drivers with this one click.
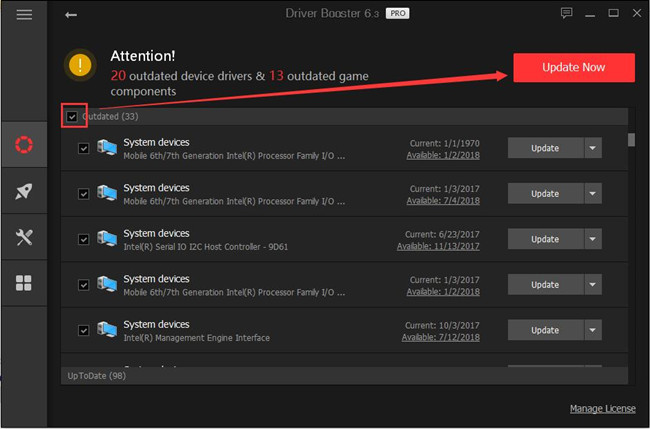
All the download and install process is automatically.
With the newly updated graphics driver, now you are free from being plagued by ntkrnlmp.exe blue screen of death Windows 10.
Solution 3: Uninstall the problematic Applications
The ntkrnlmp.exe BSOD can be caused by the problematic applications. If you installed a programs but it has some bugs, or install a program with a wrong way, this error will occurs.
So you should go the control panel > program and features to find the problematic applications and uninstall it.
Solution 4: Stop Windows 10 Overclocking
By default, overclocking settings is used to make some of your programs or components run at higher speed. But according to recent reports, overclocking can to some extent give rise to ntkrnlmp.exe BSOD on Windows 10.
Therefore, it is wise for you to disable this functionality in order to fix the blue screen of death.
You need to enter BIOS settings if you are to stop overclocking.
1. Go to Start > Settings > Update & Security.
2. Then under Recovery, click Restart now.
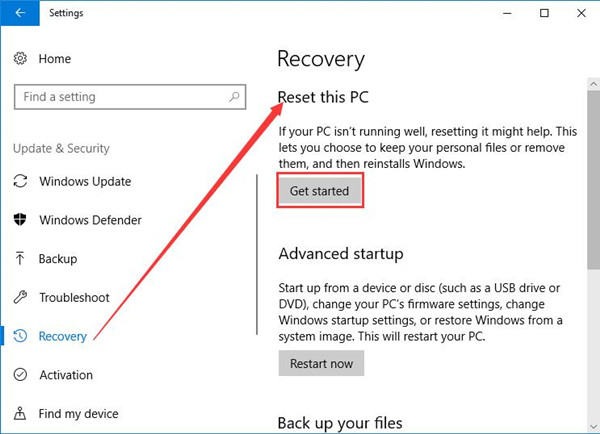
3. Then you will navigate to the startup option list, here go as the path: Troubleshoot > Advanced option > UEFI Firmware Settings.
4. Hit Restart again in the following window.
Then in BIOS settings, under the Advanced tab, click Performance, and then disable the Overclocking.
Shortly after that, try to save changes and exit from the BIOS. Here to get into BIOS settings, if you are in ntkrnlmp.exe BSOD on Windows 10, you may fail to enter it directly from Update & Security.
Once you have disabled Overclocking for your CPU or GPU, you can see the ntkrnlmp.exe blue screen of death disappeared.
Solution 5: Disable BIOS C-States and ELST
In reality, apart from the Overclocking for GPU or CPU on Windows 10, the C-States and ELST in BIOS settings can also result in the BSOD by ntkrnkmp.exe.
For most users, the C-States and ELST (Enhanced Intel SpeedStep Technology) developed by Intel on your computer can sometimes occupy much of your CPU or voltage, therefore, you would better make an attempt to disable these two options in BIOS.
It is rather foolproof to achieve this action.
In BIOS settings, move to Advanced menu > CPU configuration > CPU Power Management.
And then find out C-States and ELST and determine to set them Disabled one by one.
In a nutshell, to assist you in fixing ntkrnlmp.exe BSOD for Windows 10, this post shows you how to update the graphics card driver, disable overclocking, C-States, and ELST in BIOS settings on Windows 10.
But if you even find these methods do not work for your ntkrnlmp.exe on Windows 10, it is feasible for you to restore Windows 10 to see whether the blue screen of death error can be resolved.
What is NTKRNLMP.exe?
Ntkrnlmp represents NT Kernel, Multi-processor version, it is legal in Windows systems, be Windows 7, 8 or 10, and it often refers to Kernel image in your PC.
Concerning its usage, as a Windows system file, the ntkrnlmp.exe is a vital system file that controls the activities of various files on Windows 10.
Sometimes, when you check the memory dump files, or try to boot your PC, or experience Windows 10 update, this ntkrnlmp.exe BSOD Windows 10 will come to you unwittingly.
Why NTKRNLMP.exe Blue Screen of Death Comes up on Windows 10?
In terms of the reasons for the BSOD of ntkrnlmp.exe, it may be caused by outdated or incompatible graphics driver, the erroneous BIOS settings, or overclocking on Windows 10.
Based on the causes of your problem, now you are to follow up to get the effective methods to remove the blue screen of death error.
Related Articles:
Fix Ntoskrnl.exe Blue Screen of Death on Windows 10
Solved: VIDEO_TDR_FAILURE (nvlddmkm.sys) BSOD Windows 10, 7
Fixed: Bugcode USB Driver BSOD Error
Суть и описание Вашей проблемы:
Всем привет. Слёзно умоляю вас помогите пожалуйста! Опишу ситуацию. Не так давно в рандомных местах (но чаще в играх) выскакивает синий экран Kernel Security Check Failure
Когда (после чего) появилась проблема:
После долгого простоя, перевозки ПК, перестановки винды. А ещё видеокарту в другой слот поставила
Ваши действия по решению проблемы:
С помощью утилиты «Blue screen view» узнала что ошибка из-за ntkrnlmp.exe с кодом 0x000000139. Пишут что скорее всего конфликт драйверов или диска. Перепробовала все что нашла.. Chkdsk, dism, sfc, встроенная проверка оперативной памяти. Никаких ошибок — никаких результатов. Переустановила виндовз, все драйвера только с офф сайта, результатов никаких
Комплектующие ПК:
Материнская плата: ASRock 970m pro3
Процессор: FX 8320 4,2ghz
Оперативная память: HyperX fury 2x8gb
Видеокарта: radeon RX 580 8gb
Накопители (HDD/SDD): SSD 250gb system, SSD 450gb, HDD 1tb
Блок питания: chieftec eco 700w
Сис-ма охлаждения: DeepCool gammax 300
Дополнительное описание:
Вначале грешила на блютуз адаптер который недавно преобрела т.к. После дампа и перезагрузки выскакивала ошибка юсб, и в одной игре начало сильно глючить пока не вытянула адаптер. Но даже без него через пару часов — дамп. Все скрины которые помогут — скину
Операционная система: Windows 10
Изменено пользователем Викуля
Некорректное обьяснение
Как использовать OAuth2 со Spring Security в Java
Javaican 14.05.2025
Протокол OAuth2 часто путают с механизмами аутентификации, хотя по сути это протокол авторизации. Представьте, что вместо передачи ключей от всего дома вашему другу, который пришёл полить цветы, вы. . .
Анализ текста на Python с NLTK и Spacy
AI_Generated 14.05.2025
NLTK, старожил в мире обработки естественного языка на Python, содержит богатейшую коллекцию алгоритмов и готовых моделей. Эта библиотека отлично подходит для образовательных целей и. . .
Реализация DI в PHP
Jason-Webb 13.05.2025
Когда я начинал писать свой первый крупный PHP-проект, моя архитектура напоминала запутаный клубок спагетти. Классы создавали другие классы внутри себя, зависимости жостко прописывались в коде, а о. . .
Обработка изображений в реальном времени на C# с OpenCV
stackOverflow 13.05.2025
Объединение библиотеки компьютерного зрения OpenCV с современным языком программирования C# создаёт симбиоз, который открывает доступ к впечатляющему набору возможностей. Ключевое преимущество этого. . .
POCO, ACE, Loki и другие продвинутые C++ библиотеки
NullReferenced 13.05.2025
В C++ разработки существует такое обилие библиотек, что порой кажется, будто ты заблудился в дремучем лесу. И среди этого многообразия POCO (Portable Components) – как маяк для тех, кто ищет. . .
Паттерны проектирования GoF на C#
UnmanagedCoder 13.05.2025
Вы наверняка сталкивались с ситуациями, когда код разрастается до неприличных размеров, а его поддержка становится настоящим испытанием. Именно в такие моменты на помощь приходят паттерны Gang of. . .
Создаем CLI приложение на Python с Prompt Toolkit
py-thonny 13.05.2025
Современные командные интерфейсы давно перестали быть черно-белыми текстовыми программами, которые многие помнят по старым операционным системам. CLI сегодня – это мощные, интуитивные и даже. . .
Конвейеры ETL с Apache Airflow и Python
AI_Generated 13.05.2025
ETL-конвейеры – это набор процессов, отвечающих за извлечение данных из различных источников (Extract), их преобразование в нужный формат (Transform) и загрузку в целевое хранилище (Load). . . .
Выполнение асинхронных задач в Python с asyncio
py-thonny 12.05.2025
Современный мир программирования похож на оживлённый мегаполис – тысячи процессов одновременно требуют внимания, ресурсов и времени. В этих джунглях операций возникают ситуации, когда программа. . .
Работа с gRPC сервисами на C#
UnmanagedCoder 12.05.2025
gRPC (Google Remote Procedure Call) — открытый высокопроизводительный RPC-фреймворк, изначально разработанный компанией Google. Он отличается от традиционых REST-сервисов как минимум тем, что. . .
NTKRNLMP stands for NT Kernel, Multi-processor version and it’s a legitimate Windows component. This system file is tasked with managing the vast majority of low-level internal files, so it can be regarded as one of the most important Windows files.
BSOD (Blue Screen of Death) crashes frequently get attributed to ntkrnlmp.exe when Windows users check the memory Dump file related to the crash. However, this does not mean that the ntkrnlmp.exe file is causing the issue – it’s merely an indicator that ntkrnlmp.exe was dealing with bad data at the time of the crash.

Although the BSOD trigger is fairly hard to identify, there is a shortlist of culprits that are known to trigger this error:
- Incompatible or outdated graphics drivers are causing the BSOD.
- Problem is caused by one of the latest Windows updates.
- The crash is caused by two non-identical RAM sticks. Corsair and a few other products are notoriously known for varying timings, thus encouraging a BSOD crash to happen.
- A ntkrnlmp.exe related BSOD crash if often linked with a bad power adapter that is causing voltage issue when the PC switches from a stress state to idle.
- C-states and EIST are enabled in BIOS and are causing the issue when the PC is idle.
- The issue is caused by a corrupted RAID controller driver.
If you’re currently struggling with this issue, there are a few fixes that you can try, but you have to be prepared for some extensive troubleshooting steps. Below you have a collection of solutions that have successfully enabled Windows users to stop receiving BSOD crashes related to ntkrnlmp.exe. Please follow each method in order until you find a fix that works for your scenario.
Method 1: Reinstall your graphics card driver
Some users managed to resolve the problem after updating their video card drivers. Newer Windows versions automatically install the drivers needed for your graphics card through WU (Windows Update). However, this is not always beneficial, as there’s a high chance that WU will not install the latest version available. With newer GPU models, this can create the grounds for a system-wide crash. There’s also the possibility that the BSOD crash is a symptom of a faulty graphics driver.
You can troubleshoot and see if this triggers the BSOD by reinstalling your graphics drivers. Here’s a quick guide on how to do it:
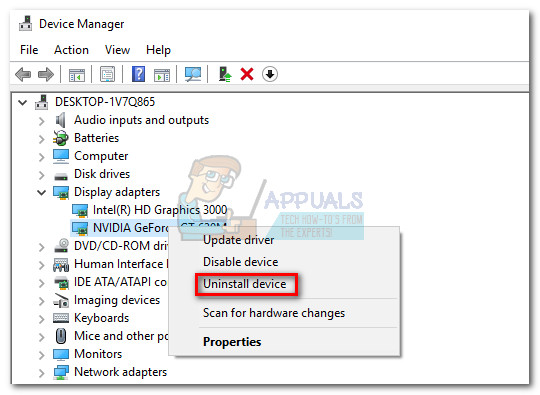
- Press Windows key + R, type “devmgmt.msc” and hit Enter to open Device Manager.

- Scroll down to Display Adapters and expand the drop-down menu. Right-click on the graphics driver and select Uninstall Device.

Note: You might see two different entries under Display Adapters. This usually occurs with laptops and notebooks that have both an integrated and a dedicated graphics card. In this case, uninstall both display adapter drivers.
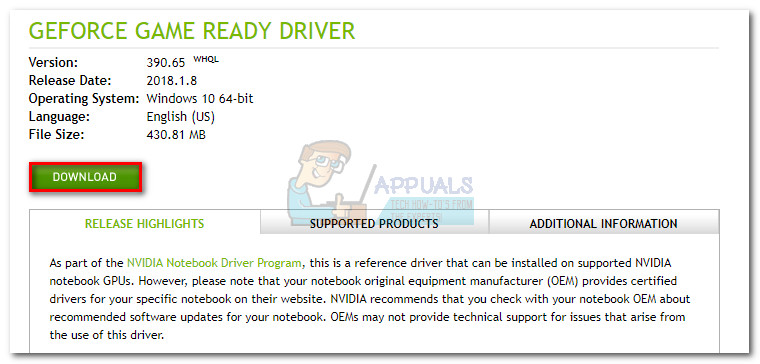
- Download the latest dedicated graphics driver version from your manufacturer’s website. To do this, visit this link (here) for Nvidia or this (here) for ATI. Download & install the latest driver version according to your GPU model and Windows version.

Note: Don’t worry about manually downloading the integrated graphics driver if you previously uninstalled it. Windows will automatically reinstall it at the next reboot if it’s missing.
- Reboot your system and see if the BSOD crash repeats. If it does, move to Method 2.

Method 2: Disable CPU or GPU overclocking
The BSOD crash related to the Ntkrnlmp executable is a fairly common occurrence on overclocked PCs. Some users encountering this issue have managed to fix the problem by removing or reducing their clocked frequencies.
Note: Overclocking is the action of increasing a component’s clock rate in order to make it run at a higher speed. This process is usually applied on CPUs and GPUs, but other components can also be overclocked. If you aren’t sure if your system is overclocked, it most likely isn’t.
If you’re currently overclocking anything, reset the frequencies to default and see how your system reacts to the change. If the crashes stop, gradually tone-down the custom clocked frequency until you reach a stable state and the BSOD crashes stop.
Keep in mind that this method only refers to those who overclocked components manually (from BIOS or a dedicated utility). If your PC uses a manufacturer-provided technology that automatically boosts the CPU frequencies on demand (Intel’s Turbo Boost or equivalent), do not disable it as it won’t make any difference.
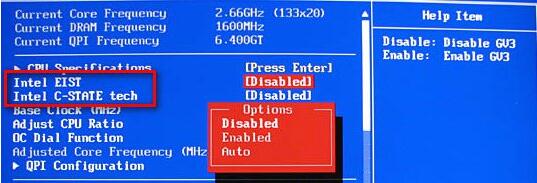
Method 3: Disable C-states and EIST from BIOS
Regardless of your PC’s architecture, your OS is likely using C-state and EIST (Enhanced Intel SpeedStep Technology) to save energy when the CPU is in idle mode. It does this by altering the CPU voltage during idle times or in other low-load circumstances. Depending on your CPU model, this can result in an insufficient voltage (undervoltage) that will trigger a random BSOD. This scenario is likely if you experience crashes several hours after you open your PC or when it’s not doing anything.
You can test this theory by disabling the two technologies from your BIOS. However, depending on your motherboard, the exact steps will be different. On most BIOS versions the two settings are located in Advanced menu > CPU configuration > CPU Power Management. Then, set them both to disabled and save your configuration.
If the BSOD crashes are still happening with C-state and EIST disabled, return to BIOS, re-enable both and move to the method below.
Method 4: Troubleshooting non-identical RAM sticks
As it turns out, a BSOD crash related to ntkrnlmp.exe is far more common on computers with non-identical RAM sticks. Keep in mind that having two RAM sticks from the same manufacturer doesn’t necessarily mean they are identical (frequency-wise).
Note: Corsair sticks are notoriously known for varying timings (having different speeds), thus encouraging a BSOD crash.
If you two unmatching RAM sticks installed on your system, take one out and see if the crashes are still happening. If the BSOD crash doesn’t happen with a lone RAM stick, it virtually proves there’s some sort of incompatibility caused by the way your motherboard deals with the presence of multiple, non-identical RAM sticks. If that’s the case, you can fix this issue by investing in a proper dual-channel RAM kit.
In the event that you only have one RAM stick, you can check it for any malfunction by using a software called Memtest. To make the whole process easier, follow the step-by-step instructions provided in this article (Your computer has a memory problem).
If you determined that your RAM stick/s are functioning properly, move to the method below.
Method 5: Investigating an inadequate PSU or AC adapter issue
BSOD errors are often linked with insufficient PSU (power supply) capacity or a faulty AC adapter. As it turns out, some users managed to stop the BSOD crashes related to ntkrnlmp.exe by changing the power adapter or upgrading to a more powerful PSU.
PC Users
If you recently upgraded one of your hardware components on your PC, it’s entirely possible that the PSU is having a hard time keeping up with new the power consumption. Keep in mind that most PSUs will not be able to deliver the output power that is written on the label.
If you suspect that this is the cause of your BSOD crashes, try to run your machine with the bare minimum components to reduce the power consumption as much as you can. You can remove the dedicated sound card (if applicable), cut the power from your DVD drive and start the machine with only one stick of RAM. Also, if you have an SLI / CrossFire setup, start your PC with only one connected GPU.
In the event that the crashes stop while you run your machine with the minimum components, there’s a high chance that your PSU is to blame. But before you go ahead and buy a new supply source, use a power supply calculator like this one (here) to see if the current PSU is under the minimum requirements for your rig. If it is, it’s probably worth it to invest into a more powerful PSU.
Laptop/Notebook users
If you’re experiencing the BSOD crashes on a laptop/notebook, you’ll need to check your AC adapter. Some laptop users have fixed the error by replacing the AC adaptor. You can test this theory by only using the battery – charge the battery fully while the laptop is shut down and remove the power cable before you power it on.
If there are no BSOD crashes while the power cable unplugged, you can probably assume that the AC charger is fluctuating the voltage and causing the crash. This typically happens with generic AC adapter brands and is far more likely on proper OEM charger. But before you buy a new charger, you can confirm that it’s the culprit by using a voltmeter/multimeter to test if the AC is outputting the advertised voltage consistently.
If you determined that the PSU/AC adapter is not the cause of your issue, move to the next method.
Method 6: Troubleshooting for a WU issue
Some users have managed identified Windows Update as the culprit for the BSOD crash related to ntkrnlmp.exe. This typically happens if the installation of a driver (installed through WU) is interrupted by an unexpected shutdown.
If you’re suspecting WU as the culprit, start by making sure that you have installed all drivers scheduled to update through WU. If your system is dealing with a driver botched by WU, the following procedure might force an override and stop the BSOD error:
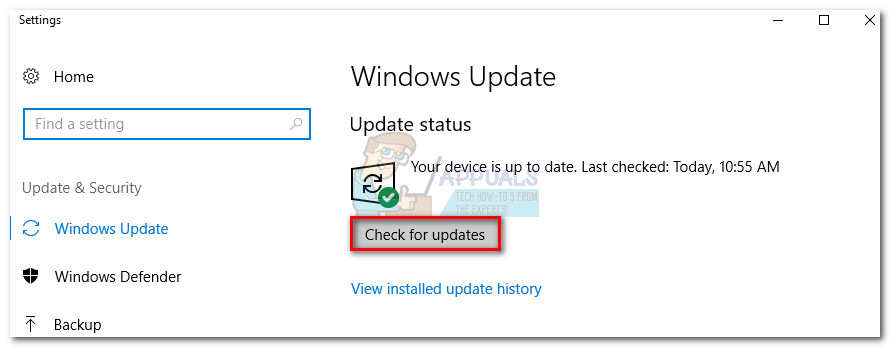
- Press Windows key + R to open a Run window. Type “control update” and hit Enter to open Windows Update.
- In the Windows Update tab, click the Check for updates button and install any available updates.

- Once all available updates are installed, reboot your system and see if the issue is resolved. If it isn’t, follow the instructions below.

Using System Restore to fix the BSOD crash
A BSOD crash related to ntkrnlmp.exe can turn out to be a symptom of a broken/corrupted Windows update component. If you are unable to update through WU (updates failing or no new updates available for a long time), it’s worth it to do a system restore to a previous point from where the update component was working properly.
Note: System Restore is a recovery tool that allows you to reverse certain changes that were made to your operating system. Think of it as an “undo” feature for the most important parts of Windows.
Here’s a quick guide to doing a system restore to a previous point:
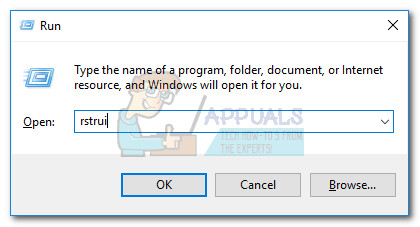
- Press Windows key + R to open a Run command. Type rstrui and hit Enter to open System Restore.
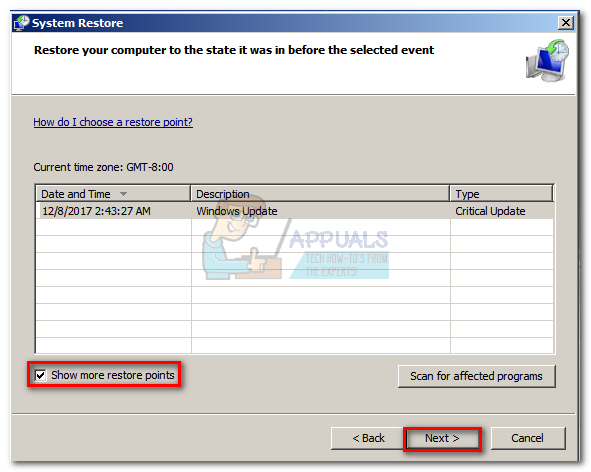
- Hit Next in the first window and then check the box next to Show more restore points. Select a restore point prior to when the update component started malfunctioning and click the Next button.

- Hit Finish and then click Yes at the next prompt to start the restore process. When the restore is complete, your PC will automatically restart. Once your OS is restored to a previous version, see if the BSOD crashes have stopped.