
ARP (англ. Address Resolution Protocol — протокол определения адреса) — протокол в компьютерных сетях, предназначенный для определения MAC-адреса по IP-адресу другого компьютера. Существуют следующие типы сообщений ARP: запрос ARP (ARP request) и ответ ARP (ARP reply). Система-отправитель при помощи запроса ARP запрашивает физический адрес системы-получателя. Ответ (физический адрес узла-получателя) приходит в виде ответа ARP.
Компьютер А (IP-адрес 192.168.1.1) и компьютер Б (IP-адрес 192.168.1.2) соединены сетью Ethernet. Компьютер А желает переслать пакет данных на компьютер Б, IP-адрес компьютера Б ему известен. Компьютеру А для осуществления передачи через Ethernet требуется узнать MAC-адрес компьютера Б в сети Ethernet. Для этой задачи и используется протокол ARP.
Компьютер А отправляет широковещательный запрос, адресованный всем компьютерам в одном с ним широковещательном домене. Суть запроса: «компьютер с IP-адресом 192.168.1.2, сообщите свой MAC-адрес компьютеру с МАС-адресом …». Этот запрос доставляется всем устройствам в том же сегменте Ethernet. Компьютер Б отвечает компьютеру А на запрос и сообщает свой MAC-адрес.
Протокол имеет буферную память (ARP-таблицу), в которой хранятся пары адресов (IP-адрес, MAC-адрес) с целью уменьшения количества посылаемых запросов, следовательно, экономии трафика и ресурсов. Записи ARP-таблицы бывают двух вид видов: статические и динамические. Статические добавляются самим пользователем, динамические же — создаются и удаляются автоматически. При этом в ARP-таблице всегда хранится широковещательный физический адрес FF:FF:FF:FF:FF:FF.
Команда arp в Windows
Позволяет просмотреть ARP-таблицу, добавить в нее новую запись или удалить существующую:
> arp
Отображение и изменение таблиц преобразования IP-адресов в физические,
используемые протоколом разрешения адресов (ARP).

ARP -s inet_addr eth_addr [if_addr]
ARP -d inet_addr [if_addr]
ARP -a [inet_addr] [-N if_addr] [-v]

  -a            Отображает текущие ARP-записи, опрашивая текущие данные
                протокола. Если задан inet_addr, то будут отображены IP и
                физический адреса только для заданного компьютера. Если
                ARP используют более одного сетевого интерфейса, то будут
                отображаться записи для каждой таблицы.
  -g            То же, что и параметр -a.
  -v            Отображает текущие ARP-записи в режиме подробного
                протоколирования. Все недопустимые записи и записи в
                интерфейсе обратной связи будут отображаться.
  inet_addr     Определяет IP-адрес.
  -N if_addr    Отображает ARP-записи для заданного в if_addr сетевого
                интерфейса.
  -d            Удаляет узел, задаваемый inet_addr. Параметр inet_addr может
                содержать знак шаблона * для удаления всех узлов.
  -s            Добавляет узел и связывает адрес в Интернете inet_addr
                с физическим адресом eth_addr.  Физический адрес задается
                6 байтами (в шестнадцатеричном виде), разделенных дефисом.
                Эта связь является постоянной
  eth_addr      Определяет физический адрес.
  if_addr       Если параметр задан, он определяет адрес интерфейса в
                Интернете, чья таблица преобразования адресов должна
                измениться. Если параметр не задан, будет использован
                первый доступный интерфейс.
Пример:
  > arp -s 157.55.85.212   00-aa-00-62-c6-09  .. Добавляет статическую запись.
  > arp -a
Создать запись в ARP-таблице:
> arp -s IP-адрес MAC-адрес
Вывести записи ARP-таблицы:
> arp -a
Интерфейс: 192.168.53.1 --- 0x5
  адрес в Интернете      Физический адрес      Тип
  192.168.53.255        ff-ff-ff-ff-ff-ff     статический
  224.0.0.22            01-00-5e-00-00-16     статический
  224.0.0.251           01-00-5e-00-00-fb     статический
  224.0.0.252           01-00-5e-00-00-fc     статический
  239.255.255.250       01-00-5e-7f-ff-fa     статический

Интерфейс: 192.168.110.2 --- 0x14
  адрес в Интернете      Физический адрес      Тип
  192.168.110.1         04-bf-6d-9a-c7-a8     динамический
  192.168.110.3         08-00-27-92-ce-01     динамический
  192.168.110.255       ff-ff-ff-ff-ff-ff     статический
  224.0.0.22            01-00-5e-00-00-16     статический
  224.0.0.251           01-00-5e-00-00-fb     статический
  224.0.0.252           01-00-5e-00-00-fc     статический
  239.255.255.250       01-00-5e-7f-ff-fa     статический
  255.255.255.255       ff-ff-ff-ff-ff-ff     статический

Интерфейс: 172.28.128.1 --- 0x15
  адрес в Интернете      Физический адрес      Тип
  172.28.128.255        ff-ff-ff-ff-ff-ff     статический
  224.0.0.22            01-00-5e-00-00-16     статический
  224.0.0.251           01-00-5e-00-00-fb     статический
  224.0.0.252           01-00-5e-00-00-fc     статический
  239.255.255.250       01-00-5e-7f-ff-fa     статический
Команда arp в Linux
Позволяет просмотреть ARP-таблицу, добавить в нее новую запись или удалить существующую:
$ arp --help
Использование:
  arp [-vn] [<HW>] [-i <интерфейс>] [-a] [<имя_компьютера>]       <- Отобразить кэш arp
  arp [-v]          [-i <if>] -d  <host> [pub]                    <- Удалить элемент ARP
  arp [-vnD] [<HW>] [-i <интерфейс>] -f [<имя_файла>]             <- Добавить запись в arp из файла
  arp [-v]   [<HW>] [-i <if>] -s  <host> <hwaddr> [temp]          <- Добавить элемент
  arp [-v]   [<HW>] [-i <if>] -Ds <host> <if> [netmask <nm>] pub

        -a показать (все) хосты в альтернативном (BSD) стиле
        -e                       display (all) hosts in default (Linux) style
        -s, --set установить новую запись ARP
        -d, --delete удалить определенную запись
        -v, --verbose более детальный вывод
        -n, --numeric не преобразовывать адреса в имена
        -i, --device указание сетевого интерфейса (например, eth0)
        -D, --use-device прочитать <hwaddr> из заданного устройства
        -A, -p, --protocol указание семейства протоколов
        -f, --file считать новые записи из файла или из /etc/ethers

  <HW>=Используйте '-H <hw>' для указания типа аппаратного адреса. По умолчанию: ether
  Список всех возможных типов HW (которые поддерживают ARP)
    ash (Ash) ether (Ethernet) ax25 (AMPR AX.25)
    netrom (AMPR NET/ROM) rose (AMPR ROSE) arcnet (ARCnet)
    dlci (Frame Relay DLCI) fddi (Fiber Distributed Data Interface) hippi (HIPPI)
    irda (IrLAP) x25 (универсальный X.25) eui64 (Универсальный EUI-64)
Создать запись в ARP-таблице:
> sudo arp -s IP-адрес MAC-адрес
Вывести записи ARP-таблицы:
$ arp
Адрес                    HW-тип  HW-адрес            Флаги  Маска          Интерфейс
192.168.110.13           ether   08:00:27:78:7a:c2   C                     enp0s3
192.168.110.2            ether   1c:1b:0d:e6:14:bd   C                     enp0s3
_gateway                 ether   04:bf:6d:9a:c7:a8   C                     enp0s3
Альтернативный способ просмотра записей таблицы — команда
$ ip neigh
192.168.110.3 dev enp0s3 lladdr 08:00:27:78:7a:c2 REACHABLE
192.168.110.2 dev enp0s3 lladdr 1c:1b:0d:e6:14:bd STALE
192.168.110.1 dev enp0s3 lladdr 04:bf:6d:9a:c7:a8 STALE
Поиск:
Linux • Windows • Команда • Локальная сеть • ARP • IP адрес • MAC адрес • Протокол • Protocol • Ethernet
Каталог оборудования
Lorem ipsum dolor sit amet, consectetur adipiscing elit, sed do eiusmod tempor incididunt ut labore et dolore magna aliqua.
Производители
Lorem ipsum dolor sit amet, consectetur adipiscing elit, sed do eiusmod tempor incididunt ut labore et dolore magna aliqua.
Функциональные группы
Lorem ipsum dolor sit amet, consectetur adipiscing elit, sed do eiusmod tempor incididunt ut labore et dolore magna aliqua.
The Windows CMD `arp` command is used to view and manage the Address Resolution Protocol (ARP) cache, which maps IP addresses to MAC addresses on your local network. Here’s an example of how to display the ARP cache:
arp -a
Introduction to ARP
What is ARP?
Address Resolution Protocol (ARP) is a crucial networking protocol used for the resolution of Internet Protocol (IP) addresses into physical machine (MAC) addresses within a local network. Essentially, ARP serves as a bridge between the network layer (IP address) and the data link layer (MAC address) of the OSI model, enabling effective communication between devices on a local network.
Understanding ARP in Windows CMD
The Windows Command Prompt (CMD) is a powerful tool for interacting with the operating system. The use of Windows CMD commands, including ARP commands, plays a significant role in troubleshooting connectivity issues and managing network settings. By mastering ARP, you can greatly enhance your network management skills.
Mastering Windows Cmd Route: A Concise Guide
Accessing the ARP Command in Windows CMD
How to Open Command Prompt
To begin using ARP commands, you must first access the Windows Command Prompt. Here’s how to do it on various Windows systems:
- Windows 10/11: Click on the Start menu, type «cmd,» and press Enter. Alternatively, you can right-click the Start button and select «Windows Terminal» or «Command Prompt.»
- Windows 7: Click on the Start button, navigate to «All Programs,» then «Accessories,» and select «Command Prompt.»
Additionally, you can access CMD using keyboard shortcuts such as `Win + R`, then typing `cmd` and hitting Enter.
Basic Syntax of the ARP Command
The general syntax for the ARP command is fairly straightforward:
arp [options]
This structure allows for several options that enable you to perform various functions related to ARP.
Windows Cmd Grep: Your Essential Guide to Text Searching
Common ARP Commands and Their Uses
Displaying the ARP Table
One of the primary functions of the ARP command is to display the current ARP table. This is achieved with the command:
arp -a
When you execute this command, you’ll see a list of IP addresses and their corresponding MAC addresses, along with the type of ARP entry (dynamic or static). The output typically looks something like this:
Interface: 192.168.1.2 --- 0x2
  Internet Address      Physical Address      Type
  192.168.1.1          00-1A-2B-3C-4D-5E     dynamic
  192.168.1.5          00-1F-2D-3B-4C-6D     dynamic
Viewing ARP Entries for a Specific Interface
If you want to focus on the ARP entries associated with a specific network interface, you can use:
arp -a <interface>
Replace `<interface>` with the specific interface you want to query (e.g., Ethernet, Wi-Fi). This command is particularly useful for identifying entries related to a specific connection, ensuring that you’re troubleshooting the right network segment.
Adding a Static ARP Entry
Static ARP entries can be added for devices with fixed IP addresses to improve network efficiency:
arp -s <IP Address> <MAC Address>
For example, if you want to add a static ARP entry for a printer with IP address `192.168.1.10` and MAC address `00-11-22-33-44-55`, you would enter:
arp -s 192.168.1.10 00-11-22-33-44-55
This ensures that your device will always resolve the IP address to the specified MAC address, potentially reducing network latency in specific scenarios.
Deleting an ARP Entry
You might need to clear outdated or incorrect entries from your ARP table. This can be done using:
arp -d <IPAddress>
For instance, to delete the ARP entry for the printer mentioned earlier, you would type:
arp -d 192.168.1.10
This action helps maintain an accurate ARP table, which is crucial for efficient network communication.
Windows Cmd Repair: Quick Fixes You Need to Know
Advanced ARP Usage Tips
Troubleshooting with ARP Commands
ARP commands can be invaluable when diagnosing network issues.
Detecting Duplicate IP Addresses
Duplicate IP addresses can disrupt network connectivity, and ARP can help identify them. When you run the `arp -a` command, pay attention to any duplicates that may show up in the output. If the same IP address has different MAC addresses, it indicates a potential IP conflict.
Resolving Network Connectivity Issues
Network problems often stem from erroneous ARP entries. If you’re unable to connect to a device, check the ARP table to see if the MAC address is correct. You can use the commands mentioned above to diagnose and rectify errors effectively.
Working with Different Network Protocols
ARP primarily works with IPv4; however, with the advent of newer protocols like IPv6, understanding ARP’s role is essential. While IPv6 utilizes Neighbor Discovery Protocol (NDP) instead of ARP, being aware of how ARP operates in conjunction with various network protocols remains relevant for comprehensive network administration.
Mastering Windows Cmd Attrib: A Quick Guide
Security Considerations
ARP Spoofing and Security Threats
While ARP is a powerful tool, it is also vulnerable to security threats, particularly ARP spoofing. This attack involves sending false ARP messages over a local network, allowing an attacker to associate their MAC address with the IP address of a legitimate device. Consequently, this can lead to data interception and man-in-the-middle attacks.
Mitigating ARP Spoofing Risks
To protect your network against ARP spoofing, consider implementing best practices:
- Use Static ARP Entries: For critical devices, use static ARP entries to prevent unauthorized MAC addresses from being associated erroneously.
- Monitor ARP Traffic: Utilize network monitoring tools to detect unusual ARP activity and immediately investigate any discrepancies.
- Educate Users: Awareness among users can also help in recognizing potential network threats.
Mastering Windows Cmd Alias for Effortless Command Shortcuts
Conclusion
Key Takeaways
The `windows cmd arp` command is a vital tool for managing and troubleshooting network connections. By mastering its various commands and understanding ARP’s role in your network, you can enhance your effectiveness as a network administrator or an informed user.
Further Reading and Resources
For those eager to delve deeper into CMD commands, consider exploring additional resources that cover various aspects of network management and troubleshooting.
Windows Cmd Repair Commands: A Quick Guide
FAQs
What is the difference between dynamic and static ARP entries?
Dynamic ARP entries are automatically created when a device communicates with another on the network, but they can expire. Static ARP entries, on the other hand, do not expire and are set manually, offering consistent IP-to-MAC mapping.
Can I use ARP commands remotely?
ARP commands are generally used on a local device. However, you can remotely manage ARP with tools like PowerShell or dedicated network management software, which can give you access to ARP tables on remote devices.
How does ARP work in a virtualized environment?
In virtualized environments, ARP operates similarly to physical networks, allowing virtual machines to communicate through virtual switches. Understanding ARP’s function within these contexts is critical for effective network management in these increasingly popular setups.
Windows has some very useful networking utilities that are accessed from a command line (cmd console).
On Windows 10 type cmd in the search box to open a command console.
These basic networking commands are mainly used for getting system information and troubleshooting networking problems.
Here we look at 10 commands that I use most often.
1. Ping Command
The ping command is one of the most often used networking utilities for detecting devices on a network and for troubleshooting network problems.
When you ping a device you send that device a short message, which it then sends back (the echo).
The general format is ping hostname or ping IPaddress.
Example
ping www.google.com or ping 216.58.208.68
This article covers the ping command in more detail.
2. ipconfig Command
Another indispensable and frequently used utility that is used for finding network information about your local machine like IP addresses, DNS addresses etc
Basic Use: Finding Your IP Address and Default Gateway
Type the command ipconfig at the prompt.
The following is displayed
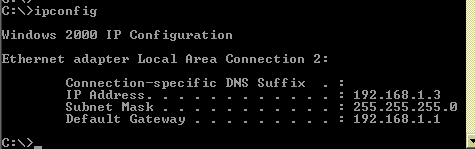
Ip config has a number of switches the most common are:
ipconfig /all – displays more information about the network setup on your systems including the MAC address.
ipconfig /release – release the current IP address
ipconfig /renew – renew IP address
ipconfig /? -shows help
ipconfig/flushdns – flush the dns cache
3. Hostname Command
A very simple command that displays the host name of your machine. This is much quicker than going to the control panel>system route.
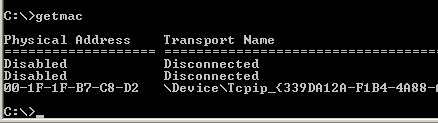
4. getmac Command
Another very simple command that shows the MAC address of your network interfaces
5. arp Command
This is used for showing the address resolution cache. This command must be used with a command line switch arp -a is the most common.

Type arp at the command line to see all available options.
See using arp in the basic networking course
6. NSlookup
Used for checking DNS record entries. See Using NSlookup for more details
7. Nbtstat
Diagnostic tool for troubleshooting netBIOS problems. See This technet article.
8 Net Command
Used for managing users,service,shares etc see here
9. Netstat Command
Used for displaying information about tcp and udp connections and ports. See tcp and udp ports and sockets and how to use the netstat command
10. TaskKill Command
View a list of running tasks using the tasklist command and kill them by name or processor ID using the taskKill command- See this tutorial.
Resources:
- Microsoft- using command line tools for networking information
Related Articles:
- Basic networking Course
- Home Network Addressing
- Setting Up Static IPAddresses on Windows 10
- Using The Ping Command For Home Network Testing
- Windows File Sharing Guide
- Configuring Networking on the Raspberry Pi
- 10 Useful Linux (Raspberry Pi) Networking Commands
Please Let me Know if you found it Useful
(Image credit: Future)
Windows 10 makes it easy to connect to a network and the internet using a wired or wireless connection. However, sometimes, you may still need to manually manage settings or troubleshoot connectivity problems, which is when the built-in command-line tools can come in handy.
Regardless of the issue, Windows 10 will likely have a Command Prompt tool to help you resolve the most common problems. For instance, ipconfig and ping are among the most important tools for viewing network settings and troubleshooting connectivity issues. If you are dealing with a routing problem, the route command can display the current routing table to examine and determine related problems, and with the nslookup tool, you can diagnose DNS problems.
You also have tools like arp to troubleshoot switching problems and determine the MAC address from an IP address. The netstat command-line tool allows you to view statistics for all the connections. And you can use the netsh tool to display and change many aspects of the network configuration, such as checking the current configuration, resetting settings, managing Wi-Fi and Ethernet settings, enabling or disabling the firewall, and a lot more.
This guide highlights eight Command Prompt tools that should help you manage and troubleshoot networking problems on your device and across the network.
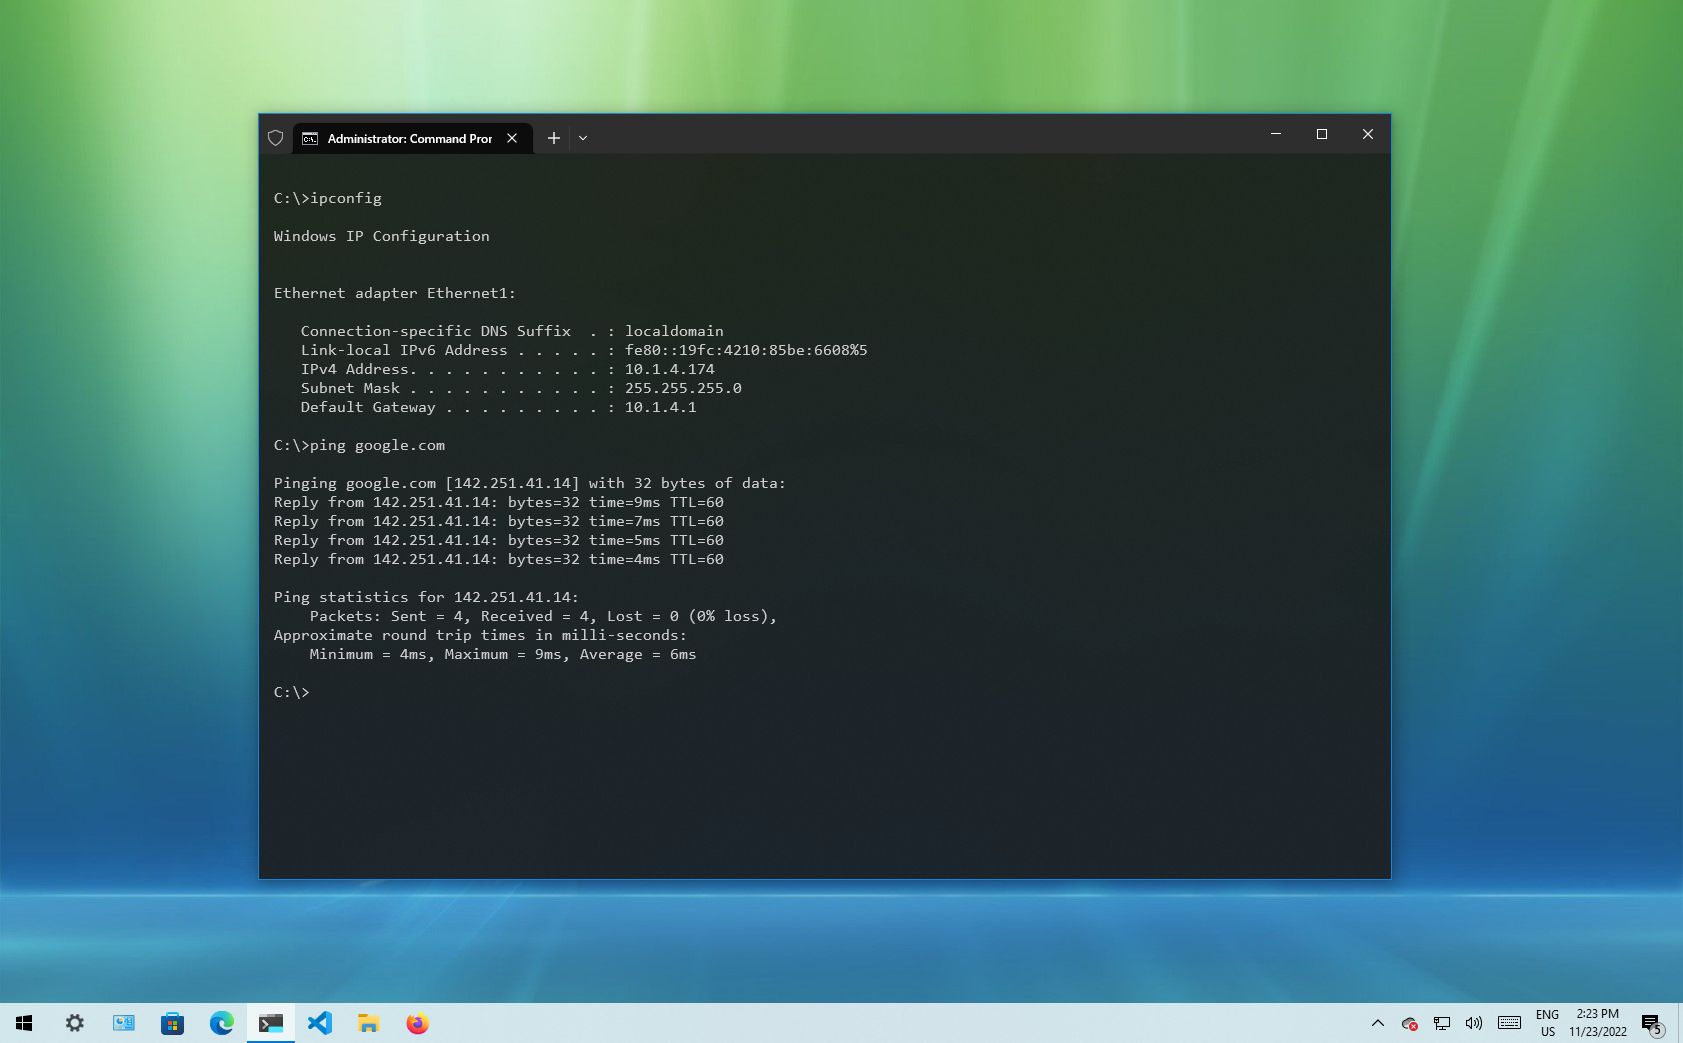
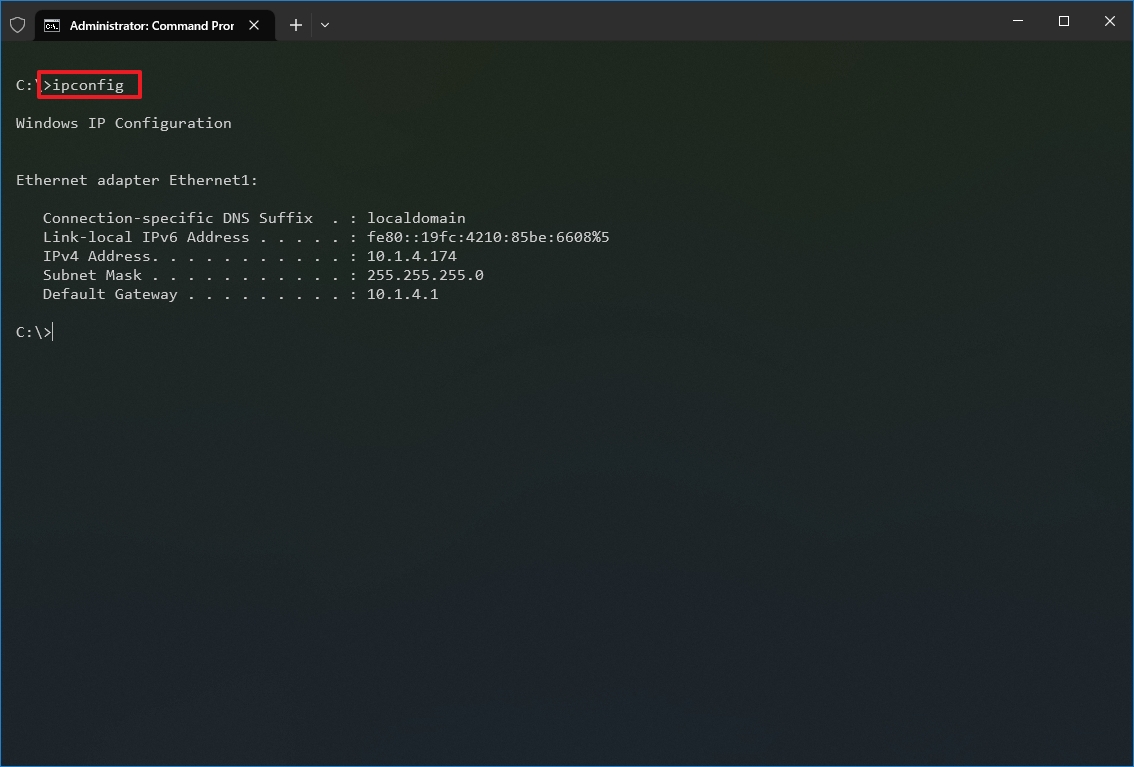
1. IPConfig
On Windows 10, ipconfig (Internet Protocol configuration) is among the most common networking tools that allow you to query and show current TCP/IP (Transmission Control Protocol/Internet Protocol) network configuration. The command also includes options to perform different actions, such as refreshing Dynamic Host Configuration Protocol (DHCP) and Domain Name System (DNS) settings.
Display network configuration
To get started with ipconfig on Windows 10, use these steps:
All the latest news, reviews, and guides for Windows and Xbox diehards.
- Open Start.
- Search for Command Prompt, right-click the top result, and select the Run as administrator option.
- Type the following command to view a summary of the TCP/IP network configuration and press Enter: ipconfig
- Quick tip: In Command Prompt, you can use the CLS command to clear the screen after you no longer need the information to continue running commands without clutter.
- Type the following command to view the complete TCP/IP network configuration and press Enter: ipconfig /all
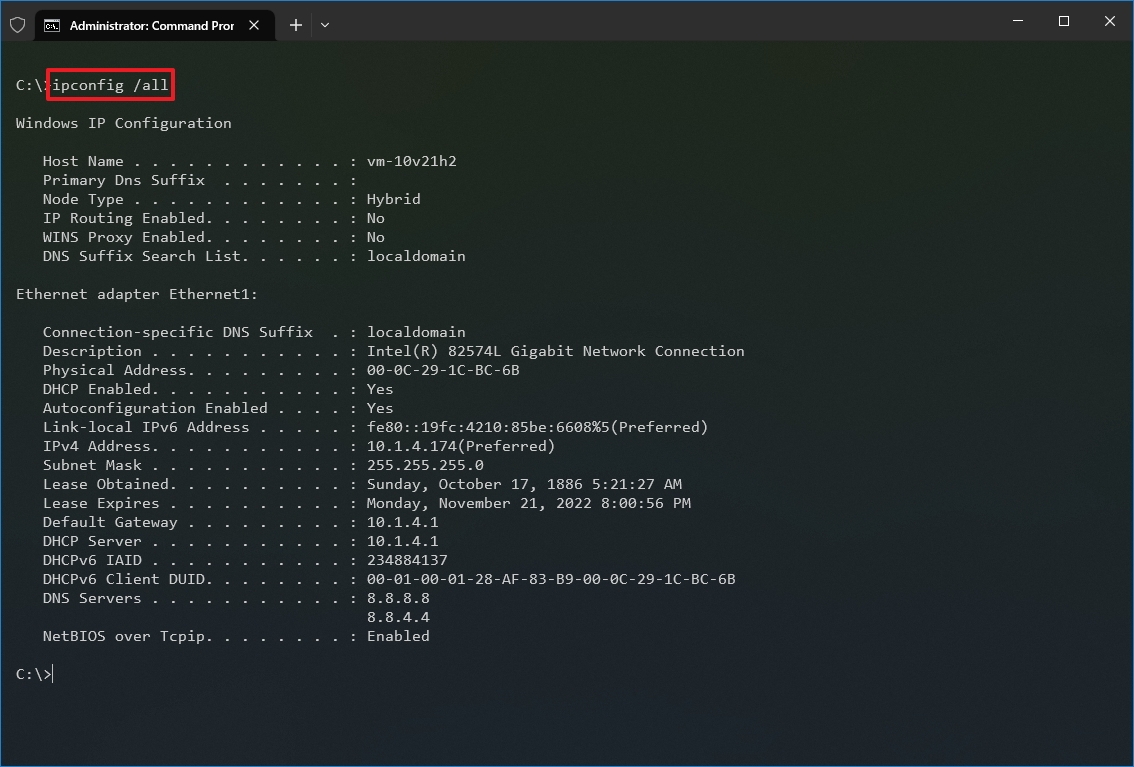
Once you complete the steps, you will have an overview of the PC’s entire TCP/IP configuration.
Refresh network settings
To release and renew the network configuration with Command Prompt, use these steps:
- Open Start.
- Search for Command Prompt, right-click the top result, and select the Run as administrator option.
- Type the following command to remove the current network configuration and press Enter: ipconfig /release
- Type the following command to reconfigure the network configuration and press Enter: ipconfig /renew
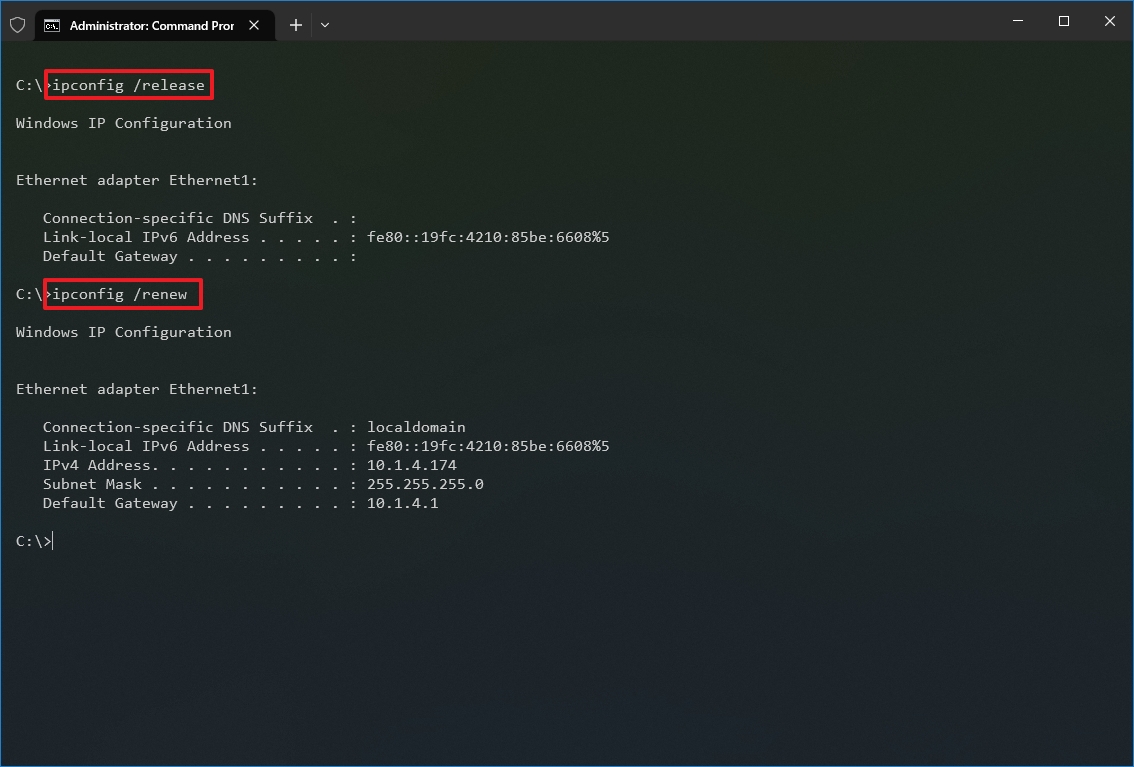
After you complete the steps, the first command will clear the current configuration, and the second command will fetch new settings from the DHCP server to resolve connectivity issues. If the dynamically assigned settings have not expired in the server, it is common to see the same IP address reconfigured on the device.
Refresh DNS settings
To flush and rebuild the current DNS cache entries on Windows 10, use these steps:
- Open Start.
- Search for Command Prompt, right-click the top result, and select the Run as administrator option.
- Type the following command to clear the DNS system cache on the device and press Enter: ipconfig /flushdns
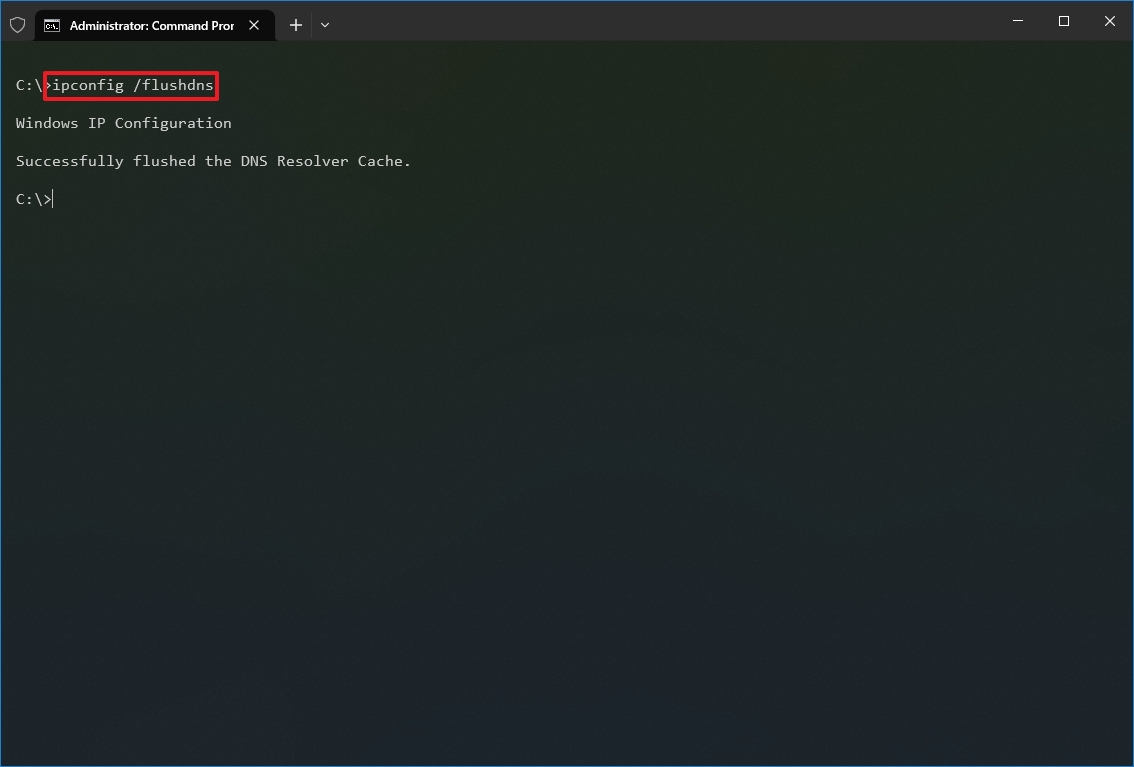
Once you complete the steps, the entries stored in the DNS cache of Windows 10 will be deleted and refreshed. Usually, this command will come in handy when you cannot connect to another computer or website using the host or domain name due to outdated information in the local cache.
2. Ping
Ping is another essential networking tool because it allows you to send ICMP (Internet Control Message Protocol) echo request messages to test the IP connectivity with other devices, whether it is another computer in the network or internet service.
Test device connectivity
To test the network connectivity with the ping command on Windows 10, use these steps:
- Open Start.
- Search for Command Prompt, right-click the top result, and select the Run as administrator option.
- Type the following command to send ICMP echo requests to test connectivity and press Enter: ping IP-OR-DOMAIN
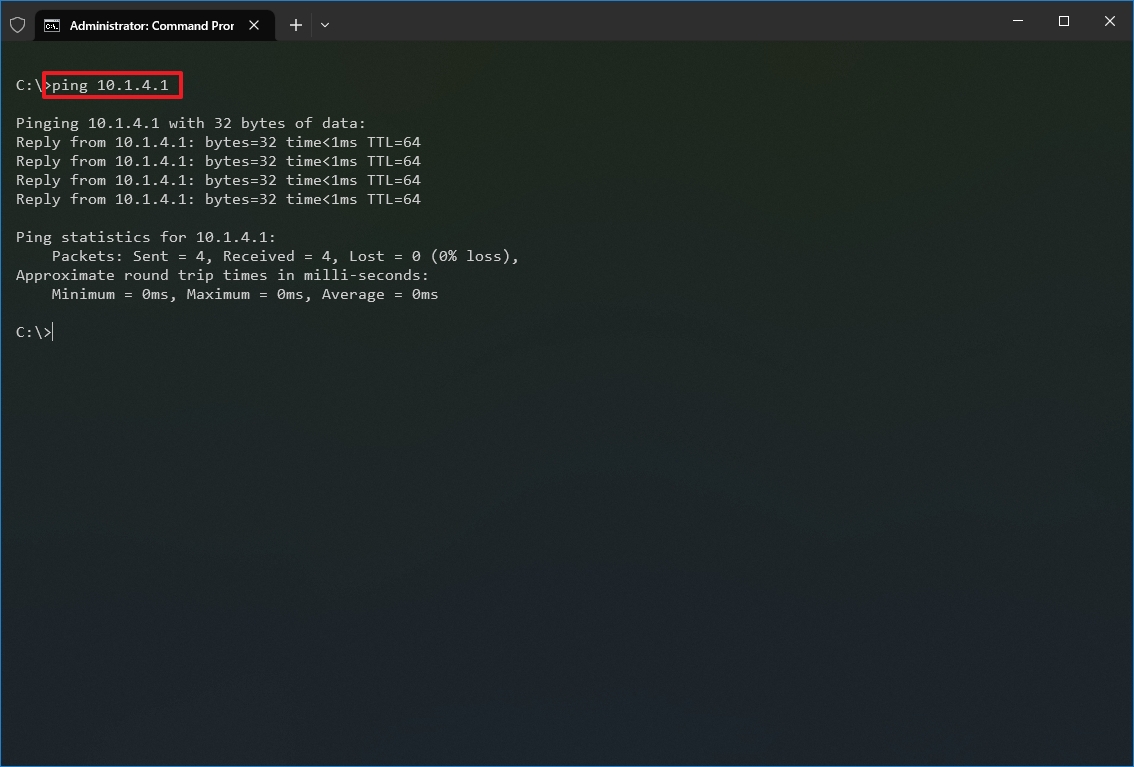
In the command, replace IP-OR-DOMAIN with the actual IP address or domain name of the computer or service you want to test. For example, this command tests the communication between the local device and router: ping 10.1.4.1
- Quick tip: If you use the -a option (for example, ping -a 10.1.4.1), the command will also resolve the address to a hostname.
- (Optional) Type the following command to test the local computer networking stack and press Enter: ping 127.0.0.1 or ping loopback
- Quick note: The 127.0.0.1 is a well-known address, and it is referred to as the loopback address. When you run the command, if you get a reply, it means that the networking stack on Windows 10 is up and running. This is the same as pinging the device using its own network address.
Once you complete the steps, receiving four successful echo replies from the destination means the device can talk with the remote host. If the request times out, there is a problem between the host and the remote device.
If you are dealing with connectivity problems, start pinning the local computer to ensure the network stack is working. Then test the router’s connection to ensure the issue is not in the local network. Then try to ping a website to find out whether there is a problem with the internet connection or the remote host.
You should also know that the ping command will always time out if the remote device or service blocks the ICMP protocol.
Diagnose packet loss activity
The ping command includes many options that you can access with the «ping /?» command, and one of these options is the ability to set the time you want to run the tool, which can come in handy to examine packets lost when you are troubleshooting connectivity problems.
To run the ping command for a specific period, use these steps:
- Open Start.
- Search for Command Prompt, right-click the top result, and select the Run as administrator option.
- Type the following command to continue pinging until stopped and press Enter: ping IP-OR-DOMAIN -t
In the command, replace IP-OR-DOMAIN with the actual IP address or domain name of the computer or service you want to test. For example, this command tests the communication between the local device and router: ping 10.1.4.1 -t
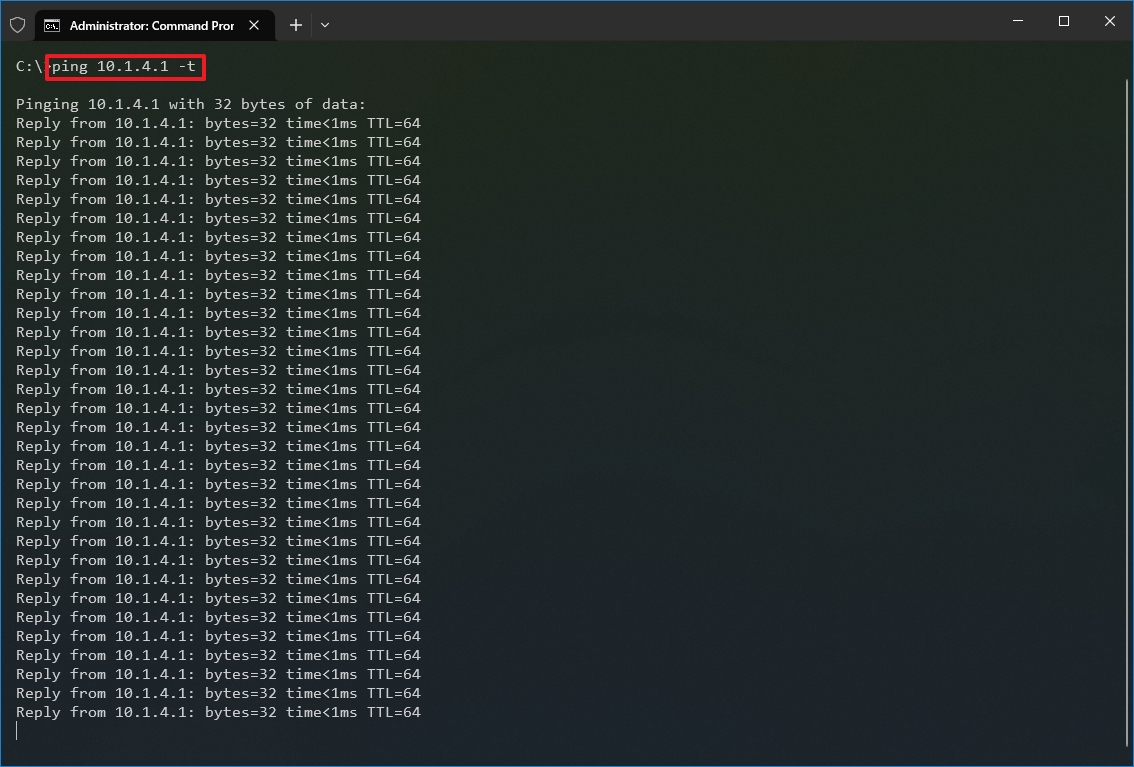
- Use the «Control + C» keyboard shortcut to stop the ping.
After you complete the steps, you will be able to see the successful and lost requests that can give you a clue on how to continue troubleshooting and resolving the connectivity problem. Administrators usually use the ping command in a local network to find out when a service goes down quickly. Also, the tool can be used as a quick way to know when the server is up and running again when restarting a server remotely.
3. Tracert
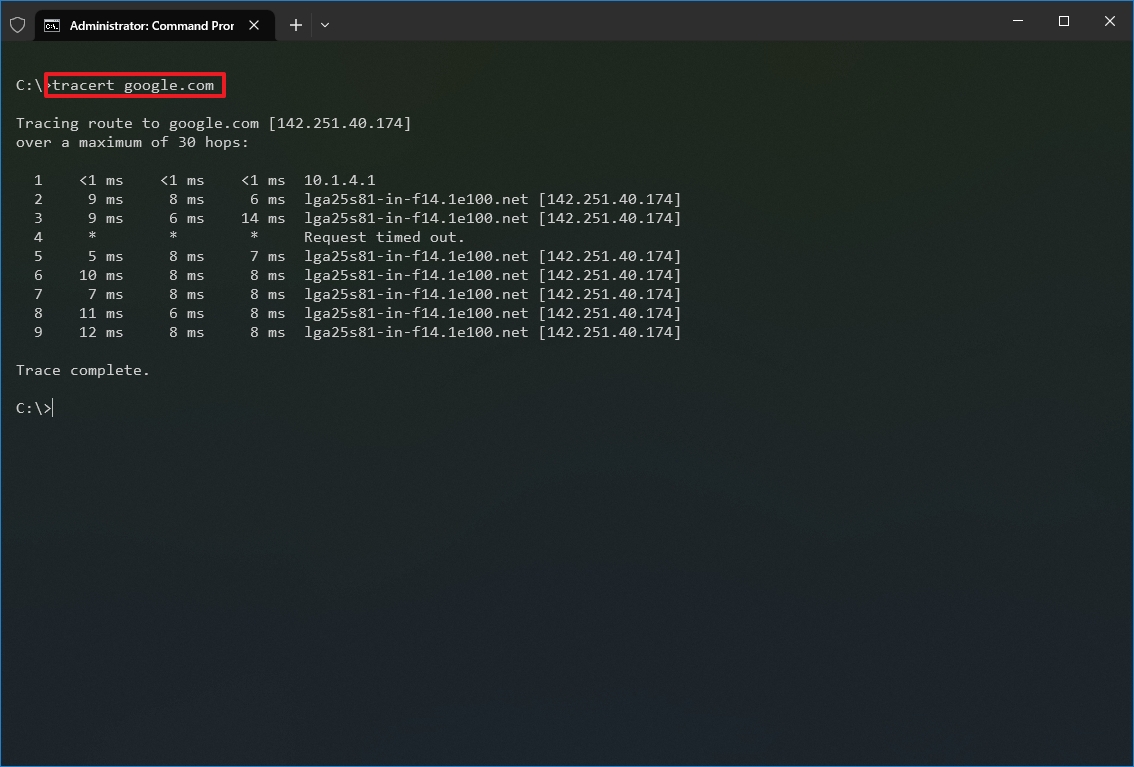
Windows 10 also includes tracert (Trace Route), a diagnostic tool to determine the network path to a destination using a series of ICMP echo requests. However, unlike the ping command, each request includes a TTL (Time to Live) value that increases by one each time, allowing to display of a list of the route the requests have taken and their duration.
To trace the route to a destination with Command Prompt on Windows 10, use these steps:
- Open Start.
- Search for Command Prompt, right-click the top result, and select the Run as administrator option.
- Type the following command to understand the path taken to the destination and press Enter: tracert IP-OR-DOMAIN
In the command, replace IP-OR-DOMAIN with the actual IP address or domain name for the destination you want to troubleshoot. For example, this command allows you to view the path the packets are taking to reach Google.com: tracert google.com
- (Optional) Type the following command to adjust the hop counts to the destination and press Enter: tracert -h HOP-COUNT IP-OR-DOMAIN
In the command, replace IP-OR-DOMAIN with the actual IP address or domain name for the destination you want to troubleshoot and HOP-COUNT for the number of hops you want to trace. For example, this command puts the limit of 5 hops (nodes) to the destination: tracert -h 5 google.com
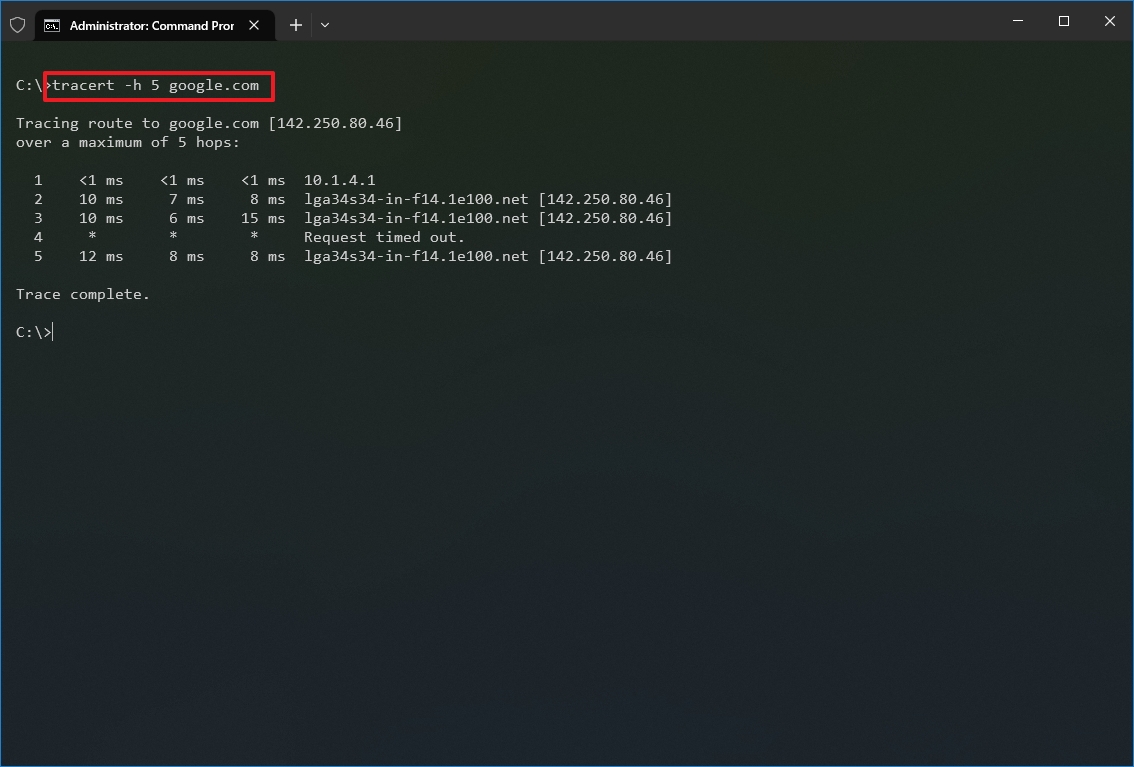
Once you complete the steps, you will know if the destination is reachable or if there is a networking problem along the way.
Similar to the ping tool, tracert includes several options, which you can view with the «tracert /?» command.
4. NSLookup
The nslookup (Name Server Lookup) tool can show valuable details to troubleshoot and resolve DNS-related issues. The tool includes an interactive and non-interactive modes. However, you will be using the non-interactive mode more often than not, which means you will type the full command to obtain the necessary information.
You can use this command to display the default DNS name and address of the local device and determine the domain name of an IP address or the name servers for a specific node.
To get started with nslookup on Windows 10, use these steps:
- Open Start.
- Search for Command Prompt, right-click the top result, and select the Run as administrator option.
- Type the following command to look up the local DNS name and address and press Enter: nslookup
- Quick note: This command also happens to open the nslookup interactive mode.
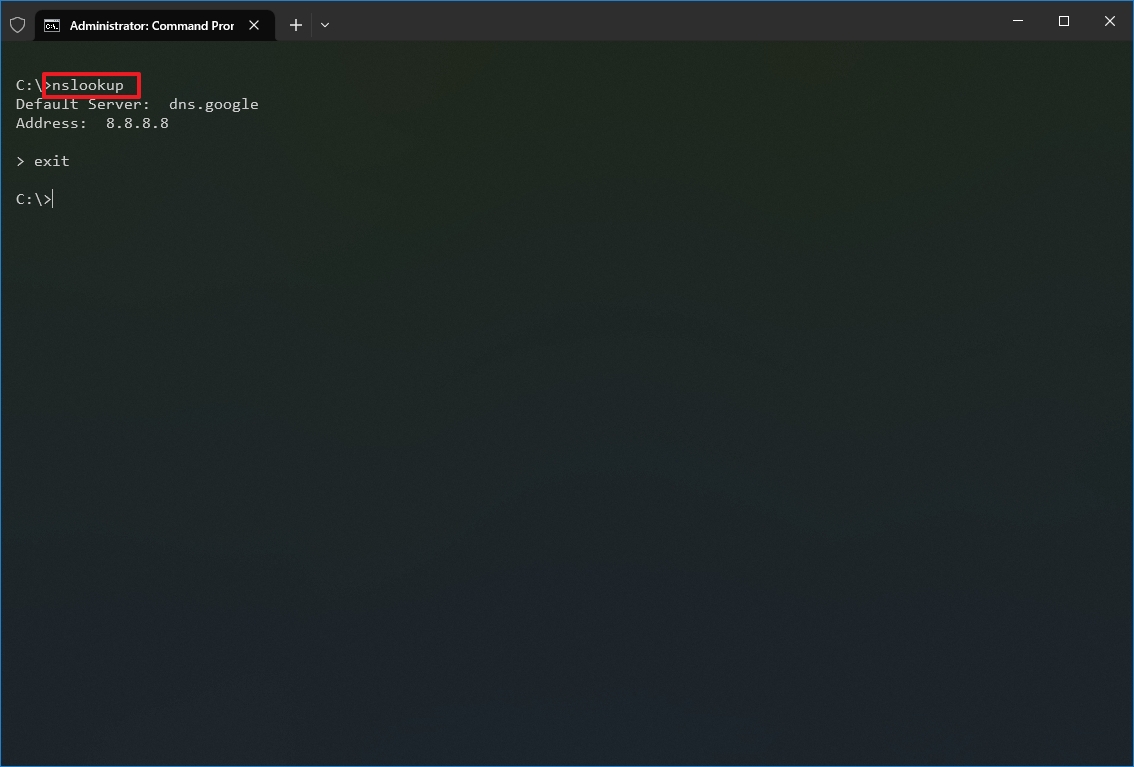
- Confirm the current DNS information.
- Type the following command to exit the interactive mode and press Enter: exit
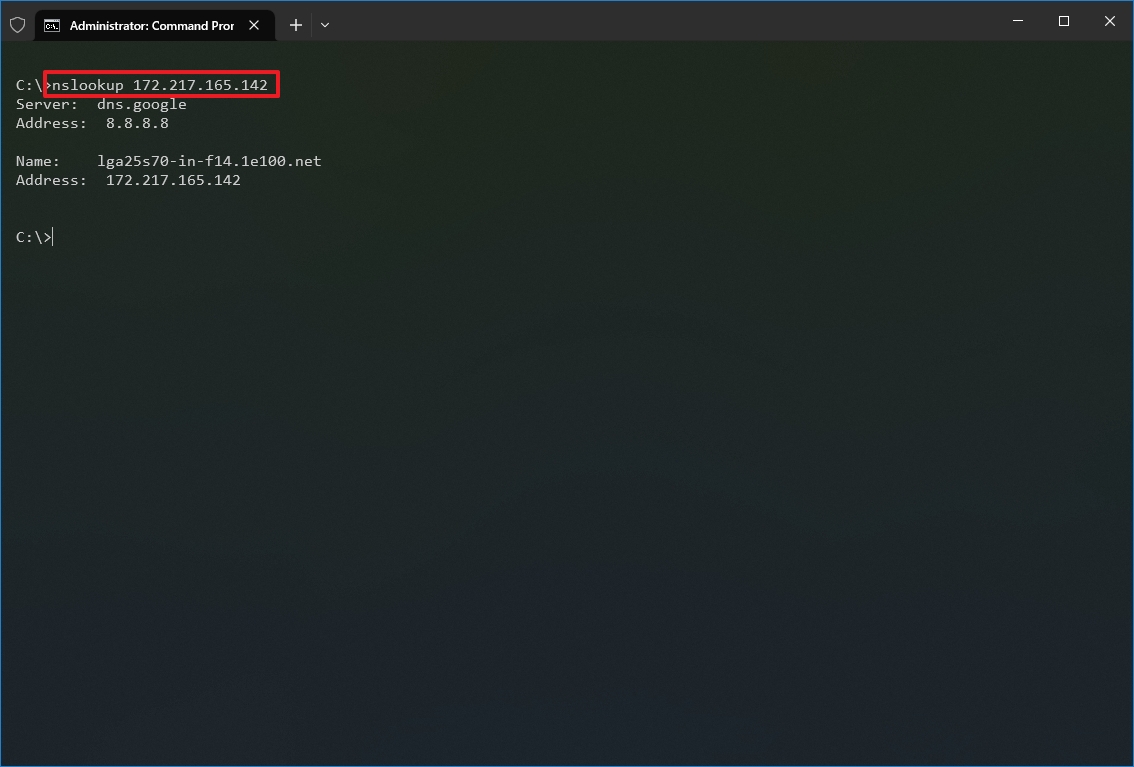
- Type the following command to determine the name and address of a specific server and press Enter: nslookup IP-ADDRESS
In the command, replace the IP-ADDRESS with the address of the remote device. For example, this command looks up the IP address 172.217.165.142 address: nslookup 172.217.165.142
- Type the following command to determine the address of a specific server and press Enter: nslookup DOMAIN-NAME
In the command, replace the DOMAIN-NAME with the address of the remote device. For example, this command looks up the IP address Google.com address: nslookup google.com
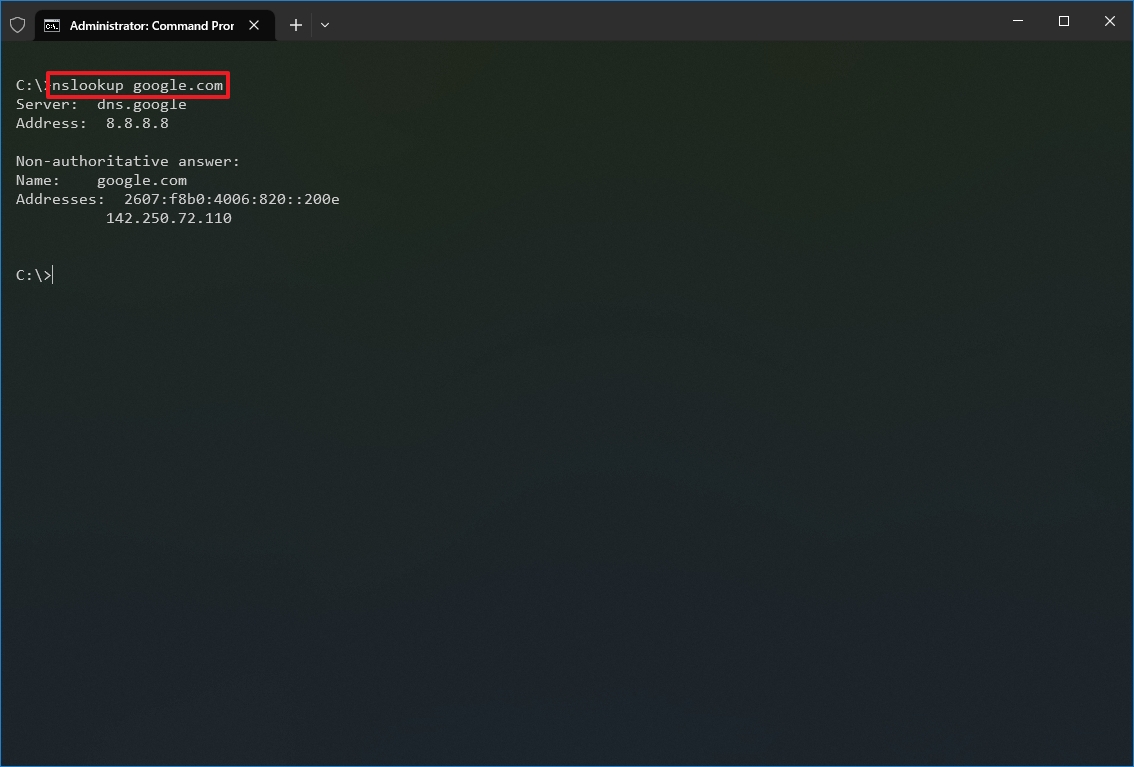
After you complete the steps, depending on the command, you will know whether the device has a DNS resolver and the IP address or domain and vice versa of the remote host.
5. NetStat
The netstat (Network Statistics) tool displays statistics for all network connections. It allows you to understand open and connected ports to monitor and troubleshoot networking problems for Windows 10 and apps.
When using the netstat tool, you can list active network connections and listening ports. You can view network adapter and protocol statistics. You can even display the current routing table and much more.
To get started with netstat, use these steps:
- Open Start.
- Search for Command Prompt, right-click the top result, and select the Run as administrator option.
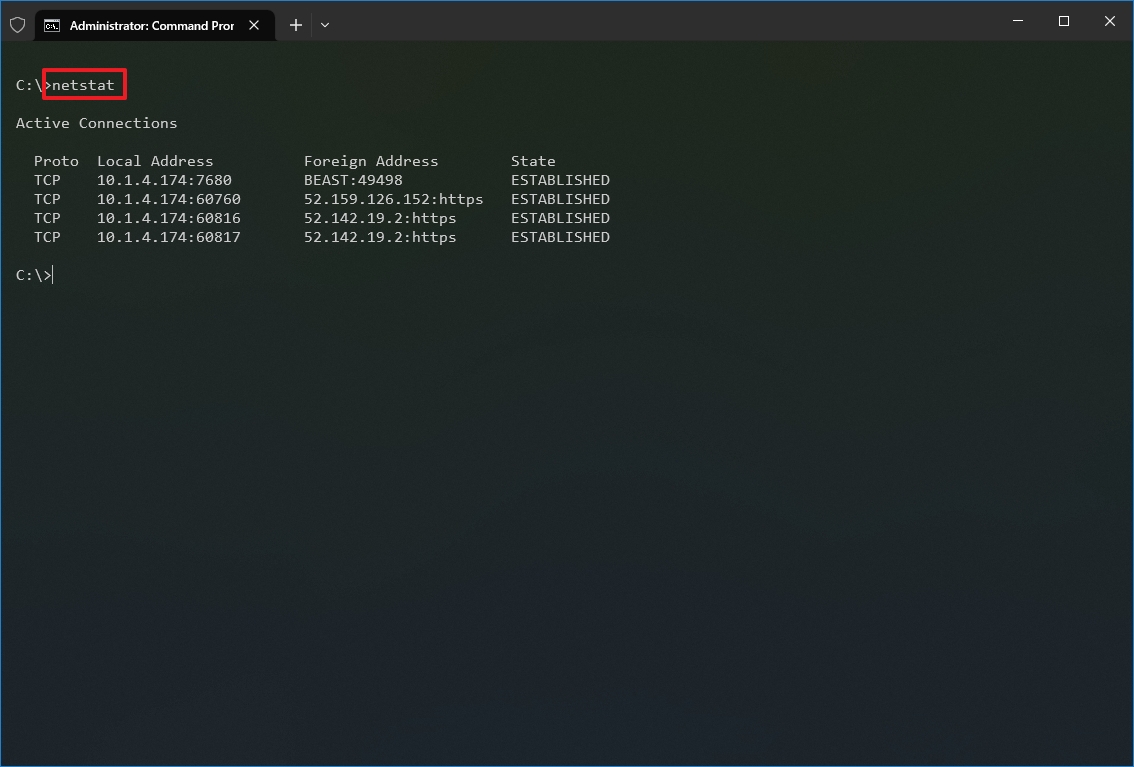
- Type the following command to show all active TCP connections and press Enter: netstat
- (Optional) Type the following command to display active connections showing numeric IP address and port number instead of trying to determine the names and press Enter: netstat -n

- (Optional) Type the following command to refresh the information at a specific interval and press Enter: netstat -n INTERVAL
In the command, make sure to replace INTERVAL for the number (in seconds) you want to redisplay the information. This example refreshes the command in question every five seconds: netstat -n 5
- Quick note: When using the interval parameter, you can terminate the command using the «Ctrl + C» keyboard shortcut in the console.
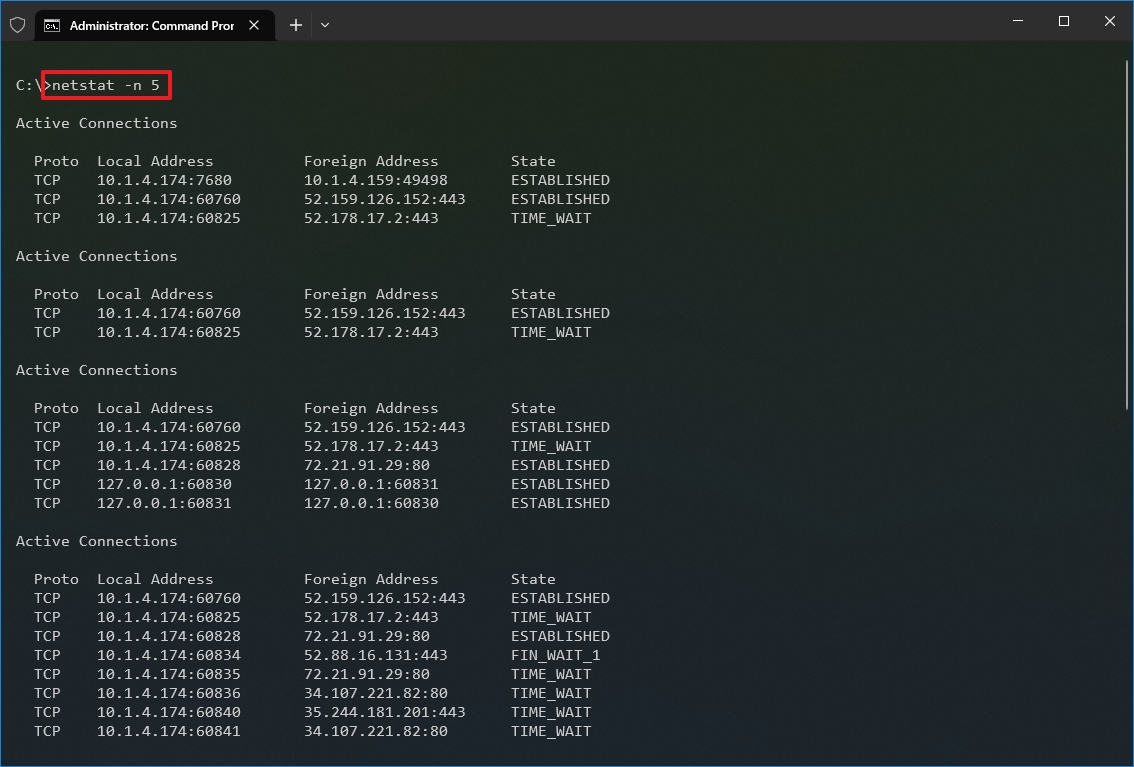
Once you run the command, it will return a list of all active connections in four columns, including:
- Proto: Displays the connection protocol, including TCP or UDP.
- Local Address: Displays the device’s IP address followed by a semicolon with a port number of the connection. The double-semicolon inside brackets indicates the local IPv6 address. The «0.0.0.0» address also refers to the local address.
- Foreign Address: Shows the remote computer’s IP (or FQDN) address with the port number after the semicolon port name (for instance, https, http, microsoft-ds, wsd).
- State: Shows whether the connection is active (established), if the port has been closed (time_wait) and if the program has not closed the port (close_wait). Other statuses available include closed, fin_wait_1, fin_wait_2, last_ack, listen, syn_received, syn_send, and timed_wait.
6. ARP
Windows 10 maintains an arp (Address Resolution Protocol) table, which stores IP to Media Access Control (MAC) entries that the system has resolved. The arp tool lets you view the entire table, modify the entries, and use it to determine a remote computer’s MAC address.
Usually, you do not need to worry about MAC addresses, but there are scenarios when this information may come in handy. For example, when troubleshooting network problems at the data link layer (switching) or when restricting access or filtering content through the network for specific devices.
To get started with arp on Windows 10, use these steps:
- Open Start.
- Search for Command Prompt, right-click the top result, and select the Run as administrator option.
- Type the following command to view the current arp table cache on Windows 10 and press Enter: arp -a

- Type the following command to determine the MAC address of a remote device and press Enter: arp -a IP
In the command, make sure to replace IP with the address of the destination. For example, this command reveals the physical address of the 10.1.4.120 destination: arp -a 10.1.4.120

- Confirm the MAC (physical) address for the remote device.
After you complete the steps, you will be able to view the entire arp table and MAC address of a specific IP address.
If you want to know all the available options, use the «arp /?» command to list the available options with their corresponding descriptions.
7. Route
The route tool displays the routing table that allows Windows 10 to understand the network and communicate with other devices and services. The tool also offers some options to modify and clear the table as needed.
Like the arp tool, you typically do not have to worry about the routing table, but the command-line tool will come in handy when troubleshooting related problems.
To view or flush the routing table available on Windows 10, use these steps:
- Open Start.
- Search for Command Prompt, right-click the top result, and select the Run as administrator option.
- Type the following command to view the routing table known to Windows 10 and press Enter: route print

- Confirm the routing table information.
- (Optional) Type the following command to clear the routing table and press Enter: route -f
- Quick note: When running this command, the device will lose network connectivity since the system no longer understands the network topology. After running the command, restart the machine to allow the networking stack to rebuild the routing table. Usually, you should not have to clear the table unless you modify some of the entries and you need to reset the table.
Once you complete the steps, you will understand the routing table and how to clear the information.
You can also use the «route /?» command to view a list of available options, including options to change networking metrics, specify a gateway, add a new route, and much more. However, modifying these settings is usually not recommended unless you understand how the network works.
8. Netsh
On Windows 10, netsh (Network Shell) is a legacy command-line tool that allows you to display and change virtually any network configuration. For instance, you can use the tool to view the current network configurations, manage wireless connections, reset the network stack to fix most common problems, enable or disable the firewall, and a lot more.
To get started with the netsh command-line tool, use these steps:
- Open Start.
- Search for Command Prompt, right-click the top result, and select the Run as administrator option.
- Type the following command to view a list of the available commands (contexts) and press Enter: netsh /?
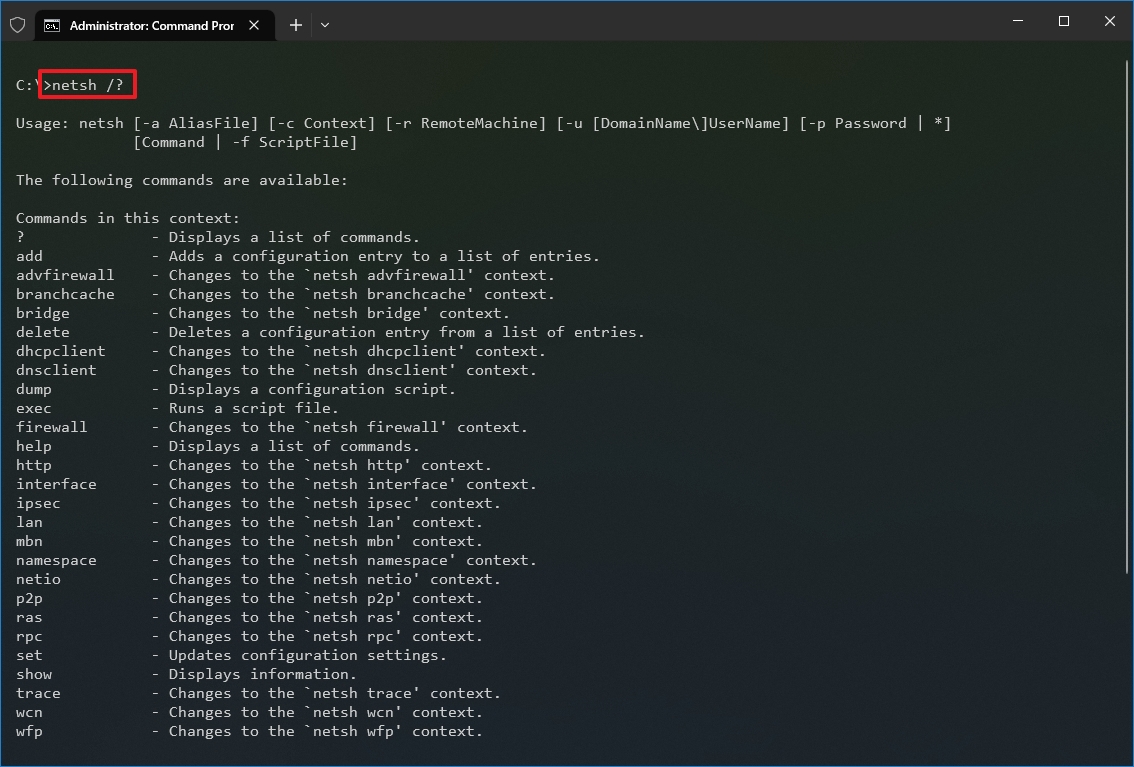
- Type the following command to view the list of available subcommands (subcontexts) for a specific option and press Enter: netsh CONTEXT-COMMAND
In the command, change the CONTEXT-COMMAND for the command that includes additional options. For example, this command shows the commands available to manage the firewall with netsh: netsh advfirewall /?
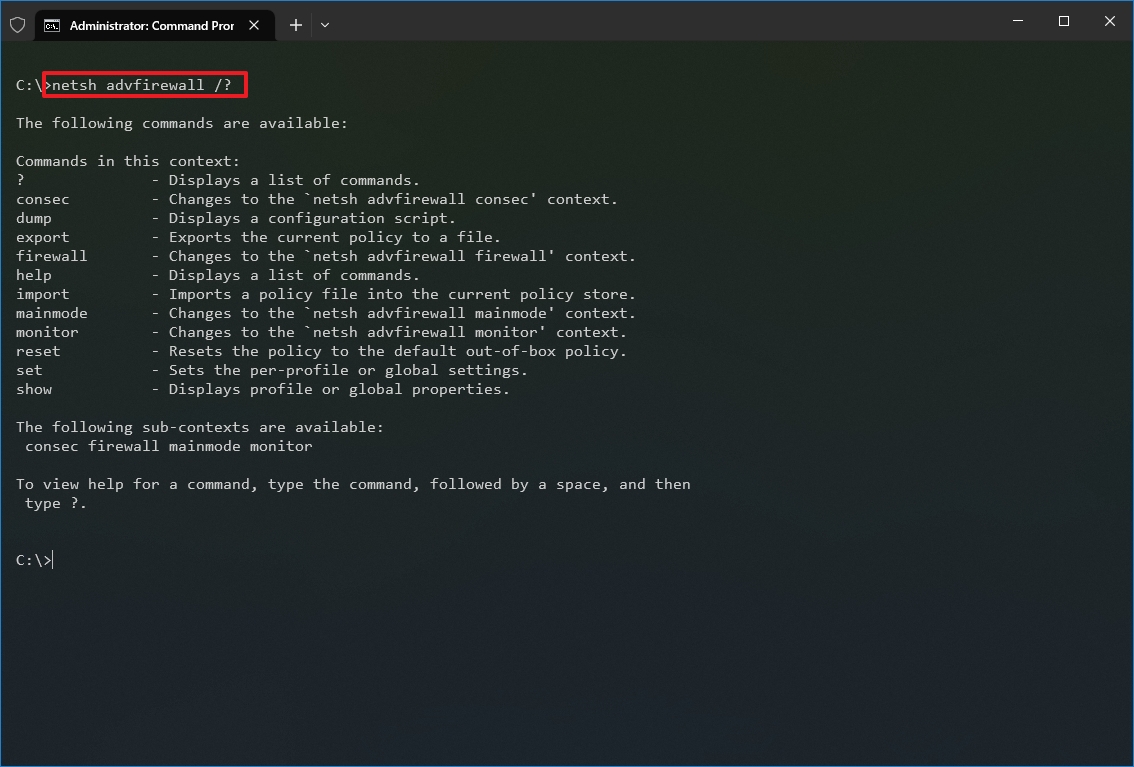
Once you complete the steps, you will know how to navigate the netsh contexts and subcontexts command to manage networking settings.
Reset system network stack
To reset the network stack to resolve common connectivity problems, use these steps:
- Open Start.
- Search for Command Prompt, right-click the top result, and select the Run as administrator option.
- Type the following command to reset the winsock stack and press Enter: netsh winsock reset
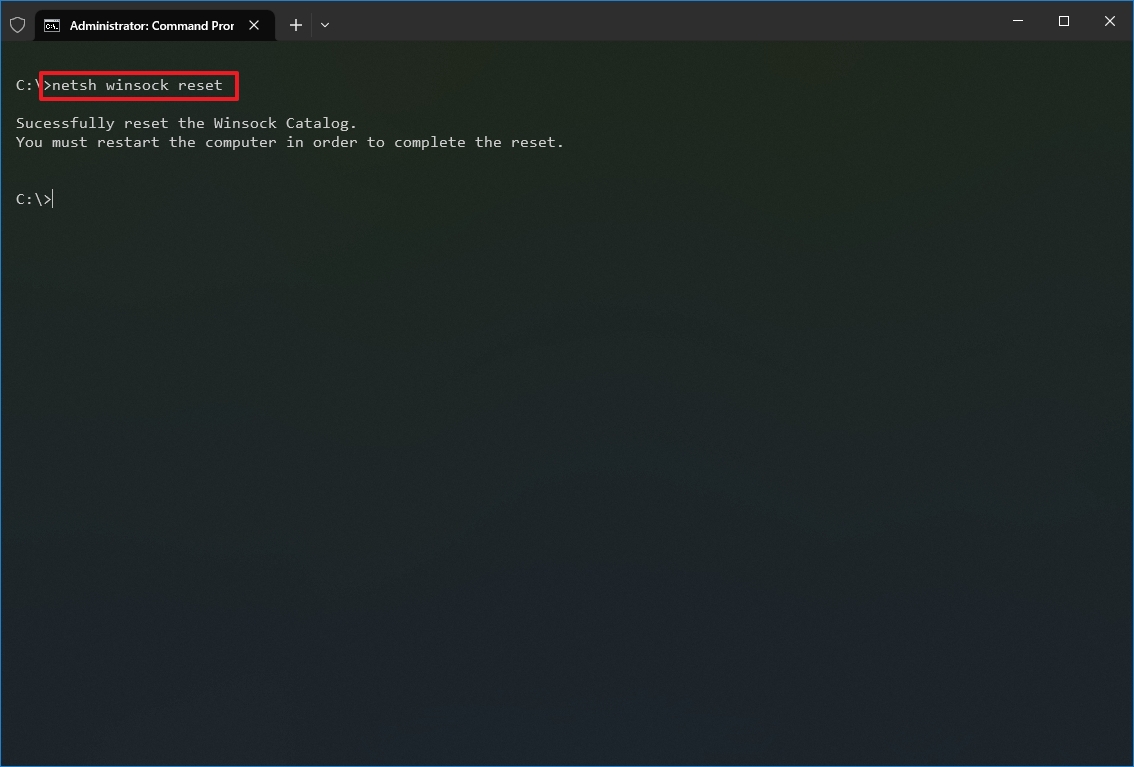
- Restart your computer.
After you complete the steps, the winsock configuration will reset, hopefully fixing the problems connecting to a network and the internet.
Export and import network configuration
To export the network configuration with netsh on Windows 10, use these steps:
- Open Start.
- Search for Command Prompt, right-click the top result, and select the Run as administrator option.
- Type the following command to export the current configuration for all the network adapters and press Enter: netsh -c interface dump>PATH\TO\EXPORTED.txt
In the command, replace the PATH\TO\EXPORTED.txt with the path and name of the file to store the configuration. For example, the following command exports the settings to the netshconfig.txt file: netsh -c interface dump>c:\netshconfig.txt
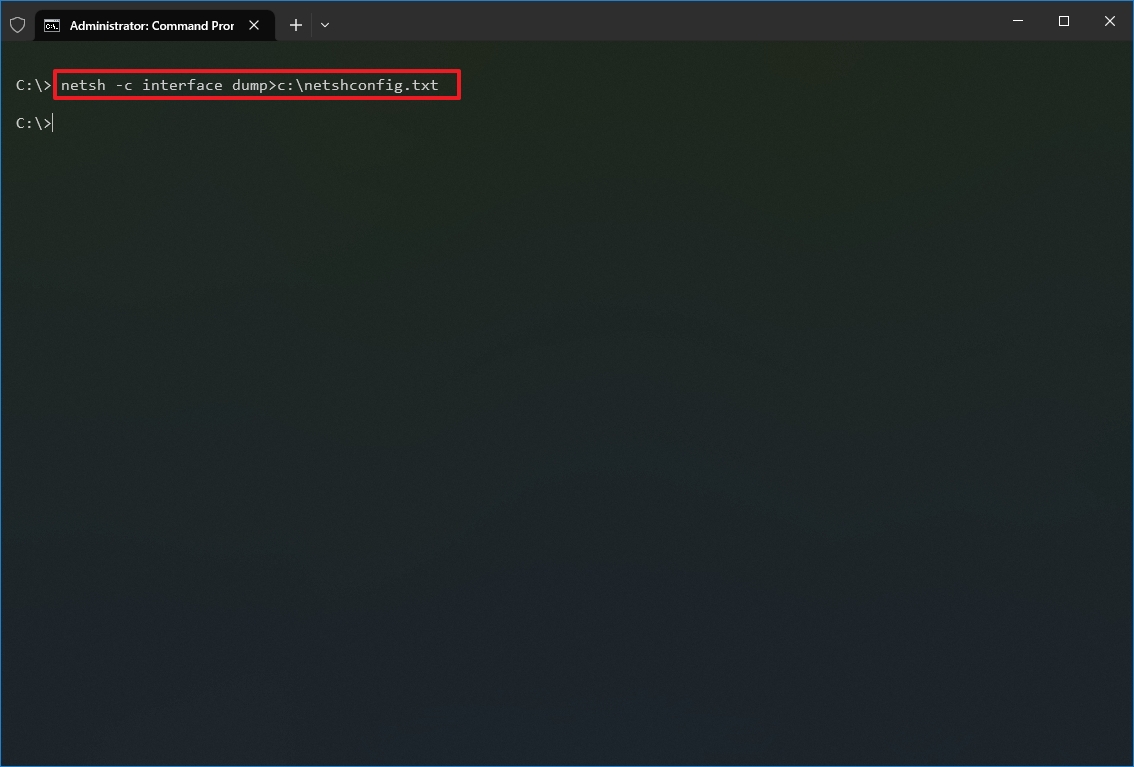
Once you complete the steps, you can open the file with any text editor to view the exported configuration.
Import network configuration
To import the network configuration settings with netsh, use these steps:
- Open Start.
- Search for Command Prompt, right-click the top result, and select the Run as administrator option.
- Type the following command to import the network configuration and press Enter: netsh -c interface dump>PATH\TO\IMPORTED.txt
In the command, replace the PATH\TO\EXPORTED.txt with the path and name of the file you want with the exported configuration. For example, the following command imports the settings from the netshconfig.txt file: netsh -f c:\netshconfig.txt
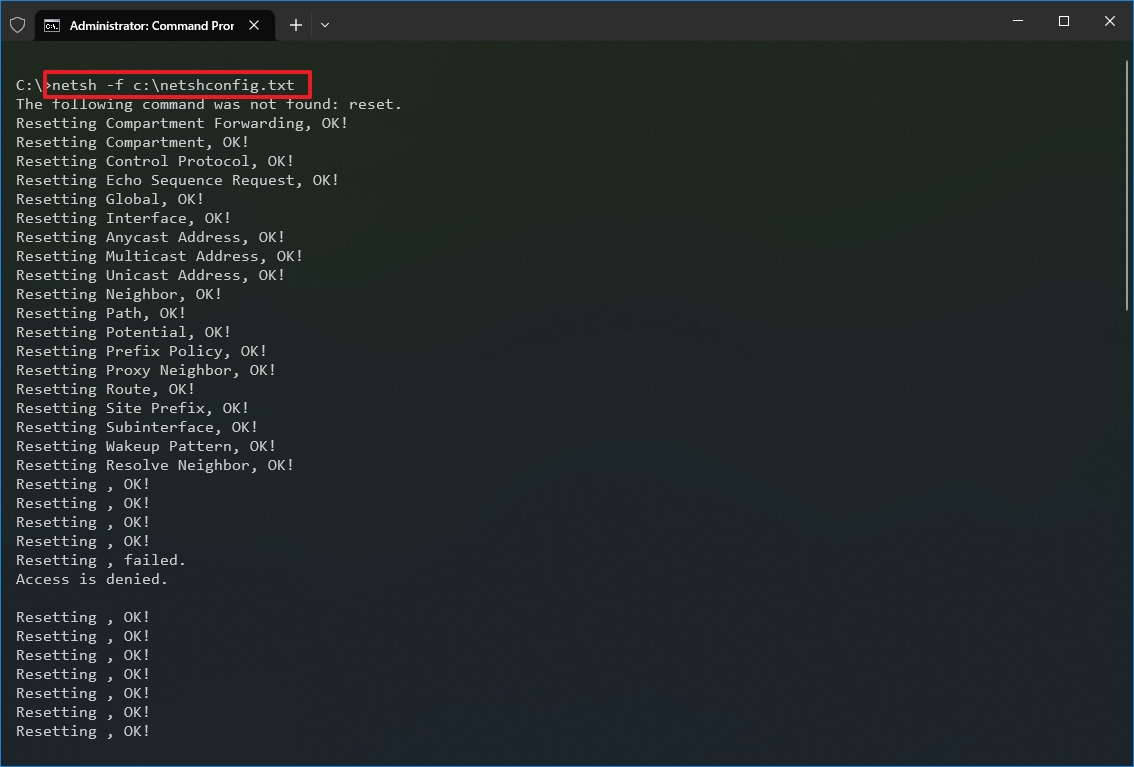
After you complete the steps, the new networking configuration will be imported and applied to Windows 10.
Enable and disable firewall
To enable the Windows 10 firewall with netsh, use these steps:
- Open Start.
- Search for Command Prompt, right-click the top result, and select the Run as administrator option.
- Type the following command to enable the default firewall and press Enter: netsh advfirewall set currentprofile state on
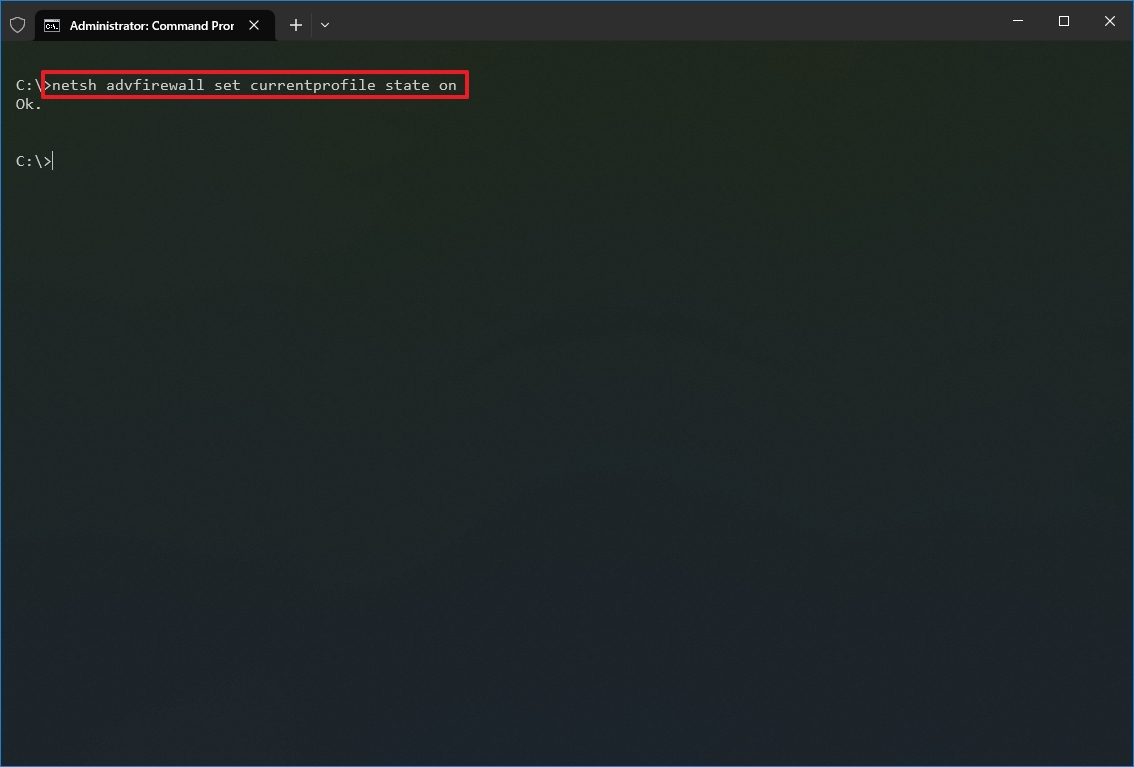
Once you complete the steps, the Windows Defender Firewall will enable on the device.
Disable firewall
To disable the Windows 10 firewall with netsh, use these steps:
- Open Start.
- Search for Command Prompt, right-click the top result, and select the Run as administrator option.
- Type the following command to disable the default firewall and press Enter: netsh advfirewall set currentprofile state off

Once you complete the steps, the Windows Defender Firewall will be disabled on the device.
On Windows 10, there are many tools you can use to change settings and troubleshoot networking issues using Command Prompt, PowerShell, and graphical applications. However, in this guide, we only focus on getting you started with some of the most common tools available in Command Prompt.
More resources
For more helpful articles, coverage, and answers to common questions about Windows 10 and Windows 11, visit the following resources:
- Windows 11 on Windows Central — All you need to know
- Windows 10 on Windows Central — All you need to know
Mauro Huculak has been a Windows How-To Expert contributor for WindowsCentral.com for nearly a decade and has over 15 years of experience writing comprehensive guides. He also has an IT background and has achieved different professional certifications from Microsoft, Cisco, VMware, and CompTIA. He has been recognized as a Microsoft MVP for many years.
The arp (address resolution protocol) is a simple Windows network command-line utility used to view and manage the arp cache. The arp cache is a collection of IP and MAC addresses of devices on your local network that your computer knows about. This tool is typically used in troubleshooting network issues.
The commands shown here are tested on computer with Windows 8 but most will work in other versions of Windows as well.
Table of Content
- Overview
- How to Launch Command Prompt
- Arp Syntax
- Arp Parameters
- Dynamic versus Static Entries
- Example Usage
- arp /a — Displays the Arp Cache Table of all Interfaces
- arp /d Inetaddr — Delete an Arp Entry
- arp /d — Delete the Entire Arp Cache
- arp /s — Manually Add an Entry to Arp Cache
- Other Usages and Getting Help
- Tips
- Redirect Output to Text File
- Recommended Reading
- Summary
Overview
Arp command (address resolution protocol) is used to view and manage the arp cache. The arp cache contains a dynamic list of IP addresses of the devices (computers, routers) your computer communicated with recently. More importantly, along with the IP address, the MAC address (the 6-byte ‘burned-in’ physical/hardware address) of the device is also stored in the cache.
The purpose for maintaining an arp cache is to improve network performance. When your computer communicates with a device, regardless of whether it is on your local network (e.g., file server) or is external to it (e.g., website, ftp server), your computer needs to know the MAC address of the device to communicate with it. In the case of external devices, your computer needs to communicate with your network router. Within the same network, all hosts communicate with each other by addressing each other by their MAC address.
By maintaining an arp table that maps an IP address to its associated MAC address of the device, your computer does not need to query the network for the MAC address each time it needs to communicate with it. When your computer needs to communicate with a device that is not in its arp cache, it will perform a network query (using arp) to get the MAC address. In essence, it asks «who has 192.168.128.64». The device that has this IP will reply back with its MAC address. This IP and MAC address mapping is then stored on your computer’s arp cache for quick lookup in future communication.
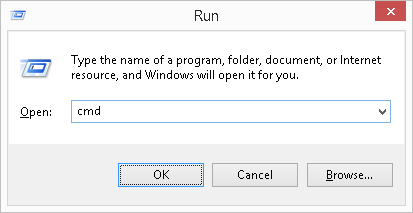
How to Open Command Prompt
To use this utility, you will need to launch the Command Prompt window. The three common ways to launch the Command Prompt window are:
- Search for
cmdusing the built-in Windows search tool. - Right-click on the Start icon and select Command Prompt.
- Press the keyboard combination WinKey + R, then type
cmdat the Run window that appears.
ARP Syntax
arp [/a [<Inetaddr>] [/n <ifaceaddr>]] [/g [<Inetaddr>] [-n <ifaceaddr>]] [/d <Inetaddr> [<ifaceaddr>]] [/s <Inetaddr> <Etheraddr> [<ifaceaddr>]]
ARP Parameters
| Parameter | Description |
|---|---|
| /a [] [/n ] | Displays current arp cache tables for all interfaces. The /n parameter is case-sensitive. |
| /g [] [/n ] | Identical to /a. |
| /d [Inetaddr] | Deletes an entry with a specific IP address, where Inetaddr is the IP address in dotted decimal notation. |
| /s [Inetaddr] [Etheraddr] | Adds a static entry to the arp cache that resolves the IP address Inetaddr to the physical address Etheraddr. |
| /? | Displays help information. |
Dynamic versus Static Entries
In an arp cache table, you will typically find two types of entries — dynamic and static. A dynamic entry is an IP to MAC address pair that your computer has learned of itself during recent communication with that device. A static entry on the hand is one that was manually entered (or by the operating system) into the cache. Static entries will remain in the cache indefinitely unless explicitly removed. Dynamic entries will stay in cache unless they have not been used recently and the ARP cache timeout has expired.
Example Usage
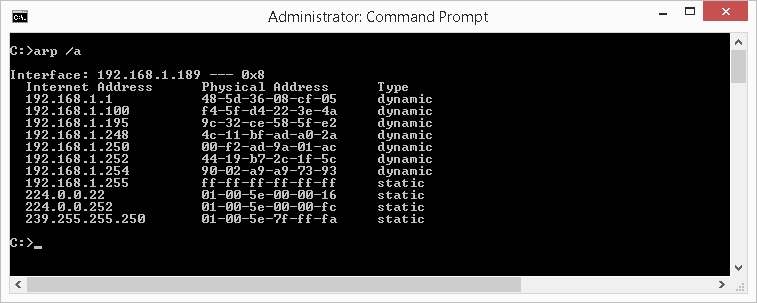
There are a variety of switches (sub commands) available with the arp utility that will alter how it will function. At the most basic, the arp is used with teh /a switch to display the arp cache table of a computer.
arp /a — Displays the Arp Cache Table for all Interfaces
To view the arp cable table for all the interfaces (network adapters) on your computer, type the following in the command window then press Enter: arp /a
The screenshot example below is the arp output of a particular computer. The output of your result will differ. In our screenshot example, it shows 9 entries in the table.
The arp cache results are dynamic and displays the IP and MAC address of devices (computers, routers) your computer network communicated (e.g., ping, internal website) with recently that are on your network. The table does not display the IP address of websites, servers and other devices outside of your network. It will however, show the IP and MAC address of your router as it is the device your computer communicate with on your internal network to get to the external server.
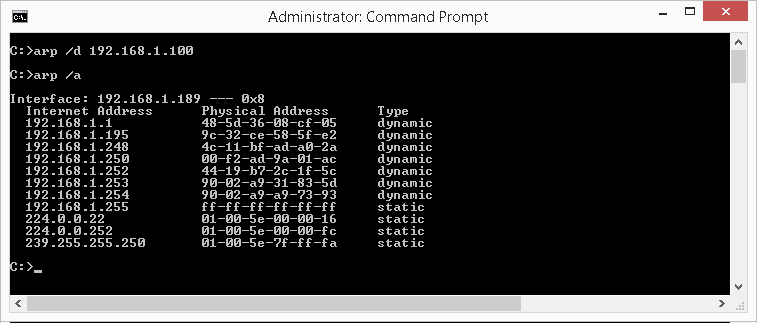
arp /d Inetaddr — Delete an Arp Entry
The /d Inetaddr switch is used to delete an entry from the arp cache, where Inetaddr is the IP address.. On newer Windows operating system, this command requires elevated permission. See this article on how to launch command prompt in administrator mode.
Although entries in the arp cache will automatically be removed if your computer has not communicated with it recently, being able to manually delete an entry is helpful particularly when you know an entry is incorrect or when performing network troubleshooting.
For example, to delete the entry with IP address of 192.168.1.100 from our above example screenshot, type the following in the command window then press Enter:
arp /d 192.168.1.100
If you display the cache once the delete command is issued, you will see the entry is no longer listed, as illustrated in the screenshot below.
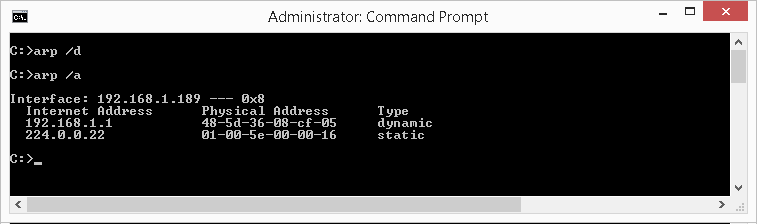
arp /d — Delete the Entire Arp Cache
The /d switch when used without specifying an IP address will delete the entire arp cache. On newer Windows operating system, this command requires elevated permission. See this article on how to launch command prompt in administrator mode. Unless you are troubleshooting a network issue that requires it, deleting the entire arp cache is not typical. For most computers, deleting the entire cache has no adverse effect. Your computer will simply re-perform the arp look-ups find the MAC addresses when the need arises.
To delete the entire arp cache, type the following in the command window then press Enter:
arp /d
If you display the cache once the delete command is issued, you will see the entire cache is empty (or near empty), as illustrated in the screenshot below. Depending on how soon you are viewing your arp cache after performing the delete command, you may already see your cache being re-populated as your computer continues re-learns them as it communicates with devices on your network.
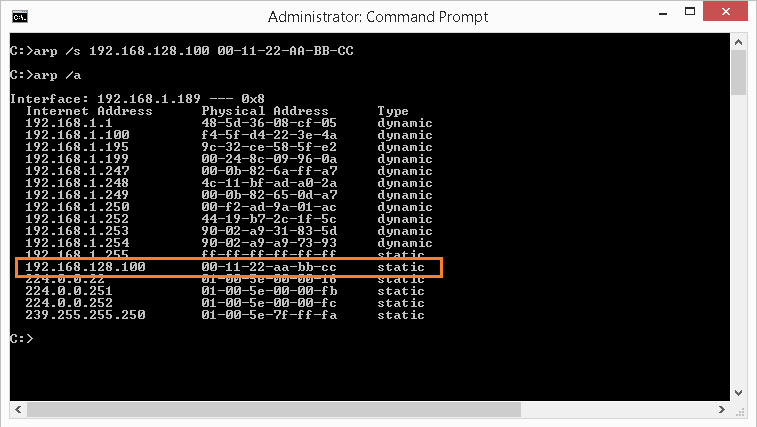
arp /s — Manually Add an Entry to Arp Cache
The /s switch when used to manually add an entry to the arp cache. To add the IP address 192.168.128.100 to the physical address of 00-11-22-AA-BB-CC, type the following in the command window then press Enter:
arp /s 192.168.128.100 00-11-22-AA-BB-CC
On newer Windows operating system, this command requires elevated permission. See this article on how to launch command prompt in administrator mode.
If you display the cache once the add command is issued, you will see the cache now shows the entry you added, as illustrated in the screenshot below. Additionally, because it is manually added, this entry is flagged as a static entry..
Other Usages and Getting Help
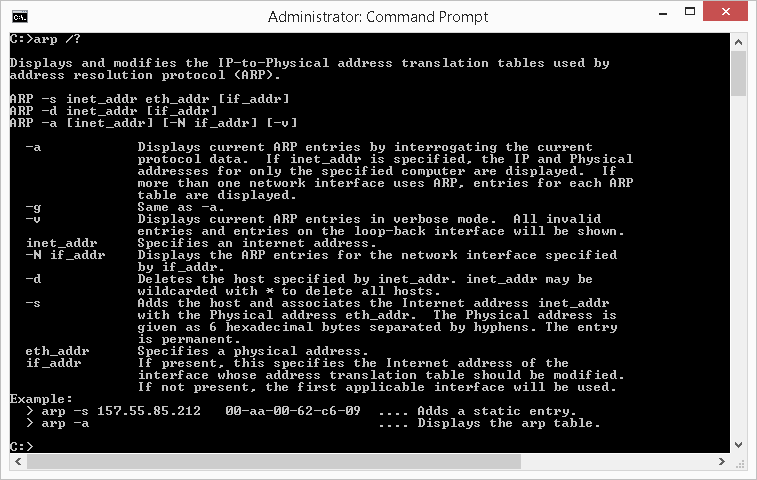
The example usage described in the article shows only some of the functions available with arp. To get a list of the available switches, type the following in the command window then press Enter: arp /?
Tips
Redirect Output to Text File
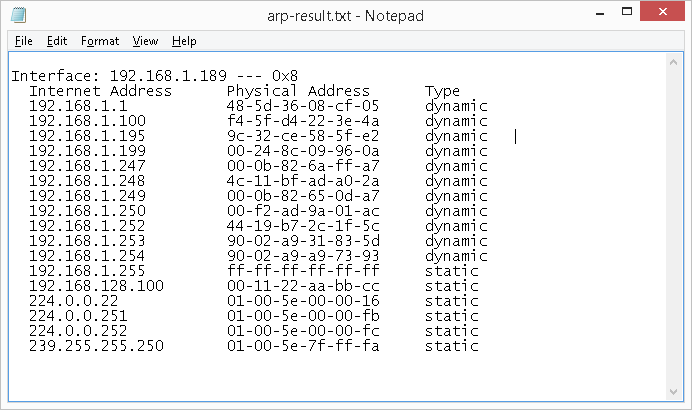
- Instead of displaying the results on the screen, you can have the results saved automatically to a text file on your computer. To do this, simply use the «>» symbol followed by the folder path and file name of your choice. For example, to redirect the output of ipconfig /renew, type the following in the command window then press Enter:
arp /a > c:\temp\arp-results.txtThis will create a file named arp-results.txt in the folder path c:\temp that will have your result. You can then open this file with any text editor, such as Notepad on a Windows computer, as illustrated below.
Recommended Reading
Improve confidence and job performance
Improve productivity and efficiency
Learn more,
earn more
Life-long
investment
To learn more about this topic, we are providing you with recommendations to help you further your knowledge. These are our affiliate links to Amazon where you can purchase them and also explore a variety of other relevant books.
Summary
You will likely not find a need to examine an ARP cache for most of your troubleshooting work. However, understanding the purpose and the use of ARP is fundamental for any networking professional as it employs basic TCP/IP communication concepts.