
Visual Studio C#: использование Show() и ShowDialog для отображения окон (форм)
Добавил(а) microsin
Окна — основные интерфейса GUI-программы Visual Studio. Чтобы создать и отобразить окна, используют экземпляры (переменные) класса Form, и методы Show() и ShowDialog(). В статье рассматривается применение этих методов.
[Обычные окна, использование Show]
Show отображает обычное окно, а ShowDialog — модальное. В программу можно добавить произвольное количество форм (окон), все они будут действовать независимо, если отображены методом Show. Добавляется новое окно так: меню Проект -> Добавить форму Windows… -> Форма Windows Forms -> OK. По умолчанию будет добавлена форма Form2. Далее в модуле Program.cs добавьте код для отображения второй формы:
...
static void Main()
{
   Application.EnableVisualStyles();
   Application.SetCompatibleTextRenderingDefault(false);
   Form2 frm = new Form2();
   frm.Show();
   Application.Run(new Form1());
}
...
После запуска программы отобразятся сразу две формы, Form1 и Form2.
Чтобы можно было вызывать из Form1 подпрограммы и функции (методы) из Form2 (и наоборот), то необходимо инициализировать и запускать формы немного по-другому (код из Program.cs):
namespace MyApp
{
   static class Program
   {
      static public Form1 frm1;
      static public Form2 frm2;

      ///
      /// Главная точка входа для приложения.
      ///
      [STAThread]
      static void Main()
      {
         Application.EnableVisualStyles();
         Application.SetCompatibleTextRenderingDefault(false);
         frm1 = new Form1();
         frm2 = new Form2();
         frm2.Show();
         Application.Run(frm1);
      }
   }
}
Пример вызова из класса Form2 (процедура Form2_FormClosed) метода класса Form1 (процедуру Close):
private void Form2_FormClosed(object sender, FormClosedEventArgs e)
{
   Program.frm1.Close();
}
[Модальные окна, использование ShowDialog]
Модальное окно должно блокировать другие окна, пока не будет закрыто модальное окно. Обычно модальное окно используется для диалогов настройки, а также для фокусирования внимания пользователя на каком-то событии. В приложении в любое время может быть активно и доступно для пользователя только одно модальное окно. Часто диалог About тоже запускают как модальное окно.
Любую обычную форму можно запустить как модальное окно, если вместо Show() использовать ShowDialog(). Пример запуска диалогового (модального) окна настройки, вызываемого из меню:
      private void SetupStripMenuItem_Click(object sender, EventArgs e)
      {
         //Program.form2.Show();
         Program.form2.ShowDialog();
      }
[Важные отличия Show от ShowDialog]
1. Show() запускает отображение обычного окна, а ShowDialog() отображает модальное окно. Отличия обычного окна от модального известны — обычное окно равноправно со всеми окнами приложения, а модальное окно блокирует все остальные окна приложения, пока не будет закрыто это модальное окно.
2. Если после вызова Show() пользователь закроет вызванное окно, то повторно вызвать Show() не получится, так как объект окна будет уничтожен, и его надо будет создавать заново. Т. е. Использование Show() всегда должно быть по такой схеме: создание экземпляра класса окна (), Show(), закрытие окна. При каждом вызове Show() экземпляр класса окна нужно создавать заново в коде приложения.
3. ShowDialog() работает по другому: после закрытия пользователем окна (в отличие от Show()) экземпляр класса окна не будет уничтожен, поэтому не нужно перед каждым новым вызовом ShowDialog создавать экземпляр класса. Этот экземпляр класса может быть создан только один раз при старте приложения (например, в функции Main модуля Program.cs).
4. Свойства модального окна нужно менять в самом классе этого окна, а не из классов других окон, так как действие кода из другого класса не будет производить никакого эффекта на модальное окно. Например, поменять свойства Top и Left модального окна, влияющие на его положение, из модулей других окон не получится.
[Ссылки]
1. C#: часто задаваемые вопросы (FAQ).
It’s common for desktop applications to use dialog boxes when prompting information from the user. You can create input dialog boxes in a Windows Forms application, by displaying a new window.
You can also add UI elements to the new dialog window. These include messages, text boxes, and «Ok» and «Cancel» buttons. When the user enters information in the input box, you can store the result and use it in other parts of the app.
How to Create an On-Click Function to Trigger the Input Dialog Box
The dialog box should not always be visible. You can trigger the dialog box to show when the user completes an action, such as a button click. You can also learn more about other Windows Forms events that you can use in a Windows Forms app.
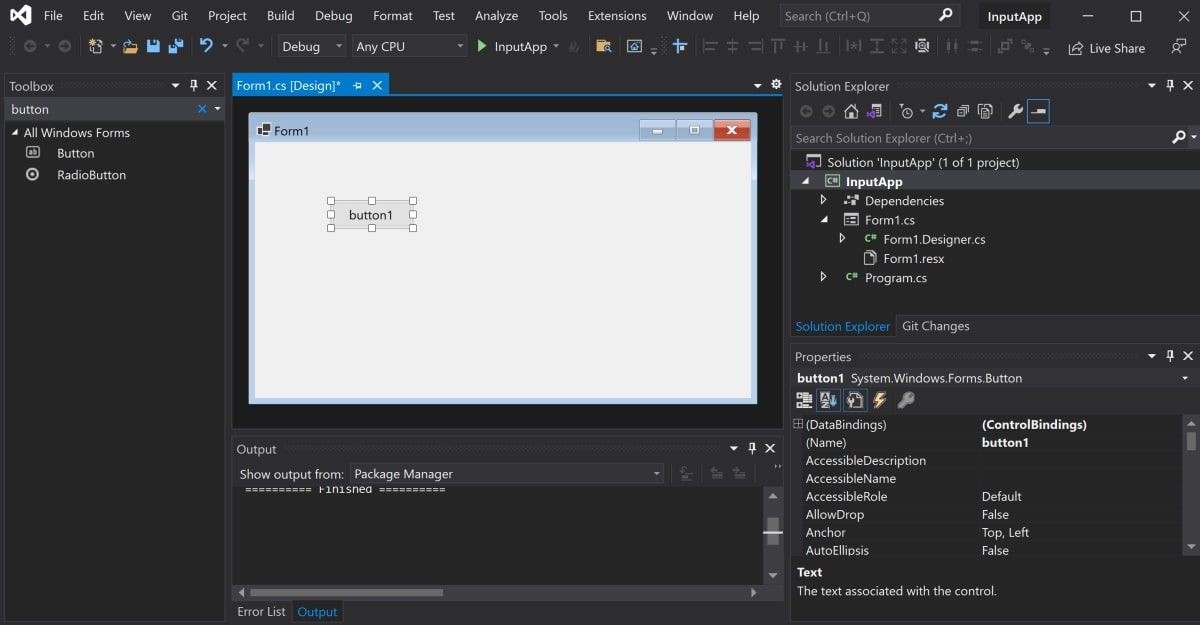
Add a button to the canvas and create a function that will run when the user clicks on the button.
- Create a new Windows Forms application in Visual Studio.
- In the Toolbox, search for a button UI control.
-
Click and drag a button onto the canvas.

-
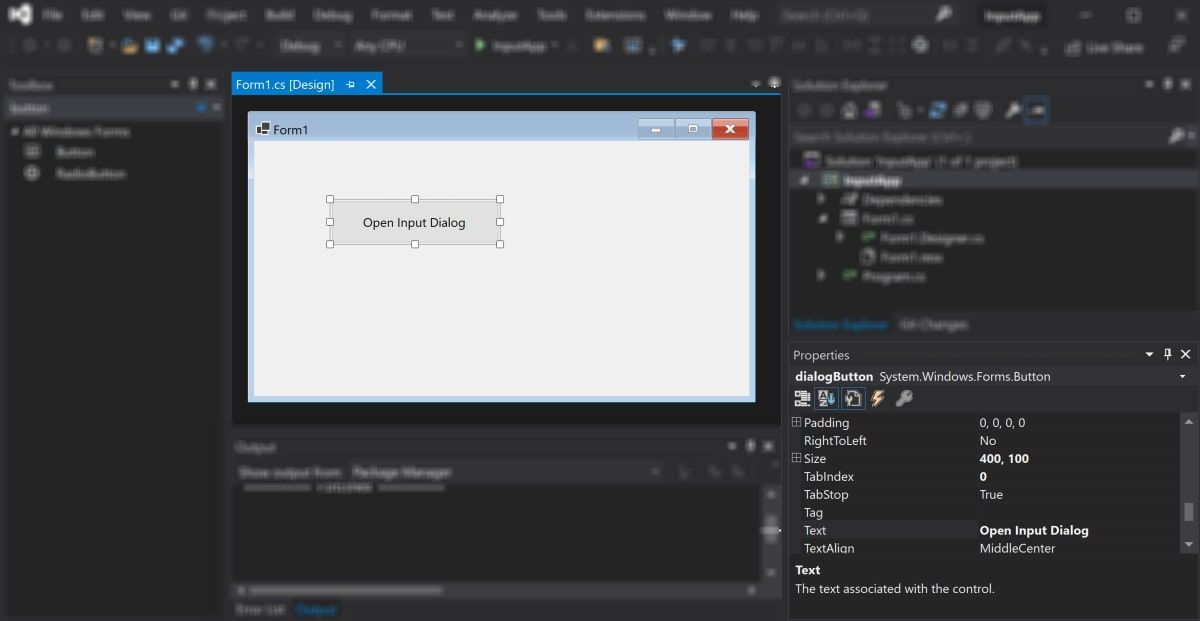
In the properties window, change the properties of the button to the following new values:
Property Name
New Value
Name
dialogButton
Size
400, 100
Text
Open Input Dialog

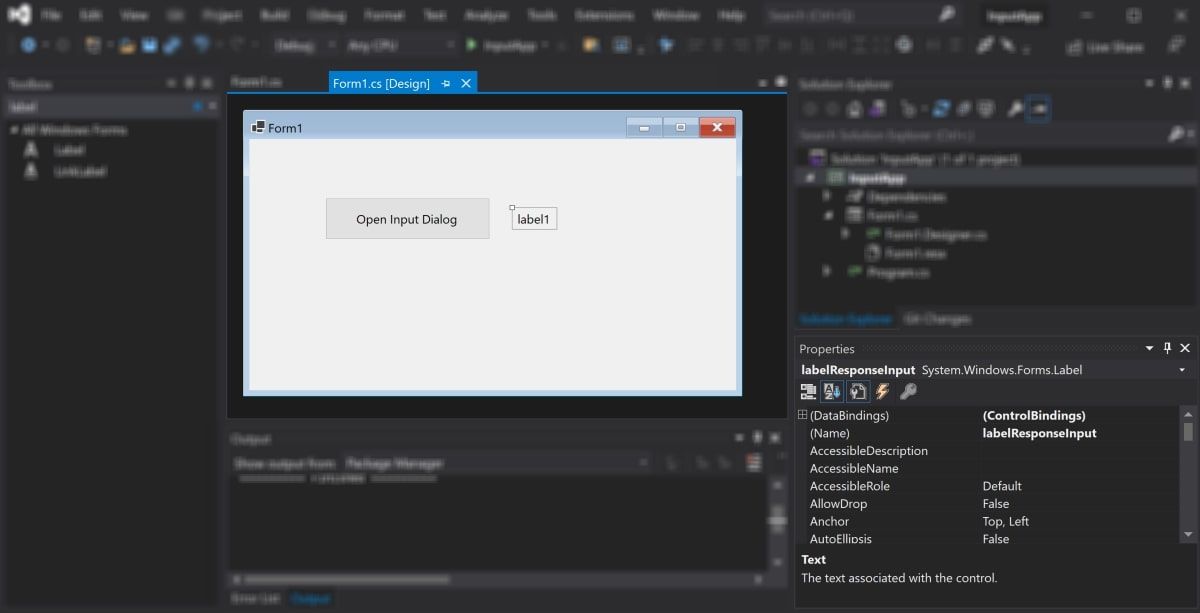
- In the Toolbox, click and drag a label onto the canvas. Place the label to the right side of the button.
-
In the properties window, change the properties of the label to the following values:
Property Name
New Value
Name
labelResponseInput
Visible
False

-
Double-click on the new Input Dialog button. This will generate an on-click function in the code-behind CS file for the form.
        private void dialogButton_Click(object sender, EventArgs e)
{
    // The code here will trigger when the user clicks on the button
    // It will display the input dialog box
}
How to Create the Input Dialog Box
Create the dialog box inside a new function. The function will programmatically create a new form, and add UI elements to it, including a text box with «Ok» and «Cancel» buttons.
-
Under the dialogButton_Click() function, create a new function that will create the Input Dialog box. The «title» parameter will show in the top-left corner of the window. The value for the «promptText» will display to the user. The «value» parameter is an out parameter and will return the value that the user entered inside the input box.
        public static DialogResult InputBox(string title, string promptText, ref string value)
{}
-
Inside the InputBox() function, create the UI elements that will display on the form.
        Form form = new Form();
Label label = new Label();
TextBox textBox = new TextBox();
Button buttonOk = new Button();
Button buttonCancel = new Button(); -
Add the title of the form, which will display in the top-left corner. Also add the main message that will display to the user, above the input box.
        form.Text = title;
label.Text = promptText; -
Add values for the «Ok» and «Cancel» buttons. The text property contains the text that shows on top of each button. The DialogResult property contains the type of result the button will represent. You can read more about DialogResult in Microsoft’s official documentation.
        buttonOk.Text = "OK";
buttonCancel.Text = "Cancel";
buttonOk.DialogResult = DialogResult.OK;
buttonCancel.DialogResult = DialogResult.Cancel; -
Use the SetBounds() method to set the x and y positions of the label, text box, and buttons on the form. You can also specify each element’s width and height.
        label.SetBounds(36, 36, 372, 13);
textBox.SetBounds(36, 86, 700, 20);
buttonOk.SetBounds(228, 160, 160, 60);
buttonCancel.SetBounds(400, 160, 160, 60); -
Configure some properties for the dialog window itself. These properties set the form size, borders, and start position. It also controls the ability to minimize or maximize the window, or resize the label if necessary.
        label.AutoSize = true;
form.ClientSize = new Size(796, 307);
form.FormBorderStyle = FormBorderStyle.FixedDialog;
form.StartPosition = FormStartPosition.CenterScreen;
form.MinimizeBox = false;
form.MaximizeBox = false; -
Add the UI elements onto the new form, and set the form’s accept and cancel buttons to the button objects created earlier.
        form.Controls.AddRange(new Control[] { label, textBox, buttonOk, buttonCancel });
form.AcceptButton = buttonOk;
form.CancelButton = buttonCancel; -
Show the newly created dialog window to the user.
DialogResult dialogResult = form.ShowDialog(); -
Store the value that the user entered into the textbox. Return the result of the form, which would either be «Ok», or «Cancel», based on the button the user clicks on.
        value = textBox.Text;
return dialogResult;
How to Use the Input Dialog Box
To use the input dialog box, call the InputBox() function inside the dialogButton_Click() function. When the user clicks on the «Open Input Dialog» button, it will show the dialog box.
-
Inside the dialogButton_Click() function, create a variable to store the value that the user enters inside the text box. This value will come from the «value» out parameter.
string value = ""; -
Display the dialog box by calling the InputBox() function. Check if the user clicks on the «Ok» button, and if so, add some text onto the screen to display the response back to the user.
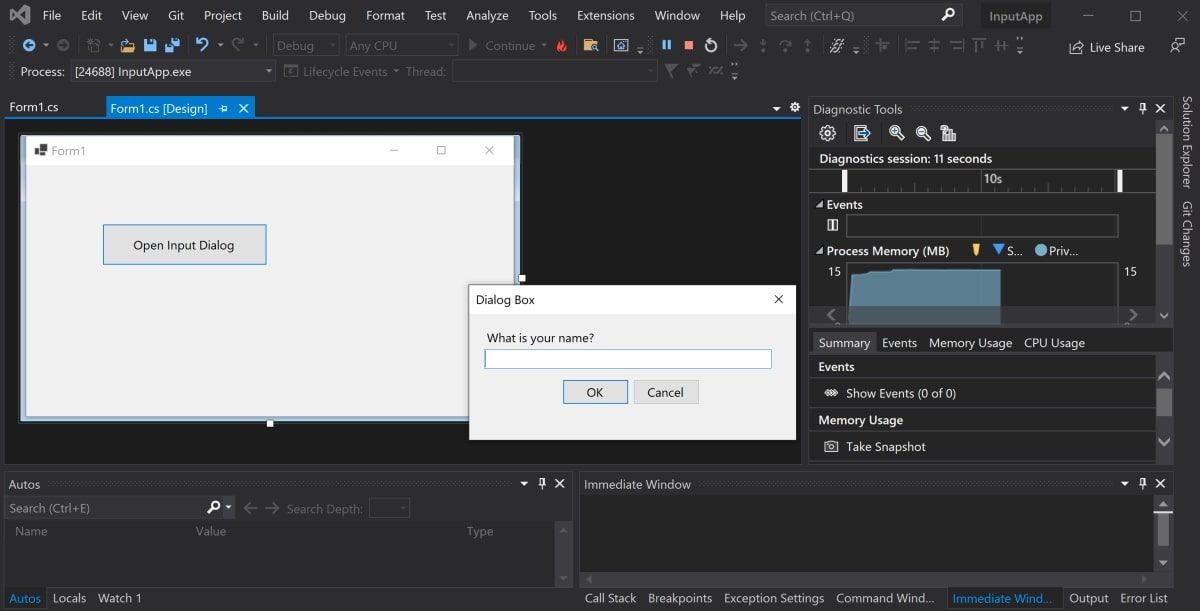
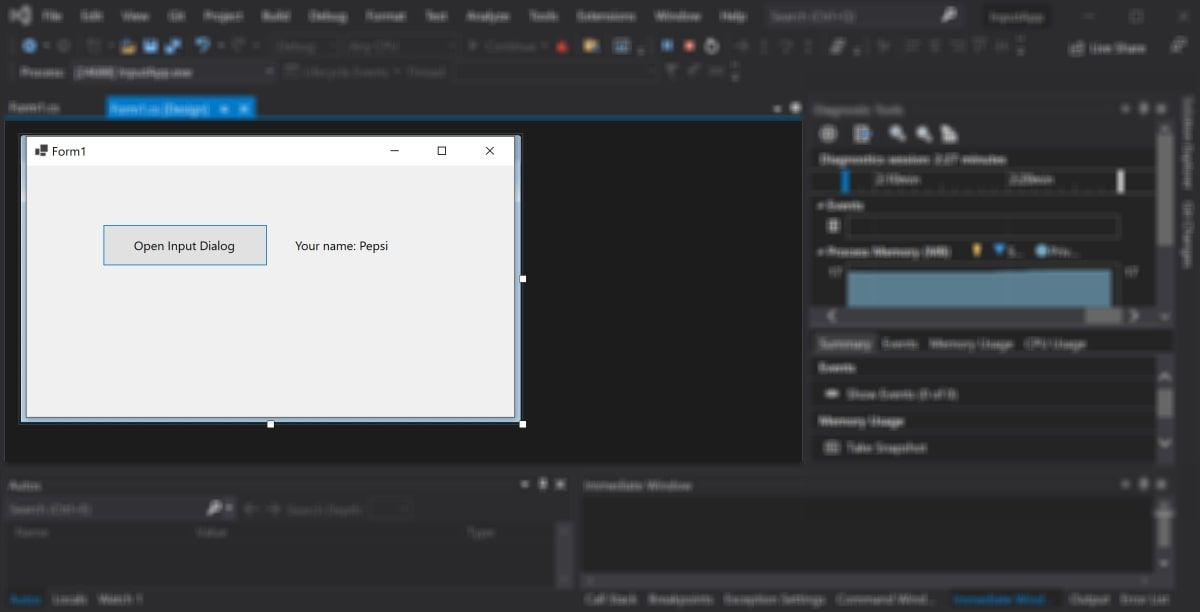
        if (InputBox("Dialog Box", "What is your name?", ref value) == DialogResult.OK)
{
    labelResponseInput.Visible = true;
    labelResponseInput.Text = "Your name: " + value;
}
How to View the Input Dialog Pop Up
Run the application and trigger the dialog box.
-
Click on the green play button at the top of the Visual Studio window.

-
Click on the Open Input Dialog button to show the dialog box.

-
Enter a name into the text box and click on the OK button. The dialog box will close and display the results entered into the text box.

- Click on the Open Input Dialog button again to re-open the dialog box.
- Click on the Cancel button to close the dialog box. This cancels the dialog box without completing any actions or updating the UI.
Adding Content and UI Elements to Your Windows Forms Application
You can create input dialog boxes in a Windows Forms application, and display them to the user when certain events happen. You can create a new dialog window by creating a new form. You can then add new UI elements to it, such as labels, text boxes, or buttons.
Once the user has entered the required information, you can close the input box and store the information that they entered.
If you want to add more content to your UI or dialog box, you can explore how to add other UI elements. This includes elements such as shapes or images.
Диалоговые окна в С#
Диалоговые окна в C# — это вид окон, который используется для обеспечения диалога между программой и пользователем. Они могут передавать информацию пользователю, запрашивать у пользователя ответ или и то и другое одновременно.
Простейшим типом диалогового окна является предупреждение, которое отображает сообщение и может потребовать от пользователя подтверждения того, что сообщение было прочитано, обычно нажатием кнопки «ОК» или принятия решения о том, следует ли продолжать действие, нажав кнопку «ОК» или «Отмена».
Диалоговое окно также можно настроить. Такое диалоговое окно называется пользовательским диалоговым окном.
Диалоговые окна — это специальный тип форм, размер которых нельзя изменять. Они используются для отображения сообщений пользователю. Сообщения могут быть сообщениями об ошибках, подтверждением пароля, подтверждением удаления определенной записи, утилитой поиска-замены слова и т.д. Существуют стандартные диалоговые окна для открытия и сохранения файла, выбора папки, печати документов, установки шрифта или цвета текста и т.д.
Классическим примером диалогового окна является класс MessageBox, используемый для отображения сообщений пользователю. Метод show() данного класса предназначен для отображения окна сообщения с указанным текстом, заголовком, кнопками и значком. Существуют и другие доступные перегрузки этого метода.
Пример кода:
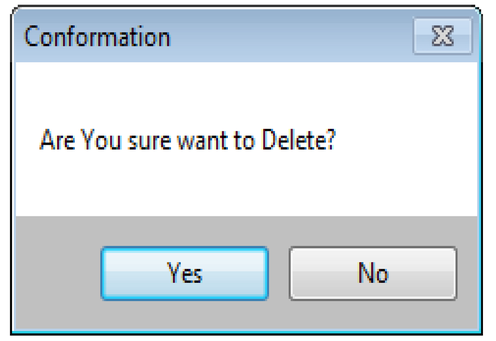
DialogResult res = MessageBox.Show("Вы действительно хотите удалить запись?", "Подтверждение удаления", MessageBoxButtons.OKCancel, MessageBoxIcon.Information);
if (res == DialogResult.OK) {
MessageBox.Show("Вы подтвердили удаление!");
}
if (res == DialogResult.Cancel) {
MessageBox.Show("Вы отказались удалять!");
}
Тип кнопок и значков можно изменить, используя соответствующие настройки, в нашем примере используются MessageBoxButtons.OKCancel, MessageBoxIcon.Information:
Диалоговые окна бывают двух типов:
- Модальные диалоговые окна
- Немодальные диалоговые окна
Диалоговое окно, которое временно останавливает работу программы так, что пользователь не может продолжить работу до тех пор, пока диалоговое окно не будет закрыто, называется модальным диалоговым окном. Приложению может потребоваться некоторая дополнительная информация, прежде чем оно сможет продолжить работать, или оно может просто попросить подтвердить, что пользователь хочет продолжить алгоритм действий. Приложение продолжает выполняться только после закрытия диалогового окна; до тех пор приложение останавливается. Например, если при сохранении файла пользователь указывает имя существующего файла отображается предупреждение о том, что файл с тем же именем существует, независимо от того, следует ли его перезаписать или сохранить с другим именем. Файл не будет сохранен, если пользователь не выберет «ОК» или «Отмена».
Другой тип диалогового окна, который часто используется, — это немодальное диалоговое окно. Оно используется, когда запрашиваемая информация не является необходимой для продолжения работы программы, поэтому такое модальное окно можно оставить открытым, пока работа продолжается где-то в другом месте. Например, при работе в текстовом редакторе пользователь хочет найти и заменить определенное слово. Это можно сделать с помощью диалогового окна, в котором отображается соответствующая форма. При этом пользователь может продолжать работать, даже если это окно открыто.
Разработчик может создать собственные классы диалоговых окон, наследуясь от базового класса System.Windows.Forms. Для отображения модального диалогового окна затем будет использоваться метод ShowDialog(). Немодальные диалоговые окна отображаются с помощью метода Show().
Таким образом, диалоговые окна — это базовый компонент интерфейса любого графического приложения и в C# они создаются очень просто и призваны нести обратную связь
для пользователя.
-
Создано 30.06.2022 08:51:47
-
Михаил Русаков
Копирование материалов разрешается только с указанием автора (Михаил Русаков) и индексируемой прямой ссылкой на сайт (http://myrusakov.ru)!
Добавляйтесь ко мне в друзья ВКонтакте: http://vk.com/myrusakov.
Если Вы хотите дать оценку мне и моей работе, то напишите её в моей группе: http://vk.com/rusakovmy.
Если Вы не хотите пропустить новые материалы на сайте,
то Вы можете подписаться на обновления: Подписаться на обновления
Если у Вас остались какие-либо вопросы, либо у Вас есть желание высказаться по поводу этой статьи, то Вы можете оставить свой комментарий внизу страницы.
Если Вам понравился сайт, то разместите ссылку на него (у себя на сайте, на форуме, в контакте):
-
Кнопка:
Она выглядит вот так:
-
Текстовая ссылка:
Она выглядит вот так: Как создать свой сайт
- BB-код ссылки для форумов (например, можете поставить её в подписи):
What is a C# dialog box?
A dialog box in C# is a type of window, which is used to enable common communication or dialog between a computer and its user. A dialog box is most often used to provide the user with the means for specifying how to implement a command or to respond to a question. Windows.Form is a base class for a dialog box.
Sometimes, in a graphical user interface, a window is used to communicate with the user or establish a dialog between the user and the application. This additional window is called a dialog box. It may communicate information to the user; prompt the user for a response or both.
The simplest type of dialog box is the warning which displays a message and may require the user to acknowledge that the message has been read, usually by clicking “OK” or a decision as to whether or not an action should continue by clicking “OK” or “Cancel”.
Some dialog boxes are standard like the warning message or error message. Save the file and enter the password. These are called standard dialog boxes.
A dialog box can also be customized. Such a dialog box is called a custom dialog box.
Dialog boxes are special forms that are non-resizable. They are also used to display the messages to the user. The messages can be error messages, confirmation of the password, confirmation for the deletion of a particular record, Find-Replace utility of the word etc. There are standard dialog boxes to open and save a file, select a folder, print the documents, set the font or color for the text, etc.
MessageBox class is used to display messages to the user. The show() method is used to display a message box with the specified text, caption, buttons, and icon. There are other overloads also available.
For example
DialogResult res = MessageBox.Show("Are you sure you want to Delete", "Confirmation", MessageBoxButtons.OKCancel, MessageBoxIcon.Information);
if (res == DialogResult.OK) {
    MessageBox.Show("You have clicked Ok Button");
    //Some task…
}
if (res == DialogResult.Cancel) {
    MessageBox.Show("You have clicked Cancel Button");
    //Some task…
}
Type of buttons and icons can be changed by using the appropriate enumerated values.
Dialog boxes are of two types, which are given below.
- Modal dialog box
- Modeless dialog box
A dialog box that temporarily halts the application and the user cannot continue until the dialog has been closed is called modal dialog box. The application may require some additional information before it can continue or may simply wish to confirm that the user wants to proceed with a potentially dangerous course of action. The application continues to execute only after the dialog box is closed; until then the application halts. For example, when saving a file, the user gives a name of an existing file; a warning is shown that a file with the same name exists, whether it should be overwritten or be saved with different name. The file will not be saved unless the user selects “OK” or “Cancel”.
Another type of dialog box, which is used is a modeless dialog box. It is used when the requested information is not essential to continue, so the Window can be left open, while work continues somewhere else. For example, when working in a text editor, the user wants to find and replace a particular word. This can be done, using a dialog box, which asks for the word to be found and replaced. The user can continue to work, even if this box is open.
Dialog box can be configured to constant by setting FormBorderStyle property to FormBorderStyle.FixedDialog, setting MinimizeBox and MaximizeBox property to false. Framework Class Library(FCL) does not provide class as Dialog. The developer creates custom dialog classes by deriving type from System.Windows.Form base class.
Model dialog is displayed, using ShowDialog() method. Modeless dialog boxes are displayed, using Show() method.
Common Dialog Box
The dialog boxes that are used, which are common to all Windows Application. It performs common tasks like saving a file, choosing a font etc. This provides a standard way to the Application interface.
The examples are given below.
- FontDialog
- ColorDialog
- OpenDialog
- SaveDialog
These dialog boxes are implemented by an operating system, so they can be shared across all the Application that runs on that operating system (Windows).
Steps to use common dialog box
- Instantiate the required common dialog box.
- Set the properties of common dialog box, if required.
- Call its ShowDialog() method to invoke the dialog box.
ShowDialog() returns an enumerated type called DialogResult. It defines the identifiers, which indicates which button was clicked. For example, DialogResult.OK and DialogResult.Cancel are some values that indicates OK or Cancel button were clicked respectively.
Open File Dialog Box
The OpenFileDialog allows you to choose a file to be opened in an Application.
For example, the code is given below.
OpenFileDialog ofd = new OpenFileDialog();
ofd.Title = "Open a Text File";
ofd.Filter = "Text Files (*.txt) | *.txt | All Files(*.*) | *.*"; //Here you can filter which all files you wanted allow to open
DialogResult dr = ofd.ShowDialog();
if (dr == DialogResult.OK) {
    StreamReader sr = new StreamReader(ofd.FileName);
    txtEx.Text = sr.ReadToEnd();
    sr.Close();
}
Save File Dialog Box
The SaveFileDialog box is used to allow the user to select the destination and name of the file to be saved.
For example, the code is given below.
SaveFileDialog sfdlg = new SaveFileDialog();
sfdlg.Filter = "Text Files (*.txt) | *.txt"; //Here you can filter which all files you wanted allow to open
if (sfdlg.ShowDialog() == DialogResult.OK) {
    // Code to write the stream goes here.
}
The content can be saved to the file, using appropriate class like StreamWriter class in the case of Text Editor Application.
Font and Color Dialog Boxes
FontDialogBox is used to allow the user to select font settings. The ColorDialogBox is used to allow the user to select a color.
For example, the code is given below.
//Font Dialog
FontDialog fdlg = new FontDialog();
fdlg.ShowDialog();
txtEx.Font = fdlg.Font;
//Color Dialog
ColorDialog cdlg = new ColorDialog();
cdlg.ShowDialog();
txtEx.ForeColor = cdlg.color;
Output of Color Dialog is given below.
In either case, the properties and methods are available. They can be used to get the selected values or set the values for the dialog box.
Custom Dialog Box
Even though common dialog boxes are useful, they do not support the requirements of domain-specific dialog boxes. Developer need to create their own dialog boxes.
Following steps represent the process of creating Custom Dialog Box
- Add a form to your project by right clicking the project in Solution Explorer, point to Add and then click Windows Form.
- In the properties Window, change the FormBorderStyle property to FixedDialog.
- Customize the appearance of the form, as required.
- Add controls into this form.
Note
Use ShowDialog() method to open the form as modal dialog box. This method can be used for the custom dialog boxes too. Show() method is used to open the model’s dialog box.
{lang: ‘ru’}
В этом посте я напомню (или расскажу) вам о том, как создать модальное диалоговое окно средствами C#. Вообще, модальное окно – это диалоговое окно, при появлении которого основное окно приложения становится недоступным до закрытия диалога. Простейшим примером модального диалогового окна в C# может служить MessageBox.
|
MessageBox.Show (“Привет”); |
Для начала, следует создать новую форму для нашего диалога, расположить на ней какие-либо элементы для опроса пользователя и не забыть добавить кнопки (button), по нажатию которых диалог будет завершаться. У меня она выглядит следующим образом:
Теперь можно приступить к отображению созданной формы в качестве модального диалога. Естественно, для этого нужно создать экземпляр класса нашей формы:
|
LoginForm lf = new LoginForm(); |
Затем, желательно сообщить окну, кто будет его владельцем. Вообще, это более актуально, когда диалог не модальный. В этом случае дочернее окно будет сворачиваться и закрываться вместе с родительским.
И, главное: «заставить» форму показаться, вызвав метод ShowDialog()
Именно он вызывает форму в качестве модального диалога. Если вместо ShowDialog() воспользоваться просто Show(), то форма откроется не модально.
От модальных диалоговых окон можно получить «обратный отклик», задав в свойствах используемых на нем кнопок DialogResult.
У кнопок вроде «OK» и «Cancel» диалоговых окон, рекомендуется это свойство заполнять. Оно очень полезно, когда вызвавшей диалог форме нужно узнать, каким образом завершился диалог. Например, когда нужно применить изменения, если пользователь выбрал «OK».
|
if (DialogResult.OK == lf.DialogResult) { //делаем что-либо } |
Немодальные диалоги не возвращают DialogResult.
Полезная статья? Их будет больше, если вы поддержите меня!