
Как размонтировать диск — Краткая инструкция
Рассмотрим случай, когда Вы эмулировали образ диска стандартными средствами Widnows (в Windows 10 или 11) и после установки приложения его нужно размонтировать, например, чтобы после удалить образ диска.
1) Заходим в проводник => Меню «Этот компьютер» => После находим там нужный Вам эмулированный образ
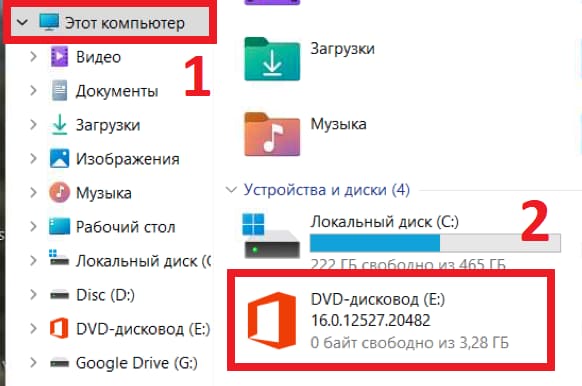
2) Нажимаем на него правой кнопкой мыши => Извлечь
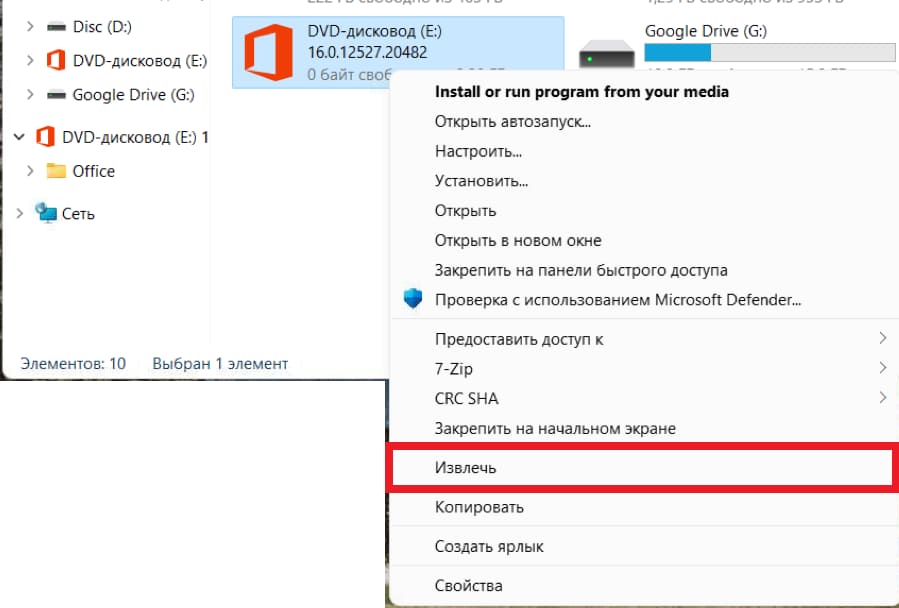
На этом все, образ диска размонтирован.
835
Похожие статьи
Получайте первыми лучшие скидки и свежие новости!
Download Article
Remove drives and disks in Windows, macOS, and Linux
Download Article
- Using Windows
- Using Mac
- Using Linux
- Q&A
- Tips
- Warnings
|
|
|
|
|
Do you need to unmount a disk or flash drive from your computer? Unmounting a drive is the same as ejecting a drive. With most devices, you cannot unmount your computer’s main hard drive (the hard drive where your operating system is installed). This wikiHow will show you how to unmount a drive on your Windows, Mac, or Linux computer.
Unmounting a Disk or USB Drive
If you’re using Windows, right-click the drive in File Explorer and click Eject on the Manage tab. On a Mac, open the Finder and click the eject button next to the drive. To unmount in Linux, use sudo umount followed by the mount point.
-

Open the File Explorer. Right-click the Start menu and select File Explorer.
- On Windows 7 and Vista, click Computer in the right column.
- Alternatively, press the Win key.
- If you need to remove or replace a physical hard drive built into your computer, see this article instead.
-

This may also look like Computer or My Computer.
Advertisement
-

A list of all currently active drives will be available under the «Devices and drives» header.
- This drive must be either a removable drive (e.g., a flash drive or SD card) or a secondary internal drive.
-

This will be in the Drive Tools tab. If you aren’t already on this tab, click it to navigate there now.
- Once you click Eject, you’ll see the drive’s icon disappear from the File Explorer window, and a notification letting you know that it’s safe to remove the drive will appear.
-
This will complete the unmounting process.
-

If you want to change or remove the drive letter, you can use the Disk Management app. This is helpful if you have a lot of partitions or volumes, or if you’d rather manually mount the drive yourself. Do the following:
- Press the Windows key + R to open the Run menu.
- Type diskmgmt.msc and press Enter.
- Right-click the drive.
- Click Change Drive Letter and Paths.
- Click Remove.
- Click Yes.
- Close Disk Management.


Advertisement
-

This can be found in the Dock.
-
You can find this in the left panel. This will safely disconnect the drive from your device.[1]
- Alternatively, you can drag the drive to the Trash to quickly eject it.
-
This will complete the unmounting process.
-

If you want to unmount an internal disk drive, do the following:
- Open the Disk Utility app.[2]
- Select the disk or disk set you want to unmount.
- Click Unmount.
- Open the Disk Utility app.[2]


Advertisement
-
Open the Terminal. On most devices, you can use the keyboard shortcut Ctrl + Alt + T.
-
This will list all human readable drives on your system.
- Take note of the drive’s path.
-

You must have superuser privileges to do this.
- Note: The command is umount, not unmount.
-
The drive will be unmounted.
-
This will complete the unmounting process.


Advertisement
Add New Question
-
Question
How do I fix an unmounted hard drive disk utility on my MacBook Pro when it doesn’t show up anymore?
Look for errors in the hardware (look for problems in the physical drive or drive connector). It usually does that when there is a physical error so try connecting the drive to a different computer to see if there are any problems.
-
Question
How do I dismount a drive that doesn’t have an «eject» button? On This PC, nothing happens if I click on the popup in the taskbar.
You can right click on the partition and press eject. Or rght click on ‘My Computer’, and select manage>Storage>Disk Management>.
Ask a Question
200 characters left
Include your email address to get a message when this question is answered.
Submit
Advertisement
-
On Windows, you can unmount a drive by clicking the USB icon in the bottom-right side of the screen and then clicking Eject.
Thanks for submitting a tip for review!
Advertisement
-
Failing to unmount a drive before disconnecting it may result in data loss or corruption.
Advertisement
About This Article
Thanks to all authors for creating a page that has been read 24,167,491 times.
Is this article up to date?
Windows automatically mounts any connected drive. When needed, you can mount or unmount a drive in Windows manually. Here’s how.
If you turn on the computer and open File Explorer, you will see all the available drives ready to use. This is because Windows automatically mounts all the drives or volumes connected to the system. Of course, the drive’s file system should be compatible. That way, you can access all the files and programs in those drives right from the start—no need to manually mount drives on each reboot.
Though this is a good thing, there might be a time when you need to unmount a drive in Windows. For example, maybe the drive is causing errors, you no longer need the drive to appear in the File Explorer, etc. On the other hand, you might want to manually mount a drive in Windows if it is not mounting automatically.
No matter the reason, if you ever needed it, Windows makes it easy to mount and unmount a drive. All it takes is a few clicks or a couple of commands, depending on your use case.
This simple Windows how-to guide shows you the steps to mount and unmount a drive in Windows without ado.
Table of contents:
- How to mount a drive in Windows
- Using the Disk Management tool
- Using Command Prompt
- How to unmount a drive in Windows
- Using the Disk Management tool
- Using Command Prompt
If a specific drive does not mount automatically, you can use the disk management or Command Prompt tool to mount it. It is pretty easy to do. I will show both methods, and they achieve the same thing. Follow the one you think is easy. Generally, if you want a point-and-click method, follow the Disk Management method. Follow the Command Prompt method if you want to dabble with commands or create a script.
Using the Disk Management tool
The Disk Management application is the built-in tool to manage drives or volumes in Windows. Follow the steps below to mount a Windows drive using the Disk Management tool.
- Open the Start menu.
- Search and open “Create and format hard disk partitions.”
- Identify the unmounted volume.
- Right-click on the unmounted drive.
- Choose the “Change Drive Letter and Paths” option.
- Press the “Add” button.
- Select the “Assign the following drive letter” radio option.
- Choose a drive letter from the dropdown menu.
- Press the “Ok” button.
- With that, the drive/partition is mounted.
- You can close the Disk Management tool.
- Open the File Explorer to see the newly mounted drive.

Using Command Prompt
You can also mount a drive using the Command Prompt with just a few commands. Here’s how.
Open the Command Prompt window with admin rights. To do that, search for “Command Prompt” in the Start menu and choose the “Run as administrator” option.

Next, execute the below command to list all the drives or volumes.
mountvolThe above command lists all the mounted and unmounted volumes with their respective GUIDs. Identify the unmounted volume and copy the respective Volume GUID.
A volume GUID looks something like “\\?\Volume{cf8ec040-28a9-43c6-bc10-3152b85b34cd}\.” You should copy the entire thing.

Next, execute the below command while replacing the “DriveLetter” with the drive letter you want to assign and the “VolumeGUID” with the actual string you copied earlier.
Important note: Make sure there is a space between the drive letter’s “:” and the volume GUID. Otherwise, the command won’t get executed. The drive letter you use in the command should not already be in use.
mountvol DriveLetter: VolumeGUIDThe actual command looks something like this:
mountvol E: \\?\Volume{cf8ec040-28a9-43c6-bc10-3152b85b34cd}\
As soon as you execute the command, Windows mounts the target volume with the drive letter.
How to unmount a drive in Windows
You can unmount a drive in Windows using the Disk Management tool or Command Prompt. Both methods are easy. Follow the one you think is easy. For beginners, I recommend following the Disk Management tool. If you are not afraid of commands or want to create custom scripts, follow the Command Prompt method.
Using the Disk Management tool
Follow these steps to unmount a drive in Windows using the Disk Management tool.
- Open the Start menu.
- Search and open “Create and format hard disk partitions.”
- Identify the drive you want to unmount.
- Right-click on the drive.
- Choose the “Change Drive Letter and Paths” option.
- Press the “Remove” button.
- Press “Yes” in the warning window.
- With that, the drive/partition is unmounted.
- You can close the Disk Management tool.
- Open the File Explorer, and you will no longer see the unmounted drive.

Using Command Prompt
You can unmount a drive in Windows using Command Prompt with a single command. It is pretty neat and easy to use. Let me show you how.
Press the Start key, search for “Command Prompt,” and choose the “Run as administrator” option to open the CMD window with admin rights.
Execute the below command while replacing the “DriveLetter” with the actual drive letter of the drive you want to unmount. For example, if I want to unmount the E: drive, I will relace “DriveLetter” with “E.”
mountvol DriveLetter: /P
Close the Command Prompt window after executing the command. You will no longer see the unmounted drive in File Explorer.
–
That is all. It is that simple to mount or unmount a drive in Windows.
I hope this simple Windows how-to guide helped you.
If you are stuck or need some help, comment below, and I will try to help as much as possible.
@Refguser
Решения для бизнеса: от создания ИМ до…
В связи с неприятной историей, описаной по соседству, возник этот вопрос.
Итак, ситуация: на ПК установлено несколько винтов. На разных винтах разные версии Windows (и мб не только Windows).
Хотелось бы, чтобы при загрузке винды со своего диска остальные диски не монтировались. Но их можно было подмонтировать/размонтировать вручную (как это возможно в линуксе).
При завершении же работы Windows первым делом эти диски размотировались.
Есть ли такие программы или иные механизмы для winows7/10-11, которые позволяют реализовать такую работу с дисками?
-
Вопрос задан
-
578 просмотров
Пригласить эксперта
Если вам нужно всего лишь монтировать вручную/не монтировать автоматически диски — смотрите в сторону команды mountvol.
Но есть подозрение, что нужно вам, на самом деле, что-то другое.
Не очень понятно зачем, руками просто провод выдерните, три секунды занимает
В целом не очень понятно что у вас случилось в прошлом вопросе, получается вы туда сюда прыгали между десяткой и семёркой плюс ещё у вас кто то что то делал с компом пока вас не было и вы не знаете что именно
То есть вы пытаетесь спастись от ситуаций неизвестных вам заранее, диск тогда надо отключать и в сейф
ставите mobile rack с горячей заменой под каждый носитель
можно через multiboot с криптозащитой каждого диска
а проще всего — изначально работать с Windows корректно
-
Показать ещё
Загружается…
Минуточку внимания
0
0
Простите за офф
Может кто знает?
Как отмонтировать диски в Windows из командной строки?
- Ссылка
Ответ на:
комментарий
от Selecter
мне только и командной строки
это для написания скрипта горячей замены диска
madworm ★
()
автор топика
- Ссылка
Ответ на:
комментарий
от magesor
Ответ на:
комментарий
от madworm
diskpart, встроен в >= winxp
borisych ★★★★★
()
- Ссылка
Вы не можете добавлять комментарии в эту тему. Тема перемещена в архив.