Это довольно сложно, если вы хотите создать приложение для iOS, но у вас нет устройств Mac!
Xcode для Windows — ваш выбор. Его хорошо используют программисты, которые хотят разрабатывать приложения для iOS с использованием Windows.
Xcode — это IDE (интегрированная среда разработки), разработанная Apple, которая состоит из различных программных инструментов, которые используются для создания приложений для macOS, iOS, watchOS и tvOS.
Этот SDK (Software Development Kit) не работает ни в одной другой операционной системе, кроме Mac OS X и iOS.
Если вы хотите установить Xcode на свой ПК с Windows (7, 8.1 и 10), то вы попали точно на нужную страницу.
Xcode — комплект для разработки приложений
Бесплатный Xcode для Windows 10 — это приложение для тестирования и набор инструментов для управления активами, или, другими словами, это построитель интерфейса, который не поддерживается в Windows по некоторым причинам и из-за проблем с совместимостью.
Есть способ его установки с помощью Oracle Virtual Box.
Следовательно, можно создавать и разрабатывать базовые приложения на ПК с Windows, установив этот Xcode SDK в вашу ОС Windows.
Взгляните: Как использовать iMessage на ПК, Windows или MAC
Требования, необходимые для установки Xcode в ОС Windows 7/8/10
Ниже приведены некоторые системные требования, которым вы должны следовать для установки Xcode для Windows 7, 8 или 8.1 и 10.
После обсуждения требований мы обязательно рассмотрим подробный процесс установки.
- Для начала вам понадобится рабочая виртуальная машина Mac OS X на VMware или Virtual Box.
- Тогда вам нужно скачать Пакет Xcode с сайта Apple. Но помните, что вам нужен Apple ID, чтобы загрузить Xcode из магазина Apple.
- Двухъядерный процессор Intel
- Минимум 2 ГБ ОЗУ (рекомендуется: 4 ГБ +)
- Аппаратная виртуализация
Убедитесь, что у вас есть работающая виртуальная машина Mac OS X, когда вы устанавливаете Xcode для Windows бесплатно. Если вы профессиональный разработчик приложений, необходимо приобрести оборудование Apple с OS X и идентификатором разработчика приложения.
Чтобы узнать больше, посмотрите это сейчас:
Прочтите это: Лучший медиаконвертер Tuneskit DRM для Windows
✔ Шаги по установке Xcode на ПК или ноутбуке с Windows 10, 8 / 8.1 и 7
Это следующие шаги, которые необходимо выполнить для установки xcode в виртуальном окне Windows, выполните их внимательно:
- Прежде всего вам необходимо загрузить и установить VMware или VirtualBox на свой ПК с Windows. Если вы не знаете, откуда скачать, нажмите на VirtualBox. Отсюда его можно скачать бесплатно, так как это открытый исходный код.
- Затем вам нужно загрузить и установить ОС X Маверикс ISO как виртуальная машина.
- Теперь вам нужно открыть виртуальный ящик и нажать «Создать», чтобы создать виртуальную машину в виртуальном ящике Oracle.
- Как только вы нажмете кнопку «Создать», откроется новое окно, в котором будет запрашиваться новое имя операционной системы. Здесь введите Имя как OSX, Тип ОС как Mac OS X, а также введите Версию как Mac OS X (32-разрядную), а затем нажмите Enter.
- Теперь необходимо выбрать размер ОЗУ для скачивания бесплатного xcode для windows. на виртуальную машину. Максимальный объем памяти, необходимый для работы Android на ПК с Windows, составляет 1024 МБ (1 ГБ). Выберите нужный размер и нажмите Enter.
- Пришло время создать файл виртуального жесткого диска.
- После этого для выбора файла оборудования всегда используйте VDI (VirtualBox Disk Image) в терминах ISO-образа. Когда вы закончите, нажмите «Далее».
- Выберите физический жесткий диск в качестве динамического. На физическом жестком диске вашего устройства укажите местоположение файла, а также размер Android. Затем нажмите «Создать».
- Если вы выполнили все указанные шаги правильно, это означает, что вы успешно создали виртуальную машину в своем виртуальном ящике. Теперь то, что осталось, — это файл iso, который был загружен ранее. Для этого перейдите в Настройки >> Хранилище >> Загрузить iso. Файл >> Нажмите ОК >> Начните.
- Чтобы установить xcode для загрузки Windows 8.1, следующее, что вам нужно сделать, это выполнить экранные шаги загрузки OSX в качестве мастера, а затем OSX будет легко установлен в Oracle Virtual.
- Теперь откройте официальный магазин приложений Apple, открыв браузер сафари, войдя в магазин приложений Apple ID и пароль.
- Чтобы получить полный пакет, введите xcode в поле поиска после регистрации. Когда вы нажмете кнопку ввода в поле поиска, он покажет вам различные связанные приложения, и из этих приложений выберите xcode и нажмите «Бесплатно» и «Загрузить». Затем нажмите ОК, чтобы загрузить файл.
- Теперь, когда вы закончите установку, откройте его из приложений на компьютере и укажите свои корневые учетные данные для установки Xcode для компонентов ПК с Windows, вместе с настройками системы. Введите свое имя и пароль и нажмите ОК.
- Что дальше? Это все. Вы установили последнюю версию Xcode на ПК с Windows 10, 8 / 8.1 и 7 с помощью программного обеспечения для виртуализации рабочего стола VMware workstation.
Должен прочитать: Почему Easeus — лучшее программное обеспечение для восстановления данных для Windows
Теперь пришло время разобраться с наиболее часто задаваемыми вопросами о xcode для Windows Free, держите ручку и бумагу наготове и сразу же записывайте эти обсуждаемые ниже вопросы!
Альтернатива для Xcode
Если вы хотите изучать и разрабатывать приложения на базе iOS, но у вас нет системы Mac, у вас есть альтернатива — Swift.
Swift — это язык программирования, который используется для разработки приложений iOS, macOS, tvOS и watchOS.
Вы также можете использовать цель c вместо Swift, так как цель c использовалась раньше Swift, но теперь все настоятельно рекомендуют ее.
Swift — это язык программирования с открытым исходным кодом, и если вы хотите изучить его, мы рекомендуем приложение Swift Playgrounds для iPad.
В 1: Как мы можем открыть среду программирования Xcode в Windows?
Ответ: Все, что вам нужно установить, — это macOS / OSX в виртуальной среде, такой как VMWare или VirtualBox, чтобы использовать Xcode в любой среде Windows.
В 2: Возникли ли какие-либо сложности после установки Xcode на переносной компьютер Windows?
Ответ: Если говорить об осложнениях, то их всего одно, что может вас беспокоить или раздражать, — это скорость.
Очевидно, что если вы загружаете и устанавливаете xcode в окнах, которые на самом деле предназначены только для пользователей Mac, он не будет работать так же хорошо, как на Mac.
В 3: Что такое Xcode для Windows?
Ответ: Xcode — это в основном SDK (Software Development Kit) или, другими словами, это полный набор инструментов разработчика, который используется для разработки приложений для Mac, iPhone, iPad, Apple Watch и Apple TV.
В 4: Каковы возможности использования инструментов командной строки для Xcode?
Ответ: Это небольшой автономный пакет, который использует разработку из командной строки в OS X. OS X SDK и инструменты командной строки, такие как Clang, являются двумя его компонентами, которые устанавливаются в / usr / bin.
В 5: Какой язык программирования используется в Xcode для Windows?
Ответ: Xcode использует множество языков программирования, таких как C, C ++, Objective-C, Objective-C ++, Java, AppleScript, Python, Ruby, Rez и Swift. GNU Pascal, Free Pascal, Ada, C #, Perl и D — сторонние системы, добавляющие поддержку языков программирования.
В 6: Можем ли мы использовать Xcode в Linux?
Ответ: Нет, мы не можем использовать Xcode в Linux.
Должен прочитать: Лучший конвертер PDF и редактор PDF для Windows
Подводя итоги: Xcode для Windows 2025
Итак, это была подробная информация о том, как загрузить и установить Xcode в Windows. Мы надеемся, что этой информации было достаточно, чтобы вы поняли, что нужно делать, чтобы Xcode работал на вашем ПК.
Так чего же вы ждете, начните разрабатывать свои приложения для ios уже сегодня!
Are you an aspiring app developer eager to delve into the realm of iOS development but tethered to a Windows environment? The dream of harnessing the power of Xcode on Windows is no longer an unattainable fantasy. In this guide, we embark on a journey to explore the intricacies and possibilities that unfold when Xcode meets the Windows ecosystem. Xcode for Windows is not merely a wishful thought; armed with the right tools and strategies, you can seamlessly integrate Xcode into your Windows development environment.
As we navigate through the challenges and solutions, our goal is to provide insights that empower you to transform your Windows machine into a dynamic hub for iOS development. Whether through virtual machines, Hackintosh setups, or cross-platform development tools, the landscape of Xcode for Windows is ripe with opportunities. Join us as we uncover the nuances and techniques that will set you on a path to realizing your iOS development ambitions on a Windows platform.
Navigating the Challenge
Embarking on iOS application development typically demands the use of the Xcode IDE, an exclusive platform designed for macOS. This poses a significant challenge for Windows users. However, rest assured; we have innovative solutions to overcome this hurdle.
Virtual Machines: A Lifesaver
2.1 Setting Up a Virtual Machine
A potent method to run Xcode on Windows involves leveraging a virtual machine (VM). Installing a macOS VM on your Windows PC establishes a development environment seamlessly supporting Xcode.
2.2 Allocating Resources
For a smooth Xcode experience, it’s crucial to allocate ample resources to your virtual machine. This includes optimizing processor cores, RAM, and storage space for optimal performance.
Exploring Hackintosh: The Adventurous Route
3.1 Creating a Hackintosh Environment
For the adventurous souls, creating a Hackintosh environment on your Windows system is a viable alternative. This involves installing macOS on non-Apple hardware, offering flexibility to run Xcode without the need for a separate Mac machine.
3.2 Navigating Challenges
While Hackintosh provides a feasible solution, it does come with its set of challenges. Compatibility issues and software conflicts may arise, requiring troubleshooting skills to overcome these hurdles.
Cross-Platform Development: A Viable Alternative
If the idea of running Xcode on Windows feels overwhelming, consider exploring cross-platform development tools such as Flutter or Xamarin. These platforms empower you to develop apps for both iOS and Android using a single codebase, streamlining your development process.
Optimizing Your Workflow
Regardless of the chosen method, optimizing your workflow is paramount. Familiarize yourself with Xcode shortcuts, debugging techniques, and project management to enhance your efficiency and productivity.
Staying Updated with Xcode on Windows
In the dynamic terrain of technology’s constant evolution, staying updated with the latest advancements is paramount. Regularly check for updates, patches, and engage with community forums to ensure a seamless Xcode experience on Windows.
FAQs: Addressing Your Concerns
Q1: Can I run Xcode on Windows without a virtual machine?
A1: Yes, alternatives like Hackintosh or cross-platform development tools are available.
Q2: What are the minimum system requirements for running Xcode on Windows?
A2: For a virtual machine, allocate at least 8GB of RAM, a quad-core processor, and sufficient storage. Hackintosh setups may have different requirements.
Q3: Are there legal implications to running macOS on non-Apple hardware?
A3: Establishing a Hackintosh could potentially breach Apple’s terms of service. It’s crucial to be aware of the legal aspects before proceeding.
In conclusion, the prospect of running Xcode on Windows is not just a technological feat but a gateway to unlocking your full potential as an iOS developer. Through the various methods explored – virtual machines, Hackintosh environments, and cross-platform development tools – the landscape of Xcode for Windows is expansive and adaptable. Your Windows machine is no longer a barrier but a canvas waiting to be painted with innovative iOS applications.
Embrace the challenges, navigate through the solutions, and stay abreast of the ever-evolving technology. Xcode for Windows is not just a tool; it’s a catalyst for innovation. As you embark on your journey to integrate Xcode seamlessly into your Windows workflow, remember that the fusion of two seemingly distinct worlds can result in unparalleled creativity and success.
Useful Resources:
- Apple Developer Documentation – Explore comprehensive documentation and resources directly from Apple.
- Stack Overflow – Join the vibrant developer community to seek answers to your Xcode on Windows queries.
Windows 10 is capable of emulation functions, too, such as emulating Raspberry Pi OS. With all of this being said and done, other operating systems are also frequently used and boast their advantages. One of them is macOS which lives in the Apple ecosystem and sports its range of software, programs, and applications.
One of the exclusive applications of macOS is Xcode—a purely development-focused integrated software that helps developers build proprietary apps for iPhones, Macbooks, and iPads. However, if you have been meaning to find out how to install Xcode on Windows 10, we’ve got you covered. The prospect may seem close to impossible at first, but we’ll illustrate how you can get this done with the help of step-by-step instructions. Let’s jump into the article straight away.
- How to effectively use the Window Startup Repair Tool.
What is Xcode?
Similar to how Linux provides its keen users with an Independent Development Environment (IDE), Xcode also does the same, but only for all things Apple. That is to say, people who are well-versed in writing and developing code will appreciate Xcloud providing them with a platform for creating new applications for iPads, iPhones, Macbooks, and macOS. Xcode also encompasses the operating systems employed in Apple Watches and Apple TV.
It has been live since early 2003, not to mention the slew of consistent updates the software has received. Xcode is primarily available to download on the Mac App Store, a full-fledged platform like Microsoft Store for installing macOS applications and software, both paid and free. The application of Xcode itself does not cost anything and can be installed on a device that runs macOS free of charge.
This is all there is to Xcode, to be fair. The program is laden with high-end tools to write and develop code for creating Apple applications. You’ll find an extremely feature-rich text editor within Xcode and a compiler that will help you manage your developments. There’s also a whole build system in Xcode that makes the operative measures of Xcode possible.
Now that you have a clear enough idea of what Xcode is and why it is used, let’s look at its best features. These can serve as an excellent incentive to try and download this software on your Windows 10 PC.
Best features of Xcode
The following is a round-up of Xcode’s most prominent features.
Diverse programming language support
Xcode takes pride in having compatibility with plenty of different programming languages. This software supports standard rules in C++, Java, Python, Ruby, and Swift. In addition, developers get the opportunity to write code in the tech giant’s very own programming language called AppleScript. The Xcode Independent Development Environment (IDE) is also included within the base Xcode application.
Advanced user interface
Xcode comprises a graphical user interface that’s both easy to understand and capable of accommodating power users on the go. It includes a feature called “View Debugging that makes it possible to perceive a 3-dimensional arrangement of your underdevelopment software’s UI. As for the interface of Xcode itself, the program mainly employs the functionality of SwiftUI. This genuinely cutting-edge system makes app development as painless as possible.
SwiftUI is popular for many reasons. One of them is the incorporation of “Fix-its.” These special codes permit effortless resolutions for your errors while writing code. Moreover, the interface makes the operation even more convenient by displaying issues live as soon as you run into them. Furthermore, the SwiftUI code keeps up with the habit of syncing itself with preview changes and canvases.
Professional-grade editor
Xcode displays the highest professionalism rank, and we say that with due consideration. It’s loaded from top to bottom with a broad set of different functionalities that all come together and pave the way to convenient workflow. You can tweak the font and the screen sizes, orient your coded interface in any way you want and employ the use of animations that are nothing short of simple and easy to understand.
What’s more, users can also enjoy performance analytics features with Xcode. You are more than welcome to use the application and observe trends in the overall performance, internal memory (RAM), CPU, GPU, and disk change over time. You will be able to do this with the help of graphical tracks in Xcode. Moreover, there’s no shortage of quality of life touches in the application.
If you want to look up any file in the system but don’t want to spend a lot of time looking for it first, you have the “Open Quickly” feature available in Xcode that pulls all the handiwork for you up the file of your requirement almost instantly. Moreover, accessibility is prevalent in spades too.
All that is required to install and run Xcode is a free Apple ID, and that’s about it. This feature, however, is limited to Apple devices only, and you will need to seek a workaround if you want to get this software on a Windows PC.
Getting Xcode on Windows 10
Now onto the big question. Getting Xcode on Windows 10 can be pretty tricky due to the many processes involved. However, if you don’t want to deal with the technicality of the matter, we recommend running macOS on a virtual machine on your Windows 10 PC and then installing Xcode on it through the Mac Store. Essentially, you’ll still be using the developer software within a Mac environment, but this will be happening through your Windows PC. In essence, you’ll be able to get Xcode on Windows 10.
We recommend Oracle VM VirtualBox to pull off a feat like this. It’s highly advanced software that can handle even the most complex operating systems in a dedicated environment, let alone macOS. If you’d like to know how to install and run VirtualBox on a Windows PC, we recommend checking out this specialized guide.
Getting macOS as a virtual machine in Windows 10
After installing VirtualBox from the tutorial we’ve talked about above, the next step is to get macOS on your PC through the aforementioned software. Now, this can be something challenging to do, but we will do our best to make you understand the exact steps needed to be performed to make it happen.
We have already ticked off the initial requirement to get macOS as a virtual machine in Windows 10 and install and run the VirtualBox software. The next step is to get an actual working macOS ISO, also known as a disc image. This critical system file will help us run macOS in the VirtualBox software on a Windows 10 PC and thereby allow us to install Xcode.
There are multiple ways of downloading a working ISO file for the Macintosh operating system, but not all of them are trustworthy. After extensive research, we’ve managed to spot a working link for the latest version of macOS, Mojave, that you can easily download on your Windows PC. Use this direct link to get the software from the Google Drive repository. The file size is enormous—around 6 GB—so you will need to wait for a little, depending on your internet connection.
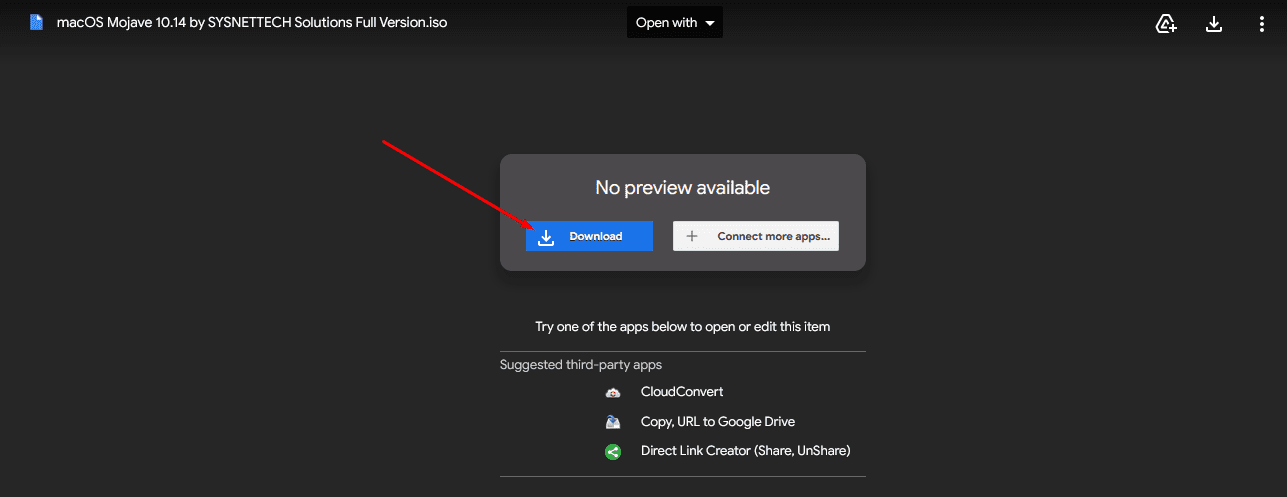
Downloading the macOS ISO
- Note: If you have access to a Mac or can borrow one from a friend momentarily, you can get the macOS ISO that you need to install for VirtualBox with the help of a dedicated macOS installer. You’ll find the latest by the latest version of the operating system in the Mac Store, so this is another possibility.
After downloading the macOS Mojave ISO, the next step is to install it in VirtualBox and configure the software for its proper functioning. Start by launching the VirtualBox app on your PC and clicking on the “New” button to launch your virtual machine.

Clicking on “New”
After that, a window will appear on the screen. It will take you through the initial setup of the virtual machine and help you tick off some vital parameters. The first of the bunch is the name and the operating system. Name your virtual machine whatever you want and select the operating system as “Mac OS X.”
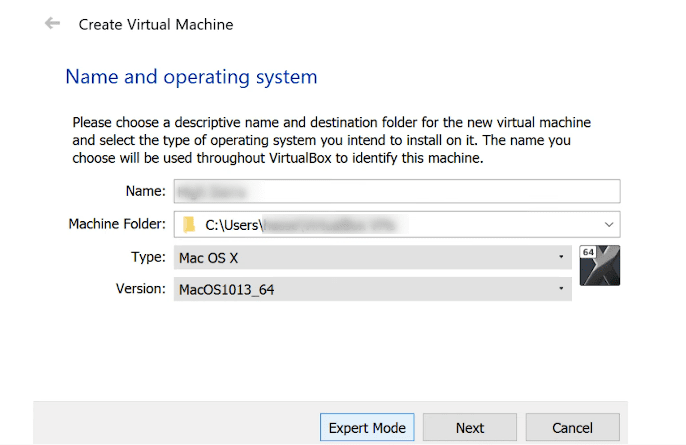
Choosing your name and operating system
The next step is to choose the memory size of your PC that you’d like to dedicate to the virtual machine. Go with whatever the recommended memory size is displayed on the screen for you. In our case, it’s somewhere around 2 GB so we will go with that.
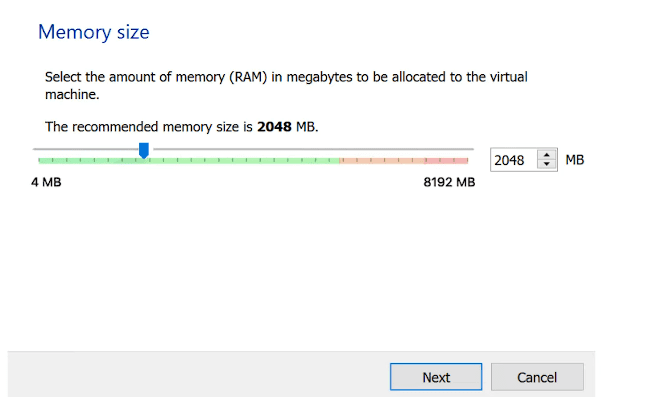
Choosing the memory size
You now have to select the hard disk file type. In the case of macOS and the ISO file we have just downloaded, we will need to choose the “VDI (VirtualBox Disk Image)” option to continue.
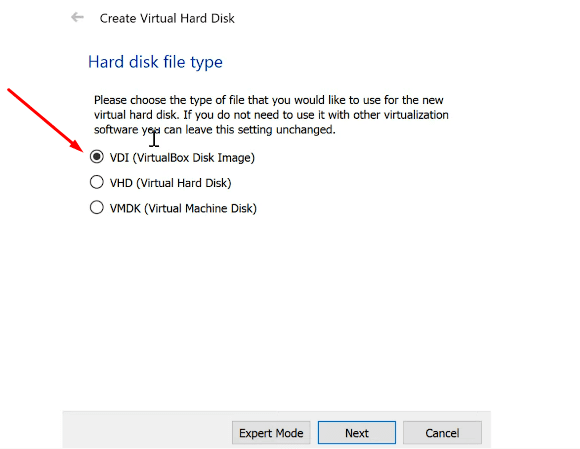
Choosing the VDI file type
Finally, choose the file location and the size you’d like to allocate to the new operating system. 30 GB, for now, seems like a good choice.
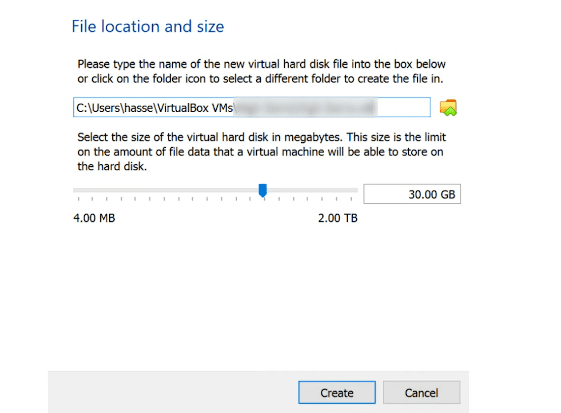
Choosing the size of your virtual hard disk
After clicking on “Create,” you will be taken back to the home page of the VirtualBox software. You will click on the “Settings” icon of the macOS virtual machine to bring up a new window. We have now to get into the final configuration of the program. To begin, click on the “System” panel on the column to the left of the window. You will see multiple options pop up on the screen for you.
One of the first things you’ll have to do here is set the base memory to a suitable level. 2042 MB is the least recommended, but you can always go up. Next, make sure to untick the “Floppy” option in the “Boot Order” area to make macOS launch appropriately on your end with the help of the Mojave disk image. Once you’re done here, click on the “Processor” tab beside “Motherboard” to get to the next step.
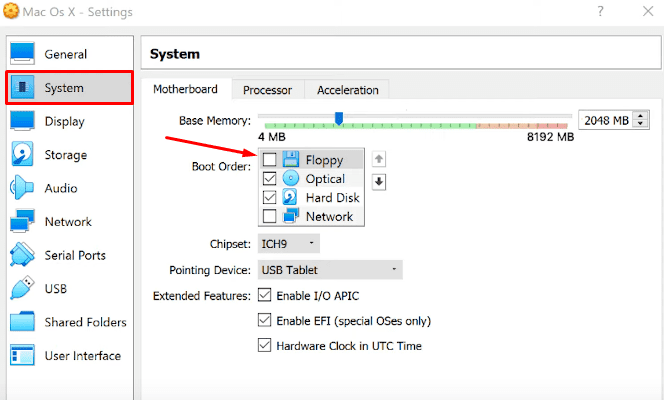
Configuring the virtual machine
In the “Processor” section, make sure you have enabled the “PAE/NX” feature from the list of “Extended Features.” In addition, set the number of processors to 2. That will help you use macOS Mojave comfortably.
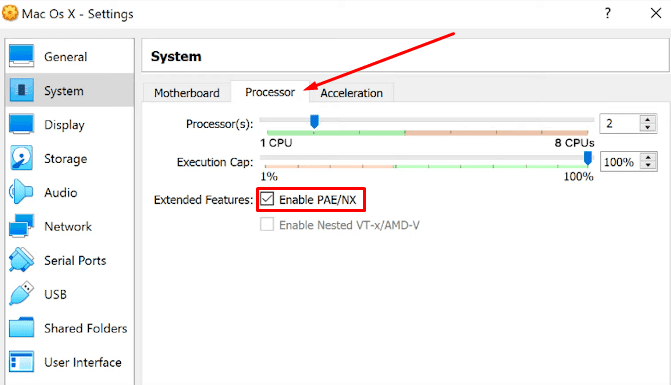
Configuring the processor settings
The next step is to click on the “Storage” panel in the sidebar. That will help you further tweak the VirtualBox software. You now have to insert the optical disk image that we’ve downloaded from the internet with the help of a distinct disk-like icon under the “Attributes” section. Clicking on it will open the “Windows Explorer” app. Select the image you’ve downloaded afterward and click on “OK” to finalize the process.
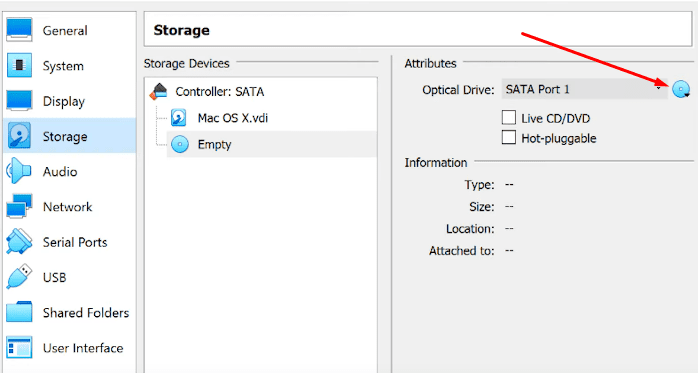
Selecting the macOS Mojave optical disk drive
The final step to configure the VirtualBox software pertains to the display, so click on the “Display” option in the sidebar to get to the relevant section. When you are there, dedicate 128 video memory, and you will be done.
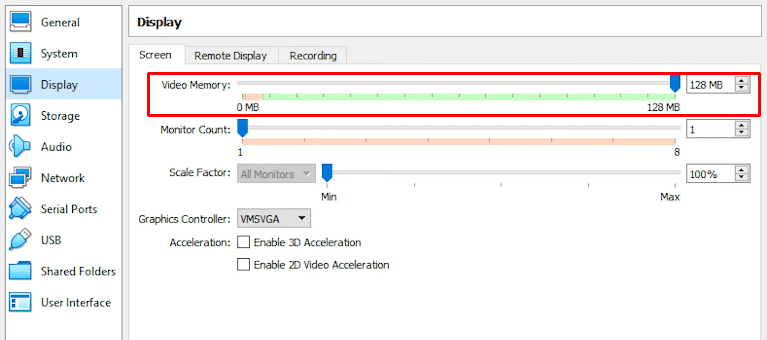
Allotting adequate video memory
We’re still not done yet entirely. You have to run the following commands in the Command Prompt terminal of your Windows PC with the VirtualBox software closed in the background. That should help set things up for you ultimately. The first command in specific relates to changing the working directory of the VirtualBox software.
cd "C:\Program Files\Oracle\VirtualBox\"
VBoxManage modifyvm "macos" --cpuidset 00000001 000106e5 00100800 0098e3fd bfebfbff
VBoxManage setextradata "macos" "VBoxInternal/Devices/efi/0/Config/DmiSystemProduct" "iMac11,3"
VBoxManage setextradata "macos" "VBoxInternal/Devices/efi/0/Config/DmiSystemVersion" "1.0"
That’s all about configuring your macOS virtual machine and getting it to run on your Windows PC. The final step is to click on the green-colored” Start icon in your VirtualBox program and start running macOS. As soon as you do that, you will be greeted by a welcome screen instructing you to follow the on-screen instructions and completely install macOS.
Installing macOS in the VirtualBox virtual machine
Installing Xcode in the macOS virtual machine
As shown in the screenshot below, run it after getting MacOS in your VirtualBox software. That will help you proceed to the next step and get you a step closer to running Xcode on your Windows PC.
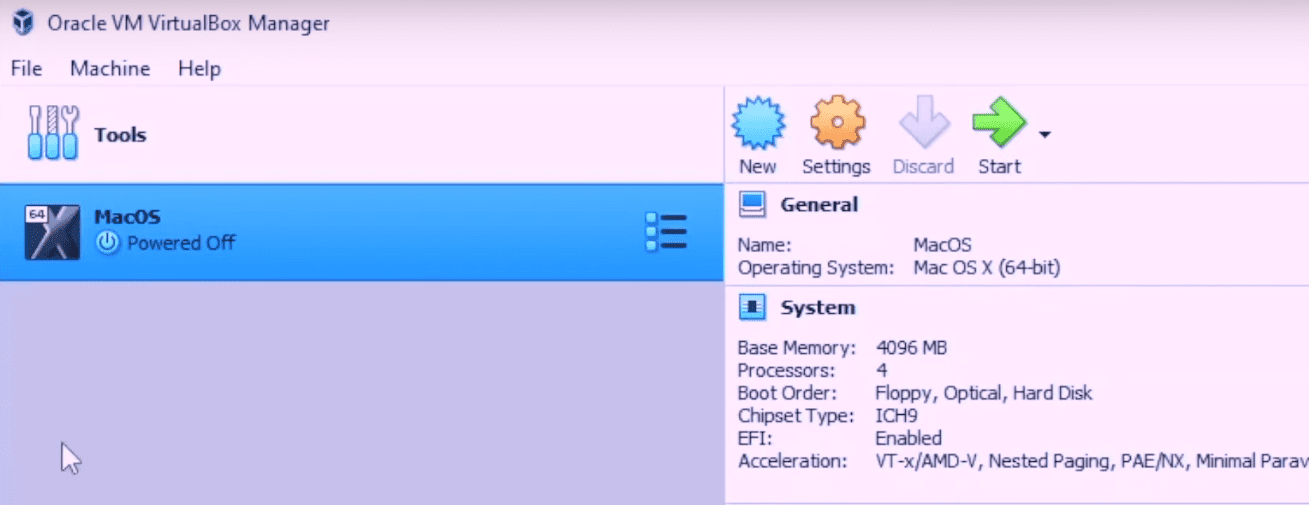
macOS in the Oracle VM VirtualBox Manager
After successfully running a macOS environment, you now have to open the Mac Store within the virtual desktop environment. Once done, search for “Xcode” and find the application on the platform. Click on it to begin the download. The image below shows a visual representation of the Mac Store within Windows 10 and how the Xcode software looks in the marketplace.
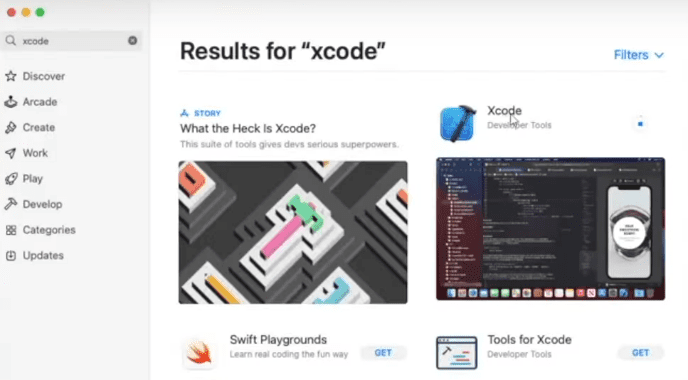
Downloading Xcode from the Mac Store in Windows 10
After installing the application, you can quickly fire it up within the virtual desktop on your Windows 10. As you do that, the initial greeting window of Xcode will appear, prompting you to create a new project or clone an existing one. That’s all there is to this process.
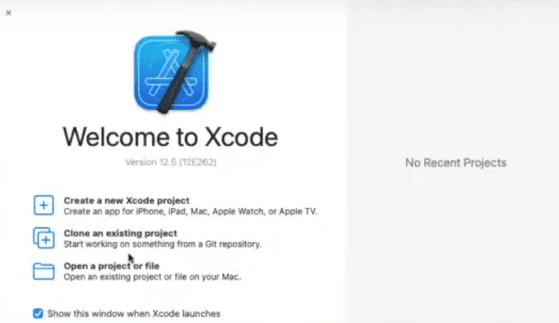
Xcode downloaded
You’ve successfully learned how to install Xcode on your Windows 10 PC with the help of this section. After thorough research, we’ve found out that running this Apple-exclusive development software in a virtual environment is the best method for achieving the task. We’ve tested other ways, but they usually end up with a bugged and laggy experience, defeating the whole purpose of going through the hassle.
We have covered you if you’d like further information and are relatively new to creating virtual machines and environments. Our “How to create and use virtual machines in Windows 10” comprehensively covers this scenario, so please look at it for more information.
Conclusion
In this article, we have talked about running Xcode using the Oracle VM VirtualBox software program. This helpful tool makes it easy to virtualize other operating systems on Windows and get a taste of their functionalities. We’ve practically done the same with macOS in the tutorial above by first getting it on the PC and then installing Xcode within the virtual environment. We hope that you’ve found this guide helpful.
Do let us know down in the comments section about your own experience. We will be delighted to read your feedback!
Apple’s Xcode is a fantastic IDE (Integrated Development Environment) to help you in making entire application development projects –making your app from scratch via coding to other processes like testing and finally publishing it on the App Store.
Xcode is a reliable app development application for Mac OS, which makes a favorable environment for people to develop apps for iOS, Mac OS, Apple TV OS, and Apple Watch OS. Xcode was released in 2003 by Apple as a free, open-source program, and now they are working on a new version with minor improvements. On the Apple official Developer website, you can download the prior versions.

Are you planning to develop iOS apps via Xcode but don’t have a system supporting Mac OS? Unfortunately, Xcode is only available for Mac OS. Apple hasn’t released any versions of Xcode on Windows.
But don’t worry, we’ve got you covered; even though you can’t install Xcode on Windows 11 or Windows 10/8.1/7, we’ll show you some methods that you can use with your Windows PC (or affordable ways) so that you can make apps for Mac OS or iOS.
The steps which we provide is mostly for education and testing purpose. If you want to do hard-core programming without any issues in your app, you need to run Xcode on Apple hardware or an Apple device, which will be the most reliable and will resolve all the errors and problems.
When considering using macOS or their products, such as Xcode, on non-Apple hardware, such as building a Hackintosh, it’s crucial to understand the legal and licensing implications. Apple’s End User License Agreement (EULA) restricts the installation of their operating systems on non-Apple hardware, making such practices potentially in violation of their terms of service.
Below are some solutions to get comfortable with the Mac and iOS environments.
Solutions at a glance to have Xcode on Windows:
- Rent a MacBook or any Apple Hardware
- Build a “Hackintosh”
- Get MacMini
- Use MacOS virtually by using VMware or Virtualbox.
- Buy a used Macbook
- Third-Party Solutions and IDE Alternatives
1) Rent a Mac:
Cloud computing technology has transformed the industry; you can now use supercomputers at only a fraction of their price it. And the best part is you can use them on an hourly basis. The best thing about cloud technology is that you can choose your desired OS platform, and you’ll get the best speed and memory.
People nowadays rent those computers via the cloud to run their favorite games. Those games need much more power than Xcode, but they run seamlessly on the system.
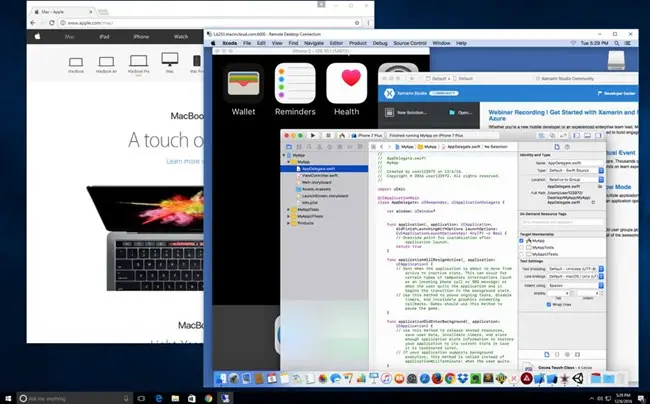
When you rent a Mac virtually, first, you will sign in on your choice of Mac OS system with a remote desktop connection or RDP pre-installed in your Windows PC. It’s just that simple; then, you can access Mac OS from any Windows PC. Some popular services such as Virtualmacosx, Mac-stadium, and Mac-in-Cloud will provide you with access to the desired Mac by paying some fee that can be paid monthly.
There are few major players when it comes to renting Macs online or on the cloud. Check out these websites.
a) MacStadium
b) MacinCloud
2) Build a “Hackintosh”:
One obvious choice is to install macOS itself on your Windows PC. Hackintosh is a Windows PC on which Mac OS is installed. You can make a Hackintosh by two methods:
- Make MacOS the primary OS of your system, switch the PC on, and macOS will load.
- You can also make a dual-boot, a system that contains Windows and macOS, so when you turn your PC on, it will prompt you to select the operating system you want to use.
Setting up a Hackintosh is a technical task, but as many people use it, you can find many websites and online forums that will assist you in building a Windows PC with macOS. The online community of Hackintosh is technical, so you’ll have to look carefully before making any changes to your system.
3) Get Mac Mini:
A cheap alternative to buying a MacBook for using MacOS is purchasing a Mac mini. Mac mini is a small portable CPU that contains numerous USB and HDMI ports; some versions of the Mac mini are more powerful than a Macbook. It can be beneficial when you want to install Xcode on your system.
You can set up a Mac mini directly to a screen via HDMI or use the remote connection to connect it to your Windows PC via a remote desktop client and use Xcode from your PC. If you set it up via remote desktop client, you can use the Mac mini wherever you want to run Xcode, whether in your office or home.
4) MacOS on VMware or Virtualbox: Virtualization for Xcode
We mentioned several guides to install macOS on a Windows computer by using VMware or VirtualBox. We can use one of these virtual machines to use Xcode on Windows.
As these VMs do not perform like those used on Apple hardware, we can’t use this setup for real game/app development using Xcode. It is always better to get Apple hardware if you are a serious and professional app developer.
Follow the steps to have Xcode for iOS SDK development from a Windows computer for testing and learning purposes.
Step 1: Install the latest macOS on a virtual machine. Read more about our guide to Big Sur on VMware.
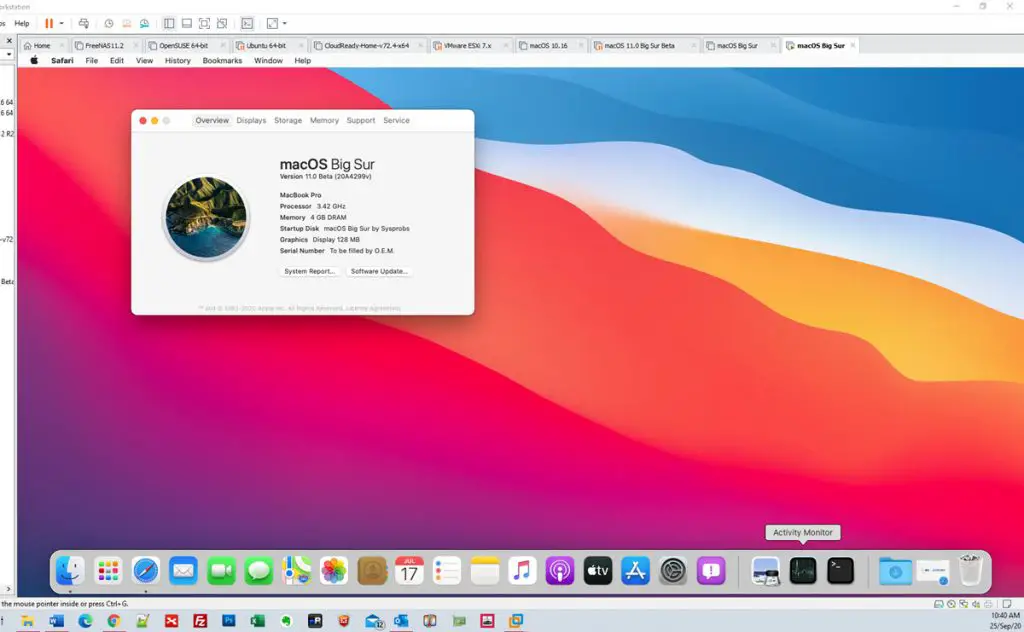
Step 2: Sign in to the app store with your Apple ID. You must have it or create a new account for this purpose.
Step 3: Search for Xcode in the App Store and install it.
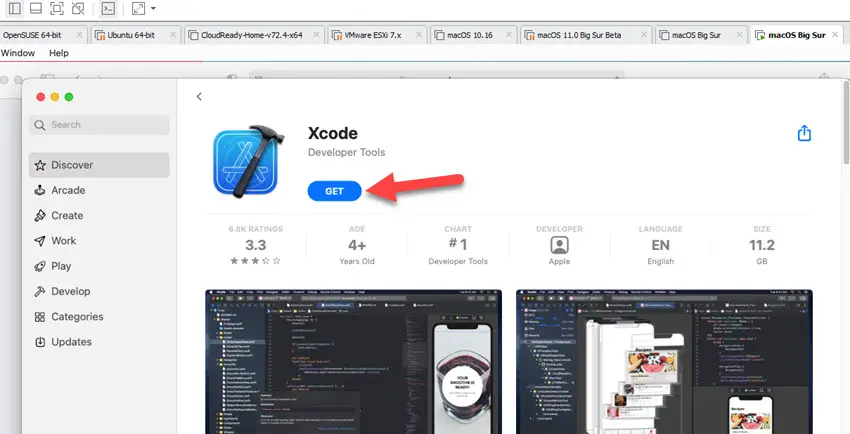
Step 4: Installation is straightforward. You may need to provide root access if required. Once it is installed successfully, open the app and create your first project in Xcode, which is actually working on your Windows computer.
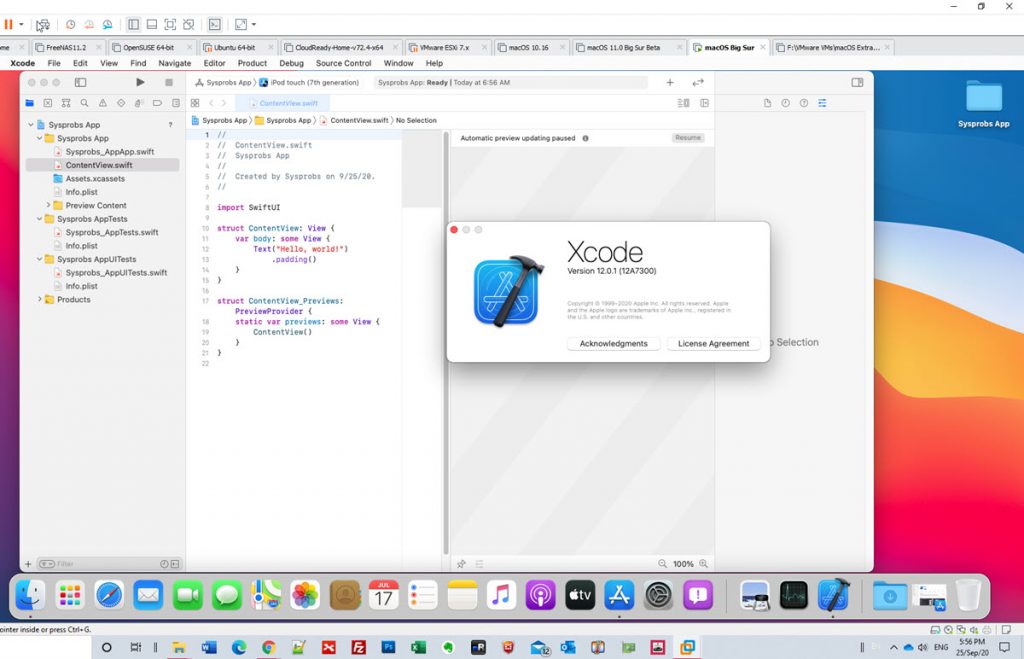
That was the Xcode 12.x version with Big Sur macOS on my Windows 10 desktop computer using a VMware workstation.
NOTE: You can follow the same steps to use the latest Xcode 15 on your Windows 11 laptop or desktop by using the virtualization technology.
5) Buy a used MacBook:
If you want to develop iOS apps without any issue via Xcode, I suggest you buy a used MacBook; sometimes, you can find great deals on a used MacBook on websites like eBay.
You should consider buying a used MacBook when a new generation gets released because, at that time, people sell off their old MacBook at very low prices, and the price of the previous generation goes down; moreover, you can get almost the latest Hardware because no significant changes happen in just one year or two.
Also, consider buying at least a 2-Year old MacBook because then you’ll have one year of Apple care left in an ideal situation to have hassle-free and cheap part replacements if you come up with any hardware issues. You can also check for physical damage and negotiate the price with the owner for a good deal.
6) Third-Party Solutions – iOS development on Windows
You can use various tools to develop cross-platform apps instead of Xcode. Those development tools help you write a single code that can be used and tested on all devices, fulfilling your primary purpose of developing iOS apps.
You must think this is the best solution, but remember that iOS only allows apps made on Xcode. Hence, what this kind of tool will do is take your app and translate your code in such a manner that it can be used on all devices. With this approach, there can be minor errors while publishing or developing it.
Since Apple releases new features frequently, these third-party tools don’t need to always keep up to date to fulfil your requirements; in that case, many issues can arise, so you’ll have to wait until the third-party app catches up with the new update.
Xcode Alternatives (Best IDE Solutions) in Windows OS
Xamarin
Xamarin is a highly popular cross-platform mobile development framework known for its flexibility and compatibility with the .NET language. The framework has been around for some time now and continues to allow Windows developers to make apps for both Android and iOS. This makes it an excellent choice for those who want to target multiple platforms simultaneously but don’t have the prerequisite skills to learn Xcode.
Using Xamarin, developers are able to swap between platforms without having to rewrite or recompile code. While compared to native app development frameworks like Objective-C and Swift/ iOS, Xamarin produces a somewhat slower end product due to running on top of Mono, a minimalist cross-platform .NET runtime, it is still considered much faster than web hybrid technologies like Cordova or PhoneGap as these still require significant overhead in terms of browser threading. These benefits and a large library of prebuilt components that can be easily accessed directly through Visual Studio make this a desirable alternative for those who may not have enough experience in the designated app platform yet need apps quickly created across different platforms.
Flutter
Flutter is the perfect solution in Windows OS for cross-platform app development across multiple platforms and screen sizes. Developed by Google, Flutter is focused on creating responsive user interfaces with natively compiled code that runs as fast as an Xcode app, if not faster. With Flutter, all types of apps can be created from existing materials, such as coded logic and UIs — you’d be able to create iOS and Android apps, desktop apps for Windows and MacOS, websites that integrate with Flutter Web, Progressed Web Apps (PWAs), etc., using one framework.
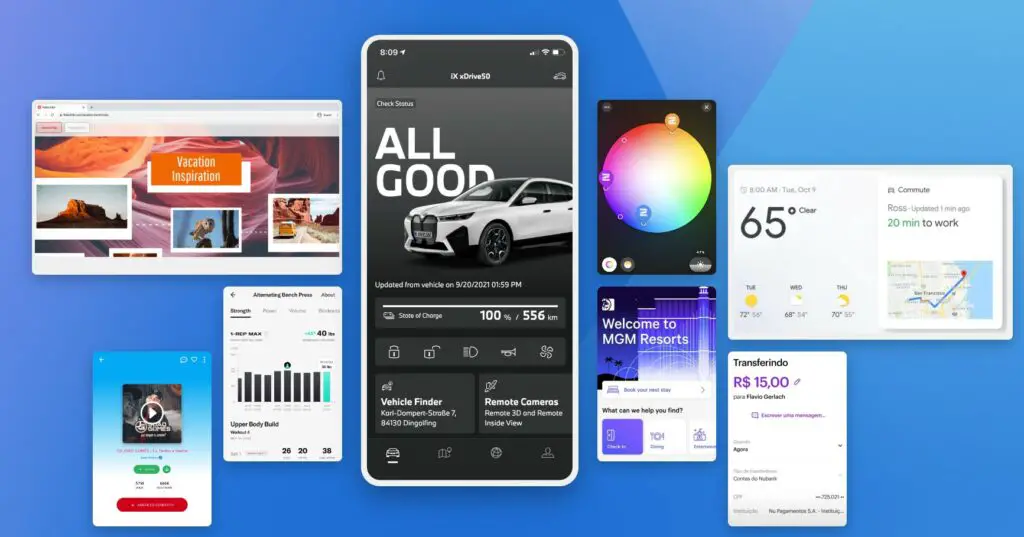
Since it uses a single codebase, rather than different codes for different platforms like most app development tools require, you can mostly save time by making fewer changes per update — meaning quicker turnarounds in terms of feature updates/bug fixes. In addition to its wonderful performance qualities and ease of use along with broadness in scope, users also have access to a ready-made material design components library which makes the process even smoother.
Overall, Flutter is a great solution to ensure your app works great on all platforms and screen sizes quickly and seamlessly.
ReactNative
ReactNative is a powerful and versatile framework that brings native mobile applications to life. Built on the React platform, it uses JavaScript to render the UI elements of an iOS or Android app, eliminating the need to learn separate languages like Java or Swift for each platform. ReactNative allows developers to create hybrid apps that can be distributed across multiple stores with no code modifications necessary.
In addition to this flexibility, ReactNative allows for faster application development with plenty of documentation for learning best practices. With support from major tech companies such as Facebook, Google, and Intel, developers can rest assured that the updates and bugs of their potential products will be addressed promptly. Development teams can easily create prototype applications without needing to write extra code for back-end development or relying on third-party libraries. This ensures more efficient timelines and more productive code management.
Visual Studio
If you are a Microsoft fan and programmer, don’t forget the Visual Studio. Visual Studio, a comprehensive IDE from Microsoft, stands out as a versatile alternative to Xcode. It features an advanced code editor equipped with IntelliSense for streamlined code completion and efficient refactoring.
This platform excels in cross-language compatibility, particularly within its debugger, and boasts robust support for syntax highlighting. Moreover, Visual Studio’s integrated website designer, which utilizes intuitive drag-and-drop widgets, simplifies the process of web page creation, making it a well-rounded tool for diverse development needs.
AppCode
AppCode, crafted by JetBrains, is a premium IDE designed specifically for macOS and iOS development. It stands out for its rapid code execution and intelligent development environment, adeptly managing repetitive tasks while minimizing the need for additional coding. You can check this paid version if you are serious about iOS development on a Windows PC.
AppCode shines in its ability to refine and improve code with its accurate and secure refactoring capabilities. The IDE also excels in project navigation, allowing effortless access and exploration of files, classes, or images within a project through its structured hierarchical views. Additionally, AppCode’s comprehensive support for languages including Objective-C, C, Swift, and C++, along with its advanced SmartType completion, makes it a powerful tool for a wide range of programming tasks.
Android Studio
Android Studio, developed by Google, emerges as a stellar, free cross-platform IDE and a viable Xcode alternative. Compatible across Windows, Linux, and macOS, it’s engineered to support a diverse array of programming languages like Java, C++, and Go. The primary aim of Android Studio is to facilitate the creation of exceptional applications for Android devices.
It boasts a robust framework that includes static analysis, efficient dependency management, and automated build processes, along with customizable build configurations. As an IDE tailored for Android development, Android Studio harnesses the versatility of IntelliJ’s programming capabilities, making it an indispensable tool for developers targeting Android platforms, available for download on multiple operating systems.
IntelliJ IDEA
Here is another paid product on our list. IntelliJ IDEA stands as a formidable paid alternative to Apple’s Xcode, boasting a suite of exceptional features. Renowned primarily as a Java Virtual Machine (JVM)-oriented platform, this versatile IDE also extends its support to a variety of other programming languages including Ruby, Python, Markdown, HTML, Dart, and XML.
Its advanced predictive capabilities are designed to intuitively understand the programming needs of users, automating mundane and repetitive tasks. This functionality allows developers to channel their focus on more complex and significant development challenges. Additionally, IntelliJ IDEA enhances the development experience with crucial features like comprehensive version control system support and context-aware code completion, along with tailored assistance for specific frameworks.
Frequently Asked Questions (FAQs):
Is it possible to run Xcode on Windows?
Apple hasn’t officially released Xcode for Windows, so you cannot install Xcode on your Windows PC, but you certainly can run Xcode via VirtualBox or VMware. Another method you can use is to rent a Mac on cloud storage. We have given some more solutions; you can consider the above options to start developing iOS applications.
Can I build iOS applications on Windows?
You can use cross-app developing platforms that can help you develop an application for both iOS and Android. But you can’t use Apple’s Xcode IDE to develop iOS apps on the Windows system as Apple doesn’t allow compilation on other platforms like Linux or Windows.
How to install Xcode in Windows 11?
Unfortunately, Xcode is only available for MacOS and cannot be installed on Windows 11. If you need to develop iOS apps on Windows, you may want to consider using third-party tools such as Xamarin or React Native.
How do I download Xcode on my computer?
You cannot download Xcode directly on your Windows computer because it isn’t compatible with Windows; you’ll have to use a virtual Mac machine via a remote desktop client and run Xcode on that, or you can even rent a Mac on the cloud, and start developing iOS apps via Xcode.
Can I run Swift on Windows?
Unlike Xcode, Swift is available for Windows. Apple has released Swift; it is a general-purpose, compiled programming language that is used for developing apps for iOS, OS X, watchOS, and tvOS. “Swift for Windows” is a free, open-source GUI IDE that provides an environment to develop apps in the Swift programming language to compile and run on a Windows PC.
What is the Xcode alternative for Windows?
One popular alternative to Xcode for Windows is Visual Studio, which is a comprehensive integrated development environment (IDE) that supports multiple programming languages, including C++, C#, Python, and more. Another option is Code::Blocks, which is an open-source IDE that is lightweight and easy to use. Other alternatives include Eclipse, NetBeans, and IntelliJ IDEA. However, it’s important to note that none of these alternatives offer the same level of integration and support for iOS and macOS development as Xcode does.
Is Xcode free to download?
Xcode is an IDE that is released by Apple to develop apps for iOS, OS X, watchOS, and tvOS. It can be downloaded with the help of the Mac app store as a free app. You will have to log in with your Apple ID and password in the Mac app store, then you need to search for the Xcode, click on download, and it’ll download and install on your Mac. You don’t have to be a member of the Apple developer program to download this application.
Can I build iOS app on Windows?
No, it is not possible to build an iOS app on Windows directly. Apple’s iOS development tools and software are designed specifically for the macOS operating system. However, there are some workarounds that allow developers to create iOS apps on Windows, such as using virtual machines, remote desktop connections, or cross-platform development tools.
Do I need a Mac to run Xcode?
Yes, you need a Mac to run Xcode, as Xcode is only available on the macOS operating system.
Final Verdict:
There is no official way to use Xcode on Windows PCs because Apple hasn’t released a version compatible with Windows. So, according to your requirements and feasibility, you can choose any of the above solutions and start developing apps for iOS.
The best option in this scenario, according to my experience, is to go with a Mac mini or a used Mac because then you don’t have to worry about minor bugs, and the investment won’t be that much.
Nowadays, every operating system got their own app development programs. Like we have used Windows apps on Linux and vice versa. But when we talk about Mac OS, it’s not easy to use Mac apps on Windows or Linux like the rest. Mac uses an SDK called Xcode to develop apps in itself. Seeing it, a few Windows users started craving for it, ignorant of the fact that Xcode cannot be used on Windows.
But is it really so?
Xcode is available only for Mac and iOS platforms and not for any other OS. The reason for this unavailability is a number of compatibility issues.
So is there any fix for this?
Yes!
We firmly believe that everything is possible when it comes to technology. So we’ve brought you a detailed method to install Xcode on Windows. But before that, you need to learn what actually Xcode is and what it includes.
What is Xcode?
Xcode is an IDE (Integrated Development Environment) that contains a set of software development tools, designed by Apple. These tools are available specifically for developing software on Mac OS X, iOS, and Apple TV. And this IDE is programmed in such a way that you cannot install it on any other OSs.
As a developer, I had always felt easy to develop apps for Linux and Windows OS as compared to Mac OS. The reason being is you can develop Linux and Windows apps on any platform while developing apps on Mac requires a toolset called XCode. If you are interested to install Xcode for Windows PC (7, 8.1 and 10), then here is a detailed way on how to install Xcode on Windows 7 and 8/8.1 and Windows 10 PC.
So we’ll be giving you a detailed guide to install Xcode on your Windows 7, Windows 8 and Windows 10 systems.
The procedure to run Xcode on other systems and developing apps for Apple is separated into two parts. First is installing Mac OS on a virtual workstation on Windows or Linux. And the second is, installing Xcode on a virtual Mac OS.
- A working Mac OS X virtual machine on VMware or VirtualBox
- Downloaded Xcode package from Apple site. You need to have an Apple ID in order to download Xcode from Apple store.
- Dual-Core Intel processor in the computer
- Minimum 2GB of RAM (Recommended: 4 GB+)
- Availability of the hardware virtualization on the computer
10 Most Popular Free File Sharing Sites (Secure Upload Websites)
Steps to install Xcode on Windows 10, 8/8.1 and 7 PC or Laptop
Here, we will use Virtual Box to install Xcode on Windows. So if you don’t have a copy of an installed Virtual Box, then you can download it as it is the free and open source.
Follow the below steps so as to install Xcode on Windows 10, 8 or 8.1 and Windows 7 desktop or Laptop for iOS SDK.
Step 1: Download and install VMware or VirtualBox on your Windows computer from the here. Search for “VirtualBox 5.2.4 platform packages” and click on “Windows Hosts”.
Step 2: Now, download and install OSX Mavericks ISO as a virtual machine from here.
Step 3: Create the virtual machine on your Oracle virtual box. For that, you need to open Virtual Box and click New.
Step 4: Now, you will get a new window asking for the name of the new operating system. Enter Name as OSX, Type of the OS as Mac OS X and also enter the Version as Mac OS X (32 bit). Click Next.
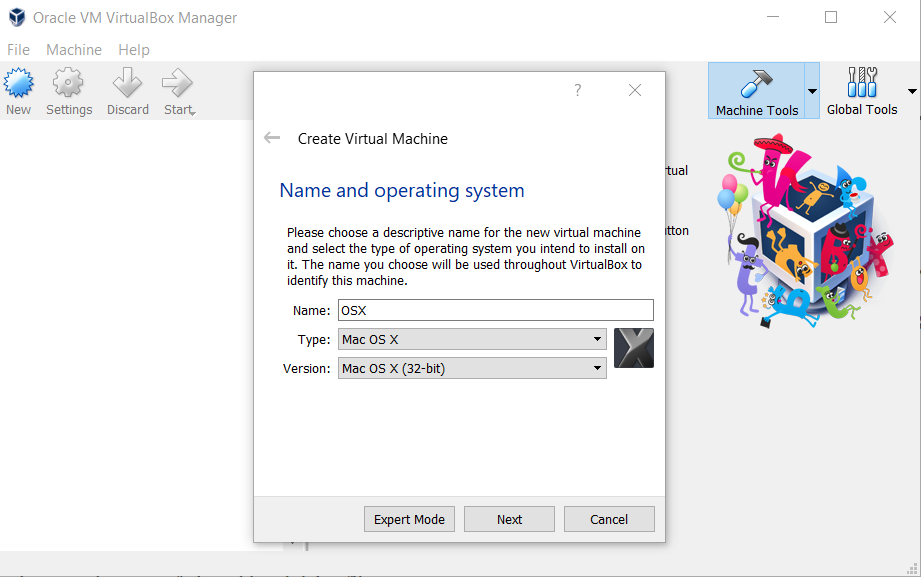
Create New Virtual Machine
Step 5: Select the memory size for the virtual machine as 1024 MB (1 GB) and then click Next.
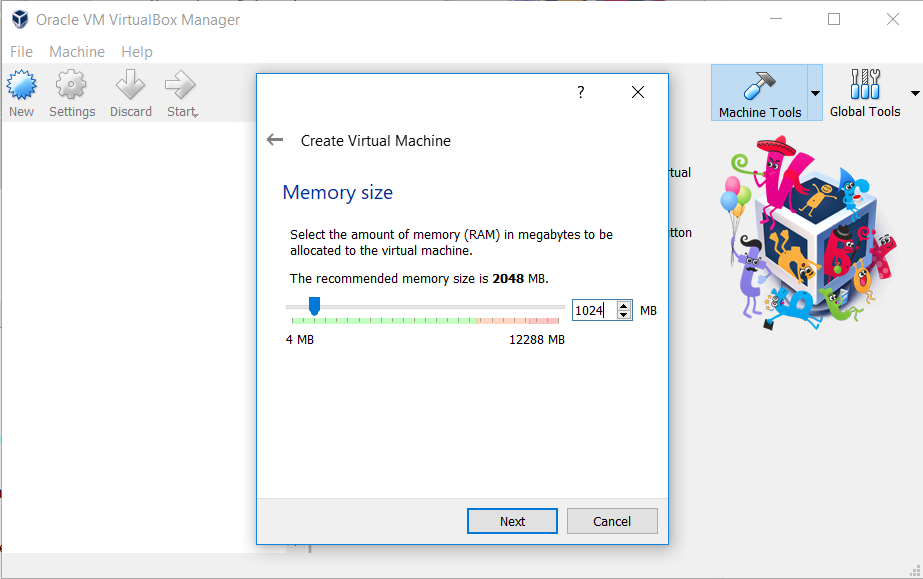
Select memory size for virtual machine
Step 6: Now, Select and create the type of virtual hard drive file.
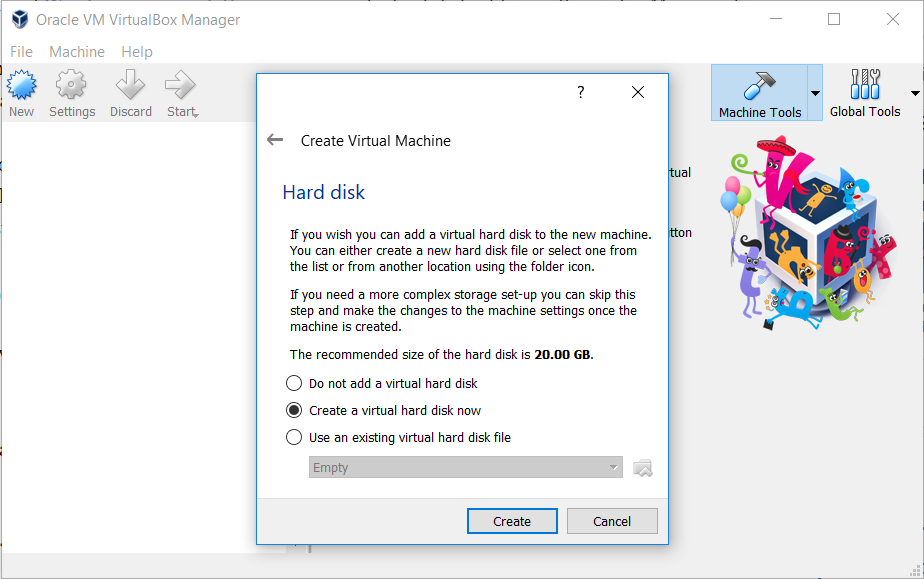
Create Virtual machine – Hard Disk
Step 7: Select the type of Hardware file as VDI (VirtualBox Disk Image). It is always recommended to go for VDI in terms of ISO image. Click Next.
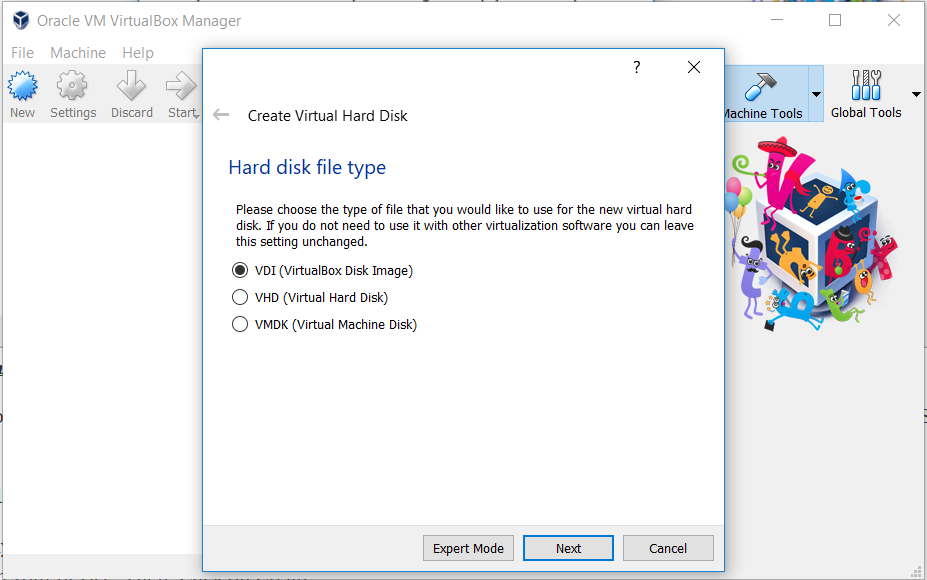
Create Virtual Machine-Hard Disk File Type
Step 8: Select the physical hard drive as Dynamically allocated. Now, you need to allocate the file location and size from the physical hard drive on your device. Then, Click on Create.
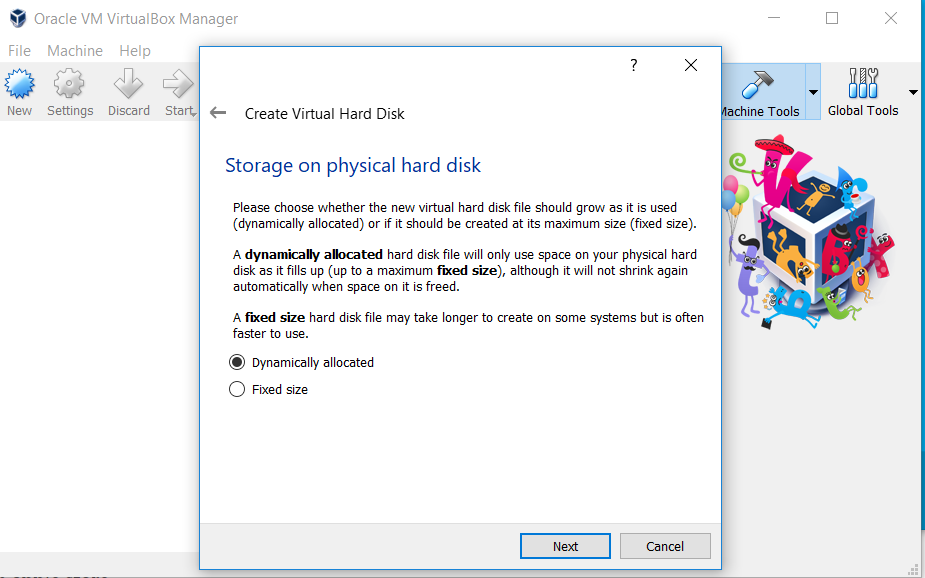
Create Virtual Machine- Storage
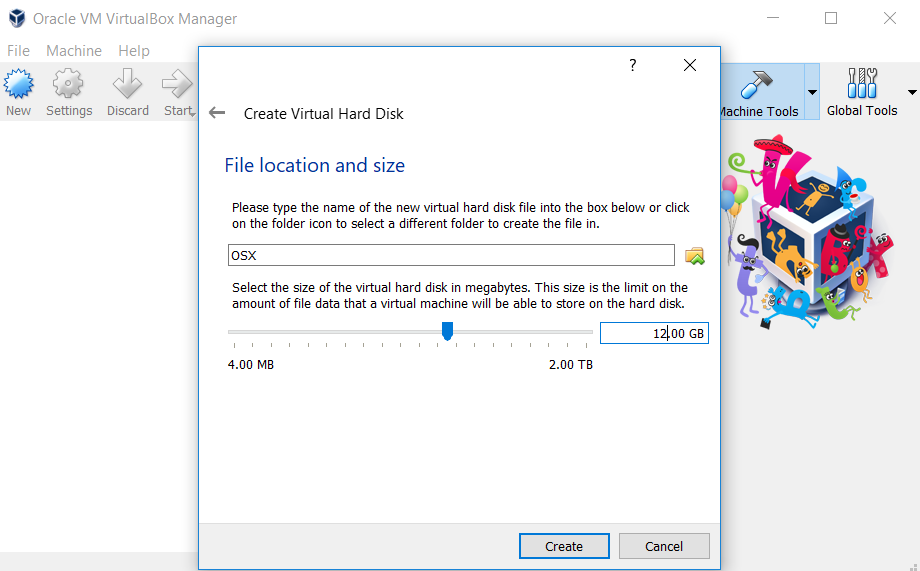
Create Virtual Machine – File Size & Location
Step 9: Now, you have successfully created a virtual machine on your virtual box. Currently, it will be in “Powered Off” state.
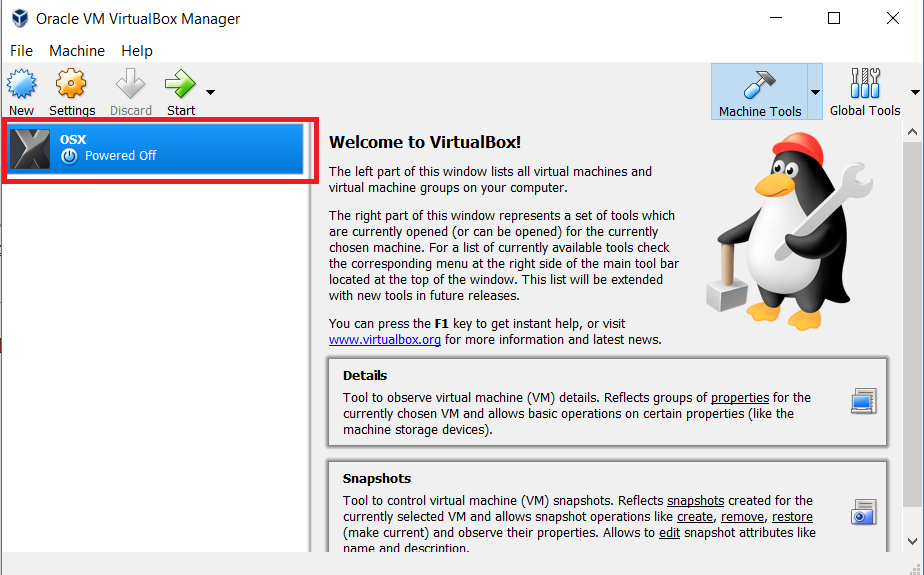
Virtual Machine – OSX
Step 10: Now you need to mount the OSX Mavericks ISO that we have downloaded before. For that, Go to Settings -> Storage -> Load iso File -> Click Ok -> Start.
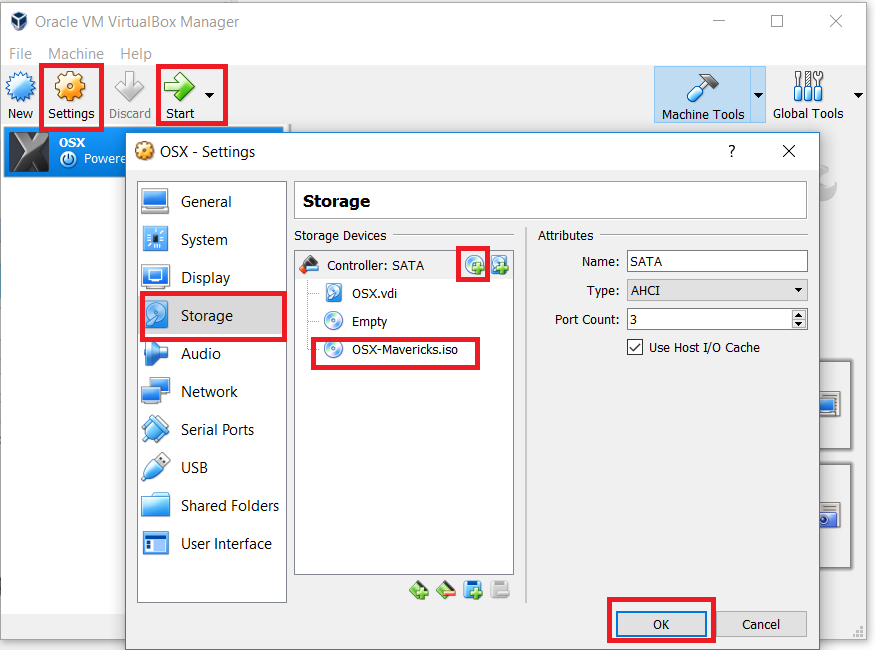
Create VM on Oracle
Step 11: Next, follow the on-screen steps of OSX boot and then OSX will be installed in Oracle Virtual.
Step 12: Go to safari browser in your Virtualbox.
Step 13: Open official Apple App store and sign in using your Apple ID in the App store. You need to enter the Apple ID and password as shown in the image below:
Step 14: After signing, type Xcode in the search box. You can select any of the apps. Click on Free and Download. Then, click OK to download the kit. After completing the installation process, open it from the applications.
Step 15: In order to install Xcode components, you need to be the root user. So now, you need to provide your root credential. Enter your name and password and press OK.
7 Best Antivirus Apps – An iPad User Must Have
That’s it, we have now successfully installed the latest Xcode version on your Windows 10, 8/8.1 and 7 PC using desktop virtualization software VMware workstation. Start creating new projects and better apps using this interface.
So in this way, you can easily download and install Xcode for windows Personal computer or laptop. The performance and speed of Xcode won’t be extremely high.
Hope this tutorial helps you in the best way to install Xcode on Windows 10, 8/8.1 and 7 OS running PC or Laptop.
