
Все способы:
- Способ 1: Меню «Пуск»
- Способ 2: Окно «Выполнить»
- Способ 3: Консоль
- Способ 4: «Параметры»
- Способ 5: Контекстное меню кнопки «Пуск»
- Способ 6: Создание ярлыка
- Вопросы и ответы: 0
Способ 1: Меню «Пуск»
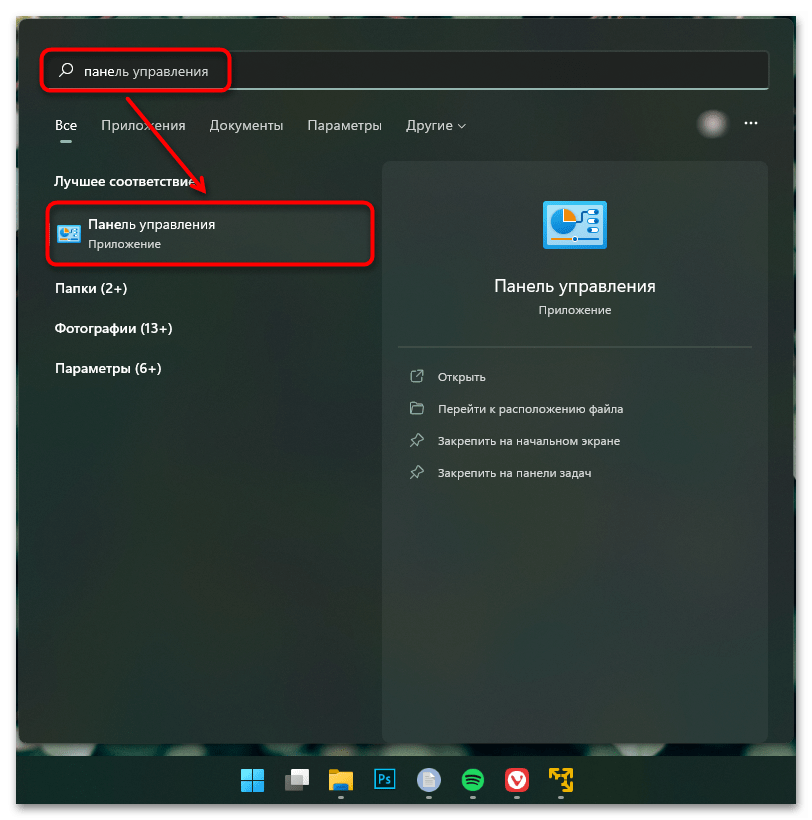
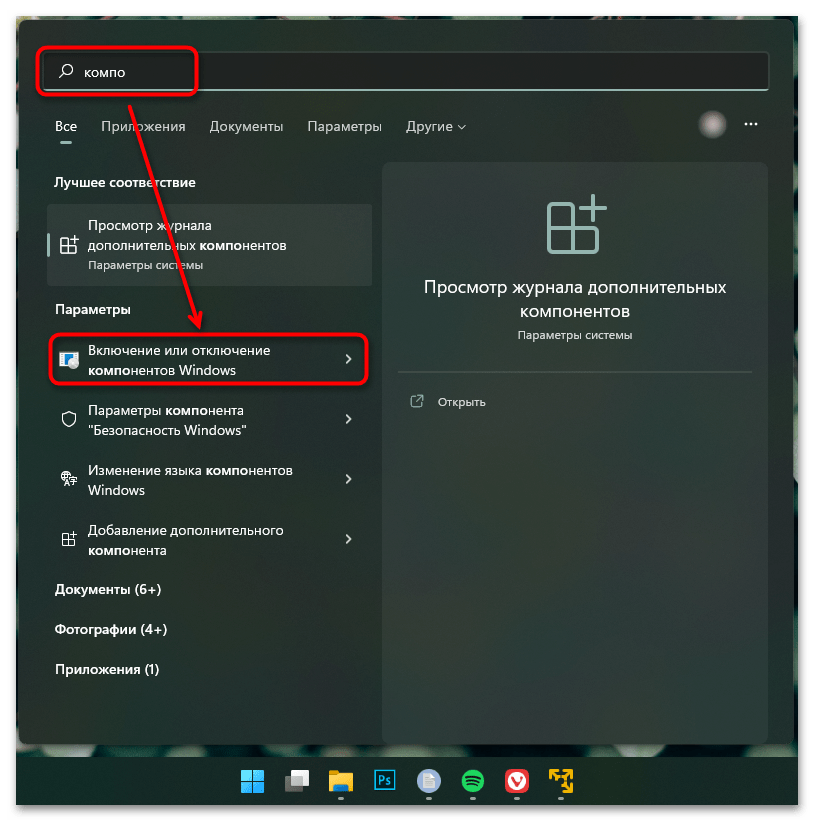
Первый, и самый логичный метод открыть всем известное приложение, заключается в использовании встроенного в меню «Пуск» поиска. Через него вы можете открыть как «Программы и компоненты», так и его отдельное окно — «Компоненты».
- Итак, для открытия основного окна «Программы и компоненты» вызовите меню «Пуск» и напишите «Панель управления».
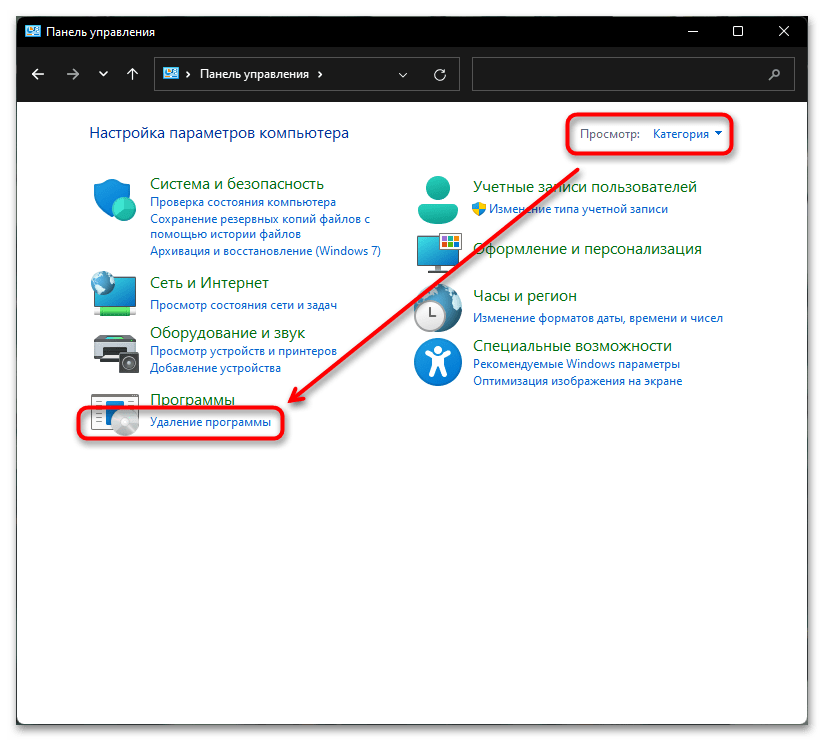
- Откройте приложение, где в зависимости от типа просмотра рассматриваемый элемент называется по-разному. Если это «Категория», то нажимайте на «Удаление программы».
- А если «Значки» — то на «Программы и компоненты».
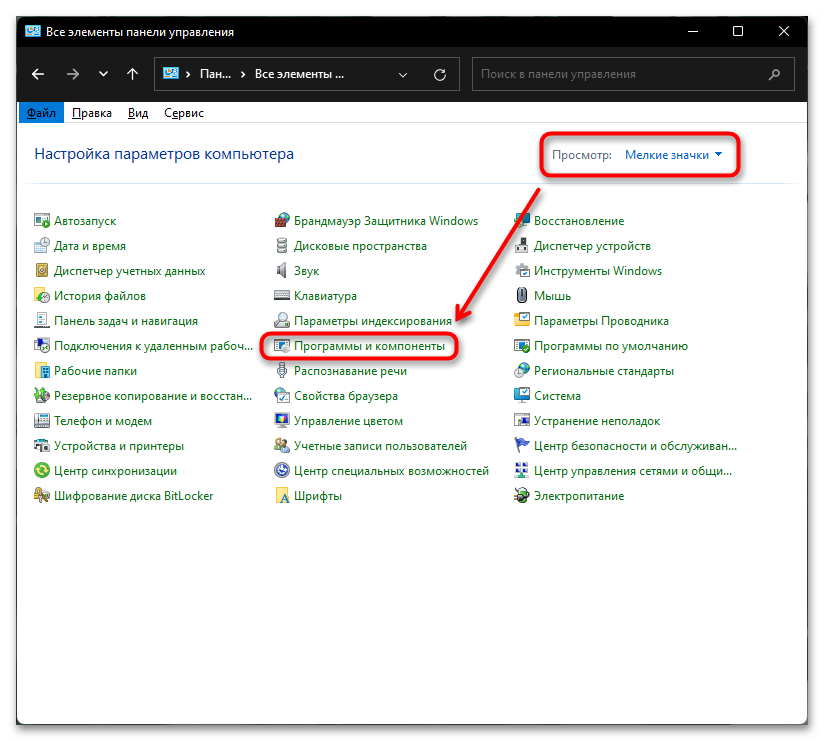
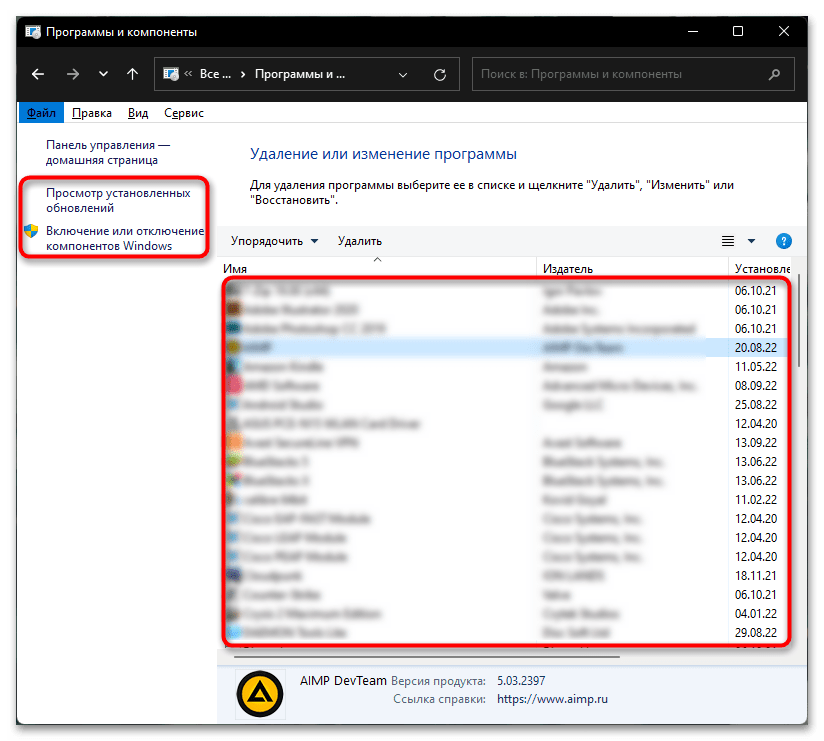
- Внутри нового окна в основной части вы увидите список установленных приложений, а на панели слева — дополнительные элементы, среди которых будут и «Компоненты Windows».
- «Компоненты Windows» можно открыть и отдельно, начав набирать название этого окна в «Пуске». Нужный вариант называется «Включение или отключение компонентов Windows».
Способ 2: Окно «Выполнить»
Запустить приложения можно и через ввод команд. Метод подойдет не всем, но актуален, если вы привыкли взаимодействовать с системой именно командами.
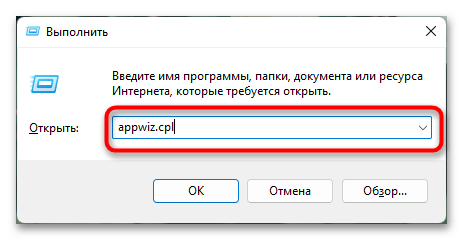
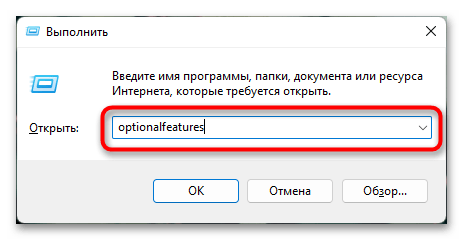
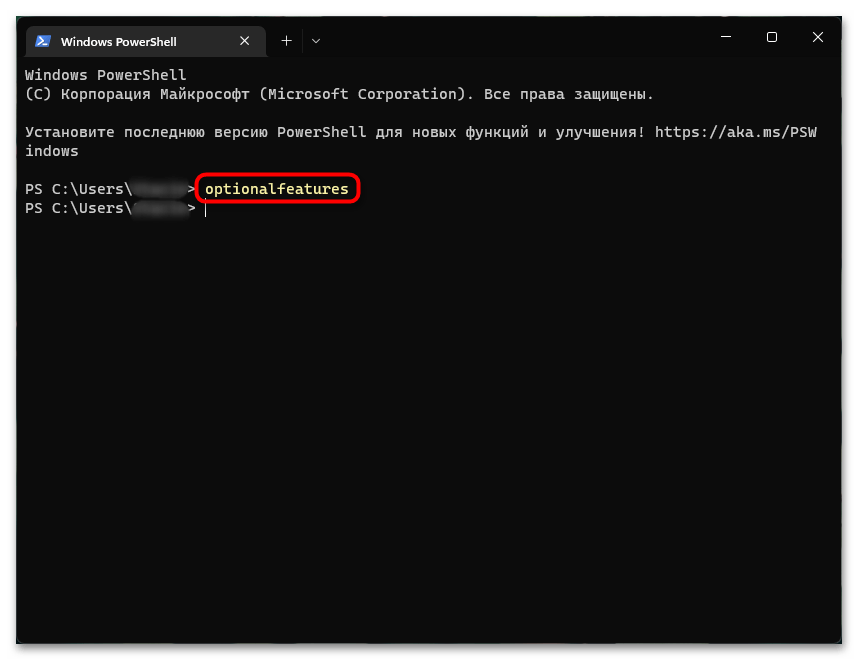
- Нажмите клавиши Win + R для вызова окна «Выполнить». Сюда в нашем случае можно ввести одну из двух команд. Чтобы открыть само окно «Программы и компоненты», напишите
appwiz.cplи нажмите Enter. - Для открытия лишь только окна «Компоненты Windows» используйте команду
optionalfeatures.
Способ 3: Консоль
Тем, кто чаще работает с консолью, можно вызывать нужные приложения прямо отсюда.
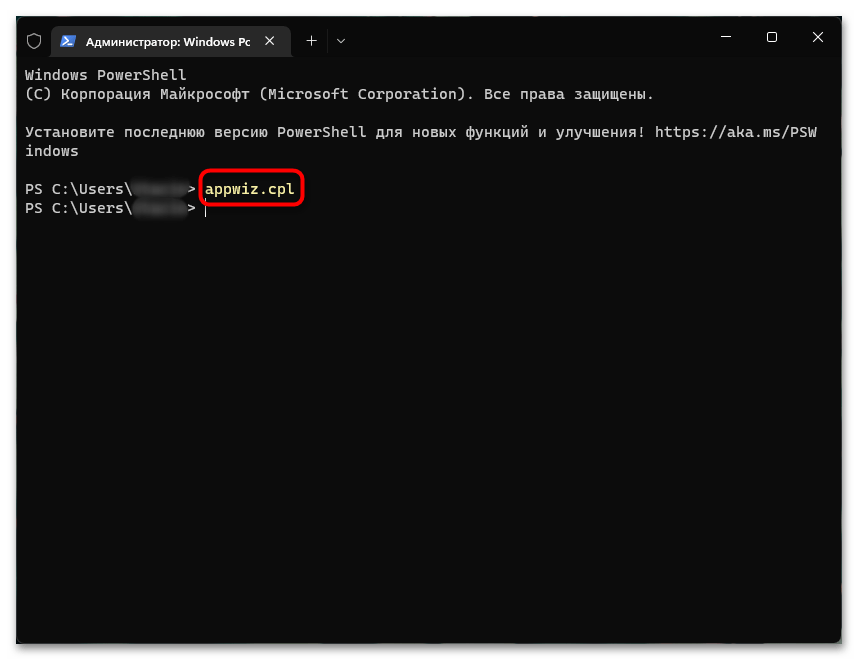
- Запустите «Командную строку», найдя ее по названию в «Пуске», или кликните ПКМ по кнопке «Пуск» и выберите вариант «Терминал Windows».
- Команды будут такими же, как в предыдущем способе:
appwiz.cpl— для запуска «Программы и компоненты». - И
optionalfeatures— для запуска «Компоненты Windows».
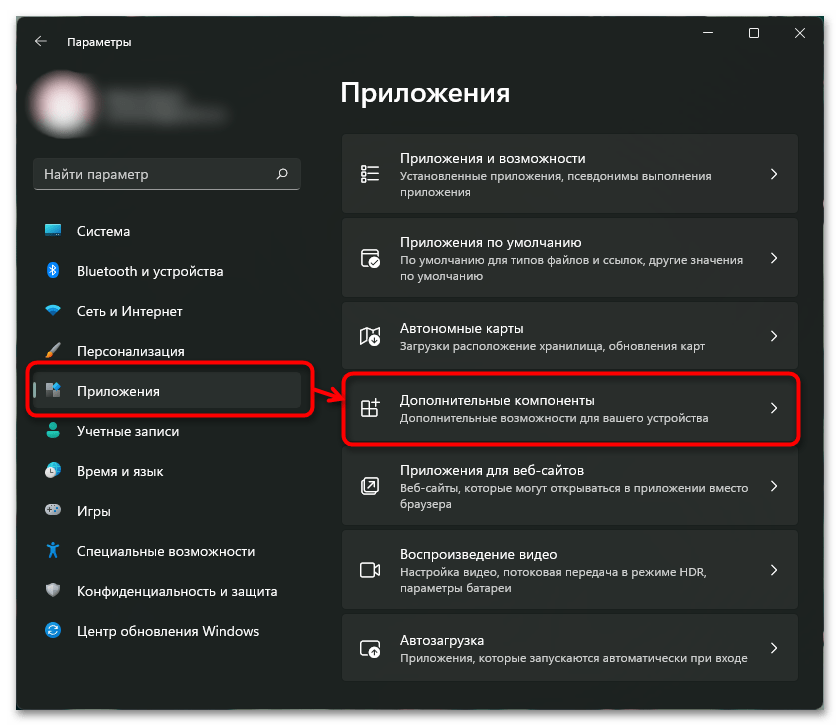
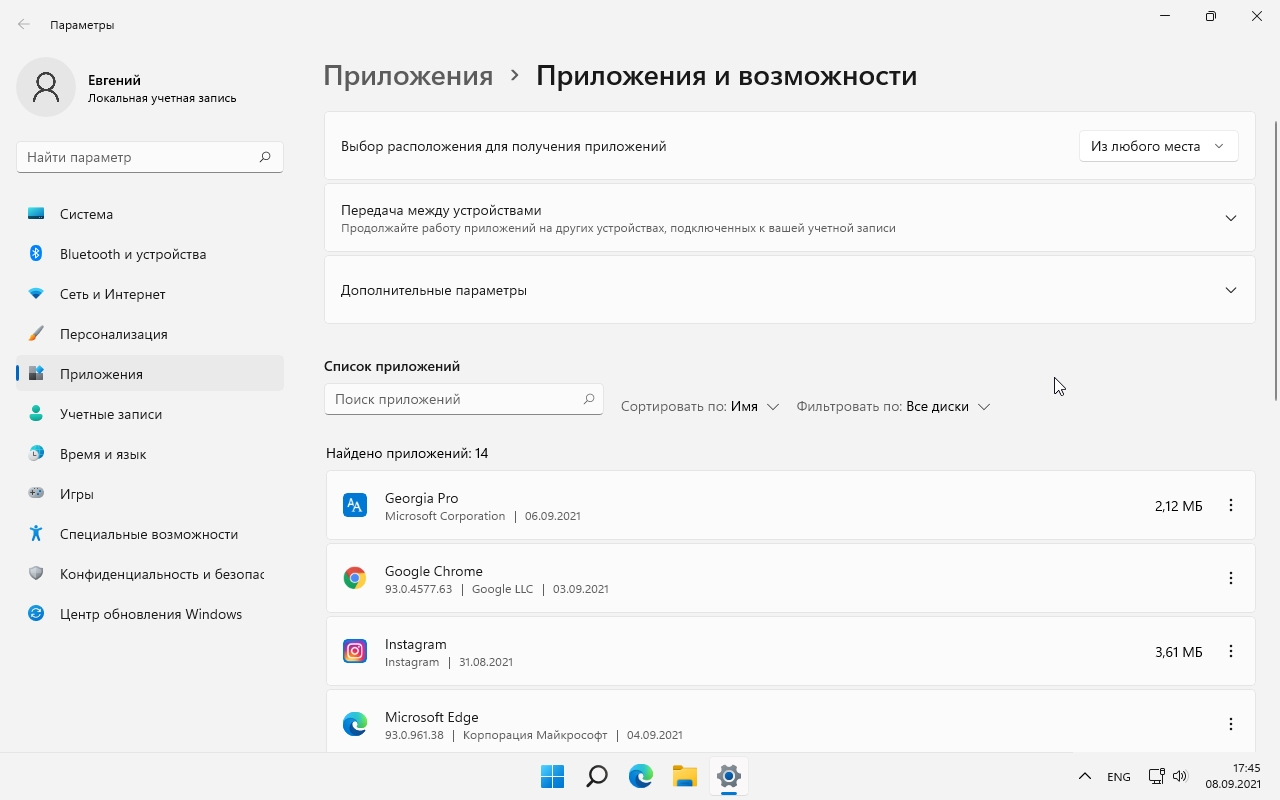
Способ 4: «Параметры»
Своеобразной заменой «Панели управления» является приложение «Параметры». Оно тоже позволяет просмотреть список установленного софта, а также некоторые компоненты.
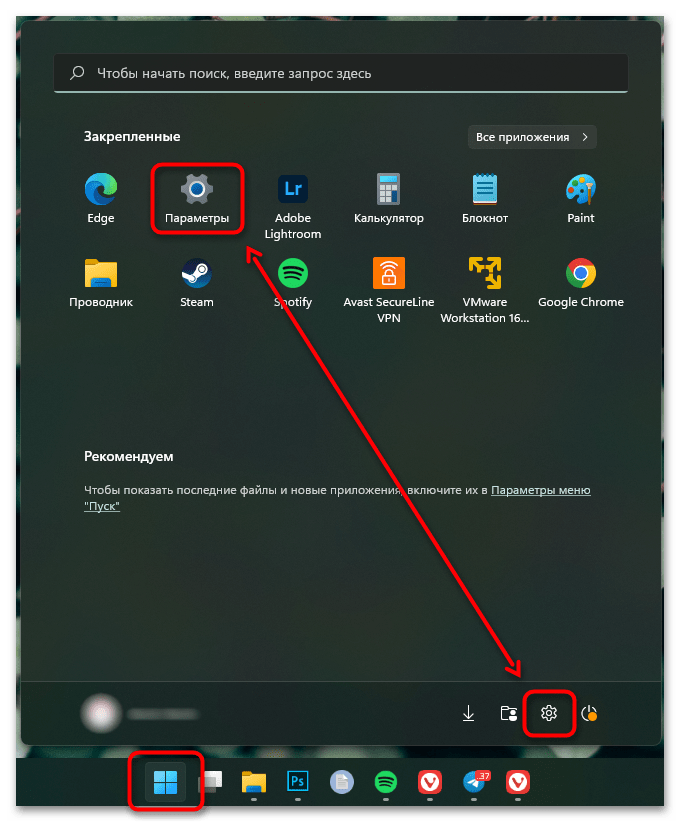
- Откройте «Параметры» через «Пуск».
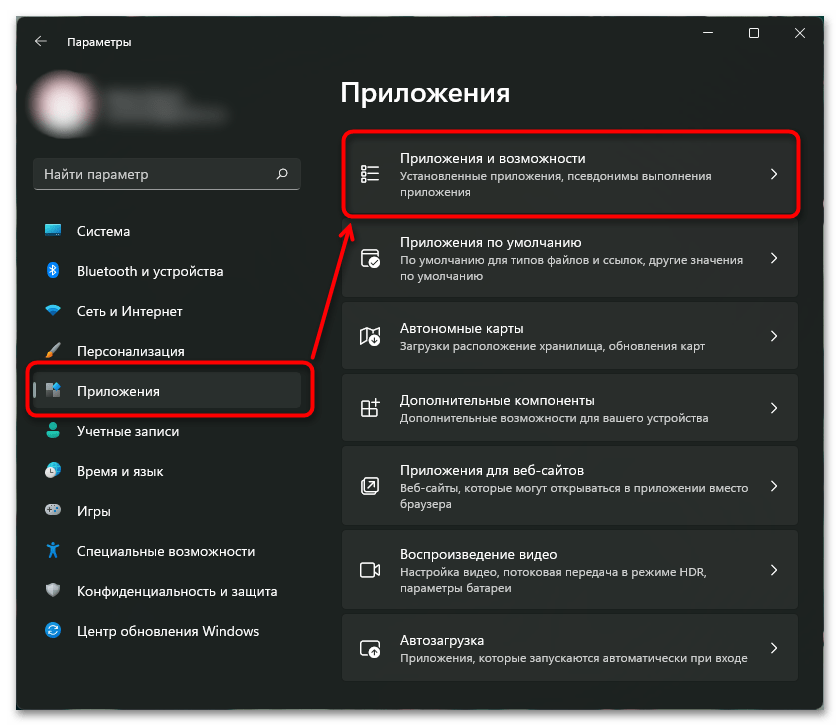
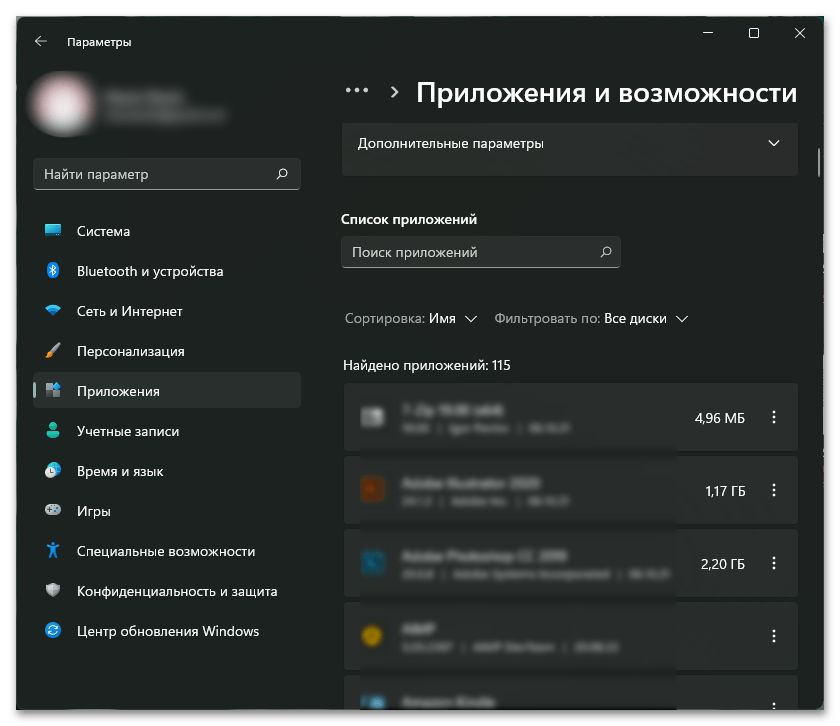
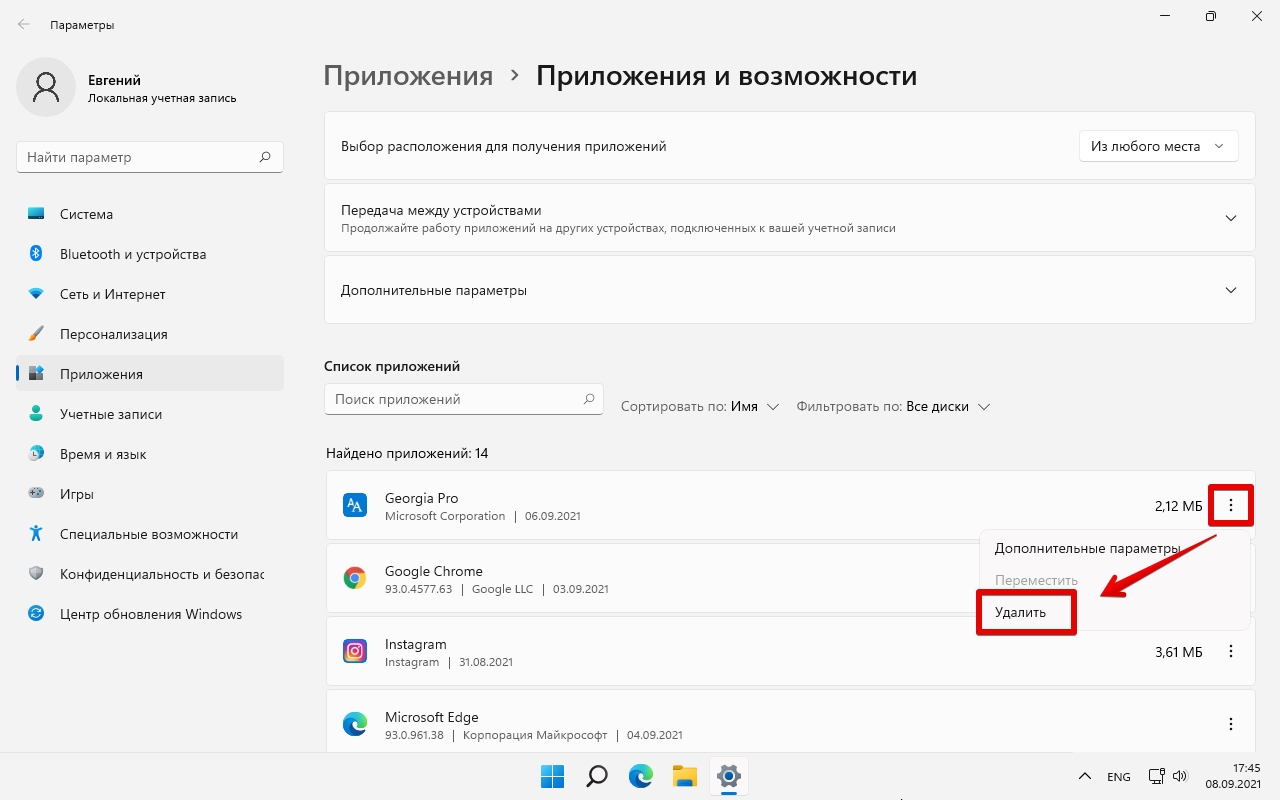
- Для отображения списка установленного ПО переключитесь на вкладку «Приложения» и щелкните по разделу «Приложения и возможности».
- Тут будет расположен список всего софта, который вы точно так же сможете отсортировать, посмотреть некоторые сведения и удалить.
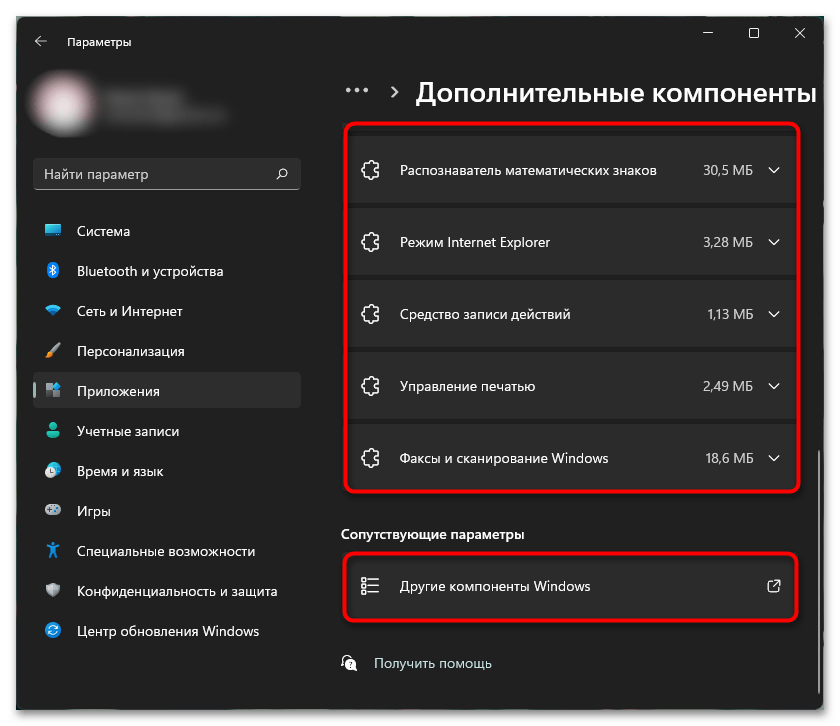
- Чтобы просмотреть «Компоненты Windows», нужно выбрать другой раздел — «Дополнительные компоненты».
- Появится список некоторых системных элементов, а если прокрутить страницу вниз, появится ссылка «Другие компоненты Windows». Нажатие по ней откроет привычное окно с названием «Компоненты Windows».
Способ 5: Контекстное меню кнопки «Пуск»
Если нажать правой кнопкой мыши по «Пуску», отобразится дополнительное меню, среди которых будет пункт «Приложения и возможности». Нажатие по нему сразу же откроет нужный раздел приложения «Параметры», через который вы увидите все программы на вашем компьютере, а также сможете переключиться в раздел с «Компонентами Windows» так же, как было показано в предыдущем способе.
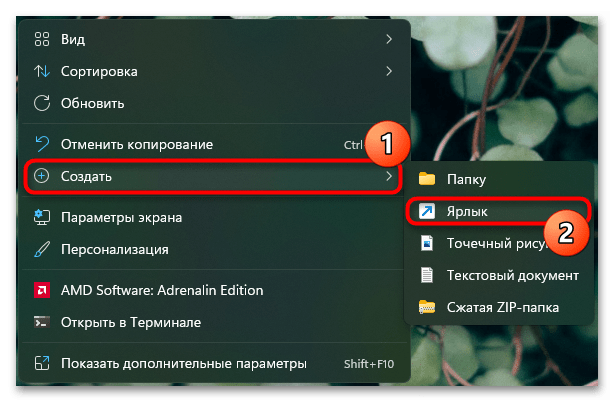
Способ 6: Создание ярлыка
При необходимости часто открывать «Приложения и компоненты», можно либо закрепить это приложение в «Пуске», либо создать ярлык на рабочем столе. Для реализации последней упомянутой задачи выполните следующее:
- Кликните правой кнопкой мыши по пустому месту на рабочем столе и выберите пункт «Создать» > «Ярлык».
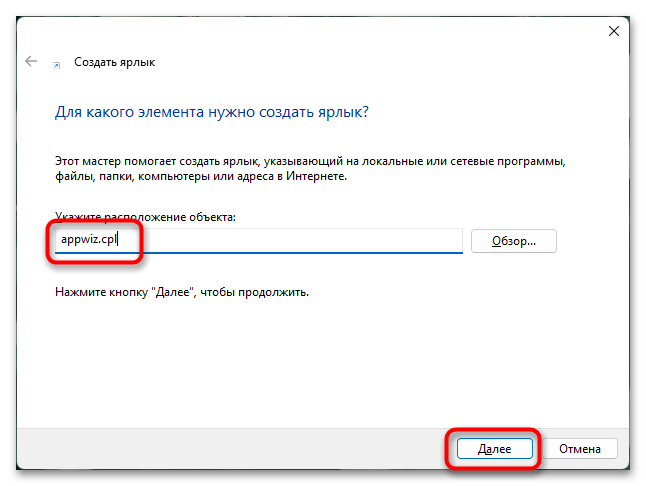
- В новом окне в единственное доступное поле введите
appwiz.cplи щелкните по «Далее». - Имя ярлыка впишите любое, на ваше усмотрение, и нажмите «Готово».
- Теперь вы сможете запускать приложение прямо с рабочего стола.
- То же самое можно сделать и с «Компонентами Windows», если вам нужно именно это приложение. Для этого в поле ввода команды напишите
optionalfeatures.

Для удобства в будущем можете поменять значок ярлыка на другой, более понятный.
Наша группа в TelegramПолезные советы и помощь
Applies ToWindows 11 Windows 10
Ищете давно потерянное приложение или программу? Найти нужный вариант можно несколькими способами.
-
Выберите Начните , выберите Все приложения , а затем прокрутите алфавитный список слева.
Совет: Чтобы уменьшить прокрутку, выберите любую букву в списке, а затем в алфавитных ссылках выберите букву, чтобы перейти к этому разделу. Например, если вы ищете приложение Teams T, выберите Teams T.
-
Выберите кнопку поиска на панели задач и введите имя приложения или программы.
-
Нажмите клавишу Windows клавиатуры и начните вводить текст.
Примечание: Учащиеся, Windows 11 SE не смогут скачивать приложения из Microsoft Store. Приложениями управляет их ИТ-администратор. Дополнительные сведения
Нужна дополнительная помощь?
Нужны дополнительные параметры?
Изучите преимущества подписки, просмотрите учебные курсы, узнайте, как защитить свое устройство и т. д.
Самый простой способ узнать, какие приложения установлены на компьютере и как их удалить
Довольно часто у пользователей появляется желание узнать, а какое же ПО установлено на их компьютерах.
Способ 1. Через приложения и возможности
Этот способ самый простой в Windows 11. Для просмотра приложений необходимо щелкнуть по меню «Пуск» правой кнопкой мыши. В открывшемся меню выбираем первый пункт «Приложения и возможности».

Щелкнув по этому пункту нас переносит в окно со списком установленных приложений.
Для того, чтобы удалить ненужное приложение из ОС Windows 11, кликаем на три точки, которые находятся справа от названия приложения, далее в появившемся меню выбираем «Удалить» и подтверждаем действие.
Способ 2. Через панель управления
Через поиск Windows 11 находим «Панель управления».
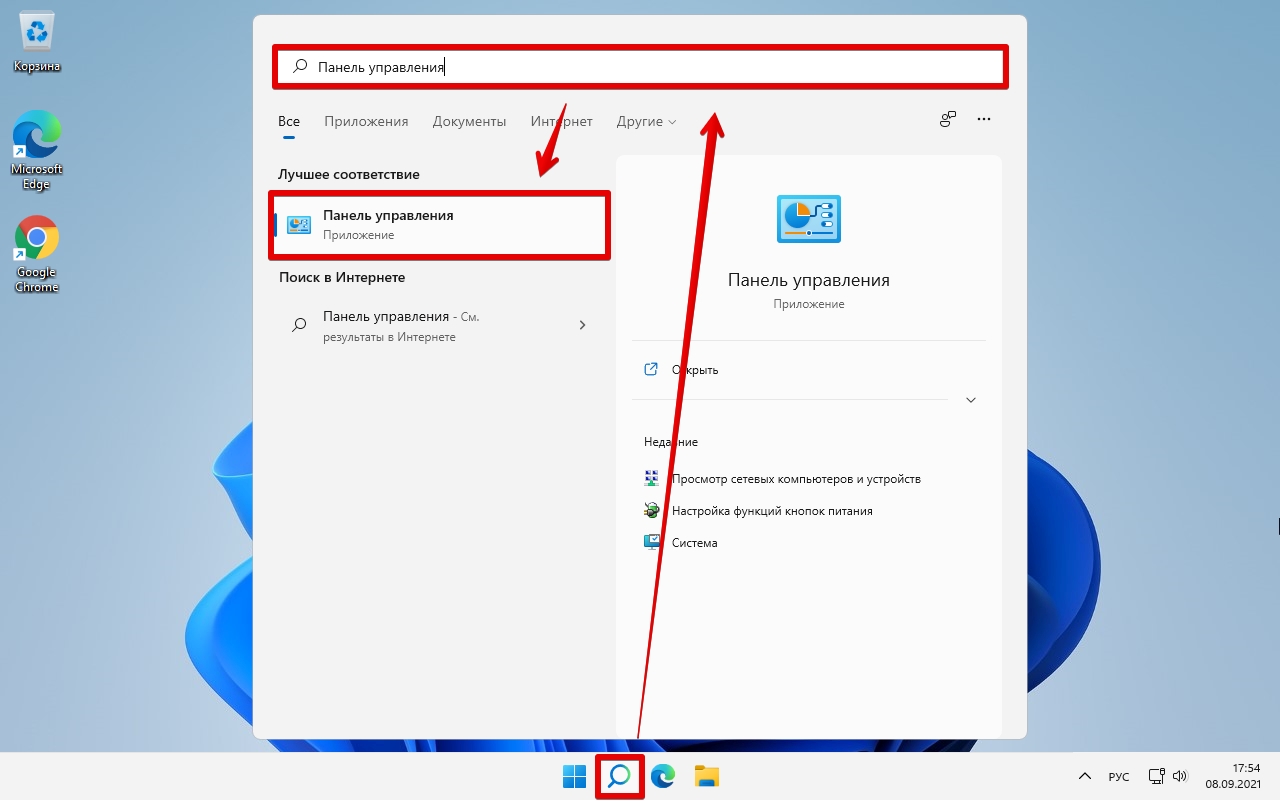
Находим «Программы» — «Удаление программ».
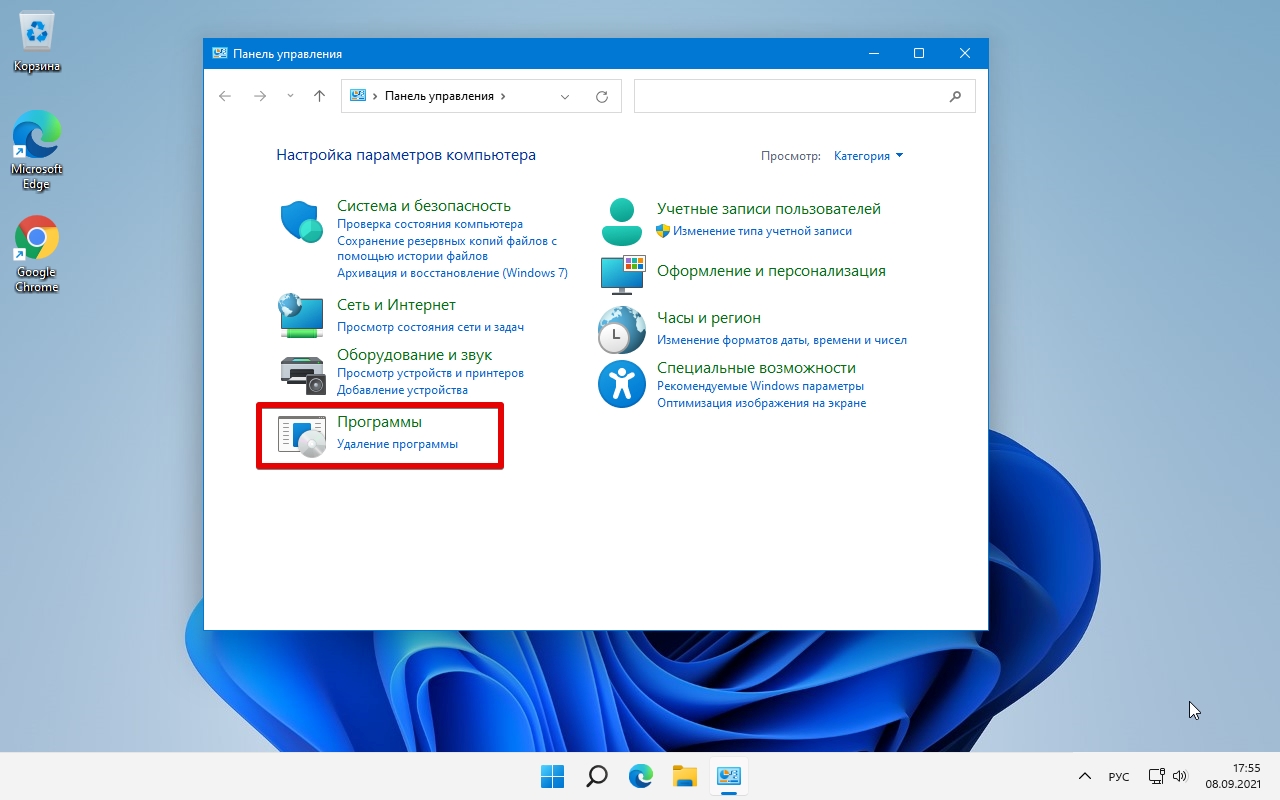
В окне «Программы и компоненты» найдем список последнего установленного ПО в Windows 11.
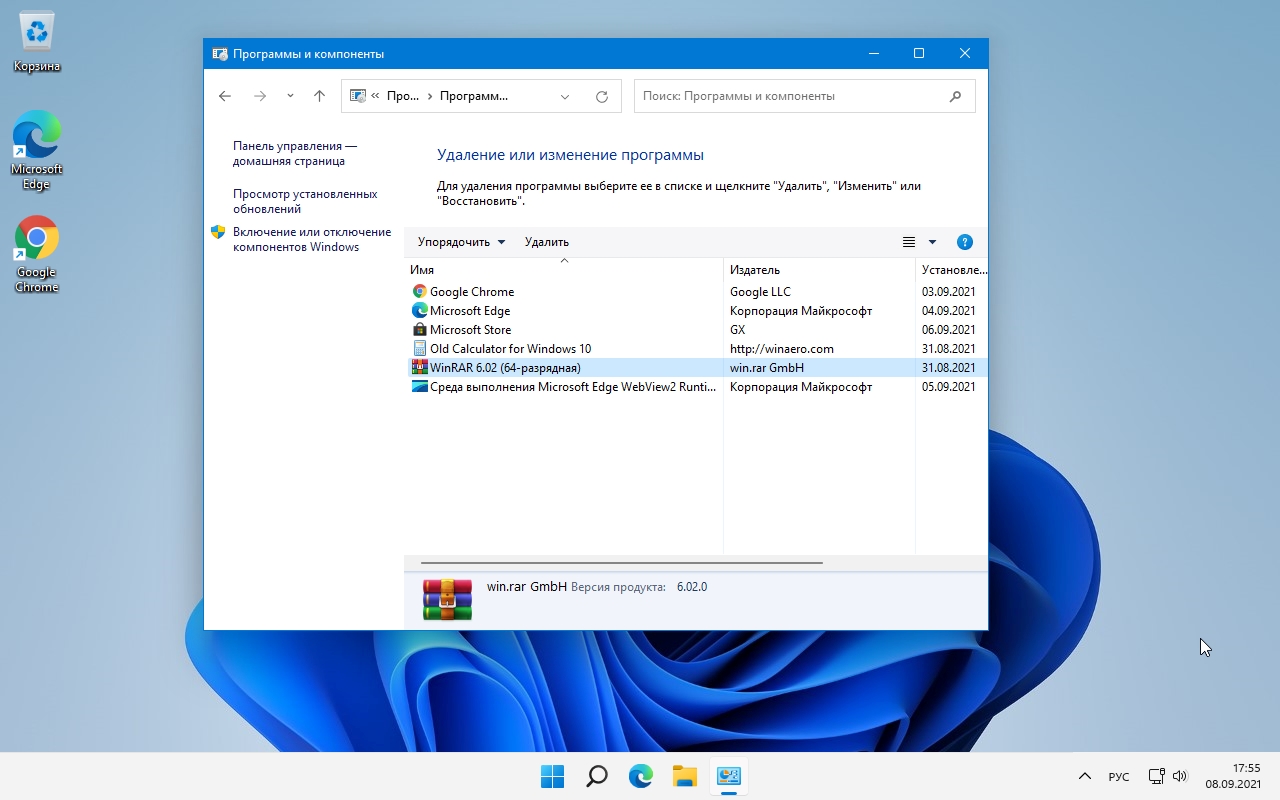
Для удаления ненужного ПО в окне «Программы и компоненты», выбираем ПО и нажимаем на кнопку «Удалить».
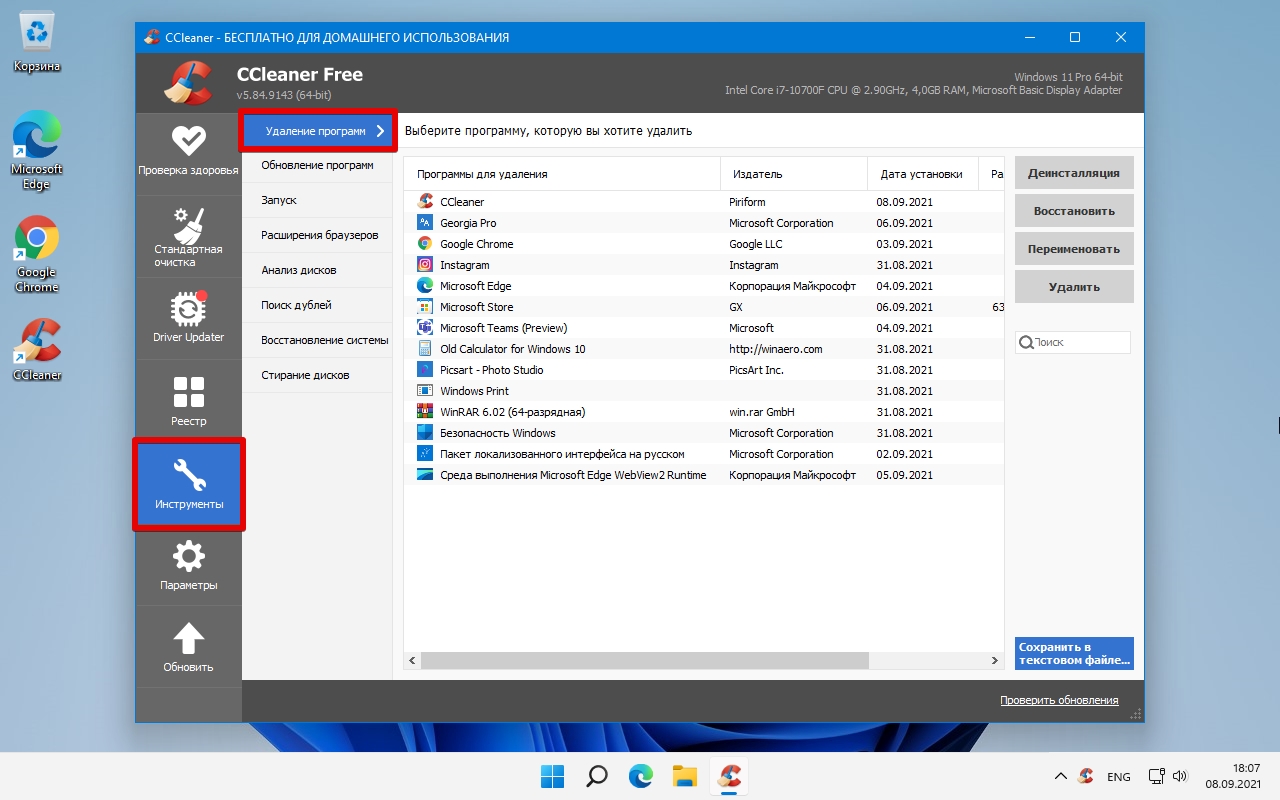
Способ 3. Через CCleaner
Третий способ для просмотра установленного ПО на компьютере подразумевает установку стороннего ПО в Windows 11 — «CCleaner». За многие годы это приложение обрело огромную популярность среди пользователей ПК. CCleaner позволяет не только просматривать и удалять установленные приложение, но и производить чистку дискового пространства и реестра.
Открыв приложение, необходимо перейти в «Инструменты» — «Удаление программ». В проявившемся списке, можно выбрать ненужно приложение и при помощи кнопки «Деинсталляция» выполнить его удаление.
Microsoft is not done experimenting with the Start Menu. The Start Menu in Windows 8 was nothing short of a disaster and became one of the worst criticisms of the OS. Microsoft eventually had to ‘fix’ it but Windows 11 has a new Start Menu which is different from the Start Menu in Windows 10, Windows 8, and Windows 7. For users, there will be a learning curve, and possibly some raging.
The Start Menu on Windows 11 is different however, it does still have an Apps list i.e. a list of every single app that is installed on the system. Users can click and app to open it. The trick is figuring out how to access the Apps list.
Open Apps list on Windows 11
The Apps list is easy to access but not as easy to find because the new Start Menu Window 11 still shows pinned apps (tiles are no longer a thing).
- Click the Start or Windows button on the taskbar to open the Start Menu.
- Click All Apps at the top right corner.
- You will see the Apps list. Scroll through it and select an app to open.
Apps list speed dial
The Start Menu on Windows 11 is different but it still has features from the Windows 10 Start Menu. The speed dial has carried over. If you click a letter in the apps list e.g., A, you will be taken to the speed dial. Click a different letter e.g. F and you’ll jump to the section of apps that start with the letter F. It makes browsing considerably easier.
Get Windows 10 Start Menu in Windows 11
There is a registry hack that was able to restore the Windows 10 start menu in Windows 11. While it worked at the time, it has been blocked by Microsoft. This isn’t unexpected and you are likely to see this happen with lots of other registry related tweaks that will be discovered while Windows 11 is in beta.
By the time Windows 11 is made available to the public, it will work very differently than how it does now during its preview stage.
Conclusion
The Start Menu in Windows 11 is divided into sections with pinned apps appearing at the top in a scrollable. This section is scrollable which means that pinning an app to the Start Menu is going to lose its utility somewhat. When you have one too many apps pinned to the Start menu, they will appear on the next ‘page’ and users will have to scroll to open them. Folders or app groups have been removed as well. Let’s hope the search bar works well enough to rival Spotlight on macOS. If it does, you may find yourself using it to open apps.

Fatima Wahab
Fatima has been writing for AddictiveTips for six years. She began as a junior writer and has been working as the Editor in Chief since 2014.
Fatima gets an adrenaline rush from figuring out how technology works, and how to manipulate it. A well-designed app, something that solves a common everyday problem and looks
Windows OS consists of many apps; in fact, apps and programs are the core of any OS; from your browsers to notepads, we rely on these apps to carry on our day to day tasks, and if you are wondering about how you can see all apps in your Windows machine, you will learn that in this article. It covers both running and installed apps that you want to see in Windows 11 and Windows 10.

Here is the list of ways to view all installed apps and running apps.
- Installed apps
- Start Menu
- Settings
- PowerShell
- Running Apps (including those in the background)
- Alt + Tab
- Task Manager
- Hidden Apps
You can use any of these as a regular user except for the PowerShell command, which you may need. All these steps work in both Windows 10 and Windows 11.
1] Using Start Menu

- Click on the Windows icon located on the bottom-left of your screen.
- Scroll, and you will see all the installed apps listed in alphabetical order.
In Windows 11, when you click on the Start Menu, look for the All Apps link on the top right under the search button. It will list down all the apps in the same alphabetical order. To find any, you can search or click on any of the alphabets to quickly jump to that section.

2] Using Settings
Press Windows + I key to open settings and navigate to Apps > Apps and features.
Here you will see all your apps listed in one place, including the pre-installed apps that come default with your Windows OS.

You can search for any app from the search bar, sort them by size or name, and find apps primarily located in any of your drives; and also, if you want, you can click on any app and uninstall it directly from the settings.
3] Using PowerShell
You can find out all the programs installed on Windows 10 by querying the registry. It is possible to get a list of installed software using the registry and PowerShell.
Follow the steps below to get the list of all programs:
- Press Windows Key + X and select the PowerShell (Admin) option.
- Enter the following command to enable running scripts in prompt if it’s not enabled already:
Set-ExecutionPolicy Unrestricted
- Now copy and paste the command below to view all the apps:
Get-ItemProperty HKLM:\Software\Wow6432Node\Microsoft\Windows\CurrentVersion\Uninstall\* | Select-Object DisplayName, DisplayVersion, Publisher, InstallDate | Format-Table –AutoSize
This command will then output a list of programs installed on your local machine, along with its version number, publisher, and date of installation (if available).
4] Using ALT + Tab

You can use this key combination to view all the running apps as well as some browsers tabs. To do this, hold down your ALT key and press Tab Key; you can then rotate between all the running apps every time you press the Tab key.
You can also WIN + TAB to view all the apps on one screen and select any apps to switch or close the app.
5] Using Task Manager

In Windows 10 and Windows 11, you can view running programs using the Task Manager app, found in the Start menu.
- Open it by clicking the Start button or by pressing Ctrl+Shift+Esc on the keyboard.
- Sort apps by memory use, CPU use, etc.
- Get more info or “End Task” when necessary
6] View All the Hidden Apps
There can be many cases when some apps run in the background that you can’t see directly and are slowing down your system. In that case, to view these hidden apps, follow the method below:
- Press Windows Key + X and select Task Manager
- Go to the Processes tab
- Scroll down to see all the hidden running apps on your system.
What Is the Best Way to Access Your Windows Computer’s Programs without Using the Start Menu?
You can use the RUN prompt to launch a program if you know the shortcut or use the PowerShell mentioned above in the article. You can also create shortcuts on the desktop or pin the apps on the taskbar to use the Start menu.
When I Install a Program in Windows, How Can I Make It Visible to All or Multiple Accounts?
Unless a particular folder is installed in which the program is only visible to specific users, the program is available to all users on Windows.
You can find the folder under the start menu. You can give users access by copying the shortcut to their start menu folder. Copies can be placed in the All Users folder if you wish all users to have access.
Usually, when you install a program, it offers an option to install for all users. Make sure to check that.
I Installed an App from the Windows App Store on My Windows PC. How Can I Create a Desktop Shortcut?
- Open the Start menu and locate the app.
- Right-click on the app and click on the open file location option
- From here, select the main app and right-click on it
- Go to Send option and click on Desktop (Shortcut)
How Do I Show All Open Windows on My Desktop?
You can easily see all the windows open by pressing the ALT + Tab or Win + Tab key together. This will let you see all the running windows and allow you to choose and switch between them quickly.
How Do I Arrange Multiple Windows on My Desktop?
If you want to snap multiple windows in your desktop to multitask, you can do that by following the steps below:
- Select your desired window to snap in the half screen, then hold and drag until the edge of the screen.
- You can see an outline showing how much space this window will take if you decide to snap it. If you are satisfied with the position and size, let go of your mouse from the window, and it will be placed in that outlined area.
How Do I Arrange Windows Horizontally or Vertically?
If you want to snap your windows in different screen parts, you can use the keyboard shortcuts available.
- Split window to left or right half: Win + left/right arrow
- Split window to corner/quarter of screen: Win + left/right arrow then up/down arrow
- Make window fullscreen: Win + up arrow until fullscreen
- Expand ¼ window to ½ window: Win + up/down arrow
When using Windows 11, you can use the Snap Layout to arrange windows in multiple ways.
I hope the post was easy to follow, and you were able to find both the installed apps and the running apps in Windows 11 and Windows 10.