
For some reason, you may need to open a VMDK file to read or transfer the content without using it on a virtual machine. In this guide let me show the simple and easy method to open a VMware VMDK file in Windows 10/11, the same method is applicable for earlier Windows Operating Systems such as 8.1 and 7 as long as you have any VMware products on your computer.
Also, we can access the Physical hard disk (like C or D partition of the host computer) inside Virtual Machine by this method in VMware. But, in this guide, we will discuss how to access the VMDK virtual disk file in Windows OS without powering on the particular VM. This method could be an ideal solution when you have a Virtual machine that is not booting, but you need to access some important data from the specific virtual hard disk file.
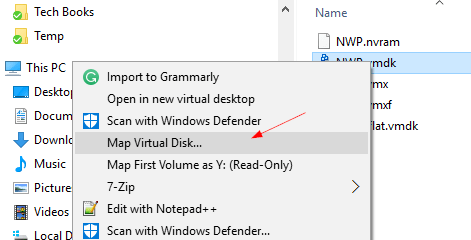
1) Locate the virtual disk file you want to open or edit in Windows host OS. Right-click on it as shown below.
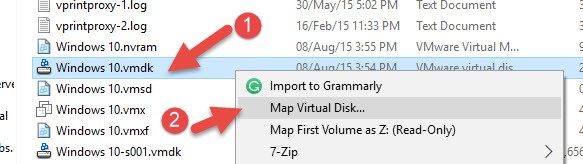
2) You must have a VMware workstation (or VMware Player) on the host computer to make it work.
Most of the time the VMDK file type would have been already associated with the VMware program. Once your Windows host computer knows that VMDK files should be opened by the VMware Workstation program, you will see an option called “Map Virtual Disk..” as shown above.
If you notice, there is another option below called “Map First Volume as Z:”, it will automatically mount and open the first volume of the VMDK file in read-only format. But we are not aware of what is the first volume and mostly it could be the system reserved portion on the bootable partition, hence it will not be helpful. So, select the first option “Map Virtual Disk..” and explore all partitions. Later we can select the desired partition to mount as shown in the next step.
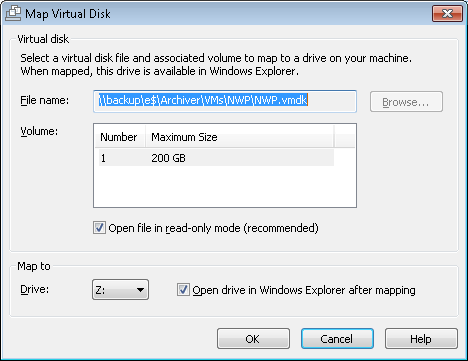
3) It is always recommended to open the VMDK files in Read-only format to prevent any modifications to the virtual disk file that may cause booting or operating system issues for the virtual machine. If you are certain of what you are doing, then you can remove the tick and open the drive with writing access.
This method will help to modify some boot options, overwrite corrupted files and do any other tasks to troubleshoot issues on the virtual machine. Once the ‘Map Virtual Disk’ option is opened, select the partition you want to open on the host computer, change the Read-only access (required) and the mount point drive letter.
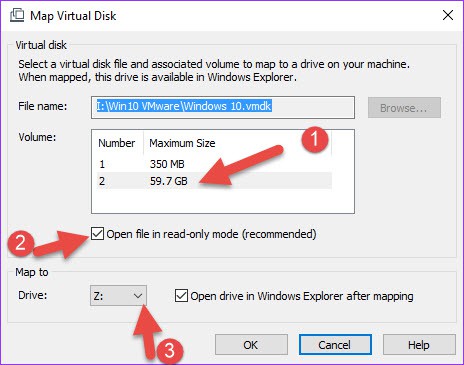
In the above example, I selected the 2nd partition (which is the C drive of the Virtual machine) with read-only access. Z is the drive letter of the mount point on my Windows 10 host.
4) Here is the VMDK file mounted on Windows explorer with the specific drive letter.
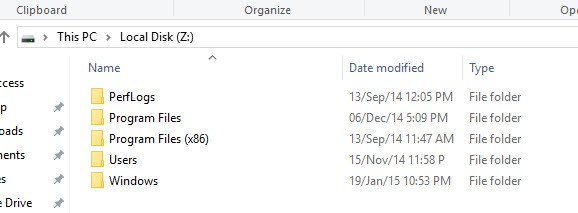
5) Now I can easily copy the data from the virtual hard disk (VMDK) to host Windows 10 or 8.1/1 through Windows Explorer. Since I opened it in Read-only access, I can’t delete or modify any files inside the VMDK file.
Remember This Step:
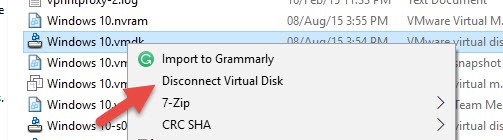
Do remember to unmount (Disconnect) the file once your task is completed. Otherwise, you can’t use the VMDK file in VMware programs or move the file to a different location because it will be in locked/open state.
I hope this guide is useful in opening the VMware VMDK file in Windows 10, 8.1 and 11 easily. Though there are several 3rd party tools available to mount or extract the VMDK files, they are complicated and paid versions too. This method can be done without any tools if you have a VMware workstation on your computer.
If you have ever come across a VMDK file and wondered how to open it on your Windows 10 machine, you’re in the right place. A VMDK file is a virtual machine disk file used by virtualization software such as VMware. While it might sound complicated, opening a VMDK file on Windows 10 is straightforward with the right tools. Follow these steps to access and manage your VMDK files effortlessly.
In this section, we’ll walk you through each step to open and access a VMDK file on Windows 10. By the end of this guide, you’ll be able to view and manage VMDK files with ease.
Step 1: Download and install a virtual machine software
First, download and install VMware Workstation Player or VirtualBox, both of which can handle VMDK files.
Both VMware Workstation Player and VirtualBox are user-friendly and free for personal use. You can find the download links on their official websites. Simply follow the installation prompts to set up the software on your computer.
Step 2: Launch the virtual machine software
Next, open the virtual machine software you installed in the previous step.
Once the software is launched, you’ll be greeted with a user interface that allows you to create, manage, and run virtual machines. This is where you’ll be able to open your VMDK file.
Step 3: Create a new virtual machine
Create a new virtual machine and select the option to use an existing virtual hard disk file.
During the virtual machine creation process, you will be prompted to choose a hard disk. Select the option to use an existing virtual hard disk file and browse for your VMDK file.
Step 4: Select the VMDK file
Browse your computer and select the VMDK file you want to open.
After selecting the option to use an existing virtual hard disk, navigate to the location of your VMDK file. Select it, then proceed with the virtual machine setup.
Step 5: Finish the virtual machine setup
Complete the virtual machine setup by following the on-screen instructions.
Follow the remaining prompts to complete the virtual machine setup. This includes configuring settings such as memory allocation and network preferences. Once finished, your VMDK file will be ready to use.
Step 6: Start the virtual machine
Finally, start the virtual machine to access the contents of the VMDK file.
Click the «Start» button on your virtual machine software to boot up the virtual machine. The operating system within the VMDK file will load, and you can interact with it as if it were a physical computer.
After completing these steps, your VMDK file will open within the virtual machine, allowing you to access its contents.
Tips for Opening VMDK File in Windows 10
- Backup Your Files: Always create a backup of your VMDK file before making any changes, just in case something goes wrong.
- Use Trusted Software: Only download virtual machine software from reputable sources to avoid malware.
- Allocate Sufficient Resources: Ensure your computer has enough RAM and CPU power to run the virtual machine smoothly.
- Keep Software Updated: Regularly update your virtual machine software to benefit from the latest features and security patches.
- Check Compatibility: Make sure the VMDK file is compatible with the virtual machine software you are using.
Frequently Asked Questions
How do I convert a VMDK file to another format?
You can use tools like VMware vCenter Converter or qemu-img to convert VMDK files to other formats such as VHD.
Can I open a VMDK file without virtual machine software?
No, VMDK files require virtual machine software to be opened and accessed.
Is it safe to delete a VMDK file?
Only delete a VMDK file if you are certain you no longer need the data it contains. Deleting it will permanently remove the virtual machine and its contents.
What is the difference between VMDK and ISO files?
A VMDK file is a virtual machine disk, whereas an ISO file is an image of a CD or DVD. They serve different purposes in virtualization and software distribution.
Can I run a VMDK file on a Mac?
Yes, you can use virtualization software like VMware Fusion or VirtualBox on a Mac to open VMDK files.
Summary
- Download and install a virtual machine software.
- Launch the virtual machine software.
- Create a new virtual machine.
- Select the VMDK file.
- Finish the virtual machine setup.
- Start the virtual machine.
Conclusion
Opening a VMDK file in Windows 10 might seem daunting at first, but with the right tools and steps, it becomes a straightforward task. Using virtualization software like VMware Workstation Player or VirtualBox, you can easily access the contents of your VMDK file. Just follow the steps outlined in this guide, and you’ll be up and running in no time.
Remember to back up your files and keep your software updated for the best experience. If you need further assistance, many online communities and resources are available to help you navigate the world of virtual machines. Now that you know how to open a VMDK file in Windows 10, you can confidently manage your virtual machines and explore their potential.
So, go ahead and give it a try! You’ll find that working with VMDK files can open up a whole new world of possibilities for your computing needs.
Kermit Matthews is a freelance writer based in Philadelphia, Pennsylvania with more than a decade of experience writing technology guides. He has a Bachelor’s and Master’s degree in Computer Science and has spent much of his professional career in IT management.
He specializes in writing content about iPhones, Android devices, Microsoft Office, and many other popular applications and devices.
Read his full bio here.
Virtual Machine Descriptor File (VMDK) is a file extension for virtual disk image files that are created by VMware products, such as VMware Workstation, VMware ESXi, and other third-party tools. It is frequently used for cloud computing services and virtualization. A virtual VMDK file carries all the information of a virtual machine. Normally, non-virtualized machines can only obtain individual system files and components, but a virtual disk file contains all the necessary information on a single disk, which empowers it for individualistic operations.
We attach VMDK with VMware as we use it to store one or more Virtual Files and it can only be accessed as a physical hard disk with VMware Software.
VMDK file is generally used by VMware software but we can mount VMDK in VMware as a virtual disk using Win Mount. As a result, users can easily delete, copy, and modify the files in Virtual disk.
If you import VMDK in Vmware then it will be more easy for you to handle the VMDK files. You can modify, delete, or copy VMDK data. Follow the steps to do so:
- Open Installed VMware and Click on “File,” then “New” and “Virtual Machine“.
- Click “Next” and choose “Custom” for your system type.
- If your VMDK file is from an earlier version of VMWare then select “Legacy“. Hit “New” if it is from the current version. Click “Next” to continue.
- Choose the Operating System you are installing from the list and then choose its version from the drop-down menu. If you do not know, Hit the radio button next to “Other.” Click “Next” to move forward.
- Enter a name for the virtual machine and then choose a folder to store it.
- Specify the number of processors you would like to use. This must match the number of processors on your computer. The default setting of “one” is the safest.
- Choose the amount of memory you would like to allocate to the operating system. Adjust the slider until it reaches the minimum requirements listed on the screen.
- Choose your network type and click “Next.”
- Now from the Select a Disk window choose “Use an existing virtual disk” and click “Next.”
- Select the VMDK file on your hard drive and click it. Press “Open” to select it.
- Click “Finish.”
Note: When you try to open VMDK file in Windows VMware, many times you don’t succeed. Because it may be possible that the VMDK fails to open in Windows or you might get an error like VMware is not opening with Windows. As may the file is not well or corrupt. So let’s find out how to solve corruption in VMDK files Vmware.
Read here: How to fix issues with your VM
Issues with VMDK file
However, it is noted that numerous times when users want to access their VMDK file data, the virtual machine often stops operating or doesn’t open the VMDK file. There can be two possibilities behind this difficulty, either the VM is not cooperative with your machine or the VMDK file is defective.
In most cases, it is found that the VMDK file gets corrupted or damaged and stops the VM machine from powering on. So, let’s find out how a VMDK file gets corrupted, and how we can open a corrupt VMDK file in Windows Vmware.
How VMDK Files Are Prone to Corruption?
There can be many reasons for VMDK corruption but we have mentioned the most possible ones here:
- Abrupt Power Failures or System Crashes
- Improper Shutdown of Virtual Machines
- Disk Space Issues
- Mismanagement of Snapshots
- Virus or Malware Attacks
Errors that occur in VM when a VMDK file is not well:
- “Unable to start. A file not found”
- “Unable to find the required file”.
- “The machine can not find the specified file”.
How to Open or Attach a Corrupt VMDK File in VMware?
So, if you are concerned about opening your corrupt VMDK files, then recline because there are solutions that can help you to easily view or open your VMDK data. One of the best ways to do this is by using suitable software. However, saying and doing is altogether a separate process. As there is ‘N’ number of tools available over the internet which term themselves as the best. But selecting one is a quite tough task. Trust me on that.
So if you take my recommendation, I would refer you to check this VMDK Recovery Software. This tool is one of the best possible tools to view and open VMDK files in VMware & Windows 11, 10, 8, 7, XP, and other versions. Plus the best part of this tool is that it provides users a free demo version which lets you evaluate the complete features that the software is providing.
Some Notable Features of the software:
- Effective recovery of maximum possible data from corrupt VMDK files.
- This tool is quite proficient in supporting VMDK files that are saved in Fixed or Dynamic disc types.
- It supports VMDK files which are FLAT, split & SPARSE event descriptors.
- Offers two different scanning modes i.e. Standard and advanced depending upon the level of corruption.
- Support both partition tables, i.e. (MBR) & (GPT).
- The custom settings option is authorized for selected volumes before recovery.
- Support file systems of all OS, such as FAT, FAT16, FAT32, FAT64, NTFS, HFS+, and EXTX.
Download Now
Conclusion
So I hope now you successfully understand how to open a VMDK file in Vmware if the file is error-free. But if the file is not well then you might face issues attaching or importing VMDK in VMware. So use the VMDK Repair tool to fix the errors and easily import VMDK in VMware.
Если у вас есть файл VMDK (Virtual Machine Disk), который содержит один или несколько разделов виртуальной машины VMware, вы можете смонтировать его в операционной системе Windows в качестве диска. Подключить vmdk диск в Window можно несколькими способами.
- Подключение vmdk файла в проводнике Windows Explorer
- Подключение образа VMDK в VMware Workstation
- Монтирование VMDK с помощью пакета vSphere Disk Development Kit
- Используем OSFMount для монтирования vmdk
Содержание:
Подключение vmdk файла в проводнике Windows Explorer
В операционной система Windows имеется встроенная поддержка VMDK файлов. Если вы используете операционную систему Windows 7 или выше, вы можете смонтировать файл VMDK прямо через проводник Windows.
Для этого нужно перейти в каталог, в котором хранится файл VMDK. В проводнике Windows щелкните по файлу правой кнопкой мыши и выберите пункт «Map Virtual Disk».
В окне «Map Virtual Disk» выберите букву, которая будет присвоена диску и нажмите кнопку «ОК».
Для того, чтобы отключить виртуальный диск — щелкните правой кнопкой мыши по диску и выберите пункт «Disconnect Virtual Disk».
Подключение образа VMDK в VMware Workstation
VMware Workstation – это настольное ПО для виртуализации от VMware. В нем имеется встроенная функция подключения vmdk образов — «Map Virtual Disks», с помощью которой также можно смонтировать и открыть файл VMDK. Если открыть файл VMDK при помощи первого описанного нами способа не получается (Проводник Windows), то при помощи VMware Workstation сделать это удастся наверняка.
Все довольно просто, перейдите в меню «File» и в раскрывающемся списке выберите пункт «Map Virtual Disks …».
Монтирование VMDK с помощью пакета vSphere Disk Development Kit
VMware-mount — это консольная утилита, которую вы можете использовать для монтирования VMDK дисков без использования графического интерфейса. Эта утилита входит в пакет разработчика vSphere Disk Development Kit, поэтому для её использования вам понадобиться его установить.
Чтобы смонтировать файл VMDK (сохраненный в каталоге C:\temp) в режиме только для чтения, используйте следующую команду:
vmware-mount.exe X: “C:\Temp\TestVM.vmdk”
Если файл VMDK содержит более одного раздела, вы можете использовать параметр /v:x для монтирования других томов:
vmware-mount.exe /v:2 X: “C:\Temp\TestVM.vmdk”
Если вам необходима возможность записи, воспользуйтесь параметром «/m:w». Этим можно воспользоваться, например — если вам нужно заменить испорченный системный файл.
vmware-mount.exe /m:w X: “C:\Temp\TestVM.vmdk”
Если вы хотите вывести все подключенные виртуальные диски, необходимо воспользоваться параметром /L:
vmware-mount.exe /L
Командной строкой очень легко пользоваться, при этом она довольно функциональна.
Используем OSFMount для монтирования vmdk
OSFMount – это бесплатная сторонняя утилита, которая монтирует файлы образов не только формата ISO, но также и файлы VMDK. Она работает практически во всех версиях Windows.
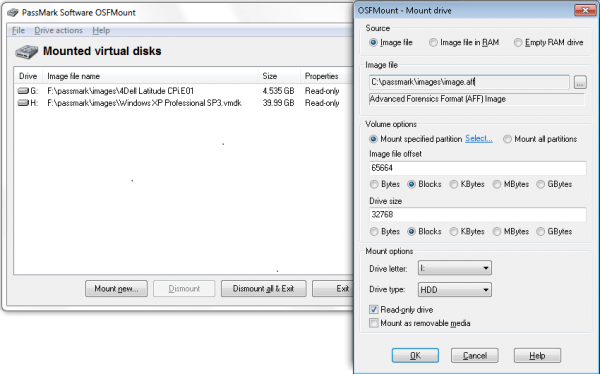
Эта утилита довольно проста в использовании. Достаточно нажать кнопку «Mount new…» расположенную в нижней части окна, выбрать vmdk файл и указать параметры подключения.
Read time: 4 minutes
At times, issues such as malware attacks, unintentional file deletions, and installation errors can disrupt the accessibility of data stored within a VMDK virtual disk utilized by a virtual machine. Therefore, I’m here today to provide you with methods for accessing a VMDK virtual disk from a Windows system.
What are VMDK files?
The VMDK file format is employed by VMware to house the contents of virtual hard disk drives, encompassing all the essential information pertaining to a virtual machine. This VMDK format plays a pivotal role in virtualization and cloud computing environments. Virtual machines equipped with VMDK files can serve as testing environments, enabling you to run and evaluate software independently on a separate system. These VMware virtual disks are typically located within the same directory as the virtual machine files, bearing the .vmdk file extension.
Some common methods to access VMDK virtual disk from windows are as follows –
Solution 1- Using VMware
VMware is a software company known for its virtualization solutions. Their software creates an abstraction layer that sits atop computer hardware, enabling the efficient utilization of various hardware components, including the computer processor, memory, storage, and more, to host multiple virtual computers, often referred to as virtual machines (VMs). This virtualization technology enables greater flexibility, resource optimization, and the ability to run multiple operating systems and applications on a single physical host machine.
- Firstly open your VMware Workstation.
- Click on File and Select Map Virtual Disks.
- Click on Browse. Here you can browse towards the location of your VMDK virtual disk file and verify the volume size.
- Select the Drive Letter and click on the OK button.
Note- Always open the file in read-only mode to avoid unnecessary data loss or drive corruption.
Now you can see the VMDK will be mounted on your Windows Machine with the drive letter specified. And you can easily access the VMDK virtual disk from your Windows Explorer.
OR
- Directly browse the location VMDK files.
- Right-click on the VMDK file.
- Select Map Virtual Disk and Select the VMDK to access.
Solution 2 – Using 7-zip
7-Zip is easily available for Windows, Linux, and other operating systems. It becomes so easy to extract any type of archive file through it.
- Right-click on the VMDK flat file.
- Select Open Archive.
- Now copy the VMDK contents to a folder of your choosing.
It only works for VMDKs previously attached to either Windows or Linux.
Solution 3- Using Linux reader
Linux Reader is a free tool used to access several file systems configured on Linux machines. It is capable of accessing VMDKs.
- Firstly install a Linux reader if you haven’t done it already.
- Select the Mount Image option from the menu.
- Now select Containers.
- Click on VMware virtual disks and press the Next button.
- Now navigate to the folder containing the VMDK files
- Select the file and click OK.
- Now check the boxes next to the VMDKs you want to be mounted and click on Mount.
- Now you can access the drive’s content by clicking on a mounted volume. These can be saved
- Save it by right-clicking on the file selection and clicking on the save button.
OR
Press CTRL-A to select all the content and click on the Save icon to export everything to a folder of your choice.
Solution 4- Use a professional VMDK recovery tool
When it comes to accessing VMDK files that are in an inaccessible state due to various issues, there are several VMDK recovery tools available. While manual methods are limited in their effectiveness, professional tools like the Kernel VMDK Recovery tool offer a reliable solution. This tool is designed to effortlessly repair corrupt and damaged VMDK files, making it a preferred choice for many users.
The Kernel VMDK Recovery tool is compatible with all Windows OS versions and supports VMDK files from various sources. Users can easily recover their data and save it to their preferred location on their system after the recovery process. The tool is also capable of recovering all file types and subfile types, including sparse and flat files. Notably, it features a snapshot function that eliminates the need to rerun the recovery process, saving time and effort.
One standout feature of this tool is its customizable recovery settings, allowing users to tailor the recovery process to their specific needs. All of these attributes make the Kernel VMDK Recovery tool a reliable and versatile option for recovering data from inaccessible VMDK files.
Conclusion
I trust that readers will find this blog post to be informative and useful. The article has comprehensively addressed various methods for accessing VMDK virtual disks from Windows. However, it’s important to acknowledge that VMDK files can become inaccessible for a variety of reasons. In such circumstances, specialized tools like the Kernel VMDK Recovery tool prove to be highly effective for mounting and unmounting VHD/VHDX files. This tool offers support for the recovery of all types of VMDK files, including those originating from VMware Workstation and Virtual. Its user-friendly interface ensures ease of use, making it a valuable asset in VMDK file recovery scenarios.