
Какой бы язык программирования вы не начали изучать, вашей первой программой, скорее всего, будет «Hello World!».
Допустим, вы хотите написать такую программу на Python. Это можно сделать двумя способами: писать сразу в оболочке Python либо написать скрипт в редакторе кода и затем запускать в терминале.
Что такое оболочка?
Операционная система состоит из множества программ. Они выполняют различные задачи: управление файлами, памятью, ресурсами. Также они обеспечивают беспроблемный запуск ваших приложений.
Что бы мы ни делали на компьютере — от анализа данных в Excel до игр — все облегчается операционной системой.
Программы операционной системы делятся на два вида: программы оболочки и ядра.
Программы ядра выполняют такие задачи, как создание файла или отправка прерываний. Задача оболочки — принимать инпут, определять, какую программу ядра требуется запустить для обработки этого инпута, запускать ее и показывать результат.
Оболочка также называется командным процессором.
[python_ad_block]
Что такое терминал?
Терминал — это программа, которая взаимодействует с оболочкой и позволяет нам коммуницировать с ней при помощи текстовых команд. Поэтому его также называют командной строкой.
Чтобы открыть терминал в Windows, нажмите клавиши Windows + R, затем наберите cmd и нажмите Enter. В Linux терминал открывается сочетанием клавиш Ctrl + Alt + T.
Python — это интерпретируемый язык программирования. Это значит, что интерпретатор Python читает строку кода, выполняет эту строку, а затем, если на этом шаге нет ошибок, процесс повторяется.
Оболочка Python дает вам интерфейс командной строки. С его помощью можно интерактивно передавать команды непосредственно в интерпретатор Python.
Подробнее об оболочке Python можно почитать в документации.
От редакции Pythonist. Об интерпретаторах Python можно почитать в статье «Топ-7 бесплатных компиляторов и интерпретаторов Python».
Как пользоваться оболочкой Python?
Чтобы запустить оболочку Python, просто введите python в терминале и нажмите Enter.
C:\Users\Suchandra Datta>python
Python 3.8.3 (tags/v3.8.3:6f8c832, May 13 2020, 22:37:02) [MSC v.1924 64 bit (AMD64)] on win32
Type "help", "copyright", "credits" or "license" for more information.
>>>print("hello world!")
Интерактивная оболочка еще называется REPL (read-evaluate-print loop — «цикл „чтение — вычисление — вывод“». Она читает команду, оценивает и выполняет ее, выводит результат (если он есть) и повторяет этот процесс, пока вы не выйдете из оболочки.
Выйти из оболочки можно по-разному:
- нажать
Ctrl+Zв Windows илиCtrl+Dв Unix-подобных системах - выполнить команду
exit() - выполнить команду
quit()
C:\Users\Suchandra Datta>python
Python 3.8.3 (tags/v3.8.3:6f8c832, May 13 2020, 22:37:02) [MSC v.1924 64 bit (AMD64)] on win32
Type "help", "copyright", "credits" or "license" for more information.
>>> print("HELLO WORLD")
HELLO WORLD
>>> quit()

C:\Users\Suchandra Datta>
C:\Users\Suchandra Datta>python
Python 3.8.3 (tags/v3.8.3:6f8c832, May 13 2020, 22:37:02) [MSC v.1924 64 bit (AMD64)] on win32
Type "help", "copyright", "credits" or "license" for more information.
>>> exit()

C:\Users\Suchandra Datta>
C:\Users\Suchandra Datta>python
Python 3.8.3 (tags/v3.8.3:6f8c832, May 13 2020, 22:37:02) [MSC v.1924 64 bit (AMD64)] on win32
Type "help", "copyright", "credits" or "license" for more information.
>>> ^Z


C:\Users\Suchandra Datta>
Что можно делать в оболочке Python?
В оболочке можно делать практически все, что вообще позволяет делать язык Python: использовать переменные, циклы, условия для определения функций и т. д.
Символы >>> — это приглашение оболочки, тут вы можете вводить свои команды. Если ваши команды занимают несколько строк, например, при определении цикла, оболочка выводит троеточие …, которое сигнализирует о продолжении строки.
Давайте рассмотрим пример:
>>>
>>> watch_list = ["stranger_things_s1", "stranger_things_s2", "stranger_things_s3","stranger_things_s4"]
>>>
>>>
Здесь мы определили список сериалов прямо в оболочке Python.
Теперь давайте определим функцию. Она будет принимать наш список сериалов и возвращать один из них случайным образом.
>>> def weekend_party(show_list):
...     r = random.randint(0, len(show_list)-1)
...     return show_list[r]
...
Обратите внимание на троеточия в начале строк.
Наконец, чтобы запустить функцию в оболочке, мы просто вызываем ее так же, как делали бы это в скрипте:
>>> weekend_party(watch_list)
'stranger_things_s1'
>>>
>>>
>>> weekend_party(watch_list)
'stranger_things_s3'
>>>
>>>
>>> weekend_party(watch_list)
'stranger_things_s2'
>>>
>>>
>>> weekend_party(watch_list)
'stranger_things_s2'
>>>
>>>
>>> weekend_party(watch_list)
'stranger_things_s3'
>>>
В оболочке можно просматривать модули Python:
>>>
>>>
>>> import numpy
>>> numpy.__version__
'1.20.1'
>>>
Посмотреть, какие методы и атрибуты предлагает модуль, можно при помощи метода dir():
>>>
>>> x = dir(numpy)
>>> len(x)
606
>>> x[0:3]
['ALLOW_THREADS', 'AxisError', 'BUFSIZE']
Мы видим, что всего Numpy имеет 606 методов и свойств.
Как запустить скрипт Python
В оболочке Python можно выполнять простые программы или заниматься отладкой отдельных частей сложных программ.
Но по-настоящему большие и сложные программы пишутся в редакторе кода. Они сохраняются в отдельных файлах с расширением .py. Их называют скриптами (сценариями) Python. Эти программы можно запускать на выполнение в терминале. Для этого используется команда Python.
Стандартный синтаксис следующий:
python filename.py
Все команды, которые мы выполняли в оболочке, можно записать в скрипт и запустить в терминале.
Заключение
Итак, вы познакомились с понятиями оболочки и терминала, а также научились пользоваться оболочкой Python. Мы также разобрали, как запустить скрипт Python в командной строке.
Перевод статьи «Run Python Script – How to Execute Python Shell Commands in the Terminal».
Python is widely used because of its simple syntax that makes it approachable for newcomers to programming.
The Python terminal is a powerful tool that lets you interact with your system directly using Python as your scripting language of choice. Learning to navigate the Python terminal will give you the tools to unlock more in-depth usage of Python.
Step 1: Open the Python Terminal
You can open the Python terminal by simply typing Python in your operating system’s console. This will bring up the Python interpreter, where you can write and execute Python code.
Step 2: Working with Python Terminal
The Python terminal works like a standard command-line interface. You enter Python commands at the >> prompt, and press Enter to execute them. For instance:
>>> print("Hello, Python Terminal")
This command will return the following output:
Hello, Python Terminal
Step 3: Exiting the Terminal
To exit the Python terminal, you can use the exit() method or press Ctrl-Z for Windows or Ctrl-D for Unix/Linux and then press[here](https://docs.python.org/3/tutorial/interpreter.html#interactive-mode) for more info.)
>>> exit()
In this tutorial, we have seen an example of how to use the Python terminal from start to end. You can use the Python terminal to execute any Python code just as if you were writing it in a .py file. This makes it a powerful tool for testing small bits of code and debugging.
Code Used:
|
# Printing in the python console >>> print(«Hello, Python Terminal») # Exiting the python terminal >>> exit() </pre> |
Conclusion
In conclusion, navigating the Python terminal is a simple and straightforward process that can open up many opportunities in your Python coding journey. We have covered opening the terminal, executing Python code, and then exiting the terminal. Now that you know this information, you can write, test, and debug Python code more efficiently.
Watch Now This tutorial has a related video course created by the Real Python team. Watch it together with the written tutorial to deepen your understanding: Using the Terminal on Windows
The terminal can be intimidating to work with when you’re used to working with graphical user interfaces (GUIs). However, it’s an important tool that you need to get used to in your journey as a Python developer.
And once you level up your skill of using the terminal, it becomes an extremely powerful tool in your repertoire. With just a few commands in the terminal, you can do tasks that are impossible or at least very tedious to do in a GUI.
In this tutorial, you’ll learn how to:
- Find the terminal on your operating system
- Open the terminal for the first time
- Navigate your file system with basic commans
- Create files and folders with the terminal
- Manage packages with
pipcommands - Keep track of your files with Git in the terminal
If you’re new to working with the terminal, or you’re looking to expand your understanding of its capabilities, then this tutorial is a great starting point. In it, you’ll get an introduction to some of the basic commands and learn how to use pip and Git to manage your projects in the terminal.
Understanding how to integrate the terminal, pip, and Git into your workflows is essential for you as a Python developer.
However, it’s important to note that you’ll only scratch the surface of what the terminal can do, and there’s much more to learn as you continue to explore the terminal as an essential development tool.
Install and Open the Terminal
Back in the day, the term terminal referred to some clunky hardware that you used to enter data into a computer.
Nowadays, people are usually talking about a terminal emulator when they say terminal, and they mean some kind of terminal software that you can find on most modern computers.
If you’re using a Linux or macOS machine, then the terminal is already built in.
You can start using it right away.
On Windows, you also have access to command-line applications like the Command Prompt.
However, for this tutorial and terminal work in general, you should use the Windows terminal application instead.
Read on to learn how to install and open the terminal on Windows and how to find the terminal on Linux and macOS.
Windows
The Windows terminal is a modern and feature-rich application that gives you access to the command line, multiple shells, and advanced customization options.
If you have Windows 11 or above, chances are that the Windows terminal is already present on your machine.
Otherwise, you can download the application from the Microsoft Store or from the official GitHub repository.
Before continuing with this tutorial, you need to get the terminal working on your Windows computer.
You can follow the Your Python Coding Environment on Windows: Setup Guide to learn how to install the Windows terminal.
After you install the Windows terminal, you can find it in the Start menu under Terminal.
When you start the application, you should see a window that looks like this:
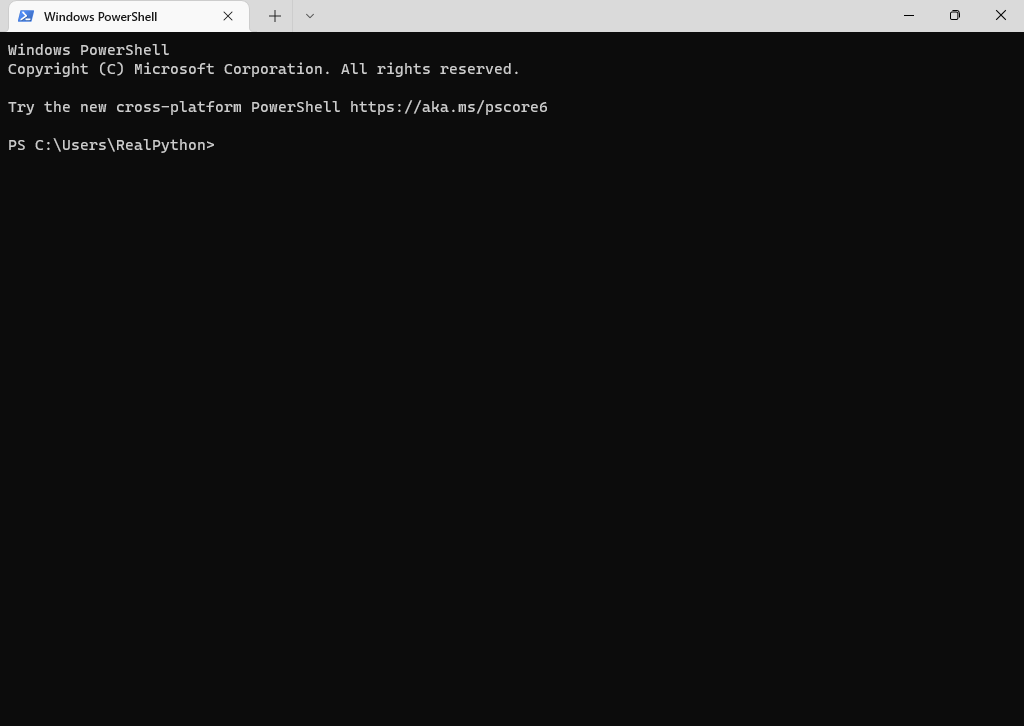
It can be handy to create a desktop shortcut for the terminal or pin the application to your task bar for easier access.
Linux
You can find the terminal application in the application menu of your Linux distribution.
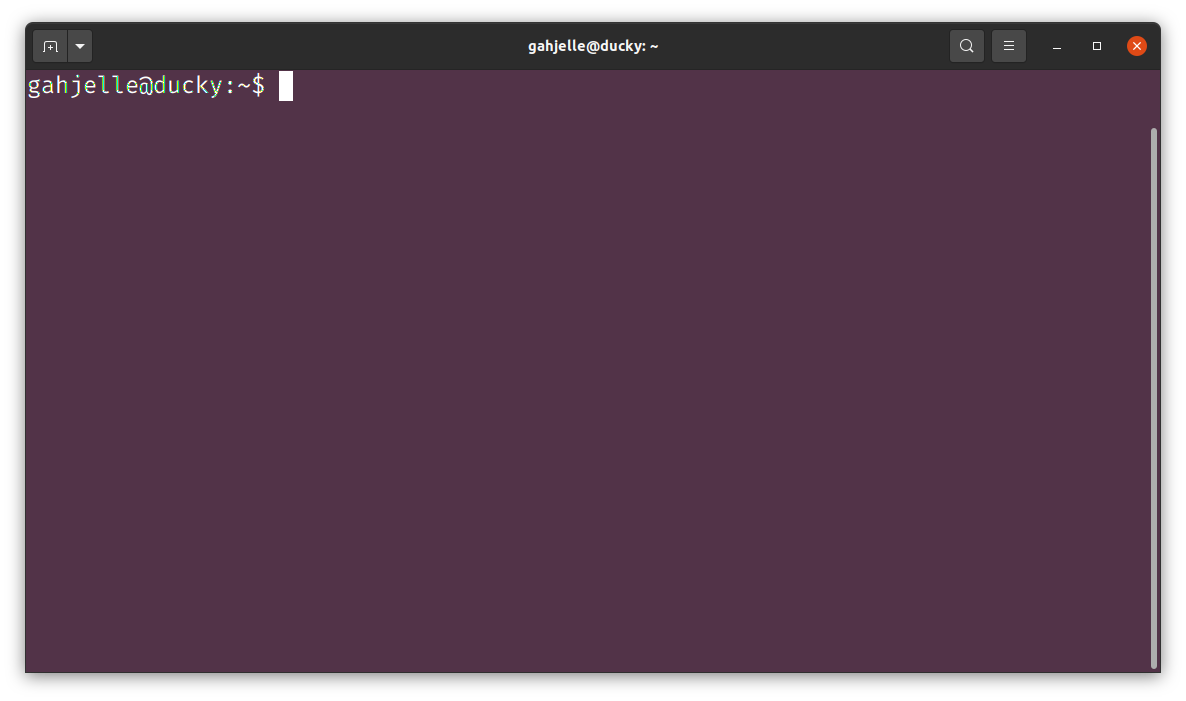
Alternatively, you can press Ctrl+Alt+T on your keyboard or use the application launcher and search for the word Terminal.
After opening the terminal, you should see a window similar to the screenshot below:
How you open the terminal may also depend on which Linux distribution you’re using. Each one has a different way of doing it.
If you have trouble opening the terminal on Linux, then the Real Python community will help you out in the comments below.
macOS
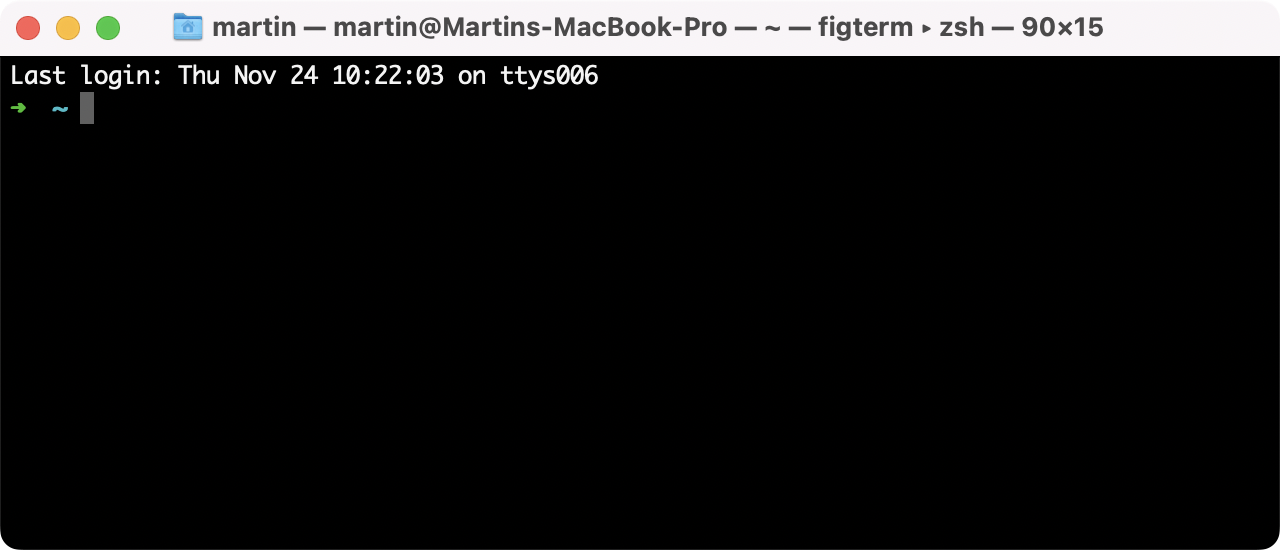
A common way to open the terminal application on macOS is by opening the Spotlight Search and searching for Terminal.
You can also find the terminal app in the application folder inside Finder.
When you open the terminal, you see a window that looks similar to the image below:
After you launch the terminal application, you’ll see a window that waits for commands.
That’s similar to when you’re interacting with a Python script that expects user input.
If you want to interact with the terminal, then you need to know which terminal commands you can enter to proceed.
In the next section, you’ll learn about basic terminal commands that’ll help you get started.
Learn Basic Terminal Commands
To work with the terminal effectively, it’s important to understand some basic terminal commands and know how to use them.
Terminal commands are the instructions that you type into the terminal to execute a specific task.
Depending on your operating system, you’ll run the terminal commands in a specific shell.
For Linux, it’s most likely Bash, for newer macOS versions it’s Zsh, and for Windows it’s PowerShell.
These shells differ in their features, but they share most of the basic commands.
In this section, you’ll explore the most commonly used terminal commands. To see a preview of the commands, select your operating system from the platform switcher below:
- Windows
- Linux + macOS
These are the Windows commands that you’ll cover:
| Command | Description |
|---|---|
pwd |
Print the path of the current directory |
mkdir FOLDERPATH |
Create a new directory |
ni FILEPATH |
Create a new file |
clear |
Clear the terminal window |
ls |
List the contents of a folder |
ls -al |
List all the contents of a folder with info |
cat TARGET |
Show the content of TARGET |
cd FOLDERPATH |
Change into a directory |
cd .. |
Change into the parent directory |
echo TEXT |
Print TEXT to the terminal |
echo TEXT > TARGET |
Print TEXT to a file named TARGET |
echo TEXT >> TARGET |
Append TEXT to TARGET |
cp SOURCE TARGET |
Copy SOURCE to TARGET |
rni SOURCE TARGET |
Rename SOURCE to TARGET |
python PYTHONFILE |
Run PYTHONFILE |
The terms in uppercase letters are references to the arguments that the commands allow.
These are the Linux and macOS commands that you’ll cover:
| Command | Description |
|---|---|
pwd |
Print the path of the current directory |
mkdir FOLDERPATH |
Create a new directory |
touch FILEPATH |
Create a new file |
clear |
Clear the terminal window |
ls |
List the contents of a folder |
ls -al |
List all the contents of a folder with info |
cat TARGET |
Show the content of TARGET |
cd FOLDERPATH |
Change into a directory |
cd .. |
Change into the parent directory |
echo TEXT |
Print TEXT to the terminal |
echo TEXT > TARGET |
Print TEXT to a file named TARGET |
echo TEXT >> TARGET |
Append TEXT to TARGET |
cp SOURCE TARGET |
Copy SOURCE to TARGET |
mv SOURCE TARGET |
Rename or move SOURCE to TARGET |
python PYTHONFILE |
Run PYTHONFILE |
The terms in uppercase letters are references to the arguments that the commands allow.
You’ll learn how to navigate the file system and create, edit, and delete files and directories.
By the end of this section, you’ll have a solid foundation for working with the terminal and be able to perform many everyday tasks with confidence. You can take this confidence and use it to tackle other tasks in the terminal, such as using pip, interacting with Git, and building command-line interfaces with Python.
Navigate Your File System
The file system is the hierarchical structure of directories and files on a computer.
It’s usually what you see when you open a GUI file system application like Windows Explorer or the macOS Finder.
It also happens to be an excellent place to start your terminal journey, but again, you’re just dipping a toe into all the terminal’s capabilities here.
The folder that you have currently open in a file system is the current working directory (cwd).
As you’ll notice, you use the working directory as a reference point for many file system operations.
Understanding the file system and the current working directory as a state is important for effectively navigating and managing files and directories in the terminal.
After you’ve opened the terminal app, you usually start in the user folder of your operating system.
You see a command prompt that’s waiting for your input.
As you’ll learn, you can use a wide variety of commands as input.
But some common commands are the ones to navigate the file system.
To get things started, find out what your current working directory is:
The pwd command stands for print working directory, which is the command that you use to determine your current location within the file system.
Here pwd shows that the current working directory is /Users/realpython.
The working directory is the current directory that you’re operating in.
It’s where commands will be executed by default.
There are two terms that are worth exploring in the context of the current working directory:
- Environment Variables
- PATH
Environment variables are variables that store stateful information about the environment in which the terminal is running.
They can be used to store information such as the current working directory, the location of installed software, or the user’s home directory.
The terminal can access and use this information to determine how to operate and where to look for files.
PATH is an environment variable that stores a list of directories. To see what paths are in your PATH, call the following command:
- Windows
- Linux + macOS
When you enter a command in the terminal, the system will look for a program that matches the command in the directories listed in the PATH.
The list visible after running the previous command is the list of locations that your system will look for when evaluating which program to run.
To see which files and folders the/Users/realpython directory contains, you can use ls, which is short for list:
When you type ls and press Enter, you see a list of all the items in the current working directory.
In this case, the example shows the folders that you commonly find in the user directory on a macOS machine.
You can also use the -a flag with the ls command, which stands for all.
The -a flag shows you all the items in the current working directory, including the hidden items.
Another flag that you can use is -l, which stands for long.
When you use this flag along with ls, the command shows you detailed information about the items in the current working directory.
You can also combine these flags to show detailed information about all the items, including the hidden ones, by using ls -al:
The output will show the file type, permissions, owner, size, and timestamp of all the items in the current working directory, including the hidden files and folders.
Here, for example, the hidden items are .DS_Store and .Trash.
Hidden files and folders aren’t displayed by default.
That’s okay for casual users.
But for you as a developer, hidden items can be of interest.
They often store configuration data or settings for various applications or the system itself.
The output above may be a bit overwhelming at first.
Have a look at this line to understand the output better:
This line gives you valuable information about an item.
There’s a directory named Desktop.
The last modified date is November 7 at 16:00, and it has a size of 704 bytes.
Apart from that, you can see information about the owner and group permissions.
If you want to learn more about the file system permission notation, then you can check out the notation of traditional Unix permissions.
Each folder in the output of ls represents a subfolder that’s inside your current working directory.
To change the current working directory into the Desktop/ subfolder, you use the change directory command, cd:
When you enter cd followed by a directory name, it’ll change the current working directory to the specified directory.
After you run the command cd Desktop, the current working directory changes to /Users/realpython/Desktop.
Note that you don’t specify a slash / or drive indicator like C:\ at the beginning of Desktop.
Calling a path like this indicates that you want to navigate into a path that’s relative to the directory that you’re in right now.
You used a relative path in the command above to navigate into a subfolder.
Relative paths make it convenient to reference items in your file system because you don’t have to specify the complete path from the root directory.
That being said, you can also change into any directory of your file system by using a complete or absolute path:
- Windows
- Linux + macOS
In this case, the cd command changes the current working directory to the directory C:\Users\realpython\Desktop, independently of its previous location.
In this case, the cd command changes the current working directory to the directory /Users/realpython/Desktop, independently of its previous location.
If you use cd with a path that doesn’t exist, then the terminal will print an error.
You’ll soon learn how to create new directories.
Before you do, make one last move in your file system.
To move one directory up, you usually don’t use the name of the parent folder but two dots:
The two dots (..) represent the parent directory of the current directory.
Using cd .. moves you up one directory in the file system hierarchy.
In a GUI file system application like Windows Explorer or the macOS Finder, you’d click little folder icons with your mouse cursor.
In the terminal application, you use commands to perform tasks—for example, cd to move between folders and ls to get an overview of the items in a directory.
Create Files and Folders
In this section, you’ll learn how to create and manage files and folders directly from the terminal with some new commands.
Additionally, you’ll continue to list the contents of a directory with ls and move between folders with cd, just like you learned before.
With the knowledge from this section, you’ll be able to create and organize your projects from within the terminal.
Start by making sure that your current working directory is the Desktop.
Then, use mkdir to create a new folder named rp_terminal:
- Windows
- Linux + macOS
You use the mkdir command to create a new directory.
The command stands for make directory.
Here, you name the new directory rp_terminal.
Next, move into rp_terminal/ and create a new file named hello_terminal.py.
Select your operating system below and use your platform-specific command accordingly:
- Windows
- Linux + macOS
When you run the ni command, you create an empty file with the given name.
In this case, the file is a Python script named hello_terminal.py.
If a file with the provided name already exists, then using ni updates the file’s timestamp to the current date and time, but doesn’t change its contents.
The ni command stands for new item.
When you run the touch command, you create an empty file with the given name.
In this case, the file is a Python script named hello_terminal.py.
If a file with the provided name already exists, then using touch updates the file’s timestamp to the current date and time.
The touch command also updates a file’s access and modification times, even if its content remains the same.
Use the long format of ls to verify that you created the file successfully:
The 0 between the group and the timestamp indicates that hello_terminal.py is currently empty.
You’ll use the echo command to add content to hello_terminal.py in a moment.
Before you do so, have a look at what echo does when you type the command followed by some text:
As a Python developer, you know that the text you just provided to echo is a print() function call.
However, for the echo command, it’s a plain string, which it outputs back into the terminal.
More specifically, the echo command sends the string to the standard output stream (stdout).
The stdout is the default destination for data that a command-line program sends.
The data is displayed on the screen, but you can tell the terminal to redirect stdout to a file:
Again, you’re using echo to output a given string.
But this time, you use the caret symbol (>) to send the output into hello_terminal.py.
One way to check if the command worked is to list the contents of your folder again:
Perfect, the size of hello_terminal.py is 26 bytes now.
To verify that it contains the print() function call, you can use the cat command:
Disappointingly, the cat command doesn’t have to do anything with cats.
It’s short for concatenate.
When you use cat with multiple files as arguments, you can concatenate them and display the contents one after another.
If you use cat with only one file, then cat is a convenient way to display the contents of a file in the terminal.
Now that you know that hello_terminal.py contains valid Python code, you can run the Python script:
When you’re using the python command, the terminal looks for the Python executable in your PATH.
If you run the python command without any arguments, then you’ll launch the interactive Python interpreter, also known as the REPL.
When you run the command with a script file as an argument, then Python runs the provided script.
In this case, you’re executing hello_terminal.py, and you see the output of your print() function directly in the terminal.
This works because Python’s print() uses stdout by default.
With the knowledge gained in this section, you can now create, edit, and inspect Python files within the terminal.
You’re now well equipped to move on to working with a command-line tool that’s essential on your journey as a Python developer.
It’s called pip, and it enables you to include external packages in your Python projects.
Manage Packages With pip
The pip package manager is an essential tool for managing Python packages.
To avoid installing packages directly into your system Python installation, you can use a virtual environment.
A virtual environment provides an isolated Python interpreter for your project. Any packages that you use inside this environment will be independent of your system interpreter. This means that you can keep your project’s dependencies separate from other projects and the system at large.
Create a Virtual Environment
Python has the built-in venv module for creating virtual environments.
This module helps you create virtual environments with an isolated Python installation.
Once you’ve activated the virtual environment, you can install packages into this environment.
The packages that you install into one virtual environment are isolated from all the other environments on your system.
You can follow these steps to create and activate a virtual environment named venv:
- Windows
- Linux + macOS
Note that the command prompt has changed.
This is a reminder that you’re working within the indicated virtual environment.
When you activate a virtual environment with Python’s venv module, you’re adding a new entry to the PATH environment variable.
The new entry points to the location of the virtual environment’s Python executable.
This ensures that when you run Python commands or scripts, they’ll use this specific Python executable instead of any other version of Python that may be installed on your system.
Install a Package
In this section, you’ll install the Rich library by Will McGugan, which enables you to create colorful text user interface (TUI) applications for the terminal.
Before you install rich, check which Python packages are currently installed in your virtual environment:
Running python -m pip list lists all the packages installed in the current environment.
Both pip and setuptools are default packages that you’ll find when you start a new virtual environment.
To install rich, use the command below:
Besides rich, you also installed some other dependencies that you need when you want to use rich.
To check all the currently installed packages, you can run python -m pip list again:
To see the capabilities that rich offers, run rich without any arguments:
Depending on your terminal’s capabilities, you should see examples that look like this:
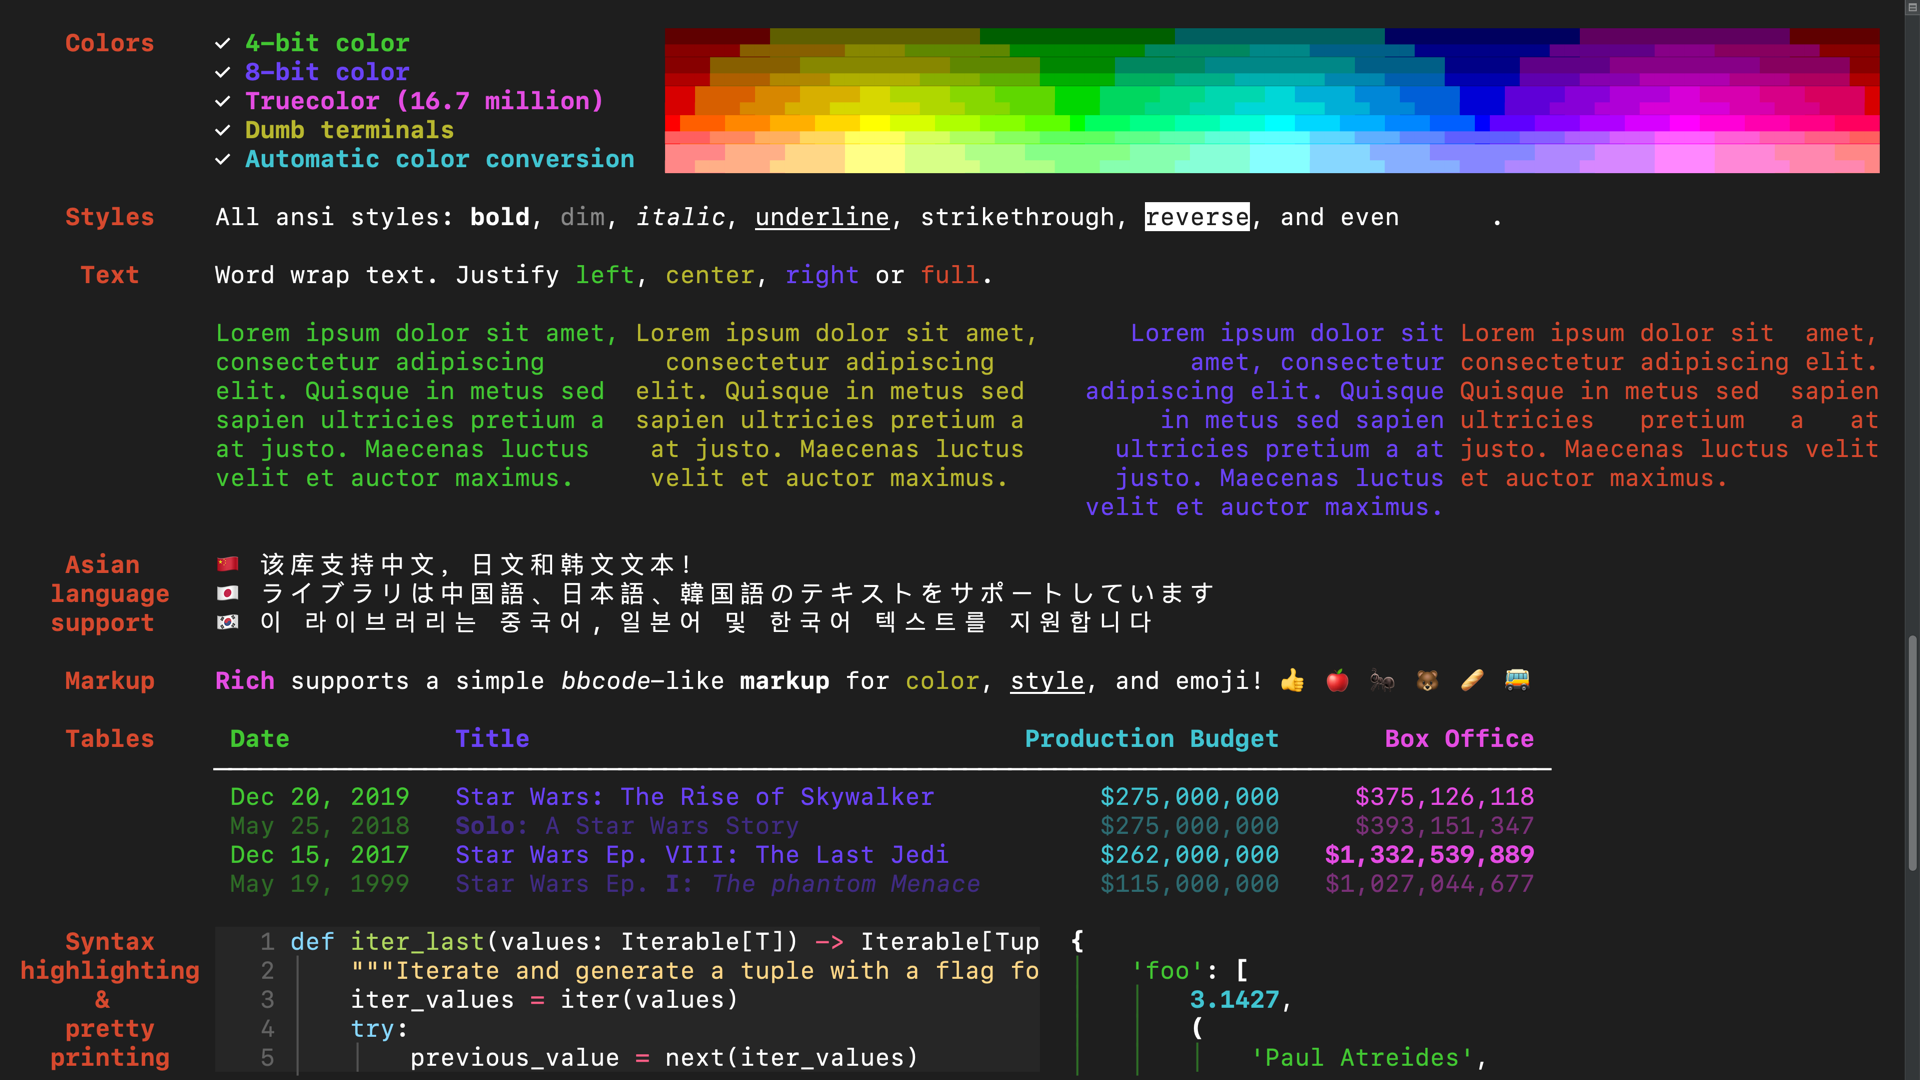
In the screenshot above, you can get an impression of what you can do with the rich library.
The terminal doesn’t have to be a dark place after all!
Now that your screen is filled from top to bottom, you may want to clear your terminal window again.
For this, you can use the clear command:
You use the clear command to clear the terminal screen.
It removes all the text and content currently displayed on the terminal, leaving a blank screen.
For example, you might want to clear the terminal screen before you run new commands.
In some terminals, you can use Ctrl+L or Cmd+L as keyboard shortcuts to clear the screen.
You’ve learned how to use pip directly from the terminal in this section.
Knowing how to use pip in the terminal is crucial for any Python developer, as it allows you to effectively manage and update the packages that you use in your projects.
If you want to learn more about virtual environments and pip, then you can check out Real Python’s primer on Python virtual environments and tutorial on how to use Python’s pip to manage your projects’ dependencies.
Both are essential tools to make your life as a Python developer more convenient.
Another helpful tool to manage your projects is Git.
Read on to learn how to improve your terminal skills and dive into the world of version control with Git.
Interact With Git
Git is a version control system that developers commonly use, no matter which programming language they’re writing their code in.
A version control system tracks changes made to files over time and helps you revert code to a previous version if needed.
In this section, you’ll learn how to interact with Git directly from the terminal.
You’ll initialize a Git repository, track files, and create commits.
There are a bunch of GUI clients for Git. They can be convenient to use and help you understand Git logic better by providing rich visual feedback.
However, it’s still a good idea to learn the basics of interacting with Git in the terminal. Learning the basic Git terminal commands can help you understand how Git works under the hood.
Initiate a Git Repository
The first step in using Git is to initialize a repository.
A repository is a container that holds all your project files, folders, and metadata.
Create a new Git repository with the command below:
When you run the git init command, Git creates an empty repository in the current working directory.
This creates a new subdirectory named .git/ that contains all of the necessary repository files.
After initializing the repository, you can check the status of your repository:
The git status command shows your repository’s current status.
It displays which branch you’re on and whether or not there are any commits.
A Git commit is a snapshot of the changes made to the files in a Git repository.
When you make changes to your files and save them, you can take a snapshot of those changes by creating a commit on a branch.
As you make new commits, the branch points to the latest commits.
In this case, you’re on the main branch, and there are no commits yet.
You can also create new branches to work on new features or bug fixes and then switch between branches as needed.
If you want to, then you can create multiple branches to work on various versions of your codebase simultaneously.
Additionally, git status shows you which files are untracked, meaning that Git isn’t tracking them.
You might want to ignore specific files and folders, such as the venv/ folder, so that Git won’t track them.
A general rule of thumb for ignoring files in a Git repository is to ignore any files that are specific to your local development environment or files that are generated by your build process. Some examples of files that should typically be ignored include:
- Files containing sensitive information, such as passwords or private keys
- Binary files that are generated by your build process, like compiled executables or object files
- Files specific to your local development environment, such as virtual environment files or user-specific editor configuration files
- Temporary files or files created by your operating system, such as
.DS_Storeon macOS orThumbs.dbon Windows - Log files or other files that your application generates at runtime
Check out GitHub’s collection of .gitignore templates to get an overview of common .gitignore files.
There you’ll also find a Python specific .gitignore example.
You can ignore files in Git by creating a .gitignore file and listing the files and folders that you want to ignore in that file:
As you learned before, this command creates a new file named .gitignore and writes venv to it.
Verify the current items in your Git repository by leveraging another command that you already know:
You now have a .gitignore file next to your hello_terminal.py file, your venv/ folder, and the .git/ folder.
To check if Git ignores the venv/ folder, run git status again:
Perfect, Git now only shows .gitignore and hello_terminal.py as untracked files.
Git knows the files are there, but you haven’t yet added them to the repository.
Track Files With Git
When you start a new project, you’ll likely want to keep track of your changes over time.
In the previous section, you initialized a new repository with git init.
Now it’s time to start tracking files.
You use the git add command to tell Git which files you want to track:
Remember the dot . in the directory listing before? The dot refers to the current directory. Using . at the end of the git add command tells Git to track all the files in the current directory.
Once you’ve added files to the repository, you can check the status of your files using the git status command:
You can see in the output that the files hello_terminal.py and .gitignore are added and ready to be committed:
With the git commit command, you take a snapshot of the current state of your files and store it in the repository’s history.
The -m flag allows you to include a message describing your changes.
The output shows the branch that you’re on and the number of files changed.
After you commit any changes, it’s a good idea to check the status of your Git repository again:
You can see in the output that there’s nothing to commit, meaning that all changes have been successfully committed.
The workflow that you used in this section is typical when you use Git in the terminal.
You use the git add command to tell Git which files to track.
Then you use git commit to take a snapshot of the current state of your files and save it to the repository’s history.
Additionally, it’s good practice to use git status often to check the current status of your repository.
While you’ve gotten an introduction to using Git in the terminal, there’s much more that Git has to offer you as a Python developer.
If you’re interested in learning more about Git, then you can check out the introduction to Git and GitHub for Python developers and dive even deeper with advanced Git tips for Python developers.
Next Steps
The more you use the terminal, the more comfortable you’ll get. A fun way to introduce the terminal into your workflows as a Python developer is to create Python scripts with command-line interfaces. For example, you can build a:
- Quiz Application With Python
- Site Connectivity Checker in Python
- Command-Line To-Do App With Python and Typer
- Python Directory Tree Generator for the Command Line
- Weather CLI App With Python
- Wordle Clone With Python and Rich
Especially for a Python developer, knowing how to work with the terminal can be extremely useful for various reasons. Besides using pip and Git to manage your Python projects, there are even more examples of when the terminal comes in handy:
- Command-line interfaces: Many popular Python libraries and frameworks—such as Django, Flask, and Poetry—come with command-line interfaces that allow you to perform tasks such as creating new projects, running development servers, and managing databases.
- Automation and scripting: The terminal allows you to automate repetitive tasks and create scripts to manage your development workflow—for example, running tests or deploying your application.
- Debugging: The terminal can be useful for debugging your code. For instance, you can use
print()or logging in Python to show output in the terminal and understand what’s happening in your code. You can also use pdb for debugging your Python code. - Performance: Many command-line tools are faster than their GUI counterparts and ideal for working with large datasets or performing advanced tasks such as data processing and analysis.
Overall, the terminal is a powerful tool that can help you streamline your development workflow, automate tasks, debug your code, and access advanced features of libraries and frameworks. With practice, you’ll find the terminal an invaluable tool for your journey as a Python developer.
Conclusion
When you’re comfortable using the terminal, then you’ll probably be able to navigate your file system faster and with more control than when using your mouse and clicking buttons.
In this tutorial, you’ve learned how to:
- Find the terminal on your operating system
- Open the terminal for the first time
- Navigate your file system with basic commands
- Create files and folders with the terminal
- Manage packages with
pipcommands - Keep track of your files with Git in the terminal
You’ve boosted your programming skills by learning how to do three really important tasks in the terminal: navigate the file system, manage Python packages with pip, and make commits to Git. Learning terminal commands is a great investment for you as a Python developer. Just take your time and get to know this powerful tool step by step. Soon enough, it’ll be an important tool in your repertoire that you can’t live without.
How important is the terminal for your workflow as a Python developer? Are there any essential commands that you would add to the tutorial? Let the Real Python community know in the comments below!
Watch Now This tutorial has a related video course created by the Real Python team. Watch it together with the written tutorial to deepen your understanding: Using the Terminal on Windows
You’ll now learn to open Python on Linux, Windows, and MacOS. First of all, you should know that there are two ways of using Python:
- Start an interactive shell, also called a REPL, short for read-evaluate-print-loop.
- Start a Python program that you stored in one or more files with the .py extension.
This tutorial will start with the interactive shell because it’s ideal for exploring the language. But at some point, using the REPL will not be enough, and you’ll have to start creating Python files instead.
If you installed Python on your local machine, you first need to start a terminal or command prompt before you can start the Python interactive shell. On all platforms, you should be able to start Python 3 with the command python3 (or sometimes just python). Just be sure you are running Python 3, not 2, because some systems can have both versions installed.
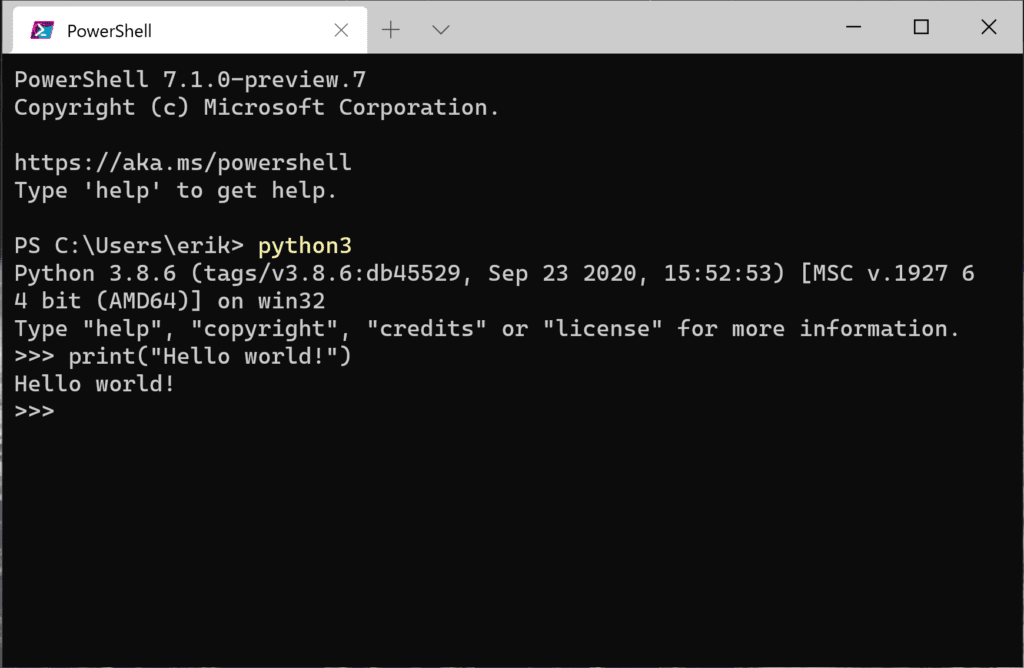
On Windows, you can start Python from a terminal. I highly recommend you follow my Computer Fundamentals course, in which I explain all the basics you need to know before you begin programming! It does a great job of introducing you to files, folders, the basics of how a computer works, and using the command line.
To start PowerShell, hit the Windows key and start typing PowerShell. You can use the ‘Command Prompt’ program if you don’t have PowerShell. Once you are in a shell or command prompt, enter one of the following commands (try them in the given order):
- py
python3- python
The first command (py) is a wrapper script that allows you to start the latest version of Python. If it works, great. Just remember that I’ll often refer to python or python3 in the tutorial. You will need to use py in those cases.
How to open Python on Mac
On MacOS, search for a program called terminal. You can do so by pressing the command key (⌘) + space bar. This will open up the Spotlight search bar, in which you start typing the word ‘terminal’.
Once inside the terminal, enter python3 to open the Python REPL. If that doesn’t work, try entering python instead (without the 3).
I highly recommend you follow my Computer Fundamentals course, in which I explain all the basics you need to know before you begin programming! It does a great job of introducing you to files, folders, the basics of how a computer works, and using the command line.
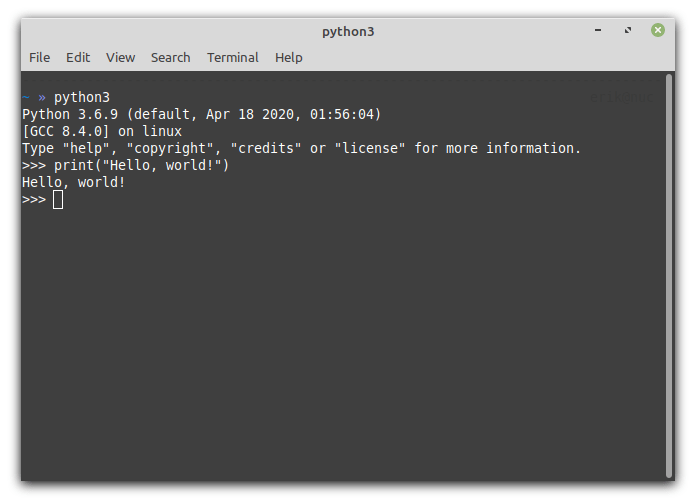
How to open Python on Linux
On Linux, you first need to start a terminal. This can often be done with the shortcut ctrl + alt + T. Alternatively, you can search for the terminal program in your start menu. The name and where to find it differ from distribution to distribution. Once you have a terminal running, enter python3 to start the Python REPL. If that doesn’t work, try python instead (without the 3).
I highly recommend you follow my Computer Fundamentals course, in which I explain all the basics you need to know before you begin programming! It does a great job of introducing you to files, folders, the basics of how a computer works, and using the command line.
How to close the REPL
Now that you know how to open the REPL, it would be nice to close it properly, too. If you simply close the terminal window by pressing the close button, you will be able to close the REPL inside it as well. However, it won’t be a clean exit; your terminal will usually warn you about this. So, how do you exit the REPL cleanly?
What works on every OS is the following Python command: exit()
You can also use a little trick if you’re on Linux or MacOS. By pressing control + d, the REPL will exit immediately. Control + d sends the ‘end of file’ character the to terminal, and the REPL interprets this as a request to exit Python. On Windows, you can do something similar by pressing control + z and then hitting enter.
Learn Python properly through small, easy-to-digest lessons, progress tracking, quizzes to test your knowledge, and practice sessions. Each course will earn you a downloadable course certificate.
In this beginner Python tutorial, you will learn about the 3 ways that you can use to run Python.
Along the way, you will learn about:
- How to Use Python Interpreters
- How to Run Python in the Command line
- How to Use Integrated Development Environments (IDEs)
- Python Scripts and Modules
- Python Notebooks
Installing Python
In order to use Python, you will need to install the Python Interpreter.
What is the Python Interpreter
The Python interpreter is the software that you need to use in order to Python code and scripts.
To install Python, read one of the following articles:
- Install Python on MacOS
- Install Python on Windows
- Install Python with Anaconda
What are the 3 Ways to Run Python
The three options to run Python code are:
- Run Python in the Command line (Terminal)
- Run Python in an IDE (Integrated Development Environment)
- Run Python in a Python Notebook
1. Run Python with the Terminal (Command-Line)
The first way that you can run Python is using the Terminal. To run Python in the Terminal, or the Command-Line, open your shell.
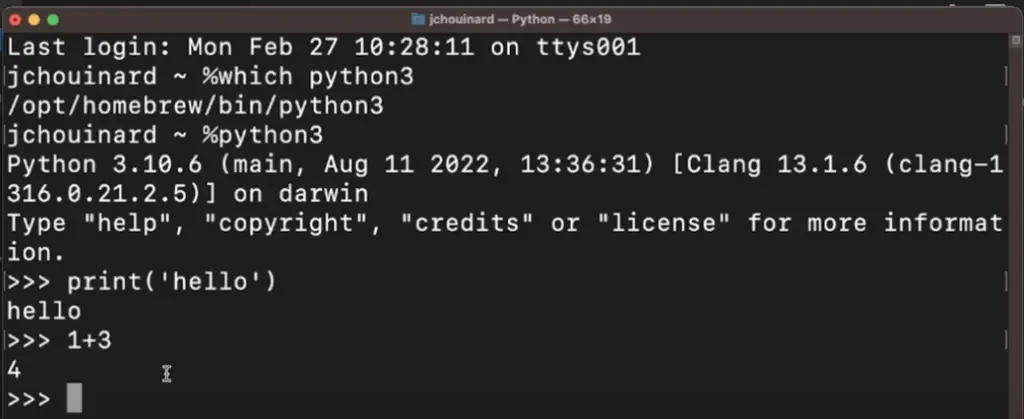
Check if Python is installed
Open Python
Open the Python Interactive Window using the python3 keyword. Sometimes, the installer is under the python alias.
Run Python
Exit the Python Interactive Window
Either type Command + Shift + D (on Mac) or type in exit() on Windows.
2. Run Python in an Integrated Development Environment (IDE)
The second way that you can execute Python code is from an Integrated Development Environment.
What is an Integrated Development Environment?
An Integrated Development Environment, also known as an IDE, is a software that gives you the tools to improve the programming workflow.
Some IDEs are Python Specific such as JetBrains’ PyCharm (paid), others can be used with most programming languages such as VS Code (free).
Why Use an IDE?
Integrated development environments are one of the ways that web developers can use to run code. They provide things such as a file management interface, access to a Terminal, run code, along with many other web development features:
- Syntax Highlighting
- Autocomplete
- Debugging
- Terminal
- Git version Control
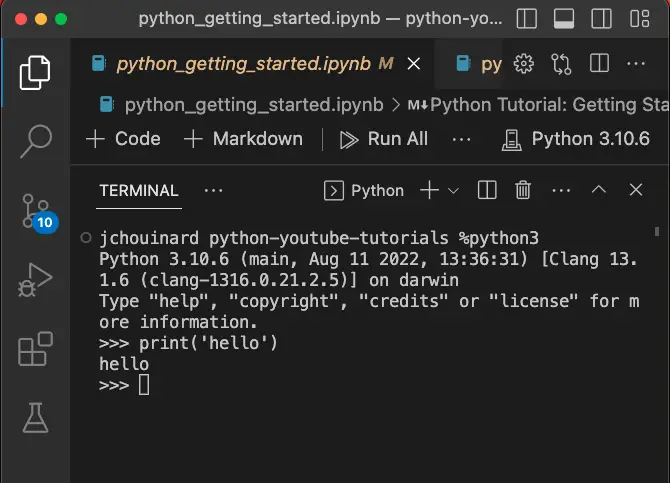
Run Python in IDE’s Terminal
In VS Code, open a new Terminal using Control + Shift + ` or by selecting Terminal > New Terminal in the menu.
From the new Terminal window that just opened, you can run Python just as before.
Run Python in IDE’s Interactive Window
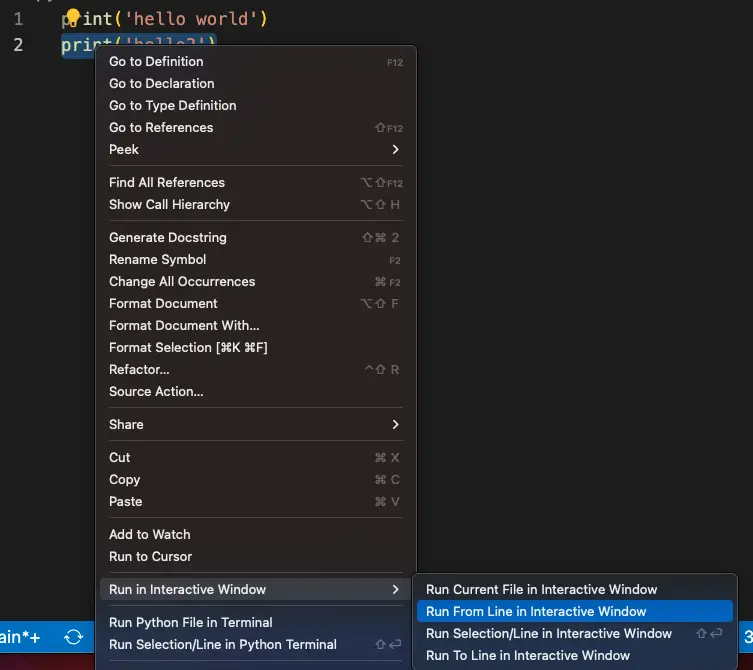
VS Code has a Python interactive window that you can access using Shift + Enter. Alternatively, you can right-click on the line that you want to run and go to Run in interactive Window and select Run From Line in Interactive Window.
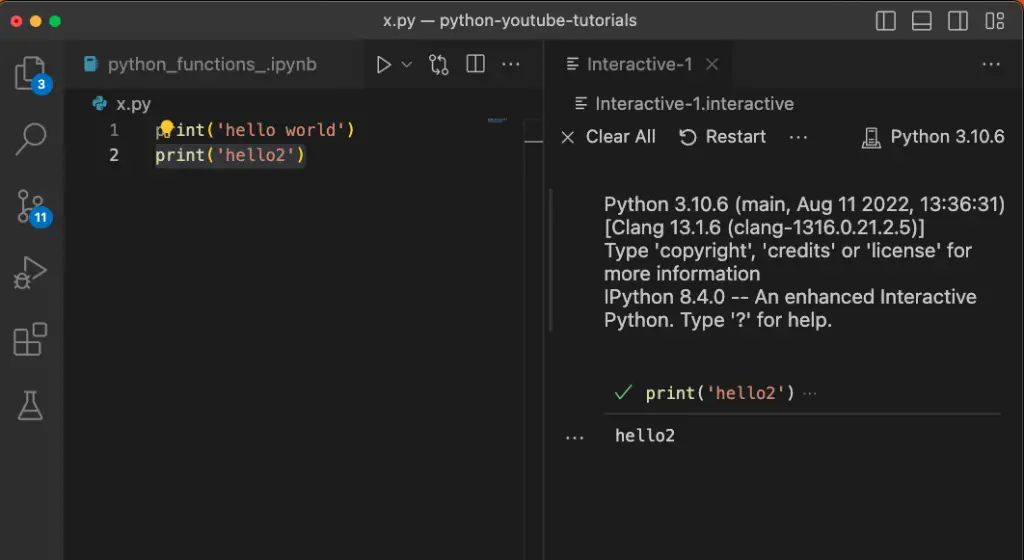
The Python Interactive Window will open and run whatever line you wanted to execute.
If this does not work, make sure that you have installed the Python plugins for VS Code.
3. Run Python in a Python Notebook
The third way that you can execute Python code is from a Python Notebook.
What is a Python Notebook?
A Python Jupyter Notebook is an open-source environment that lets you write, read and share your Python code for data analysis. It provides additional capacity such as run code line-by-line and commenting code using the Markdown syntax.
Some examples of Python notebooks are browser-based such a using Google Colab with Python or using a local version of a Jupyter Notebook.
How to use Notebooks
To use a Python notebook, you have to install Python notebook extension on VS Code or use something such as Google Colab.
You create notebook by using the ipynb extension.
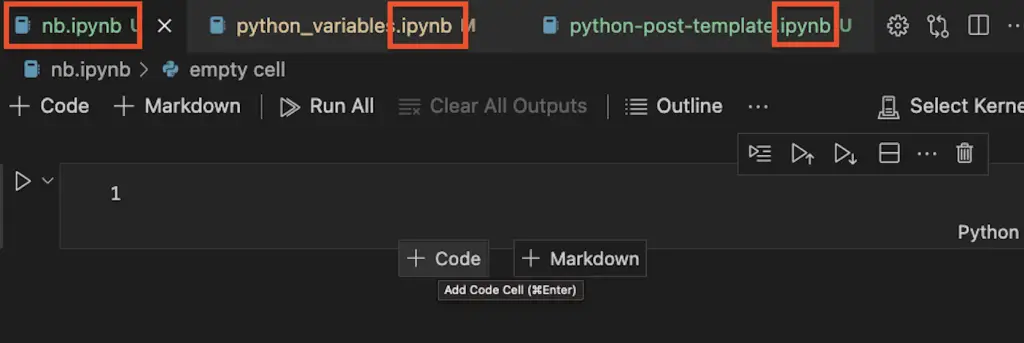
Python notebooks have a different file extension than Python files:
- Python file (.py)
- Python Notebooks (.ipynb)
In Visual Studio Code, you can create a code block by clicking on + Code.
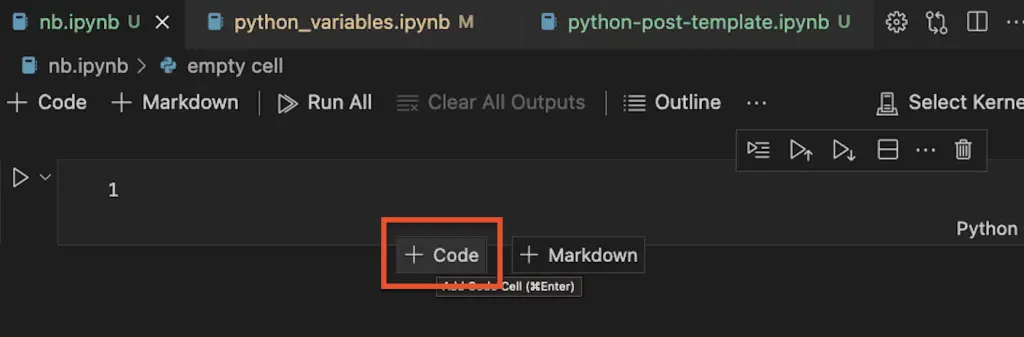
And then you can execute the block of code using the play button next to the block.
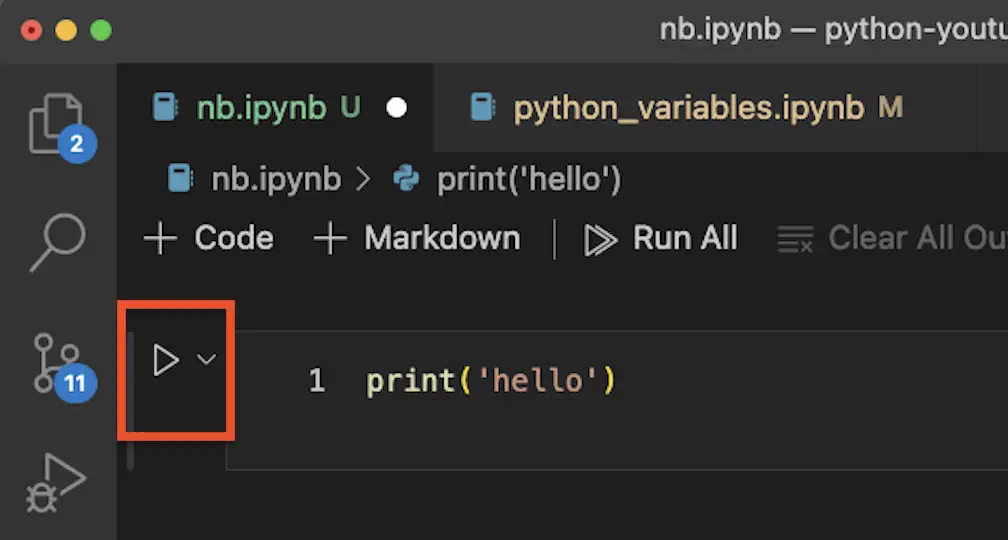
Only the block, not the entire file will have run.
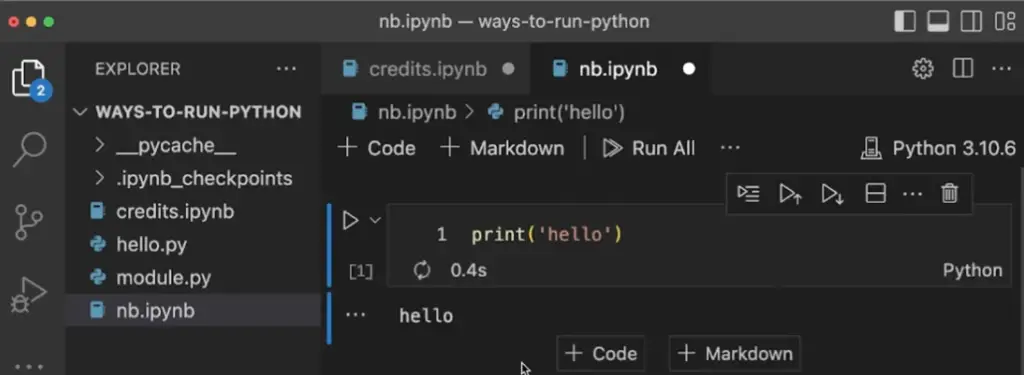
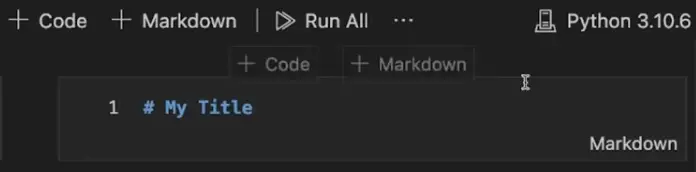
On top of that you can create description for your code by clicking on the + Markdown button and use the markdown syntax to comment your code.
Python Scripts and Modules
Python scripts and modules are both Python files with the .py extensions that are waiting to be executed;
Difference Between a Python Script and a Module
- Python script: Python file that you run Directly
- Python module: Python file that you import to be used in another Python file
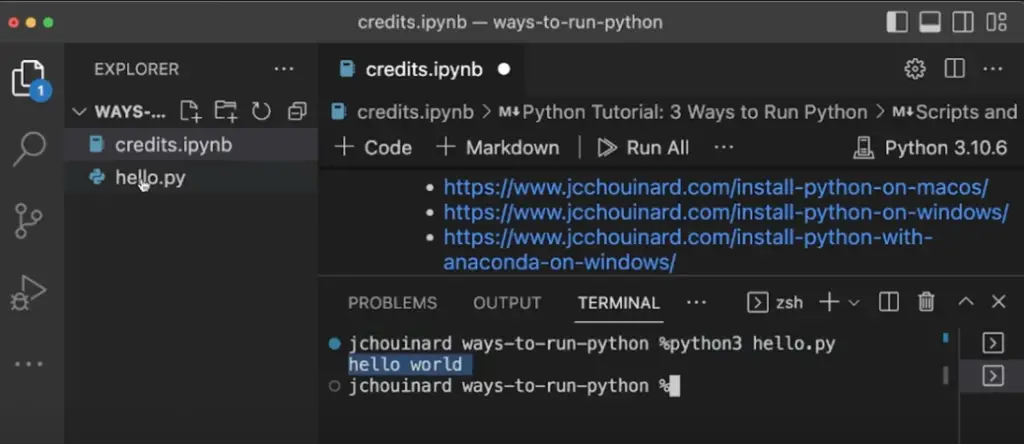
How to Run a Python Script
To run a Python script, you need to use the python keyword with the location of the file to be executed.
$ python3 path/to/file.py
Let’s take this simple Python file.
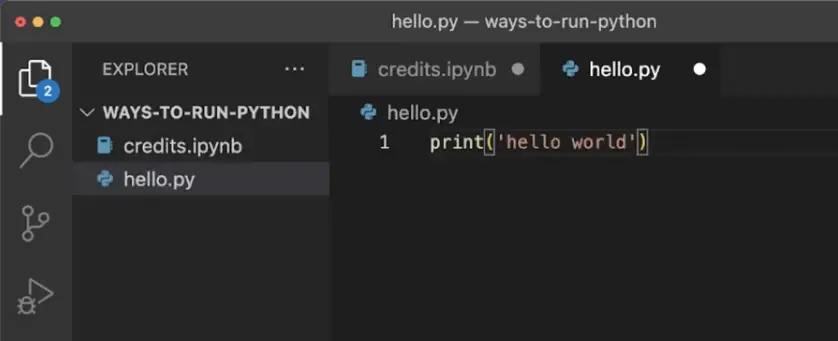
To execute the Python file in the Terminal, or in the shell of your IDE, you can type the python3 filename.py command.
How to Run a Python Module
To run a Python module, you need to import the module from another Python file and execute that file.
Take this file for example.
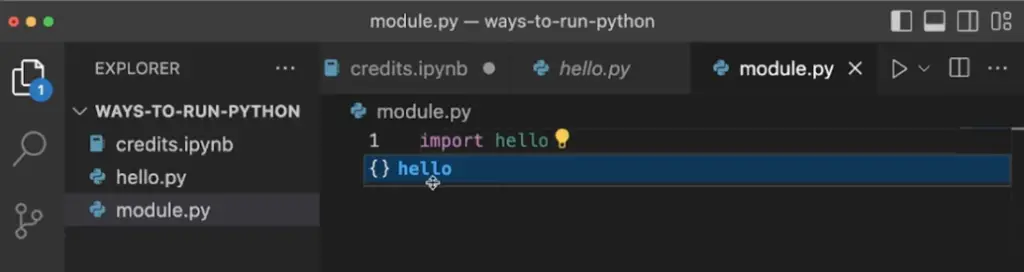
While we called the hello.py file a script earlier, it is now a called a module when I import it from module.py.
You can run this in a similar matter as earlier.
And you will see that the the print(‘hello world’) function was execute, but this time as a module.

Conclusion
This is it, you now know the 3 ways that you can use to run Python code: using the Terminal, using an IDE or using a Python Interactive Window.
SEO Strategist at Tripadvisor, ex- Seek (Melbourne, Australia). Specialized in technical SEO. Writer in Python, Information Retrieval, SEO and machine learning. Guest author at SearchEngineJournal, SearchEngineLand and OnCrawl.