
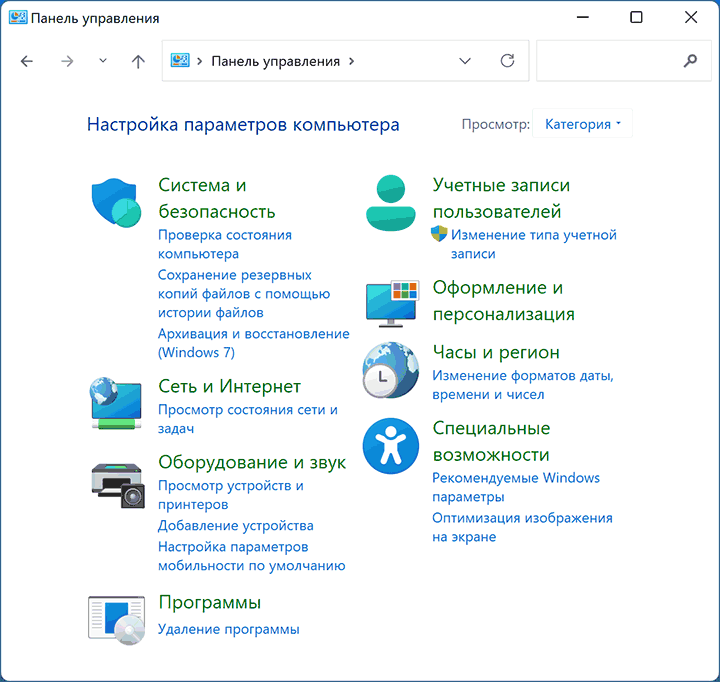
Панель управления в Windows 11 есть, хотя приоритет отдаётся новому интерфейсу «Параметры». И, в силу ли привычки или же, потому что это объективно так, некоторые настройки выглядят удобнее и логичнее реализованными именно в панели управления.
В этой инструкции подробно о способах открыть Панель управления Windows 11 — несмотря на то, что с глаз начинающего пользователя она скрыта, получить доступ к традиционному интерфейсу очень просто.
Запуск панели управления с использованием Поиска Windows 11
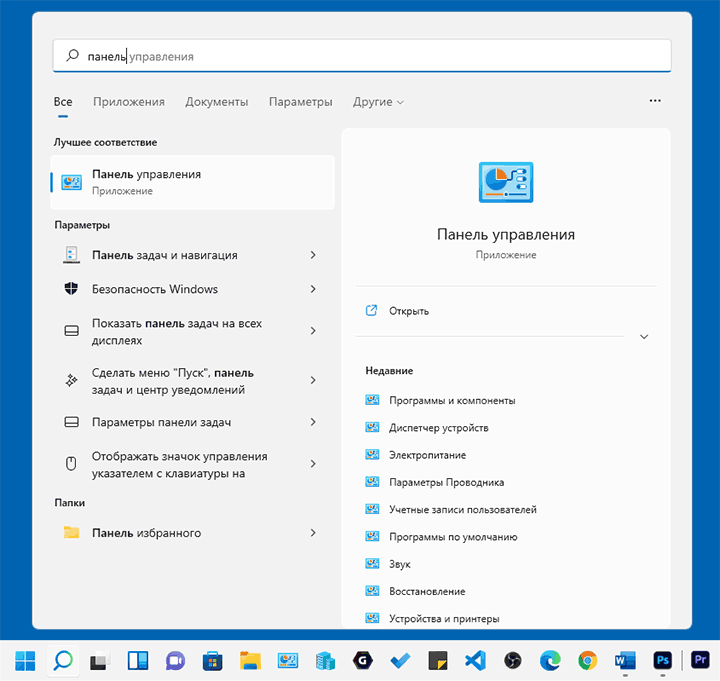
Один из самых быстрых способов открыть панель управления Windows 11 — использовать системную функцию поиска.
- Откройте окно поиска с помощью кнопки в панели задач или, если она не отображается, используйте поле поиска в меню «Пуск».
- Начните вводить «панель управления».
- Уже после ввода первых символов, Панель управления будет найдена и её можно будет открыть.
При необходимости вы можете использовать тот же подход не для того, чтобы перейти ко всей панели управления, а для быстрого доступа к нужному элементу. К сожалению, для некоторых запросов в Поиске будут обнаруживаться только разделы в «Параметрах».
Кстати, всякий раз, когда вы не знаете, как что-то запустить в Windows 11 и не уверены, присутствует ли нужная утилита в системе, помните о поиске: обычно он оказывается очень эффективным.
Как открыть панель управления через Win+R или диалоговое окно «Выполнить»
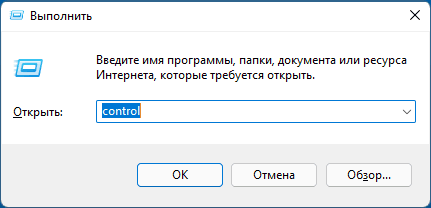
Если вы из тех пользователей, которые предпочитают использовать диалоговое окно «Выполнить» для запуска системных инструментов, с помощью него можно запустить и панель управления:
- Нажмите клавиши Win+R на клавиатуре (где Win — клавиша с эмблемой Windows), либо нажмите правой кнопкой мыши по кнопке «Пуск» и выберите пункт «Выполнить».
- В окне «Выполнить» введите control (или control.exe)

- Нажмите кнопку «Ок» или клавиши Enter на клавиатуре.
Исполняемый .exe файл панели управления Windows 11
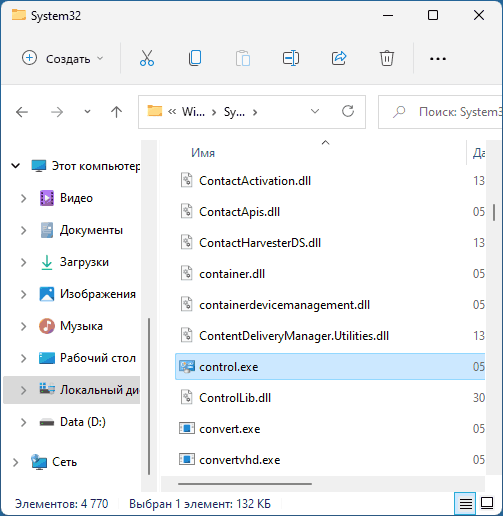
Панель управления — это обычная программа Windows, которую можно запустить, используя её исполняемый файл:
- Перейдите в папку C:\Windows\System32\
- Найдите файл control.exe (можно использовать поле поиска справа вверху окна проводника).

- Запустите его для открытия панели управления.
Дополнительные возможности
В завершение — о некоторых дополнительных возможностях, которые могут быть полезны в контексте запуска панели управления Windows 11:
- Найдя панель управления в Поиске, вы можете нажать по результату правой кнопкой мыши и закрепить панель управления на панели задач или в меню «Пуск» (на начальном экране).
- Для панели управления можно создать ярлык в удобном вам расположении: правый клик мышью — создать — ярлык, и указать control.exe в поле «Укажите расположение объекта».
- С помощью Win+R можно напрямую запускать элементы панели управления .cpl, например — appwiz.cpl для «Программы и компоненты», ncpa.cpl для списка подключений, sysdm.cpl для классического интерфейса «Свойства системы», mmsys.cpl для открытия устройств записи и воспроизведения, а некоторые можно запустить иначе, указав имя элемента, например: control /name Microsoft.BackupAndRestore для запуска «Резервное копирование и восстановление» в старом, но всё ещё исправно работающем интерфейсе (интересно, что при использовании учётной записи Майкрософт в Windows 11 этот элемент иначе и не открыть). Список доступных апплетов Панели управления для запуска описанным методом.
- Из некоторых разделов приложения «Параметры» можно попасть в элемент панели управления. Например, если зайти в Система — О системе и нажать «Дополнительные параметры системы», мы попадём в стандартное окно свойств системы.
Windows 11 has introduced a new modernized Settings app, replacing the traditional Control Panel that was a staple in previous versions of Windows. While the new Settings app offers a sleek and user-friendly interface, some users may still prefer the familiarity and functionality of the old Control Panel. If you’re one of those users, this tutorial will guide you through the steps to open the old Control Panel on Windows 11.
Step 1: Click on the Start button located at the bottom-left corner of the taskbar.
Step 2: From the Start menu, click on the «Settings» icon. It resembles a gear and is located above the power button.
Step 3: The Settings app will open. In the search bar at the top, type «Control Panel» without the quotes.
Step 4: As you type, the search results will start appearing below the search bar. Look for the search result that says «Control Panel – Desktop app» and click on it.
Step 5: The old Control Panel will now open, providing you access to various system settings and configuration options.
Step 6: Alternatively, you can also use the keyboard shortcut «Win + X» to open the Quick Links menu. From the menu, select «Control Panel» to open the old Control Panel.
Pros Cons
1. Familiarity and continuity for long-time Windows users 1. Some settings are only available in the new Settings app
2. Access to advanced configuration options and features 2. Potential for confusion with two separate settings interfaces
3. Easier navigation for experienced Control Panel users 3. Lack of future updates and advancements
Opening the old Control Panel on Windows 11 can provide a sense of familiarity and ease of access to advanced settings. However, it’s important to note that certain settings and features may only be available in the new Settings app. It ultimately comes down to personal preference and individual needs when deciding which interface to use for system configuration on Windows 11.
Video Tutorial:Why is Control Panel still there?
Did Windows remove Control Panel?
Yes, Microsoft made changes to the Control Panel in recent versions of Windows. Instead of completely removing it, they have been gradually transitioning its functionality to the modern Settings app. Here are the reasons behind this transition:
1. Streamlining the user experience: The Settings app offers a more modern and intuitive interface, designed to be user-friendly and accessible across various devices. It provides a consistent experience for users, eliminating the need to switch between the Control Panel and other settings menus.
2. Centralized settings management: By consolidating settings in the Settings app, Microsoft aims to provide a single location where users can easily access and manage various system settings. This helps simplify the configuration and customization process.
3. Improved touch and tablet support: The Settings app has been optimized for touch-enabled devices, making it easier to navigate and interact with settings using touch gestures or stylus input. This aligns with the trend towards touch-centric interfaces and the increasing use of tablets.
4. Additional features and updates: The Settings app allows Microsoft to introduce new features and settings more efficiently. With regular updates to Windows, they can add or modify settings without making significant changes to the underlying operating system.
While many settings have been migrated to the Settings app, some options are still found in the Control Panel. However, Microsoft encourages users to use the Settings app for most operations as they continue to refine and improve it.
It’s worth noting that the exact changes made to Windows can vary depending on the specific version and updates installed. Therefore, it’s essential to check the version of Windows you’re using to verify the presence and availability of the Control Panel.
Why can’t I find Control Panel in Windows 11?
Windows 11 introduces a new design and user interface compared to previous versions of Windows. One noticeable change is the removal of the traditional Control Panel. Here are a few reasons why you can’t find the Control Panel in Windows 11 and what you can do instead:
1. Modernization and Consolidation: Microsoft has been gradually moving towards a more modern and streamlined interface with each Windows update. Windows 11 continues this trend by consolidating settings and system management tools into the Settings app. This change aims to provide a more cohesive and user-friendly experience, simplifying the navigation and reducing duplicated functionality.
2. Enhanced Settings App: The Settings app in Windows 11 has been significantly improved and expanded to include most, if not all, of the features and options previously found in the Control Panel. Microsoft has been working to make the Settings app the central hub for configuring and customizing the system, ensuring a consistent and intuitive experience for users.
3. Shift to System-App Integration: Instead of having separate tools like the Control Panel and the Settings app, Windows 11 focuses on integrating system-wide settings into specific apps. For example, display settings are now accessible through the «Display» option in the Settings app, rather than being isolated in the Control Panel. This approach helps streamline the settings management process and makes relevant options easily discoverable.
4. Accessibility: By providing a unified and simplified settings experience through the Settings app, Microsoft aims to make Windows more accessible to users, regardless of their technical expertise. The consolidated interface reduces confusion and allows for easier navigation and customization of system settings.
To access various settings in Windows 11, follow these steps:
1. Click on the Start button (Windows logo) located at the bottom left of the taskbar.
2. Click on the «Settings» icon (represented by a gear-shaped icon) in the Start menu.
3. The Settings app will open, providing access to various categories and options.
4. Use the navigation pane on the left to browse and select the desired settings category.
5. Within each category, you’ll find specific options and configurations related to that category.
Remember that while the Control Panel is no longer easily accessible in Windows 11, it is still present in the background to support legacy applications and functionalities. However, Microsoft encourages users to utilize the Settings app for most configuration needs and continues to improve it with each Windows update.
Why is Control Panel missing?
The absence of the Control Panel in recent versions of operating systems, such as iOS 16, can be attributed to several key reasons:
1. User Experience Enhancement: One of the primary reasons for the removal of the Control Panel is to streamline and simplify the user experience. Control Panel was historically used for system settings management, but its interface was often cluttered and overwhelming for some users. To provide a more intuitive and straightforward approach, Apple may have replaced the Control Panel with alternative options.
2. Centralized Settings: With the introduction of newer iterations of iOS, Apple has consolidated and centralized system settings into a more cohesive and accessible location. This overarching approach makes it easier for users to locate and modify various settings, thereby eliminating the need for a separate Control Panel.
3. Control Center Integration: The functionality provided by the Control Panel has been integrated into the Control Center. Control Center is an easily accessible menu accessed by swiping down from the top-right corner of the screen or iPadOS from the top-right corner on compatible devices. It offers quick access to essential settings such as Wi-Fi, Bluetooth, brightness, volume controls, and other commonly used features.
4. Simplification of Options: Removing the Control Panel also leads to a simplification of the system’s options and reduces redundancy. By consolidating settings and eliminating duplicates, it enables a more streamlined and user-friendly experience.
5. Increasing Security: Control Panel, being a part of the system settings, provided deeper access to various critical functions and preferences. However, this level of access also came with certain security risks. By eliminating the Control Panel, Apple may have aimed to mitigate potential security vulnerabilities and ensure a more secure operating system.
Overall, the absence of the Control Panel in recent iterations of operating systems like iOS 16 reflects Apple’s commitment to enhancing user experience, simplifying settings management, increasing security, and providing a more streamlined approach to system settings through the integration of functionality into the Control Center and centralized settings.
To open the old control panel in Windows, follow these steps:
1. Press the Windows key + R on your keyboard to open the Run dialog box.
2. Type «control» (without the quotes) and press Enter or click OK. This will open the classic Control Panel.
Alternatively, you can also try one of the following methods:
Method 1: Using the Start Menu
1. Click on the Start button located at the bottom left corner of the screen.
2. In the search bar, type «Control Panel» and press Enter. This will open the classic Control Panel.
Method 2: Using File Explorer
1. Open File Explorer by clicking on the folder icon located on the taskbar or by pressing the Windows key + E.
2. In the address bar, type «Control Panel» and press Enter. This will open the classic Control Panel.
Method 3: Using Command Prompt or PowerShell
1. Open Command Prompt or PowerShell by searching for it in the Start menu or by pressing Windows key + X and selecting either «Command Prompt» or «Windows PowerShell» from the menu.
2. In the command line interface, type «control» and press Enter. This will open the classic Control Panel.
Remember, the methods mentioned may vary depending on your specific version of Windows. These steps are applicable to Windows 10, but they should work similarly in earlier versions of Windows as well.
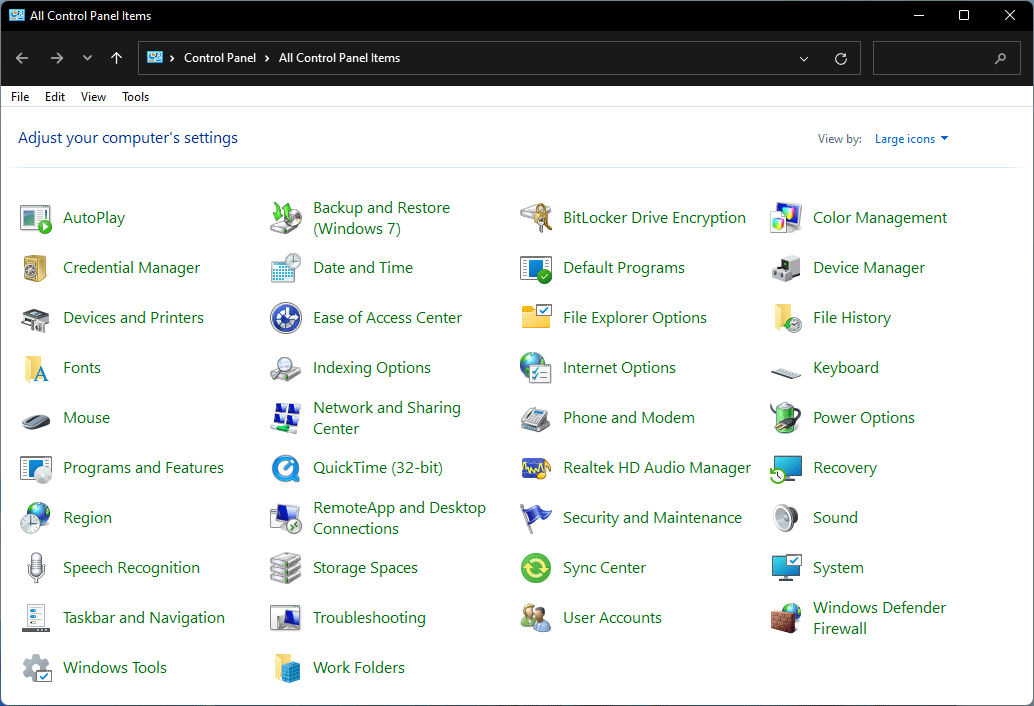
How do I see all Control Panel items in Windows 11?
To access all Control Panel items in Windows 11, follow these steps:
1. Click on the Start button located at the bottom left corner of the screen. Alternatively, you can press the Windows key on your keyboard to open the Start menu.
2. In the Start menu, click on the Settings icon. It resembles a gear-shaped icon and is usually located above the Power button.
3. The Settings window will open. Here, you will find various categories of settings.
4. Scroll down and click on the option labeled «System«. This will open the System settings.
5. Within the System settings, you will find a sidebar on the left side of the window. Scroll to the bottom and click on the option labeled «About«.
6. In the About settings, you will find a section titled «Related settings«. Click on the link labeled «Advanced system settings«.
7. A User Account Control dialog may appear, requesting permission to make changes to your system. If prompted, click on the «Yes» button to proceed.
8. This action will launch the System Properties window. Here, you will find several tabs including «General«, «Hardware«, «System Protection«, «Remote» and «Advanced«. To access Control Panel items, click on the «Hardware» tab.
9. Within the Hardware tab, you will find a button labeled «Device Manager«. Clicking on this button will open the Device Manager window, which allows you to manage and configure the hardware devices connected to your computer.
10. Additionally, to access other Control Panel items, you can click on the «Remote» tab within the System Properties window. This tab provides options to configure remote desktop and remote assistance settings.
Please note that starting from Windows 8, Microsoft has been gradually transitioning away from the Control Panel toward the new Settings app. While important Control Panel items can still be accessed through the above method, it’s worth exploring the Settings app to access many of the latest Windows settings and features.
-
Home
-
News
- How to Open Control Panel in Windows 11? [7 Ways]
How to Open Control Panel in Windows 11? [7 Ways]
By Stella | Follow |
Last Updated
The traditional Control Panel is still built-in Windows 11 (Insider preview build). Well then, how to open Control Panel in Windows 11? MiniTool Software provides some easy methods to access it on a Windows 11 computer.
Control Panel Remains in Windows 11, but It’s Being Slowly Replaced
In Windows 8, Microsoft introduced the modern UI Settings app, meaning to replace the old Control Panel. But till now, you still can find Control Panel in Windows 11 Insider preview build. It is not the best time to replace it now because you need to rely on Control Panel to change some advanced settings like power profiles.
Microsoft updates the Settings app in Windows 11. If you have downloaded and installed Windows 11, you can discover that more featured are transferred to the Settings app. This means that Control Panel is being slowly replaced by Settings.
Now, let’s go to the point: do you know how to open Control Panel in Windows 11? This post shows you 7 simple methods.
How to Open Windows 11’s Control Panel?
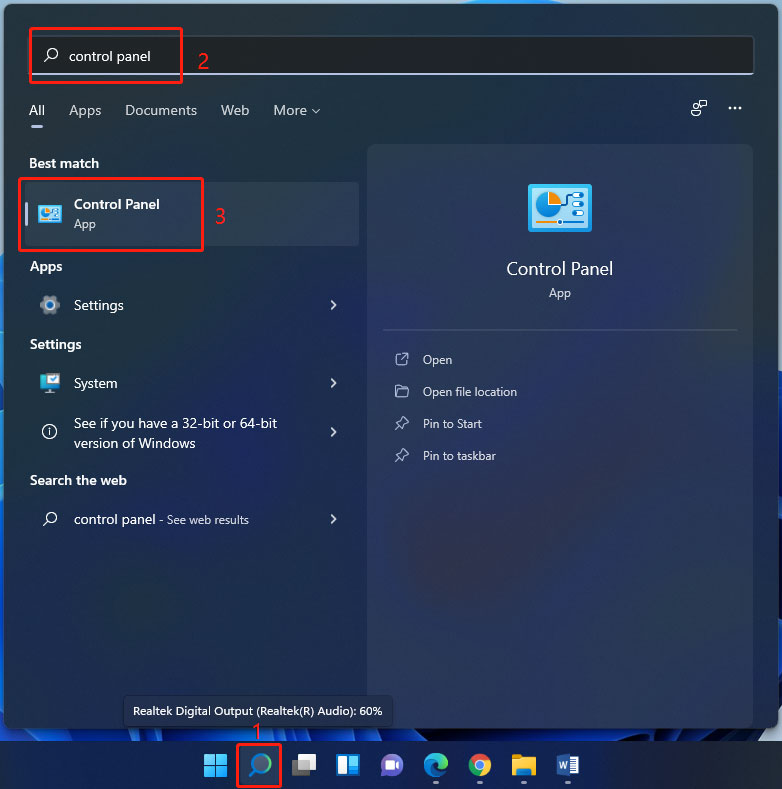
Way 1: Use Windows Search
- Click the search icon in the taskbar and type control panel to the search box.
- Select the first search result to open it.
Way 2: Via Run
- Press Win + R to open Run.
- Type control panel and press Enter to open it.
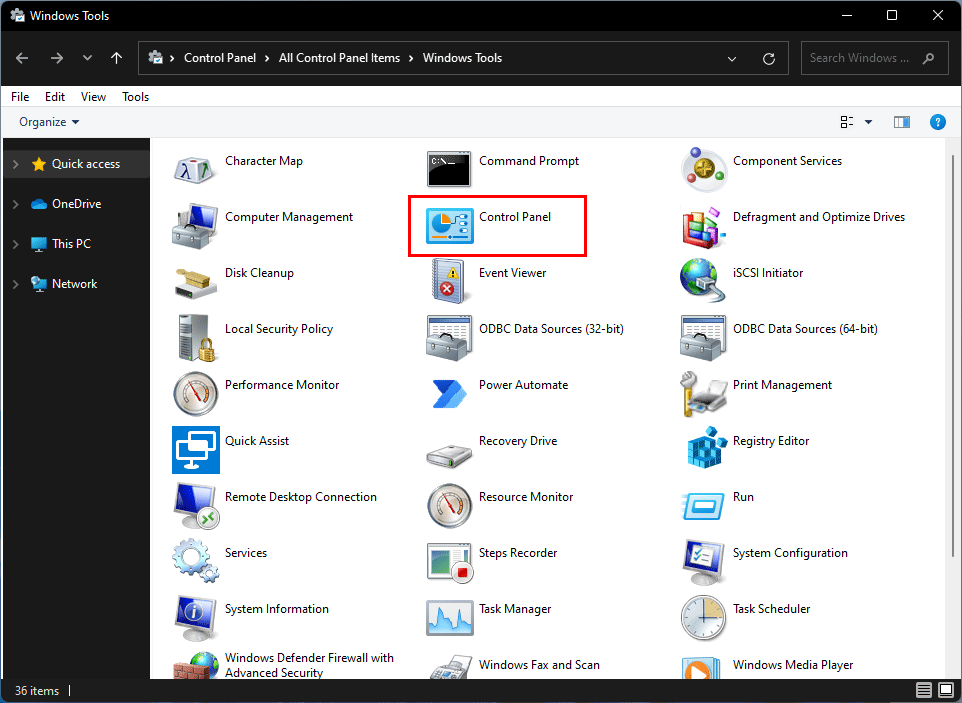
Way 3: From Windows Tools
You can find the Windows built-in tools in Windows Tools, including Control Panel.
- Open Windows Tools in Windows 11.
- Find Control Panel and click it to access it.
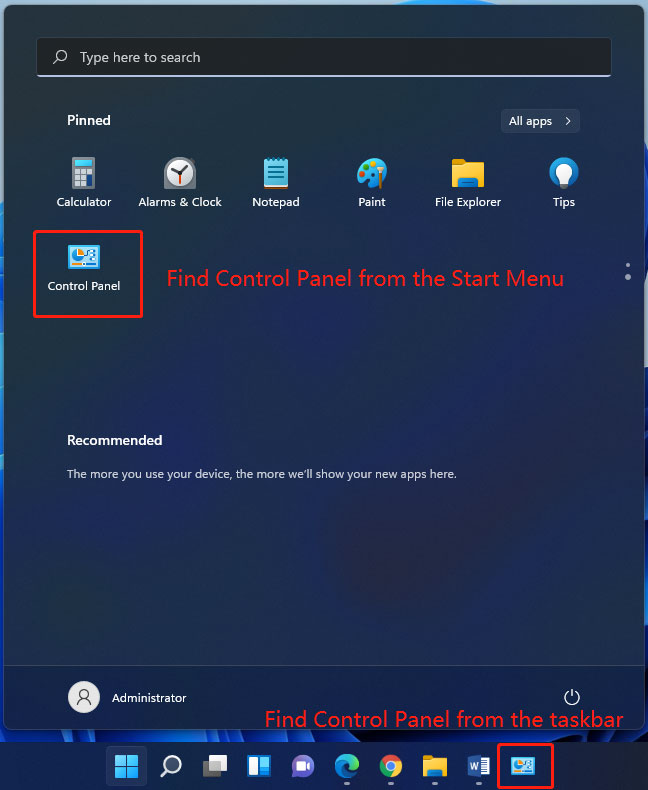
Way 4: Pin Control Control to the Taskbar/Start
You can pin Control Panel to the taskbar or the Start Menu. Next time, you will be able to quickly open it from the taskbar or the Start menu.
After typing control panel in Windows Search, you can find these two options: Pin to Start and Pin to taskbar. Select one according to your needs. For example, if you want to pin Control Panel to Start, you need to select Pin to Start.
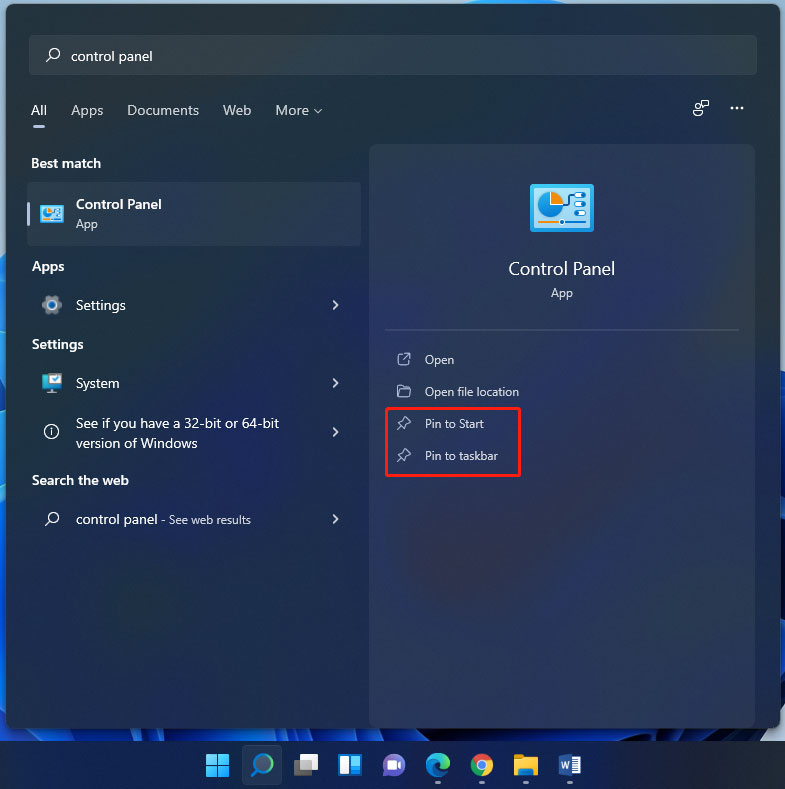
After that, you can find Control Panel from the Start menu or the taskbar in Windows 11.
Way 5: Use Control Panel Command
Another method to open Control Panel is to use the Control Panel command. You can implement the command in Windows Terminal, Windows Command Prompt, or Windows PowerShell.
In this post, we use Windows Terminal to carry out the Control Panel command.
- Right-click Start and select Windows Terminal to open it (4 Ways to Open Windows Terminal in Windows 11).
- When PS C:\Users\Administrator> or similar appears on the interface, type control panel, and press Enter. Then, Control Panel pops up.
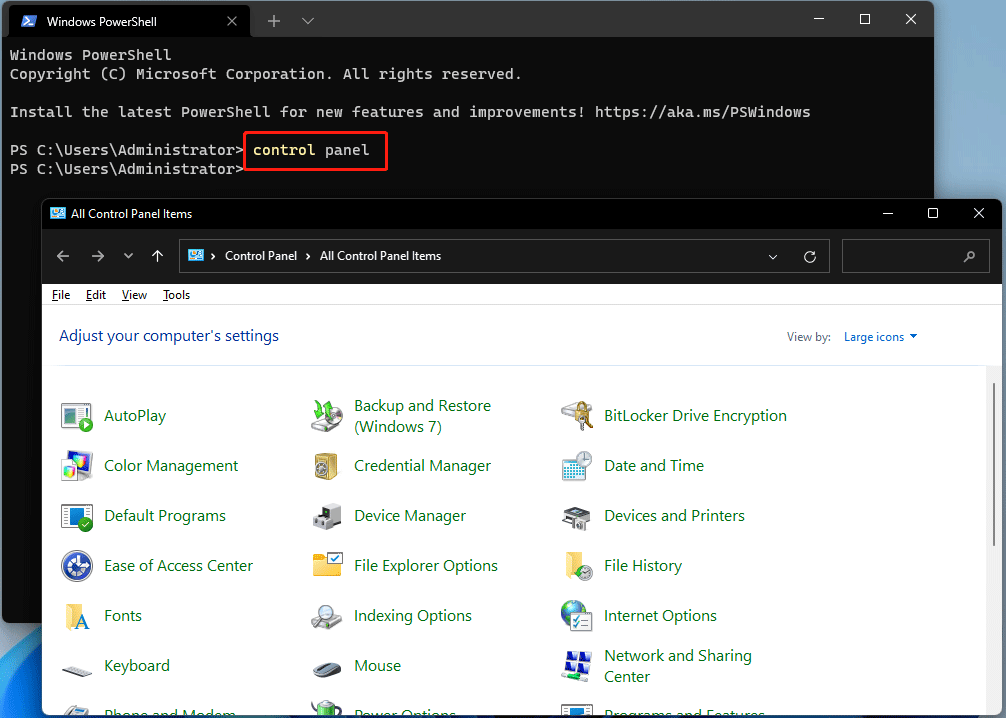
If you use Windows PowerShell or Command Prompt, the command is the same.
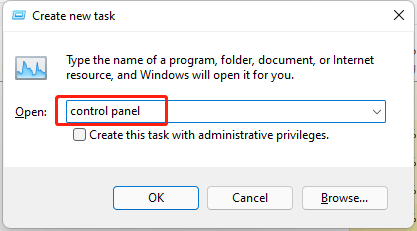
Way 6: Via Task Manager
You can open an app through Task Manager.
1. Press Ctrl + Shift + Esc at the same time to open Task Manager in Windows 11.
2. Click File on the top-left corner and select Run new task.
3. On the pop-up interface, type control panel and press Enter to open Control Panel.
Way 7: Create a Control Panel Shortcut
You are allowed to create a shortcut for Control Panel for quick access. Here is a guide:\
1. Show the desktop on your Windows 11 computer.
2. Right-click the blank space on the desktop and go to New > Shortcut.
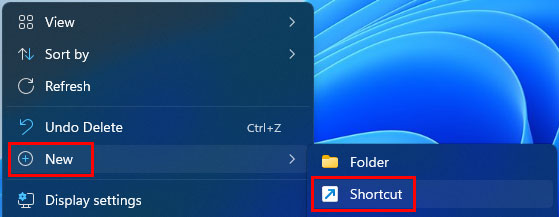
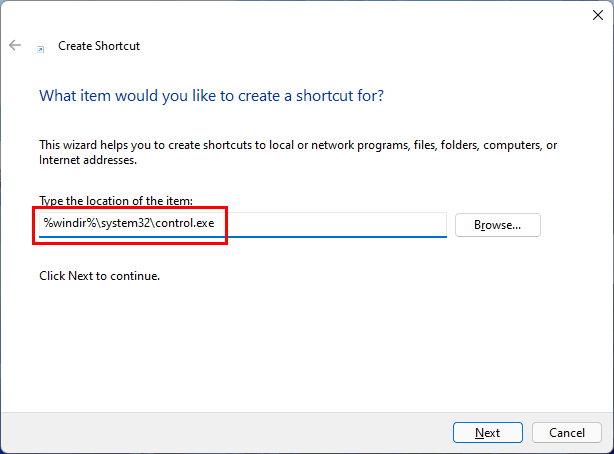
3. Copy and paste %windir%\system32\control.exe to the pop-up interface.
4. Click Next to continue.
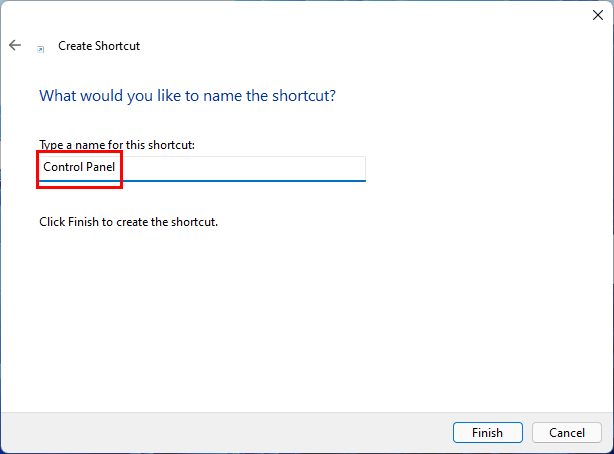
5. On the next interface, name the shortcut Control Panel.
6. Click Finish.
After these steps, you can find the Control Panel shortcut on the desktop. Next time, you can just click it to open it.
Now you know how to open Control Panel in Windows 11. These ways are also available on Windows 10/8/7.
Should you have other Windows 11 related issues, you can let us know in the comments.
About The Author
Position: Columnist
Stella has been working in MiniTool Software as an English Editor for more than 8 years. Her articles mainly cover the fields of data recovery including storage media data recovery, phone data recovery, and photo recovery, videos download, partition management, and video & audio format conversions.
3 Easy Ways to Change Windows 11 Control Panel to Classic View
Windows 11 brings with it a sleek and modern interface, designed for both aesthetics and functionality. However, for many users who appreciated the traditional layout of the Control Panel in previous versions of Windows, the shift to a more minimalistic and centralized settings system can be disorienting. While Windows 11 has made significant strides in many areas, the legacy Control Panel still holds significant value for those who prefer its classic functionality. Thankfully, if you find yourself longing for the familiar look and feel of the Windows 10 Control Panel, there are ways to revert to a classic view. This article outlines three easy methods to achieve this, with step-by-step instructions to guide you through the process.
Method 1: Use Advanced System Settings
This method involves accessing the Advanced System Settings within Windows 11, allowing you to summon the classic Control Panel easily. By altering a few settings, you can streamline the process of working with the Control Panel.
Step 1: Open the Run Dialog
- Press the Windows + R keys together on your keyboard. This opens the Run dialog box.
Step 2: Launch System Properties
- In the Run dialog box, type
sysdm.cpland then hit Enter. This command will take you directly to the System Properties window.
Step 3: Explore the Advanced Tab
- Once in the System Properties dialog, navigate to the Advanced tab. This tab is where you’ll find essential system settings.
Step 4: Continue to User Profiles Settings
- In the Advanced tab, look for the section labeled «User Profiles» and click on the Settings button.
Step 5: Navigate to Control Panel Items
- In this section, it should say “Control Panel.” Although it may not revert the entire system interface, it will give you access to specific legacy features.
Step 6: Create a Windows Shortcut (Optional)
- Optionally, you can create a shortcut to the classic Control Panel for easy access:
- Right-click on your desktop.
- Select New > Shortcut.
- Type
Control Panelin the location field and click Next. - Name your shortcut and click Finish.
Now you can easily access that shortcut whenever you need to navigate to the classic Control Panel features.
Method 2: Using Command Prompt or PowerShell
For those who are more comfortable with command-line interfaces, using Command Prompt or PowerShell can provide an efficient way to access classic Control Panel features within Windows 11. This method is straightforward and doesn’t require much technical know-how.
Step 1: Open Command Prompt or PowerShell
- You can open Command Prompt or PowerShell in different ways:
- Method A: Press Windows + X to open the Quick Access Menu, and then select Windows Terminal or Command Prompt from the list.
- Method B: Search for “Command Prompt” or “PowerShell” in the Start menu and click the corresponding application.
Step 2: Enter Command for Control Panel
-
Once you have Command Prompt or PowerShell open, type the following command and hit Enter:
control
This command will launch the classic Control Panel.
Step 3: Create a Batch File (Optional)
- As an added step, you can create a batch file to make launching the Control Panel even easier in the future:
- Open Notepad and enter the command
control. - Save the file with a
.batextension (e.g.,launch_control_panel.bat). - Double-click the batch file to open the Control Panel quickly in the future.
- Open Notepad and enter the command
Method 3: Create a Desktop Shortcut for Classic Control Panel
Another effective way to access the classic Control Panel interface in Windows 11 is to create a desktop shortcut. This solution offers a quick way to access various Control Panel items directly from your desktop.
Step 1: Right-click on the Desktop
- Begin by right-clicking on any open area on your desktop to bring up the context menu.
Step 2: Select New > Shortcut
- From the context menu, hover over the New option and select Shortcut from the submenu.
Step 3: Input Control Panel Location
-
In the Create Shortcut window that appears, type the following command in the location field:
C:WindowsSystem32control.exeClick Next to proceed.
Step 4: Name the Shortcut
- You’ll be prompted to enter a name for the shortcut. You may call it “Control Panel” or any other name that suits your preference.
Step 5: Finish Creating Shortcut
- Click Finish to create the shortcut. You should now see the new Control Panel shortcut on your desktop.
Step 6: Customizing the Shortcut (Optional)
- If desired, customize the icon for the shortcut:
- Right-click on the newly created shortcut.
- Select Properties.
- Click on the Change Icon button.
- From here, you can choose a classic Control Panel icon or browse for alternative icons installed on your system.
Conclusion
Switching back to the classic view of the Control Panel in Windows 11 is not only possible but also quite simple. Whether you prefer accessing it through System Properties, utilizing command-line tools such as Command Prompt or PowerShell, or creating a desktop shortcut, the methods outlined above provide you with versatility in your approach. While Windows 11 emphasizes a more integrated and modern experience, it’s perfectly valid to crave the familiarity and functionality that the classic Control Panel offers. With these steps, you can easily revert to a more user-friendly interface for managing your system’s settings.
Remember to explore the depths of the Control Panel, as it still offers a plethora of settings and functionalities that, while not prominently displayed in Windows 11, are crucial for many users’ workflows. Embrace the blend of modern technology with classic usability, and make your Windows 11 experience customizable to suit your needs.