
Applies ToWindows 8.1 Windows 10
DirectX — это набор компонентов в Windows, который позволяет программному обеспечению, в первую очередь и особенно играм, работать непосредственно с видео- и аудиоустройством. Игры, использующие DirectX, могут более эффективно использовать встроенные в оборудование функции мультимедийного акселератора, что улучшает общий мультимедийный интерфейс.
Если на компьютере не установлена требуемая версия DirectX, указанная на упаковке продукта, то игра может работать неправильно.
Проверка версии
Следуйте приведенным ниже указаниям, чтобы проверить установленную на компьютере версию DIrectX с помощью средства диагностики DirectX:
-
В поле Поиск на панели инструментов введите dxdiag. Затем выберите dxdiag в списке результатов.
-
В средстве диагностики DirectX выберите вкладку Система, а затем проверка версию DirectX в разделе Сведения о системе.
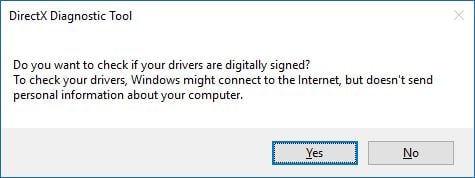
Примечание: При первом использовании средства диагностики DirectX может появиться запрос на проверку наличия цифровой подписи драйверов. Рекомендуется выбрать да , чтобы убедиться, что ваши драйверы подписаны издателем, который подтвердил их подлинность.
Обновление DirectX
Чтобы получить последнюю версию DirectX для своей версии Windows, используйте клиентский компонент Центра обновления Windows. Если у вас Windows 10 или 11, у вас уже установлена последняя версия DirectX.
Примечание: Последние версии DirectX не работают в некоторых версиях Windows.
Общий доступ к результатам
Это средство используется для сбора информации об устройствах для устранения неполадок со звуком и видео DirectX. Такую информацию может попросить сотрудник службы поддержки, или вы можете опубликовать ее на форуме для получения помощи.
Запустите dxdiag, а затем выберите Сохранить все сведения… для удобного общего формата.
Нужна дополнительная помощь?
Нужны дополнительные параметры?
Изучите преимущества подписки, просмотрите учебные курсы, узнайте, как защитить свое устройство и т. д.
The instructions here guide for How to Open DirectX Diagnostic Tool in Windows 11 or 10. The built-in utility of Windows helps to troubleshoot problems related to multimedia applications. Detection of the issues associated with audio, display, and video running an advanced game is the main function of this app. Additionally, dxdiag.exe also lets you find problems that take place while using media players.
By applying the DirectX Diagnostic Tool, you can collect all necessary information about the occurred error. As a result, troubleshooting the issue doesn’t need great effort. Microsoft generally takes help of DirectX to develop Xbox games. So, whenever your video games conflict with stability and performance issues, you need to access this tool to get support. This will help you to know where the problem is coming from.
Open DirectX Diagnostic Tool
Here is How to Open DirectX Diagnostic Tool in Windows 11 or 10 –
1] Use Run Dialog box
Step-1: Invoke Power user menu by pressing Win+X hotkey.
Step-2: When it becomes visible, select Run.
Step-3: Type dxdiag in the text area located next to Open and hit the Enter key.
2] Open DirectX Diagnostic Tool through Windows search
- Press Windows and S keys together to bring forward search box.
- Once appears, type dxdiag in the specific field.
- When the result becomes visible, either click dxdiag from the top or hit Enter.
3] Access Dxdiag with Task Manager
- Right-click on any empty space of Taskbar and select Task Manager.
- Click More details if the wizard is not elongated.
- Next, click File option located in the Menu bar and then select Run new task.
- On the next wizard, write dxdiag and click the OK button to launch it.
4] Open DirectX Diagnostic Tool using Command Prompt
- Press Win+R at once to open Run dialog.
- When it appears, type cmd in the given text field and then hit Enter.
- On the black panel of Command Prompt, type dxdiag followed by pressing Enter.
5] By means of Windows PowerShell
- Click the search icon located at the Taskbar and type powerShell.
- When you see the result, hit Enter.
- Wait for a few seconds so that Windows PowerShell becomes ready to execute the command. Thereafter, type dxdiag right after the blinking cursor and press the Enter key.
6] Go through File Explorer to open DirectX Diagnostic Tool
- Press Windows key and E simultaneously to open File Explorer.
- Once appears, move your pointer to its address bar and make a click on it.
- Write down dxdiag there and hit the Enter key to start DirectX Diagnostic Tool.
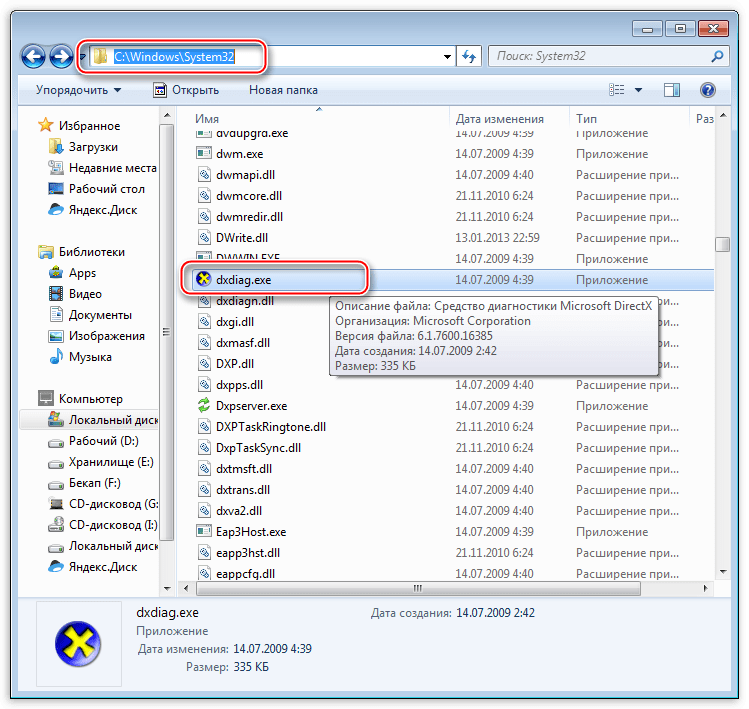
7] Explore System32 directory
Again launch File Explorer and navigate the following directory first –
C:\Windows\System32
After reaching there, press Ctrl+F and type dxdiag.
When the result shows up, select dxdiag.exe from there to access DirectX Diagnostic Tool.
8] Establish a desktop shortcut to quickly Open DirectX Diagnostic Tool
- Press Win+Q and type dxdiag in the search bar.
- Upon appearing the result, right-click on dxdiag and select Open file location.
- From the subsequent page, right-click on dxdiag.exe and then select Send to>>Desktop (create shortcut).
9] Assign hotkey to run dxdiag tool
To generate a keyboard shortcut, you need to create desktop shortcut first. To do so, follow the previous method.
- Now, head over to desktop screen by using Win+D hotkey.
- Right-click on the shortcut you created and select Properties.
- On the next wizard, take the cursor to the bar assigned for the Shortcut key.
- Type a key you prefer. For example, we pressed D and the system automatically added Ctrl+Alt before that.
In the end, click the Apply button followed by OK.
Methods:
1] Using Run Dialog box
2] Through Windows search
3] By accessing Dxdiag with Task Manager
4] Via Command Prompt
5] By means of Windows PowerShell
6] Through File Explorer
7] From System32 directory
8] Establish a desktop shortcut
9] Assign hotkey
That’s all!!
Системная утилита Windows для диагностики DirectX
Все способы:
- Обзор Средства диагностики DX
- Запуск
- Вкладки
- Файл отчета
- Вопросы и ответы: 11
Средство диагностики DirectX – небольшая системная утилита Windows, предоставляющая информацию о мультимедийных компонентах – оборудовании и драйверах. Кроме того, данная программка тестирует систему на предмет совместимости программного обеспечения и аппаратной части, различных ошибок и неполадок.
Обзор Средства диагностики DX
Ниже мы совершим краткую экскурсию по вкладкам программы и ознакомимся с информацией, которую она нам предоставляет.
Запуск
Доступ к данной утилите можно получить несколькими способами.
- Первый – меню «Пуск». Здесь в поисковое поле нужно вписать название программы (dxdiag) и перейти по ссылке в окне результатов.

- Способ второй – меню «Выполнить». Сочетание клавиш Windows+R откроет нужное нам окошко, в котором нужно прописать такую же команду и нажать ОК или ENTER.

- Запустить утилиту можно и из системной папки «System32», дважды кликнув по исполняемому файлу «dxdiag.exe». Адрес, по которому находится программа, указан ниже.
C:\Windows\System32\dxdiag.exe


Вкладки
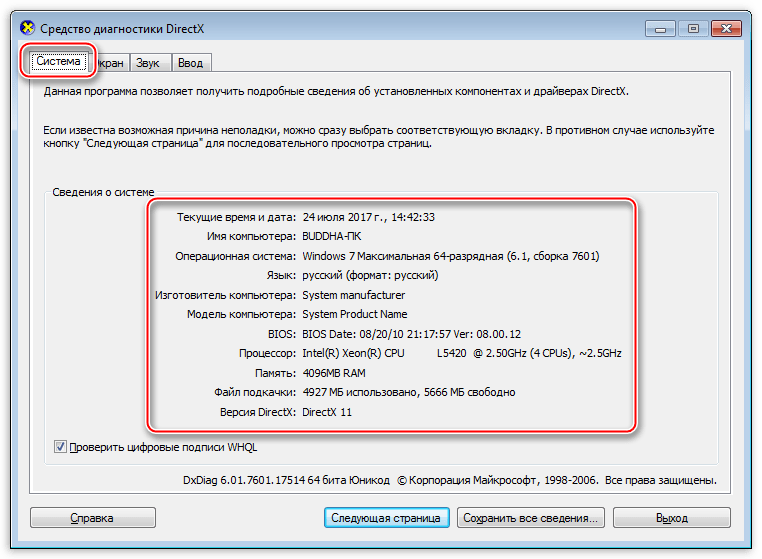
- Система.
При запуске программы появляется стартовое окно с открытой вкладкой «Система». Здесь представлена информация (сверху вниз) о текущей дате и времени, имени компьютера, сборке операционной системы, изготовителе и модели ПК, версии BIOS, модели и частоте процессора, состоянии физической и виртуальной памяти, а также о редакции DirectX.

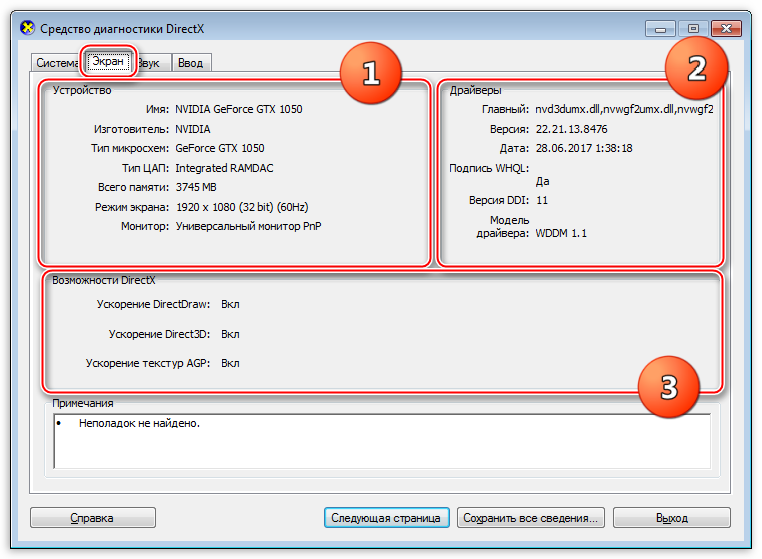
- Экран.
- На вкладке «Экран», в блоке «Устройство», мы найдем краткие данные о модели, производителе, типе микросхем, цифро-аналоговом преобразователе (ЦАП) и объеме памяти видеокарты. Две последние строки рассказывают о мониторе.
- Название блока «Драйверы» говорит само за себя. Здесь расположены сведения о драйвере видеокарты, такие как главные системные файлы, версия и дата разработки, наличие цифровой подписи WHQL (официальное подтверждение от Майкрософт о совместимости оборудования с ОС Windows), версии DDI (интерфейс драйвера устройства, совпадает с редакцией DirectX) и модели драйвера WDDM.
- В третьем блоке показаны основные функции DirectX и их состояние («вкл» или «выкл»).
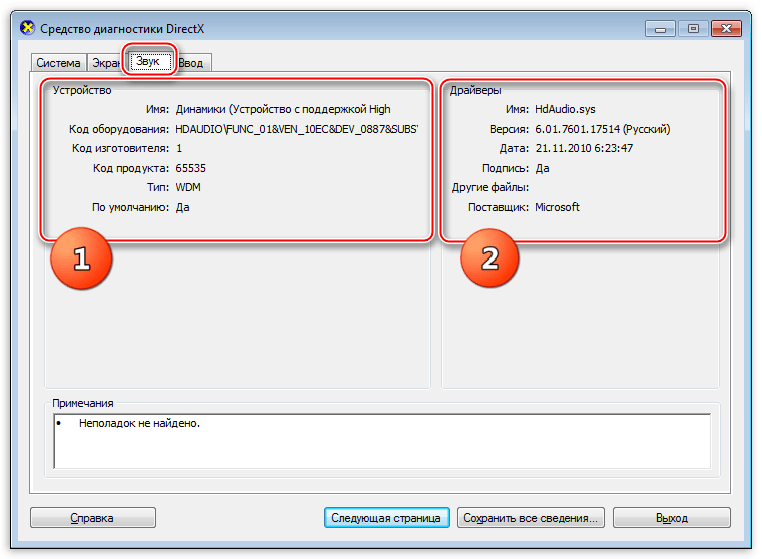
- Звук.
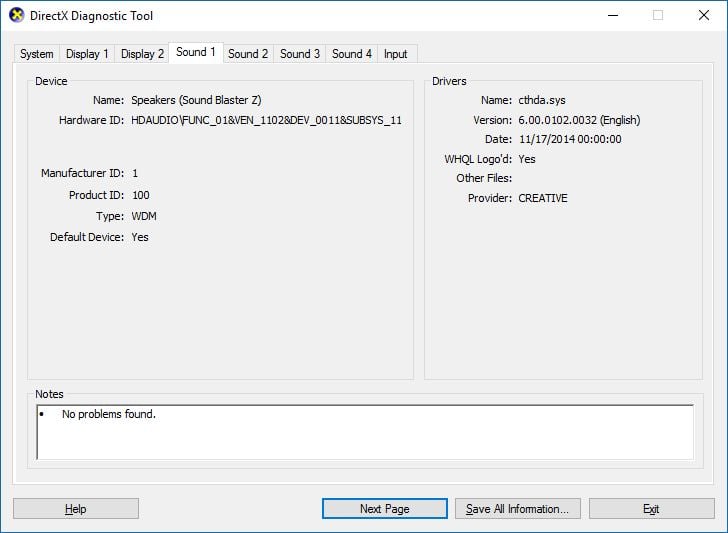
- Вкладка «Звук» содержит информацию об аудиооборудовании. Здесь также присутствует блок «Устройство», в который входят имя и код девайса, коды изготовителя и продукта, тип оборудования и данные о том, является ли оно устройством по умолчанию.
- В блоке «Драйвер» представлено имя файла, версия и дата создания, цифровая подпись и производитель.
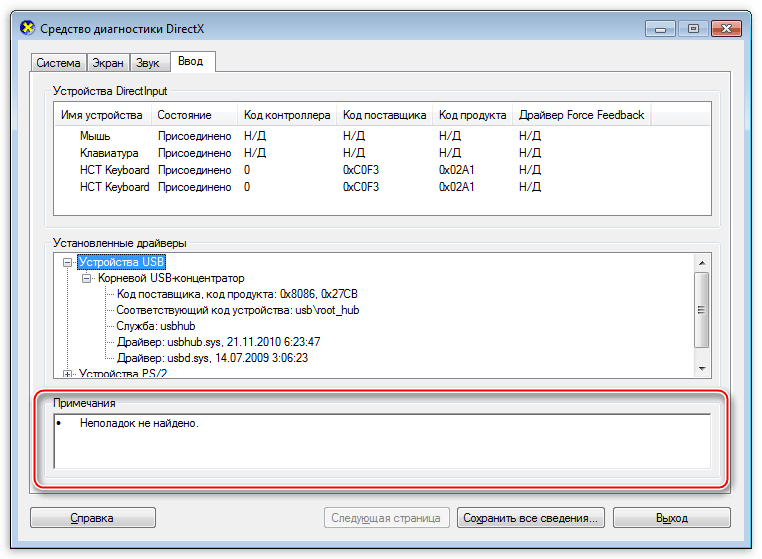
- Ввод.
На вкладке «Ввод» присутствует информация о подсоединенных к компьютеру мыши, клавиатуре и других устройствах ввода, а также сведения о драйверах портов, к которым они подключены (USB и PS/2).
- Кроме всего прочего, на каждой вкладке имеется поле, в котором отображается текущее состояние компонентов. Если там написано, что неполадок не найдено, то все в порядке.

Файл отчета
Утилита также способна представить полный отчет по системе и неполадкам в виде текстового документа. Получить его можно, нажав на кнопку «Сохранить все сведения».
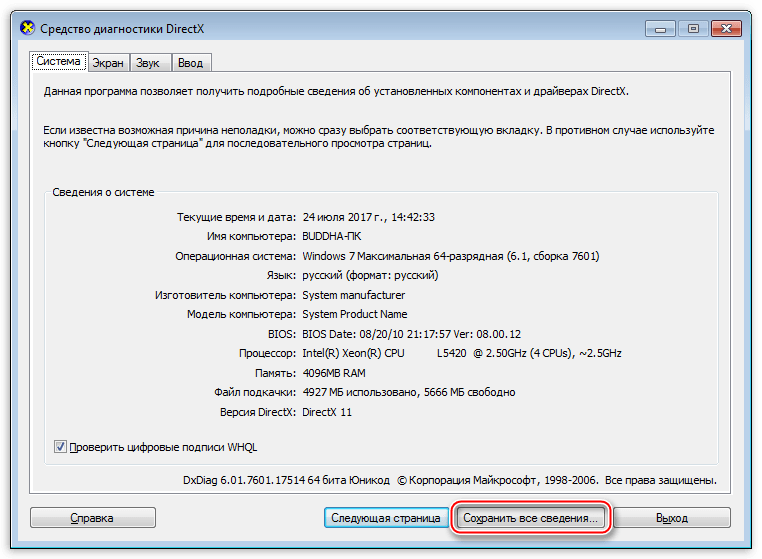
Файл содержит подробную информацию и может быть передан специалисту для диагностики и решения проблем. Часто такие документы требуют на профильных форумах, чтобы иметь более полную картину.

На этом наше знакомство со «Средством диагностики DirectX» Windows закончено. Если требуется быстро получить информацию о системе, установленном мультимедийном оборудовании и драйверах, то данная утилита Вам в этом поможет. Файл отчета, создаваемый программой, можно прикрепить к топику на форуме для того, чтобы комьюнити могло максимально точно ознакомиться в проблемой и помочь ее решить.
Наша группа в TelegramПолезные советы и помощь
As we have seen a lot of advancements in technology in the last few decades, people have also updated themselves according to technology. People have begun using devices like laptops, tablets, phones, etc for paying bills, shopping, entertainment, news, or any other activity. The Internet is the major reason behind such developments. The use of devices that run with the help of the internet has increased, as a result of which the service providers are bound to improve user experience with new updates.

This user experience improvement leads us to the development of DirectX which is an Application Programming Interface that has improved the user experience in the field of games, videos, etc.
Table of Contents
What is the DirectX diagnostic tool?
DirectX is used for creating and working on the graphic images and other effects of multimedia in games or web pages or other similar applications that run on the Microsoft Windows operating system.
No external capability is required, to work on DirectX or run it, the capability comes integrated with different web browsers. In comparison to the earlier version of DirectX, the upgraded version has become an integral part of the Microsoft Windows operating system.
The DirectX Diagnostic Tool helps Windows users in identifying problems related to the audio, video, display and other related problems. It also works on the performance of various multimedia applications. This tool also helps in diagnosing and troubleshooting problems faced on the audio, video players connected to the device. If you are facing any issue related to the audio, video or sound quality of your system you can use the DirectX Diagnostic Tool. You can use the DirectX Diagnostic Tool by using the methods listed below:
Make sure to create a restore point just in case something goes wrong.
There are different ways of accessing any specific tool in Windows 10, similarly, DirectX can also be accessed in 2 ways. Both these ways are as given below:
Method 1: Launch DirectX Diagnostic tool using the Search feature
You can use the search feature in Microsoft’s operating system for launching the DirectX Diagnostic Tool.
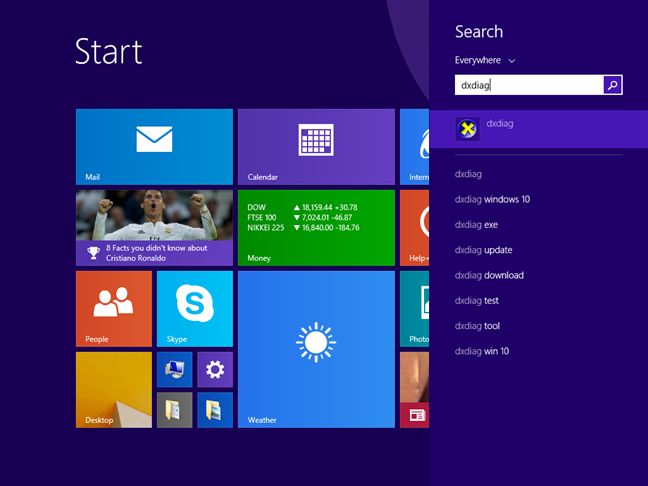
1.Press the Windows key + S button on the keyboard & type dxdiag in the search box.

2.Click to open the dxdiag option as shown below.

4.Once you click on dxdiag, the DirectX Diagnostic Tool will start running on your screen.
5.If you are using the tool for the first time, you will be prompted to check the digitally signed drivers. Click on Yes to continue.

6.Once the drivers check is completed, and the drivers are approved by Windows Hardware Quality Labs by Microsoft, the main window will open up.

7.The tool is now ready and you can check all the information or troubleshoot any particular issue.
Also Read: Fix Unable to Install DirectX on Windows 10
Method 2: Launch DirectX Diagnostic tool using Run Dialog Box
You need to follow the steps mentioned below to run the DirectX Diagnostic Tool using the Rundialog box:
1.Open the Run dialog box using the Windows key + R keys shortcut on the keyboard.

2.Enter dxdiag.exe in the dialog box.

3.Click on the OK button, and the DirectX Diagnostic tool will launch.
4.If you are using the tool for the first time, you will be prompted to check the digitally signed drivers. Click on yes.
5.Once the drivers check is completed, and the drivers are approved by Windows Hardware Quality Labs by Microsoft, the main window will open up.
6.The tool is now ready to troubleshoot as per your requirements.
The DirectX Diagnostic tool show on the screen has four tabs. But many times more than one tab for elements such as Display or Sounds might be shown on the window. This is because you might have more than one device connected to your system.
Each of the four tabs has a significant function. The functions of these tabs are as listed under:
#Tab 1: System Tab
The first tab on the dialog box is the System tab, no matter what device you connect to your device the System tab will always be there. The reason behind this is that the System tab shows information about your device. When you click on the Systems tab, you’ll see information about your device. Information about the operating system, language, manufacturer’s information, and much more. The System tab also shows the version of DirectX installed on your device.

#Tab 2: Display Tab
The tab next to the Systems tab is the Display tab. The number of display devices varies according to the number of such devices connected to your machine. The Display tab shows information about the connected devices. Information such as the name of the card, the name of the manufacturer, the device type, and other similar information.
At the bottom of the window, you’ll see a Notes box. This box shows the problems detected in your connected display device. If there aren’t any issues with your device, it will show a No issue found text in the box.

#Tab 3: Sound tab
Next to the Display tab, you’ll find the Sound tab. Clicking on the tab will show you information about the audio device connected to your system. Just like the Display tab, the number of Sound tab can increase based on the number of devices connected to your system. This tab shows information such as the manufacturer’s name, hardware information, etc. If you want to know, the problems your audio device is facing, you need to look in the Notes box, all the issues will be listed there. If there aren’t any issues you’ll see a No issue found message.

#Tab 4: Input Tab
The last tab of the DirectX Diagnostic Tool is the Input tab, which shows information about the input devices connected to your systems, such as a mouse, keyboard, or other similar devices. The information includes the status of the device, controller ID, vendor ID, etc. The notes box of the DirectX Diagnostic Tool will show the problems in the input devices connected to your system.

Once you are done checking for the errors in your connected device, you can use the buttons shown on the bottom of the window to navigate as per your choice. The functions of the buttons are as listed under:
1.Help
If you face any issue while operating the DirectX Diagnostic Tool, you can use the Help button in the tool to look for solutions to your problems. Once you click on the tab, it will take you to another window where you can get help regarding the devices connected to your system or the tabs of the Diagnostic Tool.

2.Next Page
This button on the bottom of the DirectX Diagnostic Tool, it helps you to navigate to the next tab on the window. This button only works for the System tab, Display tab, or the Sound tab, as the Input tab is the last in the window.

3.Save All Information
You can choose to save the information listed on any page of the DirectX Diagnostic Tool by clicking on the Save All Information button on the window. Once you click on the button, a window will appear on the screen, you can select the location where you want to save the text file.

4.Exit
Once you are done diagnosing issues of the connected devices and you have checked for all the errors. You can click on the Exit button and can exit from the DirectX Diagnostic Tool.

The DirectX Diagnostic Tool proves to be of great advantage when looking for the cause of errors. This tool can help you in fixing errors related to DirectX such as League of Legends DirectX error and devices connected to your machine.
Recommended:
- Fix Unable to Install DirectX on Windows 10
- Shut Down or Lock Windows Using Keyboard Shortcuts
I hope the above steps were helpful and now you will be able to use the DirectX Diagnostic Tool in Windows 10 without any issues. If you still have any queries regarding this tutorial then feel free to ask them in the comment section & we will definitely help you out.
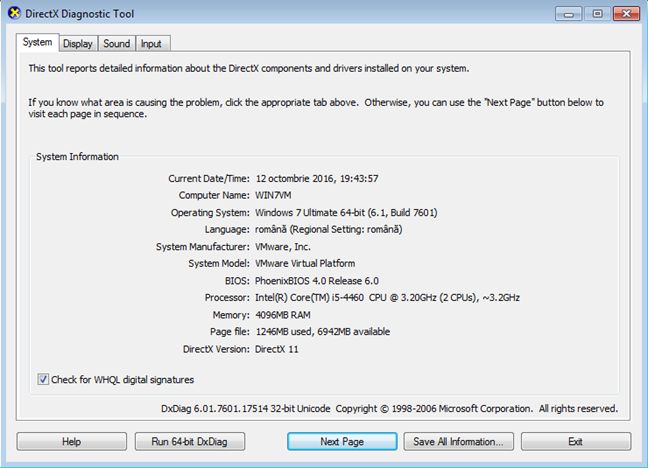
Not many people know about the DirectX Diagnostic Tool ( dxdiag.exe ) that is included in every modern version of Windows. With it, you can identify the source of the problems you may have with the hardware used by multimedia applications, such as video games or audio and video players. In this tutorial you will learn how to start the DirectX Diagnostic Tool and how to use it to gather useful information for when you need to troubleshoot issues.
NOTE: This guide applies to Windows 10, Windows 7 and Windows 8.1.
What is DirectX?
According to Wikipedia, «Microsoft DirectX is a collection of application programming interfaces (APIs) for handling tasks related to multimedia, especially game programming and video, on Microsoft platforms».
DirectX is usually used for developing Windows and Xbox games. Therefore, if your video games have stability and performance issues, the DirectX Diagnostic Tool can help you understand where the problem is coming from. Gaming companies recommend the DirectX Diagnostic Tool when players need support with their games.
If you’re interested in learning more about DirectX, Wikipedia has a detailed article about it.
How to start the DirectX Diagnostic Tool
Starting the DirectX Diagnostic Tool can only be done by using its executable found at the following location: «C:WindowsSystem32dxdiag.exe». Luckily, you can also use search to start it. For example, in Windows 7, open the Start Menu and type dxdiag in the search box. Then, click the dxdiag.exe search result.

In Windows 10, type dxdiag in Cortana’s the search box, on the taskbar, and then click or tap the dxdiag search result.
If you have Windows 8.1 installed, things are a little bit different. Go to the Start screen, type dxdiag and click or tap the dxdiag search result.
All Windows operating systems also allow you to start this tool by using Run window and typing the dxdiag command.
Checking for drivers that are digitally signed
When you start the DirectX Diagnostic Tool for the first time, a small window pops up. It asks your permission to check whether your drivers are digitally signed by Microsoft and approved by Microsoft’s Windows Hardware Quality Labs. We recommend that you press Yes.
When DirectX Diagnostic Tool starts, it should have at least four tabs: System , Display , Sound and Input.
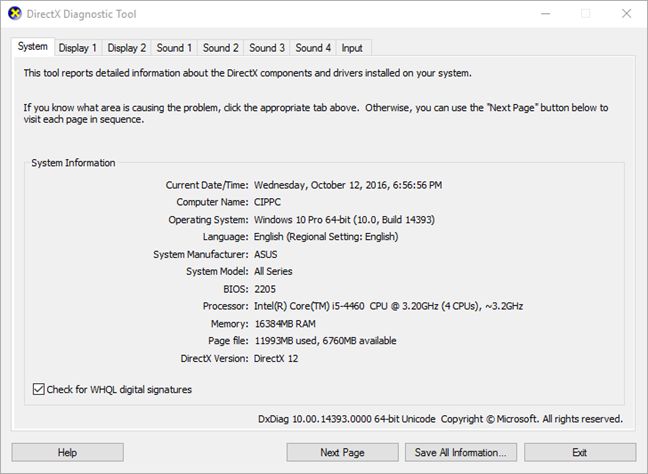
Some of the tabs can show up multiple times, with a number added to their name. This means that the DirectX Diagnostic Tool found more than one driver for devices with similar functions. For example, we have 2 monitors on one of our computers, so we see two tabs called «Display 1» and «Display 2». We also have found devices that can play sounds: a discrete Creative Sound Blaster sound card, an Acer monitor with speakers included, a sound chip that is on the motherboard and an AMD video card that can send sound through its HDMI ports. Therefore we have four tabs that are related to the sound, one for each of our sound devices.
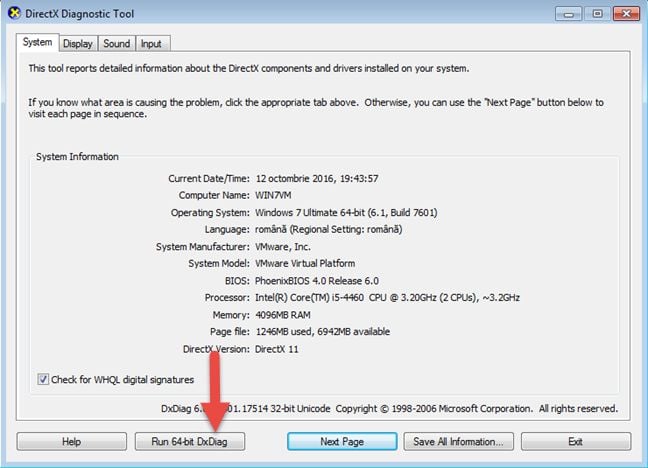
You can see the box «Check for WHQL digital signatures» at the bottom of the System tab. If you pressed Yes when the tool asked for the permission to evaluate if all your drivers are digitally signed, this box is already checked. You can check or uncheck it anytime you want. In older versions of Windows, like Windows 7, if you have a 64-bit operating system installed, DirectX Diagnostic Tool first launches and checks the 32-bit drivers that are installed on your PC. Therefore, the tool won’t show enough information, as your system has 64-bit drivers. Press the «Run 64-bit DxDiag» button when it shows up. The 64-bit version of the tool will launch to reevaluate your drivers and hardware configuration.
In Windows 10 you won’t see this button because DirectX Diagnostic Tool checks the 64-bit drivers that are installed on your computer or device, automatically, each time you start it.
How to get general system information from DxDiag
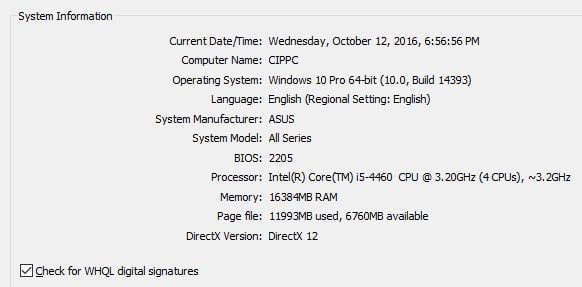
The tab named System shows basic information your computer or device, such as its name, the version of the operating system that you are using, the motherboard (displayed in the System Manufacturer and System Model fields ), the BIOS type and version, the processor, the amount of RAM and information regarding the page file and the DirectX version installed.
How to get system display information
Information regarding the video card and your monitor(s) is showed in the Display tab(s). Here you can see the name of the video card that you are using, its manufacturer, the chip type, the approximate total memory, the current resolution, the monitor it is connected to, the screen resolution that you are using and detailed information about the driver installed (such as the version, date etc.).
In the DirectX Features section, you can see which of the most important DirectX features are enabled.
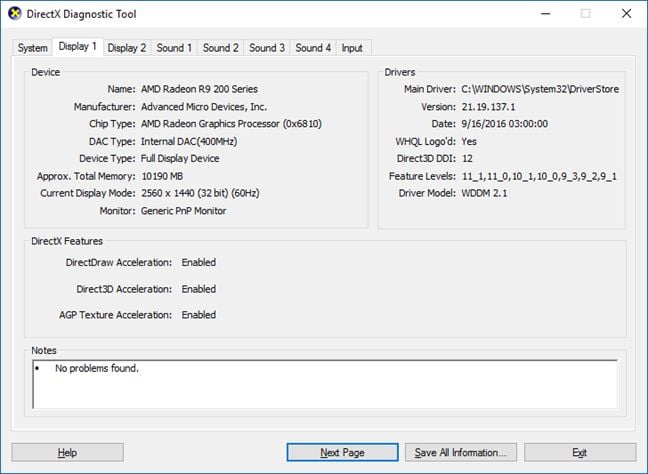
The Notes section displays eventual identified problems. This information can be used in troubleshooting issues with your Windows system.
How to get system sound information
Information about the audio output options available on your Windows computer or device can be found in the Sound tab(s). It includes the name and manufacturer for each device, and driver-related information, like the date and version. Eventual device issues are listed in the Notes field.
How to get system input information
The Input tab shows information regarding all the input devices that are plugged in: devices like a keyboard, a mouse, a gaming pad or a microphone.
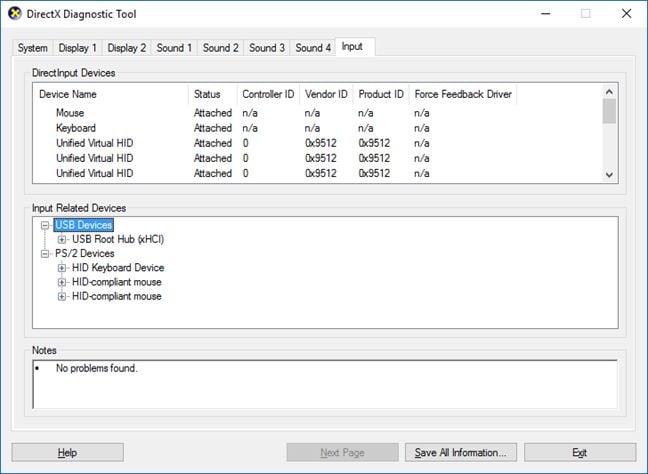
You can see more detailed information about each device (such as the exact driver file being used, version, etc.), by expanding each type of input devices, in the Input Related Devices section.

Conclusion
Among other troubleshooting tools provided by Windows, DirectX Diagnostic Tool is a very useful one that helps you identify if there’s a problem with your video card, sound card or with your input devices. If you encounter performance issues while playing games or watching movies, we recommend using this tool to find out why. Don’t hesitate to share with us any other tips regarding how this tool has helped you.