
,
In this tutorial you’ll find instructions to disable the Windows Hello for Business prompt (aka: Windows Hello for Business provisioning), «Use Windows Hello with your account» after adding a PIN and to remove the message «Your organization requires Windows Hello” during OOBE.
When adding a Windows Hello PIN/Fingerprint/Face as sign-in option on a computer joined to Azure AD, or in a Active Directory Domain (on local premises), you must setup a Microsoft Account to access your Organization resources. This is required because, when a device is set up for use in an organization, Windows Hello for Business is automatically enabled.
If for any reason, you don’t setup a Microsoft Account for Windows Hello for Business, you’ll face the following symptoms and problems on your PC:
- In the Windows Hello PIN you’ll face the error: «This option is currently unavailable» with description «Sorry, this PIN isn’t working for your organization’s resources. Tap or click here to fix it».

-
You’ll prompted to «Use Windows Hello with your account», when you setup a PC for first time (Out of the box experience (OOBE)), or after clicking «Tap or click here to fix it» in the Windows Hello PIN options (see the above screenshot).

- You’ll get the Windows Hello PIN error: «Something went wrong. We aren’t able to setup your PIN. 0x801c044f» after trying to fix the problem without adding a MS account.

If you don’t want to use a Microsoft Account in Windows Hello for Business (e.g. in case where a single device is used by several users or if you do not have Azure AD/Office365 accounts in your organization), then you can disable the Windows Hello Provisioning, by using the instructions below.
How to Disable the Windows Hello requirement to use a Microsoft Account in Windows Hello PIN or during OOBE. (FIX:Windows Hello PIN error 0x801c044f).
To force Windows to not ask for a Microsoft Account in Windows Hello PIN/Fingerprint/Face, proceed and disable the Windows Hello for Business provisioning. This will remove both the «Use Windows Hello with your account» prompt in Windows Hello PIN, and will disable the «Your organization requires Windows Hello” prompt during OOBE.
Windows Hello for Business provisioning can be disabled using Group Policy, either locally or in an Active Directory domain, or in Microsoft Intune. According your situation proceed to the corresponding part below.
- Part 1. Disable Windows Hello Provisioning in Windows 10/11 Pro.
- Part 2. Disable Windows Hello Provisioning in Active Directory.
- Part 3. Disable Windows Hello Provisioning in Microsoft Endpoint Manager (INTUNE).
Part 1. How to Disable Windows Hello prompt «Use Windows Hello with your account», in Local Group Policy (Windows 10/11 Pro).
If you want to remove the «Use Windows Hello with your account» prompt, on a standalone computer (not joined to a domain), or to specific domain PCs, proceed as follows:*
* Note: If you want to disable the Windows Hello provision to entire AD domain, follow the instructions on part-2.
1. Run gpedit.msc to open the Local Group Policy Editor.
2. In Local Group Policy, navigate to:
- Computer Configuration\Administrative Templates\Windows Components\Windows Hello for Business
3. At the right open the Use Windows Hello for Business policy.

4. Set the policy to Enabled* and check the option Do not start Windows Hello provisioning after sign-in.

* Note: If you disable this policy, users won’t be able to setup a Windows Hello for Business PIN and they will receive the following message in Windows Hello PIN options: «This option is currently unavailable. Something went wrong».

5. Restart the PC to apply the change.
Part 2. How to Disable Windows Hello prompt in Active Directory (On Premises).
To disable the Windows Hello for Business provisioning in entire AD domain, proceed as follows:
Step 1. Create a new Domain Policy for Hello for Business. *
* Note: In this guide I’ll create a new Domain Policy for the Windows Hello for Business. If you don’t want to create a new policy and you want to apply the changes to the Default Domain Policy, skip to step-2.
1. On your Domain Server, open the Server Manager and from Tools open the Group Policy Management.
2. Under the ‘Domains’ object, right-click on your domain and select Create a GPO in this domain and Link it here.

3. Type a name for the new GPO (e.g. «Hello_Provisioning») and click OK.
Step 2. Enable Windows Hello for Business.
1. Right-click at the new GPO (or in Default Domain Policy), and click Edit.

2. At the left pane navigate to:
- Computer configuration\Policies\Administrative Templates\Windows Components\Windows Hello for Business
3. On the right side, open the Use Windows Hello for Business policy and set it to Enabled and then click Apply > OK. *
* Notes:
1. By setting this policy Enabled you’ll allow users to sign-on with a Windows Hello PIN.
2. If you disable this policy, users won’t be able to setup a Windows Hello PIN and they will receive the message in Windows Hello PIN options: «This option is currently unavailable. Something went wrong».

4. Proceed to next step to disable the Windows Hello for business provisioning.
Step 3. Disable «Use Windows Hello with your account» prompt.
Finally proceed and deploy the following registry change to all computers in Active Directory, in order to disable the Windows Hello provisioning:
1. On the «Hello_Provisioning» GPO (or in default domain policy), navigate to:
- Computer Configuration\Preferences\Windows Settings\Registry
2. Right-click at Registry and select New > Registry item.

3. At the ‘New Registry Properties’ window, apply the following settings and click OK:
- At Action choose: Create
- At Hive select: HKEY_LOCAL_MACHINE
- At Key path type: SOFTWARE\Policies\Microsoft\PassportForWork
- At Value Name type: DisablePostLogonProvisioning
- Value type: REG_DWORD
- Value data: 1
4. Close the Group Policy Management Editor and restart any domain computer to see if the registry change has applied. *
* Note: To see if the registry change has been applied to the workstations:
1. Restart any AD computer (workstation) and login to the Domain.
2. Open Registry Editor and navigate to:
- HKEY_LOCAL_MACHINE\SOFTWARE\Policies\Microsoft\PassportForWork
3. See at right-pane if the DisablePostLogonProvisioning & Enabled REG_DWORD values exist and has Value Data 1. *
* Info: The «Enabled» DWORD value is created automatically when you enable the Windows Hello for Business (Step-1). If the value is not there, follow the same steps above and created it using GPO.


Part 3. How to Disable Windows Hello prompt in Microsoft Endpoint Manager (INTUNE).
To disable the Windows Hello Provisioning in Microsoft Intune:
1. Sign to Microsoft Endpoint Manager admin center with an Intune Administrator role.
2. Select Devices on the left and at the right go to Windows -> Windows enrollment.
3. Open Windows Hello for Business and under Configure Windows Hello for Business, select Enabled.
4. Now create the following PowerShell script and push to the clients the following Registry change via Intune: *
- Set-ItemProperty -Path «HKLM:\SOFTWARE\Policies\Microsoft\PassportForWork» -Name DisablePostLogonProvisioning -Value «1» -Type DWORD
* Note: Select ‘YES’ for «Run script in 64 bit PowerShell Host» when deploying it through Intune.
That’s it! Which method worked for you?
Let me know if this guide has helped you by leaving your comment about your experience. Please like and share this guide to help others.
If this article was useful for you, please consider supporting us by making a donation. Even $1 can a make a huge difference for us in our effort to continue to help others while keeping this site free:
- Author
- Recent Posts
Konstantinos is the founder and administrator of Wintips.org. Since 1995 he works and provides IT support as a computer and network expert to individuals and large companies. He is specialized in solving problems related to Windows or other Microsoft products (Windows Server, Office, Microsoft 365, etc.).
-
Home
-
News
- 3 Ways – Step-by-Step Guide on Disable Windows Hello
By Tina |
Last Updated
Windows Hello is a new feature in Windows 10 that allows users to sign into the operating system using biometric authentication. But some people do not use this feature and want to disable it. This post from MiniTool shows how to disable Windows Hello.
Windows Hello is a more personal, more secure way to get instant access to your Windows 10 devices using fingerprint, facial recognition or a secure PIN. Most PC’s with fingerprint readers already work with Windows Hello, making it easier and safer to sign into your PC.
Windows Hello feature also enables users to sign into the operating system using biometric authentication. But some users do not use this feature and wonder whether it is possible to disable it.
There is no doubt that you can disable Windows Hello. So, in this post, we will show you how to disable Windows Hello.
3 Ways – Step-by-Step Guide on Disable Windows Hello
In this section, we will show you how to disable Windows Hello. If you want to disable Windows Hello pin, the following methods would be very effective.
Way 1. Disable Windows Hello via Settings
At first, Windows Settings allows you to disable Windows Hello. Now, we will show you the tutorial.
- Press Windows key and I key together to open Settings.
- Then choose Accounts.
- On the left panel, choose Sign-in options.
- On the right side, click Remove under Windows Hello section.

When all steps are finished, you have successfully disabled Windows Hello. Some users may say that there is no Windows Hello option in the Windows Settings. So, in order to disable Windows Hello, you can try other ways.
Way 2. Disable Windows Hello via Group Policy
To disable Windows Hello, here is the second way. You can choose to disable it via Group Policy.
Now, here is the tutorial.
- Press Windows key and R key together to open Run box.
- Then type gpedit.msc in the box and click OK to continue.
- Navigate to this path: Computer Configuration -> Administrative Templates -> System -> Logon.
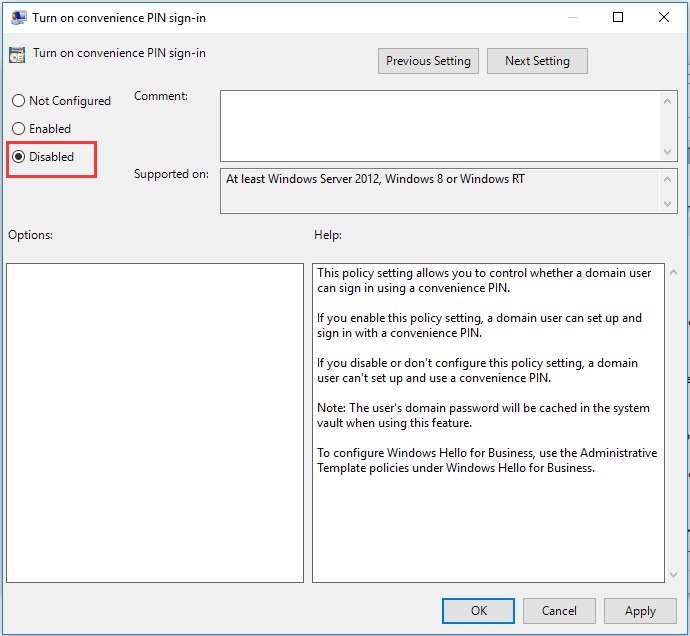
- On the right side, double-click on the Turn on convenience PIN sign in.
- In the pop-up window, click Disabled.
- Then click Apply and OK to save the changes.
Then disable other Windows Hello options. After that, exit the Group Policy window and reboot your computer to check whether the Windows Hello is disabled.
Tip: If your computers are connected to Azure Active Directory, the correct location for that in gpedit.msc is Computer Configuration | Administrative Templates | Windows Components | Windows Hello for Business. In the right side, set “Use Windows Hellow for Buiness” to Disabled.
Way 3. Disable Windows Hello via Registry
To disable Windows Hello, you can do that via the Registry. Now, here is the tutorial.
Tip: Modifying the registry may be a risky thing. So, before proceeding, please back up registries first.
- Press Windows key and R key together to open Run dialog.
- Type regedit in the box and click OK to continue.
- Navigate to the path: HKEY_LOCAL_MACHINE\SOFTWARE\Microsoft\PolicyManager\default\Settings\AllowSignInOptions.
- In the right panel, double-click on the DWORD entry named value and set it to 0.
When all steps are finished, reboot your computer and check whether the Windows Hello is disabled.
Final Words
To sum up, this post has shown 3 ways to disable Windows Hello. If you want to do that, try these solutions. If you have any better idea to disable Windows Hello PIN, you can share it in the comment zone.
About The Author
Position: Columnist
Tina is a technology enthusiast and joined MiniTool in 2018. As an editor of MiniTool, she is keeping on sharing computer tips and providing reliable solutions, especially specializing in Windows and files backup and restore. Besides, she is expanding her knowledge and skills in data recovery, disk space optimizations, etc. On her spare time, Tina likes to watch movies, go shopping or chat with friends and enjoy her life.
Applies ToWindows 11 Windows 10
Повысьте безопасность устройства с Windows, используя Windows Hello. Если вы уже настроили Windows Hello, вы можете исключить метод входа по паролю для еще более безопасного взаимодействия.
После удаления параметра пароля все функции на устройстве, которым требуется учетная запись Майкрософт и пароль, включая различные приложения и веб-браузеры, будут легко переходить на использование распознавания лиц, идентификации отпечатков пальцев или ПИН-кода Windows Hello.
Примечание: Этот параметр доступен только при входе с помощью учетной записи Майкрософт.
Чтобы перейти без пароля, можно использовать приложение «Параметры».
-
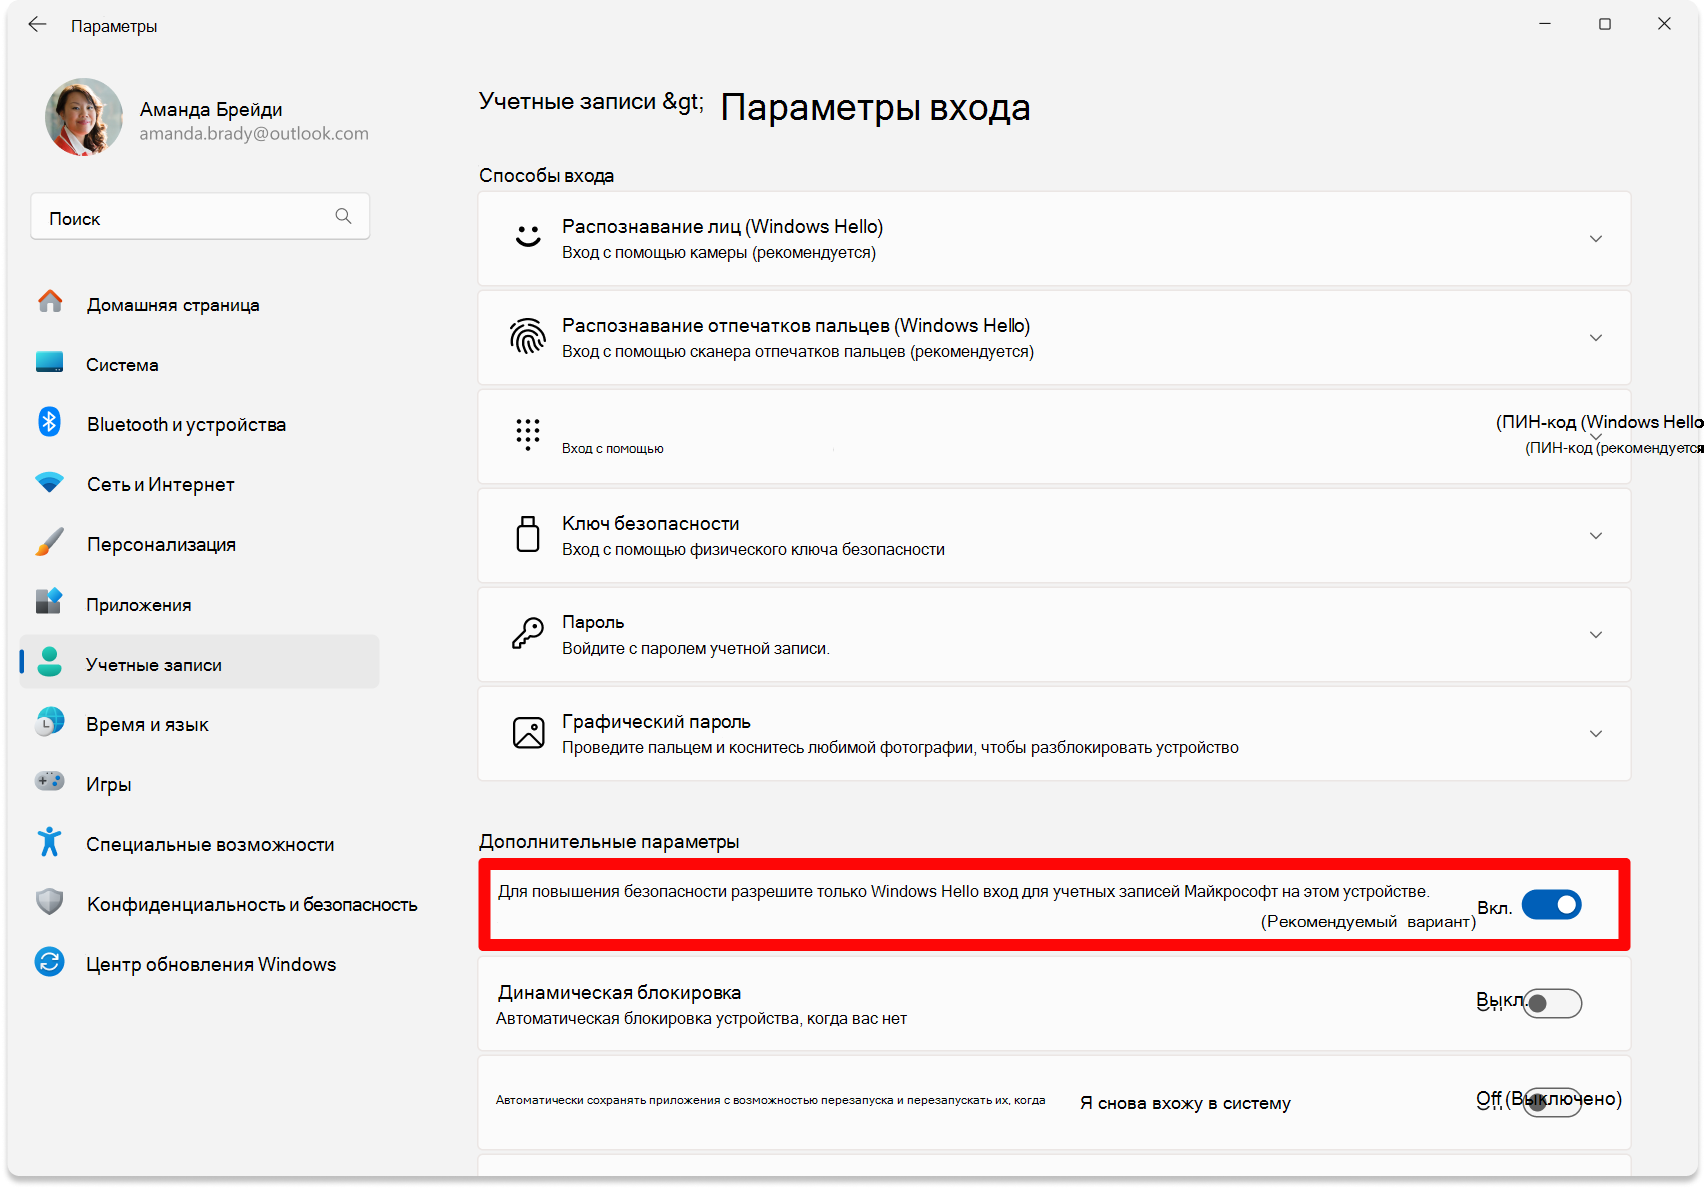
В приложении «Настройки» на устройстве с Windows, выберите Учетные записи > параметры входа или воспользуйтесь следующим сочетанием клавиш:
Параметры входа
-
В разделе Дополнительные параметры включите параметр Для повышения безопасности разрешите только Windows Hello вход для учетных записей Майкрософт на этом устройстве.
Примечание: в Windows 10 этот параметр находится в разделе Требовать Windows Hello входа для учетных записей Майкрософт.
Интерфейс входа
При следующем входе на устройство у вас не будет возможности использовать пароль. Будут доступны только жесты Windows Hello лица, отпечатка пальца или ПИН-кода.
Подробнее
Как перейти на беспарольную работу с учетной записью Майкрософт
Нужна дополнительная помощь?
Нужны дополнительные параметры?
Изучите преимущества подписки, просмотрите учебные курсы, узнайте, как защитить свое устройство и т. д.
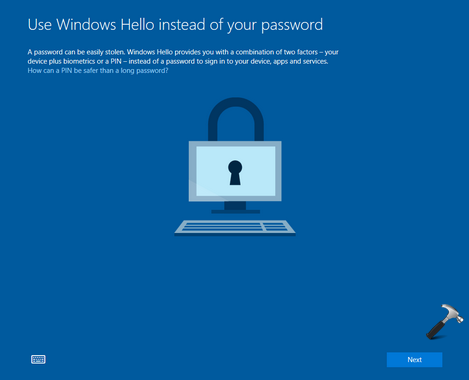
If you’ve recently setup your Windows 10 and you’re being asked to setup Windows Hello or PIN instead of your password, this article is for you. Well, on Windows Hello supported devices, while you sign-in, you’ll receive “Use Windows Hello instead of your password” screen which promotes Windows Hello and ask you to setup it.
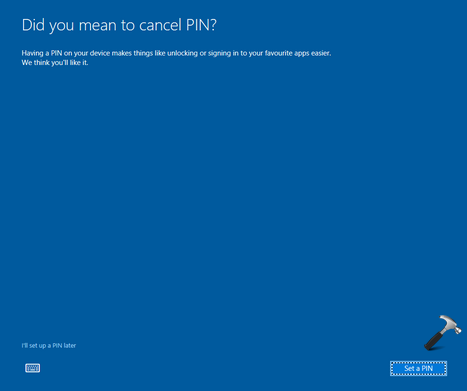
Many users okay or satisfied with existing password method might found this screen annoying, because this screen appears frequently during signing-in. When you click Next on above shown screen, you got another screen titled ‘Did you mean to cancel PIN?‘. This screen asks you to set up PIN. To skip the screen, you need to click I’ll set up a PIN later link.
Both of these screen may irritate users and if you’re also facing this issue, here’s how to get rid of it.
Page Contents
How To Disable ‘Use Windows Hello Instead Of Your Password’ Screen
Method 1 – Via Registry
Registry Disclaimer: The further steps will involve registry manipulation. Making mistakes while manipulating registry could affect your system adversely. So be careful while editing registry entries and create a System Restore point first.
1. Press + R and put regedit in Run dialog box to open Registry Editor (if you’re not familiar with Registry Editor, then click here). Click OK.

2. In left pane of Registry Editor window, navigate to following registry key:
HKEY_LOCAL_MACHINE\SOFTWARE\Microsoft\PolicyManager\default\Settings\AllowSignInOptions
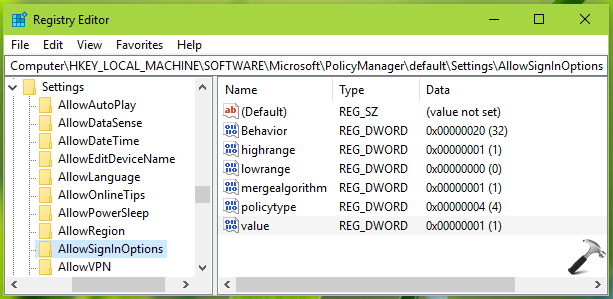
3. Now in the right pane of AllowSignInOptions registry key, you might see value named registry DWORD (REG_DWORD) which is set to 0. Double click on this registry DWORD to modify its Value data:
4. Finally, set the Value data to 1 and click OK. Close Registry Editor and reboot to make changes effective.
After restarting your system, you’ll no longer be asked to setup PIN or Windows Hello.
If issue still persists, refer Method 2 below.
Method 2 – Setup PIN Like Password [WORKAROUND]
We all know that you can configure PIN with complexity in Windows 10.
So to avoid Use Windows Hello instead of your password and successive screen, you can go to Settings app > Accounts > Sign-in options and click Add under PIN. In Set up a PIN window, check Include letters and symbols. Now create PIN just like your password. Once you’re done, click OK.
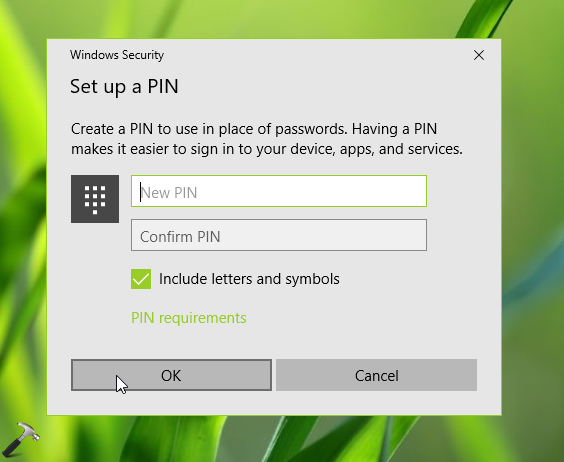
Reboot the machine, on the sign-in screen, click Sign-in options. Now use your PIN which is now like your password and login. Now Windows will remember that you use PIN to sign-in so it will directly ask you to enter PIN at next login. So ultimately this will completely skip Use Windows Hello instead of your password screen and successive screen now.
Hope this helps!